阿里百川即时通讯(iOS)OneSDK简化封装使用说明
阿里通语音SDK技术方案
假设 appkey 为 98d816d4d069f6d7fd8bf52eb313036b
此时 sign 的值为:
String
str=”appid=1e7bf6811cef5160c08bc85a4d841ce6&
appname=net.callapp.263&imei=59374046041881&time=1443437429&uid=CA2
824309408&caller=15889621822&called=0086755114&sign=xxx
名称
说明
备注
appid
App id
appname
包名
比如 net.callpal.263
uid
用户唯一识别标识
caller
主叫
发起回拨者
called
被叫
sign
签名
B)返回结果说明 {
result: 0, msg: “回拨成功” }
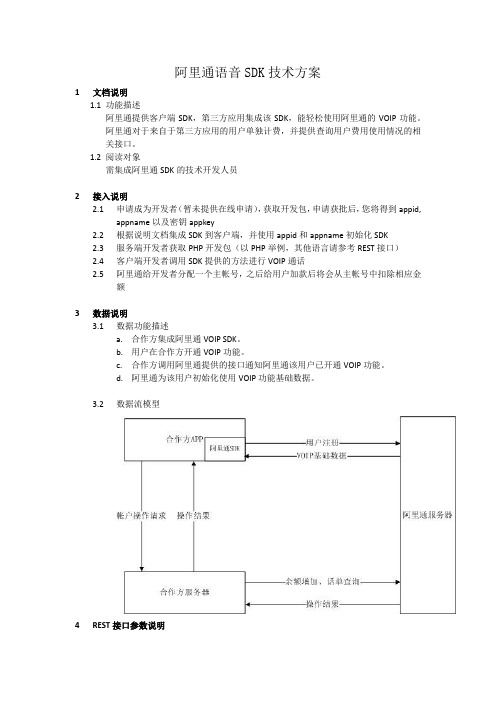
3 数据说明 3.1 数据功能描述 a. 合作方集成阿里通 VOIP SDK。 b. 用户在合作方开通 VOIP 功能。 c. 合作方调用阿里通提供的接口通知阿里通该用户已开通 VOIP 功能。 d. 阿里通为该用户初始化使用 VOIP 功能基础数据。 3.2 数据流模型
4 REST 接口参数说明
4.1 接口说明
/**功能:用户号码是否已注册(本地判断,用户卸载应用后无法判断) 返回true 说明已经注册,反之未注册(本地判断)
*/ AlicallInterface.getInstance().alicall_is_registed();
AlicallInterface.getInstance().sendDTMF(char DTMF);
IONConfigTool 用户手册说明书
IONConfigTool (ICT) User ManualDocument version 1.1Table of Contents1Introduction (4)2The main interface (4)3The Admin menu (5)3.1Unicast Discovery (5)3.2Credentials (5)4Device Discovery & Management Using Bonjour Protocol (6)4.1Discovery list (6)4.1.1Assign IP Address (8)4.1.2Firmware upgrade (8)4.1.3Identify Device (9)4.1.4Configuration Web Page (10)4.1.5Restart Device (10)4.1.6Export Configuration (10)4.1.7Import Configuration (11)5Discovering IONODES devices when your network does not support the Bonjour Protocol (14)5.1Unicast Discovery Test (14)5.1.1Disable Bonjour protocol (14)5.2Unicast Discovery Configuration (15)5.2.1Configure Unicast Discovery (15)5.2.2Configure IP scan range(s) (16)5.2.3Configure Credentials (16)5.2.4Refresh device list results (17)6Troubleshooting (18)6.1Unable to run the IonConfigTool (18)6.2Unable to see discovered units (18)6.3Unit is discovered but remains offline (18)7Getting Help (19)IONConfigTool (ICT)User Manual©2010-2022, IONODES INCAll Rights reserved.No part of this documentation may be reproduced or transmitted in any form or by any means, electronic, photographic or mechanical, except as expressed in the Software License Agreement.IONODES shall not be liable for technical or editorial errors or omissions contained herein. The information in this document is subject to change without notice.The information in this publication is provided “as is” without warranty of any kind. The entire risk arising out of the use of this information remains with the recipient. In no event shall IONODES be liable for any direct, consequential, incidental, special, punitive, or other damages whatsoever (including without limitation, damages for loss of business profits, business interruption or loss of business information), even if IONODES has been advised of the possibility of such damages and whether in an action orcontract or tort, including negligence.This software and documentation are copyrighted. All other rights, including ownership of the software, are reserved to IONODES Inc. Windows is a registered trademark of Microsoft Corporation. All other brand and product names are trademarks or registered trademarks of the respective owners.The following words and symbols mark special messages throughout this guide:Warning:Text set off in this manner indicates that failure to follow directions could result in damage to persons or equipment.Note: Text set off in this manner indicates special instructions which should be paid attention to.1IntroductionThe IONConfigTool, also referred to as ICT, was developed to properly discover and configure IONODES devices on customer networks during initial installation, for day-to-day maintenance or for support purposes.This user manual covers essential functions to get IONODES devices up and running in the most simple and efficient manner. By default, the ICT will scan a network using the multicast Bonjour protocol. If your network does not support or filters out multicast/Bonjour discovery, a unicast discovery method is also available and is explained in section 5.2The main interface1.The Admin menu – used to input device credentials or use unicast network device discoverywork interface selection – used to select which network interface to scan (i.e., cabled vs Wi-Finetworks)3.Device listing – all IONODES devices discovered on the previously-selected network3The Admin menuClick on the drop-down arrow to display menu selections3.1Unicast DiscoveryBy default, the ICT uses multicast network discovery using the Bonjour protocol, as demonstrated in this part of the user guide. For Unicast discovery procedure, please refer to section 5 of this user guide.3.2CredentialsSelecting credentials will open the following window allowing you to enter the device credentials if different than the default admin/admin.1.Enter the device’s credentials if you have previously changed from the default admin/admin.2.Click OK to save and close this window and return to the ICT4Device Discovery & Management Using Bonjour Protocol4.1Discovery listTo make things easier when discovering multiple devices on a given network, we suggest clicking on the IP Address column heading to sort multiple devices in ascending or descending order.1. A green checkmark indicates the unit is online. A red X indicates that the unit has fallen offlinesince initial discovery list was created.Note: 2- IP addresses listed in blue are DHCP-assigned3- IP addresses listed in black are static-configured IPsA left click of the mouse on the MAC Address of a given device will open a context menu with multiple choices. In this section, we’ll see what the most often used ones do.4.1.1Assign IP AddressThis will open the IP assignment window1.Manually assign IP information2.Click Start button to apply and close the window 4.1.2Firmware upgrade1.Click to select firmware file through Windows Explorer2.Select the firmware file path3.Confirm proper device information and current firmware version4.Click start to install the new firmware followed by possible reboot, device dependant4.1.3Identify DeviceOn all IONODES encoder and decoder products, this will make their status LED flash for you to physicallyidentify them. See their respective user manual for details on the LED behavior.4.1.4Configuration Web PageThis will open the configuration web page using your computer’s default web browser.Warning:Older IONODES devices require Microsoft Silverlight and must be opened using Microsoft Internet Explorer or Microsoft Edge in Internet Explorer mode.4.1.5Restart DeviceAs indicated, this will send a signal to the device to restart.4.1.6Export ConfigurationThis will open the Export Configuration window.1.The ICT will automatically save the configuration file within its own folder structure of configuration file is automatically generated based on IP, device and date & time3.Save to finalize export operation4.1.7Import ConfigurationThis will open a warning advising that passwords and network information are not imported.The Import Configuration selection window.1.Select the file to be imported2.Ensure proper file is selected, especially if multiple files are available within the folder3.Click Open to continue the import operation1.Select all the configuration that you want to import2.Select the device where the configuration will be imported3.Click Import to start the import operation2.Click Close to end import routine and return to ICT interface5Discovering IONODES devices when your network does not support the Bonjour ProtocolSome of the more secure enterprise networks filter out the Bonjour protocol as well as other network scan functions for security reasons. When you initially plug your IONODES device into one of these networks, although it is set by default to using DHCP and will be attributed an actual network IP address, network filters might make the device undiscoverable in our IONConfigTool or other IP scanning software. To remedy this situation and allow a network discovery with our IONConfigTool, it is possible to run a Unicast scan with some very basic authentication. Here’s how to do this…If your device is already on your network and undiscoverable, head down to Section 2.5.1Unicast Discovery TestFor demonstration purposes, we have disabled the Bonjour Discovery in our ION-R200 Secure Display Station to keep it from being discovered on our network. This can be changed on the Configuration page, in the Network tab of your IONODES device if you want to run a similar test.5.1.1Disable Bonjour protocol1.Once logged in to your IONODES web user interfaceI, head over to the Configuration page2.Click on the Network tab3.Click on the Bonjour section to select it4.Disable the Bonjour protocol and click Save at the bottom of the pageNow that the Bonjour protocol is disabled. When we run the IONConfigTool, in this example, our ION-R200, with a known IP of 10.190.100.42, is not discovered.5.2Unicast Discovery Configuration5.2.1Configure Unicast Discovery1.In the Admin menu item of the IONConfigTool, click on Unicast Discovery.This will bring up the Unicast Discovery settings window.Note: The values shown in the graphic are for this specific example. Verify with your network administrator for your network-specific values5.2.2Configure IP scan range(s)1.Enter the starting address of the IP range to scan2.Enter the last address of the IP range to scan3.Enter the desired ping timeout. This is the time the ICT will wait before attempting to reach thenext device in the IP address range.4.Check Unicast Discovery Only5.Click the ADD button to add the IP range to the search criteria. Multiple IP ranges can be added toa single search6.This will add the IP range(s) to the search list7.Close the configuration window5.2.3Configure CredentialsSince the IONConfigTool will send a request on all IPs of the IP range, you must enter the proper authentication credentials of the device being discovered. In the Admin menu item of the IONConfigTool, click on CredentialsBy default, the credentials are set to admin / admin as username and password. However, if the credentials have been previously changed at some point, the new credentials must be entered in the ICT to properly discover the device. To do this:1.Enter the desired username & password combination2.Click OK to save and close the Credentials configuration window5.2.4Refresh device list results1.Simply hit the Refresh button on the IONConfigTool to force a new Unicast scan of the IP rangewith proper credentials as outlined in the previous steps2.Device will now be listed in the discovered device list when present on the same network6Troubleshooting6.1Unable to run the IonConfigTool•Make sure you have properly decompressed (unzipped) the contents of the downloaded zipped file to a selected or default empty directory before running the executable. The application cannot be run from a temporary folder, as when opening the zipped file from within Windows Explorer.6.2Unable to see discovered unitsVerify unit has power via PoE or a valid power supply.•Make sure you have connected the device to your network.•Make sure the GREEN LED on the RJ45 connector is lit. If it is not lit, verify the network connectivity with the network switch.•Before the device can be discovered, the status LED must be lit GREEN as this indicates ready state of the device.•Since Bonjour Protocol uses multicast, verify with your IT department to ensure your network is multicast-enabled.•Verify that your firewall settings allow the Bonjour protocol traffic (port 5353)•Refer to section 5 for Unicast discovery.6.3Unit is discovered but remains offline•Verify that your network is on the same subnet as the discovered device7Getting HelpYou can get help from the IONODES technical support team in many ways:•By sending an email to *******************•By calling our office during regular work hours at:o+1 (844) 696-1060 (Toll Free North America)o+1 (450) 696-1060Our technical support team is trained to support you with installation as well as maintenance of your IONODES products.。
baichuan 源码 解读

baichuan(百川)是阿里巴巴集团推出的一套跨评台移动开发解决方案,旨在帮助开发者实现快速构建多种业务场景下的移动应用。
它的源码是开放的,通过深入解读baichuan源码,我们可以更好地理解阿里巴巴在移动开发领域的技术实践和创新。
一、 baichuan的基本架构1.1 通信协议baichuan源码中涉及到了丰富的通信协议,包括HTTP协议、TCP/IP协议等,这些协议的灵活应用使得baichuan在移动应用的网络通信方面有着出色的性能表现。
1.2 客户端架构baichuan的客户端架构采用了MVC模式,将界面逻辑、数据模型和业务逻辑分离,使得应用的结构更加清晰、易于维护。
baichuan还引入了诸如Retrofit、OkHttp等开源框架,对网络请求和数据解析进行了优化,提升了应用的性能和稳定性。
1.3 服务端架构baichuan的服务端架构采用了微服务架构,将复杂的系统拆分成多个小而简单的服务单元,每个服务都能够独立部署和运行。
通过这样的架构设计,baichuan实现了高可用、高可扩展性和高性能。
二、 baichuan源码解读2.1 模块解析baichuan的源码包括了众多的模块,如用户认证模块、数据管理模块、推送服务模块等,每个模块都实现了特定的功能。
通过分析每个模块的源码,我们可以深入了解这些功能的实现原理和技术特点。
2.2 核心算法baichuan源码中还涉及到了一些核心的算法,如数据加密算法、图像处理算法等。
这些算法的设计和实现对应用的安全性和性能有着重要的影响,我们可以通过研究这些算法的源码,了解阿里巴巴在这些领域的技术积累和创新。
2.3 性能优化baichuan的源码中还包括了许多性能优化的技术,如内存管理、线程池优化、IO优化等。
这些技术的应用使得baichuan具有优秀的性能表现,我们可以通过分析这些性能优化的源码,了解阿里巴巴在移动性能优化领域的经验和技巧。
三、 baichuan源码的应用实践3.1 移动应用开发baichuan源码的解读可以为移动应用开发者提供宝贵的经验和技术参考,帮助他们更加高效地构建移动应用和解决实际的开发问题。
TOP-SDK使用说明

自动化SDK使用指南目录一、新SDK的介绍 (1)二、为什么要使用最新的SDK (1)三、如何使用最新的SDK (2)1、新SDK的目录结构 (2)2、SDK命名规则 (3)3、SDK使用代码示例(java版,php版,.net版) (3)4、高级功能 (6)四、下载SDK的地址 (6)一、新SDK的介绍淘宝开放平台最新的SDK是由程序通过API的结构、业务数据等自动化生成的代码包,目前支持主流的三种语言版本(java、php、.net)。
是淘宝开放平台为了减少广大开发者使用API的开发成本而提供的一种开发工具包,其中包含了已经开放的API的请求、加密、返回解析等一些必要的功能。
二、为什么要使用最新的SDK最新的自动化SDK区别之前的版本(前期为人工手写的代码),有着以下多种优势:1、SDK代码全自动化生成,完全和对外公开的API文档一致2、自动化生成,避免人工编写产生的Bug3、在每次API升级发布后,会及时自动升级各语言SDK版本,并向下保持兼容4、SDK提供了一些基本协议级的封装,提高API访问成功率5、错误日志自动打印,错误发生时可完全收集现场数据三、如何使用最新的SDK1、新SDK的目录结构JAVA SDK目录结构.NET SDK目录结构2、SDK命名规则a)数据结构类名与API线上文档中完全一样b)API请求类名:去掉api名字中的”taobao”,把”.”后的首字母大写,再掉所有的”.”号,并加上”Request”,即为最终的类名。
比如er.get对应的请求类的类名为UserGetRequest。
c)API返回结果类名:去掉api名字中的”taobao”,把”.”后的首字母大写,再掉所有的”.”号,并加上”Response”,即为最终的类名。
比如er.get对应的响应类的类名为UserGetResponse。
3、SDK使用代码示例(java版,php版,.net版)JAVA版本●不需要登录(sessionKey)的API调用T aobaoClient client = new DefaultTaobaoClient(url, appkey, secret);UserGetRequest req = new UserGetRequest();req.setFields("nick,sex,buyer_credit,seller_credit ,created,last_visit");req.setNick("hz0799");UserGetResponse response = client.execute(req);if (response.isSuccess()) {System.out.println(response.getUser().getNick());} else {// deal error}●需要登录(sessionKey)的API调用client.execute(req, sessionKey);●有文件上传的API调用FileItem img = new FileItem(file);// FileItem为SDK包里封装好的一个类itemAddRequest.setImage(img);PHP版本⏹实例化API Client//实例化TopClient类$c = new TopClient;$c->appkey = "你的appkey";$c->secretKey = "你的secret code";⏹不需要登录(sessionKey)的API调用/*********************************** OOP风格的使用方式,下面还有传统的数组方式**********************************///实例化具体API对应的Request类$req = new UserGetRequest;$req->setFields("nick,sex,buyer_credit,seller_credit");$req->setNick("hz0799");//执行API请求并打印结果$resp = $c->execute($req);⏹需要登录(sessionKey)的API调用//实例化具体API对应的Request类$req = new UserGetRequest;$req->setFields("nick,sex,buyer_credit,seller_credit, birthday");//这行和上面不同,登录用户可以获取隐私字段$req->setNick("hz0799");//执行API请求并打印结果$resp = $c->execute($req, $sessionKey);//这行和上面不同⏹有文件上传的API调用$req = new TaobaoItemImgUploadRequest;$req->setNumIid(12345678);$req->setImage('@C:\my_picture\item_1.jpg');//附件上传的机制参见PHP CURL文档,在文件路径前加@符号即可$resp = $c->execute($req);print_r($resp);⏹传统的数组方式调用(适合已有APP迁移到PHP SDK的客户)/*********************************** 非OOP风格的使用方式, 兼容已有的PHP应用**********************************/$req_array = array("method" => "taobao.items.search","fields" => "iid,title","q" => "ipad","page_size" => 3,"location.city" => "杭州");$resp = $c->exec($req_array);print_r($resp);.NET版本⏹不需要登录(sessionKey)的API调用ITopClient client = new DefaultTopClient("url", "appkey", "appsecret");UserGetRequest req = new UserGetRequest();req.Fields = "user_id,nick,created,buyer_credit,type,sex";req.Nick = "helloworld";UserGetResponse rsp = client.Execute(req);if (rsp.IsError){Console.WriteLine(rsp.Body);}⏹需要登录(sessionKey)的API调用ITopClient client = new DefaultTopClient("url", "appkey", "appsecret");TradeGetRequest req = new TradeGetRequest();req.Fields = “tid,seller_nick,buyer_nick”;req.Tid = 129318293L;TradeGetResponse rsp = client.Execute(req, sessionKey);⏹有文件上传的API调用ITopClient client = new DefaultTopClient("url", "appkey", "appsecret");ItemAddRequest req = new ItemAddRequest();req.Image = new FileItem(“c:/temp.jpg”);ItemAddResponse rsp = client.Execute(req, sessionKey);4、高级功能SDK支持设置客户端的请求超时时间,设置方法为使用支持传入超时参数的构造函数来构造DefaultTaobaoClient,如:public DefaultTaobaoClient(String serverUrl, String appKey, String appSecret, String format,int connectTimeout,int readTimeout)其中:connectTimeout为连接超时,readTimeout为读取数据超时。
YimaEncSDK 3.3 开发文档_3.3.1.1_dll_embedded version

YIMAENC SDK开发文档产品版本:3.3文档版本:3.3.1.0更新日期:2008-09-10版权所有 YIMASOFTYimaEnc文件结构YimaEnc组件包括YimaEnc核心控件YimaEnc.ocx 及“\S57Lib” 目录下的7个库文件S57ObjectClasses,S57Attributes,S57Colours,S57Symbols,S57ComplexLineStyles,S57Patterns,S57LookupTable组成。
这些库文件一般情况下您不需要也不建议改动,但如果有特别的需求,在熟悉库文件的定义规则和结构的情况下,可以做一些扩展或改动。
●S57ObjectClasses中是所有S57所有的物标类(Object Class, 在YimaEnc中也称为图层--Layer) 的定义,包括每个类别的名称,缩略语,和所包含的特征属性列表。
您可以自行更改名称项,如在开发中文系统时将每项名称翻译成中文。
您也可增加自己的物标类定义。
●S57Attributes 中是所有S57的物标特征属性(feature attribute)的定义,包括每个属性的名称,缩略语,数据类型和枚举(enmu)或列表(list)类型的各项枚举值。
您可以自行更改名称项,如在开发中文系统时将每项名称翻译成中文。
您也可增加自己的物标特征属性定义。
●S57Colours 中是所有S52定义的5种颜色模式(Color Model)下的颜色列表。
包括DAY_BRIGHT,DAY_WHITEBACK,DAY_BLACKBACK,DUSK,NIGHT 五种模式下的所有颜色的缩略语,视觉颜色,CIE 3分量,RGB 3分量值。
●S57Symbols中是所有S52的点物标符号定义。
您可以在熟悉S52符号定义规则的前提下,增加定义自己的点物标符号。
●S57ComplexLineStyles中是所有S52的线物标循环符号定义。
SDK使用说明书

NAM网络报警通讯模块SDK使用说明书目录目录 (2)修订说明: (3)系统介绍 (6)SDK开发包使用说明 (6)虚拟串口使用流程 (6)网络接口使用流程 (6)SDK库API函数详细说明 (6)虚拟串口接入API (6)初始化串口服务Init (6)退出串口服务 (7)键盘命令 (7)子系统键盘命令 (8)状态返回回调函数设置 (8)主机状态查询命令 (9)继电器输出控制命令 (14)继电器输出状态查询命令 (15)网络接口说明 (15)接收数据回调函数 (15)设备连接状态更新回调函数 (16)网络初始化Net_Init (17)退出Net_Exit (17)继电器输出控制命令Net_CCHCommand (17)继电器输出状态查询命令Net_CCHStateRequestCommand (18)键盘命令Net_KeyCommand (18)设备添加使能Net_AddDevice (18)设备删除Net_DeleteDevice (19)主机状态请求Net_StateRequest (19)NAM3482设备接入 (19)NAM3482设备配置状态查询 (19)NAM3482防区类型配置 (20)NAM3482防区布撤防 (20)NAM3482报警确认 (21)修订说明:1.2007年10月27日加入支持CK2316驱动代码,状态返回数据格式有所变化,为了和CK238兼容,可以通过字节长度或者回调函数中的type区别,CK2316对应type=0x02,新增两个字节为9至16防区状态,此后再扩展防区时,以此类推向后增加;2、2007年11月8日加入支持CK2316增加上传系统状态(紧急、火警、盗警),支持CK2316中旁路信息上传,在回调函数中增加旁路信息识别,type=1024时为旁路信息,增加0-1023为设备区别信息的规定,旁路信息上传将采用统一方式,一个数据位为一个防区,防区增加时,以8为基数增字节数。
阿里通语音SDK技术方案
步骤三:在工程中 src 文件夹下新建一个自定义类继承 Applicaton(类名不限,并添加如图所 示代码即可)。 注:如工程中已有类继承 Application 则不必新建此类,直接在已有的继承 Application 类中 添加入下图所示的代码即可。
名称 appid appname uid time sign
说明 App id 包名 用户唯一识别标识 当前时间戳 签名
备注 比如 net.callpal.263 整数,精确到秒
b) 返回结果说明
{ result: 0, uid: "CA263-13824309408", start: "2015-09-01", stop: "2015-10-10", bill: [ { call_from: "13824309408", call_to: "40261008613824309408", call_start: "2015-10-10 15:53:22", call_minute: "0", call_paid: "0.00" }, { call_from: "13824309408", call_to: "40261008613824309408", call_start: "2015-09-30 17:07:28", call_minute: "1", call_paid: "0.00" }, { call_from: "13824309408", call_to: "008613975305477", call_start: "2015-09-12 19:29:19", call_minute: "6", call_paid: "0.60" }, { call_from: "13824309408", call_to: "80000", call_start: "2015-09-06 08:58:43",
移动推送帮助手册说明书

-----q q q q--帮助手册推送使用场景介绍按设备号DeviceId推送按账号account推送按别名alias推送按标签tag推送通知的各种应用场景打开指定activity打开指定网页打开应用自定义 key/value 说明查看设备状态查看推送效果1、按设备号推送 DeviceIddeviceId是设备在推送的唯一标示,一般刚刚接入推送的时候,验证推送效果会采用这种推送方式。
deviceId获取方式:Android:CloudPushService的getDeviceId方法,iOS:[CloudPushSDK getDeviceId]在控制台推送的"高级设置"选择 "指定终端",或者在OPENAPI中按照device推送:setTarget("device")2、按账户号推送 accountaccount和设备绑定,可以是任意您的业务需要的,一个设备只能添加一个account,不同设备可以绑定同一个account,非中文字符。
注: 按account推送的时候,绑定该account的手机都会收到推送。
如有账号之间互斥登陆需要自己的业务来保证。
在控制台推送的"高级设置"选择 "指定账号",或者在Open API中按照account推送:setTarget("account")注:如需要解绑账号,调用unbindAccount方法。
3、按别名推送aliasalias是给设备添加的别名,相比于account,别名绑定更加灵活,同一设备最多添加128个别名,单个别名长度最大为128字节。
别名绑定后,在Open API中按alas推送:setTarget("alias"),调用setTargetValue()指定别名即可。
调用removeAlias()接口可以删除设备的指定别名或全部别名,4、按标签推送 tagtag是给设备添加的标签,可以是任意您的业务需要的,支持向【设备】【账号】【别名】绑定标签,系统最大支持128个标签。
阿里云移动推送 App SDK 手册说明书

--App SDK 手册Android SDK手册使用前必读:移动推送名词解释&约束1. 创建应用到阿里云移动推送控制台创建应用,应用创建完成以后,进入移动推送相关模块进行设置,具体操作请参见 创建APP 。
在应用中完成应用配置,请注意PackageName务必和App的包名一致,否则推送将无法正确初始化。
【注意】使用Gradle构建App时,PackageName的查看:查看AndroidManifest.xml中根元素package属性;查看工程build.gradle中applicationId设置,默认AndroidManifest.xml中的package属性保持一致,如果不一致,以applicationId为准。
2. SDK下载和集成2.1 SDK下载2.2 SDK目录结构OneSDK|-- AndroidManifest.xml|-- build.gradle|-- libs--2.3 SDK集成:请在工程中添加android-support-v4.jar支持包(v2.3.0以上),关于v4支持包的说明请参考:https:///topic/libraries/support-library/features.html#v4;手动拷贝下载SDK中的libs目录,手动拷贝后需要在APP工程的build.gradle中配置jniLibs的目录:3. 配置AndroidManifest.xml3.1 appkey和appsecret配置com.alibaba.app.appkey和com.alibaba.app.appsecret为您App的对应信息,在推送控制台APP列表页的应用证书中获取。
| |-- armeabi| | |-- libcocklogic.so -网络连接库及幽灵进程的辅助lib| | |-- libtnet.so| |-- armeabi-v7a| | |-- libcocklogic.so| | |-- libtnet.so| |-- arm64-v8a| | |-- libcocklogic.so| | |-- libtnet.so| |-- x86| | |-- libcocklogic.so| | |-- libtnet.so| |-- arm64| | |-- libcocklogic.so| | |-- libtnet.so| |-- alicloud-android-push-sdk.jar -移动推送主功能包| |-- alisdk-ut.jar -UT基础包| |-- utdid4all.jar -设备Id生成包|-- project.properties|-- srcandroid {...sourceSets {main {jniLibs.srcDirs = ['libs']}}}<meta-data android:name="com.alibaba.app.appkey" android:value="*****"/> <!-- 请填写你自己的- appKey --><meta-data android:name="com.alibaba.app.appsecret" android:value="****"/> <!-- 请填写你自己的appSecret -->--3.2 Permission 的配置将以下uses-permission片段拷贝进你manifest中的Permission申明区域中:3.3 Service 的配置将以下service片段拷贝进你Manifest中的service申明区域中:<!--阿里移动推送相关权限--><!--Android 6.0版本可去除,用于选举信息(通道复用)的同步--><uses-permission android:name="android.permission.WRITE_SETTINGS" /><!--进行网络访问和网络状态监控相关的权限声明--><uses-permission android:name="android.permission.INTERNET" /><uses-permission android:name="android.permission.ACCESS_NETWORK_STATE" /><uses-permission android:name="android.permission.ACCESS_WIFI_STATE" /><!--允许对sd卡进行读写操作--><uses-permission android:name="android.permission.WRITE_EXTERNAL_STORAGE" /><!--网络库使用,当网络操作时需要确保事务完成不被杀掉--><uses-permission android:name="android.permission.WAKE_LOCK" /><!--用于读取手机硬件信息等,用于机型过滤--><uses-permission android:name="android.permission.READ_PHONE_STATE" /><!--选举使用,当应用有删除或者更新时需要重新选举,复用推送通道--><uses-permission android:name="android.permission.BROADCAST_PACKAGE_CHANGED" /><uses-permission android:name="android.permission.BROADCAST_PACKAGE_REPLACED" /><uses-permission android:name="android.permission.RESTART_PACKAGES" /><!--补偿通道小米PUSH使用,不用可去除--><uses-permission android:name="android.permission.GET_TASKS" /><!--补偿通道GCM使用,不使用可去除--><uses-permission android:name="android.permission.GET_ACCOUNTS" /><!--允许监听启动完成事件--><uses-permission android:name="android.permission.RECEIVE_BOOT_COMPLETED" /><!--允许访问震动器--><uses-permission android:name="android.permission.VIBRATE" /><!-- 通道保持服务 --><service android:name="com.alibaba.sdk.android.push.ChannelService"android:exported="true" android:process=":channel"><intent-filter><action android:name="com.taobao.accs.intent.action.SERVICE"/></intent-filter><intent-filter><action android:name="org.agoo.android.intent.action.PING_V4" /><category android:name="taobao" /></intent-filter></service><!-- 消息接收服务 --><service android:name="com.alibaba.sdk.android.push.MsgService"android:exported="false"><intent-filter><action android:name="com.taobao.accs.intent.action.RECEIVE" /></intent-filter>3.4 Receiver 的配置将以下receiver片段拷贝进你manifest中的receiver申明区域中:4. Proguard配置 <intent-filter><action android:name="com.alibaba.sdk.android.push.NOTIFY_ACTION" /></intent-filter></service><!-- 连接心跳保持监听器 --><receiver android:name="anet.channel.heartbeat.HeartbeatManager$Receiver" ><intent-filter><action android:name="MAND" /></intent-filter></receiver><!--消息接收监听器--><receiver android:name="com.alibaba.sdk.android.push.MessageReceiver"><intent-filter><action android:name="com.alibaba.push2.action.NOTIFICATION_OPENED"/></intent-filter><intent-filter><action android:name="com.alibaba.push2.action.NOTIFICATION_REMOVED"/></intent-filter><intent-filter><action android:name="MAND" /></intent-filter><intent-filter><action android:name="MAND" /></intent-filter><intent-filter><action android:name="org.agoo.android.intent.action.RECEIVE" /></intent-filter><intent-filter><action android:name=".conn.CONNECTIVITY_CHANGE" /></intent-filter><intent-filter><action android:name="ER_PRESENT" /></intent-filter><intent-filter><action android:name="android.intent.action.BOOT_COMPLETED"/></intent-filter><intent-filter><action android:name="android.intent.action.PACKAGE_REMOVED"/><data android:scheme="package"/></intent-filter></receiver>5. 在应用中注册和启动移动推送首先通过PushServiceFactory获取到CloudPushService,然后调用register()初始化并注册云推送通道,并确保Application上下文中进行初始化工作。
help-oss-aliyun_OSS_iOS_SDK_DEV_Guide_20141222

阿里云开放存储服务ALIYUN OPEN STORAGE SERVICE iOS SDK参考手册(Release 0.1.0)2014.12.22OSS iOS SDK开发指南1. 前言本文档介绍了OSS iOS SDK的使用方式。
OSS iOS SDK是为了方便移动开发者在iOS端能更简易地使用OSS云存储服务,而基于OSS RESTful接口(阿里云开放存储服务)实现的一个存储组件。
通过该SDK,开发者开发的app可以直接从终端向OSS服务端进行数据存取、数据删除、数据拷贝等操作,并且这些操作同时提供了同步和异步两种使用模式。
需要注意的一点是,本SDK是基于OSS开发的一个旨在满足移动端开发者数据存储需求的一个无线端基础组件, 目的是让移动端应用简便地对接OSS进行数据存取,而并没有提供进行OSS控制台管理的功能 ,比如申请Bucket、管理Bucket、域名绑定、开通静态网站托管等。
也不会提供全局浏览Bucket内数据的功能,数据之间的映射关系还需要开发者自己进行维护。
2. 关于OSS开放存储服务(Open Storage Service,OSS),是阿里云对外提供的海量、安全和高可靠的云存储服务。
本SDK是OSS为iOS移动开发者量身订做的一套iOS平台的API接口,所以,在使用本SDK前,你需要先到阿里云官网开通OSS服务,以及了解OSS的基本用法。
OSS官网页面: /product/ossOSS手册: OSS API 手册3. SDK的使用方式我们通过FrameWork包的形式提供该SDK,只需要在你的工程中导入我们的FrameWork包就可以直接使用iOS版OSS SDK了。
导入包的流程:选中你的工程 > TARGETS > 你的项目 > General > Embedded Binaries > 点击"+" > framework包所在的目录 >添加4. 应用程序初始化在你使用OSS iOS SDK进行OSS上的数据操作以前,你需要对SDK的上下文进行一些初始化配置,如实现加签方法、设置数据中心域名等。
ioLogik E1200 Series (E1210) 固件发布说明书

Firmware for ioLogik E1200 Series (E1210) Release NotesSupported Operating SystemsNotesChangesApplicable ProductsBugs Fixed• Added SNMP Trap Community Setting to the web console.• Added a note on the password settings page that passwords are limited to 16 characters.• Fixed DHCP lease time did not ask for extension when half of the lease time elapsed.• Closed IP forwarding function (Port 0).• Closed UDP Port 161 when SNMP agent is disabled.• Fixed RESTful API header case-sensitive issue.• Fixed invalid token issue on login page when using Firefox.EnhancementsN/AioLogik E1210-T, ioLogik E1210• Added OPTIONS method for RESTful API.• Added quick access URI for RESTful API.New FeaturesN/A• This version of the firmware only works with ioSearch v2.0 or later versions.• To prevent system failure, only update the next or the previous released firmware version to prevent from system failure.Supported Operating SystemsNotesChangesApplicable ProductsBugs FixedN/A• Fixed file transfer problems when using the Chrome browser (e.g., firmware update, configuration import or export).EnhancementsN/AioLogik E1210, ioLogik E1210-T• Added the EtherNet/IP protocol.• Added RESTful API.• Added new registers for the Modbus/TCP protocol.• Added new OIDs for the SNMP protocol.• Modbus, EtherNet/IP, and RESTful services can be disabled (enabled by default).• Added sending heartbeat to port 9500 of MX-AOPC UA Server after the heartbeat function is enabled.• Increased password length from 8 to 16 characters.• Added a function to check special characters to prevent Cross-Site Scripting.• Passwords are now sent using the POST method instead of the GET method.New FeaturesN/AN/ASupported Operating SystemsNotesChangesApplicable ProductsBugs FixedN/AN/AEnhancementsN/AioLogik E1210, ioLogik E1210-T• Improved protocol efficiency for the ioLogik 2500 Series.New FeaturesN/AN/ASupported Operating SystemsNotesChangesApplicable ProductsBugs FixedN/A• Unable to disable the P2P heartbeat interval.• When the P2P client heartbeat is larger than 256 the time interval is incorrect.EnhancementsN/AioLogik E1210, ioLogik E1210-T• Supports ioLogik 2500 expansion mode.• Supports setting an initial value for a counter.New FeaturesN/AN/ASupported Operating SystemsNotesChangesApplicable ProductsBugs FixedN/A• The counter storage is deleted when the power fails.EnhancementsN/AioLogik E1210-T, ioLogik E1210• Supports SNMP protocol.• Added P2P heartbeat function.New FeaturesN/A• This version of firmware only works with ioSearch v1.5 or later versions.• Use the web console when upgrading the firmware from v1.0 to v1.10.Supported Operating SystemsNotesChangesApplicable ProductsBugs Fixed• Ensured that the system works properly after unstable power conditions.N/AEnhancementsN/AioLogik E1210, ioLogik E1210-TN/ANew FeaturesN/AN/ASupported Operating SystemsNotesChangesApplicable ProductsBugs Fixed• Improved firmware upgrading speed.• Removed Modbus/TCP ID checking mechanism.N/AEnhancementsN/AioLogik E1210, ioLogik E1210-T• Added "Locating I/O" function in General Settings.• Added Modbus address function code=0x08 for “ECHO” function.• Counter overflow status displayed in Channel Settings can be cleared manually.New FeaturesN/A• This version of the firmware only works with ioSearch v1.5 or later versions.• Use the web console when upgrading the firmware from v1.0 to v1.9.。
Webasto ChargeConnect App 快速入门指南说明书

Webasto ChargeConnect App Quick Start Guide -ENStep by stepguide to useWCC AppWCC RegistrationOverview and navigation of the AppAdding a charging stationManaging the charging stationsGroup managementStart/Stop of charging sessionsLogbookAdding an authorization tagOverview of previous charging sessions Firmware Update & Charger SettingsWCC Registration1. Download Webasto ChargeConnect AppOpen Google Play Store or Apple App Store and search for Webasto ChargeConnect App.Select the app and download it to your smartphone. Once this step is completed, open the app and start the setup.2. Landing page & loginYou are already registeredat Webasto ChargeConnect?Enter your login data and startright away!New at Webasto ChargeConnect?Create an account and control your charging.Only a guest at the Webasto Wallbox? Continue here.3. Creating a Guest UserEnter your email address onwhich you got invited by the owner of the charging stationClick on the three dots in the right corner and choose Start . Afterwards enter the access code and authorization tag which were sent to you.4. Creating an AccountEnter your data and read theterms & conditions as well as the data protectionagreement . Set the checkmark if you agree to these.Open the confirmation email with an automaticallygenerated password. Then enter a new password and use it to log in to the app.Overview and navigation of the App1. Dashboard▪Keep track of the energy you have charged.▪See recent notifications.▪Scan the QR code of your wallbox and start charging.▪Add Authorization Tags and manage them.▪Export your recent charging data and send it to your email account.▪Create a group with up to ten charging stations to manage the usageof your chargers.2. Total Consumption▪Keep track of the energy you have charged.▪See recent notifications.▪Scan the QR code of your wallbox and start charging.▪Add Authorization Tags and manage them.▪Export your recent charging data and send it to your email account.▪Create a group with up to ten charging stations to manage the usageof your chargers.3. Notifications▪Keep track of the energy you have charged.▪See recent notifications.▪Scan the QR code of your wallbox and start charging.▪Add Authorization Tags and manage them.▪Export your recent charging data and send it to your email account.▪Create a group with up to ten charging stations to manage the usageof your chargers.4. Charge▪Keep track of the energy you have charged.▪See recent notifications.▪Scan the QR code of your wallbox and start charging.▪Add Authorization Tags and manage them.▪Export your recent charging data and send it to your email account.▪Create a group with up to ten charging stations to manage the usageof your chargers.5. Authorizations Tags▪Keep track of the energy you have charged.▪See recent notifications.▪Scan the QR code of your wallbox and start charging.▪Add Authorization Tags and manage them.▪Export your recent charging data and send it to your email account.▪Create a group with up to ten charging stations to manage the usageof your chargers.6. Session Export▪Keep track of the energy you have charged.▪See recent notifications.▪Scan the QR code of your wallbox and start charging.▪Add Authorization Tags and manage them.▪Export your recent charging data and send it to your email account.▪Create a group with up to ten charging stations to manage the usageof your chargers.7. MyGroups▪Keep track of the energy you have charged.▪See recent notifications.▪Scan the QR code of your wallbox and start charging.▪Add Authorization Tags and manage them.▪Export your recent charging data and send it to your email account.▪Create a group with up to ten charging stations to manage the usageof your chargers.Adding a charging station1. Open the chargers menuYou can add your chargerby choosing Chargers inthe main menu below.Navigating to Residentialsand click on Add.Add your charging stationby selecting Yes.If you do not have yourown charging station,select No and continue asa user in the main menu.2. Choose between QR code and credentials… via QR code(Scan)… via credentials (Manual)Do you want to add your charging station via QR code orby typing in the necessary credentials ?Choose your preferred method.3. via QR Code ScanAdd your wallbox byscanning the QR codeon the first page of yourmanual .Enter an individual name foryour charging station.4. via CredentialsAdd your wallbox byentering the credentialsprinted on the first pageof your manual .Enter an individual name foryour charging station.Manage the charging stations1. Residential chargersNow you can see your added charging station in Chargers menu under the Residentials tab.By clicking on the star symbol in the right corner, it is possible to make a charger your favourite .By clicking on the three dots you get several options to operate your charger :share your charging station see all users of the charging station restart the charging stationdelete the charging station from your group remote start / stop of charging sessions2. Favorites chargersIf you have added chargers to your favorites byclicking on the star symbol, here you can see thecharging stations which are your favorites.3. Commercial chargersIf you are a commercial end user, here you cansee the charging stations which are shared withyou by an organization or group.4. Shared chargersSee all charging stations which other usersshared with you. Here you can also start thecharging process remotely by clicking on thethree dots in the right corner.Firmware Update & Charger SettingsFirmware Update & Charger SettingsSelect your chargingstation to open thecharger settings.Change the name ofthe charger, changeFree Charging from onto off, change the LEDbrightness or performa firmware update forthe charging station.Decide betweenLocal or Remotefirmware update.Group management1. Create your GroupCreate a group with multiple users and up to ten chargers.Chargers can only be added by the group admin.Create the group by typing in the group name and the location .2. Invite a user to your groupInvite users to yourgroup by clicking on Add User .Add their email-address and they will receive an invitation.The user to be invited must have a WCC account.Group management2. Invite a user to your groupTo accept a groupinvitation, click on Invitations .All pending invitations are displayed. Now only the green tick must bepressed for confirmation.Starting the Charging Process1. Several optionsStart the charging process byScan& Charge .Scan the QR Code to start the charging session.Suitable for✓Using several chargers (eachcharger has an individual QR-Code)✓Must be done on site✓Internet connection necessaryStart the charging process by Remote Start .Click Start to start the charging process.Suitable for✓Using one charger ✓Known charge point ID✓Can be done remotely ✓Internet connection necessary2. Scan & ChargeClick Charge , Scan and hold thecamera over the QR code to start the charging process from your phone.You will then see the current charging process on the Dashboard.It is possible to stop thecharging in the dashboard by pressing Stop.3. Remote StartOpen your Chargers and select your charging station. Press thethree dots symbol and start the charging process with Start.You will then see the current charging process on the dashboard.It is possible to stop thecharging by pressing Stop either on the dashboard or in theprevious menu bar.Adding Authorization TagsAdding Authorization TagsHere you can seewhich AuthorizationTags are enabled forcharging at yourwallbox.Click here to add newAuthorization Tags.Enter the newAuthorizationTags and assignan alias.Now you can usethem to chargeat your chargingstation as usual.Overview of previous charging sessions1. General overview inside the AppWebasto NEXTWebasto NEXTWebasto NEXTWebasto NEXTWebasto NEXT123456123456123456See your charging sessions and the energy that was charged. By clicking on one charging session, you can open the details and see the meter values.2. Generate an export file as PDF/XLS/CSVBy clicking on the threepoints symbol within the “Session Export” tab you get the possibility to receive your charging data as:✓PDF-file ✓XLS-file ✓CSV-fileThe file will be sent to the user’s email -address .LogbookLogbook If Logbook is activated:Insert your mileage & vehicle inventory number (VIN) to be allowed to continue charging.RequirementMultiple chargers must be managed in one group or organization.Group or organization admin canactivate or deactivate the logbookfunction for each charging station in the Webasto ChargeConnect web portal . For that open ChargePoints menu and click on the relevant charging station. Now the feature can be activated or deactivated。
one api用法
one api用法
OneAPI 的步骤通常包括以下:
1.安装OneAPI 工具包:下载并安装Intel OneAPI 工具包,该工具包包含了一系列用于不同硬件架构的编程工具和库。
2.设置环境变量:配置环境变量以确保系统正确识别和使用OneAPI 工具。
3.选择编程语言:OneAPI 支持多种编程语言,如C++、Fortran、Data Parallel C++(DPC++)等。
4.编写代码:使用选择的编程语言编写代码,利用OneAPI 提供的库和工具来实现并行计算、加速器编程等。
5.构建和运行:使用OneAPI 的构建工具构建代码,并在相应的硬件上运行。
6.优化和调试:使用OneAPI 提供的工具进行性能优化和代码调试。
阿里云访问控制 STS SDK使用手册说明书

q q q q q q qSTS SDK使用手册Java SDK前言简介本文档主要介绍STS Java SDK的安装和使用。
本文档假设您已经开通了阿里云RAM服务,并为主账号或者RAM用户创建了Access Key ID 和Access Key Secret。
在使用STS Java SDK之前,建议认真阅读RAM用户指南, 理解主账号、RAM用户、联盟用户和短期访问凭证等概念,以及STS的应用场景。
STS API 请参考STS API文档。
版本更迭Java SDK开发包(2015-08-25) 版本号2.1.6发布AssumeRole接口安装在Eclipse中使用JAR包步骤如下:在阿里云官方网站下载STS Java SDK解压文件将解压后文件夹中的文件: aliyun-java-sdk-core-<versionId>.jar 以及 aliyun-java-sdk-sts-<versionId>.jar 拷贝到你的工程文件夹中在Eclipse右键工程 -> Properties -> Java Build Path -> Add JARs 选择你拷贝的所有JAR文件经过上面几步之后,你就可以在工程中使用STS Java SDK了其他IDE与Eclipse配置方法类似。
在Maven工程中使用SDK添加aliyun-java-sdk的相关依赖。
以2.1.6版本为例,在 <dependencies> 标签内加入如下内容:使用入门 创建和管理角色STS的AssumeRole接口的使用,需要在RAM中创建和管理角色,请参考RAM角色管理使用maven创建项目修改生成的pom.xml, 添加aliyun-java-sdk的相关依赖。
以2.1.6版本为例,在<dependencies> 标签内加入如下内容:<dependency><groupId>com.aliyun</groupId><artifactId>aliyun-java-sdk-sts</artifactId><version>2.1.6</version></dependency><dependency><groupId>com.aliyun</groupId><artifactId>aliyun-java-sdk-core</artifactId><version>2.1.7</version></dependency>mvn archetype:generate -DgroupId=com.aliyun.sts.sample \-DartifactId=sts-sdk-sample \-Dpackage=com.aliyun.sts.sample \-Dversion=1.0-SNAPSHOT<dependency><groupId>com.aliyun</groupId><artifactId>aliyun-java-sdk-sts</artifactId><version>2.1.6</version></dependency><dependency><groupId>com.aliyun</groupId><artifactId>aliyun-java-sdk-core</artifactId><version>2.1.7</version></dependency>qq aliyun-java-sdk已经加入到 https:///artifact/com.aliyun无需设置maven的settings.xml。
Okaeli_HomeBanner 扩展用户指南说明书
Manage your banners using the grid :
Extend or override style This module comes with a very simple css stylesheet. If you need to customize it in your theme directory (e.g <your_theme_dir> = app/design/frontend/MyCompany/MyTheme/ ) then:
Home Banቤተ መጻሕፍቲ ባይዱer extension for Magento 2
User Guide
Description
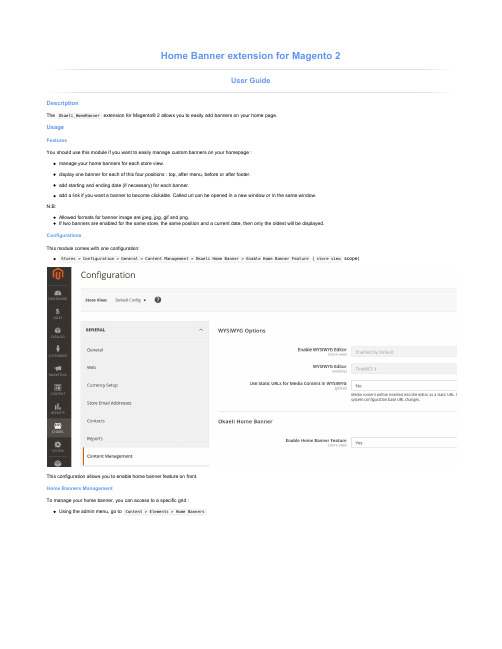
The Okaeli_HomeBanner extension for Magento® 2 allows you to easily add banners on your home page.
Usage
Features You should use this module if you want to easily manage custom banners on your homepage :
manage your home banners for each store view. display one banner for each of this four positions : top, after menu, before or after footer. add starting and ending date (if necessary) for each banner. add a link if you want a banner to become clickable. Called url can be opened in a new window or in the same window. N.B: Allowed formats for banner image are jpeg, jpg, gif and png. If two banners are enabled for the same store, the same position and a current date, then only the oldest will be displayed. Configurations This module comes with one configuration: Stores > Configuration > General > Content Management > Okaeli Home Banner > Enable Home Banner Feature ( store view scope)
用户手册模板

用户手册模板[公司名称]用户手册版本号:[版本号]日期: [日期]目录1. 产品介绍1.1 产品概述1.2 产品功能1.3 适用人群2. 系统要求2.1 硬件要求2.2 软件要求2.3 安装与配置3. 使用说明3.1 启动与登录3.2 主界面3.3 功能导航3.4 操作指南3.4.1 功能一3.4.2 功能二3.4.3 功能三3.5 常见问题解答4. 安全与保密4.1 账户与密码安全4.2 数据备份与恢复4.3 系统漏洞和安全更新5. 技术支持与反馈5.1 联系方式5.2 技术支持流程5.3 意见反馈1. 产品介绍1.1 产品概述本用户手册旨在向用户提供详细的产品说明和操作指南。
它主要包含产品功能、系统要求、使用说明、安全与保密要求以及技术支持和反馈等内容。
1.2 产品功能在这一部分,我们将介绍产品的主要功能和特点。
提供清晰的功能说明,帮助用户更好地了解产品的能力和优势。
1.3 适用人群在这一部分,我们将说明本产品适用的用户群体。
从不同角度描述不同用户在使用本产品过程中的需求和好处。
2. 系统要求2.1 硬件要求在这一部分,我们将列出运行本产品所需的硬件要求,并提供合理的建议。
确保用户的计算机系统符合最低配置要求。
2.2 软件要求在这一部分,我们将列举与本产品兼容的操作系统和其他软件要求。
用户需根据这些要求进行相关的软件安装和配置。
2.3 安装与配置在这一部分,我们将提供详细的安装和配置指南。
确保用户正确安装和配置产品,以充分发挥其功能。
3. 使用说明3.1 启动与登录在这一部分,我们将详细介绍产品的启动和登录过程。
提供用户友好的界面和操作说明,帮助用户快速上手。
3.2 主界面在这一部分,我们将展示产品的主界面,并解释主界面的各个元素和功能。
让用户能够清晰地了解主界面的布局和用途。
3.3 功能导航在这一部分,我们将介绍产品的功能导航方式。
帮助用户快速查找和使用所需功能,提高操作效率。
3.4 操作指南在这一部分,我们将逐一介绍各个功能的详细操作指南。
- 1、下载文档前请自行甄别文档内容的完整性,平台不提供额外的编辑、内容补充、找答案等附加服务。
- 2、"仅部分预览"的文档,不可在线预览部分如存在完整性等问题,可反馈申请退款(可完整预览的文档不适用该条件!)。
- 3、如文档侵犯您的权益,请联系客服反馈,我们会尽快为您处理(人工客服工作时间:9:00-18:30)。
阿里百川即时通讯(iOS)OneSDK简化封装使用说明
阿里百川SDK为OneSDK文件夹,其中WXOpenIM.h和WXOpenIM.m为封装的胶水代码,使用OneSDK做客服即时通讯只需要调用WXOpenIM中的方法即可,简化使用,步骤如下:
1.工程配置
(1)下载OneSDK
/doc2/detail.htm?articleId=102828&doc Type=1&treeId=41下载SDK(注意要用公司注册账号下载)(2)依赖库:
UIKit.framework
AddressBook.framework
SystemConfiguration.framework
CoreLocation.framework
CoreTelephony.framework
CoreData.framework
libz.dylib
libstdc++.6.0.9.dylib
MobileCoreServices.framework
ImageIO.framework
AudioToolbox.framework
AVFoundation.framework
AssetsLibrary.framework
(3)Target->Linking->Other Linker Flags中添加-ObjC选项(注意大小写)
2.添加胶水代码WXOpenIM.h和WXOpenIM.m(可以参考
“千家万纺”或者“有助”)
(1)初始化
在AppDelegate的application:(UIApplication*)application didFinishLaunchingWithOptions:(NSDictionary *)launchOptions
中调用[[WXOpenIM sharedInstance] exampleInit];//初始化OneSDK
(2)登陆
在app登录后调用[[WXOpenIM sharedInstance] startBaichuanFromNavigationController:nil];(注意参数填nil,就不会调起客服聊天页面,只是登录服务器)
(3)设置聊天页面导航栏样式
在WXOpenIM.m中的
/**
* 打开某个会话
*/
-
(void)exampleOpenConversationViewControllerWithConversation:(Y WConversation
*)aConversationfromNavigationController:(UINavigationController
*)aNavigationController {
/**********修改此处*******/
if (!_navc) {
此处省略XXXXX个字
}
(4)打开聊天页面
[[WXOpenIM sharedInstance] startBaichuanFromNavigationController:self.navigationController];(注意参数填当前导航控制器,聊天页面会加载在此控制器上,可按需求修改该代码(push 或present))
(5)查询未读消息数
NSInteger count = [[WXOpenIMsharedInstance] getTotalUnreadCount];
(6)监听消息数变化
[[WXOpenIM sharedInstance].ywIMKit setUnreadCountChangedBlock:^( NSInteger aCount) {
//aCount为未读消息数
//此处可以设置消息显示状态等
}];
(7)打开聊天页面自动发送一条文本消息(参考“千家万纺”)[WXOpenIM sharedInstance].autoMessage = @”test message”;//用千牛接收消息(当前PC端千牛会过滤域名,手机千牛不会过滤)
(8)退出登录
[[WXOpenIM sharedInstance] stopBaichuan];
备注:以上为阿里百川SDK iOS快速集成封装,简化使用,更多功能请参考官网/doc2/detail?spm=0.0.0.0.Z2f2OJ&tre eId=41&articleId=103398&docType=1。