PS2操作手册
SONY PS2 说明书
ENCTUser's GuideSCPH-90006SCPH-90007Before using this product, carefully read this manual and the Quick Reference manual included in the package with the console, and retain them forfuture reference.06/07-UG1Getting started (3)Part names (4)Connecting to a TV (5)Connecting digital audio equipment (6)Connecting the controller (7)Connecting the AC power cord (7)Turning the console on and off (8)Playing a game (10)Using memory cards (13)Audio CDsPlaying an audio CD....................................................................15DVDsWatching a DVD (17)Using the playback modes (21)Adjusting DVD player settings (23)Main menuDisplaying the main menu (30)Using the Browser screen (30)Using the System Configuration menu (31)Using the Version Information screen (34)Connecting to a network (37)Creating network settings (39)Additional informationSpecifications (40)About the PlayStation®2 console documentationThe PlayStation®2 console documentation includes the following:• Quick ReferenceA manual that is included in the package with the console. It contains information onsetting up and performing basic operations on the console, as well as safety andtroubleshooting information.• User's Guide (this document)This document (in PDF format) is accessed from a PC through the Internet and containsinformation on performing advanced operations on the console, technical specificationsand other information. You can download this document from the support page on theSony Computer Entertainment Web site (/support/).Table of contents2T able of contents3Getting started PreparationENElectrical outlet configuration may vary depending on the region of use. If the plug on the supplied AC power cord does not match the electrical outlet, loosen the screw and remove the converting adaptor.You can place the console in either the horizontal or vertical position.Horizontal positionSet the console horizontally.Vertical positionWhen setting the console in the vertical position, use the SCPH-90110 vertical stand (for PlayStation ®2) (sold separately).HintSome vertical stands (for PlayStation ®2) cannot be used with this model of thePlayStation ®2 console. For details, see the Quick Reference (page 2). Choose the SCPH-90110 when purchasing a vertical stand.CautionDo not place the console in locations where it may be exposed to the following conditions:•Places subject to excessive cigarette smoke or dust. Cigarette smoke residue or dust build-up on the internal components, such as the lens, may cause the console to malfunction.•Places subject to extreme temperatures, in direct sunlight, near a heat source, or in a car with its windows closed (particularly in summer). These conditions may warp the exterior of the console or cause the console to malfunction.•Places close to magnetic fields, such as those produced by magnets or loudspeakers.•Places subject to vibration.PreparationGetting startedRemoving the 3-pin converting adaptor (SCPH-90006 only)Positioning the consoleMains power plug3-pin converting adaptor4Part names*The "" product family logo can be rotated to match the horizontal or verticalHintYou can connect USB devices that are compatible with the PlayStation ®2 console. Note, however, that not all USB-compatible products work with the PlayStation ®2 console. Refer to the instructions supplied with the device to be connected for more information.HintFor part names of the analog controller (DUALSHOCK ®2), see "Using the analogcontroller (DUALSHOCK ®2)" (page 12).Part namesPlayStation ®2 console front]/1 (on/standby) indicatorPlayStation ®2 console rear5Connecting to a TV PreparationEN•Do not plug the AC power cord for the console into an electrical outlet until you have made all other connections.•Check that the TV is turned off.Connect the console to the TV as shown below.CautionIf you display a still image on a plasma or projection* TV screen for an extended period of time, "ghosting" may occur. This is a characteristic of these types of TVs. Static, non-moving images, such as console setting menus, DVD menus or paused images, may leave a faint image permanently on the TV screen if left on for an extended time. Refer to the instructions supplied with your TV for details.HintThe console can be connected to a VCR or an integrated TV/VCR. Note, however, that if you play a DVD with copy-protection encryption, picture quality may be reduced.Connecting to a TVBefore connectingConnecting to a TV using the supplied AV cable*Except those of LCD screen typesPicture quality differs depending on the type of cable used. Use the information below to determine the best connection method.If you use a cable sold separately, refer to the instructions supplied with thecable.Hints•To use progressive scan, you must have a TV that supports progressive scan (480p) and you must connect using the appropriate type of cable*. You must also check that the console settings are correct. For details, see "Progressive" in "Setting TVdisplay options" (page24).•You cannot connect the console to a TV with component video inputs that are exclusively for HDTV use (Y P B P R). Refer to the instructions supplied with your TV for details.By using a commercially available optical digital cable, you can enjoy surround sound with the effect of being in a movie theater or a concert hall. When connecting the console to audio equipment with digital connectors, refer to the instructions supplied with the device to be connected.Hints•If you connect the console to audio equipment using an optical digital cable, it may affect the audio output of some PlayStation®2 format software with the result that no sound is produced. If this happens, use a cable such as the supplied AV cable and connect it to the console's AV MULTI OUT connector. Do not use an optical digital cable.•After connecting digital audio equipment, set "Digital Out (Optical)" to "On" in theSystem Configuration menu. For details, see "Digital Out (Optical)" (page32).When using cables sold separatelyTV Cable typeA TV with S VIDEO inputs S VIDEO cable (SCPH-10480)A TV with component videoinput connectorsComponent AV cable (SCPH-10490)*The component AV cable (sold separately) is compatible with progressive scan.Connecting digital audio equipment6Connecting digital audio equipment7Connecting the controller PreparationEN1Insert the analog controller (DUALSHOCK ®2) into a controllerHintSome software titles designate a specific controller port to be used. Refer to the instructions supplied with the software for details.Warnings•The socket-outlet shall be installed near the equipment and shall be easily accessible.•Do not plug the AC power cord for the console into an electrical outlet until you have made all other connections.1Connect the AC power cord to the ~ AC IN connector on the console rear.Connecting the controllerConnecting the AC power cord8T urning the console on and off2Plug the AC power cord into the electrical outlet.The =/1 (on/standby) indicator on the console front will light up in red to indicate that the console is in standby mode.Do not turn on the console until you have finished these steps. Refer to the instructions supplied with your TV for details.•Turn on the TV.•Change your TV setting to display output from the line to which the console is connected.1Check that the =/1 (on/standby) indicator on the console front is lit up in red.2Press the =/1 (on/standby)/RESET button on the console front.The =/1 indicator on the console front will turn green and output fromthe console will be displayed on the TV.different electrical outlet plug from the one illustrated.indicatorTurning the console on and offBefore turning on the consoleTurning on the console/1/RESET button/1 indicator9Turning the console on and off PreparationENHints•The first time you turn on the console after purchase, screens for setting"Language", "Time Zone" and "Daylight Savings Time (Summer Time)" will be displayed. Follow the on-screen instructions to complete the settings.•If you connect the console to a wide screen TV, set "Screen Size" in the System Configuration menu (page 32).1Press and hold the =/1/RESET button on the console front for more than a second.The =/1 indicator will turn red to indicate that the console has entered standby mode.WarningThe power is not completely turned off when the console is in standby mode. If you do not plan to use the console for an extended period of time, unplug the AC power cord from the electrical outlet.Turning off the console/1/RESET button/1 indicator10Playing a gameCheck that the connections to the TV and audio equipment are correct and that the precautions have been met.•"Connecting to a TV" (page 5)•"Connecting the controller" (page 7)•"Connecting the AC power cord" (page 7)HintTo play online games, you first need to connect to and set up a network. See "Connecting to a network" (page 37) for details.1Turn on the console (page 8).The main menu is displayed (page 30).2Press the A (open) button on the console front.The disc cover opens.3Place the disc in the console.Set the disc in the disc holder with the label side facing up.GamesPlaying a gameBefore playing a gameStarting a game11Playing a game GamesEN4Close the disc cover.After the disc cover is closed, the game will start.Hints•You can also start a game from the Browser screen (page 30).•If you turn on the console after inserting a disc, the game will start automatically.To reset a gamePress the \/1 (on/standby)/RESET button on the console front. Do not accidentally press the @/1/RESET button while playing a game, as doing so will cause the game to reset.CautionWhen removing a disc, check that the disc has stopped completely. Do not touch the disc if it is spinning, as doing so may cause injury, damage to the disc or console malfunction.1Press the A button on the console front.2Remove the disc.Hold down the black center part of the disc holder, and then lift the disc by the edges.3Close the disc cover.4Press the =/1/RESET button.The main menu is displayed (page 30).Changing game discs1Open the disc cover and remove the disc.When removing a disc, hold down the black center part of the disc holder and then lift the disc by the edges.2Insert a new disc.3Close the disc cover and reset the console.The new game will start.HintYou do not need to turn off the console when changing games.Ending a game12Playing a gameThe analog controller (DUALSHOCK ®2) is equipped with a pressure-sensitive button function. It also has a vibration function.Part names*The left and right analog sticks, or the L3 and R3 buttons, function only in analog mode (indicator: red).*The L3 and R3 buttons function when the analog sticks are pressed.HintBefore using the analog controller(DUALSHOCK ®2), with the console turned on, rotate the left and right analog sticks once with your thumbs before starting a game. Do not twist the analog sticks, but rotate as if drawing a circle as shown in the diagram.About mode switchingThe ANALOG mode button can be used to switch between two modes. Switch to the appropriate mode for use. Note, however, that some software titles make this adjustment automatically.Hints•When using the analog controller in digital mode, the left and right analog sticks do not function. Also, the pressure-sensitive button function is turned off.•Depending on the software, you may not be able to switch modes even if you press the ANALOG mode button.About analog controls•When playing a PlayStation ®2 format software title, you can use all buttons in analog mode except for the START, SELECT, L3 and R3 buttons.•When playing a PlayStation ® format software title, only the left and right analog sticks can be used in analog mode.HintDepending on the software, the buttons for use in analog mode may be limited. Refer to the instructions supplied with the software for details.About the vibration functionThe vibration function can be set to ON or OFF in the software options menu.HintDepending on the software, the vibration function may be set to "On" automatically.Using the analog controller (DUALSHOCK ®2)**Digital mode (indicator: off)Analog mode (indicator: red)13Using memory cards GamesENYou can use the analog controller (DUALSHOCK ®) (SCPH-110) with the PlayStation ®2 console, but the functions of the buttons in analog mode may be different from those of the analog controller (DUALSHOCK ®2). Only the left and right analog sticks can be used in analog mode.You can save and load game data using a memory card. You can also delete game data or copy game data from one memory card to another.There are two types of memory cards. Select a memory card suitable for the software in use.MagicGate™ is a term of copyright protection technology developed by Sony Corporation.About using the analog controller (DUALSHOCK ®) (SCPH-110)Using memory cardsAbout memory card typesMemory card type Compatible software Amount of memory Memory card (8MB) (for PlayStation ®2) (SCPH-10020 G)PlayStation ®2 format softwareApprox. 8 MBMemory card (SCPH-1020)**This product is no longer manufactured.PlayStation ® format software15 memory blocks (approx. 120 KB)14Using memory cardsHintSome software titles designate a specific MEMORY CARD slot to use. Refer to the instructions supplied with the software for details.Depending on the software, the procedure for saving or loading may vary. Refer to the instructions supplied with the software for details.1At the Browser screen (page 30), use the directionalbutton.23in the console. If you have selected "Delete", skip to step 5.456Hints••–You cannot save or copy PlayStation ®2 format software to a memory card (SCPH-1020).–You cannot save PlayStation ® format game data to a memory card (8MB) (for PlayStation ®2). You can, however, copy PlayStation ® format game data from a memory card (SCPH-1020) to a memory card (8MB) (for PlayStation ®2) for storage purposes. Note that such game data cannot be loaded directly from a memory card (8MB) (for PlayStation ®2).Inserting a memory cardSaving or loading game dataCopying or deleting game data15Playing an audio CD Audio CDsEN1Turn on the console and insert the disc (page 10).Follow steps 1 to 4 of "Starting a game".The track numbers are displayed.2Playback begins.Hints•If you turn on the console after inserting a disc, the track numbers are displayed automatically.•You can also start playback from the Browser screen (page 30).CautionTo play an audio CD recorded in DTS format, you must connect a device with a DTS decoder to the DIGITAL OUT (OPTICAL) connector (page 6). Note that an extremely loud noise may be emitted if the device does not have a DTS decoder or if it is connected to the AV MULTI OUT connector.*You can operate directly by pressing the buttons of the analog controller(DUALSHOCK ®2).HintYou can also use the DVD remote control (for PlayStation ®2) (sold separately).Audio CDsPlaying an audio CDPlaying a CDOperating the CD player during playbackIcon (button *)Function.(L1 button)Go to the beginning of the current or previous track m (L2 button)Fast reverse M (R2 button)Fast forward>(R1 button)Go to the beginning of the next track N (START button)Start playback X (START button)Pause playbackx(SELECT button)Stop playback16Playing an audio CD1x and then press the A (open) button on the console front to remove the disc.You can set for "Play Mode" and "Repeat".1At the Browser screen (page button.The Play Options screen is displayed.2button.3displayed. Select the tracks you want to play.45The track numbers are displayed, and the setting option is shown in the lower left of the screen.6Playback begins.Hints•You can also access the Play Options screen from the screen displaying the tracks •Ending audio CD playbackPlaying in various modesPlay ModeNormal Plays tracks as recorded on the CD Program Plays tracks in a specified order ShufflePlays tracks in a random order RepeatOff Does not play the CD repeatedly All Plays all tracks repeatedly 1Plays a track repeatedly17Watching a DVD DVDsENYou can operate the DVD player using the following methods.•Using the on-screen Control Panel•Operating directly using the analog controller (DUALSHOCK ®2)•Using the DVD remote control (for PlayStation ®2) (sold separately)The following instructions assume use of the Control Panel to operate the DVD player. Some operations may be different depending on the method used.Hints•For details about playing a DVD, refer to the instructions supplied with the DVD.•The PlayStation ®2 console plays disc content as recorded in the DVD software. Note that not all features are available on all DVDs.1Start playback of the DVD (page 19).2Press the SELECT button.The Control Panel is displayed. If you press the SELECT button again,the display will change its position on the screen.3button.HintControl Panel item listYou can access the following options in the Control Panel.DVDsWatching a DVDUsing the Control Panel18Watching a DVDHints•You can use "" to check the options that can be accessed directly using thebuttons of the analog controller. To access the options directly using the controller, you must clear the Control Panel from the screen.•Depending on the playback mode, some options may not be available or cannot be adjusted.19Watching a DVD DVDsEN1Turn on the console and insert a disc (page 10).Follow steps 1 to 4 of "Starting a game". Playback begins.Hints•If you turn on the console after inserting a disc, playback will begin automatically.•You can also start playback from the Browser screen (page 30).1xin the Control Panel (page 17)Playback stops. Press the A (open) button on the console front, andthen remove the disc.1x in the Control Panel (page 17)2Select N To clear Resume PlayAfter step 1, select x Selecting a scene by chapter number1Control Panel (page with a single digit number (i.e. 1-9), enter a leading zero. For example, enter as "01".Selecting a scene by title number, chapter number or by specifying the time1During playback, select(page 23Playing a DVD Ending DVD playback xPlaying a DVD from the last stopping point (Resume Play)Selecting a specific scene for playbackTitle Specifies the title number ChapterSpecifies the chapter numberC XX:XX:XX (or T XX:XX:XX)Specifies the elapsed time for the chapter (or title)20Watching a DVDYou can search either forwards or backwards to quickly locate a particular point on a DVD.1During playback, select orin the Control Panel (page•Search 3•Search 2•Search 1•Slow2Playback returns to normal speed.HintTo use the analog controller for Search during playback, press and hold down the L2 or R2 button to begin searching. Use the directional buttons to change speeds. Release the L2 or R2 button when you reach the point you are searching for.You can display information such as the current title number or elapsed time.1(pagebutton.Finding a particular point on a DVD (Search)Title X Chapter XTitle number and chapter number Title X Chapter X C XX:XX:XX Elapsed time of current chapter Title X Chapter X C -XX:XX:XX Remaining time of current chapter Title X Chapter X T XX:XX:XXElapsed time of current title Title X Chapter X T -XX:XX:XX Remaining time of current title(Off)21Using the playback modesDVDsENWhen using a DVD-RW disc (VR mode), you can select the type of titles you want to play.1(page Hints•Slow-motion play in reverse is not available for DVD-RW discs (VR mode).•You cannot use this function with Resume Play. Clear Resume Play (page 19) before selecting this feature.Using the various playback modes, you can play titles or chapters in the order you want or repeat playback of a specific scene. There are four playback modes:•Program Play (page 21)•Shuffle Play (page 22)•Repeat Play (page 22)•A-B Repeat (page22)The following instructions assume use of the Control Panel (page 17)to operate the DVD player.Hints•You can play combinations of Program Play, Shuffle Play, and Repeat Play. Note, however, that some Shuffle Play or Repeat Play options may not be available depending on the combination.•The PlayStation ®2 console plays disc content as recorded in the DVD software.You can create programs to play titles and chapters in any order.1(page 2If no programs have been set, the only option will be "1. Title".3Original Plays content in the originally recorded sequence Play ListPlays edited content. Play List is the default setting.Using the playback modes22Using the playback modes4titles or chapters.5Press the START button.Program Play begins.HintThe setting will not be cleared after Program Play finishes.You can set this option for random playback of all titles or chaptersrecorded on a disc. Playback order will be different each time Shuffle Play is used.1in the Control Panel (page17), and thenbutton.2Select N You can set this option to play titles or chapters repeatedly.1in the Control Panel (page 17), and thenbutton.2Select N You can set a specific scene to be played repeatedly.1During playback, selectin the Control Panel(pageThe starting point (point A) is set.2The ending point (point B) is set, and repeated playback of the section from A to B begins.Title Shuffle Plays titles in random order Chapter Shuffle Plays chapters in random order Shuffle OffClears Shuffle PlayRepeat PlayDisc Repeat Repeats playback of all titles Title Repeat Repeats playback of one title Chapter Repeat Repeats playback of one chapter Repeat OffClears Repeat PlayA-B Repeat23Adjusting DVD player settings DVDsENClears playback modes to allow normal playback.1page 17), and thenA message stating, "Play mode contents cleared", is displayed and the console returns to normal playback.HintIf multiple playback modes have been set in a combination, all playback modes are cleared.You can use the Control Panel to adjust DVD player settings, such as thelanguage for subtitles, audio language, and Parental Control level.Hints•Some DVDs do not support all settings. The PlayStation ®2 console plays disc content as recorded in the DVD software. If the DVD does not support the features listed, you will not be able to change the settings.•The following options are not available during playback or Resume Play (page 19). Clear Resume Play before changing these settings.–"Menu", "Audio" and "Subtitles" in Language Setup –"TV Type" and "Progressive" in Screen Setup –"Parental Control" in Custom Setup–"DTS" and "Audio Track Auto Select Mode" in Audio SetupYou can change DVD player settings using the following procedure:1page 17), and then pressThe Setup icon bar is displayed.23The menu option becomes active and can be selected.Adjusting DVD player settings4for each item (pages24 to 29).Hints•The default setting for each menu item is underlined in the explanations below.•To return to the Control Panel after making settings, press the SELECT button.•Settings are saved when you do any of the following:–Stop playback (including stopping Resume Play)–Open the disc coverIn "Language Setup" you can choose the language for the DVD's menu, audio and subtitles. Note that if you select a language that is not recorded on the DVD, one of the recorded languages is selected automatically.HintIf you select "Audio Follow" for subtitles, the subtitle language will automatically be set to match the language selected for the DVD's audio track.In the Screen Setup menu, you can set the screen size (aspect ratio) and other options that affect picture quality.TV TypeYou can set the aspect ratio to match the screen of the connected TV.HintWhen you set "Progressive" to "On", "TV Type" is automatically set to "16:9".Setting language optionsMenu Selects the language for the DVD's menu Audio Selects the language for the DVD's audio track Subtitles Selects the language for the DVD's subtitles Setting TV display options24Adjusting DVD player settings25Adjusting DVD player settings DVDsENDNR (Digital Noise Reduction)You can use this setting to help reduce roughness in the on-screen image and produce a cleaner picture.Hints•"DNR2" is more effective for reducing image roughness than "DNR1", but in some cases an afterimage may appear. If this occurs, select "Off".•The DNR function may produce limited results on some DVDs.•When you set "Progressive" to "On", "DNR" is automatically turned off and cannot be turned on.Outline SharpeningYou can sharpen or soften the outline of the on-screen image. The higher the value, the sharper the outline. Normally, select "0".HintDepending on the DVD, Outline Sharpening may produce limited results.DisplayDuring playback, you can display playback status information in the top right corner of the screen for a few seconds.ProgressiveYou can display an image in which the picture updates all the lines in one pass. In most cases, this results in a clearer, flicker-free image. This feature is available only if your TV and AV cable* support progressive scan (480p).*The component AV cable (sold separately) is compatible with progressive scan.Hints•If picture quality is reduced or no image is displayed, set "Progressive" to "Off" when the console is connected to a TV without the necessary equipment. If you accidentally set this option to "On" for such a TV, picture quality may be reduced or the picture may not be displayed. To clear the setting, follow these steps:•DVDs can contain video-based and film-based material, which use different frame rates. When playing video-based material using progressive scan, some images may appear unnatural. If this occurs, set "Progressive" to "Off" and view in standard interlace mode.•When you set "Progressive" to "On", "TV Type" (page 24) is automatically set to "16:9".•DVD-RW disc (VR mode) content can only be viewed in standard interlace format. The "Progressive" option is not available when playing such content.Off DNR is not used.DNR1Increases picture qualityDNR2Increases picture quality (maximum)•-2•-1•0•+1•+2On Playback status information is displayed for a few seconds.OffPlayback status information is not displayed.On Select this option when the console is connected to a TV that supports progressive scan (480p).OffSelect this option when the console is connected to a standard TV.1Check that you have a DVD in the console.2Press the _/1(on/standby)/RESET button on the console front.Then press and hold down the START button of the analog controller (DUALSHOCK ®2) in controller port 1 until the DVD picture is displayed. The "Progressive" setting is returned to "Off", allowing the DVD-Video to be displayed as normal. You can also cancel this setting using the "Clear Progressive Setting" (page 35) option in the Version Information screen.。
ps2模拟器说明
1) 下载新版 PCSX2模拟器2) 将下载文件的内容解压缩至任意文件夹(如:C:\PCSX2)3) 运行该文件夹中的pcsx2t.exe或者pcsx2.exe设置pcsx2PCSX2目前有两种版本:TLB版和VM(虚拟内存)版。
TLB版执行文件为pcsx2.exe,VM版为pcsx2.exe。
首先按照建议的步骤(键入用户名,注销/登录,并重新启动系统)尝试运行VM版。
如果程式仍然无法分配内存的话,请使用TLB版。
在速度方面两者的差距并不大,请勿多虑。
这是pcsx2的主图像界面(图形用户界面)。
在此,你可以按照你的需要改变pcsx2的设置和插件。
请从“设置”选项开始。
你会看到如下的窗口:首先需要设置的是插件和bios的目录,以便pcsx2可以在相应的目录中调用插件和bios。
因此,如果不使用预设目录(/plugins 和 /bios)的话,就需要点击这些按键来改变它们。
在每个插件下面的“设置、测试和关于”三个按键的作用分别是设置选定的插件;测试该插件是否正常工作(这是个有点老旧的设计,因为如果该插件出现在列表中,那么它是会正常工作的);以及查看所选定的插件的讯息。
下面将要进入具体的插件设置。
图像图像卡所支持的像素着色(pixel shaders)的版本目前可以使用Zerogs v0.96.0插件(从pcsx2的界面plugins上),这是一个新的DirectX9图形插件。
支持pixel shader 2(像素着色2)的显卡才可以运行。
GSdx9 at v0.9.0, 另一个以DirectX 9 为基础的插件,其作者是Gabest。
该插件在2D画面中通常会比ZeroGS快,但同样也可能比后者慢。
如果显卡不支持pixel shaders 2 请务必使用这个插件。
上述两个插件都包含在PCSX2的压缩包中,不必单独下载。
其他的插件,比如GStaris,GSsoft,GSmax等等不会出现在列表中,因为它们已经过时了,最近也不会有更新。
22 PS2指导书
E0 5A E0 F1 14 77 PAUSE E1 F0 14 -NONEF0 77
6
北方蓝芯科技开发有限公司
NBCPIC-V2.0 使用手册
EX22.1、PS/2 键盘串口显示
//*********************************************************************************** 解码并显示函数(组合键的扫描码发送按照按键发生的次序,例如按下左 SHIFT+A 键: 1、 按下左 SHIFT 键,2、 按下 A 键,3、 释放 A 键,4、 释放左 SHIFT 键,那么 MCU 接收到的一串数据为 0x12 0x1C 0xF0 0x1C 0xF0 0x12) //*********************************************************************************** void Code_show() { uchar i; if (!Key_UP) // 当键盘按下时 { switch (key_value) { case 0xF0 : // 当收到 0xF0,表示按键释放 Key_UP = 1; //Key_UP 置 1 表示断码开始 break; case 0x12 : Shift = 1; break; case 0x59 : Shift = 1; break; default: for(i=0;(key_code[i][0]!=key_value)&&(i<59);i++);// 查表 ,key_code[i][0]=key_value 时 , 结束 for 循环 show_data= key_code[i][1]; TXREG =show_data; break; } } else { Key_UP = 0; switch (key_value) //当键松开时不处理判码,如 G 34H F0H 34H 那么第二个 34H 不会被处理 { case 0x12 : // 左 SHIFT Shift = 0; break; case 0x59 : // 右 SHIFT Shift = 0; break; //将解码数据赋给 show_data //键值发送给串口 // 左 SHIFT 按下 //shift 标志置 1 // 右 SHIFT 按下 //shift 标志置 1
PS2模拟器PCSX2-官方入门说明书
PCSX2 1.2.0ReadmeOverviewPCSX2 is a PlayStation 2 emulator for Windows and Linux, started by the same team that brought you PCSX (a Sony PlayStation 1 emulator).The PCSX2 project attempts to allow PS2 code to be executed on your computer, thus meaning you can put a PS2 DVD or CD into your computers drive, and boot it up!The project has been running for nearly 10 years now, and since its initial release has grown in compatibility. From initially just being able to run a few public domain demos, its current state enables many games to boot and actually go in game, such as the 'famous' Final Fantasy X, Devil May Cry 3 and God of War. You can always visit the PCSX2 homepage to check the latest compatibility status of games with more than 2000 titles tested.Following our new release scheme as described here, v1.2.0 is an official, stable release.What's new in 1.2.0?WindowsCore:∙microVU fixes for Dreamworks games, later Tony Hawks games, Evil Dead and others.∙Fixes to New GIF unit to solve regressions∙microVU bugs fixed (affecting Extreme-G Racing and others)∙CDVD fixes (Impossible Mission now boots)∙Path 3 arbitration and timing refinements∙MFIFO fixes for DDR games∙Huge DMAC bug fix solving most of the problematic videos. (Baldurs Gate 2, Katamari Damacy and more) ∙Memorycard support improved in many games, now supports PSX memorycards also∙Multitap support improved greatly∙Many game fixes for COP2 problems inherent with emulation. (Ace Combat, Forbidden Siren and others) ∙VIF Unpack optimizations∙VU Delays added to fix the graphics of Snowblind engine games (Champions of Norrath, Baldurs Gate 2) ∙Various other game specific fixes in GameDB∙NVM file creation (if one doesn't exist) now fills in iLink ident. (Age of Empires 2)SPU2-X:∙Improved DMA system∙Fixes to reverbGSdx:∙Improved adapter selection for detecting of videocards∙CLUT (Color LookUp Table) fixes for games such as Disney Golf∙Texture Offset options added to help improve upscaling artifacts∙OpenGL mode added (Experimental currently)∙Various CRC hacks∙Hack for NVIDIA cards, solves problems with stretching on drivers above 320.18∙New shader resources! Complete PCSX2 FX Revised 2.0 by Asmodean has been integratedDEV9ghzdrk:∙Improved support for Gran Turismo 4 online playLinuxCore:∙Support for external patch (pnach) filesOnePad changes:∙Bugfixes for multiple button presses∙Bugfixed memory leaksZZogl:∙Added support for MESA drivers∙Bump OpenGL requirement to 3.0 with floating texture∙Various OpenGL fixesSPU2-X:∙Added SDL BackendKnown issues in release 1.2.0∙GSdx DX9 Hardware mode lacks various features that DX10 mode has.∙Game database not complete (it's an ongoing WIP).∙Patches browser is not implemented yet.∙Interpreters are somewhat unstableConfigurationA very detailed guide is available on the PCSX2 homepage which is already translated in several languages! You can consult it here.A shorter quick-start guide has been written by avih which is less detailed but much smaller. Read it here.List of current hotkeysF1 -- Saves state into the current slotF2 -- Changes to the next save slotShift+F2 -- Changes to the previous slotF3 -- Loads state from the current slotShift+F3 -- Loads state from the backup slotF4– Frame Limiter Type (Normal / Off / Value) Shift+F4– Frame skip toggleF6 -- Toggles the GS window's Aspect Ratio (stretch, 4:3, 16:9)F8 (also Shift+F8 & Ctrl+Shift+F8) -- Takes a snapshot of the image inside the GS window (saved in snaps folder)F9 -- Hardware/Software Renderer Toggle for GSdx F10– Toggles loggingF11 -- Freezes the GSF12– Toggles Video Capture for GSdxTAB -- Turbo On / Off toggleShift+TAB -- Slow motion toggle Alt+ENTER– Full screen toggleESC -- Pauses the emulationCtrl+KP_ADD -- Zooms into the GS windowCtrl+KP_SUBTRACT -- Zoom out of the GS window Ctrl+KP_MULTIPLY -- Resets the zoom on the GS windowThese shortcuts change the vertical zoom of the image, thus stretching/squishing it:Alt+Ctrl+KP_ADD -- Stretches the imageAlt+Ctrl+KP_SUBTRACT -- Squishes the imageAlt+Ctrl+KP_MULTIPLY -- Resets the imageThese shortcuts move the whole image inside the GS window:Alt+Ctrl+UP -- Moves the image upAlt+Ctrl+DOWN -- Moves the image downAlt+Ctrl+LEFT -- Moves the image leftAlt+Ctrl+RIGHT -- Moves the image rightAlt+Ctrl+KP_DIVIDE -- Re-centers the imageGSdx-specific keyboard hotkeysF5 -- Toggle De-Interlacing ModesF7– Cycle Pixel Noise modes ( Internal "TV-like" shaders ) INSERT– Toggle Software mipmappingHOME– Toggle FX shaderPAGE_UP– Toggle FXAA (HW and SW)DELETE– Toggle Software anti-aliasing (AA1)StatusPCSX2 has come a long way since its starting point back in 2001. Current features include:∙Separate recompilers for Emotion Engine (EE) , Vector Unit 0 (VU0) and Vector Unit 1 (VU1).∙Triple core support, with the Graphics Synthesizer (GS) running on a second thread and the VU1 running on a third thread when MTVU is used∙Usage of MMX, SSE1, SSE2, SSSE3, and SSE4 extensions.∙Proper SPU2 emulation featuring Time Scaling and Reverb.∙Full gamepad support featuring Dual Shock 2, analog controls and even supporting analog movement over keyboard (using some external plugins).∙Many more :)Sections that still need work:∙Dev9, FireWire and USB are all just partially supported.∙Image Processing Unit (IPU) emulation (which is responsible for the FMV playback) is slow and not completely fixed yet.∙MIPS cache could be properly implemented, but currently only one title is known to rely on it.∙The complex timing between PS2 components is an on-going work in progress.How can you help?As most of you are aware, the PCSX2 team is working on this project at the expense of their free time and provides it without charge.If you want to show your appreciation to these people and motivate them, you can donate any amount of money you feel is right to the team’s PayPal account found on the official site.These funds will be used for the team members to get new, more modern hardware in order to test and debug more efficiently and even implement new features (just like dual core support for example).If you are a programmer and you are interested in helping the PCSX2 team by making additions or corrections to the code, you are free to browse through the public Github repository here after taking into account PCSX2 is under the (GPL) v3The Coding TeamBelow you can see 3 tables, showing the current team members who are actively coding at the present time, the current team members who have been inactive for some time and the older team members who for some reason quit along the way, which include the previous project leader Linuzappz, and our last “semi project leader” Jake Stine, to both of which we send our best regards JCurrent active team members:Current inactive team members:Ex-team members:Additional coding and help:F|RES, fumofumo, Nneeve, Nocomp, Pofis, _Riff_, Shadow LadyThe Beta Tester TeamBeta testers are people (slaves/mindless grunts :P) who constantly test new PCSX2 beta builds to report any new bugs, regressions or improvements. While this might sound simple to most, what many people do not know is that testers also debug with the coders, maintain the huge game compatibility list, create dumps and logs for the coders and so much more. As above, active, inactive and ex members are listed alphabetically.Current active members:Bositman, Falcon4Ever, Prafull, Parotaku, GeneralPlotCurrent inactive team members:Belmont, CKemu, Crushtest, Knuckles, Krakatos. Raziel, RudyX, Shadow LadyEx-team members:Chaoscode, CpUMasteR, EFX , Elly, JegHegy, Razorblade, RPGWizard, Seta San, Snake875Additional thanks and creditsDuke of NAPALM: For “3D stars”, the first demo that worked in PCSX2 :)Tony Saveski (dreamtime): For his great ps2tutorials!!F|res: Author of dolphin, a big thanks from shadow..Now3d: The guy that helped shadow at his first steps..Keith: Who believed in us..Bobbi & Thorgal: For hosting us, for the old page design and so many other thingsSjeep: Help and infoBGnome: Help testing stuffDixon: Design of the old pcsx2 page, and the domainBositman: PCSX2 beta tester :) (gia sou bositman pare ta credits sou )No-Reccess: Nice guy and great demo coder :)NSX2 team: For their help with VU ;)Razorblade: For the old PCSX2 logo & icon.Snake: He knows what for :PEctor: Awesome emu :)Zezu: A good guy. Good luck with your emu :PHiryu & Sjeep: For their libcdvd (ISO parsing and file system driver code)Sjeep: For the SjDATA file system driverF|res: For the original DECI2 implementationlibmpeg2: For the mpeg2 decoding routinesAumatt: For applying fixes to pcsx2Microsoft: For 2003, 2005, 2008 and now 2010.NASM team: For nasmCKemu: Logos/design…and probably to a few more.Special Shadow's thanks go to...My friends: Dimitris, James, Thodoris, Thanasis and probably to a few more… and of course to a lady somewhere out there…。
PS2 90006和90007 说明书(用户指南)
they may cause persons walking by to trip or stumble. • Do not place the console or accessories on surfaces that are unstable, tilted or
Place the console at least 10 cm (4 in) away from walls or surrounding objects. Placing the console close to walls or other objects can cause it to overheat.
connector. • Call the PlayStation® service line at the number listed on your warranty card for
technical assistance if the device does not operate properly.
playing a DVD.
• Do not place any rubber or vinyl materials on the console exterior for an extended
period of time.
• Keep the console and accessories, including cable ties and fasteners, out of the
ps2游戏机详细说明
(Ⅱ)型插头将映像地光暗度与颜色和颜色地深浅分别用两种方式表达,所以所产生地映像质数较佳.
◆端子线
(Ⅲ)综合型插头,光暗度,颜色,颜色地深浅分别用三个不同信号方式表达,所以可以得到最佳地映像效果.
◆由左数起三条全为影像输出线,右方两条为声效输出线
)通风口及风扇
主机地通风口内设置了强力风扇,风扇可减低活动中地主机内部地高热,而且风扇不会产生过大地噪音,用者可以安心长时间玩游戏而不怕烧机呢.文档收集自网络,仅用于个人学习
好了,介绍过地基本机能之后,我们会为大家介绍主机地各个部份以及这些部份将来地扩展性.
拓展
⑴控制器及记忆卡插槽 在中,控制器及记忆卡插槽分别位于主机前左方,而当纵置主机时,由于插槽位于主机地下方,所以用者可以抽插控制器及记忆卡之同时而避免了主机地不平稳.文档收集自网络,仅用于个人学习
与地外表上十分相似,但其实两者有十分大地分别,最大地特点是,除了和按钮之外一,所有按钮均是型地,并能感应个不同程度地按钮力度,亦即玩者按钮地时间以至按钮地力度,控制器都能感应得到,现时已知以及均支持手制.文档收集自网络,仅用于个人学习
另外,和一样,主机分别有两个控制器及两个记忆卡插槽,而其相对位置亦与完全相同,则记忆卡插槽位于上方(横置时),控制器位于下方.文档收集自网络,仅用于个人学习
大家最关心地,当然是旧记忆卡是否能够在上使用上可以使用记忆卡,但只限于使用游戏并储存资料,而软件文档收集自网络,仅用于个人学习
地资料亦只能利用专用记忆卡保存,亦即新旧记忆卡地资料并不能互相交换.
⑸电源开关及电源线插口
在一般情况下,用者可按照刚才所提及地方法利用按钮关闭主机电源,而不需要使用这个电源开关,但假如玩者长时间不使用主机,鉴于安全上地问题便有需要关闭此开关完全切断电源.文档收集自网络,仅用于个人学习
PhotoshopCS中文实例教程基础操作
2.3.4 分割图片(切片工具和切片选择工具)
切片工具可以将图像分割成多个小的部分,切片会分别存储为独立的文件,在网页设计 中切片工具运用得很广泛。
第16页/共19页
2.3.5 图像大小和画布大小
当图像需要调整几何尺寸时,可以使用图像大小和画布大小两个命令。
第17页/共19页
2.4 实例:调整镜头倾斜的图片并按要求保存
“导航器”面板用以对图像进行选择性区域预览,精确放大或缩小图像显示。
第9页/共19页
2.2.4 缩放工具查看图像
“缩放工具”的作用是放大或缩小画面,以便对图像的局部进行编辑。
第10页/共19页
2.2.5 抓手查看图像
使用“抓手”工具在画面中拖动,移动图像的观察区域,以便快速观看图像窗口中显 示不下的内容。
第5页/共19页
2.1.7 在Mini Bridge中浏览
Mini Bridge面板用于快捷查找图片,但Mini Bridge以面板的形式在Photoshop中就可以查 看图片,因此比Bridge浏览更加方便快捷,其用法和Bridge的基本相同。
第6页/共19页
2.2 查 看 图 像
2.2.1 选择屏幕模式
第11页/共19页
2.2.6 旋转视图工具旋转查看图像
使用“旋转视图工具”可以在不破坏图像的情况下旋转画布,并且不会使图像变形。需 要注意的是,使用旋转视图功需要显卡支持OpenGL。
第12页/共19页
2.3 改变图像大小 2.3.1 “裁剪工具”裁剪照片
当只需要素材图像中的部分内容,可以使用“裁剪工具”来裁切图像,将裁剪框外的图 像去除,从而突出照片的主体对象。
第3页/共19页
2.1.5 保存文件
ps2解码通讯手册V1.3
2 硬件连接方式
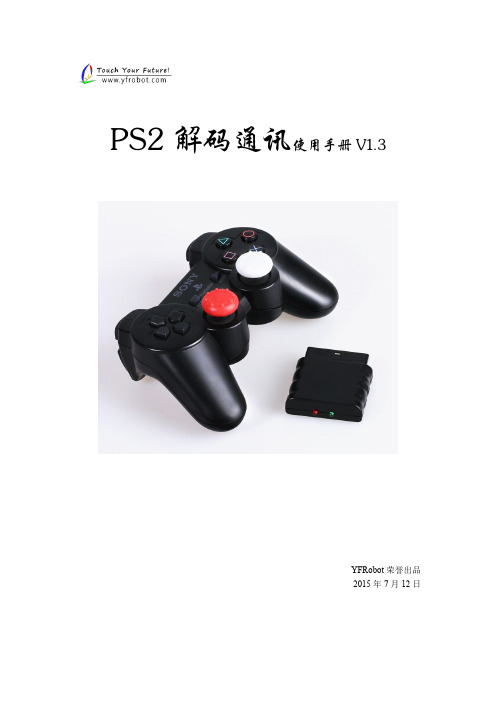
接收器与 stm32 连接方式 DI->PB12; DO->PB13; CS->PB14; CLK->PB15。
3 程序设计
完整程序详见工程文件。 这里主要介绍 pstwo.c 文件中的函数。 void PS2_Init(void) { //输入 DI->PB12 //使能 PORTB 时钟 RCC->APB2ENR|=1<<3; GPIOB->CRH|=0X00080000; // DO->PB13 CLC->PB14 CS->PB15 RCC->APB2ENR|=1<<3; //使能 PORTB 时钟
第 4页 共 7 页
PS2 解码通讯
printf(" }
\r\n
%d
is
pressed
\r\n",key);
printf(" %5d %5d %5d %5d\r\n",PS2_AnologData(PSS_LX),PS2_AnologData(PSS_LY), PS2_AnologData(PSS_RX),PS2_AnologData(PSS_RY) ); delay_ms(50); } } 当有按键按下时,输出按键值。
for(byte=2;byte<9;byte++)
第 3页 共 7 页
PS2 解码通讯
Data[byte] = ref|Data[byte]; } delay_us(50); } CS_H; } 上面两个函数分别为主机向手柄发送数据、 手柄向主机发送数据, 并将数据缓存在数组 Data[ ]中,数组中共有 9 个元素,每个元素的意义请见表 1。 //对读出来的 PS2 的数据进行处理 //按下为 0, 未按下为 1 u8 PS2_DataKey() { u8 index; PS2_ClearData(); PS2_ReadData(); Handkey=(Data[4]<<8)|Data[3]; for(index=0;index<16;index++) { if((Handkey&(1<<(MASK[index]-1)))==0) return index+1; } return 0; } 8 位数 Data[3]与 Data[4],分别对应着 16 个按键的状态,按下为 0,未按下为 1。通过 对这两个数的处理,得到按键状态并返回键值。 编写主函数: int main(void) { u8 key; Stm32_Clock_Init(9); //系统时钟设置 delay_init(72); uart_init(72,9600); PS2_Init(); while(1) { key=PS2_DataKey(); if(key!=0) { //有按键按下 //延时初始化 //串口 1 初始化 //没有任何按键按下 //这是 16 个按键 按下为 0, 未按下为 1
PS2游戏铁拳妮娜攻略及详细实用操作技巧
PS2游戏铁拳妮娜攻略及详细实用操作技巧一.游戏简介整个游戏就好象一部电影大片,惊险曲折的剧情和华丽真实的画面使游戏从头到尾紧张刺激、扣人心弦。
神秘华丽的豪华客轮机关重重、阴森恐怖的孤岛监狱戒备森严,跟随美丽的尼娜一起冒险,经常会有身临其境紧张的压迫感。
这款游戏左摇杆躲闪、右摇杆攻击的操作使得游戏上手稍难,有可能使人在初期就选择放弃。
其实熟练掌握后就会感觉到这样设计的精妙,两个摇杆的配合使用实现了尼娜五花八门超多种的攻击技,而且操作简单很容易就可以发出豪华连击。
右摇杆的方向打击判定很高,而且无论是徒手肉搏还是刀砍枪击打击感都极好,向敌人狂推右摇杆攻击的感觉很过瘾。
尼娜的攻击技非常好看,在片头动画中有很多招式的演示。
尼娜会各种花式的踢法、敏捷的擒拿、徒手和武器的华丽10连击、刺激的连续关节技、各种各样的武器、暴力的内部破坏……游戏中有大量对敌打击内部碎骨的镜头,视觉冲击很强烈。
无论是直接发动内部破坏、施展关节技或插刀,都可以看到这些惊险刺激的特写画面,非常震撼和过瘾。
游戏耐玩度很高,一周目取得的技能点不够换取所有的技能,取得的技能及点数在二周目可以继承。
到了二周目,足够的技能点可以换取所有技能,这时的尼娜更强大。
从二周目开始,游戏中可以得到一些无限耐久的格斗武器和无限子弹的枪械,这些物品使得游戏变的更有乐趣。
二周目的尼娜还拥有了旅行包随时可以换衣服,里面多了一套片头动画中超酷的摔角装。
二.操作方法1.普通操作○键:调查、捡东西、确认、开门、快速下梯子、爬管子松手、游泳时潜水。
X键:跑、快速爬、游泳。
△键:打开地图、进入菜单。
PS2手柄使用说明
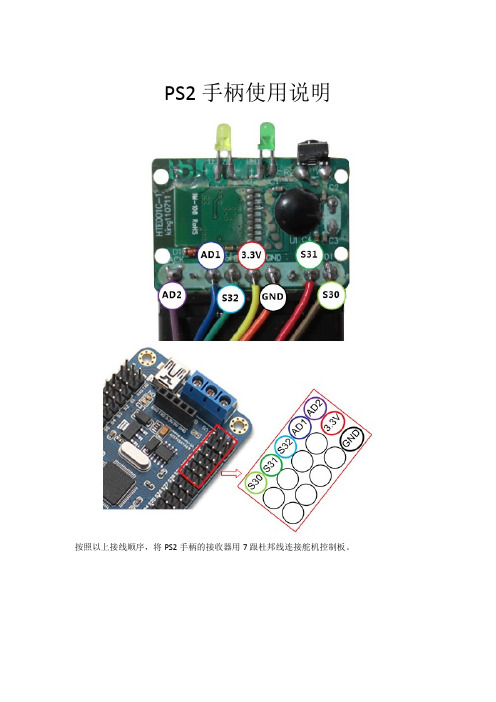
PS2手柄使用说明
按照以上接线顺序,将PS2手柄的接收器用7跟杜邦线连接舵机控制板。
打开软件,点击“设置”,填入“TOROBOT-SY2DL2Y-E4SL6RD-WAKUDLE”的注册码(不含引号),然后点“注册”,然后关闭设置
然后点击设置旁边的“遥控器”,然后填入动作组编号。
只要输入前12个就可以了,分别表示12个按键执行的动作组编号。
左边----------------
方向左--- 第1个框
方向右--- 第2个框
方向上--- 第3个框
方向下--- 第4个框
前侧1 --- 第5个框
前侧2 --- 第6个框
右边----------------
方向左--- 第7个框
方向右--- 第8个框
方向上--- 第9个框
方向下--- 第10个框
前侧1 --- 第11个框
前侧2 --- 第12个框
填写好之后,按下遥控器对应的按键,就会执行所设置的动作组了。
[教程]PCSX2初心者向使用教学,让PS2游戏在PC上续写新的传奇
![[教程]PCSX2初心者向使用教学,让PS2游戏在PC上续写新的传奇](https://img.taocdn.com/s3/m/b5915269f6ec4afe04a1b0717fd5360cba1a8d2a.png)
[教程]PCSX2初心者向使用教学,让PS2游戏在PC上续写新
的传奇
首先当然是要有模拟器啦,赶快去官网当一个吧(这里顺便给偶的官方模拟器发布专帖做个广告,呵呵~)模拟器版本推荐SVN,毕竟PCSX2正处于不断修正错误,逐步自我完善的过程中,只要作者认为有必要就会放出重编译版本。
然后就是自己想办法弄到PCSX2运行所必须的BIOS(因为几乎所有的游戏都需要调用到BIOS里的字库),这里就无须大海捞针般费时费力地在网上寻觅了,大家还是轻点鼠标下载偶提供的吧,共五种类哦。
至于BIOS版本的选择,一般来说选择初期SCPH-10000机型的就能运行绝大多数的游戏了,如果运行不能再考虑更换其它版本吧。
切入正题,下面就以偶的最爱,战棋游戏的翘楚Berwick Saga作为示例讲解下游戏模拟的要点。
同时热烈欢迎有爱人士前来泪之指轮物语专区做客,偶会极尽地主之谊的说。
ps2---ps4入门快键指令教程
ps2---ps4入门快键指令教程Adobe Photoshop是目前最流行的平面设计软件之一。
可以说,只要你接触平面设计,那么无论早晚,你都要和它打交道。
关于Photoshop,要说的实在太多太多,但不论你想让它成为你的左膀右臂,或者仅仅是用它来做一些最基础的图像处理工作,那么下面的10件事都是你一定要知道的,无论你是个初学者或是已经对它有了一定的了解。
1.快捷键的使用:这是Photoshop基础中的基础,却也是提高工作效率的最佳方法。
快捷键的使用,使你可以将精力更好的集中在你的作品而不是工具面板上。
一旦你能够熟练的使用快捷键,你就可以使用全屏的工作方式,省却了不必要的面板位置,使视野更开阔,最大限度的利用屏幕空间;一些简单的命令可以用键盘来完成,不必分心在工具的选择上,哪怕它只占用了极少的时间,但我们更希望在工作时不被打断。
注意:你应该尽量多使用快捷键,下面的这些快捷键是提高效率的好帮手,但不知为什么很多书中都一带而过,甚至没有提及,请一定要牢牢记住。
Ctrl+J:复制当前图层到一个新层;J:切换到喷枪工具;M:切换到选框工具;[]:在当前工具为画笔模式时(包括喷枪、画笔、铅笔、仿制图章历史画笔、橡皮及模糊和加深等工具),依次增减笔头大小;Shift+BackSpace:调出填充对话框。
一开始,你可能无法记住所有的快捷键,可以使用Photoshop的工具提示来帮助你。
方法是打开编辑>预置>常规,选择“显示工具提示”。
这样,当你把鼠标移动到工具面板上时,工具名称和其快捷键就会出现,直到你移走鼠标才会消失。
2.无接缝贴图:无论是对3D图像或是网页的制作,无接缝贴图都是很重要的,我们可以在Photoshop中轻易的完成。
定制好你的图像后,运行滤镜>其它>位移,在水平和垂直方向上位移,一般设置位移量为图像大小的一半,最重要的是将未定义区域设为折回。
在完成位移之后,用橡皮图章工具在图像的拼合处涂抹,消除接缝,然后将图像定义为图案。
PS2初始化简明操作指南
PS2阀门定位器简明操作指南准备:1.按照操作说明书将PS2与阀门连接.2.检查并确认电路和气路的连接.3.通电(4—20mA电流供电).4.□禁止电压供电.初始化①.确认反馈角度(33°量程<=20 mm 和90°量程>=20 mm).②.分别利用调节轮和反馈杠杆长度调整PS2的零点和量程.以直行程调节阀为例: 调节阀杠杆行程<20 mm (阀门开度),气开阀.⑴.PS2定位器与阀体固定前,先将反馈杠杆支点调整并固定在反馈杆上刻有33°15 20 一侧的20位置左右,U形定位槽与反馈支点配合使用,并与阀体固定.⑵.将PS2定位器内的位置开关置于33°位置.⑶.通电后,将PS2内的参数1设置在W AY, 参数2 设置在33°,参数3设置在20 mm。
⑷.通气后,调整调节轮使阀杆位移指针指向阀位刻度0%左右,(与下降键配合使用),使量程下限(液晶显示)在5%-----10%左右.⑸.按上升键,使阀杆指针指向阀位刻100%左右, 使量程上限液晶显示90%-98%左右.a. 如果显示>100 则重新调整反馈杠杆支点离转轴远一点.b. 如果显示<100 则重新调整反馈杠杆支点离转轴近一点.③.确认阀门开度位置在刻度50%左右,手动位置液晶显示在50% ±5%左右.④.进入参数设置并确认相关参数(参数1、参数2、-- -- -- -- -- -- -- 参数55.)⑤.几个重要参数:(举例.实际操作按照说明书或工艺过程要求设置).参数1. YFCT (执行机构的类型)WAY (直行程)参数2. YAGL (反馈角)33°参数3. YW AL (行程范围)由调节阀行程决定参数4. INITA (自动初始化)参数5. INITM (手动初始化)参数6. SCUR (输入电流范围)4~20mA参数7. SDIR (正反作用) 由工艺过程要求决定参数8. SPRA (分程范围设置起点) 0.0%参数9. SPRA (分程范围设置终点) 100.0%参数10. TSUP (斜率设定OPEN) Auto参数12. SFCT (输出设定-线性)Lin参数34. DEBA (控制死区) Auto参数37. YNRM (行程标定)MPOS (机械行程)参数38. YDIR (液晶显示) rise (正作用)参数39. YCLS (阀门紧闭功能)do (仅下降)参数40. YCDO (紧密关闭值)0.2%(仅下降)参数41. YCUP (紧密关闭值)99%(仅上升)参数55. PRST (工厂设置)Strt⑥.设置完毕.进入参数4,按上升键>5秒,则PS2自动完成初始化.⑦.如进入参数5, 则手动初始化;调整零点和量程:⑴.按上升键使阀杆指针指向阀位刻度100%左右,使量程上限液晶显示90%-98%左右.⑵.然后手键确认后,再做下一步.⑶.按下降键使阀杆指针指向阀位刻度0%左右,使量程下限液晶显示5%-10%左右.⑷.然后手键确认,则PS2自动完成手动初始化步.⑸.如果做第⑴.不能继续下一步,则改做第⑶.为第⑴.这与选择正作用,反作用有关.⑹.然后手键>5秒退回到手动模式,再按手键恢复到自动模式.注1:如果阀门阀位刻度与实际阀门开度不符,则可以进行手动初始化注2:参数12.与参数37.配合使用;如选择线性则与机械行程配合,选(反)等百分比或自由调整则与流量配合所有.注3:如果执行了参数34. 则参数39. 参数40. 功能无效.-PS2阀门定位器在调试中常见问题:⒈定位器初始化在第一步停止的可能原因.⒉定位器初始化在第二步停止的可能原因.⒊定位器初始化在第三步停止的可能原因.⒋定位器初始化后显示自由调整出错.⒌定位器初始化后,实际阀门开度总在给定信号值附近震荡的可能原因.⒍定位器初始化后,给定信号与实际阀位不一致.⒎定位器初始化后,在执行工艺过程中阀门达不到“紧密关闭”功能.⒏双作用的阀门定位器是否可以使用在单作用上.⒐①位置反馈模块如何输出信号,②输出信号3.8mA不随输入信号变化,③没有输出信号.10解答问题1. ①.阀门杠杆行程未调整到50%左右,或阀门位置显示未在45~55% 之间(液晶显示);②.反馈连杆连接松动; ③.范围不对(33°,90°)选择有误;④.气源不足。
ps2
1. 快速打开文件双击Photoshop的背景空白处(默认为灰色显示区域)即可打开选择文件的浏览窗口。
2. 随意更换画布颜色选择油漆桶工具并按住Shift点击画布边缘,即可设置画布底色为当前选择的前景色。
如果要还原到默认的颜色,设置前景色为25%灰度 (R192,G192,B192)再次按住Shift点击画布边缘。
3. 选择工具的快捷键可以通过按快捷键来快速选择工具箱中的某一工具,各个工具的字母快捷键如下:选框-M 移动-V 套索-L 魔棒-W喷枪-J 画笔-B 铅笔-N 橡皮图章-S历史记录画笔-Y 橡皮擦-E 模糊-R 减淡-O钢笔-P 文字-T 度量-U 渐变-G油漆桶-K 吸管-I 抓手-H 缩放-Z默认前景和背景色-D 切换前景和背景色-X编辑模式切换-Q 显示模式切换-F另外,如果我们按住Alt键后再单击显示的工具图标,或者按住Shift键并重复按字母快捷键则可以循环选择隐藏的工具。
4. 获得精确光标按Caps Lock键可以使画笔和磁性工具的光标显示为精确十字线,再按一次可恢复原状。
5. 显示/隐藏控制板按Tab键可切换显示或隐藏所有的控制板(包括工具箱),如果按Shift+Tab 则工具箱不受影响,只显示或隐藏其他的控制板。
6. 快速恢复默认值有些不擅长Photoshop的朋友为了调整出满意的效果真是几经周折,结果发现还是原来的默认效果最好,这下傻了眼,后悔不该当初呀!怎么恢复到默认值呀?试着轻轻点按选项栏上的工具图标,然后从上下文菜单中选取“复位工具”或者“复位所有工具”。
7. 自由控制大小缩放工具的快捷键为“Z”,此外“Ctrl+空格键”为放大工具,“Alt+空格键”为缩小工具,但是要配合鼠标点击才可以缩放;相同按Ctrl+“+”键以及“-”键分别也可为放大和缩小图像;Ctrl+Alt+“+”和Ctrl+Alt+“-” 可以自动调整窗口以满屏缩放显示,使用此工具你就可以无论图片以多少百份比来显示的情况下都能全屏浏览!如果想要在使用缩放工具时按图片的大小自动调整窗口,可以在缩放工具的属性条中点击“满画布显示”选项。
ps2具体步骤
1、取出素材文件Y82.tif
2、复制背景图层为背景副本图层,将其图层混合模式设为“叠加”
(在图层面板中右,复制图层)
3、图像调整“渐变映射”图层混合模式设为“强光”(在面板下面中间圆上右键)
4、再创建“渐变填充”调整图层,颜色从黑色到白色,图层混合模式设为“颜色加深”,(在面板下面中间圆上右键)
(3)效果装饰:调整透过窗口看到两棵大树的位置
具体操作步骤:
1、容差小一点,选中两个窗户玻璃。(左边的小容差,右边可以适当加大容差)
2、全选景色,拷贝贴入
OK
第十四题:
(1)打开文件Yps3a-01.tif,将全部蓝色球体以外的背景置换成黑色背景
(2)打开文件Yps3b-01.tif,将金盘选定拷入上述文件中央,并制作白色光晕效果
第三题:
在Photoshop CS2中基于给定素材,使用通道混合器实现“雪花飘零”的效果
(1)复制图层,对其使用“图像”菜单中的通道混合器,选择单色复选框,调整Red为+200%,Green为+150%,Blue为-200%
(2)将新图层透明度设为65%,对该图层使用“溶解”色彩混合模式
(3)在新图层添加一个蒙版,用画笔使用黑色,画笔大小为120px,硬度为0%,不透明度为50%,对原来图层的“雪花”效果进行“变稀”处理
1、打开文件,先用“污点修复工具”,再用“滤镜”杂色去斑或者还用“蒙尘划痕”。
2、复制一个图层
3、在新图层采用颜色叠加(图层图层样式颜色叠加)参数有
Ok
第七题:
(1)将人物脸部眉毛细化、皱纹抹平、牙齿亮白化、修复皮肤瑕疵,使用头发遮盖耳朵。
具体操作步骤:
1、眉毛细化:擦除工具,擦细一点;
ps2厚机使用说明
ps2厚机使用说明PS2厚机使用说明一、前言PS2是索尼公司于2000年3月4日发布的第六代家用游戏机,厚机是PS2最早的版本之一。
本文将详细介绍PS2厚机的使用说明,帮助用户更好地了解和使用该游戏机。
二、外观和硬件连接1.外观:PS2厚机采用黑色塑料外壳,正面有一个光驱口、两个控制器插口和电源开关等。
背面有AV输出接口、电源插座和网络接口等。
2.硬件连接:将电源线插入电源插座,使用AV线将PS2与电视连接,插入控制器后即可开机使用。
三、游戏光盘的使用1.游戏光盘:将游戏光盘放入光驱口,轻按光驱盖上的开关,等待光盘加载完成。
2.游戏启动:按下电源开关,等待主界面出现后,选择游戏图标并按下“开始”按钮,即可进入游戏。
四、主菜单的操作1.游戏选择:在主界面上使用手柄的方向键选择“游戏”,按下“确认”按钮进入游戏列表。
2.游戏设置:在游戏列表中,按下“三角”按钮即可进入游戏设置页面,可以调整音量、画面等参数。
3.存档管理:在游戏列表中,按下“方块”按钮可进入存档管理页面,可以加载、保存和删除游戏存档。
4.其他功能:主菜单还提供了浏览图片、观看DVD、播放音乐等功能,通过方向键和确认按钮进行操作。
五、手柄操作1.基本操作:手柄上的方向键用于控制角色移动,确认按钮用于确定选择,返回按钮用于返回上一层菜单。
2.特殊功能:手柄上还有L1、L2、R1、R2等按钮,用于触发游戏中的特殊功能,不同游戏可能有不同的设置。
六、注意事项1.保持通风:使用PS2厚机时,请确保周围通风良好,避免过热导致故障。
2.避免受潮:请避免将PS2厚机放置在潮湿的环境中,以免损坏电路。
3.适度游戏:长时间连续游戏可能对眼睛和身体造成伤害,请适度休息。
4.避免震动:请勿将PS2厚机放置在震动的环境中,以免对硬盘和光驱造成损坏。
七、故障排除1.无法开机:请检查电源是否连接正常,电源插座是否通电。
2.画面异常:请检查AV线是否连接正确,电视是否选择了正确的信号源。
- 1、下载文档前请自行甄别文档内容的完整性,平台不提供额外的编辑、内容补充、找答案等附加服务。
- 2、"仅部分预览"的文档,不可在线预览部分如存在完整性等问题,可反馈申请退款(可完整预览的文档不适用该条件!)。
- 3、如文档侵犯您的权益,请联系客服反馈,我们会尽快为您处理(人工客服工作时间:9:00-18:30)。
4
SIPART PS2 智能电气阀门定位器
SIPART PS2, SIPART PS2 PA, SIPART PS2 EEx d 和 SIPART PS2 EEx d PA
进气
排气
微处 理器 排气
1 带微处理器和输入电路的主板 2 带 LCD 和按键的控制面板 3 压电阀单元,单作用定位器 4 压电阀单元双作用定位器 5 Iy 模块用于 SIPART PS2 控制器 6 报警模块用于 3 个报警输出和 1 个二进制输入 7 SIA 模块 (限位开关报警模块)
1 气动连接管 2 气动连接管(双作用执行机构) 3 行程检测系统(10k Ω电位器 或 NCS) 4 电缆 5 改进的 EMC 滤波模块(定位器内) 6 SIPART PS2
图.5 分离安装的执行机构行程检测系统和控制单元
3
SITRANS PS2 智能电气阀门定位器
SIPART PS2, SIPART PS2 PA, SIPART PS2 EEx d 和 SIPART PS2 EEx d PA
图.1
SIPART PS2 或 SIPART PS2 PA 智能电气阀门定位器
图.2
SIPART PS2 EEx d 或 SIPART PS2 EEx d PA 隔爆型智 能电气阀门定位器
图.3
SIPART PS2 或 SIPART PS2 PA 不锈钢外壳智能电气阀 门定位器产品
Iy 阀位反馈模块和报警模块以及 SIA 模块(见第 3 页) 的信号之间,以及与基本单元之间在电气上都是隔离的。 输出表示自动发出故障信号。
SIPART!"#$%& PS2
!
SITRANS P,MK II ,MS 系列
SIPART PS2 智能电气阀门定位器
SIPART PS2/PS2 PA, SIPART PS2 EEx d 和 SIPART PS2 EEx d PA 2 2 4 7 10 15 应用 设计 工作原理 组态 技术数据 订货数据
压力变送器
软件
操作说明
请见 SIMATIC PDM 软件, 用于 HART 第 7 页 或 PROFIBUS-PA 通信协 议设备参数设定 19 SIPART PS2 的操作
1
SITRANS PS2 智能电气阀门定位器
SIPART PS2, SIPART PS2 PA, SIPART PS2 EEx d 和 SIPART PS2 EEx d PA
非接触式位置传感器(NCS) 执行机构行程的检测也可采用非接触式位置传感器代替 电位器。所有的连接件,如连接轮、执行机构上的驱动 销或反馈杠杆以及直行程执行机构的支架都可省去。 其结果是: • 抗震性更强 • 传感器无磨损 • 安装在非常小的执行机构上毫无问题 • 小行程无滞后 传感器不需要外加供给电源等等 SIPART PS2 可以在两线系统中工作。NCS(非接触传感 器)是由一个固定的感应器和一个安装在直行程执行机 构阀杆或角行程执行机构转轴上的磁性体组成。 当使用分离式传感器时,定位器(控制单元)内必须安 装特殊的保证 EMC (抗电磁兼容性干扰)符合 EN 50 081-1 或 EN 50 082-2 标准 EMC 滤波模块.(见订货数 据: EMC 滤波模块)
工作方式 SIPART PS2 型智能电气阀门定位器的工作原理与传统 定位器完全不同。 采用微处理器对给定值和位置反馈作比较。如果微处理 器检测到偏差,它就用一个五步开关程序来控制压电阀, 压电阀进而调节进入执行机构气室的空气流量。当 SIPART PS2 采用二线制连接时,它完全从 4 至 20mA 给定信号中获取电源。亦可从 PROFIBUS(SIPART PS2 PA)总线信号中获取电源。 SIPART PS2 的工作方式及其集成的附加功能为用户在定 位器安装和操作使用上提供相当多的好处: • 安装简易、高度自动化的调校,意味着节省时间,并 确保可靠运行。 • 一个在线自适应程序意味着即使在不利的工况条件下 也能实现非常高的质量控制。 • SIPART PS2 只有很少的可动部件,不受振动影响。 • 温度和压缩空气压力的变化对 SIPART PS2 定位器的 影响可以忽略 • 免维护运行 • 借助液晶显示和按键,可手动调整阀位,不需要另外 的电源。 • SIPART PS2 定位器内固化的参数可提供许多功能,定 位器可进行灵活简单的组态,例如阀门特性,行程限 定或分程操作。 • “紧密关闭”功能确保了对阀座最大的定位压力。 • 和传统定位器相比,西门子阀门定位器的耗气量可以 忽略。 SIPART PS2 定位器采用适当的安装组件固定到直行程 或角行程执行机构上,执行机构的直线或转角位移通过 安装的组件检测并由一个刚性连接的导电塑料电位器转 换,装在直行程执行机构上的组件检测得到的角度误差 被自动地校正. 微处理器根据偏差(给定值 W 与位置反馈信号 X)的大 小和方向输出一个电控指令给压电阀。 压电阀将控制指令转换为气动位移增量,当控制偏差很 大时(高速区)。定位器输出一个连续信号;当控制偏 差不大(低速区),定位器输出脉冲连续;当控制器偏 差很小时(自适应或可调死区状态),则没有控制指令 输出。 带预控压电阀的气动阀组 压电阀是以极长的工作寿命而著称,主导元件是一个压 电柔韧开关,它同主控气路连在一起。压电阀由于质量 小,可以释放很短的控制脉冲,因而能够达到很高的定 位精度。 三种防爆产品型式 基型产品有防爆等级为 EEx ia/ib 的本安型产品或用于 2 区的非本安型产品(见本安型产品技术数据)。 SIPART PS2 EEx d 隔爆型产品允许用在非本安应用的 1 区(具有 FM 认定证书也可应用在 0 区,见技术数据)。 这时允许使用全部可选择的模板而无需更换标牌。 通过 SIMATIC PDM 软件进行操作和监控 SIMATIC PDM 软件支持 HART 通迅, 也支持 PROFIBUSPA 通迅协议。 SIMATIC PDM 软件允许通过 PC 或手提电脑方便实现远 程操作和监控,定位器也能使用该软件组态,利用过程数 据和比较数据可确定整机故障诊断和维护的重要信息。当 用 HART 接口与 SIPART PS2 进行通讯时,可通过 PC 机 或笔记本的 COM 口及 HART 调制解调器用双芯电缆连接 通讯。HART 通讯所使用的信号是采用频移键控方式叠加 在电流信号上。 调试 调试(初始化)在很大程度上是自动进行的。 在初始化时,微处理器自动确定执行机构的零点,最大行 程,作用方向和执行机构的定位速度,用这些来确定最小 脉冲时间和死区,从而使控制达到最佳。使用 SIPART PS2 定位器上的按键和 LCD 可以手动操作气动执行机构。 用于定位器、执行机构和调节阀的监控和诊断功能 SIPART PS2(6DR5...)具有检测和当选择极值报警时, 能报告执行机构和调节阀变化的多项监控功能,这种诊断 对调节阀和执行机构是重要的信息。 可实现测量值(一些极值可调整)的确定和监控,包括: • 行程累积 • 行程方向改变次数 • 报警计数 • 死区自调整 • 阀门极限位置(例如:阀座的磨损) • 最高/最低温度下的运行小时数(按照温度等级) • 压电阀运行循环数 • 阀门定位时间 • 执行机构泄漏
2
SIPART PS2 智能电气阀门定位器
SIPART PS2, SIPART PS2 PA, SIPART PS2 EEx d 和 SIPART PS2 EEx d PA
图Hale Waihona Puke 4非接触阀位传感器(NCS)用于直行程执行机构(左)和角行程执行机构(右)
不锈钢外壳的产品适用于特殊环境条件 SIPART PS2(包括 EEx d 型产品)有不锈钢外壳的产 品(见图 3)可应用在特殊腐蚀性的环境(例如海上作业, 氯碱厂等)。其功能和基型产品相同。 可发出限位信号的限位开关触发器(SIA) 采用安装简便的限位开关触发器可发出二个符合 NAMUR 信号标准(DIN 19 234)的限位信号。触发器 还包含一个报警输出(见报警模块)。 执行机构行程检测组件和控制器分离安装 SIPARTP S2 所有外壳型式的产品,其行程检测组件和控 制器都可以分离安装。采用相应的连接装置和装有行程 检测组件的 SIPARTPS2 外壳,行程或角位的测量同样都 在执行机构上进行。控制器可单独安装在离执行器一定 距离的地方,如安装在管道或类似安装件上。控制器通 过一根电缆与行程检测组件连接,用一根或二根气管与 执行机构连接(见图 5)。如果安装的条件超过定位器的 正常值,例如 • 过高/过低的环境温度 • 过强的振动 • 核(例如中子)辐射 上述的分离式安装往往带来相当多的好处。 对于短行程的小型执行机构来说,采用线性电位器(电 阻值 10kΩ)更适合,因为一方面线性电位器所需的安装 空间很小,另一方面小行程的变送特性很好。
二线制定位器 (6DR50..,6DR51..)的电气连接 6DR50.. 和 6DR51..型定位器是二线制工作系统 二线制/三线制/四线制定位器 (6DR52..)的电气连接 6DR52.. 型能工作在二线制、三线制或四线制系统。
*)如果需要 R
二线制输入
SIPART PS2 系列智能电气阀门定位器用于气动直行程 或角行程执行机构的控制。智能电气阀门定位器驱动执 行机构使阀门到达与给定值相对应的位置。附加功能输 入可用于锁定阀位或驱动阀门达到安全的位置。为此, 在基型产品中都有一个用于这个目的的二进制输入接 口。 SIPART PS2 系列智能电气阀门定位器与常规产品相 比,有许多独特而实用的优点,例如: g 直行程和角行程执行机构采用同一类型的阀门定位器 g 三个按键和双行 LCD 显示可实现简捷的操作和编程 g 具有零位和行程范围自动调整的功能 g 手动操作时无需另外的设备 g 具有可选的或可编程的输出特性 g 具有自诊断功能(见第 4 页) g 耗气量极小 g 设定值和控制变量极限值可进行选择 g 可编程设置阀门"紧密关闭"功能 SIPART PS2 系列定位器有以下的产品型式: g 用于单作用执行机构的塑铝外壳或不锈钢外壳产品 g 用于双作用执行机构的塑铝外壳产品 g 可用于非危险区或危险区域: - 本安产品(EEx ia/ib) - 隔爆产品(EEx d) 通讯形式: g 具有使用 0/4 到 20mA 带 HART 通讯信号(可选择) g 具有 PROFIBUS-PA 通迅接口(EEx ia)。 设计 SIPART PS2 系列阀门定位器是一种采用高集成度微处 理器的数字式现场设备。 定位器由以下部件组成: - 壳体和盖 - PCB 印刷电路板组件:具有相应带或不带 HART 通迅 的 电 子 部 件 ; 或 者 符 合 IEC 1158-2 技 术 规 范 PROFIBUS-PA 通迅的总线供电功能电子部件。 - 执行机构行程检测组件(阀位反馈系统) - 螺丝接线端子盒 - 由压电阀组构成的气路控制及放大部分, 压电阀组安装在壳体内部,进气和输出压力的气动接口 位于定位器的右侧。可另选一个压力表模块和 / 或一个 电磁阀接在上面。位于壳体内部的电路板安装架留有数 个插槽,按编号分别插入具有以下功能模块: g Iy 模块: - 二线制 4 到 20mA 位置反馈信号模块 g 报警模块(3 个输出,1 个输入) : - 采用二进制信号作为行程或转角的两个限位信号。这两 个限位信号可单独设置为最大或最小值 - 在自动方式时如果执行单元达不到设定位置或发生故障 时,输出一个报警信号 - 第二个二进制输入用于报警信号或触发安全响应,或作 锁定/发讯功能,或作安全定位
