喷雾泵说明书
BPW516-13.2X4A喷雾泵说明书

液力端部分主要由柱塞、高压钢套、阀套、阀座、进排液阀芯、泵 头体等组成。该液力端采用线型分段结构、平面无间隙密封形式、伞形 锥阀与菌形锥阀相结合的方法,解决了通常柱塞泵采用的十字形、T字 形结构液力端由于交叉孔部分应力集中导致疲劳开裂的不足和密封件容 易损坏泄漏的缺陷。特别是更换易损件和日常维护保养非常方便。
喷雾泵主要由动力端、液力端组成,在泵的排液腔一侧装有安全 阀,另一侧装有卸载阀(见图2)。 3.1、动力端
动力端主要由箱体、曲轴、连杆、滑块、减速齿轮箱和轴齿轮等组 成。
-2-
箱体是安装曲轴、减速齿轮、连杆、滑块和液力端的基架,又是主
要的受力构件,采用高强度铸铁整体箱形结构,具有足够的强度和刚 性,曲轴选用优质锻钢制成,轴瓦为钢壳高锡铝合金瓦,齿轮采用优质 合金钢,硬齿面具有较高的传动精度。连杆大头选用剖分式结构以便装 拆,小头选用园柱销连接,工作可靠。
泵在长期运行过程中,由于磨损和锈蚀等原因,失去了原有的精度 和性能,应进行升井检修,根据实际情况,更换必需的易损零件,基本 恢复原来的性能。
本泵的连杆螺栓拧紧力矩为170N·m~180N·m,即17kg·m~18kg ·m。
-5-
故障
产生原因分析
压力脉动大,压力表指 针不稳定,进排液管严重跳 动。
-8-
修改顺序号 公称压力MPa(16兆帕) 公称流量L/min(516升分) 第二特征代号(W-卧式) 第一特征代号(P-喷雾) 泵 即:BPW516/16喷雾泵为卧式喷雾泵,公称流量为516L/min,公称 压力为16MPa。
喷杆喷雾机产品说明(之二)
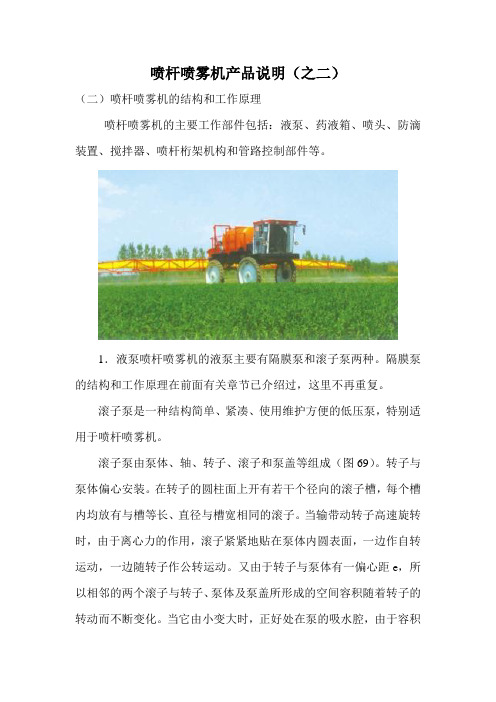
喷杆喷雾机产品说明(之二)(二)喷杆喷雾机的结构和工作原理喷杆喷雾机的主要工作部件包括:液泵、药液箱、喷头、防滴装置、搅拌器、喷杆桁架机构和管路控制部件等。
1.液泵喷杆喷雾机的液泵主要有隔膜泵和滚子泵两种。
隔膜泵的结构和工作原理在前面有关章节已介绍过,这里不再重复。
滚子泵是一种结构简单、紧凑、使用维护方便的低压泵,特别适用于喷杆喷雾机。
滚子泵由泵体、轴、转子、滚子和泵盖等组成(图69)。
转子与泵体偏心安装。
在转子的圆柱面上开有若干个径向的滚子槽,每个槽内均放有与槽等长、直径与槽宽相同的滚子。
当输带动转子高速旋转时,由于离心力的作用,滚子紧紧地贴在泵体内圆表面,一边作自转运动,一边随转子作公转运动。
又由于转子与泵体有一偏心距e,所以相邻的两个滚子与转子、泵体及泵盖所形成的空间容积随着转子的转动而不断变化。
当它由小变大时,正好处在泵的吸水腔,由于容积的增大,产生了真空度,于是把液体吸入吸水腔;随着转子的旋转,空间由大变小,此时正好处在压水腔,由于容积变小,使液体产生了压力并进入了高压管路,周而复始,于是滚子泵就实现了泵水的目的。
由于滚子是靠离心力而紧贴泵体工作的,因此对泵的转速有一定要求,转速太低则离心力太小,泵不能正常工作;转速太高则离心力太大,滚子与泵体、转子侧壁胁接触应力加大,将加速滚子的磨损,影响泵的寿命。
通常泵的铭牌上都标有泵的额定转速,使用时应予以注意。
2.药液箱药液箱用于盛装药液,其容积有0.2、0.65、1、1.5和2立方米等。
箱的上方开有加液口,并设有加液口滤网,箱的下方设有出液口,箱内装有搅拌器。
有些喷杆喷雾机不用液泵,而是用拖拉机上的气泵向药液箱内充气而使药液获得压力,此种机具的药液箱不仅要有足够的强度,而且要有良好的密封性。
药液箱通常用玻璃钢或聚乙烯塑料制作,耐农药腐蚀。
市场上也有用铁皮焊合而成的,它的内表面涂防腐材料,耐农药腐蚀的性能较差,使用时间较短。
3.喷头适用于喷杆喷雾机的喷头有狭缝喷头和空心圆锥雾喷头等几种。
BPW2506.3型喷雾泵使用说明书
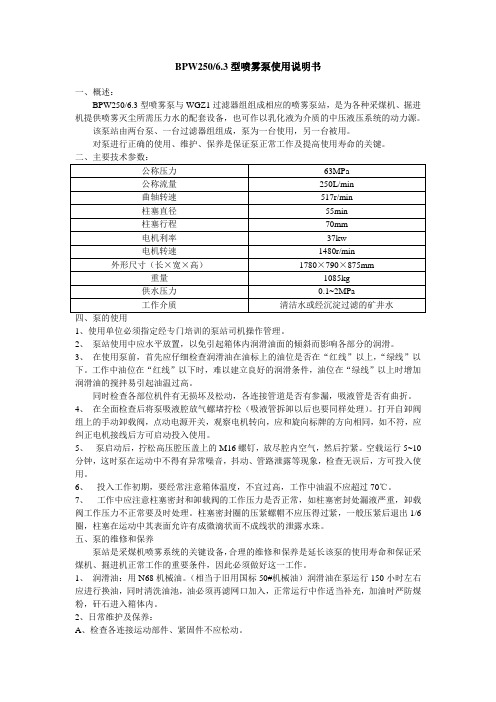
BPW250/6.3型喷雾泵使用说明书一、概述:BPW250/6.3型喷雾泵与WGZ1过滤器组组成相应的喷雾泵站,是为各种采煤机、掘进机提供喷雾灭尘所需压力水的配套设备,也可作以乳化液为介质的中压液压系统的动力源。
该泵站由两台泵、一台过滤器组组成,泵为一台使用,另一台被用。
对泵进行正确的使用、维护、保养是保证泵正常工作及提高使用寿命的关键。
四、泵的使用1、使用单位必须指定经专门培训的泵站司机操作管理。
2、泵站使用中应水平放置,以免引起箱体内润滑油面的倾斜而影响各部分的润滑。
3、在使用泵前,首先应仔细检查润滑油在油标上的油位是否在“红线”以上,“绿线”以下。
工作中油位在“红线”以下时,难以建立良好的润滑条件,油位在“绿线”以上时增加润滑油的搅拌易引起油温过高。
同时检查各部位机件有无损坏及松动,各连接管道是否有参漏,吸液管是否有曲折。
4、在全面检查后将泵吸液腔放气螺堵拧松(吸液管拆卸以后也要同样处理)。
打开自卸阀组上的手动卸载阀,点动电源开关,观察电机转向,应和旋向标牌的方向相同,如不符,应纠正电机接线后方可启动投入使用。
5、泵启动后,拧松高压腔压盖上的M16螺钉,放尽腔内空气,然后拧紧。
空载运行5~10分钟,这时泵在运动中不得有异常噪音,抖动、管路泄露等现象,检查无误后,方可投入使用。
6、投入工作初期,要经常注意箱体温度,不宜过高,工作中油温不应超过70℃。
7、工作中应注意柱塞密封和卸载阀的工作压力是否正常,如柱塞密封处漏液严重,卸载阀工作压力不正常要及时处理。
柱塞密封圈的压紧螺帽不应压得过紧,一般压紧后退出1/6圈,柱塞在运动中其表面允许有成微滴状而不成线状的泄露水珠。
五、泵的维修和保养泵站是采煤机喷雾系统的关键设备,合理的维修和保养是延长该泵的使用寿命和保证采煤机、掘进机正常工作的重要条件,因此必须做好这一工作。
1、润滑油:用N68机械油。
(相当于旧用国标50#机械油)润滑油在泵运行150小时左右应进行换油,同时清洗油池,油必须再滤网口加入,正常运行中作适当补充,加油时严防煤粉,矸石进入箱体内。
喷洒器用户手册说明书
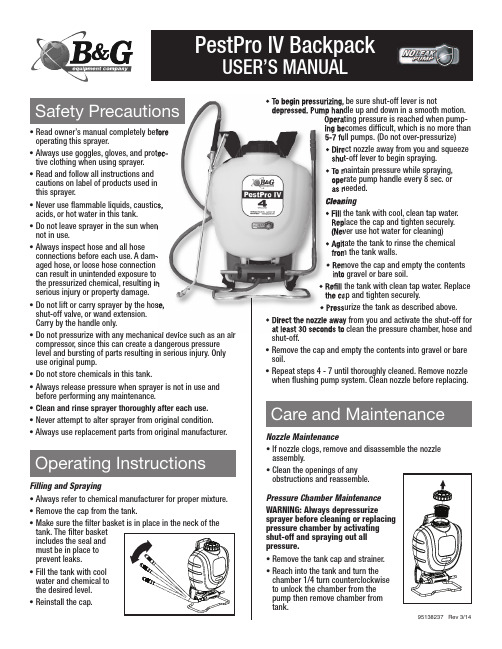
• To begin pressurizing, be sure shut-off lever is notdepressed. Pump handle up and down in a smooth motion.Operating pressure is reached when pump-ing becomes difficult, which is no more than 5-7 full pumps. (Do not over-pressurize)• Direct nozzle away from you and squeeze shut-off lever to begin spraying.• To maintain pressure while spraying, operate pump handle every 8 sec. or as needed.Cleaning• Fill the tank with cool, clean tap water.Replace the cap and tighten securely.(Never use hot water for cleaning)• Agitate the tank to rinse the chemical from the tank walls.• Remove the cap and empty the contents into gravel or bare soil.• Refill the tank with clean tap water. Replace the cap and tighten securely.• Pressurize the tank as described above.• Direct the nozzle away from you and activate the shut-off for at least 30 seconds to clean the pressure chamber, hose and shut-off.• Remove the cap and empty the contents into gravel or bare soil.• Repeat steps 4 - 7 until thoroughly cleaned. Remove nozzle when flushing pump system. Clean nozzle before replacing.Nozzle Maintenance• If nozzle clogs, remove and disassemble the nozzle assembly.• Clean the openings of any obstructions and reassemble.Pressure Chamber Maintenance WARNING: Always depressurizesprayer before cleaning or replacing pressure chamber by activating shut-off and spraying out all pressure.• Remove the tank cap and strainer.• Reach into the tank and turn the chamber 1/4 turn counterclockwise to unlock the chamber from the pump then remove chamber fromtank.Filling and Spraying• Always refer to chemical manufacturer for proper mixture.• Remove the cap from the tank.• Make sure the filter basket is in place in the neck of the tank. The filter basket includes the seal and must be in place to prevent leaks.• Fill the tank with cool water and chemical to the desired level.• Reinstall the cap.95138237 Rev 3/14• Read owner’s manual completely before operating this sprayer.• Always use goggles, gloves, and protec-tive clothing when using sprayer.• R ead and follow all instructions and cautions on label of products used in this sprayer.• Never use flammable liquids, caustics, acids, or hot water in this tank.• Do not leave sprayer in the sun when not in use.• Always inspect hose and all hose connections before each use. A dam-aged hose, or loose hose connection can result in unintended exposure to the pressurized chemical, resulting in serious injury or property damage.• Do not lift or carry sprayer by the hose,shut-off valve, or wand extension. Carry by the handle only.• Do not pressurize with any mechanical device such as an air compressor, since this can create a dangerous pressure level and bursting of parts resulting in serious injury. Only use original pump.• Do not store chemicals in this tank.• Always release pressure when sprayer is not in use and before performing any maintenance.• Clean and rinse sprayer thoroughly after each use.• Never attempt to alter sprayer from original condition.• Always use replacement parts from original manufacturer.Care and MaintenanceUnlock Chamber Remove Chamber • Rinse out any debris that mayhave accumulated in thechamber.• Reinstall the chamber into thepump by aligning the tabs onthe chamber with the slots inthe pump, push firmly intopump and turn clockwise untilpump stops.• Reinstall the strainer and tankcap.Servicing the Tank• Unscrew cap from tank. Remove and replace check valve.• Remove pressure chamber as outlined in Pressure Chamber Maintenance section of the manual. Remove and replace o-ring. Lubricate o-ring with petroleum jelly.• Unsnap agitator from piston rod. Remove from tank.• Position pump handle to the furthest downward position. Remove pump handle fromsprayer.• Disassemble carry handle by removing the (6) screws.• Remove hitch pin and lift pivot clip off of the piston rod.• Pull upward to slide piston rod out of pump.• While holding onto the pump, use an adjustable wrench to unthread pump nut from pump. Remove nut, hose and barb assembly.• Inspect (2) o-rings on barb assembly. If damaged, replace hose assembly.• Remove pump out of tank. Remove and replace gasket.• Slide piston rod assembly down and out of grommetand remove from tank.• Carefully remove and replace o-ring from piston. Lubricate o-ring with petroleum jelly.• Remove grommet from tank using pliers to grasp the head of the grommet while flexing the grommet out of the hole in the tank. Press or tap new grommet into tank. Lubricate hole in grommet with petro-leum jelly.• Insert piston rod assembly into tank and through grommet. • Reassemble pump with gasket into tank. Tighten pump nut securely with adjustable wrench while holding pump to maintain correct orientation. Push piston assembly into pump.• Attach pivot clip to piston rod and insert hitch pin. Note orientation of piston rodmust match the pivot clip. Reassemble carry handle onto tank. Tighten all (6) screws. • To reinstall the agitator, line the notch up on the agitator with the swedge on piston rod and snap into place.• Reinstall pressure chamber as outlined in the Pressure Chamber Maintenance section. Replace tank cap, filter andpump handle.Problem:Sprayer will not build pressure Inspect:•Pressure chamber installed into pump• Dirty, damaged or worn pump or chamber o-ring• Dirty poppet in pumpSolution:•Install pressure chamber as described inPressure Chamber Maintenance section• Clean and lubricate or replace o-rings asdescribed in Servicing section• Clean sprayer as described in CleaningsectionProblem:Sprayer will not sprayInspect:•Sprayer pressurization• Shut-off clogged• Nozzle cloggedSolution:•Pressurize sprayer as described in Pressurizing and Spraying section• Clean shut-off as described in Shut-offMaintenance section• Clean nozzle as described in NozzleMaintenance sectionProblem:Sprayer leaks from the bottom of the tank Inspect:•Loose pump nut• Damaged or worn o-rings or seals Solution:•Tighten pump nut as described in Servicingsection• Replace o-rings and seals as described inServicing sectionProblem:Sprayer leaks where piston rod enters top of tank Inspect:•Dirty, damaged, or worn grommet Solution:•Clean and lubricate hole in grommet orreplace grommet as described in ServicingsectionProblem:Pump handle is difficult to operate Inspect:•Swollen or damaged pump piston o-ring• Dirty, dry or damaged grommet Solution:•Clean and lubricate or replace o-ring asdescribed in Servicing section• Clean and lubricate hole in grommet or replacegrommet as described in Servicing section# Order #Description112014261Reservoir Chamber 212014262Cap Assembly312014263Tank Filter Assembly 412014264Backpack Seal Kit 522037510XR Gun Rebuild Kit 622037503Handle 722037501Valve Body 822045600Extension922049451 4 way spray tip assembly 1022032551Strainer/Check Valve 1133000309Hose AssemblyPESTPRO IV BACKPACK135 REGION SOUTH DRIVE • JACKSON, GA 30233Toll Free 800-544-8811 • Phone 678-688-5601 • Fax 678-688-5633For more detailed maintenance and servicing instructions, visit the B&G website at 11Hose Assembly1Reservoir Chamber2Cap Assembly3Tank Filter Assembly4Backpack Seal Kit10Strainer/Check Valve94 Way Spray Tip Assembly8Extension。
BPW315-12.5Ⅱ使用说明书(文字部分)201405
5)检 查 泵 输 入 轴 与 电 机 轴 的 对 正 情 况 ,要 求 泵 轴 与 电 机 轴 的 同 轴 度 误 差 不 能 大 于 0.14mm, 两 半 联 轴 节 间 应 有 24mm 的 间隙 。 若 不 符 应 按 上 述 要 求 找 正 , 并 紧 固 好地脚螺栓。
2. 电机转向应与泵上箭头标记一致。
3. 正常使用时,请勿打开联轴器护罩、柱塞腔盖板和泵盖等,严防杂物掉入造成损坏。液箱盖请
勿打开,严防脏物掉入箱内污染工作液。 4. 当环境温度低于 0℃,不用泵时,必须排净吸、排液腔的工作液以防冻裂箱体。
注意:日常维护注意事项
1. 使用过程中需要调整柱塞密封压缩量时,不要一次将螺母压得过紧,因为过紧会使密封与柱塞 的磨损加剧,缩短使用寿命。
SX2500 型 2500
中性清水 Φ89 吸液 胶管
0.31 40 目 2750×1050×1250 1000
2
3
南京六合煤矿机械有限责任公司
BPW315/12.5Ⅱ型喷雾泵 使用说明书
三、结构说明
1.泵 站 的 工 作 原 理 : 水源通过进液浮球阀进入液箱体,过滤后的水经管路进入泵的吸液腔。本系列
安全警示 一、概述……………………………………… 1 二、主要技术参数…………………………… 2 三、结构说明………………………………… 3 四、初次安装与使用………………………… 4 五、正常使用………………………………… 5 六、维护与保养……………………………… 6 七、主要故障及排除方法…………………… 7 八、随机工具清单…………………………… 8 九、贮存……………………………………… 9
背负式电动喷雾器使用说明书
背负式电动喷雾器使用说明书背负式电动喷雾器是一种新型的喷涂设备,其很好地解决了传统喷涂设备的一些痛点,例如喷涂效率低、喷雾均匀性不佳等问题。
本文将详细介绍背负式电动喷雾器的使用方法与事项,旨在帮助用户更好地掌握和使用该设备。
一、准备工作1、根据操作说明组装背负式电动喷雾器,正确安装、固定喷嘴、喷管等各部件;2、根据喷涂材料的性质,选择合适的喷嘴和喷涂距离;3、检查电源线是否损坏,在使用前请务必确认是否有漏电现象,确保安全;4、在使用前请清洗喷嘴和喷管,确保喷头畅通无阻;5、佩戴好个人防护装备,包括手套、口罩、护目镜等。
二、操作步骤1、加液:打开加液口,将要喷涂的液体倒入喷涂桶中,注意不要注满,以免影响喷涂效果;2、启动:将电源线插入插座,打开电源开关,启动电动机;3、调节:调节出液量,选择合适的喷头,喷涂距离和角度等参数;4、喷涂:按下扳机,从左往右均匀喷涂(或者从上往下),保持手持喷枪机头垂直于喷涂表面,喷涂速度均匀,不要在同一位置重复喷涂多次;5、停机:喷涂完毕后,立即关闭电源开关,关闭电动机,开启放液阀门将剩余的液体排干,清空液体桶;6、清洗:将喷嘴和喷管等各部件拆卸下来,用清水彻底清洗干净并晾干;7、存放:将背负式电动喷雾器放置在干燥通风的地方,妥善保管。
三、注意事项1、在使用前,请先阅读使用手册,确保正确使用;2、在使用过程中,应定期检查电源线和各部件是否有损坏;3、喷头应定期清洗,避免堵塞影响喷涂效果;4、使用时请佩戴好个人防护装备;5、工作时,应避免在狂风大作,高温干燥或极端潮湿等环境下使用喷涂设备;6、不得将背负式电动喷雾器用于灭虫、消毒等用途,否则后果自负。
以上就是关于背负式电动喷雾器的使用说明,希望本文能对用户有所帮助,更好地应用背负式电动喷雾器,提高喷涂效率,达到更好的效果。
动力喷雾机的使用说明
动力喷雾机的使用说明使用说明:动力喷雾机感谢您购买我们的动力喷雾机!本使用说明将提供关于如何正确使用以及维护您的喷雾机的详细信息。
请在使用之前仔细阅读,并按照说明进行操作。
部件1.喷雾机主体:包括电动机、喷雾器、喷雾嘴等部件。
2.容量桶:用于储存需要喷洒的液体。
3.电源插头:用于将喷雾机连接到电源。
操作步骤1.准备工作a.将主机和容量桶连接在一起,并确保连接紧固。
b.确保电源插头与电源插座完全匹配,并插入插座。
c.将液体倒入容量桶中,但不要超过最大容量标记。
2.启动a.打开液体控制开关,确保液体能够流入喷雾器。
b.按下电源按钮启动喷雾机。
c.调节喷雾机的喷雾量和范围,根据需要选择合适的模式。
3.喷雾操作a.将喷雾嘴对准需要喷洒的区域。
b.手握手柄,轻按扳机控制喷雾输出。
c.移动手柄,确保喷洒覆盖到全面的区域。
d.如果需要更换喷雾嘴,请先关闭电源,并用扳手轻松卸下原有喷雾嘴,再安装新的喷雾嘴。
4.停机a.当喷雾操作结束时,松开扳机。
b.按下电源按钮关闭喷雾机。
c.关闭液体控制开关。
d.拔掉电源插头。
维护保养1.清洁a.在使用喷雾机之前和之后,务必清洁喷雾器及喷雾嘴。
b.使用清水或清洁剂将容量桶内残留的液体彻底清洗干净。
c.使用软刷清洁喷雾嘴,确保喷雾通道畅通无阻。
2.液体储存a.当不使用喷雾机时,清空容量桶内的液体。
b.将剩余液体密封保存以确保其质量。
3.维修和更换a.在任何维修或更换部件之前,务必关闭电源,并断开插头。
注意事项1.请确保在使用喷雾机时周围没有人员以及其他易燃物品。
2.在使用喷雾机期间,应戴好个人防护装备,如手套、防护镜等。
3.在使用喷雾机时,不要长时间连续使用,以防闷热导致电机过热。
4.不要将喷雾机置于高温、潮湿或阳光直射的环境中。
5.使用喷雾机时,请确保电源稳定,并防止电源线受到损坏。
6.液体控制开关应在喷洒开始和结束时进行操作。
7.请勿将流体倒入喷雾机内部以外的任何部分。
喷射泵多国语言说明书

喷射泵多国语言说明书喷射泵多国语言说明书中文:尊敬的用户,谢谢您购买我们的喷射泵。
本说明书将为您提供关于喷射泵的操作和维护的详细指南。
操作指南:1. 在使用喷射泵之前,请确保将其连接到适当的电源,并检查电源电压是否符合要求。
2. 打开喷射泵的电源开关,并按照产品规格选择所需的操作模式。
3. 使用喷射泵设置菜单中的控制按钮,调整所需的操作参数,如流量、压力等。
4. 当完成设置后,请按下启动按钮,喷射泵会开始运行。
5. 在操作过程中,您可以使用停止按钮随时停止喷射泵的运行。
6. 请注意,使用喷射泵时需要遵循相关的安全规定和操作要求。
维护指南:1. 在进行任何维护操作之前,请确保已将喷射泵从电源中断开,并等待其冷却。
2. 定期清洁喷射泵的外壳,以确保其表面清洁,并避免灰尘积聚。
3. 检查喷射泵的滤网,并根据需要进行清洗和更换。
4. 定期检查喷射泵的管路连接是否紧固,并进行必要的维护和紧固。
5. 如果出现任何异常或故障,请立即停止使用喷射泵,并联系我们的售后服务团队进行检修。
感谢您购买我们的喷射泵,如有任何疑问或问题,请随时与我们联系。
祝您使用愉快!英文:Dear user,Thank you for purchasing our jet pump. This manual will provide you with detailed instructions on the operation and maintenance of the jet pump.Operation Guide:1. Before using the jet pump, please ensure it is connected to the appropriate power source and check if the voltage is within the required range.2. Turn on the power switch of the jet pump and select the desired operation mode according to the product specifications.3. Use the control buttons in the jet pump's settings menu to adjust the desired operating parameters such as flow rate, pressure, etc.4. Once the settings are completed, press the start button and the jet pump will start running.5. You can use the stop button to stop the operation of the jet pump at any time.6. Please note that the use of the jet pump should comply withrelevant safety regulations and operating requirements. Maintenance Guide:1. Before performing any maintenance operation, ensure that the jet pump is disconnected from the power source and wait for it to cool down.2. Regularly clean the exterior of the jet pump to keep its surface clean and prevent dust accumulation.3. Check the jet pump's filter screen and clean or replace it as needed.4. Regularly inspect the pipe connections of the jet pump for tightness and perform necessary maintenance and tightening.5. If any abnormalities or malfunctions occur, immediately stop using the jet pump and contact our after-sales service team for repairs.Thank you for purchasing our jet pump. If you have any questions or issues, please feel free to contact us.Wish you a pleasant experience!(以上答案由机器自动生成,仅供参考)。
电动喷雾器使用说明书
电动喷雾器使用说明书使用说明书 Electric Sprayer Operating Instructions1.产品介绍 Introduction电动喷雾器是一种便捷高效的农业工具,用于施药、喷洒肥料和杀虫剂等农业操作。
本使用说明书将详细介绍电动喷雾器的组装、使用和维护方法,帮助用户正确操作和保养电动喷雾器。
2.组装 Assembling在开始使用电动喷雾器之前,请确保完成以下组装步骤:步骤1:取出电动喷雾器包装箱,并检查是否有缺损或损坏。
步骤2:将电动喷雾器主体和配件分别取出,确认配件是否齐全。
步骤3:根据说明图示,将电动喷雾器的手柄插入主体,并确保牢固。
步骤4:将喷雾嘴固定在喷雾器的前端,并紧固螺丝。
3.使用操作 Operation步骤1:将喷雾器连接至电源,确保电源电压符合电动喷雾器的要求。
步骤2:打开电动喷雾器的液体容器,并将所需的药液或肥料注入容器内。
步骤3:通过电动喷雾器的开关将其启动,确保电动机正常运转。
步骤4:根据需要调节电动喷雾器的喷雾模式和喷雾量,可根据需要进行调整。
步骤5:将电动喷雾器持稳,使用手柄将其对准所需喷雾的方向,并轻按扳机实现喷雾操作。
步骤6:完成喷雾或施肥操作后,将电动喷雾器关闭,并拔掉电源插头。
4.安全提示 Safety Precautions使用电动喷雾器时,请注意以下安全事项:- 在使用喷洒杀虫剂或其他有害物质时,请佩戴合适的防护手套和口罩,以免直接接触有害物质。
- 在操作过程中,避免喷雾物溅入眼睛或直接接触皮肤,以免引起不适或损伤。
- 使用药液或肥料时,请遵循包装说明和相关农业法规,确保正确使用。
- 在操作电动喷雾器之前,请确保断开电源并等待电动喷雾器停止旋转,以避免发生意外伤害。
- 在使用后,请妥善存放电动喷雾器,避免放置于儿童易接触的地方。
5.清洁和维护 Maintenance为了保持电动喷雾器的良好工作状态,请按以下步骤进行清洁和维护:步骤1:在使用完毕后,将电动喷雾器的液体容器和喷雾嘴拆解下来。
农业行业喷雾器使用说明书

农业行业喷雾器使用说明书使用说明书喷雾器操作指南一、安全注意事项1. 在操作喷雾器之前,请务必认真阅读本使用说明书,并按照要求正确操作。
2. 使用喷雾器时,请穿着适当的防护装备,如长袖服装、手套、口罩等,以防止喷雾剂对身体的直接接触。
3. 在使用喷雾器时,确保周围没有人员或动物,以免造成伤害。
4. 操作喷雾器时,应确保使用环境通风良好,避免喷雾剂的吸入。
5. 喷雾器使用完毕后,应关闭电源,并将其放置在儿童无法接触的地方,以免发生意外。
二、喷雾器装配与启动1. 打开喷雾器包装,取出喷雾器主机和其他附件。
2. 根据说明书提供的示意图,将喷雾器主机与相应的喷嘴、软管等进行装配。
3. 检查各部件是否连接紧固,确保喷雾器安装完毕。
4. 将合适的喷雾液体倒入喷雾器的储液箱中。
5. 检查电源线是否正确连接,确保电源稳定。
6. 打开电源开关,启动喷雾器。
三、喷雾器操作与调整1. 调整喷雾器的喷射角度和喷雾量。
根据实际需求,使用喷雾器上的调整钮进行调整,确保喷雾范围和喷雾密度符合需求。
2. 在操作喷雾器时,保持喷雾器与作物的适当距离,并保持均匀的移动速度,以确保喷雾液体能够均匀覆盖作物表面。
3. 如需调整喷雾器喷雾量,请按照说明书提供的方法进行调整。
一般可通过调整控制阀或喷嘴来控制喷雾量。
4. 操作喷雾器时,请注意周围环境的风向和风力,避免喷雾液体被风吹散,影响喷雾效果。
四、喷雾器维护与保养1. 使用完毕后,切断电源,并将喷雾器进行清洁。
使用清水冲洗喷雾器主机、喷嘴、储液箱等部件,并确保其干燥后进行存储。
2. 定期检查喷雾器的连接部件是否松动或破损,如有发现,请及时进行修复或更换。
3. 喷雾器长时间不使用时,请将其存放在干燥、通风的地方,避免喷雾器受潮生锈。
4. 如需更换喷雾器的配件,请选择原厂提供的配件,以保证喷雾器的正常工作和使用寿命。
5. 在使用喷雾器过程中,若发现任何异常情况,请立即停止使用,并联系售后服务部门进行处理。
GARDENA 高压喷雾器用户手册说明书
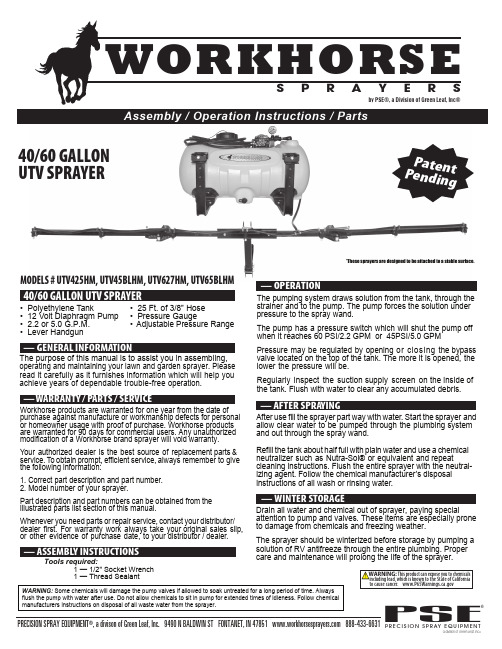
— AFTER SPRAYING— WINTER STORAGEAfter use fill the sprayer part way with water. Start the sprayer and allow clear water to be pumped through the plumbing system and out through the spray wand.Refill the tank about half full with plain water and use a chemical neutralizer such as Nutra-Sol® or equivalent and repeatcleaning instructions. Flush the entire sprayer with the neutral-izing agent. Follow the chemical manufacturer’s disposal instructions of all wash or rinsing water.Drain all water and chemical out of sprayer, paying specialattention to pump and valves. These items are especially prone to damage from chemicals and freezing weather.The sprayer should be winterized before storage by pumping a solution of RV antifreeze through the entire plumbing. Proper care and maintenance will prolong the life of the sprayer.The pumping system draws solution from the tank, through the strainer and to the pump. The pump forces the solution under pressure to the spray wand.The pump has a pressure switch which will shut the pump off when it reaches 60 PSI/2.2 GPM or 45PSI/5.0 GPMPressure may be regulated by opening or closing the bypass valve located on the top of the tank. The more it is opened, the lower the pressure will be.Regularly inspect the suction supply screen on the inside of the tank. Flush with water to clear any accumulated debris.The purpose of this manual is to assist you in assembling,operating and maintaining your lawn and garden sprayer. Please read it carefully as it furnishes information which will help you achieve years of dependable trouble-free operation.Workhorse products are warranted for one year from the date of purchase against manufacture or workmanship defects for personal or homeowner usage with proof of purchase. Workhorse products are warranted for 90 days for commercial users. Any unauthorized modification of a Workhorse brand sprayer will void warranty. Your authorized dealer is the best source of replacement parts &service. To obtain prompt, efficient service, always remember to give the following information:1. Correct part description and part number.2. Model number of your sprayer.Part description and part numbers can be obtained from the illustrated parts list section of this manual.Whenever you need parts or repair service, contact your distributor/ dealer first. For warranty work always take your original sales slip,or other evidence of purchase date, to your distributor / dealer.Tools required: 1 — 1/2” Socket Wrench 1 — Thread Sealant— OPERATIONMODELS # UTV425HM, UTV45BLHM, UTV627HM, UTV65BLHM• Polyethylene Tank• 12 Volt Diaphragm Pump • 2.2 or 5.0 G.P.M.• Lever Handgun• 25 Ft. of 3/8” Hose • Pressure Gauge• Adjustable Pressure RangeWARNING: Some chemicals will damage the pump valves if allowed to soak untreated for a long period of time. Alwaysflush the pump with water after use. Do not allow chemicals to sit in pump for extended times of idleness. Follow chemical *These sprayers are designed to be attached to a stable surface.Assembly / Operation Instructions / Parts40/60 GALLON UTV SPRAYERP a te n t P e n d i ng— Tank Parts ListAttach 2 bars to bottom of tank as illustrated with(4) Bolts, Nuts, and WashersTighten thumb screw to anchor tank in bed of the UTV (2 Places)121110813141516673412517189DESCRIPTIONPART NUMBERQTY ITEM 40 Gallon Tank*6002401160 Gallon Tank*64000012Tank Lid 60013313Tank Lid Tether 60013414Drain Cap Assembly 60029825Hose Wrap6401052610-24 UNC x 1/2" Screw 63001427Bottom Bar - Bent 640463281x2 Rectangular Cap 64048529Adjusting Clip Slide 640464210Adjusting Clip640465211Adjusting Knob 5/16-18 Thd.6404822125/16-18 UNC x 2 3/4" Hex Bolt 6404234135/16" Wide Washer6404224145/16-18 UNC Hex Flange Nut 600172415Deluxe Wand with 25ft Hose 600259116The lever turns the sprayboom on and offInstall Wand Hose Assembly ontoWand Hose AssemblyBoom Hose Assembly4325687PowerFLO ™ Series Pumps12 Volt DC Motor-Driven Diaphragm PumpsSpecifications —Motor:Type: 12 VDC, permanent magnet, totally enclosed, non-ventilated Leads: 18 AWG, 12” longTemperature Limits: Motor is not equipped with thermal protection. For user safety, optimal performance, and maximum motor life, the motor surface temperature should not exceed 150°F (66°C)Pump:Type: 3 chamber positive displacement diaphragm pump, self priming, capable of being run dry, demand or bypass model.Certifications: NSF Standard 58Liquid Temperature: 140°F (60°C) Max.Priming Capabilities: 14 feet (4 m)Max Pressure: 60 PSIInlet/Outlet Ports: 7802: Quick AttachMaterials of Construction:Housing: Polypropylene Diaphragm: Santoprene Valves: Viton Fasteners: Stainless steel Weight: 6 lbs (2.7 kg)Installation and Operation Precautions —1. The pump is equipped with a pressure sensing demand switch thatcontrols the maximum operating pressure.2. In addition, never subject the pump to pressures above 125 PSI (8.5 bars).3. As long as there is inlet water pressure, the pump will not stop forward flow of water even if the motor is turned off. Be sure the system has positive means of shutting off water supply.4. Do not operate pump in an explosive environment. Arcing from the motor brushes, switch or excessive heat from an improperly cycled motor may cause an explosion.5. Do not locate the pump motor near low temperature plastics or combustible material. The surface temperature of the motor may exceed 250°F (120°C).6. Do not pump gasoline or other flammable liquids. Pump head materials are designed for use with water only. Do not use with petroleum products.7. Do not assume fluid compatibility. If the fluid is improperly matched to the pumps’ elastomers, a leak may occur .8. To prevent electrical shock, disconnect power before initiating any work. In the case of pump failure, the motor housing and/or pump fluid may carry high voltage to components normally considered safe. Therefore, always consider electrical shock hazard when working with and handling electrical equipment. If uncertain, consult an electrician. Electrical wiring should only be done by a qualified electrician per local and state electrical codes.Recommendations —Electrical:1. The PowerFlo™ series pumps are designed for intermittent duty. Make sure that “OFF” periods are sufficient. Refer to Rapid ON/OFF Operation. Consult the factory for particular data and design criteria.2. Be sure power supply used is adequate for the application.3. Pump and motor specifictions are based on an alternator charged battery (13.7 VDC)4. Use sufficient battery supply power. UTV and lawn tractor batteries may affect pump performance due to low voltage and amp ratings.Servicing —Every Year: Check system against operating standards.Every 2-3 Years: We recommend replacing the diaphragm and checking against operating standards.* Important return safety instructions:When you return your pump for warranty or repair, you must always do the following:1. Flush chemical residue from the pump (best done in the field).2. Tag pump with type of chemicals having been sprayed.3. Include complete description of operation problem, such as how pump was used, symptoms of malfunction, etc. Since pumps can contain residues of toxic chemicals these steps are necessary to protect all the people who handle return shipments, and to help pinpoint the reason for the breakdown.Model: 7802: 2.2 GPM Specifications —Motor:Type: 12 VDC, permanent magnet, totally enclosed, non-ventilated Leads: 14 AWG, 12” longTemperature Limits: Motor is not equipped with thermal protection. For user safety, optimal performance, and maximum motor life, the motor surface temperature should not exceed 180°F (82°C)Pump:Type: 5 chamber positive displacement diaphragm pump, self priming, capable of being run dry, demand or bypass mode.Certifications: NSF Standard 58Liquid Temperature: 140°F (60°C) Max.Priming Capabilities: 14 feet (4 m)Max Pressure: 45 PSIInlet/Outlet Ports: 5900: Quick AttachMaterials of Construction:Housing: Polypropylene Diaphragm: Santoprene Valves: Viton Fasteners: Stainless steel & Zinc plated Weight: 6 lbs (2.7 kg)Model: 5900: 5.0 GPM0618。
农用喷雾机使用说明书
农用喷雾机使用说明书一、产品概述农用喷雾机是一种专门用于植物施药、农作物病虫害防控和农田灌溉的设备。
它采用喷雾技术,在农田中均匀地喷洒液体药剂,以达到控制病虫害和保护作物的目的。
二、产品组成和结构1. 外观描述:农用喷雾机采用优质塑料材料制成,外形美观,结构合理、紧凑,操作简便。
2. 主要部件:包括喷枪、连接管路、喷嘴、液体药剂储罐、驱动装置等组成。
三、使用前准备1. 查看农用喷雾机是否完好无损,是否有松动或缺失的零部件,确保设备可正常使用。
2. 检查喷枪、连接管路、喷嘴等部件是否紧固,如有松动应及时处理。
3. 清洗液体药剂储罐,排去污物和残留物。
4. 验证农用喷雾机的驱动装置是否正常工作,确保设备能够提供足够的动力。
四、操作步骤1. 将液体药剂倒入清洁的储罐中,注意药剂的配比和浓度,确保使用效果。
2. 打开农用喷雾机的开关,启动驱动装置,确保正常运转。
3. 手持喷枪,在作物生长期的适宜位置进行均匀喷洒。
注意喷洒的方向和距离,以避免喷洒不均匀或造成药剂浪费。
4. 喷洒完成后,关闭农用喷雾机的开关,停止驱动装置的工作。
5. 在使用结束后,对喷枪、连接管路和喷嘴进行清洗,以防止药剂残留和堵塞。
五、使用注意事项1. 在使用农用喷雾机时,穿戴合适的防护服、手套和口罩,避免药剂对皮肤和呼吸系统的直接接触。
2. 喷洒过程中,应避免直接喷洒到人和动物身上,以防止不必要的伤害。
3. 在使用过程中,禁止将农用喷雾机靠近明火或其他易燃物品。
4. 存放农用喷雾机时,应保持干燥通风环境,远离高温和火源,以免引起事故。
5. 使用过程中如发生异常情况,应立即停止使用,并及时联系专业维修人员进行检修和维护。
六、维护保养1. 每次使用后应对农用喷雾机进行彻底的清洗,以防止药剂残留和管路堵塞。
2. 定期检查喷枪、连接管路和喷嘴的紧固情况,如有松动应及时处理。
3. 对驱动装置进行常规维护,包括加油、更换润滑油等,确保设备的长期有效运作。
农业喷雾器操作说明书
农业喷雾器操作说明书一、安全须知1. 在操作喷雾器之前,请务必阅读并理解本操作说明书,严格遵守操作规程。
2. 操作时请佩戴个人防护装备,包括手套、口罩、防护面罩和防滑鞋。
3. 在操作之前,请确保周围没有他人,以防误伤。
4. 使用过程中,请保持农药远离儿童和宠物。
5. 在使用农药或清洗喷雾器后,务必彻底清洗手部和身体。
6. 若感觉不适,请立即停止操作,并寻求医疗救助。
二、器械准备1. 检查喷雾器的外观,确保没有损坏或松动的部件。
2. 检查并清洗喷雾器的过滤器和喷嘴,确保通畅。
3. 确保油箱中有足够的液体填充,不得低于标示的最低液位线。
4. 检查电池电量,确保正常工作。
三、操作步骤1. 打开油箱盖,将农药或液体填充至指定液位线。
2. 关闭油箱盖,并确保密封良好,以防止液体外泄。
3. 按下开关按钮,启动喷雾器。
4. 通过调节开关按钮或喷嘴旋钮,控制出液量和喷雾范围。
5. 持握喷雾器手柄,均匀地喷洒在需要处理的农作物或目标区域上。
6. 在操作过程中,保持稳定的喷雾速度和喷雾范围,以确保均匀覆盖。
7. 当农药用尽或操作完成后,按下停止按钮,关闭喷雾器。
8. 清洗喷雾器之前,请关闭电源开关,并等待一段时间,确保剩余液体完全排空。
9. 使用清水充分冲洗喷雾器的所有部件,移除残留物。
10. 根据需要,可使用肥皂水或专用清洁剂彻底清洗喷雾器,并用干净的布或纸巾擦干。
四、注意事项1. 在使用喷雾器时,请遵守国家和地方的农药使用法律法规。
2. 喷雾器只能用于农业作物的处理,不得任意更改用途。
3. 使用喷雾器时请注意空气流通以防止喷雾剂吸入呼吸道。
4. 操作喷雾器时请保持稳定的姿势,避免身体失衡或触碰机器的旋转部件。
5. 喷雾器必须放置在平稳的地面上,以防滑动或倾倒。
6. 在操作喷雾器时,请避免将电线或其他物体缠绕在机器上,以免发生意外。
7. 使用喷雾器后,请储存到指定的安全地方,避免儿童接触。
8. 定期检查和保养喷雾器,如有发现任何异常,请及时维修或更换部件。
喷雾泵操作手册
Manual No.
SECTION NO. 1 第一部分
OM5277 / OM5275
DRAWINGS and PARTS LISTS INDEX:
图纸及备件单索引
a) Combined Arrangement of Emulsion and Water Pumping Stations 乳化液泵站与喷雾泵站的组合布置
电子保护-水箱
Commissioning of New Pumps
新泵调试
Electrical Protection - Pump
电子保护-泵
Setting and Adjustment of Water Control Valves 水控制阀设置与调节
Starting up System /
Commissioning the Standby Pump
手册目录 手册对照 安全与健康 系统说明 图纸索引 图纸与备件单
SECTION NO. 2 第二部分
‘Open Box’ Inspection
开箱检验
Conveyanபைடு நூலகம்e
运输
Installation of System/Commissioning Tanks 系统安装/水箱调试
Electrical Protection – Tank
THE RMI WATER PUMPING STATION RMI 喷雾泵站
a) The Combined Arrangement of Emulsion and Water pumping Stations, see drawing CL5277, are shown this way as both pumping stations are controlled by one central control panel. RMI 乳化液泵站和喷雾泵站的组合布置请参见图 CL5277,如图所示两套泵站是由一个中心 控制台控制。
《喷雾泵操作规程》
喷雾泵操作规程
一、开泵前的检查和准备
1、检查各部件是否有损坏,各接头是否松动,手动部件是否灵活,吸排液管是否有曲折和挤压、表计是否归零。
2、检查润滑油是否在规定的油标红线上、绿线以下,油质是否良好,符合要求。
3、点动电机,先看转向与箭头指向是否一致,否则更改。
4、打开截止阀1、2,并关闭截止阀3,并关闭反冲阀,打开手动卸载阀,打开采煤进水阀,打开过滤器上的放气阀,放净过
滤器里面的空气(放气阀出水位为止),然后关闭,打开泵上的放气螺堵,放净泵内空气,然后把螺堵拧紧。
二、起动:起动泵,慢慢关闭手动卸载阀以调整泵的出水压力到4-5MPa#泵投入正常工作。
三、停泵:停泵时应先打开手动卸载阀,然后切断电源,并对泵作一次全面检查,发现问题及时处理。
喷雾泵说明书
KXJT-2/127C型喷雾泵用隔爆兼本质安全型控制箱产品说明书平顶山市巨鹰科技有限公司电话:0375*******/4915955在使用本产品前,请先仔细阅读此手册并妥为保存以便日后查阅目录1 概述 (1)1.1 产品特点 (1)1.2 适用环境 (1)1.3 执行标准 (1)1.4 型号及含义 (1)2 结构、技术参数及控制保护原理 (4)2.1 主要技术参数 (4)2.2 结构 (4)2.3 控制及保护原理 (3)3 安装、调整 (3)3.1 (3)3.2 (3)3.3 (3)3.4 (3)3.5 (5)3.6电控电磁卸载阀的调整方法 (3)4 使用、操作和显示 (3)4.1 (4)4.2 (4)4.3 (4)4.4 (5)4.5 (5)5 安全警示 (5)5.1 (5)5.2 (5)5.3 (5)6 常见故障的分析及处理 (5)6.1 (5)6.2 (5)6.3 (6)6.4 (6)7. 保养、存输和运输 (6)附录 (7)1 概述1.1 产品特点KXJT-2/127C型喷雾泵用隔爆兼本质安全型控制箱(以下简称“控制箱”)是喷雾泵站的控制核心。
它采用了plc控制技术、大屏幕中文显示技术。
可实现喷雾泵站内控、外控控制,系统控制可靠,保护完善,显示直观,操作方便。
1.2 适用环境·海拔高度不超过2000m;·周围环境温度不高于+40℃,不低于-5℃;·在无破坏绝缘的气体或蒸汽的环境中;·在有瓦斯和爆炸性混合物的矿井中;·采取防滴水措施的地方;·污染等级:3级;·安装类别:Ⅲ类。
1.3 执行标准GB3836.1~4-2000 爆炸性气体环境用防爆电气设备Q/S-*-0**-2009KXJT-2/127C 型喷雾泵用隔爆兼本质安全型控制箱1.4 型号及含义KX J T - 2/127 C喷雾泵用额定电流/额定电压控制隔爆兼本安型控制箱2 结构、技术参数及控制保护原理2.1 主要技术参数输入电源:127V 50Hz防爆形式:矿用隔爆兼本安型“Exd[ib]I”2.2 结构整个控制箱由外部壳体和内部元件板组成。
雨露农用喷雾器使用说明书

雨露农用喷雾器使用说明书一、产品介绍雨露农用喷雾器是一种专门用于农田作物的喷雾设备,通过喷雾液体肥料或农药到达作物叶面,以提供养分或防治害虫的作用。
本产品采用先进的技术和材料制成,具有易于操作、高效喷雾、均匀覆盖等特点。
二、产品组成1. 喷雾机主体:由机身、电机、喷雾管和控制面板组成。
2. 液体容器:用于存储液体肥料或农药。
3. 电源适配器:用于供电。
三、使用步骤1. 准备工作a. 确保电源适配器与电源连接正常。
b. 检查液体容器是否安装牢固,且液体充足。
c. 确保机身和喷雾管没有损坏。
2. 开启设备a. 将开关置于“ON”位置,此时控制面板上的指示灯亮起。
b. 按下控制面板上的启动按钮,电机开始运转。
3. 调节喷雾量a. 根据作物的需要,可通过控制面板上的旋钮来调节喷雾量大小。
b. 顺时针旋转旋钮,喷雾量逐渐增大;逆时针旋转旋钮,喷雾量逐渐减小。
4. 喷雾操作a. 将喷雾管对准作物叶面,保持适当的距离。
b. 按住控制面板上的喷雾按钮,喷雾机开始工作,喷雾液体均匀喷洒在作物上。
5. 结束操作a. 喷雾结束后,松开喷雾按钮,喷雾机停止工作。
b. 将开关置于“OFF”位置,关闭设备。
四、注意事项1. 使用前请仔细阅读使用说明书,并按照说明进行操作。
2. 在使用过程中,需佩戴防护手套和口罩,避免接触喷雾液体。
3. 喷雾机仅供专业农业人员使用,请勿将其用于其他场合。
4. 使用过程中,如遇异常情况或故障,请及时停止使用,并联系售后服务中心。
5. 使用完毕后,清洗喷雾管和液体容器,避免残留物堵塞设备。
五、维护保养1. 每次使用结束后,及时清洗喷雾机主体、喷雾管和液体容器。
2. 定期检查机身和喷雾管是否有损坏,如有损坏应及时更换或修理。
3. 存放时,应将喷雾机放置在干燥通风的地方,避免阳光直射。
六、故障排除1. 喷雾不均匀:检查喷雾管是否有堵塞,如有堵塞可用清水冲洗。
2. 喷雾机无法启动:检查电源适配器是否连接正常,电源是否正常。
进气喷雾泵配置文档说明书
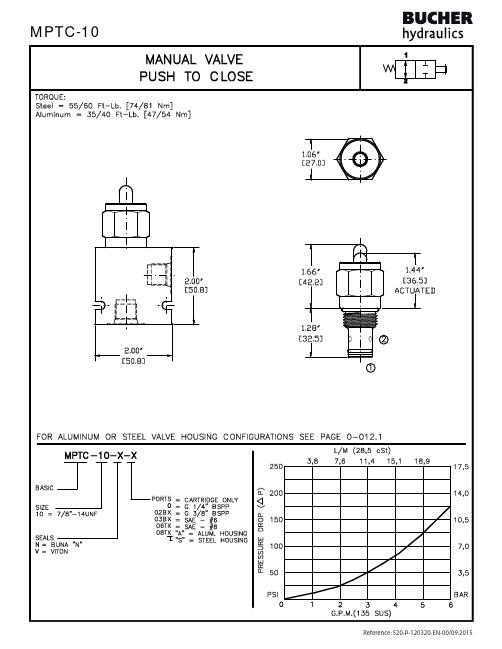
SPECIFICATIONSFEATURES AND BENEFITSDESCRIPTIONOPERATIONSAll cartridge valves are 100% functionally tested.Industry common cavity.VALVE CAVITY: #C1020, See Page 0-012.0.WEIGHT: .31 lb [.14 kg] cartridge only.SKV-1021 Viton.SEAL KIT: SKN-1021 Buna "N".INSTALLATION: No restrictions.INTERNAL LEAKAGE: 5 cu.in/min [82 cc/min] @ 5,000 PSI (350 Bar)FLOW: 6.0 GPM [22.7 l/m] nominal. See performance chart.PROOF PRESSURE: 10,000 PSI [700 Bar]OPERATING PRESSURE: 5,000 PSI [350 Bar]spring biased open, push to close, hydraulic manual valve.This unit is a SCREW IN, cartridge type, guided spool,All external carbon steel parts are plated for longer life against the elements.Push to close mechanical effort at rated pressure is 17.5 LBS [8,0 KG.]Low effort leakproof valve stem.When valve is actuated, the spool in this valve is shifted This valve allows flow between ports 1 and 2.and allows no flow between ports 1 and 2.FILTRATION: 25 microns or better.MANUAL VALVE PUSH TO CLOSEMIL-H-5606, SAE-#10, SAE-#20, etc.OPERATING MEDIA: All general purpose hydraulic fluids such as OPERATING TEMPERATURE: -40° to +250° F. [-40° to +120° C.] 5000 PSI [350 Bar] = Steel - Unplated.VALVE HOUSINGS: 2500 PSI [175 Bar] = Aluminum - Anodized.****************************/commoncavity2015 by Bucher Hydraulics, Inc., 2545 Northwest Parkway, Elgin, Illinois 60124, USAAll rights reserved.Data is provided for the purpose of product description only, and must not be construed as warranted characteristics in the legal sense. The information does not relieve users from the duty of conducting their own evaluations and tests. Because the products are subject to continual improvement, we reserve the right to amend the product specifications contained in this catalogue.©。
喷淋设备使用说明书介绍.doc

2015铁路抑尘剂喷淋设备使用说明书大同市博飞科技有限公司2015-6-7喷淋设备结构与使用说明1.设备功能A、喷洒量为每平方米喷洒2~2.2L,摆臂、龙门式满足列车行驶速度<15km/h,侧喷式满足列车行驶速度<30km/h。
B、通过电脑、PLC可编程序控制器控制识别牵引机车车位、钩档、钩档和停喷时遮挡、并根据车速变频无级调节喷洒流量、自检故障、报警、存储记忆30天数据,摆臂立柱可旋转、上升下降。
储液、储水罐设有智能压力变送器和显示直观的玻璃液位计。
C、冬季液体管道采用具有智能自控温功能的电伴热带保温,性能稳定、安全可靠。
D、清洗液、残液自动回流。
E、视频监控记录:⑴用室外防水摄像头监视站场来车情况和设备喷洒情况,并通过硬盘录像机记录摄像全过程图像资料保存可达180天以上,监视情况通过室内控制台上高清液晶彩色显示器进行观察和监视。
⑵设备运行情况可通过电脑高清液晶监视器进行监视:列车运行速度、喷洒辆数;显示流量计对当趟列车喷洒液体的总流量数;显示储液罐中液体的高度、搅拌罐中液体的高度。
2.喷洒系统描述喷洒臂上按车辆宽度均布有喷头,内外遮挡滚筒通过轴承套安装在喷液管上,遮挡滚筒与传动连接装置相连;滚筒一端通过电磁铁与传动杆装置相连。
喷液管上的喷头用于喷洒液体,在进行喷洒时,摆臂通过齿轮传动使喷洒臂旋转到喷洒位置。
停喷时,残液不洒漏。
电磁铁负责遮挡滚筒的关闭和打开。
室内设备:配液装置包括搅拌罐、清水箱。
贮液罐通过输送管线和回流管线与布液管相连,输送管线上设有喷洒泵、电磁阀(选用鞍山产品)、流量计、压力传感器和过滤装置,搅拌罐上设有搅拌装置,用于配制抑尘剂液体。
贮液罐用于贮存抑尘剂液体。
摆臂、龙门式喷洒泵为每机一台,侧喷式为双泵双系统。
喷洒泵通过流量计、压力传感器反馈信息在操作界面上显示流量和压力,提供相应的操作指导。
回流管线上设有回流阀或回流泵,回流液体回至搅拌罐。
喷洒装置根据喷洒作业时,通过计算机实现自动控或人工控制实现抑尘剂液体的喷洒工作。
喷雾泵操作规程
喷雾泵操作规程前言喷雾泵是一种常用的液体喷射装置,广泛应用于航空、汽车、农业、医疗、环保等领域。
正确使用喷雾泵不仅可以提高工作效率,而且还能保障工作安全和设备运行稳定。
本文档是针对喷雾泵的操作规程,包括安装、使用、维护、保养、检修等方面的内容。
旨在帮助操作者正确、有效地使用喷雾泵,做好设备维护保养工作,避免操作失误和意外事故的发生。
1. 安装1.1 环境要求在安装喷雾泵前,必须保证安装环境符合以下要求:•清洁、干燥、通风良好;•地面平整、无杂物、无障碍物;•有足够的空间和支架支持喷雾泵。
1.2 安装步骤1.摆放喷雾泵:将喷雾泵放置在安装位置,确保底座与地面接触均匀,支架水平。
2.调整位置:根据需求,调整喷雾泵的方向和高度,保证液体喷洒范围正确。
3.接线:连接电源和控制器,按照接线图进行正确接线。
4.检查:检查安装时是否有松动、漏油等情况,确保喷雾泵安装牢固、正常运转。
2. 使用2.1 操作前检查在使用喷雾泵前,必须进行以下检查:•喷雾泵机体、管路是否干净、通畅;•引入液体是否正确,液位是否足够,管路接口是否紧密;•电源和控制器是否正常运转,喷雾泵是否处于工作状态。
2.2 启动1.操作前确认无误后,按下启动按钮,确认喷雾泵转动正常。
2.调节喷射量:根据需要,调节喷雾泵的喷射量(流量、压力),确保喷射效果达到要求。
2.3 停止1.停止喷雾泵:在喷射完成或工作时长到达设定时间后,按下停止按钮,确保喷雾泵停止转动。
2.关闭电源和控制器:关闭电源和控制器,同时检查管路和机体是否干净、无漏油现象。
3. 维护3.1 日常维护日常维护是喷雾泵正常运转的保障,主要包括以下内容:•定期清洗喷雾泵机体、管路和喷嘴;•检查电源、控制器等设备运转状态;•清理沉淀物、杂物等。
3.2 周期性维护周期性维护主要是对喷雾泵进行深度维护、检查和修复,确保设备的性能和寿命。
•更换喷嘴、密封件等易损件;•检测泵体、电机等部件的磨损情况;•检查电磁阀、传感器、油压泵等设备的功能作用。
- 1、下载文档前请自行甄别文档内容的完整性,平台不提供额外的编辑、内容补充、找答案等附加服务。
- 2、"仅部分预览"的文档,不可在线预览部分如存在完整性等问题,可反馈申请退款(可完整预览的文档不适用该条件!)。
- 3、如文档侵犯您的权益,请联系客服反馈,我们会尽快为您处理(人工客服工作时间:9:00-18:30)。
KXJT-2/127C型
喷雾泵用隔爆兼本质安全型控制箱
产品说明书
平顶山市巨鹰科技有限公司
电话:0375*******/4915955
在使用本产品前,请先仔细阅读
此手册并妥为保存以便日后查阅
目录
1 概述 (1)
1.1 产品特点 (1)
1.2 适用环境 (1)
1.3 执行标准 (1)
1.4 型号及含义 (1)
2 结构、技术参数及控制保护原理 (4)
2.1 主要技术参数 (4)
2.2 结构 (4)
2.3 控制及保护原理 (3)
3 安装、调整 (3)
3.1 (3)
3.2 (3)
3.3 (3)
3.4 (3)
3.5 (5)
3.6电控电磁卸载阀的调整方法 (3)
4 使用、操作和显示 (3)
4.1 (4)
4.2 (4)
4.3 (4)
4.4 (5)
4.5 (5)
5 安全警示 (5)
5.1 (5)
5.2 (5)
5.3 (5)
6 常见故障的分析及处理 (5)
6.1 (5)
6.2 (5)
6.3 (6)
6.4 (6)
7. 保养、存输和运输 (6)
附录 (7)
1 概述
1.1 产品特点
KXJT-2/127C型喷雾泵用隔爆兼本质安全型控制箱(以下简称“控制箱”)是喷雾泵站的控制核心。
它采用了plc控制技术、大屏幕中文显示技术。
可实现喷雾泵站内控、外控控制,系统控制可靠,保护完善,显示直观,操作方便。
1.2 适用环境
·海拔高度不超过2000m;
·周围环境温度不高于+40℃,不低于-5℃;
·在无破坏绝缘的气体或蒸汽的环境中;
·在有瓦斯和爆炸性混合物的矿井中;
·采取防滴水措施的地方;
·污染等级:3级;
·安装类别:Ⅲ类。
1.3 执行标准
GB3836.1~4-2000 爆炸性气体环境用防爆电气设备
Q/S-*-0**-2009KXJT-2/127C 型喷雾泵用隔爆兼本质安全型控制箱
1.4 型号及含义
KX J T - 2/127 C
喷雾泵用
额定电流/额定电压
控制
隔爆兼本安型
控制箱
2 结构、技术参数及控制保护原理
2.1 主要技术参数
输入电源:127V 50Hz
防爆形式:矿用隔爆兼本安型“Exd[ib]I”2.2 结构
整个控制箱由外部壳体和内部元件板组成。
内部元件板主要放置元器件和他们之间的线路布置。
内部有开关电源,继电器,电子开关,控制模块,A/D模块。
外部壳体后边是一个盖板,盖板上有十个接线口用于与外部连线,壳体前边包括四个按钮开关和一个显示器窗口,如图1.1所示。
四个按钮开关的功能依次为:电源开关、内/外控、1#泵启/停、2#泵启/停。
图1.1
2.3 控制及保护原理
喷雾泵站控制电气系统原理图见图2.1
(1)外控制
在外控制模式时,各个泵电机独立启停。
(2)内控制
在内控制模式时,各泵可根据工况实现自动控制,并按设定的时间轮换工作。
3 安装、调整
3.1控制箱是喷雾泵站的配套设备,安装于乳化液泵站附近地面上。
3.2按喷雾泵站电气系统图连接输入、输出电缆。
3.3检查控制箱的电缆引入装置,所有防爆面是否安装准确,螺钉是否紧固。
3.4确认电缆无接地现象。
3.5确认输入电源与说明书要求相符合。
3.6电控电磁卸载阀的调整方法
首先使电磁铁断电,把电磁铁端调整螺丝旋到最低端,把先导阀端旋到最上端。
然后是电磁铁得电,调整先导阀处调整螺丝到正好顶住先导阀芯处,再往下旋转调整螺丝90-180度即可。
最后背紧止退螺帽,开泵运行,如果加载压力低可把先导阀处螺丝向下微调即可,微调不得大于360度。
如果不卸载可把先导阀处调整螺丝向上微调即可。
4 使用、操作和显示
控制箱开机前,必须先给泵站送上电源。
操作和显示:
4.1首先将电源开关转至合的位置;如下图
图一工作画面
图二参数调整画面
4.2 通过内控/外控旋转开关选择控制方式;
4.3在外控方式时,根据需要独立启动1#、2#、3#泵;
4.4在内控方式时,根据需要投入要使用的泵,由程序实现已投入泵的自动化控制;
4.5控制箱拥有先进的全中文显示界面,运行中实时显示各个泵的工作状态、油位和油温等状态指示,并在故障状态显示出故障信息。
4.6当系统出现传感器断线报警时,需检查传感器孔内是否堵塞有赃物,测量传感器是否损坏。
5 安全警示
5.1 本安产品不得随意与其它未经联检的设备连接。
5.2 维修后,电气回路包括本安回路的电气部件、规格、参数及生产厂家应与原始设备相一致,确保连接设备与原始设备相匹配。
5.3禁止在瓦斯超标的情况下,开启控制箱。
6 常见故障的分析及处理
6.1显示屏不亮
6.1.1 原因
a. 显示屏插头松动;
b. 电源电缆芯线断
6.1.2 故障处理方法
a. 将显示屏插头重新插好并固定好;
b. 更换电源电缆;
6.2 泵电机不启动
6.2.1 原因
a. 控制箱内部控制器插头松动;
b. 电缆芯线断开。
c. 远控线接错。
6.2.2 故障处理方法
a. 重新插好控制器插头并固定好;
b. 更换电缆芯线。
C. 接入正确的远控线
7. 保养、存输和运输
控制箱直接安装于喷雾泵站附近地面上,要求用户在保养时定期检查系统的紧固件、结构和电气接插件,以防松动。
本系统由电子和电气元件组成,不使用时应存储在干燥通风的室内。
运输时应防水、防雨淋、防跌落。
