Chapter_01_Table_Of_Contents
TL-2000 Sting Sport 零件目录说明书

TL – 2000 Sting Sport
Illustrated parts catalog
03 – FLIGHT CONTROLS INSTALLATION
-2-
AILERON SYSTEM
TL – 2000 Sting Sport
Illustrated parts catalog
ITEM
PART NUMBER
1
E
STING – 3 – 7 R
Rod No.2- right wing
1
F
STING – 3 – 8 R
Rod No.1- right wing
1
G
Rocking lever No.1
2
H
Rocking lever No.2
2
I
Aileron -left
1
J
Aileron -right
1
1
ČSN 02 1143
ITEM
PART NUMBER
-5-
FLAP SYSTEM
TL – 2000 Sting Sport
Illustrated parts catalog
04 – FLIGHT CONTROLS INSTALLATION
-6-
FLAP SYSTEM
TL – 2000 Sting Sport
Illustrated parts catalog
Illustrated parts catalog
ITEM
PART NUMBER
NOMENCLATURE
H1
KR-TR 12x1
Spacer
1
2KLeabharlann -TR 10x1Spacer
SWPM目录(中文)

20-24-12 PW4000/777 POWER PLANT: CONNECTOR INSERT CONFIGURATIONS AND POLARIZATION PW4000/777配电板:插头构型与角度
20-15-33 777 ELMS PANEL REPAIR: MIL-C-38999 TYPE CONNECTORS 777 ELMS板修理:MIL-C-38999型插头
20-15-35 777 ELMS PANEL REPAIR: MIL-C-5015 TYPE CONNECTORS 777 ELMS板修理:MIL-C-5015型插头
20-23-30 RB 211 TRENT 800 POWER PLANT: WIRE HARNESS DISASSEMBLY AND ASSEMBLY RB 211 TRENT 800配电板:导线束的分离与安装
20-23-32 RB 211 TRENT 800 POWER PLANT: ASSEMBLY OF TERMINAL LUGS RB 211 TRENT 800配电板:线路的终端施工
第20-14-11节至第20-14-52节
20-14-11 REPAIR OF PRIMARY FLIGHT CONTROL SYSTEM WIRE HARNESSES主飞行控制系统导线修理
20-14-12 REPAIR OF FUEL QUANTITY INDICATOR SYSTEM (FQIS) WIRE HARNESSES燃油油量指示器(FQIS)导线修理
第20-02-10节至第20-02-30节
MMM手册英文版CHAPTER01e

CHAPTER 1CORPORATE COMMITEMENT BY THEACCOUNTABLE MANAGERTABLE OF CONTENTSPARAGRAPH PAGE 1CORPORATE COMMITMENT BY THE ACCOUNTABLE MANAGER OF AMECO (2)2SAFETY POLICY (3)1 CORPORATE COMMITMENT BY THE ACCOUNTABLEMANAGER OF AMECOI, the accountable manager of Aircraft Maintenance and Engineering Corporation, Beijing (including Beijing main repair location and other repair locations) declare herewith that in order to fulfill CCAR 145 certification requirements, specific demands and policies of Ameco & its satellite repair stations, all employees of Ameco and its satellite repair stations must follow requirements described in Maintenance Management Manual (MMM) and Work Instruction Manual (WIM) during performing maintenance and alteration on civil aviation aircraft and components based on the CAAC approved maintenance organization certificate.The regulations of MMM and WIM do not override the necessity of complying with the current applicable CAAC or any new or amended requirements published by the CAAC. When the new or amended regulations/requirements are in conflict with these procedures, revisions or amendments of MMM and WIM shall be provided by Safety and quality management Director (hereafter referred as QM).CAAC will approve this maintenance organization and issue maintenance organization certificate whilst the authority is satisfied that the procedures are being followed and work standards maintained. CAAC reserves the right to suspend, cancel or change the organization’s certificate under CCAR 145 if the authority have evidence that the procedures are not followed or standards not held by Ameco.Ameco and its repair locations shall not maintain, rebuild or alter any article for which it is not rated and shall not maintain or rebuild any article for which it is rated if the required technical data, equipment, material, facilities or trained personnel are not available.Ameco and its repair locations shall accept audits from CAAC at any time and correct any findings timely.In addition, in order to ensure the smooth performance of maintenance work performed by the each repair location under the preconditions of meeting CCAR145 requirements, and fully utility of all Ameco resources, the maintenance work of each repair location shall be performed under unified and effective management and control of Ameco main repair location.For and on behalf of Ameco-BeijingAccountable manager Date 2013-09-232 SAFETY POLICYAs an approved civil aircraft maintenance organization, we provide safe and reliable maintenance service to customer on aircraft and its components per aviation regulations and airworthy standards.Safety is one of our core values, and we stick to the principle that safety is the priority all the way through work. The long-term safety targets of Ameco include development and expansion of safety culture, cultivation of safety atmosphere, improvement of safety system, strengthening of safety basis, promotion of safety profoundness, and reduction of safety risks as well. The establishment, operation and improvement of a Safety Management System (SMS) help us ensure that the aviation maintenance activities undertaken by us are in compliance with industrial, national and international standards, and assist us to pursue a safety performance at higher levels.We commit to:1. Establish, operate and improve a Safety Management System (SMS) that meets therequirements of national laws and civil aviation regulations.2. Monitor the Safety Management System (SMS) operation; carry out relativeproduction operation according to the requirements of Safety Management System and ensure corresponding actions are taken; ensure the continuous improvement of SMS via the implementation of periodic reviews.3. Periodically formulate our safety objectives along with the safety performance targetsat each level, and make a public announcement accordingly. Continually enhance our safety performance to make the maintenance activities undertaken by us reach the safety standard and the performance at higher level.4. Provide all the necessary resources for safety production operations.5. Investigate the cause of un-safety events, find out defects in the system.6. Ameco strongly stick to a fair mechanism for punishment and rewards, in which theobligations of developing and realizing safety strategies/performances undertaken by all the employees are clearly stipulated, as well as the concerned inquires and penalties they shall receive.7. Provide necessary safety and skill trainings to employees, and assign them tasksmatching up with levels of their technologies.8. Ensure that our suppliers and contractors comply with the requirements of AmecoSafety Management System (SMS), and achieve appropriate safety standards as well.Accountable manager Date 2013-09-23。
ImageMagick使用指南说明书

Table of ContentsAbout1 Chapter 1: Getting started with imagemagick2 Remarks2 Versions2 Examples2 Installation or Setup2 Convert an image between file formats3 Create an animated gif3 Compare the difference between an image3 Credits6AboutYou can share this PDF with anyone you feel could benefit from it, downloaded the latest version from: imagemagickIt is an unofficial and free imagemagick ebook created for educational purposes. All the content is extracted from Stack Overflow Documentation, which is written by many hardworking individuals at Stack Overflow. It is neither affiliated with Stack Overflow nor official imagemagick.The content is released under Creative Commons BY-SA, and the list of contributors to each chapter are provided in the credits section at the end of this book. Images may be copyright of their respective owners unless otherwise specified. All trademarks and registered trademarks are the property of their respective company owners.Use the content presented in this book at your own risk; it is not guaranteed to be correct nor accurate, please send your feedback and corrections to ********************Chapter 1: Getting started with imagemagick RemarksImageMagick is an open-source suite of tools for processing almost any raster (and some vector) image formats using either a command line interface or language bindings in an assortment of languages. Over 200 image formats are supported using any of over 20 languages. ImageMagick runs on Linux, Windows, Mac OS, iOS, Android and others.The current version is 7.x and has been out since 2011. This release series includes many new features and is a major overhaul of ImageMagick. While much of the functionality works as before, some bits are not are not completely backwards compliant with the 6.x series. As a result many distributions still default to the much older 6.x series of releases so that scrips don't break. If just getting started, using 7.x is higly recomended. Most existing tutorials and scripts will work, but a number of things will work more intuitivly, faster, and generally better.VersionsExamplesInstallation or SetupYou can install ImageMagick from source or Binary.In case of Windows BinaryDownload executable binary file. And simply click on the appropriate version and it will launch itself and follow the wizard. You can type the following command to find out whether ImageMagick is successfully installed or not:identify -versionDownload a ready-to-run ImageMagick and installation guideDownload source file and installation guideConvert an image between file formatsUsing the magick command (or `convert for IM 6.x users) you con convert any image format to any other. with no other arguments, as little processing as possible will be done to move from one format to the other. Simply specify your input and output files. To convert a JPEG to a PNG:$ magick image.jpg image.pngOr a TIFF to a GIF:$ magick image2.tif image.gifCreate an animated gifStarting from a sequence of static images (for example called frame01.jpg, frame02.jpg and so on) an animated gif can be created using the following command:magick -delay 10 -loop 0 frame*.jpg animation.gif•-delay 10 sets the interval between the frames to 0.1 seconds•-loop 0 creates an infinite looping animationCompare the difference between an imageImageMagick includes a number of command-line utilities for manipulating images. Here we will use compare command-line tool.compare tool is very useful. Suppose you want to test (e.g. layout, color, icons etc.) thedifference between your expected design UI HTML file with actual result of JSP file,you just need to use compare command. You do not need to compare with your owneyes.1.jpghttps:///imagemagick/topic/9251/getting-started-with-imagemagickCredits。
SWPM目录(中文)
20-23-39 RB 211 TRENT 800 POWER PLANT: ASSEMBLY OF BACKSHELLS RB 211 TRENT 800配电板:后框安装
20-10-17INSTALLATION OF ZIPPERTUBING拉上式防护层的安装
20-10-18INSTALLATION OF SLEEVES ON WIRING导线套管的安装
20-10-19WIRE SEPARATION导线(束)的分隔
20-10-20INSTALLATION OF PRESSURE BULKHEAD SEALS导线束过增压隔框的施工
20-15-43 777 ELMS PANEL REPAIR: HYPERTAC HPW CONNECTORS 777 ELMS板修理:HPW插头
20-15-46 777 ELMS PANEL REPAIR: RELAY SOCKETS AND RELAYS 777 ELMS板修理:继电器与继电器孔
20-10-21POWER FEEDER WIRE HARNESS RACEWAY SEAL电源馈线接线管
20-10-91REPAIR OF FLEXIBLE ELECTRICAL CONDUITS导线软套管的修理
第20-11-11节至第20-11-11节
20-11-11ARINC 629 WIRINGARINC 629数据线
第20-12-11节至第20-12-21节
20-12-11S280W701-() FIBER OPTIC CABLE ASSEMBLIES S280W701-( )光缆施工
中国涉外民事法律关系法律适用法(英文版)
Law of the People's Republic of China on Application of Laws toForeign-Related Civil RelationsPromulgating Institution: Standing Committee of the National People's CongressDocument Number: Order No. 36 of the President of the People's Republic of China Promulgating Date: 10/28/2010Effective Date: 04/01/2011Validity Status: ValidOrder No. 36 of the President of the People's Republic of ChinaThe Law of the People's Republic of China on Application of Laws to Foreign-Related Civil Relations, adopted on October 28, 2010 at the 17th session of the Standing Committee of the 11th National People's Congress of the People's Republic of China, is hereby promulgated and shall come into effecton April 1, 2011.President of the People's Republic of China Hu JintaoOctober 28, 2010 Law of the People's Republic of China on Application of Laws to Foreign-Related Civil Relations (Adopted at the 17th session of the Standing Committee of the 11th National People's Congress onOctober 28, 2010)Table of ContentsChapter 1 General ProvisionsChapter 2 Civil SubjectsChapter 3 Marriage and FamilyChapter 4 SuccessionChapter 5 Property RightsChapter 6 Creditor's RightsChapter 7 Intellectual Property RightsChapter 8 Supplementary ProvisionsChapter 1 General ProvisionsArticle 1 This Law is formulated with a view to specifying the application of laws to foreign-related civil relations, resolving foreign-related civil disputes in a reasonable manner, and safeguarding the legitimate rights and interests of the parties concerned.Article 2 Laws applicable to foreign-related civil relations shall be determined in accordance with this Law. Provisions on the application of laws to foreign-related civil relations otherwise prescribed in other laws shall prevail.In the absence of provisions on the application of laws to foreign-related civil relations as prescribed in this Law and other laws, laws having the most significant relationship with the foreign-related civil relation in question shall apply.Article 3 Parties concerned may, in accordance with the law, expressly choose laws applicable to foreign-related civil relations.Article 4 Mandatory provisions on foreign-related civil relations prescribed in laws of the People's Republic of China shall directly apply.Article 5 Laws of the People's Republic of China shall apply where the application of foreign laws will undermine social and public interests of the People's Republic of China.Article 6 In the event that laws of a given foreign country apply to the foreign-related civil relation inquestion, if different regions of the foreign country are governed by different laws, laws of the region having the most significant relationship with the foreign-related civil relation shall apply.Article 7 Limitations shall be governed by the laws applicable to the foreign-related civil relation in question.Article 8 Lex fori shall apply in determining the nature of foreign-related civil relations.Article 9 Foreign laws applicable to foreign-related civil relations shall not include laws on the application of laws of the foreign countries.Article 10 Foreign laws applicable to foreign-related civil relations shall be ascertained by people's courts, arbitration commissions or administrative organs. Parties concerned shall provide laws of the relevant foreign country if they choose to be governed by foreign laws.In the event that foreign laws are unable to be ascertained or contain no relevant provisions, laws of the People's Republic of China shall apply.Chapter 2 Civil SubjectsArticle 11 The capacity for civil rights of natural persons shall be governed by laws of their habitual residence.Article 12 The capacity for civil conduct of natural persons shall be governed by laws of their habitual residence.In the event that a natural person engages in civil activities, where he/she has no civil conduct capacity in accordance with the laws of the habitual residence but has such capacity in accordance with lex loci actus, the latter shall prevail, except for matters relating to marriage, family and succession.Article 13 Where a natural person is to be declared missing or dead, laws of the habitual residence of the natural person shall apply.Article 14 Laws of the registration place shall apply to the capacity for civil rights, capacity for civil conduct, organizational structure, shareholders' rights and obligations and other matters of a legal person and the branch offices thereof.Where the place of principal office of a legal person is different from its place of registration, laws of the place of principal office may apply. The habitual residence of a legal person shall be its place of principal office.Article 15 Contents of the rights of personality shall be governed by laws of the habitual residence of the right holder.Article 16 Agency shall be governed by lex loci actus, provided that the civil relation between the principal and the agent shall be governed by laws of the place of occurrence of the agency relationship. Parties concerned may choose laws applicable to entrustment and agency by agreement.Article 17 Parties concerned may choose laws applicable to trust by agreement. Where the parties have made no such choice, lex rei sitae of the trust property or laws of the place of occurrence of the trust relationship shall apply.Article 18 Parties concerned may agree upon the laws applicable to an arbitration agreement. Where the parties have made no such choice, laws of the domicile of the arbitration commission or laws of the place of arbitration shall apply.Article 19 In the event that lex patriae applies in accordance with this Law, where a natural person has two (2) or more nationalities, lex patriae of the country with his/her habitual residence shall apply; where no country of nationality has his/her habitual residence, lex patriae of the country having themost significant relationship with him/her shall apply. In the case of stateless natural persons or natural persons without clear nationality, laws of their habitual residence shall apply.Article 20 In the event that laws of the habitual residence shall apply in accordance with this Law, and that the habitual residence of a natural person is unclear, laws of his/her current residence shall apply.Chapter 3 Marriage and FamilyArticle 21 Conditions for marriage shall be governed by laws of the common habitual residence of both parties concerned. In the absence of a common habitual residence, common lex patriae of the parties shall apply. Where the parties are of different nationalities, and the parties get married in the habitual residence or country of nationality of either party, laws of the place of marriage shall apply.Article 22 Formalities for marriage shall be valid if they are in compliance with the laws of the place of marriage, or the laws of the habitual residence or lex patriae of either party.Article 23 Matrimonial personal relationship of a couple shall be governed by laws of their common habitual residence. In the absence of a common habitual residence, the common lex patriae of the couple shall apply.Article 24 Matrimonial property relationship of a couple may be governed by laws of the habitual residence or lex patriae of either party, or lex rei sitae of major properties, as chosen by the couple upon agreement. Where the couple have made no such choice, laws of their common habitual residence shall apply. In the absence of a common habitual residence, the common lex patriae of the couple shall apply. Article 25 Personal and property relationship between parents and children shall be governed by laws of their common habitual residence. In the absence of a common habitual residence, laws of the habitual residence or lex patriae of a party concerned that favors the rights and interests of the weak shall apply.Article 26 In the event of an uncontested divorce, the couple concerned may choose to apply laws of the habitual residence or lex patriae of either party. Where the couple have made no such choice, laws of their common habitual residence shall apply. In the absence of a common habitual residence, the common lex patriae of the couple shall apply. Where the couple are of different nationalities, laws of the place where the agency handling the divorce formalities is located shall apply.Article 27 In the case of a contested divorce, lex fori shall apply.Article 28 Conditions and formalities for adoption shall be governed by both the laws of the habitual residence of the adopter and the laws of the habitual residence of the adoptee. The validity of adoption shall be governed by laws of the habitual residence of the adopter at the time of adoption. Termination of the adoptive relationship shall be governed by lex fori or laws of the habitual residence of the adoptee at the time of adoption.Article 29 Dependence shall be governed by laws of the habitual residence or lex patriae of either party or lex rei sitae of major properties that favors the rights and interests of the dependent.Article 30 Guardianship shall be governed by laws of the habitual residence or lex patriae of either party that favors the rights and interests of the ward.Chapter 4 SuccessionArticle 31 Statutory succession shall be governed by laws of the habitual residence of the decedent at the time of death, provided that statutory succession to real properties shall be governed by lex situs of the properties.Article 32 In the case of succession ex testamento, a will shall be valid if it is in compliance with laws of the habitual residence or lex patriae of the testator or lex loci actus of will creation at the time of death or will creation.Article 33 The validity of a will shall be governed by laws of the habitual residence or lex patriae of the testator at the time of death or will creation.Article 34 Matters relating to the administration of estate shall be governed by lex rei sitae of the estate.Article 35 The ownership of estate left with no successor shall be governed by lex rei sitae of the estate at the time of death of the decedent.Chapter 5 Property RightsArticle 36 Property rights of real properties shall be governed by lex situs.Article 37 Parties concerned may choose the laws applicable to property rights of movable properties by agreement. Where the parties have made no such choice, lex rei sitae of the movable properties at the time of occurrence of the legal incident shall apply.Article 38 Parties concerned may agree upon the laws applicable to the change of property rights of movable properties during transport. Where the parties have made no such choice, laws of the transport destination shall apply.Article 39 In the case of marketable securities, laws of the place of realization of the rights of such securities or other laws having the most significant relationship with the securities shall apply. Article 40 Pledge of rights shall be governed by laws of the place where the pledge is instituted.Chapter 6 Creditor's RightsArticle 41 Parties concerned may choose the laws applicable to a contract by agreement. Where the parties have made no such choice, laws of the habitual residence of the party whose performance of obligations best reflects the characteristics of the contract or other laws having the most significant relationship with the contract shall apply.Article 42 A consumer contract shall be governed by laws of the habitual residence of the consumer. Where the consumer chooses to apply laws of the place where the goods or services are provided, or the business operator concerned does not engage in relevant business activities at the habitual residence of the consumer, laws of the place where the goods or services are provided shall apply.Article 43 A labor contract shall be governed by laws of the work place of the laborer. Where it is difficult to determine the work place of the laborer, laws of the place of principal office of the employer shall apply. Labor dispatch services may be governed by laws of the place of dispatch.Article 44 Tort liabilities shall be governed by lex loci delicti, provided that where the parties concerned have a common habitual residence, laws of the common habitual residence shall apply. Agreements on the application of laws reached by the parties concerned after the occurrence of tort shall prevail.Article 45 Product liabilities shall be governed by laws of the habitual residence of the infringed party. Where the infringed party chooses to apply laws of the place of principal office of the infringer or lex loci delicti, or the infringer does not engage in relevant business activities at the habitual residence of the infringed party, laws of the place of principal office of the infringer or lex loci delicti shall apply.Article 46 Infringement on the right of name, portrait, reputation or privacy or other rights of personality via the Internet or by other means shall be governed by laws of the habitual residence of the infringed party.Article 47 In the case of unjust enrichment and negotiorum gestio, laws chosen by the parties concerned by agreement shall apply. Where the parties have made no such choice, laws of the common habitual residence of the parties shall apply. In the absence of a common habitual residence, laws of the place of unjust enrichment or negotiorum gestio shall apply.Chapter 7 Intellectual Property RightsArticle 48 The ownership and contents of an intellectual property right shall be governed by laws of the place where protection is claimed.Article 49 Parties concerned may choose the laws applicable to the transfer and user-licensing of intellectual property rights by agreement. Where the parties have made no such choice, provisions on contracts herein shall apply.Article 50 Liabilities for infringement upon intellectual property rights shall be governed by laws of the place where protection is claimed. Parties concerned may also choose to apply lex fori by agreement after occurrence of the infringement.Chapter 8 Supplementary ProvisionsArticle 51 In the event of any discrepancy between this Law and Article 146 and Article 147 of the General Principles of the Civil Law of the People's Republic of China, as well as Article 36 of the Law of Succession of the People's Republic of China, this Law shall prevail.Article 52 This Law shall come into effect on April 1, 2011.。
ISO9001-2008质量手册(中英文)

Quality ManualISO9001-2008质量手册目录 Table of Contents章节(Chapter) 内容(Contents)0 目录Table of Contents0.1 质量手册颁布令Quality Manual Approval Statement0.2 公司简介Company Introduction0.3 管理者代表任命书Management Representative Appointing Letter0.4 质量政策Quality Policy0.5 质量手册说明Quality Manual Description0.6 质量管理体系结构图Quality Management System Structure Chart1.0 质量管理体系过程间的关系图Process Relation Map of QMS2.0 质量管理体系过程职能分配表QMS Process Function Distribution Table3.0 ISO9001条文与本公司程序文件对照表Comparison Table of Standard and Quality Procedure4.1 质量管理体系总要求Quality Management System General Requirements4.2 文件要求Documentation Requirements5.1/5.2 管理职责Management Responsibility5.3 质量方针Quality Policy5.4 体系策划System Planning5.5.1/5.5.2 职责、权限Responsibility and Authority5.5.3 内部沟通Internal Communication5.6 管理评审Management Review6.0 资源管理Resource Management7.1 产品实现的策划Product Realization Planning7.2 与顾客有关的过程Customer-related Process7.3 设计和开发Research and Development7.4 采购Purchasing7.5.1 生产和服务的提供Production and Service Provision7.5.3 标识和可追溯性Identification and Traceability7.5.5 产品防护Product Preservation7.6 监控和测量装置的控制Control of Monitoring and Measurement Device更多免费资料下载请进:好好学习社区8.1 策划Plan8.2.1 顾客满意Customer Satisfaction8.2.2 内部审核Internal Audit8.2.3 过程监视和测量Monitoring and Measurement of Process8.2.4 产品监视和测量Monitoring and Measurement of Product8.3 不合格品控制Non-conforming Product Control8.4 数据分析Data Analysis8.5 改进Improvement9.0 质量手册管理办法Quality Manual Management Method10.0 更改记录Revision History更多免费资料下载请进:好好学习社区。
Crossy Road Arcade 游戏机操作说明书

Crossy Road ArcadeCR-65-1001Operation & Service ManualVersion 1.0* Read this manual before useGeneral RemarkIf you encounter any difficulties or if you need support on how to update and/ or install your Crossy Road product, we invite you to contact your local distributor or reach us atAdrenaline Amusements TeamAdrenaline Amusements1150 Levis, Suite 302Terrebonne, QcCanadaJ6W 5S6Table of ContentsContentsGeneral Remark (2)Table of Contents (3)Chapter 01 - Preface (5)Precaution for Game Operation (5)Safety (6)Environmental Conditions (6)Chapter 02 - Game Features (7)Win a lot of tickets! How to Play (7)Chapter 3 – Unit Features (8)Hardware Features (8)Cabinet Facts (8)Voltage (8)Chapter 04 – Unit Installation (9)Assembling your Crossy Road Unit (9)Headers Installation (11)Chapter 05 – Operator Menu (13)Operator Menu (13)Chapter 06 - Service & Repair (15)Computer Connections (15)Troubleshooting (16)Video Troubleshooting (16)Audio Troubleshooting (17)Chapter 07 - Parts (21)Cabinet Parts (21)Cash Box Parts (22)Computer & Electronics (23)Decal Prints (24)Header Parts (25)I/0 board INV-04-1200 (26)Cabling (27)Wiring Harness (27)Computer Parts (27)Chapter 08 – Diagrams & Schematics (28)IO Board Wiring Diagram (29)Chapter 09 – Software Recovery (30)Chapter 01 - PrefacePlease read this page before preparing your Crossy Road Arcade product for game play.The following safety instructions apply to all game operators and service personnel. Specific warnings and cautions will be included throughout this manual.Use the following safety guidelines to help protect the system from potential damage and to ensure your personal safety:Electronic components in the game cabinet run on 110V AC 60Hz (220V/ 50Hz in most of Europe, the Middle East and the Far East delivered units).To help prevent electric shock, plug the system into a properly grounded power source.These cables are equipped with 3-prong plugs to help ensure proper grounding. Do not use adapter plugs or remove the grounding prong from a cable. If you must use an extension cable, use a 3-wire cable with properly grounded plugs.To help protect your system from sudden increases and decreases in electrical power, use a surge suppressor, line conditioner or Uninterruptible Power Supply (UPS).Be sure nothing rests on the system’s cables and that the cables are not located where they can be stepped on or tripped over.Keep your system far away from radiators and other heat sources.Do not block cooling vents.Precaution for Game OperationAdrenaline Amusements Inc. assumes no liability for injuries incurred while playing our games.Operators should be aware that certain health and physical conditions may make people susceptible to injury when playing video games.SafetyTo avoid electrical shock, unplug the cabinet before performing installation or service procedures.If a power cord is damaged, it must be replaced by the equivalent power cord available from your distributor.Adrenaline Amusement Inc. assumes no liability for any damages or injuries incurred while setting up or servicing the cabinet. Only qualified service personnel should perform installation or service procedures.Environmental ConditionsCabinet is intended for indoor use only. Be sure to keep the cabinet dry and maintain operating temperatures of 59° - 86°F (15° - 30°C).Chapter 02 - Game FeaturesWin a lot of tickets!How to PlayTap the button to cross roads, train tracks and rivers.100% Skill game.Challenge your friends; 2 player game play.Skill Bonus; beat the target score and win a bonus of 100 to 1000 ticketsChapter 3 – Unit FeaturesHardware Features2 Players GameDual Ticket DispenserCabinet FactsDepth = 41’’ / 104cmWidth = 38’’ /0.96mVoltageChapter 04 – Unit InstallationAssembling your Crossy Road Unit1.Carefully remove the Cabinet from the shipping container, giving you enough space.2.Move the cabinet to the desired location.** For your security, minimum 2 persons are needed to complete the installation **Fig. 13.Before installing the monitor, locate the 6 bolt holes as seen on figure 1.Fig. 24.Place the bottom back of the TV over the security support before lifting it vertically.Fig. 35.Affix the 6 bolts 1/4-20 x 1" and tighten them.Headers InstallationFig. 4-Using a ladder, fix the header to the monitor using the 4 bolts M6 X 12. The header will be slightly in front of the LED strips.-Connect the 12V LED Panel barrel connector.Fig. 5-Run the monitor DVI cable and the AC cable through the bottom hole. -Connect the DVI monitor cable to the computer inside the cabinet. -Connect the AC power cable to the Surge Protection Power Bar.Chapter 05 – Operator MenuOperator MenuAccess the Operator Menu by pressing the switch button located inside the top coin door.Player 1 Button: Scroll Up/Increase ValueStart Button: SelectPlayer 2 Button: Scroll Down/Decrease ValueOperator Menu Values What it doesCredits Per Game 0 – 20 Adjusts the number of credits required to play. “0”sets the unit in free play mode.Game Audio Volume 0 – 20 Adjusts the in-game audio volume. “0” will mutethe game.Attract Audio Volume 0 – 20 Adjusts the audio volume of the attract loop. “0”will mute the attract loop.Ticket Value 1 – 2 Adjusts the value of physical tickets. Physical tickets are either worth “1” ticket or “2” tickets.Payment Type Credit / CardChanges the credit type. “Credits” = Coins and “Card” = Card Reader. This will change the in-gametext accordingly.Redemption Mode On / Off Adjusts the Redemption availability. Activate Bonus On / Off Adjusts the Bonus availability.Bonus Value 50 - 1000 Adjusts the number of tickets given when theBonus is reached.Average games for Bonus 10 - 1000 Sets how frequently the Bonus could be awarded.Minimum Tickets 0 – 20 Adjusts the minimum number of tickets per game.Tickets per Step 0,1 - 2 Adjusts the divider for the amount of tickets given pernumber of steps (Increment per 0.1).Difficulty 1 - 5 Adjusts the Difficulty Level (1 is Easiest, 5 is Hardest).Ticket Feed Continuous /End GameAdjusts the ticket distribution mode(Continuous: during the game; End Game: At the endof the game).Game Stats N/A Shows the Stats Screen.Clear Credits N/A Resets the Inserted credits to 0 if more than 40credits are entered.Quit Game N/A Exits the game and returns to the Windowsdesktop.Resume Game N/A Exits the Operator Menu and returns to the game.Chapter 06 - Service & Repair Computer ConnectionsTroubleshooting* NOTE: When requesting a warranty replacement you will be asked to give the unit’s serial number from the back of the unit.Increase the volume in the game by pressing the Operator Button and adjusting the volume options in the Operator Menu. You might also Quit the game to Windows desktop and increase the volume via the Speaker icon on the bottom right of your screen.Wireless Internet ConfigurationYour network can be configured via Ethernet cable or Wireless 802.11b/g.If you have an Ethernet cable available to be plugged in, insert it into the motherboard LAN RJ45 connector.If not, here’s how to configure your wireless network with your own existing Wi-Fi network. -Start the unit.-There will be Adrenaline Amusements wallpaper with a 150 seconds delay before the attract mode shows up. It gives enough time for a wireless network to connect.(This delay will be present on each reboot if you don’t connect your unit to the Internet)*.-Open the coin door and press the Operator button.-Choose QUIT to Windows.-Connect the USB keyboard and USB mouse.- Open Connect to a Network by clicking the network icon () in the lower right corner of the screen.-In the list of networks, click the network you want to connect to and click connect.-Enter your security key.-Once connected, double-click the CrossyRoad shortcut on the desktop.Having your unit connected to the Internet includes free software live update!*If you do not connect your unit to the Internet, you can double-click the Disable_Network shortcut on the Windows desktop to bypass the 150seconds Internet lookup delay.Operator Settings keeps resetting troubleThe Windows write cache needs to be disabled.-Exit the game to Windows.-Press on Start-Right click on My Computer-Choose Properties-Click on Device Manager-Expand Disk Drives-Double click the 32GB Device (Not the USB drive if there is one)-Go to Policies-Remove the check in front of “Enable Write caching on the device” as seen below, press OK and then YES to reboot the computer.If you have a screen that look like this onePower off the computer and change the hard drive SATA cable connector and use one of those 2 SATA connectors on the motherboard identified by the red arrows.Power on the unit and redo the instructions to disable the Write Cache.Chapter 07 - Parts Cabinet PartsCash Box PartsComputer & ElectronicsI/0 board INV-04-1200CablingWiring HarnessComputer PartsCrossy Road Manual V1.0Chapter 09 – Software RecoveryChapter 09 – Software RecoveryIf your unit software needs to be restored please follow those instructions.-Connect a USB keyboard to the motherboard.-Verify that the USB Recovery flash disk is in a Black USB port.-Power on the unit.-Press F11 on your keyboard when the AsRock splash screen is displayed to enter the boot menu.-Choose USB: and press Enter.The process takes 25-30minutes and the unit will reboot back in the game at the end. The Wireless credentials will need to be re-entered and Operator settings will be back at the default ones.。
table of contents 例子

table of contents 例子Table of Contents Example:Chapter 1: Introduction1.1 Background1.2 Purpose of the Study1.3 Research Questions1.4 Significance of the StudyChapter 2: Literature Review2.1 Theoretical Framework2.2 Previous Studies2.3 Gaps in the Literature2.4 Conceptual FrameworkChapter 3: Methodology3.1 Research Design3.2 Data Collection Methods3.3 Sampling Technique3.4 Data AnalysisChapter 4: Results4.1 Presentation of Findings4.2 Analysis of Results4.3 Discussion of FindingsChapter 5: Conclusion5.1 Summary of the Study5.2 Implications of the Study5.3 Limitations and Recommendations for Future Research ReferencesAppendices附录A: 调查问卷附录B: 原始数据以上是一个使用中文的目录示例,共包含五个章节,每个章节下分为几个小节进行细分。
章节1介绍研究的背景、目的、研究问题和研究的重要性。
章节2进行文献综述,包括理论框架、先前研究、文献的不足之处以及概念框架。
章节3详细描述了研究的方法论,包括研究设计、数据收集方法、抽样技术和数据分析。
章节4呈现了研究结果,并进行了结果分析和讨论。
mpc5674f 单片机参考手册说明书
MPC5674F MicrocontrollerReference ManualDevices Supported:MPC5674FMPC5673FMPC5674FRMRev. 7Feb 2015This page is intentionally left blank.MPC5674F Microcontroller Reference Manual, Rev. 7ii Freescale SemiconductorTable of ContentsChapter1Device Overview1.1Features . . . . . . . . . . . . . . . . . . . . . . . . . . . . . . . . . . . . . . . . . . . . . . . . . . . . . . . . . . . . 1-11.1.1MPC5500 and MPC5600 Family Comparison . . . . . . . . . . . . . . . . . . . . . . . . . 1-1 1.2Block Diagram . . . . . . . . . . . . . . . . . . . . . . . . . . . . . . . . . . . . . . . . . . . . . . . . . . . . . . . . 1-41.2.1Critical Performance Parameters . . . . . . . . . . . . . . . . . . . . . . . . . . . . . . . . . . . 1-41.2.2Low-Power Modes . . . . . . . . . . . . . . . . . . . . . . . . . . . . . . . . . . . . . . . . . . . . . . 1-51.2.3Packages . . . . . . . . . . . . . . . . . . . . . . . . . . . . . . . . . . . . . . . . . . . . . . . . . . . . . 1-51.2.4Chip-Level Features . . . . . . . . . . . . . . . . . . . . . . . . . . . . . . . . . . . . . . . . . . . . . 1-51.2.5Memory Map . . . . . . . . . . . . . . . . . . . . . . . . . . . . . . . . . . . . . . . . . . . . . . . . . . . 1-61.2.6Module Features . . . . . . . . . . . . . . . . . . . . . . . . . . . . . . . . . . . . . . . . . . . . . . . . 1-91.2.6.1 High-Performance e200z7 Core Processor . . . . . . . . . . . . . . . . . . . . . 1-91.2.6.2 Crossbar Switch . . . . . . . . . . . . . . . . . . . . . . . . . . . . . . . . . . . . . . . . . 1-101.2.6.3 Enhanced Direct Memory Access Controller (eDMA2) . . . . . . . . . . . . 1-101.2.6.4 Interrupt Controller (INTC) . . . . . . . . . . . . . . . . . . . . . . . . . . . . . . . . . 1-111.2.6.5 Frequency-Modulated PLL (FMPLL) . . . . . . . . . . . . . . . . . . . . . . . . . 1-121.2.6.6 External Bus Interface (EBI) . . . . . . . . . . . . . . . . . . . . . . . . . . . . . . . . 1-121.2.6.7 System Integration Unit (SIU) . . . . . . . . . . . . . . . . . . . . . . . . . . . . . . . 1-131.2.6.8 Error Correction Status Module (ECSM) . . . . . . . . . . . . . . . . . . . . . . 1-141.2.6.9 On-Chip Flash . . . . . . . . . . . . . . . . . . . . . . . . . . . . . . . . . . . . . . . . . . . 1-141.2.6.10 General-Purpose Static RAM (SRAM) . . . . . . . . . . . . . . . . . . . . . . . 1-151.2.6.11 Boot Assist Module (BAM) . . . . . . . . . . . . . . . . . . . . . . . . . . . . . . . . 1-151.2.6.12 Enhanced Modular Input Output System (eMIOS) . . . . . . . . . . . . . . 1-151.2.6.13 Enhanced Timing Processor Unit (eTPU2) . . . . . . . . . . . . . . . . . . . . 1-161.2.6.14 Enhanced Queued Analog to Digital Converter (eQADC) . . . . . . . . 1-171.2.6.15 Deserial Serial Peripheral Interface Module (DSPI) . . . . . . . . . . . . . 1-181.2.6.16 Enhanced Serial Communication Interface Module (eSCI) . . . . . . . 1-191.2.6.17 FlexCAN . . . . . . . . . . . . . . . . . . . . . . . . . . . . . . . . . . . . . . . . . . . . . . 1-201.2.6.18 Dual-Channel FlexRay Controller . . . . . . . . . . . . . . . . . . . . . . . . . . . 1-211.2.6.19 Nexus . . . . . . . . . . . . . . . . . . . . . . . . . . . . . . . . . . . . . . . . . . . . . . . . 1-221.2.6.20 System Timer Module (STM) . . . . . . . . . . . . . . . . . . . . . . . . . . . . . . 1-231.2.6.21 Software Watchdog Timer (SWT) . . . . . . . . . . . . . . . . . . . . . . . . . . . 1-231.2.6.22 Periodic Interrupt Timer (PIT) . . . . . . . . . . . . . . . . . . . . . . . . . . . . . . 1-241.2.6.23 JTAG Controller (JTAGC) . . . . . . . . . . . . . . . . . . . . . . . . . . . . . . . . . 1-241.2.6.24 Power Management Controller (PMC) . . . . . . . . . . . . . . . . . . . . . . . 1-25 1.3Developer Environment . . . . . . . . . . . . . . . . . . . . . . . . . . . . . . . . . . . . . . . . . . . . . . . . 1-25Chapter2Signal Descriptions2.1Pin Function Selection . . . . . . . . . . . . . . . . . . . . . . . . . . . . . . . . . . . . . . . . . . . . . . . . . . 2-1MPC5674F Microcontroller Reference Manual Rev. 7Freescale Semiconductor Table of Contents-i2.1.1Pad Configuration Register (PCR) PA Definition . . . . . . . . . . . . . . . . . . . . . . . 2-12.1.2LVDS Signal Selection . . . . . . . . . . . . . . . . . . . . . . . . . . . . . . . . . . . . . . . . . . . 2-1 2.2External Signal Descriptions, Pin Multiplexing, and Attributes . . . . . . . . . . . . . . . . . . . 2-3 2.3Detailed Signal Description . . . . . . . . . . . . . . . . . . . . . . . . . . . . . . . . . . . . . . . . . . . . . 2-552.3.1eTPU Signals . . . . . . . . . . . . . . . . . . . . . . . . . . . . . . . . . . . . . . . . . . . . . . . . . 2-552.3.2IRQ and GPIO Signals . . . . . . . . . . . . . . . . . . . . . . . . . . . . . . . . . . . . . . . . . . 2-562.3.3eMIOS Signals . . . . . . . . . . . . . . . . . . . . . . . . . . . . . . . . . . . . . . . . . . . . . . . . 2-572.3.4eQADC Signals . . . . . . . . . . . . . . . . . . . . . . . . . . . . . . . . . . . . . . . . . . . . . . . . 2-582.3.5FlexRay Signals . . . . . . . . . . . . . . . . . . . . . . . . . . . . . . . . . . . . . . . . . . . . . . . 2-592.3.6FlexCAN Signals . . . . . . . . . . . . . . . . . . . . . . . . . . . . . . . . . . . . . . . . . . . . . . . 2-592.3.7eSCI Signals . . . . . . . . . . . . . . . . . . . . . . . . . . . . . . . . . . . . . . . . . . . . . . . . . . 2-602.3.8DSPI Signals . . . . . . . . . . . . . . . . . . . . . . . . . . . . . . . . . . . . . . . . . . . . . . . . . . 2-602.3.9EBI Signals . . . . . . . . . . . . . . . . . . . . . . . . . . . . . . . . . . . . . . . . . . . . . . . . . . . 2-622.3.10Reset and Clock Signals . . . . . . . . . . . . . . . . . . . . . . . . . . . . . . . . . . . . . . . . . 2-642.3.11JTAG and Nexus Signals . . . . . . . . . . . . . . . . . . . . . . . . . . . . . . . . . . . . . . . . 2-642.3.12PMC and Power/Voltage Signals . . . . . . . . . . . . . . . . . . . . . . . . . . . . . . . . . . 2-66Chapter3Resets3.1Reset Sources . . . . . . . . . . . . . . . . . . . . . . . . . . . . . . . . . . . . . . . . . . . . . . . . . . . . . . . . 3-1 3.2Reset Vector . . . . . . . . . . . . . . . . . . . . . . . . . . . . . . . . . . . . . . . . . . . . . . . . . . . . . . . . . 3-2 3.3Reset Pins . . . . . . . . . . . . . . . . . . . . . . . . . . . . . . . . . . . . . . . . . . . . . . . . . . . . . . . . . . . 3-23.3.1RESET . . . . . . . . . . . . . . . . . . . . . . . . . . . . . . . . . . . . . . . . . . . . . . . . . . . . . . . 3-23.3.2RSTOUT . . . . . . . . . . . . . . . . . . . . . . . . . . . . . . . . . . . . . . . . . . . . . . . . . . . . . . 3-3 3.4FMPLL Lock Gating Signal . . . . . . . . . . . . . . . . . . . . . . . . . . . . . . . . . . . . . . . . . . . . . . 3-3 3.5Reset Source Descriptions . . . . . . . . . . . . . . . . . . . . . . . . . . . . . . . . . . . . . . . . . . . . . . 3-33.5.1Power-on Reset (POR) . . . . . . . . . . . . . . . . . . . . . . . . . . . . . . . . . . . . . . . . . . . 3-63.5.2External Reset . . . . . . . . . . . . . . . . . . . . . . . . . . . . . . . . . . . . . . . . . . . . . . . . . 3-63.5.3Loss of Lock . . . . . . . . . . . . . . . . . . . . . . . . . . . . . . . . . . . . . . . . . . . . . . . . . . . 3-63.5.4Loss of Clock . . . . . . . . . . . . . . . . . . . . . . . . . . . . . . . . . . . . . . . . . . . . . . . . . . 3-73.5.5Core Watchdog Timer/Debug Reset . . . . . . . . . . . . . . . . . . . . . . . . . . . . . . . . . 3-73.5.6JTAG Reset . . . . . . . . . . . . . . . . . . . . . . . . . . . . . . . . . . . . . . . . . . . . . . . . . . . 3-73.5.7Software System Reset . . . . . . . . . . . . . . . . . . . . . . . . . . . . . . . . . . . . . . . . . . 3-83.5.8Software External Reset . . . . . . . . . . . . . . . . . . . . . . . . . . . . . . . . . . . . . . . . . . 3-8 3.6Reset Registers in the SIU . . . . . . . . . . . . . . . . . . . . . . . . . . . . . . . . . . . . . . . . . . . . . . 3-8 3.7Reset Configuration . . . . . . . . . . . . . . . . . . . . . . . . . . . . . . . . . . . . . . . . . . . . . . . . . . . . 3-93.7.1Reset Configuration Half Word (RCHW) . . . . . . . . . . . . . . . . . . . . . . . . . . . . . 3-93.7.1.1 RCHW Overview . . . . . . . . . . . . . . . . . . . . . . . . . . . . . . . . . . . . . . . . . . 3-93.7.1.2 RCHW Structure . . . . . . . . . . . . . . . . . . . . . . . . . . . . . . . . . . . . . . . . . . 3-93.7.2Reset Configuration Timing . . . . . . . . . . . . . . . . . . . . . . . . . . . . . . . . . . . . . . 3-113.7.3Reset Weak Pull Up/Down Configuration . . . . . . . . . . . . . . . . . . . . . . . . . . . . 3-11MPC5674F Microcontroller Reference Manual Rev. 7Table of Contents-ii Freescale SemiconductorChapter4Power Management Controller (PMC)4.1Introduction . . . . . . . . . . . . . . . . . . . . . . . . . . . . . . . . . . . . . . . . . . . . . . . . . . . . . . . . . . 4-14.1.1Features . . . . . . . . . . . . . . . . . . . . . . . . . . . . . . . . . . . . . . . . . . . . . . . . . . . . . . 4-14.1.1.1 Features of the Analog Portion of PMC_SMPS . . . . . . . . . . . . . . . . . . 4-24.1.1.2 Features of the Digital Portion of PMC_SMPS . . . . . . . . . . . . . . . . . . . 4-24.1.2Block Diagram . . . . . . . . . . . . . . . . . . . . . . . . . . . . . . . . . . . . . . . . . . . . . . . . . 4-34.1.3PMC Operation Modes . . . . . . . . . . . . . . . . . . . . . . . . . . . . . . . . . . . . . . . . . . . 4-3 4.2External Signals Description . . . . . . . . . . . . . . . . . . . . . . . . . . . . . . . . . . . . . . . . . . . . . 4-44.2.1Signals Information . . . . . . . . . . . . . . . . . . . . . . . . . . . . . . . . . . . . . . . . . . . . . . 4-4 4.3Signals Details . . . . . . . . . . . . . . . . . . . . . . . . . . . . . . . . . . . . . . . . . . . . . . . . . . . . . . . . 4-44.3.1VDDREG . . . . . . . . . . . . . . . . . . . . . . . . . . . . . . . . . . . . . . . . . . . . . . . . . . . . . 4-44.3.2VDD . . . . . . . . . . . . . . . . . . . . . . . . . . . . . . . . . . . . . . . . . . . . . . . . . . . . . . . . . 4-54.3.3VDDSYN . . . . . . . . . . . . . . . . . . . . . . . . . . . . . . . . . . . . . . . . . . . . . . . . . . . . . . 4-54.3.4VSS . . . . . . . . . . . . . . . . . . . . . . . . . . . . . . . . . . . . . . . . . . . . . . . . . . . . . . . . . . 4-54.3.5REGCTL . . . . . . . . . . . . . . . . . . . . . . . . . . . . . . . . . . . . . . . . . . . . . . . . . . . . . . 4-54.3.6REGSEL . . . . . . . . . . . . . . . . . . . . . . . . . . . . . . . . . . . . . . . . . . . . . . . . . . . . . . 4-54.3.7VDD33 . . . . . . . . . . . . . . . . . . . . . . . . . . . . . . . . . . . . . . . . . . . . . . . . . . . . . . . 4-5 4.4Memory Map/Register Definition . . . . . . . . . . . . . . . . . . . . . . . . . . . . . . . . . . . . . . . . . . 4-64.4.1Configuration Register (PMC_MCR) . . . . . . . . . . . . . . . . . . . . . . . . . . . . . . . . 4-64.4.2Trimming Register (PMC_TRIMR) . . . . . . . . . . . . . . . . . . . . . . . . . . . . . . . . . . 4-84.4.3Status Register (PMC_SR) . . . . . . . . . . . . . . . . . . . . . . . . . . . . . . . . . . . . . . . 4-12 4.5Functional Description . . . . . . . . . . . . . . . . . . . . . . . . . . . . . . . . . . . . . . . . . . . . . . . . . 4-144.5.1PMC Internal 1.2V Voltage Regulator Selection . . . . . . . . . . . . . . . . . . . . . . . 4-154.5.2PMC Bandgap . . . . . . . . . . . . . . . . . . . . . . . . . . . . . . . . . . . . . . . . . . . . . . . . 4-164.5.3VDDREG LVD . . . . . . . . . . . . . . . . . . . . . . . . . . . . . . . . . . . . . . . . . . . . . . . . . 4-164.5.4 3.3V Internal Voltage Regulator . . . . . . . . . . . . . . . . . . . . . . . . . . . . . . . . . . . 4-164.5.5 3.3V VDDSYN LVD . . . . . . . . . . . . . . . . . . . . . . . . . . . . . . . . . . . . . . . . . . . . . 4-174.5.6 1.2V Voltage Regulator Controller . . . . . . . . . . . . . . . . . . . . . . . . . . . . . . . . . 4-184.5.7 1.2V VDD LVD . . . . . . . . . . . . . . . . . . . . . . . . . . . . . . . . . . . . . . . . . . . . . . . . 4-194.5.8Trimming . . . . . . . . . . . . . . . . . . . . . . . . . . . . . . . . . . . . . . . . . . . . . . . . . . . . . 4-204.5.9Interrupts . . . . . . . . . . . . . . . . . . . . . . . . . . . . . . . . . . . . . . . . . . . . . . . . . . . . . 4-204.5.10PMC Power-on Reset . . . . . . . . . . . . . . . . . . . . . . . . . . . . . . . . . . . . . . . . . . . 4-204.5.11ADC Test Mux . . . . . . . . . . . . . . . . . . . . . . . . . . . . . . . . . . . . . . . . . . . . . . . . . 4-22 4.6Initialization . . . . . . . . . . . . . . . . . . . . . . . . . . . . . . . . . . . . . . . . . . . . . . . . . . . . . . . . . 4-23 4.7Application Information . . . . . . . . . . . . . . . . . . . . . . . . . . . . . . . . . . . . . . . . . . . . . . . . 4-234.7.1Regulator Example . . . . . . . . . . . . . . . . . . . . . . . . . . . . . . . . . . . . . . . . . . . . . 4-234.7.2Hardware Design Recommendations . . . . . . . . . . . . . . . . . . . . . . . . . . . . . . . 4-24Chapter5Frequency Modulated Phase-Locked Loop (FMPLL)5.1Introduction . . . . . . . . . . . . . . . . . . . . . . . . . . . . . . . . . . . . . . . . . . . . . . . . . . . . . . . . . . 5-15.1.1Block Diagram . . . . . . . . . . . . . . . . . . . . . . . . . . . . . . . . . . . . . . . . . . . . . . . . . 5-25.1.2Features . . . . . . . . . . . . . . . . . . . . . . . . . . . . . . . . . . . . . . . . . . . . . . . . . . . . . . 5-2MPC5674F Microcontroller Reference Manual Rev. 7Freescale Semiconductor Table of Contents-iii5.1.3Modes of Operation . . . . . . . . . . . . . . . . . . . . . . . . . . . . . . . . . . . . . . . . . . . . . 5-3 5.2External Signal Description . . . . . . . . . . . . . . . . . . . . . . . . . . . . . . . . . . . . . . . . . . . . . . 5-3 5.3Memory Map and Registers . . . . . . . . . . . . . . . . . . . . . . . . . . . . . . . . . . . . . . . . . . . . . 5-35.3.1Module Memory Map . . . . . . . . . . . . . . . . . . . . . . . . . . . . . . . . . . . . . . . . . . . . 5-35.3.2Register Descriptions . . . . . . . . . . . . . . . . . . . . . . . . . . . . . . . . . . . . . . . . . . . . 5-45.3.2.1 FMPLL Synthesizer Status Register (SYNSR) . . . . . . . . . . . . . . . . . . . 5-45.3.2.2 FMPLL Enhanced Synthesizer Control Register 1 (ESYNCR1) . . . . . . 5-65.3.2.3 FMPLL Enhanced Synthesizer Control Register 2 (ESYNCR2) . . . . . . 5-85.3.2.4 FMPLL Synthesizer FM Control Register(SYNFMCR) . . . . . . . . . . . . 5-11 5.4Functional Description . . . . . . . . . . . . . . . . . . . . . . . . . . . . . . . . . . . . . . . . . . . . . . . . . 5-135.4.1General . . . . . . . . . . . . . . . . . . . . . . . . . . . . . . . . . . . . . . . . . . . . . . . . . . . . . . 5-135.4.2PLL Off Mode . . . . . . . . . . . . . . . . . . . . . . . . . . . . . . . . . . . . . . . . . . . . . . . . . 5-135.4.3Normal Mode . . . . . . . . . . . . . . . . . . . . . . . . . . . . . . . . . . . . . . . . . . . . . . . . . 5-135.4.3.1 PLL Lock Detection . . . . . . . . . . . . . . . . . . . . . . . . . . . . . . . . . . . . . . . 5-145.4.3.2 Loss-of-Clock Detection . . . . . . . . . . . . . . . . . . . . . . . . . . . . . . . . . . . 5-155.4.3.3 PLL Normal Mode Without FM . . . . . . . . . . . . . . . . . . . . . . . . . . . . . . 5-165.4.3.4 PLL Normal Mode With Frequency Modulation . . . . . . . . . . . . . . . . . 5-18 5.5Resets . . . . . . . . . . . . . . . . . . . . . . . . . . . . . . . . . . . . . . . . . . . . . . . . . . . . . . . . . . . . . 5-215.5.1Clock Mode Selection . . . . . . . . . . . . . . . . . . . . . . . . . . . . . . . . . . . . . . . . . . . 5-215.5.1.1 Power-On Reset (POR) . . . . . . . . . . . . . . . . . . . . . . . . . . . . . . . . . . . 5-215.5.1.2 External Reset . . . . . . . . . . . . . . . . . . . . . . . . . . . . . . . . . . . . . . . . . . 5-215.5.2PLL Loss-of-Lock Reset . . . . . . . . . . . . . . . . . . . . . . . . . . . . . . . . . . . . . . . . . 5-225.5.3PLL Loss-of-Clock Reset . . . . . . . . . . . . . . . . . . . . . . . . . . . . . . . . . . . . . . . . 5-22 5.6Interrupts . . . . . . . . . . . . . . . . . . . . . . . . . . . . . . . . . . . . . . . . . . . . . . . . . . . . . . . . . . . 5-225.6.1Loss-of-Lock Interrupt Request . . . . . . . . . . . . . . . . . . . . . . . . . . . . . . . . . . . 5-225.6.2Loss-of-Clock Interrupt Request . . . . . . . . . . . . . . . . . . . . . . . . . . . . . . . . . . . 5-22Chapter6System Integration Unit (SIU)6.1Introduction . . . . . . . . . . . . . . . . . . . . . . . . . . . . . . . . . . . . . . . . . . . . . . . . . . . . . . . . . . 6-16.1.1Block Diagram . . . . . . . . . . . . . . . . . . . . . . . . . . . . . . . . . . . . . . . . . . . . . . . . . 6-26.1.2Overview . . . . . . . . . . . . . . . . . . . . . . . . . . . . . . . . . . . . . . . . . . . . . . . . . . . . . . 6-36.1.3Modes of Operation . . . . . . . . . . . . . . . . . . . . . . . . . . . . . . . . . . . . . . . . . . . . . 6-3 6.2External Signal Description . . . . . . . . . . . . . . . . . . . . . . . . . . . . . . . . . . . . . . . . . . . . . . 6-46.2.1Detailed Signal Descriptions . . . . . . . . . . . . . . . . . . . . . . . . . . . . . . . . . . . . . . . 6-46.2.1.1 Reset Input (RESET) . . . . . . . . . . . . . . . . . . . . . . . . . . . . . . . . . . . . . . 6-46.2.1.2 Reset Output (RSTOUT) . . . . . . . . . . . . . . . . . . . . . . . . . . . . . . . . . . . 6-56.2.1.3 General-Purpose I/O (GPIO n) . . . . . . . . . . . . . . . . . . . . . . . . . . . . . . . 6-56.2.1.4 Boot Configuration (BOOTCFG[0:1]) . . . . . . . . . . . . . . . . . . . . . . . . . . 6-56.2.1.5 I/O Weak Pullup Reset Configuration (WKPCFG) . . . . . . . . . . . . . . . . 6-66.2.1.6 External Interrupt Request Input (IRQ) . . . . . . . . . . . . . . . . . . . . . . . . . 6-6 6.3Memory Map and Register Definition . . . . . . . . . . . . . . . . . . . . . . . . . . . . . . . . . . . . . . 6-76.3.1Register Descriptions . . . . . . . . . . . . . . . . . . . . . . . . . . . . . . . . . . . . . . . . . . . 6-106.3.1.1 MCU ID Register (SIU_MIDR) . . . . . . . . . . . . . . . . . . . . . . . . . . . . . . 6-106.3.1.2 Reset Status Register (SIU_RSR) . . . . . . . . . . . . . . . . . . . . . . . . . . . 6-11MPC5674F Microcontroller Reference Manual Rev. 7Table of Contents-iv Freescale Semiconductor6.3.1.3 System Reset Control Register (SIU_SRCR) . . . . . . . . . . . . . . . . . . . 6-156.3.1.4 External Interrupt Status Register (SIU_EISR) . . . . . . . . . . . . . . . . . . 6-156.3.1.5 DMA/Interrupt Request Enable Register (SIU_DIRER) . . . . . . . . . . . 6-166.3.1.6 DMA/Interrupt Request Select Register (SIU_DIRSR) . . . . . . . . . . . . 6-176.3.1.7 Overrun Status Register (SIU_OSR) . . . . . . . . . . . . . . . . . . . . . . . . . 6-186.3.1.8 Overrun Request Enable Register (SIU_ORER) . . . . . . . . . . . . . . . . 6-196.3.1.9 IRQ Rising-Edge Event Enable Register (SIU_IREER) . . . . . . . . . . . 6-206.3.1.10 IRQ Falling-Edge Event Enable Register (SIU_IFEER) . . . . . . . . . . 6-216.3.1.11 IRQ Digital Filter Register (SIU_IDFR) . . . . . . . . . . . . . . . . . . . . . . . 6-226.3.1.12 IRQ Filtered Input Register (SIU_IFIR) . . . . . . . . . . . . . . . . . . . . . . . 6-226.3.1.13 Pad Configuration Registers (SIU_PCR) . . . . . . . . . . . . . . . . . . . . . 6-246.3.1.14 GPIO Pin Data Output Registers 0–512 (SIU_GPDO n) . . . . . . . . . . 6-406.3.1.15 GPIO Pin Data Input Registers 0–255 (SIU_GPDI n) . . . . . . . . . . . . 6-406.3.1.16 External IRQ Input Select Register (SIU_EIISR) . . . . . . . . . . . . . . . 6-416.3.1.17 DSPI Input Select Register (SIU_DISR) . . . . . . . . . . . . . . . . . . . . . . 6-436.3.1.18 eQADC Command FIFO Trigger Source Select - IMUX Select Registers(SIU_ISEL[4-7]) . . . . . . . . . . . . . . . . . . . . . . . . . . . . . . . . . . . . . . . . . . 6-466.3.1.19 eTPU Input Select Register (SIU_ISEL 8) . . . . . . . . . . . . . . . . . . . . 6-606.3.1.20 eQADC Advance Trigger Selection (SIU_ISEL9) . . . . . . . . . . . . . . . 6-616.3.1.21 Decimation Filter Register 1 (SIU_DECFIL1) . . . . . . . . . . . . . . . . . . 6-626.3.1.22 Decimation Filter Register 2 (SIU_DECFIL2) . . . . . . . . . . . . . . . . . . 6-646.3.1.23 Chip Configuration Register (SIU_CCR) . . . . . . . . . . . . . . . . . . . . . 6-656.3.1.24 External Clock Control Register (SIU_ECCR) . . . . . . . . . . . . . . . . . 6-666.3.1.25 Compare B Register High (SIU_CBRH) . . . . . . . . . . . . . . . . . . . . . . 6-686.3.1.26 Compare B Register Low (SIU_CBRL) . . . . . . . . . . . . . . . . . . . . . . . 6-686.3.1.27 System Clock Register (SIU_SYSDIV) . . . . . . . . . . . . . . . . . . . . . . . 6-696.3.1.28 Halt Register (SIU_HLT) . . . . . . . . . . . . . . . . . . . . . . . . . . . . . . . . . . 6-696.3.1.29 Halt Acknowledge Register (SIU_HLTACK) . . . . . . . . . . . . . . . . . . . 6-716.3.1.30 Parallel GPIO Pin Data Output Register (SIU_PGPDO0 - SIU_PGPDO15)6-736.3.1.31 Parallel GPIO Pin Data Input Register (SIU_PGPDI0 - SIU_PGPDI15) 6-746.3.1.32 Masked Parallel GPIO Pin Data Output Register (SIU_MPGPDO0 -SIU_MPGPDO31) . . . . . . . . . . . . . . . . . . . . . . . . . . . . . . . . . . . . . . . . 6-746.3.1.33 SIU DSPI Serialization Registers . . . . . . . . . . . . . . . . . . . . . . . . . . . 6-756.3.1.34 Serialized Output Signal Selection Registers for DSPI_D . . . . . . . . 6-836.3.1.35 GPIO Pin Data Input Registers (SIU_GPDI0_3 - SIU_GPDI508_511) -Standard . . . . . . . . . . . . . . . . . . . . . . . . . . . . . . . . . . . . . . . . . . . . . . . 6-85 6.4Functional Description . . . . . . . . . . . . . . . . . . . . . . . . . . . . . . . . . . . . . . . . . . . . . . . . . 6-866.4.1Pad Configuration . . . . . . . . . . . . . . . . . . . . . . . . . . . . . . . . . . . . . . . . . . . . . . 6-866.4.2Reset Control . . . . . . . . . . . . . . . . . . . . . . . . . . . . . . . . . . . . . . . . . . . . . . . . . 6-876.4.2.1 Reset Boot Configuration . . . . . . . . . . . . . . . . . . . . . . . . . . . . . . . . . . 6-876.4.2.2 RESET Pin Glitch Detect . . . . . . . . . . . . . . . . . . . . . . . . . . . . . . . . . . 6-876.4.3External Interrupts . . . . . . . . . . . . . . . . . . . . . . . . . . . . . . . . . . . . . . . . . . . . . 6-876.4.4GPIO Operation . . . . . . . . . . . . . . . . . . . . . . . . . . . . . . . . . . . . . . . . . . . . . . . 6-90MPC5674F Microcontroller Reference Manual Rev. 7Freescale Semiconductor Table of Contents-v6.4.5.1 eQADC External Trigger Input Multiplexing . . . . . . . . . . . . . . . . . . . . 6-916.4.5.2 SIU External Interrupt Input Multiplexing . . . . . . . . . . . . . . . . . . . . . . 6-926.4.5.3 Multiplexed Inputs for DSPI Multiple Transfer Operation . . . . . . . . . . 6-92Chapter7System Information Module7.1SIM Overview . . . . . . . . . . . . . . . . . . . . . . . . . . . . . . . . . . . . . . . . . . . . . . . . . . . . . . . . 7-17.1.1SIM Constants . . . . . . . . . . . . . . . . . . . . . . . . . . . . . . . . . . . . . . . . . . . . . . . . . 7-1Chapter8Boot Assist Module (BAM)8.1Overview . . . . . . . . . . . . . . . . . . . . . . . . . . . . . . . . . . . . . . . . . . . . . . . . . . . . . . . . . . . . 8-1 8.2Features . . . . . . . . . . . . . . . . . . . . . . . . . . . . . . . . . . . . . . . . . . . . . . . . . . . . . . . . . . . . 8-1 8.3Modes of Operation . . . . . . . . . . . . . . . . . . . . . . . . . . . . . . . . . . . . . . . . . . . . . . . . . . . . 8-18.3.1Normal Mode . . . . . . . . . . . . . . . . . . . . . . . . . . . . . . . . . . . . . . . . . . . . . . . . . . 8-18.3.2Debug Mode . . . . . . . . . . . . . . . . . . . . . . . . . . . . . . . . . . . . . . . . . . . . . . . . . . . 8-28.3.3Internal Boot Mode . . . . . . . . . . . . . . . . . . . . . . . . . . . . . . . . . . . . . . . . . . . . . . 8-28.3.4Serial Boot Mode . . . . . . . . . . . . . . . . . . . . . . . . . . . . . . . . . . . . . . . . . . . . . . . 8-28.3.5Development Bus Boot Mode . . . . . . . . . . . . . . . . . . . . . . . . . . . . . . . . . . . . . . 8-2 8.4Memory Map . . . . . . . . . . . . . . . . . . . . . . . . . . . . . . . . . . . . . . . . . . . . . . . . . . . . . . . . . 8-2 8.5Functional Description . . . . . . . . . . . . . . . . . . . . . . . . . . . . . . . . . . . . . . . . . . . . . . . . . . 8-38.5.1BAM Program Flow Chart . . . . . . . . . . . . . . . . . . . . . . . . . . . . . . . . . . . . . . . . . 8-38.5.2BAM Program Operation . . . . . . . . . . . . . . . . . . . . . . . . . . . . . . . . . . . . . . . . . 8-48.5.3Reset Configuration Half Word (RCHW) . . . . . . . . . . . . . . . . . . . . . . . . . . . . . 8-68.5.3.1 Application Start Address Register . . . . . . . . . . . . . . . . . . . . . . . . . . . . 8-88.5.4Internal Boot Mode . . . . . . . . . . . . . . . . . . . . . . . . . . . . . . . . . . . . . . . . . . . . . . 8-88.5.5Serial Boot Mode . . . . . . . . . . . . . . . . . . . . . . . . . . . . . . . . . . . . . . . . . . . . . . . 8-88.5.5.1 CAN Controller Configuration in the Fixed Baud Rate Mode . . . . . . . 8-108.5.5.2 SCI Controller Configuration in Fixed Baud Rate Mode . . . . . . . . . . . 8-118.5.5.3 Serial Boot Mode Download Protocol . . . . . . . . . . . . . . . . . . . . . . . . . 8-118.5.5.4 Download Protocol Execution . . . . . . . . . . . . . . . . . . . . . . . . . . . . . . . 8-128.5.5.5 Baud Rate Detection Procedure . . . . . . . . . . . . . . . . . . . . . . . . . . . . . 8-148.5.5.6 CAN Baud Rate Detection. . . . . . . . . . . . . . . . . . . . . . . . . . . . . . . . . . 8-148.5.6Booting from the Development Bus . . . . . . . . . . . . . . . . . . . . . . . . . . . . . . . . 8-168.5.6.1 EBI Configuration for Separate Address and Data Development Bus BootMode . . . . . . . . . . . . . . . . . . . . . . . . . . . . . . . . . . . . . . . . . . . . . . . . . . 8-168.5.6.2 EBI Configuration for multiplexed Address and Data Development BusBoot Mode . . . . . . . . . . . . . . . . . . . . . . . . . . . . . . . . . . . . . . . . . . . . . . 8-178.5.7Enabling Debug of a Censored Device . . . . . . . . . . . . . . . . . . . . . . . . . . . . . . 8-17Chapter9Interrupts and Interrupt Controller (INTC)9.1Introduction . . . . . . . . . . . . . . . . . . . . . . . . . . . . . . . . . . . . . . . . . . . . . . . . . . . . . . . . . . 9-1MPC5674F Microcontroller Reference Manual Rev. 7Table of Contents-vi Freescale Semiconductor9.1.2Overview . . . . . . . . . . . . . . . . . . . . . . . . . . . . . . . . . . . . . . . . . . . . . . . . . . . . . . 9-29.1.3Features . . . . . . . . . . . . . . . . . . . . . . . . . . . . . . . . . . . . . . . . . . . . . . . . . . . . . . 9-49.1.4Modes of Operation . . . . . . . . . . . . . . . . . . . . . . . . . . . . . . . . . . . . . . . . . . . . . 9-59.1.4.1 Software Vector Mode . . . . . . . . . . . . . . . . . . . . . . . . . . . . . . . . . . . . . 9-59.1.4.2 Hardware Vector Mode . . . . . . . . . . . . . . . . . . . . . . . . . . . . . . . . . . . . . 9-6 9.2External Signal Description . . . . . . . . . . . . . . . . . . . . . . . . . . . . . . . . . . . . . . . . . . . . . . 9-7 9.3Memory Map and Register Definition . . . . . . . . . . . . . . . . . . . . . . . . . . . . . . . . . . . . . . 9-79.3.1Register Descriptions . . . . . . . . . . . . . . . . . . . . . . . . . . . . . . . . . . . . . . . . . . . . 9-99.3.1.1 INTC Module Configuration Register (INTC_MCR) . . . . . . . . . . . . . . . 9-99.3.1.2 INTC Current Priority Register (INTC_CPR) . . . . . . . . . . . . . . . . . . . 9-109.3.1.3 INTC Interrupt Acknowledge Register (INTC_IACKR) . . . . . . . . . . . . 9-109.3.1.4 INTC End-of-Interrupt Register (INTC_EOIR) . . . . . . . . . . . . . . . . . . 9-119.3.1.5 INTC Software Set/Clear Interrupt Registers (INTC_SSCIR0–7) . . . . 9-129.3.1.6 INTC Priority Select Registers (INTC_PSR0–479) . . . . . . . . . . . . . . . 9-13 9.4Functional Description . . . . . . . . . . . . . . . . . . . . . . . . . . . . . . . . . . . . . . . . . . . . . . . . . 9-139.4.1Interrupt Request Sources . . . . . . . . . . . . . . . . . . . . . . . . . . . . . . . . . . . . . . . 9-139.4.1.1 Peripheral Interrupt Requests . . . . . . . . . . . . . . . . . . . . . . . . . . . . . . . 9-319.4.1.2 Software configurable Interrupt Requests . . . . . . . . . . . . . . . . . . . . . 9-319.4.1.3 Unique Vector for Each Interrupt Request Source . . . . . . . . . . . . . . . 9-319.4.2Priority Management . . . . . . . . . . . . . . . . . . . . . . . . . . . . . . . . . . . . . . . . . . . . 9-319.4.2.1 Current Priority and Preemption . . . . . . . . . . . . . . . . . . . . . . . . . . . . . 9-329.4.2.2 LIFO . . . . . . . . . . . . . . . . . . . . . . . . . . . . . . . . . . . . . . . . . . . . . . . . . . 9-339.4.3Details on Handshaking with Processor . . . . . . . . . . . . . . . . . . . . . . . . . . . . . 9-339.4.3.1 Software Vector Mode Handshaking . . . . . . . . . . . . . . . . . . . . . . . . . 9-339.4.3.2 Hardware Vector Mode Handshaking . . . . . . . . . . . . . . . . . . . . . . . . . 9-34 9.5Initialization and Application Information . . . . . . . . . . . . . . . . . . . . . . . . . . . . . . . . . . . 9-359.5.1Initialization Flow . . . . . . . . . . . . . . . . . . . . . . . . . . . . . . . . . . . . . . . . . . . . . . 9-359.5.2Interrupt Exception Handler . . . . . . . . . . . . . . . . . . . . . . . . . . . . . . . . . . . . . . 9-369.5.2.1 Software Vector Mode . . . . . . . . . . . . . . . . . . . . . . . . . . . . . . . . . . . . 9-369.5.2.2 Hardware Vector Mode . . . . . . . . . . . . . . . . . . . . . . . . . . . . . . . . . . . . 9-379.5.3ISR, RTOS, and Task Hierarchy . . . . . . . . . . . . . . . . . . . . . . . . . . . . . . . . . . . 9-379.5.4Order of Execution . . . . . . . . . . . . . . . . . . . . . . . . . . . . . . . . . . . . . . . . . . . . . 9-389.5.5Priority Ceiling Protocol . . . . . . . . . . . . . . . . . . . . . . . . . . . . . . . . . . . . . . . . . 9-399.5.5.1 Elevating Priority . . . . . . . . . . . . . . . . . . . . . . . . . . . . . . . . . . . . . . . . . 9-399.5.5.2 Ensuring Coherency . . . . . . . . . . . . . . . . . . . . . . . . . . . . . . . . . . . . . . 9-399.5.6Selecting Priorities According to Request Ratesand Deadlines . . . . . . . . . . . . . . . . . . . . . . . . . . . . . . . . . . . . . . . . . . . . . . . . . 9-429.5.7Software configurable Interrupt Requests . . . . . . . . . . . . . . . . . . . . . . . . . . . 9-429.5.7.1 Scheduling a Lower Priority Portion of an ISR . . . . . . . . . . . . . . . . . . 9-429.5.7.2 Scheduling an ISR on Another Processor . . . . . . . . . . . . . . . . . . . . . 9-439.5.8Lowering Priority Within an ISR . . . . . . . . . . . . . . . . . . . . . . . . . . . . . . . . . . . 9-439.5.9Negating an Interrupt Request Outside of its ISR . . . . . . . . . . . . . . . . . . . . . . 9-439.5.9.1 Negating an Interrupt Request as a Side Effect of an ISR . . . . . . . . . 9-439.5.9.2 Negating Multiple Interrupt Requests in One ISR . . . . . . . . . . . . . . . . 9-44MPC5674F Microcontroller Reference Manual Rev. 7Freescale Semiconductor Table of Contents-vii。
Table of Contents
Table of ContentsModule 1: Getting Started With Altium Designer1.1Introduction to Altium Designer.........................................................................................1-11.2The Altium Designer environment.....................................................................................1-21.3Document Editor Overview................................................................................................1-61.4Working with projects and documents............................................................................1-10Module 2: Help and DXP system menu2.1Using the Help system.......................................................................................................2-12.2Using the Altium website...................................................................................................2-32.3DXP System menu...........................................................................................................2-10Module 3: Schematic Editor Basics3.1Schematic Editor basics....................................................................................................3-13.2Schematic graphical objects..............................................................................................3-43.3Schematic electrical objects..............................................................................................3-9Module 4: Schematic Capture4.1Introduction to Schematic Capture....................................................................................4-14.2The Schematic Editor workspace......................................................................................4-24.3Libraries and components.................................................................................................4-94.4Placing and wiring............................................................................................................4-17Module 5: Multi-Sheet Design5.1Multi-Sheet Design.............................................................................................................5-1Module 6: Building the Project6.1Assigning designators........................................................................................................6-16.2Compiling and verifying the project...................................................................................6-5Module 7: Setting Up for Transfer to PCB and Importing Data7.1Setting Up for Transfer to PCB..........................................................................................7-1Module 8: PCB Editor Basics8.1PCB Editor Basics..............................................................................................................8-18.2PCB design objects............................................................................................................8-4Module 9: Setting up the PCB9.1Setting up the PCB.............................................................................................................9-19.2Creating a new PCB..........................................................................................................9-69.3Setting up the PCB layers................................................................................................9-10Module 10: Global Editing10.1Editing Multiple Text Objects...........................................................................................10-110.2The Data Editing System.................................................................................................10-4Module 11: PCB Design Flow, Transferring a Design and Navigation11.1PCB design process........................................................................................................11-111.2Transferring design information to the PCB......................................................................11-311.3Using the PCB Panel.......................................................................................................11-711.4Project Navigation and Cross Probing..........................................................................11-16Module 12: Design Rules12.1Design rules and design rule checking...........................................................................12-1Module 13: Classes and Rooms13.1Object classes..................................................................................................................13-113.2Rooms..............................................................................................................................13-3Module 14: Placement and Re-annotation14.1Component Placement tools...........................................................................................14-114.2Re-Annotation and back annotate...................................................................................14-3Module 15: Schematic Library Editor15.1Introduction to Library Editing..........................................................................................15-115.2Schematic Library Editor..................................................................................................15-2Module 16: PCB Library Editor16.1PCB Library Editor...........................................................................................................16-116.23D dimensional component detail.................................................................................16-14Module 17: Linking Models, Parameters, Library Package and Updates17.1Adding Model and Parameter Detail to a Component..................................................17-117.2Component Auditing........................................................................................................17-817.33D PCB Components....................................................................................................17-1417.4Library Package types...................................................................................................17-1817.5Library Reports...............................................................................................................17-20Module 18: Routing and Polygons18.1Routing.............................................................................................................................18-118.2Testpoint System...........................................................................................................18-1018.3Adding and removing teardrops....................................................................................18-1518.4Automatic routing...........................................................................................................18-1618.5Polygons and the Polygon Manager.............................................................................18-19Module 19: Output Generation and CAM File Editing19.1Bill of Materials.................................................................................................................19-119.2Output Generation............................................................................................................19-819.3CAM Editor.....................................................................................................................19-20Module 20: Interfacing to 3D Mechanical CAD20.1Interfacing to 3D Mechanical CAD..................................................................................20-1。
NVIDIA Triton Inference Server DR-09278-001 _v01 文
Berkeley Software Distribution (BSD)TABLE OF CONTENTS Chapter 1. License (1)Copyright (c) 2018-2020, NVIDIA CORPORATION. All rights reserved. Redistribution and use in source and binary forms, with or without modification, arepermitted provided that the following conditions are met:‣Redistributions of source code must retain the above copyright notice, this list of conditions and the following disclaimer.‣Redistributions in binary form must reproduce the above copyright notice, this list of conditions and the following disclaimer in thedocumentation and/or other materials provided with the distribution.‣Neither the name of NVIDIA CORPORATION nor the names of its contributors may be used to endorse or promote products derived from this software without specific prior written permission.THIS SOFTWARE IS PROVIDED BY THE COPYRIGHT HOLDERS ``AS IS'' AND ANY EXPRESS OR IMPLIED WARRANTIES, INCLUDING, BUT NOT LIMITED TO, THE IMPLIED WARRANTIES OF MERCHANTABILITY AND FITNESS FORA PARTICULAR PURPOSE ARE DISCLAIMED. IN NO EVENT SHALL THE COPYRIGHT OWNER OR CONTRIBUTORS BE LIABLE FOR ANY DIRECT, INDIRECT, INCIDENTAL, SPECIAL, EXEMPLARY, OR CONSEQUENTIAL DAMAGES (INCLUDING, BUT NOT LIMITED TO, PROCUREMENT OF SUBSTITUTE GOODS OR SERVICES; LOSS OF USE, DATA, OR PROFITS; OR BUSINESS INTERRUPTION) HOWEVER CAUSED AND ON ANY THEORY OF LIABILITY, WHETHER IN CONTRACT, STRICT LIABILITY, OR TORT (INCLUDING NEGLIGENCE OR OTHERWISE) ARISING IN ANY WAY OUT OF THE USE OF THIS SOFTWARE, EVEN IF ADVISED OF THE POSSIBILITY OF SUCH DAMAGE.3-clause BSD licenseThe 3-clause BSD license says:Redistribution and use in source and binary forms, with or without modification, are permitted provided that the following conditions are met:License1.Redistributions of source code must retain the above copyright notice, this list ofconditions and the following disclaimer.2.Redistributions in binary form must reproduce the above copyright notice, thislist of conditions and the following disclaimer in the documentation and/or other materials provided with the distribution.3.Neither the name of the copyright holder nor the names of its contributors may beused to endorse or promote products derived from this software without specific prior written permission.THIS SOFTWARE IS PROVIDED BY THE COPYRIGHT HOLDERS AND CONTRIBUTORS "AS IS" AND ANY EXPRESS OR IMPLIED WARRANTIES, INCLUDING, BUT NOT LIMITED TO, THE IMPLIED WARRANTIES OF MERCHANTABILITY AND FITNESS FOR A PARTICULAR PURPOSE ARE DISCLAIMED. IN NO EVENT SHALL THE COPYRIGHT HOLDER OR CONTRIBUTORS BE LIABLE FOR ANY DIRECT, INDIRECT, INCIDENTAL, SPECIAL, EXEMPLARY, OR CONSEQUENTIAL DAMAGES (INCLUDING, BUT NOT LIMITED TO, PROCUREMENT OF SUBSTITUTE GOODS OR SERVICES; LOSS OF USE, DATA, OR PROFITS; OR BUSINESS INTERRUPTION) HOWEVER CAUSED AND ON ANY THEORY OF LIABILITY, WHETHER IN CONTRACT, STRICT LIABILITY, OR TORT (INCLUDING NEGLIGENCE OR OTHERWISE) ARISING IN ANY WAY OUT OF THE USE OF THIS SOFTWARE, EVEN IF ADVISED OF THE POSSIBILITY OF SUCH DAMAGE.NoticeTHE INFORMATION IN THIS GUIDE AND ALL OTHER INFORMATION CONTAINED IN NVIDIA DOCUMENTATION REFERENCED IN THIS GUIDE IS PROVIDED “AS IS.” NVIDIA MAKES NO WARRANTIES, EXPRESSED, IMPLIED, STATUTORY, OR OTHERWISE WITH RESPECT TO THE INFORMATION FOR THE PRODUCT, AND EXPRESSL Y DISCLAIMS ALL IMPLIED WARRANTIES OF NONINFRINGEMENT, MERCHANTABILITY, AND FITNESS FOR A PARTICULAR PURPOSE. Notwithstanding any damages that customer might incur for any reason whatsoever, NVIDIA’s aggregate and cumulative liability towards customer for the product described in this guide shall be limited in accordance with the NVIDIA terms and conditions of sale for the product.THE NVIDIA PRODUCT DESCRIBED IN THIS GUIDE IS NOT FAULT TOLERANT AND IS NOT DESIGNED, MANUFACTURED OR INTENDED FOR USE IN CONNECTION WITH THE DESIGN, CONSTRUCTION, MAINTENANCE, AND/OR OPERATION OF ANY SYSTEM WHERE THE USE OR A FAILURE OF SUCH SYSTEM COULD RESULT IN A SITUATION THAT THREATENS THE SAFETY OF HUMAN LIFE OR SEVERE PHYSICAL HARM OR PROPERTY DAMAGE (INCLUDING, FOR EXAMPLE, USE IN CONNECTION WITH ANY NUCLEAR, AVIONICS, LIFE SUPPORT OR OTHER LIFE CRITICAL APPLICATION). NVIDIA EXPRESSL Y DISCLAIMS ANY EXPRESS OR IMPLIED WARRANTY OF FITNESS FOR SUCH HIGH RISK USES. NVIDIA SHALL NOT BE LIABLE TO CUSTOMER OR ANY THIRD PARTY, IN WHOLE OR IN PART, FOR ANY CLAIMS OR DAMAGES ARISING FROM SUCH HIGH RISK USES.NVIDIA makes no representation or warranty that the product described in this guide will be suitable for any specified use without further testing or modification. T esting of all parameters of each product is not necessarily performed by NVIDIA. It is customer’s sole responsibility to ensure the product is suitable and fit for the application planned by customer and to do the necessary testing for the application in order to avoid a default of the application or the product. Weaknesses in customer’s product designs may affect the quality and reliability of the NVIDIA product and may result in additional or different conditions and/ or requirements beyond those contained in this guide. NVIDIA does not accept any liability related to any default, damage, costs or problem which may be based on or attributable to: (i) the use of the NVIDIA product in any manner that is contrary to this guide, or (ii) customer product designs.Other than the right for customer to use the information in this guide with the product, no other license, either expressed or implied, is hereby granted by NVIDIA under this guide. Reproduction of information in this guide is permissible only if reproduction is approved by NVIDIA in writing, is reproduced without alteration, and is accompanied by all associated conditions, limitations, and notices.TrademarksNVIDIA, the NVIDIA logo, and Ampere, cuBLAS, CUDA, CUDA T oolkit, cuDNN, DALI, DIGITS, DGX, DGX-1, DGX-2, DGX Station, DLProf, GPU, Jetson, Kepler, Maxwell, NCCL, Nsight Compute, Nsight Systems, NvCaffe, NVLink, NVIDIA Deep Learning SDK. NVIDIA Developer Program, NVSHMEM, PerfWorks, Pascal, SDK Manager, T egra, T ensorRT, T ensorRT Inference Server, T esla, TF-TRT, Triton Inference Server, T uring, and Volta are trademarks and/or registered trademarks of NVIDIA Corporation in the United States and other countries. Other company and product names may be trademarks of the respective companies with which they are associated.ARM, AMBA and ARM Powered are registered trademarks of ARM Limited. Cortex, MPCore and Mali are trademarks of ARM Limited. All other brands or product names are the property of their respective holders. "ARM" is used to represent ARM Holdings plc; its operating company ARM Limited; and the regional subsidiaries ARM Inc.; ARM KK; ARM Korea Limited.; ARM T aiwan Limited; ARM France SAS; ARM Consulting (Shanghai) Co. Ltd.; ARM Germany GmbH; ARM Embedded T echnologies Pvt. Ltd.; ARM Norway, AS and ARM Sweden AB.Copyright© 2020 NVIDIA Corporation. All rights reserved.。
NVIDIA DOCA 安装指南.pdf_1701755439.789212说明书

Installation GuideTable of Contents Chapter 1. Introduction (1)1.1. Supported Platforms (1)1.2. Hardware Prerequisites (2)1.3. DOCA Packages (2)1.4. Supported Operating System (3)Chapter 2. SDK Manager (4)Chapter 3. Manual BlueField Image Installation (5)3.1. Installation Files (5)3.2. Software Prerequisites (7)3.3. Image Installation (9)3.4. Firmware Upgrade (10)3.5. Post-installation Procedure (11)Chapter 4. DOCA DPI Installation (12)4.1. Host Setup (12)4.2. Target Setup (13)Chapter 5. Setting Up Build Environment Container for Developers (14)Chapter 1.IntroductionThere are two ways install the NVIDIA BlueField-2 DPU software:‣Using the SDK Manager which provides a GUI for full BlueField-2 installation ‣Manual installation with a step-by-step procedure1.1. Supported Platforms1.2. Hardware PrerequisitesThis quick start guide assumes that an NVIDIA® BlueField®-2 DPU has been installed in a server according to the instructions detailed in your DPU's hardware user guide.1.3.DOCA Packages1.4. Supported Operating SystemChapter 2.SDK ManagerNVIDIA SDK Manager supports DOCA installation, including software packages on the host and the BlueField-2 target.Please refer to NVIDIA SDK Manager installation guide for DOCA for detailed instructions. Developers must have access to DOCA to install the relevant SDK packages. Visit the DOCA developer zone landing page to request access.Chapter 3.Manual BlueField ImageInstallationThis guide provides the minimal first-steps instructions for setting up DOCA on a standard system.3.1. Installation Files3.2. Software Prerequisites1.Download the following packages listed in the table under section Installation Filesdepending on the OS of the host you are using:‣BlueField OS image‣OFED RuntimeNote: Alternatively, you may choose not to install MLNX_OFED (step 2). In this case,you must download the following pacakges:‣MFT‣RShim2.To continue with OFED Runtime installation, run:sudo tar -xvf MLNX_OFED_LINUX-<version>-x86_64.tgzsudo ./mlnxofedinstall --ovs-dpdk --auto-add-kernel-supportThis script also installs the firmware version associated with the OFED Runtime version.The script print-out will display the Current and Available firmware versions as shown in the following example:Device #1:----------Device Type: BlueField-2[...]Versions: Current AvailableFW <Old_FW> <New_FW>The upgrade takes effect only after mlxfwreset which is performed in later steps.3.To continue without OFED Runtime:a).Install RShim.‣For Ubuntu, run:sudo dpkg --force-all -i rshim-<version>.debsudo dpkg --force-all -i mft-<version>.deb‣For CentOS, run:sudo rpm -Uhv rshim-<version>.rpmsudo rpm -Uhv mft-<version>.rpmb).Install MFT.‣For Ubuntu, run:sudo tar -xvf mft-<version>-deb.tgzsudo ./mft-<version>-deb/install.shsudo mst start‣For CentOS, run:sudo tar -xvf mft-<version>-rpm.tgzsudo ./mft-<version>-rpm/install.shsudo mst start4.Reset the nvconfig params to their default values:sudo mlxconfig -d /dev/mst/<device> -y resetReset configuration for device /dev/mst/<device>? (y/n) [n] : yApplying... Done!-I- Please reboot machine to load new configurations.Note: You may retrieve the <device> parameter by using the command: sudo mst status–v.5.Skip this step if your BlueField DPU is Ethernet only. Please refer to Supported Platformsto learn your DPU type.If you have a VPI DPU, the default link type of the ports will be configured to IB. To verify your link type, run:sudo mst startsudo mlxconfig -d /dev/mst/<device> -e q | grep -i link_typeConfigurations: Default Current Next Boot* LINK_TYPE_P1 IB(1) ETH(2) IB(1)* LINK_TYPE_P2 IB(1) ETH(2) IB(1)Note: If your DPU is Ethernet capable only, then the sudo mlxconfig -d <device>command will not provide an output.If the current link type is set to IB, run the following command to change it to Ethernet: # sudo mlxconfig -d <device> s LINK_TYPE_P1=2 LINK_TYPE_P2=26.Assign a static IP to tmfifo_net0 (RShim host interface).‣For Ubuntu, edit the file /etc/netplan/01-netcfg.yaml by adding the following lines:tmfifo_net0:addresses: [192.168.100.1/24]dhcp4: falseExample:sudo cat /etc/netplan/01-netcfg.yaml# This file describes the network interfaces available on your system# For more information, see netplan(5).network:version: 2renderer: networkdethernets:eno1:dhcp4: yestmfifo_net0:addresses: [192.168.100.1/24]dhcp4: no‣For CentOS:a).Create the file /etc/sysconfig/network-scripts/ifcfg-tmfifo_net0.b).Set the following lines:DEVICE=tmfifo_net0BOOTPROTO=noneONBOOT=yesPREFIX=24IPADDR=192.168.100.1NM_CONTROLLED=no7.Execute network restart for implemented tmfifo_net0 static configuration.‣For CentOS:/etc/init.d/network restart‣For Ubuntu:/etc/init.d/networking restart8.Verify that RShim is active.sudo systemctl status rshimThis command is expected to display active (running). If RShim service does notlaunch automatically, run:sudo systemctl enable rshimsudo systemctl start rshim3.3. Image InstallationUbuntu users are required to provide a unique password that will be applied at the end of the BlueField OS image installation. This password needs to be defined in a bf.cfg configuration file.To set the password for the "ubuntu" user:1.Create password hash. Run:# openssl passwd -1Password:Verifying - Password:$1$3B0RIrfX$TlHry93NFUJzg3Nya00rE12.Add the password hash in quotes to the bf.cfg file:# sudo vim bf.cfgubuntu_PASSWORD='$1$3B0RIrfX$TlHry93NFUJzg3Nya00rE1'When running the intallation command, use the --config flag to provide the filecontaining the password:sudo bfb-install --rshim <rshimN> --bfb <image_path.bfb> --config bf.cfgThe following is an example of Ubuntu installation assuming the "pv" tool has beeninstalled (to view the installation progress).sudo bfb-install --rshim rshim0 --bfbDOCA_v1.0_BlueField_OS_Ubuntu_20.04-5.3-1.0.0.0-3.6.0.11699-1-aarch64.bfb --config bf.cfgPushing bfb1.08GiB 0:00:57 [19.5MiB/s] [ <=> ]Collecting BlueField booting status. Press Ctrl+C to stop…INFO[BL2]: startINFO[BL2]: DDR POST passedINFO[BL2]: UEFI loadedINFO[BL31]: startINFO[BL31]: runtimeINFO[UEFI]: eMMC initINFO[UEFI]: eMMC probedINFO[UEFI]: PCIe enum startINFO[UEFI]: PCIe enum endINFO[MISC]: Ubuntu installation startedINFO[MISC]: Installation finishedINFO[MISC]: Rebooting...Note: The --config flag is necessary for Ubuntu users only. If this flag is not used byUbuntu users, then upon first login to the BlueField device, they will be asked to updatetheir password.Note: This installation sets up the OVS bridge.3.4. Firmware UpgradeTo upgrade firmware:1.SSH to your BlueField device via 192.168.100.2 (preconfigured). The default credentials forUbuntu are as follows:‣Username: ubuntu‣Password: unique passwordFor example:*****************.100.2Password:<unique-password>2.Perform the following step only if:‣Your BlueField device is a controller‣If you did not install OFED RuntimeUpgrade firmware in BlueField DPU. Run:sudo /opt/mellanox/mlnx-fw-updater/mlnx_fw_updater.plExample output:Device #1:----------Device Type: BlueField-2[...]Versions: Current AvailableFW <Old_FW> <New_FW>3.For the firmware upgrade to take effect:a).Run the following command on the BlueField DPU and x86 host:sudo mst startb).Run the command below on the BlueField DPU and immediately afterwards on the x86host. Do not wait for the command to complete on the BlueField DPU before issuingthe command on the host.sudo mlxfwreset -d /dev/mst/<device> -l 3 -y resetNote: If your BlueField device is a controller you must power cycle the controller asmlxfwreset is not supported.3.5. Post-installation Procedure 1.Restart OFED Runtime. Run:sudo /etc/init.d/openibd restartUnloading HCA driver: [ OK ] Loading HCA driver and Access Layer: [ OK ] 2.Configure the physical function (PF) interfaces.sudo ifconfig <interface-1> <network-1/mask> upsudo ifconfig <interface-2> <network-2/mask> upFor example:sudo ifconfig p2p1 192.168.200.32/24 upsudo ifconfig p2p2 192.168.201.32/24 upPings between the source and destination should now be operational.Chapter 4.DOCA DPI Installation4.1. Host SetupDownload the following packages listed in the table under section Installation Files depending on the OS of the host you are using:‣DPDK Packages‣DPI Tools‣RXP Tools (RXP Compiler and RXPBench)Perform the following procedure:1.Install DPDK Package.‣For Ubuntu, run:apt install mlnx-dpdk-dev_<current_version>_amd64.debapt install mlnx-dpdk_<current_version>_amd64.deb‣For CentOS, run:yum install -y mlnx-dpdk-<current_version>.x86_64.rpmyum install -y mlnx-dpdk-devel- <current_version>.x86_64.rpm2.Install RXP tools (RXP compiler and bench).‣For Ubuntu, run:a).Install rxp-compiler. Run:apt install rxp-compiler_<current_version>_amd64.debb).Install rxpbench.‣For Ubuntu 18.04:sudo apt install libhyperscan4apt install rxpbench_< current_version >_amd64.deb‣For Ubuntu 20.04:sudo apt install libhyperscan5apt install rxpbench_< current_version >_amd64.deb‣For CentOS, run:a).Install rxp-compiler. Run:yum install -y rxp-compiler-<current_version>-1.el7.x86_64.rpmb).Install rxpbench.DOCA DPI Installation‣For CentOS 8.2:sudo yum install hyperscan-5.3.0yum install -y rxpbench-<>.x86_64.rpm‣For CentOS 7.x:yum install epel-release sudo yum install /centos7-x86_64/hyperscan-5.3.0-1.of.el7.x86_64.rpmyum install -y rxpbench-<>.x86_64.rpm3.Install DOCA DPI Tools.‣For Ubuntu:apt remove doca-dpi-toolsapt install doca-dpi-tools_<current_version>_amd64.deb‣For CentOS:yum remove doca-dpi-toolsyum install doca-dpi-tools-<current_version>-1.el7.x86_64.rpm4.2. Target Setup1.Download the DOCA SDK, DOCA Runtime, and DOCA Tools package from sectionInstallation Files.2.Copy deb repo package into BlueField. Run:scp -r doca-repo-aarch64-ubuntu2004-************************************************************.100.2:/tmp/3.Unpack the deb repo. Run:# dpkg -i <repo_file>For example:# sudo dpkg -i doca-repo-aarch64-ubuntu2004-local_1.0-0.5.3.0.3.6.bf.3.6.0.11691_arm64.deb4.Run apt update.# apt-get update5.Run apt install for DOCA SDK, DOCA runtime, DOCA tools:# sudo apt install doca-sdk# sudo apt install doca-runtime# sudo apt install doca-toolsChapter 5.Setting Up BuildEnvironment Container forDevelopers1.Make sure Docker is installed on your host. Run:docker versionIf docker is not installed, please visit the official Install Docker Engine for installation instructions.2.Install QEMU on the host.Note: This step is for x86 hosts only. If you are working on an aarch64 host, please move tothe next step.‣For Ubuntu host, run:sudo apt-get install qemu binfmt-support qemu-user-staticsudo docker run --rm --privileged multiarch/qemu-user-static --reset -p yes ‣For CentOS 7.x host, run:sudo yum install epel-releasesudo yum install qemu-system-armcat /etc/binfmt.d/qemu-aarch64.confsudo systemctl restart systemd-binfmtNote: If qemu-aarch64.conf does not exist or is empty, please execute "*".‣For CentOS 8.0 or 8.2 host, run:sudo yum install epel-releasesudo yum install qemu-kvmcat /etc/binfmt.d/qemu-aarch64.confsudo systemctl restart systemd-binfmtNote: If qemu-aarch64.conf does not exist or is empty, please execute "*".‣For Fedora host, run:sudo yum install qemu-system-aarch64cat /etc/binfmt.d/qemu-aarch64.confsudo systemctl restart systemd-binfmtNote: If the file /etc/binfmt.d/qemu-aarch64.conf does not exist, run:Setting Up Build Environment Container for Developersecho ":qemu-aarch64:M::\x7fELF\x02\x01\x01\x00\x00\x00\x00\x00\x00\x00\x00\x00\x02\x00\xb7:\xff\xff\xff\xff\xff\xff\xff\xfc\xff\xff\xff\xff\xff\xff\xff\xff\xfe\xff\xff:/usr/bin/qemu-aarch64-static:" > /etc/binfmt.d/qemu-aarch64.conf3.Load the docker image.a).Make sure the docker service is started. Run:systemctl daemon-reloadsystemctl start dockerb).Go to the location the tar file is saved at and run the following command from the host:sudo docker load -i <filename>For example:sudo docker load -i bfb_builder_ubuntu20.04-5.3-1.0.0.0-3.6.0.11699-1.tar Note: The loading process may take a while. After the image is loaded, you can find itsID using the command docker images.4.Run the docker image.sudo docker run -v <source-code-folder>:<dest-folder-on-docker> --privileged -it -e container=docker <image-name/ID>For example, if the source code folder is /<...>/buildEnv, the destination folder on the docker is /app, and the image is the one downloaded in the previous step, the command will look like this:sudo docker run -v /<...>/buildEnv:/app --privileged -it -e container=dockermellanox/bluefield:bfb_builder_ubuntu20.04-5.3-1.0.0.0-3.6.0.11699-1Or, for example, if you use a loaded image with the ID 185c50ecb31d, the command will be: sudo docker run -v /<...>/buildEnv:/app --privileged -it -e container=docker185c50ecb31dAfter you run this command, you will have a shell inside the container, where you can build your project using the gcc command.Note: Please make sure you map a folder that everyone has write privileges to. Otherwise,the docker will not be able to write the output file to it.Note: The folder will be mapped to the "dest" folder. In this example the folder /app insidethe docker will be mapped to /<...>/buildEnv.NoticeThis document is provided for information purposes only and shall not be regarded as a warranty of a certain functionality, condition, or quality of a product. NVIDIA Corporation nor any of its direct or indirect subsidiaries (collectively: “NVIDIA”) make no representations or warranties, expressed or implied, as to the accuracy or completeness of the information contained in this document and assume no responsibility for any errors contained herein. NVIDIA shall have no liability for the consequences or use of such information or for any infringement of patents or other rights of third parties that may result from its use. This document is not a commitment to develop, release, or deliver any Material (defined below), code, or functionality.NVIDIA reserves the right to make corrections, modifications, enhancements, improvements, and any other changes to this document, at any time without notice. Customer should obtain the latest relevant information before placing orders and should verify that such information is current and complete.NVIDIA products are sold subject to the NVIDIA standard terms and conditions of sale supplied at the time of order acknowledgement, unless otherwise agreed in an individual sales agreement signed by authorized representatives of NVIDIA and customer (“Terms of Sale”). NVIDIA hereby expressly objects to applying any customer general terms and conditions with regards to the purchase of the NVIDIA product referenced in this document. No contractual obligations are formed either directly or indirectly by this document.NVIDIA products are not designed, authorized, or warranted to be suitable for use in medical, military, aircraft, space, or life support equipment, nor in applications where failure or malfunction of the NVIDIA product can reasonably be expected to result in personal injury, death, or property or environmental damage. NVIDIA accepts no liability for inclusion and/or use of NVIDIA products in such equipment or applications and therefore such inclusion and/or use is at customer’s own risk. NVIDIA makes no representation or warranty that products based on this document will be suitable for any specified use. Testing of all parameters of each product is not necessarily performed by NVIDIA. It is customer’s sole responsibility to evaluate and determine the applicability of any information contained in this document, ensure the product is suitable and fit for the application planned by customer, and perform the necessary testing for the application in order to avoid a default of the application or the product. Weaknesses in customer’s product designs may affect the quality and reliability of the NVIDIA product and may result in additional or different conditions and/or requirements beyond those contained in this document. NVIDIA accepts no liability related to any default, damage, costs, or problem which may be based on or attributable to: (i) the use of the NVIDIA product in any manner that is contrary to this document or (ii) customer product designs.No license, either expressed or implied, is granted under any NVIDIA patent right, copyright, or other NVIDIA intellectual property right under this document. Information published by NVIDIA regarding third-party products or services does not constitute a license from NVIDIA to use such products or services or a warranty or endorsement thereof. Use of such information may require a license from a third party under the patents or other intellectual property rights of the third party, or a license from NVIDIA under the patents or other intellectual property rights of NVIDIA.Reproduction of information in this document is permissible only if approved in advance by NVIDIA in writing, reproduced without alteration and in full compliance with all applicable export laws and regulations, and accompanied by all associated conditions, limitations, and notices.THIS DOCUMENT AND ALL NVIDIA DESIGN SPECIFICATIONS, REFERENCE BOARDS, FILES, DRAWINGS, DIAGNOSTICS, LISTS, AND OTHER DOCUMENTS (TOGETHER AND SEPARATELY, “MATERIALS”) ARE BEING PROVIDED “AS IS.” NVIDIA MAKES NO WARRANTIES, EXPRESSED, IMPLIED, STATUTORY, OR OTHERWISE WITH RESPECT TO THE MATERIALS, AND EXPRESSLY DISCLAIMS ALL IMPLIED WARRANTIES OF NONINFRINGEMENT, MERCHANTABILITY, AND FITNESS FOR A PARTICULAR PURPOSE. TO THE EXTENT NOT PROHIBITED BY LAW, IN NO EVENT WILL NVIDIA BE LIABLE FOR ANY DAMAGES, INCLUDING WITHOUT LIMITATION ANY DIRECT, INDIRECT, SPECIAL, INCIDENTAL, PUNITIVE, OR CONSEQUENTIAL DAMAGES, HOWEVER CAUSED AND REGARDLESS OF THE THEORY OF LIABILITY, ARISING OUT OF ANY USE OF THIS DOCUMENT, EVEN IF NVIDIA HAS BEEN ADVISED OF THE POSSIBILITY OF SUCH DAMAGES. Notwithstanding any damages that customer might incur for any reason whatsoever, NVIDIA’s aggregate and cumulative liability towards customer for the products described herein shall be limited in accordance with the Terms of Sale for the product.TrademarksNVIDIA, the NVIDIA logo, and Mellanox are trademarks and/or registered trademarks of Mellanox Technologies Ltd. and/or NVIDIA Corporation in the U.S. and in other countries. Other company and product names may be trademarks of the respective companies with which they are associated.Copyright© 2021 NVIDIA Corporation. All rights reserved.NVIDIA Corporation | 2788 San Tomas Expressway, Santa Clara, CA 95051。
英语作文本目录制作模板

英语作文本目录制作模板英文回答:Table of Contents。
1. Introduction。
2. Chapter 1: The Importance of a Thesis Statement。
3. Chapter 2: Developing a Thesis Statement。
4. Chapter 3: The Structure of a Thesis Statement。
5. Chapter 4: Common Mistakes to Avoid When Writing a Thesis Statement。
6. Chapter 5: Practice Writing Thesis Statements。
7. Conclusion。
Chapter 1: The Importance of a Thesis Statement。
A thesis statement is the central claim or argument of an essay. It is the main point that the writer wants to prove or support. A strong thesis statement is essential for a successful essay because it provides a clear and concise roadmap for the reader. It tells the reader what the essay is about and what the writer's main argument is.Chapter 2: Developing a Thesis Statement。
The first step in writing a thesis statement is to identify the topic of your essay. Once you know what you are writing about, you can start to develop a thesis statement. A good thesis statement is specific, arguable, and supported by evidence.Chapter 3: The Structure of a Thesis Statement。
Access Management Manual

July 2011
© 2011 by Texas Department of Transportation (512) 302-2453 all rights reserved
Manual Notice 2011-1
From: Manual: Mark A Marek, P.E. Access Management Manual
Table of Contents
Chapter 1 — Access Management General Section 1 — Introduction. . . . . . . . . . . . . . . . . . . . . . . . . . . . . . . . . . . . . . . . . . . . . . . . . . . . .1-2 Non-discrimination . . . . . . . . . . . . . . . . . . . . . . . . . . . . . . . . . . . . . . . . . . . . . . . . . . . . . . . .1-2 Applicability . . . . . . . . . . . . . . . . . . . . . . . . . . . . . . . . . . . . . . . . . . . . . . . . . . . . . . . . . . . . .1-2 Overview . . . . . . . . . . . . . . . . . . . . . . . . . . . . . . . . . . . . . . . . . . . . . . . . . . . . . . . . . . . . . .
关于目录表的作文英语
关于目录表的作文英语Title: The Significance of a Table of Contents。
In the realm of literature, academic papers, and even technical manuals, one ubiquitous element often stands out—the Table of Contents. This seemingly simple list serves a vital purpose in guiding readers through the contents of a document. In this essay, we will explore the significance of a Table of Contents and its role in enhancing the readability and navigability of written works.First and foremost, a Table of Contents provides a roadmap for readers, allowing them to preview the structure and organization of the document at a glance. By listingthe major sections, chapters, or topics along with their respective page numbers, a Table of Contents offers a quick overview of what the document covers. This preview helps readers orient themselves and understand the overall flowof the content, enabling them to locate specificinformation efficiently.Moreover, a well-constructed Table of Contents aids in information retrieval. In lengthy documents, such as books or research papers, readers often need to refer back to specific sections or chapters for review or citation. Without a Table of Contents, finding relevant information could be a daunting task, requiring extensive scanning or flipping through numerous pages. However, with a Table of Contents, readers can easily locate desired sections by referring to the corresponding page numbers listed in the table, saving time and effort.Furthermore, a Table of Contents serves as a structural guide for authors during the writing process. Before embarking on a writing project, authors typically outline the main topics or chapters they intend to cover. This initial outline forms the basis for the Table of Contents, which evolves as the document progresses. By organizing their thoughts and ideas into a hierarchical structure, authors can ensure coherence and logical flow in their writing, thereby enhancing the overall readability of the document.In academic and technical contexts, a Table of Contents also plays a crucial role in facilitating collaboration and communication among researchers, scholars, and professionals. When citing or referencing a document, individuals often rely on the Table of Contents to identify specific sections or chapters relevant to their research or discussion. By providing a standardized framework for referencing, a Table of Contents promotes clarity and precision in scholarly communication, enabling readers to pinpoint the exact location of cited information.Moreover, in the digital age, where online documents and electronic publications abound, the importance of a Table of Contents remains undiminished. While traditional printed materials feature static tables, digital documents often incorporate interactive or hyperlinked tables that allow readers to navigate directly to desired sections with a single click. This dynamic functionality enhances the user experience and makes online content more accessible and user-friendly.In conclusion, the Table of Contents serves as an indispensable tool for both readers and authors alike. By providing a structural overview, aiding in information retrieval, facilitating collaboration, and enhancingdigital navigation, the Table of Contents plays a vitalrole in the readability and accessibility of written works across various domains. As such, its importance should not be underestimated, and careful attention should be paid to its construction and presentation in all types of documents.。
NVIDIA DALI DR-09047-001 _v01 软件许可协议说明书

Software License AgreementTABLE OF CONTENTS Chapter 1. Definitions (1)Chapter 2. Grant of Copyright License (3)Chapter 3. Grant of Patent License (4)Chapter 4. Redistribution (5)Chapter 5. Submission of Contributions (6)Chapter 6. Trademarks (7)Chapter 7. Disclaimer of Warranty (8)Chapter 8. Limitation of Liability (9)Chapter 9. Accepting Warranty or Additional Liability (10)Appendix A. APPENDIX: How to apply the Apache License to your work (11)"License" shall mean the terms and conditions for use, reproduction, and distribution as defined by Sections 1 through 9 of this document."Licensor" shall mean the copyright owner or entity authorized by the copyright owner that is granting the License."Legal Entity" shall mean the union of the acting entity and all other entities that control, are controlled by, or are under common control with that entity. For the purposes of this definition, "control" means (i) the power, direct or indirect, to cause the direction or management of such entity, whether by contract or otherwise, or (ii) ownership of fifty percent (50%) or more of the outstanding shares, or (iii) beneficial ownership of such entity."You" (or "Your") shall mean an individual or Legal Entity exercising permissions granted by this License."Source" form shall mean the preferred form for making modifications, including but not limited to software source code, documentation source, and configuration files. "Object" form shall mean any form resulting from mechanical transformation or translation of a Source form, including but not limited to compiled object code, generated documentation, and conversions to other media types."Work" shall mean the work of authorship, whether in Source or Object form, made available under the License, as indicated by a copyright notice that is included in or attached to the work (an example is provided in the Appendix below)."Derivative Works" shall mean any work, whether in Source or Object form, that is based on (or derived from) the Work and for which the editorial revisions, annotations, elaborations, or other modifications represent, as a whole, an original work of authorship. For the purposes of this License, Derivative Works shall not include works that remain separable from, or merely link (or bind by name) to the interfaces of, the Work and Derivative Works thereof."Contribution" shall mean any work of authorship, including the original version of the Work and any modifications or additions to that Work or Derivative Works thereof, that is intentionally submitted to Licensor for inclusion in the Work by the copyright owner or by an individual or Legal Entity authorized to submit on behalf of the copyrightDefinitions.owner. For the purposes of this definition, "submitted" means any form of electronic, verbal, or written communication sent to the Licensor or its representatives, including but not limited to communication on electronic mailing lists, source code control systems, and issue tracking systems that are managed by, or on behalf of, the Licensor for the purpose of discussing and improving the Work, but excluding communication that is conspicuously marked or otherwise designated in writing by the copyright owner as "Not a Contribution.""Contributor" shall mean Licensor and any individual or Legal Entity on behalf of whom a Contribution has been received by Licensor and subsequently incorporated within the Work.Subject to the terms and conditions of this License, each Contributor hereby grantsto You a perpetual, worldwide, non-exclusive, no-charge, royalty-free, irrevocable copyright license to reproduce, prepare Derivative Works of, publicly display, publicly perform, sublicense, and distribute the Work and such Derivative Works in Source or Object form.Subject to the terms and conditions of this License, each Contributor hereby grantsto You a perpetual, worldwide, non-exclusive, no-charge, royalty-free, irrevocable (except as stated in this section) patent license to make, have made, use, offer to sell, sell, import, and otherwise transfer the Work, where such license applies only to those patent claims licensable by such Contributor that are necessarily infringed by their Contribution(s) alone or by combination of their Contribution(s) with the Work to which such Contribution(s) was submitted. If You institute patent litigation against any entity (including a cross-claim or counterclaim in a lawsuit) alleging that the Work or a Contribution incorporated within the Work constitutes direct or contributory patent infringement, then any patent licenses granted to You under this License for that Work shall terminate as of the date such litigation is filed.You may reproduce and distribute copies of the Work or Derivative Works thereof in any medium, with or without modifications, and in Source or Object form, provided that You meet the following conditions:(a) You must give any other recipients of the Work or Derivative Works a copy of this License; and(b) You must cause any modified files to carry prominent notices stating that You changed the files; and(c) You must retain, in the Source form of any Derivative Works that You distribute, all copyright, patent, trademark, and attribution notices from the Source form of the Work, excluding those notices that do not pertain to any part of the Derivative Works; and (d) If the Work includes a "NOTICE" text file as part of its distribution, then any Derivative Works that You distribute must include a readable copy of the attribution notices contained within such NOTICE file, excluding those notices that do not pertain to any part of the Derivative Works, in at least one of the following places: within a NOTICE text file distributed as part of the Derivative Works; within the Source formor documentation, if provided along with the Derivative Works; or, within a display generated by the Derivative Works, if and wherever such third-party notices normally appear. The contents of the NOTICE file are for informational purposes only and do not modify the License. You may add Your own attribution notices within Derivative Works that You distribute, alongside or as an addendum to the NOTICE text from the Work, provided that such additional attribution notices cannot be construed as modifying the License.You may add Your own copyright statement to Your modifications and may provide additional or different license terms and conditions for use, reproduction, or distribution of Your modifications, or for any such Derivative Works as a whole, provided Your use, reproduction, and distribution of the Work otherwise complies with the conditions stated in this License.Unless You explicitly state otherwise, any Contribution intentionally submitted for inclusion in the Work by You to the Licensor shall be under the terms and conditions of this License, without any additional terms or conditions. Notwithstanding the above, nothing herein shall supersede or modify the terms of any separate license agreement you may have executed with Licensor regarding such Contributions.This License does not grant permission to use the trade names, trademarks, service marks, or product names of the Licensor, except as required for reasonable and customary use in describing the origin of the Work and reproducing the content of the NOTICE file.Unless required by applicable law or agreed to in writing, Licensor provides the Work (and each Contributor provides its Contributions) on an "AS IS" BASIS, WITHOUT WARRANTIES OR CONDITIONS OF ANY KIND, either express or implied, including, without limitation, any warranties or conditions of TITLE, NON-INFRINGEMENT, MERCHANTABILITY, or FITNESS FOR A PARTICULAR PURPOSE. You are solely responsible for determining the appropriateness of using or redistributing the Work and assume any risks associated with Your exercise of permissions under this License.In no event and under no legal theory, whether in tort (including negligence), contract, or otherwise, unless required by applicable law (such as deliberate and grossly negligent acts) or agreed to in writing, shall any Contributor be liable to You for damages, including any direct, indirect, special, incidental, or consequential damages of any character arising as a result of this License or out of the use or inability to use the Work (including but not limited to damages for loss of goodwill, work stoppage, computer failure or malfunction, or any and all other commercial damages or losses), even if such Contributor has been advised of the possibility of such damages.While redistributing the Work or Derivative Works thereof, You may choose to offer, and charge a fee for, acceptance of support, warranty, indemnity, or other liability obligations and/or rights consistent with this License. However, in accepting such obligations,You may act only on Your own behalf and on Your sole responsibility, not on behalfof any other Contributor, and only if You agree to indemnify, defend, and hold each Contributor harmless for any liability incurred by, or claims asserted against, such Contributor by reason of your accepting any such warranty or additional liability.END OF TERMS AND CONDITIONSTo apply the Apache License to your work, attach the following boilerplate notice, with the fields enclosed by brackets "[]" replaced with your own identifying information. (Don't include the brackets!) The text should be enclosed in the appropriate comment syntax for the file format. We also recommend that a file or class name and description of purpose be included on the same "printed page" as the copyright notice for easier identification within third-party archives.Copyright [yyyy] [name of copyright owner]Licensed under the Apache License, Version 2.0 (the "License"); you may not use this file except in compliance with the License. You may obtain a copy of the License at/licenses/LICENSE-2.0Unless required by applicable law or agreed to in writing, software distributedunder the License is distributed on an "AS IS" BASIS, WITHOUT WARRANTIES OR CONDITIONS OF ANY KIND, either express or implied. See the License for the specific language governing permissions and limitations under the License.NoticeTHE INFORMATION IN THIS GUIDE AND ALL OTHER INFORMATION CONTAINED IN NVIDIA DOCUMENTATION REFERENCED IN THIS GUIDE IS PROVIDED “AS IS.” NVIDIA MAKES NO WARRANTIES, EXPRESSED, IMPLIED, STATUTORY, OR OTHERWISE WITH RESPECT TO THE INFORMATION FOR THE PRODUCT, AND EXPRESSL Y DISCLAIMS ALL IMPLIED WARRANTIES OF NONINFRINGEMENT, MERCHANTABILITY, AND FITNESS FOR A PARTICULAR PURPOSE. Notwithstanding any damages that customer might incur for any reason whatsoever, NVIDIA’s aggregate and cumulative liability towards customer for the product described in this guide shall be limited in accordance with the NVIDIA terms and conditions of sale for the product.THE NVIDIA PRODUCT DESCRIBED IN THIS GUIDE IS NOT FAULT TOLERANT AND IS NOT DESIGNED, MANUFACTURED OR INTENDED FOR USE IN CONNECTION WITH THE DESIGN, CONSTRUCTION, MAINTENANCE, AND/OR OPERATION OF ANY SYSTEM WHERE THE USE OR A FAILURE OF SUCH SYSTEM COULD RESULT IN A SITUATION THAT THREATENS THE SAFETY OF HUMAN LIFE OR SEVERE PHYSICAL HARM OR PROPERTY DAMAGE (INCLUDING, FOR EXAMPLE, USE IN CONNECTION WITH ANY NUCLEAR, AVIONICS, LIFE SUPPORT OR OTHER LIFE CRITICAL APPLICATION). NVIDIA EXPRESSL Y DISCLAIMS ANY EXPRESS OR IMPLIED WARRANTY OF FITNESS FOR SUCH HIGH RISK USES. NVIDIA SHALL NOT BE LIABLE TO CUSTOMER OR ANY THIRD PARTY, IN WHOLE OR IN PART, FOR ANY CLAIMS OR DAMAGES ARISING FROM SUCH HIGH RISK USES.NVIDIA makes no representation or warranty that the product described in this guide will be suitable for any specified use without further testing or modification. T esting of all parameters of each product is not necessarily performed by NVIDIA. It is customer’s sole responsibility to ensure the product is suitable and fit for the application planned by customer and to do the necessary testing for the application in order to avoid a default of the application or the product. Weaknesses in customer’s product designs may affect the quality and reliability of the NVIDIA product and may result in additional or different conditions and/ or requirements beyond those contained in this guide. NVIDIA does not accept any liability related to any default, damage, costs or problem which may be based on or attributable to: (i) the use of the NVIDIA product in any manner that is contrary to this guide, or (ii) customer product designs.Other than the right for customer to use the information in this guide with the product, no other license, either expressed or implied, is hereby granted by NVIDIA under this guide. Reproduction of information in this guide is permissible only if reproduction is approved by NVIDIA in writing, is reproduced without alteration, and is accompanied by all associated conditions, limitations, and notices.TrademarksNVIDIA, the NVIDIA logo, and cuBLAS, CUDA, cuDNN, DALI, DIGITS, DGX, DGX-1, DGX-2, DGX Station, DLProf, Jetson, Kepler, Maxwell, NCCL, Nsight Compute, Nsight Systems, NvCaffe, PerfWorks, Pascal, SDK Manager, T egra, T ensorRT, T ensorRT Inference Server, T esla, TF-TRT, and Volta are trademarks and/or registered trademarks of NVIDIA Corporation in the United States and other countries. Other company and product names may be trademarks of the respective companies with which they are associated.Copyright© 2019 NVIDIA Corporation. All rights reserved.。
AMM手册讲解

4.AMM的使用和查阅
手册的目录是依照各子系统、分系统的等级编写的,按数字顺序编排 前面所空格数代表了等级,
组件和部件是依照字母顺序编写的,(注意:是关键词(Keyword)的 字母顺序,例如:再循环风扇在手册中写作Fan – Recirculation,它关 键词Fan决定它在手册中的编排顺序。)
AMM 手册的内容并不是从飞机投入飞行至对出服役 一成不变的。 由于飞机在飞行过程中,需要进行组件的更换,或是 根据航空公司的要求进行系统的改装,这样一来, AMM的内容就要发生变化。 在AMM 每一章的索引中第一部分就是关于时效有效 性的列表,表中把该章所被更改的内容及更改的时间 一一列出。
3. AMM手册的有效性
— 勤务工作是12章
— 标准施工按照系统、结构、发动机分别是20、51、70章 — 非定期性的检修是第5章的内容
除了以上的这些信息外,其他的可以分别到各系统章节,结构章 节和发动机章节中去查询。
4.AMM的使用和查阅
一种推荐的维护手册查找程序
维修手册依据ATA100规范划分,每一个章的内容依 次编辑成有效性每页清单、目录和内容。 由三组数字组成的章-节-目号码对应某一LRU,同时 在IPC和WDM手册中章-节-目号码往往对应该LRU的 相关内容,在手册的目录中明确了这种对应关系,同 时标定了维修适用的页码段。
故障及分析
部件位置(新) 维护措施 勤 务 拆卸/安装 调试/测试 检验/检查 清洁/涂漆 核准修理方法 放行偏离指南(新)
Trouble Shooting (TS)
Component Location (CL) Maintenance Practices (MP) Servicing (SRV) Removal/Installation (R/I) Adjustment/Test (A/T) Inspection/Check (I/C) Cleaning/Painting (C/P) Approved Repairs (AR) Dispatch Deviation Guide (DDG)
2014年行政法中英文对照版
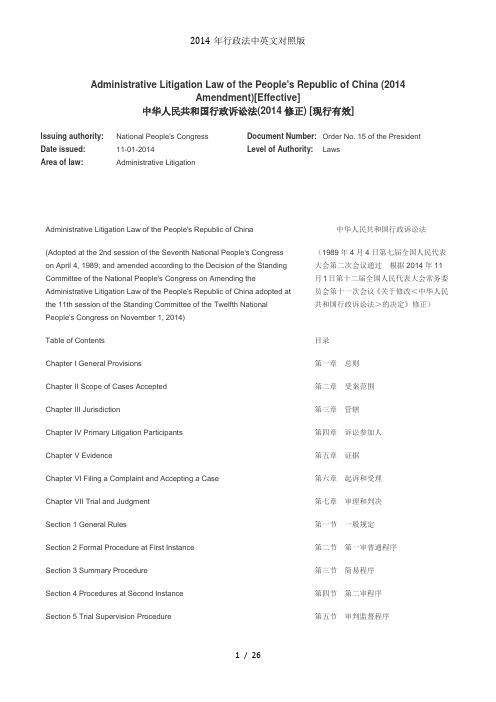
Administrative Litigation Law of the People's Republic of China (2014Amendment)[Effective]中华人民共和国行政诉讼法(2014修正) [现行有效]Issuing authority:National People's Congress Document Number:Order No. 15 of the President Date issued:11-01-2014 Level of Authority:LawsArea of law:Administrative LitigationAdministrative Litigation Law of the People's Republic of China 中华人民共和国行政诉讼法(Adopted at the 2nd session of the Seventh National People's Congress on April 4, 1989; and amended according to the Decision of the Standing Committee of the National People's Congress on Amending the Administrative Litigation Law of the People's Republic of China adopted at the 11th session of the Standing Committee of the Twelfth National People's Congress on November 1, 2014) (1989年4月4日第七届全国人民代表大会第二次会议通过根据2014年11月1日第十二届全国人民代表大会常务委员会第十一次会议《关于修改<中华人民共和国行政诉讼法>的决定》修正)Table of Contents 目录Chapter I General Provisions 第一章总则Chapter II Scope of Cases Accepted 第二章受案范围Chapter III Jurisdiction 第三章管辖Chapter IV Primary Litigation Participants 第四章诉讼参加人Chapter V Evidence 第五章证据Chapter VI Filing a Complaint and Accepting a Case 第六章起诉和受理Chapter VII Trial and Judgment 第七章审理和判决Section 1 General Rules 第一节一般规定Section 2 Formal Procedure at First Instance 第二节第一审普通程序Section 3 Summary Procedure 第三节简易程序Section 4 Procedures at Second Instance 第四节第二审程序Section 5 Trial Supervision Procedure 第五节审判监督程序Chapter VIII Enforcement 第八章执行Chapter IX Foreign-Related Administrative Litigation 第九章涉外行政诉讼Chapter X Supplementary Provisions 第十章附则Chapter I General Provisions 第一章总则Article 1 To ensure the impartial and timely trial of administrative cases by the people's courts, settle administrative disputes, protect the lawful rights and interests of citizens, legal persons, and other organizations, and oversee administrative agencies' exercise of power according to the law, this Law is developed in accordance with the Constitution.第一条为保证人民法院公正、及时审理行政案件,解决行政争议,保护公民、法人和其他组织的合法权益,监督行政机关依法行使职权,根据宪法,制定本法。