tagoram_slides_6_2
adblogcat用法

adblogcat用法ADBlogCat是一款功能强大的博客分类插件,它可以帮助博主将博客文章进行分类,方便读者查阅。
下面将详细介绍ADBlogCat的用法。
一、安装ADBlogCat插件1.进入WordPress后台,点击“插件”——“添加新插件”。
2.在搜索框中输入“ADBlogCat”,点击“搜索插件”。
3.找到ADBlogCat插件,并点击“安装”。
4.安装完成后,点击“启用”按钮。
二、设置ADBlogCat1.进入WordPress后台,点击左侧菜单栏中的“设置”——“ADBlogCat设置”。
2.在这里可以设置分类外观、分类标题等内容。
3.在这里还可以设置分类的排序方式和每个分类下文章的排序方式。
三、使用ADBlogCat1.创建分类在WordPress后台中,点击左侧菜单栏中的“文章”——“分类”,然后点击“添加新分类”,填写相关信息即可创建一个新的分类。
2.将文章添加到分类中在编辑文章时,在右侧边栏中选择相应的分类即可将该文章添加到该分类下。
3.显示分类列表可以通过使用短代码来显示博客中所有的分类列表。
只需在需要显示列表的页面或文章中插入以下短代码:[adblogcat]四、高级功能1.自定义样式如果想要自定义样式,可以在自己的主题文件中添加以下代码:.adblogcat-list {/* 自定义样式 */}2.自定义模板如果想要自定义ADBlogCat的模板,可以在主题文件夹中创建一个名为“adblogcat”的文件夹,在该文件夹中创建一个名为“template.php”的文件,并将以下代码复制粘贴到该文件中:<?php/*** ADBlogCat Template*/// Get all categories$categories = get_categories();// Loop through categoriesforeach ( $categories as $category ) {// Get category ID$category_id = $category->term_id;// Get category name$category_name = $category->name;// Get category description$category_description = $category->description;// Output category name and descriptionecho '<h2>' . esc_html( $category_name ) . '</h2>';echo '<p>' . esc_html( $category_description ) . '</p>';// Query posts for this category$posts_query = new WP_Query( array('post_type' => 'post','post_status' => 'publish','cat' => $category_id,'orderby' => 'date','order' => 'DESC') );// Loop through posts for this categoryif ( $posts_query->have_posts() ) {while ( $posts_query->have_posts() ) {$posts_query->the_post();// Output post title and excerptecho '<h3><a href="' . esc_url( get_permalink() ) . '">' . esc_html( get_the_title() ) . '</a></h3>';echo '<p>' . esc_html( get_the_excerpt() ) . '</p>';}}// Reset post datawp_reset_postdata();}>然后在需要显示分类列表的页面或文章中插入以下短代码:[adblogcat template="template.php"]以上就是ADBlogCat插件的详细用法,通过使用ADBlogCat插件,可以让博客文章更加有序、清晰,方便读者查阅。
手把手教你打造自己的个性系统光盘

手把手教你打造自己的个性系统光盘一,最新病毒库的DOS杀毒软件们的制作方法在五楼二,windows下软件安装菜单制作好像是在第三楼吧三,返回光盘启动界面问题在第四楼四,windows下软件安装菜单制作补充在第四楼五,重大更新:WINPE系统下的X P安装自动重启问题研究:在第五楼六,关于AutoPlay Media Studio 6.0中树形列表的使用,在第五楼七,关于AutoPlay Media Studio 6.0中菜单的使用在第五楼八,关于AutoPlay Media Studio 6.0中树形列表使用的小技巧,在第五楼九,不再更新声明,(被第十次更新证明不再更新是假的,被偷是真的..)在第五楼十,关于AutoPlay Media Studio 6.0中跑马灯的使用,在第五楼十一,A字的函数(一):Application函数的释义.在第五楼十二,A字头的函数完结:Audio函数的释义.在第五楼十三,B字头的函数完结:Button函数的释义.在第五楼十四,搞笑的ComboBox 函数的释义从第12个函数起.在第五楼十五,C字头的函数完结:Crypto函数的释义.在第五楼十六,C字头的函数更新:Debug 函数释义 .Dialog 函数释义DLL函数释义在第四楼十七,D字头的函数完结:Drive函数的释义.在第四楼十八,更改深度啊,剽窃深度!.在第四楼打造自己的个性系统光盘工具:1. easy boot2. AutoPlay Media Studio 6.03. WindowsNin1 3.0 /read.php?tid=436659要感谢drag0n喔4. UltraISO5. Deepinxp5.8 (随你喜欢那个版本的windowsX P)6. JUJUMAO 10.1版(克隆的GHO)7. 老毛桃PE8. ACDsee8首先呢,我们初始一下Easy Boot 做一个我们喜欢的界面:1. 选一张自己喜欢的界面2. 替换Easy Boot目录下disk1目录下ezboot目录里的BACK.BMP 图片文件,右击图片打开属性,点一下摘要,可以看到图片的要求:怎么转换自己的图片到合适的要求捏?很简单喔!打开ACDSEE8 打开图片,点一下菜单里的“更改”:里面有一项是“调整大小”在新出的界面:把“保持宽比高”前面的对勾去掉然后在宽度那一栏里填写640高度呢就是480了然后点完成,保存然后是更改色深了,其实很简单:别忘了保存喔,千万别忘了是BMP格式的喔,好了我们的背景图片做好了,把背景图片替换成Easy Boot目录下disk1目录下ezboot目录里的BACK.BMP。
TetraMax软件图形化界面使用详细介绍
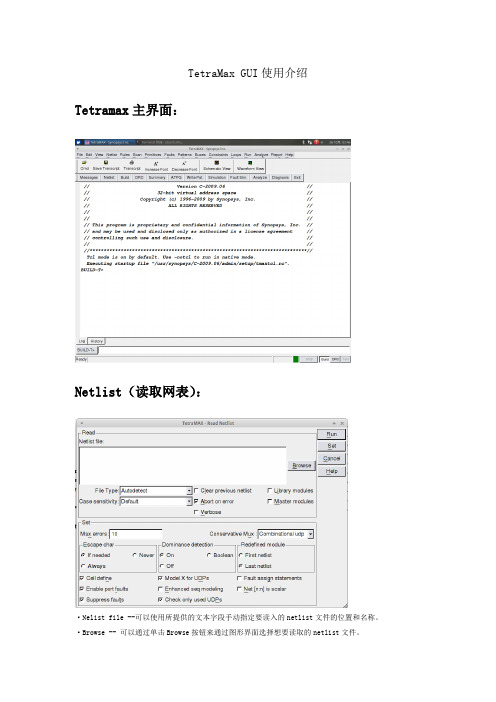
TetraMax GUI使用介绍Tetramax主界面:Netlist(读取网表):·Nelist file --可以使用所提供的文本字段手动指定要读入的netlist文件的位置和名称。
·Browse -- 可以通过单击Browse按钮来通过图形界面选择想要读取的netlist文件。
·File Type -- 默认情况下,netlist格式是由TetraMAX自动检测的。
也可以手动选择EDIF、Verilog或VHDL netlist格式。
·Clear previous netlist -- 指定在内存中当前读取的所有netlist将被删除。
如果文件名称也被指定,那么在读取该文件之前,将清除内存。
·Abort on error -- 当这个框被选中(默认选中)时,当多个netlist被读取时,TetraMAX将会终止它。
这就允许使用通配符(*)文件名读取所有的netlist。
TetraMAX忽略了这个选项,如果你使用这个选项来读取单个的netlist,就会发出一个警告信息。
·Verbose -- 指定使用通配符文件名时显示单个netlist信息。
默认情况下,只对所读取的所有netlist 进行简单的总结。
·Library Module -- 指定在指定的文件名称中定义的所有模块应该被视为是库模块。
·Master Module -- 指定被读取的文件定义的所有模块应该被标记为主模块。
通常,当读取多个具有相同名称的模块时,最后一个模块将确定最终模块定义·Max errors --指定在当前文件终止netlist解析之前允许的最大解析错误数。
默认设置为10。
·Conservative Mux -- 指定保守的MUX门是否从MUX的保守UDP模型中提取出来。
其中:None --所有提取的MUXes都是规则的(如果必要的话,会发出适当的违规)。
slidetags原理

slidetags原理
Slidetags是一种用于创建交互式演示文稿的工具,它的原理主要是基于HTML、CSS和JavaScript的组合。
当用户使用Slidetags创建演示文稿时,实际上是在编写一个包含特定标记和样式的HTML文档。
这个HTML文档包含了演示文稿的内容、结构和样式,而JavaScript则负责处理用户交互和动画效果。
在Slidetags中,用户可以使用特定的标记来定义演示文稿的每一页内容,比如使用`<slide>`标签来定义每一页的内容,使用`<step>`标签来定义每一页中的动画步骤。
同时,用户还可以使用CSS来定义演示文稿的样式,比如布局、颜色、字体等。
这些标记和样式的组合最终呈现出用户所创建的交互式演示文稿。
另外,Slidetags还利用JavaScript来实现用户与演示文稿的交互,比如通过键盘或鼠标控制翻页、动画效果的触发等。
JavaScript还可以用于实现一些高级的交互功能,比如响应用户的输入、实现自定义的动画效果等。
总的来说,Slidetags的原理是基于HTML、CSS和JavaScript 的组合,通过特定的标记和样式定义演示文稿的内容和样式,同时
利用JavaScript实现用户与演示文稿的交互。
这种原理使得用户能够方便地创建出具有交互性和动画效果的演示文稿。
使用Trados翻译XML文件的三种方法

使用Trados翻译XML文件的三种方法发表日期:2008年7月11日共浏览805次作者:崔启亮【编辑录入:giltworld】字体颜色:选择颜色黑色红色黄色绿色橙色紫色蓝色褐色墨绿深蓝赭石粉绿淡绿黄灰翠绿综红砖红淡蓝暗红玫瑰红紫红桔黄军黄烟灰深灰灰蓝【字体:放大正常缩小】【双击鼠标左键自动滚屏】【图片上滚动鼠标滚轮变焦图片】∙写作日期:2008年7月11日∙作者:崔启亮内容提要✍Trados翻译XML文件的基本原理✍带有INI文件的XML文件翻译方法✍使用TagEditor从XML文件创建INI文件的方法✍使用Trados Workbench从Word直接翻译XML文件XML是The Extensible Markup Language(可扩展标识语言)的缩写,是国际组织W3C于2000年10月6日发布的文件标准格式,目前版本是XML1.0版本,因此,现在越来越多的需要翻译的文件采用XML格式。
对于翻译人员而言,为了重复利用已经翻译过的文本内容,经常使用Trados等的翻译记忆软件对文件进行翻译。
由于XML文件格式含有很多不需要翻译的标签(Tag),而且这些标签元素不是固定的(即不同的XML文件可能含有不同的Tags),所以直接使用Trados 翻译XML文件时,可能很多不需要翻译的Tag,没有变成外部隐藏格式被保护起来,变成可翻译的内容。
这样不仅很难准确分析和统计需要翻译的文件字数,而且翻译过程中可能修改或者删除Tag,造成最后文件失效。
一、Trados翻译XML文件的基本原理Trados Workbench的作用是动态更新翻译记忆库的内容,便于重复利用已经翻译的内容,TagEditor是文档翻译软件,与翻译记忆库文件相连接。
一般地,使用Trados翻译XML文件有两种方法:1.使用Trados Workbench和TagEditor翻译2.使用Trados Workbench和Microsoft Word翻译采用第1种方法,即TagEditor翻译XML文件,需要XML文件对应的INI文件(Trados 自定义的描述Tag信息的文本文件),在TagEditor中设置好INI文件,以便TagEditor能够准确识别和保护不需要翻译的Tag元素和属性值。
vue-awesome-swiper滑块插件使用方法详解

vue-awesome-swiper滑块插件使⽤⽅法详解本⽂实例为⼤家分享了vue-awesome-swiper滑块插件的使⽤⽅法,供⼤家参考,具体内容如下1.进⼊项⽬⽬录,安装swipernpm install vue-awesome-swiper --save2.引⼊资源//vue滑块import VueAwesomeSwiper from 'vue-awesome-swiper'e(VueAwesomeSwiper)3.编辑组件<template><swiper :options="swiperOption" ref="mySwiper"><!-- slides --><swiper-slide>I'm Slide 1</swiper-slide><swiper-slide>I'm Slide 2</swiper-slide><swiper-slide>I'm Slide 3</swiper-slide><swiper-slide>I'm Slide 4</swiper-slide><swiper-slide>I'm Slide 5</swiper-slide><swiper-slide>I'm Slide 6</swiper-slide><swiper-slide>I'm Slide 7</swiper-slide><!-- Optional controls --><div class="swiper-pagination" slot="pagination"></div><div class="swiper-button-prev" slot="button-prev"></div><div class="swiper-button-next" slot="button-next"></div><div class="swiper-scrollbar" slot="scrollbar"></div></swiper></template><script>import { swiper, swiperSlide } from 'vue-awesome-swiper'export default {name: 'carrousel',data() {return {swiperOption: {// NotNextTick is a component's own property, and if notNextTick is set to true, the component will not instantiate the swiper through NextTick, which means you can get the swiper object the first time (if you need to use the get swiper object to do what Things // notNextTick是⼀个组件⾃有属性,如果notNextTick设置为true,组件则不会通过NextTick来实例化swiper,也就意味着你可以在第⼀时间获取到swiper对象,假如你需要刚加载遍使⽤获取swiper对象来做什么事,那么这个属性⼀定要是truenotNextTick: true,// swiper configs 所有的配置同swiper官⽅api配置autoplay: 3000,// direction : 'vertical',effect:"coverflow",grabCursor : true,setWrapperSize :true,// autoHeight: true,// paginationType:"bullets",pagination : '.swiper-pagination',paginationClickable :true,prevButton:'.swiper-button-prev',nextButton:'.swiper-button-next',// scrollbar:'.swiper-scrollbar',mousewheelControl : true,observeParents:true,// if you need use plugins in the swiper, you can config in here like this// 如果⾃⾏设计了插件,那么插件的⼀些配置相关参数,也应该出现在这个对象中,如下debugger// debugger: true,// swiper callbacks// swiper的各种回调函数也可以出现在这个对象中,和swiper官⽅⼀样// onTransitionStart(swiper){// console.log(swiper)// },// more Swiper configs and callbacks...// ...}}},components: {swiper,swiperSlide},// you can find current swiper instance object like this, while the notNextTick property value must be true// 如果你需要得到当前的swiper对象来做⼀些事情,你可以像下⾯这样定义⼀个⽅法属性来获取当前的swiper对象,同时notNextTick必须为truecomputed: {swiper() {return this.$refs.mySwiper.swiper}},mounted() {// you can use current swiper instance object to do something(swiper methods)// 然后你就可以使⽤当前上下⽂内的swiper对象去做你想做的事了// console.log('this is current swiper instance object', this.swiper)// this.swiper.slideTo(3, 1000, false)}}</script>根据进⾏调整以上就是本⽂的全部内容,希望对⼤家的学习有所帮助,也希望⼤家多多⽀持。
xml配置的templates标签使用方式
xml配置的templates标签使用方式
xml配置中的templates标签是用于定义模板引擎的模板路径
和后缀的。
使用方式如下:
1. 首先,在xml配置文件中添加<templates>标签,如下所示:```
<templates>
<template>template1</template>
<template>template2</template>
</templates>
```
2. 在<templates>标签内添加<template>标签,并在<template>
标签中指定模板的路径和后缀。
可以添加多个<template>标签
以定义多个模板。
例如,上述配置中定义了两个模板,template1和template2。
3. 接下来,在代码中使用模板时,可以通过模板引擎的路径参数指定具体要使用的模板。
例如,在Java中使用Thymeleaf模板引擎时,可以如下使用:```
templateEngine.process("template1", context, writer);
```
其中,"template1"为上述配置文件中指定的模板路径。
这样,模板引擎就会找到对应的模板文件,并执行相应的渲染和输出操作。
使用css实现wordpress多彩酷炫tags的特效

乐泰LetraTag标签机使用说明书

LetraTag User GuideFigure 1 DYMO LetraTag Label MakerAbout Your New Label MakerWith your new DYMO LetraTag® label maker, you can create a wide variety of high-quality, self-adhesive labels. You can choose to print your labels in many different sizes and styles. The label maker uses DYMO LetraTag (LT) 12mm label cassettes. LT cassettes are available in multiple colors of plastic tape and in white iron-on tape.Visit for information on obtaining labels and accessories for your label maker.Warranty RegistrationPlease complete the warranty registration card and return it to the appropriate Customer Support address within seven days. Visit /registration for details or to register online. Getting StartedFollow the instructions in this section to print your first label. Connecting the PowerThe label maker is powered by standard batteries. To save power, the label maker will automatically turn off after two minutes of inactivity.Inserting the BatteriesThe label maker uses four high-capacity AA alkaline batteries.To insert the batteries1.Remove the battery compartmentcover. See Figure 2.2.Insert the batteries following thepolarity markings (+ and –).3.Replace the cover.period of time.Inserting the Label CassetteYour label maker comes with one label cassette. Visit for information about purchasing additional label cassettes.To insert the label cassette 1.Press and release the label compartment. See Figure 3.2.Insert the cassette with thelabel positioned between theprint head and pinch roller. SeeFigure 4.3.Press firmly until cassette clicksinto place.4.power.Selecting a LanguageThe first time you turn on the power, you are asked to select your desired language. By default, the language is set to English. The language option you choose determines the character set and date format that are available.1. 2.Language and3.Setting the Date and TimeYou need to set the current date and time so that the date is correct if you choose to automatically insert a date on your label.The default date and time format depends upon the language you select for the label maker. US English uses the date format MMM DD, YY and the 12-hour time format; all other languages use the date format DD MMM YY and the 24-hour time format.1.2.Set DateThe default date is displayed.e the left or right arrow key to move the cursor over each setting (month, day, and year) and use the up or down arrow keys to increase or decrease the value.4.e the left or right arrow key to move the cursor over each setting (hours and minutes) and use the up or down arrow keysto increase or decrease the value and pressPrinting Your First LabelYou are now ready to print your first label.To print a label1.Enter text to create a simple label.2.Press PRINT.3.Press the cutter button to cut the label. Congratulations!You printed your first label. Continue reading to learn more about the options available for creating labels. Getting to Know the Label MakerBecome familiar with the location of the feature and function keys on your label maker. Refer to Figure1 on the inside front cover. The following sections describe each feature in detail.Powercreated is remembered and displayed when the power is turnedLCD DisplayYou can enter up to 100 characters and spaces on a label; however, the display will only show a small portion of the characters. And, with DYMO’s exclusive graphical display, any formatting you add isvisible instantly. For example, theitalics and rounded border added tothe text in Figure 5 are clearlydisplayed.Feature indicators appear along thetop of the display to let you knowwhen a feature is selected. CAPS Modeletters that you enter will be capitalized. The default setting is CAPS mode on. When CAPS mode is off, all letters appear in lower case.Font size # lines CAPs Num Lock Figure 5Lock indicator is shown on the display and the numbers 1 through 0 appear when you press the corresponding letter keys. Num Lock is turned off by default.BackspaceClearNavigation KeysYou can review and edit your label using the left and right arrow keys on the Navigation key.You can navigate through menuto make a selection.FormatInsertSettingsUser Guide.Formatting Your LabelYou can choose from a number of formatting options to enhance the appearance of your labels.Changing the Font SizeFive font sizes are available for your labels: Extra Small, Small, Medium, Large, and Extra Large.When you select a size, that size applies to all characters on a label.1.e the up or down arrow keys to select Size3.You can choose from six different font styles: Array When you select a style, that style applies to all characters. Stylescan be used with alphanumeric characters and some symbols.1.2.Style3.Creating Two-Line LabelsYou can print a maximum of two lines on labels.To create a two-line label1.e the arrow keys to selectnot print on the label.3.Type the text for the second line.Adding the DateYou can insert the date on your label. The date format is MMM DD, YY (US) or DD MMM YY (Europe) depending upon the version of your label maker.1.2.Adding Box and Underline StylesYou can highlight your text by choosing a box or underline style.A label can be underlined or enclosed in a box, but not both together.1.2.3.the lines are enclosed in one box style.Underline EdgedSquare TrainPointed Sweet HeartsRounded FlowersCrocodileUsing Symbols and Special Characters Symbols and other special characters can be added to your labels. Adding SymbolsThe label maker supports the extended symbol set shown below.1.select Symbols2.Use the arrow keys to move to the desired symbol. The left and right arrows move horizontally along a row of symbols. The up and down arrow keys scroll vertically through the rows of symbols.3.your label.Adding International CharactersThe label maker supports the extended Latin character set using RACE technology. Similar to using a mobile phone keypad, when you hold down a letter key for longer than one second, you will scroll through variations on that letter. To insert the character, release the key when the desired character appears.For example, if French is selected as the language and you hold down the letter a , you will see and so on through all the variations available. The character variations and the order in which the variations appear depend on the language you have selected to use.a à â æPrinting OptionsYou can preview your label and adjust the printing contrast. Previewing Your LabelYou can preview the text or format of your label prior to printing. A two-line label is previewed as a single-line label with a line break character between the two lines.1.2.Adjusting the Print ContrastYou can adjust the print contrast to fine tune the print quality of your label.1.2.3.Using Label Maker MemoryThe label maker has a powerful memory feature that allows you to store the text of up to nine labels you use frequently. Storing Label TextYou can store up to nine specific labels you use frequently.1.2.3.Recalling Stored LabelsYou can easily recall labels stored in memory to use at a later time.1.Press2.Caring for Your Label MakerYour label maker is designed to give you long and trouble-free service, while requiring very little maintenance. Clean your label maker from time to time to keep it working properly. Clean the cutter blade each time you replace the label cassette.To clean the cutter blade Array1.Remove the label cassette.2.Place the tip of a ball-pointpen or pencil on the black postas shown in Figure 6, and pressthe post down.3.While holding the post down,press and hold the cutter leverto expose the cutter blade.e a cotton ball and alcohol to clean both sides of the blade.5.Release the cutter lever.To clean the print head1.Remove the label cassette.2.Remove the cleaning tool from inside the label compartment cover.If you do not have a cleaning tool, contact DYMO Customer Care ()3.Gently wipe the padded side of the tool across the print head. See Figure 6.TroubleshootingReview the following possible solutions if you encounter a problem while using your label maker.If you still need assistance, contact DYMO Customer Support ().Problem/Error Message Solution No display•Ensure the label maker is turned on.•Replace discharged batteries.Poor Print Quality •Replace batteries.•Ensure label cassette is installed properly.•Clean the print head.•Replace the label cassette.Poor Cutter PerformanceClean the cutter blade. See Caring for Your Label Maker .Printing No action required.Message disappears when printing is finished.Too many charactersExceeded maximum number of characters in buffer.Delete some or all of the buffer text.Battery lowBatteries almost discharged.Replace batteries.Tape Jam Motor is stalled due to label jam.•Remove jammed label; replace label cassette. •Clean cutter blade.Documentation FeedbackWe are constantly working to produce the highest quality documentation for our products. We welcome your feedback. Send us your comments or suggestions about our user guides. Please include the following information with your feedback:•Product name, model number, and User Guide page number •Brief description of instructions that are inaccurate or unclear, areas where more detail is needed, and so onWe also welcome your suggestions about additional topics you would like to see covered in the documentation.Send email messages to: ********************** Please keep in mind that this email address is only for documentation feedback. If you have a technical question, please contact Customer Support.This product is CE marked in accordance with the EMC directive and the low voltage directive and is designed to conform with the following international standards:US FCC Class B CompatibilitySafety - EN 60950, IEC 950, UL 1950EMC Compatibility EN 61000 3-2/3; EN 61000 4-2/3/4/5/6/8/11; ENV 50204;EU Immunity - EN 55024 & addendum A1, A2 Electromagnetic Compatibility (EMC) - Information Technology equipment, Immunity CharacteristicsEmissions – EN 61000-6-3: Electromagnetic Compatibility (EMC) - Part 6: Generic Standards - Section 3: Emission standard for residential, commercial and light industrial environments. RoHS 2002/95/EC。
Materials Studio 培训教程
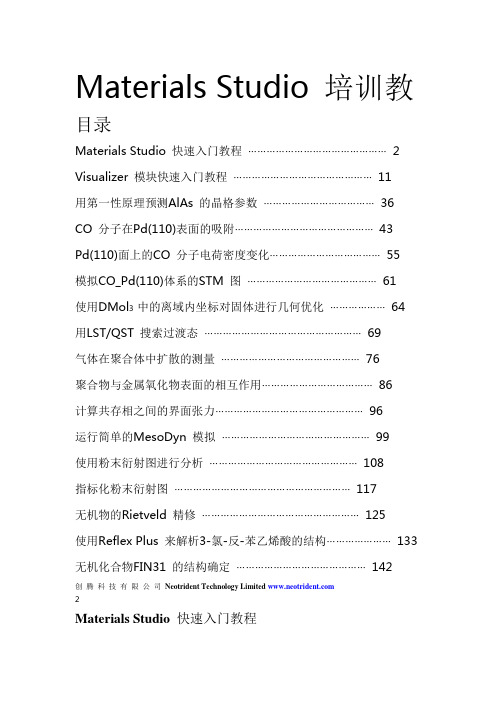
Materials Studio 培训教目录Materials Studio 快速入门教程⋯⋯⋯⋯⋯⋯⋯⋯⋯⋯⋯⋯⋯⋯⋯2 Visualizer 模块快速入门教程⋯⋯⋯⋯⋯⋯⋯⋯⋯⋯⋯⋯⋯⋯⋯11用第一性原理预测AlAs 的晶格参数⋯⋯⋯⋯⋯⋯⋯⋯⋯⋯⋯⋯36 CO 分子在Pd(110)表面的吸附⋯⋯⋯⋯⋯⋯⋯⋯⋯⋯⋯⋯⋯⋯⋯43Pd(110)面上的CO 分子电荷密度变化⋯⋯⋯⋯⋯⋯⋯⋯⋯⋯⋯⋯55模拟CO_Pd(110)体系的STM 图⋯⋯⋯⋯⋯⋯⋯⋯⋯⋯⋯⋯⋯⋯61使用DMol3 中的离域内坐标对固体进行几何优化⋯⋯⋯⋯⋯⋯64 用LST/QST 搜索过渡态⋯⋯⋯⋯⋯⋯⋯⋯⋯⋯⋯⋯⋯⋯⋯⋯⋯69气体在聚合体中扩散的测量⋯⋯⋯⋯⋯⋯⋯⋯⋯⋯⋯⋯⋯⋯⋯76聚合物与金属氧化物表面的相互作用⋯⋯⋯⋯⋯⋯⋯⋯⋯⋯⋯⋯86计算共存相之间的界面张力⋯⋯⋯⋯⋯⋯⋯⋯⋯⋯⋯⋯⋯⋯⋯⋯96运行简单的MesoDyn 模拟⋯⋯⋯⋯⋯⋯⋯⋯⋯⋯⋯⋯⋯⋯⋯⋯99使用粉末衍射图进行分析⋯⋯⋯⋯⋯⋯⋯⋯⋯⋯⋯⋯⋯⋯⋯⋯108指标化粉末衍射图⋯⋯⋯⋯⋯⋯⋯⋯⋯⋯⋯⋯⋯⋯⋯⋯⋯⋯⋯117无机物的Rietveld 精修⋯⋯⋯⋯⋯⋯⋯⋯⋯⋯⋯⋯⋯⋯⋯⋯⋯125使用Reflex Plus 来解析3-氯-反-苯乙烯酸的结构⋯⋯⋯⋯⋯⋯⋯133 无机化合物FIN31 的结构确定⋯⋯⋯⋯⋯⋯⋯⋯⋯⋯⋯⋯⋯⋯142创腾科技有限公司Neotrident Technology Limited 2Materials Studio 快速入门教程该教程将介绍Materials Studio 软件的基本功能,在这一部分,你将学到:1.生成Projects2.打开并且观察3D 文档3.绘制苯甲酰胺分子4.观察并且处理研究表格文档5.处理分子晶体:尿素6.建造Alpha 石英晶体7.建造多甲基异丁烯酸盐8.保存Project 并结束1. 生成Projects(1).运行Material Visualizer从运行菜单中运行或者在桌面点击快捷方式。
astra主题模板中的construction
文章题目:深度探析Astra主题模板中的Construction在当今数字化社会中,建设具有高质量、深度和广度的全球信息湾变得日益重要。
而Astra主题模板作为WordPress评台上备受推崇的主题之一,其Construction模板的设计和应用备受关注。
本文将深入探讨Astra主题模板中的Construction模板,通过全面评估和深入分析,帮助读者全面、深刻地理解这一主题。
1. Construction模板简介Astra主题模板是一款轻量级、快速响应的WordPress主题,被广泛应用于各类全球信息湾建设工作中。
其中,Construction模板作为Astra主题模板的重要组成部分,专为建筑、工程和房地产行业设计。
其页面布局简洁清晰,功能丰富多样,适合于展示项目、获取潜在客户和呈现公司形象。
2. 页面布局与设计风格Construction模板的页面布局以简洁、直观为主导,采用了现代化的设计风格和大量的图片展示。
通过全屏滚动和视觉效果的展示,将建筑项目的魅力充分展现出来。
该模板还支持定制化的设计,用户可以根据自身需求进行定制和调整,使得全球信息湾更具个性化和专业化。
3. 功能与插件支持在Construction模板中,Astra主题为用户提供了丰富的功能与插件支持。
从项目展示、客户案例到团队介绍,均拥有专门的模块与功能。
Astra主题还允许用户灵活选择与集成第三方插件,以满足不同的需求和使用场景。
4. SEO优化与速度性能在当下的全球信息湾建设中,SEO优化和速度性能越来越受到重视。
Astra主题的Construction模板通过精心的代码设计和SEO优化,确保全球信息湾在搜索引擎中的优异表现。
该模板在性能方面也表现出色,快速加载和流畅的体验成为其吸引用户的一大亮点。
5. 个人观点与理解作为Astra主题模板的一部分,Construction模板通过其独特的设计和功能,为建筑行业的全球信息湾建设带来全新的思路和可能性。
plantsimulation按百分比设置标签

植物模拟:按百分比设置标签1. 引言植物模拟是一种基于计算机技术的模拟方法,通过模拟植物的生长、发育和环境适应等过程,来研究植物的生理、生态和遗传等特性。
在植物模拟中,为了更好地理解和描述模拟过程中的各个阶段,设置标签是必不可少的一项任务。
本文将介绍如何按照百分比设置标签,以实现精确的植物模拟。
2. 百分比设置标签的意义在植物模拟中,通过设置标签可以对植物的生长和发育过程进行划分和描述。
而按照百分比设置标签,可以更加精确地表示植物在不同阶段的生长状态。
通过百分比设置标签,可以实现以下几个方面的目标:•精确划分生长阶段:植物的生长过程是一个连续的过程,通过按照百分比设置标签,可以将生长过程划分为不同的阶段,从而更好地理解和研究植物的生长规律。
•统一标准化描述:不同种类的植物在生长过程中可能存在差异,通过按照百分比设置标签,可以将不同植物的生长过程进行标准化描述,方便对比和研究。
•模拟结果可视化:通过按照百分比设置标签,可以将植物模拟的结果进行可视化展示,使得研究者和观察者更直观地了解和分析模拟结果。
3. 按百分比设置标签的方法在植物模拟中,按照百分比设置标签可以通过以下几个步骤来实现:3.1 数据收集首先,需要收集植物生长过程中的相关数据,包括植物的生长速率、发育时间等信息。
这些数据可以通过实验观测、文献调研等方式获取。
3.2 划分生长阶段根据收集到的数据,可以将植物的生长过程划分为不同的阶段。
一种常见的方法是按照植物生长速率的百分比来划分,例如将生长速率最快的阶段划分为生长初期,生长速率逐渐减缓的阶段划分为生长中期,生长速率几乎停滞的阶段划分为生长后期。
3.3 设置标签根据划分的生长阶段,可以为每个阶段设置相应的标签。
标签可以是文字描述,也可以是数字表示。
例如,可以将生长初期设置为0-30%的标签,生长中期设置为30-70%的标签,生长后期设置为70-100%的标签。
3.4 可视化展示最后,将按照百分比设置的标签应用于植物模拟的结果,并进行可视化展示。
Wigzo Tag Manager插件集成指南说明书

Magento Plugin Integration GuideMarketplace MethodIntroduction:The Wigzo Tag Manager plugin is a tool that helps you integrate your website.This integration guide will show you how to integrate the plugin with yourMagento store.Prerequisites:Before you begin,you should have a Magento store set up and running,and you should have access to the Magento admin panel.You will also need to have aWigzo account.Installation:To install the Wigzo Tag Manager plugin,follow these steps:●Log in to Magento Marketplace with your username and password,and purchasethe extension(it's free).●Please ensure you are using the correct access keys and paste access keys inyour auth.json file inside your project.Unset{"http-basic":{"":{"username":"<public-key>","password":"<private-key>"}}}●Use the following command to add the plugin to your project:Unsetcomposer require wigzo_tech/tagmanager:<version>●Run the following commands.You will notice that Wigzo_TagManager isdisabled.But don't worry,just run.Unset./bin/magento module:status./bin/magento module:enable Wigzo_TagManager--clear-static-contentYour plugin is now enabled!Unset./bin/magento setup:upgrade./bin/magento setup:di:compile./bin/magento cache:clean●Find Wigzo in the left navigation bar,click on it,then click on Configuration,andadd the required details from your Wigzo account.Finally,clear the Magento cache.●Go to your dashboard and click on Integration.Integration Page●Click on the applications tab on the list of the tabs●Click on the“Create a new app”button.●Provide the information about the application ,icon and URL,andproceed by clicking on the“Create App”button.●Now click on your app from the list and you can see Client Id,Client Secret andOrganization Token copy each one and paste it into Magento.●Go to your dashboard and click on Account Settings.Account Settings Page●Click on the API Credentials tab on the list of the tabs●You can see API token copy and paste in Magento.●Click on the“Save”buttonTesting:●To test the integration,go to your website and check that the Wigzo Tag Manageris working correctly.You can do this by inspecting the page source and lookingfor the Wigzo Tag Manager code.●Check some automation on the website&wigzo opt-in(if enabled).Troubleshooting:If you encounter any issues during the integration process,try thefollowing:●Double-check that you have entered your details correctly from the Wigzoaccount.●Clear your cache and refresh the page to ensure that the changes have takeneffect.Conclusion:Congratulations!You have successfully integrated the Wigzo Tag Manager plugin with your Magento store.If you encounter any issues or need further assistance, contact the support team.Best Practices:When using the Wigzo Tag Manager plugin,it is important to follow bestpractices to ensure that your tracking and analytics data is accurate andreliable.Some best practices to keep in mind include:●Test your automation thoroughly before deploying them to your live website.●Use descriptive names and labels for your events to make them easy to manageand understand.●Minimize the number of tags you use to reduce page load times and improvewebsite performance.●Regularly audit your tags to ensure that they are still necessary and relevant.Support:If you encounter any issues during the integration process or have any questions about using the Wigzo Tag Manager plugin,you can contact the support team for assistance.Updating the Plugin:To update the Wigzo Tag Manager plugin,follow the Installation steps:Disclaimer:While every effort has been made to ensure the accuracy and completeness ofthis integration guide,it is provided for informational purposes only and shouldnot be construed as legal,financial,or professional advice.Make sure to review the documentation and support resources provided by Wigzo and consult with a professional if you have any concerns or questions.About Wigzo:Wigzo is a leading provider of marketing automation solutions,including theWigzo Tag Manager plugin for Magento.Our mission is to help businesses of all sizes optimize their online sales and marketing efforts through data-driveninsights and automation.To learn more about Wigzo and our products,visit theWebsite.Thank you for following this integration guide.We hope it was helpful in integrating the Wigzo Tag Manager plugin with your Magento store.If you have any feedback or suggestions,please let us know.。
angular使用material组件库和tailwindcss样式
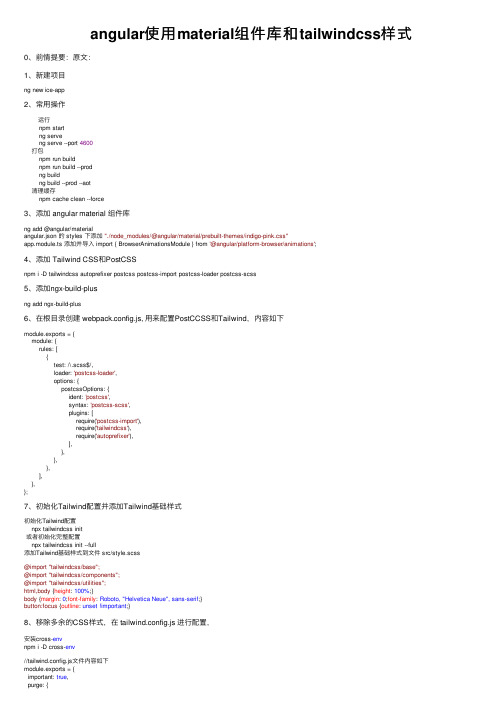
angular使⽤material组件库和tailwindcss样式0、前情提要:原⽂:1、新建项⽬ng new ice-app2、常⽤操作 运⾏npm startng serveng serve --port 4600打包npm run buildnpm run build --prodng buildng build --prod --aot清理缓存npm cache clean --force3、添加 angular material 组件库ng add @angular/materialangular.json 的 styles 下添加"./node_modules/@angular/material/prebuilt-themes/indigo-pink.css"app.module.ts 添加并导⼊ import { BrowserAnimationsModule } from '@angular/platform-browser/animations';4、添加 Tailwind CSS和PostCSSnpm i -D tailwindcss autoprefixer postcss postcss-import postcss-loader postcss-scss5、添加ngx-build-plusng add ngx-build-plus6、在根⽬录创建 webpack.config.js, ⽤来配置PostCCSS和Tailwind,内容如下module.exports = {module: {rules: [{test: /\.scss$/,loader: 'postcss-loader',options: {postcssOptions: {ident: 'postcss',syntax: 'postcss-scss',plugins: [require('postcss-import'),require('tailwindcss'),require('autoprefixer'),],},},},],},};7、初始化Tailwind配置并添加Tailwind基础样式初始化Tailwind配置npx tailwindcss init或者初始化完整配置npx tailwindcss init --full添加Tailwind基础样式到⽂件 src/style.scss@import "tailwindcss/base";@import "tailwindcss/components";@import "tailwindcss/utilities";html,body {height: 100%;}body {margin: 0;font-family: Roboto, "Helvetica Neue", sans-serif;}button:focus {outline: unset !important;}8、移除多余的CSS样式,在 tailwind.config.js 进⾏配置,安装cross-envnpm i -D cross-env//tailwind.config.js⽂件内容如下module.exports = {important: true,purge: {enabled: process.env.NODE_ENV === 'production',content: ["./src/**/*.html", "./src/**/*.ts"],},darkMode: false, // or 'media' or 'class'theme: {extend: {},},variants: {extend: {},},plugins: [],}9、修改package.json{// ...."scripts": {"start": "ng serve --extra-webpack-config webpack.config.js","build": "ng build --extra-webpack-config webpack.config.js","build:prod": "cross-env NODE_ENV=production ng build --extra-webpack-config webpack.config.js --prod", //...}//...}。
Cadence-HDL学习

1Cadence HDL学习1.1原理图设计步骤:建立项目:1.2Create Design Project, 输入Project 名称, 输入Design名称映射原理图库:1.3通过修改Setup中的cds.lib, 如果增加某个库, 可按照下列例子进行:define classlib ../classlib。
如果成功, 可在备选的库中看到classlib。
注意, 一定要小写字母, 大写字母带来不确定的问题。
1.4映射PCB库1.5在Project Setup-Tools, 选中PCB Editorsetup-Design_paths的padpath跟psmpath要选择库文件在的路径。
1.6其它设置在Project Setup-Tools-Design Entry HDL 设置General schematic settings, 具体设计看conHDLFTB_15.7.pdf page45。
设置chematic Grid Settings1.7设置Custom Vrariables, 之后就可保存并打开DE HDL了。
1.8设置原理图环境1.9View-Toolbars, 选中常用的几个, add, adit group,standard等。
1.10添加器件,画原理图1.11增加offpage connectors1.12检查设计1.13T ools-Check, 根据提示修改错误或者保存设计。
1.14打包原理图手动或者自动(在打包时候自动添加)添加元器件编号。
手动的话, 鼠标放在器件的上方, 右键看到菜单中的Attribute选项, 修改$LOCATION的值即可。
1.15选择File-Export Physical, 注意不选Update PCBEditor Board(Netrev), 但是选中Backannotate Packaging Properties to Schematic Canvas.1.16运行Rules Checker1.17在Project Manager 窗口, 选中Tools-Rules Checker:选中Logical 环境中的loading_io_checks.rle 以及net_name_checks_rle1.18运行Crefer在Project Manager Toos-Crefer, 选中Options, 在Cref Data File选项中, 找到合适的路径(User1/ftb/setup), 选中cref.dat, 点击Open。
Review6.2学习教程

– 鼠标中键粘贴
T 名称选择设置
– Pick Significent Element只提取重要元素 – Normal所有
30
30
模型中元件选择的高级选项
T 高级选择模式
– 配合“Ctrl”键选择多个模型元件
模型中元件的操作
– Slider controls-速度控制 Walkthrough
Classic
Slider controls
Fixed Focus
Flythrough
观察方式
T 四种观察方式
– Walkthrough mode-行走模式,相关视图的操作都是针对观察者所 在的位置,只能在水平的平面内移动
– Fixed Focus mode-聚焦模式,视图的操作都是针对观察面中心点 的位置
组的建立
T 组的定义New Group
36
36
添加组的内容
T 两种添加方法
– 通过菜单在图形中选取 – 选择模型后的右键弹出菜单
定义组的原点
T Group原点是我们操作组的基准点
– 通过元素原点 – 直接输入数值
通过元素原点定位
37
37
组的其他设置
T 修改组
– 打开碰撞检查 – 使用模型编辑器修改组的位置和角度
拷贝选择的元件的名称到剪切板视图控制slidercontrols速度控制walkthroughfixedfocusflythroughclassicslidercontrols观察方式walkthroughmode行走模式相关视图的操作都是针对观察者所在的位置只能在水平的平面内移动fixedfocusmode聚焦模式视图的操作都是针对观察面中心点的位置flythroughmode飞行模式与walkthroughmode类似没有水平面的限制classicmode老版本的视图操作方式行走模式1010通用鼠标操作通用鼠标操作在所有的视图操作模式下在选择的三维模型元件上单击鼠标右键将弹出快捷菜单在所有的视图操作模式下在选择的三维模型元件上按住鼠标左键将在状态栏中显示该元件的名称和坐标值快速调整观察者的位置surface站在模型表面dynamicfocusmoveclose类似于focuson但并不会把选择的元件显示在图形的中心1111行走飞行模式的鼠标操作平移旋转前进和后退单击鼠标中间键使点击处的模型移动到视图的中心按住鼠标中间键拖动模型绕观察者旋转使用鼠标的滚轮使观察者沿其视线方向移动按住鼠标右键拖动观察者的视点平行移动行走飞行模式的键盘操作键盘快捷方式1212聚焦模式的鼠标操作平移旋转前进和后退单击鼠标中间键使点击处的模型移动到视图的中心按住鼠标中间键拖动观察点绕模型旋转使用鼠标的滚轮使观察者沿其视线方向移动相当于缩放按住鼠标右键拖动观察者的视点平行移动聚焦模式的键盘操作键盘快捷方式1313自动旋转spinmode模型在视图中自动旋转在旋转过程中可以结合鼠标的视图操作顺时针旋转逆时针旋转停止旋转设置模型移动的步长增量设置模型移动的步长增量和旋转角度增量1414look操作look操作的所有选项显示设置1515显示模式实体模式照相机参数定义照相机参数定义1616模型显示质量设置视图窗体中三维图形的显示质量背景图雾化效果为视图窗体中的图形显示设置雾化效果1717背景颜色设置视图窗体中的背景颜色图片质量设置图片质量1818keyplanview的使用keyplanview打开keyplanview观察者的眼睛观察点1919keyplan工具栏剪切clipselect编辑剪切editclip组原点grouporigin组移动groupcontrol组滚动grouproll材质的定义2020材质调色板为三维模型赋予特定的材质和
thinkphp6模板
} }
html示例 </head> <body> {foreach $data as $key =>$value} <div>
key:{$key}--id:{$value.id}--姓名:{$value['name']} </div> {/foreach} </body> </html>
VOLIST标签
网络错误400请刷新页面重试持续报错请尝试更换浏览器或网络环境
thinkphp6模 板
普通标签:主要用于输出变量、函数过滤和做一些基本的运算操作 XML标签:也称为标签库标签,主要完成一些逻辑判断、控制和循环输出,并且可扩展。 一 、普通标签 1、普通标签标记 config/view.php文件里的tpl_begin和tpl_end设置普通标签标记
public function index()
{ $data=[ ['id'=>1,'name'=>'德莱文'], ['id'=>2,'name'=>'德莱厄斯'], ['id'=>3,'name'=>'诺手'] ]; View::assign('data',$data); return View::fetch();
TetraMax软件图形化界面使用详细介绍
TetraMax GUI使用介绍Tetramax主界面:Netlist(读取网表):·Nelist file --可以使用所提供的文本字段手动指定要读入的netlist文件的位置和名称。
·Browse -- 可以通过单击Browse按钮来通过图形界面选择想要读取的netlist文件。
·File Type -- 默认情况下,netlist格式是由TetraMAX自动检测的。
也可以手动选择EDIF、Verilog或VHDL netlist格式。
·Clear previous netlist -- 指定在内存中当前读取的所有netlist将被删除。
如果文件名称也被指定,那么在读取该文件之前,将清除内存。
·Abort on error -- 当这个框被选中(默认选中)时,当多个netlist被读取时,TetraMAX将会终止它。
这就允许使用通配符(*)文件名读取所有的netlist。
TetraMAX忽略了这个选项,如果你使用这个选项来读取单个的netlist,就会发出一个警告信息。
·Verbose -- 指定使用通配符文件名时显示单个netlist信息。
默认情况下,只对所读取的所有netlist 进行简单的总结。
·Library Module -- 指定在指定的文件名称中定义的所有模块应该被视为是库模块。
·Master Module -- 指定被读取的文件定义的所有模块应该被标记为主模块。
通常,当读取多个具有相同名称的模块时,最后一个模块将确定最终模块定义·Max errors --指定在当前文件终止netlist解析之前允许的最大解析错误数。
默认设置为10。
·Conservative Mux -- 指定保守的MUX门是否从MUX的保守UDP模型中提取出来。
其中:None --所有提取的MUXes都是规则的(如果必要的话,会发出适当的违规)。
Artisan常用命令

Artisan常用命令1、路由(Route)相关操作php artisan route:list 显示已注册过的路由列表php artisan route:list | findstr User 查询单个User路由列表php artisan route:clear 移除路由缓存文件php artisan route:cache 生成路由缓存文件来提升路由效率2、创建(make)相关操作php artisan make:controller Admin/UserController -r -m Models/User 创建User资源控制器和User模型注入php artisan make:model Models/User -m 在app/Models 文件夹下创建User模型并创建迁移文件命令php artisan make:seeder UserSeeder 创建用户的数据填充文件php artisan make:factory UserFactory -m Models/User 生成一个数据工厂php artisan db:seed 执行填充php artisan migrate:refresh --seed 注:迁移文件中字段可能设置有点短,可能填充不成功,此时,就需要修改一下数据字段长度,然后执行php artisan migrate 执行数据库迁移文件php artisan migrate:fresh Drop 所有数据表并重新运行Migrationphp artisan make:middleware CheckAdminLogin 创建一个后台登录CheckAdminLogin的中间件类php artisan make:request StoreNewsPost 创建StoreNewsPost(新闻修改)验证器php artisan make:rule CheckCategoryPid 创建自定义规则类(app/Rules/CheckCategoryPid.php)php artisan make:migration create_config_table 创建数据表为config的数据表迁移文件php artisan make:controller Admin/ConfigController 在Admin文件夹下的创建Config控制器php artisan make:model User -m 在app/文件夹下创建User模型并创建迁移文件命令php artisan make:migration alter_tests_table --table=tests 创建数据表迁移文件修改表结构php artisan make:export FangOwnerExport --model=Models/FangOwner 安装对应的maatwebsite/excel插件,就提供生成导出数据的命令3、view相关操作php artisan view:clear 清除视图缓存php artisan view:cache 缓存视图文件以提高效率1234、laravel复制分页php artisan vendor:publish --tag=laravel-pagination125、更新app_keyphp artisan key:generate 更新app_key126、不常用命令Artisanphp artisan --help OR -h 针对命令显示帮助信息php artisan --quiet OR -q 抑制输出信息php artisan --version OR -V 打印Laravel 的版本信息php artisan --no-interaction OR -n 不询问任何交互性的问题php artisan --ansi 强制输出ANSI 格式php artisan --no-ansi 禁止输出ANSI 格式php artisan --env 显示当前命令行运行的环境// -v|vv|vvv 通过增加v 的个数来控制命令行输出内容的详尽情况: 1 个代表正常输出, 2 个代表输出更多消息, 3 个代表调试php artisan --verbosephp artisan clear-compiled 移除编译优化过的文件(storage/frameworks/compiled.php)php artisan env 显示当前框架运行的环境php artisan help 显示某个命令的帮助信息php artisan list 显示所有可用的命令php artisan tinker 进入应用交互模式php artisan dump-server 配合dump() 函数调试数据php artisan down 进入维护模式php artisan up 退出维护模式// 优化框架性能// --force 强制编译已写入文件(storage/frameworks/compiled.php) // --psr 不对Composer 的dump-autoload 进行优化php artisan optimize [--force] [--psr]// 更改前端预设// type_name (可以是none, bootstrap, vue, react)php artisan preset [options] [--] type_name// 启动内置服务器php artisan serve// 更改默认端口php artisan serve --port 8080// 使其在本地服务器外也可正常工作php artisan serve --host 0.0.0.0// 更改应用命名空间php artisan app:name namespace// 清除过期的密码重置令牌php artisan auth:clear-resets// 清空应用缓存php artisan cache:clear// 移除key_name 对应的缓存php artisan cache:forget key_name [<store>]// 创建缓存数据库表migrationphp artisan cache:table// 合并所有的配置信息为一个,提高加载速度php artisan config:cache// 移除配置缓存文件php artisan config:clear// 程序内部调用Artisan 命令$exitCode = Artisan::call('config:cache');// 运行所有的seed 假数据生成类// --class 可以指定运行的类,默认是: "DatabaseSeeder"// --database 可以指定数据库// --force 当处于生产环境时强制执行操作php artisan db:seed [--class[="..."]] [--database[="..."]] [--force]// 基于注册的信息,生成遗漏的events 和handlersphp artisan event:generate// 罗列所有事件和监听器php artisan event:list// 缓存事件和监听器php artisan event:cache// 清除事件和监听器缓存php artisan event:clear// 生成新的处理器类// --command 需要处理器处理的命令类名字php artisan handler:command [--command="..."] name// 创建一个新的时间处理器类// --event 需要处理器处理的事件类名字// --queued 需要处理器使用队列话处理的事件类名字php artisan handler:event [--event="..."] [--queued] name// 生成应用的key(会覆盖)php artisan key:generate// 发布本地化翻译文件到resources 文件下// locales: 逗号分隔,如zh_CN,tk,th [默认是: "all"]php artisan lang:publish [options] [--] [<locales>]// 创建用户认证脚手架php artisan make:auth// 创建Channel 类php artisan make:channel name// 在默认情况下, 这将创建未加入队列的自处理命令// 通过--handler 标识来生成一个处理器, 用--queued 来使其入队列.php artisan make:command [--handler] [--queued] name// 创建一个新的Artisan 命令// --command 命令被调用的名称。
- 1、下载文档前请自行甄别文档内容的完整性,平台不提供额外的编辑、内容补充、找答案等附加服务。
- 2、"仅部分预览"的文档,不可在线预览部分如存在完整性等问题,可反馈申请退款(可完整预览的文档不适用该条件!)。
- 3、如文档侵犯您的权益,请联系客服反馈,我们会尽快为您处理(人工客服工作时间:9:00-18:30)。
LANDMARC
Lionel M. Ni
1120mm
2004
2010
2011
2013
2014
RFID Tracking & Localization State-of-the-art
[1] Lionel M. Ni, Yunhao Liu, etal LANDMARC: Indoor Location Sensing Using Active RFID Wireless Networks
Diff based
C. H.Williams
280mm
2004
2010
2011
2013
2014
RFID Tracking & Localization State-of-the-art
[1] Lionel M. Ni, Yunhao Liu, etal LANDMARC: Indoor Location Sensing Using Active RFID Wireless Networks [4] Salah Azzouzi, etal New measurement results for the localization of uhf RFID transponders using an angle of arrival (aoa) approach IEEE RFID 2011.
Drawing in the Air
40cm
30cm
TrackPoint Deployed at Airports
Reader
Industrial computer
State-of-the-art
RFID Tracking & Localization State-of-the-art
[1] Lionel M. Ni, Yunhao Liu, etal LANDMARC: Indoor Location Sensing Using Active RFID Wireless Networks
BackPos
Tianci Liu
1120mm
[3] P.Nikitin, etal Phase based spatial identification of uhf rfid tags. IEEE RFID 2010.
[6] Jue Wang, etal Dude, where's my card?: RFID positioning that works with multipath and non-line of sight ACM SIGCOMM 2013
Tagoram: Real-Time Tracking of Mobile RFID Tags to High-Precision Accuracy Using COTS Devices
Xiang-Yang Li Lei Yang, Yekui Chen, Xiang-Yang Li, Chaowei Xiao, Mo Li, Yunhao Liu Sep. 9, 2014
Tagoram: Real-Time Tracking of Mobile RFID Tags to High-Precision Accuracy Using COTS Devices
Xiang-Yang Li Lei Yang, Yekui Chen, Xiang-Yang Li, Chaowei Xiao, Mo Li, Yunhao Liu Sep. 9, 2014
280mm
210mm
300mm
2004
2010
2011
2013
2014
RFID Tracking & Localization State-of-the-art
[1] Lionel M. Ni, Yunhao Liu, etal LANDMARC: Indoor Location Sensing Using Active RFID Wireless Networks [4] Salah Azzouzi, etal New measurement results for the localization of uhf RFID transponders using an angle of arrival (aoa) approach IEEE RFID 2011.
1120mm
[3] P.Nikitin, etal Phase based spatial identification of uhf rfid tags. IEEE RFID 2010.
PinIt
Jue Wang
[2] C.Hekimian-Williams, elta Accurate localization of rfid tags using phase difference. IEEE RFID 2010.
AOA based
S. Azzouzi
[5] R. Miesen etal. Holographic localization of passive uhf rfid transponders. IEEE RFID 2011.
Holographic
R. Miesen
1120mm
[3] P.Nikitin, etal Phase based spatial identification of uhf rfid tags. IEEE RFID 2010.
680mm
[7] Jue Wang, etal RF-compass: robot object manipulation using RFIDs ACM MobiCom 2013
RF-Compass
Jue Wang
280mm
210mm
300mm
128mm 110mm 37mm
27.6mm
2004
2010
LANDMARC
Lionel M. Ni
1120mm
[3] P.Nikitin, etal Phase based spatial identification of uhf rfid tags. IEEE RFID 2010.
Spatial based
P. Nikitin
680mm
[2] C.Hekimian-Williams, elta Accurate localization of rfid tags using phase difference. IEEE RFID 2010.
Outline
01. Motivation 02. State-of-the-art 03. Overview 04. Movement with known track 05. Movement with unknown track 06. Implementation & Evaluation 07. Pilot Study 08. Conclusion
Spatial based
P. Nikitin
680mm
[2] C.Hekimian-Williams, elta Accurate localization of rfid tags using phase difference. IEEE RFID 2010.
Diff based
C. H.Williams
680mm
[7] Jue Wang, etal RF-compass: robot object manipulation using RFIDs ACM MobiCom 2013
RF-Compa
300mm
110mm
12.8mm
2004
2010
2011
2013
Imagine you can localize RFIDs to within 0.1cm to 1 cm!
Goal-line technology
Demonstration
/tracking/t agoram/youtube
High-Precision RFID Tracking Using COTS Devices
2014
RFID Tracking & Localization State-of-the-art
[1] Lionel M. Ni, Yunhao Liu, etal LANDMARC: Indoor Location Sensing Using Active RFID Wireless Networks [4] Salah Azzouzi, etal New measurement results for the localization of uhf RFID transponders using an angle of arrival (aoa) approach IEEE RFID 2011. [5] R. Miesen etal. Holographic localization of passive uhf rfid transponders. IEEE RFID 2011. [8] Tianci Liu, etal, Anchor-free Backscatter Positioning for RFID Tags with High Accuracy IEEE INFOCOM 2014
PinIt
[9] Jue Wang, etal, RF-Idaw: Virtual Touch Screen in the Air Using RF Signals IEEE INFOCOM 2014
RF-IDRaw
Jue Wang
Jue Wang
[2] C.Hekimian-Williams, elta Accurate localization of rfid tags using phase difference. IEEE RFID 2010.