XJ9100系列大字液晶电力网络仪表说明书
J系列说明书Ver
用户手册USER’S MANUALXJ9100系列电力网络仪表XJ9100 Series Network Power metersVER2.0许继测控仪表有限公司Xu Ji Measure& Control Meters Co., LtdCopyRight? 2008 XJ9100 Ver2.0Xu Ji Measure & Control Meters Co., Ltd版权所有,未经本公司书面许可,此手册中的任何段落和章节均不得被摘抄、复制与传播。
本公司保留对手册所描述之产品规格修改的权利,恕不另行通知,订货之前,欢迎垂询以确定最新订货信息。
本手册不适用于未受训者,维护、安装工作只由有资质的人完成。
目录一、产品简介....................................................................二、技术参数.................................................... 错误!未定义书签。
三、安装........................................................................3.1产品外形尺寸和安装方法.....................................................3.2接线.......................................................................3.2.1 后接线端子图..........................................................3.2.2 端子说明..............................................................3.3接线图 .....................................................................3.4辅助电源 ...................................................................3.5输入信号 ...................................................................四、操作与使用..................................................................4.1屏幕显示说明...............................................................4.1.1屏幕全部显示图..........................................................4.1.2显示字符说明............................................................4.1.3 按键定义..............................................................4.1.4 仪表具体页面...........................................................4.2参数设置 ...................................................................五、通信和输出..................................................................5.1通信协议 (11)5.2通讯应用格式说明 ...........................................................5.3读继电器输出状态(功能码01)...............................................5.4读数字输入状态(功能码02).................................................5.5读数据(功能码03).........................................................5.6控制继电器输出(功能码05)................................................5.7预置多寄存器(功能码16)...................................................5.8XJ9100系列通讯地址表......................................................六、产品选型....................................................................6.1产品命名方法...............................................................6.2快速选型指南...............................................................七、订货说明....................................................................7.1订货举例....................................................................7.2联系我们 (20)一、产品简介XJ9100系列多功能电力仪表采用最现代的微处理器和数字信号处理技术设计而成。
XJ系列说明书Ver
用户手册USER’S MANUALXJ9100系列电力网络仪表XJ9100 Series Network Power metersVER2.0许继测控仪表有限公司Xu Ji Measure& Control Meters Co., LtdCopyRight? 2008 XJ9100 Ver2.0Xu Ji Measure & Control Meters Co., Ltd版权所有,未经本公司书面许可,此手册中的任何段落和章节均不得被摘抄、复制与传播。
本公司保留对手册所描述之产品规格修改的权利,恕不另行通知,订货之前,欢迎垂询以确定最新订货信息。
本手册不适用于未受训者,维护、安装工作只由有资质的人完成。
目录一、产品简介....................................................................二、技术参数................................................... 错误!未定义书签。
三、安装........................................................................3.1产品外形尺寸和安装方法.....................................................3.2接线.......................................................................3.2.1 后接线端子图..........................................................3.2.2 端子说明..............................................................3.3接线图 .....................................................................3.4辅助电源 ...................................................................3.5输入信号 ...................................................................四、操作与使用..................................................................4.1屏幕显示说明...............................................................4.1.1屏幕全部显示图..........................................................4.1.2显示字符说明............................................................4.1.3 按键定义..............................................................4.1.4 仪表具体页面...........................................................4.2参数设置 ...................................................................五、通信和输出..................................................................5.1通信协议 (11)5.2通讯应用格式说明 ...........................................................5.3读继电器输出状态(功能码01)...............................................5.4读数字输入状态(功能码02).................................................5.5读数据(功能码03).........................................................5.6控制继电器输出(功能码05)................................................5.7预置多寄存器(功能码16)...................................................5.8XJ9100系列通讯地址表......................................................六、产品选型....................................................................6.1产品命名方法...............................................................6.2快速选型指南...............................................................七、订货说明....................................................................7.1订货举例....................................................................7.2联系我们 (20)一、产品简介XJ9100系列多功能电力仪表采用最现代的微处理器和数字信号处理技术设计而成。
9100 系列微波放大器数据手册说明书
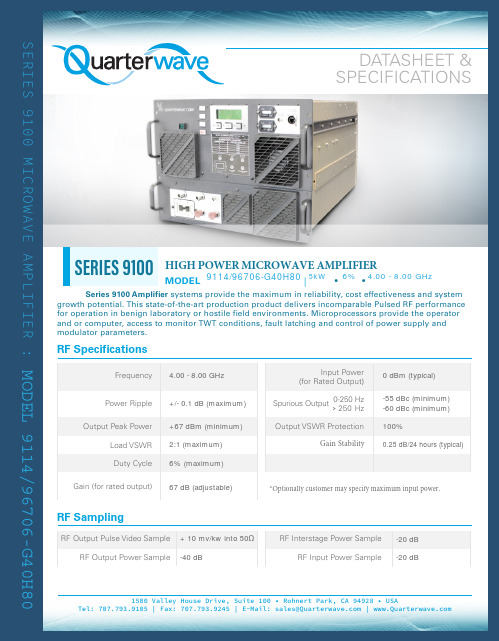
Frequency Power Ripple Duty CycleGain (for rated output)Output Peak PowerLoad VSWR RF SamplingRF Output Pulse Video SampleRF Output Power SampleRF Interstage Power SampleRF Input Power SampleInput Power (for Rated Output )Spurious Output0-250 Hz> 250 Hz Output VSWR ProtectionGain Stability*Optionally customer may specify maximum input power.4.00 - 8.00 GHz 0 dBm (typical)+/- 0.1 dB (maximum)-55 dBc (minimum)-60 dBc (minimum)+67 dBm (minimum)100%2:1 (maximum)0.25 dB/24 hours (typical)6% (maximum)67 dB (adjustable)+ 10 mv/kw into 50Ω-20 dB -40 dB-20 dBMODEL 9114/96706-G40H80EnvironmentalOperating Temperature Storage TemperatureHumidity AltitudeCoolingRS-232 interface provides ability to remotely operate, monitor, control and adjust thesystem. IEEE-488, an optional feature, provides the ability to remotely operate, monitor and control operation of the amplifier. Any fault condition latches information. Ethernet (LAN) and RS-422 are also available. Software is provided to operate with MS Windows.DIGITAL INTERFACE RS-232Self Contained Forced Air0.1 to +50C | Derate to 10C for 10,000 foot Operation -40 to +85C0 to 95% non-condensing0 to 10,000 feet above sea level, 50,000 non-operatingMODEL 9114/96706-G40H80CONNECTORSTYPERF Input (Rear Panel )RF Output (Rear Panel )RF Samples (Front Panel )RF Output Pulse Video Sample (Front Panel )Modulation Input Panel (Front Panel )FRONT PANEL : Switches: Illuminated Status Monitor : Off/Standby /Operate /Reset: Warm-up /Standby /Operate /ResetACCESSORIES SUPPLIED 1-EACH •Maintenance Manual•Primary Input Power Mating Connector •CD ROM: Computing Operating SoftwareCONTROLS & INDICATORSCo-ax | Type "NF"Waveguide | WRD-350Co-ax | Type "NF"Co-ax | Type "BNCF"Co-ax | Type "BNCF"MODEL 9114/96706-G40H80MODEL 9114/96706-G40H80。
江森DX-9100 数字控制器面板操作说明
DX-9100 数字控制器面板操作说明一、面板布置第2页二、启动模式第6页三、下载模式第6页四、时间调度模式第6页五、时间调度时间编程第7页六、实时时钟日历第9页七、模拟输入显示模式第11页八、模式滚动模式第12页九、数字输入显示第13页十、输出模块显示模式第13页十一、数字计数器显示模式第15页十二、可编程功能模块显示模式第15页十三、模拟/数字常量显示模式第18页面板布置控制器内的工作参数和值可以通过前面板显示出来并修改。
前面板的布置由七个功能块组成,这些功能块包括用来完成许多种任务的发光二极管、数码管和操作键。
DX-9100控制器,1型emdxtb59图1:DX-9100-8154的前面板布置图DX-9100控制器,2型emdxtb60图2:DX-9100-8454的前面板布置图功能块的功能两种型号控制器功能块的功能如下所述。
功能块A :两个七段绿色数码管显示所选项目的索引号。
功能块B :四个七段红色数码管监视、显示并更新所选项目的值:● 模拟输入、输出和常数以数字表示。
● 数字输入、输出和常数以“ON ”或“OFF ”表示。
● 数字输入的计数器及其他合计值以数字表示,交替显示“个”位和“千”位数。
功能块C :八个红色发光二极管指示DX (或为在功能块A 中选中的XT )的数字输入的状态,在时间调度模式下为定时模块中的星期日期以及在实时时钟模式下的当前星期日期。
功能块D1(1型):三个红色发光二极管以○t (根据设置可为○C 或○F )或%指示测量单位。
在内部的锂电池需要更换时发光二极管会闪烁。
功能块D2(2型):上方的两个红色发光二极管分别指示,在N2总线(91总线)上接收数据时RD灯点亮,DX-9100控制器经N2总线(91总线)发送数据时TD灯点亮。
下部的三个红色发光二极管指示非常情况:●AL 指示一个模拟输入处於报警状态。
●XT 指示DX-9100与I/O扩展模块之间的通信发生故障。
德力西CDI9100说明书.

目录目录序言............................................................................................................................................ (Ⅲ)第一章安全运行及注意事项 (1)1. 1 验收............................................................................................................................................ (1)1.2 安全运行的注意事项 (1)第二章产品信息............................................................................................................................................ (3)2.1 铭牌数据及命名规则 (3)2. 2 技术规范............................................................................................................................................ . (4)2. 3 CDI9100变频器系列 (5)2. 4 外型及安装尺寸 (7)2.5 日常使用的保养与维护 (9)第三章变频器的安装与接线 (11)3.1 变频器的前盖与数字操作键盘的安装 (11)3.1.1 变频器前盖的安装 (11)3.1.2 数字操作键盘的安装 (11)3.2 安装地点及空间的选择 (11)3.3 外围设备和任选件的接线 (13)3.4 主回路的接线 (12)3. 4. 1 主回路接线图及其注意事项 (14)3.4.2 主回路输入侧的接线注意事项 (15)3.4.3 主回路输出侧的接线注意事项 (16)3.4.4 380V级主回路配线及所需配套的外围设备参考表 (17)3.5 控制电路的接线 (18)3.5.1 控制电路端子排列及接线图 (18)3.5.2 控制电路端子的功能 (20)3.6 接地............................................................................................................................................ . (21)第四章键盘操作与运行 (22)4.1 操作方式的选择 (22)4.2 试运行及检查 (22)4.2.1 试运行前的注意事项及检查 (22)4.2.2 试运行...........................................................................................................................................224.2.3 运行前的检查 (22)4.3 键盘的操作方法 (23)4.3.1 键盘按键及功能 (23)4.3.2 键盘显示方式及组合功能 (24)4.3.3 查看/设定参数的方法(用数字键盘 (25)4.3.4 键盘设定频率的方法 (26)第五章功能参数表.........................................................................................................................................27第六章功能参数说明 (34)6.1 基本功能参数P00组 (34)6.2 辅助功能参数P01组 (42)6.3 输入输出端子与多段速运行功能P02组 (49)6.4 其他功能参数P03组 (60)6.5 显示功能参数P04组 (63)第七章故障排除.............................................................................................................................................647.1 故障的诊断与排除措施 (64)7.2 报警显示和解释 (64)7.3 电机故障和排除措施 (65)目录目录附录1 定期维护及检查方法 (66)附录2 选件选用指南 (67)A2.1 交流电抗器ACL (67)A2.2 直流电抗器DCL (67)A2.3 无线电噪声滤波器 (68)A2.4 远方操作键盘 (68)A2.5 回生制动单元及回生制动电阻 (69)A2.6 漏电保护电路 (69)附录3 用于注塑机的改造说明 (70)A3.1 主回路端子接线图............................................................................................................................. 70 A3.2注塑机变频节能改造的主电路的接线方法...................................................................................... 70 A3.3转换板接线方式 (70)A3.4主要参数调整 (71)附录4 RS-485通讯协议修正 (73)前言前言感谢您选用德力西(杭州)变频器有限公司生产的CDI9100系列变频调速器。
XJ9100系列说明书Ver2.0
XJ9100系列电力网络仪表用户手册用户手册USER’S MANUALXJ9100系列电力网络仪表XJ9100 Series Network Power metersVER2.0许继测控仪表有限公司Xu Ji Measure& Control Meters Co., LtdCopyRight© 2008 XJ9100 Ver2.0Xu Ji Measure & Control Meters Co., Ltd版权所有,未经本公司书面许可,此手册中的任何段落和章节均不得被摘抄、复制与传播。
本公司保留对手册所描述之产品规格修改的权利,恕不另行通知,订货之前,欢迎垂询以确定最新订货信息。
本手册不适用于未受训者,维护、安装工作只由有资质的人完成。
目录一、产品简介 (1)二、技术参数 (1)三、安装 (2)3.1产品外形尺寸和安装方法 (2)3.2接线 (2)3.2.1 后接线端子图 (2)3.2.2 端子说明 (2)3.3接线图 (3)3.4辅助电源 (3)3.5输入信号 (4)四、操作与使用 (6)4.1屏幕显示说明 (6)4.1.1屏幕全部显示图 (6)4.1.2显示字符说明 (6)4.1.3 按键定义 (6)4.1.4 仪表具体页面 (6)4.2参数设置 (9)五、通信和输出 (11)5.1通信协议 (11)5.2通讯应用格式说明 (11)5.3读继电器输出状态(功能码01) (12)5.4读数字输入状态(功能码02) (12)5.5读数据(功能码03) (13)5.6控制继电器输出(功能码05) (13)5.7预置多寄存器(功能码16) (14)5.8XJ9100系列通讯地址表 (15)六、产品选型 (19)6.1产品命名方法 (19)6.2快速选型指南 (19)七、订货说明 (20)7.1订货举例 (20)7.2联系我们 (21)一、产品简介XJ9100系列多功能电力仪表采用最现代的微处理器和数字信号处理技术设计而成。
D系列多功能仪表说明书V2[1].0版
![D系列多功能仪表说明书V2[1].0版](https://img.taocdn.com/s3/m/9691cf62b84ae45c3b358c96.png)
6 输出信号.............................................................................................................................- 7 6.1 模拟量输出............................................................................................................................... - 7 6.2 脉冲输出................................................................................................................................... - 7 6.3 通讯........................................................................................................................................... - 8 -
-2-
XJ92Байду номын сангаас 系列多功能组合式仪表说明书
安全须知
在安装、操作或维护此设备之前,请仔细阅读本手册。 以下特殊信息可能贯穿出现在本手册中或在设备上, 用来警示潜在的危险或对于 阐释和规定操作规程的信息提请注意。 附有这种安全标志示意周围存在着电力危险,假若未遵 照一定的指令将会导致人身伤害。 这是安全警告标志,用来警告你潜在人身伤害的危险, 遵照此标志后的所有安全信息,避免可能的伤害或死亡。 此标志指示临近于危险位置,如不加以避免将导致死亡 或严重伤害。 在维护和检修之前,设备必须断电并接地。 维护工作只能由有资质的人员执行。 本文件不是一本适用于未受训者的操作手册,在其正常使用范围 之外所引起的问题,本公司概不负责。
9100通用仪器校准源操作简明手册

通过自测试可以使用户增强对仪器可靠性的信心,避免计量校准中的错误。 9100 有三种自测试: 1.FAST TEST——快速自测试。这种自测试与上电时进行的自测试一样,测试仪器各部分是否 进入正常工作状态。 2.FULL TEST——全面自测试。每项测试出错都予以保留,测试完成后,可以察看任一项出错 内容。 3.Interface Test——接口测试。 这一测试专门用来测试显示屏、存贮器、跟踪球和打印机以及插入 PCMCIA 数据卡插槽的空白 存贮卡。(注意:插入数据卡插槽中的 PCMCIA 数据卡将被改写!) 2.1.3 OUTPUT OFF/ON——输出通断控制 输出通断控制键在主功能键的左侧。按下“ON”键,输出接通;按下“OFF”键,输出切断。 输出接通时,“ON”键上方的指灯亮,屏幕在左上角的通断指示显示“1”,为深底色。 输出电压值超过高电压界限值时,输出会自动切断,须重新按“ON”键确认后,才可接通输出。 2.1.4 编辑键 2.1.4.1 数字/字符键 数字可以通过前面板的数字/字符键直接键入。 按下“▲”键一次,可输入一个数字左上方的字符。 按下“■”键一次,可输入一个数字右上方的字符。 “→”为空格键,“←”为向左删除键。 2.1.4.2 游标编辑键和游标选项键。 “∧”为屏幕游标编辑上行键,数字加一键 “∨”为屏幕游标编辑下行键,数字减一键 “<”为数字位左移一位键 “>”为数字位右移一位键 屏幕中被调整参数的数字位上有“▼”和“▲”指示。 “→|”为游标选项键。 按“→|”键,可在屏幕中移动游标编辑键的位置,选择需要调整的参数。 2.1.4.3 旋轮
“△V”两上屏幕软键。
△% 百分比增益偏移设置键,可以为显示的输
出增益设置±10%内的偏移。 △V 偏移电压设置键,可以为显示的输出值增
Philips 75PD9100 电视用户手册说明书

用户手册75PD9100 Register your product and get support at内容1 遥控器4 1.1 按键概述4 1.2 将遥控器与电视配对5 1.3 语音搜索5 1.4 红外接收器52 频道安装7 2.1 自动搜索频道7 2.2 手动设定频道7 2.3 安装数字频道73 连接设备8 3.1 关于连接84 打开/关闭智能电视105 设置11 5.1 画面11 5.2 声音14 5.3 ECO设置17 5.4 一般设置17 5.5 语言设置18 5.6 通用接入设置19 5.7 频道锁196 视频、照片和音乐20 6.1 来自电脑或 NAS20 6.2 收藏夹菜单20 6.3 最流行菜单和最后播放菜单20 6.4 来自 USB 连接20 6.5 播放视频20 6.6 查看照片21 6.7 播放音乐237 电视指南24 7.1 您需要执行的操作247.2 电视指南数据24 7.3 使用电视指南248 环景光设置25 8.1 打开或关闭环景光25 8.2 环景光风格25 8.3 自定义色彩25 8.4 Ambisleep25 8.5 环景光扩展26 8.6 环景光高级设置26 8.7 环景光应用279 软件2810 Open Source29 10.1 开源软件29 10.2 开源许可证2911 故障排除31 11.1 一般电视问题31 11.2 电视频道问题31 11.3 画面问题31 11.4 声音问题31 11.5 连接问题31 11.6 网络连接问题32 11.7 联系我们3212 规格33 12.1 环境33 12.2 显示屏输入分辨率33 12.3 多媒体3313 安全与保养35 13.1 安全35 13.2 屏幕养护3614 安全3715 使用条款38 15.1 使用条款 - 电视3816 版权39 16.1 HDMI39 16.2 Dolby Atmos 和 Dolby Vision39 16.3 DTS-HD39 16.4 DTS Play-Fi39 16.5 PHILIPS 盾牌39 16.6 SDoC39 16.7 其他商标3941 17 关于第三方提供的服务和/或软件的免责声明索引421遥控器1.1按键概述顶部1 - 待机 / 开机在电视开机时将其切换到待机。
2.1 PD194EZ系列多功能电力仪表用户手册LED

多功能电力仪表LED 用户手册本手册适用于以下型号的产品 PD194Z-2S4/2S4D/2S4+ PD194Z-2S9/2S9D/2S9+ PD194Z-2S7/2S7+PD194E-2S4/2S4+/2S9/2S9+/2S7/2S7+ PD194Z-3S4/3S7/3S9 PD194E-3S4/3S7/3S9PD194Z-9S4/9S4+/9S9/9S9+/9S7/9S7+ PD194E-9S4/9S4+/9S9/9S9+/9S7/9S7+江 苏 斯 菲 尔 电 气 股 份 有 限 公 司JIANGSU SFERE ELECTRIC CO., LTD.前 言感谢您选用江苏斯菲尔电气股份有限公司研发的多功能电力仪表,为了方便您选购和安全、正确、高效地使用本仪表,请仔细阅读本说明书并在使用时务必注意以下几点。
注意CAUTION:◆ 该装置必须由专业人员进行安装与检修◆ 在对该装置进行任何内部或外部操作前、必须切断输入信号和电源;◆ 始终使用合适的电压检测装置来确定仪表各部位无电压 ◆ 提供给该装置的电参数需在额定范围内 下述情况会导致装置损坏或装置工作的异常: ◆ 辅助电源电压超范围 ◆ 配电系统频率超范围 ◆ 电流或电压输入极性不正确 ◆ 带电拔插通信插头 ◆ 未按要求连接端子连线本手册可以在本公司的主页上下载到最新版本,同时也提供一些相应的测试软件下载。
如果您需要纸质用户手册可以向本公司的技术服务部门申请。
目 录1.产品简介 (1)1.1引用标准 (1)1.2产品概述 (1)1.3用户选型 (2)2.技术参数 (4)3.安装与接线 (6)3.1仪表尺寸 (6)3.2安装方法 (7)3.3接线端子功能说明 (8)3.4接线 (9)4.编程操作 (11)4.1面板说明与使用 (11)4.2菜单介绍与操作 (11)4.2.1电量显示 (11)4.2.2设置菜单结构 (16)4.3编程操作方法 (20)4.3.1系统设置 (21)4.3.2信号输入设置 (22)4.3.3通信设置 (23)4.3.4继电器输出设置 (24)4.3.5模拟量输出设置 (25)5.功能模块 (26)5.1通信 (26)5.1.1物理层 (26)5.1.2通信协议 MODBUS-RTU (26)5.1.3报文指令格式 (27)5.2电能计量与电能脉冲输出 (30)5.3模拟量输出 (31)5.4继电器输出 (35)5.5开关量输入 (36)5.6模拟量输入 (36)5.7需量记录 (36)6.常见问题及解决办法 (37)附录1.MODBUS-RTU通信地址信息表 (39)1.产品简介1.1引用标准GB/T 17215.322 0.2S级和0.5S级静止式交流有功电度表GB/T 17215.323 2级和3级静止式交流无功电度表GB/T 4793.1 测量、控制和试验室用电气设备的安全要求第1部分设备的安全要求 第1部分GB/T 17626 电磁兼容性实验IEC 61000-4-30 电磁兼容(EMC) 试验和测量技术 电能质量测量方法1.2产品概述多功能电力仪表是针对电力系统、工矿企业、公共设施、智能大厦等的电力智能监控和电能计量等需求而设计,能够高精度测量三相电网中的所有常用电力参数,三相电压、三相电流、有功功率、无功功率、视在功率、频率、功率因数、四象限电能、UIPQ需量,并带有通信接口、模拟量输出、继电器输出控制、电能脉冲输出等功能。
9100火灾报警控制器使用说明书
1Байду номын сангаас
JB-QB-9100 火灾报警控制器(联动型)使用说明书
第二章 JB-QB-9100 火灾报警控制器简介
JB-QG-9100 火灾报警控制器(联动型)是我公司推出的大屏幕网络型火灾报警控制器, 为适应工程设计的需要,本控制器兼有联动控制功能,可与公司的其它产品配套使用,组成 配置灵活的报警、联动一体化控制系统,特别适合大、中型火灾报警与消防联动一体化控制 系统的应用。本控制器具有以下特征: 2.1 产品特点及适用范围 该控制器属于全总线制火灾报警控制器,具有以下特点: 系统采用现场实时控制操作系统,具有实时性、稳定性及可靠性、易操作的特点。 主控制器采用低功耗嵌入式工控系统,具有功耗低,抗干扰性强的特点,可适应长期 稳定可靠的工作。 系统兼容性强, 可在同一回路中混接 3251 复合智能型探测器、 SC551 系列智能型探测器、 F732 或 1451 系列传统型探测器。 控制器带有 2 个 4 服务通讯口用于与复示器及回路进行通讯 ,1 个标准并口配接微型打 印机,两个 USB 口用于数据的存储,一个网口用于网络的联接。 机器中可存储该建筑物的平面图,并标注探测器和模块的地理位置,供操作人员随时 查阅。 采用 12.1 英寸高亮液晶屏,全中文显示界面。
2.2 机器最大容量(单机)
该控制器是 20 回路通用火灾报警控制器,在同一回路中可连接智能型复合探测器、 智能型探测器与模块、传统型探测器与模块。单机系统容量如下 :
回路数 探测器与模块数 1 198 2 396 3 594 .. .. 20 3960 具有 10 个可编程控制继电器 可挂接 32 台复示器 3 块多线联动盘 3 台手动控制盘
回路板插箱工控机机箱键盘端子继电器板备用电源机柜侧视图命令故障动作回授复位消音自检运行故障通讯允许禁止命令故障动作回授命令故障动作回授命令故障动作回授命令故障动作回授命令故障动作回授命令故障动作回授命令故障动作回授命令故障动作回授命令故障动作回授命令故障动作回授命令故障动作回授命令故障动作回授机柜主视图jbqb9100火灾报警控制器故障联动运行屏蔽自检复位消音电源键盘600液晶屏打印机喇叭机柜jbqb9100火灾报警控制器联动型使用说明书32jbqb9100控制器声音控制结构说明控制器的上部为喇叭可以发出火警故障联动等声音指示
JK-9100BP日常服务指导手册

5厘米 2厘米
6厘米
脚踏控制说明
原位停止
打开电源,机器自动找上针位,机器停止时踏板所 处的状态。
前踏运行
开机上电后,缝纫机的运转速度虽踏板前踩的深度 而逐渐加快。踩入越深,速度越快。
反踏提针停止 缝纫结束时,用脚后跟踩脚踏板后方,机器作提针
动作,停止运转。
踏板压力和行程调节
1.踏板踩踏压力的调整 a) 更换踩踏弹簧1 的位置,可调整踩踏压力。
当机针不在压脚槽中间时,或者是送布牙最低,
压脚与机针调节
压脚未落在针板上时,可拧松压脚杆紧固螺丝, 调节至合适位置后,拧紧压脚杆紧固螺丝。
压脚压力调节
抬起压脚,把布料放入压脚下,用手拉扯布 料,如布料能轻易扯出,则加大压脚压力。 拧松压杆螺母,顺时针旋进压力螺杆压力加 大,反之压力减小。合适后,拧紧压杆螺母。
报错一键解除功能
系统报错后,机器将无法运行,显示面板将持续显示错误码, 按 键可一键解除报错,1秒后重新判断错误状态,若错误 仍然存在,显示面板会重新显示错误码 ,若错误已经解除, 显示面板会显示P界面。
故障代码表
错误码
原因
解决方法
OF
机器待机约10分钟 未运行
出现此种状况,需要关闭电源,稍后再打开电源开关即可
参数表
参数
参数作用
用户参数设置界面 P 初始化显示界面
速度参数调节键
F 厂商参数设置界面 L 最高转速限制参数 M 自动停针功能开关 d 补针功能 G 安全开关 C 起缝过冲 n 点针参数
用户参数
参数说明
速度=显示值x100(转/分)
厂商参数
厂商参数,禁止用户修改 0:关闭自动停针功能;1:打开自动停针功能 0:关闭补针功能;1:补半针;2:补1针 0:关闭安全开关;1:开启安全开关 范围:0—9;数值越小,起缝越稳 厂商参数,禁止用户修改
多功能电力仪表用户手册说明书

多功能电力仪表用户手册适用型号:PD194E/Z-2H4PD194E/Z-9H4/9H1PD194E/Z-3H4/3H1PD194E/Z-AH4/AH1安全须知感谢您选择江苏斯菲尔电气股份有限公司研发的产品,为了方便您选购和安全、正确、高效的使用本产品,请仔细阅读本手册并在使用时务必注意以下几点。
注意CAUTION:◆该装置必须有专业人员进行安装与检修◆在对该装置进行任何内部或外部操作前、必须切断输入信号和电源◆始终使用合适的电压检测装置来确定仪表各部位无电压◆提供给该装置的电参数需在额定范围内下述情况会导致装置损坏或装置工作的异常:◆辅助电源电压超范围◆配电系统频率超范围◆电流或电压输入极性不正确◆带电拨通信插头◆未按要求连接端子连线本手册可以在本公司的主页上下载到最新版本,同时也提供一些相应的测试软件下载。
如果您需要电子版用户手册可以向本公司的技术服务部门索取。
目录1产品简介 (1)1.1概述 (1)1.2选型 (1)2技术规格 (3)2.1技术参数 (3)2.2测量参数 (5)3安装与接线 (6)3.1尺寸 (6)3.2安装 (7)3.3接线 (8)4操作 (10)4.1面板 (10)4.2显示 (10)4.2.1电量 (11)4.2.2电能 (13)4.2.3谐波 (14)4.3设置 (16)4.3.1系统设置 (20)4.3.2信号输入设置 (21)4.3.3通信设置 (22)4.3.4继电器输出设置 (23)4.3.5模拟量输出设置 (24)5功能 (25)5.1需量记录 (25)5.2电能脉冲输出 (25)5.3开关量输入 (26)5.4继电器输出 (27)5.5模拟量输出 (29)6通信 (31)6.1物理层 (31)6.2通信协议MODBUS-RTU (31)6.3报文指令格式 (32)6.4数据格式 (38)附录1MODBUS-RTU通信寄存器信息表 (39)一次电网数据 (39)二次电网数据 (40)极值需量数据 (41)谐波数据 (43)参数设置 (48)附录2DL/T645-1997通信协议 (52)电能通信协议 (52)瞬时电量量通信协议 (52)总谐波畸变率(THD)通信协议 (53)通信参数协议 (54)附录3DL/T645-2007通信协议 (54)电能通信协议 (54)瞬时电量量通信协议 (55)总谐波畸变率(THD)通信协议 (57)通信参数协议 (57)1产品简介1.1概述H系列多功能电力仪表可测量全电量参数、谐波、电能,并具有数字通信、开关量输入、继电器输出、电能脉冲输出和模拟量输出等功能。
YDC9100系列1-3K中文说明书
第4章 面板显示操作与运行
本机操作简单,操作人员只须阅读完本手册,无需任何专门训练。按手册中指示即可操作本机。
4.1 面板显示说明 4.1.1 按键功能说明
图十六 前面板按键图示
开机键(开机) 按下开机键 1 秒以上则执行开机动作。 关机键(关机) 按下关机键 1 秒以上则执行 UPS 关机动作。 功能键(功能) 在市电模式或经济模式下长按 2 秒以上:UPS 自检操作。 在电池模式下长按 2 秒以上:UPS 静音操作。 短按半秒以上(小于 2 秒):依次显示 LCD 项目区的各选项内容。
2.2 产品工作原理
图四 UPS 工作原理图
1.输入滤波:完成对输入市电的滤波,为UPS提供干净的电源。 2.AC/DC升压:将经过滤波后的市电进行交流/直流转换,并对转换后的直流升压,供 DC/AC 逆变使用。 3.DC/DC升压:当UPS工作在电池供电模式时,由该电路进行直流升压处理,供DC/AC 逆变使用。 4.DC/AC逆变:将经过升压处理的直流电转换成稳定的交流输出。 5.旁路:当UPS发生过载、逆变异常等故障时,将自动切换到旁路供电模式保证负载不断电。 6.充电器:标准型提供1A的充电电流,长效型提供4A的充电电流。 7.电池:适用电池类型为密封式免维护铅酸蓄电池。 8.输出滤波:完成UPS输出滤波,为负载提供干净的电源。
危险: 表示若忽视安全告诫,就有可能发生人员伤亡或设备损坏的重大事故。
警告: 表示若忽视安全告诫,就有可能发生重大或严重伤害事故,或损坏设备。
注意、小心: 表示若忽视安全告诫,就有可能发生伤害事故,损坏设备。
3
第2章 产品介绍
2.1 产品外观图
图一 前面板视图
图二 1KVA 后面板视图
图三 2/3KVA 后面板视图 4
进展动力电源9100系列电源转换器说明书

PD9100 / 9200 SERIES POWER CONVERTERin material or workmanship under normal use and service; and limits the remedies to repair or This warranty shall extend for a period of two years from the original date of purchase, is valid only within the continental limits of the United States and Canada.WARRANTY EXCLUSIONS: This warranty specifically does not apply to:Any power converter which has been repaired or altered in any way by an unauthorized person orDamage caused by excessive input voltage, misuse, negligence or accident; or an external force;Any power converter which has been connected, installed or adjusted or used other than in accordance the instructions furnished, or has had the serial number altered, defaced or removed;Cost of all services performed in removing and re-installing the power converter; andANY LOST PROFITS, LOST SAVINGS, LOSS OF USE OF ENJOYMENT OR OTHERDAMAGES ARISING OUT OF THE USE OF, OR INABILITY TO USE, THEINCLUDES DAMAGES TO PROPERTY AND, TO THE EXTENT PERMITTED BY LAW, DAMAGES FOR PERSONAL INJURY. THIS WARRANTY IS IN LIEU OF ALL OTHER WARRANTIES, INCLUDING IMPLIED WARRANTIES OFMERCHANTABILITY AND FITNESS FOR A PARTICULAR PURPOSE.PROOF OF PURCHASE: A warranty claim must be accompanied by proof of the date of purchase.CLAIM PROCEDURE: Upon discovery of any defect, Progressive Dynamics, Inc. shall be suppliedthe following information at the address listed below: and address of the claimant;, model and serial number of the power converter;C.Application in which the power converter was installed. (Includes manufacturer,model and model year where applicable)D.Date of purchase; andplete description of the claimed defect.Upon determination that a warranty claimoccurring under normal use and service,)prepaid to Progressive Dynamics, Inc. togetherconverter will be repaired or replaced and returned postage prepaid.Extended warranties areavailable for purchase atINSTALLATION INSTRUCTIONSNOTES:•Horizontal mounting of the power converter, isrecommended although it can be mounted in any position that provides unobstructed ventilation to the fan and vent holes.•The OEM should test the power converter underfull load conditions in its intended mountinglocation. This will insure that there is sufficientunobstructed ventilation to the converterallowing it to operate at its maximum rated load.Failure to provide adequate ventilation to theconverter will cause the converter output to bereduced as it responds to ambient conditions.•The INTELI-POWER converters are notdesigned for zero clearance compartments. •Use a 5/32” hex driver to tighten the outputscrews. Do not exceed 50 in-lbs. torque on the output terminals.•The INTELI-POWER converters are not weather tight or designed for wet mounting locations.They must be protected from direct contact with water.•Avoid the introduction of foreign materials intothe case as this could damage or cause amalfunction of the converter. Installation Steps:1.Secure converter firmly to mounting surface.2.Connect ground lug (found on unit base) tochassis.•Ground wire to be between 6 and 12AWG wire.•Tighten lug to 25 – 35 in-lbs.3.Disconnect battery from both positive (+) andground (-) cables.4.Connect battery ground (-) to converter NEG (-)lug.•Conductor to be between 2 and 14AWG(follow all applicable codes when sizingconductor)•Tighten lug to 30 – 50 in-lbs.5.Disconnect any optional pendants or modules.6.Plug converter into appropriate outlet.ing a DC voltmeter, verify converter output.The power converter is working properly if thevoltage is above 13VDC (12V models), 26VDC(24V models, 14.3VDC (12V 9100L models),and 28.4VDC (24V 9100-24L models). If nooutput is present, refer to the trouble shooting guide in this manual.8.Disconnect power to converter9.Connect battery positive (+) to converter POS (+)lug.•Conductor to be between 2 and 14AWG(follow all applicable codes when sizingconductor)•Tighten lug to 30 – 50 in-lbs.Note: When connecting battery to converterPOS (+), a spark may occur. This is normal. 10.Reconnect battery to both positive (+) and ground(-) cables.11.Reconnect any optional pendants or modules.12.Reconnect power to converter.GENERAL INFORMATIONThe INTELI-POWER series power converters are state-of-the-art electronic converter / battery chargers.Their compact size and quiet operation gives greater flexibility in selecting the mounting location for either OEM installation or after market replacement.All INTELI-POWER series power converters have been designed and tested to provide maintenance free operation and undergone tens of thousands of hours of strenuous engineering testing to ensure years of trouble free operation.The INTELI-POWER 9200 series converter incorporates the Charge Wizard® microprocessor which constantly monitors the battery voltage and automatically adjusts the converter output voltage to provide the proper charging voltage for fast recharges and long-term maintenance.INTELI-POWER 9100 series converters incorporate the Total Charging Management System (TCMS) interface. The TCMS interface connects the converter to optional devices that can automatically control the output voltage of the converter thereby controlling the charge rate to the batteries. (See below for ChargeW izard® functions and performance)INTELI-POWER 9100L series converters do NOT support the Charge Wizard® functionality or provide a TCMS interface. The 9100L series converters incorporate an interface for a remote shutdown module for use with a smart lithium battery system.FEATURESMULTIPLE BATTERY CHARGING... INTELI- POWER converters have the capability of charging multiple batteries at the same time! They can even charge a combination of different capacity batteries. GFCI PROTECTION... INTELI-POWER converters have the LOWEST ground fault leakage. With this unit, the user can confidently utilize theRV's AC outlets without being concerned about a ground fault interruption of the facilities power source.REVERSE BATTERY PROTECTION prevents damage if battery leads are cross connected. Since the only consequence of cross connection is a blown fuse, damage to or possible replacement of the converter is avoided. Cross connection of battery leads is the only thing that will blow these fuses. Replacement fuses are available at any automotive store.CAUTIONIF THE REVERSE BATTERYPROTECTION FUSES ARE BLOWN DURING INSTALLATION, CHECK TOSEE THAT THE BATTERY HAS BEENCONNECTED PROPERLY BEFORE REPLACING THE FUSES. REPLACE THE FUSES ONLY WITH THE SAME TYPE AND RATING AS THE ORIGINAL FUSES. USING OTHER FUSES MAY RESULT IN CONVERTER DAMAGE, VEHICLEDAMAGE, INJURY OR OTHERCONSEQUENCES (SEE WARRANTY). ELECTRONIC CURRENT LIMITING... Should demand exceed the rated capacity of the converter or a short circuit occur, the output voltage of the converter drops to almost zero until the situation is corrected. This feature prevents blown fuses, damage to the converter, 12 volt motors and wiring. AUTOMATIC THERMAL PROTECTION... Should an over temperature condition occur, the converter will reduce power output. The converter automatically resumes normal operation when a safe operating temperature is reached.IGNITION PROTECTION... All INTELI-POWER series converters are ignition protected. VARIABLE SPEED COOLING FAN... An electronic sensor monitors converter temperature. Higher demand generates higher heat, requiring higher fan speeds. Lower demand means lower heat and fan speed. This means the fan may not operate at night or will operate at a very slow, quiet speed when demand is low and the owner is trying to sleep. HIGH VOLTAGE PROTECTION... This circuit shuts the converter down if a surge or spike in input voltage is detected. The converter will automatically return to normal operation when the condition is corrected.LOW VOLTAGE PROTECTION…INTELI-POWER converters automatically shut down if input voltage is insufficient for continued operation. When the low voltage situation is corrected, the INTELI-POWER converter automatically resumes normal operation.GENERAL OPERATIONThe INTELI-POWER series converter will supply "clean" power from input voltages that range from 90-130 VAC (205-265 VAC for 230 volt models). The INTELI-POWER series of converters are primarily designed for use with a battery, however, the output of the INTELI-POWER converters are a regulated, filtered DC voltage that can power sensitive electronics without the need for a battery or other filtering.At normal input voltages the full load rated capacity is available.At input voltages less than 105 VAC (205 VAC for 230 volt models) the converter may not supply full rated output capacity.9100L - The full rated load is available for load, battery charging or both. When functioning as a regulated battery charger the converter has a nominal voltage output of 14.6 VDC for 12 volt models and 29.2 VDC for 24 volt models. The system is designed to sense voltage on the battery and will taper the charging current as the battery becomes charged.CAUTIONThe 9100L series converter/chargers aredesigned to recharge lithium ironphosphate batteries.DO NOT USE TO RECHARGELEAD/ACID BATTERIES!9100 - The full rated load is available for load, battery charging or both. When functioning as a regulated battery charger the converter has a nominal voltage output of 13.6 VDC for 12 volt models and 27.2 VDC for 24 volt models. The system is designed to sense voltage on the battery and will taper the charging current as the battery becomes charged.When the vehicle is to be stored for extended periods of time it is recommended that the batteries be disconnected, unless a TCMS Charge Wizard® is attached to the TCMS interface. Reconnect battery once a month to maintain a full charge. 9200 - The full rated load is available for load, battery charging or both. When functioning as a regulated battery charger the converter has a nominal voltage output of 13.6 VDC for 12 volt models and 27.2 VDC for 24 volt models. The system is designed to sense voltage on the battery and automatically selects one of three operating modes (normal, boost and storage) to provide the correct charge level to the batteries. BOOST MODE: If the converter senses that the battery voltage has dropped below a preset level the output voltage is increased to approximately 14.4 VDC (28.8 VDC for 24 volt models) to rapidly recharge the battery.NORMAL MODE: Output voltage set at approximately 13.6 VDC (27.2 VDC for 24 volt models).STORAGE MODE: When the converter senses that there has been no significant battery usage for 30 hours the output voltage is reduced to 13.2 VDC (26.4 VDC for 24 volt models) for minimal water usage. When in storage mode the microprocessor automatically increases the output voltage to 14.4 VDC (28.8 DC for 24 volt models) for approximately 15 minutes every 21 hours to help prevent sulfation of the battery plates.CAUTIONIT IS IMPORTANT THAT THE FLUIDLEVEL OF ANY CONNECTEDBATTERIES BE CHECKED ON AREGULAR BASIS. ALL BATTERIESWILL “GAS” AND LOSE SOME FLUIDS WHEN CONTINUOUSLY CONNECTED TO ANY CHARGING SOURCECHARGE WIZARD ®… The INTELI-POWER 9200 series converters have the Charge Wizard ® controlledcharging module built in. The Charge Wizard ® is a microprocessor-controlled device incorporated in Progressive Dynamics 9200 Series INTELI-POWER converters which constantly monitors the battery, and automatically adjusts the converter output voltage based on its charge status. The Charge Wizard ® has four (4) operating modes (BOOST, NORMAL, STORAGE and EQUALIZE). Each mode is automatically selected by the Charge Wizard ® and ensures a fast yet safe recharge for your battery. See chart below for details.NOTE: Converter output voltages are 2x the values listed in above table for 24 volt models.Boost Mode (14.4V for 12V models and 28.8V for 24V models) - Boost mode is to rapidly recharge a battery up to 90% of full charge. Required 8 hours to return the battery to 90% of full charge and approximately 11 hours to reach full charge.**Normal Mode (13.6V for 12V models and 27.2V for 24V models) - Normal mode is to safely complete the charge of a battery. Required 40 hours to return the battery to 90% of full charge and approximately 78 hours to reach full charge.**Storage Mode (13.2V for 12V models and 26.4V for 24V models) – Storage mode is to maintain a batteries charge as well as help prevent battery stratification and sulfation. Required 60 hours to return the battery to 90% of full charge and approximately 100 hours to reach full charge.**Equalize Mode (14.4V for 12V models and 28.8V for 24V models) - The Charge Wizard ® will automatically switch to equalize mode for approximately 15 minutes every 21 hours the converter remains in storage mode. This will help prevent battery stratification, sulfation and loss of battery capacity (useful life).** Times based on a PD9155 recharging a 125AH battery that has been discharged to 10.5V.- All times and voltages provided above are approximate. -The integrated Charge Wizard’s ability to change the output voltage of the converter will significantly reduce the amount of time it takes to recharge your battery. The lower voltage for Storage mode helps prevents gassing and reduces water loss during long-term storage.BOOST MODENORMAL MODESTORAGE MODEEQUALIZE MODEOPTIONAL REMOTE PENDANTYour INTELI-POWER 9200 converter may have been supplied with a Remote Pendant. The Remote Pendant is optional on OEM but is included with all retail models and plugs in to the accessory port of the 9200 series converter. While the built-in Charge Wizard® automatically determines which operating mode is best suited to recharge or maintain optimum battery condition, the Remote Pendant allows for manual override and has an indicator light to indicate the mode of operation.BOOST MODE - Indicated by green LED remaining on.NORMAL MODE - When the battery is between 50% and 90% charged, the green LED will flash once per second. When the battery has reached 90% of full charge the green LED will flash 2 - 3 times per second.STORAGE MODE - Indicated by green LED flashing every 6 - 8 seconds.MANUAL BUTTON - The manual button has been provided to allow the operator to temporarily override the converter (not recommended) or to verify the converter is operating properly. For manual operation, press and hold the button. The indicator light will soon remain “ON” indicating Boost Mode. Continue to hold the button and the light will blink rapidly indicating the converter is in the Normal Mode. Continue to hold the button until the light blinks slowly indicating the converter is now in the Storage Mode. After the manual button is released the converter will stay in the selected mode. When the battery charge status changes, the converter will return to the automatic mode of operation to prevent damage to the battery.If a REMOTE PENDANT was not provided with your INTELI-POWER 9200 Series converter, you can purchase one from your local RV dealer or online at OPTIONAL TCMS CHARGE WIZARD Your INTELI-POWER 9100 converter is equipped with a TCMS interface. The TCMS Charge Wizard pendant plugs into the TCMS interface to provide computer control and monitoring of your batteries charge state. The Charge Wizard® automatically determines which operating mode is best suited to recharge or maintain optimum battery condition. The Charge Wizard®Pendant allows for manual override and has an indicator light to indicate the mode of operation.BOOST MODE - Indicated by green LED remaining on.NORMAL MODE - When the battery is between 50% and 90% charged, the green LED will flash once per second. When the battery has reached 90% of full charge the green LED will flash 2 - 3 times per second.STORAGE MODE - Indicated by green LED flashing every 6 - 8 seconds.MANUAL BUTTON - The manual button has been provided to allow the operator to temporarily override the converter (not recommended) or to verify the converter is operating properly. For manual operation, press and hold the button. The indicator light will soon remain “ON” indicating Boost Mode. Continue to hold the button and the light will blink rapidly indicating the converter is in the Normal Mode. Continue to hold the button until the light blinks slowly indicating the converter is now in the Storage Mode. After the manual button is released the converter will stay in the selected mode. When the battery charge status changes, the converter will return to the automatic mode of operation to prevent damage to the battery.The TCMS Charge Wizard Pendant can be purchased from your local RV dealer or online atOPTIONAL REMOTE SHUTDOWN MODULE Your INTELI-POWER 9100L converter is equipped with a Remote Shutdown Module interface. The converter can be shutdown using either a high or low side control, or by connecting two wires by means of a mechanical switch or relay contacts. This allows the battery management system to shutdown the converter after battery charging and balancing are complete.Do not replace the converter unless the following checks have been performed:Loosen the screw on the positive terminal and disconnect the positive wire. Read the converter output voltage using aDC voltmeter. The power converter is working properly if the voltage is above 13VDC (12V models), 26VDC (24V models, 14.3VDC (12V 9100L models), and 28.4VDC (24V 9100-24L models).If the converter output is zero volts, use an AC voltmeter to check for proper voltage at the 120VAC outlet that theconverter is plugged into. This voltage should be between 105 and 130 volts (206 and 265 volts for 230V models). Check the fuses located at the front of the converter. These fuses will only blow if the battery or DC output leadswere connected in reverse, even for a moment. Replace the fuses and repeat step 1.Disconnect optional Remote Pendant, TCMS Charge Wizard, or Remote Shutdown Module. output voltage using a DC voltmeter. The power converter is working properly if the voltage is above 13VDC (12V models), 26VDC (24V models, 14.3VDC (12V 9100L models), and 28.4VDC (24V 9100-24L models). When replacing fuse(s) it may be necessary to remove the TCMS plug or lithium shutdown module (if so equipped)to provide clearance for fuse replacement.Disconnect all power sources before replacing fuses.TROUBLE SHOOTING GUIDEPROBLEMPOSSIBLE CAUSESACTION1. No OutputProper AC power not connected Connect power supplyCheck AC distribution panel for proper operation External Fuses Blown Check for reverse polarityReplace fuses with same type and rating Short CircuitTrace circuits for possible fault Unit has shutdown due to overheating Check air flow Allow unit to cool Unit has shutdown due to over voltage (Also see Item 4 below)(No over voltage protection for 230V units) Check input voltageConverter will shut down if the input voltage exceeds 132 Volts Correct input voltageOptional remote shutdown module is active. (PD9100L only)Remove remote shutdown module.2. External Fuses Blown Reverse Battery Hook Up Correct hook up and replace fuses with same type and rating3. Low OutputExcessive load for converterReduce load requirements or install larger converter Input voltage not between 105-130 VAC (205-265 VAC for 230V units) Correct input supply voltage Bad battery cell(s)Replace battery4. Intermittent or no Output on Generator, works on Shore PowerUnit has shutdown due to over voltage. Add another load to the generator, this may reduce the “spikes” to an acceptable levelSome generators exhibit excessive voltage spikes on the AC power output, this may cause the over voltage protection to shut the unit downContact generator manufacturer for possible defect in the generatorRemote Shutdown Module does not have stable voltage.Confirm Remote Shutdown Module voltage is between 5 and 30 VDCAccessory Port (PD9200only)DC Distribution PanelGrounding Lug (located on AC end) Reverse BatteryFuse(s)-+Chassis Ground BatteryINPUT/OUTPUT S PECIFICATIONS (Specifications subject to change without notice)PD9130(L)Input: 105-130 VAC 60 Hz500 WattsOutput: 13.6 VDC, 30 Amps (9130L) – 14.6 VDC, 30 Amps Dimensions: 4.5H x 8.25L x 7.25WWeight: 4.5lbsPD9140(L)Input: 105-130 VAC 60 Hz600 WattsOutput: 13.6 VDC, 40 Amps (9140L) – 14.6 VDC, 40 Amps Dimensions: 4.5H x 8.25L x 7.25WWeight: 4.5lbsPD9_45(L)Input: 105-130 VAC 60 Hz725 WattsOutput: 13.6 VDC, 45 Amps (9145L) – 14.6 VDC, 45 Amps Dimensions: 4.5H x 8.25L x 7.25WWeight: 4.5lbsPD9_60(L)Input: 105-130 VAC 60 Hz1000 WattsOutput: 13.6 VDC, 60 Amps (9160L) – 14.6 VDC, 60 Amps Dimensions: 3.6H x 8L x 9WWeight: 5.8lbsPD9_70(L)Input: 105-130 VAC 60 Hz1250 WattsOutput: 13.6 VDC, 70 Amps (9170L) – 14.6 VDC, 70 Amps Dimensions: 3.6H x 8L x 9WWeight: 5.8lbsPD9_80A(L)Input: 105-130 VAC 60 Hz1300 WattsOutput: 13.6 VDC, 80 Amps (9180AL) – 14.6 VDC, 80 Amps Dimensions: 3.6H x 8L x 9WWeight: 6.0lbsPD9_25-24(L)Input: 105-130 VAC 60 Hz775 WattsOutput: 27.2 VDC, 25 Amps (9125-24L) – 29.2 VDC, 25 Amps Dimensions: 4.5H x 8.25L x 7.25WWeight: 4.5lbs PD9_40-24A(L)Input: 105-130 VAC 60 Hz1300 WattsOutput: 27.2 VDC, 40 Amps (9140-24AL) – 29.2 VDC, 40 Amps Dimensions: 3.6H x 8L x 9WWeight: 6.0lbsPD9260-230Input: 205-265 VAC 50/60 Hz1000 WattsOutput: 13.6 VDC, 60 Amps Dimensions: 3.6H x 8L x 9WWeight: 5.8lbsNOT UL OR CUL LISTED。
Philips 9100系列4K超高清电视说明书

Philips 9100 series Razor Slim 4K UHD TV powered by Android™ with Ambilight 4-sided andPerfect Pixel Ultra HD 139 cm (55")4K Ultra HD LED TVHex CoreTwin Tuner DVB-T/T2/C/S/S2 55PUS9109Razor Slim 4K UHD TV powered by Android with Ambilight 4-sidedHave it all: design, technology and a superior image. Philips 9100 series Ultra HD with 4-sided Ambilight has a Razor Slim profile and modern Arc stand that radiates quality. We’ve included a wireless subwoofer for an unrivaled experience.Who said only angels have halos•Ambilight 4-sided: imagine your TV in a halo of lightLove at first sight•Razor Slim profile: the ultimate in cutting edge design•The Arc stand: beautifully brightSee it. Hear it. Experience it.•4K Ultra HD: resolution like you’ve never seen it before•Perfect Pixel Ultra HD-discover stunning picture quality•1000Hz PMR Ultra HD for the ultimate in smooth moving images•Wireless subwoofer: feel the ultimate sound experienceEntertainment at the speed of light•Google Play™ store—the world at your fingertips•Twin Tuner lets you watch or record more than one program•From apps to Cloud TV: more online entertainment than everHighlightsAmbilight 4-sidedYou’ve created a home that’s more than just a house, so why not choose a TV that is warm and inviting too? Our most amazing Ambilight experience ever projects an extra wide glow around four-sides of your TV onto the surrounding wall. Your screen seems much wider, your experience more enhanced…and your TV appears to float on air. Color, vibrancy and excitement move beyond the screen and into your living room, bringing with it a more thrilling, intense and immersive viewing experience.Razor Slim profileSometimes less is more. Especially when it comes to the thinness of your TV. That’s why Philips Razor Slim TVs has our thinnest, sharpest and most refined edge. From some angles you’ll barely notice it’s there…and yet it never fails to be the first thing people admire when they walk into the room.Arc standDesigned as a companion to our 4-sided Ambilight, Philips Arc stand has a light, open arch that creates the illusion that your TV is floating in a halo of light. The high quality polished chrome finish and elegant open design add an air of style to any room.4K Ultra HD ResolutionSee TV like never before thanks to four times the resolution of a conventional Full HD TV. 3840 x 2160 pixels provide an image so refined, so lifelike, it’s a window to a new world.Perfect Pixel Ultra HDBuilding on our award winning Picture Quality heritage, we’ve elevated high definition Picture Quality to a whole new level. The picture processing algorithms of our Perfect Pixel Ultra HD engine convert any input picture into 4K Ultra HD resolution on your screen. The result? Whether you watch a video online, or native UHD content, you’ll experience the ultimate in sharpness, motion, clarity, color and contrast from Philips.1000Hz PMR UltraNothing beats the adrenaline rush of gaming,fast paced sporting events or action films on anUltra HD TV. That's why this Philips TV has1000Hz Perfect Motion Rate Ultra; so you’llenjoy the ultimate in smooth moving Ultra HDimages. Because even though your pulse mayjump, the image you’re watching shouldn’t.Wireless subwooferFeel the power of sound. We’ve included aWireless Ultra Bass subwoofer to bring moredepth to your TV experience. 50W of powerdelivers high impact sound that will transformthe ambient space of your room. It’s wirelessand thin enough to place discreetly under yoursofa or against the wall, so you can create atruly captivating sound experience anywherewithin your home.Google Play™ storeFeel like a kid in a candy store. Enjoy a deliciousassortment of apps, games, and all the goodiesavailable from the Google Play™store like theChrome™ browser, YouTube™, GoogleMovies, Google Music, social network apps andmore…and all on your TV Powered byAndroid™.Twin TunerNever fight about what to watch again. With atwin tuner on your TV you can watch yourfavorite series and a football game—and all atthe same time. Our dual recording feature letsyou watch one program while recordinganother so, you’ll always have something greatto watch later.Apps, Cloud TV* & ExplorerImagine an ever-growing Smart app portfolioon your TV. From YouTube to music, VideoOn Demand and more, you can customizewhich apps you add to your dashboard. Wantmore? Explore Cloud TV. With hundreds ofpremium international channels, it’s a greatway to watch your favorite shows and discoverwhat’s popular on the other side of the world.With Cloud Explorer, you can accessDropbox™ to view (and share) your favoritephotos and videos on the big screen.Ambilight 4-sidedAmbilight 4-sided: imagine your TV in ahalo of lightYou’ve created a home that’s more thanjust a house, so why not choose a TV thatis warm and inviting too? Our mostamazing Ambilight experience everprojects an extra wide glow around four-sides of your TV onto the surroundingwall. Your screen seems much wider,your experience more enhanced…andyour TV appears to float on air. Color,vibrancy and excitement move beyond thescreen and into your living room, bringingwith it a more thrilling, intense andimmersive viewing experience.Hex CoreThe power of Hex Core and Android on your 4K Ultra HD TVFasten your seat belt; this is a TV engine like never before. With Android on your Ultra HD TV you'll enjoy the ultimate images, make video calls, and chat in a waythat is super fast, super intuitive, and super fun. The Android robot liberatesthe power of multiple cores spread over multiple processors to get things donewith lightning speed and total ease.Issue date 2019-09-19 Version: 7.3.312 NC: 8670 001 10211 EAN: 87 12581 70513 8© 2019 Koninklijke Philips N.V.All Rights reserved.Specifications are subject to change without notice. Trademarks are the property of Koninklijke Philips N.V. or their respective owners.SpecificationsAmbilight•Ambilight Version: 4 sided•Ambilight Features: Built in Ambilight+hue, Wall colour adaptive, Gaming mode, Lounge light mode Picture/Display•Display: 4K Ultra HD LED•Diagonal screen size: 55 inch / 139 cm•Panel resolution: 3840x2160•3D: Active 3D, 2 Player Full Screen Gaming*, Premium 2D to 3D conversion•Aspect ratio: 16:9•Brightness: 450 cd/m²•Pixel engine: Perfect Pixel Ultra HD•Picture enhancement: Perfect Natural Motion, 1000Hz PMR Ultra, Local contrast, Ultra Resolution, Micro Dimming ProAndroid•Android OS: 4.2.2 (Jelly Bean)•Pre-installed apps: Google Chrome browser, Search, Google Play Movies*, Google Play Music*, YouTube, OnLive*•Google PlayStore apps: TV libraries, TV player •Memory size to install apps: 1.6GB, extendable via USB Hard DriveSmart TV•Interactive TV: HbbTV•SmartTV apps*: Catch-up TV, Netflix*, Online apps, Online Video stores•Social TV: Skype, TwitterSmart Interaction•Remote Control: with Pointer, with Keyboard •User interaction: SimplyShare, Cloud TV* and Cloud Explorer, DropboxTM, MultiRoom Client and Server*, Wi-fi Miracast Certified*•Integrated Smart Camera: Gesture Control, Skype, Distance Adaptive Sharpness•Program: Pause TV, USB Recording*•Ease of Installation: Auto detect Philips devices, Device connection wizard, Network installation wizard, Settings assistant wizard•Ease of Use: One-stop Home button, Onscreen Usermanual•Firmware upgradeable: Firmware auto upgrade wizard, Firmware upgradeable via USB, Online firmware upgrade•Screen Format Adjustments: Basic - Fill Screen, Fitto Screen, Advance - Shift, Zoom, Stretch, Native•Philips TV Remote app*: Control, Simply Share, TVGuide, Wi-fi Smart ScreenProcessing•Processing Power: Hex CoreSound•Output power (RMS): 30W (2x 15W)•Subwoofer output power: 50W•Sound Features: Ambi wOOx, Natural Sound, HDStereo•Sound Enhancement: Incredible Surround,Incredible Surround 3D, Clear Sound, Auto VolumeLeveller, Dynamic Bass Enhancement, DTS premiumConnectivity•Number of HDMI connections: 4•Number of component in (YPbPr): 1•Number of scarts (RGB/CVBS): 1•Number of USBs: 3•Wireless connections: Integrated Wi-Fi 11n, 2x2Dual band, Soundbeam•Other connections: Antenna IEC75, 2x Satelliteinput, 2x Common Interface Plus (CI+), CI+1.3certified, Ethernet-LAN RJ-45, Digital audio out(optical), Audio L/R in, Headphone out, Serviceconnector•HDMI features: 4K, 3D, Audio Return Channel•EasyLink (HDMI-CEC): Remote control pass-through, System audio control, System standby, Plug& play add to Homescreen, One touch play•HDCP 2.2: Yes on HDMI1Multimedia Applications•Video Playback Formats: Containers: AVI, MKV,H264/MPEG-4 AVC, MPEG-1, MPEG-2, MPEG-4,WMV9/VC1, 3GP•Subtitles Formats Support: .AAS, .SMI, .SRT, .SUB,.TXT, MKV/SRT•Music Playback Formats: AAC, MP3, WMA (v2 up tov9.2)•Picture Playback Formats: JPEG, BMP, GIF, JPS,PNG, PNSSupported Display Resolution•Computer inputs on all HDMI: up to 4K Ultra HD3840x2160, @60Hz•Video inputs on all HDMI: up to 4K Ultra HD3840x2160p, @ 24, 25, 30, 50, 60HzTuner/Reception/Transmission•Digital TV: 2x DVB-T/T2/C/S/S2, Astra HD+support•MPEG Support: MPEG2, MPEG4•Video Playback: NTSC, PAL, SECAM•TV Program guide*: 8 day Electronic Program Guide•Signal strength indication•Teletext: 1200 page HypertextPower•Mains power: AC 220 - 240 V 50/60Hz•Ambient temperature: 5 °C to 35 °C•Eu Energy Label power: 112 W•Annual energy consumption: 155 kW·h•Energy Label Class: A•Standby power consumption: < 0.3 W•Off mode power consumption: < 0.3 W•Power Saving Features: Auto switch-off timer, Lightsensor, Picture mute (for radio)Dimensions•Box dimensions (W x H x D):1369 x 1129 x 198 mm•Set dimensions (W x H x D): 1227 x 714 x 33 mm•Set dimensions with stand (W x H x D):1333 x 756 x 236 mm•Product weight: 18.4 kg•Product weight (+stand): 20.1 kg•Weight incl. Packaging: 32.3 kg•VESA wall mount compatible: 200 x 200 mm•Finishing (back): Grey•Finishing (front): Black•Finishing (side): Black Brushed aluminiumAccessories•Included accessories: Wireless Subwoofer, 2 x 3Dactive Glasses, Arc stand, Remote Control, 2 x AABatteries, Power cord, Quick start guide, Legal andsafety brochure•Optional accessories: Active glasses PTA509, ActiveGlasses PTA519*Philips TV Remote app and related functionalities varies per TVmodel and country, as well as smart device model and OS. For moredetail, please visit: /TV.*Pointer functionality depends on the Smart TV App being used.*Android App offerings vary per country. For more details please visityour local Google Play Store.*For smart TV app, visit /TV to discover the servicesoffering in your country*USB recording for digital channels only, recordings may be limited bybroadcast copy protection (CI+). Country and channel restrictionsmay apply.*Android, Google Play and other marks are trademarks of Google Inc.*Parents should monitor their children during 3D viewing and ensurethey do not experience any discomfort as mentioned above.Watching 3D is not recommended for children under 6 years of ageas their visual system is not fully developed yet.*The TV supports DVB reception for 'Free to air' broadcast. SpecificDVB operators may not be supported. An up to date list can befound in the FAQ section of the Philips support website. For someoperators Conditional Access and subscripction are required.Contact your operator for more information.*Energy consumption in kWh per year, based on the powerconsumption of the television operating 4 hours per day for 365days. The actual energy consumption will depend on how thetelevision is used.*EPG and actual visibility (up to 8 days) is country and operatordependent.*(Philips) only compatible with specific Philips player device.。
精品word--XJ-100使用说明书

XJ-100小电流接地故障选线及监测系统用户手册淄博科汇电气有限公司Kehui Electric Co. Ltd.,Zibo目录1XJ-100小电流接地故障选线及监测系统简介 (5)1.1 原理与概述 (5)1.2总体结构 (6)1.3 主要技术指标及技术特点 (7)2XJ-100小电流接地故障检测装置 (9)2.1 装置概述 (9)2.2 装置的结构 (9)2.3 装置的前面板说明 (10)2.4 装置组屏 (10)2.5 装置接线 (11)2.5.1装置的后面板接线端子图 (11)2.5.2装置的接线说明 (11)2.6 装置使用指南 (12)2.6.1开机 (12)2.6.2复位 (12)2.6.3设置与PC机通讯波特率、内部时钟的时间、数码管显示亮度 (12)2.6.4与T-GPS时钟通讯的波特率设置 (13)2.6.5故障启动、记录 (13)2.7 装置的运行维护及异常处理 (14)2.7.1定期检查装置 (14)2.7.2通风及散热 (14)2.7.3常见异常情况及处理 (14)3XJ-100小电流接地故障分析系统的安装 (16)3.1 XJ-100软件运行的硬件环境 (16)3.2 XJ-100软件运行的软件环境 (16)3.3 XJ-100软件的安装步骤 (16)3.4 XJ-100软件系统的外部连接 (17)3.5 XJ-100软件系统的启动 (17)3.6 XJ-100软件系统的卸载 (18)4XJ-100小电流接地故障分析系统的使用 (19)4.1 运行方式选择 (19)4.2分站运行方式下的配置 (19)4.3调度端运行方式下的配置 (22)4.4 XJ-100软件的主窗口 (23)4.4.1主窗口布局 (23)4.4.2主窗口操作 (24)4.5 XJ-100软件的主菜单 (25)4.5.1系统设置菜单 (25)4.5.2通讯菜单 (26)4.5.3数据维护菜单 (28)4.5.4查看菜单 (29)4.5.5帮助菜单 (30)4.6 波形分析 (30)4.7 故障统计 (31)本手册为您提供了科汇电气有限公司生产的XJ-100小电流接地故障选线及监测系统的各项功能和操作方法的介绍。
VJ9100F 使用说明书
VJ9100F 使用说明书 版本号: h180612一、 产品概述本产品是一款智能型电动机综合保护器,是传统热继电器的升级换代产品。
该产品采用数字处理技术,高亮度LED 显示,通过外置的电流互感器检测电动机的三相负载电流,可以显示三相电流并根据电流判断是否存在过载、欠载、缺相、三相电流不平衡等故障。
当电动机发生故障时,接触器继电器断开,切断电动机电源,同时告警继电器闭合。
二、 主要功能●过载保护(带反时限) ● 缺相保护 ● 欠载保护 ● 自动恢复● 启动堵转保护 ● 故障电流锁定● 三相不平衡保护 ● 内置延时上电的时间继电器功能●RS485通信三、四、● 查看A 、B 、C 三相电流正常工作时显示三相平均电流,按“Set ”键可以切换显示A 、B 、C 三相电流。
发生过载、欠载、缺相、三相不平衡等故障时显示电流闪烁,表示这是锁定在发生故障那一刻的电流(这时电动机已断电,实际电流为0)。
● 电动机额定电流值设置(整定电流)长按“Set ”键2秒,显示“设定”,用“ ”或“ ”键改变设定值(按住“ ”或“ ”键不放可连发),设置好后按“Set ”键退出设置状态。
● 告警(保护)状态恢复发生故障告警时,会在显示屏上闪烁显示“过载”、“LSL(欠载)”、“缺相”、“IbA (三相不平衡) ”等字样,此时继电器断开,并且锁定在断开状态。
这时只要按“M ”键即可从保护锁定状态恢复,需确认与星三角启动没有冲突。
也可给保护器重新上电来恢复。
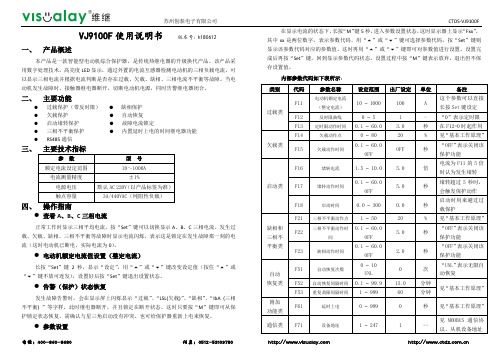
● 参数设置在显示电流的状态下,长按“M ”键5秒,进入参数设置状态,这时显示器上显示“Fxx ”,其中xx 是两位数字,表示参数代码。
用“ ”或“ ”键可选择参数代码,按“Set ”键则显示该参数代码对应的参数值,这时再用“ ”或“ ”键即可对参数值进行设置。
设置完成后再按“Set ”键,回到显示参数代码状态。
设置过程中按“M ”键表示放弃,退出但不保存设置值。
内部参数代码如下表所示:●电流检测保护器通过外置的电流互感器来检测三相负载电流,所以被保护电动机的三根相线必须分别穿过电流互感器的三个孔。
