μClinux2.4.17中添加SATA硬盘控制器驱动的方法研究
USB软驱加载sata驱动
目前可以支持改装2000及XP操作系统。
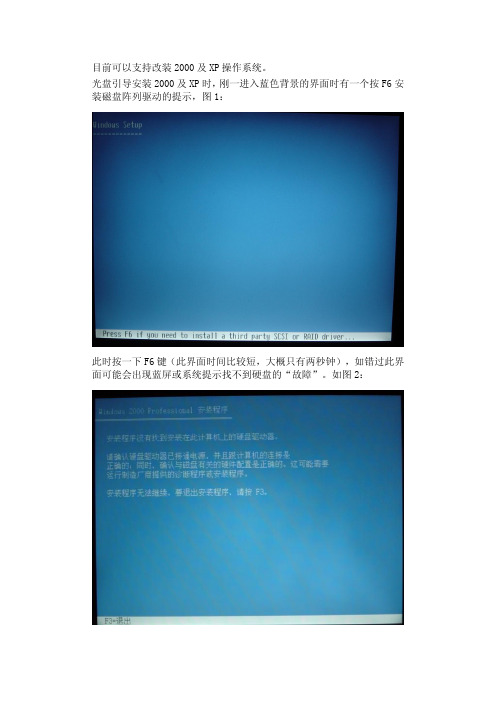
光盘引导安装2000及XP时,刚一进入蓝色背景的界面时有一个按F6安装磁盘阵列驱动的提示,图1:
此时按一下F6键(此界面时间比较短,大概只有两秒钟),如错过此界面可能会出现蓝屏或系统提示找不到硬盘的“故障”。
如图2:
等待一段时间后会进入磁盘阵列安装界面,如图3:
将装有磁盘阵列驱动的软盘插入软驱并连接笔记本后,按S键进入,会有几个选项选择。
T-6系列均采用的是INTEL 965或960,所以请选择带有“HBM、ICH8M”的选项(一般第3项)即可。
其他机型MX1000和C-5817C采用INTEL 945系列芯片,请使用“GBM、ICH7M”。
3系列机型不用加载SATA驱动。
TC7000系列和UC7000系列及P-7802c采用INTEL P(G)M45系列芯片请使用标记有“ICH9M”选择相应的选项后,回车后又会跳转到上图,再回车即可。
服务器安装Linux时手动加载阵列卡驱动
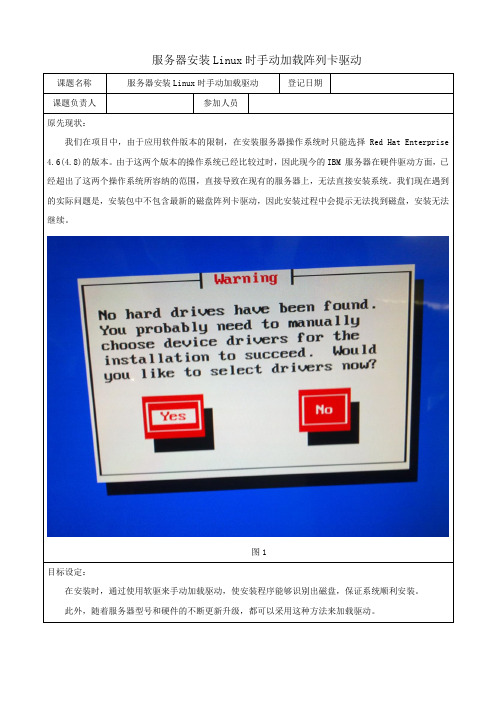
服务器安装Linux时手动加载阵列卡驱动
图1
目标设定:
在安装时,通过使用软驱来手动加载驱动,使安装程序能够识别出磁盘,保证系统顺利安装。
此外,随着服务器型号和硬件的不断更新升级,都可以采用这种方法来加载驱动。
图6
(2)其后会弹出界面“Driver Disk”,提示安装驱动,选择“yes”。
图8
图8
(5)接下来就进入Linux安装的正常步骤,按照安装指导手册一步步进行即可。
3、磁盘阵列卡驱动文件说明
(1)现有驱动文件三个,都是从IBM官网的售后支持中下载得到:
dud-2.6.9_67-32_64.RHEL4.img 对应Linux版本“RHEL 4.6 - 2.6.9-67”
dud-2.6.9_78-32_64.RHEL4.img 对应Linux版本“RHEL 4.7 - 2.6.9-78”
dud-2.6.9_89-32_64.RHEL4.img 对应Linux版本“RHEL 4.8 - 2.6.9-89”
(2)这三个驱动支持的IBM服务器磁盘阵列卡型号,对应如下:
Adapters Supported: MegaRAID 8480 SAS Controller (39R8850)
IBM ServeRAID MR10is SAS Controller (44E8695)
IBM ServeRAID MR10il SAS Controller (44E8767)。
给Linux添加一个硬盘详细步骤
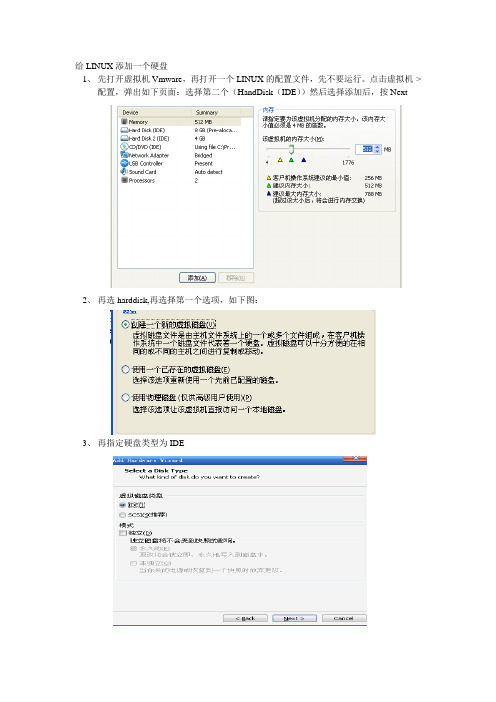
给LINUX添加一个硬盘1、先打开虚拟机Vmware,再打开一个LINUX的配置文件,先不要运行。
点击虚拟机->配置,弹出如下页面:选择第二个(HandDisk(IDE))然后选择添加后,按Next2、再选harddisk,再选择第一个选项,如下图:3、再指定硬盘类型为IDE4、再指定大小5、再将配置文件保存起来,保存路径最好与其它的配置文件放同一个路径,如下图:6、接着接通虚拟机的电源。
将添加的硬盘挂上去。
在根目录下输入命令:用fdisk -l 查看是否识别了新硬盘查看新添加的新硬盘的名称多数为sd* 或是hd* 等等其中/dev/hda 是系统盘,/dev/hdb 就是刚添加的新盘7、用fdisk /dev/hd*(指刚增加的那个盘)格式化硬盘{m-------帮助信息n--------划分分区。
}输入m后按下图所示输入,其中(First cylinder(1—4161,default 1)1)按照defualt后面的数字输入然后按ctrl+c退出指定格式化的类型mkfs.ext3 /dev/hd**8、接着新建文件夹选择挂载点文件Mkdir /home/work2 注:在根目录下新建work2文件夹9、挂载mount /dev/hd** /home/work2输入df 命令dev/hdb就是刚才挂上去的盘成功后work2下面会多一个名为lost+found的文件夹,该文件的大小就是那个盘的大小。
新增加:为了使每次开虚拟机都自动装载硬盘,而不需要重新mount上去。
(下面只是其中一种方法)1、为了使每次开虚拟机都自动装载硬盘,需要编辑/etc/fstab这个文件,增加的内容如下图的高亮部分(在图形界面下操作比较方便)2、同时为了在windows界面下可以看到这个目录,需要设置共享文件夹work2 打开菜单“系统->管理->服务器设置->samba”,点击“添加共享”,输入路径勾选“擦写”和“显示”点击标签“访问”,允许所有用户仿问OK,现在访问LINUX的共享就可以找到work2这个目录了。
SATA硬盘安装(蓝屏)和工作原理详解
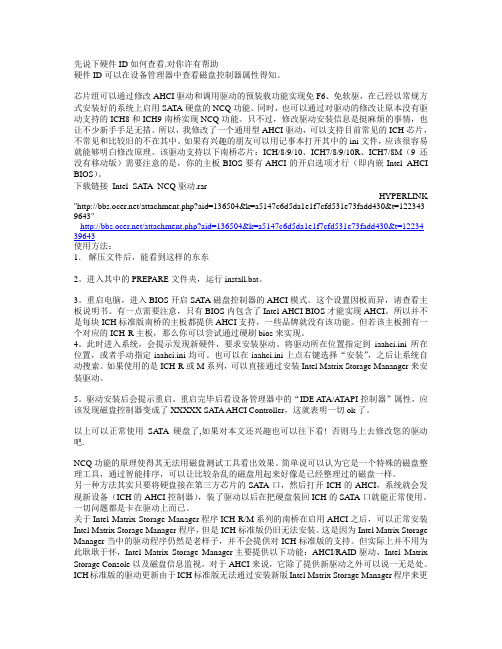
先说下硬件ID如何查看.对你许有帮助硬件ID可以在设备管理器中查看磁盘控制器属性得知。
芯片组可以通过修改AHCI驱动和调用驱动的预装载功能实现免F6、免软驱,在已经以常规方式安装好的系统上启用SA TA硬盘的NCQ功能。
同时,也可以通过对驱动的修改让原本没有驱动支持的ICH8和ICH9南桥实现NCQ功能。
只不过,修改驱动安装信息是挺麻烦的事情,也让不少新手手足无措。
所以,我修改了一个通用型AHCI驱动,可以支持目前常见的ICH芯片,不常见和比较旧的不在其中。
如果有兴趣的朋友可以用记事本打开其中的ini文件,应该很容易就能够明白修改原理。
该驱动支持以下南桥芯片:ICH/8/9/10、ICH7/8/9/10R、ICH7/8M(9还没有移动版)需要注意的是,你的主板BIOS要有AHCI的开启选项才行(即内嵌Intel AHCI BIOS)。
下载链接Intel_SATA_NCQ驱动.rarHYPERLINK "/attachment.php?aid=136504&k=a5147c6d5da1e1f7cfd531e73fadd430&t=122343 9643"/attachment.php?aid=136504&k=a5147c6d5da1e1f7cfd531e73fadd430&t=12234 39643使用方法:1.解压文件后,能看到这样的东东2。
进入其中的PREPARE文件夹,运行install.bat。
3。
重启电脑,进入BIOS开启SATA磁盘控制器的AHCI模式。
这个设置因板而异,请查看主板说明书。
有一点需要注意,只有BIOS内包含了Intel AHCI BIOS才能实现AHCI。
所以并不是每块ICH标准版南桥的主板都提供AHCI支持,一些品牌就没有该功能。
但若该主板拥有一个对应的ICH-R主板,那么你可以尝试通过硬刷bios来实现。
4。
此时进入系统,会提示发现新硬件,要求安装驱动。
在WINPE中增加ACHI、SATA驱动程序
WINPE中增加ACHI、SATA驱动程序的方法PE最关键的就是内核驱动和外置驱动,内核驱动主要就是南桥驱动.针对RAID.SATA.以及AHCI,这是PE最关键的部份.主要是让PE能够识别系统的SATA硬盘和RAID磁盘阵列驱动文件位置集成在WINPE.IS_/SYSTEM32/DRIVERS/下相关驱动的配置在txtsetup.sif中根据以上原理我们已经很清晰了,我们需要作的步骤只有2步:第一步:增加驱动文件到WINPE.IS_文件中的/SYSTEM32/DRIVERS/的目录下面第二步:修改相应的txtsetup.sif步骤也明确后,下面就是操作步骤,1. 驱动文件推荐上官方的网站下载即可或者上<驱动之家>查找下载,具体就不介绍了,这个太基础了;2. 提取txtsetup.sif文件并修改它;3. 增加驱动文件到WINPE中;(这一步比较简单,主要得到WINPE.ISO文件就行,在得到txtsetup.sif的过程中会得到,这里就不再单独介绍。
)提取过程与步骤如下:1. 打开PE的ISO文件,提取*.IS_文件,<*号表示任意,其实就是扩展名为:IS_的文件>,为了方便举例,我打开WINPE.IS_文件;2. 将WINPE.IS_文件改名为:WINPE.IS_.RAR文件<其实你可以改成ZIP,CAB等格式都可以,因为这个文件就是个CAB压缩文件,相信明白这个就很清晰了>3. 解压WINPE.IS_RAR文件,会得到WINPE.ISO文件;4. 打开这个WINPE.ISO文件,查找txtsetup.sif文件(有的PE中压缩了此文件,那对应的文件名就是:txtsetup.si_ ,这一点需要注意!)5. 修改txtsetup.sif文件,这一步可是重点哦,上面的步骤其实都是过场,下面一定要重要学习哦!关于安装配置文件txtsetup.sif的简单说明,涉及到增加驱动需要修改以下四个字段的部分内容:[SourceDiskFiles]-------------源文件的复制位置[HardwareIdsDatebase]---------硬件标识[SCSI.load]-------------------SCSI驱动加载[SCSI]------------------------SCSI设备说明这里以Intel Matrix Storage Manager driver为例,以便于说明,以下描述的驱动文件名只基于本实例,实际操作中的具体的文件名称以需要添加的具体驱动为准)先将WinPE中的winpe.is_重命名为winpe.is_.rar,然后用RAR解压出winpe.iso,用UltraISO 打开它,将txtsetup.sif提取出来,并用记事本打开备用。
安装SATA硬盘图解
安装SATA硬盘图解随着i915/945等新一代主板芯片组推出后,硬盘的连接界面也从沿用多年的Parallel ATA(并行ATA,以下简称PATA)界面,逐渐转变为设计更先进、速度更快的Serial ATA(串行ATA,以下简称SATA)界面。
不过,由于SATA界面的外设在现阶段仍然属于是一种比较新的硬件,因此在安装时若不留神就会遇到困难。
为此,在这里与大家探讨一下有关安装SATA硬盘的知识技巧。
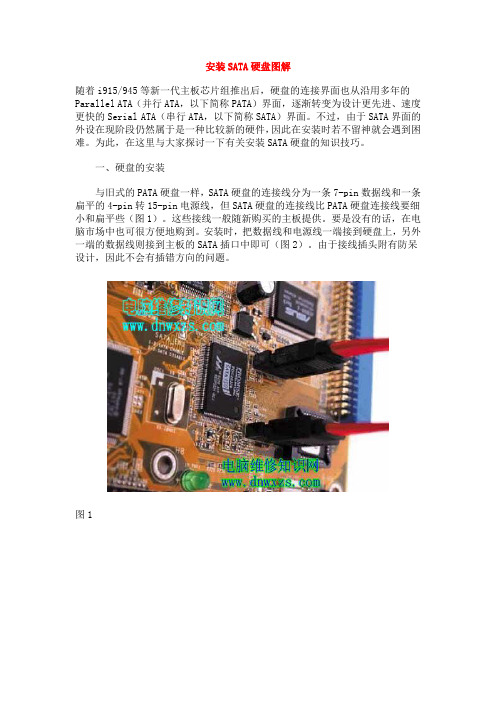
一、硬盘的安装与旧式的PATA硬盘一样,SATA硬盘的连接线分为一条7-pin数据线和一条扁平的4-pin转15-pin电源线,但SATA硬盘的连接线比PATA硬盘连接线要细小和扁平些(图1)。
这些接线一般随新购买的主板提供。
要是没有的话,在电脑市场中也可很方便地购到。
安装时,把数据线和电源线一端接到硬盘上,另外一端的数据线则接到主板的SATA插口中即可(图2)。
由于接线插头附有防呆设计,因此不会有插错方向的问题。
图1图2但有一点要注意的是,如果用户需要在系统通电状态下以Hot-Plug(热插拨)方式安装SATA硬盘,必须先装好4-pin转15-pin电源线,并把15-pin插头接到硬盘后,再接上数据线,否则会烧毁硬盘的电路。
二、主板BIOS的设置目前,主板支持SATA界面一般借助于两种方式,即主板上南桥芯片已经内置SATA功能和单独的RAID/Serial ATA控制芯片。
前者通过主板南桥芯片(如Intel的ICH5/6南桥芯片)来实现,故需在主板BIOS中对IDE模式进行设置。
按主板的不同,BIOS中有一项名为“IDE Configuration”或“On-Chip SATA Mode”的设置项目,一般提供AUTO/Combined/Enhanced及Non-Com-bined等4种模式,其意义解释如下:--------------------------------------------------------模式效果AUTO 让BIOS自动检测Combined 最多同时使用2个SATA及2个PATA设备Enhanced 最多同时使用6个设备,包括SATA及PATA设备Non-Combined 将SATA设备自动模拟成PATA模式工作--------------------------------------------------------在多数情况下,选择“Enhanced”模式可获得最佳的性能和扩展性,但对于老版本操作系统及部分DOS模式下运行的软件(如旧版GHOST)等,却有可能出现兼容问题。
如何安装SATA硬盘的驱动?
Installing SATA Drivers on HP Compaq Notebook PCsIntroduction (2)Purpose (2)Audience (2)Benefits of SATA (2)System Requirements and Prerequisites (2)System requirements (2)System prerequisites (2)Transitioning a Sysprep image from IDE to SATA (3)Where these guidelines are applicable (3)Steps to add SATA support to the original image (3)Adding SATA drivers to RIS Installation Points (4)Where these guidelines are applicable (4)Steps to add SATA drivers to the distribution point (5)Adding SATA Drivers to an Installation CD (6)Where these guidelines are applicable (6)Steps to add SATA drivers to the CD (6)Using OSCDIMG (or CDIMAGE) and CDBURN (command line utilities from Microsoft) (8)Adding SATA Drivers to WinPE 2005 (8)Where these guidelines are applicable (8)Steps to add SATA drivers to WinPE 2005 (8)Modifying a Windows XP installation to support SATA Native Mode (9)Where these guidelines are applicable (9)Steps to modify a Windows XP image to support SATA Native Mode (10)For more information (12)IntroductionPurposeThis white paper provides instructions on how to successfully incorporate SATA drivers into a Windows XP installation on HP Compaq Notebook PC models. The following guidelines provide procedures for adding SATA drivers to RIS installation points; adding SATA drivers to installation CDs; building an image and switching to SATA AHCI mode; using Sysprep with SATA in AHCI or NATIVE mode; and adding SATA drivers using WinPE.AudienceThis white paper is for use by HP personnel and customers.Benefits of SATASATA Native Mode is a storage interface technology that provides up to 150MB/Sec transfer rate for disk traffic, and provides link power management with Intel® Application Accelerator drivers. Intel Matrix Storage Manager Driver provides support for the SATA Advanced Host Controller (AHCI) Interface.System Requirements and PrerequisitesSystem requirementsInformation regarding minimum hardware requirements for installing XP Professional is available at .The following are the supported models for the subject of this white paper:HP Compaq 6310, 6320 and 6330 Notebook PC modelsHP Compaq 9420 and 9440 Notebook PC modelsHP Compaq 6400 Notebook PC modelsHP Compaq 7400 Notebook PC modelsHP Compaq 4400 Notebook PC modelsHP Compaq 8400 Notebook PC modelsSystem prerequisitesYou will need the following items before installing SATA drivers:•Microsoft Windows XP Professional Service Pack 2, Certificate of Authenticity and documentation. •Necessary drivers, especially Intel SATA AHCI Controller Driver (SP32478).•Proper OS License for each PC•1.44 MB Floppy Disk and USB floppy drive. For a list of USB floppy drives supported during Windows XP installation, please see Microsoft knowledge base article 916196.o The floppy disk is normally required by the Intel SATA ACHI Controller Driver softpaq to create an installation disk.o The softpaq creates a WinImage self-extractor file that is written toC:\swsetup\SP32478. Some third-party utilities can extract the drivers from this filewithout requiring a floppy drive.IMPORTANT:Make sure you have the latest compatible version of Microsoft Windows XPdrivers and enhancements. In addition, you must have a Microsoft OSlicense for each system on which you install Windows XP Professional.Note:You can also download HP drivers and utilities, including the most currentavailable ROM for the platform, from the HP website .Transitioning a Sysprep image from IDE to SATAWhere these guidelines are applicableIMPORTANT:Follow the installation instructions in the order provided. Failure tocomplete these steps in the proper order can result in an unsuccessful orunstable installation.This section provides guidelines for customers who need to add SATA support to a sysprep image. Sysprep images with no SATA support will display a blue screen and reboot very quickly in an infinite loop. Adding SATA drivers to the image will allow XP to access the disk and finish booting.Note:PCI IDs for current HP desktop and workstation Intel SATA controllers areincluded in step 5. Although this whitepaper is intended to cover HPCompaq Notebook PCs, this section should also be applicable to HPCompaq desktop and workstation PCs.Steps to add SATA support to the original image1)Download the Intel SATA AHCI Controller Driver, SoftPaq SP32478.exe, from .2)Extract all the files from the SoftPaq. A USB floppy is necessary for this step. Run sp32478;this will create a floppy disk. The files will be located on this floppy.3)These files should be located on the floppy disk.a.iaahci.catb.iaahci.infc.iastor.catd.iastor.infe.iastor.sysf.license.txtg.readme.txth.txtsetup.oem4)On the system you intend to Sysprep, add the first 5 files (a through e, from above)to the PnP drivers store (example: c:\drivers\sata).5)Add the following section to your c:\sysprep\sysprep.inf file:[SysprepMassStorage]PCI\VEN_8086&DEV_27C1&CC_0106 = %systemdrive%\drivers\sata\iaahci.inf ; Intel(R) 82801GR/GH SATA AHCI Controller (Desktop ICH7R/DH)PCI\VEN_8086&DEV_27C5&CC_0106 = %systemdrive%\drivers\sata\iaahci.inf ; Intel(R) 82801GBM SATA AHCI Controller (Mobile ICH7M)PCI\VEN_8086&DEV_2652&CC_0106 = %systemdrive%\drivers\sata\iaahci.inf ; Intel(R) 82801FR SATA AHCI Controller (Desktop ICH6R)PCI\VEN_8086&DEV_2653&CC_0106 = %systemdrive%\drivers\sata\iaahci.inf ; Intel(R) 82801FBM SATA AHCI Controller (Mobile ICH6M)PCI\VEN_8086&DEV_27C3&CC_0104 = %systemdrive%\drivers\sata\iastor.inf ; Intel(R) 82801GR/GH SATA RAID Controller (Desktop ICH7R/DH)PCI\VEN_8086&DEV_24DF&CC_0104 = %systemdrive%\drivers\sata\iastor.inf ; Intel(R) 82801ER SATA RAID Controller (Desktop ICH5R)PCI\VEN_8086&DEV_25B0&CC_0104 = %systemdrive%\drivers\sata\iastor.inf ; Intel(R) 6300ESB SATA RAID ControllerPCI\VEN_8086&DEV_2652&CC_0104 = %systemdrive%\drivers\sata\iastor.inf ; Intel(R) 82801FR SATA RAID Controller (Desktop ICH6R)Please note that each line to be added starts with PCI\. These lines are continued over to a second row in this paper due to space limitations.6)Add or edit the following section of sysprep.inf to add the SATA drivers to the PnPdrivers path.[Unattended]OemSkipEula=YesOemPnPDriversPath=drivers\sata;<your driver list will comehere>ConfirmHardware=NoOverwriteOemFilesOnupgrade=NoDriverSigningPolicy = Ignoreoempreinstall=yesupdateInstalledDrivers=Yes7)At this point, the Windows installation is ready for deployment. Run Sysprep on the updatedOS, capture an image, and deploy the image to systems using SATA hardware set to thedefault AHCI SATA Native mode.Adding SATA drivers to RIS Installation PointsWhere these guidelines are applicableIMPORTANT:Follow the installation instructions in the order provided. Failure tocomplete these steps in the proper order can result in an unsuccessful orunstable installation.This section provides guidelines for customers who need to add SATA support to a Remote Installation Service distribution point.Steps to add SATA drivers to the distribution point1)Download the Intel SATA AHCI Controller Driver, SoftPaq SP32478.exe, from .2)Extract all the files from the SoftPaq. A USB floppy is necessary for this step. Run sp32478;this will create a floppy disk. The files will be located on this floppy.3)These files should be located on the floppy disk.a.iaahci.catb.iaahci.infc.iastor.catd.iastor.infe.iastor.sysf.license.txtg.readme.txth.txtsetup.oem4)Copy all the files above to the following path on the distribution point (on the RIS server):RemoteInstall\Setup\<Language>\Images\<Dir_name>\i3865)Also copy the same files (from step 3, above) toRemoteInstall\Setup\<Language>\Images\<Dir_name>\$oem$\$1\drivers\s ata6)Open RemoteInstall\Setup\<Language>\Images\<Dir_name>\i386\txtsetup.sif in Notepad.7)Go to the end of the file. There will be several blank lines.8)Move the cursor up a few lines. This is necessary because there is a hidden marker at the endof the file.9)Add the following lines to the txtsetup.sif file:[SourceDisksFiles]iastor.sys= 1,,,,,,4_,4,1,,,1,4iaAHCI.cat=1,,,,,,,20,0,0iaAHCI.inf=1,,,,,,,20,0,0iaSTOR.cat=1,,,,,,,20,0,0iaSTOR.inf=1,,,,,,,20,0,0[HardwareIdsDatabase]PCI\VEN_8086&DEV_27C5&CC_0106 = "iaStor"PCI\VEN_8086&DEV_27C3&CC_0104 = "iaStor"PCI\VEN_8086&DEV_27C1&CC_0106 = "iaStor"PCI\VEN_8086&DEV_2652&CC_0104 = "iaStor"PCI\VEN_8086&DEV_2652&CC_0106 = "iaStor"PCI\VEN_8086&DEV_2653&CC_0106 = "iaStor"PCI\VEN_8086&DEV_24DF&CC_0104 = "iaStor"PCI\VEN_8086&DEV_25B0&CC_0104 = "iaStor"[SCSI.Load]iaStor = iaStor.sys,4[SCSI]iaStor = "Intel(R) 82801 SATA RAID/AHCI Controller(ICH5,6,7)"10)Save the file and exit notepad.11)Open any other .sif file(s) in the path:RemoteInstall\Setup\<Language>\Images\<Dir_name>\i386\xxxx.sif withnotepad12)In these files, under the section [Unattended], add the following lines:OemPreinstall=yesOemPnPDriversPath=drivers\sataDriverSigningPolicy = Ignore13)Save all your edited .sif file(s), and close notepad14)Restart the Remote Installation Service (binlsvc).Adding SATA Drivers to an Installation CDWhere these guidelines are applicableIMPORTANT:Follow the installation instructions in the order provided. Failure tocomplete these steps in the proper order can result in an unsuccessful orunstable installation.This section provides guidelines for customers who need to add SATA support by creating a custom Windows XP Service Pack 2 Installation CD.Steps to add SATA drivers to the CD1)Copy all the directories and files from the Windows XP CD to a temporary folder (theseguidelines will use c:\xpcd)2)Download the Intel SATA AHCI Controller Driver, SoftPaq SP32478.exe, from .3)Extract all the files from the SoftPaq. A USB floppy is necessary for this step. Run sp32478;this will create a floppy disk. The files will be located on this floppy.4)These files should be located on the floppy disk.a.iaahci.catb.iaahci.infc.iastor.catd.iastor.infe.iastor.sysf.license.txtg.readme.txth.txtsetup.oem5)Create the following path in the temporary folder: c:\xpcd\$oem$\$1\drivers\sata6)Copy all the files from step 4 to the c:\xpcd\i386 folder.7)Also copy all the files from step 4 to the c:\xpcd\$oem$\$1\drivers\sata folder.8)Open the c:\xpcd\i386\txtsetup.sif file in Notepad.9)Go to the end of the file. There will be several blank lines.10)Move the cursor up a few lines. This is necessary because there is a hidden marker at the endof the file.11)Add the following lines[SourceDisksFiles]iastor.sys= 1,,,,,,4_,4,1,,,1,4iaAHCI.cat=1,,,,,,,20,0,0iaAHCI.inf=1,,,,,,,20,0,0iaSTOR.cat=1,,,,,,,20,0,0iaSTOR.inf=1,,,,,,,20,0,0[HardwareIdsDatabase]PCI\VEN_8086&DEV_27C5&CC_0106 = "iaStor"PCI\VEN_8086&DEV_27C3&CC_0104 = "iaStor"PCI\VEN_8086&DEV_27C1&CC_0106 = "iaStor"PCI\VEN_8086&DEV_2652&CC_0104 = "iaStor"PCI\VEN_8086&DEV_2652&CC_0106 = "iaStor"PCI\VEN_8086&DEV_2653&CC_0106 = "iaStor"PCI\VEN_8086&DEV_24DF&CC_0104 = "iaStor"PCI\VEN_8086&DEV_25B0&CC_0104 = "iaStor"[SCSI.Load]iaStor = iaStor.sys,4[SCSI]iaStor = "Intel(R) 82801 SATA RAID/AHCI Controller(ICH5,6,7)"12)Save the file and exit notepad.13)Extract the files from c:\xpcd\support\tools\deploy.cab to c:\deploytools14)Create a new winnt.sif:a.Execute setupmgr.exe (extracted from deploy.cab in step 13).b.Select “Create new answer file”c.Select “Unattended Setup”d.Select “Windows XP Pro”e.Select “User Interaction desired”f.Select “Set up from a CD”g.Enter desired information under each of the following Settings sectionsh.Save the file as c:\xpcd\i386\winnt.sif15)Open the c:\xpcd\i386\winnt.sif in notepad16)Under the section [Unattended], add the following lines:OemPreinstall=yesOemPnPDriversPath=drivers\sataDriverSigningPolicy = Ignore17)Save winnt.sif and close notepad18)Burn the custom XPCD from the c:\xpcd folder.a.Note that the volume label of the CD must be the same as from the original XP CDb.The custom XPCD must be bootable (with the Microsoft bootblock). There are various3rd party utilities which can accomplish this. Utilities from Microsoft are available, asdetailed in the following section.Using OSCDIMG (or CDIMAGE) and CDBURN (command line utilities from Microsoft)Note: You will need the OSCDIMG and CDBURN utilities. OSCDIMG is found in the WinPE toolkit folder or the OPK. CDBURN is included in the Windows Resource Kits.1)To create the .iso, use oscdimg –l <your XP cd label> -b -nc:\xpcd c:\xpcd.iso2)To create the CD, use Cdburn <cd-drive-letter:> c:\xpcd.isoAdding SATA Drivers to WinPE 2005Where these guidelines are applicableIMPORTANT:Follow the installation instructions in the order provided. Failure tocomplete these steps in the proper order can result in an unsuccessful orunstable installation.This section provides guidelines for customers who need to add SATA support to a WinPE ISO or DOK.Steps to add SATA drivers to WinPE 20051)Create the WinPE folder (these guidelines will use c:\winpe)2)Download the Intel SATA AHCI Controller Driver, SoftPaq SP32478.exe, from .3)Extract all the files from the SoftPaq. A USB floppy is necessary for this step. Run sp32478;this will create a floppy disk. The files will be located on this floppy.4)These files should be located on the floppy disk.a.iaahci.catb.iaahci.infc.iastor.catd.iastor.infe.iastor.sysf.license.txtg.readme.txth.txtsetup.oem5)Copy the iaahci.inf and iastor.inf files from the floppy to the c:\winpe\i386\inffolder.6)Copy the other files to the c:\winpe\i386\system32\drivers folder.7)Open c:\winpe\i386\txtsetup.sif in Notepad.8)Go to the end of the file. There will be several blank lines9)Move the cursor up a few lines. This is necessary because there is a hidden marker at the endof the file.10)Add the following lines to the txtsetup.sif:[SourceDisksFiles]iastor.sys= 1,,,,,,4_,4,1,,,1,4iaAHCI.cat=1,,,,,,,20,0,0iaAHCI.inf=1,,,,,,,20,0,0iaSTOR.cat=1,,,,,,,20,0,0iaSTOR.inf=1,,,,,,,20,0,0[HardwareIdsDatabase]PCI\VEN_8086&DEV_27C5&CC_0106 = "iaStor"PCI\VEN_8086&DEV_27C3&CC_0104 = "iaStor"PCI\VEN_8086&DEV_27C1&CC_0106 = "iaStor"PCI\VEN_8086&DEV_2652&CC_0104 = "iaStor"PCI\VEN_8086&DEV_2652&CC_0106 = "iaStor"PCI\VEN_8086&DEV_2653&CC_0106 = "iaStor"PCI\VEN_8086&DEV_24DF&CC_0104 = "iaStor"PCI\VEN_8086&DEV_25B0&CC_0104 = "iaStor"[SCSI.Load]iaStor = iaStor.sys,4[SCSI]iaStor = "Intel(R) 82801 SATA RAID/AHCI Controller(ICH5,6,7)"11)Save the file and exit Notepad.12)Create the WinPE .ISO file or DOK from c:\winpe. This is done in the usual manner. Modifying a Windows XP installation to support SATA Native ModeWhere these guidelines are applicableIMPORTANT:Follow the installation instructions in the order provided. Failure tocomplete these steps in the proper order can result in an unsuccessful orunstable installation.This section provides guidelines for customers who have built an image with SATA AHCI Native Mode disabled in F10 Setup, and need to modify the image to support SATA AHCI Native Mode enabled (the default mode). This section is intended for customers who have not yet modified their overall process using one of the previous methods, and need an expedient method of imaging a system.This section provides guidelines for disabling SATA native mode in F10 setup, building the image, adding the drivers for SATA AHCI to the image, and re-enabling SATA native mode in F10 setup. Steps to modify a Windows XP image to support SATA Native Mode1)Enter F10 Setup, and go to System Configuration/Device Configurations/SATA Native Modeto Disable.2)Install Windows XP Service Pack 2 in whatever manner is typical for your organization.3)Download the Intel SATA AHCI Controller Driver, SoftPaq SP32478.exe, from .4)Extract all the files from the SoftPaq. A USB floppy is necessary for this step. Run sp32478;this will create a floppy disk. The files will be located on this floppy.5)These files should be located on the floppy disk.a.iaahci.catb.iaahci.infc.iastor.catd.iastor.infe.iastor.sysf.license.txtg.readme.txth.txtsetup.oem6)Download and run the Intel Chipset Installation Utility for ICH7, SoftPaq SP32781, from.7)In Device Manager, right-click the IDE ATA/ATAPI controllers/Intel ® 82801 GBM/GHM(ICH7-M Family) Serial ATA Storage Controller and select ‘Update Driver’.8)Follow these steps to complete the Hardware Update Wizard:a.At the first dialog, select ‘No, not this time’ when prompted to connect to WindowsUpdate.b.At the next dialog, select ‘Install from a list or specific location (Advanced).c.At the next dialog, select ‘Don’t search. I will choose the driver to install’.d.When prompted to select the device driver you want to install for this hardware,choose the first one in the list: Intel® 82801GBM/GHM (ICH-7M Family) Serial ATAStorage Controller – 27C4.e.When prompted to insert the manufacturer’s installation disk, browse toc:\SWSetup\SATA AHCI Drivers\, and click OK.f.When prompted to select the device driver you want to install for this hardware,select the Intel® 82801GBM SATA AHCI Controllerg. A warning that Windows cannot verify that the device is compatible with yourhardware will appear. When asked if you want to continue installing the driver,select Yes.h.The installation will complete.9)Shut down Windows and restart the computer. Enter F10 setup when prompted during theboot.10)Go to System Configuration/Device Configurations/SATA Native Mode and change it toEnable, then save settings and exit F10 Setup.11)After Windows restarts, the additional SATA components will be updated. A System SettingsChange will appear. When asked “Do you want to restart your computer now?” click Yes.12)When Windows restarts, the SATA AHCI drivers will be completely installed.For more informationTo learn more about HP business notebooks, contact your local HP sales representative or visit ourWeb site at: /go/notebooks.©2006 Hewlett-Packard Development Company, L.P. The informationcontained herein is subject to change without notice. The only warranties forHP products and services are set forth in the express warranty statementsaccompanying such products and services. Nothing herein should be construedas constituting an additional warranty. HP shall not be liable for technical oreditorial errors or omissions contained herein.Microsoft and Windows are U.S. registered trademarks of MicrosoftCorporation. Intel and Pentium are U.S. registered trademarks of IntelCorporation.c00765791, 9/2006。
SATA硬盘找不到驱动解决方法
SATA硬盘找不到驱动解决方法
SATA硬盘找不到驱动解决方法
最近看到很多网友发贴求助:SATA硬盘在安装WinXP时,已按F6安装软盘中的第三方SATA硬盘驱动并找到硬盘,但在复制文件过程中仍提示找不到viasraid.sys、viasraid.inf、viasraid.cat这三个文件,按ESC跳过后,当复制完文件重启系统便出现错误,以致不能继续安装系统。
笔者经过尝试已解决此问题,步骤如下:
1、安装开始时,按提示按下F6,正确安装软盘中的第三方SATA 硬盘驱动,选择安装系统的.分区。
2、在复制文件中提示找不到viasraid.sys、viasraid.inf、viasraid.cat这三个文件时,按ESC跳过。
3、复制完文件重启时插入软盘启动盘,从软驱启动,然后插入有SATA硬盘驱动程序的软盘,找到软盘上的viasraid.sys、viasraid.inf、viasraid.cat这三个文件(一般是在WinXP目录中)复制到C:windowssystem32drivers目录下(这里假定系统安装在C区),取出软盘重启即可完成系统的安装。
fsl_sata控制器linux驱动实现分析
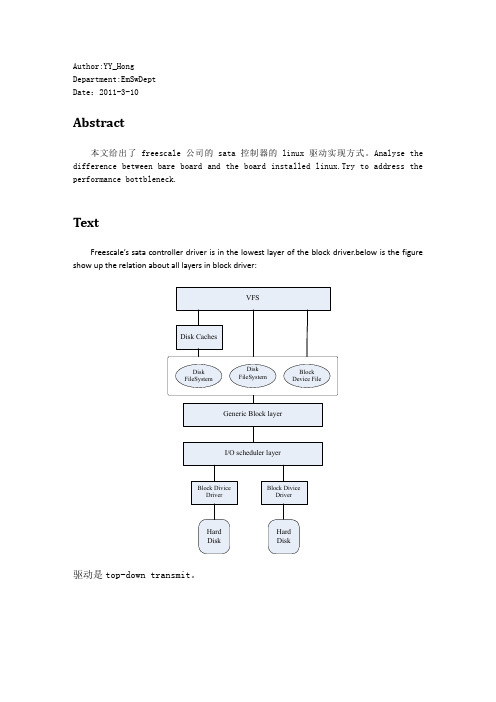
Author:YY_HongDepartment:EmSwDeptDate:2011-3-10Abstract本文给出了freescale公司的sata控制器的linux驱动实现方式。
Analyse the difference between bare board and the board installed linux.Try to address the performance bottbleneck.TextFreescale’s sata controller driver is in the lowest layer of the block driver.below is the figure show up the relation about all layers in block driver:驱动是top-down transmit。
对/dev/sdx初始化安装ATA_BASE_SHT#define ATA_BASE_SHT(drv_name) \.module = THIS_MODULE, \.name = drv_name, \.ioctl = ata_scsi_ioctl, \.queuecommand = ata_scsi_queuecmd, \.can_queue = ATA_DEF_QUEUE, \.this_id = ATA_SHT_THIS_ID, \.cmd_per_lun = ATA_SHT_CMD_PER_LUN, \.emulated = ATA_SHT_EMULATED, \.use_clustering = ATA_SHT_USE_CLUSTERING, \.proc_name = drv_name, \.slave_configure = ata_scsi_slave_config, \.slave_destroy = ata_scsi_slave_destroy, \.bios_param = ata_std_bios_param, \.unlock_native_capacity = ata_scsi_unlock_native_capacity, \.sdev_attrs = ata_common_sdev_attrs#define ATA_NCQ_SHT(drv_name) \ATA_BASE_SHT(drv_name), \.change_queue_depth = ata_scsi_change_queue_depthATA_PIO_SHT/* PIO only, sg_tablesize and dma_boundary limits can be removed */#define ATA_PIO_SHT(drv_name) \ ATA_BASE_SHT(drv_name), \.sg_tablesize = LIBATA_MAX_PRD, \.dma_boundary = ATA_DMA_BOUNDARYATA_NCQ_SHT#define ATA_NCQ_SHT(drv_name) \ATA_BASE_SHT(drv_name), \.change_queue_depth = ata_scsi_change_queue_depthstruct ata_hoststruct ata_host {spinlock_t lock;struct device *dev;void __iomem * const *iomap;unsigned int n_ports;void *private_data;struct ata_port_operations *ops;unsigned long flags;#ifdef CONFIG_ATA_ACPIacpi_handle acpi_handle;#endifstruct ata_port *simplex_claimed; /* channel owning the DMA */ struct ata_port *ports[0];};struct ata_portstruct ata_port {struct Scsi_Host *scsi_host; /* our co-allocated scsi host */struct ata_port_operations *ops;spinlock_t *lock;/* Flags owned by the EH context. Only EH should touch these once the port is active */unsigned long flags; /* ATA_FLAG_xxx *//* Flags that change dynamically, protected by ap->lock */unsigned int pflags; /* ATA_PFLAG_xxx */unsigned int print_id; /* user visible unique port ID */unsigned int port_no; /* 0 based port no. inside the host */#ifdef CONFIG_ATA_SFFstruct ata_ioports ioaddr; /* ATA cmd/ctl/dma register blocks */u8 ctl; /* cache of ATA control register */u8 last_ctl; /* Cache last written value */struct ata_link* sff_pio_task_link; /* link currently used */struct delayed_work sff_pio_task;#ifdef CONFIG_ATA_BMDMAstruct ata_bmdma_prd *bmdma_prd; /* BMDMA SG list */dma_addr_t bmdma_prd_dma; /* and its DMA mapping */#endif /* CONFIG_ATA_BMDMA */#endif /* CONFIG_ATA_SFF */unsigned int pio_mask;unsigned int mwdma_mask;unsigned int udma_mask;unsigned int cbl; /* cable type; ATA_CBL_xxx */struct ata_queued_cmd qcmd[ATA_MAX_QUEUE];unsigned long qc_allocated;unsigned int qc_active;int nr_active_links; /* #links with active qcs */struct ata_link link; /* host default link */struct ata_link *slave_link; /* see ata_slave_link_init() */ int nr_pmp_links; /* nr of available PMP links */struct ata_link *pmp_link; /* array of PMP links */struct ata_link *excl_link; /* for PMP qc exclusion */struct ata_port_stats stats;struct ata_host *host;struct device *dev;struct mutex scsi_scan_mutex;struct delayed_work hotplug_task;struct work_struct s csi_rescan_task;unsigned int hsm_task_state;u32 msg_enable;struct list_head eh_done_q;wait_queue_head_t eh_wait_q;int eh_tries;struct completion park_req_pending;pm_message_t pm_mesg;int *pm_result;enum link_pm pm_policy;struct timer_list fastdrain_timer;unsigned long fastdrain_cnt;int em_message_type;void *private_data;#ifdef CONFIG_ATA_ACPIacpi_handle acpi_handle;struct ata_acpi_gtm __acpi_init_gtm; /* use ata_acpi_init_gtm() */ #endif/* owned by EH */u8 sector_buf[ATA_SECT_SIZE] ____cacheline_aligned; };struct scsi_host_template sata_fsl_sht/** scsi mid-layer and libata interface structures*/static struct scsi_host_template sata_fsl_sht = {ATA_NCQ_SHT("sata_fsl"),.can_queue = SATA_FSL_QUEUE_DEPTH,.sg_tablesize = SATA_FSL_MAX_PRD_USABLE,.dma_boundary = ATA_DMA_BOUNDARY,};struct ata_port_info sata_fsl_port_infostatic const struct ata_port_info sata_fsl_port_info[] = {{.flags = SATA_FSL_HOST_FLAGS,.pio_mask = ATA_PIO4,.udma_mask = ATA_UDMA6,.port_ops = &sata_fsl_ops,},};struct of_platform_driver fsl_sata_driverstatic struct of_platform_driver fsl_sata_driver = {.driver = {.name = "fsl-sata",.owner = THIS_MODULE,.of_match_table = fsl_sata_match,},.probe = sata_fsl_probe,.remove = sata_fsl_remove,#ifdef CONFIG_PM.suspend = sata_fsl_suspend,.resume = sata_fsl_resume,#endif};Sata_fsl_initstatic int __init sata_fsl_init(void){of_register_platform_driver(&fsl_sata_driver);return 0;}明白驱动架构的都知道,这里就是要把struct of_platform_driver fsl_sata_driver挂载到设备上去。
SATA控制器驱动
SATA控制器驱动SATA控制器驱动我想开启硬盘的ACHI模式。
主板是产品 YESTON AN78V V1.1,芯⽚组Nvidia MCP78S,硬盘是希捷硬盘型号ST3320613AS。
⽬前⽤的是装的XP系统。
另外,处理器是规格 AMD Athlon(tm) 64 X2 Dual Core 4400+,主板BIOS⾥有AHCI选项,硬盘经检测⽀持NCQ,分区为NTFS。
我⽤了很多⽅法都不⾏,包括强制更新驱动和DPS集成,NLITE集成。
我觉得主板光盘⾥的SATA驱动似乎不对,在⽹上有找不到,找到的⼜没⽤。
2010-11-15 22:51:21举报所有回答(1)wjruson回答数:48采纳率:19%功勋值:9⼩纸条楼主:我在⽹上给你搜了⼀个⽅案,你可以试下!1、直接安装集成了SATA AHCI驱动的安装盘,⽐如蕃茄花园的V3.3和深度的Deepinn XP Lite V5.7等,这样只要安装前在BIOS中开启硬盘的AHCI模式,在安装过程中就会⾃动加载SATA AHCI 驱动。
这是最省⼼的⽅法了。
2、如果找不到这样的系统集成光盘也没关系,我们可以在安装新系统的过程中⼿动加载AHCI驱动。
第⼀步:在Intel官⽅⽹站可以下载“Intel Matrix Storage Manager driver”下载地址: /Product_Search.aspx? Prod_nm=Intel%20Matrix%20Storage%20Manager%20driver&page_nbr=l&lang=zho ,注意下载适合的版本,⽐如f6flpy32.zip是适合32位操作系统的,⽽f6flpy64.zip是适合64位操作系统的。
第⼆步:将下载的驱动程序解压缩,得到⼀个可执⾏⽂件,运⾏它,会提⽰作⼀张SATA AHCI驱动软盘。
第三步:在BIOS中将SATA硬盘设置为ACHI模式。
第四步:安装操作系统,在第⼀个蓝屏过程中按下F6键,放⼊刚才制作的驱动,在驱动中找到相应的SATA AHCI驱动,继续安装即可。
linux直接安装 sata硬盘问题解决方案
linux直接安装sata硬盘问题解决方案开篇:按照北南兄弟的《FC4菜鸟图文版安装教程》我顺利地以本地SA TA硬盘方式安装了FC4. 当时按照建议我把FC4的Linux版本GRUB程序装在了MBR(Main Boot Record主引导记录)里面。
先简单介绍一下我的遭遇:我的机器没有安装软驱,SA TA(也就是俗称串口)接口的硬盘1块,当时配机子的时候考虑到两块硬盘在价格方面比一块相当容量的硬盘要贵出一些,并且我当时也没有太长远的打算到底多大空间分给Windows多少分给Linux,所以我选择了一些Linux入门书上介绍的比较便宜的配置,就是一块硬盘安装以上的两种操作系统。
像一般的那样我首先安装了windowsXP(因为windows目前好象没有义务识别linux,后装windows可能带来很多麻烦),由于我买的redhat linux9安装光盘作为引导的内核(不知能不能这样形容)不能识别SA TA接口硬盘,当时的提示是:An error has occurred - no valid devices were found on which to create new file systems.Please check your hardware for the cause of this problem.No hard drives have been found.Y ou probably need to manually choosedevice drivers for the installation to succeed.Would you like to select drivers now?(如果你也觉得眼熟,那么我们遇到过类似的情况,如果看不懂,麻烦您查字典也好google 也好自行解决)解决的办法之一就是我从网上下载了一个FC4的安装镜像(安装盘应该有4张)如果你进的是“ftp://...Fedora/1(或2,3)/...”的话那么恳请您点“向上”按扭然后找形如Fedora/../4/..这个路径下面的文件,那几个路径下应该是FC 1,2,3的镜像。
多种方法集成SATA硬盘驱动
集成SATA硬盘之DPS对于新手来讲手动集成驱动无疑很痛苦。
DELL很多本子又是SATA的硬盘下的原版系统却往往没有集成驱动导致无法发现硬盘所以友好的界面必然是新手的D1选择目标。
集成驱动有很多办法。
这里先介绍下如何使用大名鼎鼎的DPS-Driver Packs BASE(PS:简称不带B的)做事情总得有工具我建议大家准备好MD5值校验工具(下系统盘的总得有的)POWERISO (看镜像的个人认为不错比WINISO好虚拟光驱添加速度比DAEMON快很多)还有嘛当然就是DPS了解压工具我个人建议PowerArchiver(纯粹界面好看。
WINRAR太丑。
)还有嘛浏览器个人建议GREENBROWSER (多窗口。
国内好多的浏览器都抄他源码的。
而且用着顺手用过的人无不称赞)NLITE 出镜像的好了现在开始DPS 8.05 (最新目前日期 ET 2008年5月15日星期四)/DriverPacks/download.php?pag=b到这里可以直接下载最新的DPS加上因为是DPS 他的制作小组有贴别的专门制作的驱动包咱们直接集成他的就行虽然自己做第三方驱动简单。
估计又是一大堆人不懂。
接下来当然就是XP安装光盘以下就是XP SP3 PRO VOL 简体中文的镜像信息务必校对 MD5工具就是这时候用的简体中文:File: zh-hans_windows_xp_service_pack_3_x86_cd_x14-60563.isoSize: 417675264 bytesModified: 2008年4月23日, 15:57:10MD5: 13F04D7983650FA08C619CBA2E73059BSHA1: 5566D7949E45C453964708831E16BCD73547F73BCRC32: FFFFFFFF假如问哪里下载嘿嘿那就不道德了各个软件安装完毕打开程序DPs_BASE.exe点击下拉框选择Chinese (Simplified)点击右边的Apply程序界面便会自动切换成中文的了见下图然后选择左边一小列的设置点击小三角-位置点击浏览选择你下的系统盘的镜像的解压文件夹由于SP3和SP2有点不一样选择I386这个文件夹的上一级目录就行选择完毕会有错误窗口弹出。
SATA硬盘驱动设置方法
Windows7启动SATA AHCI蓝屏在安装新系统前没有启用SATA AHCI,在系统安装后再启用SATA AHCI,启动系统后,会遭遇蓝屏,且进不了系统。
原因:Win7/Vsita禁用了 AHCI 驱动程序 (Msahci.sys),必须先启用SATA驱动,才能更改成AHCI模式。
要解决此问题,请在更改启动驱动器的 SATA 模式之前在注册表中启用 AHCI 驱动程序。
为此,请按照下列步骤操作:
退出所有基于 Windows 的程序。
单击“开始”,在“开始搜索”框中键入 regedit ,然后按 Enter。
如果显示“用户帐户控制”对话框,请单击“继续”。
找到并单击下面的注册表子项:
HKEY_LOCAL_MACHINE\System\CurrentControlSet\Services\Msahci
在右窗格中,右键单击“名称”列中的“Start”,然后单击“修改”。
在“数值数据”框中,键入 0 ,然后单击“确定”。
在“文件”菜单上,单击“退出”以关闭注册表编辑器
注意:重启后安装Intel Matrix Storage Manager!这是启用Achi的重要程序!。
硬盘驱动器安装指南

硬盘驱动器安装指南在现代的计算机时代,我们经常需要增加电脑的存储空间来满足不断增长的数据需求。
硬盘驱动器作为最常见的存储设备之一,其安装对于数据存储和管理至关重要。
本文将为您提供一份详细的硬盘驱动器安装指南,帮助您轻松完成硬盘驱动器的安装,并更好地利用计算机存储空间。
1. 硬盘驱动器的选择与准备首先,您需要选择适合您的计算机需求的硬盘驱动器。
市场上有各种不同类型和规格的硬盘可供选择。
常见的有机械硬盘(HDD)和固态硬盘(SSD)。
机械硬盘容量较大,价格相对便宜,适合大量存储数据。
固态硬盘则具有更快的读写速度,适合需要频繁访问数据的任务。
根据自己的需求和预算,选择合适的硬盘。
在购买硬盘之前,您还需要查看自己的计算机是否有可用的硬盘插槽。
大部分台式机通常会有内部硬盘插槽,而一些轻薄笔记本电脑可能需要使用外部硬盘盒来安装硬盘驱动器。
2. 安装硬盘驱动器在开始安装之前,确保关闭计算机,断开电源,并拔掉任何与计算机连接的电线或电缆。
安全操作是非常重要的。
接下来,查找计算机主板上的硬盘插槽。
一般来说,硬盘插槽通常被标记为"SATA"或"IDE"。
在找到插槽后,小心地将硬盘驱动器插入插槽中,确保连接牢固。
然后,连接硬盘驱动器的数据线和电源线。
数据线通常是一个扁平的、带有连接器的线缆,用于将驱动器与主板连接。
电源线则是用于为硬盘驱动器供电的线缆,通常是多个插头的一根线。
现在,您可以将计算机的电源线重新连接,并打开计算机。
进入计算机的BIOS界面,确认硬盘驱动器已被正确识别。
如果硬盘驱动器没有被识别,您可能需要在BIOS设置中手动启用它。
3. 格式化与分区一旦硬盘驱动器被成功安装并被识别,您需要对其进行格式化和分区。
格式化是指为硬盘驱动器创建文件系统的过程,以使其能够正确存储和管理数据。
分区则可以将硬盘驱动器划分为多个逻辑部分,使得数据存取更加有序。
在Windows操作系统中,您可以打开“磁盘管理工具”,找到已安装的硬盘驱动器。
SATA硬盘安装和BIOS设置详解
SATA硬盘安装和BIOS设置详解SATA(Serial Advanced Technology Attachment,串行高级技术附件)是一种基于行业标准的串行硬件驱动器接口,是由Intel、IBM、Dell、APT、Maxtor和Seagate公司共同提出的硬盘接口规范。
那么SATA硬盘到底是怎样安装的呢,它的bios系统又是如何设置的呢,下面就由店铺为大家一一介绍,供大家参考和学习。
随着各主板芯片组厂商陆续发布直接支持SATA硬盘甚至SATA RAID的芯片组,具备SATA RAID功能的主板成为了市场热点;而且STAT硬盘的高性价比,也使很多网友舍弃IDE硬盘,直接购买和使用拥有SATA接口的主板;不过,新事物的出现,必竟会产生新的问题,目前对于使用SATA主板和硬盘的用户来说,如何设置和使用好SATA 设备,成了关键问题。
首先安装硬盘数据线和电源线;SATA硬盘与传统硬盘在接口上有很大差异,SATA硬盘采用7针细线缆而不是大家常见的40/80针扁平硬盘线作为传输数据的通道。
细线缆的优点在于它很细,因此弯曲起来非常容易(但是对于SATA数据线,最好不要弯春成90度,否则会影响数据传输)。
接下来用细线缆将SATA硬盘连接到接口卡或主板上的SATA接口上。
由于SATA采用了点对点的连接方式,每个SATA接口只能连接一块硬盘,因此不必像并行硬盘那样设置跳线了,系统自动会将SATA硬盘设定为主盘。
为硬盘连接上电源线。
与数据线一样,SATA硬盘也没有使用传统的4针的“D型”电源接口,而采用了更易于插拔的15针扁平接口,使用的电压为12V、5V和3.3V,如果你的电源没有提供这种接口,则需要购买专门的支持SATA硬盘的电源或者转换器接头。
有些SATA 硬盘提供了4针的“D型”和15针扁平两种接口,这样就可以直接使用原有的电源了。
所有这些完成之后需要再仔细检查一遍,确信准确无误之后就可以盖上机箱了。
SATA硬盘在使用上完全兼容传统的并行硬盘,因此在驱动程序的安装使用上一般不会有什么问题。
IDE驱动程序分析及SATA驱动程序移植
IDE驱动程序分析及SATA驱动程序移植洪承煜;杨尚琴【期刊名称】《计算机系统应用》【年(卷),期】2014(000)001【摘要】SATA disk is Storage Media that has already been widely used in a multimedia applications currently, while many versions of Linux in Multimedia products that its driver framework does not support SATA drives. By analysing the driver framework in linux and its associated code analysis, this paper provides a way for porting SATA drives in IDE driver framework. Finally to SiI3512 example, the paper describes the porting process of SATA driver. This has a good reference for migration of other similar systems.%SATA硬盘已经是目前多媒体应用中被广泛使用的存储介质,而有些多媒体产品的Linux版本中,并不支持SATA驱动框架。
本文通过对Linux 下IDE驱动框架及其相关的Linux驱动代码的分析,提供了一种在IDE驱动程序框架下移植SATA驱动程序的方法。
最后以SiI3512为例,介绍了SATA驱动程序的移植过程。
对于其它此类系统的移植具有很好的借鉴作用。
【总页数】5页(P140-143,44)【作者】洪承煜;杨尚琴【作者单位】中国石化石油物探技术研究院,南京 211103;中国石化石油物探技术研究院,南京 211103【正文语种】中文【相关文献】1.Windows2000内核结构的分析及驱动程序的编制 [J], 张建新2.Windows CE6.0下LCD驱动程序移植 [J], 邓中亮;肖冠兰3.Windows CE 5.0下LCD驱动程序移植 [J], 方安平;丁智勇;库少平4.Linux下USB无线网卡驱动程序移植的实现 [J], 任厦;孟昭鹏;王晓华5.嵌入式Linux系统构建与驱动程序移植 [J], 孙昌霞因版权原因,仅展示原文概要,查看原文内容请购买。
linux sata phy参数
linux sata phy参数【原创实用版】目录1. SATA 物理层参数简介2. SATA 物理层参数的作用3. 如何查看和管理 Linux 中的 SATA 物理层参数4. SATA 物理层参数的优化建议正文SATA 物理层参数是用于配置和管理计算机硬盘驱动器的重要参数之一。
SATA(Serial Advanced Technology Attachment)是一种串行 ATA 硬盘接口标准,它用于在计算机和硬盘之间传输数据。
SATA 物理层参数是SATA 接口的一部分,它们描述了硬盘和计算机之间的物理连接的特性。
SATA 物理层参数的作用是定义硬盘和计算机之间的电气和机械特性,以确保硬盘可以正确地与计算机连接并传输数据。
这些参数包括硬盘的接口速度、传输模式、电流等级和电压等级等。
在 Linux 中,您可以使用命令行工具来查看和管理 SATA 物理层参数。
其中,最常用的工具是`hdparm`和`smartmontools`。
`hdparm`是一个用于管理 IDE 和 SATA 硬盘参数的命令行工具,它可以查看和修改硬盘的物理层参数。
`smartmontools`是一个用于查看和管理 SATA 硬盘的智能参数的命令行工具,它也可以查看硬盘的物理层参数。
对于 SATA 物理层参数的优化,建议首先查看硬盘的物理层参数,然后根据硬盘的特性和使用情况来优化参数。
例如,如果您的硬盘已经使用了一段时间,可能需要降低其接口速度和传输模式以提高稳定性。
如果您的硬盘需要高性能,可以提高其接口速度和传输模式。
总的来说,SATA 物理层参数是管理和配置硬盘驱动器的重要参数,它们描述了硬盘和计算机之间的物理连接的特性。
在 Linux 中,可以使用`hdparm`和`smartmontools`等命令行工具来查看和管理 SATA 物理层参数。
- 1、下载文档前请自行甄别文档内容的完整性,平台不提供额外的编辑、内容补充、找答案等附加服务。
- 2、"仅部分预览"的文档,不可在线预览部分如存在完整性等问题,可反馈申请退款(可完整预览的文档不适用该条件!)。
- 3、如文档侵犯您的权益,请联系客服反馈,我们会尽快为您处理(人工客服工作时间:9:00-18:30)。
摘 要 : 部 分 开 源 的 嵌 入 式 操 作 系统 内核 中 已经 添 加 了 对 S T 硬 盘 控 制 器 大 AA
s3 1 i l4驱动 的支持 , 一些 老版 本 的 内核 不 支持 S T l 而 A A硬 盘控 制 器. 根据 实际 项 目需
求 , 文采 用驱动 移植 的 方法 , 据 内核 的编 译 原理 , 本 根 生成 二进 制 内核 文 件 , 实现 了在 实时操作 系统 i l u2 4 1 x i x . . 7中添加 s3 1 Cn i 14的驱 动. l 经测 试 , 内核 可 以很 好 的 支持 该
作者简介 : 陆银 丽 ( 9 7一) 女 , 南 西峡 人 , 华 大学 电气 工 程 学 院 硕 士 研 究 生 . 要 研 究 方 向 : 成 电 路 与 系 统 设 18 , 河 南 主 集 计. 通讯作者 .
A b t ac : ATA r ik sl 1 rv rh sbe n a d d i o mo to pe o r e e sr t S had d s i3 4 d e a e d e nt s fo n s u c mbe 。 1 i d de p r tn y tm , uts me e ry v rin kenes d o up o S A r ik c n d o e ai g s se b o a l e so r l o n t s p  ̄ AT had d s o —
Di k Dr v r i o p i ux 4. 7 s i e nt Cln 2. 1
LU n-i YU ng l, Yi l , Ho —i HUANG iwe Zh - i
( co l f l tcE g er g U iesyo ot hn , e ga g H nn4 10 , hn ) Sh o o e r ni e n , nvri f uh C ia H ny n , u a 2 0 1 C ia E c i n i t S
处 理 器 、Fah D A l 、S R M、P M10 、T P 1 4 s C 81 V 55 、
等监控 领 域 … , S T 而 A A硬 盘 以其 传输 速度 高 、 抗
收 稿 日期 :0 1 1 6 2 1 —1 —1
D 4 Sl o ae 司 的 S T M6 8、icnI g 公 i m A A硬 盘 控 制 器
k y wo ds: Cln x 4. d v r r n p a a in; i 4; AT h r ik e r I i u 2. X; r e s ta s lntto sl 1 S A a d d s x i 31
0 引 言
嵌 入 式数 字视 频 录像 机 由于 其 高性 能 、 成 低
本 、 稳定 的优 势逐 渐 全 面进 入 小 区 、 宇 、 融 更 楼 金
干 扰 能力强 、 靠性 高等 特点 , 为嵌 入式 数 字视 可 成 频 监控 系统 中实 现 存储 功 能设 备 的首 选 . 项 目 本 中的嵌 入 式 数 字 视 频 录 像 系 统 采 用 ¥ C 5 0微 3 21
ST A A硬 盘 运 行 .
关 键词 : Ciu2 4 x 驱 动移植 ;i 14 S T  ̄ l x. . ; n s 3 1 ;A A硬 盘 l
中图分 类 号 : P 1 T31
文献 标识 码 : B
Re e r h n t eho fAd ng S s a c o he M t d o di ATA a d H r
—
文 章 编 号 :6 3— 0 2 2 1 0 0 3 0 17 0 6 (0 2)1— 0 4— 4
t l u2 4 1 添 加 S T x i x . .7中 Cn A A硬 盘 控 制 器 驱 动 的 方法 研 究
陆银 丽 , 于红 利 , 智 伟 黄
( 华 大 学 电气 工 程 学 院 , 南 衡 阳 4 10 ) 南 湖 2 0 1
t l rA cri erq i m n o rci lpoetteat l a ot teme o f r l . codn t t e ur e t f at a r c , rce d ps h t d o oe g oh e p c j h i h
d v r ta pa t t n, c o d n c mpi n rn i l o e e t g n r t nay e e i r e r ns ln a i o a c r ig o l g p c p e f k r l o e e ae bi r k r l i i n n i e t s e lz d ha t e r e o sl 1 4 s d e i t r a—i fl .I i r aie t t h d v r f i 1 i a d d n o etn s se tCl x 4. 7. trt se t e k r lc n s p o tS x i 2. 1 Afe e td,h e ne a u p r ATA r s l. nu ha d dik we1
第2 6卷 第 1 期 21 0 2年 3月
南华大学学报 ( 自然 科 学 版 ) o Jun l f nvri f ot hn ( cec n c nl y o ra o ie t o SuhC i : i e a d Te h o g ) U sy aS n
—
Vo_ 6 No l2 .1 M a . 01 r2 2
