SW_Premium_2013_DS_CHS
solidworks2013安装教程

solidworks2013安装教程SolidWorks是一款功能强大的3D设计软件,它可以帮助工程师和设计师创建和分析实体模型。
安装SolidWorks2013之前,你需要确保你的电脑符合最低系统要求。
以下是详细的SolidWorks2013安装教程。
步骤1: 下载SolidWorks2013首先,你需要从SolidWorks官方网站上下载SolidWorks2013安装文件。
打开你的网络浏览器,访问SolidWorks官方网站,找到SolidWorks2013的下载页面。
查看你购买的软件版本(32位或64位),然后点击下载按钮开始下载SolidWorks2013安装文件。
步骤2: 解压安装文件当SolidWorks2013安装文件下载完成后,你需要将它解压到一个适当的文件夹中。
找到下载文件的位置,右键单击安装文件,选择“解压到当前文件夹”选项。
解压后,你将得到一个名为“SolidWorks2013”的文件夹。
步骤3: 运行安装程序打开SolidWorks2013的文件夹,找到名为“setup.exe”的安装程序。
双击运行这个程序,它会引导你进入SolidWorks的安装界面。
步骤4: 选择安装选项在SolidWorks安装界面上,你可以选择从完整安装、自定义安装还是在线安装中进行选择。
推荐选择完整安装,以确保安装所有的必要组件。
点击“继续”按钮继续进行安装。
步骤5: 同意许可协议在安装过程中,你需要阅读并同意SolidWorks的许可协议。
勾选“我同意”后,点击“继续”按钮进行下一步。
步骤6: 选择安装位置根据个人喜好和电脑空间,选择安装SolidWorks2013的位置。
你可以选择默认位置,或者点击“浏览”按钮选择其他路径。
点击“下一步”继续。
步骤7: 选择安装类型根据需要,你可以选择完全安装或自定义安装。
推荐选择完全安装,以确保所有的功能和组件都被安装。
点击“下一步”继续。
步骤8: 输入序列号在安装SolidWorks2013之前,你需要输入你的SolidWorks序列号。
SolidWorks 2013 Education Edition 安装指南说明书

SolidWorks ® Education Edition 2013Installation InstructionsPreparation• Verify that your system meets the criteria specified in /System_Requirements .• Back up all SolidWorks files (parts, assemblies, and drawings, document templates, sheet formats, libraryfeatures, and form tools) before upgrading to SolidWorks 2013. Files you open and saved in SolidWorks 2013 cannot be opened in earlier versions.• To minimize disk space consumed, please consider uninstalling your older Education Edition and using anew installation of the new Education Edition product. If you uninstall the older version please be sure to also uninstall Simulation products, along with older versions of eDrawings, DWGeditor, etc.• Locate your Serial Number (S/N). The number typically begins with 9710 (Network) or 9700 (StandAlone). NEW Customer – S/N is located on the front of the box on a sticker. CURRENT Customer - S/N is located inside SolidWorks under HELP then ABOUT SOLIDWORKS. If you cannot find or you have misplaced your number, contact your local educational reseller to obtain one.• Before you uninstall a previous version of SolidWorks please make sure to transfer your license by going tohelp/transfer licenses.• Uninstall any alpha, beta, or pre-release versions of the SolidWorks software.Installation and Licensing ProcessYou are ready to begin your installation of theSolidWorks ® Education Edition!Network Users OnlySection 2Section 1Ver. 1STEPS FOR SECTION 1: NETWORK INSALLATION:1.Remove previous SolidNetWork License Managers2.Remove previous SolidWorks software3.Install 2013 SolidNetWork License Manager4.Activate 2013 Network License5.Install SolidWorks software on individual clientsSection 1 | SolidWorks® Education Edition Installation (Network)Note:If you are installing SolidWorks on a Network with Restricted Rights, please go to the Customer Portal for additional documentation or contact your local reseller for assistance.This step is only for users who are on NETWORK. If you purchased a Stand Alone, proceed to Section 2 in the installation process.Note:•All previous SolidWorks License Managers must be removed from your computer before beginning the installation of the new SolidWorks License Manager (i.e. 2012 must be removed before installing 2013).•The SolidWorks License Manager must be installed on the machine that will be used to distribute SolidWorks licenses on your network.•The SolidWorks License Manager for 2013 will license all SolidWorks EDU applications., including SolidWorks Simulaton, SolidWorks Sustainability, eDrawings and PhotoView 360.Remove previous SolidNetWork License Managersunch Add/Removeprograms and uninstall theprevious version of theinstallation Manager.Access Add/Removeprograms from Start >Control Panel >Add/Remove Programs.Locate the SolidWorksSolidNetWork LicenseManager and selectRemove.-Once the remove option is selected you will beprompted to confirm theproducts to uninstall.-The product will thenuninstall itself. A progressonly box will appear.-After the product uninstall iscomplete, close theAdd/Remove program swindow and launchWindows Explorer. Locatethe folder in which thelicense manager waspreviously installed to anddelete it. By default thelicense manager is installedto: C:\ProgramFiles\SolidWorksSolidNetWork LicenseManager.Remove previous SolidWorks Software1.If required, uninstall SolidWorks using Add/Remove Programs.2.If required, Delete SolidWorks folders located in C:\ Program Files\SolidWorks CorpBegin 2013 SolidNetWork License Manager Installation1.Insert your 2013 SolidWorks DVD in your local DVD Drive to begin the softwareinstallation process. If SolidWorks Master Setup does not come up automatically, select My Computer and double click the DVD drive, this is generally your D: drive. You may alsolaunch the Installation Manager downloaded from the SolidWorks Customer Portal.Note: Once DVD is placed in your local DVD Drive, the SolidWorks 2013 SP2.0 Installation Manager will appear. Select Server products and then select “Install SolidNetWork License Manager (distributed licensing) on this computer.”Click Next.2.The next screen will prompt you for your SolidWorks and associated products serial number.Enter your product serial number. Click Next.3.Confirm the Summary page and click “Install Now”.Note: Server Installation Progress will appear. Once done checking for Updates, the SolidWorks SolidNetWork License Manager Setup will appear. Click Next.4.After the installation is complete there will be a confirmation of the successful install. Oncecompleted the Installation Manager confirms the product(s) are installed correctly.5.Select Finish and close the installation manager. This completes the installation of theSolidWorks SolidNetWork License Manager. If you choose to tell us your installation experience, the following Survey will be displayed in your Internet Browser. Thank you for your feedback.Activate 2013 SolidNetWork LicenseStarting with SolidWorks 2010 release, a new licensing method has been introduced for network licenses. The new process will require internet connectivity to ‘activate’ the license on the SolidWorks server.What does this mean for the user? The end user will no longer need a license file or existing dongle. The dongle must be returned to your value added reseller.1.To activate the newly installed software go to Start > All programs > SolidWorks 2013 >SolidWorks License Manager > SolidNetWork License Manger.A server information dialog will appear that will allow you to choose the license server port(s)and apply an options file if desired. It is recommended that you select the option for firewall in use on this server. Select Next to continue.Note: You will need to add exceptions in your firewall software, example shown in Windows 7 Firewall settings on the next page.For Windows 7 Firewall1.Add program exceptions to the Windows 7 Firewall. In SNL Server setup, change image toshow that the windows firewall option is selected.2.Bring up the Control Panel and Select System and Security3.Allow programs through the firewall.4.Click “allow another program”And Browse to the folder where you installed theSolidWorks SolidNetwork License Manager. Add both executables. Lmgrde.exe and sw_d.exeWhen lmgrd.exe is added successful to the exceptions list, it will appear as Accresso Software Inc in the list of Allowed programsWhen sw_d is allowed successfully, it will as sw_dn in the allowed programs list.SolidnetWork License Installation, continuedThe SolidWorks Product Activationwindow will appear and you will berequired to fill out an email toassociate to the activation. Enter anemail address and select Next.Note: If you do not have internetaccess, please contact your ValueAdded Reseller.The product will now activate viainternet.After a successful activation therewill be a succeeded message whichwill show all the products associatedwith your serial number.Select Finish, completing activation. The license manager will appear and you can close it out to complete the activation process.SolidnetWork License Installation is complete.SolidWorks Network Monitor ActivationThe SolidWorks network Monitor automatically installs with the SolidnetWork License Manager. Before using the SolidWorks Network Monitor you must complete the setup.1.Open the SolidWorks Network Monitor by going to yourStart Menu>Programs>SolidWorks 2013>SolidWorksTools>SolidWorks Network Monitor2.Select “Coordinator” and Click “Connect To” and you areready to use the SolidWorks Network Monitor.NOTE:You have now finished installing the SolidWorks License Manager. You must now go to your client computers and proceed as follows on steps.Before beginning the installation process, please be sure to close out of all SolidWorks programs currently open on your computer.You can also install SolidWorks on your server machine. Follow the instructions in the next section.Section 2 | SolidWorks® Education Edition Installation (Stand Alone) Note:For SolidWorks Network install, the software does not get installed on the network machine (Server) by default. Normally SolidWorks should be installed on the user machines (Client).Before beginning the installation process, please be sure to close out of all SolidWorks programs currently open on your computer.1.On the CLIENT Machine Insert DVD or launch the Installation Manager downloaded fromthe SolidWorks Customer Portal. Select Individual (on this computer). Click Next in lower right corner.2.For new installation enter your serial number below (24 digits). Click Next.Note: The message in the center of the window under the green bar, “Connecting to SolidWorks”will appear. You may see a screen stating that a newer version is available, ALWAYS selectcontinue installing from DVD and click Next.3.After you have clicked Next, the SolidWorks 2013 SP2.0 Installation Manager will guide youthrough the installation. Accept Defaults on the screen (DO NOT change anything) Click Install Now to continue installation.Note: For the client installation of a network license, you will be asked for your license server name as below. Please enter your license server and the port number that you specified in the server ***************************************************************************“OK”4. Installation is Complete! Confirm if you would like to tell us your installation experience in a survey or participate in the Customer Experience program, then click Finish.Note: Depending upon your computer configuration you may or may not need to restart your computer. Installing SolidWorks will also install Simulation and Sustainability products automatically. You do not have to re-install Simulation after the SolidWorks installation is complete.For client installation of a network license, your SolidWorks is ready now since your network license server has been activated in Section 1 and your client SolidWorks is connected with yourFor standalone license installation, when you start SolidWorks Education Edition for the first time, the SolidWorks Product Activation dialog will appear to guide you through the activation process. Click Next, to continue with activation.To activate you SolidWorks product you must enter a serial number from SolidWorks. The SolidWorks Product Activation will help you collect the information necessary to activate your product. Choose which method for how you would like to activate. Type in email address and then click Next.Now you are done registering your SolidWorks Education Edition. Click Finish.YOU CAN NOW RUN SOLIDWORKS EDUCATION EDITION!。
▉▉▉微软MSDN中文(简体)资源全下载 ---整理过的(全得很)

产品类型: Operating Systems
产品名称: Windows Small Business Server 2008
名称: Disc 1: Windows Small Business Server 2008 Standard and Premium Installation (x64) - DVD (Chinese - Simplified)
产品类型: Servers
产品名称: BizTalk Server 2009
名称: BizTalk Server 2009 Accelerators Enterprise Edition (x86) - CD (Chinese-Simplified)
文件名: cn_biztalk_server_2009_accelerators_enterprise_x86_cd_x15-48256.iso
****************************************************
/archiver/?tid-486930.html
微软MSDN中文(简体)全下载
*****************************************************************************
产品类型: Business Solutions
产品名称: Dynamics CRM 4.0
名称: Dynamics CRM 4.0 Enterprise, Professional, and Workgroup Editions (x86) - DVD (Chinese-Simplified)
文件名: cn_disc_2_windows_essential_business_server_2008_standard_and_premium_management_server_x64_dvd_x14-73663.iso
solidworks2013激活方法
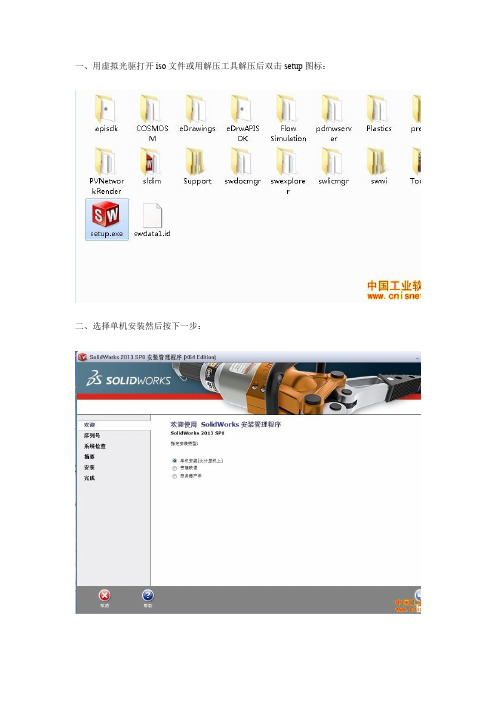
一、用虚拟光驱打开iso文件或用解压工具解压后双击setup图标:
二、选择单机安装然后按下一步:
三、因为本人之前安装过2012,他自动填入序列号,如无自动填入可以安装图片的序列号输入进去:按下一步:
四、选择取消:
五、选择生成solidworks 2013的新安装:
六、自己选择安装位置,这个位置可以更改,不会影响使用:
七、开始安装:
继续安装。
安装过程到50%左右杀毒软件会出现风险提示,全部选择允许程序执行:
八、安装过程大概20-30分钟,安装好后按完成,接着提示重启(本人没有重启照样可以继续-_-! )
本人选择了以后重启:
桌面出现了solidworks2013的图标:
九、打开下载下来的文件:
双击SW2010-2013
KeyGen没有管它。
十、接着会安装一个东西,直接选择Install即可,安装完后他会自动清除临时文件:
十一、接下来一连串点击“是”
这里可以点“否”,点“是”的话会弹出一个网页
十二、点finish完成。
十三、双击桌面solidworks 2013图标运行软件:启动画面开启,启动过程有点慢。
出现这个框点“是”
十四、点击接受
你懂得⌒_⌒
画个零件,ok。
GearTrax 2013安装步骤

GearTrax 2013安装步骤
(本安装步骤共5大步)
1.双击GearTrax_2013_for_SolidWorks_Setup,并根据提示安装完成。
2.在开始菜单所有程序里打开GearTrax_2013文件所在位置,将安装程序中的GearTrax2013C 复制粘贴到GearTrax_2013文件所在位置文件夹。
3.打开Crack,双击SW_64bit,以添加注册表。
4.打开Crack,双击打开Camnetics_2013_KeyGen_SSQ,再双击打开安装文件夹下文件所在位置中的GearTrax2013C,GearTrax2013C中第一项选择用SW序列号,则GearTrax2013C中第一项的下面会出现SW的序列号,而Camnetics_2013_KeyGen_SSQ中第一项选择GearTrax_2013 for solidworks,并在GearTrax_2013 for solidworks中的第二项输入GearTrax2013C中出现的序列号,点击GearTrax_2013 for solidworks中的Generate,则GearTrax_2013 for solidworks中的中的最后一项会出现GearTrax_2013的破解编码,将此破解编码复制到GearTrax2013C中的最后一项中,点击确认,下一步点击接受,则GearTrax_2013破解完成。
5.打开GearTrax2013C,工具→选项→常规→其他选项→浏览或者复制粘贴SW中的零件模型文件到其他选项上的窗口,点击确认即可。
Win7系统下Microsoft Office Professional Plus 2013激活及安装方法

Win7系统下Microsoft Office Professional Plus 2013(专业增强版)(批量授权版)下载及安装方法一、下载链接:/html/Office2013.html二、网页图例:Office2013官方原版下载大全:Office Professional Plus 2013简体中文版:(批量授权版)32位:SW_DVD5_Office_Professional_Plus_2013_W32_ChnSimp_MLF_X18-55126.ISOSHA1:1b15b7e8753d51ecca66e23f6d07377c58c52376下载:百度网盘64位:SW_DVD5_Office_Professional_Plus_2013_64Bit_ChnSimp_MLF_X18-55285.ISOSHA1:d20c6f6a24034e2c2b2b21e4403695cdd5a1903d下载:百度网盘三、711软件站提示:1、零售版和批量授权版有什么区别?RTL Edition(零售版)指的是官方出售的版本,只能激活一台电脑!享受微软售后技术服务!VOL Edition(批量授权版)指的是针对企业客户的大批量采购的版本,可用MARK密钥永久激活!简单的说,零售版用KEY激活后,如果微软不封,可以一直使用。
(你有正版KEY不用担心这个问题)批量授权版(也称大客户版,缩写VOL或VL)可以在网上找MARK密钥激活,一旦激活成功,不怕被封;也可以用KMS 进行180天激活。
这两个版本功能上并无区别,只是激活的方式不一样。
711软件站推荐大家首选使用批量授权版,好处你懂的!2、以上提供的都是Office2013专业增强版(Office 2013 Professional Plus),需要Office2013标准版的朋友,请在这里下载:Microsoft Office 2013 Standard 简体中文(批量授权版):32位版本|64位版本四、下载激活工具microsoft toolkit,可在网上搜索激活软件2010 Toolkit and ez-activator 2.4 beta 6进行下载安装,前提是电脑需要安装 Framework 4.0以上版本。
microsoftofficeprofession 2013激活密钥 -回复

microsoftofficeprofession 2013激活密钥-回复Microsoft Office Professional 2013激活密钥是使用Microsoft Office Professional 2013产品时必需的秘钥码,用于验证您的软件副本的合法性和完整性。
下面,我将一步一步地回答关于Microsoft Office Professional 2013激活密钥的问题。
第一步:购买Microsoft Office Professional 2013产品要使用Microsoft Office Professional 2013,您需要先购买该产品。
您可以通过Microsoft官方网站、零售商或在线市场等途径购买。
确保您从正规渠道购买,以避免获得非法或未授权的软件。
第二步:获取激活密钥在购买Microsoft Office Professional 2013产品后,您将获得一个密钥码。
这个密钥码通常是一串由字母和数字组成的代码,用于激活和验证您的软件副本的合法性。
请妥善保存您的激活密钥,在安装过程中会用到它。
第三步:安装Microsoft Office Professional 2013软件使用您购买的Microsoft Office Professional 2013的安装介质(如光盘)或下载的安装文件,开始安装过程。
按照提示逐步完成安装。
如果在安装过程中遇到问题,请参考Microsoft官方文档或在线帮助资源。
第四步:启动Microsoft Office Professional 2013完成安装后,找到安装在计算机上的Microsoft Office Professional 2013程序,比如点击开始菜单,找到Microsoft Office Professional 2013图标,点击启动。
如果是首次使用,软件将提示您激活它。
第五步:输入激活密钥当Microsoft Office Professional 2013提示您激活时,您需要输入您获得的激活密钥。
Intel Parallel Studio XE 2013 for Windows 安装指南和发行
Intel® Parallel Studio XE 2013for Windows*Installation Guide and Release Notes Document number: 323803-003US25 June 2013Table of Contents1 Introduction (1)1.1 What’s New (1)1.1.1 Changes from Intel Parallel Studio XE 2011 (2)1.2 Product Contents (2)1.3 System Requirements (2)1.4 Documentation (4)1.5 Technical Support (4)2 Installation (4)2.1 Pre-Installation Steps (4)2.1.1 Configure Visual Studio for 64-bit Applications (4)2.2 Installation (4)2.2.1 Using a License Server (5)3 Disclaimers, Notices and Legal Information (5)1 IntroductionThis document describes system requirements and how to install Intel® Parallel Studio XE 2013. Additional release notes for each component, with details of changes and additional technical information, can be found after installation, in the respective components’ Documentation folder.First-time users should view the Getting Started page that is displayed at the end of installation.1.1 What’s NewThis section highlights important changes from the previous product version and changes in product updates. For information on what is new in each component, please read the individual component release notes.Update 4 – June 2013∙Component products updated to current versionsUpdate 3 – March 2013∙Component products updated to current versionsUpdate 2 – February 2013∙Component products updated to current versionsUpdate 1 – October 2012∙Component products updated to current versions1.1.1 Changes from Intel Parallel Studio XE 2011∙Intel® Advisor XE is a new component included in this product.∙Other components updated to current versions∙Support added for Microsoft Windows 8* and Microsoft Windows Server 2012*∙Microsoft Visual Studio 2012* is now supported∙Microsoft Visual Studio 2005* is no longer supported∙Microsoft Windows Vista* and Microsoft Windows Server 2003* are no longer supported ∙Microsoft Windows XP* is deprecated – support will be removed in a future release1.2 Product ContentsIntel® Parallel Studio XE 2013 includes the following components:∙Intel® C++ Composer XE 2013 Update 5 - includes Intel® Integrated Performance Primitives (Intel® IPP), Intel® Threading Building Blocks (Intel® TBB) and Intel® MathKernel Library (Intel® MKL)∙Intel® Visual Fortran Composer XE 2013 Update 5 - includes Intel® Math Kernel Library (Intel® MKL)∙Intel® Advisor XE 2013 Update 3∙Intel® Inspector XE 2013 Update 6∙Intel® VTune™ Amplifier XE 2013 Update 9∙Sample programs∙On-disk documentation1.3 System RequirementsFor an explanation of architecture names, see http://intel.ly/mXIljK∙ A PC based on an IA-32 or Intel® 64 architecture processor supporting the Intel® Streaming SIMD Extensions 2 (Intel® SSE2) instructions (Intel® Pentium® 4 processor or later, or compatible non-Intel processor)o Incompatible or proprietary instructions in non-Intel processors may cause the analysis capabilities of this product to function incorrectly. Any attempt to analyzecode not supported by Intel® processors may lead to failures in this product.o For the best experience, a multi-core or multi-processor system is recommended ∙2GB RAM∙8GB free disk space for all product features and architectures∙Microsoft Windows XP*, Microsoft Windows 7*, Microsoft Windows 8*, Microsoft Windows Server 2012* or Microsoft Windows Server 2008*; 32-bit or “x64” editions -embedded editions not supportedo Support of Microsoft Windows XP is deprecated – a future major release of Intel® Parallel Studio XE will not support Windows XP∙One or more of:o Microsoft Visual Studio 2012* Professional Edition (or higher edition) with C++ component installedo Microsoft Visual Studio 2010* Professional Edition (or higher edition) with C++ and “x64 Compiler and Tools” components installed [1]o Microsoft Visual Studio 2008* Standard Edition (or higher edition) SP1 with C++ and “x64 Compiler and Tools” components installed [1]o For Intel® Visual Fortran, Intel® Advisor XE, Intel® Inspector XE and Intel® VTune™ Amplifier XE use only, Microsoft Visual Studio 2010* Shell and Librariesfrom the Intel® Visual Fortran Composer XE installationo For Intel® Visual Fortran, Intel® Advisor XE, Intel® Inspector XE and Intel® VTune™ Amplifier XE use only, Microsoft Visual Studio 2008* Shell and Librariesfrom an earlier version of Intel® Visual Fortran Composer XE or Intel® VisualFortran Compiler Professional EditionNotes:1. Microsoft Visual Studio 2008 Standard Edition installs the “x64 Compiler and Tools”component by default –the Professional and higher editions require a “Custom” install to select this. Microsoft Visual Studio 2010 and Visual Studio 2012 include this component by default.2. The default for the Intel® compilers is to build IA-32 architecture applications that requirea processor supporting the Intel® SSE2 instructions - for example, the Intel® Pentium®4 processor. A compiler option is available to generate code that will run on any IA-32architecture processor. However, if your application uses Intel® Math Kernel Library,Intel® Integrated Performance Primitives or Intel® Threading Building Blocks, executing the application will require a processor supporting the Intel® SSE2 instructions.3. Applications built with Intel® Compilers can be run on the same Windows versions asspecified above for development. Applications may also run on non-embedded 32-bitversions of Microsoft Windows earlier than Windows XP, though Intel does not test these for compatibility. Your application may depend on a Win32 API routine not present inolder versions of Windows. You are responsible for testing application compatibility. You may need to copy certain run-time DLLs onto the target system to run your application.1.4 DocumentationProduct documentation can be accessed through the Help menu in Microsoft Visual Studio. It can also be found, along with “Getting Started” information, in the Windows “Start” menu und er Intel Parallel Studio XE 2013. Please note that if you view the documentation in Microsoft Internet Explorer*, the browser may display a security warning when you click on links to open a documentation set. If you see this warning, you should click the option to proceed.1.5 Technical SupportIf you did not register your compiler during installation, please do so at the Intel® Software Development Products Registration Center. Registration entitles you to free technical support, product updates and upgrades for the duration of the support term.For information about how to find Technical Support, Product Updates, User Forums, FAQs, tips and tricks, and other support information, please visit/software/products/supportNote: If your distributor provides technical support for this product, please contact them for support rather than Intel.2 Installation2.1 Pre-Installation Steps2.1.1 Configure Visual Studio for 64-bit ApplicationsIf you will be developing 64-bit applications you may need to change the configuration of Visual Studio to add 64-bit support.If you are using Visual Studio 2008 Standard Edition, Visual Studio 2012 or Visual Studio 2010, no configuration is needed to build 64-bit applications. For other editions:1. From Control Panel > Add or Remove Programs, sele ct “Microsoft Visual Studio 2008 >Change/Remove. The Visual Studio Maintenance Mode window will appear. Click Next.2. Click Add or Remove Features3. Under “Select features to install”, expand Language Tools > Visual C++4. If the box “X64 Compiler and Tools” is not checked, check it, then click Update. If thebox is already checked, click Cancel.2.2 InstallationThe installation of the product requires a valid license file or serial number. If you are evaluating the product, you can also choose the “Evaluate this product (no serial number required)” option during installation.If you received your product on DVD, insert the first product DVD in your computer’s DVD drive; the installation should start automatically. If it does not, open the top-level folder of the DVD drive in Windows Explorer and double-click on setup.exe.If you received your product as a downloadable file, double-click on the executable file (.EXE) to begin installation. Note that there are several different downloadable files available, each providing different combinations of components. Please read the download web page carefully to determine which file is appropriate for you.You do not need to uninstall previous versions or updates before installing a newer version –the new version will coexist with the older versions. If you want to remove older versions, you may do so before or after installing the newer one.2.2.1 Using a License ServerIf you have purchased a “floating” license, see http://intel.ly/oPEdEe for information on how to install using a license file or license server. This article also provides a source for the Intel® License Manager for FLEXlm* product that can be installed on any of a wide variety of systems.3 Disclaimers, Notices and Legal InformationINFORMATION IN THIS DOCUMENT IS PROVIDED IN CONNECTION WITH INTEL(R) PRODUCTS. NO LICENSE, EXPRESS OR IMPLIED, BY ESTOPPEL OR OTHERWISE, TO ANY INTELLECTUAL PROPERTY RIGHTS IS GRANTED BY THIS DOCUMENT. EXCEPT AS PROVIDED IN INTEL'S TERMS AND CONDITIONS OF SALE FOR SUCH PRODUCTS, INTEL ASSUMES NO LIABILITY WHATSOEVER, AND INTEL DISCLAIMS ANY EXPRESS OR IMPLIED WARRANTY, RELATING TO SALE AND/OR USE OF INTEL PRODUCTS INCLUDING LIABILITY OR WARRANTIES RELATING TO FITNESS FOR A PARTICULAR PURPOSE, MERCHANTABILITY, OR INFRINGEMENT OF ANY PATENT, COPYRIGHT OR OTHER INTELLECTUAL PROPERTY RIGHT.Intel may make changes to specifications and product descriptions at any time, without notice. Designers must not rely on the absence or characteristics of any features or instructions marked "reserved" or "undefined." Intel reserves these for future definition and shall have no responsibility whatsoever for conflicts or incompatibilities arising from future changes to them.The information here is subject to change without notice. Do not finalize a design with this information.The products described in this document may contain design defects or errors known as errata which may cause the product to deviate from published specifications. Current characterized errata are available on request.Contact your local Intel sales office or your distributor to obtain the latest specifications and before placing your product order.Copies of documents which have an order number and are referenced in this document, or other Intel literature, may be obtained by calling 1-800-548-4725, or go to:/design/literature.htmCeleron, Centrino, Cilk, Intel, Intel logo, Intel386, Intel486, Intel Atom, Intel Core, Itanium, MMX, Pentium, VTune, and Xeon are trademarks of Intel Corporation in the U.S. and other countries. * Other names and brands may be claimed as the property of others.Copyright © 2013 Intel Corporation. All Rights Reserved.。
visual Studio 2013旗舰版安装激活步骤
visual Studio 2013旗舰版安装激活步骤
※注意事项:
1.安装包是ISO格式,可以用虚拟光驱加载也可以用WINRAR解压后进行安装。
2.安装前最好是先关闭杀毒软件或卫士,以免引起一些误操作导致软件不能一
次性安装成功。
3.软件的安装路径不可以是中文路径。
4.只有系统安装了IE10及以上版本才能安装VS2013。
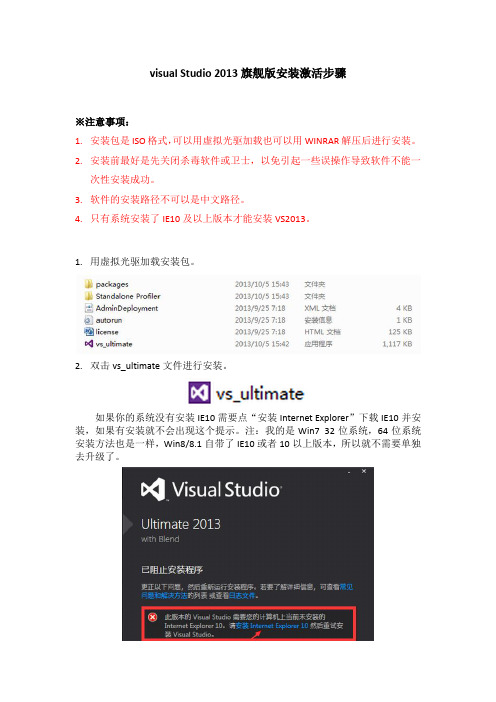
1.用虚拟光驱加载安装包。
2.双击vs_ultimate文件进行安装。
如果你的系统没有安装IE10需要点“安装Internet Explorer”下载IE10并安装,如果有安装就不会出现这个提示。
注:我的是Win7 32位系统,64位系统安装方法也是一样,Win8/8.1自带了IE10或者10以上版本,所以就不需要单独去升级了。
3.选择安装路径(非中文路径)并选择“我同意……”再点击下一步
4.选择需要安装的组件,点安装。
5.耐心等待。
如果全部组件都安装的话测试完成大概需要1个多小时。
6.经过漫长的等待后提示所有指定的组件安装成功,按提示启动软件。
可选择登录(事先在关网注册私人账号)或者以后再说。
7.启动Visual Studio 2013后只有30天有效期。
输入激活密钥
BWG7X-J98B3-W34RT-33B3R-JVYW9完成激活。
3DVIA_Composer_2013_DS_CHS
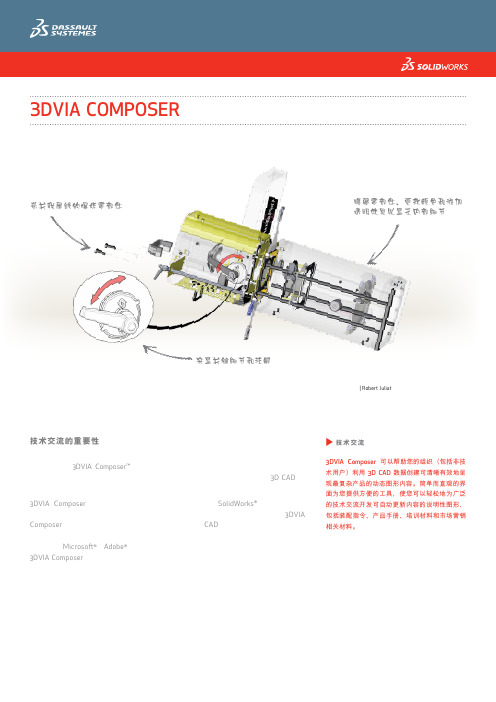
改进产品交流和市场营销相关材料
您的交流不必再受以下因素的影响:用粗糙的工程图来显示您的概念,或者必须要等到设计 完成后才能开始创建产品交流内容。使用 3DVIA Composer,您可以快速方便地创建:
• 详细视图 • 高分辨率图像 • 技术图解 • 交互式动画
创建交互式链接以快速 查看复杂的细节
交互式故事板可在广泛的产品交流内容中 使用,包括在线零件目录和维护手册。
救援设备 | Holmatro Inc.
突出显示经常更换的零部 件的装配程序
DVIA COMPOSER 汇聚所有资源
现在您可以在开发产品的同时设计和制作技术交流内容,这样可使您的文档始终与设计更改保 持同步,产品成型时文档也已准备就绪。
u 技术交流
3DVIA Composer 可以帮助您的组织(包括非技 术用户)利用 3D CAD 数据创建可清晰有效地呈 现最复杂产品的动态图形内容。简单而直观的界 面为您提供方便的工具,使您可以轻松地为广泛 的技术交流开发可自动更新内容的说明性图形, 包括装配指令、产品手册、培训材料和市场营销 相关材料。
香港总公司 香港新界沙田香港科学园科 技大道东2号光电子中心2字 楼216-217室 电话:(852) 2425 8136 传真:(852) 2425 8098
网址
电邮 ictinfo@
中国区Toll-free技术支援热线:400 886 6353
珠海分公司 电话:(86 756) 333 9630 传真:(86 756) 333 3260
上海分公司 电话:(86 21) 6336 6878 传真:(86 21) 6336 6879
• 交互式材料明细表和
TuneUp Utilities 2013激活、注册方法(2013年可用)

TuneUp Utilities 2013注册、激活方法一.注意事项写在前面,使用前必看:1.我不是大神,只是刚刚毕业的穷孩子,不是什么都知道,略略知道某些问题的某些方面。
2.人微言轻,不过还是希望,使用的时候认真看一下方法,以免不必要的麻烦。
3.再次请求花一些时间看一下方法和说明以及认真找下载地址并注意解压密码!4.因为介于版本更新问题的后果可能是无效,所以破解之后就不要更新主程序版本了!5.资料来源于网络,如非必要,请支持正版,中文49元,英文49美元。
6.一个注册号能激活三台电脑,如用四台,可能会引起注册码失效(未亲自测试,纯属猜测推断),如果用了网上的注册码,迟早会被封杀成非法密钥;而且电脑被记住,只要装tuneup就会提示你购买正版,这种情况貌似就破解不了了。
解决办法一是购买正版密;解决办法二是,重装电脑,目前我只知道这种方法,但不建议尝试,因为麻烦。
7.如果你已经安装最新版的而又破解不了,建议再安装一次,就是鼠标双击安装程序,它会删除tuneup,删除之后就可以安装老版版了!8.对于破解文件和注册机,杀软报毒,请自行决定怎么处理!个人觉得是误报及误杀!建议:是暂停保护会暂时关闭杀软。
9.整篇都属个人观点,有的可能不准确或不正确,所以只做参考,本人不负任何责任。
10.附件下载地址第二页,激活方法第四页开始!11.使用软件是尽量只使用常用的一些功能,在自己不清楚后果的情况下请不要使用。
后面有官网的使用手册,简体中文。
12.谢谢理解与支持!如果觉得此文档对你有用,请帮忙右上角给一个5分好评!BY kzs186(百度id)于2013年1月10日, Thursday二.关于这篇文档。
新年伊始,首先祝大家新年快乐,万事如意,心想事成,平安快乐,健康吉祥!这是一篇关于,TuneUpUtilities2013 激活破解的文档,本来我已经写了一篇TuneUpUtilities2013 激活注册的文档,可是鉴于一些新问题,就有必要重新完善一下!先废话几句,这篇文档是在前篇的基础上加的,把更新的内容放在前面,后面和上一篇一样!下面进入主题。
adams2013安装教程

adams2013安装教程
安装adams2013的步骤如下:
1. 首先,您需要下载adams2013安装文件。
您可以在MSC Software官方网站或其他可信的软件下载网站上找到该安装程序。
2. 下载完成后,找到该安装文件并双击运行。
系统将提示您选择安装语言,请根据个人喜好选择适合的语言,并点击“下一步”。
3. 接下来,系统将显示adams2013的许可协议。
请仔细阅读
并同意许可协议,然后点击“下一步”。
4. 在下一步中,您需要选择adams2013的安装位置。
默认情
况下,安装程序会将软件安装在C盘的Program Files目录下。
如果您希望更改安装位置,请点击“浏览”按钮,选择其他目录,然后点击“下一步”。
5. 在接下来的步骤中,您可以选择是否创建桌面快捷方式。
如果您希望在桌面上方便地访问adams2013,请勾选该选项,并
点击“下一步”。
6. 然后,系统将显示一个安装摘要,包含您之前选择的安装选项。
请仔细检查并确认无误后,点击“安装”。
7. 安装过程可能需要一些时间,请耐心等待。
一旦安装完成,
您将看到一个安装完成的对话框。
请点击“完成”。
8. 现在,您已成功安装adams2013。
您可以在开始菜单中找到adams2013的快捷方式,并通过它来启动软件。
请注意,以上步骤仅为一般安装过程的示例。
实际安装步骤可能因您的系统和安装文件的不同而略有差异。
在安装过程中,请按照系统提示进行操作,以确保安装顺利进行。
Solidworks 2013X64 安装方法

七.启动桌面图标:SolidWorks 2013 x64 Edition 。
ቤተ መጻሕፍቲ ባይዱ
1. If you have got SW2013 installed and activated this setup will update your SolidWorks 2013 to SolidWorks 2013 SP5.0. No additional crack is needed.
5. When installation completes, apply a fix inside keygen
6. Reboot your computer
7. Enjoy!
Cracked by Team-SolidSQUAD (SSQ)
2. If it is your first installation of SW2013
2.1. Install SW2013 SP5.0 using next serials
SolidWorks Serial:
0000 0000 0000 3486 Q5HF FG98
or
0001 0001 0736 0361 JK3Q HDJ3
五.若在上一步聚时,安装了eDrawings,则不必进行此步骤。
安装:eDrawings\eDrawings.exe 。
六.启动:_SolidSQUAD_\SW2010-2013.Activator.GUI.SSQ,点击小窗口右上角的[→],找到所有标签名称尾号为2013的,将所有标签下的所有复选框[选中],单击窗口下方的[Activate!]即可。
最好先断开网络。
一.启动:根目录下,红色图标 Setup.exe 。
visio standard 2013激活密钥 -回复

visio standard 2013激活密钥-回复如何激活Visio Standard 2013。
Visio Standard 2013是一种流程图和矢量图设计软件,由微软开发。
它可以帮助用户创建、编辑和共享专业级的图表、流程图、组织图和平面图。
在使用Visio Standard 2013之前,用户需要激活软件以获取完整的功能。
本文将一步一步地解释如何激活Visio Standard 2013。
第一步:获取Visio Standard 2013的激活密钥。
激活密钥是用于验证您的软件副本是否合法的一串字符。
您需要购买Visio Standard 2013的正式许可证才能获得有效的激活密钥。
如果您已经购买了Visio Standard 2013,可以通过以下方式获取激活密钥:1. 在购买Visio Standard 2013时,您可能收到了一个包含激活密钥的电子邮件。
请检查您的收件箱或垃圾邮件文件夹,确保您已经收到了该邮件。
2. 如果您未收到激活密钥的邮件或不慎删除了该邮件,您可以联系您购买Visio Standard 2013的渠道商,申请重新发送激活密钥。
第二步:打开Visio Standard 2013软件。
在您获得有效的激活密钥之后,您可以打开Visio Standard 2013以开始激活过程。
按照以下步骤进行操作:1. 单击Windows的“开始”按钮,然后在“所有程序”菜单中找到Visio Standard 2013并单击打开。
2. 启动Visio Standard 2013之后,您将看到一个欢迎界面。
在该界面上,单击“输入激活密钥”选项。
第三步:输入激活密钥。
在输入激活密钥之前,您需要确保您的计算机已连接到互联网。
按照以下步骤输入激活密钥:1. 在“输入激活密钥”界面中,输入您获得的激活密钥。
确保准确无误地输入每个字符,以避免出现错误。
2. 单击“下一步”按钮,Visio Standard 2013将尝试验证您的激活密钥。
visio standard 2013激活密钥 -回复

visio standard 2013激活密钥-回复如何激活Visio Standard 2013。
Visio Standard 2013是微软的一款流程图和图表制作工具,用于帮助用户创建和共享专业的流程图、组织结构图、网络图、平面图以及其他各种类型的图表。
为了正常使用Visio Standard 2013,用户需要进行激活操作。
以下是一步一步的指南,教您如何激活Visio Standard 2013。
第一步:获取Visio Standard 2013激活密钥激活Visio Standard 2013需要一个有效的激活密钥。
您可以通过以下几种方式获取激活密钥:1.购买Visio Standard 2013。
如果您在购买Visio Standard 2013时选择购买正版软件,那么您将会收到一份包含激活密钥的产品密钥卡。
在激活Visio Standard 2013时,您需要使用该激活密钥。
2.获取免费试用版激活密钥。
微软官网提供Visio Standard 2013的免费试用版,您可以在试用期内免费使用软件。
在试用期结束之前,您可以从微软官网获取一份免费试用版的激活密钥。
3.通过其他渠道获取激活密钥。
有些第三方渠道可能会提供VisioStandard 2013的激活密钥,但使用这些激活密钥存在风险,请谨慎选择。
第二步:运行Visio Standard 2013激活程序在您成功获取Visio Standard 2013激活密钥后,接下来的步骤是运行Visio Standard 2013激活程序,完成软件的激活过程。
以下是具体步骤:1.打开Visio Standard 2013软件。
在软件界面上方的菜单栏中,找到"文件"选项,并点击打开。
2.在"文件"选项中,选择"帐户"。
在"帐户"选项卡下方,找到"激活产品",并点击。
microsof toffice standard 2013 密钥 -回复
microsof toffice standard 2013 密钥-回复如何找到和使用Microsoft Office Standard 2013的密钥。
第一步:了解Microsoft Office Standard 2013Microsoft Office Standard 2013是一套常用的办公软件套件,包括Word、Excel、PowerPoint、Outlook等应用程序。
它提供了丰富的功能和工具,帮助用户创建、编辑和分享文档、电子表格、演示文稿等等。
然而,为了正常使用这些应用程序,你需要拥有有效的密钥。
第二步:密钥的含义和作用密钥是一串唯一的代码,用于激活和验证Microsoft Office Standard 2013的合法性。
通过输入正确的密钥,你将能够享受到完整的Office功能并解锁额外的功能。
密钥通常由25个字母和数字组成,分为5个5位的组。
第三步:寻找密钥的途径1.购买新的Microsoft Office Standard 2013产品。
你可以在正版软件销售的电子商务平台或实体店购买到全新的微软办公软件,并获得一个附带密钥的授权证书。
2.检查你的电脑或设备的原始包装。
如果你在购买电脑或设备时已预装Microsoft Office Standard 2013,则密钥可能会被打印在原始包装盒上。
3.邮箱或在线商店的购买确认邮件。
如果你曾购买过相应版本的Microsoft Office Standard 2013,你应该检查你的邮箱或在线商店帐户中的购买确认邮件,其中可能包含有关密钥的信息。
注意:对于使用非正版的Microsoft Office Standard 2013产品,我们强烈建议你购买正版软件并使用合法的密钥。
这样可以确保你获得来自官方渠道的支持和安全更新。
第四步:使用密钥一旦你找到了有效的Microsoft Office Standard 2013密钥,你可以按照以下步骤使用它:1.打开任何一个Office应用程序(如Word)。
Autodesk Revit 2013系列软件产品要求与建议说明书
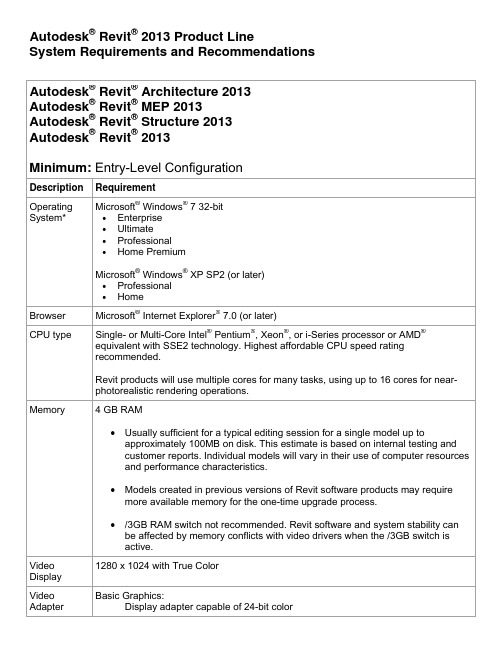
Autodesk® Revit® 2013 Product LineSystem Requirements and RecommendationsAutodesk® Revit® Architecture 2013 Autodesk® Revit® MEP 2013Autodesk® Revit® Structure 2013Autodesk® Revit® 2013Minimum: Entry-Level ConfigurationDescription RequirementOperating System* Microsoft® Windows® 7 32-bit •Enterprise•Ultimate•Professional•Home PremiumMicrosoft® Windows® XP SP2 (or later) •Professional•HomeBrowser Microsoft® Internet Explorer® 7.0 (or later)CPU type Single- or Multi-Core Intel® Pentium®, Xeon®, or i-Series processor or AMD®equivalent with SSE2 technology. Highest affordable CPU speed ratingrecommended.Revit products will use multiple cores for many tasks, using up to 16 cores for near-photorealistic rendering operations.Memory 4 GB RAM•Usually sufficient for a typical editing session for a single model up toapproximately 100MB on disk. This estimate is based on internal testing andcustomer reports. Individual models will vary in their use of computer resourcesand performance characteristics.•Models created in previous versions of Revit software products may requiremore available memory for the one-time upgrade process.•/3GB RAM switch not recommended. Revit software and system stability can be affected by memory conflicts with video drivers when the /3GB switch isactive.VideoDisplay1280 x 1024 with True ColorVideo Adapter Basic Graphics:Display adapter capable of 24-bit colorAdvanced Graphics:DirectX® 10 capable graphics card with Shader Model 3 as recommended byAutodesk at /revit-graphicshardware.Hard Disk 5 GB free disk spaceMS-Mouse or 3Dconnexion® compliant devicePointingDeviceMedia Download or installation from DVD9 or USB keyConnectivity Internet connection for license registration and prerequisite component downloadAutodesk Revit Structure 2013 Autodesk® Revit® 2013Value: Balanced price and performance Description RequirementOperating System* Microsoft® Windows® 7 64-bit •Enterprise•Ultimate •Professional•Home PremiumBrowser Microsoft® Internet Explorer® 7.0 (or later)CPU type Multi-Core Intel® Xeon®, or i-Series processor or AMD® equivalent with SSE2 technology. Highest affordable CPU speed rating recommended.Revit products will use multiple cores for many tasks, using up to 16 cores for near-photorealistic rendering operations.Memory 8 GB RAM•Usually sufficient for a typical editing session for a single model up toapproximately 300MB on disk. This estimate is based on internal testing andcustomer reports. Individual models will vary in their use of computer resourcesand performance characteristics.•Models created in previous versions of Revit software products may requiremore available memory for the one-time upgrade process.VideoDisplay1680 x 1050 with True ColorVideo Adapter DirectX® 10 capable graphics card with Shader Model 3 as recommended by Autodesk at /revit-graphicshardware.Hard Disk 5 GB free disk spacePointingDeviceMS-Mouse or 3Dconnexion® compliant deviceMedia Download or installation from DVD9 or USB keyConnectivity Internet connection for license registration and prerequisite component downloadAutodesk Revit Structure 2013 Autodesk® Revit® 2013 Performance: Large, complex models Description RequirementOperating System* Microsoft® Windows® 7 64-bit •Enterprise•Ultimate •Professional•Home PremiumBrowser Microsoft® Internet Explorer® 7.0 (or later)CPU type Multi-Core Intel® Xeon®, or i-Series processor or AMD® equivalent with SSE2 technology. Highest affordable CPU speed rating recommended.Revit products will use multiple cores for many tasks, using up to 16 cores for near-photorealistic rendering operations.Memory 16 GB RAM•Usually sufficient for a typical editing session for a single model up toapproximately 700MB on disk. This estimate is based on internal testing andcustomer reports. Individual models will vary in their use of computer resourcesand performance characteristics.•Models created in previous versions of Revit software products may requiremore available memory for the one-time upgrade process.VideoDisplay1920 x 1200 or higher with True ColorVideo Adapter DirectX® 10 capable graphics card with Shader Model 3 as recommended by Autodesk at /revit-graphicshardware.Hard Disk • 5 GB free disk space•10000+ RPM (for Point Cloud interactions)PointingDeviceMS-Mouse or 3Dconnexion® compliant deviceMedia Download or installation from DVD9 or USB keyConnectivity Internet connection for license registration and prerequisite component downloadAutodesk® Revit® Server 2013Description RequirementOperating System • Microsoft® Windows Server® 2008 64-bit• Microsoft® Windows Server® 2008 R2 64-bitWeb Server Microsoft® Internet Information Server 7.0 (or later)< 100 Concurrent Users(multiple models)Minimum Value PerformanceCPU type 4+ cores2.6 GHz+ 6+ cores2.6 GHz+6+ cores3.0 GHz+Memory 4 GB RAM 8 GB RAM 16 GB RAMHard Drive 7200+ RPM 10000+ RPM 15000+ RPM100 + Concurrent Users(multiple models)Minimum Value PerformanceCPU type 4+ cores2.6 GHz+ 6+ cores2.6 GHz+6+ cores3.0GHz+Memory 8 GB RAM 16 GB RAM 32 GB RAMHard Drive 10000+ RPM 15000+ RPM High-Speed RAID Array Virtualization VMware® and Hyper-V® Support (See Revit Server Administrator’sGuide)Autodesk® Revit® Architecture 2013 for Citrix® **Autodesk® Revit® MEP 2013 for Citrix® **Autodesk® Revit® Structure 2013 for Citrix® **Description RequirementCitrix System • XenApp® 6.0 or 6.5• Citrix® License Manager• Citrix® Profile ManagerAuthentication • Microsoft® Active Directoryo Roaming Profiles supportedLicense Server Dedicated Autodesk license server for session-specific licensesClient OS • Microsoft® Windows® XP SP2 (or later)• Microsoft® Windows® XP Professional x64 Edition SP2• Microsoft® Windows® 7 32-bit• Microsoft® Windows® 7 64-bitClient Browser • Microsoft® Internet Explorer® 7 (or later)User Access Client computers should be bound to the network domain. Each client computer should have either the full Citrix® or web client plug-in installed.Users should use their domain logins to access both the Citrix web console and theLAN.*Learn more about using Autodesk Revit Architecture 2013, Autodesk Revit MEP 2013, Autodesk Revit Structure 2013, Autodesk Revit 2013, and Autodesk Revit LT 2013 software with Boot Camp®, part of Mac OS® X that enables you to install and run Microsoft Windows (and Windows-based applications) on a Mac® computer or with Parallels Desktop®, a system utility available from Parallels, Inc. that allows you to run applications in each operating system without restarting your computer.**Autodesk Revit Architecture 2013, Autodesk Revit MEP 2013, and Autodesk Revit Structure 2013 software products are Citrix Ready™ Applications. Disclaimer: The Citrix application is network-based and performance of Autodesk Citrix Ready Applications may vary with network performance. These Autodesk Revit software products do not include the Citrix application, nor does Autodesk provide direct support for issues with the Citrix application. Users should contact Citrix directly with questions related to procurement and operation of the Citrix application.Autodesk, Revit and Revit LT are registered trademarks or trademarks of Autodesk, Inc., and/or its subsidiaries and/or affiliates, in the USA and/or other countries. Citrix and XenApp are registered trademarks and the Citrix Ready logo(s) is a trademark of Citrix Systems, Inc. All other brand names, product names, or trademarks belong to their respective holders. Autodesk reserves the right to alter product and services offerings, and specifications and pricing at any time without notice, and is not responsible for typographical or graphical errors that may appear in this document.©2012 Autodesk, Inc. All rights reserved.。
Nintendo 3DS XL Quick-Start Guide
MKA-SPR-S-UKV-C3Nintendo 3DS XL Quick-Start GuideThis guide explains how to configure your system, launch software and connect to the internet.Trademarks are property of their respective owners. Nintendo 3DS is a trademark of Nintendo.© 2012 Nintendo Co., Ltd.IMPORTANT:• D ue to the importance of the System Settings, an adult should configure them if the system is to be used by children .• B e sure to read the Health and Safety Information section of the Operations Manual before use, and follow the instructions carefully.ContentsCharge and turn on the system ........................................... 4Configure the system ................................................... 5Load software ......................................................... 7Connect to the internet . (8)to restrict your child’s use of Nintendo eShop and any other Nintendo 3DS shopping to disable the 3D feature. The use of the 3D feature by children aged six and under may cause vision damage. It is highly recommended that only children over six should use the system in 3D mode. to prevent your child from sending and receiving photos, images, to prevent your child from any online communication in games.to switch off StreetPass™. StreetPass allows automatic exchange of photos, images, videos and other content to restrict registration of new friends. Registered friends can see the online status of your child Thank you. With these available options, your child will be able to safely enjoy using your Nintendo 3DS XL system.Items used in this guide:Charging the systemTurn the power onConnect the items as shown in the illustration below and charge the system.Charge and turn on the systemNote: The illustration above shows the UK version of the AC adapter.Recharge LED lit(The LED will go out when charging is complete.)Press the POWER ButtonRemove the stylusThe stylus is used to operate the Touch Screen.Nintendo logo facing upwardsConfigure the systemYou must configure the system after turning it on for the first time.Select your languageTouch your language, then touch OK.3D calibrationMove the 3D depth slider to the upper-most position, then touch NEXT.Touch ACTIVATE 3D and the images shown on the upper screen will appear in 3D.Use the 3D depth slider to adjust the 3D effect to a comfort a ble level, then touch DONE.Hold the system as shown in the illustration, then touch NEXT.Look directly into the3D ScreenAllow a distance of 30 – 40 cm between your eyes and the screen12Set the date and timeTouch / to set the date, then touch OK.Touch / to set the time, then touch OK.Note: Ensure you enter the correct date and time, as some software titles use this setting.ProfileEnter a user name using the on-screen keyboard, then touch OK. Note: Never enter any personal data or offensive words or phrases.Touch / to enter yourdate of birth, then touch OK.Select your country / region ofresidence, then touch OK.Internet connectionRead the Nintendo 3DS Service User Agreement and Privacy Policy, then touch I ACCEPT.Touch SET and follow the instructions in “4. Connect to the internet” starting from step2. If you prefer, this can be configured later instead.3 4 5Configure Parental ControlsUse Parental Controls to restrict features which may not be suitable for children. For details, refer to the “Important Information for Parents” section at the beginning of this guide.Touch SET to begin setting restrictions.To complete the setup, press the HOME Button to display the HOME Menu. 6Load softwareInsert the Game CardCheck which way theGame Card is facingThe Nintendo 3DS XL system can use software designed for Nintendo 3DS and Nintendo DS / Nintendo DSi.Ensure that the power of your Nintendo 3DS XL system is turned off, or that the HOME Menu is displayed and no software is currently suspended, before inserting or removing a Game Card.Start the softwareTouch the icon for the software you want to use, then touch OPEN.Note:• F or subsequent instructions, refer to the software manual. If the softwarehas an electronic manual, touch MANUAL to open it.• 3D content will only be displayed on Nintendo 3DS software titles.Nintendo DS / Nintendo DSi software titles cannot display 3D content.12Connect to the internetA wireless connection is required to connect your Nintendo 3DS XL system to the internet. A computer is needed to configure the settings on your w ireless access point (router).InternetBroadband internet connection (ADSL, cable or fibre optic)Broadband internet connectionModem and / or routerWireless access pointsIt is easiest to connect to wireless access points whichsupport AOSS™ or Wi-Fi Protected Setup™.Wireless communicationNote: For a list of compatible access points, visit .Start configurationOn the HOME Menu , touch ,then OPEN.Touch INTERNET SETTINGS.Touch CONNECTION SETTINGS.1Select NEW CONNECTIONTouch NEW CONNECTION.Help configuring a connectionLet me help you through the setup process.Touch TUTORIAL and I’ll help you through the connection setup process. Follow the on-screen instructions, then moveon to the next step.Choose an access pointTouch the connection method that corresponds to your wireless access point.If you’re not sure (DON’T KNOW / NONE OF THESE), or have a different access point, go to step5– 3For AOSS, go to step5– 1For Wi-Fi Protected Setup, go to step5– 2234–3 DON‘T KNOW / NONE OF THESESearch for the access point using your Nintendo 3DS XL system.Enter the security key, then touch OK Characters entered will appear as * on screen.Touch OK to save your settings.Touch OK and perform a connection test. If the connection test is successful, the settings are complete.Touch the name of an access point from the listTouch the name (also known as SSID, ESSID or Network Name) that corresponds to your access point.Steps for the Nintendo 3DS XL system5–1AOSS SetupSteps for the AOSS access pointAOSS buttonPress and hold the AOSS button on the access point until the AOSS light flashes twice.When the Setup Complete Screen is displayed, touch OK and perform a connection test. If the connection test is successful, the settings are complete.–2Wi-Fi Protected SetupSteps for the Nintendo 3DS XL systemTouch the connection method that corresponds to your access point.For details on the connection methods available, refer to the instruction booklet that came with the access point.Press and hold the Wi-Fi Protected Setup button on the access point until the LED blinks.A PIN will be displayed on the Touch Screen. Enter it in your access point‘s settings, then touch NEXT.Steps for the access pointFor Push-Button ConnectionFor PIN ConnectionWi-Fi Protected Setup buttonWhen the Setup Complete Screen is displayed, touch OK and perform a connection test. If the connection test is successful, the settings are complete.55。
2013 Honda SXS700M2 MII Fabric Roof Rear Panel 安装说

Issue DateINSTALLATION INSTRUCTIONSAccessory Application Publication No.Honda Dealer: Please give a copy of these instructions to your customer.PARTS LIST(1)(2)(3)No.DescriptionQty (1)Washer, 6 mm flat 4(2)Screw, 6 x 30 mm 4(3)Locknut, 6 mm4(4)Adhesive Foam tape (not shown)1(5)Bar snap4(6)Fiber rod (27 inch)2(7)Fiber rod (30 inch)2(8)P-Channel1(9)Fabric roof/rear panel1FABRIC ROOF/REAR PANEL (2P)P/N 0SR85-HL3-211A (Black) 0SR85-HL3-220A (Camo)SXS700M2MII 14607October 2013TOOLS REQUIREDHex wrench (4 mm)Socket (10 mm)Ratchet Power drill 1/4 inch drill bitTORQUE VALUESTighten all screws, bolts, and nuts to their specified torque values. Refer to the Service Manual for the torque values of the removed parts.USE AND CARE INFORMATIONCompletely read and understand the instructions • before installing this accessory.Do not tow the vehicle on an open trailer with this • accessory installed, as the accessory is not designed for use at highway speeds.To clean, sponge with mild soap and cold water, rinse • with hose and allow it to drip-dry.Do not machine wash or dry.• Use mild detergent to remove stubborn stains.• NOTICEThis accessory will create the need for more frequent • air cleaner maintenance. Service the air cleaner daily when operating in dusty conditions.Poly Windscreen Preparation forInstallation of the Fabric Roof/Rear Panel using the saw.NOTERemove the windscreen from the vehicle if it is •already installed.Prepare a clean work area free of debris that may •scratch the windscreen.Remove the rubber gasket from the top edge of the 1.windscreen.Place a strip of masking tape along the top three 2.inches of the outside surface of the windscreen.Use a3. straight edge and marker to mark a straight lineacross the windscreen as indicated by the dotted line on the diagram.2 PIECE WINDSCREEN ONLY: Make two marks, 4.9-1/4 inches from the centerline and 1/2 inch below the cut line, as indicated by the cross hairs in the diagram.Use a fine tooth jig saw or fine tooth hand saw to 5.carefully cut the windscreen along the marked line.Use a fine tooth file or sanding block to deburr the 6.edge of the windscreen.2 PIECE WIN DSCREEN ON L Y: Drill a 1/4 inch hole 7.through the windscreen at each mark made in Step 3.Remove the masking tape. Clean and reinstall the 8.windscreen.1 PIECE WINDSCREEN ONLY: Do not reinstall the •two upper mounting bolts at this time.INSTALLATIONTo prevent injury from splinters, wear protective •gloves when handling the fiber rods.Apply the adhesive foam tape to the flat side of the 1.P-channel as shown.Install the P-channel on the outside of the 2.windscreen with its flat side against the windscreen and the round portion facing down. Install two of the supplied 6 mm screws through the two center holes and install the washers and locknuts on the inside of the windscreen.Using the P-channel as a template, drill a ¼ inch hole 3.through the windscreen at each of the outermost holes of the P-channel. Install the two remaining 6mm screws, washers, and locknuts through the new holes and tighten all hardware.½ in CENTERLINECut along the markedline made in Step 2.BENDCROSS HAIRSDrill 1/4 inch holes atmarks made in Step 3.9¼ in9¼ inon theoutP-CHANNELADHESIVE FOAM TAPEP-CHANNEL6 mm SCREW/WASHER/LOCKNUTWASHER/LOCKDrill 1/4 inch hole. Install screw,washer, and locknut.Reinstall the rubber gasket to the top edge of the 4.windscreen.Fully install the two 27 inch fiber rods into the side 5.pockets on the underside of the fabric roof/rear panel.Install the bar snaps and 30 inch fiber rods to the 6.front and rear cross bars of the cab frame as shown.REAR CROSS BARFRONT CROSS BARBAR SNAPWith the fabric roof upside down, slide the front7.edge of the fabric roof into the P-channel as shown.Be careful not to snag the fabric on the edge ofP-channel.Once the fabric roof/rear panel is centered in the8.P-channel, flip it over the cab frame.Attach the front strap behind the windscreen, under9.the windshield mount, and around the A-pillar. Attachto the hook and loop as shown.A-PILLARFABRIC ROOF/REARPANELWINDSREEN MOUNTFRONT STRAP/HOOK ANDLOOPRUBBER GASKETFIBER ROD, 27 inchFIBER ROD, 30 inch hFIBER ROD, 30 incP-CHANNELFABRIC FRONT EDGE<Outside View of Windscreen>Loop the lower straps and position the fabric roof/10. rear panel as shown. Loop the end of the lower strapup through the ladder loc.LOWER STRAP loc.LOWER SLADDER LOCWrap the side strap around the cab frame and attach 11. it to the hook and loop as shown.Attach mid strap to hook and loop.Tighten all straps making sure the fabric roof/rear12. panel is centered.。
- 1、下载文档前请自行甄别文档内容的完整性,平台不提供额外的编辑、内容补充、找答案等附加服务。
- 2、"仅部分预览"的文档,不可在线预览部分如存在完整性等问题,可反馈申请退款(可完整预览的文档不适用该条件!)。
- 3、如文档侵犯您的权益,请联系客服反馈,我们会尽快为您处理(人工客服工作时间:9:00-18:30)。
SolidWorks Premium 2013 是一种全面的 3D 设计解决方案,可帮助您创建、验证、传达和管理产品设计。
SolidWorks Premium 将功能强大的设计工具(包括业界领先的零件、装配体和工程图功能)与内置的仿真、成本计算、渲染、动画和产品数据管理相结合,使您能够更快捷、更简单地开发和分享设计构想,带来更有效率的 3D 设计体验。
u 创建和传达一个软件包即可应对您的所有设计挑战SolidWorks ® Premium 2013 为您提供了强大的、易于使用的功能,它可以自动完成任务,简化工作流程,并帮助您快速定义和验证设计的形状、装配和功能。
作为 SolidWorks 产品开发解决方案套件(涵盖设计、仿真、可持续设计、技术交流和数据管理)的组成部分,SolidWorks Premium 2013 通过特定于应用的工具支持创新的设计,帮助您更有效地工作,并作出更好的设计决策。
快速学习、快速工作、更有成效SolidWorks 软件不仅易于使用,还提供了大量定制选项,能够让新用户更快地学习,让老用户更有效率地工作。
各种规模的公司均可使用这款简单但功能强大的软件包,将其产品愿景付诸实践。
喷气式飞行包 | 马丁航空公司通过逼真渲染和动画呈现和传达通过大型设计、协作和数据管理工具轻松创建、共享和管理快速创建任何几何图形,包括复杂的有机形状和 C2 曲面使用内置的分析功能保证性能、可制造性并节约成本通过内置的专业功能生成焊接结构、满足生产需要的工程图、以及其他交付物,可加快机械设计和仿真的进程。
• 3D 实体建模:创建和编辑 3D 零件和装配体模型,并创建设计更改后自动更新的 2D 工程图• 概念设计:创建布局草图;应用马达和动力来检查机构性能;导入图像和扫描以用作创建 3D 几何体的参考• 大型装配体设计功能:创建和管理超大型设计,既可以在详细模式下也可以在简化模式下工作• 高级曲面制作:创建和编辑复杂的实体和曲面几何体,包括美观的、曲率连续 (C2) 的曲面• 钣金:从头开始设计,或将 3D 零件转换为钣金 — 包括自动展开钣金零件,并自动折弯长度补偿• 焊件:快速设计由结构构件、平板和角撑板组成的焊接结构;包括预定义的结构形状库• 模具设计:设计模具零件和用于制作这些零件的工具,包括型心和型腔、拔模、自动分型面和模座零部件• 管道/管筒设计:生成和记录 3D 机械系统,包括管道/管筒路径、管线布置、管坡和完整的材料明细表 (BOM)• 电力电缆/缆束和导管设计:导入电力连接信息、生成和记录 3D电力线路并填写设计的材料明细表确保对及电缆用户束手无策,而富有经验的用户又觉得枯燥、耗时。
小,甚至可以在零件中生成安装孔和间隙切口。
动画和照片级逼真的渲染通过强大的视觉效果清晰地传达您的设计意图。
• PhotoView 360:无需成为图形专家就可以快速创建照片级逼真的图像和动画• 走查动画/飞越动画:以虚拟方式走查您的设计,或录制视频以帮助向其他人说明• 装配体动画:通过应用运动、引力和零部件接触,或通过手动移动零部件来演示您产品设计的基本操作;录制并保存视频。
“通过SOLIDWORKS 成本核算功能,我们可以确定是外包加工零件还是自己内部制造更具有成本效益。
”— KYLE STRONG,Getman Corporation通过照片级逼真的渲染,无需使用物理样机即可分享构思。
自行车 | Trek Bicycle Corporation轻松SolidWorks Premium 2013 使您能够直接从“视图调色板”中快速拖放预建的爆炸视图,从而加快装配体工程图的创建。
2D 工程图快速创建可用于生产的 2D 工程图,清楚地传达设计产品的制造方法和装配方法。
• 自动创建工程图视图:只需将 3D 模型拖放到工程图中,即可创建带或不带隐藏线的线框或着色视图;自动创建任何视图类型,例如等轴测视图、剖面视图、局部剖视图或详细视图• 自动更新工程图视图:每当对 3D 零件和装配体模型进行修改时,使工程图视图自动更新保持同步• 标注尺寸:通过业界公认、可用于生产的 2D 工程图功能自动生成和放置尺寸和公差• 材料明细表 (BOM):自动生成带有零件序号标注和切割清单的材料明细表,并随模型的更改而更新;直接从装配体或工程图输出材料明细表至 Microsoft ® Excel ®,以用于打印或者上传至 ERP/MRP 系统• 注解:通过添加所有必需的公差、符号、注释、孔标注和表,创建完整的工程图• 标准检查:使用 SolidWorks Design Checker 工具将您的工程图与公司标准进行对比,以确保一致性• 工程图控制:控制工程图版本并以图形方式对比工程图,以了解其中的区别利用 SolidWorks Premium 内置的仿真功能评估接触零件之间的力和应力。
仿真可确保您的构想按照设计实施在开发过程中,利用专为熟悉其设计的设计师和工程师构建的工具对您的设计进行虚拟测试。
消除创新风险,减少物理样机的数量,从而节约资金并缩短产品完成时间。
运动仿真SolidWorks Motion 可以在整个操作周期内检查产品的运动,以验证您的产品是否符合设计目标要求。
结构验证轻松找出可能存在问题的区域,并评估设计更改以提高产品质量。
可持续性使用 SolidWorks SustainabilityXpress 评估设计对环境的影响,并优化材料的选择、零件几何体和采购。
流体流动仿真SolidWorks FloXpress 可提供初始流体仿真和报告。
成本估算• 自动估算成本:使用内置的成本估算模板自动估算零件制造成本;设计师可以基于成本更快速地做出可重复的、更明智的设计决策;制造商可以自动完成报价流程• 可定制的加工设置:加工模板是可定制的,您可以在其中输入特定的制造成本和数据,例如材料、人工、加工速度和进给量、以及安装成本消除干涉• 碰撞和干涉检查:检查设计中的零部件之间是否存在干涉、碰撞和间隙,以确保零部件正常运行• 装配体设计中的孔对齐检查:消除配合零部件中孔间的偏移,以确保制造之前扣件均已正确配合• 公差叠加分析:使用 SolidWorks TolAnalyst™ 自动检查公差对零件和装配体的影响,并确保零部件在装配时配合一致。
管路系统• 电力缆束制造:自动平展电线缆束,以生成用于电气制造的插接板工程图和电线切割清单• 管道和管筒设计:设计完整的管网,包括便于制造和运输的管线布置;生成柔性或刚性管道系统可制造性设计• DFMXpress :使用 SolidWorks DFMXpress 检查设计的制造能力和成本• 比较零件和工程图是否发生变化:使用零件和工程图比较工具直观地查看设计更新时两个版本零件或工程图之间存在的差异• 拔模、底切和壁厚检查:自动检查铸模零件、铸造零件和锻造零件及工模具内是否存在拔模、底切和壁厚问题• 钣金展平样式:自动展平钣金设计并制作文档,以进行制造;包括折弯补偿以确保正确调整余量大小进行制造输出制造数据• 用于快速原型的 3D :直接从 SolidWorks 3D 模型输出 STL 和其他快速原型设备的文件格式• 输出 2D 制造数据:直接从 SolidWorks 3D 模型自动导出可用于CNC 的 DXF™ 和 DWG™ 文件信息• 简化生产准备工作:自动输出孔图表、焊接表、切割清单、冲压工具表和 CNC 管道折弯数据• 3D CAM 合作伙伴集成:使用认证的金牌合作伙伴提供的 CAM产品,直接在 SolidWorks 内自动更新 NC 工具路径,无需进行数据转换满足成本目标要求并保证一次性制造成功使用 SolidWorks Premium 工具在设计投入生产之前验证其是否可以投产,以大幅减少浪费和成本。
SolidWorks 成本核算可帮助设计师基于制造成本更快速地制定可重复的决策,帮助制造商自动执行报价流程。
自动数据交换• 导入/导出:将 CAD 数据转化为符合要求的格式,包括导入/导出 IFC 文件,以与 AEC 设计软件交互• 现有的 2D DWG 数据:使用 SolidWorks 2D CAD 工具维护设计• 自动特征识别:自动将非 SolidWorks CAD 数据转化为易于修改的 SolidWorks 模型• ECAD-MCAD 数据交换:使用 CircuitWorks™ 在机械设计师与电子设计师之间实现双向数据交换• 导入扫描的数据:使用 SolidWorks ScanTo3D 将扫描的数据转换为 SolidWorks CAD 几何体,以便于进行逆向工程更快速地传达并与他人合作完成您的构想与他人共享 CAD 数据,并快速、轻松地合作完成产品设计。
使用“大型设计审阅”模式快速打开大型装配体以进行查看和查验,其中包括完整的零部件清单、测量、剖切和走查。
协同工具• 大型设计审阅:快速打开、导航、走查、测量、剖切大型装配体,创建带有注释的快照视图,以清楚地向团队传达您的设计。
• eDrawings ® Viewer :在 eDrawings Viewer 中直接查看和标记 SolidWorks 文件,一种紧凑的电子邮件友好文件格式;eDrawings 支持 SolidWorks CAD 、DWG 和许多其他 CAD 格式,可进行旋转、缩放、测量、标记、剖切和虚拟拆卸;eDrawings 可以运行在 iPad ® 上• 保护知识产权:利用 SolidWorks Defeature 技术在共享模型前隐藏设计中的所选部分SolidWorks 产品数据管理 (PDM)• 管理数据:通过自动化的版本控制、数据安全和访问控制来管理设计数据• 查找数据:搜索要在新设计中使用的零部件,查找并利用现有的零部件以实现重用,从而节约开发时间和成本快速共享和审学习和支持全球性的学习和支持社区SolidWorksSolidWorks10CADSolidWorksSOLIDWORKS 产品开发解决方案SolidWorks3D SolidWorks/products2013“我们目前正在使用 PDM 软件进行版本控制和电子数据控制,通过该软件,我们可以进行电子备份,以满足 FDA *要求“。
*PATRICK BROWN ,Berchtold Corporation• ANSI • GOST• BSI • ISO• DIN • JIS• GB◆ 支持的标准• 3D XML• 3DS • AI (Adobe ®Illustrator ®)• Autodesk ®Inventor ®• CADKEY®• CGR (CATIA ® graphics)• DWG • DXF• HCG (CATIA 高度压缩图形)• HSF (Hoops)• IDF • IFC • IGES • JPG• Mechanical Desktop®• OBJ • Parasolid ®• PDF• Pro/ENGINEER ®• PSD (AdobePhotoshop ®)• Rhino • SAT (ACIS ®)• Solid Edge ®• STEP • STL • TIFF• U3D (Universal 3D)• Unigraphics ®• VDA-FS • VRMLSolidWorks Premium 2013 具有内置转换程序,支持您转换以各式各样的软件应用程序和文件格式创建的 CAD 数据,这些格式包括:◆ 数据交换◆ 系统要求• Windows ® 7(32 位或 64 位)或Windows Vista ®• 至少 2 GB RAM • 至少 5 GB 磁盘空间 • 经认证推荐的视频卡 • Intel ® 或 AMD 处理器 • DVD 或宽带互联网连接 • Internet Explorer 8 或更高版本香港总公司香港新界沙田香港科学园科技大道东2号光电子中心2字楼216-217室电话:(852) 2425 8136传真:(852) 2425 8098深圳分公司电话:(86 755) 8290 0794传真:(86 755) 8295 1453广州分公司电话:(86 20) 3801 1593传真:(86 20) 3801 1595东莞分公司电话:(86 769) 2202 6215传真:(86 769) 2202 6002珠海分公司电话:(86 756) 333 9630传真:(86 756) 333 3260苏州分公司电话:(86 512) 6818 7309传真:(86 512) 6818 7310上海分公司电话:(86 21) 6336 6878传真:(86 21) 6336 6879网址 电邮ictinfo@中国区Toll-free 技术支援热线:400 886 6353。
