[UI]抽屉菜单DrawerLayout分析===
vue2 el-drawer 用法

el-drawer是Element UI 框架在Vue 2.x 版本中提供的一个组件,用于创建一个可以抽拉(滑动)打开的侧边栏。
以下是如何使用el-drawer的基本步骤和示例:安装Element UI如果你还没有安装Element UI,你可以通过npm 或yarn 来安装:bash复制代码npm install element-ui --save# 或者yarn add element-ui引入Element UI在你的Vue 项目中,你需要引入Element UI 和它的样式文件:javascript复制代码import Vue from'vue'import ElementUI from'element-ui'import'element-ui/lib/theme-chalk/index.css'e(ElementUI)使用el-drawer在你的Vue 组件或页面中,你可以使用el-drawer组件来创建一个可抽拉的侧边栏。
下面是一个基本的示例:vue复制代码<template><div id="app"><!-- 触发抽屉的按钮 --><el-button @click="drawer = true">打开抽屉</el-button><!-- 抽屉组件 --><el-drawertitle="这是标题":visible.sync="drawer":with-header="true"size="30%"direction="rtl"@close="drawer = false"><p>这里是抽屉的内容。
Android 自定义实现抽屉SlidingDrawer的功能
Android自定义实现抽屉SlidingDrawer的功能最近项目中需要实现上拉功能,首先想到的就是Android本身自带的抽屉SlidingDrawer,最后也实现了不过,出现的问题就是设置背景色问题,handl er和content是两个不同的部分,这就造成图片要做成两部分,从而产生两个部分图片看起来不是一个整体,而且我这个上拉功能,里面要实现一个水平滚动功能,而SlidingDrawer还有其他的限制,同时官方给出api 17以后,这个功能已经废弃,所以自己自定这样一个上拉功能是必须的。
这里我是继承LinearLayout同时实现GestureDetector.OnGestureListener来实现上拉功能。
下面是代码:001package com.exampl e.test;002003import android.content.Context;004import android.os.AsyncTask;005import android.util.AttributeSet;006import android.view.GestureDetector;007import android.view.MotionEvent;008import android.widget.LinearLayout;009import android.widget.RelativeLayout;010011public class PanelBom extends LinearLayout impl ements GestureDetector.OnGestureListener{012013GestureDetector mGesture = null;014private bool ean isScrolling = false;015private int MAX_HEIGHT = 80;//拖动的最大高度,当前布局位于父布局下面-80位置,这个仅仅是调试参数,这个变量是动态设置的。
移动应用开发:任务十三 (创建抽屉导航)

创建导航栏
使用ToolBar、DrawLayout和 NavigationView创建抽屉导航
1.新建view_navigation_header布局作为NavigationView 的HeaderLayout,
使用ToolBar、DrawLayout和 NavigationView创建抽屉导航
Drawerlayout重要的布局特性如下所示: 在 DrawerLayout 中,主内容视图必须是第一个子视图,因为 XML 顺序意味着按 z 序(层叠顺序)
排序,并且抽屉式导航栏必须位于内容顶部。 主内容视图设置为匹配父视图的宽度和高度, 因为在抽屉式导航栏处于隐藏状态时,它代表整个
UI。 抽屉式导航栏视图必须使用 android:layout_gravity 属性指定其水平重力。要支持“从右到
view_navigation_header.xml文件如下:
使用ToolBar、DrawLayout和 NavigationView创建抽屉导航
2. 在menu目录下创建drawer_view文件作为 NavigationView的目录。
使用ToolBar、DrawLayout和 NavigationView创建抽屉导航
Toolbar常见的属性
使用ToolBar、DrawLayout和 NavigationView创建抽屉导航
而Drawerlayout则是Google推出的抽屉效果的组件,被Google包含在了 android-support-v4.jar 这 个包下,可以让开发者更简单方便的实现侧滑菜单这一功能。DrawerLayout其实是一个布局组件,跟 LinearLayout等组件是一种东西,但是DrawerLayout带有滑动的功能。只要按照DrawerLayout的规定布 局方式写完布局,就能有侧滑的效果。
课题:Android 抽屉效果的导航菜单实现讲解
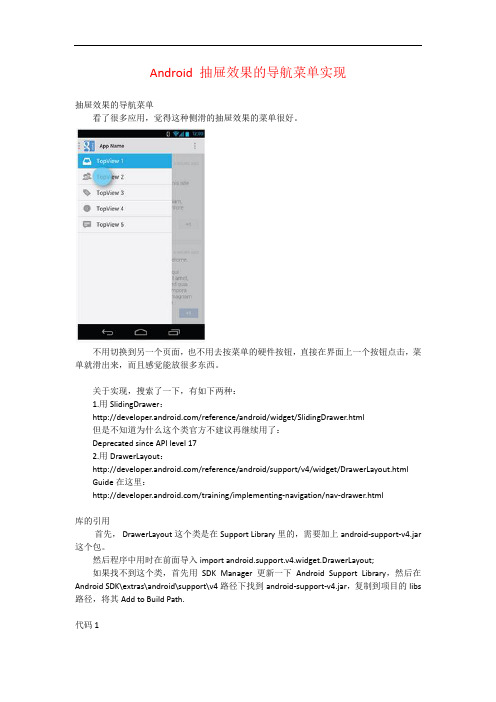
Android 抽屉效果的导航菜单实现抽屉效果的导航菜单看了很多应用,觉得这种侧滑的抽屉效果的菜单很好。
不用切换到另一个页面,也不用去按菜单的硬件按钮,直接在界面上一个按钮点击,菜单就滑出来,而且感觉能放很多东西。
关于实现,搜索了一下,有如下两种:1.用SlidingDrawer:/reference/android/widget/SlidingDrawer.html但是不知道为什么这个类官方不建议再继续用了:Deprecated since API level 172.用DrawerLayout:/reference/android/support/v4/widget/DrawerLayout.html Guide在这里:/training/implementing-navigation/nav-drawer.html库的引用首先, DrawerLayout这个类是在Support Library里的,需要加上android-support-v4.jar 这个包。
然后程序中用时在前面导入import android.support.v4.widget.DrawerLayout;如果找不到这个类,首先用SDK Manager更新一下Android Support Library,然后在Android SDK\extras\android\support\v4路径下找到android-support-v4.jar,复制到项目的libs 路径,将其Add to Build Path.代码1布局:<RelativeLayout xmlns:android="/apk/res/android"xmlns:tools="/tools"android:layout_width="match_parent"android:layout_height="match_parent" ><android.support.v4.widget.DrawerLayoutxmlns:android="/apk/res/android"android:id="@+id/drawer_layout"android:layout_width="match_parent"android:layout_height="match_parent" ><!-- The main content view --><!-- main content must be the first element of DrawerLayout because it will be drawn first and drawer must be on top of it --><FrameLayoutandroid:id="@+id/content_frame"android:layout_width="match_parent"android:layout_height="match_parent" /><!-- The navigation drawer --><ListViewandroid:id="@+id/left_drawer"android:layout_width="240dp"android:layout_height="match_parent"android:layout_gravity="left"android:background="#111"android:choiceMode="singleChoice"android:divider="@android:color/transparent"android:dividerHeight="0dp" /></android.support.v4.widget.DrawerLayout></RelativeLayout>DrawerLayout的第一个子元素是主要内容,即抽屉没有打开时显示的布局。
Android侧滑菜单之DrawerLayout用法详解
Android侧滑菜单之DrawerLayout⽤法详解onConfigurationChanged最早的时候实现侧滑菜单功能⼤多时候需要通过github上⼀个叫做SlidingMenu的开源通过依赖包来实现,后来⾕歌在v4包中添加了DrawerLayout来实现这个功能,完全可以替代SlidingMenu,这⾥我们来学习DrawerLayout 的⽤法⼀)创建DrawerLayout1)在布局⽂件⾥将布局设置为DrawerLaout,⽽且因为是v4包中的功能,所以必须写全包名,注意第⼀必须先写主视图布局,然后再写抽屉⾥的视图,这⾥我们放了ListView进⼊抽屉<pre name="code" class="java"><android.support.v4.widget.DrawerLayoutxmlns:android="/apk/res/android"android:id="@+id/drawer_layout"android:layout_width="match_parent"android:layout_height="match_parent"><!--The main content view 抽屉关闭时候的主视图--><FrameLayoutandroid:id="@+id/content_frame"android:layout_width="match_parent"android:layout_height="match_parent"></FrameLayout><!-- The Navigation view 左侧拉开之后的导航视图 --><ListViewandroid:id="@+id/left_drawer"android:layout_width="240dp"android:layout_height="match_parent"android:layout_gravity="start" //从左往右滑出菜单,如果为end就是从右往左滑出菜单android:background="#ffffcc"android:choiceMode="singleChoice"android:divider="@android:color/transparent"android:dividerHeight="0dp"></ListView></android.support.v4.widget.DrawerLayout>2)在activity⾥将DrawerLayout加载进来,并且给抽屉⾥的列表适配了数据,这样就将抽屉布局加载进来了。
uni-drawer的使用方法
Uni-drawer是一款功能强大的抽屉组件,它能够在移动端或者PC端快速创建一个抽屉式的页面布局,提供了丰富的配置能力和灵活的使用方法。
本文将为您详细介绍uni-drawer的使用方法,包括安装、基本用法、常用属性、事件回调等内容,帮助您快速上手并灵活运用uni-drawer组件。
一、安装uni-drawer组件1. 在项目根目录下打开终端,运行以下命令安装uni-drawer组件:```shellnpm install dcloudio/uni-ui```二、uni-drawer的基本用法2. 在需要使用uni-drawer的页面(如index.vue)引入uni-drawer 组件:```javascript<template><view><uni-drawer :show="showDrawer" :position="position"close="closeDrawer"><!-- drawer内容 --></uni-drawer></view></template><script>// 其他引入import uniDrawer from 'dcloudio/uni-ui/lib/uni-drawer/uni-drawer.vue'export default {ponents: {uniDrawer},data() {return {showDrawer: false,position: 'left'}},methods: {closeDrawer() {this.showDrawer = false}}}</script>```3. 在需要触发抽屉显示的地方(如button按钮)添加click事件:```javascript<button click="showDrawer = true">显示抽屉</button>```4. 根据需要编写相应的抽屉内容和样式。
Android企业级技术之_DrawerLayout
MaterialDesign之DrawerLayoutDrawerLayout基本使用我们先来看一下布局<android.support.v4.widget.DrawerLayoutandroid:layout_width="match_parent"android:layout_height="match_parent"android:id="@+id/dl"><LinearLayoutandroid:layout_width="match_parent"android:layout_height="match_parent"android:orientation="vertical"><android.support.design.widget.TabLayoutandroid:layout_height="50dp"android:layout_width="match_parent"android:id="@+id/tb"></android.support.design.widget.TabLayout><android.support.v4.view.ViewPagerandroid:layout_width="match_parent"android:layout_height="match_parent"android:id="@+id/vp"></android.support.v4.view.ViewPager></LinearLayout><LinearLayoutandroid:layout_width="100dp"android:layout_height="match_parent"android:layout_gravity="start"android:orientation="horizontal"android:background="#ffccff"><TextViewandroid:layout_width="match_parent"android:layout_height="match_parent"android:text="aaa"/></LinearLayout></android.support.v4.widget.DrawerLayout>在我们的DrawerLayout里包括两个子布局第一个是主页布局第二个是侧滑布局注意:第一个布局可以是任意布局但必须设置成全屏显示,第二个布局可以任意宽度但必须设置android:layout_gravity="start"Start表示从左边显示End 表示从右边显示然后重启一下是不是可以从左边滑出菜单来了,就是这么easy DrawerLayout和ToolBar的绑定首先我们要在上面的布局里DrawerLayout上填加一个布局ToolBar。
DrawerLayout源码分析
DrawerLayout源码分析DrawerLayout源码分析简介DrawerLayout充当窗口内容的顶层容器,允许”抽屉”式的控件可以从窗口的一边或者两边垂直边缘拉出使用抽屉的位置或者布局可以通过Android:layout_gravity子view的属性控制从那边拉出,left/start代表从左边拉出,right/end代表从右侧拉出,需要注意的是只能有一个抽屉控件从窗口的垂直边缘,如果布局中每个垂直窗口有多于一个抽屉控件,将会抛出异常根布局使用DrawerLayout作为第一个主内容布局,主内容布局宽高设置为match_parent不用设置layout_gravity,然后在主内容布局上添加子控件,并且设置layout_gravityxmlns:tools="/tools" android:id="@+id/drawerlayout"android:layout_width="match_parent" android:layout_height="match_parent">android:id="@+id/fragment_layout" android:layout_width="match_parent" android:layout_height="match_parent">android:id="@+id/left"android:layout_width="200dp"android:layout_height="match_parent"android:layout_gravity="left"android:background="@android:color/white">android:id="@+id/left_listview"android:layout_width="match_parent"android:layout_height="match_parent">android:id="@+id/right"android:layout_width="260dp"android:layout_height="match_parent"android:layout_gravity="right"android:background="@android:color/holo_green_light">android:id="@+id/right_textview" android:layout_width="match_parent" android:layout_height="match_parent" android:text="个人登陆页面"/>源码分析构造函数publicDrawerLayout(Contextcontext){this(context,null);}publicDrawerLayout(Contextcontext,AttributeSetattrs){this(context,attrs,0);}publicDrawerLayout(Contextcontext,AttributeSetattrs,intdef Style){super(context,attrs,defStyle);setDescendantFocusability(ViewGroup.FOCUS_AFTER_DESC ENDANTS);finalfloatdensity=getResources().getDisplayMetrics().density;mMinDrawerMargin=(int)(MIN_DRAWER_MARGINdensity+ 0.5f);finalfloatminVel=MIN_FLING_VELOCITYdensity;mLeftCallback=newViewDragCallback(Gravity.LEFT);mRightCallback=newViewDragCallback(Gravity.RIGHT);mLeftDragger=ViewDragHelper.create(this,TOUCH_SLOP_SE NSITIVITY,mLeftCallback);mLeftDragger.setEdgeTrackingEnabled(ViewDragHelper.ED GE_LEFT);mLeftDragger.setMinVelocity(minVel);mLeftCallback.setDragger(mLeftDragger);mRightDragger=ViewDragHelper.create(this,TOUCH_SLOP_ SENSITIVITY,mRightCallback);mRightDragger.setEdgeTrackingEnabled(ViewDragHelper.E DGE_RIGHT);mRightDragger.setMinVelocity(minVel);mRightCallback.setDragger(mRightDragger);//SothatwecancatchthebackbuttonsetFocusableInTouchMode(true);ViewCompat.setImportantForAccessibility(this,ViewCompat. IMPORTANT_FOR_ACCESSIBILITY_YES);ViewCompat.setAccessibilityDelegate(this,newAccessibilityD elegate());ViewGroupCompat.setMotionEventSplittingEnabled(this,fals e);if(ViewCompat.getFitsSystemWindows(this)){IMPL.configureApplyInsets(this);mStatusBarBackground=IMPL.getDefaultStatusBarBackgrou nd(context);}mDrawerElevation=DRAWER_ELEVATIONdensity;mNonDrawerViews=newArrayList();}构造函数中,设置viewgroup的初始焦点,根据手机密度计算出Drawer的margin值,初始化从左侧边缘拉出来的布局的回掉监听和从右侧边缘拉出来的布局的回掉监听,其中,在DrawerLayout的源码是的滑动部分使用的是ViewDragHelper,所以要初始化左侧的滑动和右侧的滑动,设置触摸时的焦点,初始化view的ListViewDragHelper的回调ViewDragCallback其中初始化的过程中有个很重要的方法,就是ViewDragHelper 的回掉,下面我们就来看一下ViewDragCallbackprivateclassViewDragCallbackextendsViewDragHelper.Callba ck{privatefinalintmAbsGravity;privateViewDragHelpermDragger;privatefinalRunnablemPeekRunable=newRunnable(){@Overridepublicvoidrun(){peekDrawer();}};//注明拖拽的方向publicViewDragCallback(intgravity){mAbsGravity=gravity;}publicvoidsetDragger(ViewDragHelperdragger){mDragger=dragger;}//移除方法回掉publicvoidremoveCallbacks(){DrawerLayout.this.removeCallbacks(mPeekRunnable);}//当前child是拖拽的view,并且当前拖拽是当前设置的方向,并且当前的child可以拖拽@OverridepublicbooleantryCaptureView(Viewchild,intpointerId){//Onlycaptureviewswherethegravitymatcheswhatwe''relooki ngfor.//ThisletsususetwoViewDragHelpers,oneforeachsidedrawer.returnisDrawerView(child)&&checkDrawerViewAbsoluteGravity(child,mAbsGravity)&&getDrawerLockMode(child)==LOCK_ MODE_UNLOCKED;}//当前拖拽的view的状态发生变化时,更新拖拽状态@OverridepublicvoidonViewDragStateChanged(intstate){updateDrawerState(mAbsGravity,state,mDragger.getCaptur edView());}//当view的位置发生变化时,重新布局@OverridepublicvoidonViewPositionChanged(ViewchangedView,intleft ,inttop,intdx,intdy){floatoffset;finalintchildWidth=changedView.getWidth();//ThisreversesthepositioningshowninonLayout.if(checkDrawerViewAbsoluteGravity(changedView,Gravity.LEFT)){offset=(float)(childWidth+left)/childWidth;}else{finalintwidth=getWidth();offset=(float)(width-left)/childWidth;}setDrawerViewOffset(changedView,offset);changedView.setVisibility(offset==0?INVISIBLE:VISIBLE);invalidate();}//view开始被拖拽@OverridepublicvoidonViewCaptured(ViewcapturedChild,intactivePoin terId){finalLayoutParamslp=(LayoutParams)capturedChild.getLayo utParams();lp.isPeeking=false;closeOtherDrawer();}//确认当前拖拽的方向,关闭掉其他方向的拖拽privatevoidcloseOtherDrawer(){finalintotherGrav=mAbsGravity==Gravity.LEFT?Gravity.RIGH T:Gravity.LEFT;finalViewtoClose=findDrawerWithGravity(otherGrav);if(toClose!=null){closeDrawer(toClose);}}//被拖拽的被回掉时调用,先获得子view的宽,然后计算出左边距,滑动到指定位置@OverridepublicvoidonViewReleased(ViewreleasedChild,floatxvel,float yvel){//Offsetishowopenthedraweris,thereforeleft/rightvalues//arereversedfromoneanother.finalfloatoffset=getDrawerViewOffset(releasedChild);finalintchildWidth=releasedChild.getWidth();intleft;if(checkDrawerViewAbsoluteGravity(releasedChild,Gravity.LE FT)){left=xvel>0||xvel==0&&offset>0.5f?0:-childWidth;}else{finalintwidth=getWidth();left=xvel<0||xvel==0&&offset>0.5f?width-childWidth:width;}mDragger.settleCapturedViewAt(left,releasedChild.getTop());invalidate();}//触摸到边缘时回掉函数@OverridepublicvoidonEdgeTouched(intedgeFlags,intpointerId){postDelayed(mPeekRunnable,PEEK_DELAY);}//根据拖拽的方向计算出view的左侧位置,判断是哪个方向滑动,如果是单侧划定关闭另一侧的view,取消另一侧的滑动privatevoidpeekDrawer(){finalViewtoCapture;finalintchildLeft;finalintpeekDistance=mDragger.getEdgeSize();finalbooleanleftEdge=mAbsGravity==Gravity.LEFT;if(leftEdge){toCapture=findDrawerWithGravity(Gravity.LEFT);childLeft=(toCapture!=null?-toCapture.getWidth():0)+peekDistance;}else{toCapture=findDrawerWithGravity(Gravity.RIGHT);childLeft=getWidth()-peekDistance;}//Onlypeekifitwouldmeanmakingthedrawermorevisibleandt hedrawerisn''tlockedif(toCapture!=null&&((leftEdge&&toCapture.getLeft()childL eft))&&getDrawerLockMode(toCapture)==LOCK_MODE_UNLO CKED){finalLayoutParamslp=(LayoutParams)toCapture.getLayoutPa rams();mDragger.smoothSlideViewTo(toCapture,childLeft,toCaptur e.getTop());lp.isPeeking=true;invalidate();closeOtherDrawer();cancelChildViewTouch();}}//是否锁定边缘,如果锁定边缘,view不为空并且view不能拖拽,关闭view的抽屉@OverridepublicbooleanonEdgeLock(intedgeFlags){if(ALLOW_EDGE_LOCK){finalViewdrawer=findDrawerWithGravity(mAbsGravity);if(drawer!=null&&!isDrawerOpen(drawer)){closeDrawer(drawer);}returntrue;}returnfalse;}//触摸边缘开始时调用此方法,先根据滑动方向获得当前view,如果当前view可以拖拽,捕获view的操作@OverridepublicvoidonEdgeDragStarted(intedgeFlags,intpointerId){finalViewtoCapture;if((edgeFlags&ViewDragHelper.EDGE_LEFT)==ViewDragHel per.EDGE_LEFT){toCapture=findDrawerWithGravity(Gravity.LEFT);}else{toCapture=findDrawerWithGravity(Gravity.RIGHT);}if(toCapture!=null&&getDrawerLockMode(toCapture)==LO CK_MODE_UNLOCKED){mDragger.captureChildView(toCapture,pointerId);}}//获取拖拽view的水平方向的范围@OverridepublicintgetViewHorizontalDragRange(Viewchild){returnisDrawerView(child)?child.getWidth():0;}//捕获水平方向的view被拖拽到的位置@OverridepublicintclampViewPositionHorizontal(Viewchild,intleft,intd x){if(checkDrawerViewAbsoluteGravity(child,Gravity.LEFT)){returnMath.max(-child.getWidth(),Math.min(left,0));}else{finalintwidth=getWidth();returnMath.max(width-child.getWidth(),Math.min(left,width));}}//垂直方向view移动的位置@OverridepublicintclampViewPositionVertical(Viewchild,inttop,intdy){ returnchild.getT op();}}ViewDragHelper使用了Scroller,最后滑动的computeScroll()@OverridepublicvoidcomputeScroll(){finalintchildCount=getChildCount();floatscrimOpacity=0;for(inti=0;ifinalfloatonscreen=((LayoutParams)getChildAt(i).getLayoutP arams()).onScreen;scrimOpacity=Math.max(scrimOpacity,onscreen);}mScrimOpacity=scrimOpacity;//"|"usedonpurpose;bothneedtorun.if(mLeftDragger.continueSettling(true)|mRightDragger.conti nueSettling(true)){ViewCompat.postInvalidateOnAnimation(this);}}看过ViewDragHelper的人应该都知道上面这个方法中的含义,这里简单在代码中注释,详见ViewDragHelper源码分析onInterceptTouchEvent方法@OverridepublicbooleanonInterceptTouchEvent(MotionEventev){finalintaction=MotionEventCompat.getActionMasked(ev);//"|"useddeliberatelyhere;bothmethodsshouldbeinvoked.finalbooleaninterceptForDrag=mLeftDragger.shouldInterce ptTouchEvent(ev)|mRightDragger.shouldInterceptTouchEvent(ev );booleaninterceptForTap=false;switch(action){caseMotionEvent.ACTION_DOWN:{finalfloatx=ev.getX();finalfloaty=ev.getY();mInitialMotionX=x;mInitialMotionY=y;if(mScrimOpacity>0){finalViewchild=mLeftDragger.findT opChildUnder((int)x,(int)y );if(child!=null&&isContentView(child)){interceptForTap=true;}}mDisallowInterceptRequested=false;mChildrenCanceledTouch=false;break;}caseMotionEvent.ACTION_MOVE:{//Ifwecrossthetouchslop,don''tperformthedelayedpeekforan edgetouch.if(mLeftDragger.checkTouchSlop(ViewDragHelper.DIRECTIO N_ALL)){mLeftCallback.removeCallbacks();mRightCallback.removeCallbacks();}break;}caseMotionEvent.ACTION_CANCEL:caseMotionEvent.ACTION_UP:{closeDrawers(true);mDisallowInterceptRequested=false;mChildrenCanceledTouch=false;}}returninterceptForDrag||interceptForTap||hasPeekingDrawer ()||mChildrenCanceledTouch;在使用ViewDragHelper时都知道要拦截事件交给ViewDragHelper,还有几种情况也要拦截,如果左侧拖转的view不为空,并且gravity==Gravity.NO_GRAVITY也拦截该事件,在Down 和Up也拦截该事件privatebooleanhasPeekingDrawer(){finalintchildCount=getChildCount();for(inti=0;ifinalLayoutParamslp=(LayoutParams)getChildAt(i).getLayou tParams();if(lp.isPeeking){returntrue;}}returnfalse;}如果当前的子view是拖拽的view,也拦截该事件onMeasure方法由于DrawerLayout是继承自ViewGroup,所以onMeasure方法主要是计算本身的宽高和子view的宽高,处理设置wrap_content的情况@OverrideprotectedvoidonMeasure(intwidthMeasureSpec,intheightM easureSpec){intwidthMode=MeasureSpec.getMode(widthMeasureSpec);intheightMode=MeasureSpec.getMode(heightMeasureSpec );intwidthSize=MeasureSpec.getSize(widthMeasureSpec);intheightSize=MeasureSpec.getSize(heightMeasureSpec);if(widthMode!=MeasureSpec.EXACTLY||heightMode!=Meas ureSpec.EXACTLY){if(isInEditMode()){//Don''tcrashthelayouteditor.Consumeallofthespaceifspecifi ed//orpickamagicnumberfromthinairotherwise.//TODOBettercommunicationwithtoolsofthisbogusstate.//Itwillcrashonarealdevice.if(widthMode==MeasureSpec.AT_MOST){ widthMode=MeasureSpec.EXACTLY;}elseif(widthMode==MeasureSpec.UNSPECIFIED){ widthMode=MeasureSpec.EXACTLY;widthSize=300;}if(heightMode==MeasureSpec.AT_MOST){ heightMode=MeasureSpec.EXACTLY;}elseif(heightMode==MeasureSpec.UNSPECIFIED){ heightMode=MeasureSpec.EXACTLY; heightSize=300;}}else{thrownewIllegalArgumentException("DrawerLayoutmustbe measuredwithMeasureSpec.EXACTLY.");}}setMeasuredDimension(widthSize,heightSize);finalbooleanapplyInsets=mLastInsets!=null&&ViewCompat. getFitsSystemWindows(this);finalintlayoutDirection=ViewCompat.getLayoutDirection(thi s);//Onlyonedrawerispermittedalongeachverticaledge(left/righ t).Thesetwobooleans//aretrackingthepresenceoftheedgedrawers.booleanhasDrawerOnLeftEdge=false;booleanhasDrawerOnRightEdge=false;finalintchildCount=getChildCount();for(inti=0;ifinalViewchild=getChildAt(i);if(child.getVisibility()==GONE){continue;}finalLayoutParamslp=(LayoutParams)child.getLayoutParams ();if(applyInsets){finalintcgrav=GravityCompat.getAbsoluteGravity(lp.gravity,l ayoutDirection);if(ViewCompat.getFitsSystemWindows(child)){IMPL.dispatchChildInsets(child,mLastInsets,cgrav);}else{IMPL.applyMarginInsets(lp,mLastInsets,cgrav);}}if(isContentView(child)){//Contentviewsgetmeasuredatexactlythelayout''ssize.finalintcontentWidthSpec=MeasureSpec.makeMeasureSpec(widthSize-lp.leftMargin-lp.rightMargin,MeasureSpec.EXACTLY);finalintcontentHeightSpec=MeasureSpec.makeMeasureSpe c(heightSize-lp.topMargin-lp.bottomMargin,MeasureSpec.EXACTLY);child.measure(contentWidthSpec,contentHeightSpec);}elseif(isDrawerView(child)){if(SET_DRAWER_SHADOW_FROM_ELEVATION){if(ViewCompat.getElevation(child)!=mDrawerElevation){ViewCompat.setElevation(child,mDrawerElevation);}}final@EdgeGravityintchildGravity=getDrawerViewAbsolute Gravity(child)&Gravity.HORIZONTAL_GRAVITY_MASK;//NotethattheisDrawerViewcheckguaranteesthatchildGravity hereiseither//LEFTorRIGHTbooleanisLeftEdgeDrawer=(childGravity==Gravity.LEFT);if((isLeftEdgeDrawer&&hasDrawerOnLeftEdge)||(!isLeftEdge Drawer&&RightEdge)){thrownewIllegalStateException("Childdrawerhasabsolutegra vity"+gravityToString(childGravity)+"butthis"+TAG+"alreadyhas a"+"drawerviewalongthatedge");}if(isLeftEdgeDrawer){hasDrawerOnLeftEdge=true;}else{hasDrawerOnRightEdge=true;}finalintdrawerWidthSpec=getChildMeasureSpec(widthMeas ureSpec,mMinDrawerMargin+lp.leftMargin+lp.rightMargin,lp.wi dth);finalintdrawerHeightSpec=getChildMeasureSpec(heightMe asureSpec,lp.topMargin+lp.bottomMargin,lp.height);child.measure(drawerWidthSpec,drawerHeightSpec);}else{thrownewIllegalStateException("Child"+child+"atindex"+i+" doesnothaveavalidlayout_gravity-mustbeGravity.LEFT,"+"Gravity.RIGHT orGravity.NO_GRAVITY");}}如果宽或者高不是MeasureSpec.EXACTLY时,如果widthMode 等于MeasureSpec.AT_MOST,则widthMode等于MeasureSpec.EXACTLY,如果widthMode 等于MeasureSpec.UNSPECIFIED则宽默认等于300,高同理,然后遍历子viewbooleanisContentView(Viewchild){return((LayoutParams)child.getLayoutParams()).gravity==Gr avity.NO_GRAVITY;}如果子view没有设置gravity属性的话,给子view设置宽高以及modebooleanisDrawerView(Viewchild){finalintgravity=((LayoutParams)child.getLayoutParams()).gra vity;finalintabsGravity=GravityCompat.getAbsoluteGravity(gravit y,ViewCompat.getLayoutDirection(child));if((absGravity&Gravity.LEFT)!=0){//Thischildisaleft-edgedrawerreturntrue;}if((absGravity&Gravity.RIGHT)!=0){//Thischildisaright-edgedrawerreturntrue;}returnfalse;}判断gravity属性是leftorright,然后通过child.measure(drawerWidthSpec,drawerHeightSpec);给子view设置宽高SpeconLayout方法@OverrideprotectedvoidonLayout(booleanchanged,intl,intt,intr,intb){ mInLayout=true;finalintwidth=r-l;finalintchildCount=getChildCount();for(inti=0;ifinalViewchild=getChildAt(i);if(child.getVisibility()==GONE){continue;finalLayoutParamslp=(LayoutParams)child.getLayoutParams ();if(isContentView(child)){yout(lp.leftMargin,lp.topMargin,lp.leftMargin+child.g etMeasuredWidth(),lp.topMargin+child.getMeasuredHeight());}else{//Drawer,ifitwasn''tonMeasurewouldhavethrownanexce ption.finalintchildWidth=child.getMeasuredWidth();finalintchildHeight=child.getMeasuredHeight();intchildLeft;finalfloatnewOffset;if(checkDrawerViewAbsoluteGravity(child,Gravity.LEFT)){childLeft=-childWidth+(int)(childWidthlp.onScreen);newOffset=(float)(childWidth+childLeft)/childWidth;}else{//Right;onMeasurecheckedforus.childLeft=width-(int)(childWidthlp.onScreen);newOffset=(float)(width-childLeft)/childWidth;}finalbooleanchangeOffset=newOffset!=lp.onScreen;finalintvgrav=lp.gravity&Gravity.VERTICAL_GRAVITY_MASK;switch(vgrav){default:caseGravity.TOP:{yout(childLeft,lp.topMargin,childLeft+childWidth,lp.t opMargin+childHeight);break;}caseGravity.BOTTOM:{finalintheight=b-t;yout(childLeft,height-lp.bottomMargin-child.getMeasuredHeight(),childLeft+childWidth,height-lp.bottomMargin);break;}caseGravity.CENTER_VERTICAL:{finalintheight=b-t;intchildTop=(height-childHeight)/2;//Offsetformargins.Ifthingsdon''tfitrightbecauseof//badmeasurementbefore,ohwell.if(childTopchildT op=lp.topMargin;}elseif(childTop+childHeight>height-lp.bottomMargin){childT op=height-lp.bottomMargin-childHeight;}yout(childLeft,childT op,childLeft+childWidth,childTo p+childHeight);break;}if(changeOffset){setDrawerViewOffset(child,newOffset);}finalintnewVisibility=lp.onScreen>0?VISIBLE:INVISIBLE;if(child.getVisibility()!=newVisibility){child.setVisibility(newVisibility);}}}mInLayout=false;mFirstLayout=false;遍历子view,如果子view设置了gravity,根据子view的gravity 属性计算childLeft和newOffset,如果子view是垂直方向的,根据gravity属性计算topandbottomdrawChild方法@OverrideprotectedbooleandrawChild(Canvascanvas,Viewchild,longdr awingTime){finalintheight=getHeight();finalbooleandrawingContent=isContentView(child);intclipLeft=0,clipRight=getWidth();finalintrestoreCount=canvas.save();if(drawingContent){finalintchildCount=getChildCount();for(inti=0;ifinalViewv=getChildAt(i);if(v==child||v.getVisibility()!=VISIBLE||!hasOpaqueBackgroun d(v)||!isDrawerView(v)||v.getHeight()continue;if(checkDrawerViewAbsoluteGravity(v,Gravity.LEFT)){finalintvright=v.getRight();if(vright>clipLeft)clipLeft=vright;}else{finalintvleft=v.getLeft();if(vleft}}canvas.clipRect(clipLeft,0,clipRight,getHeight());}finalbooleanresult=super.drawChild(canvas,child,drawingTi me);canvas.restoreToCount(restoreCount);if(mScrimOpacity>0&&drawingContent){finalintbaseAlpha=(mScrimColor&0xff000000)>>>24;finalintimag=(int)(baseAlphamScrimOpacity);finalintcolor=imag<<24|(mScrimColor&0xffffff);mScrimPaint.setColor(color);canvas.drawRect(clipLeft,0,clipRight,getHeight(),mScrimPain t);}elseif(mShadowLeftResolved!=null&&checkDrawerViewAb soluteGravity(child,Gravity.LEFT)){finalintshadowWidth=mShadowLeftResolved.getIntrinsicWi dth();finalintchildRight=child.getRight();finalintdrawerPeekDistance=mLeftDragger.getEdgeSize();finalfloatalpha=Math.max(0,Math.min((float)childRight/dra werPeekDistance,1.f));mShadowLeftResolved.setBounds(childRight,child.getT op(),c hildRight+shadowWidth,child.getBottom());mShadowLeftResolved.setAlpha((int)(0xffalpha));lved.draw(canvas);}elseif(mShadowRightResolved!=null&&checkDrawerViewAbsoluteGravity(child,Gravity.RIGHT)){finalintshadowWidth=mShadowRightResolved.getIntrinsic Width();finalintchildLeft=child.getLeft();finalintshowing=getWidth()-childLeft;finalintdrawerPeekDistance=mRightDragger.getEdgeSize();finalfloatalpha=Math.max(0,Math.min((float)showing/drawe rPeekDistance,1.f));mShadowRightResolved.setBounds(childLeft-shadowWidth,child.getTop(),childLeft,child.getBottom());mShadowRightResolved.setAlpha((int)(0xffalpha));mShadowRightResolved.draw(canvas);}returnresult;}判断当前的view是否设置gravity属性值,如果没有设置gravity,计算clipLeft和clipRight值,如果mScrimOpacity>0画一个矩形,如果view的gravity值为Gravity.LEFT,画右侧的view阴影部分,如果view的gravity值为Gravity.RIGHT画左侧的view阴影部分DrawerLayout的主要功能就是滑动,源码中使用了ViewDragHelper实现了滑动,具体不了解的地方可以去看ViewDragHelper源码,DrawerLayout继承自ViewGroup,所以要去计算自身以及子view的宽高,以及实现子view在DrawerLayout 的布局,本文主要描述主要的几个方法,想了解其他内容,自行查看源码。
VUE组件中的Drawer抽屉实现代码
VUE组件中的Drawer抽屉实现代码因为项⽬中⽤的是 element-ui 框架,⽽这个框架并没有抽屉组件,所以⾃⼰实现⼀个,具体代码如下:drawer.vue<template><div class="drawer"><div :class="maskClass" @click="closeByMask"></div><div :class="mainClass" :style="mainStyle" class="main"><div class="drawer-head"><span>{{ title }}</span><span class="close-btn" v-show="closable" @click="closeByButton">X</span></div><div class="drawer-body"><slot/></div></div></div></template><script>export default {props: {// 是否打开display: {type: Boolean},// 标题title: {type: String,default: '标题'},// 是否显⽰关闭按钮closable: {type: Boolean,default: true},// 是否显⽰遮罩mask: {type: Boolean,default: true},// 是否点击遮罩关闭maskClosable: {type: Boolean,default: true},// 宽度width: {type: String,default: '400px'},// 是否在⽗级元素中打开inner: {type: Boolean,default: false}},computed: {maskClass: function () {return {'mask-show': (this.mask && this.display),'mask-hide': !(this.mask && this.display),'inner': this.inner}},mainClass: function () {return {'main-show': this.display,'main-hide': !this.display,'inner': this.inner}},mainStyle: function () {return {width: this.width,right: this.display ? '0' : `-${this.width}`,borderLeft: this.mask ? 'none' : '1px solid #eee'}}},mounted () {if (this.inner) {let box = this.$el.parentNodebox.style.position = 'relative'}},methods: {closeByMask () {this.maskClosable && this.$emit('update:display', false) },closeByButton () {this.$emit('update:display', false)}}}</script><style lang="scss" scoped>.drawer {/* 遮罩 */.mask-show {position: fixed;top: 0;left: 0;width: 100%;height: 100%;z-index: 10;background-color: rgba(0,0,0,.5);opacity: 1;transition: opacity .5s;}.mask-hide {opacity: 0;transition: opacity .5s;}/* 滑块 */.main {position: fixed;z-index: 10;top: 0;height: 100%;background: #fff;transition: all 0.5s;}.main-show {opacity: 1;}.main-hide {opacity: 0;}/* 某个元素内部显⽰ */.inner {position: absolute;}/* 其他样式 */.drawer-head {display: flex;justify-content: space-between;height: 45px;line-height: 45px;padding: 0 15px;font-size: 14px;font-weight: bold;border-bottom: 1px solid #eee;.close-btn {display: inline-block;cursor: pointer;height: 100%;padding-left: 20px;}}.drawer-body {font-size: 14px;padding: 15px;}}</style>组件具体使⽤如下:<template><div class="box"><el-button type="primary" @click="display = true">打开抽屉</el-button><drawer title="我是⼀个抽屉组件" :display.sync="display" :inner="true" :width="drawerWidth" :mask="false">1. Hello, world!2. Do you like it?</drawer></div></template><script>import drawer from '@/components/drawer/drawer'export default {components: { drawer },data () {return {display: false,drawerWidth: '500px'}}}</script>总结以上所述是⼩编给⼤家介绍的VUE组件中的 Drawer 抽屉实现代码,希望对⼤家有所帮助,如果⼤家有任何疑问请给我留⾔,⼩编会及时回复⼤家的。
el-drawer的回调函数
el-drawer的回调函数el-drawer 是一个常见的UI 组件,用于在移动端应用中创建抽屉式的导航菜单。
它的回调函数通常用于在用户与抽屉菜单交互时执行某些操作。
el-drawer 的回调函数可以接收一个参数,该参数是一个对象,包含有关用户与抽屉菜单交互的信息。
通常,这个对象包含以下属性:* `open`: 一个布尔值,表示抽屉菜单是否处于打开状态。
* `status`: 一个字符串,表示用户与抽屉菜单的交互状态。
可能的值包括"opening"、"closing" 和"closed"。
* `instance`: 一个指向el-drawer 组件的实例。
下面是一个示例el-drawer 回调函数的代码:```javascripthandleDrawerCallback(data) {if (data.status === 'opening') {console.log('抽屉菜单正在打开...');} else if (data.status === 'closing') {console.log('抽屉菜单正在关闭...');} else if (data.status === 'closed') {console.log('抽屉菜单已关闭。
');}}```这个回调函数在用户与抽屉菜单交互时被调用,并根据用户的操作输出相应的日志信息。
可以根据需要在回调函数中执行其他操作,例如更新视图、发送网络请求等。
1。
vue drawer 实例-概述说明以及解释
vue drawer 实例-概述说明以及解释1.引言1.1 概述Vue Drawer是一种在Vue.js框架中常见的抽屉式组件,通常用于实现侧边栏、抽屉式菜单等功能。
通过Vue Drawer组件,用户可以方便地实现页面的侧边栏展开与收起,提升用户体验和页面交互效果。
本文将介绍Vue Drawer的概念、优势以及如何在Vue.js中实现Drawer组件。
通过本文的学习,读者可以深入了解Vue Drawer的应用场景和实现方式,并在自己的项目中灵活运用该组件,提升页面的交互效果和用户体验。
文章结构是指整篇文章在内容和逻辑上的组织方式。
本文分为引言、正文和结论三个部分。
1. 引言部分主要介绍了Vue Drawer实例文章的背景和整体内容安排。
- 1.1 概述: 简要介绍了Vue Drawer实例的概念和应用场景。
- 1.2 文章结构: 详细描述了本文的内容结构和章节安排。
- 1.3 目的: 阐明了撰写本文的目的和意义。
2. 正文部分是文章的核心内容,主要围绕Vue Drawer展开讨论。
- 2.1 什么是Vue Drawer: 解释了Vue Drawer的概念和特点。
- 2.2 Vue Drawer的优势: 分析了Vue Drawer相对于其他类似组件的优势和特点。
- 2.3 如何在Vue中实现Drawer: 提供了在Vue框架中实现Drawer组件的具体方法和步骤。
3. 结论部分对整篇文章的内容进行总结和展望。
- 3.1 总结Vue Drawer的应用: 对Vue Drawer在实际应用中的价值和影响进行总结。
- 3.2 展望Vue Drawer的未来发展: 探讨Vue Drawer未来可能的发展方向和趋势。
- 3.3 结束语: 对文章进行总结,强调Vue Drawer在前端开发中的重要性和潜力。
1.3 目的本文的目的是介绍Vue Drawer的基本概念和实现方法,帮助读者了解如何在Vue项目中使用Drawer组件。
setnavigationitemselectedlistener用法
setnavigationitemselectedlistener用法setNavigationItemSelectedListener是Android开发中的一个方法,用于为侧滑菜单的选项设置点击事件监听。
在本篇文章中,我将详细介绍setNavigationItemSelectedListener的用法,并逐步解释如何使用该方法来实现各种功能。
一、什么是setNavigationItemSelectedListener?setNavigationItemSelectedListener是一个用于设置侧滑菜单选项点击事件监听的方法。
它是DrawerLayout类中的一个方法,DrawerLayout 是一个常用的布局容器,用于实现侧滑菜单的展开和收起。
二、使用setNavigationItemSelectedListener的步骤1. 为了使用setNavigationItemSelectedListener方法,首先需要在布局文件中定义一个DrawerLayout和NavigationView。
2. 在Activity中找到DrawerLayout和NavigationView的实例。
3. 调用setNavigationItemSelectedListener方法为NavigationView 设置点击事件监听。
4. 在onNavigationItemSelected方法中处理菜单选项的点击事件。
接下来,我们将一步一步地解释如何实现这些步骤。
三、在布局文件中定义DrawerLayout和NavigationView首先,在你的布局文件中添加一个DrawerLayout作为根布局,并在其中内嵌一个NavigationView作为侧滑菜单的内容。
如下所示:xml<androidx.drawerlayout.widget.DrawerLayoutxmlns:android="android:id="+id/drawer_layout"android:layout_width="match_parent"android:layout_height="match_parent"><! 主要内容布局><FrameLayoutandroid:layout_width="match_parent"android:layout_height="match_parent"><! 此处为你的主要布局内容></FrameLayout><! 导航菜单布局><com.google.android.material.navigation.NavigationView android:id="+id/navigation_view"android:layout_width="wrap_content"android:layout_height="match_parent"android:layout_gravity="start"android:background="color/colorPrimary"app:headerLayout="layout/nav_header"app:menu="menu/nav_menu" /></androidx.drawerlayout.widget.DrawerLayout>在这个布局文件中,我们将主要的内容布局放在FrameLayout中,侧滑菜单布局放在NavigationView中。
【微信小程序】自定义抽屉式菜单(底部,从下向上拉出)

【微信⼩程序】⾃定义抽屉式菜单(底部,从下向上拉出)通过使⽤这个创建动画的api,可以做出很多特效出来下⾯介绍⼀个抽屉菜单的案例实现代码:wxml:<!--button--><view class="btn" bindtap="powerDrawer" data-statu="open">button</view><!--mask--><view class="drawer_screen" bindtap="powerDrawer" data-statu="close" wx:if="{{showModalStatus}}"></view><!--content--><!--使⽤animation属性指定需要执⾏的动画--><view animation="{{animationData}}" class="drawer_attr_box" wx:if="{{showModalStatus}}"><!--drawer content--><view class="drawer_content"><view class="drawer_title line">菜单1</view><view class="drawer_title line">菜单2</view><view class="drawer_title line">菜单3</view><view class="drawer_title line">菜单4</view><view class="drawer_title">菜单5</view></view></view>wxss:/*button*/.btn {width: 80%;padding: 20rpx 0;border-radius: 10rpx;text-align: center;margin: 40rpx 10%;background: #0C1939;color: #fff;}/*mask*/.drawer_screen {width: 100%;height: 100%;position: fixed;top: 0;left: 0;z-index: 1000;background: #000;opacity: 0.2;overflow: hidden;}/*content*/.drawer_attr_box {width: 100%;overflow: hidden;position: fixed;bottom: 0;left: 0;z-index: 1001;background: #fff;}.drawer_content {padding: 20rpx 40rpx;height: 470rpx;overflow-y: scroll;}.drawer_title{padding:20rpx;font:42rpx "microsoft yahei";text-align: center;}.line{border-bottom: 1px solid #f8f8f8;} js:Page({data: {showModalStatus: false},powerDrawer: function (e) {var currentStatu = e.currentTarget.dataset.statu;this.util(currentStatu)},util: function(currentStatu){/* 动画部分 */// 第1步:创建动画实例var animation = wx.createAnimation({duration: 200, //动画时长timingFunction: "linear", //线性delay: 0 //0则不延迟});// 第2步:这个动画实例赋给当前的动画实例this.animation = animation;// 第3步:执⾏第⼀组动画:Y轴偏移240px后(盒⼦⾼度是240px),停 animation.translateY(240).step();// 第4步:导出动画对象赋给数据对象储存this.setData({animationData: animation.export()})// 第5步:设置定时器到指定时候后,执⾏第⼆组动画setTimeout(function () {// 执⾏第⼆组动画:Y轴不偏移,停animation.translateY(0).step()// 给数据对象储存的第⼀组动画,更替为执⾏完第⼆组动画的动画对象 this.setData({animationData: animation})//关闭抽屉if (currentStatu == "close") {this.setData({showModalStatus: false});}}.bind(this), 200)// 显⽰抽屉if (currentStatu == "open") {this.setData({showModalStatus: true});}}})效果: 。
AndroidDrawerLayout实现抽屉效果实例代码
AndroidDrawerLayout实现抽屉效果实例代码贴上主要的逻辑和布局⽂件:activity_main.xml<?xml version="1.0" encoding="utf-8"?><android.support.v4.widget.DrawerLayout xmlns:android="/apk/res/android"android:id="@+id/drawer_layout"android:layout_width="match_parent"android:layout_height="match_parent"><!-- content --><FrameLayoutandroid:id="@+id/drawer_container"android:layout_width="match_parent"android:layout_height="match_parent"/><!-- Drawer--><ListViewandroid:id="@+id/drawer_menu"android:layout_width="240dp"android:layout_height="match_parent"android:background="#FFF0F0F0"android:layout_gravity="start"/><!--android:choiceMode 选中状态跟onItemClick没有冲突none 值为0,表⽰⽆选择模式;singleChoice 值为1,表⽰最多可以有⼀项被选中;multipleChoice 值为2,表⽰可以多项被选中。
Android开发实现抽屉菜单
Android开发实现抽屉菜单本⽂实例为⼤家分享了Android开发实现抽屉菜单的具体代码,供⼤家参考,具体内容如下实现效果点击菜单图表即可进⼊抽屉代码实现1、打开app/build.gradle⽂件,在dependencies闭包中添加如下内容:dependencies {compile fileTree(dir: 'libs', include: ['*.jar'])compile 'com.android.support:appcompat-v7:24.2.1'testCompile 'junit:junit:4.12'compile 'com.android.support:design:24.2.1'compile 'de.hdodenhof:circleimageview:2.1.0'}2、进⼊想要添加抽屉的界⾯的layout布局添加DrawerLayout控件⾸先DrawerLayout是⼀个布局,在布局中允许放⼊两个直接⼦控件,第⼀个⼦控件是主屏幕中的内容,第⼆个空间是滑动菜单中显⽰的内容原本的界⾯所有布局内容就放在第⼀个⼦控件中<?xml version="1.0" encoding="utf-8"?><androidx.drawerlayout.widget.DrawerLayout xmlns:android="/apk/res/android"xmlns:app="/apk/res-auto"xmlns:tools="/tools"android:id="@+id/drawerLayout"android:layout_width="match_parent"android:layout_height="match_parent"android:background="@mipmap/bk_1"tools:context="com.luckyxmobile.graphserviceping.MainActivity"><!-- 内容区 --><LinearLayoutandroid:layout_width="match_parent"android:layout_height="wrap_content"android:orientation="vertical"><ImageViewandroid:id="@+id/setting"android:layout_width="56dp"android:layout_height="56dp"android:layout_marginLeft="8dp"android:background="@drawable/ic_baseline_menu1"/><!-- android:background="@drawable/ic_baseline_menu_24"--><!--原图标宽⾼ 40 52--><TextViewandroid:layout_width="wrap_content"android:layout_height="wrap_content"android:layout_gravity="center"android:layout_marginTop="180dp"android:id="@+id/graphServicePing"android:gravity="center"android:text="Graph Service Ping"android:textColor="#26C6DA"android:textSize="36dp"/><LinearLayoutandroid:layout_marginTop="32dp"android:layout_gravity="center_horizontal"android:background="@drawable/bloder"android:layout_width="match_parent"android:layout_height="80dp"android:layout_marginStart="16dp"android:layout_marginEnd="16dp"android:paddingHorizontal="4dp"><!-- android:paddingHorizontal="16dp"--><!-- android:layout_height="wrap_content"--><Buttonandroid:minHeight="50dp"android:id="@+id/btn_input"android:layout_width="0dp"android:layout_weight="8"android:layout_height="wrap_content"android:textSize="20dp"android:layout_marginLeft="8dp"android:background="@null"/><Buttonandroid:id="@+id/btn_ping"android:background="@null"android:layout_weight="4"android:text="Ping!"android:textColor="#262626"android:textSize="25sp"android:layout_width="0dp"android:layout_height="80dp"/><!-- android:layout_weight="2"--><!-- android:layout_width="50dp"--><!-- android:layout_height="50dp"--></LinearLayout></LinearLayout><com.google.android.material.navigation.NavigationViewandroid:id="@+id/nav_view"android:background="@mipmap/bk_1"android:layout_height="match_parent"android:layout_width="match_parent"android:layout_gravity="start"app:menu="@menu/nav_menu"></com.google.android.material.navigation.NavigationView></androidx.drawerlayout.widget.DrawerLayout>android:layout_gravity="start"这⼀句很重要,⼀定要加上3.NavigationView⽤来优化滑动菜单页⾯的menu⽤来在NavigationView中显⽰具体的菜单项,headerLayout则⽤来在NavigationView中显⽰头布局(这⾥我只⽤到了menu,所以我只写menu)在res下如果没有menu⽬录,可以新建⼀个menu⽂件夹,然后右键menu->new_menu resource filemenu代码:<?xml version="1.0" encoding="utf-8"?><menu xmlns:android="/apk/res/android"><itemandroid:id="@+id/nav_setting"android:icon="@drawable/ic_launcher_setting_foreground"android:title="设置"></item></menu>可以添加多个item,不要忘了引⽤menuapp:menu="@menu/nav_menu"4.设置主界⾯菜单图表的点击事件跟intent不同setting.setOnClickListener(new View.OnClickListener() { //设置点击事件@Overridepublic void onClick(View v) {mDrawerLayout.openDrawer(GravityCompat.START);}});5、设置抽屉菜单item点击事件DrawerLayout mDrawerLayout;mDrawerLayout=findViewById(R.id.drawerLayout);NavigationView navView=(NavigationView)findViewById(R.id.nav_view);navView.setNavigationItemSelectedListener(new NavigationView.OnNavigationItemSelectedListener(){ @Overridepublic boolean onNavigationItemSelected(MenuItem item) {switch(item.getItemId()){case R.id.nav_setting:startActivity(new Intent(MainActivity.this, Setting.class));break;}mDrawerLayout.closeDrawers();return false;}});以上就是本⽂的全部内容,希望对⼤家的学习有所帮助,也希望⼤家多多⽀持。
androidDrawerLayout侧边栏实现
androidDrawerLayout侧边栏实现现在实现侧边栏⽐较简单了,官⽅提供的DrawerLayout可以很⽅便实现。
主要实现⽅法是:⽤DrawerLayout 作为界⾯根控件。
在DrawerLayout⾥⾯第⼀个View为当前界⾯主内容;第⼆个和第三个View为抽屉菜单内容。
如果当前界⾯只需要⼀个抽屉菜单,则第三个View可以省略。
第⼀个View的宽⾼应当设置为match_parent第⼆、三个View需要设置android:layout_gravity=”left”,和android:layout_gravity=”right”且⼀搬⾼度设置为match_parent,宽度为固定值,即侧滑菜单的宽度,宽度应该不超过320dp,这样⽤户可以在菜单打开的时候看到部分内容界⾯。
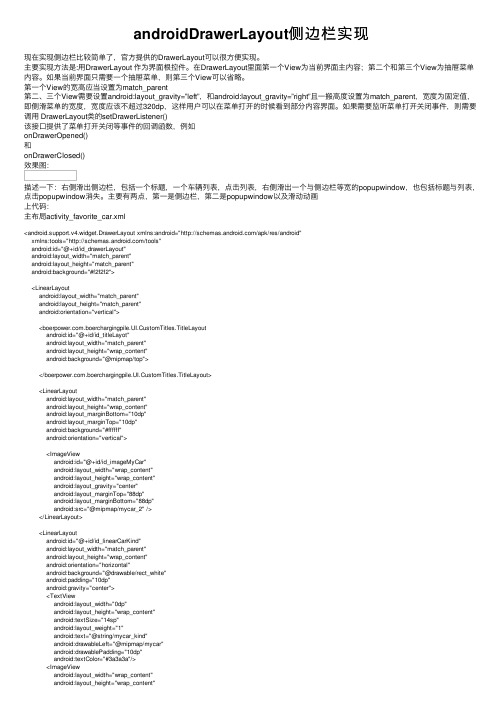
如果需要监听菜单打开关闭事件,则需要调⽤ DrawerLayout类的setDrawerListener()该接⼝提供了菜单打开关闭等事件的回调函数,例如onDrawerOpened()和onDrawerClosed()效果图:描述⼀下:右侧滑出侧边栏,包括⼀个标题,⼀个车辆列表,点击列表,右侧滑出⼀个与侧边栏等宽的popupwindow,也包括标题与列表,点击popupwindow消失。
主要有两点,第⼀是侧边栏,第⼆是popupwindow以及滑动动画上代码:主布局activity_favorite_car.xml<android.support.v4.widget.DrawerLayout xmlns:android="/apk/res/android"xmlns:tools="/tools"android:id="@+id/id_drawerLayout"android:layout_width="match_parent"android:layout_height="match_parent"android:background="#f2f2f2"><LinearLayoutandroid:layout_width="match_parent"android:layout_height="match_parent"android:orientation="vertical"><.boerchargingpile.UI.CustomTitles.TitleLayoutandroid:id="@+id/id_titleLayot"android:layout_width="match_parent"android:layout_height="wrap_content"android:background="@mipmap/top"></.boerchargingpile.UI.CustomTitles.TitleLayout><LinearLayoutandroid:layout_width="match_parent"android:layout_height="wrap_content"android:layout_marginBottom="10dp"android:layout_marginTop="10dp"android:background="#ffffff"android:orientation="vertical"><ImageViewandroid:id="@+id/id_imageMyCar"android:layout_width="wrap_content"android:layout_height="wrap_content"android:layout_gravity="center"android:layout_marginTop="88dp"android:layout_marginBottom="88dp"android:src="@mipmap/mycar_2" /></LinearLayout><LinearLayoutandroid:id="@+id/id_linearCarKind"android:layout_width="match_parent"android:layout_height="wrap_content"android:orientation="horizontal"android:background="@drawable/rect_white"android:padding="10dp"android:gravity="center"><TextViewandroid:layout_width="0dp"android:layout_height="wrap_content"android:textSize="14sp"android:layout_weight="1"android:text="@string/mycar_kind"android:drawableLeft="@mipmap/mycar"android:drawablePadding="10dp"android:textColor="#3a3a3a"/><ImageViewandroid:layout_width="wrap_content"android:layout_height="wrap_content"android:src="@mipmap/next_arrow"/></LinearLayout></LinearLayout><LinearLayoutandroid:id="@+id/id_right_menu"android:layout_width="240dp"android:layout_height="match_parent"android:layout_gravity="right"android:orientation="vertical"><LinearLayoutandroid:layout_width="match_parent"android:layout_height="wrap_content"android:gravity="center"android:background="@mipmap/top"android:orientation="horizontal"><ImageViewandroid:id="@+id/id_imageUp"android:layout_width="wrap_content"android:layout_height="wrap_content"android:src="@mipmap/back"android:layout_margin="12dp"/><TextViewandroid:layout_width="0dp"android:layout_height="wrap_content"android:layout_weight="1"android:gravity="center"android:text="@string/mycar_favorite"android:textColor="#ffffff"android:textSize="17sp" /></LinearLayout><ListViewandroid:id="@+id/id_listView"android:layout_width="match_parent"android:layout_height="match_parent"android:background="#ffffff"android:cacheColorHint="#00000000"android:divider="#f2f2f2"android:dividerHeight="1dp"/></LinearLayout></android.support.v4.widget.DrawerLayout>主界⾯代码//我的爱车public class FavoriteCarActivity extends BaseActivity implements TitleLayout.titleLayoutClick { private TitleLayout titleLayout;private ImageView imageViewCar;private LinearLayout linearLayoutCarKind;private LinearLayout linearLayoutRight;//右边栏private DrawerLayout mDrawerLayout;private ListView listViewCar;//车名称private ArrayList<String> carNameList = new ArrayList<>();//车名称private ArrayList<String> carModelList = new ArrayList<>();//车类型private PopupWindow popupWindow = null;@Overrideprotected void onCreate(Bundle savedInstanceState) {super.onCreate(savedInstanceState);setContentView(yout.activity_favorite_car);titleLayout = (TitleLayout) findViewById(R.id.id_titleLayot);titleLayout.setTitle("我的爱车");imageViewCar = (ImageView) findViewById(R.id.id_imageMyCar);ImageView imageViewUp = (ImageView) findViewById(R.id.id_imageUp);linearLayoutCarKind = (LinearLayout) findViewById(R.id.id_linearCarKind);linearLayoutRight = (LinearLayout) findViewById(R.id.id_right_menu);linearLayoutCarKind.setOnClickListener(new View.OnClickListener() {@Overridepublic void onClick(View v) {OpenRightMenu();}});mDrawerLayout = (DrawerLayout) findViewById(R.id.id_drawerLayout);mDrawerLayout.setDrawerLockMode(DrawerLayout.LOCK_MODE_LOCKED_CLOSED,Gravity.RIGHT);listViewCar = (ListView) findViewById(R.id.id_listView);for (int i = 0; i < 10; i++) {carNameList.add("保时捷");carModelList.add("Panamera");}CarAdapter carAdapter = new CarAdapter();listViewCar.setAdapter(carAdapter);listViewCar.setOnItemClickListener(new AdapterView.OnItemClickListener() {@Overridepublic void onItemClick(AdapterView<?> parent, View view, int position, long id) {showCarModelPopupWindow();}});imageViewUp.setOnClickListener(new View.OnClickListener() {@Overridepublic void onClick(View v) {mDrawerLayout.closeDrawers();}});}public void OpenRightMenu() {mDrawerLayout.openDrawer(Gravity.RIGHT);mDrawerLayout.setDrawerLockMode(DrawerLayout.LOCK_MODE_UNLOCKED,Gravity.RIGHT);}private class CarAdapter extends BaseAdapter {public CarAdapter() {}@Overridepublic int getCount() {return carNameList.size();}@Overridepublic Object getItem(int position) {return position;}@Overridepublic long getItemId(int position) {return position;}@Overridepublic View getView(int position, View convertView, ViewGroup parent) {if (convertView == null) {convertView = LayoutInflater.from(FavoriteCarActivity.this).inflate(yout.car_name_item, null); }TextView textViewCarName = ViewHolder.get(convertView, R.id.id_textViewCar);textViewCarName.setText(carNameList.get(position));return convertView;}}@Overridepublic void leftViewClick() {finish();}@Overridepublic void rightViewClick() {}private void showCarModelPopupWindow() {View view = View.inflate(FavoriteCarActivity.this, yout.car_model_list, null);ImageView imageViewUp = (ImageView) view.findViewById(R.id.id_imageUp);TextView textViewTitle = (TextView) view.findViewById(R.id.id_textViewCarName);ListView listViewCarModel = (ListView) view.findViewById(R.id.id_listViewCarModel);popupWindow = new PopupWindow(view, linearLayoutRight.getWidth(),youtParams.MATCH_PARENT, true);popupWindow.setAnimationStyle(R.style.MenuAnimationLeftRight);popupWindow.setBackgroundDrawable(new BitmapDrawable());//需要设置背景,⽤物理键返回的时候 popupWindow.setFocusable(true);popupWindow.setOutsideTouchable(true); //设置点击屏幕其它地⽅弹出框消失CarModelAdapter carModelAdapter = new CarModelAdapter();listViewCarModel.setAdapter(carModelAdapter);listViewCarModel.setOnItemClickListener(new AdapterView.OnItemClickListener() {@Overridepublic void onItemClick(AdapterView<?> parent, View view, int position, long id) {popupWindow.dismiss();}});popupWindow.showAtLocation(titleLayout, Gravity.RIGHT, 0, 0);imageViewUp.setOnClickListener(new View.OnClickListener() {@Overridepublic void onClick(View v) {popupWindow.dismiss();}});}private class CarModelAdapter extends BaseAdapter {public CarModelAdapter() {}@Overridepublic int getCount() {return carModelList.size();}@Overridepublic Object getItem(int position) {return position;}@Overridepublic long getItemId(int position) {return position;}@Overridepublic View getView(int position, View convertView, ViewGroup parent) {if (convertView == null) {convertView = LayoutInflater.from(FavoriteCarActivity.this).inflate(yout.car_model_item, null); }TextView textViewCarName = ViewHolder.get(convertView, R.id.id_textViewCarModel);textViewCarName.setText(carModelList.get(position));return convertView;}}@Overridepublic boolean onKeyDown(int keyCode, KeyEvent event) {if (keyCode == KeyEvent.KEYCODE_BACK) {if (mDrawerLayout.isDrawerOpen(Gravity.RIGHT)) {mDrawerLayout.closeDrawers();} else {return super.onKeyDown(keyCode, event);}return true;}return super.onKeyDown(keyCode, event);}}标题类TitleLayout.java/*** Created by dell on 2015/11/10.* 布局标题*/public class TitleLayout extends RelativeLayout {TextView textViewContent;LinearLayout linearLeft;ImageView imageViewLeft;LinearLayout linearRight;ImageView imageViewRight;TextView textViewRight;private titleLayoutClick mListener;public TitleLayout(Context context, AttributeSet attrs) {super(context, attrs);LayoutInflater.from(context).inflate(yout.title, this);textViewContent = (TextView) findViewById(R.id.id_textviewContent);linearLeft = (LinearLayout) findViewById(R.id.id_linearLeft);imageViewLeft = (ImageView)findViewById(R.id.id_left);linearRight = (LinearLayout) findViewById(R.id.id_linearRight);imageViewRight = (ImageView)findViewById(R.id.id_right);textViewRight = (TextView) findViewById(R.id.id_rightText);try{mListener = (titleLayoutClick) context;}catch (Exception e){e.printStackTrace();}linearLeft.setOnClickListener(new OnClickListener() {@Overridepublic void onClick(View v) {if (mListener != null) {mListener.leftViewClick();}}});linearRight.setOnClickListener(new OnClickListener() {@Overridepublic void onClick(View v) {if (mListener != null) {mListener.rightViewClick();}}});}public void setTitle(String title) {textViewContent.setText(title);}//设置右边图⽚public void setLinearRightImage(int drawableID) {imageViewRight.setBackgroundResource(drawableID);}//设置左边图⽚public void setLinearLeftImage(int drawableID) {imageViewLeft.setBackgroundResource(drawableID);}//设置右边⽂本public void setLinearRightText(String rightTextString) {textViewRight.setText(rightTextString);}//设置右边图⽚为可见,根据viewID判断⽂本与图⽚的显⽰,0显⽰图⽚,1显⽰⽂本 public void setLinearRightVisibility(int viewID) {linearRight.setVisibility(View.VISIBLE);if(viewID==0){imageViewRight.setVisibility(View.VISIBLE);textViewRight.setVisibility(View.INVISIBLE);}else if(viewID==1){textViewRight.setVisibility(View.VISIBLE);imageViewRight.setVisibility(View.INVISIBLE);}}public interface titleLayoutClick {public void leftViewClick();//左图⽚点击public void rightViewClick();//右边图⽚点击}}标题类布局title.xml<?xml version="1.0" encoding="utf-8"?><RelativeLayout xmlns:android="/apk/res/android"android:id="@+id/id_top"android:layout_width="match_parent"android:layout_height="wrap_content"><LinearLayoutandroid:id="@+id/id_linearLeft"android:layout_width="wrap_content"android:layout_height="wrap_content"android:layout_alignParentLeft="true"android:layout_centerVertical="true"><ImageViewandroid:id="@+id/id_left"android:layout_width="wrap_content"android:layout_height="wrap_content"android:layout_margin="12dp"android:background="@mipmap/back" /></LinearLayout><LinearLayoutandroid:layout_width="wrap_content"android:layout_height="wrap_content"android:layout_centerInParent="true"><TextViewandroid:id="@+id/id_textviewContent"android:layout_width="wrap_content"android:layout_height="wrap_content"android:layout_margin="12dp"android:textColor="@color/white"android:textSize="17sp"/></LinearLayout><LinearLayoutandroid:id="@+id/id_linearRight"android:layout_width="wrap_content"android:layout_height="wrap_content"android:layout_alignParentRight="true"android:layout_centerVertical="true"android:visibility="invisible"><ImageViewandroid:id="@+id/id_right"android:layout_width="wrap_content"android:layout_height="wrap_content"android:layout_margin="12dp" /><TextViewandroid:id="@+id/id_rightText"android:layout_width="wrap_content"android:layout_height="wrap_content"android:layout_margin="12dp"android:textSize="14sp"android:textColor="#ffffff"/></LinearLayout></RelativeLayout>列表项布局就不写了动画style<!-- PopupWindow左右滑动的窗⼝动画 --><style name="MenuAnimationLeftRight"><item name="android:windowEnterAnimation">@anim/menu_fadein_right</item> <item name="android:windowExitAnimation">@anim/menu_fadein_left</item> </style>menu_fadein_right<?xml version="1.0" encoding="utf-8"?><set xmlns:android="/apk/res/android"><translateandroid:duration="500"android:fromXDelta="100%"android:toXDelta="0"/></set>menu_fadein_left<?xml version="1.0" encoding="utf-8"?><set xmlns:android="/apk/res/android"> <translateandroid:duration="500"android:fromXDelta="0"android:toXDelta="100%" /></set>参考博客。
AndroidSlidingDrawer抽屉效果的实现
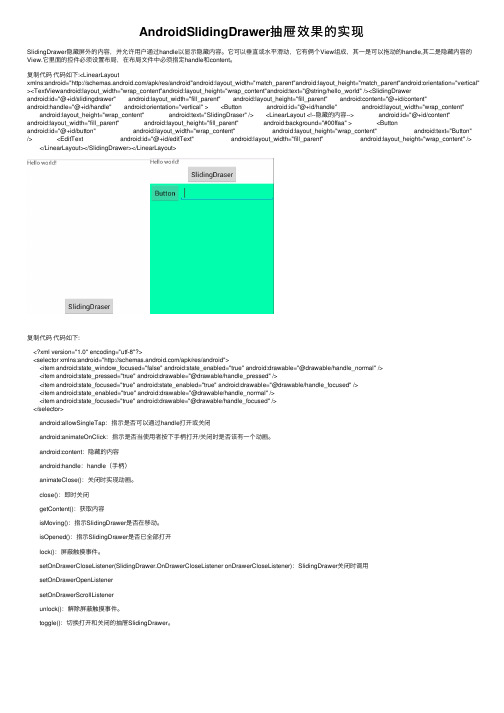
AndroidSlidingDrawer抽屉效果的实现SlidingDrawer隐藏屏外的内容,并允许⽤户通过handle以显⽰隐藏内容。
它可以垂直或⽔平滑动,它有俩个View组成,其⼀是可以拖动的handle,其⼆是隐藏内容的View.它⾥⾯的控件必须设置布局,在布局⽂件中必须指定handle和content。
复制代码代码如下:<LinearLayoutxmlns:android="/apk/res/android"android:layout_width="match_parent"android:layout_height="match_parent"android:orientation="vertical" ><TextViewandroid:layout_width="wrap_content"android:layout_height="wrap_content"android:text="@string/hello_world" /><SlidingDrawer android:id="@+id/slidingdrawer" android:layout_width="fill_parent" android:layout_height="fill_parent" android:content="@+id/content" android:handle="@+id/handle" android:orientation="vertical" > <Button android:id="@+id/handle" android:layout_width="wrap_content" android:layout_height="wrap_content" android:text="SlidingDraser" /> <LinearLayout <!--隐藏的内容--> android:id="@+id/content" android:layout_width="fill_parent" android:layout_height="fill_parent" android:background="#00ffaa" > <Button android:id="@+id/button" android:layout_width="wrap_content" android:layout_height="wrap_content" android:text="Button" /> <EditText android:id="@+id/editText" android:layout_width="fill_parent" android:layout_height="wrap_content" /> </LinearLayout></SlidingDrawer></LinearLayout>复制代码代码如下:<?xml version="1.0" encoding="utf-8"?><selector xmlns:android="/apk/res/android"><item android:state_window_focused="false" android:state_enabled="true" android:drawable="@drawable/handle_normal" /><item android:state_pressed="true" android:drawable="@drawable/handle_pressed" /><item android:state_focused="true" android:state_enabled="true" android:drawable="@drawable/handle_focused" /><item android:state_enabled="true" android:drawable="@drawable/handle_normal" /><item android:state_focused="true" android:drawable="@drawable/handle_focused" /></selector> android:allowSingleTap:指⽰是否可以通过handle打开或关闭 android:animateOnClick:指⽰是否当使⽤者按下⼿柄打开/关闭时是否该有⼀个动画。
Flutter
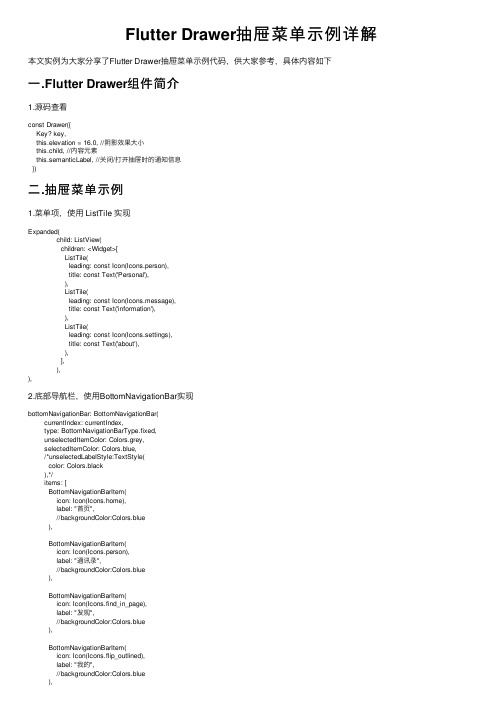
Flutter Drawer抽屉菜单⽰例详解本⽂实例为⼤家分享了Flutter Drawer抽屉菜单⽰例代码,供⼤家参考,具体内容如下⼀.Flutter Drawer组件简介1.源码查看const Drawer({Key? key,this.elevation = 16.0, //阴影效果⼤⼩this.child, //内容元素this.semanticLabel, //关闭/打开抽屉时的通知信息})⼆.抽屉菜单⽰例1.菜单项,使⽤ ListTile 实现Expanded(child: ListView(children: <Widget>[ListTile(leading: const Icon(Icons.person),title: const Text('Personal'),),ListTile(leading: const Icon(Icons.message),title: const Text('information'),),ListTile(leading: const Icon(Icons.settings),title: const Text('about'),),],),),2.底部导航栏,使⽤BottomNavigationBar实现bottomNavigationBar: BottomNavigationBar(currentIndex: currentIndex,type: BottomNavigationBarType.fixed,unselectedItemColor: Colors.grey,selectedItemColor: Colors.blue,/*unselectedLabelStyle:TextStyle(color: Colors.black),*/items: [BottomNavigationBarItem(icon: Icon(Icons.home),label: "⾸页",//backgroundColor:Colors.blue),BottomNavigationBarItem(icon: Icon(Icons.person),label: "通讯录",//backgroundColor:Colors.blue),BottomNavigationBarItem(icon: Icon(Icons.find_in_page),label: "发现",//backgroundColor:Colors.blue),BottomNavigationBarItem(icon: Icon(Icons.flip_outlined),label: "我的",//backgroundColor:Colors.blue),],onTap: (index){setState(() {print("the index is :$index");currentIndex=index;});},),参考:3.悬浮按钮,使⽤FloatingActionButton实现floatingActionButton: FloatingActionButton( //悬浮按钮child: Icon(Icons.add),onPressed:_onAddNum),三.Demo及实际效果1.mydrawer.dartimport 'package:flutter/material.dart';class MyDrawer extends StatelessWidget {const MyDrawer({Key? key,}) : super(key: key);@overrideWidget build(BuildContext context) {return Drawer(elevation: 30,child: MediaQuery.removePadding(context: context,//移除抽屉菜单顶部默认的空⽩removeTop: true,child: Column(crossAxisAlignment: CrossAxisAlignment.start,children: <Widget>[Padding(padding: const EdgeInsets.only(top: 30.0),child: Row(children: <Widget>[Padding(padding: const EdgeInsets.symmetric(horizontal: 15.0), child: ClipOval(child: Image.asset("images/cc.png",width: 60,),),),Text("jon",style: TextStyle(fontWeight: FontWeight.bold),)],),),Expanded(child: ListView(children: <Widget>[ListTile(leading: const Icon(Icons.person),title: const Text('Personal'),),ListTile(leading: const Icon(Icons.message),title: const Text('information'),),ListTile(leading: const Icon(Icons.settings),title: const Text('about'),),],),),],),),);}}2.MainPage.dartimport 'package:flutter/material.dart';import 'findpage.dart';import 'mypage.dart';import 'contactpage.dart';import 'homepage.dart';import 'mydrawer.dart';class MainPage extends StatefulWidget{const MainPage({Key? key}) : super(key: key);@overrideState<StatefulWidget> createState()=>_MainPageState();}class _MainPageState extends State<MainPage>{var allPages=[HomePage(),ContactPage(),FindPage(),MyPage()]; var currentIndex=0;@overrideWidget build(BuildContext context) {return Scaffold(appBar: AppBar( //导航栏title: Text("App Name"),actions: <Widget>[ //导航栏右侧分享菜单IconButton(icon: Icon(Icons.share), onPressed: () {}),],),drawer: MyDrawer(), //菜单抽屉body: allPages[currentIndex],backgroundColor: Colors.green,bottomNavigationBar: BottomNavigationBar(currentIndex: currentIndex,type: BottomNavigationBarType.fixed,unselectedItemColor: Colors.grey,selectedItemColor: Colors.blue,/*unselectedLabelStyle:TextStyle(color: Colors.black),*/items: [BottomNavigationBarItem(icon: Icon(Icons.home),label: "⾸页",//backgroundColor:Colors.blue),BottomNavigationBarItem(icon: Icon(Icons.person),label: "通讯录",//backgroundColor:Colors.blue),BottomNavigationBarItem(icon: Icon(Icons.find_in_page),label: "发现",//backgroundColor:Colors.blue),BottomNavigationBarItem(icon: Icon(Icons.flip_outlined),label: "我的",//backgroundColor:Colors.blue),],onTap: (index){setState(() {print("the index is :$index");currentIndex=index;});},),floatingActionButton: FloatingActionButton( //悬浮按钮child: Icon(Icons.add),onPressed:_onAddNum),);}void _onAddNum(){}}3.效果以上就是本⽂的全部内容,希望对⼤家的学习有所帮助,也希望⼤家多多⽀持。
vue3引用el-drawer
vue3引用el-drawer随着 Vue3 的正式发布,很多开发者都在尝试使用新版本并研究其中的新功能。
其中,一些 UI 组件的更新也引起了广泛的关注,例如 ElementUI 的 Vue3 版本。
最近,在使用 ElementUI-Vue3 版本的过程中,我遇到了一个非常方便的组件 - el-drawer。
在这篇文章中,我想和大家分享一下如何在 Vue3 项目中使用 el-drawer 组件。
el-drawer 是 ElementUI 的一个抽屉组件。
它可以在页面的一侧显示一些额外的信息,比如菜单、设置等等。
常见的使用场景是在手机端使用,当用户点击右上角图标时,会弹出一个抽屉来展示一些额外信息,这样可以充分利用手机的屏幕空间。
在使用 el-drawer 组件时,首先需要在项目中引入 ElementUI。
具体操作可以参考ElementUI 的官方文档,这里不再赘述。
在 Vue3 的项目中使用 el-drawer 需要注意以下几点:1. 组件的引入方式不同Vue3 中引入组件的方式已经改变,不能再使用 Vue2 的全局注册方式。
在项目中使用 el-drawer 组件需要在组件中使用 import 引入才能使用。
```javascriptimport { ElDrawer } from 'element-plus'```在 Vue2 中,我们可以使用 <el-drawer></el-drawer> 的方式来调用组件。
但是在Vue3 中,我们需要使用 h 函数来创建虚拟节点才能调用组件。
```javascriptrender() {return h(ElDrawer, {visible: this.drawerVisible,onClose: () => {this.drawerVisible = false},title: 'Title',size: '60%',direction: 'rtl'}, () => {return [h('p', null, 'Content')]})}```其中,h 函数接收三个参数。
使用DrawerLayout实现侧滑菜单
“home_drawerlayout.xml”是侧滑菜单的布局文件。该布局文件最外层是一个 DrawerLayout组件,里面有一个充满父容器的帧布局,用于显示Fragment的内容。
任务三:使用DrawerLayout实现侧滑菜单-案例效果展示 演示HomeSecurity3_Init代码
任务三小结
1、 DrawerLayout简介 ➢DrawerLayout是谷歌官方给我们提供的一个侧滑菜单控件。 ➢DrawerLayout分为侧边菜单和主内容区两部分。 ➢侧边菜单可以根据手势展开与隐,主内容区的内容可以随着菜单的点击而 变化
2、在初始代码中添加代码,实现项目的侧滑菜单功能
BaseFragment Fragment基类,实现广播的注册和接收
项目实现
任务分解
任务一:Toolbar的使用 任务二:Fragment的使用 任务三:使用DrawerLayout实现侧滑菜单 任务四:自定义控件与Toolbar标题栏的实现 任务五:RxJava的使用
任务三:使用DrawerLayout实现侧滑菜单-任务目标
➢ 掌握DrawerLayout使用的注意事项 ➢ 学会使用RadioButton实现侧边菜单项 ➢ 学会使用DrawerLayout实现侧滑菜单
DangerousGasFragment 危险气体页面对应Fragment
SmokeFragment 烟雾警报页面对应Fragment
WaterFragment 水浸页面对应Fragment
android:layout_gravity = “start”时,从左向右滑出菜单。 android:layout_gravity = “end”时,从右向左滑出菜单。 ➢ 侧滑视图的宽度以dp为单位,不建议超过320dp
- 1、下载文档前请自行甄别文档内容的完整性,平台不提供额外的编辑、内容补充、找答案等附加服务。
- 2、"仅部分预览"的文档,不可在线预览部分如存在完整性等问题,可反馈申请退款(可完整预览的文档不适用该条件!)。
- 3、如文档侵犯您的权益,请联系客服反馈,我们会尽快为您处理(人工客服工作时间:9:00-18:30)。
侧拉菜单作为常见的导航交互控件,最开始在没有没有android官方控件时,很多时候都是使用开源的SlidingMenu,一直没机会分析侧拉菜单的实现机理,本文将分析android.support.v4.widget.DrawerLayout的使用及实现。
DrawerLayout直译的事抽屉布局的意思,作为视窗内的顶层容器,它允许用户通过抽屉式的推拉操作,从而把视图视窗外边缘拉到屏幕内,如右图:抽屉菜单的摆放和布局通过android:layout_gravity属性来控制,可选值为left、right或start、end。
通过xml来布局的话,需要把DrawerLayout作为父容器,组界面布局作为其第一个子节点,抽屉布局则紧随其后作为第二个子节点,这样就做就已经把内容展示区和抽屉菜单区独立开来,只需要分别非两个区域设置内容即可。
android提供了一些实用的监听器,重载相关的回调方法可以在菜单的交互过程中书写逻辑业务。
下面是一个demo布局:<android.support.v4.widget.DrawerLayoutxmlns:android="/apk/res/android"xmlns:tools="/tools"android:id="@+id/drawer_layout"android:layout_width="match_parent"android:layout_height="match_parent"tools:context="com.aven.myapplication2.app.MainActivity"><FrameLayoutandroid:id="@+id/container"android:layout_width="match_parent"android:layout_height="match_parent"/><fragment android:id="@+id/navigation_drawer"android:layout_width="@dimen/navigation_drawer_width"android:layout_height="match_parent"android:layout_gravity="start"android:name="com.aven.myapplication2.app.NavigationDrawerFragment"tools:layout="@layout/fragment_navigation_drawer"/></android.support.v4.widget.DrawerLayout>所以DrawerLayout的使用非常简单,和很多容器类布局一样,它本身也继承自ViewGroup,只是在内部实现中会默认将第一个子节点作为内容区,第二个作为抽屉菜单,所以写布局的事后必须牢记,好在现在的IDE已经非常智能,通过引导来创建Drawerlayout时,会自动生成Activity和xml layout布局,比如使用AndroidStudio就非常方便。
DrawerLayout实例化相关辅助类既然DrawerLayout使用是作为顶层布局layout,那先看看他的构造函数:public DrawerLayout(Context context, AttributeSet attrs,int defStyle){super(context, attrs, defStyle);//根据屏幕分辨率密度计算最小的边距final float density = getResources().getDisplayMetrics().density;mMinDrawerMargin =(int)(MIN_DRAWER_MARGIN * density +0.5f);final float minVel = MIN_FLING_VELOCITY * density;//实例化视图滑动的回调接口,包括左右两边mLeftCallback =new ViewDragCallback(Gravity.LEFT);mRightCallback =new ViewDragCallback(Gravity.RIGHT);//创建滑动手势的的辅助类,负责具体的滑动监听实现mLeftDragger = ViewDragHelper.create(this, TOUCH_SLOP_SENSITIVITY, mLeftCallback);mLeftDragger.setEdgeTrackingEnabled(ViewDragHelper.EDGE_LEFT);mLeftDragger.setMinVelocity(minVel);mLeftCallback.setDragger(mLeftDragger);mRightDragger = ViewDragHelper.create(this, TOUCH_SLOP_SENSITIVITY, mRightCallback);mRightDragger.setEdgeTrackingEnabled(ViewDragHelper.EDGE_RIGHT);mRightDragger.setMinVelocity(minVel);mRightCallback.setDragger(mRightDragger);// So that we can catch the back buttonsetFocusableInTouchMode(true);ViewCompat.setAccessibilityDelegate(this,new AccessibilityDelegate());ViewGroupCompat.setMotionEventSplittingEnabled(this,false);}从构造函数中,我们发现有两个关键的类ViewDragCallback, ViewDragHelper,命名上来看前者和滑动的回调相关,后者和view的滑动操作实现有关,所以先看ViewDragHelper。
ViewDragHelper负责实现drag操作从它的类注释信息中可以看到,这个helper是个辅助类,里面封装了一些便于用户拖动ViewGroup内子view的操作及状态记录方法。
/*** ViewDragHelper is a utility class for writing custom ViewGroups. It offers a number* of useful operations and state tracking for allowing a user to drag and reposition* views within their parent ViewGroup.*/现在来看看这个helper到底是怎么封装的滑动操作,从上面的实例化我们知道这个helper通过工厂方法来构造实例,工厂方法有两个如下:/*** Factory method to create a new ViewDragHelper.** @param forParent Parent view to monitor* @param cb Callback to provide information and receive events* @return a new ViewDragHelper instance*/public static ViewDragHelper create(ViewGroup forParent, Callback cb){return new ViewDragHelper(forParent.getContext(), forParent, cb);}/*** Factory method to create a new ViewDragHelper.** @param forParent Parent view to monitor* @param sensitivity Multiplier for how sensitive the helper should be about detecting* the start of a drag. Larger values are more sensitive. 1.0f is normal.* @param cb Callback to provide information and receive events* @return a new ViewDragHelper instance*/public static ViewDragHelper create(ViewGroup forParent,float sensitivity, Callback cb){ final ViewDragHelper helper = create(forParent, cb);helper.mTouchSlop=(int)(helper.mTouchSlop*(1/ sensitivity));return helper;}这第二个工厂方法create就是刚才看到的上层调用来创建helper实例的,我们传入了一个viewgroup,也就是说helper 将持有我们的DrawerLayout实例引用,第二是一个浮点数,和drag操作的敏感性相关,数值越大表示drag操作更易被监听,最后是一个Callback,即ViewDragCallback实例,它本身继承自ViewDragHelper.Callback,现在来看helper 的构造方法:/*** Apps should use ViewDragHelper.create() to get a new instance.* This will allow VDH to use internal compatibility implementations for different* platform versions.** @param context Context to initialize config-dependent params from* @param forParent Parent view to monitor*/private ViewDragHelper(Context context, ViewGroup forParent, Callback cb){if(forParent ==null){throw new IllegalArgumentException("Parent view may not be null");}if(cb ==null){throw new IllegalArgumentException("Callback may not be null");}mParentView = forParent;mCallback = cb;final ViewConfiguration vc = ViewConfiguration.get(context);final float density = context.getResources().getDisplayMetrics().density;mEdgeSize =(int)(EDGE_SIZE * density +0.5f);mTouchSlop = vc.getScaledTouchSlop();mMaxVelocity = vc.getScaledMaximumFlingVelocity();mMinVelocity = vc.getScaledMinimumFlingVelocity();mScroller = ScrollerCompat.create(context, sInterpolator);}首先需要检测我们传入的DrawerLayout和回调Callback,不允许为空。
