飘在空中的文字(旋转LED显示灯)说明书-新
Led灯简易使用说明书
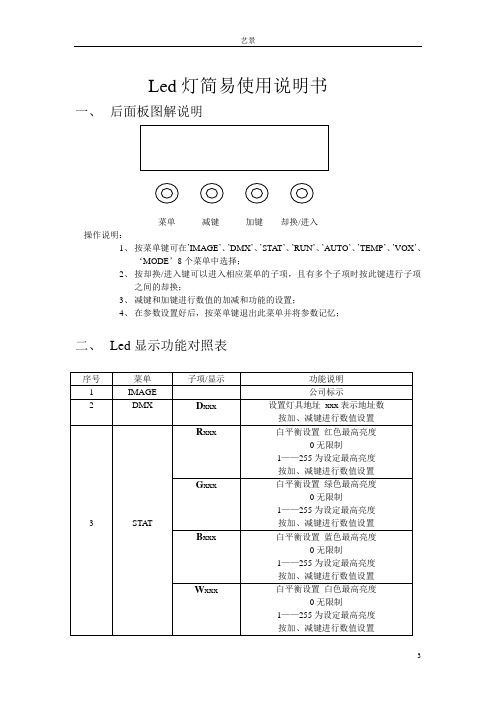
Led 灯简易使用说明书
一、 后面板图解说明
菜单 减键 加键 却换/进入 操作说明:
1、 按菜单键可在’IMAGE ’、’DMX ’、’STAT ’、’RUN ’、’AUTO ’、’TEMP ’、’VOX ’、
‘MODE ’8个菜单中选择;
2、 按却换/进入键可以进入相应菜单的子项,且有多个子项时按此键进行子项
之间的却换;
3、 减键和加键进行数值的加减和功能的设置;
4、 在参数设置好后,按菜单键退出此菜单并将参数记忆;
二、 Led 显示功能对照表
三、Dmx512通道说明3通道:
6通道:
9通道:
四、技术指标
1、工作电压:AC220v 50Hz
2、最大功率:<200W
3、亮度:3m距离>3500 CD
4、颜色:R 控制等级0—255
G 控制等级0—255
B 控制等级0—255
W 控制等级0—255
5、频闪:控制等级11——255
6、灯杯角度:15度、30度、45度可选
7、温升:<40度
8、灯体可调角度:>180度
长沙新画佳光电子有限公司
2010-2-8。
旋转LED显示屏(精)

旋转 LED 显示屏研究目的:目前主流的显示器件如电视机,显示器,电影屏幕等都是采用平面显示方式。
然而立体的显示方式与平面显示方式相比信息总量更大,互动性更强,也更逼真。
旋转 LED 显示屏可同步控制发光二极管,实现图文显示以及音频同步,另外大大降低了成本,并且能够 360度全方位观赏屏幕显示的内容,给人以立体的观赏效果,给观众带来美的享受。
非常适合大厅或候车室之类的场合, 也可应用与室外广告或室内装饰。
内容:一.主体构想本图文同步旋转 LED通信模块、字库模块、电机驱动模块等及外壳、电源构成。
通信电路用于通过计算机向显示屏下载显示内容, 由于显示屏在高速旋转的情况下不便于接线进行显示内容的更改。
所以选用红外传输数据。
总体构成如图 1所示:系统采用高速发光的 LED 作为像素元,在扇叶上排列。
旋转的扇叶设计为圆形,在扇叶上设有一圈 LED,LED 的发光颜色为单色或多色,当扇叶围绕着中心轴旋转时,会产生一个球面,而且在球面上全部都是 LED, 配合字模软件,当扇叶走到相应的位置时,点亮相应的点,根据人眼的视觉暂留原理,观察者可以看到 led 矩阵旋转扫描得到的真实三维图像,由单片机控制 led 像素的亮暗,或者控制发光时间这样就可以控制一个球面的显示内容。
二. 硬件设计1. 核心控制模块核心控制模块采 89C51单片机, 由于 89c51芯片的片内存储器容量有限, 需要扩展一片存储器作为字库存储器和显示缓冲区, 并作为下载内容的存储。
这里选用的是华邦的 29C040。
控制模块主要是对接收过来的数据进行判断, 从而执行不同的动作。
是整个屏幕的控制核心处理各种数据, 控制外部期间执行各种动作。
此外还选用了霍尔元件 TL0038J 进行相位检查并完成校正功能使 LED 的亮灭与旋转保持同步。
结构如图 1所示::图 2:硬件构成2. 旋转显示模块旋转显示模块采用阵列的方式排列 LED, 布线非常方便,而且对单个点或多个点控制方便,控制显示简单易行,而且显示效果很好。
LED屏遥控器功能 说明书
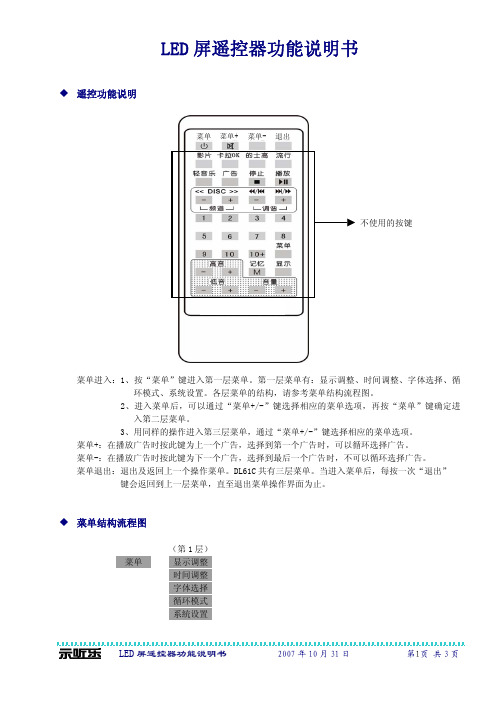
LED 屏遥控器功能说明书遥控功能说明菜单进入:1、按“菜单”键进入第一层菜单。
第一层菜单有:显示调整、时间调整、字体选择、循环模式、系统设置。
各层菜单的结构,请参考菜单结构流程图。
2、进入菜单后,可以通过“菜单+/-”键选择相应的菜单选项,再按“菜单”键确定进入第二层菜单。
3、用同样的操作进入第三层菜单,通过“菜单+/-”键选择相应的菜单选项。
菜单+:在播放广告时按此键为上一个广告,选择到第一个广告时,可以循环选择广告。
菜单-:在播放广告时按此键为下一个广告,选择到最后一个广告时,不可以循环选择广告。
菜单退出:退出及返回上一个操作菜单。
DL61C 共有三层菜单。
当进入菜单后,每按一次“退出” 键会返回到上一层菜单,直至退出菜单操作界面为止。
菜单结构流程图(第1层) 菜单 显示调整 时间调整字体选择循环模式系統设置菜单退出菜单+菜单-不使用的按键(第1层) (第2层)显示调整 亮度调节 :1~9级调节LED亮度,数值越大亮度越强。
速度调节 :1~9级调节文字的流动速度,数值越大速度越快。
TXT 模式 :文字流动进入显示屏的模式选择,详见TXT模式。
停留时间 :可以选择0~9级广告内容显示满屏的流动间隔时间。
(第2层) (第3层)TXT 模式 左到右 :广告信息从右向左的方向流出屏幕。
上到下 :广告信息从下向上的方向流出屏幕。
下到上 :广告信息从上向下的方向流出屏幕。
上拉帘 :广告信息从下向上的方向逐点组成字流出屏幕。
下拉帘 :广告信息从上向下的方向逐点组成字流出屏幕。
右开栅 :广告信息同时逐点组成字显示出来。
雪花状 :广告信息同时随意逐点组成字显示出来。
停止无效果 :广告信息直接静止地显示出来。
随机效果循环 :上述模式不同次序显示。
(第1层) (第2层)时间调整 时调整 :从01~24,01表示当前为1时。
有24及12两种小时制。
在选择12小时制时,按“菜单-”可以依次切换“AM”与“PM”,“AM”表示上午时段, “PM”表示下午及晚间时段。
幻彩控制器说明书
R700系列炫彩控制器LED产品特点99种预置程序程序单元长度可调运行速度可调双色数码管显示窗口循环演示模式DC DC内置大电流/变换器灯带可无限级联远距离无线遥控功能关机自动记忆播放状态功 能 介 绍1. 程序显示窗口显示当前运行程序,以数字~表示。
当显示时表示为循环演示模式。
在循环演示时将交替显示和当前演示程序值。
0199HL HL 2. 速度显示窗口显示当前的运行速度,以数字~表示。
数字越大表示运行越快。
01994. 暂停/运行键在运行时按下此键程序将暂停运行。
暂停时显示窗口将在当前数值下闪烁显示。
再次按下此键,程序将恢复之前的运行状态。
56. /下一程序/上一程序键跳转至下一程序或上一程序。
78. /加快速度/减慢速度键按下键时,程序运行速度将加快,当速度显示为时速度达到最快。
按下键时,运行速度将减慢,当速度显示为时速度为最慢。
由于不同程序效果各异,因此不同程序在速度值时,变换的速度可能不一致。
Quick 99Slow 0相同910. /程序单元长度增加/缩短键增加或缩短程序的单元显示长度。
按下此键时,窗口将显示以开头的数字,此数字范围是~,数值越大则单元长度越大。
此数值在不同程序下与显示的单元长度并无直接对应关系,而是其单元长度的相对值。
在部分程序下,单元长度增长时程序变换速度会相应变慢。
L 1620011. 遥控器天线拉出此拉杆天线可增加遥控距离。
(-除外)R700-B/R700D 3. 开机/待机键打开本机电源或者关闭电源到待机状态。
在待机状态下显示窗口将显示当前的设定的单元长度值。
安 装 说 明2. 输出端口本机有两路相同的输出端口,位于机体底部(图示 处)。
接线顺序如下图。
接地数据时钟空脚电源R700-A B 4A 5V 5V 12V P Lo ”C 和支持内置的电源以及外部电源与内部电源并联为灯条供电的方式。
当给本机供电的电源不足以驱动灯条时,本机会显示" 信息,以提示用户更换符合产品规格的电源。
LED节能灯说明书
济源市云州豫伟光电有限公司第一款LED路灯产品尺寸:375*306*70mm玻璃材质:钢化玻璃表面处理:阳极氧化静电喷涂防水胶圈厚度:6mm整灯寿命:>50000H.颜色可选:银色产品净重:7.6kg★此款功率可做:42W、56W、70W、84W、98W、112W、126W、140W、154W、168W、182W、196W。
★(可随功率的大小改变外壳的长度,宽度与高度不变)第二款路灯产品尺寸:348*300*80mm玻璃材质:钢化玻璃表面处理:阳极氧化静电喷涂防水胶圈厚度:6mm整灯寿命:>50000H.★此款功率可做:42W、56W、70W、84W、98W、112W、126W、140W。
第三款矿用隔爆型LED灯适用范围本系列灯具适用于有甲烷、煤尘等爆炸性混合物气体的煤层井下巷道及峒室内作固定式局部照明用。
当白炽灯灯具使用下瓦斯矿井下车场场周围、中心变电所、泵房和主要苍道时,这些场所应有新鲜空气流通。
第四款矿用隔爆型LED日光灯适用范围该产品适用于有甲烷、煤尘等爆炸性混合物气体的煤尘井下巷道及峒室内作固定式局部照明用。
当荧光灯具适用于瓦斯矿井下的车场周围、中心变电所,泵房和主要巷道时,这些场所应有新鲜空气流通。
第五款LED日光灯L ED日光灯采用超高亮L ED白光作为发光光源,散热效果好:采用高品质散热铝,表面温度30-40度,提高LED灯管的使用寿命.光效好:独特的异形铝管,发光效果更好,两侧无暗区。
铝合金壳配PC面罩(透明盖、磨砂条纹盖、雾状盖),材质好,不易损坏,经久耐用,使用安全。
设计新颖,节电显著.方便实用,安全可靠,寿命长.该产品是现代最环保,最节能的照明光源. L ED日光灯有着传统的日光灯的外型.尺寸.口径上都一样,长度有60c m,90c m,120c m,150c m等等,其功率分别为8W,12W,15W,18W;而20W 传统日光灯(电感镇流器)实际耗电约为53W,40W传统日光灯(电感镇流器)实际耗电约为68W ;8W L ED日光灯亮度与传统20W日光灯亮度无异, 15W L ED 日光灯与传统40W日光灯亮度一样.LED日光灯亮度尤其显得更柔和更使人们容易接授。
LED灯使用说明书

Agradecemos su compra!Por favor, lea el manual de instrucciones antes de la instalación y consérvelo a mano para consultas futuras.Luminaria con disipador térmico de aluminio fundido de alta pureza, alta luminosidad, chip SMD Nichia, con un driver Sosen de corriente constante. Diseño del PCB LED para media y gran altura en industria: producción, almacenes diáfanos con estanterías a media altura, talleres, gasolineras, centros comerciales, mercados, peajes de autopistas y aplicaciones similares.ProblemaPosible CausaSolucionesLED no funciona El cable de red no está conectado Conecta el cable de red.El enchufe está sueltoConéctelo firmemente a la toma de corriente. El driver del LED tiene una avería Reemplace el driver con uno nuevo.El chip LED está dañado Puede ser reparado sólo por Venalsol. La luz LED se enciende y apaga La salida del driver es anómala Reemplace el driver por uno nuevo.El chip LED tiene una averíaPuede ser reparado sólo por Venalsol.Venalsol garantiza sus productos, dentro de las condiciones generales de suministro, siempre que se trate de un defecto de fabricación o materiales por un período de cinco años a partir de la fecha de compra. La garantía consiste en la reparación/sustitución de las partes o conjuntos que se consideren defectuosos. No se aplicará por lo tanto a los artículos que presenten daños como consecuencia de no haber seguido correctamente las instrucciones de uso, o cuando la instalación haya sido realizada por personal no especializado. Así mismo, quedan excluidos los daños ocasionados por uso indebido del aparato y averías producidas en el transporte.Para realizar una reclamación de garantía, es necesario notificarlo por escrito a su vendedor, aportar factura de compra y cumplir con los demás requisitos de garantía. Siempre será necesario la devolución del producto averiado con su original placa identificativa de Venalsol Smart Light y su número de serie. Los costes de transporte están excluidos.1. La decisión de si el producto es defectuoso será tomada por Venalsol, que comprobará el mal funcionamiento del producto. SiVenalsol comprueba que el producto es defectuoso, decidirá si se ha de reparar o reemplazar por uno nuevo. Venalsol se reserva el derecho de utilizar productos nuevos o reparados en el proceso de reparación o sustitución del producto en garantía. El producto que se haya reparado o reemplazado, se garantizará durante el período de garantía original que le quede. El coste de personal y el coste de la maquinaria necesaria para la sustitución queda excluido. La responsabilidad total de Venalsol respecto al producto defectuoso estará siempre limitada al dinero pagado por el comprador por ese producto originalmente.2. En caso de solicitud de un producto en buen estado, previo al envío del producto defectuoso, con el fin de facilitar las labores de sustitución, Venalsol podrá aceptar suministrarlo y éste será facturado. Esta factura será abonada si procede, una vez sea recibido y verificado el producto supuestamente averiado. De no cumplir los requisitos de garantía, o no recibirse el material averiado, pasados 60 días de la reposición previa, se procederá al cobro de la factura.La garantía no cubrirá las siguientes circunstancias:1. Daños causados por fuerza mayor como guerras, revueltas, sabotajes, ciclones, terremotos, inundaciones explosiones, incendios, etc.2. Daños causados por uso inapropiado durante el período de entrega, defectos causados por su mal uso, tratamiento erróneo o destrucción de la maquinaria.3. Desmontaje, modificación o mantenimiento inapropiado productos reparados sin autorización del proveedor.4. Daños causados por el comprador o instalador usando cableado de baja calidad o otros componentes no compatibles con el producto.5. Esta garantía no es válida si el producto es usado para propósitos diferentes para los que está originalmente diseñado.Lea detenidamente las instrucciones antes de comenzar a utilizar el producto.50W - 100W - 150W – 200WVenalsol Smart Light S.L.C/ Garbí nº15. - Polígono Industrial Palma de Gandía - 46724 - Palma de Gandía Valencia (España) - Atención al cliente: +34 962 808 219 *****************< VER FICHA TÉCNICATodos los derechos reservados - Copyright © 2017Manual de instrucciones1. Desconecte el suministro de energía antes de la instalación o del mantenimiento de la luminaria.2. Es estrictamente obligatorio conectar el cable de tierra (Amarillo/Verde) con el conexionado de tierra de la instalación.3. No toque la fuente de alimentación cuando la lámpara esté en funcionamiento.4. Para evitar daños, descargas eléctricas o incendios, no desmonte o reemplace la lámpara (PCB CHIP LED).5. Para evitar daños, caídas, descargas eléctricas o incendios, por favor no modifique o reemplace los accesorios originales porotros que no lo sean, sin consultar y estar autorizado por Venalsol con anterioridad.6. Sólo personal cualificado puede realizar la sustitución o instalación de la luminaria y asegúrese de que sigue las instruccionesdel manual. Si la instalación no se realiza adecuadamente, puede causar caídas, descargas eléctricas, incendios u otros daños.7. Desconecte el suministro de energía si sale humo o produce olor, ya que podría producirse un incendio o descarga eléctrica.8. Consulte a personal cualificado para la inspección y mantenimiento de la lámpara.9. Si el cableado propio de la luminaria está dañado, sólo puede ser reemplazado por Venalsol.Normativa aplicableHa pasado los test y verificaciones necesarios para la obtención del Marcado CE. Este producto cumplecon los estándares de aplicación sobre Baja Tensión (LVD) 2014/35/EU: EN60598-1:2015, EN60598-2-24:2013, EN60598-2-1:1989, EN62031:2008, EN62471:2008, EN62493:2010 y CompatibilidadElectromagnética (EMC)2014/30/EU: EN61000-3-2:2014, EN61000-3-3:2013, EN61547:2009,EN55015:2013.Este símbolo indica que el producto al final de su vida útil deberá eliminarse por separado de los demásdesechos, puesto que se identifica como un aparato de uso eléctrico o electrodoméstico según el RealDecreto 208/2005. Por lo tanto, al final del uso, deberá hacerse cargo de entregar el producto a uncentro de recogida selectiva o a un gestor de residuos autorizado. Venalsol está registrado en elRegistro Nacional de Aparatos Eléctricos y Electrónicos con número de inscripción registral 3493 y seencuentra adherida a un Sistema de Gestión de Residuos de Aparatos Eléctricos y Electrónicos para losproductos con la categoría de "aparatos de alumbrado".Las luminarias LED Venalsol son respetuosas con el Medio Ambiente. No contienen mercurio y loscomponentes electrónicos utilizados cumplen con lo establecido en la normativa RoHS de transposiciónal Real Decreto 208/2005.Parámetros TécnicosEspecificaciones del producto 50W 100W 150W 200WVoltaje de entrada AC200-277V 50/60Hz Clase I ( Necesita toma de tierra )CRI Ra70Angulo del Haz de Luz 65x120º, 30x60º, 30º, 15º, 120ºClasificación IP IP66Dimensiones 300x240x69mm 335x295x71mm 375x320x75mm 400x345x78Peso neto de la luminaria 2.2 ±0.3kg 3.5 ±0.3kg 4.0 ±0.3kg 5.1 ±0.3kgFactor de potencia >0.90Vida útil ≥50000Hrs (LM70@35°C)Temperatura de funcionamiento -30 ~ +50°CHumedad de funcionamiento 15% ~ 90%RHTemperatura de almacenaje -40 ~ +70°CA. Dimensiones (mm.) e instalación mediante fijación ajustable50W 100W 150W 200WA 300 335 375 400B 240 295 320 345C 69 71 75 78D 215 265 290 320E 90 120 120 120F 120 165 170 180B. Dimensiones e instalación mediante posteDiagrama de cableado。
LED灯说明书中英文介绍
第8页光源系列 LAMP Series闪射系列 FLASHING SERIES外形设计美观、烟尘式散热排气孔Beautiful and decent appearance design, Smoke-Dust cooling exhaust hole产品特性 PRODUCTS FEATURES灯体采用6063航空铝材,冷锻式一体成型,外形新颖,美观大方;独有烟尘式散热设计,通过散热排气孔能更快的带走热量,散热效率高;电源采用美国BCD方案设计,高精度智能控制电路,具有过载欠压等保护,使用更安全;进口一体化透镜,透光率高达93%,表面鳞面设计,更好的防止眩光;新型EMC超导热大功率灯珠,具有高光效,高显指,采用陶瓷支架,散热效果更好,将低光衰。
The lamp body is made of 6063 aviation aluminum with novel and beautiful appearance. Product Category: Cold Forging, Integrated molding.Cooling Design: Unique Smoke-Dust Type, it can take away heat faster through the vent holes, so the cooling efficiency is very high.Power source: Using BCD solution design from US with precision smart control circuit, overload & under voltage protection, keeps it more secure.Lens: Integrated lens imported from abroad, light transmission rate is as high as 93%, and the surface design uses Scaly surface, so it can prevent glare much better;New EMC Lamp beads: superconducting heat and high power, high luminance, and high color render index.Ceramic bracket: provides better heat dissipation and low light decay.应用范围商业重点照明、酒店重点照明、装饰照明、专卖店、咖啡厅、KTV、超市、写字楼、书房、面包店、书店、家居等场所。
航行灯使用说明书

海恩电源密级:编号:HK□□-□/□□型航行(信号)灯控制器使用说明书大连市船用电器有限公司HK□□-□/□□型航行(信号)灯控制器使用说明书编制使用说明书审核大连市船用电器有限公司批准海恩电源航行(信号)灯控制器使用说明书目次1 前言 (1)2. 概述 (1)3. 工作条件 (1)4. 主要功能 (2)5. 主要技术指标 (3)6. 原理图、接线图和安装要素 (3)7. 使用和操作方法 (3)8. 维护及注意事项 (4)9. 附图 (4)1 前言本航行(信号)灯控制器是按照“CCS”规范要求、船舶与海上设施法定检验规则,并满足国际海事组织《第MSC.253(83)号决议》等标准,生产的新的一代航行灯控制器。
本使用说明书简述了航行(信号)灯控制器的技术特征、工作条件以及主要功能。
在使用和操作航行(信号)灯控制器(以下简称“控制器”)前,必须仔细阅读本说明书,以充分了解设备的工作原理、性能和特点,以便更好的发挥设备作用。
2. 概述2.1 组成与用途船舶航行灯系统主要由航行(信号)灯控制器和航行(信号)灯组成。
本航行灯控制器是一种能用于控制航行(信号)灯的夜间工作,并对航行(信号)灯的工作状态进行监视和控制的设备。
其内部由单片机构成,能将其工作状态通过通讯接口,传输至上级系统。
控制器安装方式分为两种,一种是一个独立的壁挂式控制箱(包含全部的控制功能);另一种为由一块可镶嵌在操作台面上的控制面板和一套可安装在操作台内部的安装了全部器件的安装板组成,可与各种操作台配合。
2.2 控制器命名方法HK□□—□ / □□J-交流; Z-直流航行灯额定功率航行灯额定电压控制航行灯的路数X-表示航行灯控制箱;此项缺省-表示航行灯控制装置航行灯控制器3. 工作条件本控制器在下列条件下可正常工作a.环境温度: 0℃~45℃;b.适应海上气候,并有可能伴有轻微盐雾、油雾和霉菌环境;c.倾斜与摇摆横摇±45°, 周期3~10S;纵摇±10°, 周期4~10S;横倾:±15°;纵倾:±10°。
LED ZOOM MOVING HEAD LIGHT 19 颗四合一调焦摇头灯说明书

USER MANUAL LED ZOOM MOVING HEAD LIGHT 19颗四合一调焦摇头灯说明书产品特点采用TFT 液晶显示。
菜单语言切换,菜单可方便切换中文或英文。
满足不同的客户需求。
655536个亮度级别,真正实现了16位调光,消除了8位调光低亮度抖动的问题,使调光变得更为柔和。
主从机,任意一台灯在断开控台信号的时候可以作为主机,带动其他的灯。
一、 菜单说明菜单结构图 主菜单子菜单主菜单通过按键控制光标,按“确认”按键进入设置。
子菜单子菜单有运行方式,地址设置,语言设置,高级设置,系统测试,系统信息等模块。
1) 运行模式设置, 同一时间只能运行一种模式,选中控台模式和自动模式的时候,按下“确认”键还能选择不同的控台模式和自动模式。
控台模式的时候可以同时为从机模式,如果接的是控台信号,则为控台模式,如果接的是主机信号,则可作为从机模式运行自动模式,自动模式同时为主机模式声控模式的时候为主机2)地址设置,设置好之后需要按下“确认”保存地址码,并回到主菜单。
按“返回”不保存地址码。
3)语言设置,菜单语言可以设置成中文和英文。
4)高级设置X轴正反转设置Y轴正反转设置X轴较正设置Y轴较正设置调焦较正设置编码盘–若关闭,则复位和运行过程中,编码盘失效,不能记录XY轴正确位置,信号连接- 开启信号连接以后,断开控台信号后会保持断开控台信号前的姿态推杆延时,推杆延时开启之后,控台推杆的调光柔和。
推杆延时可以在控台选择是否启动。
ID码,ID码作用于在16通道的控台模式,当通道16的值大于9之后,只有ID码并与通道16的前两位值相对应,才能其他通道的值才能生效。
从错误行程中恢复,复位也从编码盘复位变为最大行程复位。
温度–保护温度,开启温度保护功能以后,若检测到的温度超过了保护温度,则亮度下降(温度越高亮度底)温度保护–温度保护功能开关屏幕保护,可以设置成为关闭,打开,关闭的时候,屏幕演示之后,清屏,打开的时候,进入屏保之后,大字体显示当前模试,或者LOGO。
完整word版,led灯条显示屏编辑软件操作说明书
第一章基础知识学会《LED编制软件》的操作,需要掌握Windows操作系统的一些基本操作,这一章简单的介绍这些基础知识。
1.1 认识Windows操作系统的界面1.1.1 任务栏任务栏是桌面底部的横条。
可分为四个区,分为开始按钮区、工具栏区、任务按钮区和通知区。
1.1.2 窗口的组成标题栏、菜单栏、工具栏、工作区窗口、滚动条、状态栏、缩放框等。
1.1.3 对话框的组成对话框是窗口的一种特殊形式。
通常用于需要人机对话进行交互操作的场合。
由文本框、按钮、单选框、复选框、列表框、组合框等组成。
1.2 Windows窗口的操作1.2.1 窗口的移动窗口的移动步骤如下:☆首先把鼠标指针移到窗口的蓝色标题上。
☆按住鼠标左键不放,此时窗口会跟着鼠标的移动而移动。
☆待窗口到了合适的位置放开鼠标。
1.2.2 窗口的缩放☆最小化窗口☆还原窗口大小☆最大化窗口☆随机改变窗口的大小1.2.3 关闭窗口1.3 鼠标的基本操作鼠标的基本操作包括指向、单击、双击、拖动和右击。
☆指向:指移动鼠标,将鼠标指针移到操作对象上。
☆单击:指快速按下并释放鼠标左键。
单击一般用于选定一个操作对象。
☆双击:指连续两次快速按下并释放鼠标左键。
双击一般用于打开窗口,启动应用程序。
☆拖动:指按下鼠标左键,移动鼠标到指定位置,再释放按键的操作。
拖动一般用于选择多个操作对象,复制或移动对象等。
☆右击:指快速按下并释放鼠标右键。
右击一般用于打开一个与操作相关的快捷菜单。
第二章认识窗口界面《LED编制软件》主要功能是随心所欲地为LED灯光设置各种花样,还可以灯光工程造型,制作灯光效果,此软件共有三个窗口界面。
2.1 花样编辑窗双击桌面的快捷图标,或者单击“开始”—“程序”—“LED编制软件”,启动《LED编制软件》。
花样编辑窗(主窗口)花样编辑窗是主窗口,从这个窗口能进入到其它两个窗口。
在这个窗口能进行采集、生成、编辑,演示花样,并将花样输出为控制数据。
LEDSetting V1.0 使用说明书

LEDSetting V1.0使用说明书1 | 139历史记录目录1. 概述 (5)1.1 运行环境 (5)1.2 软件安装 (5)2. 快速入门 (7)2.1 探测设备 (7)2.2 配置发送器 (8)2.3 配置显示屏参数 (8)2.4 配置显示屏连接关系 (9)3. 主界面 (9)4. 设备信息 (13)5. 显示设置 (16)6. 屏幕配置 (21)6.1 设备信息 (21)6.2 发送器设置 (22)6.2.1 视频源设置 (22)6.2.2 控制区域 (28)6.2.3 亮度色温 (29)6.2.4 冻结黑屏 (29)6.2.5 网络 (30)6.2.6 Art-Net (30)6.2.7 HDR (31)6.2.8 精确颜色管理 (31)6.2.9 其他 (31)6.3 显示屏参数 (33)6.3.1 基本参数 (33)6.3.2 驱动&译码芯片 (46)6.3.3 伽马调节 (47)6.3.4 校正设置 (53)6.3.5 显示调节 (56)6.3.6 其他设置 (56)6.3.7 智能设置 (58)6.3.8 功能按钮 (74)6.4 显示屏连接 (76)6.4.1 标准显示屏 (78)6.4.2 复杂显示屏 (81)7. 测试工具 (84)8. 逐点校正 (92)8.1快速操作 (92)8.1.1 亮度/色度校正 (92)8.1.2 梯度调整 (94)8.1.3 修缝 (95)8.2 亮度校正 (97)8.2.1 逐点编辑 (97)8.2.2 按接收卡编辑 (105)8.2.3 修缝 (108)8.3 色度校正 (110)8.4 特殊校正 (114)8.4.1 双层校正 (114)8.4.2 低亮补偿校正 (115)8.4.3 芯片低亮校正 (116)8.4.4 系数备份 (117)9. 多功能卡 (117)9.1 传感器信息 (118)9.2 继电器控制 (119)9.3 自动亮度调节 (120)9.4 常见问题排查 (122)10. 屏幕监控 (123)10.1 工具栏 (124)10.2 监控预览区 (124)10.3 监控设置 (126)10.4 查看日志和异常 (128)11. 智慧模组 (129)11.1 屏幕连接 (129)11.2 基本信息 (130)11.3 电子标签 (131)12. 逐点检测 (132)13. 预存画面 (133)13.1 抓屏预存 (133)13.2 图片处理 (135)14. 播放盒模式 (136)1. 概述LEDSetting 软件支持卡莱特全系列设备调试,支持多种屏幕驱动芯片,适配多种型号屏体,支持多种屏幕调试。
LED显示屏操作说明
LED显示屏操作说明1. 简介LED显示屏是一种使用LED(发光二极管)作为光源的显示设备,具有亮度高、颜色鲜艳、可视角度广等特点。
LED显示屏广泛应用于室内外广告牌、体育场馆、舞台演出、商业展示等场所。
本文档将介绍如何正确操作LED显示屏。
2. 开机与关机2.1 开机操作步骤如下所示:1.确保电源插头正确连接,并插入电源插座。
2.找到LED显示屏的电源开关,将其打开。
3.等待LED显示屏启动,通常会显示一个启动界面或者欢迎词。
2.2 关机关闭LED显示屏的步骤如下所示:1.找到LED显示屏的电源开关,将其关闭。
2.拔出电源插头,从电源插座断开电源。
3. 屏幕显示设置3.1 亮度调节LED显示屏的亮度是可以调节的,通常有一个功能按钮或遥控器上的按键用于亮度调节。
按照以下步骤进行亮度调节:1.找到亮度调节功能按钮或遥控器上的亮度调节按键。
2.按下亮度调节按键,屏幕上会显示当前亮度水平。
3.通过按一下按键或向上/向下箭头键来增加或减少亮度。
4.当达到所需亮度水平时,释放按键。
3.2 色彩设置LED显示屏的色彩设置通常可以通过菜单进行调节。
按照以下步骤进行色彩设置:1.找到菜单功能按钮或遥控器上的菜单按键。
2.进入菜单界面后,找到色彩设置选项。
3.使用导航键在选项之间切换,选择需要调节的色彩选项,如亮度、饱和度、色温等。
4.通过按一下导航键或向上/向下箭头键来增加或减少选定色彩的数值。
5.当达到所需色彩效果时,确认设置并退出菜单。
4. 显示内容的切换与编辑4.1 显示内容切换LED显示屏可以显示不同类型的内容,如文字、图像、视频等。
切换显示内容的步骤如下:1.找到切换显示内容功能按钮或遥控器上的切换按键。
2.按下切换按键,屏幕上会显示当前内容的类型和编号。
3.通过按一下切换按键或向上/向下箭头键来切换到所需的显示内容。
4.当切换到所需内容时,释放按键。
4.2 显示内容编辑有时候需要对当前显示内容进行编辑,如修改文字内容、更换图片等。
LED舞台字幕机使用说明

Wo zLED舞台字幕机控制系统使用说明书------------------------------------------------------------------------------------------------------------------------------------------感谢您选用麒麟电子的《舞台字幕控制系统》,本软件用于在LED屏幕上显示字幕,支持横屏和纵屏以及小屏三种屏幕,支持异步脱机和同步发送。
适用于舞台字幕、戏曲舞台唱词显示、演讲或影视剧拍摄现场的台词提示等。
系统要求:XP W7 W8电脑分辨率:》1024*768单卡带载:128*768遥控笔:兼容市面绝大多数版本电力猫:兼容150M以上速率异步存储:64000字【以32*192点估算】以系统存储空间满为上限-------------------------------------------------------------------------------------------------------------------------------------------软件的打开:程序为绿色程序。
直接解压即可使用,主程序为舞台字幕机.EXE双击即可运行。
运行后自动在桌面生成快捷方式。
无需再次进入文件夹舞台字幕卡官网:。
正常情况下由于无法知道参数。
请各终端用户联系各自供货商。
联系不上的或者有紧急问题。
可以联系官网客服软件界面:运行软件后即可弹出运行界面*********************************************************************************************** 请终端客户注意!如果在同步状态下。
请确认所有舞台屏已经连接到电脑直接点击回读【】即可使用无需做复杂设置,以免把参数打乱影响使用!通用操作说明A:导入剧本:字幕操作区如下图点【添加剧本】按钮,可以添加TXT文件或者MP3+同名LRC歌词,如果要添加同步MP3歌词请把和这个MP3同名的歌词LRC文件放到同一个文件夹里,否则无法导入。
台面灯使用说明书

台面灯使用说明书
1、将磁悬浮灯底座放置在水平的台面上。
2、将电源适配器连接至220V(50/60HZ)电源上,适配器的输出端连接在台灯座上,并确认电源已通电。
3、用双手的拇指和食指抓住悬浮物的底部,用小指把底座压住,将悬浮物从上往下放于底座中间(直到悬浮物自己靠磁力漂起的高度)。
4、然后前后左右轻轻推动时,能感受到中间有一股强烈的磁力,将悬浮物固定在中间(有一个凹槽的感觉),然后慢慢的松开双手,使悬浮物悬浮在空中。
5、可以通过手动开关控制灯光的开/关,或用触摸开关控制灯光的开/关和亮度调整。
(完整word版)LED演播室软件说明书.docx
目录第一章概述 (1)1.1功能特点 (1)2.2运行环境 (1)第二章安装与卸载 (2)2.1安装 (2)2.2卸载 (3)第三章使用详解 (4)3.1节目组成 (4)3.2界面窗口介绍 (5)3.3功能介绍 (7)3.4节目制作流程 (14)第四章文字显示 (22)4.1在文本窗中播放 (22)4.2在单行文本窗中播放 (24)4.3在静止文本窗中播放 (26)4.4在图文窗中打开文本文件播放 (27)4.5在文件窗图片文件上叠加文字 (30)4.6在播放中插播通知文字 (30)第五章图片显示 (31)5.1新建图片节目窗 (31)5.2设置图片节目窗 (31)5.3打开播放文件 (32)5.4设置播放图片属性 (33)5.5插入背景图片、出场音乐和文字 (34)第六章动画显示 (36)6.1新建动画节目窗 (36)6.2设置动画节目窗 (36)6.3打开播放文件 (37)6.4设置播放动画文件属性 (39)第七章表格显示 (40)7.1新建表格节目窗 (40)7.2设置表格节目窗 (41)7.3插入并编辑表格 (41)第八章主页显示 (45)8.1新建主页节目窗 (45)8.2设置主页节目窗 (45)8.3打开播放文件 (46)第九章数据库显示 (48)9.1新建数据库窗 (48)9.2设置数据库节目窗 (48)9.3增加Access数据库 (49)9.4增加ODBC驱动数据库 (53)第十章时间日期 (54)10.1新建日期/时间节目窗 (54)10.2设置日期/时间节目窗 (54)10.3设置时间日期 (56)第十一章外部程序 (57)11.1新建节目窗 (57)11.2设置外部程序节目窗 (57)11.3打开外部程序 (58)第十二章计时显示 (60)12.1新建节目窗 (60)12.2设置计时节目窗 (60)12.3计时设置 (61)第十三章 VCD/DVD显示 . (63)13.1直接播放 (63)13.2在节目中播放 (63)第十四章视频输入显示 (65)14.1新建节目窗 (65)14.2设置视频输入窗 (66)第十五章幻灯片显示 (67)15.1播放 (67)15.2停止播放 (67)第十六章通知显示 (68)16.1打开通知管理窗 (68)16.2设置通知管理窗 (68)16.3播放/停止通知显示 (68)第十七章体育比分管理 (69)17.1打开体育比分管理窗 (69)17.2设置体育比分管理窗 (70)17.3播放/停止体育比分 (70)第十八章定时播放 (71)18.1打开定时指令表 (71)18.2增加定时指令 (71)18.3编辑定时指令 (73)18.4删除定时指令 (73)18.5启动定时指令 (73)18.6退出 (74)第十九章网络控制 (75)19.1远程实时显示屏管理 (75)19.2远程中转显示屏管理 (79)第二十章后台播放 (82)20.1启动后台播放 (82)20.2取消后台播放 (83)第二十一章多屏组合同步独立 (86)21.1 进入多屏组合同步独立设置. (86)21.2 设置多屏同步 (87)21.3 设置多屏组合 (88)21.4 设置多屏独立 (89)第二十二章软件设置 (91)22.1打开软件设置 (91)22.2播放窗 (92)22.3自动设置 (93)22.4网络设置 (94)22.5其它设置 (94)第二十三章用户设置 (96)23.1打开用户设置 (96)23.2增加用户 (97)23.3删除用户 (97)23.4修改密码 (97)23.5启动用户认证 (97)第二十四章常见问题 (98)第一章概述1.1功能特点《LED 演播室》是 LED 演播室工作组专为 LED 显示屏设计的一套功能强大 ,使用方便 ,简单易学的节目制作、播放软件,支持多种文件格式:文本文件,WORD 文件,所有图片文件(BMP / JPG /GIF / PCX...),所有的动画文件( MPG / MPEG / MPV / MPA /A VI /VCD /SWF /RM / RA /RMJ / ASF ...)。
Led灯简易使用说明书

Led 灯简易使用说明书
一、 后面板图解说明
菜单 减键 加键 却换/进入 操作说明:
1、 按菜单键可在’IMAGE ’、’DMX ’、’STAT ’、’RUN ’、’AUTO ’、’TEMP ’、’VOX ’、
‘MODE ’8个菜单中选择;
2、 按却换/进入键可以进入相应菜单的子项,且有多个子项时按此键进行子项
之间的却换;
3、 减键和加键进行数值的加减和功能的设置;
4、 在参数设置好后,按菜单键退出此菜单并将参数记忆;
二、 Led 显示功能对照表
三、Dmx512通道说明3通道:
6通道:
9通道:
四、技术指标
1、工作电压:AC220v 50Hz
2、最大功率:<200W
3、亮度:3m距离>3500 CD
4、颜色:R 控制等级0—255
G 控制等级0—255
B 控制等级0—255
W 控制等级0—255
5、频闪:控制等级11——255
6、灯杯角度:15度、30度、45度可选
7、温升:<40度
8、灯体可调角度:>180度
长沙新画佳光电子有限公司
2010-2-8。
Work Light II LED工作灯灯具用户手册说明书

U S E R ’S M A N U A LWORKLIGHTII_USERS_MANUAL_20210702WORK LIGHT IILED WORKLIGHT LUMINAIREUSER MANUALPage 2Have a question regarding this manual?WorkLight II Luminaire Installation & User’s Manual© Altman Lighting 2021. All rights reserved.Document Number: 49-0416Version as of: 2021 July 02Note: Information contained in this document may not be duplicated in full or in part by any person without prior written approval of Altman Lighting Its sole purpose is to provide the user with conceptual information on the equipment mentioned. The use of this document for all other purposes is specifically prohibited.The material in this manual is for information purposes only and is subject to change without notice. Altman Lighting assumes no responsibility for any errors or omissions which may appear in this manual. For comments and suggestions regarding corrections and/or updates to this manual, please visit the Altman Lighting web site at or contact your nearest Altman Lighting Regional Manager .El contenido de este manual es solamente para información y está sujeto a cambios sin previo aviso. Altman Lighting no asume responsabilidad por errores o omisiones que puedan aparecer. Cualquier comentario, sugerencia o corrección con respecto a este manual, favor de dirijirlo a la oficina de Altman Lighting más cercana.Der Inhalt dieses Handbuches ist nur für Informationszwecke gedacht, Aenderungen sind vorbehalten. Altman Lighting uebernimmt keine Verantwortung für Fehler oder Irrtuemer, die in diesem Handbuch auftreten. FürBemerkungen und Verbesserungsvorschlaege oder Vorschlaege in Bezug auf Korrekturen und/oder Aktualisierungen in diesem Handbuch, moechten wir Sie bitten, Kontakt mit der naechsten Altman Lighting Niederlassung aufzunehmen.Should you have a suggestion or question regarding your Altman Lighting product, we would love to hear from you. You can reach us at:Altman Lighting 1400 East 66th Ave. Denver, CO. 80229 +1 (303) 500-7072 ************************************************************************************PrefaceThe document provides basic information on installation and operational instructions for a quali-fied, trained installer. These instructions provide information for the following product:WorkLight IIIncluded Accessories:70-3259 - Color Frame with Diffusing Gel SC-36-BK - Safety Cable510 - Malleable Iron Pipe ClampPCL-PBG-12-5 (5’ 20A power con to Edison male)Additional product information can be found on our web site at or by scanning the QR code to the right.Altman Lighting continually engages in research related to product improvement. New materials, production methods and design refinements are introduced into existing products without notice as a routine expression of the philosophy. For this reason any current Altman Lighting product may differ in some respect from its published description, but will always equal or exceed the original design specifications unless otherwise noted.Our CommitmentPage 3When using electrical equipment, basic safety precautions should always be followed including the following:1. READ AND FOLLOW ALL SAFETY INSTRUCTIONS.2. Do not mount near gas or electric heaters.3. Equipment should be mounted in locations and at heights where it will not readily be subjected to tampering byunauthorized personnel.4. Operate only in approved environments. Do not operate outside unless product is designed to do so.5. The use of accessory equipment not recommended by the manufacturer may cause an unsafe condition.6. Do not use this equipment for other than intended use.7. Refer service to qualified personnel.SAVE THESE INSTRUCTIONS.WARNING: You must have access to a main circuit breaker or other power disconnect device before installing any wiring. Be sure that power is disconnected by removing fuses or turning the main circuit breaker off before installation. Installing the device with power on may expose you to dangerous voltages and damage the device. WARNING: Refer to National Electrical Code® and local codes for cable specifications. Failure to use proper cable can result in damage to equipment or danger to personnel.WARNING: This equipment is intended for installation in accordance with the National Electric Code® andlocal regulations. Before any electrical work is performed, disconnect power at the circuit breaker or remove the fuse to avoid shock or damage to the control. It is recommended that a qualified electrician perform this installation.WARNING: This Lighting Fixture IS NOT for residential installation or use.WARNING: The structure where fixture(s) is to be mounted must be capable of supporting the weight of the fixture and its accessories. This fixture is for temporary, portable mounting only.WARNING: The light source contained in this luminaire shall only be replaced by the manufacturer or its service agent or a similar qualified person.THIS PRODUCT MUST BE INSTALLED IN ACCORDANCE WITH THE APPLICABLE INSTALLATION CODE BY A PERSON FAMILIAR WITH THE CONSTRUCTION AND OPERATION OF THE PRODUCT AND THE HAZARDS INVOLVED.CE PRODUIT DOIT ÊTRE INSTALLÉ SELON LE CODE D’INSTALLATION PERTINENT, PAR UNE PERSONNE.CONSULT A QUALIFIED ELECTRICIAN TO ENSURE CORRECT BRANCH CIRCUIT CONDUCTOR.CONSULTER UN ÉLECTRICIEN QUALIFIÉ POUR VOUS ASSURER QUE LES CONDUCTEURS DE LA DÉRIVATION SONT ADÉQUATS.Product Safety NoticesWarningsImportant InformationFCC NoticeThis equipment has been tested and found to comply with the limits for a Class A digital device, pursuant to part 15 of the FCC Rules. These limits are designed to provide reasonable protection against harmful interference when the equipment is operated in a commercial environment. This equipment generates, uses, and can radiate radio frequency energy and, if not installed and used in accordance with the instruction manual, may cause harmful interference to radio communications.Operation of this equipment in a residential area is likely to cause harmful interference in which case the user will be required to cor-rect the interference at his own expense.Altman Lighting Product WarrantyWarranty TermsAltman Lighting, Inc., a subsidiary of Altman Stage Lighting Company, Inc., herein referred to as Altman, warrants each new product (except for spare parts or products Altman does not manufacture) for a period of FIVE (5) years and ONE (1) day from date of shipment to correct by repair or replacement any part defect due to faulty material or workmanship.Altman warrants for NINETY (90) days any spare part it manufactures. On spare parts or products Altman does not manufacture, including, but not limited to, lamps, sockets, lenses, roundels, electronics, ignitors, ballasts, etc.; Altman will grant the same war-ranty given Altman by its vendors. Altman assumes no responsibility for damage or faulty performance caused by misuse, improper installation, careless handling or where repairs have been attempted by others. This warranty is in lieu of all warranties or guarantees expressed or implied and no representative or person is authorized to assume Altman any other liability with the sale of Altman’s products.Altman assumes no responsibility for damage or faulty performance caused by misuse, improper installation, careless handling or where repairs have been attempted by others.This warranty is in lieu of all warranties or guarantees expressed or implied and no representative or person is authorized to assume Altman any other liability with the sale of Altman’s products.Warranty ServiceThe customer must receive a Return Material Authorization (RMA) number prior to return, return shipment must be visibly marked with the RMA number and the product must be returned (shipping prepaid) to the factory at:1400 East. 66th AvenueDenver, CO 80229 USA+1-303-500-7072**************************The return must be within FORTY FIVE (45) days of receiving the RMA from Altman. Altman warrants for NINETY (90) days any spare part it manufactures. On spare parts or products Altman does not manufacture, such as lamps, sockets, lenses, roundels, electronics, ignitors, ballasts, etc. Altman will grant the same warranty given Altman by its vendors.Page 4Table Of ContentsImportant Information 3 Altman Lighting Product Warranty 4 Table Of Contents 5 Installation And Setup 6 Power Requirements 6 Connecting Power 6 Mains Dimming 6 Mounting 7 Adjusting Tilt 7 Installing C-Clamp 8 Installing Safety Cable 8 Cleaning and Care 9 Special Cleaning and Care Instructions 9 Service and Maintenance 9 Troubleshooting 10 Troubleshooting Guide 10 Specifications 11Page 5Page 6Installation And SetupPower RequirementsWARNING! The maximum allowable input current is 20 Amps. Do not overload circuits! Lumi-naires must be supplied by a branch circuit protected by a maximum 20 Amp circuit protector. Doit être alimenté par un circuit de dérivation protégé par un maximum de 20 ampères circuitprotecteur. Ne surchargez pas les circuits!The LED Work Light operates on 100 to 230VAC, single phase only and draws a maximum of 90 Watts. This luminaire can be connected to a dimmer or a dimmer-controlled circuit or a circuit providing constant power..Connecting PowerUnits are powered via an AC input cable (sold separately) from 100 to 230VAC, 50/60Hz and draw approxi-mately 90 Watts of power. The table below outlines the wire colors and their purpose.WIRE COLOR PURPOSE Brown or Black Main / (L)ine Blue or White(N)eutralGreen/Yellow or GreenGround / EarthThe Work Light II Luminaire must be connected to and properly grounded to an viable earth ground.Neutral LiveTable 1: AC Input WiringThe WorkLight can be wired into a Phase Cut or Triac Dimmer. On each unit there is a Local Dim dial that will allow to locally dim the unit when connected to constant power.Mains DimmingDimming Notes: The WL-90 is designed as a set it and forget it luminaire that employs a local dim. control and mains dim compatible power supply. When running on mains dim power please make sure that the local dimcontrol is set to full.The Work Light II employs dimming technology that is compatible with many dimmer types, The overall performance of the mains dim. functionality is based upon the dimmer type and its resolution. The WL II has been designed as a “set it and forget it” luminaire and has a lower dimming resolution than that of our performance mains dim. products. When both the WLII and the Altman Pegasus or Chalice are connected tothe same dimmer or type they will display dissimilar dimming curves.Phase Cut AC Sine Wave (from dimmer to fixture)Normal AC Sine Wave (from source to dimmer)Note : The Worklight should be connected to Constant Mains power when using the local dim functions. When connected to a remote dimmer the Local Dim should be set to full on. Neutrik PowerCon WiringMountingThe LED Work Light is simple to install and position where work lighting is needed. The unit is supplied with a C-Clamp, Diffuser Frame, and Safety Cable. When mounting the LED Work Light, you must follow all national and local codes for safe installation and use. Unit weight, with accessories is 11 pounds / 4.98Adjusting TiltThe LED Work Light can have its tilt adjusted via the two lock off handles on each side of the luminaire (refer to Figure 1). Simple loosen (but DO NOT REMOVE) each handle so the unit is able to swing up and down. Set tilt as desired and re-tighten the two lock off handles so the unit does not move from the set position.Page 7Page 8To Install the C-clamp:1. With luminaire on a flat, sturdy surface, position yoke assembly for easy access as illustrated in Figure2.2. Place on 1/2-13 hex bolt, in this order, the 1/2-inch lock washer and then the 1/2-inch flat washer.3. Insert bolt into hole on yoke assembly.4. Position c-clamp over bolt and thread bolt into c-clamp.5. Tighten bolt.Safety Cable InstallationThe provided safety cable should be installed in accordance to local and national codes.NOTE : The safety cable (supplied with unit) should be used and may be required by local and/or national codes when hanging this luminaire. The mounting structure must be capable of supporting the weight of the fixture, lens, cabling, any accessories, etc.Cleaning and CareWARNING! All cleaning should be performed with power completely removed from the lumi-naire. Never remove protective covers when luminaire is powered. Wear appropriate protectiveeye wear and gloves when cleaning the fixture. All service and maintenance, other than describedherein, should be performed by a qualified technician or Authorized Service Center. AT NO TIMESHOULD THE LED BE TOUCHED.WARNING! Under no circumstances should ammonia-based cleaners, acetone, or other harshsolvents be used on or near the LED Work Light. These types of cleaners or solvents canpermanently damage the fixture.WARNING! Disassembly (other than as described herein), alterations, unauthorized service, etc.will void the product warranty. Contact your local Altman Lighting officeSpecial Cleaning and Care InstructionsBeing a solid-state fixture, and unlike most fixtures, the LED Work Light requires very littleroutine maintenance by the userIf you have any questions regarding the use or care of your LED Work Light, please contactAltman Lighting technical support (**************************) or your local Authorized Dealer.MPORTANT! The Altman Lighting LED Work Light is a solid state, convection cooled luminaire.As with any solid state luminaire it is important that these units not run in a continuous 24/7operation but be allowed sufficient OFF time during their operation.Service and MaintenanceMPORTANT! For all other service and maintenance issues, please contact your local AltmanLighting office at **************************Page 9Page 10TroubleshootingTroubleshooting GuideThe chart below provides possible causes and remedies for various error messages and/or symptoms. If this chart is unable to address your issue, please contact your authorized dealer or Altman customer service forassistance.Any service and maintenance (including troubleshooting), other than described herein should be performed by an Authorized Altman Lighting Dealer or Service Center.DESCRIPTIONISSUE POSSIBLE CAUSE/REMEDYNo light outputFixture will not produce or output light and connected to power Check to see that the Local Dim Switch is set to anything above zero. When plugged into a Dimmer the Local Dim Switch needs to be at Full.Low light outputFixture produces low light output and connected topower.Check to see that the Local Dim Switch is set above zero. When plugged into a Dimmer the Local Dim Switch needs to be at Full. Make sure that the output of the connected dimmer is set to any top end Power limitations.No power at luminaireLuminaire does not power up.Circuit not energized...verify circuit breaker is turned on.Not plugged in...ensure A/C cable is connected to power source.Power cable wired incorrectly...verify power cable and connector are wired correctly.See “Connecting Power” on page 6 for more information.Page 11Work Light II Installation & Users ManualSpecifications Notes:* - Weight was taken with the 510 and Color Frame attached to the Fixture Materials:Corrosion-resistant materials and hardware Housing:Lightweight aluminum constructionControl:Phase Cut or Triac Dimmer, or Constant power with on board local fader control.Light Engine:90W LED Array - Available in 3000K or 5000K Rated Lifespan:Array rating >50,000 hours to L70Input Voltage:100-230 VAC 50/60 HzWattage:90 WattsLED Engine Cooling:Convection, passiveColor Options:Black or White. Custom colors - consult factory Environment:0 - 40°C (32 - 104°F) with humidity of 5-95% non-condensing)Weight:11 lbs. (4.98 kg)*Compliance:cETLus listed for indoor useWarranty:Five (5) years and One (1) daySupport:Supported Forever - free phone and online tech support for the life of your product.。
旋转亮灯课程设计LED旋转亮灯的设计与制作

LED旋转亮灯的设计与制作摘要:随着LED技术的不断发展和LED在低功耗、长寿命、环保等方面的优势,LED应用领域逐渐增多。
同时,许多国家在看到LED庞大的市场潜力后,纷纷出台各项鼓励办法大力推动LED在各领域中的应用。
目前,LED的应用已经从最初的指示灯应用转向更具发展潜力的显示屏,景观照明、背光源、汽车车灯、交通灯、照明等领域,LED应用正呈现出多样化发展趋势。
本次设计就是用LED发光二极管作为电路指示灯,并利用三极管和偏置电阻组成驱动电路,使得三组(9只)LED发光二极管循环发光。
关键词:LED 发光二极管三极管旋转灯目录1概述 (1)2LED旋转灯电路设计 (2)2.1电路工作原理 (2)2.2性能参数 (2)2.3电路原理图及PCB图 (3)3元器件简介 (5)LED发光二极管 (5)LED发光二极管实物图 (5)LED特点............................................................(5)LED发光二极管极限参数的意义 (6)三极管 (6)三极管的原理 (6)三极管电极和管型的判别 (8)4 器件的选型 (10)三极管的选用 (10)LED发光二极管的选用 (10)5 总结 (12)6参考文献 (12)7 致谢 (13)8 附录 (14)一、概述:在新兴应用市场不断出现的带动下,近些年LED市场规模快速提升。
2005年中国LED的产量已经达到亿只,市场规模更是冲破百亿元大关达到亿元。
LED的应用领域已经从最初简单的电器指示灯、LED显示屏发展到LCD背光源、景观照明、室内装饰灯等其他领域。
而由于LED具有的长寿命、无污染、低功耗的特性,未来LED还将逐步替代荧光灯、白炽灯成为下一代绿色照明光源。
为此,美国、韩国、欧盟、中国台湾都制定了适合各国国情的半导体照明计划,大力推进LED灯进入普通照明灯具市场。
室内照明将是LED最具市场规模和发展潜力的应用。
完整版旋转LED显示器说明
旋转LED显示器的说明石家庄市第二外国语学校九年级9班王子璇一、功能说明:嵌在粉盒子上的东西叫做旋转LED显示器。
当接通电源,它便开始自动旋转,顶面会动态显示时钟或数字时间,侧面可滚动显示汉字古诗或图案。
红外遥控,可实现画面转换和调时功能。
二、制作原理:物体在快速运动时,当人看到的影像消失后,人眼仍能保留其影像,约0。
1s,这种现象称为视觉暂留。
旋转LED就是利用这种原理,现以旋转时钟画面为例进行说明:假设12点的刻度为0°,则每个时针之间的角度为30°,于是当一整列发光二级管每旋转30°,就点亮一瞬间,以呈现出时间刻度。
如果在小于0.1s内,这列LED能转完一圈,人眼就会误认为先后产生的12个刻度是同一时间显示出来的。
电机带动板子高速旋转,控制器(单片机)控制相应的LED点亮或者熄灭,并在0。
1s内对LED扫描完一圈,重复执行这样的扫描,人的眼睛看上去就形成了一副完整的时钟画面。
供电模块选用无线供电,因为电路板要转动动起来,采用有线供电会导致缠绕和磨损问题,所以利用电磁感应原理,电场变化可以产生磁场,磁场变化也可以产生电场用转轴外围的两个线圈感应产生电压。
三、制作过程:1。
从玩具四驱车或者旧软驱中拆下得到一个直流电机,供电路板转动;2。
设计硬件电路和软件方案;3.制作PCB电路板,特别注意:板子长度、配重(旋转平衡)、供电接口(无线供电与旋转板子的衔接)、LED间距(显示画面的质量);4。
将设计好的电路板打印出来,再转印到覆铜板上,经过腐蚀等一系列工艺得到电路板,打孔之后焊接元件。
5.将写好的程序写进控制器芯片。
6.安装,测试。
四、故障调试:1.无线供电不能正常给单片机供电,检查电路板后,调整整流二极管, 问题解决。
2.起初红外遥控接收不能工作,检查发现,红外接收二极管为光敏二极管,工作时应加反向电压. 3。
板子旋转后不能带动所有LED亮灭,经过对板子反复测量调试,确定为限流电阻太小,导致功率过大,更换电阻后,可显示画面。
- 1、下载文档前请自行甄别文档内容的完整性,平台不提供额外的编辑、内容补充、找答案等附加服务。
- 2、"仅部分预览"的文档,不可在线预览部分如存在完整性等问题,可反馈申请退款(可完整预览的文档不适用该条件!)。
- 3、如文档侵犯您的权益,请联系客服反馈,我们会尽快为您处理(人工客服工作时间:9:00-18:30)。
序号:
编号:
旋转LED灯——飘在空中的文字
摘要:本作品是一种构思新颖的旋转LED(发光二极管)灯,由电动机带动LED高速旋转,利用人体的视觉暂留效应,形成LED显示的文字或图案仿佛是在空中飘浮一般,能达到很好的视觉效果。
关键词:旋转, LED,电动机,飘浮文字
一、制作原理
在电路板上安装由LED(发光二极管)构成的阵列,运用单片机控制LED显示出特定的图案或字符,由电动机带动电路板不断高速旋转,利用人眼的视觉暂留效应,使LED显示的图案或文字流动起来,形成仿佛是在空中飘浮的效果,可达到很好的视觉效果。
二、作品外观
最终制作成功的作品外观如下图所示:
LED
阵列
单片机
控制电
路板
电动机
三、制作步骤
1. 制作难点
(1)供电:由于LED及电路板是在旋转的,因此如何给旋转部件供电就成为了一个难题。
给旋转部分供电大致有以下几种方法:(1)巧妙的由电动机供电,在直流电动机的换向器上由漆包线引出电压供给旋转部分。
这种方法供电很稳定,但需拆开电动机进行改造,制作起来比较麻烦。
(2)在电动机外面的轴附近加两层线圈,外圈通电且不动,内圈与电路板相连且随电动机轴旋转,利用电磁感应原理,把电能从外圈传递给内圈,为电路板供电。
(3)用电池给旋转部分供电,这样会增加旋转部分的质量,且电池电量耗尽后需要更换或重新充电。
(2)定位问题:定位准确,才能使LED的流动图案或文字产生很好得视觉效果,这就需要在某一时刻旋转电机转动和第一个灯亮的时间一致。
为解决这一问题,可将定位信号选自换向器的电流,换向器上的电极电流在变化,正好可以使用其中的一路信号来给LED显示的起始位置定位。
(3)要考虑机械稳定性问题,电动机带动电路板旋转要考虑离心力的作用,因此旋转部分要稳定,否则会使电路板甩飞或损坏。
2. 电动机的改装
通过对几种供电方案的论证,决定采用第一种供电方案,即对电动机进行改造,由电动机的换向器上取出电压为旋转部分供电,改装步骤如下:(1)拆开一个12V直流电动机,找到电刷,如下图所示:
(2)小心地从电机换向器上的三个电极引出三条漆包线。
(3)取下电机外壳的含油轴
(4)用原装在电机的皮带轮试一下,正好可以放进含油轴承的地方,在在上面钻几个小孔,把三条漆包线从小孔中引出。
(注意:代替上去的部分是和转子保持固定和壳之间是可以旋转的)。
(5)组装回整个电机,改造结束,改造完后的效果如下图所示:
由电动机换向
器引出的三根
漆包线
从电动机换向器引出的三根漆包线上具有电压,将它们接到旋转部分,就可以为电路板供电。
四、电路原理和程序设计
1. 电路原理图
整个电路的原理如下图所示:
2. 单片机控制程序:
#include
#define uchar unsigned char
void delay();
uchar zimo[16]={0xff,0x7d,0x00,0x7d,0xff, 0xc7,0x83,0xc1,0x83,0xc7,
0xff,
0x03,0xfd,0xfd,0xfd,0x03};
//0xc9,0xb6,0xb6,0xb6,0xc9};
void main()
{TCON|=0x01;
IE=0x81;
while(1);
}
void delay()
{uchar j;
for(j=0;j<255;j++)
{;}
}
void display() interrupt 0
{uchar i;
for(i=0;i<16;i++)
{P1=zimo[i];
delay();}
P1=0xff;
}
五、作品的特点和价值
通过这个电路我学会了给旋转部件供电的方法,当电动机旋转后,随着LED 在单片机的控制下按照一定规律点亮,于是便出现了“飘浮在空中的文字或图案”,带给人一种很奇特的视觉美感。
利用该作品的原理可制成各种礼品或装饰彩灯,有一定的市场前景。
