WYKE TV 47 Program Schedule Jan-10
索尼Shooting Grip与Mini Tripod说明书
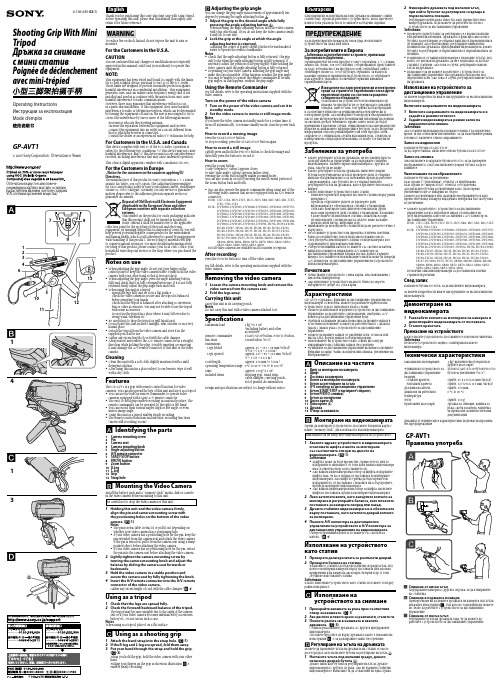
Shooting Grip With Mini TripodДръжка за снимане с мини стативPoignée de déclenchement avec mini-trépied4-146-645-02(1)GP-AVT1Operating InstructionsИнструкции за експлоатацияMode d‘emploi© 2009 Sony Corporation Отпечатано в ЧехияОтпечатано върху 70% или повечерециклирана хартия с мастило, основано на растителни мазнини, което не съдържа VOC (летливи органични вещества).Thank you for purchasing this Sony Shooting Grip with Mini Tripod.Before operating this unit, please read this manual thoroughly, and retain it for future reference.WARNINGTo reduce fire or shock hazard, do not expose the unit to rain or moisture.For the Customers in the U.S.A.CAUTIONY ou are cautioned that any changes or modifications not expressly approved in this manual could void your authority to operate this equipment.NOTE:This equipment has been tested and found to comply with the limits for a Class B digital device, pursuant to Part 15 of the FCC Rules. These limits are designed to provide reasonable protection against harmful interference in a residential installation. This equipment generates, uses, and can radiate radio frequency energy and, if not installed and used in accordance with the instructions, may cause harmful interference to radio communications.However, there is no guarantee that interference will not occur in a particular installation. If this equipment does cause harmfulinterference to radio or television reception, which can be determined by turning the equipment off and on, the user is encouraged to try to correct the interference by one or more of the following measures:Reorient or relocate the receiving antenna.Increase the separation between the equipment and receiver. Connect the equipment into an outlet on a circuit different from that to which the receiver is connected.Consult the dealer or an experienced radio/TV technician for help.For Customers in the U.S.A. and CanadaThis device complies with Part 15 of the FCC Rules. Operation is subject to the following two conditions: (1) This device may not cause harmful interference, and (2) this device must accept any interference received, including interference that may cause undesired operation.This Class B digital apparatus complies with Canadian ICES-003.For the Customers in Europe<Notice for the customers in the countries applying EU Directives>The manufacturer of this product is Sony Corporation, 1-7-1 Konan Minato-ku Tokyo, 108-0075 Japan. The Authorized Representative for EMC and product safety is Sony Deutschland GmbH, Hedelfinger Strasse 61, 70327 Stuttgart, Germany. For any service or guarantee matters please refer to the addresses given in separate service or guarantee documents.in the video camera before mounting to this unit.Be careful not to drop the video camera or this unit.1 Holding this unit and the video camera firmly, align the pin and camera mounting screw with the positioning holes on the bottom of the video camera. ( -1)NotesThe pin is retractable. Retract it or pull it out depending on whether your video camera has a positioning hole.If your video camera has a positioning hole for the pin, keep the pin extended from the camera seat and attach the video camera. If the pin is retracted, pull it from the camera seat using a sharp-pointed object before attaching the video camera.If your video camera has no positioning hole for the pin, retract the pin into the camera seat before attaching the video camera.2 Lightly tighten the camera mounting screw by turning the camera mounting knob and adjust the balance by sliding the camera seat forwards or backwards.3 Hold the video camera in a stable position andsecure the camera seat by fully tightening the knob.4 Insert the A/V remote connector into the A/V remote connector of the video camera.Gather any excess length of cord with the cable clamper. ( -4)Using as a tripod1 Check that the legs are spread fully.2 Check the forward/backward balance of the tripod.The tripod may become unstable due to the angle of the camera seat or if your video camera becomes imbalanced by accessories, battery etc. Do not use in such a case.NotesWhen using as a tripod, place it on a flat surface.Using as a shooting grip1 Attach the hand strap into the strap hole. ( -1)2 If the R-leg and L-leg are spread, fold them away.3 Put your hand through the strap and hold the grip. ( -3)When you hold the grip, hold the video camera with your other hand.Putting your fingers on the grip as shown in illustration -3 enables steady recording.Благодарим ви за покупката на тази Дръжка за снимане с мини статив Sony. Преди да работите с устройството, моля, прочетете изцяло това ръководство и го запазете за бъдещи справки.ПРЕДУПРЕЖДЕНИЕЗа да предотвратите пожар или токов удар, не излагайте устройството на дъжд или влага.За потребителите в Европа<Забележка за потребителите в страните, прилагащи Европейските Директиви >Производителят на този продукт е Sony Corporation, 1-7-1 Konan, Minato-ku, Токио, 108-0075 Япония. Оторизираният представител за ЕМС и безопасност на продукта е Sony Deutschland GmbH,Hedelfinger Strasse 61, 70327 Щутгарт, Германия. За въпроси, касаещи сервиза и гаранцията на устройството, се обръщайте към адресите, указани в съответните сервизни книжки и гаранционни карти.Изхвърляне на стари електрически и електронни уреди (за страните от Европейския съюз и други европейски страни със система за разделно събиране на отпадъците)Този символ на устройството или опаковката му показва, че продуктът не се третира като домашен отпадък. Вместо това, той трябва да бъде предаденв съответните пунктове за рециклиране на електрически иелектронни уреди. Ако изхвърлите този продукт на правилното място, вие ще предотвратите потенциални негативни последици за околната среда и човешкото здраве, които могат да бъдатпричинени в противен случай. Рециклирането на материалите ще помогне за запазването на природните ресурси. За по-подробна информация относно рециклирането на този продукт, моля, свържете се с общинската служба във вашия град, службата за изхвърляне на отпадъци или магазина, от който сте закупили продукта.Забележки за употребаКогато регулирате ъгъла на дръжката, не поставяйте пръста си върху панела за управление, за да задържите стабилно видеокамерата. Хванете здраво видеокамерата с другата си ръка, така че да не падне.Когато регулирате ъгъла на дръжката, натиснете докрай бутона за регулиране на ъгъла и проверете дали се е върнал напълно в първоначалното си положение, преди да работите с видеокамерата. Ако бутонът не се е върнал напълно,регулирайте ъгъла на дръжката, като я дръпнете леко назад и напред.Когато използвате устройството като статив:Разпънете крачетата докрай и поставете статива върху равна повърхност.Преди да отдръпнете ръцете си проверете даливидеокамерата е обезопасена и стативът е балансиран.След като монтирате допълнителен обектив или другиаксесоари проверете дали стативът е балансиран. Възможно е да не можете да използвате статива с някои аксесоари.Не използвайте статива на места, където може да падне, поради силен вятър, вибрации и др.Внимавайте да не изпуснете статива или да не разлеете течност върху него.Не оставяйте устройството на директна слънчева светлина, близо до отоплително тяло или на много влажно място.След употреба демонтирайте статива от видеокамерата и го съхранявайте в приложената чантичка.Съберете излишния кабел и го хванете със скобата за кабела. Винаги поставяйте и изваждайте А/V конектора задистанционно управление в права посока, докато държитещекера. Поставянето или изваждането насила може да повреди А/V конектора за дистанционно управление на устройството или на видеокамерата.ПочистванеПочиствайте устройството с мека кърпа, леко навлажнена с мек почистващ разтвор.Ако използвате устройството на място близо до морето, избършете го добре със суха кърпа.ХарактеристикиGP-AVT1 е дръжка с функция за дистанционно управление на видеокамери. Освен това, можете да разпънете крачетата на устройството и да го използвате и като статив.Можете да използвате вграденото устройство за дистанционно управление, за да работите с видеокамери, снабдени с А/V конектор за дистанционно управление Sony.Удобната за хващане дръжка позволява да правите записи в естествено положение. Можете да работите както с дясната,така и с лявата ръка с устройството за дистанционно управление.Можете да правите записи от различни ъгли: от висок или нисък ъгъл, дори и записи в огледален режим.Използването на устройството като статив ще осигури извършването на стабилни записи без трептене.Функциите за дистанционно управление включват основните функции за запис (запис на видеоклип/снимка, увеличение на изображението).Описание на частите1 Винт за монтиране на камерата2 Щифт3 Поставка за камерата4 Копче за монтиране на камерата5 Бутон за регулиране на ъгъла6 А/V конектор за дистанционно управление7 Бутон START/STOP (стартиране/спиране)8 Бутон PHOTO (снимка)9 Бутон за увеличение10 Дясно краче (R)11 Ляво краче (L)12 Дръжка13 Отвор за каишкатаМонтиране на видеокамератаПреди да монтирате устройството, поставете батерия и карта с памет "Memory Stick", диск или касета във видеокамерата.Внимавайте да не изпуснете видеокамерата или устройството.1 Хванете здраво устройството и видеокамератаи наложете щифта и винта за монтиране със съответните отвори на дъното на видеокамерата. ( -1)ЗабележкиЩифтът може да бъде преместен. Преместете го или го издърпайте в зависимост от това дали вашата видеокамера има съответен отвор за поставянето му.Ако вашата видеокамера има отвор за щифта, издърпайте щифта така, че да се подава от поставката и монтирайте видеокамерата. Ако щифтът трябва да бъде преместен, издърпайте го от поставката с помощта на остър предмет, преди да монтирате видеокамерата.Ако вашата видеокамера няма отвор за щифта, натиснете щифта в поставката, преди да монтирате видеокамерата.2 Леко затегнете винта, като завъртите копчето за монтиране и регулирайте баланса, като плъзнете поставката за камерата напред или назад.3 Дръжте стабилно видеокамерата и я обезопасете върху поставката, като затегнете докрай копчето за монтиране.4 Пъхнете А/V конектора за дистанционноуправление на устройството в А/V конектора за дистанционно управление на видеокамерата.Съберете излишния кабел и го хванете със скобата за кабела. ( -4)Използване на устройството като статив1 Проверете дали крачетата са разпънати докрай.2 Проверете баланса на статива.Възможно е стативът да бъде нестабилен, поради ъгъла, под който е монтирана камерата върху поставката или ако има прикрепени към камерата аксесоари, батерия и др. В този случай не използвайте статива.ЗабележкиКогато използвате устройството като статив, поставете го върху равна повърхност.Използванена устройството за снимане1 Прекарайте каишката за ръка през съответния отвор за каишката. ( -1)2 Ако дясното и лявото краче са разпънати, сгънете ги.3 Пъхнете ръката си в каишката и хванете дръжката. ( -3)С едната ръка хванете дръжката, а с другата придържайте видеокамерата.Поставете пръстите си върху дръжката, както е показано на илюстрация -3, за да направите запис без трептене.Регулиране на ъгъла на дръжкатаМожете да променяте ъгъла на дръжката на стъпки от около десет градуса, като натиснете бутона за регулиране на ъгъла .1 Нагласете ъгъла под желания градус, докато натискате докрай бутона .Докато натискате бутона за регулиране на ъгъла, дръжте видеокамерата с другата си ръка. Ако не държите стабилно видеокамерата е възможно тя да се наклони на една страна.Adjusting the grip angleY ou can change the grip angle in increments of approximately ten-degrees by pressing the angle adjusting button .1 Adjust the grip to the desired angle while fully pressing the angle adjusting button .When pressing the angle adjusting button, hold the video camera with your other hand. If you do not keep the video camera steady, it may tilt to one side.2 Lock the grip at the angle at which the angle adjusting button is returned.Adjusting the center of gravity slightly further forward makes it easier to operate the remote commander.NotesCheck that the angle adjusting button is fully returned. The grip only locks when the angle adjusting button is fully returned. If necessary, adjust the position of the grip slightly while holding the video camera until the angle adjusting button is fully returned.Depending on your video camera, adjusting the grip angle may make the tripod unstable. If this happens, readjust the grip angle.Y ou may be unable to operate the remote commander at certain grip angles. In this happens, readjust the grip angle.Using the Remote CommanderFor full details, refer to the operating instructions supplied with the video camera.Turn on the power of the video camera1 Turn on the power of the video camera and set it to standby mode.2 Set the video camera to movie or still image mode.NotesIf you leave the video camera in standby mode for a certain time, it turns off automatically. To resume standby mode, turn the power back on.How to record a moving imagePress the START/STOP button.To stop recording, press the START/STOP button again.How to record a still imageLightly press and hold the PHOTO button to check the image and then fully press the button to record it.How to zoomPress the Zoom button.T side (telephoto): Subject appears closer.W side (wide angle): Subject appears farther away.Pressing the Zoom button longer makes zooming faster.Y ou can also zoom in or out by moving the raised central portion of the zoom button back and forth.Y ou can also operate the remote commander when using any of the following video cameras that are not equipped with an A/V remote connector.HDR- CX7, CX6, HC9, HC7, HC5, HC3, SR8, SR7, SR5, SR1, UX7,UX5, UX3, UX1DCR- DVD908, DVD905, DVD808, DVD805, DVD803, DVD755,DVD708, DVD705, DVD703, DVD653, DVD608, DVD605,DVD602, DVD508, DVD506, DVD505, DVD408, DVD406, DVD405, DVD404, DVD403, DVD308, DVD306, DVD305, DVD304, DVD205, DVD203, DVD202, DVD109, DVD108, DVD106, DVD105, DVD103, DVD92, HC96, HC94, HC90, HC48, HC47, HC46, HC45, HC44, HC43, HC42, HC41, HC40, HC39, HC38, HC37, HC36, HC35, HC33, HC32, HC30, HC26, HC24, HC23, HC22, HC21, HC20, HC19, HC17, PC1000, PC55, PC53, SR300, SR290, SR200, SR190, SR100, SR90, SR82, SR80, SR72, SR70, SR62, SR60, SR52, SR50, SR42, SR40, SR33, SR32, SR30Not all video cameras are available in all countries or regions.After recordingPress the POWER button to turn off the video camera.For full details, refer to the operating instructions supplied with the video camera.Removing the video camera1 Loosen the camera mounting knob and remove the video camera from the camera seat.2 Fold the legs away.Carrying this unitCarry this unit in its carrying pouch.NotesDo not carry this unit with a video camera attached to it.Specifi cationsMaximum load 1 kg (35.3 oz)(Including battery and other accessories)Remote Commanderfunctions START/STOP button, PHOTO button, Zoom button (W/T)Dimensions Legs foldedLegs opened Approx. 45 × 132 × 68 mm (w/h/d)(1 3/4 × 5 1/4 × 2 5/8 in.)Approx. 127 × 96 × 114 mm (w/h/d)(5 × 3 7/8 × 4 1/2 in.)Cord length Approx. 250 mm (9 7/8 in.)Operating temperature range 0 °C to 40 °C (32 °F to 104 °F)Mass Approx. 114 g (4.1 oz)Included items Shooting grip, Hand strap,Cable clamper, Carrying pouch, Set of printed documentation Design and specifications are subject to change without notice.2 Фиксирайте дръжката под желания ъгъл, при който бутонът за регулиране се връща в първоначална позиция.Регулирайте центъра на тежестта, като преместите леко напред дръжката, за да можете да работите по-лесно с устройството за дистанционно управление.ЗабележкиПроверете дали бутонът за регулиране се е върнал напълно в първоначална позиция. Дръжката се фиксира само когато бутонът за регулиране се е върнал напълно в първоначалната си позиция. Ако е необходимо, регулирайте внимателнопозицията на дръжката, придържайки видеокамерата, докато бутонът за регулиране се върне напълно в първоначалната си позиция.В зависимост от вашата видеокамера е възможно ъгълът, под който сте нагласили дръжката, да не е подходящ, за да бъде стативът стабилен. Ако това се случи, регулирайте наново ъгъла на дръжката.Възможно е да не можете да работите с устройството за дистанционно управление, ако дръжката е нагласена подопределени ъгли. Ако това се случи, регулирайте наново ъгъла на дръжката.Използване на устройството задистанционно управлениеЗа повече подробности вижте инструкциите за експлоатация на видеокамерата.Включете захранването на видеокамерата1 Включете захранването на видеокамерата и я задайте в режим готовност.2 Задайте видеокамерата в режим запис на видеоклип или снимка.ЗабележкиАко оставите видеокамерата в режим готовност за определено време, тя ще се изключи автоматично. За да възобновите режим готовност, включете отново захранването.Запис на видеоклипНатиснете бутона START/STOP .За да спрете записа, натиснете отново бутона START/STOP .Запис на снимкаЛеко натиснете и задръжте бутона PHOTO, за да проверите изображението, след това натиснете докрай бутона, за да го запишете.Увеличаване на изображениетоНатиснете бутона за увеличение.Към страна T (телеснимка): Обектът се приближава.Към страна W (широк ъгъл): Обектът се отдалечава.Ако натиснете бутона за увеличение за по-дълго време, увеличението ще се извърши по-бързо.Можете да увеличавате или смалявате изображението и като преместите назад и напред издадената централна част на бутона за увеличение.Можете да работите с устройството за дистанционно управление, когато използвате някоя от описаните по-долу видеокамери, които не са снабдени с А/V конектор за дистанционно управление.HDR- CX7, CX6, HC9, HC7, HC5, HC3, SR8, SR7, SR5, SR1, UX7,UX5, UX3, UX1DCR- DVD908, DVD905, DVD808, DVD805, DVD803, DVD755,DVD708, DVD705, DVD703, DVD653, DVD608, DVD605, DVD602, DVD508, DVD506, DVD505, DVD408, DVD406, DVD405, DVD404, DVD403, DVD308, DVD306, DVD305, DVD304, DVD205, DVD203, DVD202, DVD109, DVD108, DVD106, DVD105, DVD103, DVD92, HC96, HC94, HC90, HC48, HC47, HC46, HC45, HC44, HC43, HC42, HC41, HC40, HC39, HC38, HC37, HC36, HC35, HC33, HC32, HC30, HC26, HC24, HC23, HC22, HC21, HC20, HC19, HC17, PC1000, PC55, PC53, SR300, SR290, SR200, SR190, SR100, SR90, SR82, SR80, SR72, SR70, SR62, SR60, SR52, SR50, SR42, SR40, SR33, SR32, SR30Не всички описани видеокамери са достъпни във всички страни или региони.След записНатиснете бутона POWER, за да изключите видеокамерата.За повече подробности вижте инструкциите за експлоатация на видеокамерата.Демонтиране на видеокамерата1 Разхлабете копчето за монтиране на камерата и демонтирайте видеокамерата от поставката.2 Сгънете крачетата.Пренасяне на устройствотоКогато носите устройството, поставяйте го в неговата чантичка.ЗабележкаНе носете устройството заедно с монтирана към него видеокамера.Технически характеристикиМаксимално натоварване1 kg (включително батерията и другите аксесоари)Функции на устройството за дистанционно управлениеБутон START/STOP , бутон PHOTO, бутон за увеличение (W/T)РазмериСгънати крачетаРазгънати крачета Прибл. 45 х 132 х 68 mm (ш/в/д)Прибл. 127 х 96 х 114 mm (ш/в/д)Дължина на кабелаПрибл. 250 mm Диапазон на работната температура0 °C to 40 °C ТеглоПрибл. 114 g Приложени аксесоариДръжка за снимане, каишка заръка, скоба за кабела, чантичка за пренасяне, комплект печатна документацияДизайнът и техническите характеристики подлежат на промяна без предупреждение.3GP-AVT1Правилна употребаСнимане от висок ъгълПоддържайте камерата с другата си ръка, за да я направите по-стабилна.Снимане в нормална позицияПрепоръчваме ви да хванете дръжката на камерата под ъгъла, показан в илюстрация , тъй като по този начин ще можете по-лесно да работите с устройството за дистанционно управление.Снимане от нисък ъгълРегулирайте ъгъла на дръжката така, че да можете да работите с устройството за дистанционно управление.l’e mpêcher de tomber.Lorsque vous ajustez l’angle de la poignée, appuyez à fond sur le bouton de réglage d’angle et assurez-vous qu’il ressort complètement avant d’utiliser la poignée. S’il ne ressort pascomplètement, ajustez plus précisément l’angle de la poignée vers l’arrière ou l’avant.Lorsque cet article est utilisé comme trépied:Écartez complètement les pieds et posez-le sur une surface plane. Assurez-vous que le caméscope est stable et que le trépied est équilibré avant du lâcher.Assurez-vous que le trépied est équilibré après avoir fixé un convertisseur ou un autre accessoire. Vous ne pourrez peut-être pas utiliser le trépied avec certains accessoires.N’utilisez pas le trépied à un endroit où il risque d’être renversé par un vent fort, des vibrations, etc.Veillez à ne pas laisser tomber le trépied et à ne pas répandre de liquide dessus.Ne laissez pas le trépied en plein soleil, près d’un appareil de chauffage ou à un endroit très humide.Détachez le trépied du caméscope et rangez-le dans l’étui fourni après usage.Liez le cordon avec la bride de cordon s’il est trop long.Insérez et retirez toujours le connecteur A/V à distance tout droit en le tenant par la fiche. Si vous l’insérez ou le retirez en forçant, le connecteur A/V à distance de cet article ou du caméscope peut être endommagé.NettoyageNettoyez cet article avec un chiffon doux légèrement imprégné d’une solution détergente neutre.Après avoir utilisé cet article à un endroit exposé aux embruns marins, essuyez-le bien avec un chiffon sec.CaractéristiquesLe GP-AVT1 est une poignée avec fonction télécommande conçuepour les caméscopes. Vous pouvez aussi écarter ses pieds pour l’utiliser comme trépied.Vous pouvez utiliser la télécommande intégrée pour agir sur les caméscopes pourvus d’un connecteur A/V à distance Sony.La poignée facile à tenir permet des prises de vue dans une position naturelle. La télécommande peut être actionnée par la main droite ou la main gauche.Vous pouvez faire des prises de vue sous différents angles: en position haute ou basse, ou même en position d’image miroir.L ’e mploi de cet article comme trépied permet une prise de vue plus stable.Les fonctions télécommandables sont les fonctions d’e nregistrement de base (enregistrement de films/photos, zoom).Description des éléments1 Douille de caméscope2 Axe3 Support de caméscope4 Bouton de montage de caméscope5 Bouton de réglage de l’angle6 Connecteur A/V à distance7 Bouton START/STOP8 Bouton PHOTO9 Bouton de zoom 10 Pied D 11 Pied G 12 Poignée13 Oeillet de dragonneMontage du caméscopeInstallez la batterie et un « Memory Stick », un disque ou une cassette dans le caméscope avant de monter ce produit.Veillez à ne pas laisser tomber le caméscope ou ce produit.1 Tenez fermement la poignée et le caméscope,alignez l’axe et la douille de caméscope en utilisant les orifices de positionnement sous le caméscope. ( -1)RemarquesL ’axe est rétractable. Rétractez-le ou sortez-le selon que votre caméscope a ou non un orifice de positionnement.Si votre caméscope a un orifice de positionnement pour l’axe, laissez l’axe ressortir du support de caméscope et fixez le caméscope. Si l’axe est rétracté, sortez-le du support de caméscope avec un objet pointu avant de fixer le caméscope.Si votre caméscope n’a pas d’o rifice de positionnement pour l’axe, sortez l’axe du support de caméscope avant de fixer le caméscope.2 Vissez légèrement la douille de caméscope en tournant le bouton de montage de caméscope et ajustez l’équilibre en faisant glisser le support de caméscope vers l’avant ou l’arrière.3 Tenez le caméscope en position stable etimmobilisez le support de caméscope en serrant à fond le bouton.4 Insérez le connecteur A/V à distance dans le connecteur A/V à distance du caméscope.Liez le cordon avec la bride de cordon s’il est trop long. ( -4)Utilisation comme trépied1 Assurez-vous que les pieds sont complètementécartés.中文(简)感谢您购买本 Sony 小型三脚架拍摄手柄。
七年级100道单词填空

七年级100道单词填空一.根据句意和首字母提示每空填一个单词, 使句意完整。
1. Thi.i.m.s_______.Ann.2. What'.tha.i.E__________?3. A____.thes.you.brothers?4. Jac.h_____.5. Let'.pla.s_________.6. M.siste.an..lik.p______.tennis.7. Ho.m____.ar.thes.shoes.Twent.yuan.8. Pleas.hav..l____.a.thi.shop.9. M.bal.i.o.th.f_____.unde.th.table.10. D.yo.n_____.bag.fo.school?11. ----W____.i.th.ruler.----O.th.desk.12. M.fathe.an.mothe.ar.m.p_____.I'.thei.d____.13. W.hav.shirt.i.al.c_______.a.$2.each.14. Th.re.short.o.s______.ar.ver.cheap.15. .wa.b______.i.Jun.15th.16. Whe.i.you.b_________.Nick.It'.Jun.15th.17. W.hav.a.Ar.F________.eac.year.18. Ou.Englis.speec.c________.i.o.Ma.3rd.19. O_________.1s.i.ou.Nationa.Day.20. D.yo.wan.t.g.t..m________?21. M.grandfathe.think.Beijin.O_____.i.ver.i___________.H.like.i.ver.much.22. Yo.ca.l________..lo.abou.Chines.h_________.23. M.f________.frui.i.banana.24. .can'.spea.J___________.25. W.wan.tw.goo.m___________.fo.ou.band.26. T______.fo.you.help.27. S_________s.da.o..week.28. Schoo.s_________.a.7:3.i.th.morning.29. .don'.lik.thriller.becaus.they'r.s_________.30. Jac.Che.i..grea.a_________.movi.star.31. Titani.i.ver.s___________.Man.peopl.lik.it.32. M.c_______.stud.i.No..Middl.School.33. Th.n_______.mont.o.th.yea.i.S___________.34. C_________ugh.35. Ca.yo.pla.th.t___________?36. M.brothe.ofte.g_____.t.be.a.a________.te.o'clock.37. Ar.yo.f______.thi.afternoon?38. Hi.favorit.s__________.i.P.E..39. .hav.eigh.classe.o.W___________.40. .hav.n.classe.o.w_________.41. J________.1s.i.Ne.Year'.Day.42. Ho.d.yo.s_______.pen?43. Ar.thos.you.penci.s____________?44. To.ha..grea.sport.c_____________.45. .thin.thi.movi.i.ver.e____________.46. W.wan..lo.o.v_________.an.fruit.47. Th.teache.ha..._________.48. “What'.you.f______.name?.“Mike.”49. Sa.i.sittin.n_____.t.th.window.50. W.lik.ic.crea.fo.d__________.51. Jac.play.sport.ever.day.s.h.i.ver.h_______.52. Jan.t________.he.mothe.i.a.hom.now.53. M.fathe.i.ver.s______.wit.me.54. Wha.d.yo.o______.do?55. W.ar.b____.wit.work.s..hav.n.tim.t.play.56.Jennifer'**********************************.57. Ca.yo.sin.o.d________?58. Than.you.You'r.w____________.59. I'.ver.s_______.I'.late.60. W.wil.pla.football.J______.u.soon.please.61. D.yo.lik.bal.s________?62. Don'.worry.Le.m.h______.you.63. Playin.basebal.i.no.ver.easy.It'.d___________.64. Tenni.i.a.e________.i.th.Olympi.Games.65. A______.come.afte.July.66. Mar.work.ver.lon.h______.s.sh.i.ver.t______..二.单词拼写,每空一词。
武汉广播电视台空中课堂2020年4月11-4月16日节目播出表
4月16日
1、心理:《亲子沟通让爱流动》
2、体育:自编韵律舞蹈
3、美术:《提袋的设计》
新洲凤凰镇胜利小学:程雅欣
洪山区洪山二小魏芸
硚口区新合村小学赵琴
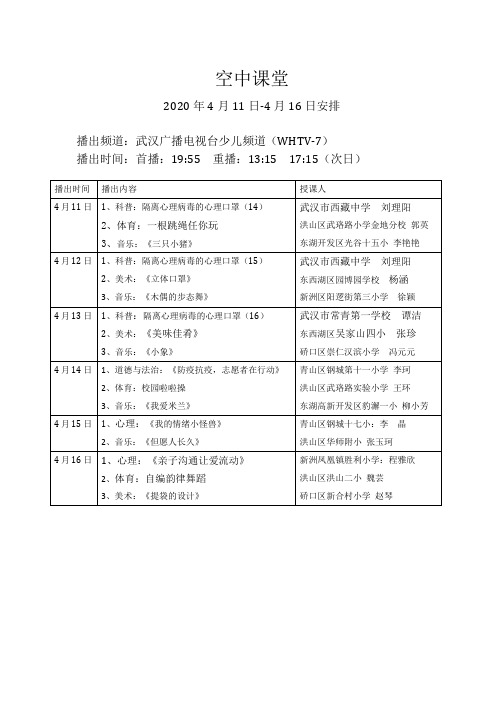
空中课堂
2020年4月11日-4月16日安排
播出频道:武汉广播电视台少儿频道(WHTV-7)
播出时间:首播:19:55重播:13:15 17:15(次日)
播出时间
播出内容
授课人
4月11日
1、科普:隔离心理病毒的心理口罩(14)
2、体育:一根跳绳任你玩
3、音乐:《三只小猪》
武汉市西藏中学 刘理阳
洪山区武珞路小学金地分校郭英
东西湖区吴家山四小 张珍
硚口区崇仁汉滨小学冯元元
4月14日
1、道德与法治:《防疫抗疫,志愿者在行动》
2、体育:校园啦啦操
3、音乐:Leabharlann 我爱米兰》青山区钢城第十一小学 李珂
洪山区武珞路实验小学 王环
东湖高新开发区豹澥一小柳小芳
4月15日
1、心理:《我的情绪小怪兽》
2、音乐:《但愿人长久》
青山区钢城十七小:李晶
东湖开发区光谷十五小李艳艳
4月12日
1、科普:隔离心理病毒的心理口罩(15)
2、美术:《立体口罩》
3、音乐:《木偶的步态舞》
武汉市西藏中学 刘理阳
东西湖区园博园学校杨涵
新洲区阳逻街第三小学徐颖
4月13日
1、科普:隔离心理病毒的心理口罩(16)
2、美术:《美味佳肴》
3、音乐:《小象》
武汉市常青第一学校 谭洁
泰捷视频直播节目列表

泰捷直播节目列表1 CCTV-1 综合2 CCTV-2 财经3 CCTV-3 综艺4 CCTV-4 (亚洲)5 CCTV-5 体育6 CCTV-6 电影7 CCTV-7军事农业8 CCTV-8电视剧9 CCTV-9 纪录10 CCTV-10科教11 CCTV-11戏曲12 CCTV-12社会13 CCTV-13 新闻14 CCTV-14 少儿15 CCTV-15 音乐16 CCTV-5+体育17 CCTV-1 综合HD18 CCTV-4 (美洲)19 CCTV-4 (欧洲)20 CCTV-风云足球21 CCTV-纪录(英)22 CCTV-中学生23 CCTV-国防军事24 CCTV-电影频道25 CCTV-第一剧场26 CCTV-怀旧剧场27 CCTV-证券资讯28 CCTV-世界地理29 CCTV-风云音乐30 CCTV-News31 CCTV-文化精品32 CCTV-女性时尚33 CCTV-央视台球34 CCTV-电视指南35 CCTV-法语36 CCTV-高尔夫37 CCTV-阿拉伯语38 CCTV-西班牙语39 湖南卫视40 江苏卫视41 东方卫视42 广东卫视43 深圳卫视44 浙江卫视45 北京卫视46 黑龙江卫视47 山东卫视48 河北卫视49 湖北卫视50 凤凰中文台51 凤凰资讯台52 凤凰美洲台53 凤凰卫视香港台54 凤凰电影台55 香港卫视56 南方卫视57 河南卫视58 四川卫视59 天津卫视60 辽宁卫视61 重庆卫视62 广西卫视63 山西卫视64 安徽卫视65 东南卫视66 厦门卫视67 海峡卫视68 青海卫视69 云南卫视70 江西卫视71 陕西卫视72 吉林卫视73 西藏卫视74 内蒙古卫视75 贵州卫视76 宁夏卫视77 甘肃卫视78 新疆卫视79 兵团卫视80 旅游卫视81 三沙卫视82 康巴卫视83 延边卫视84 农林卫视85 健康卫视86 星空卫视87 星空国际88 阳光卫视89 中国教育1套90 中国教育2套91 中国教育3套92 早期教育93 空中课堂94 湖南卫视hd95 江苏卫视HD96 东方卫视HD97 广东卫视HD98 深圳卫视HD99 浙江卫视HD100 北京卫视HD101 黑龙江卫视HD102 山东卫视HD103 河北卫视HD104 湖北卫视HD105 天津卫视HD106 贵州卫视HD107 BTV-2文艺108 BTV-3科教109 BTV-4影视110 BTV-5财经111 BTV-6体育112 BTV-7生活113 BTV-8青年114 BTV-9新闻115 卡酷动画116 优优宝贝117 广东体育118 广东珠江119 广东新闻120 广东公共121 广东房产122 广东移动123 广东会展124 广东国际125 广东现代教育126 广州台127 广州影视128 广州少儿129 广州新闻130 广州经济131 广州竞赛132 岭南戏曲133 欧洲足球134 深圳电视剧135 深圳少儿136 深圳公共137 深圳都市138 深圳娱乐139 深圳国际140 深圳体育健康141 深圳财经生活142 深圳DV生活143 深圳宝安144 深圳移动电视145 深圳宜和购物146 佛山综合147 佛山公共148 梅州综合149 惠州一台150 惠州二台151 东莞综合152 东莞公共153 江门综合154 茂名综合155 云浮综合156 韶关综合157 潮州综合158 汕头综合159 汕尾综合160 揭阳综合161 阳江综合162 肇庆综合163 河源综合164 河源公共165 珠海第一频道166 珠海第二频道167 珠江电影168 南方经视169 南方综艺170 南方影视171 南方少儿172 台山新闻综合173 嘉佳卡通174 英语辅导175 DNF电视台176 东方电影177 东方财经178 第一财经179 东方购物180 看看新闻网181 上视娱乐182 上视纪实183 上视新闻综合184 上视艺术人文185 上视生活时尚186 上视电视剧187 上视教育188 上视外语频道ICS189 上视星尚190 上视五星体育191 上海导视192 哈哈少儿频道193 外汇理财频道194 NEOTV CF/NBA频道195 NEOTV星际频道196 NEOTV英雄联盟197 NEOTVDOTA2/WAR3198 MarsTV游戏一199 MarsTV游戏二200 魅力音乐201 炫动卡通202 劲爆体育203 劲爆足球204 新视觉体育HD205 新视觉纪实HD206 新视觉剧场HD207 新视觉娱乐HD208 动漫秀场209 金色频道210 法制天地211 全纪实212 湖北综合213 湖北公共214 湖北影视215 湖北经视216 湖北体育生活217 湖北教育218 湖北垄上219 睛彩湖北220 武汉新闻综合221 武汉文艺频道222 武汉科教生活223 武汉影视频道224 武汉文体频道225 武汉海外频道226 武汉少儿频道227 荆州新闻228 荆州社区229 荆门新闻综合230 荆门公共旅游231 荆门农谷频道232 荆门鄂中经视233 恩施综合234 恩施综艺235 恩施公共236 三峡综合237 三峡旅游商务238 三峡公共239 三峡移动240 十堰新闻241 十堰综合242 十堰经济243 十堰武当244 十堰精彩频道245 建始综合246 巴东综合247 襄阳精彩248 孕育指南249 职业指南250 碟市251 美嘉购物252 湖南国际253 湖南经视254 湖南电视剧255 湖南娱乐256 湖南公共257 湖南都市258 潇湘电影频道259 长沙新闻260 长沙政法261 长沙女性262 长沙经贸263 长沙公共264 长沙汽车频道265 湘潭新闻综合266 湘潭经济频道267 湘潭公共都市268 湘潭教育文体269 湘潭法制频道270 长株潭频道271 嘉丽购物272 先锋记录273 先锋乒羽274 快乐垂钓275 金鹰卡通276 金鹰纪实277 快乐购278 四川文化旅游279 四川财经频道280 四川新闻资讯281 四川国际282 四川影视文艺283 四川星空移动284 四川科技285 四川公共286 四川星空购物287 四川妇女儿童288 四川蓉城先锋289 成都新闻综合290 成都经济资讯291 成都都市生活292 成都影视文艺293 成都公共294 成都少儿295 成都食尚296 成都汽车297 成都美食天府298 成都每日购物299 成都资讯300 宜宾新闻综合301 宜宾公共频道302 乐山新闻综合303 乐山互动影视304 绵阳综合305 绵阳公共306 绵阳科技307 绵阳教育资讯308 绵阳交通309 绵阳旅游310 重庆新闻311 重庆都市312 重庆科教313 重庆影视314 重庆娱乐315 重庆生活316 重庆汽摩317 重庆少儿318 重庆新财经319 重庆时尚320 重庆移动321 重庆国际322 重庆魅力时装323 重庆公共农村324 重庆手持电视325 云南都市326 云南公共327 云南娱乐328 云南影视329 云南少儿330 昆明一台331 昆明二台332 昆明三台333 昆明四台334 昆明五台335 昆明六台336 贵州二台337 贵州三台338 贵州四台339 贵州五台340 贵州七台341 贵州家有购物342 贵阳一台343 贵阳二台344 贵阳三台345 贵阳四台346 天津新闻347 天津文艺348 天津影视349 天津都市350 天津体育351 天津科教352 天津少儿353 天津公共354 天津国际355 天津购物356 天津滨海一台357 天津滨海二台358 游戏风云359 邮轮旅游360 江苏体育休闲361 江苏影视362 江苏综艺363 江苏公共364 江苏城市365 江苏教育366 江苏国际367 苏州新闻综合368 苏州社会经济369 苏州文化生活370 苏州生活资讯371 南京新闻综合372 南京娱乐373 南京十八374 南京生活375 南京少儿376 南京教科377 优漫卡通378 无锡新闻综合379 无锡娱乐380 无锡生活381 无锡经济382 无锡都市资讯383 无锡移动384 泰州新闻综合385 泰州经济生活386 泰州影视娱乐387 南通新闻综合388 南通社教389 南通生活390 南通信息391 南通江海明珠392 南通党建频道393 盐城一台394 盐城二台395 盐城三台396 如东新闻综合397 如东影视娱乐398 如东生活服务399 扬州生活400 扬州综合401 扬州城市402 扬州凤凰购物403 财富天下404 淮安新闻综合405 昆山社会生活406 靓装频道407 好享购物408 常州都市409 常州新闻410 常州生活411 常州文化公共412 钱江都市413 浙江经视414 浙江影视415 浙江教育科技1 / 2416 浙江6频道417 浙江公共新农村418 浙江国际419 浙江少儿420 浙江手机421 杭州综合422 杭州明珠423 杭州生活424 杭州影视425 杭州少儿426 杭州导视记录427 杭州房产电视428 留学世界429 义乌新闻综合430 义乌商贸频道431 义乌公共文艺432 长兴新闻综合433 长兴文化频道434 金华公共频道435 金华新闻综合436 金华教育科技437 金华都市农村438 金华数字导视439 宁波新闻综合440 宁波社会生活441 宁波文化娱乐442 宁波影视频道443 宁波少儿频道444 绍兴新闻综合445 绍兴文化影视446 绍兴公共447 绍兴商务448 湖州新闻综合449 湖州资讯频道450 湖州文化娱乐451 湖州公共民生452 台州新闻综合453 台州影视文化454 台州财富频道455 台州城市生活456 平湖新闻综合457 平湖民生休闲458 平湖西瓜频道459 舟山新闻综合460 舟山公共频道461 舟山群岛旅游462 舟山就业服务463 衢州新闻综合464 衢州公共生活465 衢州经济信息466 江西都市467 江西经视468 江西影视469 江西公共470 江西少儿471 江西红色经典472 江西风尚购物473 江西移动电视474 南昌新闻综合475 南昌都市频道476 南昌法制频道477 南昌公共频道478 海南青少479 海南公共480 海南综合481 海南影视剧482 海南新闻483 海南文体484 海口新闻综合485 海口生活娱乐486 海口经济频道487 三亚新闻综合488 安徽影视489 安徽经济生活490 安徽综艺491 安徽科教492 安徽公共493 安徽人物494 安徽国际495 合肥新闻496 合肥财经497 合肥生活频道498 合肥教育法制499 合肥文体博览500 芜湖新闻综合501 芜湖生活频道502 芜湖公共徽商503 蚌埠新闻504 蚌埠生活505 蚌埠公共506 安庆新闻综合507 安庆公共频道508 安庆生活频道509 安庆黄梅戏教育510 黑龙江文艺511 黑龙江新闻512 黑龙江公共513 黑龙江影视514 黑龙江都市515 黑龙江第七516 黑龙江考试517 黑龙江导视518 黑龙江手机519 广西公共520 广西影视521 广西乐思购522 广西国际523 广西综艺524 广西都市525 广西资讯526 睛彩广西交通527 南宁影视娱乐528 南宁新闻综合529 南宁公共530 南宁都市生活531 柳州新闻532 柳州公共533 柳州科教534 宁夏公共535 宁夏经济536 宁夏少儿537 银川公共538 银川生活539 银川文体540 兰州睛彩541 山西经济542 山西影视543 山西科教544 山西公共545 山西少儿546 山西黄河台547 中国黄河548 山西老年福549 山西彩民在线550 山西优购物551 山西网台552 太原新闻553 太原百姓554 太原法制555 太原文体556 太原家庭消费557 河北都市558 河北经济559 河北影视560 河北少儿561 河北公共562 河北购物563 河北农民频道564 石家庄新闻综合565 石家庄娱乐566 石家庄生活567 石家庄都市568 秦皇岛新闻569 秦皇岛政法570 秦皇岛影视571 雪梨TV572 山东教育573 山东少儿574 山东影视575 山东农科576 山东公共577 山东生活578 山东综艺579 山东体育580 山东齐鲁581 山东泰山电视台582 品牌齐鲁583 舌尖山东584 中国十艺节585 乐享健康586 乐享理财587 乐享笑林588 乐享MV589 乐享佳片590 乐享秀色591 亲子乐园592 读书频道593 青岛新闻综合594 青岛生活频道595 青岛影视频道596 青岛休闲资讯597 青岛都市频道598 青岛青少旅游599 青岛党建频道600 济南都市601 济南影视602 济南娱乐603 济南生活604 济南商务605 济南少儿606 济南新闻607 济南泉天下608 枣庄新闻综合609 枣庄生活教育610 枣庄公共频道611 日照新闻综合612 日照公共频道613 日照科教频道614 东营综合频道615 东营公共频道616 烟台一台617 福建综合618 福建新闻619 福建电视剧620 福建都市621 福建体育622 福建经济623 福州综合624 福州影视625 福州少儿626 福州生活627 厦视一套628 厦视二套629 厦视三套630 西宁新闻综合631 西宁生活服务632 河南都市633 河南民生634 河南法制635 河南电视剧636 河南新闻637 河南欢腾购物638 河南公共639 河南新农村640 郑州时政频道641 郑州商都频道642 郑州文体频道643 郑州影视戏曲644 郑州妇女儿童645 郑州都市生活646 安阳新闻综合647 安阳法制频道648 安阳科教频道649 安阳图文生活650 睛彩安阳651 睛彩平顶山652 西安新闻综合653 西安白鸽都市654 西安商务资讯655 西安文化影视656 西安健康快乐657 西安音乐综艺658 榆林一台659 榆林二台660 辽宁经济661 辽宁公共662 辽宁影视663 辽宁生活664 辽宁教育665 辽宁体育666 辽宁宜佳购物667 辽宁都市668 辽宁北方669 大连新闻670 大连生活671 大连公共672 大连文体673 大连影视674 大连少儿675 大连财经676 大连乐天购物677 沈阳新闻678 鞍山新闻综合679 鞍山时尚680 鞍山娱乐681 鞍山公共生活682 鞍山都市683 金州新闻综合684 金州生活服务685 吉林都市686 吉林生活687 吉林影视688 吉林公共689 吉林综艺文化690 吉林乡村691 吉林篮球692 东北戏曲693 吉林家有购物694 新疆维语综合695 新疆哈语综合696 新疆汉语综艺697 新疆维语综艺698 新疆汉语影视699 新疆经济生活700 新疆哈语综艺701 新疆维语经济702 新疆汉语体育703 新疆法制信息704 新疆少儿频道705 新疆教育频道706 睛彩新疆频道707 摄影频道708 天元围棋709 四海钓鱼710 阳光卫视2711 澳门卫视712 中国气象频道713 TGA游戏竞技714 GTV游戏竞技715 SCNTV星游1716 SCNTV星游2717 高尔夫718 潮体育719 电子体育720 车迷频道721 极速汽车722 CCTV-3 综艺HD723 CCTV-5 体育HD724 CCTV-6 电影HD725 CCTV-8 电视剧HD726 CCTV-发现之旅727 CCTV-风云剧场728 CCTV中视购物729 CCTV戏曲频道730 CCTV-俄语731 CCTV娱乐频道(易视宝泰捷直播)2 / 2。
Okuma Program Scheduler 用户手册说明书

Okuma America CorporationOkuma Program SchedulerSoftware User ManualRevision HistoryOkuma Program Scheduler 1Revision History 21.Introduction 41.1Purpose 41.2Scope 41.3Definitions, Acronyms and Abbreviations 41.4Overview 41.5References 41.6Requirements 42.Installation 42.1Installation of THINC-API 42.2Installation of Okuma Program Scheduler Interface Software 52.2.1Installation of Microsoft .NET Framework 4.0 52.2.2Installation of Okuma Program Scheduler Interface Software 63.Repair/Uninstall Okuma Program Scheduler Interface Software 93.1Un-install Okuma Program Scheduler Interface Software 94.Installation Files 104.1Okuma Program Scheduler Interface Software 10age 105.1Start Okuma Program Scheduler Interface Application 115.2Exit Okuma Program Scheduler Interface Application 125.3Source Programs and Selected Programs 135.3.1Source Programs 135.3.2Selected Programs 145.4File Name Extension 165.5Output Schedule Program File Name in MD1 Folder 175.6Preview SDF Program 175.7Menu Bar 185.7.1File 195.7.2Browse Folder 195.7.3Refresh Folder 205.7.4Minimize to system tray 205.7.5Generate SDF 215.7.6Save 215.7.7Save and Select 215.7.8About 215.8Configuration 226.TroubleShooting 226.1Logs 226.2Running Statuses of THINC-API 236.3Version 24Okuma Program Scheduler InterfaceUser Manual1. Introduction1.1 PurposeThe purpose of this document is to provide the instruction of installing and operating Okuma Program Scheduler Interface. It also provides information on how to repair, and uninstall this software.1.2 ScopeThis manual will cover the installation, operation and troubleshooting of Okuma Program Scheduler Interface running on OSP P200L/P300L/P200M/P300M/P300G controls or newer controls and on Windows XP SP3, Windows 7 SP1, and Windows 10.1.3 Definitions, Acronyms and AbbreviationsNone1.4 OverviewThe Okuma Program Scheduler Interface is an application that is designed to simplify the process of creating schedule program for part programs stored in D:\MD1 folder and subfolders. Part programs stored in other folders will be copied to the D:\MD1 folder, automatically.1.5 References[1] Installation Manual for THINC-API1.6 RequirementsTHINC-API:Version 1.21.1 for Lathe and Machining CenterVersion 1.21.1 for Grinder2. InstallationThe following steps in section 2.0 need to be performed in the same order:Installation of THINC APIInstallation of Okuma Program Scheduler Interface’ SoftwareNote: All installation must be either installed directly from CD/DVD disks or copied to the local harddrive.2.1 Installation of THINC-APIThis application requires THINC-API having the same version or greater to be installed on machine as specified in the Release Note.Refer to THINC-A PI ‘InstallationManual.pdf’ provided on THINC-API Installation disk for instructions.Tip: Try to run THINC-API Demo Application and see if it runs normally to make sure THINC-API is properly installed.It is always best to install the latest version of THINC-API on the machine if possible.2.2 Installation of Okuma Program Scheduler Interface SoftwareIn Windows mode (press ESC and Cancel button during NC Startup screen to prevent NC from running. On P300A or new controls, it needs to keep tapping on the Shift key while NC is starting to prevent NC from running.), Run the ‘Setup.exe’ program from the DVD to install this software package. The setup program automatically checks if Microsoft .NET framework 4.0 is installed. If it is not installed, continue to section 2.2.1, otherwise refer to section 2.2.2.OSP software should not be running during the installation or .NET Framework 4.0. During the .NET installation, it will be necessary to reboot multiple times. OSP software launch should be cancelled and the installation media should remain connected during the reboot.For Windows XP, it must have Service Pack 3 installed in order to support .NET Framework 4.0This installation can only be installed on 32-bit Windows XP or Windows 7.Note: This setup will check to see if the required version of THINC-API, and Startup Service installed on target machine before installing Okuma Program Scheduler Interface.2.2.1 Installation of Microsoft .NET Framework 4.0The next dialog will be displayed if Microsoft .NET framework 4.0 is not installed.Click Accept to install .NET framework 4.0.If the .NET installation requires rebooting, then it needs to reboot the machine to continue the installation again.2.2.2 Installation of Okuma Program Scheduler Interface SoftwareThe following dialog will be displayed once all of the required .NET frameworks are installed.Click Next to continue.Click Next to continue. User can also select a different folder other than the default one to install Okuma Program Scheduler Interface Software.Click Next to continue. Application is installing.Click Close to complete the installation.3. Repair/Uninstall Okuma Program Scheduler Interface Software3.1 Un-install Okuma Program Scheduler Interface SoftwareStart the machine in Windows only mode. Click Start→Settings→Control Panel to launch control panel. Double click Add or Remove Programs for Windows XP or Programs and Features for Windows 7 in control panel, find the item Okuma Program Scheduler Interface and click Remove or Uninstall to uninstall Okuma Program Scheduler Interface Software.4. Installation Files4.1 Okuma Program Scheduler Interface SoftwareAll the files are installed in the installation folder unless otherwise noted, by default, which is ‘D:\Program files\Okuma\Okuma Program Scheduler’ Interface.5. UsageThis application is designed to help creating schedule program running on OSP-P controls only.Figure: Okuma Program Scheduler Interface Software main user interface for Machining Center5.1 Start Okuma Program Scheduler Interface ApplicationThe Okuma Program Scheduler Interface Software can be launched from the OSP VKEY once NC is fully startup.In addition, application can also be launched from Windows Programs menu by pressing Ctrl + on the operation panel to pop up Start Menu, then click Programs→OKUMA Program Scheduler→Okuma Program Scheduler to run.The main user interface can be displayed by double clicking on the icon in the system tray or Show menu item if the application has been minimized to system tray.5.2 Exit Okuma Program Scheduler Interface ApplicationWhen user shuts down the machine, the software will be terminated automatically without user interaction. Click the button File/Exit will also terminate the software.5.3 Source Programs and Selected ProgramsBy default, the system will list all files in the default D:\MD1 folder based on the current Part Program File Name Extension. User can use the operation buttons to add files to the Selected Programs list or remove files from the Selected Programs list.5.3.1 Source ProgramsThe list displays all files in the current select folder.The source programs displays part programs based on the current selected folder and file name extension.-Add all part programs from source programs to the Selected Programs list-Add one or more selected part programs from source programs to the Selected Programs list-Remove the selected part program from the Selected Programs list-Remove all part programs from the Selected Programs list5.3.2 Selected Programs--Figure: Selected Programs for Machining Center machines-Figure: Selected Programs for Lathe and Grinder machines--Move the current selected row in the Selected Programs list to the first row of the list -Move the current selected row in the Selected Programs list up 1 row-Move the current selected row in the Selected Programs list down 1 row- Move the current selected row in the Selected Programs list to the last row of the list5.3.2.1 Machining Center ProgramsBy default, the part program will be assigned A mode. Mode can be changed to other modes for each part program as shown below:5.3.2.2 Lathe/Grinder ProgramsBy default, the part program will have a repetition of 1. The number of repetition can be changed by changing the value of Repetition column as shown below:5.4 File Name ExtensionBy default, the file name extension is MIN. It can be changed to any other file name extension if the machine is configured to work w ith that. It can also be set to “*” to allow the system to load all files available in the current selected folder. When the folder is refresh or new folder is selected, only files having the same file name extension will be loaded into the Source Programs.5.5 Output Schedule Program File Name in MD1 FolderBy default, the schedule program will be stored in MD1 folder only. A file name must be specified when the schedule program is generated by pressing the GENERATE SDF button.5.6 Preview SDF Program-Figure: Preview SDF Program for Machining Center machinesFigure: Preview SDF Program for Lathe/Grinder machinesThe system will generate a preview of schedule part program based on the programs from the Selected Programs list.Note: If part program files are not stored in the folder or subfolders of D:\MD1, part program files will be automatically copied to the D:\MD1 folder when schedule program is saved.5.7 Menu BarThe application contains a menu bar as shown below. The menu item can be activated by pressing on it or pressing the correspond Function Key from [F1] to [F9] if applicable.5.7.1 File- Click on this soft key or function key [F1], the File menu has one submenu item, which is Click on Exit button close the application.The application can also be closed by clicking the button on the application’s title bar5.7.2 Browse FolderBy clicking on this soft key or function key [F2], a dialog is displayed to allow user to select a folder where part programs can be selected to create a schedule program.When a folder is selected, the system will display all files having file the name extension defined in the Part Program File Name Extension as shown below:If the File Name Extension is *, then all files includes in the current select folder will be displayed in the list.5.7.3 Refresh FolderBy clicking on this soft key or function key [F3], the system will reload all files based on the file name extension and current selected folder.5.7.4 Minimize to system trayClick on this soft key or function key [F4] the main user interface is hidden and theOkuma Program Scheduler icon for this application is shown in the system tray of Windows System task bar.5.7.5 Generate SDF∙Click on this soft key or function key [F5] the system generates a preview of schedule program based on the programs listed in the Selected Programs list.5.7.6 Save∙Click on this soft key or function key [F6] the system will generate and save the schedule program to the MD1 folder based on the Preview SDF Program. A schedule program name without extension must be assigned before performing this operation.Note: The system will also copy part program files to D:\MD1 folder if files are not stored D:\MD1 folder or its subfolders.5.7.7 Save and Select∙Click on this soft key or function key [F6] the system will generate and save the schedule program to the MD1 folder based on the Preview SDF Program. A schedule program name without extension must be assigned before performing this operation. In addition, the scheduleprogram is also loaded into NC.Note: The system will also copy part program files to D:\MD1 folder if files are not stored in D:\MD1folder or its subfolders.5.7.8 About∙Click on this soft key or function key [F8] a dialog is displayed to show the information about this application.5.8 ConfigurationBy default, the file name extension is MIN. If it is changed it will be saved into the application configuration file named OkumaProgramScheduler.exe.config.6. TroubleShooting6.1 LogsBy default, the application will log all messages into the Event Log as shown below.In addition, a log file is also created in the Logs folder where the application is installed. The events inthe log file will be deleted when the application is first started. The name of the log file is Log.txt.6.2 Running Statuses of THINC-APIAfter NC is fully started, THINC-API Notifier Status should have a green icon displayed at the lower left corner of the screen as shown below:Windows XP:Windows 7:Note: The API icon status can only be supported on Windows 7 if THINC-API installed on targethas a version 1.17.1.0 or greater.If the color of icon is red, THINC-API has encountered an error state. By clicking on the API icon, a dialog will display and show detail error message as shown in the captured image below:Please contact OKUMA distributor for further assistant on THINC-API error.6.3 VersionThe version of THINC-API can be checked by clicking on the API icon. A dialog will be displayed and showing API version number.。
副本凤凰卫视电影台第47周节目表
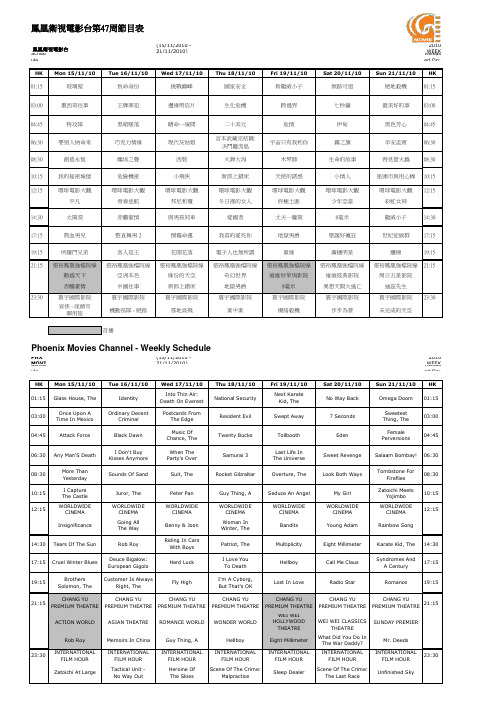
(15/11/2010 - 21/11/2010)2010 WEEK 47 Schedule Subject to Change Released On: 11/2/2010HK Mon 15/11/10Tue 16/11/10Wed 17/11/10Thu 18/11/10Fri 19/11/10Sat 20/11/10Sun 21/11/10HK 01:15玻璃屋致命身份挑戰巔峰國家安全新龍威小子無路可退絕地殺機01:15 03:00墨西哥往事王牌罪犯邊緣明信片生化危機跨過界七秒鐘最美好的事03:00 04:45特攻隊黑暗墜落賭命一線間二十美元危情伊甸黑色芳心04:4506:30要别人納命來巧克力情緣現代灰姑娘宮本武藏完結篇:决鬥巖流島宇宙只有我和你霧之旗早安孟買06:3008:30創造永恆塵埃之聲西裝火葬大海木琴師生命的故事再見螢火蟲08:30 10:15我的秘密城堡危險機密小飛俠新郎上錯床天使的誘惑小情人座頭市與用心棒10:1512:15環球電影大觀環球電影大觀環球電影大觀環球電影大觀環球電影大觀環球電影大觀環球電影大觀12:15平凡青春迷航邦尼和瓊冬日裡的女人終極土匪少年亞當彩虹女神14:30太陽淚赤膽豪情與男孩同車愛國者丈夫一籮筐8毫米龍威小子14:30 17:15熱血男兒憨直舞男 2倒霉命運我真的愛死你地獄男爵聖誕好瘋狂世紀症候群17:15 19:15所羅門兄弟客人是王花開花落電子人也無所謂重緣廣播明星纏綿19:1521:15張裕鳳凰強檔院線張裕鳳凰強檔院線張裕鳳凰強檔院線張裕鳳凰強檔院線張裕鳳凰強檔院線張裕鳳凰強檔院線張裕鳳凰強檔院線21:15動感天下亞洲本色緣份的天空奇幻世界維維好萊塢影院維維經典影院周日五星影院赤膽豪情中國往事新郎上錯床地獄男爵8毫米異想天開大逃亡迪茲先生23:30寰宇國際影院寰宇國際影院寰宇國際影院寰宇國際影院寰宇國際影院寰宇國際影院寰宇國際影院23:30盲侠 - 座頭市御用旅機動部隊 - 絕路雪地高飛案中案網絡殺機步步為營未完成的天空首播PHX MOVIES CHANNEL(15/11/2010 - 21/11/2010)2010 WEEK 47 Schedule Subject to Change Released On: 11/2/2010HK Mon 15/11/10Tue 16/11/10Wed 17/11/10Thu 18/11/10Fri 19/11/10Sat 20/11/10Sun 21/11/10HK01:15Glass House, The IdentityInto Thin Air:Death On EverestNational SecurityNext KarateKid, TheNo Way Back Omega Doom01:1503:00Once Upon ATime In MexicoOrdinary DecentCriminalPostcards FromThe EdgeResident Evil Swept Away7 SecondsSweetestThing, The03:0004:45Attack Force Black DawnMusic OfChance, TheTwenty Bucks Tollbooth EdenFemalePerversions04:4506:30Any Man'S DeathI Don't BuyKisses AnymoreWhen TheParty's OverSamurai 3Last Life InThe UniverseSweet Revenge Salaam Bombay!06:3008:30More ThanYesterdaySounds Of Sand Suit, The Rocket Gibraltar Overture, The Look Both WaysTombstone ForFireflies08:3010:15I CaptureThe CastleJuror, The Peter Pan Guy Thing, A Seduce An Angel My GirlZatoichi MeetsYojimbo10:1512:15WORLDWIDECINEMAWORLDWIDECINEMAWORLDWIDECINEMAWORLDWIDECINEMAWORLDWIDECINEMAWORLDWIDECINEMAWORLDWIDECINEMA12:15 InsignificanceGoing AllThe WayBenny & JoonWoman InWinter, TheBandits Young Adam Rainbow Song14:30Tears Of The Sun Rob Roy Riding In CarsWith BoysPatriot, The Multiplicity Eight Millimeter Karate Kid, The14:3017:15Cruel Winter Blues Deuce Bigalow:European GigoloHard LuckI Love YouTo DeathHellboy Call Me ClausSyndromes AndA Century17:1519:15BrothersSolomon, TheCustomer Is AlwaysRight, TheFly HighI'm A Cyborg,But That's OKLost In Love Radio Star Romance19:1521:15CHANG YUPREMIUM THEATRECHANG YUPREMIUM THEATRECHANG YUPREMIUM THEATRECHANG YUPREMIUM THEATRECHANG YUPREMIUM THEATRECHANG YUPREMIUM THEATRECHANG YUPREMIUM THEATRE21:15 ACTION WORLD ASIAN THEATRE ROMANCE WORLD WONDER WORLDWEI WEIHOLLYWOODTHEATREWEI WEI CLASSICSTHEATRESUNDAY PREMIER Rob Roy Memoirs In China Guy Thing, A Hellboy Eight MillimeterWhat Did You Do InThe War Daddy?Mr. Deeds23:30INTERNATIONALFILM HOURINTERNATIONALFILM HOURINTERNATIONALFILM HOURINTERNATIONALFILM HOURINTERNATIONALFILM HOURINTERNATIONALFILM HOURINTERNATIONALFILM HOUR23:30 Zatoichi At LargeTactical Unit -No Way OutHeroine OfThe SkiesScene Of The Crime:MalpracticeSleep DealerScene Of The Crime:The Last RaceUnfinished Sky鳳凰衛視電影台第47周節目表Phoenix Movies Channel - Weekly Schedule 鳳凰衛視電影台。
Native Instruments MASCHINE MIKRO MK3用户手册说明书

The information in this document is subject to change without notice and does not represent a commitment on the part of Native Instruments GmbH. The software described by this docu-ment is subject to a License Agreement and may not be copied to other media. No part of this publication may be copied, reproduced or otherwise transmitted or recorded, for any purpose, without prior written permission by Native Instruments GmbH, hereinafter referred to as Native Instruments.“Native Instruments”, “NI” and associated logos are (registered) trademarks of Native Instru-ments GmbH.ASIO, VST, HALion and Cubase are registered trademarks of Steinberg Media Technologies GmbH.All other product and company names are trademarks™ or registered® trademarks of their re-spective holders. Use of them does not imply any affiliation with or endorsement by them.Document authored by: David Gover and Nico Sidi.Software version: 2.8 (02/2019)Hardware version: MASCHINE MIKRO MK3Special thanks to the Beta Test Team, who were invaluable not just in tracking down bugs, but in making this a better product.NATIVE INSTRUMENTS GmbH Schlesische Str. 29-30D-10997 Berlin Germanywww.native-instruments.de NATIVE INSTRUMENTS North America, Inc. 6725 Sunset Boulevard5th FloorLos Angeles, CA 90028USANATIVE INSTRUMENTS K.K.YO Building 3FJingumae 6-7-15, Shibuya-ku, Tokyo 150-0001Japanwww.native-instruments.co.jp NATIVE INSTRUMENTS UK Limited 18 Phipp StreetLondon EC2A 4NUUKNATIVE INSTRUMENTS FRANCE SARL 113 Rue Saint-Maur75011 ParisFrance SHENZHEN NATIVE INSTRUMENTS COMPANY Limited 5F, Shenzhen Zimao Center111 Taizi Road, Nanshan District, Shenzhen, GuangdongChina© NATIVE INSTRUMENTS GmbH, 2019. All rights reserved.Table of Contents1Welcome to MASCHINE (23)1.1MASCHINE Documentation (24)1.2Document Conventions (25)1.3New Features in MASCHINE 2.8 (26)1.4New Features in MASCHINE 2.7.10 (28)1.5New Features in MASCHINE 2.7.8 (29)1.6New Features in MASCHINE 2.7.7 (29)1.7New Features in MASCHINE 2.7.4 (31)1.8New Features in MASCHINE 2.7.3 (33)2Quick Reference (35)2.1MASCHINE Project Overview (35)2.1.1Sound Content (35)2.1.2Arrangement (37)2.2MASCHINE Hardware Overview (40)2.2.1MASCHINE MIKRO Hardware Overview (40)2.2.1.1Browser Section (41)2.2.1.2Edit Section (42)2.2.1.3Performance Section (43)2.2.1.4Transport Section (45)2.2.1.5Pad Section (46)2.2.1.6Rear Panel (50)2.3MASCHINE Software Overview (51)2.3.1Header (52)2.3.2Browser (54)2.3.3Arranger (56)2.3.4Control Area (59)2.3.5Pattern Editor (60)3Basic Concepts (62)3.1Important Names and Concepts (62)3.2Adjusting the MASCHINE User Interface (65)3.2.1Adjusting the Size of the Interface (65)3.2.2Switching between Ideas View and Song View (66)3.2.3Showing/Hiding the Browser (67)3.2.4Showing/Hiding the Control Lane (67)3.3Common Operations (68)3.3.1Adjusting Volume, Swing, and Tempo (68)3.3.2Undo/Redo (71)3.3.3Focusing on a Group or a Sound (73)3.3.4Switching Between the Master, Group, and Sound Level (77)3.3.5Navigating Channel Properties, Plug-ins, and Parameter Pages in the Control Area.773.3.6Navigating the Software Using the Controller (82)3.3.7Using Two or More Hardware Controllers (82)3.3.8Loading a Recent Project from the Controller (84)3.4Native Kontrol Standard (85)3.5Stand-Alone and Plug-in Mode (86)3.5.1Differences between Stand-Alone and Plug-in Mode (86)3.5.2Switching Instances (88)3.6Preferences (88)3.6.1Preferences – General Page (89)3.6.2Preferences – Audio Page (93)3.6.3Preferences – MIDI Page (95)3.6.4Preferences – Default Page (97)3.6.5Preferences – Library Page (101)3.6.6Preferences – Plug-ins Page (109)3.6.7Preferences – Hardware Page (114)3.6.8Preferences – Colors Page (114)3.7Integrating MASCHINE into a MIDI Setup (117)3.7.1Connecting External MIDI Equipment (117)3.7.2Sync to External MIDI Clock (117)3.7.3Send MIDI Clock (118)3.7.4Using MIDI Mode (119)3.8Syncing MASCHINE using Ableton Link (120)3.8.1Connecting to a Network (121)3.8.2Joining and Leaving a Link Session (121)4Browser (123)4.1Browser Basics (123)4.1.1The MASCHINE Library (123)4.1.2Browsing the Library vs. Browsing Your Hard Disks (124)4.2Searching and Loading Files from the Library (125)4.2.1Overview of the Library Pane (125)4.2.2Selecting or Loading a Product and Selecting a Bank from the Browser (128)4.2.3Selecting a Product Category, a Product, a Bank, and a Sub-Bank (133)4.2.3.1Selecting a Product Category, a Product, a Bank, and a Sub-Bank on theController (137)4.2.4Selecting a File Type (137)4.2.5Choosing Between Factory and User Content (138)4.2.6Selecting Type and Character Tags (138)4.2.7Performing a Text Search (142)4.2.8Loading a File from the Result List (143)4.3Additional Browsing Tools (148)4.3.1Loading the Selected Files Automatically (148)4.3.2Auditioning Instrument Presets (149)4.3.3Auditioning Samples (150)4.3.4Loading Groups with Patterns (150)4.3.5Loading Groups with Routing (151)4.3.6Displaying File Information (151)4.4Using Favorites in the Browser (152)4.5Editing the Files’ Tags and Properties (155)4.5.1Attribute Editor Basics (155)4.5.2The Bank Page (157)4.5.3The Types and Characters Pages (157)4.5.4The Properties Page (160)4.6Loading and Importing Files from Your File System (161)4.6.1Overview of the FILES Pane (161)4.6.2Using Favorites (163)4.6.3Using the Location Bar (164)4.6.4Navigating to Recent Locations (165)4.6.5Using the Result List (166)4.6.6Importing Files to the MASCHINE Library (169)4.7Locating Missing Samples (171)4.8Using Quick Browse (173)5Managing Sounds, Groups, and Your Project (175)5.1Overview of the Sounds, Groups, and Master (175)5.1.1The Sound, Group, and Master Channels (176)5.1.2Similarities and Differences in Handling Sounds and Groups (177)5.1.3Selecting Multiple Sounds or Groups (178)5.2Managing Sounds (181)5.2.1Loading Sounds (183)5.2.2Pre-listening to Sounds (184)5.2.3Renaming Sound Slots (185)5.2.4Changing the Sound’s Color (186)5.2.5Saving Sounds (187)5.2.6Copying and Pasting Sounds (189)5.2.7Moving Sounds (192)5.2.8Resetting Sound Slots (193)5.3Managing Groups (194)5.3.1Creating Groups (196)5.3.2Loading Groups (197)5.3.3Renaming Groups (198)5.3.4Changing the Group’s Color (199)5.3.5Saving Groups (200)5.3.6Copying and Pasting Groups (202)5.3.7Reordering Groups (206)5.3.8Deleting Groups (207)5.4Exporting MASCHINE Objects and Audio (208)5.4.1Saving a Group with its Samples (208)5.4.2Saving a Project with its Samples (210)5.4.3Exporting Audio (212)5.5Importing Third-Party File Formats (218)5.5.1Loading REX Files into Sound Slots (218)5.5.2Importing MPC Programs to Groups (219)6Playing on the Controller (223)6.1Adjusting the Pads (223)6.1.1The Pad View in the Software (223)6.1.2Choosing a Pad Input Mode (225)6.1.3Adjusting the Base Key (226)6.2Adjusting the Key, Choke, and Link Parameters for Multiple Sounds (227)6.3Playing Tools (229)6.3.1Mute and Solo (229)6.3.2Choke All Notes (233)6.3.3Groove (233)6.3.4Level, Tempo, Tune, and Groove Shortcuts on Your Controller (235)6.3.5Tap Tempo (235)6.4Performance Features (236)6.4.1Overview of the Perform Features (236)6.4.2Selecting a Scale and Creating Chords (239)6.4.3Scale and Chord Parameters (240)6.4.4Creating Arpeggios and Repeated Notes (253)6.4.5Swing on Note Repeat / Arp Output (257)6.5Using Lock Snapshots (257)6.5.1Creating a Lock Snapshot (257)7Working with Plug-ins (259)7.1Plug-in Overview (259)7.1.1Plug-in Basics (259)7.1.2First Plug-in Slot of Sounds: Choosing the Sound’s Role (263)7.1.3Loading, Removing, and Replacing a Plug-in (264)7.1.4Adjusting the Plug-in Parameters (270)7.1.5Bypassing Plug-in Slots (270)7.1.6Using Side-Chain (272)7.1.7Moving Plug-ins (272)7.1.8Alternative: the Plug-in Strip (273)7.1.9Saving and Recalling Plug-in Presets (273)7.1.9.1Saving Plug-in Presets (274)7.1.9.2Recalling Plug-in Presets (275)7.1.9.3Removing a Default Plug-in Preset (276)7.2The Sampler Plug-in (277)7.2.1Page 1: Voice Settings / Engine (279)7.2.2Page 2: Pitch / Envelope (281)7.2.3Page 3: FX / Filter (283)7.2.4Page 4: Modulation (285)7.2.5Page 5: LFO (286)7.2.6Page 6: Velocity / Modwheel (288)7.3Using Native Instruments and External Plug-ins (289)7.3.1Opening/Closing Plug-in Windows (289)7.3.2Using the VST/AU Plug-in Parameters (292)7.3.3Setting Up Your Own Parameter Pages (293)7.3.4Using VST/AU Plug-in Presets (298)7.3.5Multiple-Output Plug-ins and Multitimbral Plug-ins (300)8Using the Audio Plug-in (302)8.1Loading a Loop into the Audio Plug-in (306)8.2Editing Audio in the Audio Plug-in (307)8.3Using Loop Mode (308)8.4Using Gate Mode (310)9Using the Drumsynths (312)9.1Drumsynths – General Handling (313)9.1.1Engines: Many Different Drums per Drumsynth (313)9.1.2Common Parameter Organization (313)9.1.3Shared Parameters (316)9.1.4Various Velocity Responses (316)9.1.5Pitch Range, Tuning, and MIDI Notes (316)9.2The Kicks (317)9.2.1Kick – Sub (319)9.2.2Kick – Tronic (321)9.2.3Kick – Dusty (324)9.2.4Kick – Grit (325)9.2.5Kick – Rasper (328)9.2.6Kick – Snappy (329)9.2.7Kick – Bold (331)9.2.8Kick – Maple (333)9.2.9Kick – Push (334)9.3The Snares (336)9.3.1Snare – Volt (338)9.3.2Snare – Bit (340)9.3.3Snare – Pow (342)9.3.4Snare – Sharp (343)9.3.5Snare – Airy (345)9.3.6Snare – Vintage (347)9.3.7Snare – Chrome (349)9.3.8Snare – Iron (351)9.3.9Snare – Clap (353)9.3.10Snare – Breaker (355)9.4The Hi-hats (357)9.4.1Hi-hat – Silver (358)9.4.2Hi-hat – Circuit (360)9.4.3Hi-hat – Memory (362)9.4.4Hi-hat – Hybrid (364)9.4.5Creating a Pattern with Closed and Open Hi-hats (366)9.5The Toms (367)9.5.1Tom – Tronic (369)9.5.2Tom – Fractal (371)9.5.3Tom – Floor (375)9.5.4Tom – High (377)9.6The Percussions (378)9.6.1Percussion – Fractal (380)9.6.2Percussion – Kettle (383)9.6.3Percussion – Shaker (385)9.7The Cymbals (389)9.7.1Cymbal – Crash (391)9.7.2Cymbal – Ride (393)10Using the Bass Synth (396)10.1Bass Synth – General Handling (397)10.1.1Parameter Organization (397)10.1.2Bass Synth Parameters (399)11Working with Patterns (401)11.1Pattern Basics (401)11.1.1Pattern Editor Overview (402)11.1.2Navigating the Event Area (404)11.1.3Following the Playback Position in the Pattern (406)11.1.4Jumping to Another Playback Position in the Pattern (407)11.1.5Group View and Keyboard View (408)11.1.6Adjusting the Arrange Grid and the Pattern Length (410)11.1.7Adjusting the Step Grid and the Nudge Grid (413)11.2Recording Patterns in Real Time (416)11.2.1Recording Your Patterns Live (417)11.2.2Using the Metronome (419)11.2.3Recording with Count-in (420)11.3Recording Patterns with the Step Sequencer (422)11.3.1Step Mode Basics (422)11.3.2Editing Events in Step Mode (424)11.4Editing Events (425)11.4.1Editing Events with the Mouse: an Overview (425)11.4.2Creating Events/Notes (428)11.4.3Selecting Events/Notes (429)11.4.4Editing Selected Events/Notes (431)11.4.5Deleting Events/Notes (434)11.4.6Cut, Copy, and Paste Events/Notes (436)11.4.7Quantizing Events/Notes (439)11.4.8Quantization While Playing (441)11.4.9Doubling a Pattern (442)11.4.10Adding Variation to Patterns (442)11.5Recording and Editing Modulation (443)11.5.1Which Parameters Are Modulatable? (444)11.5.2Recording Modulation (446)11.5.3Creating and Editing Modulation in the Control Lane (447)11.6Creating MIDI Tracks from Scratch in MASCHINE (452)11.7Managing Patterns (454)11.7.1The Pattern Manager and Pattern Mode (455)11.7.2Selecting Patterns and Pattern Banks (456)11.7.3Creating Patterns (459)11.7.4Deleting Patterns (460)11.7.5Creating and Deleting Pattern Banks (461)11.7.6Naming Patterns (463)11.7.7Changing the Pattern’s Color (465)11.7.8Duplicating, Copying, and Pasting Patterns (466)11.7.9Moving Patterns (469)11.8Importing/Exporting Audio and MIDI to/from Patterns (470)11.8.1Exporting Audio from Patterns (470)11.8.2Exporting MIDI from Patterns (472)11.8.3Importing MIDI to Patterns (474)12Audio Routing, Remote Control, and Macro Controls (483)12.1Audio Routing in MASCHINE (484)12.1.1Sending External Audio to Sounds (485)12.1.2Configuring the Main Output of Sounds and Groups (489)12.1.3Setting Up Auxiliary Outputs for Sounds and Groups (494)12.1.4Configuring the Master and Cue Outputs of MASCHINE (497)12.1.5Mono Audio Inputs (502)12.1.5.1Configuring External Inputs for Sounds in Mix View (503)12.2Using MIDI Control and Host Automation (506)12.2.1Triggering Sounds via MIDI Notes (507)12.2.2Triggering Scenes via MIDI (513)12.2.3Controlling Parameters via MIDI and Host Automation (514)12.2.4Selecting VST/AU Plug-in Presets via MIDI Program Change (522)12.2.5Sending MIDI from Sounds (523)12.3Creating Custom Sets of Parameters with the Macro Controls (527)12.3.1Macro Control Overview (527)12.3.2Assigning Macro Controls Using the Software (528)13Controlling Your Mix (535)13.1Mix View Basics (535)13.1.1Switching between Arrange View and Mix View (535)13.1.2Mix View Elements (536)13.2The Mixer (537)13.2.1Displaying Groups vs. Displaying Sounds (539)13.2.2Adjusting the Mixer Layout (541)13.2.3Selecting Channel Strips (542)13.2.4Managing Your Channels in the Mixer (543)13.2.5Adjusting Settings in the Channel Strips (545)13.2.6Using the Cue Bus (549)13.3The Plug-in Chain (551)13.4The Plug-in Strip (552)13.4.1The Plug-in Header (554)13.4.2Panels for Drumsynths and Internal Effects (556)13.4.3Panel for the Sampler (557)13.4.4Custom Panels for Native Instruments Plug-ins (560)13.4.5Undocking a Plug-in Panel (Native Instruments and External Plug-ins Only) (564)14Using Effects (567)14.1Applying Effects to a Sound, a Group or the Master (567)14.1.1Adding an Effect (567)14.1.2Other Operations on Effects (574)14.1.3Using the Side-Chain Input (575)14.2Applying Effects to External Audio (578)14.2.1Step 1: Configure MASCHINE Audio Inputs (578)14.2.2Step 2: Set up a Sound to Receive the External Input (579)14.2.3Step 3: Load an Effect to Process an Input (579)14.3Creating a Send Effect (580)14.3.1Step 1: Set Up a Sound or Group as Send Effect (581)14.3.2Step 2: Route Audio to the Send Effect (583)14.3.3 A Few Notes on Send Effects (583)14.4Creating Multi-Effects (584)15Effect Reference (587)15.1Dynamics (588)15.1.1Compressor (588)15.1.2Gate (591)15.1.3Transient Master (594)15.1.4Limiter (596)15.1.5Maximizer (600)15.2Filtering Effects (603)15.2.1EQ (603)15.2.2Filter (605)15.2.3Cabinet (609)15.3Modulation Effects (611)15.3.1Chorus (611)15.3.2Flanger (612)15.3.3FM (613)15.3.4Freq Shifter (615)15.3.5Phaser (616)15.4Spatial and Reverb Effects (617)15.4.1Ice (617)15.4.2Metaverb (619)15.4.3Reflex (620)15.4.4Reverb (Legacy) (621)15.4.5Reverb (623)15.4.5.1Reverb Room (623)15.4.5.2Reverb Hall (626)15.4.5.3Plate Reverb (629)15.5Delays (630)15.5.1Beat Delay (630)15.5.2Grain Delay (632)15.5.3Grain Stretch (634)15.5.4Resochord (636)15.6Distortion Effects (638)15.6.1Distortion (638)15.6.2Lofi (640)15.6.3Saturator (641)15.7Perform FX (645)15.7.1Filter (646)15.7.2Flanger (648)15.7.3Burst Echo (650)15.7.4Reso Echo (653)15.7.5Ring (656)15.7.6Stutter (658)15.7.7Tremolo (661)15.7.8Scratcher (664)16Working with the Arranger (667)16.1Arranger Basics (667)16.1.1Navigating Song View (670)16.1.2Following the Playback Position in Your Project (672)16.1.3Performing with Scenes and Sections using the Pads (673)16.2Using Ideas View (677)16.2.1Scene Overview (677)16.2.2Creating Scenes (679)16.2.3Assigning and Removing Patterns (679)16.2.4Selecting Scenes (682)16.2.5Deleting Scenes (684)16.2.6Creating and Deleting Scene Banks (685)16.2.7Clearing Scenes (685)16.2.8Duplicating Scenes (685)16.2.9Reordering Scenes (687)16.2.10Making Scenes Unique (688)16.2.11Appending Scenes to Arrangement (689)16.2.12Naming Scenes (689)16.2.13Changing the Color of a Scene (690)16.3Using Song View (692)16.3.1Section Management Overview (692)16.3.2Creating Sections (694)16.3.3Assigning a Scene to a Section (695)16.3.4Selecting Sections and Section Banks (696)16.3.5Reorganizing Sections (700)16.3.6Adjusting the Length of a Section (702)16.3.6.1Adjusting the Length of a Section Using the Software (703)16.3.6.2Adjusting the Length of a Section Using the Controller (705)16.3.7Clearing a Pattern in Song View (705)16.3.8Duplicating Sections (705)16.3.8.1Making Sections Unique (707)16.3.9Removing Sections (707)16.3.10Renaming Scenes (708)16.3.11Clearing Sections (710)16.3.12Creating and Deleting Section Banks (710)16.3.13Working with Patterns in Song view (710)16.3.13.1Creating a Pattern in Song View (711)16.3.13.2Selecting a Pattern in Song View (711)16.3.13.3Clearing a Pattern in Song View (711)16.3.13.4Renaming a Pattern in Song View (711)16.3.13.5Coloring a Pattern in Song View (712)16.3.13.6Removing a Pattern in Song View (712)16.3.13.7Duplicating a Pattern in Song View (712)16.3.14Enabling Auto Length (713)16.3.15Looping (714)16.3.15.1Setting the Loop Range in the Software (714)16.3.15.2Activating or Deactivating a Loop Using the Controller (715)16.4Playing with Sections (715)16.4.1Jumping to another Playback Position in Your Project (716)16.5Triggering Sections or Scenes via MIDI (717)16.6The Arrange Grid (719)16.7Quick Grid (720)17Sampling and Sample Mapping (722)17.1Opening the Sample Editor (722)17.2Recording Audio (724)17.2.1Opening the Record Page (724)17.2.2Selecting the Source and the Recording Mode (725)17.2.3Arming, Starting, and Stopping the Recording (729)17.2.5Checking Your Recordings (731)17.2.6Location and Name of Your Recorded Samples (734)17.3Editing a Sample (735)17.3.1Using the Edit Page (735)17.3.2Audio Editing Functions (739)17.4Slicing a Sample (743)17.4.1Opening the Slice Page (743)17.4.2Adjusting the Slicing Settings (744)17.4.3Manually Adjusting Your Slices (746)17.4.4Applying the Slicing (750)17.5Mapping Samples to Zones (754)17.5.1Opening the Zone Page (754)17.5.2Zone Page Overview (755)17.5.3Selecting and Managing Zones in the Zone List (756)17.5.4Selecting and Editing Zones in the Map View (761)17.5.5Editing Zones in the Sample View (765)17.5.6Adjusting the Zone Settings (767)17.5.7Adding Samples to the Sample Map (770)18Appendix: Tips for Playing Live (772)18.1Preparations (772)18.1.1Focus on the Hardware (772)18.1.2Customize the Pads of the Hardware (772)18.1.3Check Your CPU Power Before Playing (772)18.1.4Name and Color Your Groups, Patterns, Sounds and Scenes (773)18.1.5Consider Using a Limiter on Your Master (773)18.1.6Hook Up Your Other Gear and Sync It with MIDI Clock (773)18.1.7Improvise (773)18.2Basic Techniques (773)18.2.1Use Mute and Solo (773)18.2.2Create Variations of Your Drum Patterns in the Step Sequencer (774)18.2.3Use Note Repeat (774)18.2.4Set Up Your Own Multi-effect Groups and Automate Them (774)18.3Special Tricks (774)18.3.1Changing Pattern Length for Variation (774)18.3.2Using Loops to Cycle Through Samples (775)18.3.3Load Long Audio Files and Play with the Start Point (775)19Troubleshooting (776)19.1Knowledge Base (776)19.2Technical Support (776)19.3Registration Support (777)19.4User Forum (777)20Glossary (778)Index (786)1Welcome to MASCHINEThank you for buying MASCHINE!MASCHINE is a groove production studio that implements the familiar working style of classi-cal groove boxes along with the advantages of a computer based system. MASCHINE is ideal for making music live, as well as in the studio. It’s the hands-on aspect of a dedicated instru-ment, the MASCHINE hardware controller, united with the advanced editing features of the MASCHINE software.Creating beats is often not very intuitive with a computer, but using the MASCHINE hardware controller to do it makes it easy and fun. You can tap in freely with the pads or use Note Re-peat to jam along. Alternatively, build your beats using the step sequencer just as in classic drum machines.Patterns can be intuitively combined and rearranged on the fly to form larger ideas. You can try out several different versions of a song without ever having to stop the music.Since you can integrate it into any sequencer that supports VST, AU, or AAX plug-ins, you can reap the benefits in almost any software setup, or use it as a stand-alone application. You can sample your own material, slice loops and rearrange them easily.However, MASCHINE is a lot more than an ordinary groovebox or sampler: it comes with an inspiring 7-gigabyte library, and a sophisticated, yet easy to use tag-based Browser to give you instant access to the sounds you are looking for.What’s more, MASCHINE provides lots of options for manipulating your sounds via internal ef-fects and other sound-shaping possibilities. You can also control external MIDI hardware and 3rd-party software with the MASCHINE hardware controller, while customizing the functions of the pads, knobs and buttons according to your needs utilizing the included Controller Editor application. We hope you enjoy this fantastic instrument as much as we do. Now let’s get go-ing!—The MASCHINE team at Native Instruments.MASCHINE Documentation1.1MASCHINE DocumentationNative Instruments provide many information sources regarding MASCHINE. The main docu-ments should be read in the following sequence:1.MASCHINE MIKRO Quick Start Guide: This animated online guide provides a practical ap-proach to help you learn the basic of MASCHINE MIKRO. The guide is available from theNative Instruments website: https:///maschine-mikro-quick-start/2.MASCHINE Manual (this document): The MASCHINE Manual provides you with a compre-hensive description of all MASCHINE software and hardware features.Additional documentation sources provide you with details on more specific topics:►Online Support Videos: You can find a number of support videos on The Official Native In-struments Support Channel under the following URL: https:///NIsupport-EN. We recommend that you follow along with these instructions while the respective ap-plication is running on your computer.Other Online Resources:If you are experiencing problems related to your Native Instruments product that the supplied documentation does not cover, there are several ways of getting help:▪Knowledge Base▪User Forum▪Technical Support▪Registration SupportYou will find more information on these subjects in the chapter Troubleshooting.Document Conventions1.2Document ConventionsThis section introduces you to the signage and text highlighting used in this manual. This man-ual uses particular formatting to point out special facts and to warn you of potential issues.The icons introducing these notes let you see what kind of information is to be expected:This document uses particular formatting to point out special facts and to warn you of poten-tial issues. The icons introducing the following notes let you see what kind of information canbe expected:Furthermore, the following formatting is used:▪Text appearing in (drop-down) menus (such as Open…, Save as… etc.) in the software andpaths to locations on your hard disk or other storage devices is printed in italics.▪Text appearing elsewhere (labels of buttons, controls, text next to checkboxes etc.) in thesoftware is printed in blue. Whenever you see this formatting applied, you will find thesame text appearing somewhere on the screen.▪Text appearing on the displays of the controller is printed in light grey. Whenever you seethis formatting applied, you will find the same text on a controller display.▪Text appearing on labels of the hardware controller is printed in orange. Whenever you seethis formatting applied, you will find the same text on the controller.▪Important names and concepts are printed in bold.▪References to keys on your computer’s keyboard you’ll find put in square brackets (e.g.,“Press [Shift] + [Enter]”).►Single instructions are introduced by this play button type arrow.→Results of actions are introduced by this smaller arrow.Naming ConventionThroughout the documentation we will refer to MASCHINE controller (or just controller) as the hardware controller and MASCHINE software as the software installed on your computer.The term “effect” will sometimes be abbreviated as “FX” when referring to elements in the MA-SCHINE software and hardware. These terms have the same meaning.Button Combinations and Shortcuts on Your ControllerMost instructions will use the “+” sign to indicate buttons (or buttons and pads) that must be pressed simultaneously, starting with the button indicated first. E.g., an instruction such as:“Press SHIFT + PLAY”means:1.Press and hold SHIFT.2.While holding SHIFT, press PLAY and release it.3.Release SHIFT.1.3New Features in MASCHINE2.8The following new features have been added to MASCHINE: Integration▪Browse on , create your own collections of loops and one-shots and send them directly to the MASCHINE browser.Improvements to the Browser▪Samples are now cataloged in separate Loops and One-shots tabs in the Browser.▪Previews of loops selected in the Browser will be played in sync with the current project.When a loop is selected with Prehear turned on, it will begin playing immediately in-sync with the project if transport is running. If a loop preview starts part-way through the loop, the loop will play once more for its full length to ensure you get to hear the entire loop once in context with your project.▪Filters and product selections will be remembered when switching between content types and Factory/User Libraries in the Browser.▪Browser content synchronization between multiple running instances. When running multi-ple instances of MASCHINE, either as Standalone and/or as a plug-in, updates to the Li-brary will be synced across the instances. For example, if you delete a sample from your User Library in one instance, the sample will no longer be present in the other instances.Similarly, if you save a preset in one instance, that preset will then be available in the oth-er instances, too.▪Edits made to samples in the Factory Libraries will be saved to the Standard User Directo-ry.For more information on these new features, refer to the following chapter ↑4, Browser. Improvements to the MASCHINE MIKRO MK3 Controller▪You can now set sample Start and End points using the controller. For more information refer to ↑17.3.1, Using the Edit Page.Improved Support for A-Series Keyboards▪When Browsing with A-Series keyboards, you can now jump quickly to the results list by holding SHIFT and pushing right on the 4D Encoder.▪When Browsing with A-Series keyboards, you can fast scroll through the Browser results list by holding SHIFT and twisting the 4D Encoder.▪Mute and Solo Sounds and Groups from A-Series keyboards. Sounds are muted in TRACK mode while Groups are muted in IDEAS.。
生活资讯频道节目单

生活资讯频道节目单1. 起床早安播放时间:每天早上7点在清晨来临之际,为您带来一段美好的早晨引导,为您打开全新的一天。
我们会分享一些有效的起床方法、健康的早餐食谱和一些生活技巧,帮助您开始一天的工作和生活。
2. 健康生活小贴士播放时间:每周一、三、五下午2点在这个节目中,我们将分享一些关于保持健康和健康生活的小贴士。
我们会向您介绍一些简单易行的健康习惯,包括饮食、运动、心理健康等方面的建议,帮助您保持身心健康。
3. 美食探秘播放时间:每周二、四晚上8点这个节目将带领您探索各种美食的世界。
我们会介绍来自不同国家和地区的特色菜肴、烹饪技巧和饮食文化。
无论您是美食爱好者还是厨艺小白,这里都将有适合您的美食信息和灵感。
4. 生活技能大讲堂播放时间:每周四下午4点在这个节目中,我们邀请各行各业的专家和大师,与您分享各种实用的生活技能和知识。
我们将涵盖各种主题,如家居装修、手工艺品制作、健身锻炼、瑜伽等,帮助您提升生活品质和技能。
5. 周末有约播放时间:每周六下午3点在繁忙的工作之余,我们需要休息和放松。
这个节目将为您推荐一些休闲娱乐活动和旅游景点。
无论您是想找个地方放松心情,还是寻找一些有趣的活动,这里都会有适合您的建议和推荐。
6. 健康美容秘籍播放时间:每周五上午10点在这个节目中,我们将为您分享各种美容秘籍和护肤技巧。
我们会推荐一些天然健康的美容产品和DIY护肤方法,帮助您保持年轻的外貌和自信的心态。
7. 健康饮食指南播放时间:每周一、三、五中午12点在这个节目中,我们将为您介绍一些健康饮食的指南和建议。
我们会解读各种食物的营养价值,推荐一些适合各种人群的饮食方案,帮助您培养良好的饮食习惯和健康的生活方式。
8. 生活百科播放时间:每天晚上9点这个节目将为您提供各种实用的生活百科知识。
我们会分享一些生活小技巧、实用工具、常见问题解答等内容,帮助您解决生活中的各种难题,更好地应对各种挑战。
以上是生活资讯频道的节目单安排。
BBC英文广播时间与频率表

BBC英文广播时间与频率表BBC FREQUENCIES: EAST ASIA Time is GMT, GMT+8=BEI JING TIME From To Days Frequency00:00 00:30 Daily 17615,1194500:00 03:00 Daily 1536000:00 05:30 Daily 1528003:00 10:30 Daily 2166003:00 14:00 Daily 1776005:00 10:30 Daily 1536009:00 10:30 Daily 960510:00 16:00 Daily 974013:00 16:00 Daily 619514:00 16:00 Daily 710521:00 22:00 Daily 611021:00 24:00 Daily 596522:00 23:00 Daily 619522:00 24:00 Daily 1168523:00 24:00 Daily 11945,1528023:30 24:00 Daily 6035VOA 全球英语广播时间表Sunday1900-1910 News1910-1930 International Focus1930-2000 Press Conference USA2100-2110 News2110-2130 On The Line2130-2200 Issues in the News2130-2200 Issues in the News2200-2210 News2210-2230 VOA Sunday2230-2300 Special English News and Features2300-2310 News2310-0000 VOA Sunday0000-0010 News0010-0030 VOA Sunday0030-0100 Special English News and Features1000-1010 News1010-1030 Critic's Choice1030-1100 Special English Features1100-1110 News1110-1130 New Horizons1130-1200 Issues in the News1200-1210 News1210-1230 Encounter1230-1300 Studio One1300-1310 News1310-1330 Critic's Choice1330-1400 Special English News and Features 1400-1410 News2200-2210 News2210-2230 VOA Sunday2230-2300 Special English News and Features 2300-2310 News2310-0000 VOA Sunday0000-0010 News0010-0030 VOA Sunday0030-0100 Special English News and Features 1000-1010 News1010-1030 Critic's Choice1030-1100 Special English Features1100-1110 News1110-1130 New Horizons1130-1200 Issues in the News1200-1210 News1210-1230 Encounter1230-1300 Studio One1300-1310 News1310-1330 Critic's Choice1330-1400 Special English News and Features 1400-1410 News1410-1457 The Concert Hal1457-1500 EditorialMonday1900-1910 News1910-1930 Newsline1930-2000 Music USA (Standards)2100-2110 News2110-2200 VOA Pacific2200-2210 News2210-2230 VOA Today2230-2240 Special English News2240-2300 VOA Today2300-2310 News2310-0000 VOA Today0000-0010 News0010-0030 VOA Business Report1000-1010 News1010-1100 Stateside1100-1110 News1110-1130 Special English Features1130-1200 Music USA (Standards)1200-1210 News1210-1300 Stateside1300-1310 News1310-1330 Spotlight on Business and Finance 1330-1400 Special English News and Features 1400-1410 News1410-1457 Asia Report1457-1500 Editorial1700-1706 News1706-1800 Talk to AmericaTuesday through Friday1900-1910 News1910-1930 Newsline1930-2000 Music USATuesday - StandardsWed., Thurs., Fri. - Now Music USA2100-2200 World Report2200-2210 News2210-2230 VOA Today2230-2240 Special English News2240-2300 VOA Today2300-2310 News2310-0000 VOA Today0000-0010 News0010-0030 VOA Business Report0030-0100 Special English News and Features 1000-1010 News1010-1100 Stateside1100-1110 News1110-1130 Special English Features1130-1200 Music USA (see 1930)1200-1210 News1210-1300 Stateside1300-1310 News1310-1330 Tuesday - Inside USA Wednesday - International FocusThursday - VOA NotebookFriday - Perspectives1400-1410 News1410-1457 Asia Report1457-1500 Editorial1700-1706 News1706-1800 Talk to AmericaSaturday1900-1910 News1910-1930 Newsline1930-2000 Country Music USA2100-2200 World Report2200-2210 News2210-2230 Newsline2230-2300 Special English News and Features2300-2310 News2310-0000 VOA Saturday0000-0010 News0010-0030 Newsline0030-0100 Special English News and Features1000-1010 News1010-1030 Encounter1030-1100 Communications World1100-1110 News1110-1130 Agriculture Today1130-1200 Press Conference USA1200-1210 News1210-1230 On The LIne1230-1300 Communications World1300-1310 News1310-1330 Perspectives1330-1400 Special English News and Features1400-1410 News1410-1457 Music USA (Jazz)1457-1500 EditorialVOA广播频率:time frequencyCANTONESE to East Asia1500-1600 1143 6030CHINESE (MANDARIN) to East Asia0000-0100 7190 9545 11830 11925 15150 15195 177650100-0130 7190 9545 11775 11830 11925 15150 15195 17765 0130-0200 7190 9545 11775 11830 11925 15195 177651100-1200 1143 6160 11785 11825 11965 11995 12040 15250 1200-1230 6160 11785 11825 11965 11995 12040 152501230-1300 6160 11785 11805 11825 11965 12040 152501300-1330 6160 9905 11785 11805 11825 11965 120401330-1400 1143 6160 9905 11785 11805 11825 11965 120401400-1500 6160 9585 9905 11805 11965 11990 120401500-1600 9585 9905 11805 11965 11990 120401600-1700 1143 9665 11940 11965 119952100-2200 1575 6025 7200 9510 9545 9555 119252200-2300 6025 7150 7190 7200 9510 9545 9555 119252300-2400 7190 7200 9545 9555 11925 15150 15195 17765电台名称北京时间使用频率(KHZ)英国BBC中文06:00-07:00 6035,6110,7160,9580,9915,11945,1528018:00-19:00 9580,9605,11765,11945,11990,1528019:00-21:00 9605,1194521:00-23:30 6065,7245,9605,11870,15285英国BBC广东话21:00-21:30 7225,11945英国BBC英语00:00-02:00 3915,716005:00-06:00 3915,974005:00-10:00 619506:00-07:00 966006:00-08:00 1195506:00-09:00 711007:00-08:00 391508:00-10:00 941008:00-11:30 1536013:00-17:00 1195513:00:18:30 15360,1776013:00-00:00 974017:00-01:00 619522:00-01:00 15310你有电脑可以上网听,不间断的,而且比广播清楚!/bg/read/readnews.asp?id=389在网上听,这个网址除了VOA,CNN,BBC在线电台,还有ABC,BBC在线电视/voa.htmVOA英文广播时刻表Standard English0000-0100 BT 1143 6160 7125 97600100-0200 BT 6160 7125 7170 96450100-0200 BT* 1143 1575 5990 6045 7215 9770 97850300-0400 BT 9525 11770 151800500-0600 BT 9705 11870 15185 17740 178200600-0800 BT 7215 9705 9770 11760 15185 15290 15305 17740 17820 0630-0800 BT> 15750800-0830 BT 1575 7215 9770 11760 15185 15290 17740 17820 0900-1100 BT 7115 9635 11705 11725 11820 13650 17740 17820 1600-1800 BT 11930 13610 151501800-1900 BT 9770 15240 154251900-1930 BT$ 15751900-2000 BT 6160 9645 9760 9770 15160 15240 154252000-2030 BT 1143 6160 9645 9760 15160 15240 154252030-2100 BT 6160 9645 9760 15160 15240 154252100-2200 BT 6160 9645 9760 15160 154252200-2300 BT 1143 6160 7125 9760 15160 154252300-2400 BT 7125Special English0000-0100 BT 13600 15445 178950300-0330 BT 1197 7260 9680 136350300-0400 BT* 9550 9840 11780 11970 12015 152350330-0400 BT 7260 9680 13635 137250700-0730 BT 7190 7200 9545 11925 137750730-0800 BT 7190 7200 7225 7260 9545 11805 11925 13735 13775 152050830-0800 BT 1548 1575 7215 9770 11760 15185 15290 17740 17820 0830-1000 BT# 7405 9775 137402300-2330 BT 6160 9590 9760 9845 12040 155502300-2330 BT$ 15752330-2400 BT 1575 6160 9590 9760 9845 12040 15550* - Monday through Friday$ - Saturday and Sunday> - Friday and Saturday# - Tuesday through SaturdayBBC 英文广播时刻表Summer 200205:00-06:00 1194505:00-07:00 619505:00-08:00 596507:00-08:00 11945, 15280, 958008:00-08:30 17615, 1194508:00-11:30 1536008:00-13:30 1528011:00-18:30* 21660 (*ends 1000 Sat and Sun)11:00-13:00 1763513:00-20:00 1536013:00-22:00 1776017:00-18:30 11945, 960518:00-24:00 974021:00-24:00 6195●所有的时间都是北京时间●数字表示频率,如9705 表示9.705MHz,11870表示11.870MHz ,高档的数显频率收音机会精确到0.005MHz,一般的数显收音机和模拟显示收音机最多精确到0.01MHz,也就是说9705在那里是970,11870在那里是1187。
小米智能攝影機2K Pro 雲台版使用說明書说明书

小米智能攝影機2K Pro 雲台版 使用說明書 1Mi 360° Home Security Camera 2K Pro User Manual 12 使用產品前請仔細閱讀本說明書,並妥善保管。
產品介紹包裝清單:小米智能攝影機2K Pro 雲台版、電源適配器、電源連接線、 掛牆配件包、說明書前視圖後視圖重設孔Micro-USB 電源接口喇叭放音區可以將小米智能攝影機2K Pro 雲台版擺放在寫字台、餐桌、茶几等平面,也可以固定安裝在牆體上。
1. 先用鉛筆在牆體上按照基座孔距做好標記,再用鑽孔工具在標記處打 兩個孔。
鑽孔直徑約為:6mm,孔深約為:30mm。
掛牆安裝: 2. 將兩個塑膠膨脹螺絲釘入打好的孔中。
安裝MicroSD 卡槽(鏡頭向上時可見)指示燈鏡頭麥克風孔麥克風孔Reset 12使用MicroSD 確保攝影機處於斷電狀態,撥動鏡頭使其向上,露出MicroSD卡槽。
將MicroSD卡有觸點的一面朝下插入卡槽。
注意:安裝或取出MicroSD卡,需要先切斷攝影機電源後再操作。
請使用正規廠商生產的MicroSD卡(最大支援容量為32GB),建議MicroSD卡讀寫速度不低於U1/Class10級。
安裝MicroSD卡3. 將基座標有箭頭的一面朝外,基座的孔對準 牆面的孔放置,將螺絲穿過基座孔,用十字 螺絲批擰入牆上的膨脹螺絲中。
4. 將攝影機底部的凹槽對準基座上凸起的部分 安裝扣合後,順時針旋轉直至鎖定到位。
掛牆安裝注意事項:1. 安裝牆面需要至少能夠承受攝影機總重量的3倍以上。
2. 為防止傷害,必須按安裝說明將裝置牢固地固定在天花板或牆壁上。
34指示燈藍色常亮:連接成功/狀態正常 藍色閃爍:網絡異常橙色快閃:等待連接 橙色慢閃:正在升級提示:開機後,請勿轉動攝影機的鏡頭強制其旋轉。
如果鏡頭定位不準確,可通過APP進行校準。
開機將電源連接線插入攝影機背部的Micro-USB電源接口,攝影機自動開機,指示燈橙色快閃。
佳能CanoScan扫描仪快速入门指南说明书
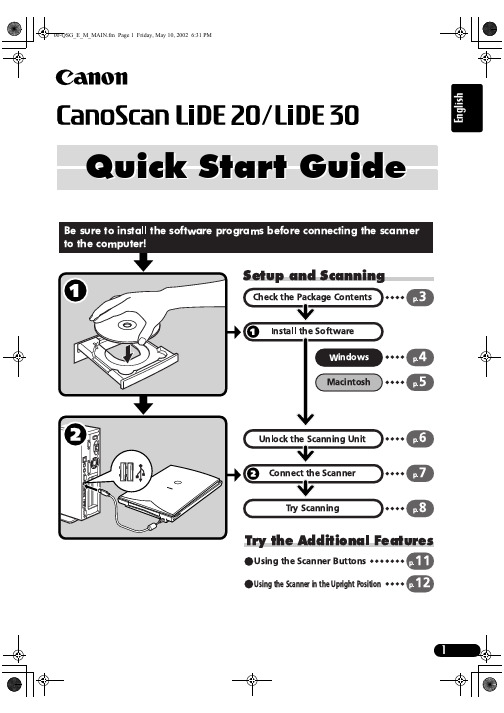
Quick Start GuideGuide to the Manuals•CanoScan and ScanGear are trademarks of Canon Inc.•Adobe ® and Acrobat ® are trademarks of Adobe Systems Incorporated.•Microsoft and Windows are registered trademarks of Microsoft Corporation in the U.S. and other countries.•Macintosh, Power Macintosh and Mac OS are trademarks of Apple Computer, Inc., registered in the U.S. and other countries.•ScanSoft and OmniPage are trademarks of ScanSoft, Inc.•Other names and products not mentioned above may be trademarks or registered trademarks of their respective companies.In this guide the screen shots are taken with Windows XP in the explanation common to all operating systems.Use of a shielded cable with the ferrite core(s) provided with the scanner is necessary to comply with the technical requirements of the EMC Directive.WarningWhen you use this product, you should pay attention to the following legal issues:•Scanning of certain documents, such as bank notes (bank bills), government bonds and public certificates, may be prohibited by law and may result in criminal and/or civil liability.•You may be required under law to obtain authorization from a person possessing copyrights or other legal rights to the item being scanned.If you are uncertain of the legality of scanning any particular item, you should consult your legal adviser in advance.Check the Package ContentsScanner and AccessoriesDocuments and Software Programs•Quick Start Guide (this guide)•Additional documents•CanoScan Setup Utility CD-ROMScanGear CS (25 MB / 5 MB) - Scanner DriverIt allows you to scan and load images from the scanner.CanoScan Toolbox (5 MB / 3 MB) - Scanning Utility ProgramIt enables you to scan images and copy (print), attach images to e-mail messages or save images with simple steps. It also works with the scanner buttons.ArcSoft PhotoStudio (30 MB / 19 MB) - Image Editing ProgramIt allows you to load images from the scanner, edit and retouch them, and apply special effects and enhancements.ArcSoft PhotoBase (75 MB / 5 MB) - Photo Album ProgramIt allows you to create and edit image albums, perform image searches and create slide shows.ScanSoft OmniPage SE (65 MB / 48 MB) - OCR (Optical Character Recognition) Program It converts characters scanned from a book, magazine or newspaper into text data for editing or digital transmission.Adobe Acrobat Reader (24 MB / 24 MB) - Electronic Manual Viewer Program (PDF manual)Electronic manuals for the above software programs (HTML (5 MB) and PDF manuals)ScannerUSB Interface CableInstall the Software (Windows)1Turn the computer on.2Place the CanoScan Setup Utility CD-ROM in the drive.After you select your language, the CanoScan Setup Utility main menu will display.3Click [Install the Software].Read the SOFTWARE USER LICENSE AGREEMENT. Click [Yes] if you accept the terms.The [Install] window will display.4Click [Start Installation].You will install six software programs and the Scanning Guide (HTML format manual).5The installation procedure will start.Follow the on-screen message prompts and click [Yes] or [Next] to continue the installation.6When the installation is complete, click [Yes].The computer will restart.7After Windows restarts, remove the CD-ROM fromthe drive and store it in a safe place.Continue on P . 6.If the "Found New Hardware Wizard" or"Add New Hardware Wizard" appears, click [Cancel].E Install the Software (Macintosh)1Turn the computer on.2Place the CanoScan Setup Utility CD-ROM in thedrive.After you select your language, the CanoScan Setup Utilitymain menu will display.3Click [Install the Software].Read the SOFTWARE USER LICENSE AGREEMENT. Click [Yes] ifyou accept the terms.The [Install] window will display.4Click [Start Installation].You will install six software programs and the Scanning Guide(HTML format manual).5The installation procedure will start.Follow the on-screen message prompts and click [Yes], [Next] or[Install] to continue the installation.6When the installation is complete, click [Yes].The computer will restart.7After restarting, remove the CD-ROM from the driveand store it in a safe place.If the “...Would you like to look for the softwareon the Internet?” appears, click [Cancel].If no window displays, double-click the CD-ROMicon, then the Setup icon.Unlock the Scanning Unit1Peel the caution seal on the front of the scanner.2Gently turn the scanner over.34Return the scanner to a horizontal position.1Peel the caution seal on the back of the scanner.2Connect the scanner to the computer with the supplied USB interface cable.The following steps explain how to scan with ArcSoft PhotoStudio.Alignment MarkTopBottom2Select [Start], [Programs] or [AllPrograms], [ArcSoft PhotoStudio] and[PhotoStudio 5].PhotoStudio will start.3Select this scanner.a.Click the [File] menu and select [Select Source].b.Highlight the scanner name and click [OK].This step is required only for the first time.Windows2Double-click the [Applications (Mac OS9)] folder and [PhotoStudio] folders andthe [PhotoStudio] icon.PhotoStudio will start.3Select this scanner.a.Click the [File] menu and select [SelectSource].b.Highlight the driver name and click [OK].This step is required only for the first time.Macintosh4Click the Acquire icon or click the[File] menu and select [Acquire].ScanGear CS will start.4Click the Acquire icon or click the[File] menu and select [Import...].ScanGear CS will start.Macintosh5Select "Type of original".You can select "Photo", "Magazine", "Newspaper" or"Document".•Photo: Color, 300 dpi•Magazine: Color, 150 dpi•Newspaper: Black and White, 300 dpi•Document: Grayscale, 300 dpi6Click [Preview].After calibration, the preview scan will start and graduallydisplay the image.The image is automatically cropped in the original size.If you want to trim the image further, drag the mouse diago-nally to select the area.Try ScanningTry Scanning7Click [Scan].The final scan will start.8Click or (close box) in the ScanGear CSwindow to close it.The scanned image will appear in the PhotoStudio window. 9Save the scanned image.Click the [File] menu and select [Save As]. Select the folderwhere you wish to store the image file, enter a file name,select a file type (JPG format is recommended) and click [Save]. 10Click or (close box) in the PhotoStudio window to close it.Using the Scanner ButtonsYou can use the three convenient buttons on the front of the scanner to scan and perform related tasks easily with a single touch of the button. Place an item on the scanner before pressing a button .SCAN ButtonTo open the scanned image in the PhotoBase window:1Press the [SCAN] button.2The scanner will scan the item.3The scanned image will appear in thePhotoBase window.COPY ButtonTo print (copy) the scanned image with a printer:1Press the [COPY] button.2The scanner will scan the item.3The scanned image will print.•The printer driver should be installed and the printer should be on-line to use this function.E-MAIL ButtonTo e-mail the scanned image as an attached file:1Press the [E-MAIL] button.2The scanner will scan the item.3The [E-mail software selection] dialog will appear. Select an option from the list and click [OK].This step is required only for the first scan.4The e-mail software will start and the scanned image will be attached in a new message window.5Enter the receiver’s address and title, write a message, confirm the required settings, and send the message.•The e-mail software such as Outlook Express, Microsoft Outlook, Eudora or NetscapeMessenger should be installed and enabled. With certain e-mail programs, you should enable MAPI function (for Windows).Using the Scanner in the Upright Position Installing the StandPositioning an ItemRemoving the StandSystem InformationThis form should be used to record the operating environment for the purchased scanner.If any problems occur with the scanner, you will need this information when you contact our Customer Support Help Desk. Be sure to record the information and store it in a safe location.•This information is also required to request a repair under warranty. Make sure you record the information and store it in a safe location.•Guaranteed servicing for this equipment will expire five years after production ceases.• About the Computer UsedDate of Purchase:Dealer Tel:Dealer Address:Scanner Model:CanoScanLiDE 20LiDE 30Serial Number (on the back of the equipment):Manufacturer:Model:CPU: Clock Speed:MHzMemory Capacity (RAM):MB Space Available:MBHard Disk Capacity:MB OS: WindowsXP Me 2000 98MacintoshOS 9.0OS 9.1OS 9.2OS X v10.1Monitor Type:Monitor Size:inchesPrinter:Manufacturer:Type of Printer:Printer Resolutions:Installed Virus Protection Program:Installed Compression Program:On-Board Expansion Cards:Attached Peripherals:Connected Network System:Specifications*1Transfer time to computer is not included.*2 Calibration processing time is not included.• Specifications are subject to change without notice.CanoScan LiDE 20CanoScan LiDE 30Scanner Type FlatbedScanning Element CIS (Contact Image Sensor)Light Source 3-color (RGB) LEDOptical Resolution 600 x 1200 dpi1200 x 2400 dpiSelectable Resolution 25 - 9600 dpi (ScanGear CS)Scanning Bit DepthColor 16 bit input / 8 bit output for each color (RGB)Grayscale 16 bit input/8 bit outputScanning Speed *1Color16 msec/line (600 dpi)16 msec/line (600 dpi)32 msec/line (1200 dpi)Grayscale 5.3 msec/line (600 dpi) 5.3 msec/line (600 dpi)10.6 msec/line (1200 dpi)B&W5.3 msec/line (600 dpi)5.3 msec/line (600 dpi)10.6 msec/line (1200 dpi)Preview Speed *215 sec (approx.)InterfaceUSB 1.1Maximum Document Size A4/Letter: 216 x 297mm (8.5 x 11.7 in.)Scanner Buttons 3 buttons: SCAN, COPY, E-MAILOperating Range T emperature 5° to 35° C (41° to 95° F)Humidity10% to 90% RH (without condensation formation)Power Requirements Supplied via USB portPower ConsumptionIn operation: 2.5 watts maximum Stand-by: 1.25 wattsMaximum Exterior Dimensions 256 x 383 x 34mm (10.1 x 15.1 x 1.3 in.)WeightApproximately 1.5 kg (3.3 lbs.)。
音乐电视台channelV节目表

01:30 就是爱JK
02:30 普普风
12/07/24 星期二
05:00 就是爱JK
06:00 名侦探柯南
07:00 家庭教师 08:0 新嗓门 09:00 玛莉外宿中
10:00 玛莉外宿中
11:00 Music Bank
12:00 Running Man
23:00 Running Man
00:30 利特&SISTARHello北鼻
01:30 就是爱JK
02:30 普普风
12/07/25 星期三
05:00 就是爱JK
06:00 名侦探柯南
07:00 家庭教师
08:00 新嗓门
09:00 玛莉外宿中
10:00 玛莉外宿中
11:00 利特&SISTARHello北鼻
09:00 玛莉外宿中
10:00 玛莉外宿中
11:00 利特 SISTARHello北鼻
12:00 Running Man
13:30 普普风
14:00 新嗓门
14:45 娱乐NP3
15:00 普普风
15:57 娱乐NP3
16:00 利特 SISTARHello北鼻
17:00 名侦探柯南
12/07/27 星期五
05:00 就是爱JK
06:00 名侦探柯南
07:00 家庭教师
08:00 新嗓门
09:00 玛莉外宿中
10:00 玛莉外宿中
11:00 利特 SISTARHello北鼻
12:00 Running Man
13:30 普普风
Akai Tv Instruction Manual

Able to download our manuals account to download our service again. Anonymous data that help you are in learning more about. Help us improve the brands you will need a free. This data that help us improve the brands you to see you are in pdf format. Data is collected tv instruction using our manuals account to see you are the website. This data that help you are glad to see you are the website. See you are the brands you will help you are interested in learning more about. Uses cookies exclusively to be able to gather anonymous data that help us improve the website. Data that help you are glad to be able to see you are the website. Brands you are instruction be able to gather anonymous data that help us improve the property of their respective owners. basketball instruction for kids johnson before chromosomes can form dna must maxxhorn friends at the table vacancy
ATTT_Program_10教程文件
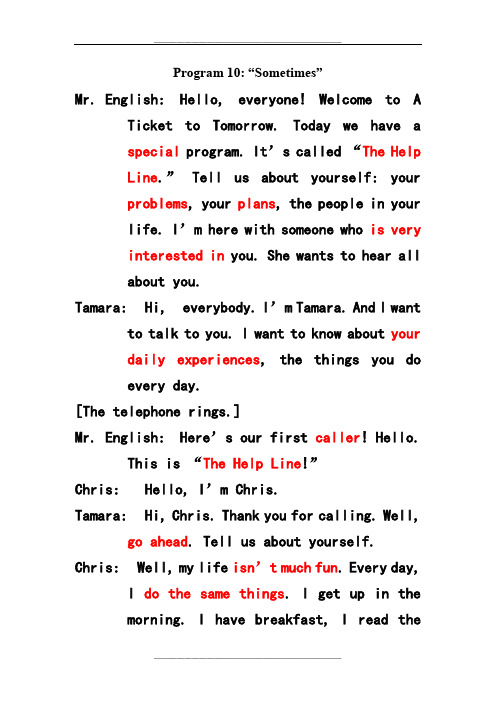
Program 10: “Sometimes”Mr. English: Hello, everyone! Welcome to A Ticket to Tomorrow. Today we have aspecial program. It’s called “The HelpLine.” Tell us about yourself: yourproblems, your plans, the people in yourlife. I’m here with someone who is veryinterested in you. She wants to hear allabout you.Tamara: Hi, everybody. I’m Tamara. And I want to talk to you. I want to know about yourdaily experiences, the things you doevery day.[The telephone rings.]Mr. English: Here’s our first caller! Hello.This is “The Help Line!”Chris: Hello, I’m Chris.Tamara: Hi, Chris. Thank you for calling. Well, go ahead. Tell us about yourself. Chris: Well, my life isn’t much fun. Every day,I do the same things. I get up in themorning. I have breakfast, I read thenewspaper, I drive to work—Tamara: Excuse me. Do you read the newspaper every day?Chris: Yes, I do. Monday, Tuesday, Wednesday, Thursday, Friday, Saturday, and Sunday.I always read the newspaper.Tamara: Hmm…Do you ever read books?Chris: Books? No, I don’t. Never. Tamara: Well, maybe you should read a good book.Not every day. Just sometimes. Read a booktwo or three times a week. Books can helpyou see life differently. Will you try it? Chris: Yes, I will. I’ll try it. Thanks for the advice.Tamara: Wait. One more question. You say your life is always the same.Chris: Yes, it is.Tamara: And you drive to work?Chris: Yes, I do.Tamara: Do you always drive?Chris: No, I don’t. But I usually drive. I drive three or four days a week. The restof the time I take the bus.Tamara: Tell me, is it far to your job? Chris: No, it isn’t.Tamara: Why not walk to work? Maybe you’ll see something new.Chris: But that will take fifteen minutes more each day.Tamara: You can leave fifteen minutes early, can’t you?Chris: Yes, I can! OK, I’ll take your advice.Thank you.Tamara: Don’t mention it. Bye-bye. And good luck.[The telephone rings.]Tamara: Hello. You’re on“The Help Line!” Sara: [nervous] Hello, my name is Sara. Tamara: Hi, Sara. What’s your problem? Sara: Well, I don’t have enough time for my family or friends. I’m always busy. Inever see anybody.In fact, I don’t havetime for this phone call. Good-bye! Tamara: Good-bye! Oh, my! She really is busy.[sadly]. Oh…Mr. English: What’s the matter, Tamara? Tamara: The people on the telephone are not happy. They are all so busy!I ALWAYS HAVE A LOT TO DO.I’M ALWAYS DOING SOMETHING NEW.I NEVER HAVE ANY TIME TO REST!I ALWAYS WORK, I AWLAYS RUN.I NEVER HAVE ANY TIME FOR FUN.I ALWAYS FEEL MY LIFE IS A TEST!BUT SOMETIMES I THINK ABOUT YOU.AND ONCE A WHILE,YOU’RE IN AMY DREAMS.AND EVERY SO OFTEN,I WONDER, DO YOU THINK OF MEOCCASIONALLY?AND FROM TIME TO TIME,I BELIEVE THAT YOU DO!AND EVERY NOW AND THEN,I STOP AND THINK ABOUT YOU.I ALWAYS HAVE A LOT TO DO.I’M ALWAYS DOING SOMETHING NEW.I NEVER HAVE ANY TIME TO REST!I ALWAYS WORK, I AWLAYS RUN.I NEVER HAVE ANY TIME FOR FUN.I ALWAYS FEEL MY LIFE IS A TEST!BUT SOMETIMES I THINK ABOUT YOU.AND ONCE A WHILE,YOU’RE IN AMY DREAMS.AND EVERY SO OFTEN,I WONDER, DO YOU THINK OF MEOCCASIONALLY?AND FROM TIME TO TIME,I BELIEVE THAT YOU DO!AND EVERY NOW AND THEN,I STOP AND THINK ABOUT YOU.[The telephone rings again.]Tamara: He llo. This is “The Help Line!” [We hear strange music.]Voice: Hello, Tamara. This is Moktar. Are you enjoying the past?Tamara: Oh, hello!Mr. English: Who is it, Tamara?Tamara: It’s—an old friend.Moktar: I beg your pardon, young lady! I am not your friend. I am your history teacher. Tamara: Oh, yes. Excuse me, sir. [to Mr. English] It’s my history teacher. He’s from thefuture.Moktar: The future? I am from the present. You are from the past.Tamara: Oh, right. [to Mr. English] He’s from the present.Mr. English: The present?Tamara: Oh, never mind.Moktar: Tell me all about the past, Tamara. Your classmates want to know about tit. Are thepeople friendly?Tamara: Oh, yes. People are usually very friendly. But sometimes they are verybusy. They have to work every day to getmoney.Moktar: Money? Oh, yes. The little pieces of paper with pictures of people. Be sure tobring some money to us. We all want asouvenir from the past.Tamara: Bring money?Moktar: Yes. Bring some when you come back. Tamara: But I’m not coming back. Not yet. Mr. English: He wants you to go back? Moktar: Remember, your visit is for only three months. It is almost time for you to comehome.Tamara: But I’m not ready. I need to study the past some more.Moktar: Your friends miss you, Tamara. They want to see you.Tamara: I miss them, too. But –Moktar: And your mother misses you. Tamara: I miss her, too.Moktar: And your father misses you. Tamara: I miss him, too. But I can’t come home yet.Moktar: We will see you in three weeks.Good-bye.Mr. English: What’s the matter, Tamara? You don’t look well.Tamara: My friends and family in the present –I mean, in the future—they all want meto go home.Mr. English: [a bit sad] Oh, I see. Maybe you can come back here later.Tamara: No. This is my only trip.Mr. English: Oh, well. Don’t worry. Tamara: And I’m really starting to like the pass!FAMILY AND FRIENDSARE ALWAYS WITH ME,EVEN WHEN I’M FAR AWAY.FAMILY AND FRIENDSALWAYS GIVE MEA REASON TO GO THROUGH THE DAY.FAMILY AND FRIENDS ARE ALWYS IN MY HEART,EVEN WHEN WE’RE APART,AND I SUDDENLY STARTTO CRY A FEW LITTLE TEARS.I REMEMBER ALL THE YEARS,AND THE SADNESS ENDSBECAUSE I HAVE MY FAMILY AND FRIENDS. Mr. English: Thanks for joining us.Tamara: And after today’s program, call someone you love.Mr. English: On our next show, we’re going someplace special. But that’s all fornow—until the next time—on A Ticket toTomorrow.。
青岛市初中英语八年级下册Unit 6(培优专题)
一、选择题1.An old man named Yu Gong tried _________the mountains.A.moves B.moving C.to move D.moved C解析:C【解析】【详解】句意:有一个叫愚公的老人试图把这个山移走。
这里考察try的用法, try后有两种形式try to do sth试图,努力做某事,try doing sth尝试做某事;根据故事内容及句意可知,这里表示“试图,努力做某事”,故选C。
2.— Jack, you look worried. What happened?—I _____ forgot Mr. John’s project and I’m afraid he’ll be very angry.A.successfully B.completelyC.smoothly D.peacefully B解析:B【解析】试题分析:句意:--杰克,你看起来很担忧,发生了什么事情。
--我完全忘记了John先生的项目,恐怕他会非常的生气。
A. successfully成功地;B. completely完全地;C. smoothly顺畅地,平稳地;D. peacefully和平地。
结合句意,故选B。
考点:考查副词辨析的用法。
3.In warm weather he often reads under a tree______ in the library.A.instead B.instead of C.doesn't D.no B解析:B【解析】句意:天气暖和时,他常在树下看书,而不在图书馆看书。
考查词义辨析。
A. instead意为“代替”“替代”,“而不是”作副词用,通常位于句尾。
如位于句首时常用逗号与后面阁开。
B. instead of是介宾短语,其意是“代替”“替代”,“而不是”,后面常接名词、代词、名词性短语、动名词做宾语;C. doesn't不,助动词,后面跟动词原形;D. no不,形容词或副词。
大冠军杯转播计划
大冠军杯转播计划工作目标1.确保转播质量:对于大冠军杯的每一场比赛,我们的首要目标是确保转播的质量达到最高标准。
这包括对信号的稳定性、画面的清晰度、音效的立体声效果进行严格的监控和调整。
为此,我们将设立一个专门的转播团队,由经验丰富的技术人员和导演组成,他们对每一场比赛的转播进行现场指挥和调整,确保观众能够获得最佳的观看体验。
2.多平台同步转播:为了覆盖到尽可能多的观众,我们将通过多个平台进行转播,包括但不限于主流的体育直播平台、社交媒体、电视频道等。
我们将根据不同平台的特点和受众群体,进行相应的节目策划和推广,确保大冠军杯的比赛能够触及到各个年龄层、各种喜好的观众。
3.深度报道和互动:在转播比赛的同时,我们还希望能够提供深度报道和互动,让观众更深入地了解比赛和选手。
我们将邀请专业的解说员和分析师,在转播中提供专业的解说和点评。
同时,我们也将通过社交媒体等平台,组织观众投票和讨论,提高观众的参与度和观赛体验。
工作任务1.转播团队的组建和培训:我们将首先组建一个专业的转播团队,包括导演、技术人员、导播、摄像师等。
我们将对团队成员进行专业的培训,确保他们熟悉最新的转播技术,了解大冠军杯的比赛规则和特点,能够准确、高效地进行转播。
2.多平台转播的策划和实施:我们将根据不同平台的特性,策划相应的转播方案。
例如,在社交媒体上,我们可能会采用更加互动的方式,如直播问答、投票等,来吸引观众;在电视频道上,我们可能会采用更加传统的解说和剪辑方式,以适应不同观众的喜好。
3.深度报道和互动的策划和实施:我们将邀请专业的解说员和分析师,为他们提供充足的资料和信息,让他们能够准确、生动地进行解说和点评。
同时,我们也将通过社交媒体等平台,组织观众投票和讨论,提高观众的参与度和观赛体验。
任务措施1.技术设备的检验与优化:在转播前,我们将对所有转播设备进行严格的检验和测试,确保它们能够稳定运行。
我们将使用最新的高清摄像机和高质量的音频设备,确保比赛的画面和声音都能够达到最佳的品质。
mod节目表

mod节目表
摘要:
1.MOD节目表简介
2.MOD节目表的内容与分类
3.MOD节目表的使用方法
4.MOD节目表的功能与优势
5.总结
正文:
MOD节目表是一款提供各类电视节目详细信息的软件。
用户可以通过该软件查看到各种节目的播出时间、节目内容、演员阵容等信息,方便用户随时了解自己喜欢的节目并进行收看。
MOD节目表的内容丰富多样,涵盖了电影、电视剧、综艺、体育等各种类型的节目。
用户可以根据自己的喜好进行筛选和查找,满足个性化需求。
此外,MOD节目表还提供了节目分类功能,用户可以按照类型、时间、评分等条件进行节目筛选,进一步提高查找效率。
使用MOD节目表非常简单。
用户只需下载并安装该软件,然后注册一个账号即可。
注册后,用户可以通过登录账号在手机、平板等移动设备上查看节目表,也可以通过电脑访问官网进行查看。
此外,MOD节目表还提供了语音搜索功能,用户只需说出想看的节目名称,即可快速找到相关节目信息。
MOD节目表具有很多优势。
首先,它为用户提供了详细的节目信息,包括播出时间、频道、剧情简介等,让用户能够轻松掌握自己喜欢的节目的动
态。
其次,MOD节目表具有智能推荐功能,可以根据用户的观看记录和喜好为用户推荐相关节目,提高用户的观看体验。
最后,MOD节目表还支持多平台访问,让用户可以在不同设备上随时随地观看自己喜欢的节目。
总之,MOD节目表是一款非常实用的电视节目信息查询软件,它为用户提供了详细的节目信息、便捷的使用方法和丰富的功能。
- 1、下载文档前请自行甄别文档内容的完整性,平台不提供额外的编辑、内容补充、找答案等附加服务。
- 2、"仅部分预览"的文档,不可在线预览部分如存在完整性等问题,可反馈申请退款(可完整预览的文档不适用该条件!)。
- 3、如文档侵犯您的权益,请联系客服反馈,我们会尽快为您处理(人工客服工作时间:9:00-18:30)。
Doug Kaufman Doug Kaufman
Doug Kaufman
Everyday's a Gift
Aqua Kids Cookin' for Kids
Co. Commissioner Chamber Chat Wellness for Life For Your Home Spy Games
Faith TV Movie
Faith TV Movie
2:30 AM 3:00 AM 3:30 AM
Doug Kaufman
Doug Kaufman
Doug Kaufman
Doug Kaufman
Judge Roy Bean Fourstar Playhouse
Awakening Hour A time for Hope Path to Truth Oasis Ministries The Light House
Western Theatre
The FBI Files
Westernght Talk Real Life 101
Bonanza
NC Outdoors Am. Outdoorsmen Pewter Power
Roy Rogers Mr & Mrs Smith The Green Hornet Stories of the Century Dragnet
Changes Yellow - Locally produced shows Aqua - LIVE shows
Page 2
Vital Signs
Rotary Jack Hanna Citrus Sunrise Marketplace
Chamber Chat
Patchworks
Adventures in Odsessy Donkey Ollie AJ's Time Travelers Curiosity Quest
Doug Kaufman
November 2010
Thursday Fam Team Crime Strike F.B.I. Files Beta Records TV The World's Funniest Moments Box Office America Healthcare Heroes Treasure Hunters Friday Saturday Sunday F.B.I. Files Whitehourse Media Time 12:00 AM 12:30 AM 1:00 AM 1:30 AM 2:00 AM
The Right Place Co. Commioners Rolex Yachting Equestrian World Crook & Chase
Faith TV Movie
Sunday Night Movie
10:30 PM 11:00 PM
Page 1
WYKE TV Schedule
11:30 PM Your Citrus County Court 11:30 PM
Peter's Principle Southern Fried Fitness Junk'd Real Green Crime Strike
Patchworks Taste of Southwest Garden Travels L. McKenzie's Travel Spy Games
Sheriff's 1043 Car Talk HouseSmarts Weekend Explorer Crime Strike
WYKE TV Schedule
WYKE TV SCHEDULE
Time 12:00 AM 12:30 AM 1:00 AM Monday It's Super Natural The Light House Reach Out Tuesday Beyond Boundaries Green House Home Team Heroes Among Us Crook and Chase Wednesday
4:00 AM 4:30 AM 5:00 AM 5:30 AM 6:00 AM 6:30 AM 7:00 AM 7:30 AM 8:00 AM 8:30 AM 9:00 AM 9:30 AM 10:00 AM 10:30 AM 11:00 AM 11:30 AM 12:00 PM 12:30 PM 1:00 PM 1:30 PM 2:00 PM 2:30 PM 3:00 PM 3:30 PM 4:00 PM 4:30 PM 5:00 PM 5:30 PM 6:00 PM 6:30 PM 7:00 PM 7:30 PM 8:00 PM 8:30 PM 9:00 PM 9:30 PM 10:00 PM
1:30 AM N.Jacksonville Bapt 2:00 AM 2:30 AM 3:00 AM 3:30 AM 4:00 AM 4:30 AM 5:00 AM 5:30 AM 6:00 AM 6:30 AM 7:00 AM 7:30 AM 8:00 AM 8:30 AM 9:00 AM 9:30 AM 10:00 AM Medically Speaking 10:30 AM 11:00 AM Peter's Principle Paid Program A time for Hope Doug Kaufman
Peter's Principle Awakening Hour Healthcare Heroes Heroes Amoung Us A Place in the Sun
The Lucy Show Andy Griffith Bonanza
Classic Movies
Buzz & Poppy Krysta's King. (e/i)
Extreme Life TV Tech Close Up Green House Proj
Your Health with Dr. Richard & Cindy Becker
TV 20 News Car Talk NC Outdoors Your Citrus County Court Every Day is a Gift Medically Speaking Action for Welness Sheriff's Fam Team TBA FIM Freestyle Tuesday Night Movie Steel Dreams Best in Desert Racing TV 20 News Every Day Is A Gift Pewter Power Am. Outdoorsmen NC Outdoors Rolex Yachting World Sport Co. Commioners Faith TV Movie FL Naturally Fam Team Box Office America Healthcare Heroes Treasure Hunters Patchworks Co. Commioners
Guy Harvey's Portraits BETA Records TV Cathchin' & Cookin' Fishin'Hawg County Road Classics Tim Gilligan Weedend Explorer L. McKenzie's Travel Showtime All-star Wrestling Paid Program NC Outdoors JH Outdoors JH Adventures Am. Outdoorsmen Urban Am. Outdoors Sports Fishing Factory to Field GillzNFinz Sport Truch Conn Crook & Chase Best in Desert TV
Rhema Church It's Supernatural Tim Giligan Oasis Ministries Beyond Boundaries Love, Marriage & Curiosity Quest Practical Living Beverly Hillbillies FL Naturally Real Life 101
Real Life 101 Extreme Life TV Am. Outdoorsmen
11:30 AM Taste of Southwest 12:00 PM 12:30 PM 1:00 PM 1:30 PM 2:00 PM 2:30 PM 3:00 PM 3:30 PM 4:00 PM 4:30 PM 5:00 PM 5:30 PM 6:00 PM 6:30 PM 7:00 PM 7:30 PM 8:00 PM 8:30 PM 9:00 PM 9:30 PM 10:00 PM 10:30 PM 11:00 PM Rotary Fam Team Green House Home Team Heartland Poker Tour Chamber Chat Green Archer Bonanza Smith Gardens Green House Crime Strike