Socket.IO
一个简单的Socket通信Demo
⼀个简单的Socket通信Demo服务器端Demo:Server.java(服务器端运⾏主程序,直接运⾏):package cn.wjs;import .InetAddress;import .ServerSocket;import .Socket;public class Server {private static final int port = 9999;private static final int backlog = 100;private static final String bindAddr = "127.0.0.1";public static void main(String[] args) throws Exception {System.out.println("正在启动Socket服务器");ServerSocket server = new ServerSocket(9998, 100, InetAddress.getByName("127.0.0.1"));System.out.println("启动完成\n正在监听客户端连接");while (true) {Socket socket = server.accept();System.out.println("产⽣了⼀个新的会话,来⾃:" + socket.getInetAddress() + "\n=================================="); new ServerMessageReceiver(socket).start();new ServerMessageSender(socket).start();System.out.println("服务器端已启动");}}}ServerMessageReceiver.java:package cn.wjs;import java.io.BufferedReader;import java.io.IOException;import java.io.InputStreamReader;import java.io.UnsupportedEncodingException;import .Socket;public class ServerMessageReceiver extends Thread{private Socket socket;public ServerMessageReceiver(Socket socket){this.socket = socket;}public void run() {try {BufferedReader reader = new BufferedReader(new InputStreamReader(this.socket.getInputStream(), "UTF-8"));String content = null;while (true) {if (this.socket.isClosed()) {System.out.println("Socket已经关闭");reader.close();this.socket.close();break;}content = reader.readLine();if (content.equals("bye")) {System.out.println("对⽅请求关闭连接,⽆法继续进⾏聊天");reader.close();this.socket.close();break;}System.out.println("【对⽅】" + content + "\n");}reader.close();this.socket.close();}catch (UnsupportedEncodingException e){e.printStackTrace();}catch (IOException e) {e.printStackTrace();}}}ServerMessageSender.java:package cn.wjs;import java.io.BufferedReader;import java.io.BufferedWriter;import java.io.IOException;import java.io.InputStreamReader;import java.io.OutputStreamWriter;import java.io.UnsupportedEncodingException;import .Socket;public class ServerMessageSender extends Thread{private Socket socket;public ServerMessageSender(Socket socket){this.socket = socket;}public void run() {try {BufferedWriter outwriter = new BufferedWriter(new OutputStreamWriter(this.socket.getOutputStream(), "UTF-8")); BufferedReader inputReader = new BufferedReader(new InputStreamReader(System.in));String msg = null;while (true) {msg = inputReader.readLine();if (msg.toLowerCase().equals("exit")) {System.exit(0);}if (this.socket.isClosed()) {System.out.println("Socket已经关闭");outwriter.close();inputReader.close();this.socket.close();break;}outwriter.write(msg);outwriter.newLine();outwriter.flush();}}catch (UnsupportedEncodingException e){e.printStackTrace();}catch (IOException e) {e.printStackTrace();}}}ClientDemo:Client.java(客户端主程序,直接运⾏):package cn.wjs;import java.io.IOException;import .InetAddress;import .Socket;import .UnknownHostException;public class Client{private static final int port = 9999;private static final String bindAddr = "127.0.0.1";public static void main(String[] args){System.out.println("正在连接Socket服务器");try {Socket socket = new Socket(InetAddress.getByName("127.0.0.1"), 9998);System.out.println("已连接\n================");new ClientMessageSender(socket).start();new ClientMessageReceiver(socket).start();System.out.println("已启动");}catch (UnknownHostException e) {e.printStackTrace();}catch (IOException e) {e.printStackTrace();}}}ClientMessageReceiver.java:package cn.wjs;import java.io.BufferedReader;import java.io.IOException;import java.io.InputStreamReader;import java.io.UnsupportedEncodingException;import .Socket;public class ClientMessageReceiver extends Thread{private Socket socket;public ClientMessageReceiver(Socket socket){this.socket = socket;}public void run(){try {BufferedReader reader = new BufferedReader(new InputStreamReader(this.socket.getInputStream(), "UTF-8")); String content = null;while (true) {if (this.socket.isClosed()) {System.out.println("Socket已经关闭");reader.close();this.socket.close();break;}content = reader.readLine();if (content.equals("bye")) {System.out.println("对⽅请求关闭连接,⽆法继续进⾏聊天");reader.close();this.socket.close();break;}System.out.println("【对⽅】" + content + "\n");}}catch (UnsupportedEncodingException e){e.printStackTrace();}catch (IOException e) {e.printStackTrace();}}}ClientMessageSender.java:package cn.wjs;import java.io.BufferedReader;import java.io.BufferedWriter;import java.io.IOException;import java.io.InputStreamReader;import java.io.OutputStreamWriter;import java.io.UnsupportedEncodingException;import .Socket;public class ClientMessageSender extends Thread{private Socket socket;public ClientMessageSender(Socket socket){this.socket = socket;}public void run(){try {BufferedWriter writer = new BufferedWriter(new OutputStreamWriter(this.socket.getOutputStream(), "UTF-8"));BufferedReader reader = new BufferedReader(new InputStreamReader(System.in));String msg = null;while (true) {msg = reader.readLine();if (msg.toLowerCase().equals("exit")) {System.exit(0);}if (this.socket.isClosed()) {System.out.println("Socket已经关闭");writer.close();this.socket.close();break;}writer.write(msg);writer.newLine();writer.flush();}}catch (UnsupportedEncodingException e){e.printStackTrace();}catch (IOException e) {e.printStackTrace();}}}通过elicpse导出jar包直接运⾏,服务器端导出jar设置main.class为Server.java,客户端导出jar设置main.class为Client.java------这是传统的TCP/BIO模式.如果多个客户端向服务器发送请求,通常采⽤连接池的⽅式来维护,这和数据库的连接池⼀个道理。
java NIO和Socket的区别
本文并非Java.io或Java.nio的使用手册,也不是如何使用Java.io与Java.nio的技术文档。
这里只是尝试比较这两个包,用最简单的方式突出它们的区别和各自的特性。
Java.nio提出了新的流(stream)通讯概念并且加入了新的缓冲、文件流以及socket(套接字)特性。
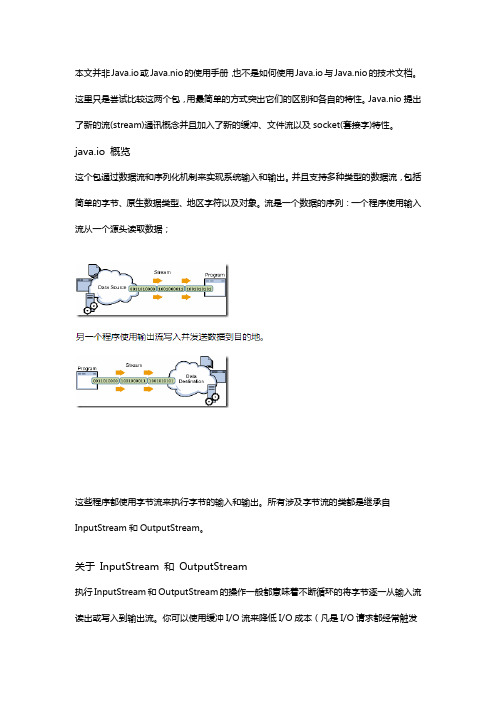
java.io 概览这个包通过数据流和序列化机制来实现系统输入和输出。
并且支持多种类型的数据流,包括简单的字节、原生数据类型、地区字符以及对象。
流是一个数据的序列:一个程序使用输入流从一个源头读取数据;这些程序都使用字节流来执行字节的输入和输出。
所有涉及字节流的类都是继承自InputStream和OutputStream。
关于InputStream 和OutputStream执行InputStream和OutputStream的操作一般都意味着不断循环的将字节逐一从输入流读出或写入到输出流。
你可以使用缓冲I/O流来降低I/O成本(凡是I/O请求都经常触发磁盘访问、网络动作或其他一些成本昂贵的操作)。
缓冲输入流则是从缓冲的内存区域读取数据,只有缓冲读完才会调用native input API(不同操作系统提供的本地输入流API——译者注)。
同样的,缓冲输出流也将数据写入缓冲,只有缓冲写满才会调用native output API。
这些带缓冲的API很好的封装了未缓冲的流操作:BufferedInputStream 和BufferedOutputStream.File I/O上面一节主要是针对数据流,它提供一种数据读取和写入的简单模型。
真实的数据流其实是涉及种类繁多的数据源和目的地,包括磁盘文件。
但是,数据流并不支持所有磁盘文件操作。
下面的链接介绍了非数据流的文件I/O:∙File类可以编写平台无关的检查和处理文件、目录的代码。
∙Random access files支持非序列化的磁盘文件数据访问。
socket两个在网络上运行的程序之间会建立双向通讯的链接,socket就是其中一个端点。
java socketioserver类的方法
Java中的Socket.IO是一个用于实现实时双向通信的库,它基于WebSocket协议,可以在客户端和服务器之间建立持久的连接。
在Java中,我们可以使用SocketIOServer类来创建和管理Socket.IO 服务器,通过该类的方法可以实现各种服务器端的功能。
本文将介绍SocketIOServer类的一些常用方法,帮助读者更好地了解和使用Socket.IO在Java中的实现。
一、创建Socket.IO服务器在使用Socket.IO之前,我们需要先创建一个Socket.IO服务器。
SocketIOServer类提供了创建服务器实例的方法,示例代码如下:```javaConfiguration config = new Configuration();config.setHostname("localhost");config.setPort(9092);SocketIOServer server = new SocketIOServer(config);```上述代码中,我们首先创建了一个Configuration实例来配置服务器的主机名和端口号,然后通过SocketIOServer类的构造函数创建了一个服务器实例。
通过这样的方式,我们就可以在Java中创建一个Socket.IO服务器,为后续的通信提供支持。
二、服务器端事件的处理在Socket.IO服务器上,我们通常需要处理一些事件,例如连接事件、断开事件、自定义事件等。
SocketIOServer类提供了一系列方法来注册和处理这些事件,示例代码如下:```javaserver.addConnectListener(client -> {System.out.println("客户端连接:" + client.getSessionId()); });server.addDisconnectListener(client -> {System.out.println("客户端断开连接:" + client.getSessionId()); });server.addEventListener("chat message", String.class, (client, data, ackRequest) -> {System.out.println("收到消息:" + data);});```上述代码中,我们使用addConnectListener方法和addDisconnectListener方法分别注册了客户端连接和断开连接的事件处理函数,使用addEventListener方法注册了一个名为"chat message"的自定义事件的处理函数。
Socket.io详解

Socket.io详解socket.io是⼀个跨浏览器⽀持WebSocket的实时通讯的JS。
由于HTTP是⽆状态的协议,要实现即时通讯⾮常困难。
因为当对⽅发送⼀条消息时,服务器并不知道当前有哪些⽤户等着接收消息,当前实现即时通讯功能最为普遍的⽅式就是轮询机制。
即客户端定期发起⼀个请求,看看有没有⼈发送消息到服务器,如果有服务端就将消息发给客户端。
这种做法的缺点显⽽易见,那么多的请求将消耗⼤量资源,⼤量的请求其实是浪费的。
现在,我们有了WebSocket,它是HTML5的新API。
WebSocket连接本质上就是建⽴⼀个TCP连接,WebSocket会通过HTTP请求建⽴,建⽴后的WebSocket会在客户端和服务端建⽴⼀个持久的连接,直到有⼀⽅主动关闭该连接。
所以,现在服务器就知道有哪些⽤户正在连接了,这样通讯就变得相对容易了。
Socket.io⽀持及时、双向、基于事件的交流,可在不同平台、浏览器、设备上⼯作,可靠性和速度稳定。
最典型的应⽤场景如:实时分析:将数据推送到客户端,客户端表现为实时计数器、图表、⽇志客户。
实时通讯:聊天应⽤⼆进制流传输:socket.io⽀持任何形式的⼆进制⽂件传输,例如图⽚、视频、⾳频等。
⽂档合并:允许多个⽤户同时编辑⼀个⽂档,并能够看到每个⽤户做出的修改。
Socket.io实际上是WebSocket的⽗集,Socket.io封装了WebSocket和轮询等⽅法,会根据情况选择⽅法来进⾏通讯。
Node.js提供了⾼效的服务端运⾏环境,但由于Browser对HTML5的⽀持不⼀,为了兼容所有浏览器,提供实时的⽤户体验,并为开发者提供客户端与服务端⼀致的编程体验,于是Socket.io诞⽣了。
npm安装socket.opnpm install --save socket.ioSocket.io将WebSocket和Polling机制以及其它的实时通信⽅式封装成通⽤的接⼝,并在服务端实现了这些实时机制相应代码。
聊天室使用Nodejs和Socketio库开发的小程序

聊天室使用Nodejs和Socketio库开发的小程序聊天室使用Node.js和Socket.io库开发的小程序Node.js是一个构建可扩展网络应用程序的开放源代码及可移植的跨平台JavaScript运行时环境。
Socket.io是一个基于WebSockets的实时通信库,它提供了在服务器和客户端之间进行双向通信的能力。
本文将介绍如何使用Node.js和Socket.io库开发一个简单的聊天室小程序。
我们将分为几个部分来讲解。
第一部分:环境搭建1. 安装Node.js和npm(Node包管理器)2. 创建一个新的项目目录3. 在项目目录中初始化npm,并安装Socket.io库第二部分:服务器端开发1. 导入必要的模块(如http和socket.io)2. 创建一个HTTP服务器,并将其绑定到指定的端口3. 初始化Socket.io,并将其与HTTP服务器进行连接4. 监听连接事件,并处理客户端的加入和离开等事件5. 监听消息事件,并将消息广播给所有连接的客户端第三部分:客户端开发1. 创建一个HTML页面作为聊天室的前端界面2. 引入Socket.io的客户端库,并与服务器进行连接3. 监听连接事件,并发送加入房间请求4. 监听服务器的消息事件,并将消息显示在屏幕上5. 监听发送按钮的点击事件,并将输入的消息发送给服务器第四部分:运行和测试1. 启动服务器,并监听指定的端口2. 打开浏览器,访问服务器的URL地址3. 输入昵称,并点击加入房间按钮4. 在文本框中输入消息,并点击发送按钮5. 观察服务器和客户端的交互,并验证聊天功能是否正常运行通过以上步骤,我们可以使用Node.js和Socket.io库成功开发一个简单的聊天室小程序。
在实际应用中,我们可以根据需求进行功能的扩展和优化,例如增加用户登录验证、添加表情和图片的发送功能等。
总结:本文介绍了如何使用Node.js和Socket.io库开发一个聊天室小程序。
java nio socketchannel 用例-概述说明以及解释
java nio socketchannel 用例-概述说明以及解释1.引言1.1 概述在计算机网络通信中,传统的IO操作(即阻塞IO)往往会导致单线程无法高效处理多个网络连接。
为了解决这个问题,Java引入了NIO(New IO)机制,其中SocketChannel是NIO中最重要的一个组件之一。
Java NIO的背后思想是通过事件驱动模型实现非阻塞式IO操作。
相比传统的阻塞IO,NIO利用Selector选择器、Channel通道和Buffer 缓冲区的概念来实现高效的网络通信。
SocketChannel是NIO中提供网络连接的通道之一,它可以与一个TCP连接进行交互。
与传统的Socket不同,SocketChannel是非阻塞的,这意味着它可以在没有数据可读写时立即返回而不会阻塞线程,从而允许单线程同时处理多个连接。
SocketChannel通过Buffer进行数据读写,可以使用多种类型的Buffer来满足不同的需求,例如ByteBuffer、CharBuffer、IntBuffer等。
通过Buffer,SocketChannel可以实现高效的数据传输。
在本文中,我们将深入探讨SocketChannel的使用场景、优势和不足,以及它与NIO的关系。
通过了解SocketChannel的用例,读者将能够更好地理解和应用Java NIO的特性,并在网络编程中实现高效的数据传输和处理。
1.2文章结构1.2 文章结构本文将围绕Java NIO的SocketChannel展开详细讨论。
下面是本文的结构说明:1. 引言1.1 概述1.2 文章结构(即本节)1.3 目的2. 正文2.1 SocketChannel简介- SocketChannel的定义和作用- SocketChannel与传统IO的对比2.2 NIO简介- NIO的概念和特点- NIO中的关键组件和概念解析(Buffer、Channel、Selector等)- NIO与传统IO的对比3. 结论3.1 应用场景- SocketChannel的典型应用场景3.2 优势和不足- SocketChannel的优势- SocketChannel的不足与局限性通过以上结构,本文将全面介绍SocketChannel的基本概念和用法,并与传统IO进行对比,以便读者能够更好地理解NIO编程模型和SocketChannel的应用场景。
Socket之重叠IO

Socket之重叠IO(附单线程下重叠IO测试代码)步骤:1)创建一个套接字,开始在指定的端口上监听连接请求。
2)接受一个进入的连接请求。
3)为接受的套接字新建一个WSAOVERLAPPED结构,并为该结构分配一个事件对象句柄。
也将事件对象句柄分配给一个事件数组,以便稍后由WSAWaitForMultipleEvents函数使用。
4)在套接字上投递一个异步WSARecv请求,指定参数为WSAOVERLAPPED结构。
5)使用步骤3)的事件数组,调用WSAWaitForMultipleEvents函数,并等待与重叠调用关联在一起的事件进入"已传信"状态6)WSAWaitForMultipleEvents函数完成后,事件数组,调用WSAResetEvent函数,从而重设事件对象,并对完成的重叠请求进行处理.7)使用WSAGetOverlappedResult函数,判断重叠调用的返回状态是什么.8)在套接字上投递另一个重叠WSARecv请求.9)重复步骤5~8.附测试代码(采用AcceptEx 在单线程下完成)#include <stdio.h>#include <Winsock2.h>#include <windows.h>#pragma comment(lib,"Ws2_32.lib")#include <Mswsock.h>#pragma comment(lib,"Mswsock.lib")BOOL InitSocket();#define DATA_BUFSIZE 8192typedef struct _SOCKET_INFORMATION {CHAR sBuffer[DATA_BUFSIZE]; //发送缓冲区CHAR rBuffer[DATA_BUFSIZE]; //接收缓冲区CHAR IpBuffer[256];WSABUF SendBuf;WSABUF RevBuf;SOCKET Socket;DWORD nSend;WSAOVERLAPPED rOverlapped;WSAOVERLAPPED sOverlapped;} SOCKET_INFORMATION;void printErr(int Errid);void main(int argc, char* argv[]){DWORD EventTotal=0;SOCKET_INFORMATION* SockArray[WSA_MAXIMUM_WAIT_EVENTS]; //保存的指针WSAEVENT sEventArray[WSA_MAXIMUM_WAIT_EVENTS];WSAEVENT rEventArray[WSA_MAXIMUM_WAIT_EVENTS];SOCKET ListenSocket,AcceptSocket;SOCKADDR_IN addr;DWORD Flags;DWORD RecvBytes;if(!InitSocket()){printf("Init Socket lib failed...\n");}printf("initsocket succeed...\n");printf("Step1 Start winsock and set up a listening socket");ListenSocket=WSASocket(AF_INET,SOCK_STREAM,0,NULL,0,WSA_FLAG_OVERLAPP ED);if(INVALID_SOCKET==ListenSocket){printf("Create listensocket failed...\n");return;}addr.sin_addr.s_addr=htonl(INADDR_ANY);addr.sin_family=AF_INET;addr.sin_port=htons(5150);if(SOCKET_ERROR==bind(ListenSocket,(SOCKADDR*)&addr,sizeof(addr))) {printf("bind ip addr failed...\n");return;}printf("bind ip addr succeed...\n");if(SOCKET_ERROR==listen(ListenSocket,5)){printf("listen port 5150 failed...\n");return;}printf("listen port 5150 succeed...\n");AcceptSocket=WSASocket(AF_INET,SOCK_STREAM,0,NULL,0,WSA_FLAG_OVERLAPP ED);if(INVALID_SOCKET==AcceptSocket){printf("Create accept socket failed...\n");return;}//第一个socket用于连接请求SOCKET_INFORMATION* pInfo1=new SOCKET_INFORMATION();ZeroMemory(pInfo1,sizeof(SOCKET_INFORMATION));sEventArray[EventTotal]=WSACreateEvent();rEventArray[EventTotal]=WSACreateEvent();pInfo1->rOverlapped.hEvent=pInfo1->sOverlapped.hEvent=rEventArray[Eve ntTotal];pInfo1->Socket=AcceptSocket;SockArray[EventTotal]=pInfo1;if(!AcceptEx(ListenSocket,AcceptSocket,pInfo1->IpBuffer,0, // read nothing from the socketsizeof(struct sockaddr_in) +16,sizeof(struct sockaddr_in) +16,&RecvBytes,&(pInfo1->rOverlapped))){if(WSAGetLastError()!=ERROR_IO_PENDING){printf("AcceptEx failed %d...\n",WSAGetLastError());return;}}printf("AcceptEx succeed...\n");EventTotal++;DWORD Index;printf("Enter thread of serviceIo\n");DWORD BytesTransferred;SOCKADDR_IN laddr;SOCKADDR_IN raddr;SOCKADDR_IN* pladdr;SOCKADDR_IN* praddr;int llen=sizeof(laddr);int rlen=sizeof(raddr);while(TRUE){Index=WSAWaitForMultipleEvents(EventTotal,rEventArray,FALSE,WSA_IN FINITE,FALSE);if(Index==WSA_WAIT_FAILED){printErr(WSAGetLastError());//printf("WSAWaitForMultipleEvents failed %d\n",WSAGetLastError()); return;}//if the event triggered was zero then a connection attempt as made on our listening socket.Index-=WSA_WAIT_EVENT_0;if(0==Index) //说明是收到的连接请求返回则将返回的连接加入监视中 {WSAResetEvent(rEventArray[0]);GetAcceptExSockaddrs(SockArray[0]->IpBuffer,0,sizeof(sockaddr_in) + 16,sizeof(sockaddr_in) + 16,(SOCKADDR **)&pladdr,&llen,(SOCKADDR **)&praddr,&rlen);memcpy(&laddr, pladdr, sizeof sockaddr_in );memcpy( &raddr, praddr, sizeof sockaddr_in );printf("%s :%d connecting...\n",inet_ntoa(raddr.sin_addr),ntohs(raddr.sin_port));//将第一个连接加入SOCKET_INFORMATION* pInfo=new SOCKET_INFORMATION();ZeroMemory(pInfo,sizeof(SOCKET_INFORMATION));pInfo->Socket=SockArray[0]->Socket;pInfo->SendBuf.buf=pInfo->sBuffer;pInfo->SendBuf.len=DATA_BUFSIZE;pInfo->RevBuf.buf=pInfo->rBuffer;pInfo->RevBuf.len=DATA_BUFSIZE;rEventArray[EventTotal]=WSACreateEvent();sEventArray[EventTotal]=WSACreateEvent();memcpy(pInfo->IpBuffer,SockArray[0]->IpBuffer,256);pInfo->rOverlapped.hEvent=rEventArray[EventTotal];pInfo->sOverlapped.hEvent=sEventArray[EventTotal];SockArray[EventTotal]=pInfo;// Post a WSARecv request to to begin receiving data on the socket Flags = 0;if(SOCKET_ERROR==WSARecv(SockArray[EventTotal]->Socket,&(SockArray[EventTotal]->RevBuf),1,&RecvBytes,&Flags,&(SockArray[EventTotal]->rOverlapped),NULL)) {if(WSA_IO_PENDING!=WSAGetLastError()){printf("Post Rev request failed %d...\n",WSAGetLastError());return;}}EventTotal++;//post a new accept request.....SockArray[0]->Socket=WSASocket(AF_INET,SOCK_STREAM,0,NULL,0,WSA_F LAG_OVERLAPPED);if(!AcceptEx(ListenSocket,SockArray[0]->Socket,SockArray[0]->IpBuffer,0, // read nothing from the socketsizeof(struct sockaddr_in) +16,sizeof(struct sockaddr_in) +16,&RecvBytes,&(SockArray[0]->rOverlapped))){if(WSAGetLastError()!=ERROR_IO_PENDING){printf("AcceptEx failed %d...\n",WSAGetLastError());return;}}continue;}SOCKET_INFORMATION* tempInfo=SockArray[Index];WSAResetEvent(rEventArray[Index]);if(!WSAGetOverlappedResult(tempInfo->Socket,&(tempInfo->rOverlappe d),&BytesTransferred,FALSE,&Flags)){printf("WSAGetOverlapped Error socket close\n");closesocket(tempInfo->Socket);WSACloseEvent(rEventArray[Index]);WSACloseEvent(sEventArray[Index]);delete tempInfo;//压缩数组for (DWORD i =Index; i < EventTotal; i++){rEventArray[i] = rEventArray[i + 1];sEventArray[i]=sEventArray[i+1];SockArray[i] = SockArray[i+1];}EventTotal--;continue;}if(0==BytesTransferred){printf("One client break the connect\n");closesocket(tempInfo->Socket);WSACloseEvent(rEventArray[Index]);WSACloseEvent(sEventArray[Index]);delete tempInfo;//压缩数组for (DWORD i =Index; i < EventTotal; i++){rEventArray[i] = rEventArray[i + 1];sEventArray[i]=sEventArray[i+1];SockArray[i] = SockArray[i+1];}EventTotal--;continue;}//now...显示并投递到Send中tempInfo->rBuffer[BytesTransferred]=0;GetAcceptExSockaddrs(tempInfo->IpBuffer,0,sizeof(sockaddr_in) + 16,sizeof(sockaddr_in) + 16,(SOCKADDR **)&pladdr,&llen,(SOCKADDR **)&praddr,&rlen);memcpy(&laddr, pladdr, sizeof sockaddr_in ); memcpy( &raddr, praddr, sizeof sockaddr_in ); printf("%s :%d Say: %s \n",inet_ntoa(raddr.sin_addr),ntohs(raddr.sin_port),tempInfo->rBuffer );//the post next read requestif (WSARecv(tempInfo->Socket, &(tempInfo->RevBuf), 1, &RecvBytes, &Flags,&(tempInfo->rOverlapped), NULL) == SOCKET_ERROR){if (WSAGetLastError() !=WSA_IO_PENDING){printf("WSARecv() failed with error %d\n", WSAGetLastError()); return;}}}WSACleanup();return;}BOOL InitSocket(){WORD wVersionRequested;WSADATA wsaData;int err;wVersionRequested = MAKEWORD( 2, 2 );err = WSAStartup( wVersionRequested, &wsaData );if ( err != 0 ) {return FALSE;}if ( LOBYTE( wsaData.wVersion ) != 2 ||HIBYTE( wsaData.wVersion ) != 2 ) {WSACleanup( );return FALSE;}return TRUE;}void printErr(int Errid){LPVOID lpMsgBuf = NULL;FormatMessage(FORMAT_MESSAGE_ALLOCATE_BUFFER |FORMAT_MESSAGE_FROM_SYSTEM | FORMAT_MESSAGE_IGNORE_INSERTS,NULL,Errid,MAKELANGID(LANG_NEUTRAL,SUBLANG_DEFAULT), reinterpret_cast<LPTSTR>(&lpMsgBuf),0,NULL); //得到信息printf("Err:%s",(char*)lpMsgBuf);LocalFree(lpMsgBuf);}。
四种常用IO模型
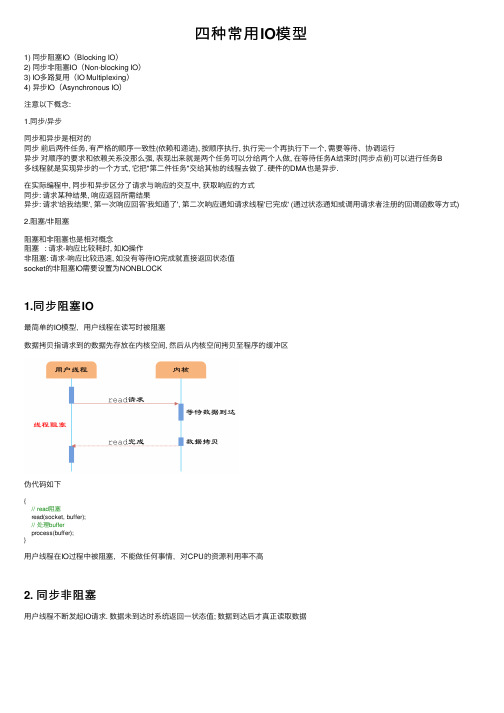
四种常⽤IO模型1) 同步阻塞IO(Blocking IO)2) 同步⾮阻塞IO(Non-blocking IO)3) IO多路复⽤(IO Multiplexing)4) 异步IO(Asynchronous IO)注意以下概念:1.同步/异步同步和异步是相对的同步前后两件任务, 有严格的顺序⼀致性(依赖和递进), 按顺序执⾏, 执⾏完⼀个再执⾏下⼀个, 需要等待、协调运⾏异步对顺序的要求和依赖关系没那么强, 表现出来就是两个任务可以分给两个⼈做, 在等待任务A结束时(同步点前)可以进⾏任务B多线程就是实现异步的⼀个⽅式, 它把"第⼆件任务"交给其他的线程去做了. 硬件的DMA也是异步.在实际编程中, 同步和异步区分了请求与响应的交互中, 获取响应的⽅式同步: 请求某种结果, 响应返回所需结果异步: 请求'给我结果', 第⼀次响应回答'我知道了', 第⼆次响应通知请求线程'已完成' (通过状态通知或调⽤请求者注册的回调函数等⽅式) 2.阻塞/⾮阻塞阻塞和⾮阻塞也是相对概念阻塞 : 请求-响应⽐较耗时, 如IO操作⾮阻塞: 请求-响应⽐较迅速, 如没有等待IO完成就直接返回状态值socket的⾮阻塞IO需要设置为NONBLOCK1.同步阻塞IO最简单的IO模型,⽤户线程在读写时被阻塞数据拷贝指请求到的数据先存放在内核空间, 然后从内核空间拷贝⾄程序的缓冲区伪代码如下{// read阻塞read(socket, buffer);// 处理bufferprocess(buffer);}⽤户线程在IO过程中被阻塞,不能做任何事情,对CPU的资源利⽤率不⾼2. 同步⾮阻塞⽤户线程不断发起IO请求. 数据未到达时系统返回⼀状态值; 数据到达后才真正读取数据伪代码如下{// read⾮阻塞while(read(socket, buffer) != SUCCESS);process(buffer);}⽤户线程每次请求IO都可以⽴即返回,但是为了拿到数据,需不断轮询,⽆谓地消耗了⼤量的CPU⼀般很少直接使⽤这种模型,⽽是在其他IO模型中使⽤⾮阻塞IO这⼀特性3. IO多路复⽤IO多路复⽤建⽴在内核提供的阻塞函数select上⽤户先将需要进⾏IO操作的socket添加到select中,然后等待阻塞函数select返回。
Java网络编程(Socket基础,多线程socket,socket中文乱码问题)学习笔记
Java⽹络编程(Socket基础,多线程socket,socket中⽂乱码问题)学习笔记1.概念2.简单TCP通信代码,⽤两个java程序模拟客户端和服务器端。
客户端代码:TCP通信的客户端:向服务器发送连接请求,给服务器发送数据,读取服务器回写的数据表⽰客户端的类:.Socket:此类实现客户端套接字(也可以就叫“套接字”)。
套接字是两台机器间通信的端点。
套接字:包含了IP地址和端⼝号的⽹络单位构造⽅法:Socket(String host, int port) 创建⼀个流套接字并将其连接到指定主机上的指定端⼝号。
参数:String host:服务器主机的名称/服务器的IP地址int port:服务器的端⼝号成员⽅法:OutputStream getOutputStream() 返回此套接字的输出流。
InputStream getInputStream() 返回此套接字的输⼊流。
void close() 关闭此套接字。
实现步骤:1.创建⼀个客户端对象Socket,构造⽅法绑定服务器的IP地址和端⼝号2.使⽤Socket对象中的⽅法getOutputStream()获取⽹络字节输出流OutputStream对象3.使⽤⽹络字节输出流OutputStream对象中的⽅法write,给服务器发送数据4.使⽤Socket对象中的⽅法getInputStream()获取⽹络字节输⼊流InputStream对象5.使⽤⽹络字节输⼊流InputStream对象中的⽅法read,读取服务器回写的数据6.释放资源(Socket)注意:1.客户端和服务器端进⾏交互,必须使⽤Socket中提供的⽹络流,不能使⽤⾃⼰创建的流对象2.当我们创建客户端对象Socket的时候,就会去请求服务器和服务器经过3次握⼿建⽴连接通路这时如果服务器没有启动,那么就会抛出异常ConnectException: Connection refused: connect如果服务器已经启动,那么就可以进⾏交互了import java.io.IOException;import java.io.InputStream;import java.io.OutputStream;import .Socket;import java.util.Scanner;public class TCPClient {public static void main(String[] args) throws IOException {Scanner cin = new Scanner(System.in);Socket socket = new Socket("127.0.0.1",8888);InputStream is = socket.getInputStream();while(true){//给服务器端发数据System.out.println("请输⼊你要向服务器发送的数据:");String sendMessage = cin.nextLine();OutputStream os = socket.getOutputStream();os.write(sendMessage.getBytes());//接收服务器端发过来的数据byte[] getMessage = new byte[1024];int len = is.read(getMessage);String message = new String(getMessage,0,len);System.out.println("收到服务器端发来的数据为: "+message);}}}服务器端代码:TCP通信的服务器端:接收客户端的请求,读取客户端发送的数据,给客户端回写数据表⽰服务器的类:.ServerSocket:此类实现服务器套接字。
java socketio消息发送成功后的回调方法
java socketio消息发送成功后的回调方法当我们使用Java SocketIO进行消息发送时,通常会在发送成功后执行一些回调方法。
这些回调方法可以帮助我们处理接收到的消息,或者在消息发送成功后执行一些必要的操作。
下面,我将详细介绍如何使用Java SocketIO实现消息发送成功后的回调方法。
一、准备工作在使用Java SocketIO之前,需要先确保你已经正确地配置了SocketIO服务器。
这通常涉及到配置服务器地址、端口号、身份验证等信息。
此外,还需要确保你的Java项目已经包含了SocketIO库的相关依赖。
二、创建SocketIO客户端接下来,我们需要创建一个SocketIO客户端,用于与SocketIO服务器进行通信。
以下是一个简单的示例代码:```javaimport java.io.IOException;import .Socket;import .UnknownHostException;import java.util.concurrent.TimeUnit;import org.eclipse.jetty.client.HttpClient;import org.eclipse.jetty.client.util.BytesHttpResponse;import org.eclipse.jetty.client.util.StringRequest;import org.eclipse.jetty.io.nio.NioSelector;import org.eclipse.jetty.server.Server;import org.eclipse.jetty.util.ssl.SslContextFactory;import org.json.JSONObject;import io.socket.IOCallback;import io.socket.SocketIOClient;public class SocketIOClientExample {public static void main(String[] args) throws UnknownHostException, InterruptedException {// 创建HttpClient对象,用于与SocketIO服务器通信HttpClient httpClient = new HttpClient();httpClient.start();// 创建SocketIOClient对象,并指定服务器地址和端口号SocketIOClient socketIOClient = new SocketIOClient(new NioSelector(System.in, System.out), "http://localhost:8080", new SslContextFactory());socketIOClient.connect();// 发送消息并设置回调方法socketIOClient.emit("message", "Hello, SocketIO!", new IOCallback() {@Overridepublic void onMessage(String response) {System.out.println("Message received: " + response);// 在这里执行发送成功后的回调方法}@Overridepublic void onError(Throwable t) {t.printStackTrace();}@Overridepublic void onClose() {System.out.println("Connection closed");httpClient.stop();}});}}```这段代码创建了一个SocketIOClient对象,并指定了服务器地址和端口号。
WindowsSocket五种IO模型(异步选择)

Winsock 提供了⼀个有⽤的异步I/O模型。
利⽤这个模型,应⽤程序可在⼀个套接字上,接收以Windows消息为基础的络事件通知。
具体的做法是在建好⼀个套接字后,调⽤WSAAsyncSelect函数。
该模型最早出现于Winsock的1.1版本中,⽤于帮助应⽤程序开发者⾯向⼀些早期的16位 Windows平台(如Windows for Workgroups),适应其“落后”的多任务消息环境。
应⽤程序仍可从这种模型中得到好处,特别是它们⽤⼀个标准的Windows例程(常称为 "WndProc"),对窗⼝消息进⾏管理的时候。
该模型亦得到了Microsoft Foundation Class(微软基本类,MFC)对象CSocket的采纳。
(节选⾃《Windows络编程》第⼋章) 还是先贴出代码,然后做详细解释: #include #include #define PORT 5150 #define MSGSIZE 1024 #define WM_SOCKET WM_USER+0 #pragma comment(lib, "ws2_32.lib") LRESULT CALLBACK WndProc(HWND, UINT, WPARAM, LPARAM); int WINAPI WinMain(HINSTANCE hInstance, HINSTANCE hPrevInstance, PSTR szCmdLine, int iCmdShow) { static TCHAR szAppName[] = _T("AsyncSelect Model"); HWND hwnd ; MSG msg ; WNDCLASS wndclass ; wndclass.style = CS_HREDRAW | CS_VREDRAW ; wndclass.lpfnWndProc = WndProc ; wndclass.cbClsExtra = 0 ; wndclass.cbWndExtra = 0 ; wndclass.hInstance = hInstance ; wndclass.hIcon = LoadIcon (NULL, IDI_APPLICATION) ; wndclass.hCursor = LoadCursor (NULL, IDC_ARROW) ; wndclass.hbrBackground = (HBRUSH) GetStockObject (WHITE_BRUSH) ; wndclass.lpszMenuName = NULL ; wndclass.lpszClassName = szAppName ; if (!RegisterClass(&wndclass)) { MessageBox (NULL, TEXT ("This program requires Windows NT!"), szAppName, MB_ICONERROR) ; return 0 ; } hwnd = CreateWindow (szAppName, // window class name TEXT ("AsyncSelect Model"), // window caption WS_OVERLAPPEDWINDOW, // window style CW_USEDEFAULT, // initial x position CW_USEDEFAULT, // initial y position CW_USEDEFAULT, // initial x size CW_USEDEFAULT, // initial y size NULL, // parent window handle NULL, // window menu handle hInstance, // program instance handle NULL) ; // creation parameters ShowWindow(hwnd, iCmdShow); UpdateWindow(hwnd); while (GetMessage(&msg, NULL, 0, 0)) { TranslateMessage(&msg) ; DispatchMessage(&msg) ; } return msg.wParam; } LRESULT CALLBACK WndProc (HWND hwnd, UINT message, WPARAM wParam, LPARAM lParam) { WSADATA wsd; static SOCKET sListen; SOCKET sClient; SOCKADDR_IN local, client; int ret, iAddrSize = sizeof(client); char szMessage[MSGSIZE]; switch (message) { case WM_CREATE: // Initialize Windows Socket library WSAStartup(0x0202, &wsd); // Create listening socket sListen = socket(AF_INET, SOCK_STREAM, IPPROTO_TCP); // Bind local.sin_addr.S_un.S_addr = htonl(INADDR_ANY); local.sin_family = AF_INET; local.sin_port = htons(PORT); bind(sListen, (struct sockaddr *)&local, sizeof(local)); // Listen listen(sListen, 3); // Associate listening socket with FD_ACCEPT event WSAAsyncSelect(sListen, hwnd, WM_SOCKET, FD_ACCEPT); return 0; case WM_DESTROY: closesocket(sListen); WSACleanup(); PostQuitMessage(0); return 0; case WM_SOCKET: if (WSAGETSELECTERROR(lParam)) { closesocket(wParam); break; } switch (WSAGETSELECTEVENT(lParam)) { case FD_ACCEPT: // Accept a connection from client sClient = accept(wParam, (struct sockaddr *)&client, &iAddrSize); // Associate client socket with FD_READ and FD_CLOSE event WSAAsyncSelect(sClient, hwnd, WM_SOCKET, FD_READ | FD_CLOSE); break; case FD_READ: ret = recv(wParam, szMessage, MSGSIZE, 0); if (ret == 0 || ret == SOCKET_ERROR && WSAGetLastError() == WSAECONNRESET) { closesocket(wParam); } else { szMessage[ret] = ’\0’; send(wParam, szMessage, strlen(szMessage), 0); } break; case FD_CLOSE: closesocket(wParam); break; } return 0; } return DefWindowProc(hwnd, message, wParam, lParam); } WSAAsyncSelect是最简单的⼀种Winsock I/O模型(之所以说它简单是因为⼀个主线程就搞定了)。
socket.io服务多节点(负载均衡)和反向代理部署方案

socket.io服务多节点(负载均衡)和反向代理部署⽅案(1)使⽤nginx做长连接服务(websocket、socket.io)的负载均衡(2)使⽤nginx做长连接服务(websocket、socket.io)的反向代理(3)通过ip_hash的均衡策略保证长连接服务(websocket、socket.io)的正常访问。
为提⾼⽤户的访问效率,⽣产环境需要部署⾄少两台socket.io服务,那么就需要保证长连接的请求正常。
(1)服务性能可通过⽔平拓展节点来提⾼(2)保证了长连接的正常访问3、成效说明(1)提⾼了服务的性能,缓解⾼并发下单节点响应速度慢的问题。
(2)提⾼了服务的可⽤性,当其中⼀个服务宕机时,另外⾄少⼀个服务正常运⾏中,可保证⽤户的继续使⽤。
(3)提⾼了服务的稳定性,当流量飙升时,可以通过⽔平拓展服务节点来保证服务的稳定,避免宕机。
技术⽅案的详细说明1、技术说明架构图如下所⽰:nginx配置⽂件内容:upstream collaboration_servers {ip_hash;server 172.24.126.2:3000;server 172.24.126.2:3001;server 172.24.126.2:3002;server 172.24.126.2:3003;}server{listen 3333;server_name ;location /socket.io/ {proxy_pass http://collaboration_servers;# WebScoket Supportproxy_http_version 1.1;proxy_set_header Upgrade $http_upgrade;proxy_set_header Connection "upgrade";proxy_set_header Host $host;proxy_set_header X-Real-IP $remote_addr;proxy_set_header X-Forwarded-For $proxy_add_x_forwarded_for;proxy_connect_timeout 900;proxy_send_timeout 900;proxy_read_timeout 900;proxy_buffer_size 128k;proxy_buffers 4 256k;proxy_busy_buffers_size 256k;proxy_temp_file_write_size 256k;}access_log /var/log/nginx/collaborationserverLog.log main;}2、难点说明使⽤nginx做负载均衡后,测试时发现长连接经常断开,导致游戏流程⽆法继续。
netty-socketio概述

netty-socketio概述netty-socketio 概述netty-socketio是⼀个开源的Socket.io服务器端的⼀个java的实现,它基于Netty框架,可⽤于服务端推送消息给客户端。
说到服务端推送技术,⼀般会涉及WebSocket,WebSocket是HTML5最新提出的规范,虽然主流浏览器都已经⽀持,但仍然可能有不兼容的情况,为了兼容所有浏览器,给程序员提供⼀致的编程体验,SocketIO将WebSocket、AJAX和其它的通信⽅式全部封装成了统⼀的通信接⼝,也就是说,使⽤SocketIO时不⽤担⼼兼容问题,底层会⾃动选⽤最佳的通信⽅式。
netty-socketio 框架事件流程netty-socketio ⽰例demopom.xml<dependencies><dependency><groupId>org.springframework.boot</groupId><artifactId>spring-boot-starter-web</artifactId></dependency><dependency><groupId>com.corundumstudio.socketio</groupId><artifactId>netty-socketio</artifactId><version>1.7.17</version></dependency><dependency><groupId>org.projectlombok</groupId><artifactId>lombok</artifactId><version>1.18.4</version><scope>provided</scope></dependency></dependencies>启动类 NettySocketioApplication@SpringBootApplication@Slf4jpublic class NettySocketioApplication implements CommandLineRunner {public static void main(String[] args) {SpringApplication.run(NettySocketioApplication.class, args);}@Autowiredprivate SocketIOServer socketIOServer;@Overridepublic void run(String... strings) {socketIOServer.start();}}Message@Datapublic class Message {private String msg;}配置类 NettySocketioConfig@Configurationpublic class NettySocketioConfig {/*** netty-socketio服务器*/@Beanpublic SocketIOServer socketIOServer() {com.corundumstudio.socketio.Configuration config = new com.corundumstudio.socketio.Configuration(); config.setHostname("localhost");config.setPort(9092);SocketIOServer server = new SocketIOServer(config);return server;}/*** ⽤于扫描netty-socketio的注解,⽐如 @OnConnect、@OnEvent*/@Beanpublic SpringAnnotationScanner springAnnotationScanner() {return new SpringAnnotationScanner(socketIOServer());}}消息处理器 MessageEventHandler@Component@Slf4jpublic class MessageEventHandler {@Autowiredprivate SocketIOServer socketIoServer;public static ConcurrentMap<String, SocketIOClient> socketIOClientMap = new ConcurrentHashMap<>(); /*** 客户端连接的时候触发** @param client*/@OnConnectpublic void onConnect(SocketIOClient client) {String mac = client.getHandshakeData().getSingleUrlParam("mac");//存储SocketIOClient,⽤于发送消息socketIOClientMap.put(mac, client);//回发消息client.sendEvent("message", "onConnect back");("客户端:" + client.getSessionId() + "已连接,mac=" + mac);}/*** 客户端关闭连接时触发** @param client*/@OnDisconnectpublic void onDisconnect(SocketIOClient client) {("客户端:" + client.getSessionId() + "断开连接");}/*** 客户端事件** @param client 客户端信息* @param request 请求信息* @param data 客户端发送数据*/@OnEvent(value = "messageevent")public void onEvent(SocketIOClient client, AckRequest request, Message data) {//回发消息client.sendEvent("messageevent", "我是服务器都安发送的信息");//⼴播消息sendBroadcast();}/*** ⼴播消息*/public void sendBroadcast() {for (SocketIOClient client : socketIOClientMap.values()) {if (client.isChannelOpen()) {client.sendEvent("Broadcast", "当前时间", System.currentTimeMillis());}}}}html 页⾯<!doctype html><html lang="en"><head><meta charset="UTF-8"><meta name="viewport" content="width=device-width,initial-scale=1, maximum-scale=1, user-scalable=no"> <title>websocket-java-socketio</title><script src="https:///socket.io/2.2.0/socket.io.js"></script></head><body><h1>Socket.io Test</h1><div><p id="status">Waiting for input</p></div><div><p id="message">hello world!</p></div><button id="connect" onClick='connect()'/>Connect</button><button id="disconnect" onClick='disconnect()'>Disconnect</button><button id="send" onClick='send()'/>Send Message</button></body><script type="text/javascript">/*** 前端js的 socket.emit("事件名","参数数据")⽅法,是触发后端⾃定义消息事件的时候使⽤的,* 前端js的 socket.on("事件名",匿名函数(服务器向客户端发送的数据))为监听服务器端的事件**/var socket = io.connect("http://localhost:9092?mac=2");var firstconnect = true;function connect() {if(firstconnect) {//socket.on('reconnect', function(){ status_update("Reconnected to Server"); });//socket.on('reconnecting', function( nextRetry ){ status_update("Reconnecting in "//+ nextRetry + " seconds"); });//socket.on('reconnect_failed', function(){ message("Reconnect Failed"); });//firstconnect = false;} else {socket.socket.reconnect();}}//监听服务器连接事件socket.on('connect', function(){ status_update("Connected to Server"); });//监听服务器关闭服务事件socket.on('disconnect', function(){ status_update("Disconnected from Server"); });//监听服务器端发送消息事件socket.on('messageevent', function(data) {message(data)//console.log("服务器发送的消息是:"+data);});//断开连接function disconnect() {socket.disconnect();}function message(data) {document.getElementById('message').innerHTML = "Server says: " + data;}function status_update(txt){document.getElementById('status').innerHTML = txt;}function esc(msg){return msg.replace(/</g, '<').replace(/>/g, '>');}//点击发送消息触发function send() {console.log("点击了发送消息,开始向服务器发送消息") var msg = "我很好的,是的.";socket.emit('messageevent', {msgContent: msg});};</script></html>执⾏输出运⾏ SpringBoot 服务器> mvn spring-boot:run点击⽹页按钮。
socket.io中sid生成规则
【主题:socket.io中sid生成规则】1. 什么是socket.io中的sid?在使用socket.io进行实时通信的时候,每个连接的客户端都会被分配一个唯一的标识符,被称为sid(session id)。
这个sid是用来标识客户端与服务器端之间的连接的,可以帮助服务器端在处理不同客户端的消息时进行区分。
2. socket.io中sid的生成规则在socket.io中,sid的生成规则是基于一种类似于UUID (Universally Unique Identifier)的算法来实现的。
它包含了时间戳、随机数、服务器信息等多种因素,以确保在同一时刻不会生成相同的sid,从而保证其唯一性。
3. 深入探讨socket.io中sid的生成规则从技术角度来看,socket.io中sid的生成规则涉及到了一些复杂的算法和逻辑。
它需要考虑到网络延迟、并发连接、安全性等多方面因素,以确保sid的唯一性和安全性。
4. sid的作用和意义通过sid,服务器端可以轻松地识别和管理不同客户端的连接状态。
它可以帮助服务器端进行消息的路由和分发,保证消息能够准确地传递给目标客户端,而不会混淆或丢失。
sid还可以用来进行连接状态的管理和监控,以提高整个系统的稳定性和可靠性。
5. 如何在开发中使用sid?在实际的开发中,我们通常不需要直接操作sid,因为socket.io已经在底层透明地处理了它。
但是理解sid的生成规则和作用,可以帮助我们更好地设计和开发基于socket.io的实时通信系统,提高系统的性能和可靠性。
6. 总结和回顾socket.io中sid的生成规则是基于复杂的算法和逻辑,以确保其唯一性和安全性。
它在实时通信系统中扮演着重要的角色,可以帮助服务器端准确地管理和路由客户端之间的消息,保证通信的稳定性和可靠性。
7. 个人观点和理解作为一个实时通信系统的重要组成部分,sid的生成规则应该得到足够重视。
在开发过程中,我们应该充分理解sid的作用和原理,以确保系统能够稳定、高效地运行。
python-socketio用法

前后端常⽤通讯⽅式⼀、前后端常⽤通讯⽅式# 1. ajax 浏览器发起请求,服务器返回数据,服务器不能主动返回数据,要实现实时数据交互只能是ajax轮询(让浏览器隔个⼏秒就发送⼀次请求,然后更新客户端显⽰。
这种⽅式实际上浪费了⼤量流量并且对服务端造成了很⼤压⼒)。
# 2. websocketwebsocket是HTML5出的东西(协议),是⼀种全双⼯通信机制,两端可以及时地互发事件,互发数据,相互通信,只需要浏览器和服务器建⽴⼀次连接,服务器就可以主动推送数据到浏览器实现实时数据更新。
原⽣ websocket ⽀持到IE11 ,实际开发中,有⽐较著名的两个库socket.io(推荐)(、可能跟新不及时)和 , 它们都对原始的API做了进⼀步封装和兼容IE,提供了更多功能,都分为客户端和服务端的实现,实际应⽤中,可以选择使⽤。
websocket 的实现需要后端搭建⼀个WebSocket服务器,但是如果想搭建⼀个WebSocket服务器就没有那么轻松了,因为WebSocket是⼀种新的通信协议,⽬前还是草案,没有成为标准,市场上也没有成熟的WebSocket服务器或者Library实现WebSocket协议,我们就必须⾃⼰动⼿写代码去解析和组装WebSocket的数据包。
要这样完成⼀个WebSocket服务器,估计所有的⼈都想放弃,幸好的是市场上有⼏款⽐较好的开源库供我们使⽤,⽐如 PyWebSocket,WebSocket-Node, LibWebSockets等等,这些库⽂件已经实现了WebSocket数据包的封装和解析,我们可以调⽤这些接⼝,这在很⼤程度上减少了我们的⼯作量。
⼆、socket.io(推荐)socket.io 是⼀个为实时应⽤提供跨平台实时通信的库。
socket.io 旨在使实时应⽤在每个浏览器和移动设备上成为可能,模糊不同的传输机制之间的差异。
socket.io 的名字源于它使⽤了浏览器⽀持并采⽤的 HTML5 WebSocket 标准,因为并不是所有的浏览器都⽀持 WebSocket ,所以该库⽀持⼀系列降级功能:WebsocketAdobe® Flash® SocketAJAX long pollingAJAX multipart streamingForever IframeJSONP Polling在⼤部分情境下,你都能通过这些功能选择与浏览器保持类似长连接的功能。
webassembly socket编程
WebAssembly Socket 编程WebAssembly (Wasm) 是一种可移植、体积小、加载和运行速度快的二进制代码格式,可以在现代浏览器中运行,并且与 JavaScript 和其他 Web 技术紧密集成。
Wasm 使开发者能够在浏览器中编写高性能的应用程序,同时享受到更快的加载时间和更好的用户体验。
在 WebAssembly 中进行 Socket 编程意味着我们可以通过 Wasm 模块与服务器进行实时交互,利用底层的网络套接字来传输数据。
这为 Web 应用程序的实现提供了更多可能性,包括实时聊天、多人在线游戏、即时数据同步等。
本文将介绍如何在 WebAssembly 中进行 Socket 编程,包括以下几个方面:1.WebAssembly 和 Socket 编程简介2.构建 WebAssembly Socket 编程环境3.在 WebAssembly 中使用 Socket API4.在浏览器中测试 WebAssembly Socket 编程5.WebSocket 和 Socket.IO6.WebAssembly Socket 编程的应用场景7.WebAssembly Socket 编程的限制和注意事项1. WebAssembly 和 Socket 编程简介WebAssembly 是一种可以直接在浏览器中运行的二进制格式,它是一种虚拟机的目标代码,可以将各种语言的代码编译成 Wasm 模块并在浏览器中执行。
WebAssembly 具有比 JavaScript 更高的性能,这使得它成为处理计算密集型任务和实时交互的理想选择。
Socket 编程是一种在计算机网络中进行通信的方式,其中套接字 (Socket) 是网络通信中的一个概念,用于在客户端和服务器之间建立连接。
通过 Socket 编程,我们可以在不同的主机上实现实时通信和数据传输。
将 WebAssembly 和 Socket 编程结合起来,可以使我们在浏览器环境中直接进行实时通信,并更灵活地处理数据传输、事件处理等任务。
软件开发知识:了解前后端分离的实现方式

软件开发知识:了解前后端分离的实现方式前端和后端分离是一种广泛应用于Web应用程序开发的架构模式。
在传统的Web应用程序中,前端和后端的职责通常都包括对页面的生成和维护。
这种模式存在很多问题,例如难以扩展和维护,前端和后端代码高度耦合等。
而前后端分离的架构模式可以有效地解决这些问题,提高开发效率和应用程序的可维护性。
前后端分离的实现方式有很多,以下将分别从API设计、前端框架选择等方面介绍其中的一些核心实现方式。
一、API设计API是前后端分离中的一个关键点。
API是指应用程序接口,它是前后端之间交互的规范。
在前后端分离架构中,API称为数据接口,它负责将服务器端的数据转化为易于使用的JSON或XML格式,传输到客户端,客户端访问这些接口来拉取数据。
因此,一个好的API设计是前后端分离中的关键。
1. RESTful APIRESTful API是一个符合RESTful架构的API。
RESTful API的核心设计原则有以下几点:使用HTTP动词进行CRUD操作,使用HTTP状态码定义响应状态,使用JSON结构传输数据等。
这种API可以使得前后端分离架构更加灵活,具有更高的可维护性和可拓展性。
2. GraphQLGraphQL是一种新型的API设计语言。
GraphQL允许客户端精准地定义其需要的数据集,并返回所需数据,从而减少了客户端需要拉取的不必要数据,提高了数据传输效率。
采用GraphQL设计的API对于多客户端场景非常有用,例如Web、移动应用等。
二、前端框架选择在前后端分离架构模式中,前端框架选择非常重要。
一个好的前端框架可以大幅提高开发效率。
1. ReactReact是一个非常流行的JavaScript前端框架。
React的特点是组件化编程,易于组织和管理组件化的UI。
React可以很好地配合后台API进行数据交互。
2. AngularAngular是一个由Google维护的前端框架。
Angular的规范化和模块化编码可以使代码更加易于阅读、管理和维护。
socketio连接参数

socketio连接参数Socket.IO连接参数详解Socket.IO是一个实时的、双向的通信库,它使用了WebSocket协议来实现实时通信。
在使用Socket.IO进行连接时,我们需要设置一些连接参数来满足我们的需求。
本文将详细介绍Socket.IO连接参数的使用方法和作用。
1. 引入Socket.IO库在使用Socket.IO之前,首先需要在项目中引入Socket.IO库。
可以通过在HTML文件中添加以下代码来引入Socket.IO库:<script src="https://cdn.socket.io/socket.io-3.1.3.js"></script>2. 创建Socket.IO连接在引入Socket.IO库之后,我们可以使用以下代码来创建Socket.IO连接:var socket = io();这样就成功创建了一个Socket.IO连接,并将其赋值给变量socket。
接下来我们可以使用socket对象来进行相关的操作。
3. 连接参数在创建Socket.IO连接时,我们可以传递一些连接参数来进行自定义设置。
以下是一些常用的连接参数:3.1. transportstransports参数用于指定在客户端和服务器之间传输数据的方式。
默认值为["polling", "websocket"],即首先尝试使用轮询方式进行传输,如果不支持则使用WebSocket进行传输。
例如,我们可以使用以下代码将transports参数设置为仅使用WebSocket传输方式:var socket = io({ transports: ["websocket"] });3.2. reconnectionreconnection参数用于指定在连接断开后是否自动尝试重新连接。
默认值为true,即自动尝试重新连接。
前后端常用通讯方式

前后端常⽤通讯⽅式⼀、前后端常⽤通讯⽅式# 1. ajax 浏览器发起请求,服务器返回数据,服务器不能主动返回数据,要实现实时数据交互只能是ajax轮询(让浏览器隔个⼏秒就发送⼀次请求,然后更新客户端显⽰。
这种⽅式实际上浪费了⼤量流量并且对服务端造成了很⼤压⼒)。
# 2. websocketwebsocket是HTML5出的东西(协议),是⼀种全双⼯通信机制,两端可以及时地互发事件,互发数据,相互通信,只需要浏览器和服务器建⽴⼀次连接,服务器就可以主动推送数据到浏览器实现实时数据更新。
原⽣ websocket ⽀持到IE11 ,实际开发中,有⽐较著名的两个库socket.io(推荐)(、可能跟新不及时)和 , 它们都对原始的API做了进⼀步封装和兼容IE,提供了更多功能,都分为客户端和服务端的实现,实际应⽤中,可以选择使⽤。
websocket 的实现需要后端搭建⼀个WebSocket服务器,但是如果想搭建⼀个WebSocket服务器就没有那么轻松了,因为WebSocket是⼀种新的通信协议,⽬前还是草案,没有成为标准,市场上也没有成熟的WebSocket服务器或者Library实现WebSocket协议,我们就必须⾃⼰动⼿写代码去解析和组装WebSocket的数据包。
要这样完成⼀个WebSocket服务器,估计所有的⼈都想放弃,幸好的是市场上有⼏款⽐较好的开源库供我们使⽤,⽐如 PyWebSocket,WebSocket-Node, LibWebSockets等等,这些库⽂件已经实现了WebSocket数据包的封装和解析,我们可以调⽤这些接⼝,这在很⼤程度上减少了我们的⼯作量。
⼆、socket.io(推荐)socket.io 是⼀个为实时应⽤提供跨平台实时通信的库。
socket.io 旨在使实时应⽤在每个浏览器和移动设备上成为可能,模糊不同的传输机制之间的差异。
socket.io 的名字源于它使⽤了浏览器⽀持并采⽤的 HTML5 WebSocket 标准,因为并不是所有的浏览器都⽀持 WebSocket ,所以该库⽀持⼀系列降级功能:WebsocketAdobe® Flash® SocketAJAX long pollingAJAX multipart streamingForever IframeJSONP Polling在⼤部分情境下,你都能通过这些功能选择与浏览器保持类似长连接的功能。
- 1、下载文档前请自行甄别文档内容的完整性,平台不提供额外的编辑、内容补充、找答案等附加服务。
- 2、"仅部分预览"的文档,不可在线预览部分如存在完整性等问题,可反馈申请退款(可完整预览的文档不适用该条件!)。
- 3、如文档侵犯您的权益,请联系客服反馈,我们会尽快为您处理(人工客服工作时间:9:00-18:30)。
Overview Server API Client APIRooms and NamespacesMigrating from 0.9Using multiple nodes Logging and DebuggingFAQHow to useInstallingUsing with Node http server$ npm install socket.ioHome Demos Get started Docs Blog Slack 78Server (app.js)var app = require('http').createServer(handler)var io = require('socket.io')(app);var fs = require('fs');Client (index.html)<script src="/socket.io/socket.io.js"></script><script>var socket = io('http://localhost');Using with Express 3/4Using with the Express frameworkapp.listen(80);function handler (req, res) {fs.readFile(__dirname + '/index.html', function (err, data) { if (err) {res.writeHead(500);return res.end('Error loading index.html'); }res.writeHead(200); res.end(data); });}io.on('connection', function (socket) { socket.emit('news', { hello: 'world' }); socket.on('my other event', function (data) { console.log(data); });});socket.on('news', function (data) { console.log(data);socket.emit('my other event', { my: 'data' }); });</script>Server (app.js)var app = require('express')();var server = require('http').Server(app);var io = require('socket.io')(server);server.listen(80);app.get('/', function (req, res) {res.sendfile(__dirname + '/index.html');});io.on('connection', function (socket) { socket.emit('news', { hello: 'world' });socket.on('my other event', function (data) { console.log(data); });});Client (index.html)<script src="/socket.io/socket.io.js"></script><script>var socket = io.connect('http://localhost'); socket.on('news', function (data) { console.log(data);socket.emit('my other event', { my: 'data' }); });</script>Server (app.js)Client (index.html)Sending and receiving eventsSocket.IO allows you to emit and receive custom events. Besides connect,messageanddisconnect, you canemit custom events:ServerRestricting yourself to a namespaceIf you have control over all the messages and events emitted for a particular application, using the default /namespace works. If you want to leverage 3rd-party code, or produce code to share with others, socket.io provides a way of namespacing a socket.This has the benefit of multiplexinga single connection. Instead of socket.io using twoWebSocketconnections,it’ll use one.// note, io(<port>) will create a http server for you var io = require('socket.io')(80);io.on('connection', function (socket) {io.emit('this', { will: 'be received by everyone'});socket.on('private message', function (from, msg) {console.log('I received a private message by ', from, ' saying ', msg); });socket.on('disconnect', function () { io.emit('user disconnected'); });});var app = require('express').createServer();var io = require('socket.io')(app);app.listen(80);app.get('/', function (req, res) {res.sendfile(__dirname + '/index.html');});io.on('connection', function (socket) {socket.emit('news', { hello: 'world' });socket.on('my other event', function (data) { console.log(data); });});<script src="/socket.io/socket.io.js"></script><script>var socket = io.connect('http://localhost'); socket.on('news', function (data) {console.log(data);socket.emit('my other event', { my: 'data' }); });</script>Sending volatile messagesSometimes certain messages can be dropped. Let’s say you have an app that shows realtime tweets for the keyword bieber .If a certain client is not ready to receive messages (because of network slowness or other issues, or because they’re connected through long polling and is in the middle of a request-response cycle), if they doesn’t receive ALL the tweets related to bieber your application won’t suffer.In that case, you might want to send those messages as volatile messages.Servervar io = require('socket.io')(80);io.on('connection', function (socket) { var tweets = setInterval(function () { getBieberTweet(function (tweet) {socket.volatile.emit('bieber tweet', tweet); }); }, 100);socket.on('disconnect', function () { clearInterval(tweets); });});Server (app.js)var io = require('socket.io')(80);var chat = io.of('/chat').on('connection', function (socket) { socket.emit('a message', { that: 'only' , '/chat': 'will get' });chat.emit('a message', { everyone: 'in' , '/chat': 'will get' }); });var news = io .of('/news').on('connection', function (socket) { socket.emit('item', { news: 'item' }); });Client (index.html)<script>var chat = io.connect('http://localhost/chat') , news =io.connect('http://localhost/news');chat.on('connect', function () { chat.emit('hi!'); });news.on('news', function () { news.emit('woot'); });</script>Sending and getting data (acknowledgements)Sometimes, you might want to get a callback when the client confirmed the message reception.To do this, simply pass a function as the last parameter of.sendor.emit. What’s more, when you use.emit,the acknowledgement is done by you, which means you can also pass data along:Broadcasting messagesTo broadcast, simply add a broadcast flag to emit and send method calls. Broadcasting means sending a message to everyone else except for the socket that starts it.ServerUsing it just as a cross-browser WebSocketIf you just want the WebSocket semantics, you can do that too. Simply leverage sendand listen on themessageevent:var io = require('socket.io')(80);io.on('connection', function (socket) { socket.broadcast.emit('user connected');});Server (app.js)var io = require('socket.io')(80);io.on('connection', function (socket) {socket.on('ferret', function (name, fn) { fn('woot'); });});Client (index.html)<script>var socket = io(); // TIP: io() with no args does auto-discoverysocket.on('connect', function () { // TIP: you can avoid listening on `connect` and listen on events directly too!socket.emit('ferret', 'tobi', function (data) {console.log(data); // data will be 'woot' }); });</script>Server (app.js)var io = require('socket.io')(80);Client (index.html)<script>var socket = io('http://localhost/');Home Demos Get started Docs Blog Slack78OverviewServer APIClient APIRooms and NamespacesMigrating from 0.9Using multiple nodesLogging and DebuggingFAQServer APIServerExposed by require('socket.io').Server()Creates a new Server. Works with and without new:var io = require('socket.io')();// orvar Server = require('socket.io');var io = new Server();Server#onconnection(socket:engine#Socket):ServerAdvanced use only. Creates a new socket.io client from the incoming engine.io (or compatible API) socket.Server#of(nsp:String):NamespaceInitializes and retrieves the given Namespace by its pathnameidentifier nsp.If the namespace was already initialized it returns it right away. Server#emitEmits an event to all connected clients. The following two are equivalent:var io = require('socket.io')();io.sockets.emit('an event sent to all connected clients');io.emit('an event sent to all connected clients');For other available methods, see Namespace below.Server#useSee Namespace#use below.NamespaceRepresents a pool of sockets connected under a given scope identified by a pathname (eg: /chat).By default the client always connects to /.Eventsconnection / connect. Fired upon a connection.Parameters:Socket the incoming socket.Namespace#name:StringThe namespace identifier property.Namespace#connected:ObjectHash of Socket objects that are connected to this namespace indexed by id.Namespace#use(fn:Function):NamespaceRegisters a middleware, which is a function that gets executed for every incoming Socket and receives as parameter the socket and a function to optionally defer execution to the next registered middleware.var io = require('socket.io')();e(function(socket, next){if (socket.request.headers.cookie) return next();next(new Error('Authentication error'));});Errors passed to middleware callbacks are sent as special error packets to clients.SocketA Socket is the fundamental class for interacting with browser clients. A Socket belongs to a certain Namespace (by default /)and uses an underlying Client to communicate.Socket#rooms:ArrayA list of strings identifying the rooms this socket is in.Socket#client:ClientA reference to the underlying Client object.Socket#conn:SocketA reference to the underyling Client transport connection (engine.ioHome Demos Get started Docs Blog Slack78OverviewServer APIClient APIRooms and NamespacesMigrating from 0.9Using multiple nodesLogging and DebuggingFAQClient APIIO(url:String, opts:Object):SocketExposed as the io global in window if using the standalone build (eg: /socket.io/socket.io.js or the CDN), or the result of calling require('socket.io-client').When called, it creates a new Manager for the given URL, and attemptsto reuse an existing Manager for subsequent calls, unless themultiplex option is passed with false. Passing this option is the equivalent of passing 'force new connection': true.The rest of the options are passed to the Manager constructor (see belowfor details).A Socket instance is returned for the namespace specified by the pathname in the URL, defaulting to /. For example, if the url is http://localhost/users, a transport connection will be established to http://localhost and a Socket.IO connection will be established to/users.IO#protocolSocket.io protocol revision number this client works with.IO#SocketReference to the Socket constructor.IO#ManagerReference to the Manager constructor.IO#EmitterReference to the Emitter constructor.Manager(url:String, opts:Object)A Manager represents a connection to a given Socket.IO server. One or more Socket instances are associated with the manager. The manager can be accessed through the io property of each Socket instance.The opts are also passed to engine.io upon initialization of the underlying Socket.Options:– reconnection whether to reconnect automatically (true)– reconnectionDelay how long to wait before attempting a new reconnection (1000)– reconnectionDelayMax maximum amount of time to wait between reconnections (5000). Each attempt increases the reconnection bythe amount specified by reconnectionDelay.– timeout connection timeout before a connect_errorand connect_timeout events are emitted (20000)Eventsconnect. Fired upon a successful connection.connect_error. Fired upon a connection error.Parameters:Object error objectconnect_timeout. Fired upon a connection timeout.reconnect. Fired upon a successful reconnection.Parameters:Number reconnection attempt numberreconnect_attempt. Fired upon an attempt to reconnect.reconnecting. Fired upon an attempt to reconnect.Parameters:Number reconnection attempt numberreconnect_error. Fired upon a reconnection attempt error.Parameters:Object error objectreconnect_failed. Fired when couldn’t reconnect within reconnectionAttemptsThe events above are also emitted on the individual sockets thatreconnect that depend on this Manager.Manager#reconnection(v:Boolean):ManagerSets the reconnection option, or returns it if no parametersare passed.Manager#reconnectionAttempts(v:Boolean):ManagerSets the reconnectionAttempts option, or returns it if no parametersare passed.Manager#reconnectionDelay(v:Boolean):ManagerSets the reconectionDelay option, or returns it if no parametersare passed.Manager#reconnectionDelayMax(v:Boolean):ManagerSets the reconectionDelayMax option, or returns it if no parametersare passed.Home Demos Get started Docs Blog Slack78OverviewServer APIClient APIRooms and NamespacesMigrating from 0.9Using multiple nodesLogging and DebuggingFAQNamespacesSocket.IO allows you to “namespace” your sockets, which essentially means assigning different endpoints or paths.This is a useful feature to minimize the number of resources (TCP connections) and at the same time separate concerns within your application by introducing separation between communication channels.Default namespaceWe call the default namespace / and it’s the one Socket.IO clients connect to by default, and the one the server listens to by default.This namespace is identified by io.sockets or simply io:// the following two will emit to all the sockets connected to `/`io.sockets.emit('hi', 'everyone');io.emit('hi', 'everyone'); // short formEach namespace emits a connection event that receives each Socket instance as a parameter io.on('connection', function(socket){socket.on('disconnect', function(){ });});Custom namespacesTo set up a custom namespace, you can call the of function on the server-side:var nsp = io.of('/my-namespace');nsp.on('connection', function(socket){console.log('someone connected'):});nsp.emit('hi', 'everyone!');On the client side, you tell Socket.IO client to connect to that namespace:var socket = io('/my-namespace');Important note: The namespace is an implementation detail of the Socket.IO protocol, and is not related to the actual URL of the underlying transport, which defaults to /socket.io/….RoomsWithin each namespace, you can also define arbitrary channels that sockets can join and leave.Joining and leavingYou can call join to subscribe the socket to a given channel:io.on('connection', function(socket){socket.join('some room');});And then simply use to or in (they are the same) when broadcasting or emitting:io.to('some room').emit('some event'):Home Demos Get started Docs Blog Slack77OverviewServer APIClient APIRooms and NamespacesMigrating from 0.9Using multiple nodesLogging and DebuggingFAQMigration from 0.9For most applications, the transition to 1.0 should be completely seamless and devoid of any hiccups. That said, we’ve done some work to streamline some APIs, and we have changed some internals, so this is a recommended read for most existing users.Authentication differencesSocket.io uses middleware nowYou can give a Socket.io server arbitrary functions via e() that are run when a socket is created. Check out this example:var srv = require('http').createServer();var io = require('socket.io')(srv);var run = 0;e(function(socket, next){run++; // 0 -> 1next();});e(function(socket, next) {run++; // 1 -> 2next();});var socket = require('socket.io-client')();socket.on('connect', function(){// run == 2 at this time});… so its cleaner to do auth via middleware nowThe old io.set() and io.get() methods are deprecated and only supported for backwards compatibility. Here is a translation of an old authorization example into middleware-style.io.set('authorization', function (handshakeData, callback) {// make sure the handshake data looks goodcallback(null, true); // error first, 'authorized' boolean second});vs.e(function(socket, next) {var handshakeData = socket.request;// make sure the handshake data looks good as before// if error do this:// next(new Error('not authorized');// else just call nextnext();});Namespace authorization?io.of('/namespace').use(function(socket, next) {var handshakeData = socket.request;next();});Log differencesLogging is now based on debugTo print all debug logging, set the environment variable DEBUG to *. ie: DEBUG=* node index.jsConfiguration differencesio.set is goneInstead do configuration in server initialization like this:var socket = require('socket.io')({// options go here});Options like log-level are gone. io.set('transports'), io.set('heartbeat interval'), io.set('heartbeat timeout', and io.set('resource') are still supported for backwards compatibility.Setting resource pathThe previous resource option is equivalent to the new path option, but needs a / in the beginning. For example, the following configurationvar socket = io.connect('localhost:3000', {'resource': 'path/to/socket.io';});becomesvar socket = io.connect('localhost:3000', {'path': '/path/to/socket.io';});Parser / Protocol differencesThis is only relevant for updating things like socket.io implementations in other languages, custom socket.io clients, etc.Difference 1 – packet encodingParsing is now class based and asynchronous. Instead of returning a single encoded string, encode calls callback with an array of encodings as the only argument. Each encoding should be written to the transport in order. This is more flexible and makes binary data transport work. Here’s an example:var encoding = parser.encode(packet);console.log(encoding); // fully encoded packetvs.Home Demos Get started Docs Blog Slack79OverviewServer APIClient APIRooms and NamespacesMigrating from 0.9Using multiple nodesLogging and DebuggingFAQUsing multiple nodesSticky load balancingIf you plan to distribute the load of connections among different processes or machines, you have to make sure that requests associated with a particular session id connect to the process that originated them.This is due to certain transports like XHR Polling or JSONP Polling relying on firing several requests during the lifetime of the “socket”.To illustrate why this is needed, consider the example of emitting an event to all connected clients: io.emit('hi', 'all sockets');Chances are that some of those clients might have an active bi-directional communication channel like WebSocket that we can write to immediately, but some of them might be using long-polling.If they’re using long polling, they might or might not have sent a request that we can write to. They could be “in between” those requests. In those situations, it means we have to buffer messages in the process. In order for the client to successfully claim those messages when he sends his request, the easiest way is for him to connect to be routed to that same process.An easy way to do that is by routing clients based on their originating address. An example follows using the NginX server:NginX configurationWithin the http { } section of your nginx.conf file, you can declare a upstream section with a list of Socket.IO process you want to balance load between:upstream io_nodes {ip_hash;server 127.0.0.1:6001;server 127.0.0.1:6002;server 127.0.0.1:6003;server 127.0.0.1:6004;}Notice the ip_hash instruction that indicates the connections will be sticky.In the same http { } section, you can declare a server { } that points to this upstream. In order for NginX to support and forward the WebSocket protocol, we explicitly pass along the required Upgrade headers:server {listen 3000;server_name ;location / {proxy_set_header Upgrade $http_upgrade;proxy_set_header Connection "upgrade";proxy_set_header X-Forwarded-For $proxy_add_x_forwarded_for;proxy_set_header Host $host;proxy_http_version 1.1;proxy_pass http://io_nodes;}}Make sure you also configure worker_processes in the topmost level to indicate how many workers NginX should use. You might also want to look into tweaking the worker_connections setting within the events { } block.Using Node.JS Cluster。