VMware note
详尽Vmvare图文教程-详尽VMware教程

详尽VMware教程现如今有很多人都拥有电脑,但多数人都只有一两台,想组建一个自己的局域网或者是做个小规模的实验一台机器是不够的,最少也要个两三台,可为了这再买电脑就太不值了。
好在有许多虚拟机可以帮我们解决这个问题。
虚拟机可以在一台电脑上虚拟出很多的主机,只要真实主机的配置足够就可以,我这里和大家说说一个老牌的虚拟机VMware。
VMware workstation是VMware公司设计的专业虚拟机,可以虚拟现有任何操作系统,而且使用简单,容易上手。
要知道所有微软员工的机器上都装有一套正版的VMware,足见它在这方面的权威,废话少说,下面我就合大家说说VMware的使用方法,我使用的是最新的VMware4。
这个软件的安装和其他的软件没什么区别,所以安装过程我就不多费口舌了,下面我将把VMware 的完整使用过程分为:建立一个新的虚拟机、配置安装好的虚拟机、配置虚拟机的网络这三个部分,向大家从头说来。
一、建立一个新的虚拟机首先让大家看看VMware的界面我们来建立一个新的虚拟机向导选择普通安装或者是自定义。
这里大家选自定义,后面可以自行规划设备,内存和硬盘容量选择想要虚拟的系统给虚拟机起个名字,指定它的存放位置分配内存大小网络设置模式。
这里比较复杂,安装的时候可以先随便选一个,装好后也可以改,但千万不要选最后一个,否则你将无法创建网络了。
关于这三者之间的区别和怎样使用虚拟机连接到internet 会在后面介绍。
创建一块磁盘。
当第一次建立虚拟机时,请选择第一项,第二项适用于建立第二个或更多虚拟机,即使用已经建立好的虚拟机磁盘,这样可以减少虚拟机占用的真实磁盘空间。
第三项则允许虚拟机直接读写磁盘空间,比较危险,所以适合熟悉使用磁盘的高级用户,如果操作失误会把真实磁盘里的内容删掉的。
设置虚拟机磁盘容量。
第一项可以定义磁盘大小。
第二项允许虚拟机无限使用磁盘空间,但需要真实磁盘足够大。
第三项则限制了每块虚拟磁盘的最大容量为2G。
VMWare虚拟系统上网设置及VMWare虚拟机三种工作模式详解

VMWare虚拟系统上网设置及VMWare虚拟机三种工作模式详解很多网友安装了VMWare虚拟机,但是在虚拟机上网问题上却卡住了。
要想虚拟机上网,首先让我们了解一下VMWare虚拟机三种工作模式。
现在,让我们一起走近VMWare的三种工作模式。
理解三种工作模式VMWare提供了三种工作模式,它们是bridged(桥接模式)、NAT(网络地址转换模式)和host-only(主机模式)。
要想在网络管理和维护中合理应用它们,你就应该先了解一下这三种工作模式。
1.bridged(桥接模式)在这种模式下,VMWare虚拟出来的操作系统就像是局域网中的一台独立的主机,它可以访问网内任何一台机器。
在桥接模式下,你需要手工为虚拟系统配置IP地址、子网掩码,而且还要和宿主机器处于同一网段,这样虚拟系统才能和宿主机器进行通信。
同时,由于这个虚拟系统是局域网中的一个独立的主机系统,那么就可以手工配置它的TCP/IP配置信息,以实现通过局域网的网关或路由器访问互联网。
使用桥接模式的虚拟系统和宿主机器的关系,就像连接在同一个Hub 上的两台电脑。
想让它们相互通讯,你就需要为虚拟系统配置IP地址和子网掩码,否则就无法通信。
如果是你是局域网上网方式,虚拟机使用网桥连接方式,只要设置虚拟机的IP地址与本机是同一网段,子网、网关、DNS与本机相同就能实现上网,也能访问局域网络。
如果你是拨号上网方式,虚拟机使用此种方式连接,就要在虚拟机内系统建立宽带连接、拨号上网,但是和宿主机不能同时上网。
2.NAT(网络地址转换模式)使用NAT模式,就是让虚拟系统借助NAT(网络地址转换)功能,通过宿主机器所在的网络来访问公网。
也就是说,使用NAT模式可以实现在虚拟系统里访问互联网。
NAT模式下的虚拟系统的TCP/IP配置信息是由VMnet8(NAT)虚拟网络的DHCP服务器提供的,无法进行手工修改,因此使用NAT模式虚拟系统也就无法和本地局域网中的其他真实主机进行通讯。
VMware虚拟机数据迁移方案
VMware虚拟机数据迁移方案虚拟机数据迁移是指将虚拟机中的数据从一个主机迁移到另一个主机的过程。
VMware虚拟机数据迁移方案是指在VMware 虚拟化环境中,如何高效、安全地迁移虚拟机数据。
下面将详细介绍VMware虚拟机数据迁移方案。
首先,VMware虚拟机数据迁移可以通过VMotion和Storage vMotion两种方式实现。
VMotion是一种基于网络的虚拟机迁移技术,它可以在不停机的情况下将虚拟机从一个主机迁移到另一个主机,同时保持虚拟机的运行状态。
Storage vMotion是一种基于存储的虚拟机迁移技术,它可以将虚拟机的存储数据从一个存储设备迁移到另一个存储设备,同时保持虚拟机在同一主机上的运行状态。
其次,实施VMware虚拟机数据迁移方案需要按照以下步骤进行。
步骤一:规划虚拟机数据迁移计划。
在规划阶段,需要确定虚拟机迁移的目标主机和存储设备,并评估目标主机和存储设备的性能和容量。
此外,还需要考虑迁移的时间窗口和可能的风险,以确保迁移过程的顺利进行。
步骤二:准备迁移环境。
在准备阶段,需要确保源主机和目标主机之间的网络连接正常,并且目标主机上已经安装了相应的虚拟化软件。
此外,还需要在目标存储设备上创建足够的空间来存放虚拟机的数据。
步骤三:进行虚拟机迁移。
在迁移阶段,可以选择使用VMotion或Storage vMotion进行虚拟机迁移。
如果选择使用VMotion进行虚拟机迁移,需要将虚拟机的运行状态从源主机迁移到目标主机,并将虚拟机的内存、CPU和设备状态迁移到目标主机。
如果选择使用Storage vMotion进行虚拟机迁移,需要将虚拟机的存储数据从源存储设备迁移到目标存储设备,并在迁移过程中保持虚拟机的运行状态。
步骤四:验证迁移结果。
在验证阶段,可以使用VMware vSphere客户端或其他管理工具检查虚拟机迁移的结果。
可以检查虚拟机的运行状态、网络连接和存储设备的可访问性,以确保迁移过程的成功。
VMware Workstation使用手册
VMware Workstation使用手册VMware Workstation使用手册一、简介1.1 VMware Workstation的概述1.2 功能特点1.3 安装和配置二、虚拟机的创建与配置2.1 创建虚拟机2.1.1 新建虚拟机向导2.1.2 虚拟机配置选项2.2 虚拟机硬件设置2.2.1 处理器设置2.2.2 内存设置2.2.3 网络设置2.2.4 存储设置2.2.5 其他硬件设置三、VMware Tools的安装与使用3.1 VMware Tools的概述3.2 VMware Tools的安装步骤3.3 VMware Tools的功能和设置四、虚拟机的克隆和快照4.1 克隆虚拟机4.2 虚拟机快照的创建和恢复4.3 管理虚拟机快照五、虚拟网络和网络设置5.1 虚拟网络概述5.2 虚拟网络编辑器5.2.1 设置NAT网络5.2.2 设置桥接网络5.2.3 设置Host-Only网络5.3 网络适配器设置六、VMware Workstation高级功能6.1 重定向设备6.2 多屏显示6.3 虚拟机组6.4 远程连接和共享6.5 虚拟机性能优化七、故障排除和常见问题解决7.1 虚拟机启动问题7.2 硬件兼容性问题7.3 网络连接问题7.4 VMware Tools无法安装或启动问题八、附录附件1:VMware Workstation常用快捷键表附件2:常用命令行操作附件3:常见故障解决方法本文档涉及附件:附件1:VMware Workstation常用快捷键表附件2:常用命令行操作附件3:常见故障解决方法本文所涉及的法律名词及注释:1、VMware Workstation:VMware公司开发的一款用于虚拟化的软件产品。
2、虚拟机:在主机操作系统上模拟出的一台真实的计算机。
3、VMware Tools:用于提供虚拟机和主机之间互通的一组软件和驱动程序。
4、克隆虚拟机:复制现有虚拟机的副本。
HPE VMware Software Recipe Table of Contents说明书

Technical white paper Array January 2022 VMware Software RecipeTable of contentsAbout this document 2Document Update Policy 2Important Support Notes 3HPE System Management Software 5Revision History 6About this documentThis document is for the person who installs, administers, and troubleshoots servers, Virtual Connect and storage systems. HPE assumes you are qualified in the servicing of computer equipment and trained in recognizing hazards in products with hazardous energy levels.This document does not apply to HPE Superdome servers. For information on HPE Superdome, see the following links: ∙HPE Integrity Superdome X∙HPE Superdome FlexInformation on HPE Synergy supported VMware ESXi OS releases, HPE ESXi Custom Images and HPE Synergy SPPs is available at:∙VMware OS Support Tool for HPE SynergyFor more information on HPE Synergy Software Releases, see the following link:∙HPE Synergy Software Releases - OverviewDocument Update PolicyA new version of this recipe will be published when a new HPE Service Pack for ProLiant (SPP) is published, when a new HPE Maintenance Supplement Bundle (MSB) is published, when VMware publishes a new OS Release (e.g. 6.7) or when VMware publishes a new update release (e.g. 6.7 U1).A Customer Notice will be released to notify customers of a newly published Recipe document. To sign up to receive Customer Notice notifications please see the instructions below:∙Go to /info/myadvisory∙In the “Choose a product category” search for ”VMware vSphere Software”∙In the search results, select ” VMware vSphere Software”∙Select “Add select products”2Important Support NotesThis document provides information for using VMware vSphere 7.0 Update 3c and VMware vSphere 6.x OS releases in conjunction with the Service Pack for ProLiant (SPP) Version 2021.10.0.For information on how to deploy and update VMware vSphere using the VUP or the SPP, vibsdepot and the HPE Custom Image, see Deploying and Updating vSphere on HPE Servers.Review the SPP and VUP Component Notes on /VMwareSPPComponentReleaseNotes to find which firmware and driver components are included in the SPP and the VUP.Review the vibsdepot directories to find the drivers and software included in the HPE Custom Images.For the alignment of SPP versions to vibsdepot release directories for pre-Gen9 see:/mapping/SPP-HPE_Custom-Image-vibsdepot-mapping-pre-Gen9.pdfFor the alignment of SPP versions to vibsdepot release directories for Gen9 and newer see:/mapping/SPP-HPE_Custom-Image-vibsdepot-mapping-Gen9-later.pdfReview the SPP Support Statement document to understand the support policy for the VUP releases. The drivers in the VUP and SPP are also included in the HPE Custom image, available from or available on HPE’s vibsdepot ( 6.5, 6.7 ,7.0 ) for this release. The system management software is included in the HPE Custom Image, available from or available on HPE’s vibsdepot (6.5, 6.7 and 7.0) for this release.VMware vSphere 7.0 Update 3c, VMware vSphere 6.7 Update 3, VMware vSphere 6.7 Update 2, VMware vSphere 6.5 Update 3, and VMware vSphere 6.5 Update 2 are the VMware Releases that have been tested against Service Pack for ProLiant (SPP) version 2021.10.0.Note: The Gen10 Service Pack for ProLiant (SPP) Version 2021.10.0 includes driver, SW and online FW components for Gen10 and Gen10 Plus servers running VMware vSphere 7.0U3c, 7.0U2, 6.5U3 and 6.7U3. The Gen9 Service Pack for ProLiant (SPP) Version 2021.10.0 includes driver, SW and online FW components for Gen 9 servers running VMware vSphere 7.0U3c, 6.5 and 6.7.For Driver and Software versions: Please view the HPE customized image contents page.For FW versions: Please view the /VMwareSPPComponentReleaseNotes.For the list of HPE Custom ISO’s that are supported with SPP 2021.10.0 please see table below.Notes:Gen10 SPP version 2021.10.0 supports use with vLCM/HSM with vSphere 7.0U2 (OneView HSM only) and 7.0U3c (OneView and iLO Amplifier HSM). For more information, see /customimages/Valid-vLCM-Combos.pdf.Software and drivers in the /hpe/jan2022 release directories matches the Gen10 SPP version 2021.10.0 SPP at https:///global/swpublishing/MTX-47182ec74e7647138acbe2c5a5 and the Gen9 SPP version 2021.10.0 SPP at https:///global/swpublishing/MTX-dd8a257eca984bd2aa5157c4c1 with some exceptions as described in /mapping/SPP-HPE_Custom-Image-vibsdepot-mapping-Gen9-later.pdf.For a complete reference on which HPE Server models support which version of VMware OS, you can access the HPE Server Support Matrix from the HPE website here. This recipe should be used in conjunction with the HPE Server Support Matrix to build a supported HW and SW configuration.A new version of this document will be published when a new HPE Service Pack for ProLiant (SPP) is published, when a new HPE Maintenance Supplement Bundle (MSB) is published, when VMware publishes a new OS Release (e.g. 6.7) or when VMware publishes a new update release (e.g. 6.7 U1).4HPE System Management SoftwareRevision History6。
vmware 试题及答案
vmware 试题及答案一、简介VMware是一家专注于虚拟化技术的公司,其产品包括虚拟机软件、云计算平台、虚拟桌面基础设施等。
本文将介绍一些常见的VMware试题,以及它们的答案。
二、题目一:什么是VMware虚拟机?答案:VMware虚拟机是一种创建在物理计算机上的虚拟计算机环境。
它通过VMware软件,将物理计算机划分为多个虚拟计算机,每个虚拟机都可以独立运行操作系统和应用程序。
三、题目二:VMware虚拟机有哪些常见的用途?答案:VMware虚拟机有以下常见的用途:1. 服务器虚拟化:将一台物理的服务器划分为多个虚拟服务器,提高硬件资源利用率。
2. 应用程序测试和开发:在虚拟机上安装和测试不同的操作系统和应用程序,保持环境的隔离性。
3. 软件兼容性测试:在不同的虚拟机中运行不同的操作系统,测试软件在各种环境下的兼容性。
4. 数据中心和云计算:通过虚拟化技术构建弹性和可扩展的数据中心和云计算平台。
四、题目三:如何创建一个VMware虚拟机?答案:创建一个VMware虚拟机的步骤如下:1. 安装VMware软件:下载并安装VMware软件,如VMware Workstation或VMware vSphere。
2. 创建虚拟机:打开VMware软件,选择新建虚拟机的选项,按照向导完成虚拟机配置,包括选择操作系统类型、分配内存和硬盘空间等。
3. 安装操作系统:启动虚拟机并安装操作系统,可以选择从光盘安装或从ISO镜像文件安装。
4. 配置虚拟机:根据需求配置虚拟机的网络、存储和其他设置,如共享文件夹、USB设备等。
5. 安装应用程序:在虚拟机中安装所需的应用程序和软件。
五、题目四:如何将实体机迁移到VMware虚拟机上?答案:将实体机迁移到VMware虚拟机的步骤如下:1. 准备工作:在实体机上备份和整理数据,确保没有重要数据丢失。
2. 使用转换工具:使用VMware提供的P2V (Physical to Virtual) 转换工具,将实体机转换为虚拟机。
VMware故障处理

400 816 0688
请准备好: 姓名 公司名称 联系电话 支持请求号 Support Request (SR) number(电话支持时 VMware 分配,后期跟踪) 问题描述(报错信息,截图,日志等)
提醒: 如果是 vSphere Client 直连到 ESX/ESXi 主机,将不会出现下面这个列表 如果选择“Include information from vCenter Server and vSphere Client”,将包含 vCenter
Server 和 vSphere Client 的日志信息.
运行 vm-support 命令查看版本号,如下: [user@esxhost]$ cd /tmp [user@esxhost]$ vm-support VMware ESX Server Support Script 0.94 Preparing Files: | [Ctrl+C to cancel]
VMware vSphere 诊断信息收集和提交
ESXi5 主机的日志收集
使用 vSphere Web Client 收集 ESXi 主机和 vCenter Server 的诊断信息
1. 使用 vSphere Web Client 登录 vCenter Server. 2. 在清单下面选择 vCenter Servers. 3. 选中需要收集的 ESX/ESXi 主机的 vCenter Server 4. 选中 Monitor 标签,点击 System Logs. 5. 点击 Export System Logs. 6. 选择要收集的 ESX/ESXi 主机 7. 如果需要,可以选中 Include vCenter Server and vSphere Web Client logs 选项 8. Next 下一步,选择要导出的 system logs 9. 选择 Gather performance data 选项,日志中可以包含 performance 信息 10. Next 然后点击 Generate Log Bundle. 当收集动作完成,出现下载日志包对话框 11. 点击 Download Log Bundle 选项保存日志到本地客户端
vmware虚拟机使用手册
VMware虚拟机使用手册如下:
一、安装VMware虚拟机软件
1. 下载并安装VMware软件。
2. 打开虚拟机软件,根据向导进行安装。
3. 等待安装完成,输入许可证密钥。
二、新建虚拟机
1. 点击“新建虚拟机”按钮。
2. 选择“典型安装”选项。
3. 选择稍后安装操作系统。
4. 选择要安装的系统类型。
5. 选择虚拟机文件的位置。
6. 调整需要分配硬盘的大小。
7. 配置完成,稍后调整硬件。
8. 编辑虚拟机硬件。
9. 内存建议大于2G,处理器内核大于2个,网络选择NAT。
10. 点击光驱,配置光驱文件,设备状态要勾选启动时连接。
11. 开启虚拟机,出现此界面要点进虚拟机中。
12. 等待进入系统后,打开我的电脑,点击光驱,安装VMware Tools。
三、优化虚拟机设置
1. 打开虚拟机设置,调整CPU信息、内存、网络等参数。
2. 移除不需要的组件,如软盘等。
3. 优化虚拟机设置,提高运行效率。
以上是VMware虚拟机使用手册的主要内容,供您参考。
在使用过程中,请注意备份重要数据,并按照相关说明进行操作,以确保虚拟机的稳定性和安全性。
VMware ThinApp使用教程
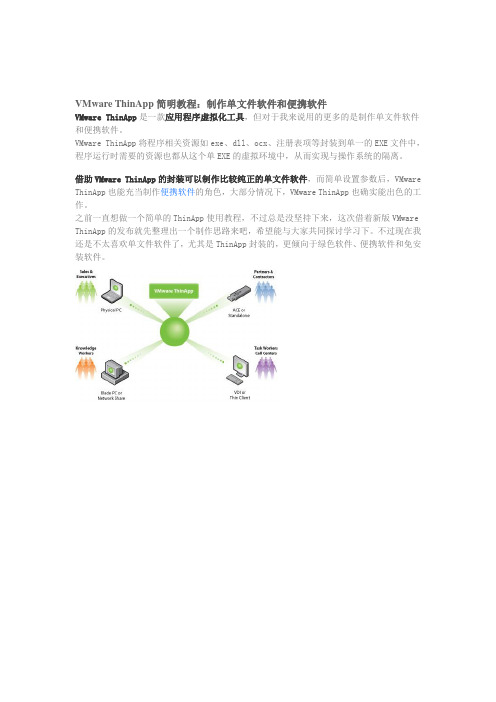
VMware ThinApp简明教程:制作单文件软件和便携软件VMware ThinApp是一款应用程序虚拟化工具,但对于我来说用的更多的是制作单文件软件和便携软件。
VMware ThinApp将程序相关资源如exe、dll、ocx、注册表项等封装到单一的EXE文件中,程序运行时需要的资源也都从这个单EXE的虚拟环境中,从而实现与操作系统的隔离。
借助VMware ThinApp的封装可以制作比较纯正的单文件软件,而简单设置参数后,VMware ThinApp也能充当制作便携软件的角色,大部分情况下,VMware ThinApp也确实能出色的工作。
之前一直想做一个简单的ThinApp使用教程,不过总是没坚持下来,这次借着新版VMware ThinApp的发布就先整理出一个制作思路来吧,希望能与大家共同探讨学习下。
不过现在我还是不太喜欢单文件软件了,尤其是ThinApp封装的,更倾向于绿色软件、便携软件和免安装软件。
1. 首先运行程序Setup Capture.exe ,ThinApp会以向导模式完成程序打包,点击Next 继续。
2. 这里简单介绍了注意事项,最主要的就是在一个干净的系统上扫描形成系统快照,好处就是能得到程序正常运行所需要的最多信息。
如需要自定义扫描配置,点击Advanced settings… ,这里可以设置需要扫描的驱动器和注册表分支,设定好之后确定返回。
3. 点击Next后ThinApp会以扫描当前文件系统和注册表并形成一个快照,ThinApp正在保存快照:待系统快照完成之后,VMware ThinApp会给出提示,即开始安装并配置好你需要封装的程序,建议将程序安装到默认位置。
一切完成之后点击Next继续:4. VMware ThinApp进行程序安装后的系统快照扫描:扫描完成后将会提示选择程序入口点,即从哪个程序开始启动,一般就是主程序文件,通常ThinApp会自动选择好,点击Next继续。
VMware MSP入门指南说明书

PRE-COMMIT PROCESS POST-COMMIT PROCESS MSP Model and ProcessThere are four participants in the Managed Services Provider (MSP) model –the “Customer” for the services, the Managed Services Provider (“MSP”), the Billing Agent (“Aggregator”) and “VMware”.The MSP works with both an Aggregator and VMware in order to transact and purchase the cloud services. MSP owns the terms of service for their end customers and is responsible for all transactions and support for them, which includes contract, order, support and billing.Discover the Value of the VMware MSP ProgramThe Managed Service Provider route to market gives partners the option to grow their sales through VMware Software-as-a-Service offerings without investment in their own data center infrastructure, delivering managed services on top.To get started:Read these case studies to see how other partners have successfully offered managed services to their end customers.Learn more: VMware MSP Program on our websiteSupport: Contact UsJoin the VMware Partner Connect ProgramThe VMware Partner Connect Program offers partners a simplified, consistent experience in joining the VMware partner ecosystem, designed to provide clearer paths to profitability by offering value-added managed services to their customers.To get started:Go to our VMware Partner Connect page, scroll down to the ‘Getting Started’ section and click on the ‘Enroll Now’ button under ‘I want to become a Partner’. Fill out and submit the VMware Partner Connect application form. Within 10 days, depending on the program selected, you will receive an email with your partner ID and log in credentials to the VMware Partner Connect portal.Learn more: Partner Connect Program GuideSupport:*************************Pick an AggregatorAfter joining Partner Connect, you will work with a third-party company, a VMware Aggregator, to manage the monthly reporting and invoicing. The partner connect portal includes a list of aggregators by country and you can choose who you reach out to.To get started:Decide which aggregator you want to work with.Learn more: Review List of Aggregators on the partner connect portalSupport:*************************Learn more: Access the Partner Connect Program Guide and the Solution Competencies GuideSupport: *************************Sign a Commit Contract for the Desired ServiceYou decide which commit contract level to sign up for and the service you want to offer.To get started:Work with your Aggregator to complete the commit contract process in the VMware Commerce Portal.Learn more: Pricing HandbookSupport: Raise a ticket within the VMware Commerce Portal. Access theVMware Commerce Portal DocumentationNote: VMware Cloud on AWS, Workspace ONE, VMware Horizon Cloud, VMware SD-WAN and VMware Carbon Black Cloud are some of the MSP services that require solution competency training before MSPs can transact. Please refer to the Solution Competencies guide for details.Build an MSP PipelineNow that you have identified a service to offer and signed a commit contract, you are ready to start building your business. As you work through the final steps,you can start initiating go-to-market activities and building your business for the managed service.Learn more:Pricing HandbookDetermine Terms of Service for End CustomersAs a cloud provider, you must offer your own terms of service to your end customers since you will be delivering this service to your customers, not VMware. Additionally, you will be responsible for delivering L1/L2 technical support, implementation services to your end customers, and all functions associated with service configuration, add-ons, renewals, terminations and anything pertaining to customer billing.To get started:Review the Cloud Partner Navigator support documentationLearn more:Cloud Partner Navigator Support DocumentationAccess the on-boarding email. It opens a wizard-based workflow for you to establish your account on and create a new provider organization. You will land on the Cloud Partner Navigator page on the portal, and the service will be available for provisioning.Learn more: Service level MSP Operations HandbooksSupport: For support during the on-boarding process, before getting access to the Cloud Partner Navigator portal, call us or log onto VMware Customer Connect. For support after logging into Cloud Partner Navigator, refer to the support process towards the end of this doc.Resources: Demo Videos»Cloud Partner Navigator PlaylistConfigure Customer Org and Provision ServiceYou can create a customer organization under the provider organization.To get started:Open the service tile on the VMware Cloud Partner Navigator portal. This will activate the service for that customer. Selecting each customer and providing manage customer access will allow you to decide the level of access for the service – fully, partially managed or no access. You can provision the Software-Defined Data Center (SDDC) from within the console for the customer org.Learn more: Service level MSP Operations HandbooksSupport: For support during the on-boarding process, before getting access to the Cloud Partner Navigator portal, call us or log onto VMware Customer Connect.For support after logging into Cloud Partner Navigator, refer to the support process towards the end of this doc.Resources: Demo Videos»Cloud Partner Navigator Playlist。
2021年vmware网络虚拟化知识题库
NSX 中如下哪种集中安全保护形式负责提供统一恶意软件、防病毒和自检服务(对的)在讨论新数据中心设计时, 您被规定保证某些特定网络互相隔离。
如果不能使用VLAN, 您需要更多地购买如下哪种硬件?(对的)NSX Edge 服务网关支持各种路由合同。
如下哪些是NSX Edge 服务网关支持路由合同?(请选取两项。
)(对的)如果未完全实现网络虚拟化, 需要针对新计算机配备如下哪些物理网络配备任务?(请选取两项。
)(对的)您经理规定您拟定, 与不使用VLAN 网络设计相比, 在使用VLAN 网络设计中可以减少哪些硬件。
如下哪几项符合条件?(请选取两项)虚拟网络连接环境中也许使用了各种不同技术。
连接到Virtual Distributed Switch 虚拟机也许需要与NSX 逻辑互换机上虚拟机进行通信。
运用如下哪项功能, 可以在逻辑互换机上虚拟机和分布式端口组上虚拟机之间建立直接以太网连接?(对的)您即将完毕数据中心配备文档, 并且需要简介与不支持中继或标记VLAN 虚拟互换机上行链路相连接物理互换机端口。
这些端口是哪几种类型?(对的)通过如下哪种物理网络连接设备, 不同IP 子网不同网段上计算机可以互相进行通信?(对的)实行第三方NSX 安全服务所采用是如下哪种办法?使用如下什么术语可以标记单台NSX 逻辑互换机?NSX 执行其中一项重要功能是更新路由表和逻辑接口。
如下哪个NSX 组件负责执行此任务?推荐使用NSX Controller 节点最小数量是多少NSX 逻辑路由器由两某些构成, 这两某些是什么?(请选取两项。
)对于在不同NSX 逻辑互换机(在单独物理主机上运营)上两台虚拟机之间传播流量, 如下哪个组件负责为其做出路由决定?您正在向同事简介, 若要配备环境中虚拟互换机, 以访问物理网络以及接受来自物理网络访问, 需要完毕哪些任务。
要执行这些任务, 必要配备如下哪些vSphere 虚拟互换机组件?为了支持位于两台单独虚拟互换机上两台虚拟机进行通信, 虚拟机网络流量不得不离开物理主机, 然后再通过重新路由返回到该主机。
VMware ESXi 主机说明书

VMware ESXi HostDesigned to take advantage of theexpanded memory and I/O slots of your Dell PowerEdge system, VMware's ESXi software represents the latest invirtualization technology. Each host runs an integrated version of virtualization software to enable your virtualization solution.Management ClientVMware Infrastructure Client (VI Client)connects to VMware ESXi to manage it on a one-to-one basis. VI Client can also connect to VMware VirtualCenter Server to manage multiple hosts. Install VI Client from the VMware InfrastructureManagement Installer media or download VI Client from a browser connected to the VMware ESXi host IP address.Management ServerVMware VirtualCenter ManagementServer is a Windows-based service that aggregates resources from multiple VMware ESXi hosts to build a virtual datacenter. It is available with an additional cost. A 60-day free trial is included on the VMware Infrastructure Management Installer CD. See VMware's Getting Started Guide for more details.Fibre Channel/iSCSI StorageOptimized for virtualization, your solution can use multiple connections of both Fibre Channel and iSCSI networks at speeds ranging from 1 Gb to 10 Gb. This creates a very fast and redundant storageenvironment to address your datacenter needs.Learn more at the Dell VMware alliance website at /vmware Support documents: Dell Solution GuideSystems Management GuideStorage NetworkManagement NetworkFibre Channel/iSCSI SAN Virtual Machine NetworkVMware Infrastructure ClientVMware VirtualCenter Management ServerManagement ClientVMware ESXi HostsManagement ServerDell and VMware are focused on making it easier for all companies to adapt to virtualization.Simplifying virtualization is about ensuring that the entire virtual infrastructure is integrated into the mainstream.The process starts with testing and certifying VMware Infrastructure 3 virtualization software on Dell PowerEdge TM systems with Dell PowerVault, Dell|EquallLogic, or Dell|EMC Storage arrays. Then, Dell OpenManage TM and VMwareVirtualCenter are integrated to manage and maintain your physical and virtual datacenter. Dell InfrastructureConsulting Services is available to assist you in assessing andimplementing lifecycle management.Innovation from Dell, in the form of redesigned servers and storage,compliment the new technologies found in VMware's latest releases of ESX Server and VirtualCenter. Ourcollaboration offers a wide variety of benefits ranging from the embedded hypervisor on internal storage for faster time to productivity of fully qualified solutions that can providezero-downtime maintenance capabilities,high availability, and disaster recovery scenarios.3Turn on the system. The VMware ESXi loads.After you see this screen, your system is ready to be configured. Press <F2>.Note:If you purchased ESXi in addition to your primary operating system,you need to change the boot order to allow ESXi to boot.For more information, see the documentation that shipped with your system or see the appropriate Dell Solution Guide located at the Dell Support website at .11Virtual Center7Your VMware license is distributed electronically or via a license card. The license card is in your system packaging.If you do not have a license card, your system has been pre-licensed in the Dell factory for your convenience. Use the steps below to retrieve your license code.In the main screen, select View Support Information menu.The serial number (license) appears. It is recommended that you record this code in a safe place.Record your server license code in the space provided.Licensing Information8If you purchased an advanced licensing edition of ESXi (VMware ESXi Foundation or Enterprise), claim an additional license from VMware to enable these features.Browse to /code/dell , follow the VMware registration instructions, and enter the license code.Note : Your version of VMware software may allow you to try advanced VMware features for a limited period. At the end of the trial period, the VMware product disables these features unless you claim your advance VMware features. Once you install the new license, your system offers the VMware features you purchased.Server 3.5Additional VMware FeaturesConfiguring the SystemTurning on the ESXi ConsoleMulti-Host — Use the VMware VirtualCenter Server (VC Server) to manage multiple hosts from your Management Server. Install VC Server from the VMware Infrastructure Management Installer media. VC Server is available with an additional cost, or as a 60-day trial. Login using the Microsoft ®Windows ®administrator credentials on your Management Server.4Use the menu items to configure your system. It is recommended that you set a root password and configure a static IP address.For Dell-VMware Information:/vmware For Dell Support:/support For VMware Support:0FR224A01Information in this document is subject to change without notice.© 2007-2008 Dell Inc. All rights reserved.Reproduction of these materials in any manner whatsoever without the written permission of Dell Inc. is strictly forbidden.Dell , the DELL logo, PowerEdge, PowerVault are trademarks of Dell Inc.;VMware , and the VMware “boxes”logo and design, are registered trademarks or trademarks (the "Marks") of VMware, Inc. in the United States and/or otherjurisdictions; Microsoft and Windows are either trademarks or registered trademarks of Microsoft Corporation in the United States and/or other countries.Dell disclaims proprietary interest in the trademarks and trade names other than its own.July 2008Printed in the U.S.A.Server InformationServer IP address :_____________________________________Server Name : _________________________________________Server License Code: ___________________________________。
VMware虚拟化技术操作练习题参考答案

VMware虚拟化技术操作练习题参考答案VMware虚拟化技术是一种先进的服务器虚拟化技术,它可以将一台物理服务器划分为多个独立的虚拟机,每个虚拟机可以运行不同的操作系统和应用程序,并且彼此互相隔离。
在虚拟化环境下,我们可以更好地管理资源、提高服务器的利用率,并且实现故障隔离和快速恢复等优势。
下面是关于VMware虚拟化技术操作练习题的参考答案,帮助您更好地理解和掌握这项技术的操作方法:一、虚拟机的创建与配置1. 打开VMware Workstation软件,点击"创建新的虚拟机"。
2. 选择"典型(推荐)"选项,点击"下一步"。
3. 选择安装操作系统的光盘镜像文件所在位置,点击"下一步"。
4. 输入虚拟机的名称和保存位置,点击"下一步"。
5. 选择虚拟机的操作系统版本,并设置虚拟机的硬件配置,如内存大小、处理器个数等,点击"下一步"。
6. 分配虚拟机的磁盘空间,选择使用单个文件存储虚拟机或分割磁盘为多个文件存储虚拟机,点击"下一步"。
7. 点击"完成"按钮,虚拟机的创建与配置完成。
二、虚拟机的安装与使用1. 在虚拟机创建完成后,点击"虚拟机"菜单,选择"开始安装操作系统"。
2. 按照操作系统的安装界面提示,完成操作系统的安装过程。
3. 安装完成后,通过虚拟机窗口即可进入操作系统界面。
4. 在虚拟机中,可以像使用物理计算机一样使用操作系统和应用程序。
三、虚拟机的网络设置1. 在虚拟机运行状态下,点击"编辑"菜单,选择"虚拟网络编辑器"。
2. 在虚拟网络编辑器中,可以设置虚拟机的网络适配器和网络连接方式。
3. 选择适配器类型,可以是桥接模式、NAT模式或仅主机模式。
vmware注册激活流程
vmware注册激活流程VMware registration and activation process can be a bit overwhelming for first-time users, especially for those who are not familiar with software installation and setup. However, with the right guidance and patience, anyone can successfully complete the process and enjoy the benefits of using VMware virtualization technology.VMware注册和激活流程对于首次使用者来说可能有些困难,特别是对于那些不熟悉软件安装和设置的用户。
然而,通过正确的指导和耐心,任何人都可以成功完成这个过程,并享受使用VMware虚拟化技术的好处。
First and foremost, make sure you have a valid license key or serial number ready before starting the registration process. This key is essential for activating the software and unlocking all of its features. Without it, you won't be able to fully utilize VMware's capabilities.首先,请确保在开始注册流程之前准备好有效的许可密钥或序列号。
这个密钥是激活软件并解锁所有功能所必需的。
如果没有这个密钥,您将无法充分利用VMware的功能。
To begin the registration process, visit VMware's official website and locate the registration page. You will be prompted to enter your license key or serial number, as well as some personal information such as your name and email address. Make sure to double-check all the information you enter to avoid any errors that may hinder the registration process.要开始注册流程,访问VMware官方网站并找到注册页面。
虚拟机vmware安装教程

虚拟机vmware安装教程以下是一份关于如何安装VMware虚拟机的简要教程:1. 下载VMware虚拟机安装程序。
你可以在VMware官方网站或其他可靠的下载网站上找到安装程序。
根据你的操作系统选择正确的版本进行下载。
2. 运行安装程序。
双击下载的安装程序文件并按照指示完成安装过程。
在某些情况下,你可能需要提供管理员权限来安装软件。
3. 启动安装程序。
一旦安装完成,你可以在开始菜单、桌面或安装位置找到VMware虚拟机。
双击图标启动该程序。
4. 创建新的虚拟机。
当你第一次使用VMware虚拟机时,你需要创建一个新的虚拟机。
点击"新建虚拟机"或类似的按钮,并按照向导的指示填写必要的信息,如虚拟机的操作系统和配置选项。
5. 安装操作系统。
一旦创建了新的虚拟机,你需要为其安装操作系统。
在VMware虚拟机中,你可以像在实际计算机上一样安装操作系统。
你可以使用光盘镜像文件(ISO)或物理光盘作为安装介质。
6. 配置虚拟机设置。
在安装操作系统后,你可以进一步配置虚拟机的各种设置,如网络连接、硬件资源等。
根据你的需求和虚拟机的用途进行相应的设置。
7. 启动虚拟机。
完成配置后,你可以启动虚拟机。
这时,虚拟机会像真正的计算机一样运行,并可以在虚拟机内操作和使用软件。
8. 关闭虚拟机。
当你不再需要使用虚拟机时,可以选择关闭虚拟机。
在关闭虚拟机前,确保保存并关闭所有正在进行的工作以及存储的文件。
9. 升级和管理虚拟机。
你可以随时升级和管理虚拟机,如更新操作系统、增加硬盘空间或调整虚拟机的配置等。
注意:以上步骤只是一个简要的指导,具体的安装过程可能会因版本和操作系统的不同而有所变化。
在安装过程中,请阅读并遵循VMware提供的具体指南和说明。
VMware vSphere Replication安全指南说明书
VMware vSphere Replication Security Guide vSphere Replication 8.4You can find the most up-to-date technical documentation on the VMware website at: https:///VMware, Inc.3401 Hillview Ave.Palo Alto, CA 94304Copyright ©2012-2023 VMware, Inc. All rights reserved. Copyright and trademark information.VMware vSphere Replication Security GuideContents1About VMware vSphere Replication Security Guide42vSphere Replication Security Reference5Services, Ports, and External Interfaces That the vSphere Replication Virtual Appliance Uses 5vSphere Replication Configuration Files9vSphere Replication Private Key, Certificate, and Keystore9vSphere Replication License and EULA File9vSphere Replication Log Files9vSphere Replication User Accounts11Security Updates and Patches for vSphere Replication12About VMware vSphere Replication Security Guide1The VMware vSphere Replication Security Guide provides a concise reference to the security features of vSphere Replication.To help you protect your vSphere Replication installation, this guide describes security features built into vSphere Replication and the measures that you can take to safeguard it from attack.n External interfaces, ports, and services that are necessary for the proper operation of vSphere Replicationn Configuration options and settings that have security implicationsn Location of log files and their purposen Required system accountsn Information about obtaining the latest security patchesIntended AudienceThis information is intended for IT decision makers, architects, administrators, and others who must familiarize themselves with the security components of vSphere Replication.vSphere Replication Security Reference2You can use the Security Reference to learn about the security features of vSphere Replication and the measures that you can take to safeguard your environment from attack.This chapter includes the following topics:n Services, Ports, and External Interfaces That the vSphere Replication Virtual Appliance Usesn vSphere Replication Configuration Filesn vSphere Replication Private Key, Certificate, and Keystoren vSphere Replication License and EULA Filen vSphere Replication Log Filesn vSphere Replication User Accountsn Security Updates and Patches for vSphere ReplicationServices, Ports, and External Interfaces That the vSphere Replication Virtual Appliance UsesThe operation of vSphere Replication depends on certain services, ports, and external interfaces. vSphere Replication ServicesThe operation of vSphere Replication depends on several services that run on the vSphere Replication virtual appliance.Table 2-1. vSphere Replication ServicesvSphere Replication Management Servicehms Automatic for the vSphere Replication appliance.Deactivated for the vSphere Replication add-onappliance.hbrsrv Automatic vSphere Replication Servicesshd Deactivated by default.SSH ServiceTable 2-1. vSphere Replication Services (continued)ntpd Automatic Time service for syncing-up with Internet Time Serverthrough Network Time Protocol.Note After you install or upgrade a vSphereReplication virtual appliance, you must synchronizethe appliance with a time server.vaos Automatic Guest OS initialization that drives network settings,host name settings, ssh keys creation, EULAacceptance, boot scripts execution, and VRMSAppliance Management Interface initialization.Communication PortsvSphere Replication uses several communication ports and protocols.The vSphere Replication appliance requires certain ports to be open.Note vSphere Replication servers must have NFC traffic access to target ESXi hosts.Table 2-2. Ports Used by the vSphere Replication AppliancevSphere Replication appliance Local vCenter Server80TCP All management traffic to the local vCenterServer proxy system. vSphere Replication opensan SSL tunnel to connect to the vCenter Serverservices.vSphere Replication appliance Remote LookupService443TCP All calls to the remote Lookup Service.Site Recovery HTML 5 user interface vSphere Replicationappliance443HTTPS Default port for the Site Recovery HTML 5 userinterface when you open it from the vSphereReplication appliance.Site Recovery HTML 5 user interface Local and remotevCenter Serveror all vCenterServer instances inEnhanced LinkedMode with aregistered vSphereReplication.443HTTPS Default port for the Site Recovery HTML 5 userinterface when you open it from the vSphereReplication appliance.Site Recovery HTML 5 user interface Local and remotePlatform ServicesController instancesor all PlatformServices Controllerinstances inEnhanced LinkedMode with aregistered vSphereReplication.443HTTPS Default port for the Site Recovery HTML 5 userinterface when you open it from the vSphereReplication appliance.Site Recovery HTML 5 user interface Remote SiteRecovery Managerаppliance443TCP TCP port 443 must be open when you accessthe Site Recovery HTML 5 user interface from thevSphere Replication appliance.vSphere Replication server in the vSphere Replication appliance Local ESXi host(intra-site)80HTTP Traffic between the vSphere Replication serverand the ESXi hosts on the same site. vSphereReplication opens an SSL tunnel to the ESXiservices.vSphere Replication appliance Local and remotevCenter Server443TCP All management traffic to the vSphere Replicationappliance.vSphere Replication appliance https://443TCP Customer Experience Improvement Program(CEIP) for vSphere Replication.vSphere Replication server in the vSphere Replication appliance ESXi host (intra-siteonly) on target site902TCPandUDPTraffic between the vSphere Replication serverand the ESXi hosts on the same site. Specificallythe traffic of the NFC service to the destinationESXi servers.Browser vSphere Replicationappliance5480HTTPS VRMS Appliance Management Interface.vSphere Replication appliance vSphere Replicationappliance8043SOAP Inter-site communication from the vSphereReplication Management servers of the sourceand the target site.vCenter Server vSphere Replicationappliance8043SOAP Intra-site communication used for SDRS.vSphere Replication appliance vSphere Replicationserver8123SOAP Intra-site management traffic from the vSphereReplication Management server to additionalvSphere Replication server in the environment.ESXi host on the source site vSphere Replicationserver at the targetsite31031TCP Initial and outgoing replication traffic from theESXi host on the source site to the vSphereReplication appliance or vSphere Replicationserver at the target site for replication trafficwithout network encryption.ESXi host on the source site vSphere Replicationserver at the targetsite32032TCP Initial and outgoing replication traffic from theESXi host on the source site to the vSphereReplication appliance or vSphere Replicationserver at the target site for replication traffic withnetwork encryption.If you deploy additional vSphere Replication servers, you must open the ports that vSphere Replication requires on those servers.Table 2-3. Ports Used by the vSphere Replication ServervSphere Replication server ESXi host (intra-siteonly) on target site902TCPandUDPTraffic between the vSphere Replication serverand the ESXi hosts on the same site. Specificallythe traffic of the NFC service to the destinationESXi servers.Browser vSphere Replicationserver5480HTTPS VRMS Appliance Management Interface.vSphere Replication Management server vSphere Replicationserver8123SOAP Intra-site management traffic from the vSphereReplication Management server to the vSphereReplication server.ESXi host on the source site vSphere Replicationserver at the targetsite31031TCP Initial and outgoing replication traffic from theESXi host on the source site to the vSphereReplication server at the target site for replicationtraffic without network encryption.ESXi host on the source site vSphere Replicationserver at the targetsite32032TCP Initial and outgoing replication traffic from theESXi host on the source site to the vSphereReplication server at the target site for replicationtraffic with network encryption.Open Source and Third-Party ComponentsFor the complete text of the open-source licenses, a list of all open-source and third-party components, and the open-source code used in vSphere Replication, you can go to http:// /download/open_source.html and see the VMware vSphere Replication Open Source and Licenses section under the VMware vSphere Open Source link. If a certain open-source license requires it, the vSphere Replication Open Source Disclosure Package (ODP) contains text files with instructions how to build and replace the software libraries.vSphere Replication Configuration FilesSome configuration files contain settings that affect the security of vSphere Replication.Note All security-related resources are protected with the correct permissions and ownership. Do not change the ownership or permissions of these files./opt/vmware/hms/conf/hms-configuration.xml The default system configuration of the vSphereReplication Management server./opt/vmware/hms/conf/embedded_db.cfg The configuration file for the embedded database .vSphere Replication Private Key, Certificate, and KeystoreThe private key, the certificate, and the keystore of vSphere Replication are located on the vSphere Replication virtual appliance.Note All security-related resources are protected with the correct permissions and ownership. Do not change the ownership or permissions of these files.n/etc/vmware/ssl/hbrsrv.crtn/etc/vmware/ssl/hbrsrv.keyn/opt/vmware/hms/security/hms-keystore.jksn/opt/vmware/hms/security/hms-truststore.jksvSphere Replication License and EULA FileThe end-user license agreement (EULA) and open source license files are located in the vSphere Replication virtual appliance.Open Source License/usr/share/doc/vmware-vspherereplication/open_source_licenses.txtVMware Postgres License/usr/share/doc/vmware-vspherereplication/VMware_Postgres_11.10.0_open_source_licenses.txt/opt/vmware/etc/isv/EULA/language_code/0End-user licenseagreementvSphere Replication Log FilesThe files that contain system messages are located in the vSphere Replication virtual appliance./opt/vmware/hms/logs/hms-configtool.log Used to log errors that occurred during the VRMS Appliance Management Interface configuration./opt/vmware/hms/logs/hms.n.log.gz Used to track the runtime information of vSphere Replication Managementserver. The most recent log file is labeled hms.log, and hms.n.log.gz filescontain older log messages. The file with the highest n value contains themost recent messages./var/log/vmware/The folder contains the vSphere Replication server log files. Used to trackreplication problems./var/opt/apache-tomcat/logs/dr.log Site Recovery user interface logs./opt/vmware/hms/logs/hms-audit.log vSphere Replication audit logs.Log Messages Related to SecurityThe /opt/vmware/hms/logs/hms.log file contains login and logout event messages, authorization error messages, and certificate verification error messages in the following format.n Login message2015-03-23 15:54:05.558 DEBUG jvsl.security.authentication.sessionmap[tcweb-5] (..security.authentication.SessionMap) operationID=087657ec-ef0f-494c-9739-a4af62a5c049-HMS-1033 | Adding new session to the session map:com.vmware.hms.security.authentication.HmsUserSession@234f4bed:[erSession:key = site_...1b034,userName = root,fullName = root ,loginTime = ...,lastActiveTime = ...,hmsServers = null,locale = en,messageLocale = en]n Logout message15-03-23 15:54:05.585 INFO jvsl.security.authorization[tcweb-8] (..security.authorization.SessionAuthorizer) |HmsSessionManager.HmsSessionManagerLogout called on session-manager by root@/10.26.233.124:50776 with opId 43263a64-1681-4459-a921-1d9406308dc8-HMS-1036n Authorization message2015-06-25 16:10:35.994 INFO jvsl.security.authorization [tcweb-5](..security.authorization.SessionAuthorizer) | Authorization for method "HmsRemoteSiteManager.HmsRemoteSiteManagerFindHmsServer" failed.(vim.fault.NoPermission) {faultCause = null,faultMessage = null,object = MoRef: type = HmsRemoteSiteManager, value = site-manager,serverGuid = 18327b1a-dac2-44d9-972e-fa9dd99fce47,privilegeId = .vmware.vcHms.Hms.View}n Certificate verification error message2015-06-25 16:19:13.794 WARN jvsl.sessions [hms-main-thread-1](.ServerRegistryHms) | Can not start HMS connection to remote site ''java.util.concurrent.ExecutionException:com.vmware.vim.vmomi.client.exception.SslException:.ssl.SSLHandshakeException:com.vmware.vim.vmomi.client.exception.VlsiCertificateException: Server certificate chain is not trusted and thumbprint doesn't matchvSphere Replication User AccountsYou must set up a root and admin accounts for vSphere Replication. The admin account is used to access both the virtual appliance console and the VRMS Appliance Management Interface.vSphere Replication currently uses the admin account as the administrator of the VRMS Appliance Management Interface. No other user is created.When you deploy the vSphere Replication virtual appliance, you set the password for the root and admin accounts in the OVF Deployment wizard.The root and admin passwords must be at least 8 characters long.Privileges Assigned to Default User RolesvSphere Replication includes a set of roles. Each role includes a set of privileges, which allow users with those roles to complete different actions.See the topic vSphere Replication Roles and Permissions in the VMware vSphere Replication Installation and Configuration Guide.Security Updates and Patches for vSphere ReplicationThe vSphere Replication virtual appliance uses VMware Photon OS 3.0 as the guest operating system.You can apply the latest security update or patch by using the corresponding ISO file.Before you apply an update or patch to the guest operating system, take into account the dependencies. See Services, Ports, and External Interfaces That the vSphere Replication Virtual Appliance Uses.To receive the latest security announcements, you can subscribe to the VMware Security Announcements mailing list.。
vmware虚拟机使用教程
vmware虚拟机使用教程VMware虚拟机是一款非常强大且常用的虚拟化软件,它能够在一台物理机上同时运行多个独立的操作系统。
下面是一些使用VMware虚拟机的基本步骤及常见操作方法。
1. 下载并安装VMware虚拟机软件。
你可以从VMware官方网站上找到最新版本的软件,并按照提示进行安装。
2. 打开VMware虚拟机软件。
在桌面上或开始菜单中查找并点击VMware图标,启动软件。
3. 创建新的虚拟机。
在软件主界面上,点击"创建新的虚拟机"或"新建"按钮,进入虚拟机创建向导。
4. 选择操作系统。
根据你想在虚拟机上运行的操作系统类型(如Windows、Linux等),在向导中选择相应的操作系统版本。
5. 设置虚拟机硬件配置。
根据需要,可以为虚拟机分配内存、处理器、硬盘空间等资源。
一般来说,根据操作系统的要求设置合理的配置。
6. 安装操作系统。
根据你选择的操作系统类型,在虚拟机创建完成后,可以选择从光盘或ISO镜像文件中安装操作系统。
7. 运行虚拟机。
在软件主界面上,选中创建好的虚拟机,点击"运行虚拟机"按钮或双击虚拟机名称,启动虚拟机。
8. 使用虚拟机。
一旦虚拟机启动成功,你可以像在一台独立的物理机上一样使用虚拟机,安装软件、配置网络、打开文件等等。
9. 关闭虚拟机。
当你要关闭虚拟机时,可以点击虚拟机窗口的关闭按钮或按下虚拟机工具栏的关闭按钮。
10. 保存虚拟机快照(可选)。
虚拟机快照可以记录虚拟机在某个时间点的状态,你可以随时还原到该快照。
在虚拟机关闭的状态下,可以点击软件主界面上方的"管理"选项卡,找到"快照"功能,进行快照的创建、还原等操作。
这些是VMware虚拟机的基本使用步骤和操作方法。
通过学习和实践,你可以更好地掌握这个功能强大的虚拟化工具,并在其中运行多个操作系统,提高工作效率。
VMware合作伙伴登录指南说明书

Multi-Factor Authentication User GuideIMPORTANT DISCLAIMER 1)The VMware partner login page is the following link. Correct URL :URL:https:///partnerconnect/PC_Login?ec=302&startU RL=%2Fpartnerconnect%2Fs%2F)2)For any reason if the screen for login is showing as below (Carpathia URL), please trythe following steps. Incorrect URL :(https:///Carpathia/login?ec=302&inst=2H&startURL=% 2FCarpathia%2Fidentity%2Ftwofactor%2FaddTwoFactorOnly.apexp ):a)Clear Cache and try opening the login URL in an incognito window. i.e. STEP 1URLb)Try opening a different browser from the current used browser.c)If both the above options do not work, please re-try after an hour.d)Please do no request for password reset if the below screen is coming up.Resetting the password will not helpUsing SFDC Authenticator If you are currently logged into the Partner Connect Portal, please go ahead and logout prior to setting up Multi-Factor AuthenticationStep 1: Login to the Partner Portal using your username and passwordAfter logging in, you will be shown a page with instructions on how to download the Salesforce authenticator application.Note - If you choose to use a different third-party authenticator application click on “Choose Another Verification Method” on the b ottom of the screen. More information can be found here.**If you are trying to allow multiple users to login to one Partner Portal account using the same username and password, please click here for the browser method.Step 2: Download the Salesforce application on the mobile deviceStep 3: Open the authenticator and click on Add an AccountA two-phrase code will be shown on the mobile appNOTE: If you are using a group username and password and you are the first to setup MFA, you will be the default approver for all logins using the group username and password. Please see the browser option below for group logins.Step 4: Type the code in the browser and click on connectThere will be a push notification which will be sent to the Mobile Device. The browser will look as belowStep 5: Click on Connect to bind the device with the account.After the connection has been made, you will see a confirmation on the mobile application If for some reason you receive a login error message, please clear your cache and try again. If the problem persists, try using an incognito window to login instead. If problems continue to exist, please reach out to *************************Browser will show the success messageOnce this is done, you will be logged into the community.After Initial Setup:On a re-login, there will a push notification which is sent to your mobile device.You can either approve or deny the request from the deviceOn approval, you are logged into the communityUsing a Different Mobile Authenticator ApplicationIf you choose to use a different third-party mobile authenticator application other than Salesforce – please see below.Step 1: Click on “Choose Another Verification Method”Step 2: Select the option “Use v erification codes from an authenticator app”NOTE: If you are using a group username and password and you are the first to setup MFA, you will be the default approver for all logins using the same group username and password. Please see the browser option below.Step 3: Scan the generated QR code within the authenticator application and typein the one-time password that is generated. Click connect.If for some reason you receive a login error message, please clear your cache and try again. If the problem persists, try using an incognito window to login instead. If problems continue to exist, please reach out to *************************You will then be logged into the Partner Portal.After Initial Setup:On a re-login, all you will need to do is open the third-party application that you chose to setup Multi-Factor Authentication with and enter in the 6-digit totp code that is shown.After clicking “Verify”, you will then be logged into the Partner Portal.Using A Web Browser Application (totp.app)If multiple users are sharing one Partner Connect Portal account (not recommended), you do not have a corporate issued mobile device to download an application to, or you are not allowed to bring a corporate device onsite with a customer – please use this method Step 1: Click on “Choose Another Verification Method”Step 2: Click on “Use verification codes from an authenticator app”Step 3: Click on “I Can’t Scan the QR Code”device for this method):Step 4: On a separate browser window, head over to “totp.app”Step 5: Click on the “Add” button on the top left of your screenStep 6: Enter in the Unique Key that was displayed on your Partner Portal page, then click “Add”Your Partner Portal account will now be connected to the totp.app website.A temporary one-time password (totp) will be displayed on the top left of your screen.Step 7: Please enter in this passcode on your Partner Portal window and click connect.You will then be logged into the Partner Portal:After Initial Setup:On a re-login, all you will need to do is enter in the totp that is generated on totp.app.Step 1: Login to your Partner Portal accountStep 2: Head over to totp.app and copy the totp that is displayedStep 3: Enter the totp into your Partner Port al and click “Verify”You will then be logged into the Partner Portal:If you are sharing a Partner Portal account, please share the Unique Key with other users and they will be able to enter in the same key on their browser on the totp.app website. They will be able to login to the Partner Portal using their browser once they have the unique key. NOTE: This is not a recommended method. Be careful who you share the key with as your account contains sensitive data.To find the Unique Key once again, please go back to the totp.app website.Click on the 3 lines displayed with your current totp:Click “Show secret”:Your Unique Key will then be displayed. Please share this key with any users who also need to login to the Partner Portal account:FAQQ. Who should I contact if I am having problems logging into the Partner Portal using Multi-Factor Authentication (MFA)?A: Please reach out to ************************* if there are any issues logging in.Q. Will all users need to use MFA when logging in?A: Yes. If you are currently a partner that has an account in the Partner Portal, you will need to use MFA when logging in.Q. Do I need to enter a phrase every time I login using SFDC Authenticator?A: You will only need to enter in a phrase on your first login using the SFDC Authenticator. After your initial setup, you will only need to approve or deny the login request on your mobile device.Q. What is the purpose of MFA?A: Using MFA adds a second layer of protection for your sensitive data. The first being your username and password when logging into the Partner Portal, the second being a third-party authenticator app. We want to be sure sensitive data stays secure and is only visible to those who have access to view it.Q. Does the mobile device I have matter when using the authenticator?A: Authenticators will work on both iPhone and Android devices. If you do not have a device that fits these parameters, please use our browser option.Q. Do I need to use a specific authenticator when logging into the Partner Portal?A: Salesforce Multi-Factor Authentication (MFA), Google MFA, and Microsoft MFA are our recommended mobile authenticators to use when using a mobile application. If you are using the browser option, please use totp.app.Q: If I am using a group username and password to access the partner portal, how does this impact me?A: If you have multiple users leveraging the same username and password to access the portal, you will need to either designate one user to approve all attempted logins through their mobile device OR use the browser option (totp.app) to allow group logins. If for some reason that user leaves the company, changes their mobile device, loses their device, or you lose the unique key to your account when using the browser option - reach out to************************* for a MFA reset.Q: What should I do if I receive a login error message when trying to connect my authentication application with my partner account?A: If for some reason you receive a login error message, please clear your cache, and try again. If the problem persists, try using an incognito window to login instead. If problems continue to exist, please reach out to *************************。
VMware命令集-20180301

1RVC命令1.1进入rvcwindow系统:进入c:\Program file\Vmware\Infrastructure\VirtualCenter Server\support\rvc,找到rvc.bat文件,编辑文件,加入vCenter的账号密码,然后运行这个rvc.bat即可。
VCSA系统则通过ssh登录,输入rvc <vc-ip>,然后输入密码即可,默认账户是administrator@vsphere.local1.2查看数据重新同步vsan.resync_dashboard~cluster~|~host~查看正在重新同步的数据量举例:CHOT-OA>vsan.resync_dashboard ~/computers/CHOT-OA-VSAN或者在集群模式下/10.56.201.5/CHOT-OA/computers/CHOT-OA-VSAN>vsan.resync_dashboard~/computers/CHOT-OA-VSAN/1.3RVC收集日志/usr/bin/rvc -c "vsan.support_information 1" -c "quit"administrator@vsphere.local:'Admin123+'@10.56.201.5> /tmp/rvc.log1.4vsan.host_info/10.56.201.5/CHOT-OA/computers/CHOT-OA-VSAN/hosts> vsan.host_info 01.5vsan.cluster_info/10.56.201.5/CHOT-OA/computers> vsan.cluster_info 01.6vsan.cmmds_find/10.56.201.5/CHOT-OA/computers/CHOT-OA-VSAN>vsan.cmmds_find ~/computers/CHOT-OA-VSAN -t DISK_USAGEcmmds_find –t DISK显示所有硬盘的信息1.7fix_renamed_vms如果由于什么原因导致无法访问vsan存储,会导致某些虚拟机的名字变得非常长的路径名,在vsphere web客户端中显示成虚拟机名字,这个命令可以修改这些虚拟机的名字1.8vsan.obj_status_report他可以用来验证群集中所有对象和组件是否正常、健康且没有对象或组件被孤立(也就是没有和虚拟机相关联)/10.56.201.5/CHOT-OA/computers> vsan.obj_status_report 01.9vsan.check_state这个命令可以帮助检查vsan存储中是否有问题/10.56.201.5/CHOT-OA/computers> vsan.check_state 0并且一个很有用的功能是,添加-r 参数后,他可以刷新vsan存储中的组件信息,可以重新连接孤立的虚拟机/10.56.201.5/CHOT-OA/computers> vsan.check_state –r 01.10vsan.whatif_host_failures他不仅在输出结果中显示出了当前的存储容量配置,还会显示出如果集群中的单台主机发生故障会发生些什么/10.56.201.5/CHOT-OA/computers> vsan.whatif_host_failures 01.11vsan.disks_stats显示所有硬盘的信息/10.56.201.5/CHOT-OA/computers> vsan.disks_stats 01.12vsan.vm_perf_stats后面跟虚拟机名字,中间的Discovered virtual machine的路径可以通过tab键实现。
VMware使用手册
VMware使用手册VMware使用手册1、概述1.1 介绍VMware软件的作用和功能 1.2 支持的操作系统和硬件要求1.3 VMware产品版本和许可证选项2、安装与配置2.1 和安装VMware软件2.2 创建虚拟机2.3 配置虚拟机硬件2.4 安装操作系统2.5 配置虚拟网络和网络适配器2.6 设置共享文件夹3、虚拟机管理3.1 启动、暂停和关闭虚拟机3.2 快照功能的使用3.3 虚拟机克隆和迁移3.4 虚拟硬件设备的管理3.5 虚拟机性能调整4、网络和安全性4.1 设置虚拟网络4.2 配置网络连接类型4.3 防火墙和网络安全设置4.4 虚拟机间的网络通信5、高级功能5.1 虚拟机共享和访问控制 5.3 自动化和脚本操作5.4 存储和快速克隆5.5 故障转移和故障恢复6、故障排除和维护6.1 虚拟机无法启动6.2 网络连接问题6.3 性能问题和资源调整6.4 管理员密码重置6.5 数据存储管理7、VMware支持和社区资源7.1 获取技术支持7.2 官方文档和知识库7.3 参与社区讨论和论坛7.4 建议和反馈附件:附件1:VMware安装指南附件3:网络连接设置示例法律名词及注释:1、许可证 - 一项法律文件,规定了软件供应商授予用户使用其软件的权利和条款。
2、快照 - 通过保存虚拟机的状态和数据来实现的一种功能,可用于在出现故障或错误后恢复虚拟机到早期状态。
3、克隆 - 复制一个虚拟机以创建一个与原始虚拟机相同的副本。
4、脚本操作 - 使用脚本语言编写的一系列指令,可用于自动执行一些常规任务。
5、存储 - 用于存储虚拟机文件和数据的物理设备或存储介质。
6、故障转移 - 当一个物理主机或虚拟机出现故障时,将其上运行的虚拟机转移到其他可用的主机上以保持业务连续性。
7、技术支持 - 提供给用户的技术和咨询服务,以解决软件使用过程中遇到的问题。
- 1、下载文档前请自行甄别文档内容的完整性,平台不提供额外的编辑、内容补充、找答案等附加服务。
- 2、"仅部分预览"的文档,不可在线预览部分如存在完整性等问题,可反馈申请退款(可完整预览的文档不适用该条件!)。
- 3、如文档侵犯您的权益,请联系客服反馈,我们会尽快为您处理(人工客服工作时间:9:00-18:30)。
vSphere Acceleration Kit 是可扩展套件,具有高级管理功能,还可以随着业务发展而扩展。 所有 Acceleration Kit 均包括 vCenter Standard 和一组 vSphere 版本许可证。
VMware vSphere Standard Acceleration Kit(用于 8 个处理器)
基于向导的快速调配和虚拟机模板
使用 VMware vCenter Update Manager 实现自动补丁程序管理
通过任务调度和警报实现操作自动化
从物理机到虚拟机的集成式转换功能
了解有关 vCenter Server 的更多信息
所有 vSphere 产品均包括高性能服务器虚拟化、安全功能以及广泛的硬件和软件互操作性。
VMware ESXi 虚拟化管理程序体系结构的优点
工程师见面会:Lance Berc 谈 VMware ESXi
VMware vSphere 的虚拟化管理程序体系结构在虚拟基础架构的管理中起关键作用。 2001 年推出的裸机 ESX 体系结构大幅增强了性能和可靠性,客户因此可将虚拟化的优势扩展到他们的关键任务应用程序上。 同样,ESXi 体系结构的推出也代表着可靠性和虚拟化管理方面的飞跃。 VMware ESXi 的大小不到 ESX 的 5%,它独立于操作系统运行,并改进了虚拟化管理程序在安全性、部署和配置以及持续管理方面的管理操作。
通过将vSphere用作云计算基础架构的平台,可显著简化IT的云计算服务管理。进而帮助他们为更多的项目提供支持。
并以更快的速度完成这些项目。vSphere 平台中内置了业内最先进的自动化和智能策略管理功能。可为IT节省宝贵的时间。
这些功能包括存储DRS,配置文件驱动的存储和自动部署。
其中,存储DRS可确保实现基于策略的管理和存储资源自动负载平衡。
基于群集的传统应用程序,可用性保障方法不仅成本高昂,而且十分复杂,
而vSphere High Availability 只需要几分钟即可以设置完毕, 成本很低。
此外,借助业内应用最广泛的vSphere HA技术,您可以确信关键业务应用程序的可用性足以获得保障。
为在灾难来临时提供终极保护,vCenter Site Recovery Manager 可自动完成恢复过程。确保及时、成功地实现恢复。
------------------------------------------------------------------------------
vSphere 功能特性
面向中小型企业的 vSphere 套件包括 vSphere 虚拟化和用于集中管理的 vCenter Server - 您开始虚拟化之旅需要的一切。 vSphere 和 vCenter 有多个不同版本。
凭借vSphere Storage Appliance HA,所有客户现在都可以获得DRS和vMotion,即使他们没有昂贵的共享存储硬件,也没有关系。
有1400家软件供应商支持2500多款应用程序在vSphere中运行,同时vSphere还支持最广泛的OS,行业标准,x86服务器、存储解决方案和网络设备。
基于角色的访问控制并与 Microsoft Active Directory 集成
用于安全地远程访问 vSphere 主机的 SSL 加密功能
广泛的硬件和软件互操作性
与业界服务器硬件最广泛的兼容性
经认证可与 Dell、Fujitsu Siemens、HP、IBM、NEC 和 Sun 服务器集成
借助 vSphere 以及我们的虚拟化和云计算管理产品,您可以:
借助 容量管理最大程度地提高效率和确保服务级别>>
借助 灾难恢复管理自动执行恢复计划>>
借助 性能管理确保满足性能 SLA 要求>>
借助 成本报告管理掌握 IT 服务的准确交付成本>>
借助 VMware vSphere,可以降低资金成本和运营成本,并增强对 IT 基础架构的控制能力,同时保留选择任何操作系统、应用程序和硬件的灵活性。
更快地对业务需求作出响应,并简化IT运营,此外,由于vShield全面的安全框架,专门针对动态的云环境而设计,因此客户还可以确信其云环境是安全的。
借助VMware vSphere,您可以构建自己的云环境和智能虚拟基础架构,并按您自己的方式进行交付。
通过公共云和私有云获得弹性和灵活性
构建公共云、私有云或混合云,并按需与来自 VMware 广泛的领先云计算服务提供商体系的公共云建立连接,以实现“按服务付费”的按需提供基础架构。 采用策略驱动的自动化实现 IT 即服务 (ITaaS) 的同时,获得对资源池信息的可见性以及应对不断变化的业务需求所需的弹性。
vSphere可提供无可比拟的扩展性,即使是最占用资源的应用程序也在其支持范围之内。
它可以创建业内最大的虚拟机,这种虚拟机包含多达32个虚拟CPU和1TB的内存,同时支持超过每秒1百万次I/O操作的网络吞吐量。
这意味着任何应用程序,都不会因为太大而无法由vSphere进行处理。
vSphere提供了一套全面的可用性功能,无论对于计划内停机还是计划外停机,都可以确保所有应用程序均得到保护。
简化虚拟化管理程序修补和更新。由于 ESXi 的体积更小,组件更少,因此所需的补丁程序比 ESX 少得多,从而缩短了维护时段,并减少了安全漏洞。 在其生命周期中,ESXi 3.5 所需的补丁程序约为 ESX 3.5 的 1/10。
经认证可支持 SATA、NAS、iSCSI 和光纤通道存储设备
可支持最广泛的 32 位和 64 位 x86 服务器操作系统
无需修改即可运行任何标准软件应用程序
------------------------------------------------------------------------------------------
VMware vSphere Enterprise Plus Acceleration Kit 包含全套 vSphere 功能,其中包括基于策略的计算、网络和存储资源自动化,从而确保最关键应用程序的服务级别。
------------------------------------------------------------------------------
vSphere 提供了多个业务连续性选项,已在世界上对性能要求最严苛的数据中心内运行。 当服务器出现故障时,使用最新备份自动重新启动应用程序,或提供持续可用性保护。 您还可以跨多个物理站点自动执行
自动执行 IT 管理
借助 VMware vSphere 的管理自动化功能,您可以从繁琐乏味的任务中解脱出来。 VMware vSphere 易于部署、使用和管理。 数分钟内即可完成新应用程序的调配,无需浪费数周的时间,并可将更改请求响应时间从数小时或数天缩短为短短数分钟。 通过基于策略的自动划分工作负载优先级,确保最重要的应用程序总是能够获得所需要的计算、网络和存储资源。
用户可以确信vSphere将适用于其IT环境中的应用程序。超过25万家企业将其作为虚拟平台。
vSphere平台的无可比拟的可靠性源于ESXi,ESXi是新一代的裸机虚拟机管理程序。也是当今最有效,最安全和最具扩展能力的虚拟机管理程序。
ESXi可为虚拟环境和云计算提供强大的基础,客户深知vSphere是构建云计算基础架构的最佳平台,他们依赖vSphere来运行关键业务应用程序。
经济实惠地实现业务连续性
借助 自动备份为您的所有虚拟机提供完整数据保护,以保护您的业务。 使用 vMotion 消除计划内停机,借助 vMotion 您可以在服务器之间实时移动虚拟机,无需中断任何服务。 并且 vSphere Storage Appliance 软件为您提供了共享存储功能,并且无需任何附加硬件。
比较 vSphere 版本功能
VMware vSphere Enterprise Acceleration Kit(用于 6 个处理器)
始终可用的高效基础架构:
VMware vSphere Enterprise Acceleration Kit 具有自动化资源管理功能,可最大限度地提高计算能力和效率。 容错业务连续性保护还可以确保最关键的应用程序始终可用。
让 IT 员工将精力转移到打造具有变革意义的业务解决方案上,而不是放在对硬件和软件的日常维护上
更充分地利用现有 IT 资产,并使数据中心的资金开支降低多达 60%
大幅降低电力、散热和占地空间需求,并使能源成本降低多达 80%
VMware vSphere 有多个不同的版本,可以有针对性地为 小型企业和 大中型企业客户带来好处。
包括:1 个 vCenter Server Standard 实例和 6 个 vSphere Standard 版许可证
比较 vSphere 版本功能
VMware vSphere Enterprise Plus Acceleration Kit(用于 6 个处理器)
基于策略的服务级别管理:
配置文件驱动的存储可根据用户定义的策略对存储进行分组,进而简化存储资源的选择。
自动部署则允许先定义单个映像配置,再将其自动部署到每个vSphere主机,这样只需几分钟即可让多个vSphere主机运转起来。
让Oracle和Exchange等关键业务应用程序保持正常运行。
借助vSphere, 企业可以信心十足地运行其关键业务应用程序。
简化部署和配置。ESXi 拥有的配置项比 ESX 少得多,因此可以极大地简化部署和配置,并且更容易保持一致性。
减少管理开销。ESXi 采用基于 API 的合作伙伴集成模型,因此不需要安装和管理第三方管理代理。 利用远程命令行脚本编写环境(例如 vCLI 或 PowerCLI),可以自动执行日常任务。
