爱普生TM-U220系列使用说明书
Epson产品使用说明书
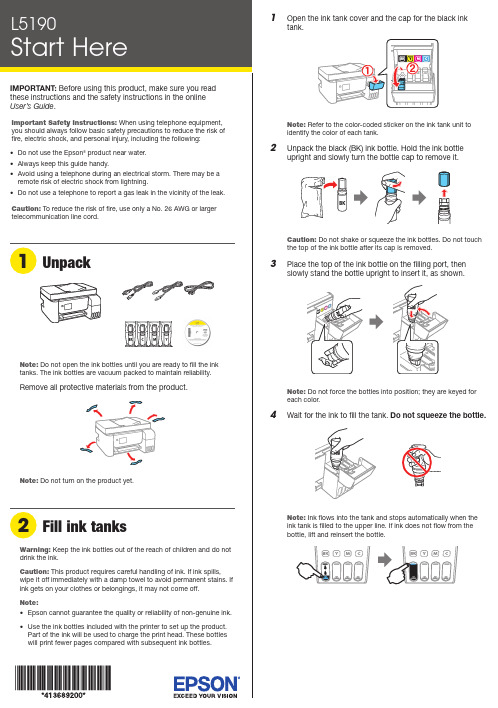
Do not open the ink bottles until you are ready to fill the ink tanks. The ink bottles are vacuum packed to maintain reliability.emove all protective materials from the product.11 Select your language, country, date, and time.Note: You can change these settings later using the product’scontrol panel. For more information see the online User’s Guide.12 W hen instructed to see the Start Here sheet, press andhold the help button for 5 seconds.13 P ress the start button to start ink charging.Note: Ink charging takes about 10 minutes. When the power light stops flashing, ink charging is complete. Once initial setup of the printer is complete, you can top off the ink tanks with any remaining ink. See the online User’s Guidefor instructions.C aution: Do not unplug or turn off the product, or open theinner cover while the product is charging or you’ll waste ink. 14 PressSee the online User’s Guide for information about loading capacity and available paper types and sizes.1 M ake sure the product is not charging ink. Then raise thepaper support and tilt it backwards slightly.2 Slide the edge guides all the way out.Note: If you are using a Mac or your computer does not have aCD/DVD drive, an Internet connection is required to obtain the product software.To print from a Chromebook™, go to.jm/support/gcp for instructions.1 M ake sure the product is NOT CONNECTED to yourcomputer.Windows ®: If you see a Found New Hardware screen, clickCancel and disconnect the USB cable.2I nsert the product CD (Windows only) or download andrun your product’s software package. For the latest software, visit .jm/support/L5190.3 F ollow the instructions on the computer screen to run the setup program.4 W hen you see the Select Your Connection screen, selectone of the following:• Wireless connectionIn most cases, the software installer automatically attempts to set up your wireless connection. If setup is unsuccessful, you may need to enter your network name (SSID) and password.• Direct USB connectionMake sure you have the USB cable ready.• Wired network connectionMake sure you have an Ethernet cable (not included).Mobile printingConnect wirelessly from your smartphone, tablet, or computer. Print documents and photos from across the room or around the world:• Print directly from your iOS device. Simply connect your printer and device to the same network and tap the action icon to select the print option.• Use Epson Print Enabler (free from Google Play™) with Android™ devices (v4.4 or later). Then connect your printer and device to the same network and tap the menu icon to select the print option.• Print remotely with Epson Connect™ and Google Cloud Print™. See your online User’s Guide for instructions or learn more at .jm/connect .3 L oad A4- or letter-size paper, glossy or printable side upand short edge first, in the middle of the rear paper feedslot.Note:guides.4 S lide the edge guides against the paper, but not tootightly.5 P6 W hen prompted, use the arrow and OK buttons to selectAdjust to adjust print quality now, or select Adjust Laterto do so at another time.For instructions on loading envelopes or legal-size paper, see the online User’s Guide.1 C onnect the phone cord to a telephone wall jack andto the LINE port on your product. See the online User’sGuidefor more information.2 P ress the OK button to set up the fax, or press the #pound button to set it up later.EPSON is a registered trademark, EPSON Exceed Your Vision is a registered logomark, and Epson Connect is a trademark of Seiko Epson Corporation.Designed for Excellence is a trademark of Epson America, Inc.Mac is a trademark of Apple Inc., registered in the U.S. and other countries.Windows is a registered trademark of Microsoft Corporation in the United States and/or other countries.Android, Google Cloud Print, Chromebook, and Google Play are trademarks of Google LLC.General Notice: Other product names used herein are for identification purposes only and may be trademarks of their respective owners. Epson disclaims any and all rights in those marks.This information is subject to change without notice. © 2018 Epson America, Inc., 10/18CPD-56090Technical supportVisit .jm/support/L5190 to download drivers, view manuals, get FAQs, or contact Epson.You can also speak to a service technician by calling one of these numbers:Argentina(54 11) 5167-0300 Guatemala * 1-800-835-03580800-288-37766Mexico 01-800-087-1080Bolivia * 800-100-116 Mexico City (52 55) 1323-2052Chile (56 2) 2484-3400 Nicaragua * 00-1-800-226-0368Colombia 018000-915235 Panama * 00-800-052-1376Bogota (57 1) 592-2200 Paraguay 009-800-521-0019Costa Rica 800-377-6627 Peru 0800-10-126DominicanLima (51 1) 418-0210 Republic * 1-888-760-0068 Uruguay 00040-5210067Ecuador * 1-800-000-044 Venezuela (58 212) 240-1111El Salvador * 800-6570* C ontact your local phone company to call this toll-free number from a mobile phone.If your country does not appear on the list, contact your nearest Epson sales office. Toll or long distance charges may apply.Need paper and ink?Ensure brilliant results with Epson specialty papers, engineered specifically for Epson printers. You can purchase them from an Epson authorized reseller. To findthe nearest one, visit .jm or contact Epson as described in “Any questions?” on this sheet.L5190 replacement inks。
EPSON 投影机 说明书

目錄安全使用須知•安全使用須知 (2)•使用和保管上的注意事項 (10)支援與維修指南•本公司提供的實用軟體 (14)•故障檢查表 (15)•Epson投影機聯繫清單 (17)安全使用須知操作投影機時,請先閱讀所有安全和操作使用須知。
閱讀所有使用須知後,請保存本注意事項以備將來參考。
本文件和投影機均使用圖像符號來顯示安全使用投影機的方法。
請了解並遵守注意事項的符號,避免造成人身傷害和財產損失。
符號說明本符號代表若有疏忽,可能因錯誤操作而造成人身傷害或甚至死亡的注意事項。
本符號代表若有疏忽,可能因錯誤操作而造成人身傷害或外傷的注意事項。
代表不能執行的動作的符號不要執行不要拆解不要觸摸不要弄濕不要在潮濕地區使用不要放置在不穩的表面上代表應該執行的動作的符號使用須知從插座上拔下插頭⨸r發生以下情況時,請將投影機插頭從插座上拔下,並將所有維修工作交由專業維修人員執行:•如果有煙霧、異味或奇怪的噪音從投影機中發出。
•如果液體或異物掉入投影機內部。
•如果投影機掉落或機殼損壞。
在以上情況繼續使用,可能會引起火災或觸電。
不要試圖自行維修投影機。
請把全部維修作業交由合格的維修人員執行。
請將投影機放在方便拔掉插頭的插座附近使用。
除非使用說明書中有特別說明,否則不要打開投影機上方的任一個蓋子。
不要試圖拆解或改裝投影機(包括消耗品)。
請把全部維修作業交由合格的維修人員執行。
投影機內的電壓會造成嚴重的人身傷害。
如果要將投影機安裝在天花板上,應由合格的技師採用認可的吊裝裝備進行安裝。
如果不正確執行安裝工作,投影機可能會掉落。
這樣可能會造成人身傷害或意外。
請向您的經銷商聯絡以便執行安裝工作。
如果您在吊裝座上使用膠粘劑以防螺釘鬆動,或在投影機上使用潤滑劑、油類製品等,可能會造成機殼破裂,使投影機從吊裝座上掉落。
這樣可能會對吊架座下方的人造成嚴重的傷害,並可能損壞投影機。
安裝或調整吊裝座時,請勿使用膠粘劑防止螺釘鬆動,也不要使用潤滑劑、油類製品等。
EPSON TM-T20II-i 说明书
User’s ManualImportant Safety Information. . . . . . . . . . . . . . . . . . .page 2Part Names and Functions. . . . . . . . . . . . . . . . . . . . . .page 4Setup. . . . . . . . . . . . . . . . . . . . . . . . . . . . . . . . . . . . . . . . . .page 6Basic Operations. . . . . . . . . . . . . . . . . . . . . . . . . . . . . page 13Installing/Replacing the Roll Paper . . . . . . . . . . . page 15Cleaning. . . . . . . . . . . . . . . . . . . . . . . . . . . . . . . . . . . . . page 16Troubleshooting. . . . . . . . . . . . . . . . . . . . . . . . . . . . . page 17Specifications. . . . . . . . . . . . . . . . . . . . . . . . . . . . . . . . page 19Appendix. . . . . . . . . . . . . . . . . . . . . . . . . . . . . . . . . . . . page 20Important Safety InformationThis manual presents important information intended to ensure safe and effective use of this product. Read this manual carefully and store it in an accessible location.For information on development of a system with this product and setup, see also Technical Reference Guide. You can access Technical Reference Guide from the included Manual CD.Key to SymbolsThe symbols in this manual are identified by their level of importance, as defined below. Read the following carefully before handling the product.!WARNING:Warnings must be observed carefully to avoid serious bodily injury.!CAUTION:Cautions must be observed to avoid minor injury to yourself, damage to your equipment, or loss of data.Q Note:Notes have important information and useful tips on the operation of your product.Safety Precautions!WARNING:❏If this product produces smoke, a strange odor, or unusual noise, immediately unplug the AC cable, and then contact your dealer or an Epson service center for advice. Continued use may lead to fire or electric shock.❏Do not use this product with any voltage other than the specified one. Doing so may lead to fire or electric shock.❏Do not connect the cables in ways other than those specified in the manuals. Different connections may cause equipment damage or fire.❏Do not use this product where inflammable fumes of gasoline, benzine, thinner, or other inflammable liquids may be in the air. Doing so may cause an explosion or fire.❏Do not use aerosol sprayers containing flammable gas inside or around this product.Doing so may cause fire.❏If water or other liquid spills into this product, immediately unplug the AC cable, and then contact your dealer or an Epson service center for advice. Continued use may lead to fire or shock.❏Do not allow foreign objects to fall into this product. Penetration by foreign objects may lead to fire or electric shock.❏Never attempt to repair this product yourself. Improper repair work can be dangerous.❏Never disassemble or modify this product. Tampering with this product may result in injury, fire, or electric shock.!CAUTION:❏Do not use this product in locations subject to high humidity or dust levels. Excessive humidity and dust may cause paper jams and other problems, such as fire, or electric shock.❏Be sure to set this product on a firm, stable, horizontal surface. The product may break or cause injury if it falls.❏Do not stand on or place heavy objects on top of this product. Equipment may fall or collapse, causing breakage and possible injury.❏The print head can be very hot during and immediately after printing. If you need to touch it, such as for cleaning, wait until it cools down. Touching it before that may cause burns.❏Do not connect a telephone line to the drawer-kick connector of this product. The telephone line or product may become damaged.❏To ensure safety, unplug this product before leaving it for an extended period.Caution LabelsThe caution label on the product indicates the following precautions.!K CAUTION:Do not touch the thermal head because it can be very hot after printing.!CAUTION:When connecting external devices to the USB ports, follow the precautions below.❏Confirm the rated current of the external devices by checking the descriptions on the devices or manuals. Connect the external devices only when those total rated current is less than 800 mA.Do not use a device whose rated current is unclear.❏Use UL-approved external devices (only for North American users).Part Names and FunctionsRoll paper coverOpen this cover to install/replace the roll paper.Manual cutterUse this cutter when you cut the roll paper manually.Cutter coverOpen this cover to unlock the autocutter blade when the roll paper cover does not open due to a paper jam. (U “Paper is jammed” on page 17)Power switchUse this switch to turn on or off the printer.Cover open leverUse this lever to open the roll paper cover.Control panel(Power) LED:This LED is on when the printer is on.Error LED:This LED indicates an error. (U “Error LED is on” on page 17 or “Error LED is flashing” on page 17)Paper LED:This LED is on when the paper is out. This LED flashes when the printer is in standby.Feed button:This button feeds paper.Roll paper coverCutter coverControl panelSetupInstalling the PrinterInstall the printer horizontally on a flat surface.If you want to install the printer vertically, be sure to attach the included control panel label for vertical installation and rubber feet. (U “Installing the printer vertically” on page 6) Also, you can hang it on a wall using the included accessories. (U “Hanging the printer on a wall” on page 8)Q Note:Take measures to prevent the printer from moving by vibration during paper cutting and when using a drawer. Affixing tape (DF-10) is provided as option.Installing the printer verticallyAttach the included control panel label for vertical installation and rubber feet on the printer.❏Attaching the control panel label for vertical installation<Horizontal installation><Vertical installation>❏Attaching the rubber feetQ Note:You can install the printer so that the roll paper cover isupright to the mounting surface using the included wallhanging bracket. Follow the steps below.1.Install the wall hanging bracket on the printer, andfix it using 2 included screws.2.Attach 2 rubber feet on the printer case, and attach2 rubber feet on the hanging bracket.Hanging the printer on a wallFollow the steps below to hang the printer on the wall.!CAUTION:❏To fix the printer securely, install printer on a wall made of wood, concrete, or metal. The thickness of the wall should be 10 mm {0.4"} or more.❏Be sure to use metallic screws.❏The screws on the wall side must have a pull-out strength of 150 N (15.3 kgf) or more.1.Install 2 screws (screw diameter: 4 mm {0.16"}, head diameter: 7 to 9 mm {0.28" to 0.35"} in thewall at an interval of 80 mm {3.15"}. Make sure the length of the screw’s body in the wall is 10 mm {0.39"} or more, and the length outside the wall is 3 to 4 mm {0.12" to 0.16"}. Array2.3.Install the wall hanging bracket on the printer, and fix it using the screws removed in Step 2.4.Align the holes in the wall hanging bracket with the screws on the wall, and hook it securely.4.Connecting External DevicesIf you connect external devices, connect each cable to the port/connector on the back of the printer. (U“Interface” on page 5)!CAUTION:❏When connecting external devices to the USB ports, follow the precautions below.•Confirm the rated current of the external devices by checking the descriptions on the devices or manuals.Connect the external devices only when those total rated current is less than 800 mA. Do not use a device whose rated current is unclear.•❏coming off.❏❏When Ethernet cables are installed outdoors, make sure devices without proper surge protection are cushioned by being connected through devices that do have surge protection. Otherwise, the devices can be damaged by lightning.Q Note:Connecting the optional Wireless LAN Cable Set (OT-WL01) to the USB port enables the wireless LAN connection. While connecting via wireless LAN, keep the Ethernet cable unconnected to the printer.Attaching the Power Switch CoverAttaching the enclosed power switch cover prevents inadvertent changing of the power switch and tampering. You can turn the power switch on and off by inserting a sharp-pointed object in the holes in the power switch cover. A waterproof cover for the power switch is also included.To detach these covers, also use a sharp-pointed object.!WARNING:If an accident occurs with the power switch cover attached, unplug the AC cable immediately.Continued use may lead to fire or electric shock.Basic OperationsTurning Power On/OffPress the power switch to turn on/off the printer.Q Note:It takes approximately 30 seconds after the printer is turned on until it is ready for printing. Opening the CoversOpening the roll paper coverPull the cover open lever to open the roll paper cover.Opening the cutter coverPut your fingers in the indents in both sides of the cutter cover, and pull it to open it.Installing/Replacing the Roll Paper Follow the steps below to install/replace the roll paper.!CAUTION:Be sure to use the specified roll paper. (U“Specifications” on page 19)1.Open the roll paper cover. (U“Opening the roll paper cover” on page 13)2.Remove the used roll paper core, if there is one.3.Insert the roll paper in the correct direction.4.Pull out some paper, and close the roll paper cover.When the printer power is on, the roll paper is automatically cut.CleaningCleaning the Printer CaseBe sure to turn off the printer, and wipe the dirt off the printer case with a dry cloth or a damp cloth.!CAUTION:Never clean the printer with alcohol, benzine, thinner, or other such solvents. Doing so may damage or break the parts made of plastic and rubber.Cleaning the Thermal HeadTo maintain print quality, Epson recommends cleaning the thermal head periodically (generally every 3 months) by following the steps below.!K CAUTION:❏The thermal head can be very hot after printing. Be careful not to touch it and to let it cool before you clean it.❏Do not damage the thermal head by touching it with your fingers or any hard object.1.Turn off the printer. (U“Turning Power On/Off” on page 13)2.Open the roll paper cover. (U“Opening the roll paper cover” on page 13)3.Troubleshooting (Power) LED does not lightCheck whether the AC adapter is correctly connected. (U “Connecting the AC Adapter” on page 10)Error LED is on❏Check whether the roll paper cover is correctly closed.❏If the Paper LED is on, check whether the roll paper is correctly installed and any roll paper remains. (U “Installing/Replacing the Roll Paper” on page 15)Error LED is flashing❏Check whether paper is jammed. If it is jammed, remove it. (U “Paper is jammed” on page 17)❏Printing stops if the thermal head overheats and resumes automatically when it cools.❏For other cases, turn the printer off, and after 10 seconds, turn it back on.Paper is jammed!K CAUTION:Do not touch the thermal head because it can be very hot after printing.When paper is jammed, never pull out the paper forcibly. Open the roll paper cover (U “Opening the roll paper cover” on page 13), and then remove the jammed paper.The roll paper cover will not openWhen the autocutter blade is locked, the roll paper cover will not open. Follow the steps below to return the autocutter blade to the normal position.1.Turn off the printer. (U “Turning Power On/Off” on page 13)2.Open the cutter cover. (U “Opening the cutter cover” on page 14)3.Turn the knob in the direction of the arrow until you see a triangle in the opening of the frame.4.Close the cutter cover.5.Open the roll paper cover. (U “Opening the roll paper cover” on page 13)Specifications*1: 58 mm width paper (57.5 ± 0.5 mm) is also available. For information on how to change paper width, see Technical Reference Guide.*2: 500 mA at maximum for one port. 800 mA at maximum for total of the two ports.*3: Available when the PHP function is enabled. For information on how to setup PHP environment, see TM-i Series PHP Setup Manual. Be sure to use a micro SD card with the wearleveling function.*4: Be sure to use a safety-standards-applied power source that meets the following specifications.Rated outputM267A: 24 V/2.0 to 10.0 AM267D: 24 V/1.5 to 10.0 AMaximum output240 VA or less *5: The current varies depending on the model number. Use the label on the product to identify the model number andcheck the current for your printer.*6: Reference data: In case of using the Epson power supply, PS-180 (Model: M159B)*7: Based on Epson operating conditions.Item SpecificationPrinting method Thermal line printingRoll paper dimensions Paper width*179.5 mm ± 0.5 mm {3.13" ± 0.02"}Diameter83 mm {3.27"} maximumInside diameter of core12 mm {0.47"}Outside diameter ofcore18 mm {0.71"}Thermal paper type NTP080-80Interface Ethernet× 110BASE-T/100BASE-TXSerial× 1D-sub 9 pin maleUSB (host)× 2USB 2.0, Type A5 V, 500 mA*2USB (device)× 1USB 2.0 High speed, Type Bmicro SD card*3× 1Drawer kick-out× 1Power supply*4DC +24 V ± 7%Current consumption (at 24 V)*5M267A 1.8 A M267D 1.5 AAC power consumption*6Operating*7230 V/50 Hz: 29.4 W115 V/60 Hz: 29.5 WStandby230 V/50 Hz: 2.9 W115 V/60 Hz: 2.8 WTemperature Operating 5 to 45°C {41 to 113°F}Storage–10 to 50°C {14 to 122°F}Humidity Operating10 to 90 %RHStorage10 to 90 %RHOverall dimensions W × D × H: 140 mm × 199 mm × 146 mm {5.51"× 7.83" × 5.75"} Mass (excluding paper and AC adapter)Approx. 1.6 kg {3.55 lb}AppendixDownloading Software and ManualsThe latest versions of SDK, utilities, and manuals can be downloaded from one of the following URLs.For customers in North America, go to the following web site:/For customers in other countries, go to the following web site:/?service=posOpen Source Software LicenseThis product uses open source software in addition to Epson proprietary software.For information of the open source software used in this product, see the following URL.http://xxx.xxx.xxx.xxx/licenses/For “xxx.xxx.xxx.xxx” in the above URL, input your printer’s IP address.Restriction of UseWhen this product is used for applications requiring high reliability/safety, such as transportation devices related to aviation, rail, marine, automotive, etc.; disaster prevention devices; various safety devices, etc.; or functional/precision devices, etc.; you should use this product only after giving consideration to including fail-safes and redundancies into your design to maintain safety and total system reliability. Because this product was not intended for use in applications requiringextremely high reliability/safety, such as aerospace equipment, main communication equipment, nuclear power control equipment, or medical equipment related to direct medical care, etc., please make your own judgment on this product’s suitability after a full evaluation.CautionNo part of this publication may be reproduced, stored in a retrieval system, or transmitted in any form or by any means, electronic, mechanical, photocopying, recording, or otherwise, without the prior written permission of Seiko Epson Corporation. No patent liability is assumed with respect to the use of the information contained herein. While every precaution has been taken in thepreparation of this book, Seiko Epson Corporation assumes no responsibility for errors oromissions. Neither is any liability assumed for damages resulting from the use of the information contained herein.Neither Seiko Epson Corporation nor its affiliates shall be liable to the purchaser of this product or third parties for damages, losses, costs, or expenses incurred by purchaser or third parties as a result of: accident, misuse, or abuse of this product or unauthorized modifications, repairs, or alterations to this product, or (excluding the U.S.) failure to strictly comply with Seiko Epson Corporation’s operating and maintenance instructions.Seiko Epson Corporation shall not be liable against any damages or problems arising from the use of any options or any consumable products other than those designated as Original EpsonProducts or Epson Approved Products by Seiko Epson Corporation.EPSON is a registered trademark of Seiko Epson Corporation. Exceed Your Vision is a registered trademark or trademark of Seiko Epson Corporation. All other trademarks are the property of their respective owners and used for identification purpose only.Other product and company names used herein are for identification purposes only and may be trademarks or registered trademarks of their respective companies. Epson disclaims any and all rights in those marks.NOTICE: The contents of this manual are subject to change without notice.© 2014 Seiko Epson Corporation. All rights reserved.21。
Epson 投影仪用户指南说明书
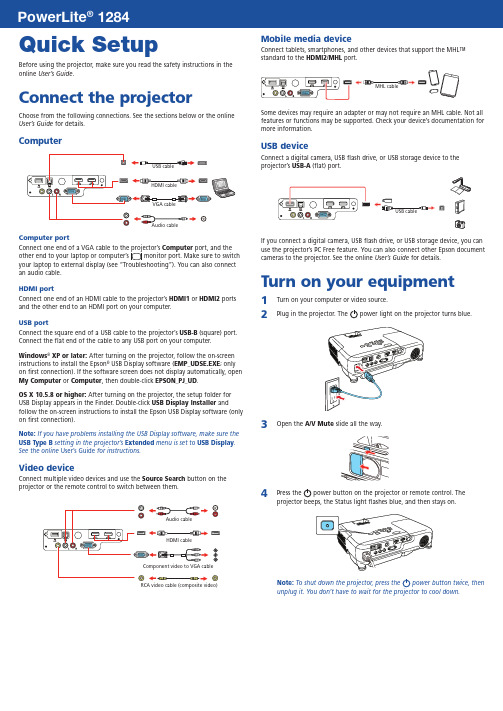
Quick SetupBefore using the projector, make sure you read the safety instructions in the online User’s Guide .Connect the projectorChoose from the following connections. See the sections below or the online User’s Guide for details.ComputerComputer portComputer port, and the an audio cable.HDMI portConnect one end of an HDMI cable to the projector’s HDMI1 or HDMI2 ports and the other end to an HDMI port on your computer.USB portConnect the square end of a USB cable to the projector’s USB-B (square) port. Connect the flat end of the cable to any USB port on your computer.Windows ® XP or later: After turning on the projector, follow the on-screen instructions to install the Epson ® USB Display software (EMP_UDSE.EXE ; only on first connection). If the software screen does not display automatically, open My Computer or Computer , then double-click EPSON_PJ_UD .OS X 10.5.8 or higher: After turning on the projector, the setup folder for USB Display appears in the Finder. Double-click USB Display Installer andfollow the on-screen instructions to install the Epson USB Display software (only on first connection).Note: If you have problems installing the USB Display software, make sure the USB Type B setting in the projector’s Extended menu is set to USB Display . See the online User’s Guide for instructions.Video deviceConnect multiple video devices and use the Source Search button on theprojector or the remote control to switch between them.RCA video cable (composite video)Mobile media deviceConnect tablets, smartphones, and other devices that support the MHL™ standard to the HDMI2/MHLport.Some devices may require an adapter or may not require an MHL cable. Not all features or functions may be supported. Check your device’s documentation for more information.USB deviceConnect a digital camera, USB flash drive, or USB storage device to the projector’s USB-A(flat) port.If you connect a digital camera, USB flash drive, or USB storage device, you can use the projector’s PC Free feature. You can also connect other Epson document cameras to the projector. See the online User’s Guide for details.Turn on your equipment1 Turn on your computer or video source.2Plug in the projector. Thepower light on the projector turns blue.3O4 PNote: To shut down the projector, press the power button twice, thenunplug it. You don’t have to wait for the projector to cool down.12845 U se the arrow buttons on the remote control to highlight any of theoptions on the Home screen that appears, then press to select it. Youcan display a QR code, switch between projection sources, and quicklyaccess various adjustment options from this screen.6 T he default language of the menu system is English. To select anotherlanguage, press the Menu button on the projector or remote control.Select Extended and press . Select Language and press . Selectyour language and press . Press the Menu button to exit the menusystem.Adjust the image1 I f you don’t see an image, press the Source Search button on theprojector or the remote control to select the image source.Note: If you still see a blank screen or have other display problems, see2 T3 To reduce or enlarge the image, turn the zoom ring.4 Turn the focus ring to sharpen the image.5 I f your image looks like or, you may have placed the projectoroff to one side of the screen at an angle. Place the projector directly infront of the center of the screen, facing the screen squarely. If you can’tmove the projector, use the horizontal keystone slider on the projector tocorrect the image shape.,Using the remote controlMake sure the batteries are installed as shown (two AA batteries).Choose which sourceto displayTurn projectoron and offAccess projectormenusTurn off projectordisplayAccess the HomescreenNavigate projectormenusFor more information on using the remote control, see the onlineUser’s Guide.Project wirelesslyFollow the steps here to connect the projector over a wireless network.If you’re projecting from a computer, it must have a wireless card or built-in wireless interface, and be running Windows 10, Windows 8, Windows 7,Windows Vista®, Windows XP Professional x64, or Windows XP, or OS X 10.5.8to 10.10.x.1 P ress the Menu button on the remote control, select the Networkmenu, and press .2 Choose Network Configurationand press .3 Select the Wireless LAN menu and press .4 C hoose Connection Mode, press , select Quick for a directconnection to a computer, tablet, or smartphone, then press again.When you’re finished, press Esc to return to the Wireless LAN menu.Note: For instructions on setting up an Advanced connection for aconnection to a router or access point, see the online User’s Guide.5 T o prevent the SSID and IP address from appearing on the networkstandby screen, set the SSID Display and IP Address Display settings to Off.6 W hen you’re finished selecting settings in the Wireless LAN menu, pressEsc.7 S elect Complete and press , then select Yes and press again tosave your settings.Install network softwareInstall links to download the network software and manuals from the projector CD. Downloads require an Internet connection. You can also install the software and manuals from the Epson website, as described in “Where to get help.”To project over the network, install the EasyMP® Network Projection software on each computer you will project from. To monitor and control your projector over the network, install the EasyMP Monitor software (Windows only). To project from multiple PCs over the network, install the EasyMP Multi PC Projection software.Click the icons on your desktop to download and install the software and their manuals. See the manuals for instructions on installing and using the software.Project wirelessly from a mobile deviceYou can connect your mobile device and projector using Epson iProjection™ and a QR code. Make sure the latest version of Epson iProjection is installed on your device.Install the Epson iProjection appTo project from an iOS or Android™ device,download and install the Epson iProjection app.Visit /projectorapp (U.S.) orepson.ca/projectorapp (Canada) for more information.Direct wireless connectionMake sure your device and Epson projector are not connected to a network and your Epson projector’s Connection Mode is set to Quick.1Tap iProjection on your device’s Home screen.2 Tap Projectorto open the Search Projector menu.3 Tap Read QR code.4 P oint your device’s camera at the QR code your projector displays; theQR code is read automatically.5 Tap OK to register your projector’s Wi-Fi profile.6 Tap Install to install your projector’s Wi-Fi profile.7 Tap Install Now at the Unsigned Profile notification.8 Tap Done to exit the Profile Installed screen.9 Tap OK to confirm the connection to the projector.10 N ote the projector network name (SSID) shown on your device’s screen.Then go to the Wi-Fi settings on your device to select that network.Your device and Epson projector are now work connectionMake sure your projector and mobile device are connected to the same network.1Tap iProjection on your device’s Home screen.2 Tap Projectorto open the Search Projector menu.3 Tap Read QR code.4 P oint your device’s camera at the QR code your projector displays; theQR code is read automatically.Your device and Epson projector are now connected. TroubleshootingIf you see a blank screen or the No signal message after turning on your computer or video device, check the following:•M ake sure the Status light on the projector is blue and not flashing, and the A/V Mute slide is open.•P ress the Source Search button on the projector or the remote control to switch to the correct image source, if necessary.•P ress the Home button on the projector or remote control to verify the source input and settings.•I f you’re using a Windows laptop, press the function key on your keyboard that lets you display on an external monitor. It may be labeled CRT/LCD or have an icon such as . You may have to hold down the Fn key while pressing it (such as Fn + F7). Wait a moment for the display to appear.•I f you’re using a Mac laptop, open System Preferences and select Displays. Click the Arrangement tab and select the Mirror Displayscheckbox.Where to get helpManualsFor more information about using the projector, click the icons on your desktop to access the online manuals (requires an Internet connection). If you don’t see icons to the manuals, you can install them from the projector CD or go to the Epson website, as described below.Telephone support servicesTo use the Epson® PrivateLine® Support service, call (800) 637-7661. This service is available for the duration of your warranty period. You may also speak with a support specialist by calling (562) 276-4394 (U.S.) or (905) 709-3839 (Canada). Support hours are 6 AM to 8 PM, Pacific Time, Monday through Friday, and7 AM to 4 PM, Pacific Time, Saturday. Days and hours of support are subject to change without notice. Toll or long distance charges may apply.Internet supportVisit /support (U.S.) or epson.ca/support (Canada) for solutions to common problems. You can download utilities and documentation, get FAQs and troubleshooting advice, or e-mail Epson.For more information on wireless projection, visit/wirelessprojectors.RegistrationRegister today to get product updates and exclusive offers. You can use the CD included with your projector or register online at /webreg.Optional accessoriesFor a list of optional accessories, see the online User’s Guide.You can purchase screens or other accessories from an Epson authorized reseller.To find the nearest reseller, call 800-GO-EPSON (800-463-7766). Or you canpurchase online at (U.S. sales) or epson.ca (Canadian sales).Wireless noticeContains wireless LAN 802.11b/g/n moduleModel: WN7122BEPThis document provides safety instructions and describes the specifications. Read thisdocument carefully before use to ensure your safety and product performance.The grantee is not responsible for any changes or modifications not expressly approvedby the party responsible for compliance. Such modifications could void the user’sauthority to operate the equipment. This equipment should be installed and operatedkeeping the radiator at least 7.9 inches (20 cm) or more away from person’s body. Thisdevice is restricted to indoor operations only.EPSON, PowerLite, and EasyMP are registered trademarks, Epson iProjection is a trademark, and EPSON ExceedYour Vision is a registered logomark of Seiko Epson Corporation. PrivateLine is a registered trademark andEpson Connection is a service mark of Epson America, Inc.Mac and OS X are trademarks of Apple Inc., registered in the U.S. and other countries.Android is a trademark of Google Inc.General Notice: Other product names used herein are for identification purposes only and may be trademarksof their respective owners. Epson disclaims any and all rights in those marks.This information is subject to change without notice.© 2015 Epson America, Inc., 9/15Printed in XXXXXX CPD-42655R1。
(完整版)TM-U220安装
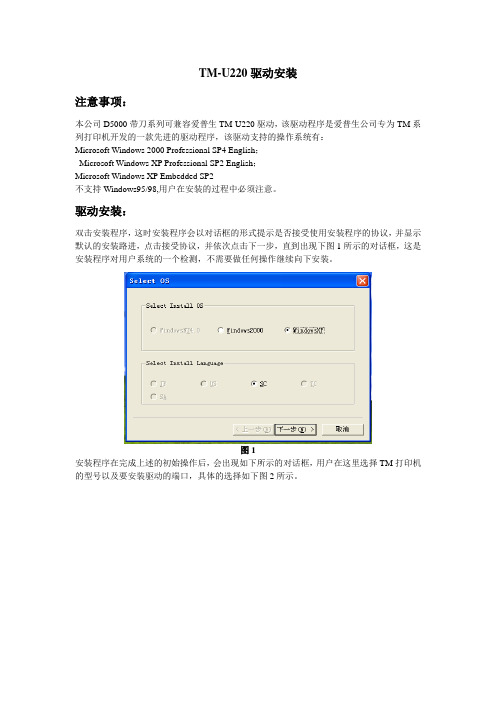
TM-U220驱动安装注意事项:本公司D5000带刀系列可兼容爱普生TM-U220驱动,该驱动程序是爱普生公司专为TM系列打印机开发的一款先进的驱动程序,该驱动支持的操作系统有:Microsoft Windows 2000 Professional SP4 English;Microsoft Windows XP Professional SP2 English;Microsoft Windows XP Embedded SP2不支持Windows95/98,用户在安装的过程中必须注意。
驱动安装:双击安装程序,这时安装程序会以对话框的形式提示是否接受使用安装程序的协议,并显示默认的安装路进,点击接受协议,并依次点击下一步,直到出现下图1所示的对话框,这是安装程序对用户系统的一个检测,不需要做任何操作继续向下安装。
图1安装程序在完成上述的初始操作后,会出现如下所示的对话框,用户在这里选择TM打印机的型号以及要安装驱动的端口,具体的选择如下图2所示。
图2如果用户要进行进一部的端口操作,可以点击图2中Printer Port Seting,,将出现如图3所示的对话框,在这里用户可以进行端口的选择配置,建议用户按照下面的“操作配置”进行操作。
图3在做好上述基本选项后就可以点击完成了。
安装程序会自动完成下面的安装操作,安装成功后系统会提示重新启动电脑以完成安装,点击重启完成安装。
操作配置:在开始菜单栏里面选中打印机和传真,单击TM-220点右键选择属性选项,属性的对话框如下图4所示,选中“端口”栏,根据打印机所在端口进行选择,例如:如果打印机连接在并口1上,选中“打印机端口LTP1”,如果打印机连在串口1上,则勾上“COM1:串型口”,在默认情况下系统默认在Epson的LTP1上。
请用户不要启用双向支持和打印机池,否则打印机将不能工作。
图4。
埃森普打印墨水T200XL320说明书

Safety Data Sheet1. Article and Corporate IdentificationProduct: Epson Ink Cartridge T200XL320for use with Epson Expression Home XP-200, XP-300, XP-310, XP-400and XP-410 PrintersDistributor:Epson America, Inc.3840 Kilroy Airport WayLong Beach, CA 90806United StatesTel: 562-276-1369Fax: 562-997-57992. Composition InformationThis is an aqueous ink formulationInk Composition CAS No. % By WeightProprietary dyes and pigments - <6%Proprietary organic materials - 15 -20%Glycerols - 10 –15%Water 7732-18-5 balance3. Hazard Identification3.1 Emergency Overview: Ink component is a light magenta liquid that may cause eye irritation. Avoid contact witheyes or clothing. In the case of skin contact, wash with soap and water. Keep out of reach of children.3.2 Potential Health Effects:Eyes: Ink contact with eye may be mildly irritating. See Section 11 for Toxicology.Skin: Ink contact with skin may cause irritation, swelling, or redness. It is not expected to cause an allergic skinreaction. See Section 11 for Toxicology.Inhalation: Intentional exposure to ink vapors may cause respiratory irritation. See Section 11 for Toxicology.Ingestion: May cause upset stomach. See Section 11 for Toxicology.4. First Aid Measures4.1 Eyes: Immediately flush with room temperature, low pressure, clean water for at least 15 minutes. Seek medicalattention if eye irritation continues.4.2 Skin: Wash surface areas with soap and water. Wash soiled clothing before re-wearing. Seek medical attention ifirritation continues.4.3 Inhalation: Remove subject to ventilated fresh air. Consult physician if necessary4.4 Ingestion: Seek medical attention if stomach continues to be upset.5. Fire Fighting MeasuresFlammability: Flash point is greater than 248 deg. F / 120 deg. C (closed cup in accordance with ASTM D3278)Extinguishing Media: Dry chemical or carbon dioxideFire Fighting Instructions: No special fire fighting procedures are required other than breathing apparatus. No specialexplosion hazards are known.6. Accidental Release MeasuresIf a spill occurs, use sponges to wipe-up ink, then rinse area with damp cloth. Place waste in closed container fordisposal. Use proper ventilation. Do not dispose of waste to the sewer. No eye or skin protection required during clean-up. Wash hands with soap and water.7. Precautions for Safe Handling and UseKeep out of reach of children and do not drink ink. Do not store the cartridge in a high or freezing temperatures.Keep cartridge out of direct sunlight. Do not dismantle cartridge. Do not store cartridges with oxidizing agents orexplosives. Make sure cartridge is dry before insertion into printer housing.8. Exposure Controls and Personal ProtectionEngineering Controls: None requiredExposure Controls: None requiredPersonal Protection: None required when cartridges are used as intended9. Physical and Chemical Properties of Ink FormulationAppearance: Magenta LiquidOdor: NonepH: 9.0 – 10.0Boiling point: Approximately 212 deg. F / 100 deg. CFreezing point: Less than 32 deg. F / O deg. CMelting point: Less than 32 deg. F / O deg. CFlash point: Greater than 248 deg. F / 120 deg. C (closed cup, ASTM D3278)Autoflammability: NoneExplosive properties: NoneOxidizing properties: NoneVapor density: Greater than 1 (air=1)Relative density: 1.07 at 68 deg. F / 20 deg. CSolubility in water: CompleteSolubility in fat: No data availablePartition coefficient: No data availableViscosity: Less than 5mPa-s10. Stability and ReactivityStability: StableHazardous polymerization: Will not occurHazard decomposition products: NoneIncompatible materials: Oxidizers and explosives11. Toxicology and Health HazardsRoutes Of Overexposure: Eye, skin, inhalation, and oralAcute Health Hazards:∙Overexposure of eye surface to ink may be mildly irritating∙Overexposure of skin to ink contact may cause irritation and in some people swelling and redness∙Intentional inhalation overexposure to ink vapors may result in respiratory tract irritation∙Intentional or accidental oral ingestion may cause an upset stomachChronic Health Hazards: None knownCarcinogenicity: None knownToxicity Data: Oral LD50 Dermal LD50 Inhalant LC50 OSHA Regulated?>5000mg/kg(Rats) >2000mg/kg(Rats) Not Applicable Not Established12. Ecological InformationNo data available on the adverse effects of this material on the environment13. Disposal ConsiderationsUsed and unused cartridges are not a federal RCRA hazardous waste. Disposal should be in accordance with federal, state, and local requirements.14. Transportation InformationNot regulated as a Hazardous Material by DOT, IMO, or IATA15. Regulatory ConsiderationsU.S. DOT Hazard Class Regulated?NOU.S. OSHA Inhalation Hazard?NOIn U.S., NFPA/HMIS Hazard Rating:Health (1), Flammability (1), Instability/Reactivity (0), Other (0)EU RoHS compliant? YES16. Other InformationThis SDS adheres to U.S. regulatory requirements and standards and may not meet the regulatory requirements in other locations.This is a revised Safety Data Sheet which replaces all prior U.S. SDS for this product.This “Safety Data Sheet” contains health, safety, and environmental information. It does not replace any precautionary language or use and disposal information which accompanies the product. The information contained herein is believed to be accurate at the time of preparation, but should only be used as a guide. Epson does not warrant the completeness or accuracy of the information contained herein. It is subject to revision from time to time.YOU’VE GOT TO SEE IT IN EPSON C O L O R ™。
EPSON爱普生TM-U220针打票据打印机规格介绍
高性价比的打印机灵活的黑标定位功能通过黑标传感器识别黑标,实现票据的定位打印。
如果黑标传感器被启动,纸卷的宽度将在出厂时被固定设置为76毫米或是57.5毫米。
即使B型/D型打印机使用纸卷调节挡板,也不能调节纸卷的宽度。
通过使用“GS(E”指令可以将自动切纸器的位置调节到任意的位置。
当黑标传感器被启动时,按FEED进纸键,打印机会将纸送到下一个黑标的位置。
为了配合国家税控项目的发展,增加了黑标定位功能。
正反面左右,共6个可选黑标位,满足您不同的定位选择,而且无需更换打印机,就可以很轻松地实现税控打印功能。
纸卷的宽度可选57.5、69.5或76毫米的纸可适用于B、D款机型。
您可以根据实际需要选择纸宽,从而减少纸张的浪费。
开启黑标定位功能,纸卷宽度可选:TM-U220A 76mm;TM-U220A/B 76mm/57.5mm。
更快的打印速度TM-U220黑标版提供了更高效的打印能力,比TM-U210打印速度提高了30%。
零售商可以更快的给顾客提供收据。
全面的兼容性TM-U220黑标版打印机具有全面的兼容性。
通过使用TM-U220黑标版打印机可以很简单的对现存系统升级,而且无须改变安装环境,它同TM-U210投影面积相同。
可以轻松实现新型号的替换,并且支持单向打印和双向打印。
亚洲多语种扩充内存能实现打印包括中文和泰文在内的多语种的文字。
默认设置为支持GB18030大字库。
广泛的多用性TM-U220黑标版适用于广泛的应用领域。
它的任何一款型号都功能强大,每一款结构紧凑的TM-U220黑标版都可适合各类的空间限制。
不仅挂式B型可适用于狭小的地方以节约空间,B型和D型还可选择使用57.5,69.5或76毫米宽的纸卷。
支持多种接口RS-232、并行接口I/F、USB及网络接口都可任选。
这样可以更容易配合用户系统的要求。
简单操作繁忙的用户往往很头疼去更换打印机的纸卷和色带盒。
TM-U220黑标版使这些繁琐的工作变得非常简单。
精准定位,TM-U220领衔同业霸主
F E E D 进 纸键 , 打 印机 会 自动将 纸 送 到下 一 个黑标 的位 置 ;
此外 ,
TM —
U 2 2 0 还可以通过
“
”
G SE
指令 ,
将 自动 切 纸 器
调节到任意位置 。 在 纸 张 的正 反 左 右共有 6 个可选 黑标 位 , 能够满足 用
户的不 同定位选 择; 这 样一 来 , 无 需更换打 印机就可 以轻松 实现 税控打 印 , 为 需要 国税 、 地税发票打 印 的用 户提 供便 捷。
H D T /G E /~
,。, ,。 .,;
泰格 软 件
2 0 0 5 年 6 年度 中 国优 秀物 流 软 件 企 业
虎威餐饮娱乐管理 系统 泰格百货超市管理 系统 泰格GS P 医 药管理 系统 泰格服装销售管理 系统 虎威ERP 大型商业 管理磊
的满 意度 进 而保 证 企 业 的 良好 形 象 。
每 行 T M — U 2 2 0
秒4 7 .
的打 印速度在 同类产 品 中具 有领先 的技 术 优势 , 从 而使 零售
商能更高速 地为 消费者提供票据 。
T M — U 2 2 0 适 用 的领 域 非常广泛 , 而 且 拥 有极 好 的兼
容性 。 通 过使用 T M — U 2 2 0 打 印机 , 可 以 很 简单地对现 存 系
使用 更 简便
相 对 于 其他品牌机 型 繁琐 的换 纸方 式 , 爱普 生 T M — U 2 2 0 的落人 式换纸 方 式一 步到位 , 为 用 户省 去许 多麻 烦 。 机 器 内部 设 置 自动裁 纸 器 , 不 仅 免除 了 手撕 的步骤 , 更能保证 票据 的美观 , 为用 户的公 司形 象加分 。 爱普生 一 直关注用 户 使 用 的细 节 , T M - U 2 2 0 有精心 绘 制的细 节 图示 , 贴心 为 用 户展示机 器 的正 确使用方法 。
爱普生产品指南说明书

P R O D U C T R A N G E G U I D EPage 03Expression home range DPerfect for generalpurpose documents andimage printing.Page 03Expression photo rangeOffers high quality photos and is ideal for printing a mixture ofdocuments and prints.D Page 04WorkForce range Compact and sleek, ideal for the office or home environment. D Page 08 Document scanner range Increase efficiencies with easydocument management solutions for the home or office.D Page 05EcoTank rangeFeaturing integrated high capacityink tanks, boasting up to 2years of ink in the box D Page 09 Photo scanner range Allows film and photo scanning for high level printed artwork.D TABLE OF CONTENTSEpson’s product range offers a stunning array of features designed to provide you with an exceptional user experience and superior performance. Our unique printers and all-in-one solutions meet your every printing need.A quick reference table to compare key features ofeach printer model.Page 06Quick reference guide DE P S O N P H E P S O N H O M “As Epson employees, we always strive to exceed our own vision, and to produce results that bring surprise and delight to our customers.”EXPRESSION ® HOME XP-3100/XP-3105 + Wireless and Wi-Fi Direct ®, Apple AirPrint+ 1.44" colour LCD+ 100 sheet paper capacity+ 4 x individual ink cartridges+ Auto 2-sided printing + Wireless and Wi-Fi Direct ®, Apple AirPrint + 2.4" colour LCD + 100 sheet paper capacity + 4 x individual ink cartridges + Auto 2-sided printing EXPRESSION ® PHOTO HD XP-15000+ 6 colour Claria Photo HD Inks+ Print on specialty media up to A3++ Wireless, Wi-Fi Direct ® and Ethernet+ 2.4" colour LCD and auto 2-sided printing+ 200 sheet paper capacity plusCD/DVD printing A3+ PRINTE P S WORKFORCE WF-7845 WORKFORCE PRO WF-4830+ Wireless, Wi-Fi Direct ®, Apple AirPrintand Ethernet+ 500 sheet paper capacity+ Auto 2-sided print, copy, scan and fax+ 4.3" colour touchscreen+ 50 sheet ADF WORKFORCE WF-2850 + Wireless and Wi-Fi Direct ®, Apple AirPrint + 100 sheet paper capacity + Auto 2-sided printing + 2.4" colour LCD + 30 sheet ADF WORKFORCE WF-2830+ Wireless and Wi-Fi Direct ®, Apple AirPrint+ 100 sheet paper capacity+ Auto 2-sided printing+ 1.44" colour LCD+ 30 sheet ADF WORKFORCE PRO WF-3825 A3+ PRINTSURECOLOR SC-P706• Borderless photos up to A3• 10 UltraChrome Pro 10 pigment inks• Built in roll paper holder for panoramic printing• Customisable 4.3" LCD touchscreen• 30% smaller than the previous model• WiFi, WiFi Direct and EthernetA3+ PRINTPHOTO / FINE ART MEDIA - Up to A3+ Sheets and 13″ Rolls- Print fine artistry, photography and archival works- Hot Press, Cold Press, Lustre and Traditional finishes- Try our range out with the Epson Signature Worthy Sample PackE P S O N E C O T A N K R A N G EE C O TA N K E T-2810 Up to 3,600 pages in black / 6,500 pages colour* + Wireless and Wi-Fi Direct ®+ Borderless 4" x 6" printing + 100 sheet capacity E C O TA N K E T-1810 Up to 3,600 pages in black / 6,500 pages colour* + Wireless and Wi-Fi Direct ®+ Borderless 4" x 6" printing + 100 sheet capacity + Single function printerE C O TA N K E T-2820Up to 3,600 pages in black / 6,500 pages colour*+ Wireless, Wi-Fi Direct ®, Apple AirPrint + 1.44" colour LCD + Borderless 4" x 6" printing + 100 sheet capacity E C O TA N K E T-2850Up to 6,500 pages in black / 5,200 pages colour*+ Wireless, Wi-Fi Direct ®, Apple AirPrint + 1.44" colour LCD + Borderless A4 printing + 100 sheet capacity E C O TA N K E T-3800 Up to 14,000 pages in black / 5,200 pages colour* + Wireless, Wi-Fi Direct ®, Apple AirPrint and Ethernet+ 2.4” colour LCD+ Borderless A4 printing+ 250 sheet capacityE C O TA N K E T-4800Up to 3,600 pages in black / 6,500 pages colour*+ Wireless, Wi-Fi Direct ®, Apple AirPrint and Ethernet + 1.44" colour LCD + 30 page Automatic Document Feeder (ADF)+ Borderless 4" x 6" printing + 100 sheet capacity *Yields based on the ISO/IEC 24712 pattern with Epson’s methodology. Actual ink yields will vary considerably for reasons including images printed, print settings, temperature and humidity. Yields may be lower when printing infrequently or predominantly with one ink colour. All ink colours are used for printing and printer maintenance, and all colours must be available for printing. E C O TA N K E T-4850Up to 14,000 pages in black / 5,200 pages colour* + Wireless, Wi-Fi Direct ®, Apple AirPrint and Ethernet + 2.4" colour touchscreen + Auto 2-sided printing + 30 page Automatic Document Feeder (ADF)+ Borderless A4 printing +250 sheet capacity E C O TA N K P R O E T-5800Up to 7,500 pages in black / 6,000 pages colour* (replacement bottles)+ Wireless, Wi-Fi Direct ®, Apple AirPrint and Ethernet+ 4.3" colour touchscreen + Auto 2-sided print, copy, scan and fax + 50 page Automatic Document Feeder (ADF)+ Borderless A4 printing+550 sheet capacityE C O TA N K P H O TO E T-8500Print up to 1,800 6 x 4" photos + 6 colour inks for high quality photos and documents + Wireless, Wi-Fi Direct ®, Apple AirPrint and Ethernet + Dedicated paper and photo trays + 4.3" colour touchscreen + CD/DVD printing Epson Product Range EcoTank Range 05.E C O TA N K P R O E T-16600Up to 7,500 pages in black / 6,000 pages colour* (replacement bottles)+ Wireless, Wi-Fi Direct ®, Apple AirPrint and Ethernet + 4.3” colour touchscreen + Auto 2-sided print, copy, scan, fax up to A3+ 50 sheet capacity Automatic Document Feeder (ADF)+ Borderless A3 printing +550 page paper capacity E C O TA N K P H O TO E T-8550Print up to 1,800 6 x 4" photos + 6 colour inks for high quality photos and documents up to A3+ Wireless, Wi-Fi Direct ®, Apple AirPrint and Ethernet+ Dedicated paper and photo trays + 4.3" colour touchscreen + CD/DVD printingquick reference guide E X P R E S S I O N ® H O M EXP-3100 / 310510ppm/5ppm 5760 opt dpi up to 2400 dpi XP-410010ppm/5ppm 5760 opt dpi up to 2400 dpi E X P R E S S I O N ®P R E M I U M / P H O T OXP-87009.5ppm/9ppm 5760 opt dpi up to 4800 dpi XP-150009.2ppm/9ppm 5760 opt dpi SURECOLOR SC-P706N/A 5760 opt dpi W O R K F O R C EWF-283010ppm/5ppm 5760 opt dpi up to 2400 dpi WF-285010ppm/5ppm 5760 opt dpi up to 2400 dpi WF-382521ppm/11ppm 4800 opt dpi up to 2400 dpi WF-483025ppm/12ppm 4800 opt dpi up to 2400 dpi WF-7845 25ppm/12ppm 4800 opt dpi up to 2400 dpi E C O TA N KET-181010ppm / 5ppm 5760 opt dpi ET-281010ppm / 5ppm 5760 opt dpi 2400 opt dpi ET-282010ppm / 5ppm 5760 opt dpi 2400 opt dpi ET-285010.5ppm / 5ppm 5760 opt dpi 2400 opt dpi ET-380015.5ppm / 8.5ppm 4800 opt dpi 2400 opt dpi ET-480010ppm / 5ppm 5760 opt dpi 2400 opt dpi ET-485015.5ppm / 8.5ppm 4800 opt dpi 2400 opt dpi E C O TA N K P H O T OET-850016ppm / 12ppm 5760 opt dpi 4800 opt dpi ET-855016ppm / 12ppm 5760 opt dpi 4800 opt dpi E C O TA N K P R OET-580025ppm/12ppm 4800 opt dpi 2400 opt dpi ET-1660025ppm/12ppm 4800 opt dpi 2400 opt dpi I S O P r i n t S p e e d * B l k /C l r (A 4, p p m )P r i n t R e s o l u t i o n S c a n R e s o l u t i o n M o b i l e P r i n t i n gW i -F i D i re c t ®F a xE t h e r n e t1.44" colour4212/212XL 150 blk/130 clr 500 blk/350 clr 1.44" colour 4212/212XL 150 blk/130 clr500 blk/350 clr4.3" colourClaria ® Photo HD 6312/312XL 240 blk/360 clr 500 blk/830 clr 2.4" colourA3+Claria ® Photo HD 6312/312XL 314XL (Red/Gray)240 blk/360 clr 500 blk/830 clr 4.3" colour A3+UltraChrome ® Pro 1010T46S N/A1.44" colour4212/212XL 150 blk/130 clr 500 blk/350 clr 2.4" colour4212/212XL 150 blk/130 clr 500 blk/350 clr 2.7" colourDURABrite ® Ultra 4702/702XL 350 blk/300 clr 1,100 blk/950 clr 4.3" colour DURABrite ® Ultra 4802/802XL900 blk/650 clr 2,600 blk/1,900 clr 4.3" colour A3+ DURABrite ® Ultra 4252/252XL254XL (black only)350 blk/300 clr 1,100 blk/1,100 clr254XL/2,200 blk EcoTank bottles45224,500 blk/ 7,500 clr EcoTank bottles45224,500 blk/ 7,500 clr 1.44" colourEcoTank bottles 45224,500 blk/ 7,500 clr 1.44" colourEcoTank bottles 45027,500 blk/ 6,000 clr 2.4" colourEcoTank bottles 45027,500 blk/ 6,000 clr 1.44" colourEcoTank bottles 45224,500 blk/ 7,500 clr 2.4" colour EcoTank bottles 45027,500 blk/6,000 clr4.3" colourClaria ® Premium ET 65526,700 blk/ 6,200 clr 4.3" colour A3+Claria ® Premium ET 65526,700 blk/6,200 clr4.3" colourDURABrite ® Ultra ET 45427,500 blk/ 6,000 clr 4.3" colour A3+ DURABrite ® Ultra ET 45427,500 blk/6,000 clr L C D S c r e e n M e d i a C a r d S l o t C D /D V D P r i n t i n g 2-S id e d P r i nt i n g P r i n t u p t o A 3A u t o D o c u m e n t F e e d e r I n k T y p eN u m b e r o f I n k s I n k C a r t r i dg e s S t a n d a r d C a p a c i t y H i g h C a p a c i t y X L I n k Y i e l d sE P S O N D O C U M E N T S C A N N E R R A N G E Epson Product RangeDocument Scanner Range08.W O R K F O R C E D S-360W+ Wireless scanning to smartphone or tablet+ Scan up to 25ppm/50ipm+ Total portability with in-built battery+ Super speed USB 3.0 connectivity+ Document Capture Software+ 20 page auto document feeder W O R K F O R C E D S-1630+ 1200 x 1200 dpi optical resolution (flatbed)W O R K F O R C E D S-530I I + Scan up to 30ppm/60ipm in just one pass W O R K F O R C E D S-570W I I+ Scan up to 35ppm/70ipm in just one pass+ Scan directly to popular cloud services+ Compact small design+ 50 sheet ADF capacity+ Advanced colour and image adjustmentsW O R K F O R C E E S-60W + Wireless portable document scanning + 600 dpi resolution + Battery & USB powered + Scan A4 documents, business cards, ID cards + Lightweight, only 500g + Compatible with Windows ® and Mac n 45ppm/90ipm scan speeds for fast andproductive scanning nIntuitive colour LCD touchscreen for easy jobcreation without the need to access a computer nScan directly to popular cloud services nScan to searchable PDFs nAdvanced colour and image adjustments n Versatile paper handling with a 100 sheet ADFW O R K F O R C E D S-780NE P S O N P H O T O S C A N N E R R A N G ETHE TECHNICAL RANGE Epson Product Range Photo Scanners 09.SURECOLOR T3160/T3160M/ T5160/T5160M • Available in 24" or 36" sizes• Prints an A1 image in as little as 31 sec• 4 UltraChrome XD2 pigment inks up to 80 ml• Switches between roll and sheets automatically• 4.3" colour touchscreen• Up to 3 years CoverPlusEpson’s technical printers are designed to produce posters, POS, plans, drawings, maps, CAD, GIS and presentation material.They are simple to use and consume little power. They output ultra-fine lines and solid fills, with high brightness and colour density, using inexpensive ink that dries almost instantly to become moisture and abrasion resistant.P E R F E C T I O N ® V39 + 4800 x 4800 dpi optical resolution+ Compact and space saving+ Powered with energy efficient ReadyScanLED technology+ Scan to social media for easy photo sharingUSB powered P E R F E C T I O N ® V600 P H O TO + 6400 x 9600 dpi optical resolution + Scans variety of film formats up to 6 x 22 cm + Scan in as little as 6 seconds + Powered with energy efficient ReadyScan LED Technology P E R F E C T I O N ® V850 + 6400 dpi optical resolution and a 4.0 Dmax+ Dual Lens System and advanced optics+ Digital ICE™ removes many surface defects+ Anti reflection coating on CCD cover glass+ Additional film holders and Silverfastsoftware included。
爱普生 TM-U220 技术参考指南
i
About This ManFra bibliotekalAim of the Manual
This manual was created to provide information on the TM-U220 printer for anyone who is developing hardware, installations, or programs. Programmers will also want to consult other documents.
Contains various notices and comparison information for using the TM-U220 as a replacement for the TM-U210/TM-U300.
Appendix A, “Comparison table for TMU220/U210/U300.”
t The contents of this document are subject to change without notice. Please contact us for the latest information.
TM-U220培训讲解

故障排除
打印动作中途停止/反复打印相同字行 不使用正确的电源转换器的话,打印机不能正常动作,确认打印机是否连接有正确的电 源转换器。
TM-U220 ANK型号(A,B,D型)可以使用 TM-U220 多语言*型号(A,B,D型)可 的电源 以使用电源 “AC接合器,C”(ANK规格一同包装品)或 “PS-180”(多语言规格一同包装品) 者“PS-180”(选件) *多语言是指可以使用下列中某种语言打印。日文汉字、简体中文、繁体中文、泰文、 或者韩文。
常见问题-1
• 串口打印机在WINDOWS驱动下打印乱 码的解决方法
– 确认串口属性中的流控制为XON/XOFF – 打印机底部拨动开关DIP SWITCH-3 设为 ON – 串口属性高级设置FIFO不选用
常见问题-2
• 打图形有停顿现象
– 由于采用Unimi Driver打印图形有个将图形转换成点 阵的过程,且点阵打印比文本要慢
故障排除
控制面板上没有灯亮 检查电源线缆的连接情况和电源输出。
故障排除
错误指示灯闪亮或点亮 1. 2. 3. 打印头温度可能很高或很低。请等待打印头冷却或温度降低,打印机自动重新开 始打印。 确认纸卷盖确实盖好。 A和B型:自动裁纸刀没有在正常的位置上,或者,自动裁纸刀被锁住。如果是简 单的锁住的话,错误将会自动纠正。如果不能自动恢复正常,请参照下列指示, 手动把裁纸刀摆到正常的位置上。 发生了卡纸现象。参照下列指示,取出卡住的纸张。 确认使用电源规格是否正确。PA-6xxx和PB-6xxx不适用于本打印机。 关闭电源,等待数秒之后,再次接通。如果错误信号仍不消失的话,请与负责人 员或具有资格的维修人员联系。
专用名词解释
18. 19. 20. 21. 22. 23. 24. 25. 26. 27. 28. 29. 30. 31. 32. 33. Power Supply: 电源 Peak current: 最大电流 Ribbon Cassette: 色带盒 Cut Sheet retracting module: 切纸回收模块 Loop Guide: 导纸器 Paper Supply Spacer: 供纸器 Multilingual Font Set: 字库 Paper Near-end Sensor: 纸将尽传感器 Mark sensor: 标记传感器 Autocutter Type: 自动切纸器 Thermal line: 热敏 Straight: 直线 Curve: 曲线 Photosensor: 光电传感器 Thermistor: 电热调节器 Microswitch: 微言字符*
爱普生TM—U120Ⅱ微型针式打印机全新上市
2 1 中华 区最佳人 力资源服 务品牌 ’ 00
大 奖 。 白2 0 年 进 入 中 国市 场 以 来 , 06 AD 致 力 于 为 中 国 雇 主 创 造 高价 值 , P
智百威 签约 深圳 前海新天 地购 物广场
对 W i dO S 7 点 触 摸 互 动 的 附 n W 多
爱普生T — 10 I M U 2 I
微型针式打印机全新 市
为 应 对 用 户 多元 化 需 求 ,爱 普 生
加 资格 ( AQ ) 测 试 的 所 有 要 求 。
I tl T u h ls 摸 技 术 基 于 成 熟 n el o c P u 触 i
件 系统 采 用 《 百成 9 0 V6 业管 理 00 商 软件 》 ,广场 将于 近期隆 重开 业 。
的 表 面 声 波 技 术 ,该 技 术 已成 功 应 用 于 市 场 2 多 年 , 性 能 稳 定 ,产 品 在 全 0 球 各地 广 泛 应 用 。它 利 用 三 轴 触 摸 信 息 精 确 地 同 时 记 录 屏 幕 上 任 意 两 个 位 置 , 克 服 了 其 它 多 点 触 摸 技 术 的 许 多 弱 点 , 如 基 于 摄 像 头 的 光 学 组 件
摸 I tl To c 触摸技 术一 样稳 定 。 n e1 u h i
Itl T u h ls 点 触 摸 技 术 将 在 n el o c P u 多 i
2 1 年 年 初 上 市 ,用 于 1 至 2 英 寸 消 00 7 2
近 日ADP中 国在 HR管 理 世 界 旗 下
人 力 资 本 管理 》 杂 志 举 办 的 ” 0 9 20 -
(完整版)TM-U220B型、D型更改打印宽度)
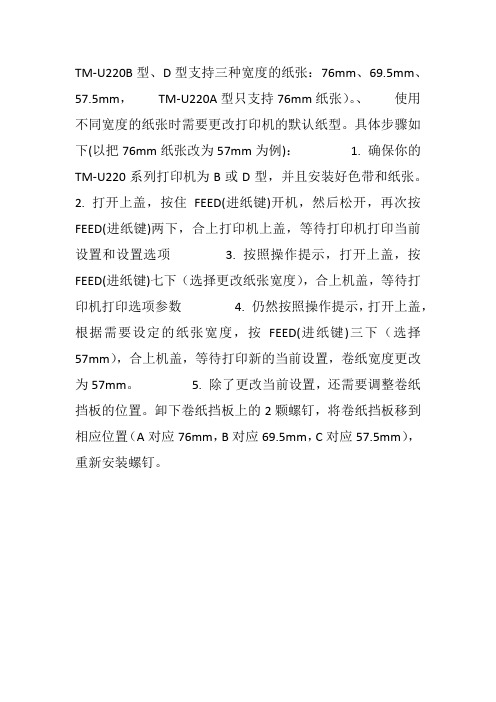
TM-U220B型、D型支持三种宽度的纸张:76mm、69.5mm、57.5mm,TM-U220A型只支持76mm纸张)。
、使用不同宽度的纸张时需要更改打印机的默认纸型。
具体步骤如下(以把76mm纸张改为57mm为例): 1. 确保你的TM-U220系列打印机为B或D型,并且安装好色带和纸张。
2. 打开上盖,按住FEED(进纸键)开机,然后松开,再次按FEED(进纸键)两下,合上打印机上盖,等待打印机打印当前设置和设置选项
3. 按照操作提示,打开上盖,按FEED(进纸键)七下(选择更改纸张宽度),合上机盖,等待打印机打印选项参数
4. 仍然按照操作提示,打开上盖,根据需要设定的纸张宽度,按FEED(进纸键)三下(选择57mm),合上机盖,等待打印新的当前设置,卷纸宽度更改为57mm。
5. 除了更改当前设置,还需要调整卷纸挡板的位置。
卸下卷纸挡板上的2颗螺钉,将卷纸挡板移到相应位置(A对应76mm,B对应69.5mm,C对应57.5mm),重新安装螺钉。
EPSON TM-U220PD黑标设置
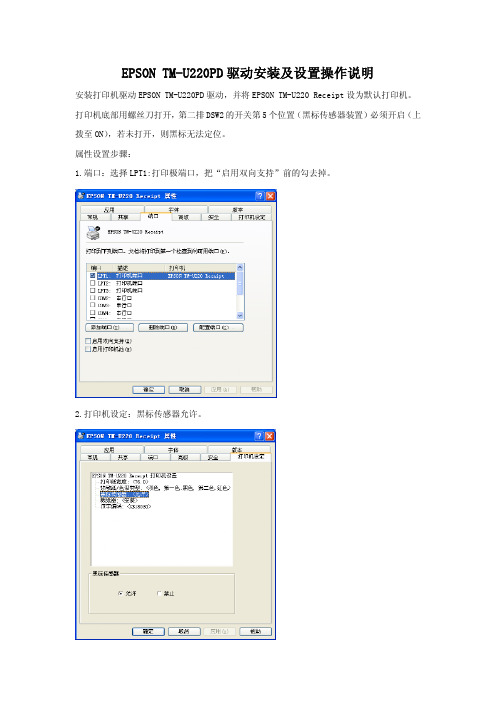
EPSON TM-U220PD驱动安装及设置操作说明
安装打印机驱动EPSON TM-U220PD驱动,并将EPSON TM-U220Receipt设为默认打印机。
打印机底部用螺丝刀打开,第二排DSW2的开关第5个位置(黑标传感器装置)必须开启(上拨至ON),若未打开,则黑标无法定位。
属性设置步骤:
1.端口:选择LPT1:打印极端口,把“启用双向支持”前的勾去掉。
2.打印机设定:黑标传感器允许。
3.常规\打印首选项\操作\页开始:把“进纸到开始打印为止”前的勾去掉;(若步骤2未完成,则该选项为灰色,无法修改。
)页结束:把“进纸到开始打印为止”前的勾勾上,选择手动裁纸。
注:打印首选项中的设置修改仅仅针对本机的当前用户,若其他用户要正常使用也必须做相应的修改。
4.连接打印机,打印测试。
- 1、下载文档前请自行甄别文档内容的完整性,平台不提供额外的编辑、内容补充、找答案等附加服务。
- 2、"仅部分预览"的文档,不可在线预览部分如存在完整性等问题,可反馈申请退款(可完整预览的文档不适用该条件!)。
- 3、如文档侵犯您的权益,请联系客服反馈,我们会尽快为您处理(人工客服工作时间:9:00-18:30)。
不使用正确的电源转换器的话,打印机不能正常动作。请参照下列内容,确 认打印机是否连接有正确的电源转换器。
TM-U220 ANK 型号 (A,B,D 型)可以使用的电源
TM-U220 多语言 * 型号 (A,B,D 型)可以使用电 源
“AC 接合器,C” (ANK 规格一同包装品)或者 “PS-180” (选件)
电源开关和电源开关盖
电源开关在打印机的前面。按下电源开关接通打印机电源。
电源开关盖
可以使用配带的电源开关盖,确保电源开关不会被突然按下。这只需要把盖 子按入将要安装的地方。 如果需要打开或关闭电源开关的时候,可以在一 个孔中插入薄片工具然后操作开关。参照插图 C。
警告∶
在盖子盖着的情况下如果突然发生故障的话,请立即拔下电源线以免发生火灾。 如果把打印机收藏起来或者长时间不使用的话,请关闭打印机上的电源开 关。
“PS-180” (多语言规格一同包装品)
* 多语言是指可以使用下列中某种语言打印。日文汉字、简体中文、繁体中文、泰文、或者韩文。
控制面板上没有灯亮 ❏ 检查电源线缆的连接情况和电源输出。
错误指示灯闪亮或点亮
❏ 打印头温度可能很高或很低。请等待打印头冷却或温度降低,打印机 自动重新开始打印。
❏ 确认纸卷盖确实盖好。 ❏ A 和 B 型:自动裁纸刀没有在正常的位置上,或者,自动裁纸刀被锁住。
注意∶
在打印时或者打印之后,打印头非常热。
使用注意事项
❏ 在打印的时候,或者自动裁纸刀作业的时候,不得打开盖子。 ❏ 不得把打印机安置在尘土多的地方。 ❏ 避免打印机受到撞击。 ❏ 电线或者其他的外部物质不得缠绕在打印机上。 ❏ 不得在打印机盖上施加过渡的力。 ❏ 不得把食品或者咖啡等饮料放在打印机箱上。
EPSON是Seiko Epson Corporation的注册商标。 Exceed Your Vision是Seiko Epson Corporation的注册商标或商标。 所有其他商标均为其各自所有者的财产,仅供识别之用。产品信息如有变更,恕不另行通知。 备注∶本手册中的内容有可能发生更改,恕不事先通知。 ©2014 Seiko Epson Corporation. 版权所有。20141127 制造商 : 精工爱普生株式会社 地址 : 日本东京都新宿区西新宿2-4-1
安全防范
警告∶
如果发生冒烟、异常气味、或者不正常的噪音时,请立即关闭机器。继续使用可能 会引起火灾。应该立即关闭电源开关,拔掉插头并与销售商或精工爱普生服务中心 取得联系询问处理办法。 请勿试图自行维修本机。不正确的维修是很危险的。 请勿自行拆卸或校正。不正确的动作会对本机造成伤害或火灾。 请使用符合规格的电源。连接不符合规格的电源可能会导致火灾。 防止任何异物落入机内,以免引起火灾。 如果有水或其他液体流入机内,应该立即关闭电源开关。继续使用可能会导致火 灾。拔掉电源线,并且与销售商或精工爱普生服务中心取得联系询问处理办法。 请勿在本产品的内部及周围使用可燃性气体的喷雾器。否则可能造成火灾。
开箱
标准规格的打印机包括下列部件。如果某些部件损坏的话,请与销售商联 系。
❏ 打印机 ❏ 纸卷 ❏ 专用色带盒 [ERC-38(B/R)] ❏ AC 适配器 (可能不包括在打印机内)
下载驱动程序、应用程序以及操作说明
驱动程序、应用程序以及操作说明可以从下列 URL 下载。 /?service=pos
76
B型 有 没有 76/69.5/57.5
D型 没有 没有 76/69.5/57.5
插 图
本手册适用于 TM-U220 的 3 种型号,因此,一些插图可能与您实际使用的打 印机稍微不同。总之,除了一些特别注释的以外,插图适用于所有型号。
使用限制
将本产品用于飞机、列车、船舶、汽车等的与运行直接相关的装置、防灾防 盗装置、各种安全装置等要求机能、精度等具备高度可信性、安全性的用途 时,为维持这些系统整体的可信性与安全,请采取故障自动防护设计及冗长 设计等措施,在确保系统全体安全的基础上使用本公司产品。本产品并非以 使用于太空机器、干线通信机器、原子力控制机器、医疗机器等需具备高度 可信性与安全性的用途。若使用于前述用途时,请客户充分进行确认和判断 本产品的适用性。
图 P所示,直至看到孔内有圆轴。
24 TM-U220 使用说明书
取出卡住的纸张
中文(简体)
注意∶
打印头在打印过程中非常热。在触摸打印机之前,应该先冷却一下。
1. 如插图 H所示,使用提把打开卷纸盖。 2. 如果使用 A 型打印机的话,取出收纸卷轴,如插图 I 所示,使用机组打
开杆打开机组。 3. 取出卡住的纸。 4. 重新安装纸卷并盖上卷纸盖。
控制面板 (指示灯和按键)
参照插图 B
指示灯
电源
接通电源时,灯点亮。切断电源时,灯熄灭。
TM-U220 打印机脱机时灯点亮(纸卷到达终端,或者卷纸盖打开时)。打印机正确作 业时熄灭。发生错误时,闪亮 (参照故障排除部分)。
缺纸
缺纸或者接近缺纸时,点亮。
按键 进纸
装入卷纸。 注意: 当检测出没有纸卷的时候,此键不起作用。
TM-U220 多语言 * 型号 (A,B,D 型)
“AC 接合器,C” (ANK 规格一同包装品)或者 “PS-180” (选件)
“PS-180” (多语言规格一同包装品)
注意: 与 ANK 型号一同包装的 “AC 接合器,C” 不能用于多语言 * 型号。多语言 * 型号 请务必连接 “PS-180”。万一错误在多语言 * 型号上连接了 ANK 型号一同包装的 “AC 接合器,C” 的话,则有可能需要中途停止打印,或者,在相同的字行上重新 打印。
中文(简体)
重要安全信息
本章节介绍有关确保本产品的安全和有效使用的重要信息。请仔细阅读此 部分并将其保存在便于拿到的地方。
主要标识
本手册中的标识,根据重要程度不同而分别为下列等级,在使用产品之前, 请仔细阅读下列内容。
警告∶
务必遵守警告内容,以免造成重大的人身伤害。
注意∶
必须对注意事项加以注意,以免对你本人或设备造成损伤。
插入纸卷
注意∶
确认所使用纸卷符合规格。 确认不得碰触手动裁纸刀,以免手指受伤。 1. 如插图 G所示,使用剪刀裁剪纸卷边。 2. 接通打印机,如插图 H中所示,使用提把打开纸卷盖。 3. 仅限于A型:如插图 I中所示,使用机组打开杆,打开机组。 4. 如插图 J中所示,插入纸卷。
注意: 注意插图 G 中所显示的纸离开纸卷的方向。 当使用双层纸卷时,确认上下层纸卷在出纸处对齐。参照插图 G-a。 5. 如果不使用收纸卷轴,拉出一些纸卷并盖上纸卷盖。然后,使用手动裁 纸刀撕下。这里,可以跳跃过步骤6-11。 6. 仅限于 A 型:当使用双层纸卷时,如插图 K 所示,把纸卷拉出到打印机 的底部作为前导。 7. 如插图 L所示,关闭机组。 8. 如插图 M所示,把纸的最底边部分 (日志单)插入收纸卷轴。 9. 把收纸卷轴插入打印机。如插图 N所示,确认纸整齐地收在收纸卷轴的 法兰上。 10. 使用进纸键进纸,从收纸卷轴被收回。 11. 关闭纸卷盖,如插图 O所示,使用手动裁纸刀撕下纸卷。 注意: 在打印或者进纸过程中,不得打开纸卷盖。 使用打印机时,在进纸完成后,确认使用手动裁纸刀裁切纸卷。
如果是简单的锁住的话,错误将会自动纠正。如果不能自动恢复正常, 请参照下列指示,手动把裁纸刀摆到正常的位置上。 ❏ 发生了卡纸现象。参照下列指示,取出卡住的纸张。 ❏ 关闭电源,等待数秒之后,再次接通。如果错误信号仍不消失的话, 请与负责人员或具有资格的维修人员联系。
把自动裁纸刀放置在应有的位置上
1. 如插图 H所示,使用提把打开纸卷盖。 2. 使用圆珠笔或改锥,按照箭头指示的方向转动自动裁纸刀的旋钮,如插
DIP 拔动开关
DIP 拨动开关的设置会因打印机而异。 请检查下图所示位置的记载(US或STD),并确认所用打印机所对应的列表。
安装和更换色带盒
注意∶
打印头在打印过程中非常热。应该在更换色带盒之前冷却。
注意∶
不得向色带盒上标出的箭头方向相反的方向转动色带盒旋钮,以免损伤色带盒。 注意∶ 使用 EPSON ERC-38 色带盒 1. 如插图 D所示,使用盖子边上的提把打开色带盒盖。 2. 如插图 E所示,按照箭头方向转动旋钮2-3次。 3. 如插图 F所示,在适当的位置上插入色带。然后,按下色带盒直至卡
· 取出打印的纸张时 · 执行其他操作时,如安装/更换纸卷
为安全起见,长时间不使用本机时,应该拔掉电源插销。 在移动装置之前,应该拔掉所有的插头,以及所有连接的电缆。
TM-U220 使用说明书 19
中文(简体)
安全标签
产品上的注意标签表示如下安全注意事项。
警告∶
请勿将电话线接到钱箱控制插座上;否则装置以及电话线都可能遭受损毁。
插图 A 1.纸卷盖 2.色带盒盖 3.控制面板 4.电源开关
版权所有。没有精工爱普生公司的正式书面许可,本手册不得复制,不得保存在可再生系统内,或以 任何形式任何手段进行电子、机械转载、复印、录制等。使用本手册内的有关信息无须授权。在编辑 本手册时我们考虑到了各项防备措施,对于手册中的错误和遗漏,精工爱普生公司概不负责。同时, 也不负责由于使用本手册中的信息内容造成的损失。 本产品由于用户或第三方造成的事故、错误使用和乱用,以及擅自改装、修理或变更式样等,不严格 遵守精工爱普生公司的操作和维修要求 (美国除外),引起的危害、损失、费用和付出款项等,不论 是精工爱普生公司还是其它有关的集团公司,对于该顾客或第三方概不负有任何责任。 由于使用非正规爱普生产品或非精工爱普生公司指定许可的任何附件或任何消耗品,从而造成的损 失和故障,精工爱普生公司概不负责。
安装注意事项
❏ 使用打印机时,请确认打印机放置在水平位置上。 ❏ 如果使用 B 或 D 型打印机的话,可以使用挂吊选件 WH-10 挂在墙上。 注意: 有关把打印机挂在墙上的详细说明,请参照 WH-10 的安装手册。