N5K-N2K配置模板
Cisco Nexus 5000 Series 开关模块预配置设置指南说明书

Configuring Module Pre-ProvisioningThis chapter describes how to configure pre-provisioning for offline interfaces or modules in the Cisco Nexus5000Series switch.This chapter includes the following sections:•Information About Module Pre-Provisioning,page1•Guidelines and Limitations,page2•Enabling Module Pre-Provisioning,page2•Removing Module Pre-Provisioning,page3•Verifying the Pre-Provisioned Configuration,page4•Configuration Examples for Pre-Provisioning,page5Information About Module Pre-ProvisioningThe pre-provisioning feature allows you to preconfigure interfaces before inserting or attaching a module toa Cisco Nexus5000Series switch.If a module goes offline,you can also use pre-provisioning to make changesto the interface configurations for the offline module.When a pre-provisioned module comes online,thepre-provisioning configurations are applied.If any configurations were not applied,a syslog is generated.The syslog lists the configurations that were not accepted.In some Virtual Port Channel(vPC)topologies,pre-provisioning is required for the configurationsynchronization feature.Pre-provisioning allows you to synchronize the configuration for an interface that isonline with one peer but offline with another peer.Supported HardwareThe pre-provisioning feature supports the following hardware:•N2K-C2148T Fabric Extender48x1G4x10G Module•N2K-C2232P Fabric Extender32x10G Module•N2K-C2248T Fabric Extender48x1G4x10G Module•N51-M16EP Cisco16x10-Gigabit Ethernet Expansion Module•N51-M8E8FP Cisco 8Port 1/2/4/8G FC and 8Port 10-Gigabit Ethernet Expansion Module •N5K-M1008Cisco 8Port Fiber Channel Expansion Module 8x SFP •N5K-M1060Cisco 6Port Fiber Channel Expansion Module 6x SFP •N5K-M1404Expansion Module 4x 10GBase-T LAN,4x Fiber Channel •N5K-M1600Cisco 6-port 10Gigabit Ethernet SFP Module 6x SFP Upgrades and DowngradesWhen upgrading from Cisco NX-OS Release 4.2(1)N2(1)and earlier releases to Cisco NX-OS Release 5.0(2)N1(1),there are no configuration implications.When upgrading from a release that supportspre-provisioning to another release that supports the feature including InService Software Upgrades (ISSU),pre-provisioned configurations are retained across the upgrade.When downgrading from an image that supports pre-provisioning to an image that does not support pre-provisioning,you are prompted to remove pre-provisioning configurations.Guidelines and LimitationsPre-provisioning has the following configuration guidelines and limitations:•When a module comes online,commands that are not applied are listed in the syslog.•If a slot is pre-provisioned for module A and if you insert module B into the slot,module B does not come online.•There is no MIB support for pre-provisioned interfaces.•Cisco DCNM is not supported.Enabling Module Pre-ProvisioningYou can enable pre-provisioning on a module that is offline.Enter the provision model model command in module pre-provisionmode.After enabling pre-provisioning,you can configure the interfaces as though they are online.NoteSUMMARY STEPS1.configuration terminal2.slot slot3.provision model model4.exit5.(Optional)copy running-config startup-configConfiguring Module Pre-ProvisioningGuidelines and LimitationsDETAILED STEPSPurposeCommand or ActionEnters global configuration mode.configuration terminalExample:switch#config t switch(config)#Step 1Selects the slot to pre-provision and enters slot configuration mode.slot slotExample:switch(config)#slot 101switch(config-slot)#Step 2Selects the module that you want to pre-provision.provision model modelExample:switch(config-slot)#provision model N2K-C2248T switch(config-slot)#Step 3Exits slot configuration mode.exitExample:switch(config-slot)#exit switch#Step 4(Optional)Copies the running configuration to the startup configuration.copy running-config startup-configExample:switch#copy running-config startup-configStep 5This example shows how to select slot 101and the N2K-C2232P module to pre-provision.switch#configure terminal switch(config)#slot 101switch(config-slot)#provision model N2K-C2232P switch(config-slot)#exitRemoving Module Pre-ProvisioningYou can remove a module that has been pre-provisioned.SUMMARY STEPS1.configuration terminal2.slot slot3.no provision model model4.exit5.(Optional)copy running-config startup-configConfiguring Module Pre-ProvisioningRemoving Module Pre-ProvisioningDETAILED STEPSPurposeCommand or ActionEnters global configuration mode.configuration terminalExample:switch#config t switch(config)#Step 1Selects the slot to pre-provision and enters slot configuration mode.slot slotExample:switch(config)#slot 101switch(config-slot)#Step 2Removes pre-provisioning from the module.no provision model modelExample:switch(config-slot)#no provision model N2K-C2248T switch(config-slot)#Step 3Exits slot configuration mode.exitExample:switch(config-slot)#exit switch#Step 4(Optional)Copies the running configuration to the startup configuration.copy running-config startup-configExample:switch#copy running-config startup-configStep 5This example shows how to remove a preprovisioned module from a chassis slot:switch(config)#slot 2switch(config-slot)#no provision model N5K-M1404switch(config-slot)#Verifying the Pre-Provisioned ConfigurationTo display the pre-provisioned configuration,perform one of the following tasks:PurposeCommand Displays provisioned modules.show provision Displays module information.show module Displays switch profile information.show switch-profile Displays the running configuration without the pre-provisioned interfaces or modules that are offline.show running-config exclude-provisionDisplays the pre-provisioned commands that were not applied to the configuration when the interface or module came online.show provision failed-configConfiguring Module Pre-ProvisioningVerifying the Pre-Provisioned ConfigurationPurposeCommand This command also displays a history of failed commands.Displays the commands that were not applied when the interface ormodule came online.show provision failed-config interface Displays the running configuration including the pre-provisioned configuration.show running-config Displays the startup configuration including the pre-provisioned configuration.show startup-configConfiguration Examples for Pre-ProvisioningThe following example shows how to enable pre-provisioning on slot 110on the Cisco Nexus 2232P Fabric Extender and how to pre-provision interface configuration commands on the Ethernet 110/1/1interface.switch#configure terminal switch(config)#slot 110switch(config-slot)#provision model N2K-C2232P switch(config-slot)#exitswitch#configure terminalEnter configuration commands,one per line.End with CNTL/Z.switch(config)#interface Ethernet110/1/1switch(config-if)#description module is preprovisionedswitch(config-if)#show running-config interface Ethernet110/1/1Time:Wed Aug 2521:29:442010version 5.0(2)N1(1)interface Ethernet110/1/1description module is preprovisionedThe following example shows the list of pre-provisioned commands that were not applied when the module came online.switch(config-if-range)#show provision failed-config 101The following config was not applied for slot 33================================================interface Ethernet101/1/1service-policy input test interface Ethernet101/1/2service-policy input test interface Ethernet101/1/3service-policy input testThis example shows how to remove all pre-provisioned modules from a slot:switch(config)#slot 2switch(config-slot)#no provision model switch(config-slot)#Configuring Module Pre-ProvisioningConfiguration Examples for Pre-ProvisioningConfiguring Module Pre-Provisioning Configuration Examples for Pre-Provisioning。
思科Nexus交换机-简介

Nexus新一代数据中心交换机一、思科Nexus交换机要点1、品牌定位:1993年,思科公司推出了一个交换机的品牌-Catalyst,这个品牌在市场上处于绝对的领导地位,经过了15年的时间,到了2008年1月,思科又对外宣布了另一个交换机的品牌-Nexus。
Nexus交换机是适应未来云计算、虚拟化、整合化数据中心的新一代交换机产品,对以前的Catalyst交换机有重大改进和扩展,是业界最先进的产品。
要点:全新的品牌,适应未来数据中心的先进架构,和Catalyst交换机及其它厂家等交换机有本质上不同。
2、高性能/低延迟/不丢包的以太网Nexus交换机是适应未来数据中心的高密度万兆交换机,具有比Catalyst交换机高得多的极高的性能,端口交换延迟很低(比如N5K端口间的交换延迟只有3微秒),同时又支持国际标准不丢包的以太网技术DCB。
这三者(高性能/低延迟/不丢包)的结合就使能Nexus交换机具有一个独特的优势-计算机总线的延伸,相当于把彼此通讯的众多计算机的总线直接连接起来。
举个例子:高性能相当于修了一条非常宽的路,宽到有多少车都可以直接上来;低延迟相当于每辆车的速度都很快,不丢包相当于车上的货物在道路上不丢失,以前的所有交换机就做不到这点,相当于目的地有个货物检察员来检查车上的货物,一旦发现丢了,再重发货,效率会降低。
要点:Nexus交换机不简单是传输数据,而是一种全新的架构设计-计算机总线的延伸。
目前可能只有Brocade交换机能部分支持,其他厂商等根本无法支持这些特性。
3、统一的架构Nexus交换机能支持以太网和存储网的统一架构。
原来的计算机要支持很多以太接口卡NIC卡和存储接口卡HBA(通常6-8个接口),使用Nexus交换机的统一架构FCOE后,布线大大减少,考虑到冗余,只需要2个接口卡(CAN)即可,使得原来机房杂乱的布线变得非常简单、整洁,维护管理异常方便。
要点:Nexus交换机将以太网和存储完美整合在一个接口上,机房的布线简单整洁,服务器接口数量大大减少是用户容易接受的事。
云计算Demo实验教材

熟悉常用的NX-OS命令(续)
4.查看硬件相关信息
熟悉常用的NX-OS命令(续)
5.查看相关特性(feature)
实验二:部署N5K/N2K启用EtherChannel
实验目的: 通过本实验,您将学习到如何通过配置 EtherChannel连接Nexus 2000和Nexus。 5000。 实验内容: 通过配置EtherChannel,实现Nexus 2000和Nexus 5000的互联。
步骤1:配置VDC,开启OTV特性
DC-A-N7010中建立VDC03 vdc VDC03 allocate interface Ethernet1/9-16 allocate interface Ethernet3/13-24 配置VDC03管理接口地址及VRF vrf context management ip route 0.0.0.0/0 10.75.58.1 interface mgmt0 ip address 10.75.58.172/24 配置建立VLAN 101-104 vlan 101-104 配置开启OTV及LACP特性 feature otv feature lacp
实验目的: 通过这个实验你将会学习基本的配置关 于N7000交换机的VDC配置,同时熟悉思科 N7K交换机中VDC理念及用途。 实验内容: VDC基本配置命令 资源类配置方法 分配物理接口 VDC中相关常用命令及使用
步骤一:建立VDC
步骤二:为VDC分配物理接口
步骤三:观察VDC缺省资源模板
实验四拓扑
步骤1:配置启用vPC和LACP特性
步骤2:创建vPC域及相应配置
步骤3:配置vPC Peer Link
步骤4:配置FEX用于对N2K管理
Cisco Nexus 数据中心交换机配置介绍

Journey2011.11一、 Nexus 5000 基础配置Ø 为N5K交换机配管理接口及 管理接口及IP地址。
Ø 激活Layer 3 License Ø 软件升级1.1 初始化配置系统加电自检通过后,进入系统初始化界面 进入系统初始化界面,如下操作: ---- System Admin Account Setup ---Do you want to enforce secure password standard (yes/no): no Enter the password for "admin": P@ssw0rd Confirm the password for "admin": P@ssw0rd Would you like to enter the basic configuration dialog (yes/no): no 输入管理账号和密码进入配置模式配置管理 IP:switch login: admin Password: P@ssw0rd switch # configure terminal switch #(config)# interface mgmt0 (config)# switch (config-if)# ip address 192.168.2.82 255.255.255.0 if)# switch (config-if)#no shut down no switch (config-if)#exit switch (config)# copy run start1.2 用购买的 License 激活 Layer 3 License:首先需要查看 hostid, ,用来绑定 License,命令如下 switch# show license host-id idLicense hostid: VDH=FOX17 731KTV5 “FOX1731KTV5”即为该设备的 hostid,复制出来备用。
Cisco Nexus数据中心方案竞争分析

--内部培训
云计算业务部
思科Nexus数据中心交换机产品线简介
思科Nexus产品来自于2008年对Nuova Systems公司的收购,软件平台是NX-OS,独立 于Cisco原IOS平台,目前Nexuw产品线分为以下几个产品序列:
Nexus 7000 Series Switches 包含N7009、N7010和N7018三款产品,定位于数据中心核心,每槽位带宽550G,交换容量可扩展至17Tbps。 目前单槽位最高支持48个万兆接口,40/100G接口Ready。 N7K的板卡分为M和F两大系列,其中M系列定位为富特性板卡,F系列定位为高性能板卡。
(32端口万兆)
(48端口万兆)
单槽位包转发率
120Mpps(8口线速)480Mpps(32口线速)720Mpps(48口线速)
VLANs
16K
4K
4K
MAC表项
128K
16K
16K/chip
路由功能/IPv4
128K
No
32K
IPv6
64K
NO
16K
10G端口缓存(入/出方向) 96MB/80MB
10
总结:Cisco方案1劣势
N7K F2板卡是小Buffer板卡,整板只有 72MB共享缓存(H3C S12500是每个万兆端口 256MB缓存),此板卡Cisco定位是数据中心 汇聚,不适合数据中心核心,如右图所示:
在同一个N7K机框内,F2和M/F1板卡不 能混插。若要混插,需使用VDC技术将 N7K虚拟化为多个逻辑设备,F2与M/F1处 于不同的VDC内,采用外接网线的方式进行 互通。这将增加网络配置管理的复杂度,跨 板转发带宽低。
N5K VPC功能配置及测试要点

N5K VPC功能配置及测试2013年01月目录一、概述 (3)1.1 测试目的 (3)1.2测试环境: (3)1.3配置前准备 (4)1.3.1配置管理地址 (4)1.3.2安装存储license (4)1.3.2N5K操作系统升级 (4)三、VPC功能测试 (5)3.1 测试目的 (5)3.2 测试拓扑 (6)3.3 测试配置 (6)3.4测试结果 (7)四、VPC兼容性测试 (11)4.1 测试目的 (11)4.2 测试拓扑 (11)4.3 测试配置 (11)4.4测试结果 (12)五、EVPC功能测试 (15)5.1 测试目的 (15)5.2 测试拓扑 (16)5.3 测试配置 (16)5.4测试结果 (17)一、概述1.1 测试目的Nexus 5500交换机作为业界第一款统一端口交换机,同时支持ethernet、 Fibre Channel和Fibre Channel over Ethernet (FCOE)协议。
本次测试的目的是为了测试Nexus 5500交换机的功能,以验证是否适合作为服务器区的汇聚交换机,同时实现服务器区的以太网汇聚和SAN存储汇聚,从而逐渐向两网融合的方向演进。
.1.2测试环境:1.主机:1台IBM P5502.系统:AIX3.FC HBA:emulex 4Gb double-port4.盘柜:HDS 23005.网络设备:两台Nexus 5596,一台Nexus 2148,一台Nexus 2248,一台Catalyst 3560G 以下是这次测试方案的拓扑。
1.3配置前准备1.3.1配置管理地址通过Console线连接到两台Nexus 5596的管理口上,分别配置两台设备的管理IP地址在同一网段。
在本例中Nexus 5596-1的管理ip是168.7.63.11,Nexus 5596-2的管理ip是168.7.63.12。
如下图所示,管理站和A、B控制器正常连接。
Nexus交换机,有什么不一样

4
网络对虚拟的识别 超级交换机虚拟技术 怎么实现网络带宽将来 6 VN-Link Fabric Path 160T
怎么实现双活数据中心?
OTV在同城 OTV在异地
的扩容?
多数据中心虚拟化 OTV
IP骨干网 SAN 生产中心 SAN 同城备份中心 SAN 异地灾备中心
5
© 2010 Cisco and/or its affiliates. All rights reserved.
Nexus 3100 Nexus 2000 Nexus 3000 FEX扩展 高密度万兆 以太网
Nexus 5500 融合网络FCoE DFA自动化
Nexus 9000 APIC* AVS* ACI 全新的ACI架构
Nexus 1000V 软交换机
开放 APIs/ 开源/ 应用策略模式
高性能的网络 1/10/40/100 GE
弹性而且安全系统分区 VXLAN
实现客户数据中心的全方位需求
弹性可扩展的网络 负载在DC内和DC 间自由迁移 存储网络和数据网 络的整合 运行的高效性 架构的灵活性
© 2010 Cisco and/or its affiliates. All rights reserved.
Cisco Confidential
Layer 2 Layer 3 Protocols Protocols
VLAN STP LACP UCLD CCP OGPF BGP PM EGRP PVLAN
原来必须分开的很多张网络
LAN SAN
Switch 1 Core
Switch 2
LAN VDC
Aggregation
Storage Access VDC
多参数监护仪说明书

说明书信息部件号:01.54.456438-10 发行时间:2014 年4 月版权©深圳市理邦精密仪器股份有限公司2014 声明本说明书为操作、保养和维修产品的参考资料。
用户应严格依照说明书内容操作,对于不按照说明书内容操作而造成的故障或事故,深圳市理邦精密仪器股份有限公司(以下简称“理邦仪器”)不负担任何法律责任。
理邦仪器拥有本说明书中所有内容的版权,未经本公司的明确书面许可,任何人不得照相复制、复印或翻译成其它语言。
本产品说明书包含受版权法保护的专有资料,包括但不限于技术秘密、专利信息等商业秘密,用户具有保密义务,不得向无关第三方披露本说明书中的任何内容。
用户持有本产品说明书并不表示理邦仪器对产品所含知识产权的授权许可。
本说明书的修改权、更新权及最终解释权均属于理邦仪器。
注册信息医疗器械生产企业许可证编号:粤食药监械生产许20010086 号粤制00000556 号产品注册证号:国食药监械(准)字2014 第3210404 号执行标准号:YZB/国0681-2014 产品名称:病人监护仪产品型号:iM50、iM60 、iM70、iM80制造商的责任理邦仪器仅在下列情况下才认为应对仪器的安全性、可靠性和性能负责,即:装配操作、扩充、重调、改进和维修均由理邦仪器认可的人员进行,相应房间的电气安装环境符合国家标准,以及仪器按照操作指导进行使用。
理邦仪器将在用户提出要求时有偿提供电路图及其它信息,以帮助用户由适当的、合格的技术人员来维修那些理邦仪器归类为可由用户维修的仪器部分。
本说明书的术语说明警告:针对可能造成人员伤亡的操作或情形。
小心:针对可能造成设备损坏、产生错误数据,或使过程失效的操作或情形。
注意:您应当了解的重要信息。
目录1 预期用途和安全信息 (1)1.1 预期用途 (1)1.2 安全信息 (1)1.3 监护仪上使用的符号的解释 (3)2 安装 (7)2.1 初始检查 (7)2.2 安装监护仪 (7)2.2.1 将监护仪置于水平台面上 (7)2.2.2 安装到墙上 (7)2.2.3 安装到台车上 (7)2.3 连接交流电源线 (7)2.4 检查监护仪 (8)2.5 检查记录仪 (8)2.6 设定日期与时间 (8)2.7 移交监护仪 (8)3 基本操作 (9)3.1 概况 (9)3.1.1 正面图 (9)3.1.2 背面图 (12)3.1.3 侧面图 (15)3.1.4 功能配置 (16)3.2 操作与浏览 (17)3.2.1 使用按键 (18)3.3.1 演示模式 (20)3.3.2 待机模式 (20)3.3.3 夜间模式 (20)3.4 更改监护仪设置 (20)3.4.1 调整屏幕亮度 (20)3.4.2 更改日期与时间 (21)3.5 调整音量 (21)3.5.1 设置键盘音量 (21)3.5.2 设置报警音量 (21)3.5.3 调整心跳音量 (21)3.6 检查监护仪版本 (21)3.7 联网监护 (21)3.8 设置语言 (22)3.9 了解屏幕 (22)3.10 触摸屏校准 (22)3.11 禁止触摸屏操作 (22)3.12 使用条形码扫描仪 (22)3.13 解决IBP 标名冲突 (23)4 报警 (24)4.1 报警分类 (24)4.1.1 生理报警 (24)4.1.2 技术报警 (24)4.1.3 提示信息 (24)4.2 报警级别 (24)4.3 报警控制 (25)4.3.1 设置参数报警 (25)4.3.2 报警音暂停 (26)4.3.3 静音 (26)4.5 探头脱落报警 (27)4.6 报警自检 (27)5 报警信息列表 (28)5.1 患者报警消息 (28)5.2 技术报警 (31)5.3 提示信息 (42)5.4 报警限范围 (43)6 管理病人 (48)6.1 接收病人 (48)6.1.1 病人类型和“起搏的”状态 (49)6.2 快速接收病人 (49)6.3 编辑病人资料 (49)6.4 更新病人 (49)6.5 中央监护系统 (50)7 用户界面 (51)7.1 设置界面风格 (51)7.2 选择参数 (51)7.3 更改波形 (51)7.4 更改界面布局 (51)7.5 观察趋势共存 (51)7.6 观察呼吸氧合图 (52)7.7 大字体界面 (52)7.8 它床观察 (52)7.8.1 打开它床观察窗口 (53)7.8.2 设置它床观察窗口 (53)7.11 默认配置 (54)8 监护ECG (55)8.1 概述 (55)8.2 安全信息 (55)8.3 ECG 显示 (56)8.3.1 更改ECG 波形大小 (56)8.3.2 更改ECG 滤波设定 (57)8.4 使用ECG 报警 (57)8.5 选择计算导联 (57)8.6 ECG 监护 (57)8.6.1 备皮以供粘贴电极 (57)8.6.2 连接心电图电缆 (58)8.7 选择导联类型 (58)8.8 安装电极 (58)8.8.1 3 导联的电极安放 (59)8.8.2 5 导联的电极安放 (59)8.8.3 12 导联的电极安放 (61)8.8.4 为外科患者推荐的ECG 导联连接 (62)8.9 ECG 菜单设置 (63)8.9.1 设置心率报警源 (63)8.9.2 智能导联脱落 (63)8.9.3 心跳音量 (64)8.9.4 ECG 监护类型 (64)8.9.5 设定起搏状态 (64)8.9.6 ECG 校准 (65)8.9.7 ECG 波形设置 (65)8.10 ST 分析 (65)8.10.2 ST 显示 (66)8.10.3 报警限设置 (66)8.10.4 确定ST 段分析点 (66)8.10.5 调整ISO、ST 测量点 (66)8.11 心律失常监护 (67)8.11.1 心律失常分析 (67)8.11.2 心律失常分析菜单 (68)8.12 12 导监护 (68)8.12.1 进入12 导监护界面 (68)8.12.2 12 导诊断回顾 (69)9 监护RESP (70)9.1 概述 (70)9.2 安全信息 (70)9.3 安放呼吸电极 (70)9.4 心脏重叠 (71)9.5 胸廓扩张 (71)9.6 腹式呼吸 (71)9.7 选择呼吸导联 (71)9.8 更改计算类型 (71)9.9 更改波形 (72)9.10 使用“呼吸”报警 (72)9.11 设置窒息报警时间 (72)10 监护SpO2 (73)10.1 概述 (73)10.2 安全信息 (73)10.3 SpO2 测量 (74)10.4 测量步骤 (74)10.6 调整报警限 (75)10.7 将SpO2/Pleth(体积描记)设为脉搏源 (75)10.8 设置脉搏调制音 (75)10.9 设置灵敏度 (75)10.10 SI(信号强度) (76)11 监护PR (77)11.1 概述 (77)11.2 设置PR 来源 (77)11.3 设置脉搏音量 (77)11.4 使用脉搏报警 (77)11.5 选择处于活动的报警源 (77)12 监护NIBP (78)12.1 概述 (78)12.2 安全信息 (78)12.3 介绍NIBP 测量 (79)12.4 测量的限制 (79)12.5 测量模式 (79)12.6 测量步骤 (80)12.7 操作提示 (80)12.8 肢体与心脏不在同一水平高度时对测量的修正 (81)12.9 NIBP 报警 (81)12.10 NIBP 复位 (81)12.11 NIBP 校准 (81)12.12 漏气检测 (82)12.12.1 漏气检测过程 (82)13 监护TEMP (84)13.1 概述 (84)13.2 安全信息 (84)13.3 温度测量设置 (84)13.4 计算温差 (84)14 监护IBP (85)14.1 概述 (85)14.2 安全信息 (85)14.3 监护步骤 (85)14.4 选择监护的压力 (86)14.5 压力传感器校零 (86)14.6 压力测量校零 (87)14.7 压力校零故障排除(以Art 为例说明) (87)14.8 IBP 压力校准 (87)14.9 压力校准故障排除 (89)14.10 IBP 报警 (89)14.11 更改IBP 波形标尺 (89)15 监护CO2 (90)15.1 概述 (90)15.2 安全信息 (90)15.3 监护步骤 (91)15.3.1 传感器校零 (91)15.3.2 旁流CO2 模块测量设置 (91)15.3.3 主流CO2 模块测量设置 (93)15.4 设置CO2 波形 (95)15.5 修正CO2 (95)15.7 设置窒息报警延迟 (96)16 监护AG (97)16.1 概述 (97)16.2 安全信息 (97)16.2.1 旁流式麻醉模块的安全信息 (97)16.2.2 主流式麻醉模块的安全信息 (99)16.3 监护步骤 (100)16.3.1 旁流式的监护步骤 (100)16.3.2 主流式的监护步骤 (102)16.4 设置窒息报警时间 (106)16.5 旁流式麻醉模块的工作状态 (106)16.6 主流式麻醉模块的工作状态 (106)16.7 O2 补偿 (107)16.8 湿度影响 (107)17 冻结 (108)17.1 概述 (108)17.2 冻结状态的进入与退出 (108)17.2.1 进入冻结状态 (108)17.2.2 退出冻结状态 (108)17.3 冻结波形回顾 (109)18 回顾 (110)18.1 趋势图回顾 (110)18.1.1 挑选不同参数的趋势图显示 (110)18.1.2 调节幅度 (110)18.1.3 设定分辨率 (111)18.1.4 移动图形 (111)18.1.5 切换到趋势表 (111)18.1.6 在记录仪上输出趋势曲线 (111)18.2.1 设置分辨率 (111)18.2.2 移动图形 (111)18.2.3 切换到趋势图 (112)18.2.4 在记录仪上输出趋势表 (112)18.3 NIBP 回顾 (112)18.3.1 移动图形 (112)18.3.2 在记录仪上输出NIBP 回顾数据 (112)18.4 报警事件回顾 (112)18.4.1 移动图形 (112)18.4.2 选择特定参数的报警事件回顾 (112)18.4.3 设置时间索引 (113)18.4.4 在记录仪上输出报警事件回顾 (113)18.5 12 导诊断回顾 (113)18.5.1 删除分析结果 (113)18.5.2 诊断结果与波形之间的切换 (114)18.5.3 在记录仪上输出波形或分析结果 (114)19 计算和滴定表 (115)19.1 药物计算 (115)19.1.1 计算步骤 (115)19.1.2 计算单位 (116)19.2 滴定表 (116)19.3 血液动力学计算 (117)19.3.1 计算步骤 (117)19.3.2 输入参数 (117)19.3.3 输出参数 (117)20 记录 (119)20.1 记录仪的一般资料 (119)20.2 记录仪性能 (119)20.3 记录类型 (120)20.5 记录仪操作及状态信息 (121)21 其它功能 (124)21.1 护士呼叫 (124)21.2 无线网络 (124)21.3 在可移动存储设备上进行数据存储 (124)22 电池 (127)22.1 电池灯 (127)22.2 主屏幕上的电池状态信息 (127)22.3 检查电池性能 (127)22.4 更换电池 (128)22.5 电池回收 (129)22.6 电池的保养 (129)23 保养与清洁 (130)23.1 概述 (130)23.2 清洁 (130)23.3 消毒 (133)23.4 对其他附件进行清洁及消毒 (135)24 维护 (136)24.1 检查 (136)24.2 维护计划 (136)25 保修及售后服务 (137)25.1 保修 (137)25.2 售后服务 (137)26 电子信息产品污染控制 (138)26.1 标识 (138)26.2 有毒有害物质或元素的名称及含量 (138)27.1 ECG 附件 (139)27.2 SpO2 附件 (141)27.3 NIBP 附件 (141)27.4 TEMP 附件 (142)27.5 IBP 附件 (142)27.6 CO2 附件 (142)27.7 GAS 附件 (144)27.8 其它附件 (145)A 产品规格 (146)A.1 监护仪类型 (146)A.2 监护仪规格 (146)A.2.1 物理规格 (146)A.2.2 工作环境 (146)A.2.3 显示器规格 (147)A.2.4 电池 (148)A.2.5 记录仪 (148)A.2.6 数据存储 (149)A.3 ECG 规格 (149)A.4 RESP 规格 (153)A.5 NIBP 规格 (154)A.6 SpO2 规格 (155)A.7 TEMP 规格 (155)A.8 IBP 规格 (156)A.9 CO2 规格 (157)A.10 AG 规格 (160)A.10.1 旁流 (160)A.10.2 主流 (163)B EMC 测试等级申明-指南和制造商的声明 (166)B.1 电磁发射 (166)B.2 电磁抗扰度 (166)B.3 电磁抗扰度 (167)B.4 推荐隔离距离 (169)C 出厂默认设置 (170)C.1 病人信息 (170)C.2 报警 (170)C.3 ECG (170)C.4 RESP (172)C.5 SpO2 (172)C.6 PR (172)C.7 NIBP (173)C.8 TEMP (173)C.9 IBP (174)C.10 CO2 (174)C.11 AG (175)D 术语一览表 (177)1 预期用途和安全信息1.1 预期用途产品性能结构以及组成:该产品由主机、相应功能附件(心电电缆、无创血压袖套、血氧传感器、体温传感器、二氧化碳气体测量组件、麻醉气体测量组件)组成。
Nexus_design_workshop(5.1)_virtualization

Virtual Device Context Enables collapsing of multiple logical networks into single physical infrastructure Helps scale physical resources of device Appropriate for typical silo designs such as: Production, Dev, Test Intranet, DMZ, Extranet Organization A, B C Application A, B, C Customer A, B, C
Feature Overview 跨机箱多链路捆绑 避免以太网环路
增加上行带宽
双活的工作机制
传统设计
快速故障收敛 网络更简单
VPC 设计
更大规模的汇聚方案 FabricPath
16-Way Equal Cost Multipathing (ECMP) FabricPath Header
Hierarchical Addressing with built in loop mitigation (RPF,TTL)
VDC Prod
VDC Extranet VDC DMZ
Different network islands virtualized onto common data center networking infrastructure
Presentation_ID © 2007 Cisco Systems, Inc. All rights reserved. Cisco Confidential
VRF VRF VRF
数据中心硬件配置
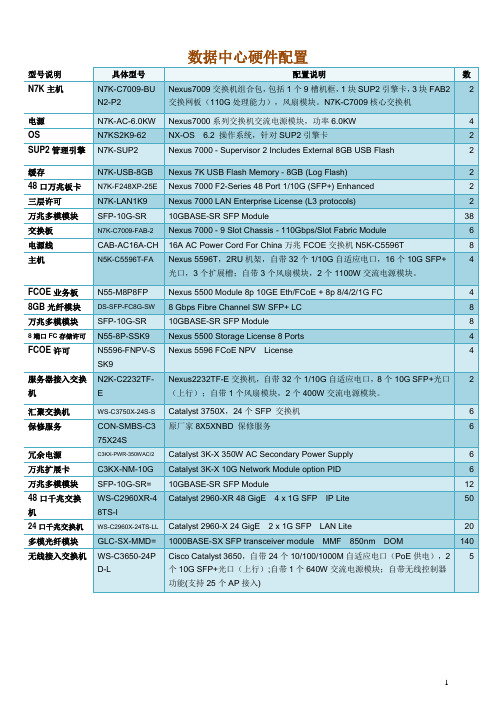
Catalyst 3750X,24个SFP交换机
6
保修服务
CON-SMBS-C375X24S
原厂家8X5XNBD保修服务
6
冗余电源
C3KX-PWR-350Wห้องสมุดไป่ตู้C/2
Catalyst 3K-X 350W AC Secondary Power Supply
6
万兆扩展卡
C3KX-NM-10G
Catalyst 3K-X 10G Network Module option PID
10GBASE-SR SFP Module
38
交换板
N7K-C7009-FAB-2
Nexus 7000 - 9 Slot Chassis - 110Gbps/Slot Fabric Module
6
电源线
CAB-AC16A-CH
16A AC Power Cord For China万兆FCOE交换机N5K-C5596T
4
8GB光纤模块
DS-SFP-FC8G-SW
8 Gbps Fibre Channel SW SFP+ LC
8
万兆多模模块
SFP-10G-SR
10GBASE-SR SFP Module
8
8端口FC存储许可
N55-8P-SSK9
Nexus 5500 Storage License 8 Ports
4
FCOE许可
N5596-FNPV-SSK9
Nexus 5596 FCoE NPV License
4
服务器接入交换机
N2K-C2232TF-E
Nexus2232TF-E交换机,自带32个1/10G自适应电口,8个10G SFP+光口(上行);自带1个风扇模块,2个400W交流电源模块。
智能LED控制和光源电路的5050大小包装产品说明书
Instruction ManualILPL-K501-RGBW-SK105-01Product OverviewThe ILPL-K501-RGBW-SK105-01 is an Intelligent LED with control and light emitting circuit, all contained in a 5050 sized package.Based on the industry standard SK6182 device, the control circuit consists of signal shaping amplification, built-in constant current source, and a high precision RC oscillator.The data protocol being used is the unipolar NRZ communication mode, where the 32-bit data is transmitted from the controller to DIN of the first LED, after an internal data latch, the remaining data is passed through the internal amplification circuit and sent out of the DO port to the remaining pixels. Using ‘automatic shaping forwarding technology’ means the number of cascaded LEDs is only limited by the signal transmission speed.Applicationsz Task Lightingz Back Lightingz Desk Lightingz Garage Lightingz Accent Lightingz Under Cabinet Lightingz Bar Lightingz Refrigerationz Industrial Applicationsz PhotographyTechnical Featuresz Control circuit and the RGBW die all in one 5050 sized devicez Grey level adjusting control (256 level grey scale)z Red drive special control enhances colour balancez Transmission distance between two points can be up to 10Mz Using a typical data transmission frequency of 800 Kbps, you can achieve refresh rates of 30 frames per secTechnical Drawing (mm)Notes:1. All dimensions are in millimeters.2. Tolerance is ±0.1mm unless otherwise notedPIN configurationAbsolute Maximum Ratings (Ta=25˚,VSS=0V)The electrical parameters (unless otherwise specified, TA=-20 - +70˚C, VDD=4.5 - 5.5V, VSS=0V)The dynamic parameters (Ta=25˚C)The data transmission time (TH+TL=1.25μs±600ns)T0H0 code, high level time0.3μs±0.15μs T0L0 code, low level time0.9μs±0.15μs T1H 1 code, high level time0.6μs±0.15μs T1L 1 code, low level time0.6μs±0.15μs Trst Reset code, low level time80μsTiming waveformmode:ConnectionInputcode:The method of data transmissionThe data structure of 24bitNote: high starting, in order to send data (R7 - R6 - ...... ..W0) The typical application circuit:CIE chromaticity coordinates (ANSI Natural white)ANSI Warm White Color bin structuresStandard LED Performance Graph1020%0.0040%60%80%Forward Current(mA)Forward Voltage(V) Tj=25 °CN o r m a l i z e d L u m i n o u s F l u xF o r w a r dC u r r e n t (m A )Typical Relative Luminous Flux vs. Forward CurrentForward Voltage vs. Forward Current12040608010020%0.0040%60%80%Thermal Pad Temperature (T=25°C)N o r m a l i z e dL u m i n o u s F l u xThermal Pad Temperature vs. Relative Light Output12020%0.0040%60%80%Wavelength (nm)R e l a t i v e E m i s s i o n D i s t r i b u t i o nWavelength Characteristics7590604530150.40.20.60.81.090°Typical Radiation Pattern 120°Radiation Angle1020150150.02050150150%200406080100F o r w a r d C u r r e n t (m A )Thermal Pad Temperature vs. Forward Current200406080100Thermal Pad Temperature (°C)120TOP SMD LED Application Notes1. FeaturesThe Purposes of making OPSCO’s customers and users to have a clear understanding on the ways how to use the LED.2. DescriptionGenerally. The LED can be used the same way as other general purposed semiconductors. When using OPSCO’s TOP SMD LED, the following precautions must be taken to protect the LED.3. Cautions3.1. Dust & CleaningThis emitter has a silicone surface, There are many benefits to the silicone surface in terms of optical properties and improved reliability. However, silicone is a softer material and prone to attract dust. Whilea minimal amount of dust and debris on the LED will not cause significant reduction in illumination, steps should be taken to keep the emitter free of dust.These include keeping the LEDs in the manufacturer’s package prior to assembly and storing assemblies in an enclosed area after installing the emitters.Surface condition of this device may change when organic solvents such as trichloroethylene or acetone were applied.Avoid using organic solvent, it is recommended that isopropyl be used as a solvent for cleaning the LEDs. When using other solvents, it should be confirmed beforehand whether the solvents will dissolve the package and the resin of not.Do not clean the LEDs by the ultrasonic. When it is absolutely necessary, the influence as ultrasonic cleaning on the LEDs depends on factors such as ultrasonic power. Baking time and assembled condition. Before cleaning, a pre-test should be done to confirm whether any damage to the LEDs will occur.3.2. Moisture Proof PackageIn order to avoid the absorption of moisture during transportation and storage, LED are packed in the aluminum envelop, A desiccant is included in the aluminum envelop as it absorbs moisture. When moisture is absorbed into the AMT package it may vaporize and expand during soldering. There is a possibility that this can cause exfoliation of the contacts and damage to the optical characteristics of the LEDs. For this reason, the moisture proof package is used to keep moisture to a minimum in the package.3.3. StorageIn order to avoid the absorption of moisture, It is recommended to store SMD LED (in bulk or taped) inthe dry box (or the desiccator ) with a desiccant, Otherwise to store them in the following environment as recommended.a. Temperature: 5˚C — 30˚Cb. Humidity: 60% RH MaxIt is recommended to solder the LED as soon as possible after unpacking the aluminum envelop, But in case that the LED have to be left unused after unpacking envelop again is requested.The LED should be soldering within 1 hours after opening the package.If baking is required, A baking treatment should be performed as follows:70˚C ±5˚C for more than 24 hours.Reflow Soldering CharacteristicsIn testing, OPSCO has found S50 LEDs to be compatible with JEDEC J-STD-020C,using the parameters listed below. As a general guideline OPSCO recommends that users follow the recommended soldering profile provided by the manufacturer of solder paste used.Note that this general guideline is offered as a starting point and may require adjustment for certain PCB designs and Configurations of reflow soldering equipment.Tem per at ure(°C )L Profile Feature Lead-Based Solder Lead-Free SolderAverage Ramp-Up Rate (Ts max to Tp )3˚C/second max.3˚C/second max.Preheat: Temperature Min (Ts min)100˚C 150˚CPreheat: Temperature Min (Ts max)150˚C 200˚CPreheat: Time ( ts min to ts max )60-120 seconds 60-180 secondsTime Maintained Above: Temperature (TL)183˚C 217˚CTime Maintained Above: Time (t L)60-150 seconds 60-150 secondsPeak/Classification Temperature (T P)215˚C 240˚CTime Within 5˚C of Actual Peak Temperature ( tp)<10 seconds <10 secondsRamp-Down Rate 6˚C/second max.6˚C/second max.Time 25˚C to Peak Temperature <6 minutes max.<6 minutes max.Note: All temperatures refer to topside of the package, measured on the package body surface.Heat GenerationThermal design of the end product is of paramount importance. Please consider the heat generation of the LED when making the system design. The coefficient of temperature increase per input electric power is affected by the thermal resistance of the circuit board and density of LED placement on the board, as wellas components. It is necessary to avoid in tense heat generation and operate within the maximum rating given in this specification. The operating current should be decided after considering the ambient maximum temperature of LEDs.Electrostatic Discharge & Surge CurrentElectrostatic discharge (ESD) or surge current (EOS) may damage LED.Precautions such as ESD wrist strap, ESD shoe strap or antistatic gloves must be worn whenever handling of LED.All devices, equipment and machinery must be properly grounded.It is recommended to perform electrical test to screen out ESD failures at final inspection.It is important to eliminate the possibility of surge current during circuitry design.Moisture Proof PackageCannot take any responsibility for any trouble that are caused by using the LEDs at conditions exceeding our specifications.The LED light output is strong enough to injure human eyes. Precautions must be taken to prevent looking directly at the LEDs with unaided eyes for more than a few seconds.The formal specification must be exchanged and signed by both parties before large volume purchase begins. The appearance and specifications of the product may be modified for improvement without notice.For further information please contact ILSThe values contained in this data sheet can change due to technical innovations. Any such changes will be made without separate notification.。
nexus详细介绍

© 2009 Cisco Systems, Inc. All rights reserved.
Cisco Confidential
14
VDC创建和资源分配实例
© 2009 Cisco Systems, Inc. All rights reserved.
Cisco Confidential
15
物理端口分配命令
11
VDC资源类型
全局资源 只能在Default VDC中进行分配,且作用于所有VDC的资源,
例如boot image,CoPP等;
独享资源 分配给某个特定VDC,且由该VDC独占的资源,如物理端口、
VLAN、路由表等;
共享资源
所有VDC共享的资源,如OOB管理口。
© 2009 Cisco Systems, Inc. All rights reserved.
FRU指示灯
从前下方往后上 方的空气流
排气口
前门(可选)
系统风扇组 交换矩风扇组
21RU
引擎插槽 (5-6) 交换矩阵模块 I/O卡插槽 (1-4, 7-10) 电源模块 (最多3个) 进气口,可选过 滤网
前视图
© 2009 Cisco Systems, Inc. All rights reserved. Cisco Confidential
具有最高权限
Non-Default VDC (VDC 2,3,4)
具有所有的功能集
具有所有功能集
以下配置只能在Default VDC进行
•VDC的创建/删除/挂起; •资源的分配;
在non-default VDC中的更改只影响该 VDC本身
VDC之间的协议进程均相互独立,互 不干扰
n7k config

establishing the vpc peer keepalive link
config the vpc peer link
config the vpcs
make sure config are consistent
配置vpc domain
feature vpc
span-tr port type edge
no shut
配置ospf
feature OSPF 1
router ospf 1
int lo 0
ip add
ip router os 1 a 0
为ospf配置bfd技术
feature
查看bfd邻居关系
vpc damain x
role pri x
配置vpc peer keepalive link
vrf context x
feature lacp
interface e x
channel-g x mode ac
通过前面板来实现VDC之间的通讯,resources templates被用来限制vdc对引擎资源影响,在一个VDC中的VLAN和VRF限制数量,可以直接被设置。
查看关联资源:sh vdc n7k resource
配置resource template
vdc tmeplate x
limit-resource vlan min x max x
vlan x
no shut
int vlan x
ip add
no shut
配置port-channel
int ethernet x
N5K FEX功能配置及测试

NX5K FEX功能配置及测试2013年01月目录一、概述 (3)1.1 测试目的 (3)1.2测试环境: (3)1.3配置前准备 (3)1.3.1配置管理地址 (3)1.3.2安装存储license (4)1.3.2N5K操作系统升级 (4)二、FEX功能测试 (5)2.1 测试目的 (5)2.2 测试拓扑 (6)2.3测试配置 (6)2.4测试结果 (7)一、概述1.1 测试目的Nexus 5500交换机作为业界第一款统一端口交换机,同时支持ethernet、 Fibre Channel和Fibre Channel over Ethernet (FCOE)协议。
本次测试的目的是为了测试Nexus 5500交换机的功能,以验证是否适合作为服务器区的汇聚交换机,同时实现服务器区的以太网汇聚和SAN存储汇聚,从而逐渐向两网融合的方向演进。
.1.2测试环境:1.网络设备:两台Nexus 5596,一台Nexus 2148,一台Nexus 2248,一台Catalyst 3560G 以下是这次测试方案的拓扑。
1.3配置前准备1.3.1配置管理地址通过Console线连接到两台Nexus 5596的管理口上,分别配置两台设备的管理IP地址在同一网段。
在本例中Nexus 5596-1的管理ip是168.7.63.11,Nexus 5596-2的管理ip是168.7.63.12。
如下图所示,管理站和A、B控制器正常连接。
配置内容备注N5596-11.3.2安装存储license缺省情况下,N5K没有安装存储license。
需要通过思科网站申请临时license。
申请步骤如下:1.3.2N5K操作系统升级在测试前需要升级N5K的操作系统。
二、FEX 功能测试2.1 测试目的传统数据中心网络结构采用生成树协议进行收敛,二层网络的收敛时间会相对较长,同时会带来网络的不稳定因素,而且也非常不利于故障的分析和诊断。
即使采用三层连接,由于应用负载分担的要求,无法通过配置ospf area 的方式来实现路由总结,也会给网络带来大的负载和不稳定性。
cisco-FEX宝典
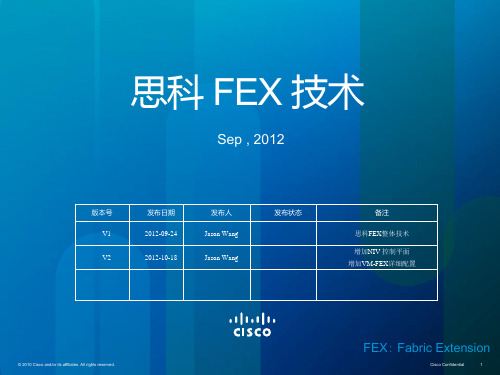
C97-693579-00 © 2011 Cisco and/or its affiliates. All rights reserved. Cisco Confidential 逻辑上:ESX Hypervisor里,Dynamic vNIC ,经由Static vNIC再去往KR17
思科 UCS P81E VIC网卡架构
FIXed vNIC: 主要用作A-FEX 包含: static(ESX uplink)、Dynamic
Floating vNIC: 主要用作VM-FEX 包含: Dynamic
C97-693579-00 © 2011 Cisco and/or its affiliates. All rights reserved.
(如果算的话)
FEX技术: fabric extension, 区别于extender
© 2011 Cisco and/or its affiliates. All rights reserved. Cisco Confidential 3
分布式模块系统,直至ToR(架顶交换机)/服务器网卡/虚机网卡
© 2011 Cisco and/or its affiliates. All rights reserved.
Cisco Confidential
11
场景 思科UCS 刀片服务器 思科UCS 机架服务器
Nexus父设备 UCS FI6200
CiscoNexusN5K简要配置
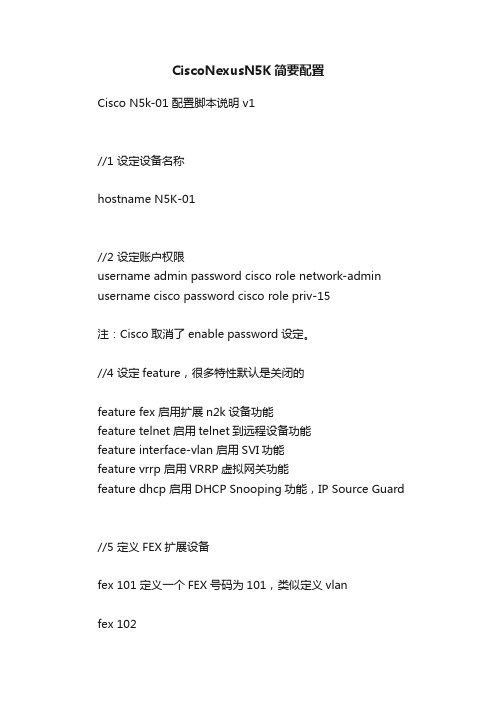
CiscoNexusN5K简要配置Cisco N5k-01 配置脚本说明 v1//1 设定设备名称hostname N5K-01//2 设定账户权限username admin password cisco role network-admin username cisco password cisco role priv-15注:Cisco取消了enable password设定。
//4 设定feature,很多特性默认是关闭的feature fex 启用扩展n2k设备功能feature telnet 启用telnet到远程设备功能feature interface-vlan 启用SVI功能feature vrrp 启用VRRP虚拟网关功能feature dhcp 启用DHCP Snooping功能,IP Source Guard //5 定义FEX扩展设备fex 101 定义一个FEX号码为101,类似定义vlanfex 102interface Ethernet1/1switchport mode fex-fabric 设定端口属性为FEX连接属性fex associate 101 设定连接的fex号码,在连接成功后,以E 101/1/X 表示扩展端口no shutinterface Ethernet1/2switchport mode fex-fabricfex associate 102no shut//6 设定捆绑端口int e1/31-32 将e1/31-32口进行捆绑。
channel-group 1 mode on 设定捆包号 1,模式强制switchportswitchport mode trunkno shut//7 设定port-channelint po 1 捆绑号1switchportswitchport trunk encapsulation dot1q Nexus Trunk协议只支持dot1q,可以不写这一条switchport mode trunkswitchport trunk allowed vlan all 设定允许通过的vlan id。
AMD D-NF52K 处理器主板 说明书

D-NF52KAMD® AM2 (Socket 940) 处理器主板使用手册版本:Rev1.02007年6月本产品必须通过特定的废物回收渠道回收,不得任意抛弃!版权1989-2008 DAMTIN TECHNOLOGY CO., LTD. All rights reserved.本手册所谈论到的产品名称仅做识别之用,而这些名称可能是属于其他公司的注册商标或是版权,在此声明如下:所有的品牌,产品,徽标,商标和公司名称都是属于商标或注册商标各自的拥有者。
Award®是Phoenix Technologies Ltd的注册商标。
Intel®和Pentium®是Intel有限公司的注册商标。
Microsoft是Microsoft有限公司的注册商标。
Netware®是Novell, Inc的注册商标。
NVIDIA,NVIDIA徽标, DualNet,和nForce是NVIDIA有限公司在美国和其他国家的注册商标。
ATI,ATI徽标,是AMD Technologies Ltd的注册商标。
Windows® 2000/XP/Vista是Microsoft有限公司的注册商标。
本手册中出现的其他商标均已注册。
责任声明本产品的所有部分,包括配件与软件等,其所有权都归本公司所有,未经本公司许可,不得任意地仿制、拷贝、摘抄或转译。
本用户手册没有任何形式的担保、立场表达或其它暗示。
若有任何因本用户手册或其所提到之产品的所有资讯,所引起直接或间接的信息流失或事业终止,本公司及其所属员工恕不为其担负任何责任。
除此之外,本用户手册所提到之产品规格及资讯仅供参考,内容亦会随时更新,恕不另行通知。
本用户手册的所有部分,包括硬件及软件,若有任何错误,本公司没有义务为其担负任何责任。
关于保修问题,根据谁销售谁负责三包的原则,如果您的主板在保修期内出现问题,请您与购买时的经销商联系作售后服务。
思科交换机N5K N2K-网络设备技术指标要求-公开版

*安全性 *访问控制列表 *Private VLAN 支持 *管理性 *网管协议 *端口镜像 *智能诊断功能
实配支持 SNMP v1、v2 和 v3 支持在物理端口、PortChannel、VLAN 和 FC 光纤通道端口 上的镜像; 支持主动对硬件和内部数据路径进行检测功能,支持引导 时间诊断、持续监控,以及按需和定期测试等
2 数据中心柜顶接入交换机
设备名称:柜顶接入交换机 指标项 每台配置要求: 千兆以太网电口≥48,万兆以太网光纤接口≥4 指标项 *性能要求 *线速转发端口数 *转发延迟 *功能要求 *虚拟服务器支持 *可靠性 *电源冗余 *风扇冗余 指标要求 千兆以太网端口≥40,万兆以太网端口≥4 端口到端口转发延迟≤3.2us 支持硬件化 VN-Link 协议,实现与 VMware 虚拟机的策略定 位 实配冗余电源 实配冗余可在线更换风扇模块 数量: ≥
Nexus系列交换机介绍_VMware vSphere企业级网络和存储实战_[共2页]
![Nexus系列交换机介绍_VMware vSphere企业级网络和存储实战_[共2页]](https://img.taocdn.com/s3/m/c618daa67fd5360cbb1adb94.png)
第5章 部署Nexus N5K&N2K交换机1993年,Cisco公司推出了一个交换机的品牌——Catalyst,这个品牌在市场上处于绝对的领导地位。
经过15年的时间,到2008年1月,Cisco公司又对外宣布了另一个交换机的品牌——Nexus。
Nexus交换机是适应未来云计算、虚拟化、整合化数据中心的新一代交换机产品,对以前的Catalyst交换机有重大改进和扩展,是业界最先进的产品。
本章介绍Cisco Nexus N5K&N2K交换机的基本配置以及在VMware vSphere环境的应用。
本章要点Nexus N5K&N2K交换机介绍配置使用Nexus FEX配置使用Nexus Vpc虚拟化架构使用N5K&N2K5.1 Nexus N5K&N2K交换机介绍Cisco Nexus交换机是适应未来数据中心的高密度交换机,具有比Catalyst交换机高得多的极高的性能,端口交换延迟很低,同时支持国际标准不丢包的以太网技术。
5.1.1 Nexus系列交换机介绍作为全新的品牌,Nexus系列交换机适应未来数据中心的先进架构,与Catalyst交换机及其他厂家等交换机有本质上不同。
Nexus交换机不简单是传输数据,而是一种全新的架构设计——计算机总线的延伸,目前只有Brocade交换机能部分支持,其他厂商等无法支持这些特性。
Nexus交换机具有以下特点。
1.高性能/低延迟/不丢包的以太网高性能/低延迟/不丢包的结合使得Nexus交换机具有一个独特的优势——计算机总线的延伸,相当于把彼此通信的众多计算机的总线直接连接起来。
z高性能相当于修了一条非常宽的路,宽到有多少车都可以直接上来;z低延迟相当于每辆车的速度都很快;z不丢包相当于车上的货物在道路上不丢失,以前的所有交换机都做不到这点,相当于目的地有个货物检查员来检查车上的货物,一旦发现丢了,再重发货,效率会降低。
- 1、下载文档前请自行甄别文档内容的完整性,平台不提供额外的编辑、内容补充、找答案等附加服务。
- 2、"仅部分预览"的文档,不可在线预览部分如存在完整性等问题,可反馈申请退款(可完整预览的文档不适用该条件!)。
- 3、如文档侵犯您的权益,请联系客服反馈,我们会尽快为您处理(人工客服工作时间:9:00-18:30)。
N5K-3# write erase
Warning: This command will erase the startup-configuration.
Do you wish to proceed anyway? (y/n) [n] y
N5K-3# reload
WARNING: There is unsaved configuration!!!
N5K-1(config-if)# fex associate 100
N5K-1(config-if)# vpc 100
N5K-1(config)#fex 101
N5K-1(config-fex)# pinning max-links 1
N5K-1(config-fex)# description "SECOND_FEX_IN_1 "
N5K-1(config-vrf)#interface mgmt0
N5K-1(config-if)#ip address 10.75.58.24/24
N5K-1(config-if)#no shutdown
3、启用SSH:
N5K-1(config)# no ssh server enale
N5K-1(config-fex)# description "N5k1 FEX 100 "
N5K-1(config-fex)# interface e1/7-8
N5K-1(config-if)# switchport mode fex-fabric
N5K-1(config-if)# fex associate 100
N5K-1(config)# spanning-tree vlan 101-104 root secondary(备份根桥)
5、N5K/N2K部署配置:
>EtherChannel(最大可以支持四条链路)
>static pinning
----------EtherChannel方式----------------
N5K-1(config)#feature fex
N5K-1(config)# fex 100
N5K-1(config-fex)# pinning max-links 1
N5K-1(config-fex)# description "fex 100 n5k-1 "
N5K-1(config-fex)# interface e1/7-8
N5K-1(config-if)# no shutdown
-----------static pinning方式-------------
N5K-1(config)#feature fex
N5K-1(config)# fex 100
N5K-1(config-fex)# pinning max-links 2
-----------------配置下连主机VLAN及接口-------------------------
N5K-1(config)# vlan 101
N5K-1(config-vlan)# interface e100/1/1
N5K-1(config-if)# switchport access vlan 101
WARNING: This command will reboot the system
Do you want to continue? (y/n) [n] y
2、交换机管理配置:
N5K-1(config)#vrf context management
N5K-1(config-vrf)#ip route 0.0.0.0/0 10.75.58.1
N5K-1(config-vpc-domain)# peer-keepalive destination 10.75.58.25 vrf management
N5K-1(config-vpc-domain)# interface ethernet 1/17-18
N5K-1(config-if-range)# channel-group 93 mode active
N5K-1(config-if)#exit
N5K-1(config)#feature fex
N5K-1(config)#fex 100
N5K-1(config-fex)# pinning max-links 1
N5K-1(config-fex)# description "FIRST_FEX_IN_1 "
N5K-1(config)# no ssh key
N5K-1(config)# ssh key rsa 1024
N5K-1(config)# ssh server enable
4、STP配置:
N5K-1(config)# spanning-tree vlan 101-104 root primary(根桥)
N5K-1(config-vpc-domain)# peer-keepalive destination 10.75.58.25 vrf management
N5K-1(config-vpc-domain)# interface ethernet 1/17-18
N5K-1(config-if-range)# channel-group 93 mode active
N5K-1(config-fex)# interface e1/7-8
N5K-1(config-if-range)# channel-group 100
N5K-1(config-if-range)# int port-channel 100
N5K-1(config-if)# switchport mode fex-fabric
N5K-1(config-if)#exit
N5K-1(config)# vlan 101
N5K-1(config-vlan)# name POD1_VLAN
N5K-1(config)# interface ethernet 100/1/1
N5K-1(config-if)# channel-group 10 mode active
N5K-1(config-if-range)# interface port-channel 93
N5K-1(config-if)#vpc peer-link
N5K-1(config-if)#switchport mode trunk
N5K-1(config-if)#switchport trunk allowed vlan 1,101
--------配置下连服务器接口----------------
N5K-1(config)# vlan 101
N5K-1(config-vlan)# name PODX_VLAN
N5K-1(config-vlan)# nfig-if)# switchport access vlan 101
N5K-1(config-if)# fex associate 101
N5K-1(config-if)# vpc 101
7、N5K/N2K单宿主环境中部署VPC配置,服务器启用LACP
N5K-1(config)#feature fex
N5K-1(config)#fex 100
N5K-1(config-fex)# pinning max-links 1
N5K-1(config-if)# no shut
6、N5K/N2K双宿主环境中部署VPC配置
N5K-1(config)#feature vpc
N5K-1(config)#feature lacp
N5K-1(config)#vpc domain 1
N5K-1(config-vpc-domain)#role priority 1 (优先级低的为主)
N5K-1(config-if-range)# channel-group 100
N5K-1(config-if-range)# int port-channel 100
N5K-1(config-if)# switchport mode fex-fabric
N5K-1(config-if)# fex associate 100
N5K-1(config-if)# int po10
N5K-1(config-if)# switchport access vlan 101
N5K-1(config-if)# vpc 10
N5K-1(config-if)# fex associate 100
N5K-1(config)#feature vpc
N5K-1(config)#feature lacp
N5K-1(config)#vpc domain 1
N5K-1(config-vpc-domain)#role priority 1
N5K-1(config-fex)# interface e1/9-10
N5K-1(config-if-range)# channel-group 101
N5K-1(config-if-range)# int port-channel 101
N5K-1(config-if)# switchport mode fex-fabric
N5K-1(config-if-range)# interface port-channel 93
N5K-1(config-if)#vpc peer-link
N5K-1(config-if)#switchport mode trunk
