Jack_Ganssle__Workshop_A_Process_for_Developing
HP Color LaserJet Enterprise MFP M776用户指南说明书
Legal informationCopyright and License© Copyright 2019 HP Development Company, L.P.Reproduction, adaptation, or translation without prior written permission is prohibited, except as allowedunder the copyright laws.The information contained herein is subject to change without notice.The only warranties for HP products and services are set forth in the express warranty statementsaccompanying such products and services. Nothing herein should be construed as constituting anadditional warranty. HP shall not be liable for technical or editorial errors or omissions contained herein.Edition 1, 10/2019Trademark CreditsAdobe®, Adobe Photoshop®, Acrobat®, and PostScript® are trademarks of Adobe Systems Incorporated.Apple and the Apple logo are trademarks of Apple Inc., registered in the U.S. and other countries.macOS is a trademark of Apple Inc., registered in the U.S. and other countries.AirPrint is a trademark of Apple Inc., registered in the U.S. and other countries.Google™ is a trademark of Google Inc.Microsoft®, Windows®, Windows® XP, and Windows Vista® are U.S. registered trademarks of MicrosoftCorporation.UNIX® is a registered trademark of The Open Group.iiiT able of contents1 Printer overview (1)Warning icons (1)Potential shock hazard (2)Printer views (2)Printer front view (2)Printer back view (4)Interface ports (4)Control-panel view (5)How to use the touchscreen control panel (7)Printer specifications (8)T echnical specifications (8)Supported operating systems (11)Mobile printing solutions (12)Printer dimensions (13)Power consumption, electrical specifications, and acoustic emissions (15)Operating-environment range (15)Printer hardware setup and software installation (16)2 Paper trays (17)Introduction (17)Load paper to Tray 1 (multipurpose tray) (17)Load Tray 1 (multipurpose tray) (18)Tray 1 paper orientation (19)Use alternative letterhead mode (24)Enable Alternative Letterhead Mode by using the printer control-panel menus (24)Load paper to Tray 2 (24)Load Tray 2 (24)Tray 2 paper orientation (26)Use alternative letterhead mode (29)Enable Alternative Letterhead Mode by using the printer control-panel menus (29)Load paper to the 550-sheet paper tray (30)Load paper to the 550-sheet paper tray (30)550-sheet paper tray paper orientation (32)Use alternative letterhead mode (35)Enable Alternative Letterhead Mode by using the printer control-panel menus (35)ivLoad paper to the 2 x 550-sheet paper trays (36)Load paper to the 2 x 550-sheet paper trays (36)2 x 550-sheet paper tray paper orientation (38)Use alternative letterhead mode (41)Enable Alternative Letterhead Mode by using the printer control-panel menus (41)Load paper to the 2,700-sheet high-capacity input paper trays (41)Load paper to the 2,700-sheet high-capacity input paper trays (41)2,700-sheet HCI paper tray paper orientation (43)Use alternative letterhead mode (45)Enable Alternative Letterhead Mode by using the printer control-panel menus (45)Load and print envelopes (46)Print envelopes (46)Envelope orientation (46)Load and print labels (47)Manually feed labels (47)Label orientation (48)3 Supplies, accessories, and parts (49)Order supplies, accessories, and parts (49)Ordering (49)Supplies and accessories (50)Maintenance/long-life consumables (51)Customer self-repair parts (51)Dynamic security (52)Configure the HP toner-cartridge-protection supply settings (53)Introduction (53)Enable or disable the Cartridge Policy feature (53)Use the printer control panel to enable the Cartridge Policy feature (54)Use the printer control panel to disable the Cartridge Policy feature (54)Use the HP Embedded Web Server (EWS) to enable the Cartridge Policy feature (54)Use the HP Embedded Web Server (EWS) to disable the Cartridge Policy feature (55)Troubleshoot Cartridge Policy control panel error messages (55)Enable or disable the Cartridge Protection feature (55)Use the printer control panel to enable the Cartridge Protection feature (56)Use the printer control panel to disable the Cartridge Protection feature (56)Use the HP Embedded Web Server (EWS) to enable the Cartridge Protection feature (56)Use the HP Embedded Web Server (EWS) to disable the Cartridge Protection feature (57)Troubleshoot Cartridge Protection control panel error messages (57)Replace the toner cartridges (58)T oner-cartridge information (58)Remove and replace the cartridges (59)Replace the imaging drums (62)Imaging drum information (62)Remove and replace the imaging drums (63)Replace the toner-collection unit (66)T oner-collection unit information (66)vRemove and replace the toner-collection unit (67)Replace the staple cartridge (M776zs model only) (70)Staple cartridge information (70)Remove and replace the staple cartridge (71)4 Print (73)Print tasks (Windows) (73)How to print (Windows) (73)Automatically print on both sides (Windows) (74)Manually print on both sides (Windows) (74)Print multiple pages per sheet (Windows) (75)Select the paper type (Windows) (75)Additional print tasks (76)Print tasks (macOS) (77)How to print (macOS) (77)Automatically print on both sides (macOS) (77)Manually print on both sides (macOS) (77)Print multiple pages per sheet (macOS) (78)Select the paper type (macOS) (78)Additional print tasks (79)Store print jobs on the printer to print later or print privately (79)Introduction (79)Create a stored job (Windows) (79)Create a stored job (macOS) (80)Print a stored job (81)Delete a stored job (81)Delete a job that is stored on the printer (81)Change the job storage limit (82)Information sent to printer for Job Accounting purposes (82)Mobile printing (82)Introduction (82)Wi-Fi, Wi-Fi Direct Print, NFC, and BLE printing (82)Enable wireless printing (83)Change the Wi-Fi Direct name (83)HP ePrint via email (83)AirPrint (84)Android embedded printing (85)Print from a USB flash drive (85)Enable the USB port for printing (85)Method one: Enable the USB port from the printer control panel (85)Method two: Enable the USB port from the HP Embedded Web Server (network-connectedprinters only) (85)Print USB documents (86)Print using high-speed USB 2.0 port (wired) (86)Method one: Enable the high-speed USB 2.0 port from the printer control panel menus (86)Method two: Enable the high-speed USB 2.0 port from the HP Embedded Web Server (network-connected printers only) (87)vi5 Copy (88)Make a copy (88)Copy on both sides (duplex) (90)Additional copy tasks (92)6 Scan (93)Set up Scan to Email (93)Introduction (93)Before you begin (93)Step one: Access the HP Embedded Web Server (EWS) (94)Step two: Configure the Network Identification settings (95)Step three: Configure the Send to Email feature (96)Method one: Basic configuration using the Email Setup Wizard (96)Method two: Advanced configuration using the Email Setup (100)Step four: Configure the Quick Sets (optional) (104)Step five: Set up Send to Email to use Office 365 Outlook (optional) (105)Introduction (105)Configure the outgoing email server (SMTP) to send an email from an Office 365 Outlookaccount (105)Set up Scan to Network Folder (108)Introduction (108)Before you begin (108)Step one: Access the HP Embedded Web Server (EWS) (108)Step two: Set up Scan to Network Folder (109)Method one: Use the Scan to Network Folder Wizard (109)Method two: Use Scan to Network Folder Setup (110)Step one: Begin the configuration (110)Step two: Configure the Scan to Network Folder settings (111)Step three: Complete the configuration (118)Set up Scan to SharePoint (118)Introduction (118)Before you begin (118)Step one: Access the HP Embedded Web Server (EWS) (118)Step two: Enable Scan to SharePoint and create a Scan to SharePoint Quick Set (119)Scan a file directly to a SharePoint site (121)Quick Set scan settings and options for Scan to SharePoint (122)Set up Scan to USB Drive (123)Introduction (124)Step one: Access the HP Embedded Web Server (EWS) (124)Step two: Enable Scan to USB Drive (124)Step three: Configure the Quick Sets (optional) (125)Default scan settings for Scan to USB Drive setup (126)Default file settings for Save to USB setup (126)Scan to email (127)Introduction (127)Scan to email (127)Scan to job storage (129)viiIntroduction (129)Scan to job storage on the printer (130)Print from job storage on the printer (132)Scan to network folder (132)Introduction (132)Scan to network folder (132)Scan to SharePoint (134)Introduction (134)Scan to SharePoint (134)Scan to USB drive (136)Introduction (136)Scan to USB drive (136)Use HP JetAdvantage business solutions (138)Additional scan tasks (138)7 Fax (140)Set up fax (140)Introduction (140)Set up fax by using the printer control panel (140)Change fax configurations (141)Fax dialing settings (141)General fax send settings (142)Fax receive settings (143)Send a fax (144)Additional fax tasks (146)8 Manage the printer (147)Advanced configuration with the HP Embedded Web Server (EWS) (147)Introduction (147)How to access the HP Embedded Web Server (EWS) (148)HP Embedded Web Server features (149)Information tab (149)General tab (149)Copy/Print tab (150)Scan/Digital Send tab (151)Fax tab (152)Supplies tab (153)Troubleshooting tab (153)Security tab (153)HP Web Services tab (154)Networking tab (154)Other Links list (156)Configure IP network settings (157)Printer sharing disclaimer (157)View or change network settings (157)Rename the printer on a network (157)viiiManually configure IPv4 TCP/IP parameters from the control panel (158)Manually configure IPv6 TCP/IP parameters from the control panel (158)Link speed and duplex settings (159)Printer security features (160)Introduction (160)Security statements (160)Assign an administrator password (160)Use the HP Embedded Web Server (EWS) to set the password (160)Provide user access credentials at the printer control panel (161)IP Security (161)Encryption support: HP High Performance Secure Hard Disks (161)Lock the formatter (161)Energy-conservation settings (161)Set the sleep timer and configure the printer to use 1 watt or less of power (161)Set the sleep schedule (162)Set the idle settings (162)HP Web Jetadmin (163)Software and firmware updates (163)9 Solve problems (164)Customer support (164)Control panel help system (165)Reset factory settings (165)Introduction (165)Method one: Reset factory settings from the printer control panel (165)Method two: Reset factory settings from the HP Embedded Web Server (network-connectedprinters only) (166)A “Cartridge is low” or “Cartridge is very low” message displays on the printer control panel (166)Change the “Very Low” settings (166)Change the “Very Low” settings at the control panel (166)For printers with fax capability (167)Order supplies (167)Printer does not pick up paper or misfeeds (167)Introduction (167)The printer does not pick up paper (167)The printer picks up multiple sheets of paper (171)The document feeder jams, skews, or picks up multiple sheets of paper (174)Clear paper jams (174)Introduction (174)Paper jam locations (174)Auto-navigation for clearing paper jams (175)Experiencing frequent or recurring paper jams? (175)Clear paper jams in the document feeder - 31.13.yz (176)Clear paper jams in Tray 1 (13.A1) (177)Clear paper jams in Tray 2 (13.A2) (182)Clear paper jams in the fuser (13.B9, 13.B2, 13.FF) (188)ixClear paper jams in the duplex area (13.D3) (194)Clear paper jams in the 550-sheet trays (13.A3, 13.A4) (199)Clear paper jams in the 2 x 550 paper trays (13.A4, 13.A5) (206)Clear paper jams in the 2,700-sheet high-capacity input paper trays (13.A3, 13.A4, 13.A5, 13.A7) (213)Resolving color print quality problems (220)Introduction (220)Troubleshoot print quality (221)Update the printer firmware (221)Print from a different software program (221)Check the paper-type setting for the print job (221)Check the paper type setting on the printer (221)Check the paper type setting (Windows) (221)Check the paper type setting (macOS) (222)Check toner-cartridge status (222)Step one: Print the Supplies Status Page (222)Step two: Check supplies status (222)Print a cleaning page (222)Visually inspect the toner cartridge or cartridges (223)Check paper and the printing environment (223)Step one: Use paper that meets HP specifications (223)Step two: Check the environment (223)Step three: Set the individual tray alignment (224)Try a different print driver (224)Troubleshoot color quality (225)Calibrate the printer to align the colors (225)Troubleshoot image defects (225)Improve copy image quality (233)Check the scanner glass for dirt and smudges (233)Calibrate the scanner (234)Check the paper settings (235)Check the paper selection options (235)Check the image-adjustment settings (235)Optimize copy quality for text or pictures (236)Edge-to-edge copying (236)Improve scan image quality (236)Check the scanner glass for dirt and smudges (237)Check the resolution settings (238)Check the color settings (238)Check the image-adjustment settings (239)Optimize scan quality for text or pictures (239)Check the output-quality settings (240)Improve fax image quality (240)Check the scanner glass for dirt and smudges (240)Check the send-fax resolution settings (242)Check the image-adjustment settings (242)Optimize fax quality for text or pictures (242)Check the error-correction setting (243)xSend to a different fax machine (243)Check the sender's fax machine (243)Solve wired network problems (244)Introduction (244)Poor physical connection (244)The computer is unable to communicate with the printer (244)The printer is using incorrect link and duplex settings for the network (245)New software programs might be causing compatibility problems (245)The computer or workstation might be set up incorrectly (245)The printer is disabled, or other network settings are incorrect (245)Solve wireless network problems (245)Introduction (245)Wireless connectivity checklist (245)The printer does not print after the wireless configuration completes (246)The printer does not print, and the computer has a third-party firewall installed (246)The wireless connection does not work after moving the wireless router or printer (247)Cannot connect more computers to the wireless printer (247)The wireless printer loses communication when connected to a VPN (247)The network does not appear in the wireless networks list (247)The wireless network is not functioning (247)Reduce interference on a wireless network (248)Solve fax problems (248)Checklist for solving fax problems (248)What type of phone line are you using? (249)Are you using a surge-protection device? (249)Are you using a phone company voice-messaging service or an answering machine? (249)Does your phone line have a call-waiting feature? (249)Check fax accessory status (249)General fax problems (250)The fax failed to send (250)No fax address book button displays (250)Not able to locate the Fax settings in HP Web Jetadmin (250)The header is appended to the top of the page when the overlay option is enabled (251)A mix of names and numbers is in the recipients box (251)A one-page fax prints as two pages (251)A document stops in the document feeder in the middle of faxing (251)The volume for sounds coming from the fax accessory is too high or too low (251)Index (252)xiPrinter overview1Review the location of features on the printer, the physical and technical specifications of the printer,and where to locate setup information.For video assistance, see /videos/LaserJet.The following information is correct at the time of publication. For current information, see /support/colorljM776MFP.For more information:HP's all-inclusive help for the printer includes the following information:●Install and configure●Learn and use●Solve problems●Download software and firmware updates●Join support forums●Find warranty and regulatory informationWarning iconsUse caution if you see a warning icon on your HP printer, as indicated in the icon definitions.●Caution: Electric shock●Caution: Hot surface●Caution: Keep body parts away from moving partsPrinter overview1●Caution: Sharp edge in close proximity●WarningPotential shock hazardReview this important safety information.●Read and understand these safety statements to avoid an electrical shock hazard.●Always follow basic safety precautions when using this product to reduce risk of injury from fire orelectric shock.●Read and understand all instructions in the user guide.●Observe all warnings and instructions marked on the product.●Use only a grounded electrical outlet when connecting the product to a power source. If you do notknow whether the outlet is grounded, check with a qualified electrician.●Do not touch the contacts on any of the sockets on the product. Replace damaged cordsimmediately.●Unplug this product from wall outlets before cleaning.●Do not install or use this product near water or when you are wet.●Install the product securely on a stable surface.●Install the product in a protected location where no one can step on or trip over the power cord.Printer viewsIdentify certain parts of the printer and the control panel.Printer front viewLocate features on the front of the printer.2Chapter 1 Printer overviewPrinter front view3Printer back viewLocate features on the back of the printer.Interface portsLocate the interface ports on the printer formatter. 4Chapter 1 Printer overviewControl-panel viewThe control panel provides access to the printer features and indicates the current status of the printer.NOTE:Tilt the control panel for easier viewing.The Home screen provides access to the printer features and indicates the current status of the printer.screens.NOTE:The features that appear on the Home screen can vary, depending on the printerconfiguration.Control-panel view5Figure 1-1Control-panel view?i 12:42 PM6Chapter 1 Printer overviewHow to use the touchscreen control panelPerform the following actions to use the printer touchscreen control panel.T ouchT ouch an item on the screen to select that item or open that menu. Also, when scrolling T ouch the Settings icon to open the Settings app.How to use the touchscreen control panel 7SwipeT ouch the screen and then move your finger horizontally to scroll the screen sideways.Swipe until the Settings app displays.Printer specificationsDetermine the specifications for your printer model.IMPORTANT:The following specifications are correct at the time of publication, but they are subject to change. For current information, see /support/colorljM776MFP .T echnical specificationsReview the printer technical specifications.Product numbers for each model ●M776dn - #T3U55A ●Flow M776z - #3WT91A ●Flow M776zs - #T3U56APaper handling specificationsPaper handling features Tray 1 (100-sheet capacity)Included Included Included Tray 2 (550-sheet capacity)IncludedIncludedIncluded8Chapter 1 Printer overview550-sheet paper trayOptional Included Not included NOTE:The M776dn models accept one optional550-sheet tray.Optional Included Included2 x 550-sheet paper tray and standNOTE:The M776dn models accept one optional550-sheet tray that may be installed on top of thestand.Optional Not included Not included2,700-sheet high-capacity input (HCI) paper trayand standNOTE:The M776dn models accept one optional550-sheet tray that may be installed on top of theoptional printer stand.Printer standOptional Not included Not included NOTE:The M776dn models accept one optional550-sheet tray that may be installed on top of theoptional printer stand.Inner finisher accessory Not included Not included Included Automatic duplex printing Included IncludedIncludedIncluded Included Included10/100/1000 Ethernet LAN connection with IPv4and IPv6Hi-Speed USB 2.0Included Included IncludedIncluded Included IncludedEasy-access USB port for printing from a USBflash drive or upgrading the firmwareIncluded Included Included Hardware Integration Pocket for connectingaccessory and third-party devicesHP Internal USB Ports Optional Optional OptionalOptional Optional OptionalHP Jetdirect 2900nw Print Server accessory forWi-Fi connectivity and an additional Ethernet portOptional IncludedIncludedHP Jetdirect 3100w accessory for Wi-Fi, BLE, NFC,and proximity badge readingPrints 45 pages per minute (ppm) on Letter-sizepaper and 46 ppm on A4-size paperEasy-access USB printing for printing from a USBIncluded Included Includedflash driveT echnical specifications9Included Included Included Store jobs in the printer memory to print later orprint privatelyScans 100 pages per minute (ppm) on A4 andIncluded Included Included letter-size paper one-sidedIncluded Included Included 200-page document feeder with dual-headscanning for single-pass duplex copying andscanningNot included Included Included HP EveryPage T echnologies including ultrasonicmulti-feed detectionNot included Included Included Embedded optical character recognition (OCR)provides the ability to convert printed pages intotext that can be edited or searched using acomputerIncluded Included Included SMART Label feature provides paper-edgedetection for automatic page croppingIncluded Included Included Automatic page orientation for pages that haveat least 100 characters of textIncluded Automatic tone adjustment sets contrast,Included Includedbrightness, and background removal for eachpageIncluded Included Includedfolders on a networkIncludedSend documents to SharePoint®Included IncludedIncluded Included Included NOTE:Memory reported on the configurationpage will change from 2.5 GB to 3 GB with theoptional 1 GB SODIMM installed.Mass storage: 500 GB hard disk drive Included Included IncludedSecurity: HP Trusted Platform Module (TPM)Included Included IncludedT ouchscreen control panel Included Included IncludedRetractable keyboard Not included Included Included 10Chapter 1 Printer overviewFax Optional Included IncludedSupported operating systemsUse the following information to ensure printer compatibility with your computer operating system.Linux: For information and print drivers for Linux, go to /go/linuxprinting.UNIX: For information and print drivers for UNIX®, go to /go/unixmodelscripts.The following information applies to the printer-specific Windows HP PCL 6 print drivers, HP print driversfor macOS, and to the software installer.Windows: Download HP Easy Start from /LaserJet to install the HP print driver. Or, go tothe printer-support website for this printer: /support/colorljM776MFP to download the printdriver or the software installer to install the HP print driver.macOS: Mac computers are supported with this printer. Download HP Easy Start either from /LaserJet or from the Printer Support page, and then use HP Easy Start to install the HP print driver.1.Go to /LaserJet.2.Follow the steps provided to download the printer software.Windows 7, 32-bit and 64-bit The “HP PCL 6” printer-specific print driver is installed for this operating system aspart of the software installation.Windows 8.1, 32-bit and 64-bit The “HP PCL-6” V4 printer-specific print driver is installed for this operating systemas part of the software installation.Windows 10, 32-bit and 64-bit The “HP PCL-6” V4 printer-specific print driver is installed for this operating systemas part of the software installation.Windows Server 2008 R2, SP 1, 64-bit The PCL 6 printer-specific print driver is available for download from the printer-support website. Download the driver, and then use the Microsoft Add Printer tool toinstall it.Windows Server 2012, 64-bit The PCL 6 printer-specific print driver is available for download from the printer-support website. Download the driver, and then use the Microsoft Add Printer tool toinstall it.Windows Server 2012 R2, 64-bit The PCL 6 printer-specific print driver is available for download from the printer-support website. Download the driver, and then use the Microsoft Add Printer tool toinstall it.Windows Server 2016, 64-bit The PCL 6 printer-specific print driver is available for download from the printer-support website. Download the driver, and then use the Microsoft Add Printer tool toinstall it.Windows Server 2019, 64-bit The PCL 6 printer-specific print driver is available for download from the printer-support website. Download the driver, and then use the Microsoft Add Printer tool toinstall it.Supported operating systems11macOS 10.13 High Sierra, macOS 10.14 MojaveDownload HP Easy Start from /LaserJet , and then use it to install the print driver.NOTE:Supported operating systems can change.NOTE:For a current list of supported operating systems and HP’s all-inclusive help for the printer, go to /support/colorljM776MFP .NOTE:For details on client and server operating systems and for HP UPD driver support for this printer, go to /go/upd . Under Additional information , click Specifications .●Internet connection●Dedicated USB 1.1 or 2.0 connection or a network connection● 2 GB of available hard-disk space ●1 GB RAM (32-bit) or2 GB RAM (64-bit)●Internet connection●Dedicated USB 1.1 or 2.0 connection or a network connection●1.5 GB of available hard-disk spaceNOTE:The Windows software installer installs the HP Smart Device Agent Base service. The file size is less than 100 kb. Its only function is to check for printers connected via USB hourly. No data is collected. If a USB printer is found, it then tries to locate a JetAdvantage Management Connector (JAMc) instance on the network. If a JAMc is found, the HP Smart Device Agent Base is securelyupgraded to a full Smart Device Agent from JAMc, which will then allow printed pages to be accounted for in a Managed Print Services (MPS) account. The driver-only web packs downloaded from for the printer and installed through the Add Printer wizard do not install this service.T o uninstall the service, open the Control Panel , select Programs or Programs and Features , and then select Add/Remove Programs or Uninstall a Programto remove the service. The file name isHPSmartDeviceAgentBase.Mobile printing solutionsHP offers multiple mobile printing solutions to enable easy printing to an HP printer from a laptop, tablet, smartphone, or other mobile device.T o see the full list and to determine the best choice, go to /go/MobilePrinting .NOTE:Update the printer firmware to ensure all mobile printing capabilities are supported.●Wi-Fi Direct (wireless models only, with HP Jetdirect 3100w BLE/NFC/Wireless accessory installed)●HP ePrint via email (Requires HP Web Services to be enabled and the printer to be registered with HP Connected)●HP Smart app ●Google Cloud Print12Chapter 1 Printer overview。
clad模拟卷2-副本(1)
CLAD 模拟题LabVIEW助理开发工程师考试试题注:考试过程中不允许使用计算机或其他参考资料。
说明:如您收到试卷时,试卷不是在盖有"NI Certification"的密封袋中,请不要开始答题。
请将试卷立即退还给监考人。
您将会收到一份替换试卷。
请不要拆开装订试卷。
如National Instruments收到的试卷有部分缺失或散页,考试成绩视为不通过。
请不要向监考人请求帮助。
如您认为试卷的问题不够清楚,可在问题旁添加注释,然后选择您认为最适合的答案。
不得部分或全部复印或复制试卷。
完成考试后,不得保存试卷的任何部分。
考试详细信息:时间:1小时试题类型:选择题试题数量:40通过分数:70%重要提示:完成考试后,将试卷放入信封内并密封。
将密封好的信封交给监考人。
CLAD 模拟题 答题纸:为了快速找到问题,可将答案记录在本页答题纸上。
撕下该页用于记录答案。
实际的 CLAD 考试中并无 该页,仅供模拟题使用。
答案页在模拟题的最后。
1. _____2._____3._____ 4. _____ 5. _____6. _____7. _____8. _____9. _____10. _____11. _____12. _____13. _____14. _____15. _____16. _____17. _____18. _____19. _____20. _____21. _____22. _____23. _____24. _____25. _____26. _____27. _____28.模拟题:1. 下列关于代码执行的陈述,正确的是a. 循环执行 51 次。
b. 循环执行 50 次。
c. 循环执行 49 次。
d. 连接 50 至 For 循环的总数接线端,与本题代码的执行一致。
2. 下列哪项将生成一个 LabVIEW 事件结构可捕捉到的事件a. 通过鼠标单击改变前面板控件的值b. 通过属性节点更新前面板控件c. 通过控件引用以编程方式更新前面板控件d. 通过 VI 服务器更新前面板控件3. 下列代码执行后,结果显示多少a. 子 VI 执行消耗的毫秒数b. 零c. 自 1970 年 1 月 1 日以来经历的秒数d. 顺序结构执行消耗的毫秒数4. 要在运行时修改前面板控件的一个属性。
waters质谱masslynx软件使用说明
Copyright Notice
Micromass UK Limited believes that the information in this publication is accurate. However the information is subject to change without notice and should not be construed as a contractual undertaking by Micromass UK Limited. Despite the care that has been given to the preparation of this publication, Micromass UK Limited accepts no responsibility for any loss or any other matter that may arise from any error or inaccuracy that may inadvertently have been included. Copyright 1993-2002 Micromass Ltd. All Rights Reserved. No part of this publication may be copied without the express written permission of Micromass UK Limited.
Page ii
MassLynx NT Users Guide
Contents
MassLynx NT User’s Guide............................................................................
od-2020_ed1.7
Part 1 General introduction to the TRF procedures
1.1 Scope
This Operational Document (OD) addresses various stages of Test Report Form (TRF) development, distribution, maintenances and use. It also includes various examples to illustrate the requirements.
1.3 Definitions
Test Report Form (TRF) – A blank form prepared by the TRF originator according to Part 3 of OD CB 2020 and published according to Annexes G and H of this Operational Document. TRF Originator – An NCB appointed by IECEE to develop a specific Test Report Form. CB Test Report – A filled out Test Report Form (TRF), containing results of product investigation, measured test data and attachments per the list of attachments referring to supporting documents. (See Annex E for instructions).
1.4 Structure of OD CB 2020
kctf的game第十四题
kctf的game第十四题KCTF的Game第十四题是一道CTF(Capture The Flag)游戏题目,旨在考察参与者在网络安全方面的技能和知识。
本题具体情景如下:假设你是一名网络安全工程师,你收到了一份关于一个公司内部服务器的安全漏洞报告。
据报告,该服务器上存在一个可以被利用的漏洞,攻击者可以通过该漏洞获取敏感数据并进一步入侵系统。
你的任务是分析漏洞并提供修复方案,以保证该服务器的安全。
你需要进行一系列的信息收集和分析。
通过对系统日志、网络流量数据和配置文件的仔细检查,你可以寻找潜在的漏洞来源和可能的攻击路径。
你可以使用各种安全工具来辅助你的分析,如漏洞扫描工具、入侵检测系统和网络流量分析工具。
在分析过程中,你可能会发现一个可疑的文件上传功能存在安全风险。
攻击者可以通过该功能上传恶意文件,并在服务器上执行任意代码。
为了修复该漏洞,你可以通过以下步骤来加强服务器的安全性:1. 更新和修复服务器软件:确保你的服务器软件处于最新版本,并安装任何可用的安全补丁。
及时更新软件可以防止已知漏洞被利用。
2. 限制文件上传功能:通过设置文件上传的最大限制和文件类型过滤机制,可以减少文件上传功能带来的潜在风险。
只允许上传经过验证的文件类型,并限制上传文件的大小,以减少恶意文件的传入。
3. 强化访问控制:通过正确配置文件和目录权限,限制服务器上敏感文件和目录的访问权限。
最小化文件的可写权限,以防止未授权的修改和删除。
4. 引入多重身份验证:通过绑定多个身份验证因素,如密码和物理令牌,来增强用户验证的安全性。
这将有效地降低攻击者获取合法用户凭证的风险。
5. 加密通信协议:确保所有通过网络传输的数据使用安全的通信协议进行加密,如HTTPS。
这可以防止攻击者窃取敏感信息,如用户凭证和数据传输内容。
通过对服务器进行漏洞分析和相应修复措施的实施,你可以提高该服务器的安全性,并防止潜在攻击者利用漏洞入侵系统。
这样,敏感数据和系统的完整性将得到保护,保障了公司的网络安全。
ANSI-TIA-EIA-568-B.2-1 Cat.6 June 20 2002

PUBLICATIONS or call Global Engineering Documents, USA and Canada (1-800-854-7179) International (303-397-7956)
All rights reserved Printed in U.S.A.
PLEASE! DON'T VIOLATE
This Standard does not purport to address all safety problems associated with its use or all applicable regulatory requirements. It is the responsibility of the user of this Standard to establish appropriate safety and health practices and to determine the applicability of regulatory limitations before its use.
Published by
Thermo-calc软件-TCCP用户指南 (有目录索引)
Thermo-Calc®User’s GuideVersion PThermo-Calc Software ABStockholm Technology ParkBjörnnäsvägen 21SE-113 47 Stockholm, SwedenCopyright © 1995-2003 Foundation of Computational ThermodynamicsStockholm, Sweden目录第1部分一般介绍 (12)1.1 计算热力学 (12)1.2 Thermo-Calc软件/数据库/界面包 (12)1.3 致谢 (13)1.4 版本历史 (13)1.5 Thermo-Calc软件包的通用结构 (13)1.6 各类硬件上Thermo-Calc软件包的有效性 (14)1.7 使用Thermo-Calc软件包的好处 (14)第2部分如何成为Thermo-Calc专家 (14)2.1 如何容易地使用本用户指南 (14)2.2 如何安装和维护Thermo-Calc软件包 (16)2.2.1 许可要求 (16)2.2.2 安装程序 (16)2.2.3 维护当前和以前版本 (16)2.2.4 使TCC执行更方便 (16)2.3 如何成为Thermo-Calc专家 (16)2.3.1 从TCSAB与其世界各地的代理获得迅速技术支持 (17)2.3.2 日常使用各种Thermo-Calc功能 (17)2.3.3 以专业的和高质量的标准提交结果 (17)2.3.4 通过各种渠道相互交换经验 (17)第3部分Thermo-Calc软件系统 (17)3.1 Thermo-Calc软件系统的目标 (17)3.2 一些热力学术语的介绍 (18)3.2.1 热力学 (18)3.2.2 体系、组元、相、组成、物种(System, component, phases, constituents and species) (18)3.2.3 结构、亚点阵和位置 (19)3.2.4 成分、构成、位置分数、摩尔分数和浓度(composition, constitution, site fractions, molefractions and concentration) (19)3.2.5 平衡态和状态变量 (19)3.2.6 导出变量 (22)3.2.7 Gibbs相规则 (25)3.2.8 状态的热力学函数 (25)3.2.9 具有多相的体系 (25)3.2.10 不可逆热力学 (26)3.2.11 热力学模型 (26)3.2.12 与各种状态变量有关的Gibbs能 (27)3.2.13 参考态与标准态 (27)3.2.14 溶解度范围 (28)3.2.15 驱动力 (28)3.2.16 化学反应 (28)3.2.17 与平衡常数方法相对的Gibbs能最小化技术 (28)3.2.18 平衡计算 (29)3.3 热力学数据 (30)3.3.1 数据结构 (30)3.3.3 数据估价 (32)3.3.6 数据加密 (33)3.4 用户界面 (34)3.4.1 普通结构 (34)3.4.2 缩写 (34)3.4.3 过程机制(history mechanism) (35)3.4.4 工作目录和目标目录(Working directory and target directory) (35)3.4.5 参数转换为命令 (36)3.4.6 缺省值 (36)3.4.7 不理解的问题 (36)3.4.8 帮助与信息 (36)3.4.9 出错消息 (36)3.4.10 控制符 (36)3.4.11 私人文件 (36)3.4.12 宏工具 (37)3.4.13 模块性 (37)3.5 Thermo-Calc中的模块 (37)3.5.1 基本模块 (37)3.7 Thermo-Calc编程界面 (39)3.7.1 Thermo-Calc作为引肇 (39)3.7.2 Thermo-Calc应用编程界面:TQ和TCAPI (40)3.7.3 在其它软件包中开发Thermo-Calc工具箱 (43)3.7.4 材料性质计算核材料工艺模拟的应用 (43)3.8 Thermo-Calc的功能 (44)3.9 Thermo-Calc应用 (44)第4部分Thermo-Calc数据库描述 (45)4.1 引言 (45)4.2 Thermo-Calc数据库描述形式 (45)第5部分数据库模块(TDB)——用户指南 (55)5.1 引言 (55)5.2 TDB模块中用户界面 (56)5.3 开始 (56)5.3.1 SWITCH-DATABASE (56)5.3.2 LIST-DATABASE ELEMENT (56)5.3.3 DEFINE_ELEMENTS (56)5.3.4 LIST_SYSTEM CONSTITUENT (56)5.3.5 REJECT PHASE (56)5.3.6 RESTORE PHASE (56)5.3.7 GET_DATA (56)5.4 所有TDB监视命令的描述 (56)5.4.1 AMEND_SELACTION (56)5.4.6 DEFINE_SPECIES (58)5.4.7 DEFINE_SYSTEM (58)5.4.8 EXCLUDE_UNUSED_SPECIES (58)5.4.9 EXIT (58)5.4.10 GET_DATA (58)5.4.11 GOTO_MODULE (59)5.4.12 HELP (59)5.4.13 INFORMA TION (59)5.4.14 LIST_DATABASE (60)5.4.15 LIST_SYSTEM (60)5.4.16 MERGE_WITH_DA TABASES (61)5.4.17 NEW_DIRECTORY_FILE (61)5.4.18 REJECT (61)5.4.19 RESTORE (62)5.4.20 SET_AUTO_APPEND_DA TABASE (62)5.4.21 SWITCH_DA TABASE (63)5.5 扩展命令 (64)第6部分数据库模块(TDB)——管理指南 (64)6.1 引言 (64)6.2 TDB模块的初始化 (65)6.3 数据库定义文件语法 (66)6.3.1 ELEMENT (67)6.3.2 SPECIES (67)6.3.3 PHASE (67)6.3.4 CONSTITUENT (67)6.3.5 ADD_CONSTITUENT (68)6.3.6 COMPOUND_PHASE (68)6.3.7 ALLOTROPIC_PHASE (68)6.3.8 TEMPERA TURE_LIMITS (68)6.3.9 DEFINE_SYSTEM_DEFAULT (69)6.3.10 DEFAULT_COMMAND (69)6.3.11 DATABASE_INFORMATION (69)6.3.12 TYPE_DEFINITION (69)6.3.13 FTP_FILE (70)6.3.14 FUNCTION (70)6.3.15 PARAMETER (72)6.3.16 OPTIONS (73)6.3.17 TABLE (73)6.3.18 ASSESSED_SYSTEMS (73)6.3.19 REFERENCE_FILE (74)6.3.20 LIST_OF_REFERENCE (75)6.3.21 CASE与ENDCASE (76)6.3.22 VERSION_DA TA (76)6.5 数据库定义文件实例 (77)6.5.1 例1:一个小的钢数据库 (77)6.5.2 例2:Sb-Sn系个人数据库 (78)第7部分制表模块(TAB) (81)7.1 引言 (81)7.2 一般命令 (81)7.2.1 HELP (81)7.2.2 GOTO_MODULE (81)7.2.3 BACK (82)7.2.4 EXIT (82)7.2.5 PATCH (82)7.3 重要命令 (82)7.3.1 TABULATE_SUBSTANCE (82)7.3.2 TABULATE_REACTION (85)7.3.3 ENTER_REACTION (86)7.3.4 SWITCH_DA TABASE (87)7.3.5 ENTER_FUNCTION (88)7.3.6 TABULATE_DERIV A TIVES (89)7.3.7 LIST_SUBSTANCE (91)7.4 其它命令 (92)7.4.1 SET_ENERGY_UNIT (92)7.4.2 SET_PLOT_FORMAT (92)7.4.3 MACRO_FILE_OPEN (92)7.4.4 SET_INTERACTIVE (93)7.5 绘制表 (93)第8部分平衡计算模块(POL Y) (94)8.1 引言 (94)8.2 开始 (95)8.3 基本热力学 (95)8.3.1 体系与相 (95)8.3.2 组元(Species) (95)8.3.3 状态变量 (96)8.3.4 组分 (97)8.3.5 条件 (98)8.4 不同类型的计算 (98)8.4.1 计算单一平衡 (98)8.4.2 性质图的Steping计算 (99)8.4.3 凝固路径模拟 (99)8.4.4 仲平衡与T0温度模拟 (99)8.4.5 相图的Mapping计算 (101)8.4.6 势图计算 (101)8.4.7 Pourbaix图计算 (101)8.4.8 绘制图 (101)8.5.4 更高阶相图 (104)8.5.5 性质图 (104)8.6 普通命令 (104)8.6.1 HELP (104)8.6.2 INFORMA TION (104)8.6.3 GOTO_MODULE (105)8.6.4 BACK (105)8.6.5 SET_INTERACTIVE (105)8.6.6 EXIT (106)8.7 基本命令 (106)8.7.1 SET_CONDITION (106)8.7.2 RESET_CONDITION (107)8.7.3 LIST_CONDITIONS (107)8.7.4 COMPUTE_EQUILIBRIUM (107)8.7.6 DEFINE_MATERIAL (108)8.7.6 DEFINE_DIAGRAM (111)8.8 保存和读取POL Y数据结构的命令 (112)8.8.1 SA VE_WORKSPACES (112)8.8.2 READ_WORKSPACES (113)8.9 计算与绘图命令 (114)8.9.1 SET_AXIS_V ARIABLE (114)8.9.2 LIST_AXIS_V ARIABLE (114)8.9.3 MAP (114)8.9.4 STEP_WITH_OPTIONS (115)8.9.5 ADD_INITIAL_EQUILIBRIUM (117)8.9.6 POST (118)8.10 其它有帮助的命令 (118)8.10.1 CHANGE_STA TUS (118)8.10.2 LIST_STA TUS (119)8.10.3 COMPUTE_TRANSITION (120)8.10.4 SET_ALL_START_V ALUES (121)8.10.5 SHOW_V ALUE (122)8.10.6 SET_INPUT_AMOUNTS (122)8.10.7 SET_REFERENCE_STA TE (122)8.10.8 ENTER_SYMBOL (123)8.10.9 LIST_SYMBOLS (124)8.10.10 EV ALUATE_FUNCTIONS (124)8.10.11 TABULATE (124)8.11 高级命令 (125)8.11.1 AMEND_STORED_EQUILIBRIA (125)8.11.3 DELETE_INITIAL_EQUILIBRIUM (126)8.11.4 LIST_INITIAL_EQUILIBRIA (126)8.11.5 LOAD_INITIAL_EQUILIBRIUM (126)8.11.10 SELECT_EQUILIBRIUM (128)8.11.11 SET_NUMERICAL_LIMITS (128)8.11.12 SET_START_CONSTITUTION (129)8.11.13 SET_START_V ALUE (129)8.11.14 PATCH (129)8.11.15 RECOVER_START_V ALUE (129)8.11.16 SPECIAL_OPTIONS (129)8.12 水溶液 (132)8.13 排除故障 (133)8.13.1 第一步 (133)8.13.2 第二步 (133)8.13.3 第三步 (133)8.14 频繁提问的问题 (134)8.14.1 程序中为什么只得到半行? (134)8.14.2 在已经保存之后为什么不能绘图? (134)8.14.3 为什么G.T不总是与-S相同? (134)8.14.4 如何获得组元偏焓 (135)8.14.5 为什么H(LIQUID) 是零而HM(LIQUID)不是零 (135)8.14.6 即使石墨是稳定的为什么碳活度小于1? (135)8.14.7 如何获得过剩Gibbs能? (135)8.14.8 当得到交叉结线而不是混溶裂隙时什么是错的? (135)8.14.9 怎么能直接计算最大混溶裂隙? (136)第9部分后处理模块(POST) (136)9.1 引言 (136)9.2 一般命令 (137)9.2.1 HELP (137)9.2.2 BACK (137)9.2.3 EXIT (137)9.3 重要命令 (137)9.3.1 SET_DIAGRAM_AXIS (137)9.3.2 SET_DIAGRAM_TYPE (138)9.3.3 SET_LABEL_CORVE_OPTION (139)9.3.5 MODIFY_LABEL_TEXT (139)9.3.6 SET_PLOT_FORMAT (140)9.3.7 PLOT_DIAGRAM (141)9.3.8 PRINT_DIAGRAM (142)9.3.9 DUMP_DIAGRAM (143)9.3.10 SET_SCALING_STA TUS (144)9.3.11 SET_TITLE (144)9.3.12 LIST_PLOT_SETTINGS (144)9.4 实验数据文件绘图命令 (144)9.4.1 APPEND_EXPERIMENTAL_DA TA (144)9.4.2 MAKE_EXPERIMENTAL_DA TAFILE (145)9.5.3 SET_AXIS_LENGTH (147)9.5.4 SET_AXIS_TEXT_STATUS (147)9.5.5 SET_AXIS_TYPE (147)9.5.6 SET_COLOR (147)9.5.7 SET_CORNER_TEXT (148)9.5.8 SET_FONT (148)9.5.9 SET_INTERACTIVE_MODE (149)9.5.10 SET_PLOT_OPTION (149)9.5.11 SET_PREFIX_SCALING (149)9.5.12 SET_REFERENCE_STA TE (149)9.5.13 SET_TIELINE_STA TE (150)9.5.14 SET_TRUE_MANUAL_SCALING (150)9.5.15 TABULATE (150)9.6 奇特的命令 (150)9.6.1 PATCH_WORKSPACE (150)9.6.2 RESTORE_PHASE_IN_PLOT (150)9.6.3 REINIATE_PLOT_SETTINGS (151)9.6.4 SET_AXIS_PLOT_STATUS (151)9.6.5 SET_PLOT_SIZE (151)9.6.6 SET_RASTER_STATUS (151)9.6.8 SUSPEND_PHASE_IN_PLOT (151)9.7 3D图标是:命令与演示 (151)9.7.1 CREATE_3D_PLOTFILE (153)9.7.2 在Cortona VRML Client阅读器中查看3D图 (154)第10部分一些特殊模块 (155)10.1 引言 (155)10.2 特殊模块生成或使用的文件 (156)10.2.1 POL Y3文件 (156)10.2.2 RCT文件 (156)10.2.3 GES5文件 (156)10.2.4 宏文件 (157)10.3 与特殊模块的交互 (157)10.4 BIN模块 (157)10.4.1 BIN模块的描述 (157)10.4.2 特定BIN模块数据库的结构 (161)10.4.3特定BIN计算的演示实例 (162)10.5 TERN 模块 (162)10.5.1 TERN 模块的描述 (162)10.5.2 特殊TERN模块数据库的结构 (166)10.5.3 TERN模块计算的演示实例 (167)10.6 POT模块 (167)10.7 POURBAIX 模块 (167)10.8 SCHAIL 模块 (167)11.2 热化学 (168)11.2.1 一些术语的定义 (168)11.2.2 元素与物种(Elements and species) (168)11.2.3 大小写模式 (169)11.2.4 相 (169)11.2.5 温度与压力的函数 (169)11.2.6 符号 (170)11.2.7 混溶裂隙 (170)11.3 热力学模型 (170)11.3.1 标准Gibbs能 (171)11.3.2 理想置换模型 (171)11.3.3 规则溶体模型 (171)11.3.4 使用组元而不是元素 (172)11.3.5 亚点阵模型—化合物能量公式 (172)11.3.6 离子液体模型,对具有有序化趋势的液体 (172)11.3.7 缔合模型 (173)11.3.8 准化学模型 (173)11.3.9 对Gibbs能的非化学贡献(如铁磁) (173)11.3.10 既有有序-无序转变的相 (173)11.3.11 CVM方法:关于有序/无序现象 (173)11.3.12 Birch-Murnaghan模型:关于高压贡献 (173)11.3.13 理想气体模型相对非理想气体/气体混合物模型 (173)11.3.14 DHLL和SIT模型:关于稀水溶液 (173)11.3.15 HKF和PITZ模型:对浓水溶液 (173)11.3.16 Flory-Huggins模型:对聚合物 (173)11.4 热力学参数 (173)11.5 数据结构 (175)11.5.1 构造 (175)11.5.2 Gibbs能参考表面 (175)11.5.3 过剩Gibbs能 (175)11.5.4 存储私有文件 (175)11.5.5 加密与不加密数据库 (176)11.6 GES系统的应用程序 (176)11.7 用户界面 (176)11.7.1 模块性和交互性 (177)11.7.2 控制符的使用 (177)11.8 帮助与信息的命令 (177)11.8.1 HELP (177)11.8.2 INFORMATION (177)11.9 改变模块与终止程序命令 (178)11.9.1 GOTO_MODULE (178)11.9.2 BACK (178)11.9.3 EXIT (178)11.10 输入数据命令 (178)11.10.4 ENTER_SYMBOL (180)11.10.5 ENTER_PARAMETER (181)11.11 列出数据的命令 (183)11.11.1 LIST_DATA (183)11.11.2 LIST_PHASE_DA TA (183)11.11.3 LIST_PARAMETER (184)11.11.4 LIST_SYMBOL (185)11.11.5 LIST_CONSTITUENT (185)11.11.6 LIST_STATUS (185)11.12 修改数据命令 (185)11.12.1 AMEND_ELEMENT_DA TA (185)11.12.2 AMEND_PHASE_DESCRIPTION (186)11.12.3 AMEND_SYMBOL (188)11.12.4 AMEND_PARAMETER (189)11.12.5 CHANGE_STATUS (191)11.12.6 PATCH_WORKSPACES (191)11.12.7 SET_R_AND_P_NORM (191)11.13 删除数据的命令 (192)11.13.1 REINITIATE (192)11.13.2 DELETE (192)11.14 存储或读取数据的命令 (192)11.14.1 SA VE_GES_WORKSPACE (192)11.14.2 READ_GES_WORKSPACE (193)11.15 其它命令 (193)11.15.1 SET_INTERACTIVE (193)第12部分优化模块(PARROT) (193)12.1 引言 (193)12.1.1 热力学数据库 (194)12.1.2 优化方法 (194)1 2.1.4 其它优化软件 (195)12.2 开始 (195)12.2.1 试验数据文件:POP文件 (195)12.2.2 图形试验文件:EXP文件 (197)12.2.3 系统定义文件:SETUP文件 (197)12.2.4 工作文件或存储文件:PAR文件 (198)12.2.5 各种文件名与其关系 (198)12.2.6 交互运行PARROT模块 (199)12.2.6.3 绘制中间结果 (199)12.2.6.4 实验数据的选择 (199)12.2.6.6 优化与连续优化 (200)12.2.7 参数修整 (200)12.2.8 交互完成的变化要求编译 (201)12.3 交替模式 (201)12.4 诀窍与处理 (201)12.4.4 参数量 (201)12.5 命令结构 (201)12.5.1 一些项的定义 (201)12.5.2 与其它模块连接的命令 (201)12.5.3 用户界面 (201)12.6 一般命令 (201)12.7 最频繁使用的命令 (202)12.8 其它命令 (203)第13部分编辑-实验模块(ED-EXP) (203)第14部分系统实用模块(SYS) (203)14.1 引言 (203)14.2 一般命令 (203)14.2.1 HELP (203)14.2.2 INFORMA TION (204)14.2.4 BACK (205)14.2.5 EXIT (205)14.2.6 SET_LOG_FILE (205)14.2.7 MACRO+FILE_OPEN (205)14.2.8 SET_PLOT_ENVIRONMENT (206)14.3 Odd命令 (207)14.3.1 SET_INTERACTIVE_MODE (207)14.3.2 SET_COMMAND_UNITS (207)14.3.4 LIST_FREE_WORKSPACE (207)14.3.5 PATCH (207)14.3.6 TRACE (207)14.3.7 STOP_ON_ERROR (208)14.3.8 OPEN_FILE (208)14.3.9 CLOSE_FILE (208)14.3.10 SET_TERMINAL (208)14.3.11 NEWS (208)14.3.12 HP_CALCULATOR (208)14.4 一般信息的显示 (209)第15部分数据绘图语言(DATAPLOT) (215)第1部分一般介绍1.1 计算热力学在近十年内与材料科学与工程相联系的计算机计算与模拟的研究与发展已经为定量设计各种材料产生了革命性的方法,热力学与动力学模型的广泛结合使预测材料成分、各种加工后的结构和性能。
汽车零部件维护指南说明书
AccessoriesInstallation.................................. 117ACCESSORY (Ignition KeyPosition) .......................................51AddingAutomatic TransmissionFluid ....................................... 161Brake Fluid................................. 163Clutch Fluid................................ 163Differential Oil ...........................161Engine Coolant ..........................156Engine Oil ..................................152Manual Transmission Fluid.......162Power Steering Fluid................. 165Windshield Washer Fluid......... 160Additional Safety Information ......... 18Door Locks................................... 19Head Restraint Position .............. 18Seat-back Position ....................... 18Driving with Pets......................... 19Storing Cargo Safely ................... 19Additives, Engine Oil..................... 154AdjustmentsHeadlights (182)Head Restraints ...........................60Mirrors .........................................69Seats.............................................. 55Steering Wheel ............................45Airbag (SRS) .....................................12Air Cleaner...................................... 166Air ConditioningMaintenance............................... 175Usage......................................81, 88Air Outlets (Vents) .....................80, 87Air Pressure, Tires......................... 174Alarm, Anti-theft............................. 107Alcohol and Drugs ...........................26Aluminum Wheels, Cleaning ........ 195Antenna, Cleaning.......................... 194Antifreeze........................................ 156Anti-lock Brakes (ABS)Description.................................230Fluid ............................................164Indicator Light .............................33Operation.................................... 131Anti-theft Steering ColumnLock ..............................................51Anti-theft System............................ 107Appearance Care............................ 193Ashtrays .. (75)Audio Controls, Remote ................104Audio System....................................93Automatic Climate ControlSystem ..........................................87Automatic Speed Control ................47Automatic Transmission ............... 126Capacity, Fluid ...........................228Checking Fluid Level................ 161Shifting ....................................... 126Shift Lever Positions ................. 126Shift Lock Release ..................... 129Shift Position Indicator (35)Baby, Holding a................................21Back-up Lamp Replacement ......... 188BatteryCharging SystemIndicator...........................32, 215Jump Starting .............................210Maintenance............................... 170Specifications .............................229Before Driving................................ 109Belts, Seat . (5)CONTINUEDBeverage Holder ..............................73Body Repair ....................................200Brakes ............................................. 130Anti-lock System (ABS) ............ 131Break-in, New Linings............... 110Fluid............................................ 163Light, Burned-out ......................188Parking .........................................71System Indicator.......................... 32Wear Indicators ......................... 130Brakes, ABSDescription.................................230Operation.................................... 131System Indicator.......................... 33Braking System.............................. 130Break-in, New Car.......................... 110Brightness Control,Instruments..................................41Brights, Headlights..........................40Bulb Replacement.......................... 184Back-up Lights........................... 188Brake Lights............................... 188Ceiling Lights............................. 189Courtesy Lights ......................... 189Front Side Marker Lights......... 186Headlights. (184)License Plate Lights ..................189Parking Lights ........................... 186Rear Side Marker Lights .......... 187Specifications .............................229Trunk Light................................ 191Turn Signal Lights..................... 185Bulbs, Halogen . (184)Cables, Jump Starting with ........... 210Cancel Button ...................................49Capacities Chart .............................228Carbon Monoxide Hazard...............26Cargo, Loading............................... 118Car Seats for Children .....................20Cassette PlayerCare............................................. 106Operation...................................... 98CAUTION, Explanation of ................ii CD Changer.................................... 100Ceiling Lights ...................................76Certification Label ..........................226Chains ............................................. 181Change OilHow to (154)When to ...................................... 146Changing a Flat Tire ...................... 203Changing Engine Coolant............. 157Charging System Indicator .....32, 215Check Engine Light................. 33, 216CheckingAutomatic TransmissionFluid ....................................... 161Battery Condition ...................... 170Brake Fluid................................. 163Clutch Fluid................................ 165Differential Oil ...........................162Drive Belts.................................. 176Engine Coolant ..........................156Engine Oil .................................. 152Fuses ...........................................218Manual Transmission Fluid...... 162Power Steering Fluid................. 165Checklist, Before Driving.............. 120Child Safety.......................................20Cigarette Lighter.............................. 74Cleaner, Air..................................... 166CleaningAluminum Wheels..................... 195Antenna....................................... 194Exterior.......................................194Interior........................................ 197Leather........................................ 197Seat Belts.................................... 197Vinyl............................................ 197Windows..................................... 198Wood Trim ................................. 197CLEAN Light.................................. 106Climate Control System ..................87Clock, Setting the............................. 72Clutch Fluid.................................... 165Code, Audio system....................... 105CO in the Exhaust............................26Cold Weather, Starting in.............. 122Compact Spare ...............................202Console Compartment.....................73Controls, Instruments and ..............29CoolantAdding ........................................ 156Checking .................................... 156Proper solution .......................... 156Temperature Gauge ....................37Corrosion Protection ..................... 199Courtesy Lights ................................76Crankcase Emission ControlSystem ........................................235Cruise Control Operation ................47Customer Relations Office (241)DANGER, Explanation of.................. ii Dashboard ........................................30Daytime Running Lights .................40Dead Battery, What to do ..............210Defog and Defrost...................... 86, 91Defogger, Rear Window.................. 44Defog, Rear Window........................44Defrosting the Windows............86, 91Dexron ® II AutomaticTransmission Fluid.................... 161Differentral Oil ...............................162Dimensions.....................................228Dimming the Headlights................. 40DipstickAutomatic Transmission........... 161Engine Oil ..................................152Directional Signals ...........................41Disabled, Towing Your Car if .......223Disc Brake Wear Indicators..........130Disposal of Used Oil...................... 155DoorsLocking and Unlocking...............52Lockout Prevention .....................52Monitor Light. (34)Power Door Closers ....................53Power Door Locks....................... 52DOT Tire Quality Grading ............233Downshifting, 6-speed ManualTransmission.............................. 123Drive Belts ......................................176Driving ............................................ 119Economy..................................... 116In Bad Weather..........................135In Foreign Countries .....................111Driving Position MemorySystem (61)Economy, Fuel ...............................116Emergencies on the Road .............201Battery, Jump Starting ..............210Changing a Flat Tire .................203Charging System Indicator.......215Check Engine Light ..................216Checking the Fuses...................218Low Oil Pressure Indicator.......214Malfunction Indicator Lamp .. (216)CONTINUEDManually ClosingtheMoonroof.........................217Overheated Engine ...................212Emergency Brake ............................71Emergency Flashers........................ 44Emission Controls ..........................235EngineBelts............................................ 176Check Light..........................33, 216Coolant Temperature Gauge...... 37Malfunction IndicatorLamp.................................33, 216Oil Pressure Indicator .........32, 214Oil, What Kind to Use (15)3Overheating ...............................212Specifications .............................229Ethanol in Gasoline........................ 111Evaporative Emission controls .....235Exhaust Fumes.................................26Exhaust Gas RecirculationSystem ........................................236Expectant Mothers, Use of SeatBelts by.........................................10Exterior, Cleaning the . (194)Fabric, Cleaning............................. 197Fan, Interior................................ 81, 92Features, Comfort andConveniences...............................79Filling the Fuel Tank ..................... 112FiltersFuel............................................. 167Oil................................................ 154First Gear, Shifting......................... 128Flashers, Hazard Warning ..............44Flat Tire, Changing a .....................203FluidsAutomatic Transmission........... 161Brake........................................... 163Clutch .........................................165Differential Oil ...........................162Manual Transmission ............... 162Power Steering .......................... 165Windshield Washer ....................... 160FM Stereo RadioReception...................................... 94Four-way Flashers............................44Front End, Towing by Emergency Wrecker.. (223)Fuel.................................................. 110Fill Door and Cap ...................... 112Filter ............................................167Gauge............................................ 37Octane Requirement .................110Oxygenated................................ 110Reserve Indicator......................... 35Tank, Filling the ........................112Fuel Mileage, Improving............... 116Fuel Station Procedures ................ 112Fuses, Checking the . (218)Gasohol........................................... 111Gasoline .......................................... 110Filter............................................ 167Fuel Reserve Indicator ................35Gauge............................................ 37Octane Requirement .................110Oxygenated Fuels...................... 110Tank, Filling the ........................112Gauges ..............................................36Engine Coolant Temperature.....37Fuel ...............................................37GAWR(Gross Axle Weight Rating) (137)Gearshift Lever PositionsAutomatic Transmission (126)6-speed ManualTransmission (123)Glass Cleaning (198)Glove Box (54)GVWR (Gross Vehicle WeightRating) (137)Halogen Headlight Bulbs (184)Hazard Warning Flashers (44)HeadlightsAiming (182)Daytime Running Lights (40)High Beam Indicator (35)High Beams, Turning on (40)Low Beams, Turning on (40)Reminder Chime (40)Replacing Halogen Bulbs (184)Turning on (40)Head Restraints (60)Heating and Cooling (80)High Altitude, Starting at (122)High-Low Beam Switch (40)High Speed, Shifting at (124)Holding a Baby (20)Hood, Opening the (113)Horn (49)Hot Coolant, Warning about (156)Hydraulic Clutch (165)Hydroplaning (136)Identification Number, Vehicle (226)If Your Car has to be Towed (223)IgnitionKeys (50)Switch (51)Timing Control System (236)Important Facts AboutAirbags (13)Indicator Lights, InstrumentPanel (31)Infant Restraint (19)Inflation, Proper Tire (177)Inside Mirror (69)Inspection, Tire (178)Instrument Panel (30)Instrument Panel Brightness (41)Interior Cleaning (197)Interior Lights (76)Introduction (i)Jacking Up the Car (205)Jack, Tire (204)Jump Starting (210)Keys (50)Label, Certification (226)Lane Change, signaling (41)Lap Belt (7)Lap/Shoulder Belts (6)Leaking of Exhaust into Car (26)Leather, Cleaning (197)Lighter, Cigarette (74)CONTINUED。
Native Instruments MASCHINE MIKRO MK3用户手册说明书
The information in this document is subject to change without notice and does not represent a commitment on the part of Native Instruments GmbH. The software described by this docu-ment is subject to a License Agreement and may not be copied to other media. No part of this publication may be copied, reproduced or otherwise transmitted or recorded, for any purpose, without prior written permission by Native Instruments GmbH, hereinafter referred to as Native Instruments.“Native Instruments”, “NI” and associated logos are (registered) trademarks of Native Instru-ments GmbH.ASIO, VST, HALion and Cubase are registered trademarks of Steinberg Media Technologies GmbH.All other product and company names are trademarks™ or registered® trademarks of their re-spective holders. Use of them does not imply any affiliation with or endorsement by them.Document authored by: David Gover and Nico Sidi.Software version: 2.8 (02/2019)Hardware version: MASCHINE MIKRO MK3Special thanks to the Beta Test Team, who were invaluable not just in tracking down bugs, but in making this a better product.NATIVE INSTRUMENTS GmbH Schlesische Str. 29-30D-10997 Berlin Germanywww.native-instruments.de NATIVE INSTRUMENTS North America, Inc. 6725 Sunset Boulevard5th FloorLos Angeles, CA 90028USANATIVE INSTRUMENTS K.K.YO Building 3FJingumae 6-7-15, Shibuya-ku, Tokyo 150-0001Japanwww.native-instruments.co.jp NATIVE INSTRUMENTS UK Limited 18 Phipp StreetLondon EC2A 4NUUKNATIVE INSTRUMENTS FRANCE SARL 113 Rue Saint-Maur75011 ParisFrance SHENZHEN NATIVE INSTRUMENTS COMPANY Limited 5F, Shenzhen Zimao Center111 Taizi Road, Nanshan District, Shenzhen, GuangdongChina© NATIVE INSTRUMENTS GmbH, 2019. All rights reserved.Table of Contents1Welcome to MASCHINE (23)1.1MASCHINE Documentation (24)1.2Document Conventions (25)1.3New Features in MASCHINE 2.8 (26)1.4New Features in MASCHINE 2.7.10 (28)1.5New Features in MASCHINE 2.7.8 (29)1.6New Features in MASCHINE 2.7.7 (29)1.7New Features in MASCHINE 2.7.4 (31)1.8New Features in MASCHINE 2.7.3 (33)2Quick Reference (35)2.1MASCHINE Project Overview (35)2.1.1Sound Content (35)2.1.2Arrangement (37)2.2MASCHINE Hardware Overview (40)2.2.1MASCHINE MIKRO Hardware Overview (40)2.2.1.1Browser Section (41)2.2.1.2Edit Section (42)2.2.1.3Performance Section (43)2.2.1.4Transport Section (45)2.2.1.5Pad Section (46)2.2.1.6Rear Panel (50)2.3MASCHINE Software Overview (51)2.3.1Header (52)2.3.2Browser (54)2.3.3Arranger (56)2.3.4Control Area (59)2.3.5Pattern Editor (60)3Basic Concepts (62)3.1Important Names and Concepts (62)3.2Adjusting the MASCHINE User Interface (65)3.2.1Adjusting the Size of the Interface (65)3.2.2Switching between Ideas View and Song View (66)3.2.3Showing/Hiding the Browser (67)3.2.4Showing/Hiding the Control Lane (67)3.3Common Operations (68)3.3.1Adjusting Volume, Swing, and Tempo (68)3.3.2Undo/Redo (71)3.3.3Focusing on a Group or a Sound (73)3.3.4Switching Between the Master, Group, and Sound Level (77)3.3.5Navigating Channel Properties, Plug-ins, and Parameter Pages in the Control Area.773.3.6Navigating the Software Using the Controller (82)3.3.7Using Two or More Hardware Controllers (82)3.3.8Loading a Recent Project from the Controller (84)3.4Native Kontrol Standard (85)3.5Stand-Alone and Plug-in Mode (86)3.5.1Differences between Stand-Alone and Plug-in Mode (86)3.5.2Switching Instances (88)3.6Preferences (88)3.6.1Preferences – General Page (89)3.6.2Preferences – Audio Page (93)3.6.3Preferences – MIDI Page (95)3.6.4Preferences – Default Page (97)3.6.5Preferences – Library Page (101)3.6.6Preferences – Plug-ins Page (109)3.6.7Preferences – Hardware Page (114)3.6.8Preferences – Colors Page (114)3.7Integrating MASCHINE into a MIDI Setup (117)3.7.1Connecting External MIDI Equipment (117)3.7.2Sync to External MIDI Clock (117)3.7.3Send MIDI Clock (118)3.7.4Using MIDI Mode (119)3.8Syncing MASCHINE using Ableton Link (120)3.8.1Connecting to a Network (121)3.8.2Joining and Leaving a Link Session (121)4Browser (123)4.1Browser Basics (123)4.1.1The MASCHINE Library (123)4.1.2Browsing the Library vs. Browsing Your Hard Disks (124)4.2Searching and Loading Files from the Library (125)4.2.1Overview of the Library Pane (125)4.2.2Selecting or Loading a Product and Selecting a Bank from the Browser (128)4.2.3Selecting a Product Category, a Product, a Bank, and a Sub-Bank (133)4.2.3.1Selecting a Product Category, a Product, a Bank, and a Sub-Bank on theController (137)4.2.4Selecting a File Type (137)4.2.5Choosing Between Factory and User Content (138)4.2.6Selecting Type and Character Tags (138)4.2.7Performing a Text Search (142)4.2.8Loading a File from the Result List (143)4.3Additional Browsing Tools (148)4.3.1Loading the Selected Files Automatically (148)4.3.2Auditioning Instrument Presets (149)4.3.3Auditioning Samples (150)4.3.4Loading Groups with Patterns (150)4.3.5Loading Groups with Routing (151)4.3.6Displaying File Information (151)4.4Using Favorites in the Browser (152)4.5Editing the Files’ Tags and Properties (155)4.5.1Attribute Editor Basics (155)4.5.2The Bank Page (157)4.5.3The Types and Characters Pages (157)4.5.4The Properties Page (160)4.6Loading and Importing Files from Your File System (161)4.6.1Overview of the FILES Pane (161)4.6.2Using Favorites (163)4.6.3Using the Location Bar (164)4.6.4Navigating to Recent Locations (165)4.6.5Using the Result List (166)4.6.6Importing Files to the MASCHINE Library (169)4.7Locating Missing Samples (171)4.8Using Quick Browse (173)5Managing Sounds, Groups, and Your Project (175)5.1Overview of the Sounds, Groups, and Master (175)5.1.1The Sound, Group, and Master Channels (176)5.1.2Similarities and Differences in Handling Sounds and Groups (177)5.1.3Selecting Multiple Sounds or Groups (178)5.2Managing Sounds (181)5.2.1Loading Sounds (183)5.2.2Pre-listening to Sounds (184)5.2.3Renaming Sound Slots (185)5.2.4Changing the Sound’s Color (186)5.2.5Saving Sounds (187)5.2.6Copying and Pasting Sounds (189)5.2.7Moving Sounds (192)5.2.8Resetting Sound Slots (193)5.3Managing Groups (194)5.3.1Creating Groups (196)5.3.2Loading Groups (197)5.3.3Renaming Groups (198)5.3.4Changing the Group’s Color (199)5.3.5Saving Groups (200)5.3.6Copying and Pasting Groups (202)5.3.7Reordering Groups (206)5.3.8Deleting Groups (207)5.4Exporting MASCHINE Objects and Audio (208)5.4.1Saving a Group with its Samples (208)5.4.2Saving a Project with its Samples (210)5.4.3Exporting Audio (212)5.5Importing Third-Party File Formats (218)5.5.1Loading REX Files into Sound Slots (218)5.5.2Importing MPC Programs to Groups (219)6Playing on the Controller (223)6.1Adjusting the Pads (223)6.1.1The Pad View in the Software (223)6.1.2Choosing a Pad Input Mode (225)6.1.3Adjusting the Base Key (226)6.2Adjusting the Key, Choke, and Link Parameters for Multiple Sounds (227)6.3Playing Tools (229)6.3.1Mute and Solo (229)6.3.2Choke All Notes (233)6.3.3Groove (233)6.3.4Level, Tempo, Tune, and Groove Shortcuts on Your Controller (235)6.3.5Tap Tempo (235)6.4Performance Features (236)6.4.1Overview of the Perform Features (236)6.4.2Selecting a Scale and Creating Chords (239)6.4.3Scale and Chord Parameters (240)6.4.4Creating Arpeggios and Repeated Notes (253)6.4.5Swing on Note Repeat / Arp Output (257)6.5Using Lock Snapshots (257)6.5.1Creating a Lock Snapshot (257)7Working with Plug-ins (259)7.1Plug-in Overview (259)7.1.1Plug-in Basics (259)7.1.2First Plug-in Slot of Sounds: Choosing the Sound’s Role (263)7.1.3Loading, Removing, and Replacing a Plug-in (264)7.1.4Adjusting the Plug-in Parameters (270)7.1.5Bypassing Plug-in Slots (270)7.1.6Using Side-Chain (272)7.1.7Moving Plug-ins (272)7.1.8Alternative: the Plug-in Strip (273)7.1.9Saving and Recalling Plug-in Presets (273)7.1.9.1Saving Plug-in Presets (274)7.1.9.2Recalling Plug-in Presets (275)7.1.9.3Removing a Default Plug-in Preset (276)7.2The Sampler Plug-in (277)7.2.1Page 1: Voice Settings / Engine (279)7.2.2Page 2: Pitch / Envelope (281)7.2.3Page 3: FX / Filter (283)7.2.4Page 4: Modulation (285)7.2.5Page 5: LFO (286)7.2.6Page 6: Velocity / Modwheel (288)7.3Using Native Instruments and External Plug-ins (289)7.3.1Opening/Closing Plug-in Windows (289)7.3.2Using the VST/AU Plug-in Parameters (292)7.3.3Setting Up Your Own Parameter Pages (293)7.3.4Using VST/AU Plug-in Presets (298)7.3.5Multiple-Output Plug-ins and Multitimbral Plug-ins (300)8Using the Audio Plug-in (302)8.1Loading a Loop into the Audio Plug-in (306)8.2Editing Audio in the Audio Plug-in (307)8.3Using Loop Mode (308)8.4Using Gate Mode (310)9Using the Drumsynths (312)9.1Drumsynths – General Handling (313)9.1.1Engines: Many Different Drums per Drumsynth (313)9.1.2Common Parameter Organization (313)9.1.3Shared Parameters (316)9.1.4Various Velocity Responses (316)9.1.5Pitch Range, Tuning, and MIDI Notes (316)9.2The Kicks (317)9.2.1Kick – Sub (319)9.2.2Kick – Tronic (321)9.2.3Kick – Dusty (324)9.2.4Kick – Grit (325)9.2.5Kick – Rasper (328)9.2.6Kick – Snappy (329)9.2.7Kick – Bold (331)9.2.8Kick – Maple (333)9.2.9Kick – Push (334)9.3The Snares (336)9.3.1Snare – Volt (338)9.3.2Snare – Bit (340)9.3.3Snare – Pow (342)9.3.4Snare – Sharp (343)9.3.5Snare – Airy (345)9.3.6Snare – Vintage (347)9.3.7Snare – Chrome (349)9.3.8Snare – Iron (351)9.3.9Snare – Clap (353)9.3.10Snare – Breaker (355)9.4The Hi-hats (357)9.4.1Hi-hat – Silver (358)9.4.2Hi-hat – Circuit (360)9.4.3Hi-hat – Memory (362)9.4.4Hi-hat – Hybrid (364)9.4.5Creating a Pattern with Closed and Open Hi-hats (366)9.5The Toms (367)9.5.1Tom – Tronic (369)9.5.2Tom – Fractal (371)9.5.3Tom – Floor (375)9.5.4Tom – High (377)9.6The Percussions (378)9.6.1Percussion – Fractal (380)9.6.2Percussion – Kettle (383)9.6.3Percussion – Shaker (385)9.7The Cymbals (389)9.7.1Cymbal – Crash (391)9.7.2Cymbal – Ride (393)10Using the Bass Synth (396)10.1Bass Synth – General Handling (397)10.1.1Parameter Organization (397)10.1.2Bass Synth Parameters (399)11Working with Patterns (401)11.1Pattern Basics (401)11.1.1Pattern Editor Overview (402)11.1.2Navigating the Event Area (404)11.1.3Following the Playback Position in the Pattern (406)11.1.4Jumping to Another Playback Position in the Pattern (407)11.1.5Group View and Keyboard View (408)11.1.6Adjusting the Arrange Grid and the Pattern Length (410)11.1.7Adjusting the Step Grid and the Nudge Grid (413)11.2Recording Patterns in Real Time (416)11.2.1Recording Your Patterns Live (417)11.2.2Using the Metronome (419)11.2.3Recording with Count-in (420)11.3Recording Patterns with the Step Sequencer (422)11.3.1Step Mode Basics (422)11.3.2Editing Events in Step Mode (424)11.4Editing Events (425)11.4.1Editing Events with the Mouse: an Overview (425)11.4.2Creating Events/Notes (428)11.4.3Selecting Events/Notes (429)11.4.4Editing Selected Events/Notes (431)11.4.5Deleting Events/Notes (434)11.4.6Cut, Copy, and Paste Events/Notes (436)11.4.7Quantizing Events/Notes (439)11.4.8Quantization While Playing (441)11.4.9Doubling a Pattern (442)11.4.10Adding Variation to Patterns (442)11.5Recording and Editing Modulation (443)11.5.1Which Parameters Are Modulatable? (444)11.5.2Recording Modulation (446)11.5.3Creating and Editing Modulation in the Control Lane (447)11.6Creating MIDI Tracks from Scratch in MASCHINE (452)11.7Managing Patterns (454)11.7.1The Pattern Manager and Pattern Mode (455)11.7.2Selecting Patterns and Pattern Banks (456)11.7.3Creating Patterns (459)11.7.4Deleting Patterns (460)11.7.5Creating and Deleting Pattern Banks (461)11.7.6Naming Patterns (463)11.7.7Changing the Pattern’s Color (465)11.7.8Duplicating, Copying, and Pasting Patterns (466)11.7.9Moving Patterns (469)11.8Importing/Exporting Audio and MIDI to/from Patterns (470)11.8.1Exporting Audio from Patterns (470)11.8.2Exporting MIDI from Patterns (472)11.8.3Importing MIDI to Patterns (474)12Audio Routing, Remote Control, and Macro Controls (483)12.1Audio Routing in MASCHINE (484)12.1.1Sending External Audio to Sounds (485)12.1.2Configuring the Main Output of Sounds and Groups (489)12.1.3Setting Up Auxiliary Outputs for Sounds and Groups (494)12.1.4Configuring the Master and Cue Outputs of MASCHINE (497)12.1.5Mono Audio Inputs (502)12.1.5.1Configuring External Inputs for Sounds in Mix View (503)12.2Using MIDI Control and Host Automation (506)12.2.1Triggering Sounds via MIDI Notes (507)12.2.2Triggering Scenes via MIDI (513)12.2.3Controlling Parameters via MIDI and Host Automation (514)12.2.4Selecting VST/AU Plug-in Presets via MIDI Program Change (522)12.2.5Sending MIDI from Sounds (523)12.3Creating Custom Sets of Parameters with the Macro Controls (527)12.3.1Macro Control Overview (527)12.3.2Assigning Macro Controls Using the Software (528)13Controlling Your Mix (535)13.1Mix View Basics (535)13.1.1Switching between Arrange View and Mix View (535)13.1.2Mix View Elements (536)13.2The Mixer (537)13.2.1Displaying Groups vs. Displaying Sounds (539)13.2.2Adjusting the Mixer Layout (541)13.2.3Selecting Channel Strips (542)13.2.4Managing Your Channels in the Mixer (543)13.2.5Adjusting Settings in the Channel Strips (545)13.2.6Using the Cue Bus (549)13.3The Plug-in Chain (551)13.4The Plug-in Strip (552)13.4.1The Plug-in Header (554)13.4.2Panels for Drumsynths and Internal Effects (556)13.4.3Panel for the Sampler (557)13.4.4Custom Panels for Native Instruments Plug-ins (560)13.4.5Undocking a Plug-in Panel (Native Instruments and External Plug-ins Only) (564)14Using Effects (567)14.1Applying Effects to a Sound, a Group or the Master (567)14.1.1Adding an Effect (567)14.1.2Other Operations on Effects (574)14.1.3Using the Side-Chain Input (575)14.2Applying Effects to External Audio (578)14.2.1Step 1: Configure MASCHINE Audio Inputs (578)14.2.2Step 2: Set up a Sound to Receive the External Input (579)14.2.3Step 3: Load an Effect to Process an Input (579)14.3Creating a Send Effect (580)14.3.1Step 1: Set Up a Sound or Group as Send Effect (581)14.3.2Step 2: Route Audio to the Send Effect (583)14.3.3 A Few Notes on Send Effects (583)14.4Creating Multi-Effects (584)15Effect Reference (587)15.1Dynamics (588)15.1.1Compressor (588)15.1.2Gate (591)15.1.3Transient Master (594)15.1.4Limiter (596)15.1.5Maximizer (600)15.2Filtering Effects (603)15.2.1EQ (603)15.2.2Filter (605)15.2.3Cabinet (609)15.3Modulation Effects (611)15.3.1Chorus (611)15.3.2Flanger (612)15.3.3FM (613)15.3.4Freq Shifter (615)15.3.5Phaser (616)15.4Spatial and Reverb Effects (617)15.4.1Ice (617)15.4.2Metaverb (619)15.4.3Reflex (620)15.4.4Reverb (Legacy) (621)15.4.5Reverb (623)15.4.5.1Reverb Room (623)15.4.5.2Reverb Hall (626)15.4.5.3Plate Reverb (629)15.5Delays (630)15.5.1Beat Delay (630)15.5.2Grain Delay (632)15.5.3Grain Stretch (634)15.5.4Resochord (636)15.6Distortion Effects (638)15.6.1Distortion (638)15.6.2Lofi (640)15.6.3Saturator (641)15.7Perform FX (645)15.7.1Filter (646)15.7.2Flanger (648)15.7.3Burst Echo (650)15.7.4Reso Echo (653)15.7.5Ring (656)15.7.6Stutter (658)15.7.7Tremolo (661)15.7.8Scratcher (664)16Working with the Arranger (667)16.1Arranger Basics (667)16.1.1Navigating Song View (670)16.1.2Following the Playback Position in Your Project (672)16.1.3Performing with Scenes and Sections using the Pads (673)16.2Using Ideas View (677)16.2.1Scene Overview (677)16.2.2Creating Scenes (679)16.2.3Assigning and Removing Patterns (679)16.2.4Selecting Scenes (682)16.2.5Deleting Scenes (684)16.2.6Creating and Deleting Scene Banks (685)16.2.7Clearing Scenes (685)16.2.8Duplicating Scenes (685)16.2.9Reordering Scenes (687)16.2.10Making Scenes Unique (688)16.2.11Appending Scenes to Arrangement (689)16.2.12Naming Scenes (689)16.2.13Changing the Color of a Scene (690)16.3Using Song View (692)16.3.1Section Management Overview (692)16.3.2Creating Sections (694)16.3.3Assigning a Scene to a Section (695)16.3.4Selecting Sections and Section Banks (696)16.3.5Reorganizing Sections (700)16.3.6Adjusting the Length of a Section (702)16.3.6.1Adjusting the Length of a Section Using the Software (703)16.3.6.2Adjusting the Length of a Section Using the Controller (705)16.3.7Clearing a Pattern in Song View (705)16.3.8Duplicating Sections (705)16.3.8.1Making Sections Unique (707)16.3.9Removing Sections (707)16.3.10Renaming Scenes (708)16.3.11Clearing Sections (710)16.3.12Creating and Deleting Section Banks (710)16.3.13Working with Patterns in Song view (710)16.3.13.1Creating a Pattern in Song View (711)16.3.13.2Selecting a Pattern in Song View (711)16.3.13.3Clearing a Pattern in Song View (711)16.3.13.4Renaming a Pattern in Song View (711)16.3.13.5Coloring a Pattern in Song View (712)16.3.13.6Removing a Pattern in Song View (712)16.3.13.7Duplicating a Pattern in Song View (712)16.3.14Enabling Auto Length (713)16.3.15Looping (714)16.3.15.1Setting the Loop Range in the Software (714)16.3.15.2Activating or Deactivating a Loop Using the Controller (715)16.4Playing with Sections (715)16.4.1Jumping to another Playback Position in Your Project (716)16.5Triggering Sections or Scenes via MIDI (717)16.6The Arrange Grid (719)16.7Quick Grid (720)17Sampling and Sample Mapping (722)17.1Opening the Sample Editor (722)17.2Recording Audio (724)17.2.1Opening the Record Page (724)17.2.2Selecting the Source and the Recording Mode (725)17.2.3Arming, Starting, and Stopping the Recording (729)17.2.5Checking Your Recordings (731)17.2.6Location and Name of Your Recorded Samples (734)17.3Editing a Sample (735)17.3.1Using the Edit Page (735)17.3.2Audio Editing Functions (739)17.4Slicing a Sample (743)17.4.1Opening the Slice Page (743)17.4.2Adjusting the Slicing Settings (744)17.4.3Manually Adjusting Your Slices (746)17.4.4Applying the Slicing (750)17.5Mapping Samples to Zones (754)17.5.1Opening the Zone Page (754)17.5.2Zone Page Overview (755)17.5.3Selecting and Managing Zones in the Zone List (756)17.5.4Selecting and Editing Zones in the Map View (761)17.5.5Editing Zones in the Sample View (765)17.5.6Adjusting the Zone Settings (767)17.5.7Adding Samples to the Sample Map (770)18Appendix: Tips for Playing Live (772)18.1Preparations (772)18.1.1Focus on the Hardware (772)18.1.2Customize the Pads of the Hardware (772)18.1.3Check Your CPU Power Before Playing (772)18.1.4Name and Color Your Groups, Patterns, Sounds and Scenes (773)18.1.5Consider Using a Limiter on Your Master (773)18.1.6Hook Up Your Other Gear and Sync It with MIDI Clock (773)18.1.7Improvise (773)18.2Basic Techniques (773)18.2.1Use Mute and Solo (773)18.2.2Create Variations of Your Drum Patterns in the Step Sequencer (774)18.2.3Use Note Repeat (774)18.2.4Set Up Your Own Multi-effect Groups and Automate Them (774)18.3Special Tricks (774)18.3.1Changing Pattern Length for Variation (774)18.3.2Using Loops to Cycle Through Samples (775)18.3.3Load Long Audio Files and Play with the Start Point (775)19Troubleshooting (776)19.1Knowledge Base (776)19.2Technical Support (776)19.3Registration Support (777)19.4User Forum (777)20Glossary (778)Index (786)1Welcome to MASCHINEThank you for buying MASCHINE!MASCHINE is a groove production studio that implements the familiar working style of classi-cal groove boxes along with the advantages of a computer based system. MASCHINE is ideal for making music live, as well as in the studio. It’s the hands-on aspect of a dedicated instru-ment, the MASCHINE hardware controller, united with the advanced editing features of the MASCHINE software.Creating beats is often not very intuitive with a computer, but using the MASCHINE hardware controller to do it makes it easy and fun. You can tap in freely with the pads or use Note Re-peat to jam along. Alternatively, build your beats using the step sequencer just as in classic drum machines.Patterns can be intuitively combined and rearranged on the fly to form larger ideas. You can try out several different versions of a song without ever having to stop the music.Since you can integrate it into any sequencer that supports VST, AU, or AAX plug-ins, you can reap the benefits in almost any software setup, or use it as a stand-alone application. You can sample your own material, slice loops and rearrange them easily.However, MASCHINE is a lot more than an ordinary groovebox or sampler: it comes with an inspiring 7-gigabyte library, and a sophisticated, yet easy to use tag-based Browser to give you instant access to the sounds you are looking for.What’s more, MASCHINE provides lots of options for manipulating your sounds via internal ef-fects and other sound-shaping possibilities. You can also control external MIDI hardware and 3rd-party software with the MASCHINE hardware controller, while customizing the functions of the pads, knobs and buttons according to your needs utilizing the included Controller Editor application. We hope you enjoy this fantastic instrument as much as we do. Now let’s get go-ing!—The MASCHINE team at Native Instruments.MASCHINE Documentation1.1MASCHINE DocumentationNative Instruments provide many information sources regarding MASCHINE. The main docu-ments should be read in the following sequence:1.MASCHINE MIKRO Quick Start Guide: This animated online guide provides a practical ap-proach to help you learn the basic of MASCHINE MIKRO. The guide is available from theNative Instruments website: https:///maschine-mikro-quick-start/2.MASCHINE Manual (this document): The MASCHINE Manual provides you with a compre-hensive description of all MASCHINE software and hardware features.Additional documentation sources provide you with details on more specific topics:►Online Support Videos: You can find a number of support videos on The Official Native In-struments Support Channel under the following URL: https:///NIsupport-EN. We recommend that you follow along with these instructions while the respective ap-plication is running on your computer.Other Online Resources:If you are experiencing problems related to your Native Instruments product that the supplied documentation does not cover, there are several ways of getting help:▪Knowledge Base▪User Forum▪Technical Support▪Registration SupportYou will find more information on these subjects in the chapter Troubleshooting.Document Conventions1.2Document ConventionsThis section introduces you to the signage and text highlighting used in this manual. This man-ual uses particular formatting to point out special facts and to warn you of potential issues.The icons introducing these notes let you see what kind of information is to be expected:This document uses particular formatting to point out special facts and to warn you of poten-tial issues. The icons introducing the following notes let you see what kind of information canbe expected:Furthermore, the following formatting is used:▪Text appearing in (drop-down) menus (such as Open…, Save as… etc.) in the software andpaths to locations on your hard disk or other storage devices is printed in italics.▪Text appearing elsewhere (labels of buttons, controls, text next to checkboxes etc.) in thesoftware is printed in blue. Whenever you see this formatting applied, you will find thesame text appearing somewhere on the screen.▪Text appearing on the displays of the controller is printed in light grey. Whenever you seethis formatting applied, you will find the same text on a controller display.▪Text appearing on labels of the hardware controller is printed in orange. Whenever you seethis formatting applied, you will find the same text on the controller.▪Important names and concepts are printed in bold.▪References to keys on your computer’s keyboard you’ll find put in square brackets (e.g.,“Press [Shift] + [Enter]”).►Single instructions are introduced by this play button type arrow.→Results of actions are introduced by this smaller arrow.Naming ConventionThroughout the documentation we will refer to MASCHINE controller (or just controller) as the hardware controller and MASCHINE software as the software installed on your computer.The term “effect” will sometimes be abbreviated as “FX” when referring to elements in the MA-SCHINE software and hardware. These terms have the same meaning.Button Combinations and Shortcuts on Your ControllerMost instructions will use the “+” sign to indicate buttons (or buttons and pads) that must be pressed simultaneously, starting with the button indicated first. E.g., an instruction such as:“Press SHIFT + PLAY”means:1.Press and hold SHIFT.2.While holding SHIFT, press PLAY and release it.3.Release SHIFT.1.3New Features in MASCHINE2.8The following new features have been added to MASCHINE: Integration▪Browse on , create your own collections of loops and one-shots and send them directly to the MASCHINE browser.Improvements to the Browser▪Samples are now cataloged in separate Loops and One-shots tabs in the Browser.▪Previews of loops selected in the Browser will be played in sync with the current project.When a loop is selected with Prehear turned on, it will begin playing immediately in-sync with the project if transport is running. If a loop preview starts part-way through the loop, the loop will play once more for its full length to ensure you get to hear the entire loop once in context with your project.▪Filters and product selections will be remembered when switching between content types and Factory/User Libraries in the Browser.▪Browser content synchronization between multiple running instances. When running multi-ple instances of MASCHINE, either as Standalone and/or as a plug-in, updates to the Li-brary will be synced across the instances. For example, if you delete a sample from your User Library in one instance, the sample will no longer be present in the other instances.Similarly, if you save a preset in one instance, that preset will then be available in the oth-er instances, too.▪Edits made to samples in the Factory Libraries will be saved to the Standard User Directo-ry.For more information on these new features, refer to the following chapter ↑4, Browser. Improvements to the MASCHINE MIKRO MK3 Controller▪You can now set sample Start and End points using the controller. For more information refer to ↑17.3.1, Using the Edit Page.Improved Support for A-Series Keyboards▪When Browsing with A-Series keyboards, you can now jump quickly to the results list by holding SHIFT and pushing right on the 4D Encoder.▪When Browsing with A-Series keyboards, you can fast scroll through the Browser results list by holding SHIFT and twisting the 4D Encoder.▪Mute and Solo Sounds and Groups from A-Series keyboards. Sounds are muted in TRACK mode while Groups are muted in IDEAS.。
TD信息元素详解
信息元素功能性定义作者:李欣目录目录 (1)信息元素功能性定义 (11)1 核心网信息元素 (11)1.1 CN Information elements (11)1.2 CN Domain System Information (11)1.3 CN Information info (11)1.4 IMEI (11)1.5 IMSI (GSM-MAP) (11)1.6 Intra Domain NAS Node Selector (11)1.7 Location Area Identification (12)1.8 NAS message (12)1.9 NAS system information (GSM-MAP) (12)1.10 Paging record type identifier (12)1.11 PLMN identity (12)1.12 PLMN Type (12)1.13 P-TMSI (GSM-MAP) (12)1.14 RAB identity (12)1.15 Routing Area Code (12)1.16 Routing Area Identification (13)1.17 TMSI (GSM-MAP) (13)2 UTRAN 移动信息元素 (13)2.1 Cell Access Restriction (13)2.2 Cell identity (13)2.3 Cell selection and re-selection info for SIB3/4 (13)2.4 Cell selection and re-selection info for SIB11/12 (13)2.5 Mapping Info (14)2.6 URA identity (14)3 UE 信息元素 (14)3.1 Activation time (14)3.2 Capability Update Requirement (14)3.3 Cell update cause (15)3.4 Ciphering Algorithm (15)3.5 Ciphering mode info (15)3.6 CN domain specific DRX cycle length coefficient (15)3.7 CPCH Parameters (15)3.8 C-RNTI (15)3.9 DRAC system information (15)3.10 Void (16)3.11 Establishment cause (16)3.12 Expiration Time Factor (16)3.13 Failure cause (16)3.14 Failure cause and error information (16)3.15 Initial UE identity (16)3.16 Integrity check info (16)3.17 Integrity protection activation info (17)3.18 Integrity protection Algorithm (17)3.19 Integrity protection mode info (17)3.20 Maximum bit rate (17)3.21 Measurement capability (17)3.22 Paging cause (17)3.23 Paging record (17)3.24 PDCP capability (17)3.25 Physical channel capability (18)3.26 Protocol error cause (18)3.27 Protocol error indicator (18)3.28 RB timer indicator (18)3.29 Redirection info (18)3.30 Re-establishment timer (18)3.31 Rejection cause (18)3.32 Release cause (18)3.33 RF capability FDD (19)3.34 RLC capability (19)3.35 RLC re-establish indicator (19)3.36 RRC transaction identifier (19)3.37 Security capability (19)3.38 START (19)3.39 Transmission probability (19)3.40 Transport channel capability (20)3.41 UE multi-mode/multi-RAT capability (20)3.42 UE radio access capability (20)3.43 UE Timers and Constants in connected mode (21)3.44 UE Timers and Constants in idle mode (21)3.45 UE positioning capability (21)3.46 URA update cause (21)3.47 U-RNTI (21)3.48 U-RNTI Short (21)3.49 UTRAN DRX cycle length coefficient (21)3.50 Wait time (21)3.51 UE Specific Behavior Information 1 idle (21)3.52 UE Specific Behavior Information 1 interRAT (22)4 无线承载信息元素 (22)4.0 Default configuration identity (22)4.1 Downlink RLC STATUS info (22)4.2 PDCP info (22)4.3 PDCP SN info (22)4.4 Polling info (22)4.5 Predefined configuration identity (23)4.6 Predefined configuration value tag (23)4.7 Predefined RB configuration (23)4.8 RAB info (23)4.9 RAB info Post (23)4.10 RAB information for setup (23)4.11 RAB information to reconfigure (24)4.12 NAS Synchronization indicator (24)4.13 RB activation time info (24)4.14 RB COUNT-C MSB information (24)4.15 RB COUNT-C information (24)4.16 RB identity (24)4.17 RB information to be affected (24)4.18 RB information to reconfigure (25)4.19 RB information to release (25)4.20 RB information to setup (25)4.21 RB mapping info (25)4.22 RB with PDCP information (25)4.23 RLC info (25)4.24 Signaling RB information to setup (26)4.25 Transmission RLC Discard (26)5 传输信道信息元素 (26)5.1 Added or Reconfigured DL TrCH information (26)5.2 Added or Reconfigured UL TrCH information (27)5.3 CPCH set ID (27)5.4 Deleted DL TrCH information (27)5.5 Deleted UL TrCH information (27)5.6 DL Transport channel information common for all transport channels (27)5.7 DRAC Static Information (27)5.8 Power Offset Information (28)5.9 Predefined TrCH configuration (28)5.10 Quality Target (28)5.11 Semi-static Transport Format Information (28)5.12 TFCI Field 2 Information (28)5.13 TFCS Explicit Configuration (28)5.14 TFCS Information for DSCH (TFCI range method) (29)5.15 TFCS Reconfiguration/Addition Information (29)5.16 TFCS Removal Information (29)5.17 Void (29)5.18 Transport channel identity (29)5.19 Transport Format Combination (TFC) (29)5.20 Transport Format Combination Set (29)5.21 Transport Format Combination Set Identity (29)5.22 Transport Format Combination Subset (29)5.23 Transport Format Set (29)5.24 UL Transport channel information common for all transport channels (30)6 物理信道信息元素 (30)6.1 AC-to-ASC mapping (30)6.2 AICH Info (30)6.3 AICH Power offset (30)6.4 Allocation period info (30)6.5 Alpha (30)6.6 ASC Setting (30)6.7 Void (31)6.8 CCTrCH power control info (31)6.9 Cell parameters Id (31)6.10 Common timeslot info (31)6.11 Constant value (31)6.12 CPCH persistence levels (31)6.13 CPCH set info (31)6.14 CPCH Status Indication mode (31)6.15 CSICH Power offset (32)6.16 Default DPCH Offset Value (32)6.17 Downlink channelisation codes (32)6.18 Downlink DPCH info common for all RL (32)6.19 Downlink DPCH info common for all RL Post (32)6.20 Downlink DPCH info common for all RL Pre (32)6.21 Downlink DPCH info for each RL (32)6.22 Downlink DPCH info for each RL Post (33)6.23 Downlink DPCH power control information (33)6.24 Downlink information common for all radio links (33)6.25 Downlink information common for all radio links Post (33)6.26 Downlink information common for all radio links Pre (33)6.27 Downlink information for each radio link (33)6.28 Downlink information for each radio link Post (33)6.29 Void (33)6.30 Downlink PDSCH information (33)6.31 Downlink rate matching restriction information (34)6.32 Downlink Timeslots and Codes (34)6.33 DPCH compressed mode info (34)6.34 DPCH Compressed Mode Status Info (34)6.35 Dynamic persistence level (34)6.36 Frequency info (34)6.37 Individual timeslot info (35)6.38 Individual Timeslot interference (35)6.39 Maximum allowed UL TX power (35)6.40 Void (35)6.41 Midamble shift and burst type (35)6.42 PDSCH Capacity Allocation info (35)6.43 PDSCH code mapping (36)6.44 PDSCH info (36)6.45 PDSCH Power Control info (36)6.46 PDSCH system information (36)6.47 PDSCH with SHO DCH Info (36)6.48 Persistence scaling factors (36)6.49 PICH Info (36)6.50 PICH Power offset (37)6.51 PRACH Channelisation Code List (37)6.52 PRACH info (for RACH) (37)6.53 PRACH partitioning (37)6.54 PRACH power offset (37)6.55 PRACH system information list (37)6.56 Predefined PhyCH configuration (38)6.57 Primary CCPCH info (38)6.58 Primary CCPCH info post (38)6.59 Primary CCPCH TX Power (38)6.60 Primary CPICH info (38)6.61 Primary CPICH Tx power (38)6.62 Primary CPICH usage for channel estimation (38)6.63 PUSCH info (38)6.64 PUSCH Capacity Allocation info (38)6.65 PUSCH power control info (39)6.66 PUSCH system information (39)6.67 RACH transmission parameters (39)6.68 Radio link addition information (39)6.69 Radio link removal information (39)6.70 SCCPCH Information for FACH (39)6.71 Secondary CCPCH info (39)6.72 Secondary CCPCH system information (40)6.73 Secondary CPICH info (40)6.74 Secondary scrambling code (40)6.75 SFN Time info (40)6.76 SSDT cell identity (40)6.77 SSDT information (40)6.78 STTD indicator (40)6.79 TDD open loop power control (41)6.80 TFC Control duration (41)6.81 TFCI Combining Indicator (41)6.82 TGPSI (41)6.83 Time info (41)6.84 Timeslot number (41)6.85 TPC combination index (41)6.86 TSTD indicator (41)6.87 TX Diversity Mode (41)6.88 Uplink DPCH info (41)6.89 Uplink DPCH info Post (42)6.90 Uplink DPCH info Pre (42)6.91 Uplink DPCH power control info (42)6.92 Uplink DPCH power control info Post (42)6.93 Uplink DPCH power control info Pre (42)6.94 Uplink Timeslots and Codes (42)6.95 Uplink Timing Advance (42)6.96 Uplink Timing Advance Control (43)7 测量信息元素 (43)7.1 Additional measurements list (43)7.2 Cell info (43)7.3 Cell measured results (43)7.4 Cell measurement event results (44)7.5 Cell reporting quantities (44)7.6 Cell synchronization information (44)7.7 Event results (44)7.8 FACH measurement occasion info (45)7.9 Filter coefficient (45)7.10 HCS Cell re-selection information (45)7.11 HCS neighboring cell information (45)7.12 HCS Serving cell information (45)7.13 Inter-frequency cell info list (46)7.14 Inter-frequency event identity (46)7.15 Inter-frequency measured results list (46)7.16 Inter-frequency measurement (46)7.17 Inter-frequency measurement event results (47)7.18 Inter-frequency measurement quantity (47)7.19 Inter-frequency measurement reporting criteria (47)7.20 Inter-frequency measurement system information (47)7.21 Inter-frequency reporting quantity (47)7.22 Inter-frequency SET UPDATE (48)7.23 Inter-RAT cell info list (48)7.24 Inter-RAT event identity (48)7.25 Inter-RAT info (48)7.26 Inter-RAT measured results list (48)7.27 Inter-RAT measurement (49)7.28 Inter-RAT measurement event results (49)7.29 Inter-RAT measurement quantity (49)7.30 Inter-RAT measurement reporting criteria (49)7.31 Inter-RAT measurement system information (50)7.32 Inter-RAT reporting quantity (50)7.33 Intra-frequency cell info list (50)7.34 Intra-frequency event identity (50)7.35 Intra-frequency measured results list (50)7.36 Intra-frequency measurement (50)7.37 Intra-frequency measurement event results (51)7.38 Intra-frequency measurement quantity (51)7.39 Intra-frequency measurement reporting criteria (51)7.40 Intra-frequency measurement system information (51)7.41 Intra-frequency reporting quantity (52)7.42 Intra-frequency reporting quantity for RACH reporting (52)7.43 Maximum number of reported cells on RACH (52)7.44 Measured results (52)7.45 Measured results on RACH (52)7.46 Measurement Command (52)7.47 Measurement control system information (53)7.48 Measurement Identity (53)7.49 Measurement reporting mode (53)7.50 Measurement Type (53)7.51 Measurement validity (53)7.52 Observed time difference to GSM cell (53)7.53 Periodical reporting criteria (53)7.54 Primary CCPCH RSCP info (54)7.55 Quality measured results list (54)7.56 Quality measurement (54)7.57 Quality measurement event results (54)7.58 Quality measurement reporting criteria (54)7.59 Quality reporting quantity (54)7.60 Reference time difference to cell (54)7.61 Reporting Cell Status (55)7.62 Reporting information for state CELL_DCH (55)7.63 SFN-SFN observed time difference (55)7.64 Time to trigger (55)7.65 Timeslot ISCP info (55)7.66 Traffic volume event identity (55)7.67 Traffic volume measured results list (55)7.68 Traffic volume measurement (55)7.69 Traffic volume measurement event results (56)7.70 Traffic volume measurement object (56)7.71 Traffic volume measurement quantity (56)7.72 Traffic volume measurement reporting criteria (56)7.73 Traffic volume measurement system information (56)7.74 Traffic volume reporting quantity (56)7.75 UE internal event identity (56)7.76 UE internal measured results (57)7.77 UE internal measurement (57)7.78 UE internal measurement event results (57)7.79 UE internal measurement quantity (57)7.80 UE internal measurement reporting criteria (57)7.81 Void (58)7.82 UE Internal reporting quantity (58)7.83 UE Rx-Tx time difference type 1 (58)7.84 UE Rx-Tx time difference type 2 (58)7.85 UE Transmitted Power info (58)7.86 UE positioning Ciphering info (58)7.87 UE positioning Error (58)7.88 UE positioning GPS acquisition assistance (59)7.89 UE positioning GPS almanac (59)7.90 UE positioning GPS assistance data (59)7.91 UE positioning GPS DGPS corrections (59)7.92 UE positioning GPS ionospheric model (59)7.93 UE positioning GPS measured results (59)7.94 UE positioning GPS navigation model (60)7.95 UE positioning GPS real-time integrity (60)7.96 UE positioning GPS reference time (60)7.97 UE positioning GPS UTC model (61)7.98 UE positioning IPDL parameters (61)7.99 UE positioning measured results (61)7.100 UE positioning measurement (61)7.101 UE positioning measurement event results (61)7.102 Void (62)7.103 UE positioning OTDOA assistance data for UE-assisted (62)7.104 Void (62)7.105 UE positioning OTDOA measured results (62)7.106 UE positioning OTDOA neighbor cell info (62)7.107 UE positioning OTDOA quality (63)7.108 UE positioning OTDOA reference cell info (63)7.109 UE positioning position estimate info (64)7.110 UE positioning reporting criteria (64)7.111 UE positioning reporting quantity (64)7.112 T ADV info (65)8 其它信息元素 (65)8.1 BCCH modification info (65)8.2 BSIC (65)8.3 CBS DRX Level 1 information (65)8.4 Cell Value tag (65)8.5 Inter-RAT change failure (65)8.6 Inter-RAT handover failure (66)8.7 Inter-RAT UE radio access capability (66)8.8 Void (66)8.9 MIB Value tag (66)8.10 PLMN Value tag (66)8.11 Predefined configuration identity and value tag (66)8.12 Protocol error information (66)8.13 References to other system information blocks (66)8.14 References to other system information blocks and scheduling blocks (67)8.15 Rplmn information (67)8.16 Scheduling information (67)8.17 SEG COUNT (67)8.18 Segment index (67)8.19 SIB data fixed (67)8.20 SIB data variable (67)8.21 SIB type (67)8.22 SIB type SIBs only (67)9 ANSI-41 Information elements (68)10 Multiplicity values and type constraint values (68)信息元素功能性定义消息是由多个信息元素组合而成,信息元素根据其功能的不同划分为:核心网域信息元素、UTRAN 移动信息元素、UE 信息元素、无线承载信息元素、传输信道信息元素、物理信道信息元素和测量信息元素。
LabWindows CVI 2015 Release Notes说明书
RELEASE NOTESLabWindows /CVI Version 2015These release notes introduce LabWindows ™/CVI ™ 2015. Refer to this document for system requirements, installation and activation instructions, and information about new features in LabWindows/CVI.ContentsLabWindows/CVI System Requirements (1)Installing LabWindows/CVI (2)Before Installation (2)Running the Installation (2)Activating LabWindows/CVI (4)What’s New in LabWindows/CVI? (4)Upgraded Version of Clang (4)Improved Source Code Browsing (4)Include Runtime Installers in Distributions (5)Include Driver and Component Files in Patch Distributions (5)Updated Windows SDK (5)Improved Installer Messages and Errors (6)Bug Fixes (6)LabWindows/CVI Resources...................................................................................................6LabWindows/CVI System Requirements To run LabWindows/CVI, you must have the following:•Personal computer using a Pentium 4/M or equivalent processor •Microsoft operating systems:–Windows 8.1 (32-bit and 64-bit)–Windows 8.0 (32-bit and 64-bit)–Windows 7 (32-bit and 64-bit), including Starter Edition –Windows Server 2012 R2 (64-bit)–Windows Server 2008 R2 Service Pack 2 (64-bit)Note LabWindows/CVI supports only R2 editions of Windows Server.•1024 × 768 resolution (or higher) video adapter •Minimum of 512 MB of RAM, 2 GB recommended™™•7 GB free hard disk space for full installation, which includes the Windows SDK 8.1 and the Microsoft .NET Framework 4.5.2; additional space needed for National Instruments Device Drivers•Microsoft-compatible mouseInstalling LabWindows/CVIThe LabWindows/CVI Platform DVD includes LabWindows/CVI and the following modules and toolkits:Modules•Real-Time Module•Vision Development ModuleToolkits•Real-Time Execution Trace Toolkit•SQL Toolkit•Signal Processing Toolkit•PID Toolkit•Execution Profiler Toolkit•ECU Measurement and Calibration Toolkit•Automotive Diagnostic Command SetIf you purchased any of these modules or toolkits, you can install them using the LabWindows/CVI Platform DVD. If you want to evaluate any of these modules or toolkits before purchasing them, you can install these add-ons from the LabWindows/CVIPlatform DVD.Before InstallationKeep the following points in mind before you install LabWindows/CVI:•If you already have a different version of LabWindows/CVI installed on your computer, be sure to install version 2015 in a different directory. If you want to install to an existing directory, uninstall the other version before installing LabWindows/CVI 2015.•You must have administrator privileges to install LabWindows/CVI.•If your software is part of a V olume License Agreement (VLA), contact your VLA administrator for installation instructions.Running the InstallationComplete the following steps to install LabWindows/CVI:LabWindows/CVI Runtime with the LabWindows/CVI 2015 Runtime. To restore theprevious runtime, uninstall LabWindows/CVI 2015, the LabWindows/CVI 20152||LabWindows/CVI Release NotesLabWindows/CVI Release Notes |© National Instruments |3Runtime, and any previous versions of LabWindows/CVI and LabWindows/CVIRuntimes on the computer. Then reinstall the LabWindows/CVI version you want to use, along with any additional National Instruments software you might haveinstalled.1.Insert the LabWindows/CVI media into the disk drive. If the media does not runautomatically, open Windows Explorer, right-click the disk drive icon, and selectAutoPlay .2.On installation startup, the National Instruments LabWindows/CVI 2015 screen appears. Click Install LabWindows/CVI, Modules, and Toolkits .3.Continue to follow the instructions on the screen.Note If you have a serial number for the product you want to install, enter thenumber during installation when you are prompted. You also can activate the product after installation. For more information about finding serial numbers, refer to/info and enter SerialNumbers_en as the Info Code.Each product on the LabWindows/CVI Platform DVD has a different serial number, with the possible exception of the LabWindows/CVI Execution Profiler Toolkit.The Execution Profiler Toolkit does not require a separate license if youhave a LabWindows/CVI Full Development System license. If you have theLabWindows/CVI Base Package, you can install the Execution Profiler Toolkit for evaluation.4.If you select Device Drivers in the Features panel, the LabWindows/CVI installer promptsyou to insert the National Instruments Device Drivers media, which is available on . The NI Device Drivers media is required only if you want to upgrade existing driver software to the latest version. Otherwise, you can ignore this prompt.5.If you have an active Internet connection, the installer prompts you to select Windows SDK components to install. The components you select are downloaded and installed from the Microsoft website. For more information about the components, refer to /info and enter the Info Code CVI2015_WindowsSDK .If you do not have an active Internet connection, LabWindows/CVI installs all Windows SDK components, which might not be the latest components available on the Microsoft website.Note If you cancel the Windows SDK installation, LabWindows/CVI will notfunction properly. You can download the Windows SDK from one of the following places:•The Microsoft website•—Visit /info and enter the Info CodeDownloadMSDTWindowsSDK4| |LabWindows/CVI Release Notes6.Install hardware. Refer to your device documentation, such as printed manuals or PDFs, for information about installing your NI hardware.7.To activate a National Instruments product, refer to the What’s New in LabWindows/CVI? section of this document.Activating LabWindows/CVIIf you did not enter a serial number during installation, click Activate Products in the License Status dialog box to launch the NI Activation Wizard.Once you choose your activation method and launch the NI Activation Wizard, follow the instructions on the screen to activate LabWindows/CVI. For more information about activation, refer to the Activating Your Software topic in the LabWindows/CVI Help .Note If you are unable to activate LabWindows/CVI, refer to the web page at/activate .What’s New in LabWindows/CVI?This section includes information about changes and enhancements in LabWindows/CVI 2015.Upgraded Version of ClangLabWindows/CVI has updated the Clang 2.9 compiler to Clang 3.3. This upgrade provides the following features:•New warning flags and warnings messages •Improved detection of unintialized local variables •Improved stability when building large files •Up to 21% faster execution speed for 64-bit binariesNote The compiler backend is particularly suited for optimizing resources used in mathematical calculations, so you will see the highest performance gains if youperform complex computation, mathematics, or analysis.Improved Source Code BrowsingIn addition to the updated compiler, source code browsing also has been improved. These improvements include the following features:•Improved array support for the function prototype tooltip, Select Variable dialog box, and documentation generation from source code •Improved preprocessor support with macros •Improved stability due to various fixesLabWindows/CVI Release Notes |© National Instruments |5Include Runtime Installers in DistributionsSelect the Only display runtime installers option in the Drivers & Components tab of the Edit Installer dialog box to show which runtime installers are available for deployment. This option makes it easy to distinguish between full installers and runtime installers. Runtime installers are typically smaller in size, allowing you more control over the size of your distribution.Include Driver and Component Files in Patch DistributionsYou now can include NI components and driver files in your patch distributions. You also can choose to include in your patch all products with upgrades or patches by selecting the Include driver updates option in the Drivers & Components tab of the Edit Installer dialog box.Updated Windows SDKThis version of LabWindows/CVI installs the Windows SDK 8.1. Refer to MSDN for a complete list of enhancements. Some of the features provided by the Windows SDK include the following items:•Handle processes and threads—You can use functions such asSetProcessInformation to lower the priority of processes that perform background operations, GetProcessInformation to get the memory priority of a process, SetThreadInformation to lower the priority of a thread that does not need to run immediately, and GetThreadInformation to get the priority of a thread.•Get the firmware type—Call GetFirmwareType to find the firmware type of your users’ computers.•Speed up operations that access the same file data repeatedly—Call OperationStart and OperationEnd .•Take advantage of better virtual memory handling—Call functions such asPrefetchVirtualMemory , OfferVirtualMemory , ReclaimVirtualMemory , and DiscardVirtualMemory .•Take advantage of better physical memory handling—Call functions such as GetMemoryErrorHandlingCapabilities ,RegisterBadMemoryNotification , andUnregisterBadMemoryNotification .•Call helpers for National Language Support functions—For example, you can call IsValidNLSVersion to determine whether a version is valid for a National Language Support function.To use the Windows SDK 8.1, include the following in the Compiler Defines dialog box: _WIN32_WINNT=_WIN32_WINNT_WIN8 or WINVER=_WIN32_WINNT_WIN8.NoteThe Windows SDK 8.1 requires Windows 7 (minimum).Improved Installer Messages and ErrorsErrors and warning messages you receive when you create installers provide more useful information.Bug FixesFor a list of bugs fixed in LabWindows/CVI 2015, refer to the NI web page at /info and enter the Info Code exmvwx.LabWindows/CVI ResourcesHow do I get started?Read the Getting Started with LabWindows/CVI manual, which provides a tutorial for learning basic LabWindows/CVI program development techniques.Are there known issues or late-breaking information?Refer to the LabWindows/CVI Readme, which you can access from Start»All Programs»National Instruments»LabWindows CVI 2015»LabWindows CVI 2015 Documentation. The readme file contains information about known issues.Where can I find reference information?The LabWindows/CVI Help contains complete reference information. Use the Search tab in the LabWindows/CVI Help to quickly locate specific information.Where can I find examples?Find examples with the NI Example Finder, which you can access by selecting Help»Find Examples.LabWindows/CVI example programs are located in the following location:C:\Users\Public\Documents\National Instruments\CVI2015\samples.Is there a list of LabWindows/CVI documentation?The Guide to LabWindows/CVI Documentation topic describes documentation available for new users and upgrade users. In addition, this topic provides links to LabWindows/CVI documentation, including manuals and web resources. You can access the Guide to LabWindows/CVI Documentation topic through the LabWindows/CVI Help.Where else can I go for LabWindows/CVI information?Visit the LabWindows/CVI w ebsite at for the most up-to-date information about LabWindows/CVI.6||LabWindows/CVI Release NotesRefer to the NI Trademarks and Logo Guidelines at /trademarks for more information on National Instruments trademarks. Other product and company names mentioned herein are trademarks or trade names of their respective companies. For patents covering National Instruments products/technology, refer to the appropriate location: Help»Patents in your software, the patents.txt file on your media, or the National Instruments Patents Notice at /patents. You can find information about end-user license agreements (EULAs) and third-party legal notices in the readme file for your NI product. Refer to the Export Compliance Information at /legal/export-compliance for the National Instruments global trade compliance policy and how to obtain relevant HTS codes, ECCNs, and other import/export data. NI MAKES NO EXPRESS OR IMPLIED WARRANTIES AS TO THE ACCURACY OF THE INFORMATION CONTAINED HEREIN AND SHALL NOT BE LIABLE FOR ANY ERRORS. U.S. Government Customers: The data contained in this manual was developed at private expense and is subject to the applicable limited rights and restricted data rights as set forth in FAR 52.227-14, DFAR 252.227-7014, and DFAR 252.227-7015.© 2003–2015 National Instruments. All rights reserved.373607N-01Aug15。
Jack的操作方法
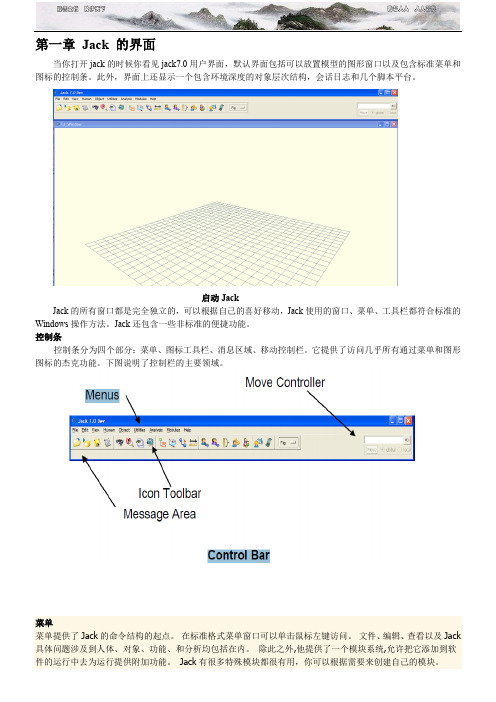
第一章Jack 的界面当你打开jack的时候你看见jack7.0用户界面,默认界面包括可以放置模型的图形窗口以及包含标准菜单和图标的控制条。
此外,界面上还显示一个包含环境深度的对象层次结构,会话日志和几个脚本平台。
启动JackJack的所有窗口都是完全独立的,可以根据自己的喜好移动,Jack使用的窗口、菜单、工具栏都符合标准的Windows操作方法。
Jack还包含一些非标准的便捷功能。
控制条控制条分为四个部分:菜单、图标工具栏、消息区域、移动控制栏。
它提供了访问几乎所有通过菜单和图形图标的杰克功能。
下图说明了控制栏的主要领域。
菜单菜单提供了Jack的命令结构的起点。
在标准格式菜单窗口可以单击鼠标左键访问。
文件、编辑、查看以及Jack 具体问题涉及到人体、对象、功能、和分析均包括在内。
除此之外,他提供了一个模块系统,允许把它添加到软件的运行中去为运行提供附加功能。
Jack有很多特殊模块都很有用,你可以根据需要来创建自己的模块。
菜单条图标工具栏工具栏图标,让你快速访问常用功能。
打开文件保存当前文件切换日志窗口视野控制放大切换对象阶层移动图形调整接点创建男性模型创建女性模型人体比例打开动画窗口Jack的工具栏图标以上所有的图标执行立即的行动或弹出合适的对话框,除了对象选择器。
这些对图形窗口的动作以及作用将会在后文详细描述。
对象选择器对象选择器与图形窗口相结合,当你再选取模式时,用鼠标右键点击对象或者对象类型时,当前的对象类型决定弹出的关联菜单。
你可以选取任何Jack的对象来决定关联菜单:图形、模块、位置、接点。
你也可以通过对象选择器的下拉菜单或者再图形窗口点击鼠标右键选择。
你还可以通过在图形窗口的空白处单击右键弹出的菜单来访问图形参数。
选择模式用于在图形窗口搜索特定的对象。
在这种情况下,该对象的类型将会在你点击Jack对话框的选择图标是自动改变。
除了Jack的基本对象类型,您还可以选择的面、棱、节点。
ICP DAS CAN-2024D设备网络从机设备说明书
Copyright © 2011 is reserved by ICP DAS.
Trademark
The brand name ICP DAS as a trademark is registered, and can be used by other authorized companies.
CAN-2024D User’s Manual (v1.00, March/2011)
4
1.3 Features
z DeviceNet general I/O slave devices. z Comply with DeviceNet specification Volume I, Release 2.0 &
Warning
ICP DAS revises the manual at any time without notice. However, no responsibility is taken by ICP DAS unless infringement act imperils to patents of the third parties.
3 DeviceNet Profile Area .........................................................................13 3.1 DeviceNet Statement of Compliance..........................................13 3.2 Identity Object (Class ID: 0x01) ..................................................14 3.3 Connection Object (Class ID:0x05) ............................................15 3.4 Assembly Object (Class ID: 0x04) ..............................................16 3.5 Application Object1 (Class ID: 0x64)..........................................19 3.6 Application Object2 (Class ID: 0x65)..........................................21
汽车维修手册.pdf_1702093083.1311035说明书
IndexAccessoriesInstallation.................................. 105ACCESSORY (Ignition KeyPosition)........................................ 50AddingAutomatic TransmissionFluid........................................ 149Brake Fluid................................. 151Clutch Fluid................................ 153Engine Coolant........................... 144Engine Oil................................... 138Manual Transmission Fluid..... 150Power Steering Fluid................. 153Windshield Washer Fluid......... 148Additional Safety Information........ 16Door Locks................................... 16Driving with Pets......................... 17Seat-back Position........................ 16Storing Cargo Safely................... 17Additives, Engine Oil..................... 140AdjustmentsMirrors.......................................... 61Seats.............................................. 53Steering Wheel. (45)Airbag (SRS)...................................... 9Air Cleaner..................................... 154Air Conditioning............................... 74Maintenance............................... 162Usage............................................. 72Air Outlets (Vents).......................... 72Air Pressure, Tires........................ 164Alcohol and Drugs........................... 24Alcohol in Gasoline.......................... 98Antenna, Cleaning......................... 178Antifreeze....................................... 140Anti-lock Brakes (ABS)Description................................. 216Indicator Light..................... 34, 119Operation.................................... 118Anti-theft Steering ColumnLock............................................... 50Appearance Care........................... 181Ashtray.............................................. 66Audio System................................... 79Automatic Speed Control................ 46Automatic Transmission............... 113Capacity, Fluid........................... 215Checking Fluid Level................ 149Shifting........................................ 113Shift Lever Positions.. (113)Shift Lock Release (116)BatteryCharging System Light............... 33Jump Starting............................. 197Maintenance............................... 157Specifications............................. 215Before Driving................................. 97Belts, Seat........................................... 5Body Repair.................................... 187BrakesAnti-lock System (ABS)............ 118Break-in, New Linings................. 98Fluid............................................ 151Light, Burned-out...................... 174Parking.......................................... 63System Indicator.......................... 33Wear Indicators......................... 117Brakes, ABSDescription................................. 216Operation.................................... 118System Indicator.................. 34, 119CONTINUEDIndexBraking System.............................. 117Break-in, New Car........................... 98Brightness Control,Instruments.................................. 43Brights, Headlights......................... 42Bulb ReplacementBack-up Lights........................... 174Brake Lights............................... 174Front Parking Lights................. 170Front Side Marker Lights......... 171Headlights.................................. 169High-mount Brake Light.......... 173License Plate Lights.................. 176Rear Side Marker Lights.......... 175Specifications............................. 215Turn Signal Lights..................... 172Bulbs, Halogen. (169)Cables, Jump Starting With.......... 198Capacities Chart............................. 214Carbon Monoxide Hazard.............. 25Cargo, Loading............................... 106Cassette PlayerCare (94)Operation...................................... 87CAUTION, Explanation of............... ii Certification Label......................... 212Chains............................................. 168Change OilHow to......................................... 141When to....................................... 132Changing a Flat Tire..................... 191Changing Engine Coolant............. 146Charging System Indicator.... 33, 202Check Engine Light................ 34, 203CheckingAutomatic TransmissionFluid........................................ 149Battery Condition...................... 157Brake Fluid................................. 151Clutch Fluid................................ 153Drive Belts.................................. 163Engine Coolant........................... 144Engine Oil................................... 138Fuses........................................... 205Manual Transmission Fluid..... 150Power Steering Fluid................. 153Checklist, Before Driving............. 108Child Safety...................................... 18Cigarette Lighter.. (65)Cleaner, Air.................................... 154CleaningAluminum Wheels..................... 183Antenna....................................... 182Carpeting.................................... 185Exterior....................................... 182Fabric.......................................... 185Interior........................................ 185Leather........................................ 185Seat Belts.................................... 185Vinyl............................................ 185Washing...................................... 182Waxing........................................ 183Windows..................................... 186CLEAN Light................................... 94Clock, Setting the............................ 64Clutch Fluid.................................... 153CO in the Exhaust......................... 221Cold Weather, Starting in............. 110Compact Spare............................... 190Consumer Information.................. 227Controls, Instruments and.............. 29CoolantAdding......................................... 144Checking..................................... 144Proper Solution..........................144IndexTemperature Gauge.................... 40Corrosion Protection..................... 186Crankcase Emission ControlSystem......................................... 221Cruise Control Operation............... 46Customer Relations Office.. (227)DANGER, Explanation of................. ii Dashboard........................................ 30Daytime Running Lights................. 42Dead Battery, What to Do............ 197Defects, Reporting Safety............... 26Defogger, Rear Window................. 58Defrosting the Windows................. 78DEXRON ® II AutomaticTransmission Fluid.................... 150Dimensions..................................... 214Dimming the Headlights................ 42DipstickAutomatic Transmission........... 149Engine Oil................................... 138Directional Signals........................... 43Disabled, Towing Your Car If...... 210Disc Brake Wear Indicators (117)Disposal of Used Oil...................... 143DoorsLocking and Unlocking............... 51Power Door Locks....................... 51DOT Tire Quality Grading........... 219Downshifting, 5-speed ManualTransmission.............................. 111Drive Belts...................................... 163Driving............................................ 107Economy..................................... 104In Bad Weather.......................... 120In Foreign Countries. (99)Economy, Fuel............................... 104Emergencies on the Road............. 189Battery, Jump Starting.............. 197Changing a Flat Tire................. 191Charging System Indicator...... 202Check Engine Light.................. 203Checking the Fuses................... 206Low Oil Pressure Indicator...... 201Malfunction Indicator Lamp.... 203Manually Closing Sunroof........ 204Overheated Engine. (199)Emergency Brake............................ 63Emergency Flashers....................... 58Emission Controls......................... 221EngineBelts............................................. 163Check Light.......................... 34, 203Coolant Temperature Gauge ..... 40Malfunction IndicatorLamp................................. 34, 203Oil Pressure Indicator......... 33, 201Oil, What Kind to Use............... 139Overheating................................ 199Specifications............................. 214Ethanol in Gasoline ......................... 99Evaporative Emission Controls.... 221Exhaust Fumes................................ 25Expectant Mothers, Use of SeatBelts by........................................... 8Exterior, Cleaning the. (182)Fabric, Cleaning............................. 185Fan, Interior.. (74)CONTINUEDIndexFan, Radiator.................................... 27Features, Comfort andConvenience................................. 71Filling the Fuel Tank..................... 100FiltersFuel.............................................. 155Oil................................................ 141First Gear, Shifting........................ 1115-speed Manual Transmission,Checking Fluid Level................ 150Shifting the................................. 111Flashers, Hazard Warning.............. 58Flat Tire, Changing a.................... 191FluidsAutomatic Transmission........... 149Brake........................................... 151Clutch.......................................... 153Manual Transmission............... 150Power Steering........................... 153Windshield Washer................... 148FM Stereo RadioReception...................................... 81Folding Rear Seat............................ 57Foreign Countries, Driving in........ 99Four-way Flashers (58)Four Wheel Steering (4WS)Description................................. 217Indicator Light............................. 35Operation.................................... 119Front End, Towing byEmergency Wrecker................. 210Fuel.................................................... 98Fill Door and Cap....................... 100Filter............................................ 155Gauge............................................ 38Octane Requirement................... 98Oxygenated.................................. 98Tank, Filling the......................... 100Fuses, Checking the. (205)Gas Mileage, Improving................ 104Gasohol............................................. 98Gasoline............................................ 98Filter............................................ 155Gauge............................................ 40Octane Requirement................... 98Tank, Filling the......................... 100Gas Station Procedures.. (100)GaugesEngine Coolant Temperature .... 40Fuel................................................ 40Gearshift Lever PositionsAutomatic Transmission........... 1135-speed ManualTransmission.................... 111Glass Cleaning............................... 186Glove Box.. (64)Halogen Headlight Bulbs.............. 169Hazard Warning Flashers............... 58HeadlightsDaytime Running Lights............. 42High Beam Indicator................... 36High Beams, Turning on............ 42Low Beams, Turning on............. 42Reminder Chime.......................... 42Replacing Halogen Bulbs......... 169Turning on.................................... 42Heating and Cooling........................ 72High Altitude, Starting at.............. 110High-Low Beam Switch.................. 42Hood, Opening the........................101IndexHorn................................................... 49Hot Coolant, Warning about........ 144Hydraulic Clutch............................ 153Hydroplaning. (121)Identification Number,Vehicle........................................ 212If Your Car Has to be Towed....... 210IgnitionKeys............................................... 49Switch............................................ 50Timing Control System............. 222Indicator Lights, InstrumentPanel.............................................. 31Infant Restraint................................ 19Inflation, Proper Tire .................... 164Inside Mirror.................................... 61Inspection, Tire.............................. 165Instrument Panel............................. 30Instrument Panel Brightness......... 43Interior Cleaning............................ 185Interior Lights.................................. 68Introduction.........................................iJacking up the Car......................... 193Jack, Tire........................................ 191Jump Starting.................................197Keys...................................................49Label, Certification........................ 212Lane Change, Signaling.................. 43Lap/Shoulder Belts........................... 6Leaking of Exhaust into Car.......... 25Lighter, Cigarette............................ 65LightsBulb Replacement..................... 169Indicator........................................ 31Parking.......................................... 42Turn Signal................................... 43Loading Cargo................................ 106LOCK (Ignition Key Position)....... 50LocksAnti-theft Steering Column (50)Fuel Fill Door............................. 100Glove Box..................................... 64Power Door.................................. 51Trunk............................................ 52Low Coolant Level......................... 144Lower Gear, Downshifting to a.... 111Low Oil Pressure Indicator.... 33, 201Lubricant Specifications Chart.... 214Luggage (106)Maintenance................................... 127Periodic Items............................ 136Record................................. 134 - 135Schedule.............................. 130 - 133Manual Transmission.................... 111Manual Transmission Fluid......... 150Maximum Shift Speeds......... 112, 115Meters, Gauges................................ 38Methanol in Gasoline...................... 98Mirrors, Adjusting (61)CONTINUED。
索尼电子产品用户手册说明书
IndexAccessoriesInstallation................................... 95ACCESSORY(Ignition Key Position).............. 46AddingAutomatic TransmissionFluid........................................ 128Brake Fluid................................ 130Clutch Fluid............................... 131Engine Coolant......................... 123Engine Oil.................................. 119Manual Transmission Fluid... 129Power Steering Fluid .............. 132Windshield Washer fluid......... 127Additional Safety Information..... 15Door Locks.................................. 15Driving with Pets ....................... 16Seat-back Position..................... 15Storing Cargo Safely ................. 16Additives, Engine Oil.................. 120AdjustmentsMirrors......................................... 55Seats.............................................. 50Steering Wheel (41)Airbag (SRS).................................... 11Air Cleaner.................................... 133Air Conditioning............................. 66Maintenance.............................. 141Usage............................................ 66Air Outlets (Vents)......................... 64Air Pressure, Tires ...................... 142Alcohol and Drugs.......................... 23Alcohol in Gasoline ........................ 88Antifreeze...................................... 123Anti-lock Brakes (ABS)Description................................ 188Indicator Light...................32, 108Operation................................... 108Anti-theft Steering ColumnLock.............................................. 46Appearance Care.......................... 155Ashtrays........................................... 60Audio System.................................. 71Automatic. Speed Control............. 42Automatic Transmission............ 102Capacity, Fluid.......................... 186Checking Fluid Level.............. 128Shifting....................................... 102Shift Lever Positions............... 102Shift Lock Release. (105)BatteryCharging System Light............. 31Jump Starting............................ 171Maintenance.............................. 136Specifications............................ 187Before Driving................................ 87Belts, Seat.......................................... 4Body Repair................................... 161BrakesAnti-lock System (ABS).......... 107Break-in, New Linings.............. 88Fluid............................................ 130Light, Burned-out.................... 148Parking......................................... 57System Light............................... 31Wear Indicators........................ 106Brakes, ABSDescription................................ 188Operation................................... 108System Indicator................32, 108Braking System............................ 106Break-in, New Car . (88)CONTINUEDIndexBrightness Control,Instruments................................. 38Brights, Headlights........................ 37Bulb ReplacementBack-up Lights (151)Brake Lights .....................150,151Front Parking Lights .............. 149Front Side Marker Lights...... 149Headlights................................. 148High-mount Brake Light........ 151License Plate Lights................ 152Rear Side Marker Lights........ 150Specifications............................ 187Turn Signal Lights .................. 149Bulbs, Halogen (148)Cables, Jump Starting With ....... 172Capacities Chart........................... 186Carbon Monoxide Hazard ............ 24Cargo, Loading............................... 96Cassette PlayerCare............................................... 85Operation...............................75, 82CAUTION, Explanation of (ii)Certification Label....................... 184Chains............................................. 147Change OilHow to........................................ 121When to...................................... 113Changing a Flat Tire................... 165Changing Engine Coolant........... 124Charging System Light.........31, 176Check Engine Light..............32, 177CheckingAutomatic TransmissionFluid........................................ 128Battery Condition..................... 136Brake Fluid................................ 130Clutch Fluid............................... 131Engine Belts.............................. 142Engine Coolant......................... 123Engine Oil.................................. 119Fuses........................................... 179Manual Transmission Fluid... 129Power Steering Fluid .............. 132Checklist, Before Driving............. 98Child Safety..................................... 17Cigarette Lighter........................... 60Cleaner, Air.. (133)CleaningExterior...................................... 156Interior ....................................... 159Seat Belts................................... 159Vinyl............................................159CLEAN Light................................. 85Clock, Setting the........................... 58Clutch Fluid................................... 131CO in the Exhaust........................ 190Cold Weather, Starting in........... 100Compact Spare.............................. 164Console Compartment................... 59Consumer Information................ 195Controls, Instruments and............ 27CoolantAdding........................................ 123Checking.................................... 123Proper Solution......................... 123Temperature Gauge.................. 35Corrosion Protection................... 160Crankcase Emission ControlSystem........................................ 190Cruise Control Operation.............. 42Cup Holder....................................... 59Customer Relations Office.........195IndexDANGER, Explanation of.............. ii Dashboard........................................ 28Daytime Running Lights.............. 37Dead Battery, What to Do........... 171Defects, Reporting Safety ............ 25Defogger, Rear Window ............... 40Defrosting the Windows............... 70DEXRON® II AutomaticTransmission Fluid.................. 128Dimensions.................................... 186Dimming the Headlights .............. 37DipstickAutomatic Transmission........ 128Engine Oil.................................. 119Directional Signals......................... 38Disabled, Towing Your Car If ... 182Disc Brake Wear Indicators....... 106Disposal of Used Oil..................... 122DoorsLocking and Unlocking............ 47Power Door Locks ..................... 47DOT Tire Quality Grading......... 145Downshifting, 5-speed ManualTransmission (101)Driving (97)Economy...................................... 94In Bad Weather......................... 108In Foreign Countries.. (89)Economy, Fuel................................ 94Emergencies on the Road........... 163Battery, Jump Starting............ 171Changing a Flat Tire............... 165Charging System Light........... 176Check Engine Light................. 177Checking the Fuses................. 180Low Oil Pressure Light........... 175Malfunction IndicatorLamp....................................... 177Manually Closing Moonroof .. 178Overheated Engine.................. 173Emergency Brake.......................... 57Emergency Flashers...................... 40Emission Controls........................ 190EngineBelts............................................ 142Check Light........................32, 177Coolant Temperature Gauge (35)Malfunction IndicatorLamp.................................32, 177Oil Pressure Light..............31, 175Oil, What Kind to Use ............. 120Overheating............................... 174Specifications............................ 186Ethanol in Gasoline........................ 88Evaporative EmissionControls...................................... 190Exhaust Fumes............................... 24Expectant Mothers, Use ofSeat Belts by................................ 10Exterior, Cleaning the.. (156)Fabric, Cleaning........................... 159Fan, Interior.................................... 66Fan, Radiator.................................. 26Features, Comfort andConvenience................................ 63Filling the Fuel Tank.................... 90FiltersFuel (134)Oil (121)CONTINUEDIndexFirst Gear, Shifting...................... 1015-speed Manual TransmissionChecking Fluid Level.............. 1295-speed Manual Transmission,Shifting the................................ 101Flashers, Hazard Warning ........... 40Flat Tire, Changing a.................. 165FluidsAutomatic Transmission........ 128Brake.......................................... 130Clutch ......................................... 131Manual Transmission.............. 129Power Steering......................... 132Windshield Washer.................. 127FM Stereo RadioReception............................... 72, 78Folding Rear Seat........................... 51Foreign Countries, Driving in...... 89Four-way Flashers......................... 40Front End, Towing by Emergency Wrecker...................................... 182Fuel................................................... 88Fill Door and Cap ....................... 90Filter........................................... 134Gauge............................................ 35Octane Requirement.. (88)Oxygenated................................. 88Tank, Filling the ........................ 90Fuses, Checking the .. (179)Gas Mileage, Improving................ 94Gasohol.............................................88Gasoline............................................ 88Filter........................................... 134Gauge............................................35Octane Requirement................. 88Tank, Filling the ........................ 90Gas Station Procedures................. 90GaugesEngine Coolant Temperature.. 35Fuel............................................... 35Gearshift Lever PositionsAutomatic Transmission........ 1025-speed Manual Transmission ..................................................101Glass Cleaning.............................. 160Glove Box . (57)Halogen Headlight Bulbs............ 148Hazard Warning Flashers ............ 40HeadlightsDaytime Running Lights.......... 37High Beam Indicator................. 33High Beams, Turning on.......... 37Low Beams, Turning on........... 37Reminder Chime........................ 37Replacing Halogen Bulbs ....... 148Turning on................................... 37Heating and Cooling...................... 64High Altitude, Starting at.......... 100High-Low Beam Switch ............... 37Hood, Opening the.......................... 91Horn.................................................. 45Hot Coolant, Warning about...... 123Hydraulic Clutch.......................... 131Hydroplaning . (109)Identification Number,Vehicle ....................................... 184If Your Car Has to be Towed.....182IndexIgnitionKeys..............................................45Switch........................................... 46Timing Control System........... 191Indicator Lights, InstrumentPanel.............................................29Infant Restraint.............................. 19Inflation, Proper Tire .................. 143Inside Mirror................................... 55Inspection, Tire............................. 142Instrument Panel............................ 28Instrument Panel Brightness....... 38Interior Cleaning.......................... 159Interior Lights................................ 61Introduction. (i)Jacking up the Car....................... 166Jack, Tire....................................... 165Jump Starting.. (171)Keys (45)Label, Certification...................... 184Lane Change, Signaling................ 38Lap/Shoulder Belts.......................... 6Lap Belt.............................................. 6Leaking of Exhaust into Car ....... 24Lighter, Cigarette.......................... 60LightsBulb Replacement.................... 148Indicator....................................... 29Parking......................................... 37Turn Signal................................. 38Loading Cargo................................ 96LOCK (Ignition Key Position)..... 46LocksAnti-theft Steering Column..... 46Fuel Fill Door.............................. 90Glove Box.................................... 57Power Door.................................. 47Trunk ........................................... 48Low Coolant Level....................... 123Lower Gear, Downshifting to a. 101Low Oil Pressure Light.........31, 175Lubricant Specifications Chart. 186Luggage. (96)Maintenance................................... 111Periodic Items..............................117Record................................. 115-116Schedule.............................. 113-114Malfunction IndicatorLamp.....................................32, 177Manual Transmission.................. 101Manual Transmission Fluid....... 129Maximum Shift Speeds............... 102Meters, Gauges............................... 34Methanol in Gasoline..................... 89Mirrors, Adjusting......................... 55Moonroof ......................................... 54Closing Manually..................... 178Operation. (54)Neutral Gear Position ................. 104New Vehicle Break-in................... 88Normal Shift Speeds.................... 101NOTICE, Explanation of................ ii Numbers, Identification.. (184)CONTINUED。
V-DOSC MANUAL V4 0605 1-50

L-ACOUSTICS V-DOSC Manual Version 4
6/29/2005
Page 4 of 158
TABLE OF CONTENTS
TABLE OF CONTENTS........................................................................................................................... 5 LIST OF FIGURES.................................................................................................................................... 8 LIST OF TABLES ....................................................................................................................................10 INTRODUCTION .................................................................................................................................. 11 WAVEFRONT SCULPTURE TECHNOLOGY FUNDAMENTALS ........................................................ 11 THE SOUND REINFORCEME
ninja:buildstopped:subcommandfailed.
ninja:buildstopped:subcommandfailed.
1. 切换到⼯程根⽬录,检查 jack-server 是否开启 ------------- ./prebuilts/sdk/tools/jack-admin list-server
2. 检查宿主⽬录下的 .jack-server ⽂件夹以及⽂件jack-setting ------------ ls -al
如果两⽂件的所属组与所有者不是编译⼯程的⽤户,直接rm 删除
到prebuilts/sdk/tools ⽬录下执⾏⼀下这个命令:./jack-admin install-server jack-launcher.jar jack-server-4.8.ALPHA.jar
jack-launcher.jar,jack-server-4.8.ALPHA.jar这两个⽂件的名字视 prebuilts/sdk/tools ⽬录下的⽂件名⽽定。
3. 执⾏完毕后开启服务 prebuilts/sdk/tools/jack-admin start -server,执⾏成功就ok
Launching Jack server java -XX:MaxJavaStackTraceDepth=-1 -Djava.io.tmpdir=/tmp -Dfile.encoding=UTF-8 -XX:+TieredCompilation -cp /home/xxx(⽤户名)/.jack-server/launcher.jar uncher.ServerLauncher
4. 接着编译 make -j8 ,线程加多少个具体看机器配置,问题也最可能是这⼀步骤引起的,如果是虚拟机的话,建议不要加线程,
直接make ⾛起,跟楼主遇见的问题⼀模⼀样,后来⼈别再纠结了。
KeAttachProcess 原理
KeAttachProcess 原理KeAttachProcess 是一个Windows系统内核中的API函数,它的主要作用是将一个线程或进程附加到另一个进程中,从而使它们共享同一个地址空间,并且可以执行该进程的代码和访问其数据结构。
本文将介绍KeAttachProcess的原理及其相关知识。
一、KeAttachProcess的定义KeAttachProcess函数主要作用是将调用该函数的线程或进程附加到目标进程中,并返回调用进程(即需要被附加到其他进程的进程)的先前的执行上下文,以便当从目标进程切换回调用进程时,该进程可以恢复其以前的执行状态。
二、KeAttachProcess的实现原理KeAttachProcess常常在驱动程序中被调用,用于在一个进程中执行另一个进程的代码。
它的实现原理主要依赖于系统的内核态和用户态之间的切换。
当一个进程执行KeAttachProcess函数时,该函数会将执行上下文保存到原进程中,并且初始化一个新的执行上下文用于目标进程的执行。
然后,KeAttachProcess会将执行上下文切换到目标进程中,这样就使得进程附加到了目标进程中。
在进程附加到目标进程后,目标进程的内核态地址空间会被打开,允许该进程在其地址空间中执行代码和访问数据。
此外,附加进程还可以通过目标进程的内核态地址空间中的系统调用(如ZwReadFile和ZwWriteFile)对目标进程进行操作,从而实现共享目标进程的资源,如读写文件、磁盘、网络等。
在执行完与目标进程相关的操作后,附加进程可以调用KeDetachProcess来退出目标进程,并将进程附加回原进程中。
三、KeAttachProcess的使用注意事项在使用KeAttachProcess函数时,需要注意以下几个方面:1. KeAttachProcess函数只能在内核态下使用,因此驱动程序中通常会用到该函数。
2. KeAttachProcess函数调用前,需要获取目标进程的句柄(如HANDLE hProcess),并将其转换为进程内核对象(如PEPROCESS)。
dungeon master英文编程题
dungeon master英文编程题
"Dungeon Master" 通常是指一个游戏,其中玩家在一个地下城中领导角色,进行战斗、解谜和其他任务以获得奖励。
如果你想要一个基于这个主题的编程题目,下面是一个示例:
题目:编写一个简单的文本冒险游戏
要求:
创建一个程序,允许玩家在地下城中进行探索。
地下城应该包含多个房间,每个房间都有不同的敌人、物品和挑战。
玩家需要与敌人战斗,解决谜题,并收集物品来获得奖励。
程序应该跟踪玩家的健康、物品和进度。
使用英文描述所有的交互和指令。
示例:
开始游戏后,玩家首先进入一个初始房间。
在初始房间中,玩家会遇到一个简单的敌人并开始战斗。
如果玩家赢得战斗,他们会得到一些奖励。
玩家可以使用奖励来购买新的物品或提升他们的能力。
例如,他们可以购买一把剑来增加他们的攻击力,或者购买一个盾牌来增加他们的防御力。
玩家可以使用他们的物品和技能来战胜更强大的敌人,并解决更复杂的谜题。
例如,他们可能需要使用一把钥匙来打开一扇门,或者使用他们的剑来击败一个特定的敌人。
玩家可以探索地下城的多个楼层,每个楼层都有不同的难度和挑战。
最顶层的房间将包含最终的挑战,如果玩家成功完成挑战,他们将获得最大的奖励并结束游戏。
FactSage Macro Processing 2014

6
2. Saving an Equilib file (Equi*.dat)
• All the Equilib files have a file name starting with Equi and extension .dat • When an Equilib files is saved, all the reactants, products and databases selection, and other selected conditions are saved • When saved, Equilib files are always stored in My Files directory (no prompt for path)
My Files directory (no prompt for path) Enter filename then press OK ⇒ Mixtfilename.dat Enter stream name then press OK
10
3. Saving an equilibrated stream (Mixt*.dat)
14
DATABASE SELECTION FOR PYROMETALLURGICAL PROCESSES
15
FactSage database - ferrous/non-ferrous applications
FACTPS: All gaseous species, stoichiometric solid and liquid species (organic, inorganic). It used to be called FACT53 Similar to thermodynamic tables like JANAF, Barin-Kubaschewski FToxid: Most updated Oxide database with - many solution phases (slag, spinel, monoxide, olivine, etc.) - pure solid and liquid oxides, No gas phase FTmisc: FeLq solution - most reliable liquid steel database for steelmaking calculations (slags/refractories/gases/molten iron) Cu-Lq, Pb-Lq, Zn-Lq solution, etc. Matte and other Sulfides FSStel: solid and liquid steel phases (also includes small number of gases, oxides, sulfides, nitrides, etc.) - for steel solidifications and alloy design. - liquid steel: reasonable calculations for steelmaking applications
- 1、下载文档前请自行甄别文档内容的完整性,平台不提供额外的编辑、内容补充、找答案等附加服务。
- 2、"仅部分预览"的文档,不可在线预览部分如存在完整性等问题,可反馈申请退款(可完整预览的文档不适用该条件!)。
- 3、如文档侵犯您的权益,请联系客服反馈,我们会尽快为您处理(人工客服工作时间:9:00-18:30)。
Jack Ganssle
Where we are - Cost per MIP
800 700 600 500 400 300 200 100
0 1975 1980 1985 1990 1995 2000
Qualities of Useful Measures
• Can be done easily • Give insight into the product and the processes • Support effective change-making
jack@
Quality
jack@
Resources
- massive free C source Buyer’s Guide
jack@
jack@
Definition: Quality
The Quality of any product is exactly what the customer says it is.
jack@
Firmware is the Most Expensive Thing in the Universe!
jack@
Where we are – Power
jack@ganΒιβλιοθήκη
Where we are - Market Shares
16 bits
32 bits
4 bits
8 bits
Over 9 billion CPUs sold in 2005!
jack@
jack@
Change Usually Fails
Do nothing Dictate change from the top Push from the bottom
jack@
Getting Products Out Faster
• Use clever technical ideas • Start testing from day 1 • Manage features to ship on time • Stamp out bugs aggressively • Create an efficient development environment
jack@
“I Need to Write this Package”
• Why? • Are any commercial packages available? • If so, why can’t we use them? • What is the tradeoff between writing
Where we are - Growth
jack@
Where we are - Projects
2.5 design starts per year 83,000 design starts per year 15.8 developers per project 225,000 developers worldwide 8% projects outsourced
jack@
Bug Rates
C (typical) 50 – 100 bugs/KLOC Ada (typical) 25 SPARK (typical) 4
jack@
“I Need to Write this Package”
• What are the risk factors? • Are we experts at this technology?
jack@
Measurements
jack@
Measurements
jack@
Measurements
Three kinds: • Motivators • Rewards/punishment • Understanding
jack@
jack@
Where we are - Projects
Size Under $500k $501k to $3m $3m to $6m $6m to $10m Over $10m
Successful 38% 27% 16% 4% 0%
Challenged 44% 52% 55% 57% 66%
Quality is nice… as long as it doesn’t cost anything.
jack@
Quality
Quality is free, but only to those who are willing to pay heavily for it.
and buying?
jack@
“I Need to Write this Package”
• How long will it take? • How much will it cost? • How many LOC will it be? • How buggy will it be?
Failed 19% 21% 29% 39% 34%
Study of 35,000 projects Success = on-time, on-budget, with most of the desired features Challenged = over-budget, over-time, many features removed Failed = Project is cancelled or unused
