Eclipse Plugin- GT4IDE
eclipse的使用教程
eclipse的使用教程Eclipse是一个功能强大的集成开发环境(IDE),主要用于开发Java应用程序。
它提供了许多功能和工具,帮助开发人员更高效地编写、调试和管理代码。
在本篇教程中,我们将介绍Eclipse的基本使用方法,以帮助你上手这个强大的开发工具。
一、Eclipse的安装和配置1. 首先,你需要下载适用于你的操作系统的Eclipse安装包。
你可以从Eclipse官方网站上找到最新的版本进行下载。
2. 下载完成后,解压缩安装包并将其放置在一个你喜欢的位置。
打开解压缩后的文件夹,你将看到一个“eclipse.exe”或“eclipse”可执行文件。
3. 双击可执行文件以启动Eclipse。
在第一次启动时,你将被要求选择一个工作空间(Workspace),它是用于存储你的项目和相关文件的文件夹。
选择一个合适的文件夹并点击“OK”按钮。
4. 启动后,你将看到Eclipse的主界面。
你可以在窗口上方的工具栏中找到各种功能和选项。
二、创建新项目1. 在Eclipse的主界面上方的工具栏中,找到“File”菜单并点击它。
2. 在下拉菜单中,选择“New”选项。
然后,你将看到一个子菜单,点击“Java Project”选项。
3. 在弹出窗口中,输入你的项目名称并点击“Finish”按钮。
Eclipse将自动创建一个新的Java项目,并在你的工作空间文件夹中创建一个相应的文件夹。
三、编写代码1. 在Eclipse的主界面的左侧,你将看到一个“Package Explorer”视图。
在其中,你可以看到你的项目和相关文件夹的层次结构。
2. 右键点击你的项目,并选择“New”选项。
然后,选择“Class”选项。
3. 在弹出窗口中,输入你的类的名称和所属的包名,并选择其他相关选项。
然后,点击“Finish”按钮。
Eclipse将自动在你的项目中创建一个包和一个类文件。
4. 在类文件中,你可以开始编写你的Java代码。
ecplice使用方法
ecplice使用方法Eclipse 使用方法作为一款功能强大的集成开发环境(IDE),Eclipse可以帮助开发者高效地编写、测试和调试代码。
本文将介绍Eclipse的使用方法,帮助初学者快速上手。
一、安装Eclipse1. 在官方网站上下载适用于您的操作系统的Eclipse安装包;2. 解压安装包到您选择的目录;3. 运行eclipse.exe文件。
二、创建项目1. 打开Eclipse;2. 在菜单栏中选择"File"->"New"->"Project";3. 在弹出的对话框中选择适合您开发需求的项目类型,并点击"Next";4. 输入项目名称和存储位置,并点击"Finish"。
三、编辑代码1. 在左侧的"Package Explorer"视图中,展开项目文件夹,找到您想要编辑的代码文件;2. 双击打开代码文件,在代码编辑器中进行编辑;3. 可以使用代码补全功能来加快编写速度,只需输入部分代码,然后按下"Ctrl + Space"即可;4. 可以使用快捷键"Ctrl + /"来注释或取消注释选中的代码行。
四、编译和运行代码1. 在代码编辑器中右键点击您想要编译和运行的代码文件;2. 选择"Run As"->"Java Application",或使用快捷键"Ctrl + F11";3. 程序将在Eclipse的控制台中输出结果。
五、调试代码1. 在代码编辑器中设置断点,单击代码行号左侧的空白区域即可;2. 在菜单栏中选择"Run"->"Debug",或使用快捷键"F11"启动调试;3. 程序将在断点处中断执行,您可以逐行查看代码执行过程和变量的值,以便发现和排查问题。
为Geant4配置Eclipse编译环境IDE

为Geant4配置Eclipse编译环境IDE**************************************Eclipse 安装.**************************************官网下载Eclipse for c++ IDE. 解压直接用。
**************************************用Eclipse打开N02.**************************************点击:File--New--Makefile Project with Existing Code;点击浏览选择文件的位置。
选择Linux GCC作为indexer setting。
点击Finish.点击Run,出现Launch Debug configuration selection. 双击gdb/mi运行:***************************************使用Mac文件,运行程序***************************************点击Run--Run Configurations;在左边找到要运行的工程,例如exampleN02;右边找到Arguments,内容输入你要运行的mac文件,例如vis.mac ;点击右下角Run。
可以通过mac文件运行程序。
***************************************自动补全功能的实现***************************************这就需要改变Geant4的安装了。
如果你安装Geant4三次以上,你一定对以下语句很了解了:>./Configure -build>./Configure 。
这里,我们要重新build一次。
但是选项稍作改变。
首先在安装目录下运行:>./Configure -rebuild到回答下面的问题时,要注意。
使用Antlr4 eclipse plugin解析java入门

使用Antlr4 eclipse plugin解析java入门Alex Shawn1.准备工作1.Eclipse2.Antlr4 ide eclipse plugin3.Antlr4 jar 文件(下载链接)4.Xtext 2.7.3 (下载链接)5.grammars-v4 (下载链接)2.安装antlr4 eclipse plugin1.打开Eclipse- > Help -> Eclipse Marketplace2.S earch “ANTLR4”然后安装3.重启Eclipse3.安装Xtext 2.7.3 (antlr4暂时不支持更高版本)1.打开Eclipse -> Help -> Install New Software2.Add -> Archive -> select选择上面下载的Xtext 2.7.3 -> OK3.Selcet All -> continue installing4.重启Eclipse4.创建一个JAVA项目1.File -> New -> Java Project2.把项目命名为JavaParser5.添加antlr类库1.解压grammars-v4文件2.把grammars-v4-master/java8下的Java8.g4文件放在项目根目录3.然后antlr plugin会自动生成一个target文件夹4.右键点击刚才创建的项目,选择properties5.选择Java Build Path,点击Add Folder6.勾选target/generated-sources/antlr4文件夹, 然后点击OK7.接着能看到有报错信息,因为我们还必须添加antlr4 jar文件到项目中8.在项目根目录下创建一个叫lib的文件夹, 并把之前下载的Antlr4.jar复制进去9.右键点击这个jar文件, 选择Build Path -> Add to Build Path,这时报错信息消失了6.测试JavaPaser是否能用1.在src下创建一个HelloWorld类, 如public class HelloWorld {private int a = 1;private int b = 2;public static void main(String[] args) {System.out.println("Hello, World");}2.回到之前解压的grammars-v4-master/java8,复制Test.java到HelloWorld.java同级目录3.修改Test.java main方法, 如下public static void main(String[] args) {String[] files = new String[1];files[0] = "src/HelloWorld.java";doAll(files);}4.修改Test.java成员变量gui,原来为false,改为true5.保存运行Test.java,得到HelloWorld.java的语法树,如下图7.结尾1.除了java之外,其它语言的语法文件都在grammars-v4 中,按上面的步骤替换Java8.g4就行了2.内容收集翻译自互联网, 素材来源:JSON Parser with ANTLR4 and EclipseAntlr4ide issues 134Antlr/grammars-v4。
ECLIPSE介绍
ECLIPSE介绍ECLIPSE是一个开源的集成开发环境(IDE)工具,它提供了用于编写、调试和部署应用程序的完整工具套件。
ECLIPSE最初由IBM公司于2001年推出,现在由Eclipse基金会管理和维护。
ECLIPSE的目标是成为一个可扩展和通用的开发平台,可以用于开发各种类型的应用程序,包括Java、C++、Python等等。
以下是ECLIPSE的一些关键特点:2. 跨平台:ECLIPSE可以在多个操作系统上运行,包括Windows、Mac OS和Linux等。
这使得开发者可以在他们喜欢的操作系统上使用ECLIPSE进行开发,而不受平台约束。
3.可扩展性:ECLIPSE提供了丰富的插件和扩展机制,使开发者能够根据自己的需求灵活地扩展和定制IDE。
无论是添加新的功能、整合第三方工具还是创建自己的插件,ECLIPSE都提供了相应的工具和文档来支持。
5.调试和测试工具:ECLIPSE提供了强大的调试和测试工具,使开发者能够快速定位和修复代码中的问题。
开发者可以在代码中设置断点,逐步执行代码,并查看变量的值和程序的执行流程。
此外,ECLIPSE还支持各种类型的单元测试、集成测试和性能测试,以帮助开发者确保代码质量和性能。
6. 版本控制和团队协作:ECLIPSE集成了多种版本控制系统,包括Git、SVN等,使开发者可以方便地对代码进行版本控制和管理。
此外,ECLIPSE还提供了用于团队协作的工具,如代码审查、任务管理和团队开发等,使团队成员能够协同工作。
7. 丰富的插件生态系统:ECLIPSE拥有一个庞大的插件生态系统,涵盖了各种开发工具和框架。
开发者可以根据自己的需求选择和安装各种插件,扩展和丰富ECLIPSE的功能。
无论是用于Web开发、移动应用开发还是数据分析,都可以在ECLIPSE的插件市场中找到相应的工具和框架。
总之,ECLIPSE是一个功能强大、可扩展和通用的开发环境工具,适用于各种类型的应用程序开发。
eclipse安装反编译插件
eclipse安装反编译插件前⾔:在实际的开发中⼏乎都会使⽤到⼀些框架来辅助项⽬的开发⼯作,对于⼀些框架的代码我们总怀有⼀些好奇之⼼,想⼀探究竟,有源码当然更好了,对于有些JAR包中的代码我们就需要利⽤反编译⼯具来看⼀下了,下⾯是我常使⽤的⼀种安装JAVA反编译⼯具的⽅法,操作⽐较简单,不过时间长了也容易忘记,还是在此⼩记⼀笔吧!毕竟好记性不如烂笔头(插件市场中有好多好玩的,⾃⼰可以尝试玩玩看!)1:Eclipse的版本信息2:Help——Eclipse Marketplace3-1:输⼊Decompiler搜索并安装此插件3-2:输⼊反编译搜索并安装此插件(有好多好玩的插件,不妨尝试玩⼀玩)4:这⾥有⼏种不同的反编译插件⼯具的选择,可以先都选上,然后尝试⼀下,看看那个更好玩5:没得选,不接受,就不能继续玩了6:当然要继续了7:好啦!反编译插件安装完成了,重启Eclipse之后就能玩了,那就Yes吧!8:想看⼀下反编译插件安装后的设置选项 Window——Preferences9:下图为Eclipse Class Decompiler的⾸选项页⾯,可以选择缺省的反编译器⼯具,并进⾏反编译器的基本设置。
缺省的反编译⼯具为JD-Core,JD-Core更为先进⼀些,⽀持泛型、Enum、注解等JDK1.5以后才有的新语法。
⾸选项配置选项的含义如下所⽰:9-1.重⽤缓存代码:只会反编译⼀次,以后每次打开该类⽂件,都显⽰的是缓存的反编译代码。
9-2.忽略已存在的源代码:若未选中,则查看Class⽂件是否已绑定了Java源代码,如果已绑定,则显⽰Java源代码,如果未绑定,则反编译Class⽂件。
若选中此项,则忽略已绑定的Java源代码,显⽰反编译结果。
9-3.显⽰反编译器报告:显⽰反编译器反编译后⽣成的数据报告及异常信息。
9-4.使⽤Eclipse代码格式化⼯具:使⽤Eclipse格式化⼯具对反编译结果重新格式化排版,反编译整个Jar包时,此操作会消耗⼀些时间。
ECLIPSE介绍

ECLIPSE介绍Eclipse是一个开源的集成开发环境(IDE),主要用于Java开发。
它是由Eclipse基金会开发并维护的,可以在多个操作系统上运行,如Windows,MacOS和Linux。
Eclipse最初是为Java开发而设计的,但它已经延伸到了其他语言,如C,C++,PHP,Python等。
它提供了许多功能强大的工具和插件,以帮助开发人员在一个集成的环境中完成开发工作。
Eclipse的界面简洁、直观,工具和视图可以通过拖拽和调整大小来自定义。
它采用了插件体系结构,使得开发者可以根据需求随时添加或删除工具和功能。
这使得Eclipse成为一个高度可扩展的IDE,可以满足各种不同的开发需求。
Eclipse还提供了源代码管理(SCM)工具的集成,比如Git,Subversion等。
这使得开发人员可以轻松地管理和共享他们的代码库,并与团队成员进行协作开发。
Eclipse还支持项目管理工具,如Maven和Ant,以帮助开发人员轻松构建和部署他们的应用程序。
Eclipse的一个主要特点是它的插件生态系统。
有成千上万的第三方插件可供选择,从而扩展了Eclipse的功能。
这些插件包括代码分析工具,测试框架,数据库管理工具等。
开发人员可以根据自己的需求选择并安装这些插件,使得Eclipse成为一个高度定制化的开发环境。
与其他IDE相比,Eclipse最大的优势之一是它的社区支持。
Eclipse拥有一个庞大的开发者社区,他们为Eclipse开发插件和工具。
开发人员可以通过访问Eclipse官方网站和论坛,获得帮助和支持。
此外,Eclipse还定期发布更新和修补程序,以确保IDE的稳定性和安全性。
eclipse可视化工具使用方法

eclipse可视化工具使用方法一、简介Eclipse是一款开源的集成开发环境(IDE),是Java开发最常用的工具之一。
它提供了丰富的功能和插件,使开发者能够更高效地编写、调试和管理代码。
本文将介绍如何使用Eclipse的可视化工具,以及如何充分利用这些工具提升开发效率。
二、安装与配置1. 下载Eclipse在Eclipse官网上下载最新版本的Eclipse安装包,并解压到本地目录。
2. 安装Eclipse打开解压后的文件夹,运行eclipse.exe。
首次运行Eclipse时,需要选择一个工作空间,用于存储项目文件。
3. 配置Eclipse在Eclipse的菜单栏中选择“Window”->“Preferences”,可以进行各种个性化配置。
- 在“General”->“Appearance”中,可以选择主题、字体和颜色等外观设置。
- 在“Java”->“Code Style”中,可以设置代码格式化规则,使代码更易读。
- 在“Java”->“Editor”->“Content Assist”中,可以配置代码自动补全功能。
- 在“Java”->“Build Path”中,可以添加外部库和设置编译路径。
三、常用可视化工具1. 导航视图(Package Explorer)导航视图显示项目的目录结构,可以方便地浏览和管理项目文件。
在Eclipse的左侧窗口中,找到“Package Explorer”选项卡。
2. 编辑器(Editor)编辑器是Eclipse的核心功能之一,用于编辑和查看代码。
在Eclipse的右侧窗口中,找到“Editor”选项卡。
可以在编辑器中输入代码,进行语法高亮、代码折叠等操作。
3. 调试器(Debugger)调试器可以帮助开发者在代码执行过程中进行调试和排错。
在Eclipse的底部窗口中,找到“Debug”选项卡。
可以设置断点、单步执行、查看变量的值等。
Eclipse各版本代号一览表以及官网上有很多版本的eclipse,下载哪个版本比较合适呢?
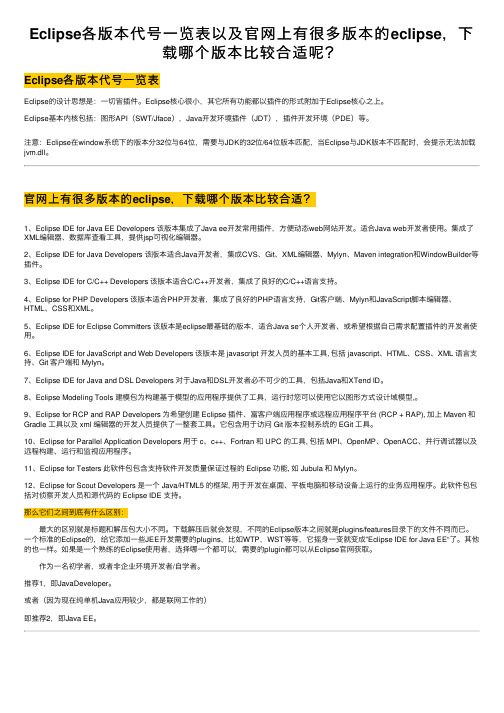
Eclipse各版本代号⼀览表以及官⽹上有很多版本的eclipse,下载哪个版本⽐较合适呢?Eclipse各版本代号⼀览表Eclipse的设计思想是:⼀切皆插件。
Eclipse核⼼很⼩,其它所有功能都以插件的形式附加于Eclipse核⼼之上。
Eclipse基本内核包括:图形API(SWT/Jface),Java开发环境插件(JDT),插件开发环境(PDE)等。
注意:Eclipse在window系统下的版本分32位与64位,需要与JDK的32位/64位版本匹配,当Eclipse与JDK版本不匹配时,会提⽰⽆法加载jvm.dll。
官⽹上有很多版本的eclipse,下载哪个版本⽐较合适?1、Eclipse IDE for Java EE Developers 该版本集成了Java ee开发常⽤插件,⽅便动态web⽹站开发。
适合Java web开发者使⽤。
集成了XML编辑器、数据库查看⼯具,提供jsp可视化编辑器。
2、Eclipse IDE for Java Developers 该版本适合Java开发者,集成CVS、Git、XML编辑器、Mylyn、Maven integration和WindowBuilder等插件。
3、Eclipse IDE for C/C++ Developers 该版本适合C/C++开发者,集成了良好的C/C++语⾔⽀持。
4、Eclipse for PHP Developers 该版本适合PHP开发者,集成了良好的PHP语⾔⽀持,Git客户端、Mylyn和JavaScript脚本编辑器、HTML、CSS和XML。
5、Eclipse IDE for Eclipse Committers 该版本是eclipse最基础的版本,适合Java se个⼈开发者、或希望根据⾃⼰需求配置插件的开发者使⽤。
6、Eclipse IDE for JavaScript and Web Developers 该版本是 javascript 开发⼈员的基本⼯具, 包括 javascript、HTML、CSS、XML 语⾔⽀持、Git 客户端和 Mylyn。
eclipse 使用技巧
eclipse 使用技巧Eclipse 是一款功能强大的 Java 集成开发环境(IDE),它提供了许多有助于开发人员提高效率的使用技巧。
下面是一些常用的 Eclipse 使用技巧。
1. 编辑器区域拆分:Eclipse 的编辑器区域可以水平或垂直拆分,用于同时查看多个文件或同一个文件的不同部分。
拆分编辑器区域的方法是拖动编辑器标签到编辑器区域的左侧、右侧、上方或下方。
2. 快捷键:Eclipse 提供了大量的快捷键,可以帮助用户快速完成常见的操作。
例如,Ctrl + S 用于保存文件,Ctrl + F 用于查找,Ctrl + D 用于删除当前行等。
3. 代码补全:Eclipse 的代码补全功能可以帮助开发人员快速输入代码,并提供相关的代码提示。
按下 Ctrl + 空格键即可触发代码补全,同时还可以通过输入关键字的前几个字母进行筛选。
4. 代码重构:Eclipse 提供了多种代码重构的功能,包括重命名变量、提取方法、提取接口等。
可以右键点击要重构的代码,然后选择相关的重构操作。
此外,还可以使用快捷键 Ctrl + Shift + R 快速打开重构对话框。
5. 自动导入:当使用一个未导入的类或方法时,Eclipse 会自动弹出一个提示框,提供导入该类或方法的选项。
按下 Ctrl + Shift + O 快捷键可以自动导入所有需要的类。
6. 快速开启文件:按下 Ctrl + Shift + T 快捷键可以快速在工作空间中搜索并打开指定的 Java 类文件。
同样,Ctrl + Shift + R 快捷键可以用于快速打开任何类型的文件。
7. 快速查找:Eclipse 提供了多种快速查找功能,包括全局搜索、工作空间搜索、在当前文件中查找等。
这些功能可以帮助开发人员快速定位所需的代码或资源。
8. 调试技巧:Eclipse 提供了强大的调试功能,可以帮助开发人员找到程序中的 bug。
使用断点、观察变量、堆栈跟踪等调试技巧可以提高调试的效率。
Nsight Eclipse Plugins Edition DG-06450-001 _v9.1
Getting Started GuideTABLE OF CONTENTS Chapter 1. Introduction (1)1.1. About Nsight Eclipse Plugins Edition (1)Chapter 2. Using Nsight Eclipse Edition (2)2.1. Installing Nsight Eclipse Edition (2)2.1.1. Installing CUDA T oolkit (2)2.1.2. Configure CUDA T oolkit Path (2)2.2. Nsight Eclipse Main Window (4)2.3. Creating a New Project (5)2.4. Importing CUDA Samples (6)2.4.1. cuHook Sample (6)2.5. Configure Build Settings (7)2.6. Debugging CUDA Applications (8)2.7. Remote development of CUDA Applications (10)2.8. Debugging Remote CUDA Applications (12)2.9. Profiling CUDA applications (18)2.10. Importing Nsight Eclipse Projects (19)2.11. More Information (21)LIST OF FIGURESFigure 1 Nsight main window after creating a new project (5)Figure 2 Debugging CUDA application (9)Figure 3 Debugging CUDA application (10)Figure 4 Debugging remote CUDA application (18)Figure 5 Profiling CUDA Application (19)This guide introduces Nsight Eclipse Plugins Edition and provides instructions necessary to start using this tool. Nsight Eclipse is based on Eclipse CDT project. Fora detailed description of Eclipse CDT features consult the integrated help "C/C++ Development User Guide" available from inside Nsight (through Help->Help Contents menu).1.1. About Nsight Eclipse Plugins EditionNVIDIA® Nsight™ Eclipse Edition is a unified CPU plus GPU integrated development environment (IDE) for developing CUDA® applications on Linux and Mac OS X for the x86, POWER and ARM platforms. It is designed to help developers on all stages of the software development process. Nsight Eclipse Plugins can be installed on vanilla Eclipse 4.4 or later using the standard Help->Install New Software.. Menu. The principal features are as follows:‣Edit, build, debug and profile CUDA-C applications‣CUDA aware source code editor – syntax highlighting, code completion and inline help‣Graphical user interface for debugging heterogeneous applications‣Profiler integration – Launch visual profiler as an external application with the CUDA application built in this IDE to easily identify performance bottlenecksFor more information about Eclipse Platform, visit 2.1. Installing Nsight Eclipse EditionNsight Eclipse Plugins archive is part of the CUDA Toolkit. Nsight Eclipse Plugins archive can be installed using the Help -> Install New Software... Menu on Eclipse 4.4 or later2.1.1. Installing CUDA T oolkitTo install CUDA Toolkit:1.Visit the NVIDIA CUDA Zone download page:/object/cuda_get.html2.Select appropriate operating system. Nsight Eclipse Edition is available in Mac OS X and Linux toolkit packages.3.Download and install the CUDA Driver.4.Download and install the CUDA Toolkit.5.Follow instructions to configure CUDA Driver and Toolkit on your system.2.1.2. Configure CUDA T oolkit PathTo get started, CUDA Toolkit path must be configured in Eclipse with Nsight Plugins:1.Open the Preferences page, Window > Preferences.2.Go to CUDA toolkit section.3.Select the CUDA toolkit path to be used by Nsight. CUDA tookits that are installed in the default location will automatically appear.4.CUDA toolkit path can be also specified in the project properties page in order to use different toolkit for a project.5.For QNX: When QNX is selected as Target OS, a dialog will be displayed to set theQNX_HOST and QNX_TARGET environment variables if they were not already set.QNX_HOST environment variable identifies the directory that holds the host-related components:QNX_TARGET environment variable identifies the directory that holds the target-related components:2.2. Nsight Eclipse Main WindowOn the first run Eclipse will ask to pick a workspace location. The workspace is a folder where Nsight will store its settings, local files history and caches. An empty folder should be selected to avoid overwriting existing files.The main Nsight window will open after the workspace location is selected. The main window is divided into the following areas:‣Editor - displays source files that are opened for editing.‣Project Explorer - displays project files‣Outline - displays structure of the source file in the current editor.‣Problems - displays errors and warnings detected by static code analysis in IDE or bya compiler during the build.‣Console - displays make output during the build or output from the running application.2.3. Creating a New Project1.From the main menu, open the new project wizard - File > New... > C/C++ Project2.Specify the project name and project files location.3.Specify the project type like executable project.4.Specify the CUDA toolchain from the list of toolchains.5.Specify the project configurations on the next wizard page.plete the wizard.The project will be shown in the Project Explorer view and source editor will be opened.7.Build the project by clicking on the hammer button on the main toolbar.Figure 1 Nsight main window after creating a new project2.4. Importing CUDA SamplesThe CUDA samples are an optional component of the CUDA Toolkit installation. Nsight provides a mechanism to import these samples and work with them easily: Samples that use the CUDA driver API (suffixed with "Drv") are not supported byNsight.1.From the main menu, open the new project wizard - File > New... > C/C++ Project2.Specify the project name and project files location.3.Select Import CUDA Sample under Executable in the Project type tree.4.Select CUDA toolchain from the Toolchains option. location.5.On the next wizard page select project sample you want to import. Also select the target CPU architecture. Press Next...6.Specify the project parameters on the next wizard page.plete the wizard.The project will be shown in the Project Explorer view and source editor will be opened.8.Build the project by clicking on the hammer button on the main toolbar.2.4.1. cuHook SamplecuHook sample builds both the library and the executable. cuHook sample should be imported as the "makefile" project using the following steps.1.From the main menu, open the new project wizard - File > New... > C/C++ Project2.Select project type "Makefile project" and choose "Empty Project"3.Specify the project name and project files location.plete the wizard.The project will be shown in the Project Explorer view.5.Right click on the project - Import... > General > File System6.On the next wizard page, select the location of cuHooksample(Samples/7_CUDALibraries/cuHook)7.Select all the source files and makefile and Finish the wizard8.Build the project by clicking on the hammer button on the main toolbar.9.To run the sample, from the main menu - Run > Run Configurations... > Select the executable > Go to Environment tab > New... > enter Name=LD_PRELOAD, Value=./ libcuhook.so.1 > Run will execute the sample2.5. Configure Build SettingsTo define build settings: In the C/C++ Projects view, right-click your project, and select Properties. Select C/C++ Build, Settings from the list.The following are the categories of Nvcc linker settings that can be configured for the selected project.All options field in the main page is not editable and it's the collection of options setin the child categories.‣Libraries - Configure library search path(-L) and to include linker libraries(-l). When you are cross compiling for different target os, the library search path should point to the appropriate location where the target os libraries are present.‣Miscellaneous - Set additional linker options and option to link with OpenGL libraries.‣Shared Library Settings - Set option to build a shared library.The following are the categories of Nvcc Compiler settings that can be configured for the selected project.All options field in the main page is not editable and it's the collection of options set‣Dialect - Select the language standard and dialect options.‣Preprocessor - Add the defined and undefined symbols for the preprocessor.‣Includes - Set include paths and include files for the compiler.‣Optimization - Set the compiler optimization level.‣Debugging - Set the options to generate debug information.‣Warnings - Set inhibit all warning messages.‣CUDA - Generate code for different real architectures with the PTX for the same vitrual architectures.2.6. Debugging CUDA ApplicationsNsight must be running and at least one project must exist.1.In the Project Explorer view, select project you want to debug. Make sure the project executable is compiled and no error markers are shown on the project.2.Right click on the project and go to Debug As > NVIDIA CUDA GDB Debugger menu.3.You will be offered to switch perspective when you run debugger for the first time. Click "Yes".Perspective is a window layout preset specifically designed for a particular task.4.Application will suspend in the main function. At this point there is no GPU code running.5.Add a breakpoint in the device code. Resume the application.Debugger will break when application reaches the breakpoint. You can now explore your CUDA device state, step through your GPU code or resume the application.Figure 2 Debugging CUDA applicationAdditional debugger options can be set in the debug configuration dialog through Run > Debug Configurations .. menu..Figure 3 Debugging CUDA application2.7. Remote development of CUDA ApplicationsNsight Eclipse Edition also supports remote development of CUDA application starting with CUDA Toolkit 6.0. The picture below shows how Nsight Eclipse Edition can beused for local as well as remote development:For remote development you do not need any NVIDIA GPU on your host system. The remote target system can be a Linux x86 or POWER system with an NVIDIA GPU or an Tegra-based ARM system. Nsight IDE and UI tools can only be hosted on x86 and POWER systems.Nsight Eclipse Plugins supports the cross compilation mode for remote devices.In the cross compilation mode the project resides on the host system and the cross compilation is also done on the host system. The cross compilation mode is only supported on an Ubuntu x86 host system.To cross compile select the target cross compile architecture in CPU architecture dropdown in the project properties page:2.8. Debugging Remote CUDA Applications Remote debugging is available starting with CUDA Toolkit 5.5. A dedicated GPU is not required to use Nsight remote debugging UI. A dedicated GPU is still required on the debug target. Only Linux targets are supported. Debug host and target may run different operating systems or have different CPU architectures. The remote machine must be accessible via SSH and CUDA Toolkit must be installed on both machines.If there is a firewall between the host and the target, it must be set up to let RSP1.Select the project and right click then go to Debug As...>NVIDIA CUDA GDBDebugger(Remote) menu item.2.Type the full path to a local executable or select one using the Local file... button.3.Select a remote connection from a drop-down list or press the Add connection... button to create a new one.4.If you are creating a new remote connection, select the SSH Only connection type, press Next, and type the host name(or IP address) as well as the connection name anddescription (both are optional) and then press Finish.5.For Android devices: To configure the remote connection using Android debug bridge, select the Android debug bridge from the Remote Connection drop-downlist, Android device must be connected to the host system using USB port.Press Manage button, and enter or select the path to adb utility. You need to install Android SDK platform tools to use Android debug bridge. press Detect button tofind the android device available through ADB.6.Optional: Press Connect to verify the selected remote connection.7.Press the Next button.8.Type the full path to cuda-gdbserver on the remote system or select one using theBrowse... button.9.Click on "Add new path" or on the Browse... button to specify the path to the shared libraries the remote application depends on.10.C lick on the Finish button to finish the new debug configuration wizard and start debugging the application.11.Y ou will be offered to switch perspective when you run the debugger for the first time. Click Yes.Perspective is a window layout preset specifically designed for a particular task. The debugger will stop at the application main routine. You can now set breakpoints, orresume the application.Figure 4 Debugging remote CUDA application2.9. Profiling CUDA applicationsNsight must be running and at least one project must exist. Profiler cannot be used when debugging session is in progress.Nsight Eclipse Edition profiling features are based on the NVIDIA Visual Profiler ( nvvp ) code. Nsight Eclipse Plugins Edition will launch the Visual Profiler as an external tool with the executable and other information from the selected project.1.In the Project Explorer view, select project you want to profile. Make sure the project executable is compiled and no error markers are shown on the project.2.Select the project and right click and go to Profile As>NVIDIA Visual Profiler menu.Nsight Eclipse will launch the Visual Profiler to specify extra profiler options with the executable information already passed from the selected project.Figure 5 Profiling CUDA Application2.10. Importing Nsight Eclipse ProjectsThe projects that are created with Nsight Eclipse Edition can be imported into the Eclipse workbench with Nsight Eclipse plugins.1.Open Nsight Eclipse edition and select the project that needs to be exported.2.Right click on the Nsight Eclipse project and go to - Export > C/C++ > C/C++ Project Settings > Next menu.3.Select the project and settings to export.4.Specify the "Export to file" location.5.Settings will be stored in the given XML file.6.Go to Eclipse workbench where the project settings needs to be imported.7.Create a C/C++ Project from the main menu File > New > C/C++ Project8.Specify the project name and choose Empty project type with CUDA toolchains.9.Right click on the project to import the source files. Import > General > File System >(From directory) or copy the source files from the existing project.10.I mport the project settings like include paths and symbols using the following right click menu Import > C/C++ > C/C++ Project Settings >Next...11.S elect the location of the project settigns file and select the project and configurationon the next wizard page.12.C omplete the wizard.The project settings will be imported from the file exported from Nsight Eclipse Edition.13.B uild the project by clicking on the hammer button on the main toolbar.2.11. More InformationMore information about the Eclipse CDT features and other topics is available in the Help contents. To access Help contents select Help->Help Contents from the Nsight main menu.More information about CUDA, CUDA Toolkit and other tools is available on CUDAweb page at /cudaNoticeALL NVIDIA DESIGN SPECIFICATIONS, REFERENCE BOARDS, FILES, DRAWINGS, DIAGNOSTICS, LISTS, AND OTHER DOCUMENTS (TOGETHER AND SEPARATEL Y, "MATERIALS") ARE BEING PROVIDED "AS IS." NVIDIA MAKES NO WARRANTIES, EXPRESSED, IMPLIED, STATUTORY, OR OTHERWISE WITH RESPECT TO THE MATERIALS, AND EXPRESSL Y DISCLAIMS ALL IMPLIED WARRANTIES OF NONINFRINGEMENT, MERCHANTABILITY, AND FITNESS FOR A PARTICULAR PURPOSE.Information furnished is believed to be accurate and reliable. However, NVIDIA Corporation assumes no responsibility for the consequences of use of such information or for any infringement of patents or other rights of third parties that may result from its use. No license is granted by implication of otherwise under any patent rights of NVIDIA Corporation. Specifications mentioned in this publication are subject to change without notice. This publication supersedes and replaces all other information previously supplied. NVIDIA Corporation products are not authorized as critical components in life support devices or systems without express written approval of NVIDIA Corporation.TrademarksNVIDIA and the NVIDIA logo are trademarks or registered trademarks of NVIDIA Corporation in the U.S. and other countries. Other company and product names may be trademarks of the respective companies with which they are associated. Copyright© 2007-2018 NVIDIA Corporation. All rights reserved.。
eclipse 项目编译

Eclipse 是一个流行的集成开发环境(IDE),可以用于开发各种不同类型的软件项目。
要编译Eclipse 项目,您可以按照以下步骤进行操作:
1. 打开Eclipse IDE,并导航到您的项目。
2. 确保您的项目已经被导入到Eclipse 中。
如果您的项目还没有被导入,可以通过菜单栏的"File" -> "Import" 来导入项目。
3. 在项目导航器中,右键单击您的项目,然后选择"Properties"(属性)菜单项。
4. 在属性对话框中,选择"Java Build Path"(Java 构建路径)选项卡。
5. 确保"Source"(源代码)和"Output"(输出)目录已经被正确设置。
6. 如果您的项目包含其他依赖项(例如库或框架),请确保这些依赖项已经添加到项目的构建路径中。
7. 单击"Apply and Close"(应用并关闭)按钮以保存更改。
8. 在项目导航器中,右键单击您的项目,然后选择"Clean"(清理)菜单项。
这将清除任何旧的编译文件。
9. 最后,再次右键单击您的项目,然后选择"Build Project"(构建项目)菜单项。
这将编译您的项目并生成新的编译文件。
如果您的项目没有任何错误或问题,编译过程应该会成功完成,并在输出目录中生成新的编译文件。
如果您遇到任何错误或问题,请检查代码中的语法错误或其他问题,并确保所有依赖项都已正确配置。
Nsight Eclipse Plugins 安装指南说明书
Nsight Eclipse Plugins Installation GuideNsight Eclipse Plugins Installation GuideTable of Contents Chapter 1. Introduction (1)1.1. Install plugins using Eclipse IDE (1)1.2. Uninstall plugins using Eclipse IDE (2)1.3. Install Using Script (3)Chapter 1.IntroductionThis guide provides the procedures to install the Nsight Eclipse Edition Plugins in users own eclipse environment.Nsight Eclipse Plugins offers full-featured IDE that provides an all-in-one integrated environment to edit, build, debug and profile CUDA-C applications.1.1. Install plugins using Eclipse IDE1.You can install Nsight Eclipse plugins in your own Eclipse environment or download andinstall Eclipse IDE for C/C++ developers.unch Eclipse and go to Help > Install New Software.. menu.3.Click on the Add Button4.Enter name (ex: NsightEE) in the Name field. Choose the the zipfile(com.nvidia.cuda.repo.zip) that contains the plugins using Archive button or Enter the full path of zip file. Nsight EE plugns zip file can be found in /usr/local/cuda-11.1/ nsightee_plugins directory.5.Click OK button6.Select “Cuda Main Features” option and go to next page.7.Accept the license agreement and click on Finish button to install the plugins.8.Click OK on the “Security Warning” dialog to ignore the warning message about unsignedcontent (This warning message is displayed for all the plugins that are not signed by).9.Restart eclipse when prompted.Nsight Eclipse plugins installation is now complete.Go to Help > Installation Details.. Menu to verify the “Cuda Developer Tools” and “Cuda Remote Launch” plugins are installed1.2. Uninstall plugins using Eclipse IDEunch Eclipse and go to Help > Installation Details menu.2.Select “Cuda Developer Tools” and “Cuda Remote Launch” options from the dialog3.Click on the Uninstall button.4.Click Finish button when asked to review and confirm.5.Restart eclipse when prompted.Nsight Eclipse plugins will be uninstalled after restarting eclipse. Go to Help > Installation Details.. menu to verify.1.3. Install Using ScriptTo install or uninstall the Nsight Eclipse Plugins using the script, run the installation script provided in the bin directory of the toolkit. By default, it is located in /usr/local/cuda-11.1/ bin:The usage of the script is as follows:Usage: ./nsight_ee_plugins_manage.sh <action> <eclipse_dir><action> : 'install' or 'uninstall'<eclipse_dir> : eclipse installation directoryTo install the Nsight Eclipse Plugins, run the following command:$ /usr/local/cuda-11.1/bin/nsight_ee_plugins_manage.sh install <eclipse_dir>To uninstall the Nsight Eclipse Plugins, run the following command:$ /usr/local/cuda-11.1/bin/nsight_ee_plugins_manage.sh uninstall <eclipse_dir>NoticeThis document is provided for information purposes only and shall not be regarded as a warranty of a certain functionality, condition, or quality of a product. NVIDIA Corporation (“NVIDIA”) makes no representations or warranties, expressed or implied, as to the accuracy or completeness of the information contained in this document and assumes no responsibility for any errors contained herein. NVIDIA shall have no liability for the consequences or use of such information or for any infringement of patents or other rights of third parties that may result from its use. This document is not a commitment to develop, release, or deliver any Material (defined below), code, or functionality.NVIDIA reserves the right to make corrections, modifications, enhancements, improvements, and any other changes to this document, at any time without notice. Customer should obtain the latest relevant information before placing orders and should verify that such information is current and complete.NVIDIA products are sold subject to the NVIDIA standard terms and conditions of sale supplied at the time of order acknowledgement, unless otherwise agreed in an individual sales agreement signed by authorized representatives of NVIDIA and customer (“Terms of Sale”). NVIDIA hereby expressly objects to applying any customer general terms and conditions with regards to the purchase of the NVIDIA product referenced in this document. No contractual obligations are formed either directly or indirectly by this document.VESA DisplayPortDisplayPort and DisplayPort Compliance Logo, DisplayPort Compliance Logo for Dual-mode Sources, and DisplayPort Compliance Logo for Active Cables are trademarks owned by the Video Electronics Standards Association in the United States and other countries.HDMIHDMI, the HDMI logo, and High-Definition Multimedia Interface are trademarks or registered trademarks of HDMI Licensing LLC.OpenCLOpenCL is a trademark of Apple Inc. used under license to the Khronos Group Inc.TrademarksNVIDIA and the NVIDIA logo are trademarks or registered trademarks of NVIDIA Corporation in the U.S. and other countries. Other company and product names may be trademarks of the respective companies with which they are associated.Copyright© -2020 NVIDIA Corporation. All rights reserved.NVIDIA Corporation | 2788 San Tomas Expressway, Santa Clara, CA 95051。
eclipse-plugin 插件使用说明说明书

Table of ContentsAbout1 Chapter 1: Getting started with eclipse-plugin2 Remarks2 Examples2 Installation or Setup2 Hello World4 Credits14AboutYou can share this PDF with anyone you feel could benefit from it, downloaded the latest version from: eclipse-pluginIt is an unofficial and free eclipse-plugin ebook created for educational purposes. All the content is extracted from Stack Overflow Documentation, which is written by many hardworking individuals at Stack Overflow. It is neither affiliated with Stack Overflow nor official eclipse-plugin.The content is released under Creative Commons BY-SA, and the list of contributors to each chapter are provided in the credits section at the end of this book. Images may be copyright of their respective owners unless otherwise specified. All trademarks and registered trademarks are the property of their respective company owners.Use the content presented in this book at your own risk; it is not guaranteed to be correct nor accurate, please send your feedback and corrections to ********************Chapter 1: Getting started with eclipse-plugin RemarksThis section provides an overview of what eclipse-plugin is, and why a developer might want to use it.It should also mention any large subjects within eclipse-plugin, and link out to the related topics. Since the Documentation for eclipse-plugin is new, you may need to create initial versions of those related topics.ExamplesInstallation or SetupAssuming you have Eclipse IDE for Java Developers installed, start Eclipse, click "Help" -> "Install New Software..."Select "--All Available Sites--" at "Work with:", and navigate to "Eclipse Plugin Development Tools ". Select "Eclipse Plug-in Development Environment" by ticking the checkbox in front of it.Click "Next" to let Eclipse check for any dependencies needed. Click "Next" again to start the installation.Once that has finished, restart Eclipse.Hello WorldTo create a Hello World plug-in for Eclipse, click: File ➜ New ➜ Other...Select Plug-in Project and click Next >The New Plug-in Project wizard will guide you through the options for creating a new plug-in. Enter a project name (like HelloWorld), and click Next >On the Content page, you can set the ID, Version, Name and Vendor of the plug-in.The Version will be 1.0.0.qualifier by default. You can leave this as-is, but it is better to change this to something meaningful. The eclipse wiki recommends a syntax like vYYYYMMDD (year, month day).On the Templates page, you can choose to create you plug-in from any template by selecting it and clicking Next >. Alternatively you can combine these templates by choosing Custom plug-in wizard, or to create a new plug-in without a template by deselecting the checkbox in front of Create a plug-in using one of the templates.For the Hello, World Command template, there are additional settings: the package name, Handler class name and the text for the message box.When the plug-in is created, you can run it by right-clicking the plugin.xml ➜ Run As ➜ Eclipse ApplicationThis will launch a new instance of Eclipse (with its own workspace) that will have your plug-in loaded.This Hello World plug-in will have made 3 contributions to the Eclipse GUI:1. A Sample Menu (with Sample Command):Plugin.xml:point="org.eclipse.ui.menus"><menuContributionlocationURI="menu:org.eclipse.ui.main.menu?after=additions"><menulabel="Sample Menu"mnemonic="M"id="HelloWorld.menus.sampleMenu"><commandcommandId="mands.sampleCommand"mnemonic="S"id="HelloWorld.menus.sampleCommand"></command></menu></menuContribution></extension>2. A toolbar icon:Plugin.xml:<extensionpoint="org.eclipse.ui.menus"><menuContributionlocationURI="toolbar:org.eclipse.ui.main.toolbar?after=additions"> <toolbarid="HelloWorld.toolbars.sampleToolbar"><commandcommandId="mands.sampleCommand"icon="icons/sample.gif"tooltip="Say hello world"id="HelloWorld.toolbars.sampleCommand"></command></toolbar></menuContribution></extension>3. A key shortcut (Ctrl+6)Plugin.xml:<extensionpoint="org.eclipse.ui.bindings"><keycommandId="mands.sampleCommand"contextId="org.eclipse.ui.contexts.window"sequence="M1+6"schemeId="org.eclipse.ui.defaultAcceleratorConfiguration"></key>When activating any of these 3, the Handler class will be executed:Plugin.xml:<extensionpoint="mands"><categoryname="Sample Category"id="mands.category"></category><commandname="Sample Command"categoryId="mands.category"id="mands.sampleCommand"></command></extension><extensionpoint="org.eclipse.ui.handlers"><handlercommandId="mands.sampleCommand"class="helloworld.handlers.SampleHandler"></handler></extension>SampleHandler.java:package helloworld.handlers;import mands.AbstractHandler;import mands.ExecutionEvent;import mands.ExecutionException;import org.eclipse.ui.IWorkbenchWindow;import org.eclipse.ui.handlers.HandlerUtil;import org.eclipse.jface.dialogs.MessageDialog;/*** Our sample handler extends AbstractHandler, an IHandler base class.* @see mands.IHandler* @see mands.AbstractHandler*/public class SampleHandler extends AbstractHandler {@Overridepublic Object execute(ExecutionEvent event) throws ExecutionException {IWorkbenchWindow window = HandlerUtil.getActiveWorkbenchWindowChecked(event); MessageDialog.openInformation(window.getShell(),"HelloWorld","Hello, Eclipse world");return null;}}When the Handler class is executed, MessageBox will show:This is all the Hello World plug-in does.If you want to create a plug-in with more functionality, you could have chosen a template that best fits your need or create a plug-in via the Custom plug-in wizard to combine these templates:Read Getting started with eclipse-plugin online: https:///eclipse-plugin/topic/4982/getting-started-with-eclipse-pluginCredits。
eclipse插件开发教程
eclipse插件开发教程Eclipse是一个非常强大的集成开发环境(IDE),可用于开发各种类型的应用程序。
与其它IDE相比,Eclipse的一个重要特点是其插件化的架构,这使得开发者可以根据自己的需求和喜好进行个性化定制。
开发Eclipse插件的过程需要掌握一些基本知识和技巧。
下面将提供一个简单的Eclipse插件开发教程,以帮助初学者入门。
第一步是安装Eclipse的开发工具包(Eclipse SDK)。
可以从Eclipse官方网站上下载并安装最新版本的开发工具包。
安装完成后,可以打开Eclipse,开始开发。
第二步是创建一个新的插件项目。
在Eclipse的菜单中选择“File”->“New”->“Project”,然后选择“Plug-in Development”->“Plug-in Project”。
在弹出的对话框中,输入项目的名称和位置,然后点击“Next”按钮。
接下来,选择一些项目的特性,并点击“Next”再点击“Finish”。
第三步是定义插件的扩展点(extension point)。
插件的扩展点是其他插件可以扩展的地方,通过定义扩展点,可以让其他插件在这个地方插入自己的代码。
在Eclipse的插件项目中,可以在“plugin.xml”文件中定义扩展点。
例如,可以定义一个扩展点来扩展Eclipse的编辑器,并在其中添加自定义的编辑功能。
第四步是实现插件的功能。
实现插件的功能主要通过编写Java代码来完成。
可以在插件项目中的“src”目录下创建Java类,并实现所需的功能。
例如,可以实现一个简单的Hello World视图,显示一个Hello World的文本。
第五步是将插件导出为可执行的JAR文件。
可以在Eclipse的插件项目上点击鼠标右键,然后选择“Export”->“Deployable plug-ins and fragments”。
在弹出的对话框中,选择要导出的插件,并选择导出的位置,点击“Finish”按钮即可导出插件。
Eclipse调试技巧与实用插件推荐
Eclipse调试技巧与实用插件推荐第一章:Eclipse调试功能概述Eclipse是一款常用的集成开发环境(IDE),具备强大的调试功能。
通过调试,开发人员可以逐步执行代码,查看变量的值,以及定位和修复错误。
本章将介绍Eclipse调试功能的基本使用方法和常见技巧。
1.1 启动和配置调试器Eclipse提供了多个调试器,包括Java调试器、C/C++调试器等。
在进行调试前,需要配置合适的调试器。
通过“Run Configurations”菜单可以选择调试器类型,并设置调试的目标程序以及启动参数。
1.2 设置断点断点是调试过程中的关键工具。
在Eclipse中,可以通过在代码行上右键单击并选择“Toggle Breakpoint”来设置断点。
也可以通过单击编辑器左侧的行号进行设置。
设置断点后,程序执行到断点处会自动暂停。
1.3 运行调试通过单击“Debug”按钮或使用快捷键(如F11)可以启动调试。
程序执行到断点处后,会自动暂停。
在程序暂停时,可以查看变量的值、执行单步调试和观察程序运行状态。
第二章:Eclipse调试基本技巧2.1 断点调试在程序暂停时,可以逐行执行代码。
通过点击“Step Over”按钮或使用快捷键(如F6),可以执行当前行,并移到下一行。
通过点击“Step Into”按钮或使用快捷键(如F5),可以进入方法内部执行。
2.2 条件断点除了在特定行上设置断点外,还可以设置条件断点。
条件断点在满足特定条件时才会触发暂停,可以通过右击断点并选择“Breakpoint Properties”来设置断点的条件。
2.3 监视变量通过在“Expressions”窗口中添加相关变量,可以实时监视变量的值。
在程序暂停时,Expressions窗口会显示变量的值,并随着程序的执行更新。
2.4 修改变量在调试过程中,有时候需要修改某个变量的值以验证不同的逻辑分支。
通过鼠标右键单击变量并选择“Change Value”,可以在调试过程中修改变量的值。
Eclipse插件安装总结

Eclipse插件安装总结Eclipse插件安装总结通过个人的学习体会,将目前Eclipse插件安装的三种方式,总结如下:第一种方法很简单,在Eclipse的主目录(%ECLIPSE_HOME%)下有一个plugins目录和features目录。
将插件解压缩后,在解压缩后的文件夹里一般可以看到plugins文件夹,有的插件解压缩后还可以看到一个features文件夹。
一般将plugins文件夹下的内容直接拷贝到%ECLIPSE_HOME%\plugins目录下,如果解压缩后的插件目录下还有features文件夹,则把该文件夹下的内容也拷贝到%ECLIPSE_HOME%\features下。
重新启动Eclipse之后就可以使用刚刚安装的插件了。
如果不能使用插件,可能是因为插件还未启用。
可以到Help/Software Updates/Manage Configuration下将“Disable”的插件“Enable”即可。
这种插件安装方式简单、快捷,但是有缺陷,若插件太多,会使内容非常混乱,而且分不清哪个是系统自带的,哪个是以后安装的。
当安装了许多插件之后,Eclipse变的很大,不便于更新和管理众多插件。
每次重新安装Eclipse,就要花时间来安装那几个常用的插件。
第二种方法也很简单,它主要借助于Eclipse的向导来安装插件。
通过Help/Software Updates/Find and Install,在弹出的菜单中选择“Search for new features to install”,点“Next”,在下一菜单中选择“New Local Site”或“New Archived Site”,找到你下载的插件所在目录,选中安装即可。
这种方法安装插件比较安全,不易出错,缺点就是对于插件的要求也比较挑剔,所以能够支持这种方式安装的插件也比较少。
一般要求插件目录下不光有plugins和features文件夹,还要有site.xml 文件(site.xml是进行自动安装的配置文件,eclipse会根据文件的信息自动安装插件)。
为Geant4配置Eclipse编译环境IDE

为Geant4配置Eclipse编译环境IDE**************************************Eclipse 安装.**************************************官网下载Eclipse for c++ IDE. 解压直接用。
**************************************用Eclipse打开N02.**************************************点击:File--New--Makefile Project with Existing Code;点击浏览选择文件的位置。
选择Linux GCC作为indexer setting。
点击Finish.点击Run,出现Launch Debug configuration selection. 双击gdb/mi运行:***************************************使用Mac文件,运行程序***************************************点击Run--Run Configurations;在左边找到要运行的工程,例如exampleN02;右边找到Arguments,内容输入你要运行的mac文件,例如vis.mac ;点击右下角Run。
可以通过mac文件运行程序。
***************************************自动补全功能的实现***************************************这就需要改变Geant4的安装了。
如果你安装Geant4三次以上,你一定对以下语句很了解了:>./Configure -build>./Configure 。
这里,我们要重新build一次。
但是选项稍作改变。
首先在安装目录下运行:>./Configure -rebuild到回答下面的问题时,要注意。
EclipseIDE工程使用手册
EclipseIDE工程使用手册12.FX3 Development T oolsA set of development tools is provided with the SDK, which includes the third party tool-chain andIDE.The firmware development environment will help the user to develop, build and debug firmwareapplications for FX3. The third party ARM? software development tool provides an integrateddevelopment environment (IDE) with compiler, linker, assembler and debugger (via JTAG). FreeGNU tool-chain and Eclipse IDE (to be used with the GNU tool-chain) is provided.12.1GNU ToolchainThe GNU T oolchain provided as part of the FX3 SDK comprises of1.GCC compiler (gcc) – version 4.5.22.GNU Linker (ld) – version 2.20.513.GNU Assembler (as) – version 2.20.514.GNU Debugger (gdb) – version 7.2.50These executables are invoked by the Eclipse IDE.12.2Eclipse IDEThe Eclipse IDE for C/C++ Developer is provided as part of the FX3 SDK. This IDE comprises of thebase Eclipse platform (3.5.2) and the CPP feature (1.2.2). A couple of plugins required for develop-ment are bundled with the IDE■GNU ARM C/C++ Development support (0.5.3)The GNU ARM plug-in hooks the GNU tool-chain into the eclipse platform and supports the develop-ment of C/C++ applications for the ARM series of processors.■Zylin Embedded CDT (4.10.1)The Zylin plug-in provides GDB support.■Java(TM) Platform, Standard Edition Runtime Environment Version 7The JRE is required by eclipse.12.2.1JTAG ProbeThe Segger JLink probe is the preferred JTAG probe for the FX3 SDK. This probe along with theSegger JLink ARM GDB Server is used for debug.12.2.2Eclipse ProjectsEclipse projects for each of the FX3 application examples are part of the FX3 SDK. These projectscan be used with together with the Eclipse IDE and the GNU tool-chain to build and debug theapplications. The following sections explain the usage of the Eclipse IDE to build and debug theFX3 Development Toolssample applications which are distributed with the FX3 SDK. It also explains how to create a newapplication project using FX3 SDK.12.2.2.1Importing Eclipse ProjectsEclipse projects are provided with each FX3 firmwareexample. These have to be imported intoeclipse before they can be used. The following steps describe invoking eclipse and importing theprojects.1.Invoke eclipse. Then click on File->Import. This will open up the import dialogFX3 Development Tools 2.Select General->Existing projects into Workspace.3.Select the root directory where the eclipse projects are available. This will be the directory wherethe FX3 SDK is installed.FX3 Development Tools4.All the available FX3 projects are shown. Select all the projects displayed and click “Finish”.At the end of this step, all the projects for the FX3 firmware examples have been imported into theeclipse workbench.12.2.2.2Building ProjectsAfter the projects have been imported, they have to be built. The following steps describe the projectview and the build.1.The view has to be switched to the project view. Select Window->Show View-> C/C++ Projects.FX3 Development Tools2.The project view is opened up and projects will appear in the left pane. The projects are automat-ically built after an import. The build console displays the build messages.12.2.2.3Executing and Debugging1. The GNU debugger (gdb) connects to the target (FX3hardware) using the J-Link GDB serverfrom Segger Systems. This has to be downloaded and installed from /cms/jlink-software.html. The J-Link JTAG probe has to be connected to the FX3 hardware JTAGFX3 Development Tools port. Once the JTAG is connected and the GDB server is run, the ARM9 core will appear con-nected on the GDB server window as shown below.The “Init regs on start” wil l be checked by default. Please ensure to un-check this box. All initial-izations will be done by our debug configuration.FX3 Development Tools2.The first step is to create a debug configuration for the project. Select Debug Configurations.FX3 Development Tools 3.Select Zylin Embedded debug (native) and launch a new configuration.A new configuration window opens up.4.The debug settings must be modified. The first setting that needs to change is in the Debuggertab.The default setting uses the native gdb as the debugger.The default setting has to be modified to use “arm-none-eabi-gdb.exe” as the debugger.No GDB command file is used.FX3 Development ToolsThe verbose console mode is checked.5.The commands have to be added next.The initialize commands areset prompt (arm-gdb)# This connects to a target via netsiliconLibRemote# listening for commands on this PC's tcp port 2331target remote localhost:2331monitor speed 1000monitor endian littleset endian littlemonitor reset# Set the processor to SVC modemonitor reg cpsr =0xd3# Disable all interruptsmonitor memU32 0xFFFFF014 =0xFFFFFFFF# Enable the TCMsmonitor memU32 0x40000000 =0xE3A00015 monitor memU32 0x40000004 =0xEE090F31 monitor memU32 0x40000008 =0xE240024F monitor memU32 0x4000000C =0xEE090F11# Change the FX3 SYSCLK setting based on# input clock frequency. Update withFX3 Development Tools # correct value from list below. # Clock input is 19.2 MHz: Value = 0x00080015# Clock input is 26.0 MHz: Value = 0x00080010# Clock input is 38.4 MHz: Value = 0x00080115# Clock input is 52.0 MHz: Value = 0x00080110 monitor memU32 0xE0052000 = 0x00080015# Add a delay to let the clock stabilize.monitor sleep 1000set $pc =0x40000000sisisisiThe run command is “load”.FX3 Development Tools6.Once the debug is launched, the executable is loaded and the debug screen is displayed.The execution is halted at the instruction specified in the load command.FX3 Development Tools7.If the execution is resumed, it will stop at a breakpoint, if one has been set.12.2.2.4Creating New Eclipse ProjectsNew projects can be created in eclipse. The following steps illustrate the creation of a new project.FX3 Development Tools1.Select File->New->C project2.Select ARM Cross Target Application -> Empty projectSelect Arm Windows GCC (Sourcery G++ Lite)Select the folder where the project must be created. This must be the folder where the sourcefiles for this project are present.FX3 Development Tools Click next.3.Click on Advanced Settings to get the settings window. Here we are updating the debug configu-ration.the processor. Click on Apply.5.The next settings are for debug. Select the default debug level (-g) and the dwarf-2 debug format.Click on Apply.FX3 Development Tools Select the default debug level none for release configuration. Click on Apply.。
Eclipse插件安装总结-huxin1的专栏-CSDN博客
Eclipse插件安装总结-huxin1的专栏-CSDN博客Eclipse插件安装总结收藏Eclipse插件安装总结通过个人的学习体会,将目前Eclipse插件安装的三种方式,总结如下:第一种方法很简单,在Eclipse的主目录(%ECLIPSE_HOME%)下有一个plugins目录和features目录。
将插件解压缩后,在解压缩后的文件夹里一般可以看到plugins文件夹,有的插件解压缩后还可以看到一个features文件夹。
一般将plugins文件夹下的内容直接拷贝到%ECLIPSE_HOME%\plugins目录下,如果解压缩后的插件目录下还有features文件夹,则把该文件夹下的内容也拷贝到%ECLIPSE_HOME%\features下。
重新启动Eclipse之后就可以使用刚刚安装的插件了。
如果不能使用插件,可能是因为插件还未启用。
可以到Help/Software Updates/Manage Configuration下将“Disable”的插件“Enable”即可。
这种插件安装方式简单、快捷,但是有缺陷,若插件太多,会使内容非常混乱,而且分不清哪个是系统自带的,哪个是以后安装的。
当安装了许多插件之后,Eclipse变的很大,不便于更新和管理众多插件。
每次重新安装Eclipse,就要花时间来安装那几个常用的插件。
第二种方法也很简单,它主要借助于Eclipse的向导来安装插件。
通过Help/Software Updates/Find and Install,在弹出的菜单中选择“Search for new features to install”,点“Next”,在下一菜单中选择“New Local Site”或“New Archived Site”,找到你下载的插件所在目录,选中安装即可。
这种方法安装插件比较安全,不易出错,缺点就是对于插件的要求也比较挑剔,所以能够支持这种方式安装的插件也比较少。
