MQSeries使用指南
IBM MQ Series 快速入门
IBM MQ Series 快速入门 3. MQSeries 系统管理
对本地队列的管理 –本地队列
定义:DEFINE QLOCAL(队列名称) 属性名(属性值) ……
该例中,我们定义的队列 ORANGE.LOCAL.QUEUE 被指定为拥有以下 特性:
•
• •
它可以获取、禁止存放的,并且在先进先出 (FIFO) 基础上进行操作。
直到等到停止了所有的应用程序并终止了队列管理器后才返回。
立即关闭,允许完成任何当前的 MQI 调用,但是新的调用将会失败。
这将立即停止所有队列管理器代码。尽量不要使用。 正确尝试顺序:依次执行以上命令,直到成功为止。Ctrl+C中断执行, 实在停不下来查阅文档,进行“人工停止队列管理器”。
IBM MQ Series 快速入门 3. MQSeries 系统管理
对象的管理,如创建、更改、显示和删除在后面介绍。
IBM MQ Series 快速入门 1. 介绍 MQSeries
客户机和服务器
MQSeries 客户机是 MQSeries 产品的一部分,该产品安装 在机器上,以接受应用程序的 MQI 调用并将它们传递 到 MQI 服务器上。 MQI 服务器是一个队列管理器,它对一个或多个客户机提 供了排队服务。所有 MQSeries 对象,例如队列,都只 能存在于队列管理器的机器上
hp52-U481511
hp51-U474879
IBM MQ Series 快速入门 2.安装 服务器及客户机
安装客户机
MQ客户机的详细安装过程参见《MQ安装手册》。 为mqm建立文件系统: /var/mqm:尽量大
若服务器/客户机在同一台主机上,要使用服务器安装介质 上的安装文件,否则使用独立的安装介质
思讯尚锐V 使用流程
思讯软件使用流程商品条码说明商品条码是由一组按一定规则排列的条、空及对应字符(阿拉伯数字)所组成的用于表示商店自动销售管理系统的信息标记或者对商品分类编码进行表示的标记。
条码类型,有两种形式,即标准码和缩短码。
标准码:由13位数字构成的条码称为标准码,标准码的13位数字构成分两种情况:1)对690,691打头的条码,由7位(国别代码+厂商代码)、5位商品代码及1位校验码构成。
例:690MMMMMPPPPPC ( 690为国别代码,MMMMM为厂商代码,PPPPP为商品代码,C为校验码)2)对692打头的条码,由8位(国别代码+厂商代码)、4位商品代码及1位校验码构成。
缩短码:由8位数字构成的条码称为缩短码,只有当标准码尺寸超过总印刷面积的25%时,才允许申报使用缩短码。
1)缩短码的8位数字由7位商品代码和1位校验码构成。
例:69×××××C ( 69×××××为商品代码,C为校验码)条形码类型:主要包括EAN-13码,EAN-8,CODE39,CODE128码等,其中CODE39和CODE128码比EAN码宽很多。
条码相关说明前缀码只表示分配和管理厂商识别代码的国家(或地区)编码组织成员,并非产品的原产地。
当您看到条码的数字串开头部分是“690”—“695”,就知道这件商品的生产商是在中国大陆地区申请的商品条码。
商品条码具有唯一性,它要求,一个商品项目、一家厂商或一个国家(地区)只有一个代码,当商品项目、厂商、国家(地区)一但确定,就永不改变。
对于没有条码的商品,如自产商品等,可以自行编码。
不过前两位不能跟电子称条码标识位相同,如果条码标识位是“22”,则不能以“22”开头编码。
机构商品属性说明在总部系统初始化时,可以设置机构商品属性,三种属性说明如下:◆不同机构相同商品属性总部初始化时选择“不同机构相同商品属性”,在商品档案中不能维护分店商品属性,可以修改门店价格,不作控制,下传门店后,可以正常看到门店的修改后价格。
马兰士SA-7S1型超级音频CD播放机 说明书

======= 目录序言 (2)设备主电源作业设定............................................................................................................................................2版权 (2)简介 (2)产品功能..............................................................................................................................................................3有关超级音频.......................................................................................................................................................3播放CD-RW 光盘................................................................................................................................................3适用于本装置的光盘.. (3)使用前 (4)光盘须知..............................................................................................................................................................4不适合安装的位置...............................................................................................................................................4注意事项..............................................................................................................................................................5使用遥控器..........................................................................................................................................................5安装电池.. (5)名称和功能 (6)正面面板..............................................................................................................................................................6遥控器.................................................................................................................................................................7背面面板..............................................................................................................................................................9显示. (10)接线方式...............................................................................................................................................11操作 (12)电源连接............................................................................................................................................................12正常播放............................................................................................................................................................12启动音响模式.....................................................................................................................................................14设置喜好音轨.....................................................................................................................................................14播放光盘上您所喜欢的音轨...............................................................................................................................16播放光盘上您最喜好的部分(搜索)..................................................................................................................16重复播放光盘(重复播放).................................................................................................................................16按随意顺序播放音轨(随机播放)......................................................................................................................17以指定的顺序播放音轨(编程)..........................................................................................................................17搜索您喜好的音轨(AMS )................................................................................................................................18快速重播............................................................................................................................................................19有关TEXT (文字)资料的显示.........................................................................................................................19关闭显示或星号标记(显示屏(DISPLAY)操作)...............................................................................................20播放光盘时使用主时钟发生器...........................................................................................................................21定时播放............................................................................................................................................................22关于平衡插孔.....................................................................................................................................................22模拟输出连接器相位切换.. (22)故障排除...............................................................................................................................................23规格 (24)=== ====序言与电源进行任何连接前,请务必阅读此节设备主电源作业设定Marantz 产品符合目前您所居住之区域的家用与安全要求。
IBMMQSeries通信中间件技术及应用简介
IBMMQSeries通信中间件技术及应用简介摘要:IBMMQSeries通信中间件概念和技术介绍,并结合实际应用场景简要说明。
关键词:MQ;中间件;队列YANGChao(GuangdongPostalInformationTechnologyBureauDevelopmentDepar tmentofGuangdong,Guangzhou510898,China)Keywords:MQ;middleware;queueIBMMQSeries是IBM的商业通讯中间键。
IBMMQSeries提供一个具有工业标准、安全、可靠的信息传输系统。
它以消息为载体,以队列为媒介进行本地、远程以及跨平台的信息传递。
随着计算机网络技术的发展和分布式计算机系统的应用,信息系统间的数据交换已经成为不可或缺的组成部分,商业中间键在此基础上应运而生,它既可以保证消息传输的可靠性、高效率和安全性,同时可以替代系统通信模块,进而大幅度减少系统的开发周期,使设计人员将精力更多的放到业务逻辑和数据逻辑的设计上。
该文就MQSeries的工作原理和在广东省的业务应用做一个简单的介绍。
1IBMMQSeries工作原理MQSeries为程序提供了一种安全可靠的通信模式,支持本地应用和分布应用,本地应用可以提供一台物理主机上的不同应用程序之间相互通信;分布应用可以提供联网的主机上不同应用程序之间相互通信。
MQSeries为应用程序提供了一种可靠的通信机制,不管是本地应用还是分布应用,参与通信的应用程序之间无需关注网络通信模块的实现,发送方将数据组装成消息,放入消息队列,接收方从消息队列中获取消息,从而完成一次通信过程。
队列管理器负责MQSeries内部对象的管理、通信链路的维护以及消息传递的可靠性和完整性。
MQSeries的消息传递模式见图1:程序A要和程序B需要交换数据,程序A把数据封装成一个消息并放入队列1中,程序B从队列1中以先进先出的顺序取出消息,处理完成后将应答消息放入队列2中,程序A同样以先进先出的顺序从队列2中取出应答消息,从而完成了一次数据交换。
MQSeries Integrator 说明书

5 在MQSeries Integrator中执行活动在本章中,我们将详细解释用于支持订单处理应用程序的MQSeries Integrator中的消息流。
消息流由MQSeries Workflow服务器请求开始。
该消息流是MQSeries Workflow中活动的执行。
在MQSeries Workflow术语中,有时称为call-out。
该消息流由一些数据库操作、路由到供应商的消息,以及在历史格式和XML消息之间的格式化组成。
1795.1 活动执行概述在第一个方案中,我们使用如下案例。
这些案例需要MQSeries Integrator与MQSeriesWorkflow共同工作。
客户确认该消息流在数据库中检查客户并检索一些关于客户的其他信息。
该活动调用是同步的。
库存确认该消息流在数据库中检查产品并在订单数量超出库存时检索供应商信息。
该活动调用是同步的。
供应商订单该消息流将入站消息转变成CWF格式并将订单发送给供应商。
流程还存储数据存储数据,该数据是将回复消息发送给工作流流程实例所需的数据。
另一个消息流处理订单回执,并创建MQSeries Workflow回复消息,然后更新产品库存并以订单数量增加库存。
该活动调用是同步的。
CICS事件处理初始化该消息流将引入消息转换成CICS所使用的历史格式并将其发送给CICS程序。
该活动调用是同步的。
在以下各节中,我们将介绍该消息流。
首先,我们将以关于设计考虑、前提、先决条件的预备词汇开始。
本章第二部分将给出对消息流元素进行详细描述。
我们可以在Web上获得完整的消息流XML输出和消息设置输出。
请参考本书第405页的附录C“其他资料”获得关于如何检索这些输出的信息。
本书的397页的附录B“实例应用程序安装”解释了Web资料包中每个文件的使用方法。
1805.2 设计考虑本节将描述UPES调用背景、应用数据库设计步骤,以及关于消息流设计的若干前提。
5.2.1 外部活动调用概述我们将在实例中使用MQSeries Workflow用户定义程序执行服务器(UPES)工具。
IBM MQ 版本 9.0 快速入门指南说明书
IBM MQVersion 9.0Quick Start GuideUse this guide to get started with IBM MQ Version 9.0.National Language Version:To obtain the Quick Start Guide in other languages, print the language-specific PDF from the Quick Start DVD.Product overviewIBM ®MQ is robust messaging middleware that simplifies and accelerates the integration of diverse applications and business data across multiple platforms. IBM MQ facilitates the assured, secure and reliable exchange of information betweenapplications, systems, services and files by sending and receiving message data via messaging queues, thereby simplifying the creation and maintenance of business applications. It delivers Universal Messaging with a broad set of offerings to meet enterprise-wide messaging needs, and can be deployed across a range of different environments including on-premise, in cloud environments and supporting hybrid cloud deployments.IBM MQ supports a number of different application programming interfaces (APIs) including Message Queue Interface (MQI),Java ™Message Service (JMS), .NET, IBM MQ Light and MQTT.Product documentation for all versions of IBM MQ is available at /software/integration/wmq/library/.Specifically, the IBM MQ Version 9.0 product documentation is also available in IBM Knowledge Center(/support/knowledgecenter/SSFKSJ_9.0.0/com.ibm.mq.helphome.v90.doc/WelcomePagev9r0.htm).Service and support information is provided in the documentation.Information about how to use MQ Explorer can be accessed either from within MQ Explorer or in the product documentation.3Step 3: Review the installation architectureIBM MQ architectures range from simple architectures that use a single queue manager, to more complex networks of interconnected queue managers. For more information about planning your IBM MQ architecture, see the Planning section of the product documentation.For links to additional information, see the IBM MQ product page in IBM Knowledge Center (/support/knowledgecenter/SSFKSJ/).4Step 4: Install the productFor installation instructions for IBM MQ on AIX ®, HP-UX, Linux, Solaris, IBM i, or Microsoft Windows, and for details of the hardware and software configurations that are required, refer to the Installing section of the product documentation.For installation instructions for IBM MQ on z/OS ®, and for details of the hardware and software configurations that are required, see the Installing IBM MQ for z/OS section of the product documentation.IBM®5Step 5: Get startedThe Getting Started scenario in the Scenarios section of the product documentation explains how to get started with IBMMQ on Windows. Use this scenario if you have not used IBM MQ before and want to get started quickly.Further scenarios help you to configure or use product features by taking you through the appropriate task steps. The scenarios include links to other content that helps you to gain a better understanding of the area in which you are interested.More informationFor more information about IBM MQ, see the following resources:Product readme fileThe product readme file (readme.html) is included on the product media and is installed when you install productcomponents. The latest version is available on the product readmes web page (/support/docview.wss?rs=171&uid=swg27006097).IBM Support PortalSupport information available through IBM Support Portal includes the following resources:v Support technotes (/support/search.wss?q=websphere+mq)v Available downloads and other resources (/support/entry/portal/product/websphere/websphere_mq?productContext=24824631)v Systems Middleware Support Social Media Channels (/support/docview.wss?uid=swg21410956#2IBM MQ Version 9.0 Licensed Materials - Property of IBM. © Copyright IBM Corp. 2006, 2016. U.S. Government Users Restricted Rights - Use, duplication or disclosure restricted by GSA ADP Schedule Contract with IBM Corp. IBM, the IBM logo, , AIX, Passport Advantage, WebSphere®and z/OS are trademarks or registered trademarks of International Business Machines Corp., registered in many jurisdictions worldwide. Java and all Java-based trademarks and logos are trademarks or registered trademarks of Oracle and/or its affiliates. Linux is a registered trademark of Linus Torvalds in the United States, other countries, or both. Microsoft, Windows, and the Windows logo are trademarks of Microsoft Corporation in the United States, other countries, or both. Other product and service names might be trademarks of IBM or other companies. A current list of IBM trademarks is available on the Web at “Copyright and trademark information” (/legal/copytrade.shtml).Part Number:CF4IWMLPrinted in Ireland。
IBM MQ使用指南
启动侦听 runmqlsr –t TYPE –p PORT –m QMgrName
停止侦听 endmqlsr -m QmgrName
MQSeries 命令
定义死信队列 DEFINE QLOCAL(QNAME) DEFPSIST(YES) REPLACE
设定队列管理器的死信队列 ALTER QMGR DEADQ(QNAME)
InitialContextFactory 是专门为 websphere 提供的,它需要和 websphere 的 CosNaming 资源库一起 使用。
PROVIDER_URL 表 示 会 话 初 始 上 下 文 的 URL , 由 JMSAdmin tool 实 现 的 所 有 JNDI 操 作 的 根 。 它 和 INITIAL_CONTEXT_FACTORY 一一对应。
定义模型队列 DEFINE QMODEL(QNAME) DEFTYPE(TEMPDYN)
定义本地传输队列 DEFINE QLOCAL(QTNAME) USAGE(XMITQ) DEFPSIST(YES) + INITQ(SYSTEM.CHANNEL.INITQ)+ PROCESS(PROCESSNAME) REPLACE
一.MQ 基本操作
MQ 中有几个很重要的组件:队列管理器(QueueManager)、队列(Queue)和通道(Channel)。其基本的操作方 法如下:
MQSeries 系统管理
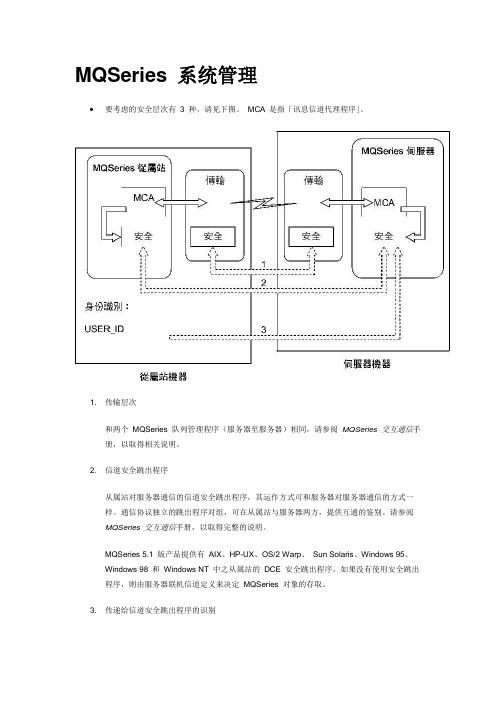
MQSeries 系统管理要考虑的安全层次有3 种,请见下图。
MCA 是指「讯息信道代理程序」。
1. 传输层次和两个MQSeries 队列管理程序(服务器至服务器)相同,请参阅MQSeries 交互通信手册,以取得相关说明。
2. 信道安全跳出程序从属站对服务器通信的信道安全跳出程序,其运作方式可和服务器对服务器通信的方式一样。
通信协议独立的跳出程序对组,可在从属站与服务器两方,提供互通的鉴别。
请参阅MQSeries 交互通信手册,以取得完整的说明。
MQSeries 5.1 版产品提供有AIX、HP-UX、OS/2 Warp、Sun Solaris、Windows 95、Windows 98 和Windows NT 中之从属站的DCE 安全跳出程序。
如果没有使用安全跳出程序,则由服务器联机信道定义来决定MQSeries 对象的存取。
3. 传递给信道安全跳出程序的识别在从属站对服务器的通信中,信道安全跳出程序不必以成对方式运作。
可以忽略MQSeries 从属站端的跳出程序。
在这里,使用者ID 会放在通道描述子(MQCD) 中,必要时,安全跳出程序可以改变它。
某些从属站亦会传送其它的信息以协助识别。
o如果是Windows NT 和UNIX从属站,传送给服务器的使用者ID 是从属站目前登入的使用者ID。
另外,Windows NT 从属站会传送目前登入的使用者的安全ID。
o如果是DOS、OS/2 Warp、Windows 3.1 与Windows 95 和Windows 98 从属站,则会透过环境变量MQ_USER_ID 来指定使用者ID。
此外,另会将环境变量MQ_P ASSWORD 传输给服务器(限上述的从属站)。
服务器安全跳出程序可以利用使用者ID 值和密码或安全ID(如果有的话)来建立MQSeries 从属站的身份。
环境变量如果是DOS、OS/2 Warp、Windows 3.1、Windows 95 和Windows 98 的MQSeries 从属站,且没有定义安全跳出程序,则MQ_USER_ID 和MQ_PASSWORD 这两个环境变量的值会传给服务器。
IBM SDK for Java 8 下载、安装和设置指南(Linux)以运行 IBM MQ Jav

Download, install and setup of IBM SDK for Java 8 in Linuxto run MQ Java/JMS client applicationshttps:///support/pages/node/6202414Date last updated: 27-Apr-2020Angel Rivera –*************.comIBM MQ Support+++ ObjectiveThe objective of this tutorial is to show all the steps to download, install and setup IBM SDK (Software Development Kit) for Java 8 in Linux (RHEL 7.6), in order to work with IBM MQ Client applications that use Java or JMS.For illustration purposes, the version MQ 9.1.5 CD (Continuous Delivery) will be used. Why? Because it is the latest one at the time this tutorial is written.In addition, it is important for you to see concrete real file names instead of using generic file names.Furthermore, a Linux x86 64-bit VM will be used and it is using RHEL 7.6:+ROOT+ : /# cat /etc/redhat-releaseRed Hat Enterprise Linux Server release 7.6 (Maipo)The default installation directory will be used:/opt/ibm/java-x86_64-80+++ Which are the MQ requirements for working with Java applications?If you have a Linux Host (physical server, VM, …) you will need to have 2 things in order to run MQ Java/JMS Client applications:a) MQ jar filesb) A Java Runtime Environment (JRE) or a Java Software Development Kit (SDK)+++ How to get the MQ jar files?There are several methods for getting the MQ jar files:1) You could install the rpm filesets for MQ, which are provided by downloading:- The MQ Server package from IBM Passport Advantagehttps:///support/pages/downloading-ibm-mq-version-915-continuous-deliveryDownloading IBM MQ Version 9.1.5 Continuous DeliveryPart Number DescriptionCC0AGML IBM MQ V9.1.5 Continuous Delivery Release for Linux on x86 64-bit eImage - The MQ Client package from IBM Fix Centralhttps:///mq91cdclientsMQ 9.1 Clients for CD and LTS (including Java-InstallRA, Install-Java-All, Redist)You will download a tar.gz file and after you unpack it, you will see several filesets. The filesets of interest for this tutorial are:MQSeriesJava-9.1.5-0.x86_64.rpm (REQUIRED)MQSeriesJRE-9.1.5-0.x86_64.rpm (OPTIONAL)1.a) What is the difference between the above filesets?1.a.1) MQSeriesJava-9.1.5-0.x86_64.rpm (REQUIRED)The *Java*.rpm fileset provides the MQ Classes for Java, the MQ Classes for JMS, binary executables, utilities, etc.You will need these files for compilation and runtime.The following environment variables from the MQ utility “setmqenv” are set: MQ_JAVA_INSTALL_PATH=/opt/mqm/javaMQ_JAVA_LIB_PATH=/opt/mqm/java/lib641.a.2) MQSeriesJRE-9.1.5-0.x86_64.rpm (OPTIONAL)The *JRE*.rpm fileset provides a Java Runtime Environment.It is an OPTIONAL component to install.When do you want to install it and use it?There are customers who do NOT have installed a JRE or an SDK in their system, but if the customer wants to use the Java-based MQ GUI for GSKit (for SSL/TLS), then the customer can use the JRE provided by MQ.The default installation directory is specified by the following environment variable from the MQ utility “setmqenv”:MQ_JRE_PATH=/opt/mqm/java/jre64/jreNotice that the SDK is NOT provided by MQ, that is, you CANNOT compile Java/JMS programs with the JRE provided by MQ: you will need to download and install a compatible SDK (which also will include its own JRE).It is possible to have multiple JREs in the system. The one that is used at runtime is the one selected at runtime (using environment variables, PATH settings, etc).2) Instead of installing the MQ Java/JRE filesets, you could install a set of files (*.jar files) that have a smaller footprint because they are subsets from the filesets in option 1. https:///mq91cdjavaclientMQ 9.1 JMS and Java 'All Client'This is for Standalone MQ Client applications.https:///mq91cdRAMQ 9.1 Resource Adapter for use with Application ServersThis is NOT for Standalone MQ client applications.https:///mq91cdredistclientsMQ 9.1 Redistributable client (C and .NET; JMS and Java)This is used when you want to package your own application AND you want to include some of the MQ jar files.+++ Which IBM SDK to download?The version of the JRE provided by MQ depends on the version/fixpack level of MQ.The following article has the mapping:/support/docview.wss?uid=swg27038676Levels of JRE and GSkit and LDAP bundled with WebSphere MQFor example, in the table, the row for MQ 9.1.5 has the following:IBM MQ V9.1 CD GSKit Level JRE Level IBM Security Directory ServerClient Level9.1.5 (Windows, Linux, AIX)8.0.55.13 8.0.6.5 6.4.0.20From the column titled “JRE Level” we can see that the level is: 8.0.6.5Which means that it is within the Java version: Java 8.0If you use Google and search for “JRE 8.0.6.5” the top hits will provide you the sites where you can download the SDK (which includes the JRE), for example:https:///javasdk/downloads/sdk8/IBM DeveloperDownloads - Java 8IBM SDK, Java T echnology Edition, Version 8Java SDK8 last updated: 8.0.6.7 - 31 March 2020IBM® SDK, Java T echnology Edition, Version 8 contains the latest virtual machine technology from IBM. Downloads contain the latest IBM fixes and Oracle updates to the Java SE 8 application programming interfaces (APIs).This release contains the latest virtual machine technology from IBM.++ Downloading the desired IBM SDKNotice that at the time this tutorial was written, the latest downloadable version is 8.0.6.7. There were 4 downloads for IBM x86 64-bit.The item that is highlighted is the one that was used for this tutorial.Linux on AMD64/EMT64TSDKInstallable package (InstallAnywhere as root)(File name: ibm-java-x86_64-sdk-8.0-6.7.bin, Size: 159MB)Simple unzip with license (InstallAnywhere root not required)(File name: ibm-java-sdk-8.0-6.7-x86_64-archive.bin, Size: 159MB)JREInstallable package (InstallAnywhere as root)(File name: ibm-java-x86_64-jre-8.0-6.7.bin, Size: 129MB)Simple unzip with license (InstallAnywhere root not required)(File name: ibm-java-jre-8.0-6.7-x86_64-archive.bin, Size: 129MB)Download the file:ibm-java-x86_64-sdk-8.0-6.7.binIt is a good practice to have a dedicated directory for the “downloads” and in this case, it is:/downloadsA dedicated subdirectory for the “java” download files is created:/downloads/javaThus, the full path name of the file in the target host is:: /downloads/java# lsibm-java-x86_64-sdk-8.0-6.7.binFor the installation step you need to login as user “root”.The downloaded file is a “binary executable” file and thus, you need to ensure that it has the proper “execute” permissions:+++ROOT+++ : /# cd /downloads/java+++ROOT+++ : /downloads/java# chmod 755 *.bin# ls -ltotal 162308-rwxr-xr-x 1 root root 166200534 Apr 27 14:23 ibm-java-x86_64-sdk-8.0-6.7.binExecute the bin file and follow the prompts and accept the defaults:# ./ibm-java-x86_64-sdk-8.0-6.7.binPreparing to install...Extracting the JRE from the installer archive...Unpacking the JRE...…Choose Locale...----------------1- Bahasa Indonesia2- Català3- Deutsch->4- English5- Español6- Français7- Italiano8- PortuguêsCHOOSE LOCALE BY NUMBER: 4…Press Enter to continue viewing the license agreement, or enter "1" toaccept the agreement, "2" to decline it, "3" to print it, or "99" to go backto the previous screen.: 1Respond to each prompt to proceed to the next step in the installation. If you want to change something on a previous step, type 'back'.You may cancel this installation at any time by typing 'quit'.PRESS <ENTER> TO CONTINUE:Choose Install Folder---------------------Where would you like to install?Default Install Folder: /opt/ibm/java-x86_64-80ENTER AN ABSOLUTE PATH, OR PRESS <ENTER> TO ACCEPT THE DEFAULT:Product Name:IBM® 64-bit SDK for Linux®, v8.0Install Folder:/opt/ibm/java-x86_64-80Disk Space Information (for Installation T arget):Required: 256,935,865 BytesAvailable: 228,828,958,720 BytesPRESS <ENTER> TO CONTINUE:Congratulations. IBM® 64-bit SDK for Linux®, v8.0 has been successfullyinstalled to:/opt/ibm/java-x86_64-80PRESS <ENTER> TO EXIT THE INSTALLER:Now let’s take a quick look at the default directory where the code was installed: +++ROOT+++ : /downloads/java# cd /opt/ibm/java-x86_64-80# lsbin demo include lib notices.txt release src.zip copyright docs jre license_en.txt readme.txt sample _uninstall # ls binappletviewer java javaw jdmpview policytool tnameserv ControlPanel javac javaws jjs rmic unpack200extcheck javadoc jconsole jrunscript rmid wsgenidlj javah jcontrol keytool rmiregistry wsimportjar javap jdb native2ascii schemagen xjcjarsigner java-rmi.cgi jdeps pack200 serialver# ls jrebin lib plugin# ls jre/binclassic j9vm jcontrol keytool pack200 tnameservControlPanel java jdmpview kinit policytool unpack200ikeycmd javaw jextract klist rmidikeyman javaws jjs ktab rmiregistry++ Setup of JAVA environment variables for the user “mqm”Ok! So far, so good!But what is next?It is a good practice to create some environment variables inside the .bashrc (or .profile) in order to facilitate the compilation and runtime tasks when using Java.Login as user “mqm” (or another user who is going to use MQ Java/JMS)Edit the .bashrc or similar profile script:## Java Development Kit or Java Runtime Environment.## Basic variables for Javaexport JAVA_HOME=/opt/ibm/java-x86_64-80export JAVA_BINDIR=$JAVA_HOME/bin# Add Java to the PATHexport PATH=$JAVA_BINDIR:$PATHIt is suggested that you create a shell script that helps you invoke the MQ utility “setmqenv” and does few other things for properly setting the environment.# Name: set-mq-915# Purpose: to setup the environment to run MQ 9.1.5. /opt/mqm/bin/setmqenv -n Installation1# Additional MQ directories for the PATHexportPATH=$PATH:$MQ_INSTALLATION_PATH/java/bin:$MQ_INSTALLATION_PATH/samp/bin:$MQ_INSTALLATION_ PATH/samp/jms/samples:# Add local directory for running Java/JMS programsexport CLASSPATH=$CLASSPATH:.# Display the full fix pack leveldspmqver -f 2# endLogout and login in order to refresh the shellInvoke the shell script. Notice that you need to use: dot + space + script name****************:/home/mqm$ . set-mq-915****************:/home/mqm$ which java/opt/ibm/java-x86_64-80/bin/java****************:/home/mqm$ java -versionjava version "1.8.0_241"Java(TM) SE Runtime Environment (build 8.0.6.7 - pxa6480sr6fp7-20200312_01(SR6 FP7)) IBM J9 VM (build 2.9, JRE 1.8.0 Linux amd64-64-Bit Compressed References20200219_440062 (JIT enabled, AOT enabled)OpenJ9 - 3088245OMR - eb95a4dIBM - 83517b6)JCL - 20200310_01 based on Oracle jdk8u241-b07****************:/home/mqm$ set | grep -i javaCLASSPATH=/opt/mqm/java/lib/com.ibm.mq.jar:/opt/mqm/java/lib/com.ibm.mqjms.jar: /opt/mqm/java/lib/com.ibm.mq.allclient.jar:/opt/mqm/samp/wmqjava/samples:/opt/m qm/samp/jms/samples:.JAVA_BINDIR=/opt/ibm/java-x86_64-80/binJAVA_HOME=/opt/ibm/java-x86_64-80MQ_JAVA_DATA_PATH=/var/mqmMQ_JAVA_INSTALL_PATH=/opt/mqm/javaMQ_JAVA_LIB_PATH=/opt/mqm/java/lib64MQ_JRE_PATH=/opt/mqm/java/jre64/jrePATH=/opt/mqm/bin:/opt/ibm/java-x86_64-80/bin:/usr/lib64/qt-3.3/bin:/usr/local/bin:/bin:/usr/bin:/usr/local/sbin:/usr/sbin:/usr/local/bin:/home/mqm /bin:.:/sbin:/opt/mqm/java/bin:/opt/mqm/samp/bin:/opt/mqm/samp/jms/samples:/ho me/mqm/.local/bin:/home/mqm/binLet’s try now to run one of the MQ JMS samples. The attempt will fail, but the objective is to illustrate that the Java runtime will be OK and that the MQ jar files can be found! Many novice MQ Java/JMS users struggle a lot in getting the setup right!****************:/home/mqm$ ls /opt/mqm/samp/jms/samplesinteractive JmsJndiBrowser.class JmsJndiProducer.javaJmsBrowser.class JmsJndiBrowser.java JmsProducer.classJmsBrowser.java JmsJndiConsumer.class JmsProducer.javaJmsConsumer.class JmsJndiConsumer.java simpleJmsConsumer.java JmsJndiProducer.class****************:/home/mqm$ java JmsProducerNo arguments! Mandatory arguments must be specified.Usage:JmsProducer -m queueManagerName -d destinationName [-h host -p port -l channel] [-u userid -w passWord]+++ end。
JDSMSServer V3.4产品手册

JDSMSServer V3.4 产品手册JDSMSServer是一款基于短信猫、猫池的JA V A短信二次开发软件。
可以部署在Win、Linux等环境下,为企业事业单位提供六种短信调用接口。
用户不需要编码,就可以实现业务系统和短信收发功能的嫁接。
金笛短信服务器v3.2 在v3.1基础上,做了大量改进。
在保证稳定的基础上,比旧版本容易安装部署,容易扩展功能。
通过创新的通道(Gateway)概念和技术,支持多种短信发送设备混合发送;通过接口(Interface)概念和技术,支持多种短信数据存储、交换格式。
金笛短信服务器v3.4在V3.2基础上,增加了短信设备状态检查(keepalive)和看门狗(WatchDdog)功能,当线程侦测到设备超时(timeout)自动复位硬件设备。
V3.4只保留了数据库、File、http、httpServer 四种接口,其它如SMTP、XML、JMX接口因为不太常用,不再支持。
V3.4比之前的版本有详细日志功能。
日志保存在jdsmsserver的logs目录。
金笛短信服务器的目标,就是为组织机构提供一个方便易用的高可靠的短信平台,实现OA办公提醒、邮件到达通知、CRM客户关怀、关键事务监控、网站短信服务、机房软硬件报警等。
通道(Gateway)目前支持:Wavecom全系列GSM/GPRS/CDMA Modem、西门子全系列、Maestro全系列、金笛工业手机、金笛短信猫池全系列硬件产品。
通过通道(Gateway)测试的硬件设备型号有:Wavecom:M1206B, M1306B, WMOD2 Wismo, Fastrack Supreme 20, WISMO CDMA。
.Maestro:M100,M100Lite。
金笛工业手机:Q24PL、Q2403A、Q2406A、Q2303a系列、金笛8口串口猫池、金笛8口网口猫池。
支持的接口主要有:●数据库接口:采用数据库存储收到的短信和待发送的短信。
MIBrowser使用说明
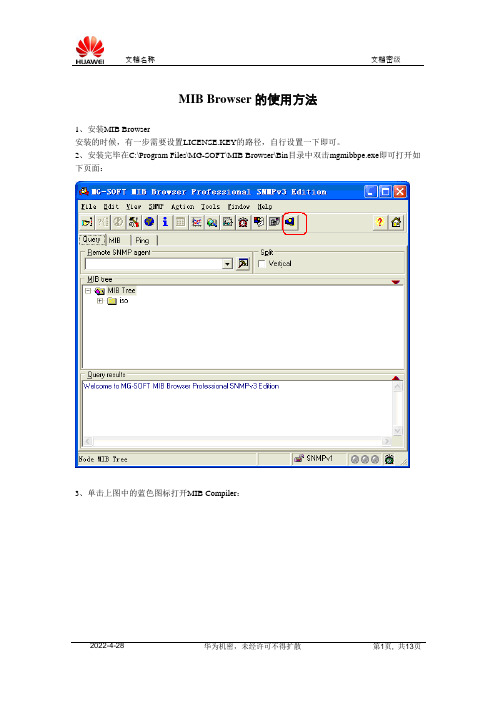
MIB Browser的使用方法1、安装MIB Browser安装的时候,有一步需要设置LICENSE.KEY的路径,自行设置一下即可。
2、安装完毕在C:\Program Files\MG-SOFT\MIB Browser\Bin目录中双击mgmibbpe.exe即可打开如下页面:3、单击上图中的蓝色图标打开MIB Compiler:4、File>>Compile,找到CMCC-MAS.MIB,编译CMCC-MAS.MIB:5、保存编译结果:6、保存完毕,关闭MIB Compiler,回到MIB Browser:选择MIB选项>>单击蓝色的箭头>>Unload all MIB Modules>>然后在MIB Modules中选择“CMCC-MAS”(双击即可load)7、切换到“Query”选项,即可看到CMCC-MAS中定义的节点:8、在Remote SNMP Agent中填入MAS服务器的IP地址:比如我在本机测试,就填入本机的IP地址10.72.85.126。
现场使用时,填入MAS服务器的IP 即可。
9、比如我们想采集MAS服务器的CPULoad信息:选择cpuLoad>>点右键>>ContactContact之后,MASAgent回返回一个sysUpTime。
下图注意两个地方,其一:协议类型是SNMPv1(后面会把它替换为SNMPv2);其二:MAS服务器的MASAgent返回了一个sysUpTime。
如果MAS服务器无法Contact,那么一定时间后MIB Browser会返回TimeOut。
此时需要检查MAS服务器的161端口是否开放,确认MASAgent的“网管平台IP鉴权功能”是否关闭,并检查网络情况。
也可以跟踪MASAgent的日志确认MASAgent是否接收到MIB Browser的GET请求。
10、Contact成功后,就可以发送GET请求了:cpuLoad上点右键>>选择Get采集到的信息如下:CPULoad的信息为7% 其他的信息采集操作类似。
IBM MQ 9.2.x 快速入门指南说明书
IBM MQVersion 9.2.x IBM®Quick Start Guide Use this guide to get started with IBM MQ 9.2.x Continuous DeliveryNational Language Version: The Quick Start Guide is available in other languages from the Quick Start Guide eImage.Product overview IBM ® MQ is robust messaging middleware that simplifies and accelerates the integration of diverse applications and business data across multiple platforms. IBM MQ facilitates the assured, secure and reliable exchange of information between applications, systems, services and files by sending and receiving message data via messaging queues, thereby simplifying the creation and maintenance of business applications. It delivers Universal Messaging with a broad set of offerings to meet enterprise-wide messaging needs, and can be deployed across a range of different environments including on-premise, in cloud environments and supporting hybrid cloud deployments.IBM MQ supports a number of different application programming interfaces (APIs) including Message Queue Interface (MQI), Java Message Service (JMS), .NET, IBM MQ Light, MQTT, and the messaging REST API.Downloading IBM MQ 9.2 (https:///support/pages/node/6027838).• A Quick Start Guide eImage. A Quick Start Guide PDF file can also be downloaded from https:///software/integration/wmq/docs/V9.2/QuickStartGuide/mq92cdr_qsg_en.pdf).Alternatively, the Quick Start Guide is available in HTML format from IBM Documentation (https:///docs/ibm-mq/9.2?topic=mq-92x-quick-start-guide-continuous-delivery.For more information about downloading the product from IBM Passport Advantage, see Downloading IBM MQ 9.2(https:///support/pages/node/6027838) and the Passport Advantage and Passport Advantage Express website (https:///software/passportadvantage/).Online documentation for all supported versions of IBM MQ is available through IBM Documentation (https:///docs/ibm-mq). Specifically, the IBM MQ 9.2 documentation is available in IBM Documentation (https:///docs/ibm-mq/9.2).The IBM MQ 9.2 documentation is also available as a set of PDF files that can be downloaded from https:///software/integration/wmq/docs/V9.2/PDFs/.Information about how to use IBM MQ Explorer can be accessed either from within IBM MQ Explorer or in the IBM MQ 9.2 product information.2Step 2: Evaluate the hardware and system configurationFor details of hardware and software requirements on all supported platforms, see the System Requirements for IBM MQ web page (https:///support/pages/node/318077).3Step 3: Review the installation architectureIBM MQ architectures range from simple architectures that use a single queue manager, to more complex networks of interconnected queue managers. For more information about planning your IBM MQ architecture, see the Planning section of the IBM MQ 9.2 documentation (https:///docs/ibm-mq/9.2?topic=mq-planning).For links to additional information, see the IBM MQ family information roadmap (https:///docs/ibm-mq/9.2?topic=mq-family-information-roadmap).4Step 4: Installing the product on a serverFor installation instructions for IBM MQ on all supported platforms, and for details of the hardware and software configurations that are required, see the Installing section of the IBM MQ 9.2 documentation (https:///docs/ibm-mq/9.2?topic=mq-installing-uninstalling).5Step 5: Get startedFor information to help you get started with IBM MQ, see the IBM MQ family information roadmap (https:///docs/ibm-mq/9.2?topic=mq-family-information-roadmap).More informationFor more information about IBM MQ, see the following resources:IBM FAQ for Long Term Support and Continuous Delivery releasesFrom IBM MQ 9.0, IBM MQ introduced a Continuous Delivery (CD) support model. Following the initial releaseof a new version, new function and enhancements are made available by incremental updates within the same version and release. There is also a Long Term Support release available for deployments that require security and defect fixes only. For more information, see IBM MQ FAQ for Long Term Support and Continuous Deliveryreleases (https:///support/pages/node/713169).Online product readme fileThe latest version of the online product readme file is available on the IBM MQ product readmes web page(https:///support/pages/node/317955).IBM Support informationSupport information includes the following resources:•IBM MQ for Multiplatforms Support web page (https:///mysupport/s/topic/0TO5000000024cJGAQ/mq)•IBM MQ for z/OS® Support web page (https:///mysupport/s/topic/0TO0z0000006k52GAA/mq-for-zos)•IBM Cloud Pak® for Integration Support web page (https:///mysupport/s/topic/ 0TO0z000000YsIrGAK/cloud-pak-for-integration)•IBM Support Assistant (https:///support/home/product/C100515X13178X21/ other_software/ibm_support_assistant)•Social Media Channels within Cloud Technical Support (https:///support/pages/node/ 131651#2IBM MQ 9.2.x Licensed Materials - Property of IBM. © Copyright IBM Corp. 2006, 2021. U.S. Government Users Restricted Rights - Use, duplication or disclosure restricted by GSA ADP Schedule Contract with IBM Corp.IBM, the IBM logo, , IBM Cloud Pak, Passport Advantage, and z/OS are trademarks or registered trademarks of International Business Machines Corp., registered in many jurisdictions worldwide. Java and all Java-based trademarks and logos are trademarks or registered trademarks of Oracle and/or its affiliates. Other product and service names might be trademarks of IBM or other companies. A current list of IBM trademarks is available on /trademark.Part Number: G014JML。
kitten server用法
kitten server用法Kitten server是一个轻量级的Web框架,用于构建高性能且可伸缩的Web应用程序。
它基于Ruby编程语言,并使用EventMachine事件驱动框架来实现非阻塞的IO操作。
以下是Kitten server的使用方法:1.安装Kitten server:在命令行中使用gem包管理器安装Kitten server:gem install kitten-server2.创建一个新的Kitten server应用程序:在命令行中使用kitten命令创建一个新的Kitten server应用程序:kitten new myapp3.编写应用程序代码:在"myapp"文件夹中打开app.rb文件,这是主要的应用程序文件。
您可以在其中定义路由和处理HTTP请求的逻辑。
4.启动Kitten server应用程序:在命令行中进入"myapp"文件夹,并使用kitten命令启动Kitten server应用程序:kitten start5.访问应用程序:在浏览器中输入http://localhost:3000(默认端口号是3000),您将能够访问您的Kitten server应用程序。
除了上述基本用法外,Kitten server还具有一些其他功能和拓展:1.路由和控制器:Kitten server支持定义路由和处理HTTP请求的控制器,使您能够轻松地组织和处理请求。
2.中间件:您可以使用Kitten server的中间件机制来处理请求和响应,例如身份验证、日志记录等。
3.模板引擎:Kitten server内置了一个简单而强大的模板引擎,可用于将动态内容嵌入到HTML页面中。
4.数据库支持:Kitten server可以轻松地集成各种数据库,如MySQL、PostgreSQL等,以便您可以轻松地存储和检索数据。
5.扩展性:Kitten server提供了许多拓展点,您可以使用它们来添加自定义功能和集成其他库和工具。
杰吉思汤普路由器SMS命令配置指南

Quick Note 18 Configuring a Digi TransPort router to accept CLI commands via SMSUK SupportNovember 20151Introduction (3)1.1Outline (3)1.2Assumptions (3)1.3Version (3)2Configuration (4)2.1Obtain the phone number of the router’s SIM (4)2.2SMS Configuration (5)2.3Configuration - Network > Interfaces > Mobile (5)3Example scenario (8)4Monitoring (9)5Configuring SMS administration from the Command line (10)Page | 21.1OutlineThis document contains configuration instructions for allowing a Digi TransPort router with cellular access to accept CLI commands via SMS.To be able to accept an SMS, the router only needs GSM access to the mobile network. Even if the router has lost its GPRS/3G connection, it will normally still be contactable via SMS, assuming the mobile network cell station is still providing GSM coverage.1.2AssumptionsThis guide has been written for use by technically competent personnel with a good understanding of the communications technologies used in the product, and of the requirements for their specific application.Configuration: This application note assumes that the router will be connecting to a cellular network. This application note applies to;Models shown: Digi Transport WR41 router with Option 3G module.Other Compatible Models: All Digi Transport products with a cellular module.Firmware versions: 4.694 and above.Configuration: This Application Note assumes the devices are set to factory default configurations. Most configuration commands are only shown if they differ from the factory default.1.3VersionPage | 32.1Obtain the phone number of the router’s SIMBefore an SMS message can be sent to the router the phone number assigned to its SIM needs to be known.Browse to:Administration - Execute a commandAnd enter the command to send a message to the mobile phoneThe syntax is as follows:Sendsms <phonenumber> “message”Where <phonenumber> is the mobile phone number.NOTE: Th e “message” must be in quotes ““A second option is to send the message from the from the command lineThe mobile phone will receive the “test message” and its number will be displayed.It’s now possible to send commands to the router with this number as its destinationPage | 42.2SMS ConfigurationAll cellular TransPort routers have the ability to be configured by SMS. To configure a TransPort cellular router to accept CLI commands via SMS the following configuration will be required.Browse to:2.3Configuration - Network > Interfaces > MobileAnd make the following changesPage | 5Click ApplyIMPORTANT:1.Make sure to click “Add” after configuring a phone number and then click Apply.2.Make sure to replace the leading zero in the phone number when adding the internationalprefix (44 in this example)Page | 6NOTE on SMS command caller IDConfigure the parameter SMS command caller ID, enter the MSISDN (mobile phone number) that will be issuing CLI commands to the TransPort router. This needs to include the country code but without the + sign. For example for a UK mobile phone number 0797******* the number entered would be 447976123456. A different MSISDN can be entered on each line.Accepting SMS commands from any mobile numberWhen the SMS Command Caller ID is set to an asterisk character ”*” instead of an MSISDN, the TransPort router will accept and execute CLI commands from any MSISDN.SMS access levelThe parameter SMS access level will need to match the level required by the command sent by SMS for the command to be accepted. To execute all CLI commands, this should be set to Super.Multiple CLI commands in a single SMSSMS Command Separator, more than 1 CLI command may be sent per SMS, the CLI commands need to be separated by a character that will not be used in the CLI command, e.g. %To receive feedback on the outcome of the CLI command, the parameter SMS Replies should beset to On.Page | 7Consider an example scenario where the username and password of a PPP interface need to be changed remotely. Using the CLI the commands would be as follows:ppp 1 username <my-user>ppp 1 password <my-pass>config 0 saverebootAssuming that the command separator has been configured as % the SMS would be required would be: ppp 1 username my-user%ppp 1 password my-pass%config 0 save%rebootPlease note:Concatenate replies:There is normally a limit of 160 characters per SMS but concatenation of messages is allowed. Normally an SMS message is limited to 160 characters. However, the ETSI standard specifies a way to allow a number of SMS messages to be linked together by the sender (in this case the router). This enables the router to reply with long responses to SMS commands of longer than 160 characters. The reply comes back as a series of linked SMS messages which the phone reassembles and displays as one big message.To allow the TransPort router to send/receive concatenated messages, on the web interface the “Concatenate replies” box must be ticked.Page | 8SMS receipt and actions from the SMS are logged in the event logger.Here is an excerpt from the eventlog after a router is sent the commands in the example scenario above from a mobile phone(0752*******)Note: 0 replaced by 44 for UKThe key lines from the event logger are listed below.12:09:25, 15 Aug 2012,PPP 1 down,Rebooting12:09:25, 15 Aug 2012,Par change by MODEM 0, ppp 1 username to my-user12:09:25, 15 Aug 2012,SMS Received: 447522954965: Ppp 1 username my-user%ppp1 password my-pass%confi,ExecutedThe following line from config.da0 also shows that the SMS updated the configuration.config last_saved_user "MODEM 0"Page | 9The following commands will configure SMS administration from the command line.modemcc 0 sms_interval 1modemcc 0 sms_callerid “447522954965”modemcc 0 sms_cmd_sep %modemcc 0 sms_access 0modemcc 0 sms_replies onPage | 10。
IBM MQ 9.3 C说明书

Detailed example of running IBM MQ Explorerto setup JMS Administered objects in the JNDI .bindings fileand test with sample JmsJndiProducer for queue and topichttps:///support/pages/node/6956770Date last updated: 26-Jun-2023Angel RiveraIBM MQ Supporthttps:///products/mq/supportFind all the support you need for IBM MQ+++ Objective +++Detailed example of running IBM MQ Explorer to setup JMS Administered objects in the JNDI .bindings file and test with the MQ JMS sample JmsJndiProducer for putting a message into a queue and for publishing a message to a topic.Note 1: About using MQ ExplorerIf you have installed MQ Explorer in the host where you want to have your JDNI .bindings file, then it is far easier to use MQ Explorer than the JMSAdmin tool.For more information on using the MQ Explorer for this task, see the online manual: https:///docs/en/ibm-mq/9.3?topic=explorer-creating-configuring-jms-administered-objectsIBM MQ / 9.3Creating and configuring JMS administered objectsYou can use IBM® MQ Explorer to configure the JMS administered objects that enable communication between Java™ applications and IBM MQ.Note 2: For Jakarta Messaging 3.0- You cannot administer JNDI using IBM MQ Explorer.- JNDI administration is supported by the Jakarta Messaging 3.0 variant of JMSAdmin, which is JMS30Admin.+ Related tutorial for JMS Admin:If you want to use the command line utility JMSAdmin see:https:///support/pages/node/481027Detailed example of running IBM MQ JMSAdmin to setup JMS Administered objects in the JNDI .bindings file and test with sample JmsJndiProducer for queue and topic++ Requirements ++You need:- The MQ Java fileset (MQSeriesJava)- The MQ Samples fileset (MQSeriesSamples), which provides the sample JmsJndiProducer - A Java Runtime Environment (JRE). You can use the JRE shipped with MQ.- The MQ Explorer.- Note: MQ Explorer 9.3 has been removed from the main product installers (Linux x86-64 and Windows), that is, is no longer included with the MQ server package from IBM Passport Advantage. But it is available as a separate download from IBM Fix Central:https:///mqexplorer- The MQ samples for JMS are located at:Linux:/opt/mqm/samp/jms/samples/JmsJndiProducer.class.rpm fileset: MQSeriesSamples-9.2.0-5.x86_64Windows:C:\Program Files\IBM\MQ\tools\jms\samples- It is necessary to have a Java Runtime Environment (JRE) installed in the machine.MQ already provides one, if you install the following components:Linux:$ rpm -qa | grep MQSeriesJREExample output:MQSeriesJRE-9.3.0-2.x86_64Windows:C:\> reg.exe query"HKEY_LOCAL_MACHINE\SOFTWARE\Wow6432Node\IBM\WebSphereMQ\Installation" /s…HKEY_LOCAL_MACHINE\SOFTWARE\Wow6432Node\IBM\WebSphereMQ\Installation\Installation1\ComponentsJRE REG_SZ Installed++ Configuration- Host-1: Queue Manager in Linux RHEL MQ version.release: 9.3.0.2 LTSHost-1: volterra1Queue Manager Name:QM93Port: 1414Server-Connection Channel: MY.CHANNEL - Host-2L Client in Linux RHELMQ version.release: 9.2.0.6 LTSHost-2: suvetero1User: mqm- Host-3: Client in Windows 10MQ version.release: 9.3.0.2 LTSHost-3: tolteca1User: Administrator+++ Procedure +++++ Step 1: You must use "setmqenv" to setup the MQ environment variables.Login as MQ Administrator.It is very important that you always establish the proper setup for MQ via the command "setmqenv" because it will define the environment variables, updated the PATH, and update the CLASSPATH for Java/JMS programs.In Linux and AIX you must "source" it! (That is, type a dot, then a space, then the setmqenv command and parameters).The following use the default Installation directories.Linux:. /opt/mqm/bin/setmqenv -n InstallationAIX:. /usr/mqm/bin/setmqenv -n InstallationWindows:"C:\Program Files\IBM\MQ\bin\setmqenv" -n Installation1+ Highly recommended: Create a script that invokes setmqenv and adds samples directory+ LinuxYou can create a shell script and invoke it in your .bashrc file that issues the setmqenv command and adds the samples directories into the PATH and your current directory into the CLASSPATH, in that way, it will be easier to run the samples.Note that the "export PATH" is a very long single line!# Name: set-mq-inst1# Purpose: to setup the environment to run MQ in Installation1. /opt/mqm/bin/setmqenv -n Installation1# Additional MQ directories for the PATHexportPATH=$PATH:$MQ_INSTALLATION_PATH/java/bin:$MQ_INSTALLATION_PATH/samp/ bin:$MQ_INSTALLATION_PATH/samp/jms/samples:# Add local directory for running Java/JMS programsexport CLASSPATH=$CLASSPATH:.# Display the full fix pack leveldspmqver -f 2# end+ WindowsYou can create a batch command file and invoke it in your Windows terminal, that issues the setmqenv command and adds the samples directories into the PATH and your current directory into the CLASSPATH, in that way, it will be easier to run the samples.Note that the "SET PATH" is a very long single line!REM Setup the environment to run MQ from Installation1CALL "C:\Program Files\IBM\MQ\bin\setmqenv" -n Installation1REM Adding Samples to the pathSETPATH=%PATH%;%MQ_FILE_PATH%\Tools\c\Samples\Bin;%MQ_FILE_PATH%\Tools\c \Samples\Bin64;%MQ_FILE_PATH%\Tools\jms\samples;%MQ_JAVA_INSTALL_PATH %\bin\dspmqver -f 2SET CLASSPATH=%CLASSPATH%;.++ Step 2: Creation of physical objects (for example, a Queue) in the queue manager Note:This document assumes that the queue manager is already created and that the proper security/authorizations are in place.For more details, see the following tutorial:https:///support/pages/node/1135522Configuring IBM MQ to use a dedicated Listener, Channel and Queue in LinuxThe following is an example:Host-1: Queue Manager name: QM93Port: 1414Ensure to have the following test queue:$ runmqsc QM93DEFINE QL(Q1)DEFINE TOPIC(T1) TOPICSTR('TOPIC1')END++ Step 3: Create a directory where the JMS configuration objects will be located in a file name ".bindings".Login as an MQ Administrator.You can create the following subdirectory in the same directory where the other MQ objects are stored (variable: MQ_DATA_PATH)JNDI-Directory- Linux:mkdir /var/mqm/JNDI-Directory- Windows:mkdir %MQ_DATA_PATH%\JNDI-Directory+ File permissions and ownershipThe permissions and ownership must allow read-write permission to the user "mqm" and read-execute for group and others:$ ls -dl /var/mqm/JNDI-Directorydrwxr-xr-x 2 mqm mqm 91 Jun 26 05:52 /var/mqm/JNDI-Directory$ ls -al-rw-r--r-- 1 mqm mqm 15880 Jun 23 05:56 .bindingsIf the file permission / ownership are not correct, then at runtime, JMSAdmin may issue the following error, which is very vague and generic.Unable to bind object++ Step 4: Launch MQ Explorer to add JMS Administered objects - Launch MQ Explorer- On the left navigation panel, scroll down to the bottom.- Select:JMS Administered Objects- Right click and select:Add Initial Context…- You will see a dialog that says "Connection details"Let's look at the top part about:Where is the JNDI namespace located and the JNDI Service ProviderThis top part is the equivalent of the following attribute in the JMSAdmin.config file: INITIAL_CONTEXT_FACTORY=com.sun.jndi.fscontext.RefFSContextFactoryThis means that the JNDI will be a FILE, named:.bindingsThe bottom part specifies the full path of the directory where the .bindings file will be located.For this tutorial is:C:\ProgramData\IBM\MQ\JNDI-DirectoryThis is the equivalent following attribute in the JMSAdmin.config file:PROVIDER_URL- For Windows:Notice only 1 forward slash after "file:" and notice the drive letter "C:/" and that the slash is FORWARD SLASH:For example:file:/C:/ProgramData/IBM/MQ/JNDI-Directory/- For UNIX:Notice the 3 forward slashes after "file:"For example:file:///var/mqm/JNDI-DirectoryFollow the prompts and click on "Finish"The MQ Explorer will show the entry for the new "Initial Context"In the future, you may need to "manually connect" to this Initial Context. Expand the folders for the Initial ContextYou will see 2 folders and at this time they are empty:Connection FactoriesDestinationsLet's add our first Connection Factory.Select the folder "Connection Factories", right click on "New" and then click on"Connection Factory…"In the next dialog, enter the name:CF1Accept the default that this will be a "Connection Factory" (JMS 1.1 standard)Note: The very old JMS 1.0 standard had "Queue Connection Factory" and "T opic Connection Factory".In the next screen you need to select for the "Transport" type:MQ ClientClick Next.Because we do not have another Connection Factory so far, click Next.In the next page you will see a notebook with several tabs.The first tab is "General".Ensure that you have the name (CF1) and transport type (CLIENT)Select the tab: ConnectionSpecify the queue manager (QM93) and the connection list [(1414)]Select the tab: ChannelsSpecify the server-connection channel (MY.CHANNEL)All these selections are the equivalent of the following command for JMSAdmin: DEF CF(CF1) QMGR(QM93) CHANNEL(MY.CHANNEL) TRANSPORT(CLIENT) HOSTNAME() PORT(1414)Click on "Finish"You will see now our 1st entry in the right panel of the Connection Factories:Let's proceed to define our Destination Queue Q1.Select the folder "Destinations", right click "New" and select "Destination…"In the next dialog, enter the name: Q1… and specify that the type is: QueueClick Next.You will see a notebook with T abs. We are only interested in the tab: GeneralYou need to enter the queue manager name (QM93) and the name of the queue (Q1). These options are the equivalent of the following JMSAdmin command:DEF Q(Q1) QMGR(QM93) QUEUE(Q1)You will see now our 1st entry (queue Q1) in the Destinations section, on the right panel.Let's proceed to create the topic.On the left panel, select "Destinations", right click "New", then "Destination".Enter the name T1 and ensure to specify the type to be "T opic"You will see a notebook dialog with several tabs.We are only interested in the tab: GeneralEnsure that we have the name "T1" and the topic "TOPIC1"These options are the equivalent of the following JMSAdmin command:DEF T(T1) TOPIC('TOPIC1')You will see now our 2nd entry (topic T1) in the Destinations section, on the right panel. You can see the .bindings file in the desired directory:++ Step 5: Copy the .bindings file to other hosts (if needed)Because the creation of the .bindings file is far easier via MQ Explorer, then possibly you could create this file in a Windows host and then copy the .bindings file into another host, such as AIX or Linu.You will need to store the file in the desired directory in the other host, such as in:/var/mqm/JNDI-Directory++ Step 6: Run the MQ sample: JmsJndiProducerThe MQ sample JmsJndiProducer can be used to:- Access an JNDI to look up for the Connection Factory and a Destination (queue or topic) - Put a message into a queue.- Or publish a message into a topic.In Linux, the sample is in:/opt/mqm/samp/jms/samples/JmsJndiProducer.javaIn Windows, the sample is in:C:\Program Files\IBM\MQ\tools\jms\samples\JmsJndiProducer.java+ What to enter into the -I flag (Initial Context, aka JNDI file .bindings)?The following is a bit tricky.You need to specify exactly the value of the URI from the MQ Explorer:In Windows:file:/C:/ProgramData/IBM/MQ/JNDI-DirectoryIn Linux:file:///var/mqm/JNDI-Directory+ Putting a message into Destination Queue Q1 (from Linux)We are using only Linux to show this example.But the usage from Windows is the same, of course, the flag -i will be different.Note:If your only "java" executable is the one provided by MQ, then its full path name is:/opt/mqm/java/jre64/jre/bin/java******************:/opt/mqm/samp/jms/samples$ cd /opt/mqm/samp/jms/samples/$ java JmsJndiProducer -i file:///var/mqm/JNDI-Directory -c CF1 -d Q1 Initial context found!Sent message:JMSMessage class: jms_textJMSType: nullJMSDeliveryMode: 2JMSDeliveryDelay: 0JMSDeliveryTime: 1676754470495JMSExpiration: 0JMSPriority: 4JMSMessageID:ID:414d5120514d39332020202020202020eabeef63013f0040JMSTimestamp: 1676754470495JMSCorrelationID: nullJMSDestination: queue://QM93/Q1JMSReplyTo: nullJMSRedelivered: falseJMSXAppID: JmsJndiProducerJMSXDeliveryCount: 0JMSXUserID: mqmJMS_IBM_PutApplType: 28JMS_IBM_PutDate: 20230218JMS_IBM_PutTime: 21075050JmsJndiProducer: Your lucky number today is 467SUCCESSNotice the output line that indicates that the destination is a queue, and provides the name of the queue manager and the queue:JMSDestination: queue://QM93/Q1++ Browsing the message.+ Using the MQ sample "amqsbcg"Notice the RHF2 (RFH) header, shown in blue.Example:amqsbcg Q1 QM93AMQSBCG0 - starts here**********************MQOPEN - 'Q1'MQGET of message number 1, CompCode:0 Reason:0****Message descriptor****StrucId : 'MD ' Version : 2Report : 0 MsgType : 8Expiry : -1 Feedback : 0Encoding : 273 CodedCharSetId : 1208Format : 'MQHRF2 'Priority : 4 Persistence : 1MsgId : X'414D5120514D393357494E20202020202D0E7664012B0040'CorrelId : X'000000000000000000000000000000000000000000000000'BackoutCount : 0ReplyToQ : ' ' ReplyToQMgr : 'QM93 '** Identity ContextUserIdentifier : '594079897 'AccountingToken :X'16010501000000480366CD527F8B47B07254FAC264847300000000000000000C' ApplIdentityData : ' '** Origin ContextPutApplType : '11'PutApplName : 'JmsProducer 'PutDate : '20230530' PutTime : '14562385'ApplOriginData : ' 'GroupId : X'000000000000000000000000000000000000000000000000'MsgSeqNumber : '1'Offset : '0'MsgFlags : '0'OriginalLength : '-1'**** Message ****length - 177 of 177 bytes00000000: 5246 4820 0000 0002 0000 0094 0000 0111 'RFH .......ö....' 00000010: 0000 04B8 4D51 5354 5220 2020 0000 0000 '....MQSTR ....' 00000020: 0000 04B8 0000 0020 3C6D 6364 3E3C 4D73 '....... <mcd><Ms' 00000030: 643E 6A6D 735F 7465 7874 3C2F 4D73 643E 'd>jms_text</Msd>' 00000040: 3C2F 6D63 643E 2020 0000 0048 3C6A 6D73 '</mcd> ...H<jms' 00000050: 3E3C 4473 743E 7175 6575 653A 2F2F 2F51 '><Dst>queue:///Q' 00000060: 313C 2F44 7374 3E3C 546D 733E 3136 3835 '1</Dst><Tms>1685' 00000070: 3435 3835 3833 3834 353C 2F54 6D73 3E3C '458583845</Tms><' 00000080: 446C 763E 323C 2F44 6C76 3E3C 2F6A 6D73 'Dlv>2</Dlv></jms' 00000090: 3E20 2020 5075 7420 5465 7374 204A 4D53 '> Put Test JMS' 000000A0: 204D 6573 7361 6765 2077 6974 6820 5246 ' Message with RF' 000000B0: 48 'H '+ Using the MQ ExplorerSelect the desired queue, then right click to show the context menu. Then select: Browse Messages…You will see the messages in the queue.Double click on the desired message.T o see the JMS header, select the tab: Named Properties++ Publishing a message into Destination T opic T1 (from Windows)We are using only Windows to show this example.But the usage from Linux is the same, of course, the flag -i will be different.Note:If your only "java" executable is the one provided by MQ, then its full path name is:"C:\Program Files\IBM\MQ\java\jre\bin\java"C:\> "C:\Program Files\IBM\MQ\java\jre\bin\java" JmsJndiProducer -i file:/C:/ProgramData/IBM/MQ/JNDI-Directory -c CF1 -d T1Initial context found!Sent message:JMSMessage class: jms_textJMSType: nullJMSDeliveryMode: 2JMSDeliveryDelay: 0JMSDeliveryTime: 1676753963274JMSExpiration: 0JMSPriority: 4JMSMessageID:ID:414d5120514d39332020202020202020eabeef63013c0040JMSTimestamp: 1676753963274JMSCorrelationID: nullJMSDestination: topic://TOPIC1JMSReplyTo: nullJMSRedelivered: falseJMSXAppID: JmsJndiProducerJMSXDeliveryCount: 0JMSXUserID: mqmJMS_IBM_ConnectionID:414D5143514D39332020202020202020EABEEF63003B0040JMS_IBM_PutApplType: 28JMS_IBM_PutDate: 20230218JMS_IBM_PutTime: 20592253JmsJndiProducer: Your lucky number today is 260SUCCESSNotice the output line that indicates that the destination is a queue, and provides the name of the topic:JMSDestination: topic://'TOPIC1'+++ end +++。
mqtool工具用法
mqtool工具用法
mqtool是一个用于操作和管理消息队列的工具。
以下是mqtool的一些常用用法:
1. 查看消息队列信息:
mqtool --queue-info <queue_name>
2. 创建一个新的消息队列:
mqtool --create-queue <queue_name>
3. 删除一个消息队列:
mqtool --delete-queue <queue_name>
4. 发送消息到队列:
mqtool --send-message <queue_name> --message <message>
5. 从队列中接收消息:
mqtool --receive-message <queue_name>
6. 查看队列中的消息数量:
mqtool --queue-size <queue_name>
7. 清空队列:
mqtool --clear-queue <queue_name>
8. 查看所有队列的信息:
mqtool --all-queue-info
这只是mqtool的一部分常用用法,还有很多其他功能可以根据具体情况使用。
您可以使用mqtool --help命令查看更多详细的用法和选项。
MQSeries安装手册范本
亿阳信通BOCO Inter-Telecom三期MQSeries5.2 安装手册亿阳信通股份2003-10所有本产品或文档受保护,其使用、复制、发行和反编译均受许可证限制。
未经亿阳信通股份及其授权者事先的书面许可,不得以任何形式、任何手段复制本产品及其文档的任何部分。
前言1.1目的GP_WNMS系统采用全新的软件体系结构,利用消息平台IBM MQSeries在采集服务程序、数据库服务程序与上层应用程序之间进行消息传递,各个程序的相互通信是以消息的形式完成。
因此在本系统中,安装和配置MQSeries是必不可少的。
本文着重描述GP_WNMS系统消息平台软件IBM MQSeries在Solaris和HP_UN平台上的的安装和配置过程。
1.2容针对GP_WNMS系统服务程序的要求,本文详细描述规划、安装及配置IBM MQSeries 的详细步骤。
其中包括:准备安装;安装;配置;测试。
1.3谁应该读这本书本文针对省级移动网管系统3期的系统安装,适用于软件安装和维护人员。
本文假设读者具备Solaris和HP_UN系统使用与维护的基本知识,文中Solaris系统安装和维护的相关容请参阅相关文档。
第一章准备安装1.1软硬件要求硬件平台:Sun SPARC 或UltraSPARC台式机或服务器系统磁盘存储器:在包含 /opt 目录的文件系统中,至少要有 25 MB 的磁盘空间用于产品代码和数据。
此外,如果安装 HTML 格式的联机书籍,还需要在 /opt 目录中有 35 MB 的存储器空间用于存放书籍,安装后,书籍位于 /opt/mqm/html 目录中。
注:MQSeries Sun Solaris 版的工作数据缺省存储于 /var/mqm 中。
软件要求:最低支持带有修补程序 105210-13 和 105568-10 的 Sun Solaris 版本 2.6。
1.2从 MQSeries Sun Solaris 版的早期版本迁移从 MQSeries Sun Solaris 版 V2.2 或 MQSeries Sun Solaris 版 V5.0 迁移到MQSeries Sun Solaris 版 V5.1,应该按照以下步骤操作:终止所有队列管理器的活动。
MQSeries 连环画

MQSeries 连环画谨以此文献给那些对MQSeries 感兴趣的朋友,取名“MQSeries 连环画“。
1。
在早先的时候,人们往往使用两个程序之间直接通信的方式。
这种办法最大的问题就是通信协议相关性,也就是说与通信协议相关的代码充斥在应用程序之中,而且可能出现在程序的任何地方, 甚至影响程序的设计与结构。
这种办法的另一个问题就是应用程序不容易写出可靠强壮的代码。
应用程序的通信部分会因为工作方式的灵活性、网络协议的通用性,以及为实现一些实用功能变得非常庞大,往往超过应用程序本身的逻辑代码,变得本末倒置,且代码很难写好,也很难维护。
2。
人们开始意识到应该把通信代码放到外面,变成独立的工作进程或工作模块,不同的工作进程可以适同于不同的通信协议,而应用程序与通信程序之间使用通用的本地通信方式。
这样一来,应用程序与通信程序的代码完全分开,各自的逻辑清晰自然,易于管理与维护,在通信方式上前进了一大步。
但是,这种方式对通信程序的编程要求比较高,如果考虑到平台的广泛适用性,通信程序可能要写一大堆,要设计一个通用高效的本地通信接口也非易事,再考虑到通信上的一些附加功能,其实现对普通编程人员是有一定困难的。
人们很自然地想到,这种工作最好交由专业的通信软件来完成。
在这种情况下,市场逐渐出现了专门负责消息通信的软件,其中IBM MQSeries 是其中起步较早,功能出众的一款。
经过多年的“大浪淘沙“,目前市场上MQSeries 终于成为优势产品,占有率在70% 以上,在同类产品中,Microsoft MSMQ 与BEA 的Tuxedo Q 也是不错的产品。
MQSeries 利用内部的消息排队与调度机制将应用程序之间的通信的“活儿“全包了。
目前支持超过23 种平台,基本可以实现任何两种异构平台之间的互连。
在消息传递的过程中,本地应用发送消息,通过MQSeries 界面MQI (MQSeries Interface) 在消息头中会加入消息路由信息,这条消息放入本地传输队列。
mq的使用方法

mq的使用方法【实用版3篇】目录(篇1)1.MQ 的概念与作用2.MQ 的基本使用方法3.MQ 的高级使用方法4.MQ 的实际应用案例正文(篇1)一、MQ 的概念与作用消息队列(Message Queue,简称 MQ)是一种应用程序之间的通信机制,通过将消息发送到队列中,接收方可以从队列中获取消息并进行相应的处理。
消息队列具有异步、解耦、削峰填谷等特点,可以提高系统的可靠性、可用性和扩展性。
二、MQ 的基本使用方法1.创建队列:使用`mqsend`命令创建一个队列,同时需要指定队列的名称、存储位置和权限等信息。
2.发送消息:使用`mqsend`命令发送消息到队列中,需要指定队列名称、消息内容和消息优先级等信息。
3.接收消息:使用`mqreceive`命令从队列中接收消息,需要指定队列名称、消息数量和消息处理方式等信息。
4.删除队列:使用`mqsend`命令删除一个队列,需要指定队列的名称。
三、MQ 的高级使用方法1.消息过滤:通过设置消息过滤规则,可以实现对队列中消息的筛选,只接收符合规则的消息。
2.消息持久化:通过设置队列的持久化策略,可以实现对消息的存储和备份,以防数据丢失。
3.消息分片:将大消息分割成多个小消息进行发送和接收,可以降低系统间的通信带宽要求。
4.消息确认与重试:通过设置消息的确认机制和重试策略,可以提高系统的可靠性和稳定性。
四、MQ 的实际应用案例1.异步处理:将一些耗时较长的任务放入消息队列中,让接收方在有空闲资源时进行处理,提高系统的并发能力和响应速度。
2.系统解耦:通过消息队列,可以将各个子系统之间的通信解耦,降低系统间的依赖性,提高系统的可维护性和扩展性。
3.流量削峰填谷:在高并发场景下,通过消息队列可以缓存请求,避免系统瞬间压力过大,提高系统的稳定性。
总结:消息队列(MQ)作为一种重要的应用程序间通信机制,具有异步、解耦、削峰填谷等特点,可以提高系统的可靠性、可用性和扩展性。
- 1、下载文档前请自行甄别文档内容的完整性,平台不提供额外的编辑、内容补充、找答案等附加服务。
- 2、"仅部分预览"的文档,不可在线预览部分如存在完整性等问题,可反馈申请退款(可完整预览的文档不适用该条件!)。
- 3、如文档侵犯您的权益,请联系客服反馈,我们会尽快为您处理(人工客服工作时间:9:00-18:30)。
IBM MQSeries使用指南随着计算机网络和分布式应用的不断发展,远程消息传递越来越成为应用系统中不可缺少的组成部分。
商业消息中间件的出现保证了消息传输的可靠性,高效率和安全性,同时也减少了系统的开发周期。
目前应用最多的消息中间件产品为IBM MQSeries。
本文就针对MQ的基本操作与配置进行详细的阐述,希望对读者有所帮助。
一.MQ基本操作MQ中有几个很重要的组件:队列管理器(QueueManager)、队列(Queue)和通道(Channel)。
其基本的操作方法如下:创建队列管理器crtmqm –q QMgrName-q是指创建缺省的队列管理器删除队列管理器dltmqm QmgrName启动队列管理器strmqm QmgrName如果是启动默认的队列管理器,可以不带其名字停止队列管理器endmqm QmgrName 受控停止endmqm –i QmgrName 立即停止endmqm –p QmgrName 强制停止显示队列管理器dspmq –m QmgrName运行MQSeries命令runmqsc QmgrName如果是默认队列管理器,可以不带其名字往队列中放消息amqsput QName QmgrName如果队列是默认队列管理器中的队列,可以不带其队列管理器的名字从队列中取出消息amqsget QName QmgrName如果队列是默认队列管理器中的队列,可以不带其队列管理器的名字启动通道runmqchl –c ChlName –m QmgrName启动侦听runmqlsr –t TYPE –p PORT –m QMgrName停止侦听endmqlsr -m QmgrNameMQSeries命令定义死信队列DEFINE QLOCAL(QNAME)DEFPSIST(YES)REPLACE设定队列管理器的死信队列ALTER QMGR DEADQ(QNAME)定义本地队列DEFINE QL(QNAME)REPLACE定义别名队列DEFINE QALIAS(QALIASNAME) TARGQ(QNAME)远程队列定义DEFINE QREMOTE(QRNAME)+RNAME(AAA)RQMNAME(QMGRNAME)+XMITQ(QTNAME)定义模型队列DEFINE QMODEL(QNAME)DEFTYPE(TEMPDYN)定义本地传输队列DEFINE QLOCAL(QTNAME) USAGE(XMITQ) DEFPSIST(YES) +INITQ(SYSTEM.CHANNEL.INITQ)+PROCESS(PROCESSNAME) REPLACE创建进程定义DEFINE PROCESS(PRONAME)+DESCR(‘STRING’)+APPLTYPE(WINDOWSNT)+APPLICID(’runmqchl -c SDR_TEST -m QM_ TEST’)其中APPLTYPE的值可以是:CICS、UNIX、WINDOWS、WINDOWSNT等创建发送方通道DEFINE CHANNEL(SDRNAME)CHLTYPE(SDR)+CONNAME(‘100.100.100.215(1418)’)XMITQ(QTNAME)REPLACE其中CHLTYPE可以是:SDR、SVR、RCVR、RQSTR、CLNTCONN、SVRCONN、CLUSSDR和CLUSRCVR。
创建接收方通道DEFINE CHANNEL(SDR_ TEST)CHLTYPE(RCVR)REPLACE创建服务器连接通道DEFINE CHANNEL(SVRCONNNAME)CHLTYPE(SVRCONN)REPLACE显示队列的所有属性DISPLAY QUEUE(QNAME)[ALL]显示队列的所选属性DISPLAY QUEUE(QNAME)DESCR GET PUTDISPLAY QUEUE(QNAME)MAXDEPTH CURDEPTH显示队列管理器的所有属性DISPLAY QMGR [ALL]显示进程定义DISPLAY PROCESS(PRONAME)更改属性ALTER QMGR DESCR(‘NEW DESCRIPTION’)ALTER QLOCAL(QNAME)PUT(DISABLED)ALTER QALIAS(QNAME)TARGQ(TARGQNAME)删除队列DELETE QLOCAL(QNAME)DELETE QREMOTE(QRNAME)清除队列中的所有消息CLEAR QLOCAL(QNAME)二.配置一个能够通信的远程连接以上讲述了MQ的基本命令操作,但只知道这些是没有实际意义的。
MQ的最终目的是实现远程通信,所以下面就以一个具体的例子来说明如何实现远程连接。
这个例子的目的是建立可以实现消息传递的一对MQ服务器,它们分别基于NT和UNIX平台。
首先在NT端建一队列管理器crtmqm –q QM_NT启动队列管理器strmqm QM_NT运行MQ控制台命令runmqsc QM_NT创建死信队列DEFINE QL(NT.DEADQ) DEFPSIST(YES) REPLACE更改队列管理器属性,设置其死信队列ALTER QMGR DEADQ(NT.DEADQ)创建进程定义DEFINE PROCESS(P_NT)+APPLTYPE(WINDOWSNT)+APPLICID(’runmqchl -c SDR_NT -m QM_NT’)创建本地传输队列DEFINE QL(QT_NT) USAGE(XMITQ) DEFPSIST(YES) +INITQ(SYSTEM.CHANNEL.INITQ)+PROCESS(P_NT) REPLACE创建远程队列定义,对应于UNIX机器上的本地队列Q_UNIX,传输队列为QT_NTDEFINE QREMOTE(QR_NT)+RNAME(Q_UNIX)RQMNAME(QM_UNIX)+XMITQ(QT_NT)创建发送方通道,其传输队列为QT_NT,远程主机地址为10.10.10.2,侦听端口为1414DEFINE CHANNEL(SDR_NT)CHLTYPE(SDR)+CONNAME(‘10.10.10.2(1414)’)XMITQ(QT_NT)REPLACE创建服务器连接通道DEFINE CHANNEL(S_NT)CHLTYPE(SVRCONN)REPLACE在UNIX端创建队列管理器crtmqm –q QM_UNIX启动队列管理器strmqm QM_UNIX添加侦听程序修改/etc/services文件,加入一行:MQSeries 1414/tcp #MQSeries channel listener修改/etc/inetd.conf文件,加入一行(启动侦听程序)MQSeries stream tcp nowait mqm /usr/lpp/mqm/bin/amqcrsta amqcrsta –m QM_UNIX运行以下命令,以使修改起作用refresh –s inetd运行MQ控制台命令runmqsc QM_UNIX创建死信队列DEFINE QL(UNIX.DEADQ) DEFPSIST(YES) REPLACE更改队列管理器属性,设置其死信队列ALTER QMGR DEADQ(UNIX.DEADQ)创建接收方通道,其名字必须与远程发送方相同DEFINE CHANNEL(SDR_NT)CHLTYPE(RCVR)REPLACE创建本地队列DEFINE QL(Q_UNIX)DEFPSIST(YES) REPLACE创建服务器连接通道DEFINE CHANNEL(S_UNIX)CHLTYPE(SVRCONN)REPLACE经过以上操作之后,远程连接的配置工作完成。
接下来需要验证配置是否正确。
在NT端启动发送方通道runmqchl –c SDR_NT –m QM_NT 或start chl(SDR_NT)从NT端发送消息到UNIX端amqsput QR_NT QM_NT在UNIX端接收消息/usr/mqm/samp/bin/amqsget Q_UNIX QM_UNIX若能收到消息,说明配置成功。
另,在NT下一般情况下在建立队列管理器时会自动建立侦听器,启动队列管理器时则会自动启动侦听程序。
当然也可以手动配置侦听程序。
修改\winnt\system32\drivers\etc\services文件,在文件中加入一行:MQSeries 1414/tcp #MQSeries channel listener启动侦听程序runmqlsr –t tcp –p 1414 –m QM_NT以上说明了怎样建立简单的单向传输网络。
消息从NT端传送到UNIX端。
建立从UNIX端到NT端的远程连接和以上相仿,要建立双向的传输网络也是同样的道理。
三.配置JNDI用JMS实现消息的发送和接收时,经常会用到JNDI。
因为JNDI这种方式比较灵活,对于编程也比较简单。
在安装了MQSeries Client for Java之后,在\java\bin目录下找到JMSAdmin.config文件。
该文件主要用来说明Context的存储方式及存储地址,对应于文件中的两个参数INITIAL_CONTEXT_FACTORY和PROVIDER_URL。
典型的JMSAdmin.config文件内容如下:#INITIAL_CONTEXT_FACTORY=com.sun.jndi.ldap.LdapCtxFactoryINITIAL_CONTEXT_FACTORY=com.sun.jndi.fscontext.RefFSContextFactory#INITIAL_CONTEXT_FACTORY=InitialContextFactory##PROVIDER_URL=ldap://polaris/o=ibm,c=usPROVIDER_URL=file:/d:/temp#PROVIDER_URL=iiop://localhost/#SECURITY_AUTHENTICATION=noneINITIAL_CONTEXT_FACTORY表示JMSAdmin Tool使用的服务提供商。
当前有三种受支持的值。
com.sun.jndi.ldap.LdapCtxFactory用于LDAP,如果使用它就必须安装一个LDAP服务器。
com.sun.jndi.fscontext.RefFSContextFactory用于文件系统上下文,它只需要使用者提供存放上下文的文件路径。
InitialContextFactory是专门为websphere提供的,它需要和websphere的CosNaming资源库一起使用。
