USB转串口驱动下载
USB转串口的虚拟串口驱动
USB转串口的虚拟串口驱动简介USB2COM是USB转串口转换器的虚拟串口驱动程序(Windows2000/XP),适用于Cypess的USB-HID->COM转换器(未测试), 以及与之兼容的设备。
USB-HID->COM转换器是兼容USB HID类设备的设备,因此可以不用此驱动,直接以USB_HID类设备访问。
特性:∙支持设置波特率、奇偶校验、停止位。
∙事件检测。
仅支持SERIAL_EV_RXCHAR | SERIAL_EV_RXFLAG | SERIAL_EV_TXEMPTY。
∙数据流控。
todo∙超时设置。
todo安装方法-:1.把HID->COM转换器插入USB端口。
2.HID->COM转换器被识别为:USB人体学输入设备。
3.选择设备管理器->人体学输入设备->USB人体学输入设备,单击右键。
4.选择更新驱动程序。
5.选择从列表或指定位置安装,单击下一步。
6.选择不要搜索,我要自己选择要安装的驱动程序,单击下一步。
7.选择从磁盘安装,浏览驱动程序所在路径,单击确定。
8.提示没有通过Windows徽标测试,选择仍然继续。
9.安装完成,端口(COM和LPT) 项下面显示USB-HID ->Comm Port(COM?)。
方法二:使用安装程序。
还没写-;)访问设备∙使用Windows APIo阻塞式读写comtst.co检测事件comevent.co适当的超时设置,可以实现有数据时ReadFile返回,无数据时阻塞。
o CommTimeOuts.ReadIntervalTimeout = 3;o CommTimeOuts.ReadTotalTimeoutMultiplier = 0;o CommTimeOuts.ReadTotalTimeoutConstant = 0;o CommTimeOuts.WriteTotalTimeoutMultiplier = 0;o CommTimeOuts.WriteTotalTimeoutConstant = 0;o bRc = SetCommTimeouts(hCommPort, &CommTimeOuts);∙MFC中使用MSComm控件1.VC6.0 Project菜单--->Add toProject--->Components and Controls--->RegisteredActiveX Controls,选择Components: MicrosoftCommunications Control 插入到当前的Workspace中。
WIN7下USB转串口驱动安装指导
以上所有资料为力天电子(LT)版权所有
4
WIN7 下 USB 转串口驱动安装指导
以上所有资料为力天电子(LT)版权所有
5
第三步: 右键单击桌面上的“计算机” ,
选择“属性” ,在弹出的界面中选择“设备管理器” ,如下图所示:
以上所有资料为力天电子(LT)版权所有
2
WIN7 下 USB 转串口驱动安装指导
第四步: 在设备管理器中能看到“端口(COM 和 LPT),单击这个,会出现如下图所示 ” 信息。这个在我的电脑上虚拟出的是 COM4,不同的电脑可能有所差异,有的可 能是 COM3,这个不是统一的。
以上所有资料为力天电子(LT)版权所有
1
WIN7 下 USB 转串口驱动安装指导 第一步: 右键单击 PL2303_Prolific_DriverInstaller_v110.exe
出现下图这个界面,选择以“管理员身份运行”
进入安装界面,接下来软件会自动安装到电脑中。
第二步: 安装完成后,通过 USB 线将 LT-SUPER51 和电脑连接起来,此时电脑右下角会 显示查找硬件和安装驱动程序,待安装完成之后,再进行如下操作来验证驱动程 序安装是否正确。
技
术
文
件
技术文件名称:WIN7 下 USB 转串口驱动安装指导 技术文件编号:<V1.0> 版 本:<V1.0>
拟 审 批
制 核 准
叶红渝 张 勇
力天电子
WIN7 下 USB 转串口驱动安装指导 修改记录
拟制人/ 文件编号 版本号 拟制/修改日期 修改人 叶红渝 2011-2-24 1.0 更改理由 主要更改内容 (写要点即可)
第五步: 右键单击下面的图标所示,选择“属性”
USB转串口线 驱动安装及使用说明
1.说明:下面的操作步骤只适用于UT-810型号的USB转串口黑色线缆;
2.安装驱动程序
⏹情况1:安装文件在光盘上,假设光盘的驱动符为E,点击E盘盘符,
依次进入下面的目录E:\USB 1.1 TO RS232 Cable\PC Driver\Setup;
⏹找到安装文件98ME_20011_2kXP_20024 Driver Installer.exe双击,系统
弹出下面的对话框;
⏹单击下一步后系统弹出,“InstallShield Wizard 完成”对话框,表明驱动
已经安装完成;
⏹情况2:如果98ME_20011_2kXP_20024 Driver Installer.exe文件在硬盘
或者U盘上,找到对应的目录双击即可完成安装;
3.插上串口线
4.检查USB转串口的串口编号
在进行串口扩展之后,用户在使用“一控多”功能之前,应该先检查该PC 上共有多少个串口设备,基本步骤如下:
⏹在系统桌面上,选择我的电脑,单击鼠标右键;
⏹选择我的属性,然后弹出“系统属性”窗口;
⏹在系统属性窗口中,点击“硬件”选项后单击“设备管理器”按钮,弹
出“设备管理器”对话框;
⏹单击“端口(COM和LPT)”弹出“设备管理器”的对话框;
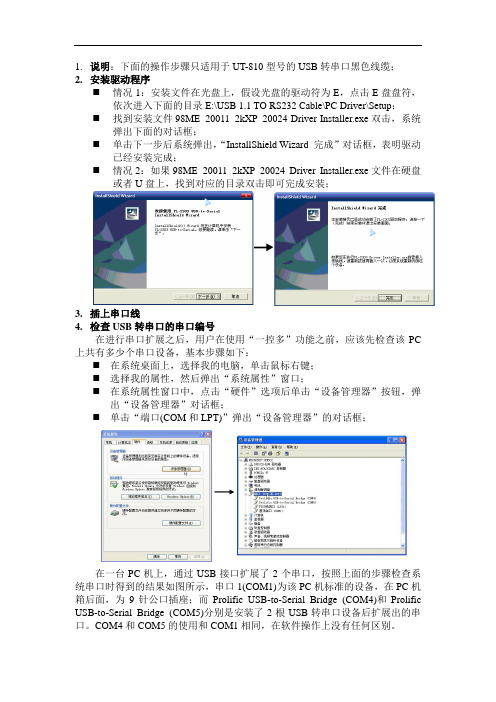
在一台PC机上,通过USB接口扩展了2个串口,按照上面的步骤检查系统串口时得到的结果如图所示,串口1(COM1)为该PC机标准的设备,在PC机箱后面,为9针公口插座;而Prolific USB-to-Serial Bridge (COM4)和Prolific USB-to-Serial Bridge (COM5)分别是安装了2根USB转串口设备后扩展出的串口。
COM4和COM5的使用和COM1相同,在软件操作上没有任何区别。
USB 转232串口线驱动安装及COM设置
USB 转232串口线驱动安装及COM设置USB 转232串口线驱动安装当你给笔记本接上USB 转232串口线后,桌面右下角将有如下提示,这表明系统已认出转接线,下面请安装USB 转232串口线驱动程序。
不久,系统将自动弹出如下对话框,先选择此项再单击请先选择“否,暂时不(T)”,再单击“下一步(N)”,然后出现下面的对话框,接下来,先选择“从列表或指定位置安装(高级)(S )”,再单击“下一步(N )”,然后出现下面的对话框,再先选择“在搜索中包括这个位置(O )”,再单击“浏览(R )”,然后出现下面对话框,先选择此项再单击再单击先选择选择驱动所在的文件夹再单击先选择驱动所在的文件夹,再单击“确定”,单击再单击“下一步”,然后出现下面的对话框,稍等一回,如果出现以下对话框,单击单击“仍然继续”,然后出现下面的对话框,稍等片刻,将出现以下对话框,单击单击“完成”,结束安装。
这时桌面右下角将有如下提示,这表明USB 转232串口线驱动已安装成功!COM设置鼠标右键单击桌面上“我的电脑”,在弹出的菜单中左键单击“管理(G)”,将看到如下对话框,选择左侧的“计算机管理(本地)”中的“系统工具”中的“设备管理器”,再选择“端口(COM和LPT)”,双击“USB2.0”或从右肩探出的对话框中选择“属性(R)”,将看到如下对话框,再弹出的对话框中,选择“端口设置”选项卡,将看到如下对话框,单击单击“高级(A)...”,将看到如下对话框,先单击下拉菜单再选择“COM1”先单击“COM端口号(P)”的下拉菜单,再选择“COM1”,然后一路点击“确定”,设备的COM就设置完毕了。
如果其它的设备占用了“COM1”,先用这个方法把那些设备的调成别的“COM”口,再把“COM1”预留出来,给此设备。
USB转串口使用手册
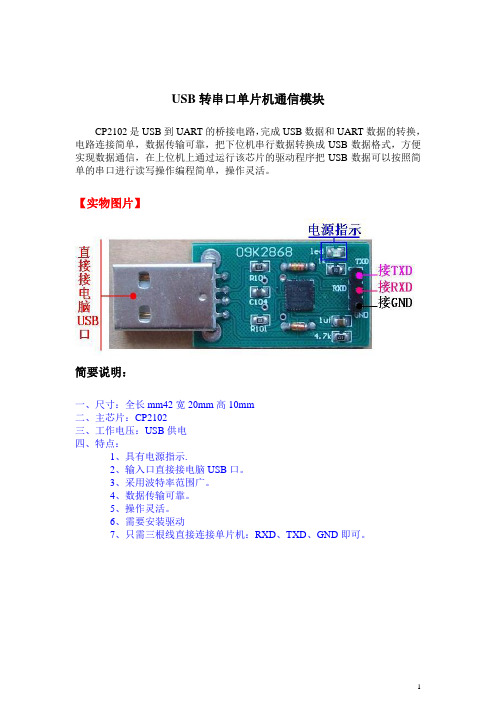
USB转串口单片机通信模块
CP2102是USB到UART的桥接电路,完成USB数据和UART数据的转换,电路连接简单,数据传输可靠,把下位机串行数据转换成USB数据格式,方便实现数据通信,在上位机上通过运行该芯片的驱动程序把USB数据可以按照简单的串口进行读写操作编程简单,操作灵活。
【实物图片】
简要说明:
一、尺寸:全长mm42宽20mm高10mm
二、主芯片:CP2102
三、工作电压:USB供电
四、特点:
1、具有电源指示.
2、输入口直接接电脑USB口。
3、采用波特率范围广。
4、数据传输可靠。
5、操作灵活。
6、需要安装驱动
7、只需三根线直接连接单片机:RXD、TXD、GND即可。
驱动安装:
1、将串口模块与计算机电脑连接,电脑提示;
2、电脑设备管理器出现下图(感叹号);
3、电脑自动弹出硬件安装向导;
4、如上图选择,然后,点击:“下一步”,提示下图,选择安装路
径;
5、点击“下一步,开始安装驱动程序;
6、提示安装完成,点击安装完成USB驱动。
7、系统再次提示安装硬件对话框,如下图操作;
8、如下图操作;
9、系统安装串行通信驱动;
10、完成安装!
串口通信测试
1、查看串口号;
2、打开串口调试工具;
3、选择与设备管理器对应的串口号;
4、将串口模块的输出端TXD、RXD端接,如下图;
5、点击串口工具“手动发送”按钮;
6、如果接收区,显示内容与发送去内容相同,证明串口模块可以
正常使用!。
usb转串口驱动有什么作用?怎么安装usb转串口驱动?
usb转串口驱动有什么作用?怎么安装usb转串口驱
动?
usb转串口驱动的作用
usb转串口驱动的作用是使usb转串口硬件能在连接到电脑usb接口上时被识别为串口设备,并分配相应的可用串口编号使用。
大部分新的笔记本没有提供串口,在使用一些程序如考勤打卡机、门禁读卡器等设备时,无法将这些设备的串口直接接到电脑上进行数据的传输,这种情况下就需要用到usb转串口转换接头,转换接头连接到电脑usb 接口上时,电脑会提示发现新硬件,并会弹出向导完成驱动的安装,只有驱动安装完毕了,才能正常使用。
驱动安装指南
一。
在在win98、winme、win2000、XP等系统中。
先下载相应的驱动程序,只需先双击driver里hidcominst程序,再插上串口线,系统即可自动完成安装。
在xp系统下,完成以上步骤后,有时在设备管理器里会出现人机学设备,此时需分别用右键点击此项下的两个选项的属性,选择属性里的驱动程序这一项,选择更新驱动程序这一项,选择:从列表或指定位置安装,单击下一步,选择:不要搜索,单击下一步,选择:从磁盘安装,再选。
USB转串口的驱动和下载说明
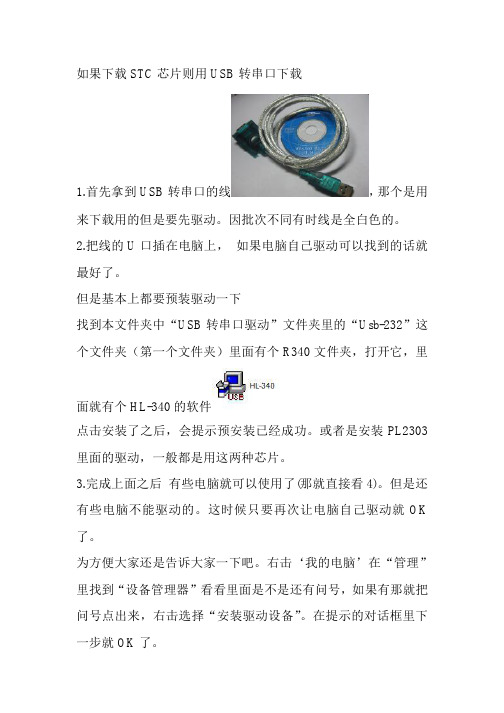
如果下载STC芯片则用USB转串口下载
1.首先拿到USB转串口的线,那个是用来下载用的但是要先驱动。
因批次不同有时线是全白色的。
2.把线的U口插在电脑上,如果电脑自己驱动可以找到的话就最好了。
但是基本上都要预装驱动一下
找到本文件夹中“USB转串口驱动”文件夹里的“Usb-232”这个文件夹(第一个文件夹)里面有个R340文件夹,打开它,里
面就有个HL-340的软件
点击安装了之后,会提示预安装已经成功。
或者是安装PL2303里面的驱动,一般都是用这两种芯片。
3.完成上面之后有些电脑就可以使用了(那就直接看4)。
但是还有些电脑不能驱动的。
这时候只要再次让电脑自己驱动就OK 了。
为方便大家还是告诉大家一下吧。
右击‘我的电脑’在“管理”里找到“设备管理器”看看里面是不是还有问号,如果有那就把问号点出来,右击选择“安装驱动设备”。
在提示的对话框里下一步就OK了。
4.在设备管理器里,找到看看是不是有提示CH340后面的(COM?)是几大家看上面图上就是COM9,这表示已经驱动成功。
5.在A盘中找到STC-ISP下载文件“MCU-板配资料”——“应
用软件”—。
串口转USB线驱动安装方法

串口转USB线驱动安装方法
串口转USB线需要安装驱动程序才能使用,我们以XP系统的电脑为例进行说明,WIN7系统与XP系统基本相同。
安装步骤如下:(1)打开资料中的“开发环境\串口转USB驱动\XP系统驱动”文件夹下的“HL-340.EXE”。
双击如下图所示。
点击“INSTALL”按钮,安装完成后出现如下图所示的图。
点击确定,完成驱动程序的安装。
将串口线插到电脑上,如果出现“找到新硬件向导”,选择自动安装即可。
安装之后,可以在设备管理器中看到串口线对应的端口号。
如下图所示。
其中COM4就是串口线对应的端口号。
特别注意:如果在WIN7系统下资料中的串口驱动程序不好用,读者可以自行在网上下载驱动。
方法很简单,在百度上搜索“CH340
驱动WIN7”等内容,一般很容易就可以找到可用的驱动。
USB串口转换器(Micro USB B类)2014.02 Rev. 1.01 产品说明书
USB Serial Converter (Micro USB B type)2014.02Rev. 1.01Contents1.Introduction (2)1-1. Overview (2)1-2. Package Contents (2)1-3. System Requirements and Restrictions (2)1-4. RS-232C connector Pin Assignment (3)2.Installation and Operation on Android OS (4)2-1. Installation of USB60Term application (4)2-2. How to operate USB60Term (5)3. Specifications (8)*All trademarks and logos are the properties of their respective holders. *The specifications and pictures are subject to change without notice.11.Introduction1-1. Overview● REX-USB60MB is a USB to serialconverter. Compatible with UniversalSerial Bus specifications Rev. 1.1.● Up to 230.4Kbps data transfer rate.●Micro USB (B type Male)Easy to connect Android tablet or smartphone.●Power/Transmit/Receive LED indicatorsfor monitoring communication status.1-2. Package ContentsThis product is shipped with the following items:● REX-USB60MB USB Serial Converter● Warranty Card in JapaneseNote: Not include the printed document of User’s manual and Software CD. 1-3. System Requirements and RestrictionsHost machine●Android tablet/smart phone with free Micro USB B type portOperating System● Android OS 3.2、Android OS 4.0 or laterNote:The Android driver software for this product is not provided from RATOC Systems, Inc.The FTDI Java D2xx for Android Library which is provided by FTDI Ltd, “D2xx.jar” works with this product.And we made the terminal application “USB60Term” using “D2xx.jar”, published at Google Play.21-4. RS-232C connector Pin AssignmentThe pin assignment of the connector is below:This DB9pin connector is compatible with ANSI/EIA/TIA-574 specifications.1 2 3 4 5Signal NameDirectionDTE – DCE. Meaning1 DCD <--- Data Carrier Detected2 RXD <--- ReceivedData3 TXD ---> TransmittedData4 DTR ---> Data Terminal Ready5 GND - SignalGround6 DSR <--- DataSetReady7 RTS ---> Request to Send8 CTS <--- Clear to Send9 RI <--- RingIndicator6 7 8 932. Installation and Operation on Android OS Please make sure that the Android tablet meets the following specifications: •USB port is Micro-USB B or AB•Android OS version is 3.2, 4.0 or later•USB Host mode is available2-1. Installation of USB60Term applicationDownload the terminal application “USB60Term” from Google Play.1) Start Google Play. Type “USB60” to the search box on Google Play.2) Select “USB60Term” from the search result, and install it.3) After USB60Term application is installed, connect USB Serial Converter. Then, the below window will show:Set the check to the checkbox “[ ] Useby default for this USB device”.If you set the uncheck to the abovecheckbox, the above popup windowshows up at each time attaching USBserial converter.4) Select “OK”, and then start USB60Term. The below window will show:After the USB Serial Converter is recognized, the “Connected” message shows up on the left of “USB Serial”. And then, it will be ready for use.42-2. How to operate USB60TermWhen the USB60Term starts, the below window will show:1Status of detecting USBSerial Converter Display the status of detecting USB SerialConverter, this status shows “Connected” or “Not connected”.2 “To setting” buttonThe button for changing serial parameter.After changing the parameter values, tap the“Configure” button to enable new values.3 Send data fieldAfter tapping this field, enter the send data.4 Receive data fieldDisplay the received data.The displayed data is holding till the “Clear ”buttonis tapped.5 Option menuOption menu shows up6 “Send” buttonTransmit the data of the “send data field “ 7 “Send with CR+LF” buttonTransmit the send data with CR code(0x0D) and LF code(0x0A) 8“new line [CR+LF]” checkbox Before transmitting the send data, an LF(0x0A)code in the send data will be replaced with the CR+LF(0x0D+0x0A) code.9 “Clear” buttonErase the data of the “Receive data field ” Option menuRTS_clear checkboxWhen checked the “RTS_clear” checkbox, then the RTS signal will be stable to clear (off). If unchecked this checkbox, the RTS signal will be unstable after opening serial port.5How to send dataWhen tapping the send data field, the software keyboard shows up. Then, enter the send data.You can set multiple lines with a new-line.After entering the send data, tap the “Send” button or the “Send with CR+LF” button at the upper-right of screen. Then, the send data will be transmitted.How to receive dataThe data from USB Serial Converter will be always received.And the received data will show at the “receive data field”.When tapping the “Clear” button, the data of the “Receive data field” will be erased.6How to change serial parameterAfter tapping the “To setting” button, you can change serial parameter values. When edit is ready, the “To setting” button will be changed to the “Configure” button. And the back-ground color of serial parameter values will be changed in light blue.Baud Rate Stop Bit Data Bit Parity Flow ControlAfter finishing editing the parameter values, tap the “Configure ” button for changing values.73. SpecificationsProduct Name REX-USB60MBSerial Input/Output level RS-232C levelUSB Specification USB(Universal Serial Bus) Specifications Rev. 1.1 Connector USB :Micro-USB B maleRS-232C:D-Sub9 male (with anchor [#4-40]) Number of I/O ports 1 portUnit Dimensions 3.35[L] x 1.1[W] x 0.43[H] in (85[L] x 28[W] x 11[H] mm) Cable Length Approx. 2.83 ft (85 cm)Weight 0.194 oz (55 g)Data transfer mode Asynchronous (Start stop synchronization)Data transfer Rate (Baud) 300/600/1,200/2,400/4,800/9,600/19,200/38,40057,600/115,200/230,400 bpsTransmit Distance Within 50ft (15m)Power Voltage DC+5V (Powered for USB Bus)Power Consumption Average: 36mA(5V) Max.: 60mA(5V)Serial Parameter Data bit: 7/8 Start bit:1 Stop bit: 1/2Parity bit: even/odd/noneRS-232C connector D-SUB9PIN RS-232C connector MaleANSI/EIA/TIA-574LED Indicators PWR:Power LEDIf 5V power from USB bus is properlysupplied from USB bus, this indicator LEDwill be on.TXD:Transmit data indicator (Host to Device)RXD:Receive data indicator (Device to Host) Operating Environment Temperature: 32ºF to 122ºF (0ºC to 50ºC)Humidity: 10 to 90% (non condensing)Storage Environment Temperature: -4ºF to 149ºF (-20ºC to 65ºC)Humidity: 10 to 90% (non condensing)Note:1.Do not remove while the application is communicating. System will beunstable.2.Do not operate to suspend while the application is communicating.System will be unable to resume properly.3.This product does not support the serial mouse for connecting to RS-232Cport.89。
USB转串口线HL-340驱动安装说明
USB USB转串口线转串口线转串口线HL HL HL--340340驱动驱动驱动
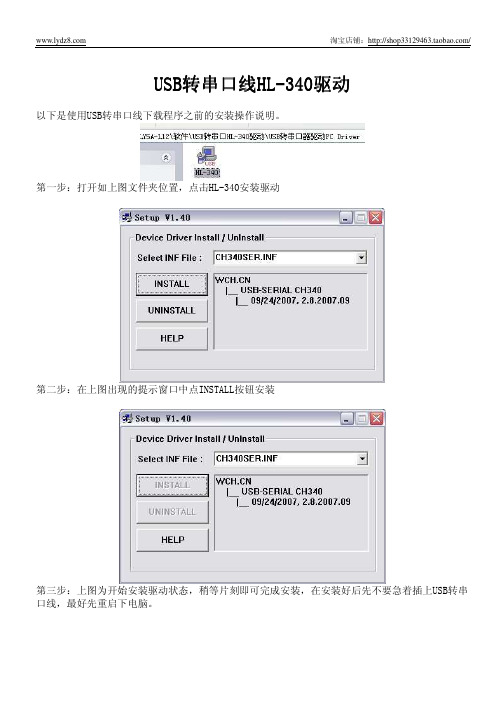
以下是使用USB转串口线下载程序之前的安装操作说明。
第一步:打开如上图文件夹位置,点击HL-340安装驱动
第二步:在上图出现的提示窗口中点INSTALL按钮安装
第三步:上图为开始安装驱动状态,稍等片刻即可完成安装,在安装好后先不要急着插上USB转串口线,最好先重启下电脑。
第四步:重启电脑后即可插上USB转串口线,电脑自动查找安装文件,等提示设备安装好可以使用后,进入设备管理器找到端口项,把前面的+号点开,如下图:
图中显示的USB转串口线CH340的端口号为COM6,此端口号是作者电脑系统自动分配的,不是每台电脑都一样,在没有必要的情况下也不需要去修改它,记住端口号即可。
到此USB转串口线驱动已正常安装结束。
chip
原帖由nongxiaoming发自:------------------------------------------------------------------------------------------------------------------------------------------驱动安装与平台的搭建本节我们主要学习如何安装ChipKIT Uno32的驱动以及开发平台Mpide的搭建,内容比较简单。
首先,我们先进行ChipKIT Uno32开发板USB转串口驱动的安装,将开发板通过USB 与电脑连接,电脑会提示发现硬件并安装驱动程序,笔者使用的是Windows 7 32位系统,所以本教程提到的都是针对Windows 7 32位系统安装驱动为例,其他系统可能略有不同。
等待系统在线搜索驱动,系统搜索到驱动后进行联网下载,下载完毕后开始安装,如下图:等待几分钟后,系统将安装驱动完成,如下图:此时说明安装完成,串口端口名称为COM17,打开我们的设备管理器在“端口”下面会看到我们的串口口端口“COM17”,如下图:这里的端口号是电脑自动分配的,不同电脑端口号可能不一样,请以实际为准。
如果你发现你的电脑不能正确的安装驱动,请登录一下网址下载驱动手动安装。
USB转串口驱动下载地址:/Drivers/VCP.htm打开USB转串口驱动下载网页后,会看到如下列表:请根据自己的电脑系统情况选择相应的驱动包进行安装。
接下来我们讲解如何搭建开发平台并开发我们的第一个程序。
首先,登录https:///chipKIT32/chipKIT32-MAX/downloads下载ChipKIT的开发平台Mpide,在下载页面上有如下列表:这里提供了多平台的Mpide下载,我们根据自己的电脑平台下载。
下载完Mpide的开发包后,将其解压并打卡文件夹:这里简要介绍几个比较有用的东西,drivers文件夹主要存放一些开发板硬件驱动程序,USB转串口驱动程序,examples文件夹主要存放一些开发示例,里面有很多可以参考的例子,hardware里面主要存放开发板的硬件信息,包括开发板的bootloader等,libraries 主要是存放一下开发板可使用的库,包括SPI,IIC,EEPROM等。
PL-2303 USB转串口适配器用户安装手册说明书
PL-2303 USB to Serial AdapterUser Installation Manual(For Vendor Reference Only)For Windows 98/ME/2000/XPRelease Version 1.0 (4/08/2002)ContentsIntroductionFeatures & SpecificationsSystem RequirementsInstalling the DeviceVerifying the InstallationUninstalling the DeviceDisclaimerIntroductionThe PL-2303 USB to Serial adapter is your smart and convenient accessory for connecting RS-232 serial devices to your USB-equipped Windows host computer. It provides a bridge connection with a standard DB 9-pin male serial port connector in one end and a standard Type-A USB plug connector on the other end. You simply attach the serial device onto the serial port of the cable and plug the USB connector into your PC USB port. It allows a simple and easy way of adding serial connections to your PC without having to go thru inserting a serial card and traditional port configuration.This USB to Serial adapter is ideal for connecting modems, cellular phones, PDAs, digital cameras, card readers and other serial devices to your computer. It provides serial connections up to 1Mbps of data transfer rate. And since USB does not require any IRQ resource, more devices can be attached to the system without the previous hassles of device and resource conflicts.Finally, the PL-2303 USB to Serial adapter is a fully USB Specification compliant device and therefore supports advanced power management such as suspend and resume operations as well as remote wakeup. The PL-2303 USB Serial cable adapter is designed to work on all Windows operating systems.Features & SpecificationsSmart USB to RS-232 (DB 9-pin male serial port) interfaceSupports various serial devices like modems, PDAs, cellular phones, digital cameras, card readers, and more.Easy Plug and Play InstallationFull Compliance with the Universal Serial Bus Specification v1.1Supports the standard RS-232 Serial InterfaceSupports automatic handshake modeOver 1Mbps data transfer rateSupports Remote Wake-up and Intelligent Power ManagementProvides Dual Buffers for upstream and downstream data transferNo IRQ resource requiredBus Powered – no separate power supply or battery requiredDimensions L x W x H: _________ (mm)Weight: ____grams (approximate)System RequirementsWindow s 98, Windows ME, Windows 2000, or Windows XP operating system AMD or Intel Pentium 133MHz or better based computerUSB 1.1 or higher portUSB to RS-232 (Serial Port) Cable AdapterUSB to RS-232 Driver Utility DiskInstalling the DeviceThis section will guide you on how to install the PL-2303 USB to Serial adapter under Windows XP, Windows 2000, Windows ME, and Windows 98 operating systems.Note:Before you plug in the USB to Serial adapter for the first time, make sure that you do not attach any serial device first to the adapter. You must only plug in the USB to Serial adapter itself.The following steps will show how to install the device under Windows XP. Basically, the procedures are also somewhat the same for other Windows operating systems.1. Power on your computer and boot to Windows.2. Locate the USB port of your computer and plug in the USB to Serial adapter.3. Windows will detect the new device and will initiate the Found New HardwareWizard prompting you to install the software for the detected USB Device.Select to install from a list or specific location. Click Next to continue.4. When prompted for the driver location of the device, click Browse and refer tothe USB to Serial driver disk or folder drive. Click Next to continue.5. Windows should detect the driver as Prolific USB-to-Serial Comm Port. BeforeWindows installs this, it may prompt you that this device driver has not yet passed Windows XP Logo compatibility. Click Continue Anyway.6. Windows will then start to install the driver for the USB-to-Serial Comm Port.Once installation is complete, Windows will prompt you that it has finished installing the software. Click Finish to continue.Verifying the InstallationThis section will guide you on how to verify if the PL-2303 USB to Serial adapter was properly installed. You will also need to determine the COM port assignment made by Windows for the USB to Serial adapter.Note:Before you plug in the USB to Serial adapter for the first time, make sure that you do not attach any serial device first to the adapter. You must only plug in the USB to Serial adapter itself.To verify if the device is properly installed and determine the COM port assignment of the device:1. Click Start Control Panel System. Inside System Properties, click onDevice Manager. Double-click on Ports (COM & LPT1). You should see theProlific USB-to-Serial Comm Port (COM3) device listing. This also means that Windows has assigned the device to COM3 port.Note:The COM port assignment of the USB to Serial adapter varies on yourcomputer hardware configuration. Windows will check what COM port are unused or free in your computer and assigns that port number to the device.2. If you want to assign the COM Port of the device to another port number, you candouble-click on the device (Prolific USB-to-Serial Comm Port) to view properties.3. Inside the USB-to-Serial Comm Port Properties, click on the Port Settings tab.Click on the Advanced button.4. Inside the Advanced Settings, click on the COM Port Number and check whatother port numbers are unused. If it so happens that Windows assigned a COM5 to the device, you may try to reassign it to a lower unused port number. Click OK when finished. Try running HyperTerminal to test if the new port number is OK.Note:Some software programs may only support up to COM4 and may not work if the port is assigned to COM5 or higher.5. Once you have verified the device to be properly installed, you may now proceedto using the USB to Serial adapter in connecting to serial devices. Attached the serial device to the serial port of the adapter and then plug in the USB connector to the USB port of your computer. Use the supplied driver of the serial device if needed.Uninstalling the Device DriverIt is easy to uninstall the USB to Serial device driver:1. Run the DRemover98_2K.exe UnInstall program found on your driver utility CDor diskette.2. The uninstall program will then prompt you if you want to remove the utilityprogram. Click OK to continue.3. After uninstall is complete, the program will prompt you to restart Windows.Click Yes to continue. Make sure you remove the diskette from floppy drive.4. Windows will also show a dialog box that the driver was removed successfully.Wait for Windows to restart your computer.DisclaimerInformation in this document is subject to change without notice. The manufacturer does not make any representations or warranties (implied or otherwise) regarding the accuracy and completeness of this document and shall in no event be liable for any loss of profit or any other commercial damage, including but not limited to special, incidental, consequential, or other damages.No part of this document may be reproduced or transmitted in any form by any means without the express written permission of the manufacturer.All brand names and product names used in this document are trademarks or registered trademarks of their respective holders.。
usb 转串口驱动程序
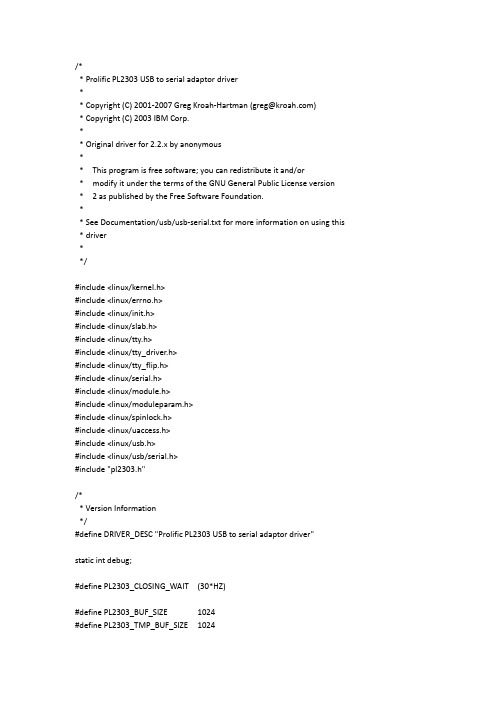
* Prolific PL2303 USB to serial adaptor driver** Copyright (C) 2001-2007 Greg Kroah-Hartman (greg@)* Copyright (C) 2003 IBM Corp.** Original driver for 2.2.x by anonymous** This program is free software; you can redistribute it and/or* modify it under the terms of the GNU General Public License version * 2 as published by the Free Software Foundation.** See Documentation/usb/usb-serial.txt for more information on using this * driver**/#include <linux/kernel.h>#include <linux/errno.h>#include <linux/init.h>#include <linux/slab.h>#include <linux/tty.h>#include <linux/tty_driver.h>#include <linux/tty_flip.h>#include <linux/serial.h>#include <linux/module.h>#include <linux/moduleparam.h>#include <linux/spinlock.h>#include <linux/uaccess.h>#include <linux/usb.h>#include <linux/usb/serial.h>#include "pl2303.h"/** Version Information*/#define DRIVER_DESC "Prolific PL2303 USB to serial adaptor driver"static int debug;#define PL2303_CLOSING_WAIT (30*HZ)#define PL2303_BUF_SIZE 1024#define PL2303_TMP_BUF_SIZE 1024struct pl2303_buf {unsigned int buf_size;char *buf_buf;char *buf_get;char *buf_put;};static struct usb_device_id id_table [] = {{ USB_DEVICE(PL2303_VENDOR_ID, PL2303_PRODUCT_ID) },{ USB_DEVICE(PL2303_VENDOR_ID, PL2303_PRODUCT_ID_RSAQ2) },{ USB_DEVICE(PL2303_VENDOR_ID, PL2303_PRODUCT_ID_DCU11) },{ USB_DEVICE(PL2303_VENDOR_ID, PL2303_PRODUCT_ID_RSAQ3) },{ USB_DEVICE(PL2303_VENDOR_ID, PL2303_PRODUCT_ID_PHAROS) },{ USB_DEVICE(PL2303_VENDOR_ID, PL2303_PRODUCT_ID_ALDIGA) },{ USB_DEVICE(PL2303_VENDOR_ID, PL2303_PRODUCT_ID_MMX) },{ USB_DEVICE(PL2303_VENDOR_ID, PL2303_PRODUCT_ID_GPRS) },{ USB_DEVICE(IODATA_VENDOR_ID, IODATA_PRODUCT_ID) },{ USB_DEVICE(IODATA_VENDOR_ID, IODATA_PRODUCT_ID_RSAQ5) },{ USB_DEVICE(ATEN_VENDOR_ID, ATEN_PRODUCT_ID) },{ USB_DEVICE(ATEN_VENDOR_ID2, ATEN_PRODUCT_ID) },{ USB_DEVICE(ELCOM_VENDOR_ID, ELCOM_PRODUCT_ID) },{ USB_DEVICE(ELCOM_VENDOR_ID, ELCOM_PRODUCT_ID_UCSGT) },{ USB_DEVICE(ITEGNO_VENDOR_ID, ITEGNO_PRODUCT_ID) },{ USB_DEVICE(ITEGNO_VENDOR_ID, ITEGNO_PRODUCT_ID_2080) },{ USB_DEVICE(MA620_VENDOR_ID, MA620_PRODUCT_ID) },{ USB_DEVICE(RATOC_VENDOR_ID, RATOC_PRODUCT_ID) },{ USB_DEVICE(TRIPP_VENDOR_ID, TRIPP_PRODUCT_ID) },{ USB_DEVICE(RADIOSHACK_VENDOR_ID, RADIOSHACK_PRODUCT_ID) },{ USB_DEVICE(DCU10_VENDOR_ID, DCU10_PRODUCT_ID) },{ USB_DEVICE(SITECOM_VENDOR_ID, SITECOM_PRODUCT_ID) },{ USB_DEVICE(ALCATEL_VENDOR_ID, ALCATEL_PRODUCT_ID) },{ USB_DEVICE(SAMSUNG_VENDOR_ID, SAMSUNG_PRODUCT_ID) },{ USB_DEVICE(SIEMENS_VENDOR_ID, SIEMENS_PRODUCT_ID_SX1) },{ USB_DEVICE(SIEMENS_VENDOR_ID, SIEMENS_PRODUCT_ID_X65) },{ USB_DEVICE(SIEMENS_VENDOR_ID, SIEMENS_PRODUCT_ID_X75) },{ USB_DEVICE(SIEMENS_VENDOR_ID, SIEMENS_PRODUCT_ID_EF81) },{ USB_DEVICE(SYNTECH_VENDOR_ID, SYNTECH_PRODUCT_ID) },{ USB_DEVICE(NOKIA_CA42_VENDOR_ID, NOKIA_CA42_PRODUCT_ID) },{ USB_DEVICE(CA_42_CA42_VENDOR_ID, CA_42_CA42_PRODUCT_ID) },{ USB_DEVICE(SAGEM_VENDOR_ID, SAGEM_PRODUCT_ID) },{ USB_DEVICE(LEADTEK_VENDOR_ID, LEADTEK_9531_PRODUCT_ID) },{ USB_DEVICE(SPEEDDRAGON_VENDOR_ID, SPEEDDRAGON_PRODUCT_ID) }, { USB_DEVICE(DATAPILOT_U2_VENDOR_ID, DATAPILOT_U2_PRODUCT_ID) },{ USB_DEVICE(BELKIN_VENDOR_ID, BELKIN_PRODUCT_ID) },{ USB_DEVICE(ALCOR_VENDOR_ID, ALCOR_PRODUCT_ID) },{ USB_DEVICE(WS002IN_VENDOR_ID, WS002IN_PRODUCT_ID) }, { USB_DEVICE(COREGA_VENDOR_ID, COREGA_PRODUCT_ID) },{ USB_DEVICE(YCCABLE_VENDOR_ID, YCCABLE_PRODUCT_ID) }, { USB_DEVICE(SUPERIAL_VENDOR_ID, SUPERIAL_PRODUCT_ID) }, { USB_DEVICE(HP_VENDOR_ID, HP_LD220_PRODUCT_ID) },{ } /* Terminating entry */};MODULE_DEVICE_TABLE(usb, id_table);static struct usb_driver pl2303_driver = {.name = "pl2303",.probe = usb_serial_probe,.disconnect = usb_serial_disconnect,.id_table = id_table,.suspend = usb_serial_suspend,.resume = usb_serial_resume,.no_dynamic_id = 1,.supports_autosuspend = 1,};#define SET_LINE_REQUEST_TYPE 0x21#define SET_LINE_REQUEST 0x20#define SET_CONTROL_REQUEST_TYPE 0x21#define SET_CONTROL_REQUEST 0x22#define CONTROL_DTR 0x01#define CONTROL_RTS 0x02#define BREAK_REQUEST_TYPE 0x21#define BREAK_REQUEST 0x23#define BREAK_ON 0xffff#define BREAK_OFF 0x0000#define GET_LINE_REQUEST_TYPE 0xa1#define GET_LINE_REQUEST 0x21#define VENDOR_WRITE_REQUEST_TYPE 0x40#define VENDOR_WRITE_REQUEST 0x01#define VENDOR_READ_REQUEST_TYPE 0xc0#define VENDOR_READ_REQUEST 0x01#define UART_STATE 0x08#define UART_STATE_TRANSIENT_MASK 0x74#define UART_DCD 0x01#define UART_DSR 0x02#define UART_BREAK_ERROR 0x04#define UART_RING 0x08#define UART_FRAME_ERROR 0x10#define UART_PARITY_ERROR 0x20#define UART_OVERRUN_ERROR 0x40#define UART_CTS 0x80enum pl2303_type {type_0, /* don't know the difference between type 0 and */ type_1, /* type 1, until someone from prolific tells us... */HX, /* HX version of the pl2303 chip */};struct pl2303_private {spinlock_t lock;struct pl2303_buf *buf;int write_urb_in_use;wait_queue_head_t delta_msr_wait;u8 line_control;u8 line_status;enum pl2303_type type;};/** pl2303_buf_alloc** Allocate a circular buffer and all associated memory.*/static struct pl2303_buf *pl2303_buf_alloc(unsigned int size){struct pl2303_buf *pb;if (size == 0)return NULL;pb = kmalloc(sizeof(struct pl2303_buf), GFP_KERNEL);if (pb == NULL)return NULL;pb->buf_buf = kmalloc(size, GFP_KERNEL);if (pb->buf_buf == NULL) {kfree(pb);return NULL;}pb->buf_size = size;pb->buf_get = pb->buf_put = pb->buf_buf;return pb;}/** pl2303_buf_free** Free the buffer and all associated memory.*/static void pl2303_buf_free(struct pl2303_buf *pb){if (pb) {kfree(pb->buf_buf);kfree(pb);}}/** pl2303_buf_clear** Clear out all data in the circular buffer.*/static void pl2303_buf_clear(struct pl2303_buf *pb){if (pb != NULL)pb->buf_get = pb->buf_put;/* equivalent to a get of all data available */}/** pl2303_buf_data_avail** Return the number of bytes of data available in the circular * buffer.*/static unsigned int pl2303_buf_data_avail(struct pl2303_buf *pb){if (pb == NULL)return 0;return (pb->buf_size + pb->buf_put - pb->buf_get) % pb->buf_size;}/** pl2303_buf_space_avail** Return the number of bytes of space available in the circular* buffer.*/static unsigned int pl2303_buf_space_avail(struct pl2303_buf *pb){if (pb == NULL)return 0;return (pb->buf_size + pb->buf_get - pb->buf_put - 1) % pb->buf_size; }/** pl2303_buf_put** Copy data data from a user buffer and put it into the circular buffer.* Restrict to the amount of space available.** Return the number of bytes copied.*/static unsigned int pl2303_buf_put(struct pl2303_buf *pb, const char *buf,unsigned int count){unsigned int len;if (pb == NULL)return 0;len = pl2303_buf_space_avail(pb);if (count > len)count = len;if (count == 0)return 0;len = pb->buf_buf + pb->buf_size - pb->buf_put;if (count > len) {memcpy(pb->buf_put, buf, len);memcpy(pb->buf_buf, buf+len, count - len);pb->buf_put = pb->buf_buf + count - len;} else {memcpy(pb->buf_put, buf, count);if (count < len)pb->buf_put += count;else /* count == len */pb->buf_put = pb->buf_buf;}return count;}/** pl2303_buf_get** Get data from the circular buffer and copy to the given buffer.* Restrict to the amount of data available.** Return the number of bytes copied.*/static unsigned int pl2303_buf_get(struct pl2303_buf *pb, char *buf,unsigned int count){unsigned int len;if (pb == NULL)return 0;len = pl2303_buf_data_avail(pb);if (count > len)count = len;if (count == 0)return 0;len = pb->buf_buf + pb->buf_size - pb->buf_get;if (count > len) {memcpy(buf, pb->buf_get, len);memcpy(buf+len, pb->buf_buf, count - len);pb->buf_get = pb->buf_buf + count - len;} else {memcpy(buf, pb->buf_get, count);if (count < len)pb->buf_get += count;else /* count == len */pb->buf_get = pb->buf_buf;}return count;}static int pl2303_vendor_read(__u16 value, __u16 index,struct usb_serial *serial, unsigned char *buf){int res = usb_control_msg(serial->dev, usb_rcvctrlpipe(serial->dev, 0), VENDOR_READ_REQUEST, VENDOR_READ_REQUEST_TYPE,value, index, buf, 1, 100);dbg("0x%x:0x%x:0x%x:0x%x %d - %x", VENDOR_READ_REQUEST_TYPE, VENDOR_READ_REQUEST, value, index, res, buf[0]);return res;}static int pl2303_vendor_write(__u16 value, __u16 index,struct usb_serial *serial){int res = usb_control_msg(serial->dev, usb_sndctrlpipe(serial->dev, 0), VENDOR_WRITE_REQUEST, VENDOR_WRITE_REQUEST_TYPE,value, index, NULL, 0, 100);dbg("0x%x:0x%x:0x%x:0x%x %d", VENDOR_WRITE_REQUEST_TYPE, VENDOR_WRITE_REQUEST, value, index, res);return res;}static int pl2303_startup(struct usb_serial *serial){struct pl2303_private *priv;enum pl2303_type type = type_0;unsigned char *buf;int i;buf = kmalloc(10, GFP_KERNEL);if (buf == NULL)return -ENOMEM;if (serial->dev->descriptor.bDeviceClass == 0x02)type = type_0;else if (serial->dev->descriptor.bMaxPacketSize0 == 0x40) type = HX;else if (serial->dev->descriptor.bDeviceClass == 0x00) type = type_1;else if (serial->dev->descriptor.bDeviceClass == 0xFF) type = type_1;dbg("device type: %d", type);for (i = 0; i < serial->num_ports; ++i) {priv = kzalloc(sizeof(struct pl2303_private), GFP_KERNEL);if (!priv)goto cleanup;spin_lock_init(&priv->lock);priv->buf = pl2303_buf_alloc(PL2303_BUF_SIZE);if (priv->buf == NULL) {kfree(priv);goto cleanup;}init_waitqueue_head(&priv->delta_msr_wait);priv->type = type;usb_set_serial_port_data(serial->port[i], priv);}pl2303_vendor_read(0x8484, 0, serial, buf);pl2303_vendor_write(0x0404, 0, serial);pl2303_vendor_read(0x8484, 0, serial, buf);pl2303_vendor_read(0x8383, 0, serial, buf);pl2303_vendor_read(0x8484, 0, serial, buf);pl2303_vendor_write(0x0404, 1, serial);pl2303_vendor_read(0x8484, 0, serial, buf);pl2303_vendor_read(0x8383, 0, serial, buf);pl2303_vendor_write(0, 1, serial);pl2303_vendor_write(1, 0, serial);if (type == HX)pl2303_vendor_write(2, 0x44, serial);elsepl2303_vendor_write(2, 0x24, serial);kfree(buf);return 0;cleanup:kfree(buf);for (--i; i >= 0; --i) {priv = usb_get_serial_port_data(serial->port[i]);pl2303_buf_free(priv->buf);kfree(priv);usb_set_serial_port_data(serial->port[i], NULL);}return -ENOMEM;}static int set_control_lines(struct usb_device *dev, u8 value){int retval;retval = usb_control_msg(dev, usb_sndctrlpipe(dev, 0),SET_CONTROL_REQUEST, SET_CONTROL_REQUEST_TYPE,value, 0, NULL, 0, 100);dbg("%s - value = %d, retval = %d", __func__, value, retval);return retval;}static void pl2303_send(struct usb_serial_port *port){int count, result;struct pl2303_private *priv = usb_get_serial_port_data(port);unsigned long flags;dbg("%s - port %d", __func__, port->number);spin_lock_irqsave(&priv->lock, flags);if (priv->write_urb_in_use) {spin_unlock_irqrestore(&priv->lock, flags);return;}count = pl2303_buf_get(priv->buf, port->write_urb->transfer_buffer,port->bulk_out_size);if (count == 0) {spin_unlock_irqrestore(&priv->lock, flags);return;}priv->write_urb_in_use = 1;spin_unlock_irqrestore(&priv->lock, flags);usb_serial_debug_data(debug, &port->dev, __func__, count,port->write_urb->transfer_buffer);port->write_urb->transfer_buffer_length = count;port->write_urb->dev = port->serial->dev;result = usb_submit_urb(port->write_urb, GFP_ATOMIC);if (result) {dev_err(&port->dev, "%s - failed submitting write urb,"" error %d\n", __func__, result);priv->write_urb_in_use = 0;/* TODO: reschedule pl2303_send */}usb_serial_port_softint(port);}static int pl2303_write(struct tty_struct *tty, struct usb_serial_port *port,const unsigned char *buf, int count){struct pl2303_private *priv = usb_get_serial_port_data(port);unsigned long flags;dbg("%s - port %d, %d bytes", __func__, port->number, count);if (!count)return count;spin_lock_irqsave(&priv->lock, flags);count = pl2303_buf_put(priv->buf, buf, count);spin_unlock_irqrestore(&priv->lock, flags);pl2303_send(port);return count;}static int pl2303_write_room(struct tty_struct *tty){struct usb_serial_port *port = tty->driver_data;struct pl2303_private *priv = usb_get_serial_port_data(port);int room = 0;unsigned long flags;dbg("%s - port %d", __func__, port->number);spin_lock_irqsave(&priv->lock, flags);room = pl2303_buf_space_avail(priv->buf);spin_unlock_irqrestore(&priv->lock, flags);dbg("%s - returns %d", __func__, room);return room;}static int pl2303_chars_in_buffer(struct tty_struct *tty){struct usb_serial_port *port = tty->driver_data;struct pl2303_private *priv = usb_get_serial_port_data(port);int chars = 0;unsigned long flags;dbg("%s - port %d", __func__, port->number);spin_lock_irqsave(&priv->lock, flags);chars = pl2303_buf_data_avail(priv->buf);spin_unlock_irqrestore(&priv->lock, flags);dbg("%s - returns %d", __func__, chars);return chars;}static void pl2303_set_termios(struct tty_struct *tty,struct usb_serial_port *port, struct ktermios *old_termios) {struct usb_serial *serial = port->serial;struct pl2303_private *priv = usb_get_serial_port_data(port);unsigned long flags;unsigned int cflag;unsigned char *buf;int baud;int i;u8 control;dbg("%s - port %d", __func__, port->number);/* The PL2303 is reported to lose bytes if you change serial settings even to the same values as before. Thuswe actually need to filter in this specific case */if (!tty_termios_hw_change(tty->termios, old_termios)) return;cflag = tty->termios->c_cflag;buf = kzalloc(7, GFP_KERNEL);if (!buf) {dev_err(&port->dev, "%s - out of memory.\n", __func__);/* Report back no change occurred */*tty->termios = *old_termios;return;}i = usb_control_msg(serial->dev, usb_rcvctrlpipe(serial->dev, 0),GET_LINE_REQUEST, GET_LINE_REQUEST_TYPE,0, 0, buf, 7, 100);dbg("0xa1:0x21:0:0 %d - %x %x %x %x %x %x %x", i, buf[0], buf[1], buf[2], buf[3], buf[4], buf[5], buf[6]);if (cflag & CSIZE) {switch (cflag & CSIZE) {case CS5:buf[6] = 5;break;case CS6:buf[6] = 6;break;case CS7:buf[6] = 7;break;default:case CS8:buf[6] = 8;break;}dbg("%s - data bits = %d", __func__, buf[6]);}baud = tty_get_baud_rate(tty);dbg("%s - baud = %d", __func__, baud);if (baud) {buf[0] = baud & 0xff;buf[1] = (baud >> 8) & 0xff;buf[2] = (baud >> 16) & 0xff;buf[3] = (baud >> 24) & 0xff;}/* For reference buf[4]=0 is 1 stop bits *//* For reference buf[4]=1 is 1.5 stop bits *//* For reference buf[4]=2 is 2 stop bits */if (cflag & CSTOPB) {buf[4] = 2;dbg("%s - stop bits = 2", __func__);} else {buf[4] = 0;dbg("%s - stop bits = 1", __func__);}if (cflag & PARENB) {/* For reference buf[5]=0 is none parity *//* For reference buf[5]=1 is odd parity *//* For reference buf[5]=2 is even parity *//* For reference buf[5]=3 is mark parity *//* For reference buf[5]=4 is space parity */if (cflag & PARODD) {buf[5] = 1;dbg("%s - parity = odd", __func__);} else {buf[5] = 2;dbg("%s - parity = even", __func__);}} else {buf[5] = 0;dbg("%s - parity = none", __func__);}i = usb_control_msg(serial->dev, usb_sndctrlpipe(serial->dev, 0),SET_LINE_REQUEST, SET_LINE_REQUEST_TYPE,0, 0, buf, 7, 100);dbg("0x21:0x20:0:0 %d", i);/* change control lines if we are switching to or from B0 */ spin_lock_irqsave(&priv->lock, flags);control = priv->line_control;if ((cflag & CBAUD) == B0)priv->line_control &= ~(CONTROL_DTR | CONTROL_RTS);elsepriv->line_control |= (CONTROL_DTR | CONTROL_RTS);if (control != priv->line_control) {control = priv->line_control;spin_unlock_irqrestore(&priv->lock, flags);set_control_lines(serial->dev, control);} else {spin_unlock_irqrestore(&priv->lock, flags);}buf[0] = buf[1] = buf[2] = buf[3] = buf[4] = buf[5] = buf[6] = 0;i = usb_control_msg(serial->dev, usb_rcvctrlpipe(serial->dev, 0),GET_LINE_REQUEST, GET_LINE_REQUEST_TYPE,0, 0, buf, 7, 100);dbg("0xa1:0x21:0:0 %d - %x %x %x %x %x %x %x", i,buf[0], buf[1], buf[2], buf[3], buf[4], buf[5], buf[6]);if (cflag & CRTSCTS) {if (priv->type == HX)pl2303_vendor_write(0x0, 0x61, serial);elsepl2303_vendor_write(0x0, 0x41, serial);} else {pl2303_vendor_write(0x0, 0x0, serial);}/* FIXME: Need to read back resulting baud rate */if (baud)tty_encode_baud_rate(tty, baud, baud);kfree(buf);}static void pl2303_close(struct tty_struct *tty,struct usb_serial_port *port, struct file *filp){struct pl2303_private *priv = usb_get_serial_port_data(port);unsigned long flags;unsigned int c_cflag;int bps;long timeout;wait_queue_t wait;dbg("%s - port %d", __func__, port->number);/* wait for data to drain from the buffer */spin_lock_irqsave(&priv->lock, flags);timeout = PL2303_CLOSING_WAIT;init_waitqueue_entry(&wait, current);add_wait_queue(&tty->write_wait, &wait);for (;;) {set_current_state(TASK_INTERRUPTIBLE);if (pl2303_buf_data_avail(priv->buf) == 0 ||timeout == 0 || signal_pending(current) ||port->serial->disconnected)break;spin_unlock_irqrestore(&priv->lock, flags);timeout = schedule_timeout(timeout);spin_lock_irqsave(&priv->lock, flags);}set_current_state(TASK_RUNNING);remove_wait_queue(&tty->write_wait, &wait);/* clear out any remaining data in the buffer */pl2303_buf_clear(priv->buf);spin_unlock_irqrestore(&priv->lock, flags);/* wait for characters to drain from the device *//* (this is long enough for the entire 256 byte *//* pl2303 hardware buffer to drain with no flow *//* control for data rates of 1200 bps or more, *//* for lower rates we should really know how much */ /* data is in the buffer to compute a delay *//* that is not unnecessarily long) */bps = tty_get_baud_rate(tty);if (bps > 1200)timeout = max((HZ*2560)/bps, HZ/10);elsetimeout = 2*HZ;schedule_timeout_interruptible(timeout);/* shutdown our urbs */dbg("%s - shutting down urbs", __func__);usb_kill_urb(port->write_urb);usb_kill_urb(port->read_urb);usb_kill_urb(port->interrupt_in_urb);if (tty) {c_cflag = tty->termios->c_cflag;if (c_cflag & HUPCL) {/* drop DTR and RTS */spin_lock_irqsave(&priv->lock, flags);priv->line_control = 0;spin_unlock_irqrestore(&priv->lock, flags);set_control_lines(port->serial->dev, 0);}}}static int pl2303_open(struct tty_struct *tty,struct usb_serial_port *port, struct file *filp){struct ktermios tmp_termios;struct usb_serial *serial = port->serial;struct pl2303_private *priv = usb_get_serial_port_data(port);int result;dbg("%s - port %d", __func__, port->number);if (priv->type != HX) {usb_clear_halt(serial->dev, port->write_urb->pipe);usb_clear_halt(serial->dev, port->read_urb->pipe);} else {/* reset upstream data pipes */pl2303_vendor_write(8, 0, serial);pl2303_vendor_write(9, 0, serial);}/* Setup termios */if (tty)pl2303_set_termios(tty, port, &tmp_termios);/* FIXME: need to assert RTS and DTR if CRTSCTS off */dbg("%s - submitting read urb", __func__);port->read_urb->dev = serial->dev;result = usb_submit_urb(port->read_urb, GFP_KERNEL);if (result) {dev_err(&port->dev, "%s - failed submitting read urb,"" error %d\n", __func__, result);pl2303_close(tty, port, NULL);return -EPROTO;}dbg("%s - submitting interrupt urb", __func__);port->interrupt_in_urb->dev = serial->dev;result = usb_submit_urb(port->interrupt_in_urb, GFP_KERNEL);if (result) {dev_err(&port->dev, "%s - failed submitting interrupt urb,"" error %d\n", __func__, result);pl2303_close(tty, port, NULL);return -EPROTO;}return 0;}static int pl2303_tiocmset(struct tty_struct *tty, struct file *file,unsigned int set, unsigned int clear){struct usb_serial_port *port = tty->driver_data;struct pl2303_private *priv = usb_get_serial_port_data(port);unsigned long flags;u8 control;if (!usb_get_intfdata(port->serial->interface))return -ENODEV;spin_lock_irqsave(&priv->lock, flags);if (set & TIOCM_RTS)priv->line_control |= CONTROL_RTS;if (set & TIOCM_DTR)priv->line_control |= CONTROL_DTR;if (clear & TIOCM_RTS)priv->line_control &= ~CONTROL_RTS;if (clear & TIOCM_DTR)priv->line_control &= ~CONTROL_DTR;control = priv->line_control;spin_unlock_irqrestore(&priv->lock, flags);return set_control_lines(port->serial->dev, control);}static int pl2303_tiocmget(struct tty_struct *tty, struct file *file){struct usb_serial_port *port = tty->driver_data;struct pl2303_private *priv = usb_get_serial_port_data(port);unsigned long flags;unsigned int mcr;unsigned int status;unsigned int result;dbg("%s (%d)", __func__, port->number);if (!usb_get_intfdata(port->serial->interface))return -ENODEV;spin_lock_irqsave(&priv->lock, flags);mcr = priv->line_control;status = priv->line_status;spin_unlock_irqrestore(&priv->lock, flags);result = ((mcr & CONTROL_DTR) ? TIOCM_DTR : 0)| ((mcr & CONTROL_RTS) ? TIOCM_RTS : 0)| ((status & UART_CTS) ? TIOCM_CTS : 0)| ((status & UART_DSR) ? TIOCM_DSR : 0)| ((status & UART_RING) ? TIOCM_RI : 0)| ((status & UART_DCD) ? TIOCM_CD : 0);dbg("%s - result = %x", __func__, result);return result;}static int wait_modem_info(struct usb_serial_port *port, unsigned int arg) {struct pl2303_private *priv = usb_get_serial_port_data(port);unsigned long flags;unsigned int prevstatus;unsigned int status;unsigned int changed;spin_lock_irqsave(&priv->lock, flags);prevstatus = priv->line_status;spin_unlock_irqrestore(&priv->lock, flags);while (1) {interruptible_sleep_on(&priv->delta_msr_wait);/* see if a signal did it */if (signal_pending(current))return -ERESTARTSYS;spin_lock_irqsave(&priv->lock, flags);status = priv->line_status;spin_unlock_irqrestore(&priv->lock, flags);changed = prevstatus ^ status;if (((arg & TIOCM_RNG) && (changed & UART_RING)) || ((arg & TIOCM_DSR) && (changed & UART_DSR)) ||((arg & TIOCM_CD) && (changed & UART_DCD)) ||((arg & TIOCM_CTS) && (changed & UART_CTS))) {return 0;}prevstatus = status;}/* NOTREACHED */return 0;}static int pl2303_ioctl(struct tty_struct *tty, struct file *file,unsigned int cmd, unsigned long arg){struct usb_serial_port *port = tty->driver_data;dbg("%s (%d) cmd = 0x%04x", __func__, port->number, cmd);switch (cmd) {case TIOCMIWAIT:dbg("%s (%d) TIOCMIWAIT", __func__, port->number);return wait_modem_info(port, arg);default:dbg("%s not supported = 0x%04x", __func__, cmd);break;}return -ENOIOCTLCMD;}static void pl2303_break_ctl(struct tty_struct *tty, int break_state) {struct usb_serial_port *port = tty->driver_data;struct usb_serial *serial = port->serial;u16 state;int result;dbg("%s - port %d", __func__, port->number);if (break_state == 0)state = BREAK_OFF;elsestate = BREAK_ON;dbg("%s - turning break %s", __func__,state == BREAK_OFF ? "off" : "on");result = usb_control_msg(serial->dev, usb_sndctrlpipe(serial->dev, 0),BREAK_REQUEST, BREAK_REQUEST_TYPE, state,0, NULL, 0, 100);if (result)dbg("%s - error sending break = %d", __func__, result);}static void pl2303_shutdown(struct usb_serial *serial){int i;struct pl2303_private *priv;dbg("%s", __func__);for (i = 0; i < serial->num_ports; ++i) {priv = usb_get_serial_port_data(serial->port[i]);if (priv) {pl2303_buf_free(priv->buf);kfree(priv);usb_set_serial_port_data(serial->port[i], NULL);}}}static void pl2303_update_line_status(struct usb_serial_port *port,unsigned char *data,unsigned int actual_length){struct pl2303_private *priv = usb_get_serial_port_data(port);unsigned long flags;u8 status_idx = UART_STATE;u8 length = UART_STATE + 1;u16 idv, idp;idv = le16_to_cpu(port->serial->dev->descriptor.idVendor);idp = le16_to_cpu(port->serial->dev->descriptor.idProduct);if (idv == SIEMENS_VENDOR_ID) {if (idp == SIEMENS_PRODUCT_ID_X65 ||idp == SIEMENS_PRODUCT_ID_SX1 ||idp == SIEMENS_PRODUCT_ID_X75) {length = 1;status_idx = 0;}}if (actual_length < length)return;/* Save off the uart status for others to look at */spin_lock_irqsave(&priv->lock, flags);priv->line_status = data[status_idx];spin_unlock_irqrestore(&priv->lock, flags);wake_up_interruptible(&priv->delta_msr_wait);}static void pl2303_read_int_callback(struct urb *urb){struct usb_serial_port *port = urb->context;unsigned char *data = urb->transfer_buffer;unsigned int actual_length = urb->actual_length;int status = urb->status;int retval;dbg("%s (%d)", __func__, port->number);switch (status) {case 0:/* success */break;case -ECONNRESET:case -ENOENT:case -ESHUTDOWN:/* this urb is terminated, clean up */。
win7 usb转串口驱动安装方案 32位 64位
USB装串口不成功,出错问题的解决方案
最近链接刻字机的usb线坏掉了,不得己只好用usb转串口线替代USB线进行作业。
开始在网上找了大量关于usb转串口的驱动程序,尝试了都是不行。
虽然都没有安装成功,但是从大家的描述中还是找到一些规律。
现在做成教程发到网上和大家共享。
同时,我会共享最后找到的经过测试成功的驱动程序。
废话不多说,先说明我电脑当时出现的情况:
一、现象把握
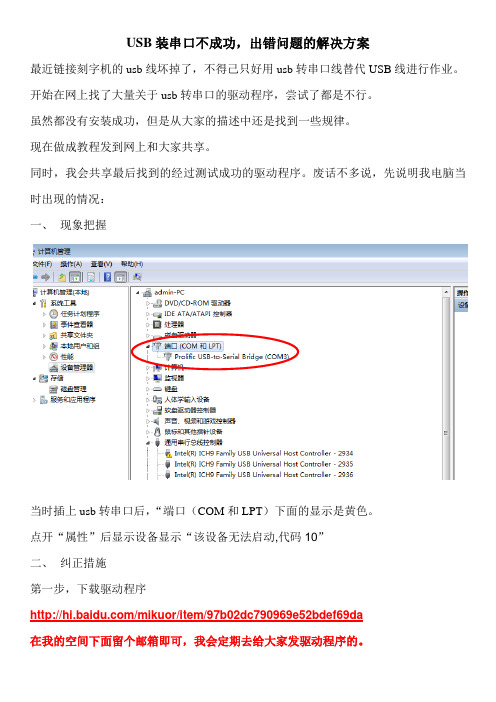
当时插上usb转串口后,“端口(COM和LPT)下面的显示是黄色。
点开“属性”后显示设备显示“该设备无法启动,代码10”
二、纠正措施
第一步,下载驱动程序
/mikuor/item/97b02dc790969e52bdef69da
在我的空间下面留个邮箱即可,我会定期去给大家发驱动程序的。
第二步,在“设备管理器”里面点“端口”下面黄色,选择“属性”,点“驱动程序”,“更新驱动程序”
第三步,“浏览计算机一级查找驱动程序软件(R)”
第四步,“从计算机的设备驱动程序列表中选择”
第五步,“从磁盘安装”第六步,浏览
第七步,选择“SERWPL.INF”,点“打开”
第八步,等待安装完毕后,设备管理器中自动更新程序,黄色问号没有了。
CH340T驱动安装
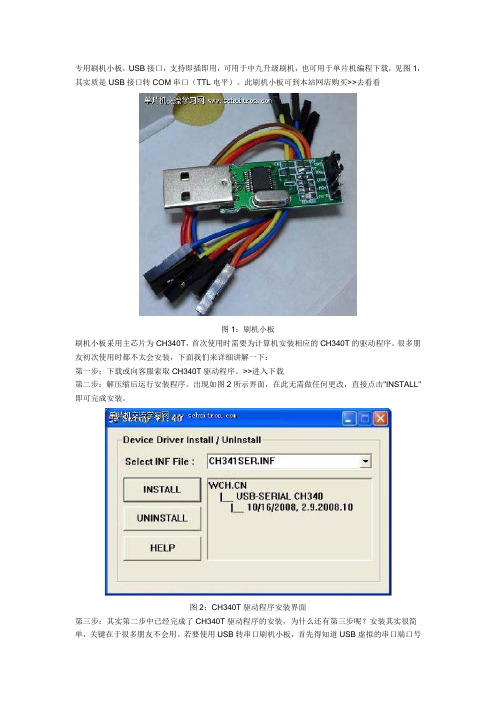
专用刷机小板,USB接口,支持即插即用,可用于中九升级刷机,也可用于单片机编程下载,见图1,其实质是USB接口转COM串口(TTL电平)。
此刷机小板可到本站网店购买>>去看看图1:刷机小板刷机小板采用主芯片为CH340T,首次使用时需要为计算机安装相应的CH340T的驱动程序。
很多朋友初次使用时都不太会安装,下面我们来详细讲解一下:第一步:下载或向客服索取CH340T驱动程序。
>>进入下载第二步:解压缩后运行安装程序。
出现如图2所示界面,在此无需做任何更改,直接点击"INSTALL"即可完成安装。
图2:CH340T驱动程序安装界面第三步:其实第二步中已经完成了CH340T驱动程序的安装,为什么还有第三步呢?安装其实很简单,关键在于很多朋友不会用。
若要使用USB转串口刷机小板,首先得知道USB虚拟的串口端口号是多少。
其端口号的查询方法需进入计算机的设备管理器中进行查看。
方法:在计算机桌面上找到“我的电脑”图标,然后鼠标右键单击“我的电脑”,在出现的下拉菜单中选择“属性”,此时将出现图3所示界面。
如需更详细的了解,到运用搜索功能。
图3:计算机系统属性界面第四步:在计算机系统属性界面下,点击“硬件”标签,如图4所示。
然后点击“设备管理器”即可。
文章来源于”单片机交流学习网”:/content/648.html 转载请保留出处。
图4:进入设备管理器界面第五步:插上刷机小板(USB 转串口线),会在设备管理器界面中看到“端口”选项里多了一个“USB-SERIAL CH340(COM6)”,其中COM6就是USB转串口线在本台电脑上所占用的COM口,不同的USB接口和不同的计算机产生的COM*端口号是不一样的。
如图5所示。
图5:查看刷机小板端口号至此,你可以通过设置正确的COM端口号来使用刷机小板了。
USB转串口RS232驱动程序下载
作者:赛购商城时间:2008-11-29
PL2303 USB转串口RS232驱动程序
软件名称:Pቤተ መጻሕፍቲ ባይዱ2303 USB TO RS232驱动程序
授权方式:共享软件
软件类型:工具软件
软件大小:61K
上传时间:2006-6-14
运行环境:Windows9x
下载地址1:◆点击这里下载◆
在win98、winme、win2000、XP系统里,只需先双击driver里hidcominst程序,再插上串口线,系统即可自动可完成安装。在xp系统下,完成以上步骤后,有时在设备管理器里会出现人机学设备,此时需分别用右键点击此项下的两个选项的属性,选择属性里的驱动程序这一项,选择更新驱动程序这一项,选择:从列表或指定位置安装,单击下一步,选择:不要搜索,单击下一步,选择:从磁盘安装,再选择浏览,指定驱动盘,打开driver文件夹,在driver里会出现hidcom.INF文件,单击打开,然后单击确定,选择下一步,选择是,此时会出现微软的提示说没有得到微软的数字签证,选择仍然继续,最后单击完成。只要依次更新这两项,即可使用串口线了。
安装驱动以后在程序中出现一个新的菜单显示USB to Serial Cable Driver,但是我把转换线插到USB口中的时候,系统自动安装驱动是USB人体学输入设备。部分杂牌的USB转串口线的确存在这样的问题,
点选:更新驱动程序(p)...项,选择所下载文件解压后的目录,下
在电脑上设置USB转换后的串口号。操作如下:
我的电脑——控制面板——系统——硬件——设备管理器——Ports(COM&LPT) BAFO USB-to-serial Com Port(COMn)n=1,2,3,4,5…——单击属性——端口设置——高级(A)——COM端口号(P):COMn更改为COM1或COM2——确定——重新启动计算机;
ch340模块使用方法
ch340模块使用方法
CH340模块是一种USB转串口芯片,它通常用于将设备连接到计算机的USB端口,并通过串口与设备进行通信。
以下是CH340模块的使用方法:
1. 下载和安装驱动程序:首先,在计算机上下载并安装
CH340的驱动程序。
你可以从制造商的网站或其他可靠的资源中找到驱动程序。
2. 连接模块到计算机:将CH340模块通过USB线连接到计算机的USB端口。
确保连接稳固,并注意模块的指示灯是否亮起。
3. 确认串口设置:打开计算机的设备管理器或串口调试工具,找到CH340模块所在的串口。
通常,它显示为"CH340"或类似的名称。
4. 配置串口参数:选择正确的串口,并配置通信参数,如波特率、数据位、校验位和停止位。
这些参数应与你的设备的通信参数相匹配。
5. 编写代码或使用串口调试工具:根据你的需求,可以使用编程语言(如C、C++、Python等)编写代码,以使用串口与CH340模块进行通信。
或者,你可以使用串口调试工具(如Realterm、Putty等)来发送和接收数据。
6. 进行通信:通过编写代码或在串口调试工具中输入命令,与
设备进行通信。
你可以发送数据到设备,或者从设备接收数据。
以上是CH340模块的基本使用方法,具体操作可能会根据你
使用的平台和程序有所不同。
在使用模块之前,建议阅读相关的文档和指南,以便更好地了解模块的使用。
- 1、下载文档前请自行甄别文档内容的完整性,平台不提供额外的编辑、内容补充、找答案等附加服务。
- 2、"仅部分预览"的文档,不可在线预览部分如存在完整性等问题,可反馈申请退款(可完整预览的文档不适用该条件!)。
- 3、如文档侵犯您的权益,请联系客服反馈,我们会尽快为您处理(人工客服工作时间:9:00-18:30)。
昨晚做开发板演示时,下载armvivi.bin程序时,出现错误,发现是Jlink线没连接好,重起了一下电脑后问题解决,后来发现超级终端不能用,
先说下什么是超级终端:
终端,即计算机显示终端,是计算机系统的输入、输出设备。
计算机显示终端伴随主机时代的集中处理模式而产生,并随着计算技术的发展而不断发展。
迄今为止,计算技术经历了主机时代、PC时代和网络计算时代这三个发展时期,终端与计算技术发展的三个阶段相适应,应用也经历了字符哑终端、图形终端和网络终端这三个形态。
超级终端是一个通用的串行交互软件,很多嵌入式应用的系统有与之交换的相应程序,通过这些程序,可以通过超级终端与嵌入式系统交互,使超级终端成为嵌入式系统的“显示器”。
超级终端的原理是将用户输入随时发向串口(采用TCP协议时是发往网口,这里只说串口的情况),但并不显示输入。
它显示的是从串口接收到的字符。
所以,嵌入式系统的相应程序应该完成的任务便是:1、将自己的启动信息、过程信息主动发到运行有超级终端的主机;2、将接收到的字符返回到主机,同时发送需要显示的字符(如命令的响应等)到主机。
说道这里该说我出现的问题了,这是我发现串口在电脑上没有识别,发现驱动没安装,我就找了个驱动安装,发现无法找到该硬件,这是我很迷茫,就去请教国嵌的老师,经过一翻波折,在老师的提问下说看下驱动的型号对不?这时我看了下驱动的型号是HL340的我就在网上下载了个HL340的驱动,安装,成功,哈哈,搞定,
这时打开超级终端出现的端口选择
确定
这里数据流控制设置为无,波特率设置为115200,
出现这个界面说明成功了,问题解决!哈哈。
