FileApp使用说明
Installshield9使用说明
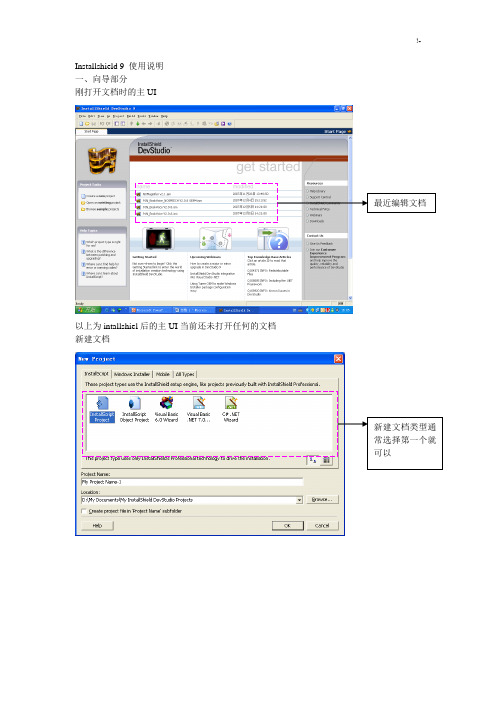
Installshield 9 使用说明一、向导部分刚打开文档时的主UI最近编辑文档以上为intallshiel后的主UI当前还未打开任何的文档新建文档新建文档类型通常选择第一个就可以向导UI1 2 3 4 5 6 7 8 9程序的基本信息,包括公司名称,程序名称,版本号以及公司网址等。
以上信息将会在安装过程中的UI中显示。
2.Installation architecture:组件的建立,类似于office安装过程中的程序模块选择。
例如。
在office安装过程中要全部安装,还是只安装word,excel等。
3.Application Files文件的添加:在此处将所有的程序要使用到的文件添加到这里。
主要包括以下文件夹3.1 script-defined folders:脚本定义文件夹:放到这里面的文件,其安装目录由脚本中FeatureSetTarget(MEDIA,"<para1>",para2);函数来重新定义。
para1在此定义的文件夹名。
Para2为目标文件夹名3.2 application target folder:安装目标文件夹。
即实际安装过程中的目标文件夹。
一般在安装过程中由用户来选择,当然可以指定默认。
3.3 program files:program file文件夹,如果有特定的文件必须放在此文件夹里。
就放这个位置吧。
3.4 windows:同上。
这两个文件夹是系统自动搜索的。
如果是自己安装的操作系统,比如将操作系统安装在其它盘符,一样可以搜到4.Application redistributables插件选择安装:如果你的程序需要以上的动态库连接,就打上5Application shortcuts快捷方式的建立点击New以后,会出现选择文件的对话框。
当然是已经在Application Files 中添加过的文件。
默认的可执行文件会自动添加。
如果不想用删掉即可6Application registery注册表添加:以上右击可以添加一个新的注册表项,其结构与windows自动的regedit十分类似。
山灵Eddict Player APP使用说明书(中英版)

使用说明书User's Manual APPEddict Player简体中文• 本说明书最终解释权归深圳山灵数码科技发展有限公司。
• 本说明书中的图片和文字解释权归深圳山灵数码科技发展有限公司。
本说明书并不针对山灵的某一特定型号产品,说明书中提到的某些图片、功能可能与您• 购买的型号 产品有差异。
• 系、咨询。
本说明书内容若有变动,恕不另行通知,以APP最新版本为准。
如有疑问,请与售后联• 本说明书中提到的产品型号、品牌有可能是相应公司的商标或注册商标。
• 深圳山灵数码科技发展有限公司版权所有,保留所有权力 。
ENGLISHThe final interpretation right of this manual belongs to Shenzhen Shanling Digital Technology •Development Co., Ltd.•Shenzhen Shanling Digital Technology Development Co., Ltd. has the right to interpret pictures and texts in this manual.This manual is not aimed at a specific model and some pictures and functions mentioned in the •manual may be different from the model you purchased.The contents of this manual are subject to change without prior notice, and the latest version of the •APP shall prevail. If you have any questions, please contact the after-sales service for consultation.The product models and brands mentioned in this manual may be the trademarks or registered •trademarks of the respective companies.• Copyright Shenzhen Shanling Digital Technology Development Co., Ltd. All rights reserved.介 绍本用户使用说明是Eddict Player APP软件针对用户的使用操作手册,在本使用说明中我们通过对本软件的功能模块进行介绍和操作指引说明,用户通过阅读该使用说明可以了解该APP的基本功能,对上手操作APP有一定的帮助。
Appium简介和使用说明书

1) Explain what is Appium?Appium is a freely distributed open source mobile application UI Testing framework.2) List out the Appium abilities?Appium abilities are•Test Web•Provides cross-platform for Native and Hybrid mobile automation•Support JSON wire protocol•It does not require recompilation of App•Support automation test on physical device as well as similar or emulator both•It has no dependency on mobile device3) List out the pre-requisite to use APPIUM?Pre-requisite to use APPIUM is•ANDROID SDK•JDK•TestNG•Eclipse•Selenium Server JAR•Webdriver Language Binding Library•APPIUM for Windows•APK App Info On Google Play•js4) List out the limitations of using Appium?•Appium does not support testing of Android Version lower than 4.2•Limited support for hybrid app testing. E.g., not possible to test the switching action of application from the web app to native and vice-versa•No support to run Appium Inspector on Microsoft Windows5) Explain how to find DOM element or xPath in a mobile application?To find the DOM element use "UIAutomateviewer" to find DOM element for Android application.6) Explain the design concept of Appium?•Appium is an "HTTP Server" written using Node.js platform and drives iOS and Android session using Webdriver JSON wire protocol. Hence, before initializing the Appium Server, Node.js must be pre-installed on the system•When Appium is downloaded and installed, then a server is setup on our machine that exposes a REST API•It receives connection and command request from the client and execute that command on mobile devices (Android / iOS)•It responds back with HTTP responses. Again, to execute this request, it uses the mobile test automation frameworks to drive the user interface of the apps. Framework like o Apple Instruments for iOS (Instruments are available only in Xcode 3.0 or later with OS X v10.5 and later)o Google UIAutomator for Android API level 16 or highero Selendroid for Android API level 15 or less7) What language does Appium support?Appium support any language that support HTTP request like Java, JavaScript with Node.js, Python, Ruby, PHP, Perl, etc.8) Explain the pros and cons of Appium?Pros:•For programmer irrespective of the platform, he is automating ( Android or iOS) all the complexities will remain under single Appium server•It opens the door to cross-platform mobile testing which means the same test would work on multiple platforms•Appium does not require extra components in your App to make it automation friendly •It can automate Hybrid, Web and Native mobile applicationsCons:•Running scripts on multiple iOS simulators at the same time is possible with Appium•It uses UIAutomator for Android Automation which supports only Android SDK platform, API 16 or higher and to support the older API's they have used another open source library called Selendroid9) Explain what is APPIUM INSPECTOR?Similar to Selenium IDE record and Playback tool, Appium has an "Inspector" to record and playback. It records and plays native application behavior by inspecting DOM and generates the test scripts in any desired language. However, Appium Inspector does not support Windows and use UIAutomator viewer in its option.10) Mention what are the basic requirement for writing Appium tests?For writing Appium tests you require,•Driver Client: Appium drives mobile applications as though it were a user. Using a client library you write your Appium tests which wrap your test steps and sends to the Appiumserver over HTTP.•Appium Session: You have to first initialize a session, as such Appium test takes place in the session. Once the Automation is done for one session, it can be ended and wait for another session•Desired Capabilities: To initialize an Appium session you need to define certain parameters known as "desired capabilities" like PlatformName, PlatformVersion, Device Name and so on. It specifies the kind of automation one requires from the Appium server.•Driver Commands: You can write your test steps using a large and expressive vocabulary of commands.11) Mention what are the possible errors one might encounter using Appium?The possible errors one might face in Appium includes•Error 1: The following desired capabilities are needed but not provided: Device Name, platformName•Error 2: Could not find adb. Please set the ANDROID_HOME environment variable with the Android SDK root directory path•Error 3: openqa.selenium.SessionNotCreatedException: A new session could not be created •Error 4: How to find DOM element or XPath in a mobile application?12) Do you need a server machine to run tests on Appium?No, you don't need server machine to run tests on Appium. Appium facilitates a 2-tier architecture where a test machine connects to a test server running Appium and automating the whole thing. You can have Appium running on the same machine where your test runs.13) Is it possible to interact with my apps using Javascript while I am testing with Appium?Yes, it is possible to interact with App while using Javascript. When the commands run on Appium, the server will send the script to your app wrapped into an anonymous function to be executed.14) Mention what are the most difficult scenarios to test with Appium?The most difficult scenario to test with Appium is data exchange.15) While using Appium can I run my tests in a multithreaded environment?Yes, you can run the test in a multithreaded environment but you have to ensure that no more than one test runs at the same time against the same Appium server.16) In Android, do you need an app's .apk to automate using Appium or you also need app in my workspace?In Android, you only need .apk file to automate using Appium.17) Explain what is Appium package master? How to create package?Appium package master is a set of tools manage and create appium packages. For example to create package you can use the code# using es7/babe1Gulp create-package –n <package-name>#regular es5Gulp create-package ---nobabe1 –n <package-name>The package will be generated in the out/<package-name>18) Explain how test frameworks are supported by Appium?Appium does not support test framework as such there is no need to support them. Appium can be used with any frameworks you want.Guru99 Provides FREE ONLINE TUTORIAL on Various courses like。
[vip专享]Fileapp使用方法-PC和IPAD IPHONE之间方便传文件
![[vip专享]Fileapp使用方法-PC和IPAD IPHONE之间方便传文件](https://img.taocdn.com/s3/m/c768e0af580216fc710afd7b.png)
43m1m“-”J520Gm01m24“492k-Z(1)g2L3-”3060@k%3-g“/1”7mD2%BJ/Tg0d1-ZP318¬-A_2"o70)Xc0?y258z6n”217 NE)
看到右上角的伞形的图标了吗,那个 WIFI 的标,点开他,下面有个 USB 和 WIFI 的选项,选 WIFI,点开后下面有个 address:ftp://……好了,记住 这个地址,从 FTP 开始哦。 然后在你的 PC 上点击“我的电脑”,在地址栏里输入刚才那个 ftp://```````
43m1m“-”5J2Gm001m244“92Zk-(1g2L)33-0”@6%0k3g-“1/”m7D%2BJ/Tg0d1Z-P318¬A-_2o"70X)c0?y2586zn”217 NE)
43m1m“-”5J2Gm001m244“92Zk-(1g2L)33-0”@6%0k3g-“1/”m7D%2BJ/Tg0d1Z-P318¬A-_2o"70X)c0?y2586zn”217 NE)
Fileapp 使用方法-PC 和 IPAD IPHONE 之间方便 传文件
2011 年 10 月 12 日 23:11
苹果的 IPAD iphone 现在已很普及了,很多用户还是苦于不能方便的把 P C 的文件传到苹果的设备上,下面我向大家介绍一款能方便的连通 PC Байду номын сангаас IP AD Iphone 的软件:Fileapp 大家可以到 Appstore 去下载安装 FILEAPP 这个软件,这个就不多说了。 下面说一下使用方法。 首先需要 IPAD 和 PC 在同一个 WIFI 环境下,就是说 IPAD 和 PC 都用的同 一个 WIFI 信号。 下面在 IPAD 上打开 FILEAPP 这个软件
阿里云移动推送 App SDK 手册说明书

--App SDK 手册Android SDK手册使用前必读:移动推送名词解释&约束1. 创建应用到阿里云移动推送控制台创建应用,应用创建完成以后,进入移动推送相关模块进行设置,具体操作请参见 创建APP 。
在应用中完成应用配置,请注意PackageName务必和App的包名一致,否则推送将无法正确初始化。
【注意】使用Gradle构建App时,PackageName的查看:查看AndroidManifest.xml中根元素package属性;查看工程build.gradle中applicationId设置,默认AndroidManifest.xml中的package属性保持一致,如果不一致,以applicationId为准。
2. SDK下载和集成2.1 SDK下载2.2 SDK目录结构OneSDK|-- AndroidManifest.xml|-- build.gradle|-- libs--2.3 SDK集成:请在工程中添加android-support-v4.jar支持包(v2.3.0以上),关于v4支持包的说明请参考:https:///topic/libraries/support-library/features.html#v4;手动拷贝下载SDK中的libs目录,手动拷贝后需要在APP工程的build.gradle中配置jniLibs的目录:3. 配置AndroidManifest.xml3.1 appkey和appsecret配置com.alibaba.app.appkey和com.alibaba.app.appsecret为您App的对应信息,在推送控制台APP列表页的应用证书中获取。
| |-- armeabi| | |-- libcocklogic.so -网络连接库及幽灵进程的辅助lib| | |-- libtnet.so| |-- armeabi-v7a| | |-- libcocklogic.so| | |-- libtnet.so| |-- arm64-v8a| | |-- libcocklogic.so| | |-- libtnet.so| |-- x86| | |-- libcocklogic.so| | |-- libtnet.so| |-- arm64| | |-- libcocklogic.so| | |-- libtnet.so| |-- alicloud-android-push-sdk.jar -移动推送主功能包| |-- alisdk-ut.jar -UT基础包| |-- utdid4all.jar -设备Id生成包|-- project.properties|-- srcandroid {...sourceSets {main {jniLibs.srcDirs = ['libs']}}}<meta-data android:name="com.alibaba.app.appkey" android:value="*****"/> <!-- 请填写你自己的- appKey --><meta-data android:name="com.alibaba.app.appsecret" android:value="****"/> <!-- 请填写你自己的appSecret -->--3.2 Permission 的配置将以下uses-permission片段拷贝进你manifest中的Permission申明区域中:3.3 Service 的配置将以下service片段拷贝进你Manifest中的service申明区域中:<!--阿里移动推送相关权限--><!--Android 6.0版本可去除,用于选举信息(通道复用)的同步--><uses-permission android:name="android.permission.WRITE_SETTINGS" /><!--进行网络访问和网络状态监控相关的权限声明--><uses-permission android:name="android.permission.INTERNET" /><uses-permission android:name="android.permission.ACCESS_NETWORK_STATE" /><uses-permission android:name="android.permission.ACCESS_WIFI_STATE" /><!--允许对sd卡进行读写操作--><uses-permission android:name="android.permission.WRITE_EXTERNAL_STORAGE" /><!--网络库使用,当网络操作时需要确保事务完成不被杀掉--><uses-permission android:name="android.permission.WAKE_LOCK" /><!--用于读取手机硬件信息等,用于机型过滤--><uses-permission android:name="android.permission.READ_PHONE_STATE" /><!--选举使用,当应用有删除或者更新时需要重新选举,复用推送通道--><uses-permission android:name="android.permission.BROADCAST_PACKAGE_CHANGED" /><uses-permission android:name="android.permission.BROADCAST_PACKAGE_REPLACED" /><uses-permission android:name="android.permission.RESTART_PACKAGES" /><!--补偿通道小米PUSH使用,不用可去除--><uses-permission android:name="android.permission.GET_TASKS" /><!--补偿通道GCM使用,不使用可去除--><uses-permission android:name="android.permission.GET_ACCOUNTS" /><!--允许监听启动完成事件--><uses-permission android:name="android.permission.RECEIVE_BOOT_COMPLETED" /><!--允许访问震动器--><uses-permission android:name="android.permission.VIBRATE" /><!-- 通道保持服务 --><service android:name="com.alibaba.sdk.android.push.ChannelService"android:exported="true" android:process=":channel"><intent-filter><action android:name="com.taobao.accs.intent.action.SERVICE"/></intent-filter><intent-filter><action android:name="org.agoo.android.intent.action.PING_V4" /><category android:name="taobao" /></intent-filter></service><!-- 消息接收服务 --><service android:name="com.alibaba.sdk.android.push.MsgService"android:exported="false"><intent-filter><action android:name="com.taobao.accs.intent.action.RECEIVE" /></intent-filter>3.4 Receiver 的配置将以下receiver片段拷贝进你manifest中的receiver申明区域中:4. Proguard配置 <intent-filter><action android:name="com.alibaba.sdk.android.push.NOTIFY_ACTION" /></intent-filter></service><!-- 连接心跳保持监听器 --><receiver android:name="anet.channel.heartbeat.HeartbeatManager$Receiver" ><intent-filter><action android:name="MAND" /></intent-filter></receiver><!--消息接收监听器--><receiver android:name="com.alibaba.sdk.android.push.MessageReceiver"><intent-filter><action android:name="com.alibaba.push2.action.NOTIFICATION_OPENED"/></intent-filter><intent-filter><action android:name="com.alibaba.push2.action.NOTIFICATION_REMOVED"/></intent-filter><intent-filter><action android:name="MAND" /></intent-filter><intent-filter><action android:name="MAND" /></intent-filter><intent-filter><action android:name="org.agoo.android.intent.action.RECEIVE" /></intent-filter><intent-filter><action android:name=".conn.CONNECTIVITY_CHANGE" /></intent-filter><intent-filter><action android:name="ER_PRESENT" /></intent-filter><intent-filter><action android:name="android.intent.action.BOOT_COMPLETED"/></intent-filter><intent-filter><action android:name="android.intent.action.PACKAGE_REMOVED"/><data android:scheme="package"/></intent-filter></receiver>5. 在应用中注册和启动移动推送首先通过PushServiceFactory获取到CloudPushService,然后调用register()初始化并注册云推送通道,并确保Application上下文中进行初始化工作。
WhatsApp使用手册说明书
WhatsApp User ManualFor front-line debt advisers using WhatsApp to support andcommunicate with clients.Supported by Contents1.Introduction2.Delivering money advicea.Tips & Guidanceing the WhatsApp Desktop Application3.Setting up WhatsApp on your phone4.Setting up WhatsApp on your computer5.Sending and receiving documents6.Video - setting up on your computer7.WhatsApp Business ApplicationIntroductionThe purpose of this manual is to assist you in setting up and using WhatsApp Messenger for the delivery of advice. It is important that you keep in mind a few things while reading this document.Firstly, it should be read alongside the other materials within the pack, especially the Learning Report. Within this report there are recommendations about the type of service we believe WhatsApp is appropriate for use with at the time of publication. We would strongly urge you to read and consider these recommendations before using the platform within your organisation. Secondly please keep in mind that we tested WhatsApp messenger with the delivery of debt advice within our organisation, Citizens Advice Manchester. The accompanying learning report as well as the Evaluation Report goes into detail about the type of service within which the platform was tested. It would be useful to keep this in mind when drawing your own conclusion about the platform’s appropriateness for use within your organisation.Finally, keep in mind at all times that the information within this pack may become outdated given the speed of technological change and advancement. WhatsApp is continuously being updated and improved by the developers and as such, some of the screen shots and the way in which specific parts of the application are accessed may change over time.This first section of this guide focuses on the delivery of money advice using WhatsApp. This contains practical tips and guidance as well as a brief look at the WhatsApp desktop application, which we used to to organise and respond to messages using a computer. The second section is more focussed on the technical side of things, showing you how you can set up WhatsApp on your phone and on your computer.The final section looks at the newly released WhatsApp Business Application which offers some additional features which will be useful for an organisation using WhatsApp to communicate with their clients.Delivering Money Advice - Tips & GuidanceDelivering money advice using WhatsApp is unlike other channels. It can be thought of as a hybrid of email and webchat. The convenience and flexibility that the platform offers clients mean some will message in with the expectation of a back and forth instant messaging scenario, much like webchat. Others may wait hours or even days in between responses with the chat more closely resembling email.Here’s a picture to show how the service worked in terms of new clients accessing debt advice using WhatsApp.There is some good practice you can try to incorporate to help manage this.Setting client’s expectations -i t should be made clear on your website or wherever there is information about the service how long clients can expect to wait before a response to their message. We used two working days and found this offered a nice balance.Encourage client to provide initial overview of problem- to avoid something along the lines of “hi, hello” and nothing more in an initial message. This wassomething we encountered quite frequently and it meant that it took longer to give the client the advice.Managing chats- I t is important to use your own personal judgment when managing chats. Some clients will be more open and provide a lot of information up front, all at once. Others may be more closed and provide information in smaller chunks, resulting in some longer back and forth conversations. Try and apply a consistent rule such as if a client has not responded within a set time (such as a few days) the chat can be ‘closed’.By closed, we mean that:●the content of the chat is copied into your case management system●any shared documents are downloaded and attached to the client’s casefile●the conversation is deleted from the phone●the client is sent a message to confirm that their enquiry has been closedUsing the WhatsApp Desktop ApplicationWhile this may change in the future, at the time of writing and based on a review on software available at the time, the WhatsApp desktop application was the most suitable software for accessing and using WhatsApp on a computer. Later in the guide we will explain how to set up WhatsApp on your phone and your computer and how to connect the two.Although the platform has some great features there are some limitations worth knowing about.The Phone - you will only be able to access WhatsApp on your computer if you have a working mobile phone with you. If someone on another computer wishes to access WhatsApp then they can do so, but they will need the phone to log in.Once a phone is logged in on one computer it will automatically be logged out of the other computer being previously used. This means that you cannot have multiple people using WhatsApp at one time.Contacts -I t’s best to add the client as a contact on the mobile phone when the first message has been received. T his has to be done on the phone itself. Wewould recommend saving the client under a reference number; we used the number generated when creating a profile on our case management system.This means the client remains anonymous on the phone and allows you to easily search and find them on WhatsApp.When adding a client you need to ensure their number is saved using the country code. For the UK this is +44. See below:-[country code] + [Full Phone Number]-So 0712******* should be saved as +447123456789We found that saving contacts on your phone without the area code occasionally meant they could not be found on WhatsApp.You can read more about adding contacts on Android devices here A dding contacts on Android FAQChats- Once you have finished with that particular client the WhatsApp conversation should be deleted. As well as protecting client information this means that your phone’s message list does not get clogged with dozens of different client conversations.Autoresponse- There are a number of third party apps that offer anauto-response function for use within WhatsApp. However after extensive testing none of them worked consistently or were fit for purpose. This is a feature that is available in the WhatsApp Business App (see relevant section below) but we did not have a chance to properly test it.Template Responses -I t may be useful to develop a template response that you can quickly send to all clients when they first contact you.The contents of this will depend on the sort of service you are operating. We found this useful for our ‘access channel’ clients, for whom we had no information about.Here is an example of the message we used:“Hi, thank you for your message. My name is XXXX. Your reference number for this chat is XXXX You should keep a note of this so we can identify you if you contact us again. Can you please give us an overview of the problem?”We also used an additional template to request basic information from the client (date of birth, gender, postcode), so you may wish to add something to help you gather whatever data you need at the beginning of the conversation.Templates for non-debt advice - b ecause we had clients continually contact us about other issues, such as Employment, Welfare Benefits, Housing etc we developed standardised templates to signpost them to our general adviceline or other specialist organisations, such as Shelter, as we were only funded to deliver debt advice via WhatsApp.Click to chat - A useful feature to implement is to create a ‘click to chat’ link on your website. This allows clients using their mobile phone to click on your telephone number on your website and access WhatsApp straight away, without the need to save the number in their contacts first. When they tap the phone number WhatsApp will automatically open and they can begin to type their message to you.You can also create a p re-filled message that will automatically appear in the text field of a chat when they being their WhatsApp message. We used this to provide a link to the terms and conditions of the service and also to request basic information from the client.There is a detailed guide on how to do this on the WhatsApp website:https:///en/android/26000030/We would recommend adjusting your phone setting so that any phone calls go straightto voicemail, to avoid the issue of having clients call the phone rather than sending a WhatsApp message.Unfortunately there’s no way to stop clients making a WhatsApp Voice Call, so we would encourage you to make it clear on your website and promotional materials that clients must send a message rather than call, assuming this is how you want to operate your service.Setting up WhatsApp on your PhoneBelow is a witten step-by-step guide for setting up WhatsApp Messenger on an Android device with accompanying screenshots. If you are using an Apple iPhone, the process is very similar; you will need to go to the App Store on your device and download WhatsApp from there.1.Open Google Play Store on your phone. The icon for this app should looklike this:2.Search for WhatsApp on the store and tap on WhatsApp Messenger as itcomes up in the search results.3.Tap install to download the app for your phone4.Tap accept to allow WhatsApp access to your contacts, location, andothers5.Tap open once WhatsApp has downloaded on your phone.6.On the Welcome to WhatsApp screen, tap on agree and continue onceyou have read the terms of service7.Select your country (United Kingdom),a.enter the phone number of the device you are using,b.click nextOnce you have done this you should receive a six digit verification code, sent to you by text message8.On the next screen enter the codeTip - No Code?If you have any problems receiving the message you have the option to ask for it to be re-sent or to receive it by phone call.9.Finally, enter your name and a profile picture of your choosing.It’s up to you what you want to use as your profile picture. We used our logo but you could also consider using a picture of an adviser with something that identifies them as working for your organisation, e.g a t-shirt or lanyard with your branding on.If you get stuck at any point then head over to h ttps:///for further information and support.Setting up WhatsApp on your ComputerOnce you have your phone set up properly you can download WhatsApp for your computer and connect it to your phone. This is very important because this will allow you to read and respond to messages on your computer, using your keyboard. This is far more efficient and practical then using the phone itself to send message to clients as many will likely be quite long and detailed.It also means you can send and receive documents and images using your computer. If a client sends you something then you can download it and put it straight onto your case management system, rather than having to move it from your phone to the computer first.Download WhatsAppGo to: h ttps:///download/You should see the image below on the webpage.Click to download the appropriate version. If you are not using Windows you can click the ‘not on windows’ link just below to download for Mac.Once you have downloaded and installed WhatsApp on your computer, you should be met with the screen below:Tip - Pin to TaskbarWhile the application is open, you can right click the WhatsApp logo at the bottom ofyour screen and select ‘pin to taskbar’. This means the WhatsApp logo will stay there atall times and you can simply click it in order to open the program. A small red notification will appear when you have a new message.Connecting Your Phone & Computer1.Open WhatsApp on your phone2.Click on the three white dots in the top right hand corner3.Click‘WhatsApp Web’.The following screen should appear below..Click ‘Ok, Got It’You now need to lift the phone up to scan the code on the WhatsApp web application (see earlier screenshot). You simply need to hold the phone up to your computer screen (you may have to keep it there for a few seconds) and it will automatically sync the phone with the computer, meaning WhatsApp will now appear on your computer.This is what the computer will look like once the phone is connected. Messages will appear on the left hand side.WhatsApp WebThere is also a way to access WhatsApp on your computer without downloading it. You can go to h ttps:///directly and access it this way. However we have recommend that you download WhatsApp to your computer because in our experience it ran more smoothly and was quicker. However online access could be useful in certain situations, such as if you are using a colleague’s computer temporarily.Sending and Receiving Documents/ImagesReceiving DocumentsWhatsApp makes it very easy to send and receives images, documents and other files. This is very useful when advising clients as they can easily take and send a photograph of any paperwork relevant to their enquiry. This ensures that you are able to give accurate advice. It also means that you can easily send documents, such as a financial statement, from your computer to the client.You can read the full evaluation report for more feedback from clients and advisers about using WhatsApp to send and receive documents.If a client sends an image, it should appear on the message as below.Click on the arrow on the top right hand corner of the image and click‘download’. This file will save on your computer, typically as a jpeg file.Sending DocumentsClick on the paperclip on the top right hand corner. From there you can select the appropriate icon from photo, camera, document, contact. The most common will be document if you are sending PDFs or word documents from your computer, however there may be photographs taken on the phone that you also wish to send.Tip - File SizesWhatsApp supports sending documents in all kinds of file formats but be aware that there is a file size limit of 100mb.WhatsApp have an excellent guide to sending different documents on their website here, which breaks down the different icons seen above in more detail:●iPhone●AndroidHow to VideoWe have produced a video showing you how to set up WhatsApp on your phone as well as some other useful hints and tips.This can be found on Citizens Advice Manchester’s YouTube channel.Link: h ttps:///yd5k3sjbIf you search ‘Citizens Advice Manchester YouTube’on Google it is one of the top results.WhatsApp Business ApplicationShortly after completion of the pilot, WhatsApp released their much anticipated Business Application. This is a separate app aimed at small-medium sizebusiness/organisations who want to use WhatsApp to communicate with their customers.As of the date of publication this app is free to use and is available to downloadfor Android devices. It is not yet available for iPhone.The app is very similar to the standard WhatsApp and you will need to downloadit from the play store and verify your phone number in the same way outlined earlier on in this guide. You can also use it with WhatsApp web (no separate download is required - it is just one WhatsApp web for both the normal and business versions) which looks and operates in much the same way.There are still plenty of very useful features unique to the business app whichwill help in ensuring a smoother and more efficient service for clients. Pleasenote we did not have an opportunity to test these features during service delivery.Business App FeaturesProfileYou can set up a profile for your organisation to give clients more information about who they are getting in touch with.Tap on the three white dots in the top right hand corner. Go to settings > business settings > profile.From here you can add a photo, business address, category, description, opening hours, contact details and web address.Messaging ToolsProbably the biggest addition in terms of features offered by the Business App are the messaging tools. They are likely to be very useful for you when speaking with clients.Away Message-t his allows you tocreate an automated message forwhen you are away.For example,thiscould be used over the Christmasperiod if your organisation closes.Itcan be customised so that it is sentbetween a specific time and daterange. E.g between23rd-31stDecember.If a client contacts youduring this period they will receive amessage explaining the service is closed over the Christmas period.Greeting Message -t his allows you to create and send an automated response to clients when messaging you for the first time or after a 14 day period of inactivity. This feature will be useful to briefly explain basics of service, e.g expected time for a response, ask for certain information and/or to direct users to terms and conditions of service.Quick Replies -y ou can create template responses to suit your needs, for example a thank you message for once the enquiry is finished. You can then create a shortcut, for example /thanks. So instead of having to type this full message out each time, you can just type ‘/thanks’ and it will add the full text into the message to save on time.StatisticsAnother useful feature relates to your data. WhatsApp Business has a dedicated statistics section which will be useful for helping you to understand how WhatsApp is working for your organisation. Within this you can keep tabs on the number of messages that have been sent, delivered and read.For further information about the use of WhatsApp for advice delivery, contact Joel Crawley:*****************************************.ukAcknowledgementsThank you to the Money Advice Trust for funding this pilot as part of their Innovation Grants Programme.Thank you to Manchester Metropolitan University for assisting us in the evaluation of the project and for producing their report.For infographic image showing how the service works:Icon 1 made by G ood Warefrom w Icons 2 and 5 made by V ectors Marketfrom w Icon 3 made by T hose Iconsfrom w Icons 4, 6 and 8 made by F reepikfrom w Icon 7 made by M ynamepong f rom w 。
用户操作手册说明书
目 录使用说明User Guide简 介 15开始步骤电池的安装 - - - - - - - - - - - - - - - - - - - - - - - - - - - - - - - - - - - - - - - - - - - - - - - - - - - - - - - - - -17按键功能------------------------------------------------------------18基本菜单操作 --------------------------------------------------------18开机与关机 - - - - - - - - - - - - - - - - - - - - - - - - - - - - - - - - - - - - - - - - - - - - - - - - - - - - - - - - - -20第一次开机 - - - - - - - - - - - - - - - - - - - - - - - - - - - - - - - - - - - - - - - - - - - - - - - - - - - - - - - - - -20基本录音与回放基本录音------------------------------------------------------------22停止录音------------------------------------------------------------23录音回放------------------------------------------------------------24使用“录音场景”录音场景的选择 ------------------------------------------------------25内置和外置麦克风内置麦克风 - - - - - - - - - - - - - - - - - - - - - - - - - - - - - - - - - - - - - - - - - - - - - - - - - - - - - - - - - -26专用外置麦克风 ------------------------------------------------------26第三方麦克风 --------------------------------------------------------27麦克风线缆的固定-----------------------------------------------------27麦克风供电 - - - - - - - - - - - - - - - - - - - - - - - - - - - - - - - - - - - - - - - - - - - - - - - - - - - - - - - - - -28麦克风毛衣的使用-----------------------------------------------------28耳机的连接和监听耳机的连接 - - - - - - - - - - - - - - - - - - - - - - - - - - - - - - - - - - - - - - - - - - - - - - - - - - - - - - - - - -29耳机线的固定 --------------------------------------------------------30耳机音量的调整 ------------------------------------------------------30使用耳机进行录音监听 -------------------------------------------------31录音详解录音界面元素介绍-----------------------------------------------------32录音中可进行的操作 - - - - - - - - - - - - - - - - - - - - - - - - - - - - - - - - - - - - - - - - - - - - - - - - - - -40录音设置菜单 --------------------------------------------------------43播放详解播放界面------------------------------------------------------------52播放中可进行的操作 - - - - - - - - - - - - - - - - - - - - - - - - - - - - - - - - - - - - - - - - - - - - - - - - - - -59文件管理进入和退出 - - - - - - - - - - - - - - - - - - - - - - - - - - - - - - - - - - - - - - - - - - - - - - - - - - - - - - - - - -62操作方法------------------------------------------------------------63对文件夹的操作 ------------------------------------------------------64对文件的操作 --------------------------------------------------------64播放列表------------------------------------------------------------65对播放列表的操作-----------------------------------------------------66对播放列表文件的操作 -------------------------------------------------66电池与外置供电电池的安装 - - - - - - - - - - - - - - - - - - - - - - - - - - - - - - - - - - - - - - - - - - - - - - - - - - - - - - - - - -67电池电量指示 --------------------------------------------------------68干电池与充电电池-----------------------------------------------------68电池的其他注意事项 - - - - - - - - - - - - - - - - - - - - - - - - - - - - - - - - - - - - - - - - - - - - - - - - - - -69外置供电------------------------------------------------------------69系统设置录音提示灯 - - - - - - - - - - - - - - - - - - - - - - - - - - - - - - - - - - - - - - - - - - - - - - - - - - - - - - - - - -71播放提示灯 - - - - - - - - - - - - - - - - - - - - - - - - - - - - - - - - - - - - - - - - - - - - - - - - - - - - - - - - - -71 Peak提示灯 ---------------------------------------------------------71屏幕休眠------------------------------------------------------------72扬声器 -------------------------------------------------------------72自动关机------------------------------------------------------------72电池类型------------------------------------------------------------73语言 ---------------------------------------------------------------73 Fn键自定义 ---------------------------------------------------------73时间设置------------------------------------------------------------74储存信息------------------------------------------------------------75格式化 -------------------------------------------------------------75系统信息------------------------------------------------------------75恢复出厂设置 --------------------------------------------------------76更新数据库 - - - - - - - - - - - - - - - - - - - - - - - - - - - - - - - - - - - - - - - - - - - - - - - - - - - - - - - - - -76 APP解绑 -----------------------------------------------------------76 USB扩展USB-DAC -----------------------------------------------------------79 USB声卡 -----------------------------------------------------------79手机APP的使用APP的下载与安装 ----------------------------------------------------81与PAW-1进行绑定----------------------------------------------------81系统升级升级流程------------------------------------------------------------84PAW-1标准包装内包括如下部件:购买产品时请认真核实。
Cloud Drive使用说明

使用说明目录1.简介 (3)2. 配件 (3)3. 系统支持 (3)4. 文件支持 (3)5. 安装应用软件 (4)5.1IPAD安装: (4)5.2A NDROID安装 (4)6. 认识CLOUD DRIVE (5)7. 电池状态 (6)8. 连接电脑 (6)9. 上传文件 (7)10. 通过WIFI连接数码设备 (7)11. IOS使用方法 (7)11.1打开F ILE B ROWSER (7)11.2添加C LOUD D RIVE (7)11.3浏览C LOUD D RIVE中的内容 (8)11.3.1播放音乐 (8)11.3.2 播放电影 (8)11.3.3 播放图片 (9)11.3.4 浏览文件 (9)11.3.5 文件编辑 (9)12 ANDROID用法 (10)13 最强功能-APP服务器 (11)13.1IOS APP服务器 (11)13.2A NDROID APP服务器 (11)14 配置CLOUD DRIVE (12)12.1设置语言 (12)12.2设置无线ID和密码 (12)15 网络桥接 (12)16 附录 (13)16.1苹果越狱用户软件安装教程 (13)16.1.1添加软件源 (13)16.1.2 “和协”软件安装 (14)16.2RMVB/WMV/MKV视频播放 (14)16.2.1 Oplayer用法 (14)1.简介Cloud Drive是一种便携式的USB存储装置,可以无线传输数字媒体内容(如,文档,音乐,照片,视频 等)可以自动组建局域网,用户只需将设备加入到“Cloud Drive”网络中,就可以通过浏览器或专用软件来访问无线硬盘中的文件,无需将文件下载到设备中就可以进行编辑,播放等操作,内置大容量锂聚合物电池,可以续航8个小时,内置大容量固态硬盘,8GB~1TB 等多种容量规格供客户选择,完美扩展您的Iphone,IPAD,智能手机……2. 配件● CloudDrive主机×1● USB数据线×13. 系统支持● WINDOWS XP / WIN7 / Mac0s10.0/Linux2.6以上;● IPOD TOUCH4,IPHONE4/4S,IPAD1/2,NEW IPAD(IOS5以上);● Android2.3以上;4. 文件支持● 音乐: aac, mp3, wav● 视频: m4v, mp4, mov● 图片: bmp, jpeg, jpg, png● 文档: pdf, doc, docx, ppt, pptx, txt, rtf, xls, xlsx注:以上文件格式为常规数码设备原生态支持的文件格式,Cloud Drive本身没有文件格式限制.5. 安装应用软件5.1 IPAD安装:确保您的IPAD已正确连接到网络,打开App store;在搜索栏输入“FileBrowser”点搜索点击安装,按照提示输入您的App store的密码,输入后按确定就可以下载了,静待安装成功即可.注意:Iphone和Ipod Touch安装方法和IPAD一样就不在此列举了.5.2 Android安装确保您的Android爱机已正确连接到网络在play商店中搜索“ES File Explorer”选择安装,按提示选择接受并下载, 静待安装成功即可6. 认识Cloud DriveA Mini USB 端口Array功能: 充电和数据传输B 复位开关功能: 按下后打开电源保持10秒,系统恢复为出厂状态C 电源开关功能: 长按开/关机短按剩余电量查询D 状态指示灯功能: 绿色电源指示蓝色WIFI指示红色数据指示E 电量指示灯功能: 4个全亮满电3个常亮80%2个常亮50%1个常亮25%1个闪烁<10%充电逐级点亮注: Cloud Drive的默认状态,无线网络名称是“Cloud Drive”默认不需要连接密码(用户可以自己设置密码);忘记密码复位设备不会影响硬盘中的数据.7. 电池状态Cloud Drive第一次使用前必须先充电,轻按电源按键(按下即放开)查询电量,满电时4个灯全亮,三个灯时电量<80%,两个灯亮时<50%,一个灯亮时<25%,一个灯闪烁时<10%,充电时逐级从低到高闪烁,充满4个灯常亮.满电<80% <50% <25%8. 连接电脑将Cloud Drive用包装中的数据线连接到电脑,传输媒体文件,跟使用移动硬盘一样简单.9. 上传文件当连接到计算机, Cloud Drive 就跟标准的移动硬盘一样,操作简单方便,强烈建议把文件按分类放入相应的文件夹中,以便以后查找文件时能够快速定位;例如音频文件放在音乐文件夹中,视频放在电影文件夹中,依次类推.注:在传输数据的同时也可以为Cloud Drive 充电,在充电或联接电脑时没有无线信号,数码外设在这时不能访问Cloud Drive.对于Windows 用户,请右键单击任务栏的右下角的USB 图标,并选择 “安全删除硬件”。
FiiO M9 使用说明书

All the below illustrating pictures are for reference only.M9 Complete User ManualForeword:Thank you for purchasing FiiO’s high resolution lossless music player M9. To let you better utilize the M9 to enjoy high-quality music, we have prepared this complete user manual. We hope this manual will help you get to know the M9 and unleash its full potential.Contents●Introduction: (3)1. Buttons and ports introduced (3)2. Buttons and ports explained (4)●Main menu and Drop-down menu interface: (5)●Settings interface: (6)1. WiFi (6)2. Bluetooth function (7)Bluetooth transmitter (7)Bluetooth receiver (8)3. Audio (9)Multifunctional Output (9)Coaxial digital output (10)Gain (10)Digital filter mode (11)Wireless playback quality (11)Balance (12)In-line remote (12)Adjustable volume at LO (13)USB DAC (14)4. LED (14)5. Key-lock Settings (15)6. General (15)About device (16)Power-off Timer (16)Apps (17)Brightness level (17)Sleep (17)Language setting (18)Factory data reset (19)●Firmware Update (20)●Status bar (22)●Technical Support (22)●FiiO Music (23)1. APP homepage (23)2. Quickly locate all music (25)3. Gestures (25)4. Function menu (26)5. Now playing (26)6. Tap buttons (27)7. Gesture operations (27)8. EQ (28)Micro SD card slotNext trackPrevious trackPlay / PauseType C USB data/ charging portIndicatorlightVolume knobPower / LockTouchscreen●Introduction:The M9 is a high fidelity, high resolution digital audio player, using Samsung 14nm Exynos 7270, Dual AK4490EN DACs, 2GB native memory, and support external Micro SD Card storage (512GB) , 480* 800 LG IPS screen, supporting multi-touch. TheType C interface supports charging, file transfer, USB Audio output; Bluetooth 4.2 supports SBC/ aptX/ aptX-HD/ LDAC/HWA. With a deeply-customized Android, the system runs at a fast and smooth speed, with simple operation; every interface is methodical and crisp. Built-in professional custom music player "FiiO Music" , and pre-install Cloud Music, MOOV, Tidal, KKBOX for more joy.1. Buttons and ports introduced3.5mmPO/LO/ SPDIFcoaxial output2. Buttons and ports explained1) Touchscreen (16 million colors, 480x800 pixels): Displays the user interface and other information; for operating the unit via screen touches and/or in conjunction with buttons on the unit;2) Power / Lock: While M9 is powered off, hold for 2s to turn on; while powered on, hold to display power off / reboot menu; press briefly while powered on to turn screen on / off; Press and hold for 10 seconds to reboot.3) Volume knob: Scroll up to turn up the volume, scroll down to turn down the volume.4) Play / Pause: Press while playing to pause music, press while paused to continue playback;5) Previous track: Short press, play the previous track; Long press, the track will run fast backward.6) Next track: Short press, play the next track; long press, the track w ill run fast forward;7) Micro SD card slot: Supporting up to 512GB capacity8) Indicator light: Blue light in working condition, red light when charging, turn off indicator light when power off;9) Type C USB data/ charging port: Used for charging, transmitting data, USB Audio output. The DC5V 2a adapter is recommended for charging and can be fully charged in 2 hours.10) 2.5mm balanced headphone output: Supports 2.5mm TRRS balanced headphone11) 3.5mm PO/LO/ SPDIF coaxial output: Shared Phone/line / coaxial output port. Switch between the three outputs in M9 Settings ->Audio Settings -> Multifunctional Output.CTIA-spec headsets with in-line remote control supported with the following remote control operation (single button remotes and main button of multi-button remotes supported):Volume Up/Down: click to turn up/down the volume once, hold to turn up/down the volume continuously to Max volume/Mute;Play / Pause: press main button once briefly to toggle between play and pause;Next track: double-click main button quickly;Previous track: triple-click main button quickly;●Main menu and Drop-down menu interface:●Settings interface:1. WiFiThe M9 may connect to the Internet or other network resources to obtain musicresources or perform other Android functions;To connect the M9 to WiFi devices / hotspots:1) Tap the WLAN in setting as shown in the picture below;2) C lick the WiFi switch to the right (ON) and the M9 will automatically search for and display available WiFi connections;3) Tap the name of the WiFi network you wish to connect to and enter the password if prompted, and the M9 will connect to the network:2. Bluetooth functionM9 supports virtually all Bluetooth formats including the high-resolution ones for your ultimate listening pleasure, including: 24bit aptX-HD(also backwards compatible with aptX), LDAC and HWA. M9 can alsobe a Bluetooth transmitter or a Bluetooth receiver.Bluetooth transmitterTo use the M9 with new Bluetooth devices (e.g. Bluetooth earphones, speakers, remote controls), the M9 must first be paired with the device as follows:1) Tap the Bluetooth in setting as shown in the picture below;2) If Bluetooth on the M9 is off, turn it on by clicking the switch on the upper right to the “ON” positionon the right;3) Tap “SEARCH FOR DEVICES” at the bottom of the screen to have the M9 search for and display nearby Bluetooth devices;4) Tap the name of your Bluetooth device to pair with it. Successfully paired devices will appear under the “PAIRED DEVICES” list:Refresh tosearch Blutooth Before connecting Bluetooth device, you can select the Bluetooth audio codec which you want to useas follows:1)Enter the Settings-Audio settings interface2)Click on the Wireless Playback quality, select the one you want to use, then disconnect the current connection and connect with your Bluetooth device again.Note:1. If you already connect with one Bluetooth device, it is necessary to disconnect the Bluetooth connection in order to switch the Bluetooth audio code successfully before reconnecting with the Bluetooth device. (The switching between the three modes of LDAC can work in real time.)2. When you turn on the Bluetooth , M9 will automatically connect to the latest available device.Bluetooth receiverWhen M9 is connected to a new Bluetooth device (such as the mobile phone) as a Bluetooth receiver, turn on the "Bluetooth decoding amp mode" in the Bluetooth settings interface, then the Bluetooth will turned off automatically, turn on the Bluetooth again and you are in Bluetooth receive mode now! (It only supports SBC now, and will support LDAC in the future.)Disconnect3. AudioMultifunctional OutputSwitch the output betweenPO/LO/SPDIFCoaxial digital outputYou can choose between DOP and D2p modes. In D2P mode, DSD will Converted to PCM. In DOP mode, it will output whatever you input (The DAC device should support DSD or there will be noise when you play DSD in DOP mode)GainSets the Gain level of the headphone output to be either High (high volume) or Low (low volume).Digital filter modeTo set the filter modes: Sharp Roll-Off Filter, Slow Roll-Off Filter, Short delay Sharp Roll-Off Filter, Short delay Slow Roll-Off Filter, Super Slow Roll-Off FilterWireless playback qualityWhen the Bluetooth receiver supports multiple Bluetooth audio codecs such as BTR3), you can select which you want to use.BalanceSet the Balance between the left and right channels. From being biased leftmost (L10) through centre (0) to rightmost (R10), there are 21 settings available.In-line remoteResponse to in-line remotes on connected headsets may be enabled or disabled by your choice.Balance BoostAfter checking the Balance Boost option, the output power of the balanced headphone output will increate, and it could drive the high impedance headphones better.Adjustable volume at LOThis allows you to set whether the volume through Line Out can be controlled by adjusting the volume level or not.USB DACCheck “USB DAC” and connect the M9 with computer via USB cable. (If you’re using Windows system, please install the driver at https:///supports; MAC system doesn’t need to install the DAC driver.4. LEDYou can adjust brightness of the indicator.5. Key-lock SettingsYou can choose the buttons/knob you want to be available when the screen is off.6. GeneralGeneral includes About device, Power-off timers, Apps, Brightness level, Wallpaper, Sleep, Date& time, Language &Input, Screen lock. H ere are a few common function’s introductions.About device“You can view Device name, Build number, etc.Power-off TimerPower-off timer includes two categories, namely “Sleep” and “Idle power off”:Sleep: once the pre-set power-off time is expired, M9 will power off automatically, no matter whether it is playing or not. The power-off time can be set to any value between 0 to 120 minutes. By default the sleep power off is turned off, and it will restore to the default settings once the power-off time is expired.Idle power off: once the pre-set power-off time is expired and no operation is performed during the time period, M9 will power off automatically. The timer can be set to any value between 0 to 50 minutes. By default the sleep power off is turned off, and it will restore to the default settings once the power-off time is expired.AppsM9 app can be disabled or forced to stop. The memory and RAM can also be checkedBrightness levelThe brightness can be adjusted according to the environment.SleepSpecify after how much time of inactivity (no button presses, screen touches or playing) M9 will enter sleep mode. In Sleep mode, M9 would have low power consumption. To short press the Power button can wake up M9 from Sleep mode.Language setting1. “Settings”-“G eneral”- “L anguage & input”, and “L anguages” in sequence, which will bring you to the “L anguage preference setting” interface.2. Press “Add a language”3. Select a language4. After selecting the language, you should press the “=” icon on the right side of the target language and drag the language to the head of the list. Switching language can only be completed after this operation.Factory data reset“Factory data reset” will clean all the user data in memory and restore to the original default settings. Please backup important data in advance.●Firmware UpdateYou can select OTA updates or choose Local updates.OTA updates requires a stable WiFi network, and once you press the “check for updates” button, M9 will automatically look for updates online. If a new version firmware is available, it will notify you the new version, and then the update can be performed accordingly.For local package update, the following steps need to be followed:1. Download the firmware from FiiO official website, such as “M9-ota-1.0.1.zip” ,and copy this firmware file to the root directory of your micro SD. Note that the file should not be unzipped, andyou are recommended not to modify the file name.2. Press “Technical Support >Firmware Update>L ocal upgrade” accordingly, locate the firmware file in the “L ocal upgrade” interface, and then choose the firmware file.3. Press “confirm" button on the prompt window, and then M9 will be rebooted and the update will be completed automatically.Attention1. Please ensure the battery power is more than 30%, or the device is connected to a power supply.2. Please ensure the firmware file is selected.3. Please do not perform any operation on M9 while updating, and if the update is not successful,you can hold POWER and PLAY buttons simultaneously to reboot the device.●Status barThe status bar on top of the screen can indicate the working status.1—volume icon2—current volume3—blue tooth status4—Blue tooth codec format5—balanced plug6—current time8—micro sd7—POplug(includedPO,LO,spdif)9——WiFi10—remaining battery inpercentage●Technical SupportTap the Technical support icon on the home screen to enter the technical support menu, where the following options are provided:Firmware update: you can choose the online upgrade or select a local package to update the M9’s firmware;FAQ: List the solutions for some FAQ;Quick start guide: tap to view the quick start guide for the M9.●FiiO MusicThe M9 comes with the FiiO Music app, a music playing application that has been highly customized to make full use of the audio hardware of the M9 and tailored to the usage needs of advanced music enthusiasts.On first launch of FiiO Music, an illustration of the guide to the app will appear. Below is the introduction of FiiO Music app.1. APP homepageOn launching the FiiO Music app, the following homepage will appear. The following functions can be performed on the homepage:Back the Main menu inferface Tap the icon to jump to playing pageSettingsSettings: tap the icon to go to app settings options; Return to desktop: tap the icon to return to main screen; Playing page: tap the icon to jump to playing page;Recently played: Lists your recently played songs according to the time it is played; Most played: Lists your most popular songs according to playback frequency; Recently added: Lists the tracks that are recently added to the library.2. Quickly locate all musicWhen the list is ordered by alphabet (tap the blue circle to the lower right and select the “A->Z” option), you can slide your finger over the alphabet list to the right of the screen and quickly jump to the part of the list that starts with the selected letter.3. GesturesSliding your finger from right to left over a list item to enable the shortcuts menu and tap on the icons to perform the operations.Play ModeEQ SearchReturnMore fuctionsAdd to palylist Previous trackPlay/PauseNext track4. Function menuTap the shortcuts icon of function menu, the following functions can be performed.Selected sort order: sort by added time, sort by first letter, sort by filename.Bulk management: batched playback, batched adds to my favorite, batched add to playlist,batched delete, exit batch operation5. Now playingThe Now Playing screen support frequently used taps and cool gesture actions, as below:6. Tap buttonsThe tap buttons from top to bottom on the playing screen:1) Return: return to Original path2) Search: Tap to show a full screen search pane for all songs on the M9. Searching for track title, album name and artist name are supported. Recent searching history is saved;3) Equalizer: tap to the equalizer settings;4) Play mode: Tap to choose between Play All once, Loop Single, Shuffle and Loop All;5) Add to playlist: Tap to show playlists screen, tap to add the present song to a playlist of your choosing.6) Add to Favorites: Tap to add the present track to the Favorites playlist;7) More functions: Tap to view track info or delete the present track;8) Previous track9) Play / Pause: Tap to Play or Pause the present track10) Next track7. Gesture operationsSwitch displaying information: Click on the middle of the album cover to switch between displaying the album cover, lyrics, ID3 info.View playlist: slide in from left edge to view the current list of songs queued for play; tap any song on the list to jump to that song;Adjust volume: Scroll the volume knob to show a full screen volume pane, no operation for 2s or click "Back" button, this pane will disappear;Slide to fast forward/rewind: tap anywhere on the progress bar below the album cover area to fast forward or rewind playing;Note: While in the lyrics display page, you can adjust the playback progress by sliding over the lyrics, adjust lyrics timeline or adjust font size.8. EQFiiO Music has built-in a graphic equalizer. One may choose between the given genre presets directly, or adjust the ten frequency bands from 20 to 20kHz independently from -6 to +6 dB, thus satisfying your personalized listening needs.1) Choose preset EQ: Swipe up from the bottom of the screen to show the full list of EQ presets, tap icon to switch the equalizer.2) Customize EQ: to customize an EQ setting as below:a. Tap the button on the upper right to the right to activate the equalizer.b. Choose the genre preset to be adjusted (e.g. “User Defined”);c. Drag a vertical slider to adjust its corresponding frequency up and down. The EQ curve above changes to reflect your adjustments.Swipe left or right over the sliders to move between the low and high frequency sliders;d. Press the Back button to the lower right to exit and save changes;3) Reset EQ: Tap the reset button at the upper right corner to reset the present EQ preset to its genre default.Note: If a factory reset is performed on the M9, all EQ settings will be reset to defaults.。
perftest 使用手册
PerfTest是一个用于性能测试和分析的工具,它可以帮助开发人员识别应用程序中的性能瓶颈,并提供有关应用程序性能的详细信息。
以下是PerfTest使用手册的概述:1. 概述PerfTest是一个命令行工具,可以在Windows和Linux系统上使用。
它支持多种性能测试场景和指标,并可以生成详细的性能报告。
PerfTest支持多种性能指标,包括CPU使用率、内存使用率、网络带宽等,并可以测试应用程序的并发性能和响应时间。
2. 安装和配置要使用PerfTest,需要先安装Microsoft Visual Studio或MinGW编译器。
在Windows上,可以从Visual Studio官方网站下载并安装Visual Studio。
在Linux上,可以从MinGW官方网站下载并安装MinGW编译器。
安装完成后,可以通过命令行运行PerfTest工具。
3. 使用说明使用PerfTest时,需要指定要测试的应用程序和测试场景,并指定要测试的性能指标和参数。
以下是一些常用的命令行选项:perftest <app_path> <test_name> [options]其中,<app_path>是应用程序的路径,<test_name>是测试场景的名称,[options]是可选的选项。
以下是一些常用的选项:--c <config_file>:指定配置文件的路径;--n <num_concurrency>:指定并发用户数;--w <wait_time>:指定等待时间;--p <params>:指定参数列表。
4. 常见问题和解决方案在使用PerfTest时,可能会遇到一些常见问题,例如测试结果不准确、性能瓶颈难以定位等。
为了解决这些问题,可以查阅PerfTest的官方文档或在线社区,或者联系Microsoft Visual Studio或MinGW的技术支持团队。
InstallShield软件封装打包说明

软件封装打包说明AppDataFolder 应用程序数据文件夹The AppData folder contains app settings, files, and data specific to the apps on your PC. The folder is hidden by default in File Explorer, and has three hidden sub-folders: Local, LocalLow, and Roaming.●Roaming. This folder (%appdata%) contains data that can move with your userprofile from PC to PC—like when you’re on a domain—because this data has the ability to sync with a server. For example, if you sign in to a different PC on a domain, your web browser favorites or bookmarks will be available.●Local. This folder (%localappdata%) contains data that can't move with your userprofile. This data is typically specific to a PC or too large to sync with a server. For example, web browsers usually store their temporary files here.●LocalLow. This folder (%appdata%/…/locallow) contains data that can't move, butalso has a lower level of access. For example, if you're running a web browser in a protected or safe mode, the app will only be able access data from the LocalLow folder.The apps themselves choose whether to save to the Local, LocalLow, or Roaming folders. Most desktop apps use the Roaming folder by default, while most Windows Store apps use the Local folder by default.WarningWe don't recommend moving, deleting, or making any changes to files or folders in the AppData folder. Doing so could make your apps run poorly or stop working entirely.AppData文件夹该文件夹包含特定于你电脑上的应用程序的应用程序设置、文件和数据。
ds file使用说明
ds file使用说明1. 简介ds file是一款功能强大的文件管理工具,为用户提供了便捷的文件上传、下载、分享等功能。
无论是个人用户还是企业团队,都可以通过ds file快速管理和共享文件,提高工作效率。
2. 安装与登录2.1 安装ds file支持多个平台,包括Windows、Mac、iOS和Android。
用户可以根据自己的设备选择合适的版本进行安装。
•Windows/Mac:从官方网站下载安装程序,运行程序并按照提示进行安装。
•iOS:在App Store搜索“ds file”,点击安装。
•Android:在Google Play搜索“ds file”,点击安装。
2.2 登录安装完成后,打开ds file应用程序,在登录界面输入您的账号和密码,点击“登录”按钮即可登录。
3. 功能介绍3.1 文件上传在ds file中,文件上传非常简单。
您可以通过以下步骤完成文件上传:1.打开ds file应用程序,登录您的账号。
2.在界面中找到“上传”按钮,点击进入上传界面。
3.在上传界面中,您可以选择上传文件的来源,包括本地设备、外部存储设备等。
4.选择需要上传的文件,点击“上传”按钮即可开始上传。
3.2 文件下载使用ds file下载文件同样非常方便。
您可以按照以下步骤进行文件下载:1.打开ds file应用程序,登录您的账号。
2.在界面中找到您需要下载的文件,点击进入文件详情界面。
3.在文件详情界面中,找到“下载”按钮,点击即可开始下载。
3.3 文件分享ds file提供了多种文件分享方式,让您可以方便地与他人共享文件。
以下是一些常用的文件分享方式:•内部分享:您可以将文件分享给同一团队或组织中的其他成员。
只需要在文件详情界面中找到“分享”按钮,选择分享的对象即可。
•外部分享:如果需要与外部人员分享文件,可以使用外部分享功能。
在文件详情界面中找到“分享”按钮,选择生成分享链接并设置访问权限,然后将链接分享给需要的人员即可。
The Noise App 使用说明说明书

The Noise App User Guide – AppDownloadTo download the app go to the “App Store” for i P hone users or the “Play Store” for android users. Search for “The Noise App” and click “Get” or “Install” to download the app.RegisterOpen the app and click on “Create an Account”. Fill in the details and select your Service Provider. If your Service Provider isn’t there then we will keep your details on file until they are registered as a provider. Agree to the terms of service and click Create Account. An email will be sent to your email address asking you to confirm your account. Once your account has been confirmed you can then begin submitting reports.Once your account has been confirmed log in to the app on your phone. This will prompt you to enter your address and complete the registration process.Submit a complaint1. Record - After logging in for the first time you will be prompted to make a recording. To start recording press and hold the microphone icon button at the bottom of the screen. You don’t have to record the whole event – just a representative snapshot of the noise as it is happening. You can record up to 30 seconds and if you need to, you can make several recordings each one 30 seconds.Whilst recording you will see a wave form along with a timer that moves across the screen.When you remove your finger or thumb the app stops recording. Accept, reject or playback the recording.Once accepted, you will then be prompted to provide more general information about the noise you are experiencing.2. Source - First, what type of noise is it? Scroll and choose a source from the list provided3. Location - Next, where did you record the noise? Choose an area of your property from the list provided and move to the next screen.4. Intensity and commentary - You are then asked to rate the noise in terms of how loud you consider it is. Underneath you may add a comment as to how the noise is affecting you, for example, you might state “the noise woke me up and is preventing me from getting back to sleep”. This information about how the noise affects you is very important so please try to add as much information as possible.5. Address - Lastly, enter the address of the noise source. Please ensure you check the address is correct if you use the Google maps GPS function.6. Confirmation - If you are happy with the information presented on the confirmation screen press the “send report button”. Your recording will then be placed into your diary. This may then be reviewed by your service provider.7. Report Sent - You’ll receive a confirmation message saying that your entry has been sent.8. Noise Diary - Your first entry will populate your noise diary and will appear at the top of the screen with all your previous recordings listed below.Notice the symbols on the left – they change colour according to whether your entry has been reviewed by your service provider or not.Select one of the entries in the diary and you will access two screens–the “detail” and “activity” screens.Switch between detail and activity screens using the tabs at the top.The detail screen (on the left) provides a summary of the information relating to the particular diary entry you selected.In the activity screen you will see a summary of activity related to that entry by you and the investigating officer. You may also both add comments or enter into a dialogue using the comments box at the bottom. This might be useful for you to add additional information after the event, for example, how long the noise continued for.10. What next? - When you next log on you will be taken to your noise diary. Continue to make recordings and entries for as long as the problem continues.。
LoadRunner Professional 软件安装指南说明书

安装指南转到联机帮助中心https:///lr/LoadRunner Professional软件版本:2023文档发布日期: 2023四月向我们发送反馈请告知我们如何改善安装指南的用户体验。
将电子邮件发送至:**********************法律声明©版权所有1994-2023Micro Focus或其附属公司之一。
担保Micro Focus及其附属公司和许可方(“Micro Focus”)的产品和服务的唯一担保已在此类产品和服务随附的明示担保声明中提出。
此处的任何内容均不构成额外担保。
Micro Focus不会为此处出现的技术或编辑错误或遗漏承担任何责任。
此处所含信息如有更改,恕不另行通知。
受限权限声明包含机密信息。
除非另有特别说明,否则必须具备有效许可证方可拥有、使用或复制。
按照FAR12.211和12.212,并根据供应商的标准商业许可的规定,商业计算机软件、计算机软件文档与商品技术数据授权给美国政府使用。
免责声明此处可访问的某些版本的软件和/或文档(以下称为“资料”)可能包含Hewlett-Packard Company(现为HP Inc.)和Hewlett Packard Enterprise Company的品牌。
从2017年9月1日起,该材料现在由Micro Focus(一家具有独立所有权和经营权的公司)提供。
对HP和Hewlett Packard Enterprise/HPE标志的任何引用都是历史性的,HP和Hewlett Packard Enterprise/HPE标志是其各自所有者的财产。
目录欢迎使用LoadRunner Professional5 LoadRunner帮助中心5 LoadRunner Professional组件5系统要求和先决条件7系统要求7在Windows上安装必备软件7由安装程序自动检测和安装7手动安装Windows更新8安装注意事项和限制8在Windows上安装LoadRunner Professional11安装工作流11升级LoadRunner Professional14在Windows上安装LoadRunner Professional14安装向导信息14运行安装15静默安装LoadRunner Professional18安装命令行选项21通过包装文件安装完整的LoadRunner Professional程序包21通过PFTW文件安装独立应用程序或其他组件23在Windows上部署Docker化Load Generator24先决条件25使用预定义映像运行通过Docker设置的Load Generator25使用自定义映像运行Docker化Load Generator26 Dockerfile的自定义内容示例27运行Load Generator容器后28提示和准则29配置用户登录设置29安装LoadRunner语言包30在Linux上安装Load Generator31安装工作流31通过安装向导在Linux上安装Load Generator33开始之前34运行安装向导34 Linux上的Load Generator静默安装35在Linux上部署Docker化Load Generator36先决条件36使用预定义映像运行通过Docker设置的Load Generator37使用自定义映像运行Docker化Load Generator38运行Load Generator容器后40提示和准则40配置Linux环境41设置环境变量41验证Linux安装42运行verify_generator43检查Controller连接44改善Load Generator性能45增加文件描述符46增加进程条目数47增加交换空间47从Linux计算机上卸载Load Generator48卸载Load Generator12.55或更低版本48卸载Load Generator12.56或更高版本49 Load Generator Linux安装疑难解答49安装LoadRunner Data Hub56安装工作流56使用安装向导安装Data Hub57开始之前57运行安装向导57静默Data Hub安装58运行静默安装58静默安装选项60验证Data Hub安装60安装Data Hub Web Connector61安装工作流61使用安装向导安装Web Connector62开始之前62运行安装向导62静默Web Connector安装63运行静默安装63静默安装选项65验证Web Connector安装65欢迎使用LoadRunner Professional欢迎阅读《LoadRunner Professional安装指南》。
win读取、写入ios移动硬盘的 解决方案

win读取、写入ios移动硬盘的解决方案摘要:1.问题背景2.解决方案一:使用Windows 系统自带的HFS+驱动3.解决方案二:使用第三方软件4.解决方案三:通过网络共享5.总结与建议正文:【问题背景】随着移动硬盘的普及,越来越多的用户在Windows 和iOS 设备之间传输数据。
然而,由于Windows 和iOS 操作系统之间的文件系统差异,直接在Windows 系统下读取和写入iOS 移动硬盘中的数据并不方便。
为了解决这一问题,本文将介绍三种解决方案。
【解决方案一:使用Windows 系统自带的HFS+驱动】对于支持HFS+文件系统的iOS 移动硬盘,用户可以在Windows 系统中直接安装HFS+驱动。
具体操作步骤如下:1.打开设备管理器2.找到“其他设备”选项,双击打开3.选择“从列表或驱动程序安装”4.在“从磁盘安装”选项中,选择HFS+驱动的路径5.完成安装【解决方案二:使用第三方软件】如果上述方法无法解决问题,用户还可以尝试使用第三方软件。
例如,Paragon HFS+ for Windows 可以实现Windows 系统对HFS+文件系统的完美支持。
用户只需下载并安装该软件,即可在Windows 系统下读取和写入iOS 移动硬盘中的数据。
【解决方案三:通过网络共享】另外,用户还可以通过网络共享的方式实现Windows 与iOS 设备之间的文件传输。
具体操作如下:1.在Windows 系统中,启用共享文件夹功能2.在iOS 设备上,下载并安装支持网络共享的APP,如AirDisk、FileApp 等3.使用APP 连接到Windows 系统的共享文件夹,实现文件的读取和写入【总结与建议】总之,针对Windows 系统下读取和写入iOS 移动硬盘的问题,用户可以通过以上三种方法解决。
在实际操作过程中,用户可根据自己的需求和设备情况选择合适的方法。
FileApp使用说明
FileApp使用说明
1.安装和启动
2.文件浏览
FileApp提供了一个直观的界面,用于浏览和管理设备上的文件。
打开FileApp后,您将看到一个文件浏览器界面,显示了您设备上存储的文件和文件夹。
您可以通过滑动屏幕来浏览文件和文件夹,并点击打开文件或文件夹。
3.文件传输
FileApp支持通过多种方式传输文件。
您可以通过Wi-Fi、蓝牙、iTunes或云存储服务(如Dropbox和Google Drive)将文件从计算机或其他设备传输到手机中,也可以将文件从手机传输到其他设备。
选择所需的传输方式,按照提示进行操作即可完成文件传输。
4.文件管理
5.文件
如果您在设备上有大量的文件,可以使用FileApp的功能来快速找到所需的文件。
点击图标,输入关键词,FileApp将设备上的文件,并显示与关键词匹配的结果。
6.文件预览
7.文件共享
8.文件保护
9.云存储服务
FileApp支持与云存储服务(如Dropbox和Google Drive)的集成。
您可以将FileApp连接到云存储服务,以便在设备上浏览和管理云存储中的文件。
打开应用程序设置,选择“云存储服务”选项,按照提示进行连接。
10.其他功能。
CEF 使用说明中文版
这是一个翻译文档,持续更新中CEF General Usage(CEF3预览)介绍CEF全称Chromium Embedded Framework,是一个基于Google Chromium 的开源项目。
Google Chromium项目主要是为Google Chrome应用开发的,而CEF的目标则是为第三方应用提供可嵌入浏览器支持。
CEF隔离底层Chromium和Blink的复杂代码,并提供一套产品级稳定的API,发布跟踪具体Chromium版本的分支,以及二进制包。
CEF的大部分特性都提供了丰富的默认实现,让使用者做尽量少的定制即可满足需求。
在本文发布的时候,世界上已经有很多公司和机构采用CEF,CEF的安装量超过了100万。
[CEF wikipedia]页面上有使用CEF 的公司和机构的不完全的列表。
CEF的典型应用场景包括:嵌入一个兼容HTML5的浏览器控件到一个已经存在的本地应用。
创建一个轻量化的壳浏览器,用以托管主要用Web技术开发的应用。
有些应用有独立的绘制框架,使用CEF对Web内容做离线渲染。
使用CEF做自动化Web测试。
CEF3是基于Chomuim Content API多进程构架的下一代CEF,拥有下列优势:改进的性能和稳定性(JavaScript和插件在一个独立的进程内执行)。
支持Retina显示器。
支持WebGL和3D CSS的GPU加速。
类似WebRTC和语音输入这样的前卫特性。
通过DevTools远程调试协议以及ChromeDriver2提供更好的自动化UI测试。
更快获得当前以及未来的Web特性和标准的能力。
本文档介绍CEF3开发中涉及到的一般概念。
开始使用二进制包从源码编译(Building from Source Code)示例应用程序(Sample Application)重要概念(Important Concepts)C++ 封装(C++ Wrapper)进程(Processes)线程(Threads)引用计数(Reference Counting)字符串(Strings)命令行参数(Command Line Arguments)应用程序布局(Application Layout)应用程序结构(Application Structure)Windows操作系统(Windows)Linux操作系统(Linux)Mac X平台(Mac OS X)单一执行体(Single Executable)分离子进程执行体(Separate Sub-Process Executable)集成消息循环(Message Loop Integration)CefSettingsCefBrowser和CefFrameCefAppCefClientBrowser生命周期(Browser Life Span)离屏渲染(Off-Screen Rendering)投递任务(Posting Tasks)进程间通信(Inter-Process Communication (IPC))处理启动消息(Process Startup Messages)处理运行时消息(Process Runtime Messages)异步JavaScript绑定(Asynchronous JavaScript Bindings)通用消息转发(Generic Message Router)自定义实现(Custom Implementation)同步请求(Synchronous Requests)网络层(Network Layer)自定义请求(Custom Requests)浏览器无关请求(Browser-Independent Requests)请求响应(Request Handling)Scheme响应(Scheme Handler)请求拦截(Request Interception)其他回调(Other Callbacks)Proxy Resolution使用二进制包CEF3的二进制包可以在这个页面下载。
MOSES安装以及使用说明
MOSES安装以及初级说明作为初学者对MOSES现在也没有什么深入的了解就在这里嫌丑,浅显的介绍一下。
首先是moses的官网:/moses/里面资料很详细,可以下载说明文档(manual.pdf)按照文档里面的提示一步步进行,一般来说整体只要依照这个步骤就没有问题我现在本机上安装的moses,然后又在服务器上进行的运行,所以安装经验是本机的,但是两面使用的搭配是一样的都是moses+boost+GIZA+++IRSTLM。
就是操作系统不一样,本机是ubuntu,而服务器是CentOS,但是基本上的过程是一样的。
一、前期安装准备1、Boost【ubuntu下】apt-get install libboost1.53-all-dev2、GIZAA++【ubuntu下】wget /files/giza-pp-v1.0.7.tar.gztar xzvf giza-pp-v1.0.7.tar.gzcd giza-ppMake在编译后会生成三个可执行文件· giza-pp/GIZA++-v2/GIZA++· giza-pp/GIZA++-v2/snt2cooc.out· giza-pp/mkcls-v2/mkcls这三个文件是在之后主要要使用的文件,可以单独把这三个文件提取出来放到一个方便的位置,不觉得麻烦的话也可以每次键入路径,不过使用频率不算高还可以。
比如说建立tools\ 把这三个文件放进去可以在编译的时候直接指出GIZA++的位置,也可以在编译的时候不指出,在使用的时候再指明,我采用的是后者。
3、IRSTLM这个我在ubuntu和centOS下都编译了,方法都很简单1)【ubuntu下】在编译IRSTLM之前,需要安装两个工具。
使用下面的命令来安装这两个工具:$ sudo apt-get install automake$ sudo apt-get install libtool接下来就可以安装IRSTLM了。
fortify安装使用手册

Fortify SCA安装使用手册编号:GRG _YT-RDS-PD-D03_A.0.1版本:V1.0发布日期:2011-5-5文档历史记录编号与名称版本发布日期创建/修改说明参与人员版权声明本软件产品(包括所含的任何程序、图像、文档和随附的印刷材料),以及本软件产品的任何副本的产权和著作权,均属广州广电运通金融电子股份有限公司所有。
您不得使用任何工具或任何方式对本软件产品进行反向工程,反向编译。
未经广州广电运通金融电子股份有限公司许可,您不得以任何目的和方式发布本软件产品及任何相关资料的部分或全部,否则您将受到严厉的民事和刑事制裁,并在法律允许的范围内受到最大可能的民事起诉。
目录文档历史记录......................................................................................................................................... I I 1. 产品说明 (9)1.1.特性说明 (10)1.2.产品更新说明 (10)2. 安装说明 (10)2.1.安装所需的文件 (11)2.2.F ORTIFY SCA支持的系统平台 (11)2.3.支持的语言 (11)2.4.F ORTIFY SCA的插件 (12)2.5.F ORTIFY SCA支持的编译器 (12)2.6.F ORTIFY SCA在WINDOWS上安装 (13)2.7.F ORTIFY SCA安装E CLISPE插件 (14)2.8.F ORTIFY SCA在LINUX上的安装(要有LINUX版本的安装文件) (14)2.9.F ORTIFY SCA在U NIX上的安装(要有U NIX版本的安装文件) (15)3. 使用说明 (15)3.1.F ORTIFY SCA扫描指南 (16)3.2.分析F ORTITFY SCA扫描的结果 (21)4.故障修复 (25)4.1使用日志文件去调试问题 (26)4.2转换失败的信息 (26)4.3JSP的转换失败 (26)4.4C/C++预编译的头文件 (27)前言Fortify SCA是目前业界最为全面的源代码白盒安全测试工具,它能精确定位到代码级的安全问题,完全自动化的完成测试,最广泛的安全漏洞规则,多维度的分析源代码的安全问题。
- 1、下载文档前请自行甄别文档内容的完整性,平台不提供额外的编辑、内容补充、找答案等附加服务。
- 2、"仅部分预览"的文档,不可在线预览部分如存在完整性等问题,可反馈申请退款(可完整预览的文档不适用该条件!)。
- 3、如文档侵犯您的权益,请联系客服反馈,我们会尽快为您处理(人工客服工作时间:9:00-18:30)。
以前使用其它牌子的智能手机,基本上都可以和电脑共享文件,还可以替代U盘,与其它电脑之间传递文件。
自从使用联通版iPhone 3GS后,发现电脑和iPhone之间只能通过“相机胶卷”共享一些图片,而像Word、Excel、PDF等类型的文档只能Email发送到iPhone,文件的管理和分类很不方便,而且发送Email到iPhone还要浪费大量的流量(如果文件很大的话)。
在不越狱的情况下,如何让联通版iPhone和电脑共享文件以及替代U盘就成了一个一直困扰俺的问题。
感谢上帝,俺无意间在App Store发现一个免费的文件管理软件,基本上解决了iPhone和电脑之间共享文件的问题,而且还可以把iPhone当做U盘使用,不同的是此U 盘是通过将iPhone当做FTP Server方式实现的。
为帮助其他使用联通版iPhone而又没有越狱的坛友可以让iPhone和电脑共享文件,特写此宝典共同探讨,具体操作方式如下:
1.先在App Store内搜索FileApp这
个应用程序,可以找到两个版本,
FileApp Pro是收费版本,售价
4.99美刀,俺钱少选择免费的版
本下载并安装。
如果您手机流量
有限,可以考虑使用iTunes下载,
然后同步到iPhone上。
App Store
搜索结果如下图:
2.用数据线连接iPhone到电脑(当然也可使用
蓝牙,但这样速度慢而且耗费iPhone电池),在iPhone上点设置–> 通用–> 网络–> 网
络共享–> 共享网络打开。
共享打开后在
iPhone屏幕上部出现蓝色条并有“网络共享”
字样,如下图:
3.从iPhone屏幕上找到并打开FileApp这个应
用程序,如下图:
4.在iPhone屏幕上点击右上部的WiFi图标,启动共享,如下图:
Sharing is On灯为绿色说明已经开始共享,下面的四个图标分别说明使用Win7、Win Vista、Win XP和Mac OS X如何从电脑上访问此共享,可以在iPhone上滚动屏蔽获得完整帮助信息。
5.上面4步完成了iPhone端的操作,下面的操作在电脑上。
在电脑桌面的“开始”点右键
打开“资源管理器”,然后在地址栏输入FTP://192.168.20.1:2121,回车后可看到电脑读取的iPhone FileApp的共享内容,如下图:
6.在电脑上找到想要复制到iPhone的文件或文件夹,拖入上图右侧即可,如下图:
7.下面三张图片说明复制的过程和复制后在“资源管理器”内的效果,和使用U盘一样。
8.此时就可以断开iPhone和电脑的连接了,因为文件已经从电脑复制到iPhone。
下面几
张图片说明如何在iPhone上通过FileApp这个使用程序管理从电脑复制过来的文件。
按文件名排序:
按文件夹管理:
按文件类型排序:
查看Excel文件:
查看图片文件:
等等等等。
此时,您的未越狱的联通版iPhone 3GS已经可以替代U盘功能了。
