CISCO PIX525 iOS 升级方法 BY上帝的眵目糊
CiscoIOS升级6步轻松搞定
CiscoIOS升级6步轻松搞定Cisco IOS升级6步轻松搞定前面的文章给大家介绍了什么是IOS、IOS升级的意义及一些方法,现在让我们用思科2811路由器升级IOS的实例来看看Cisco IOS升级的详细步骤。
我们选用通过TFTP服务器直接将新版IOS复制到路由器中的方法来进行IOS的升级。
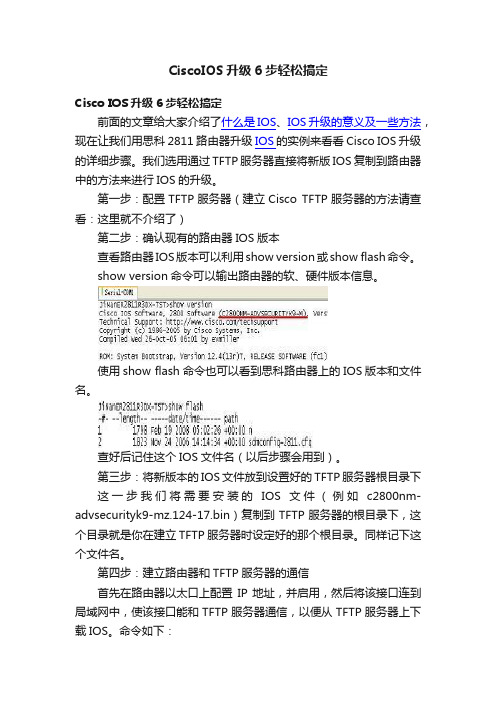
第一步:配置TFTP服务器(建立Cisco TFTP服务器的方法请查看:这里就不介绍了)第二步:确认现有的路由器IOS版本查看路由器IOS版本可以利用show version或show flash命令。
show version命令可以输出路由器的软、硬件版本信息。
使用show flash命令也可以看到思科路由器上的IOS版本和文件名。
查好后记住这个IOS文件名(以后步骤会用到)。
第三步:将新版本的IOS文件放到设置好的TFTP服务器根目录下这一步我们将需要安装的IOS文件(例如c2800nm-advsecurityk9-mz.124-17.bin)复制到TFTP服务器的根目录下,这个目录就是你在建立TFTP服务器时设定好的那个根目录。
同样记下这个文件名。
第四步:建立路由器和TFTP服务器的通信首先在路由器以太口上配置IP地址,并启用,然后将该接口连到局域网中,使该接口能和TFTP服务器通信,以便从TFTP服务器上下载IOS。
命令如下:Router(config)#inter f0/0Router(config-if)#ip address 192.168.0.10 255.255.255.0Router(config-if)#no shut这样我们就在路由器的f0/0口上配置了IP地址:192.168.0.10。
然后使用ping命令测试路由器和TFTP服务器之间能否正常通信(TFTP服务器的地址是192.168.0.1)。
能够正常的ping到TFTP服务器就可以开始为路由器IOS升级了。
第五步:升级IOS升级IOS的命令是copy tftp flashRouter#copy tftp flashAddress or name of remote host []?在后边输入TFTP服务器的IP地址:192.168.0.1后回车;Source filename []?在后边输入新版本IOS文件名(前边提醒你记录了)c2800nm-advsecurityk9-mz.124-17.bin后回车;Destination filename [c2800nm-advsecurityk9-mz.124-17.bin]?Do you want to over write? [confirm]回车;Accessing tftp://192.168.0.1/c2800nm-advsecurityk9-mz.124-17.bin…运行到这一步,如果你的路由器FLASH空间足够用的话就可以顺利完成IOS的升级了,如果空间不够的话会提示:“Not enough space on device”,这时根据IOS版本的不同出现这个错误后的处理方法不同,老版本会提示你删除flash文件“Erase flash:”你可以强制删除flash中的文件;新版本的IOS会直接回到提示符下终止IOS的升级,这是你必须首先删除路由器中老版本的IOS文件然后继续执行IOS升级,命令是“delete flash:”。
CISCO路由器的IOS升级

IOS升级方法一在对能够正常启动的CISCO路由器的IOS进行升级时,比较简单。
具体步骤如下:1、寻找一种TFTP服务器软件(有CISCO公司的TFTPServer或3COM公司的3Cserver等,在升级较大IOS 映象文件时,建议用3Cserver),安装在一台计算机上,将要升级的IOS映象文件拷贝到相关的目录中(例:D:\),并运行TFTP服务器软件,通过菜单设置Root目录为拷贝IOS映象文件所在目录(如D:\)。
假设该计算机的IP地址为;2、连接路由器的console口和PC机的COM1,使用PC的终极终端软件访问路由器,将路由器的地址设为(和计算机的IP地址同网段即可)。
建议在进行IOS升级前将原有IOS文件备份下来,防止待升级的IOS文件存在问题不可用;QUOTE:? ???Router# dir flash:? ???(查看目前IOS映象文件名,也可用Router#Show version)? ???Directory of flash:/? ???1??-rw-? ???5998292? ?? ?? ?? ?? ? C2600-I-MZ.122-11.BIN? ???8388608 bytes total (2390252 bytes free)? ???Router#copy flash tftp? ?? ?? ?? ?(备份IOS文件)? ???Source filename []?c2600-i-mz.122-11.bin服务器地址)? ???Destination filename [c2600-i-mz.122-11.bin]?? ???!!!!!!!!!!!!!!!!!!!!!!!!!!!!!!!!!!!!!!!!!!!!!!!!!!!!!!!!!!!!!!!!!!!!!!!!!!!!!!!!? ???…? ???!!!!!!!!!!!!!!!!!!!!!!!!!!!!!!!!!!!!!!!!!!!!!!!!!!!!!? ???5998292 bytes copied in 324.071 secs (18509 bytes/sec)? ???Router#3、对路由器进行IOS升级;QUOTE:? ???Router#copy tftp flash服务器地址)? ???Source filename []? c2600-i-mz.122-11.bin? ?? ?? ?(需升级的新IOS映象文件名)? ???Destination filename [c2600-i-mz.122-11.bin]?? ???Do you want to over write? [confirm]? ???Erase flash: before copying? [confirm]? ???Erasing the flash filesystem will remove all files! Continue? [confirm]? ???Erasing device... eeeeeeeeeeeeeeeeeeeeeeeeeeeeeeee ...erasedee? ???Erase of flash: complete: !!!!!!!!!!!!!!? ???!!!!!!!!!!!!!!!!!!!!!!!!!!!!!!!!!!!!!!!!!!!!!!!!!!!!!!!!!!!!!!!!!!!!!!!!!!!!!!!!? ???…? ???!!!!!!!!!!!!!!!!!!!!!!!!!!!!!!!!!!!!!!? ???[OK - 5998292 bytes]? ???Verifying checksum...??OK (0xA0C0)? ???5998292 bytes copied in 318.282 secs (18846 bytes/sec)? ???Router#++++++++++++++++++++++++++++++++++++++++++++++++++++++++++++++IOS升级方法二由于升级失败后或路由器的config-register寄存器值为0x2101时,开启路由器时、或在开启(某些型号)Cisco 路由器的电源开关后30秒内按下Ctrl+break键,中断路由器的正常启动,路由器都会进入rom监视模式,即Router(boot)>,在这种情形下,对路由器的IOS进行升级,也比较简单。
(完整word版)CISCO交换机IOS升级步骤
IOS 升级在介绍CISCO 路由器IOS 升级方法前,有必要对Cisco 路由器的存储器的相关知识作以简单介绍。
路由器与计算机相似,它也有内存和操作系统。
在Cisco 路由器中,其操作系统叫做互连网操作系统(Internetwork Operating System),常简称为IOS 。
路由器的存储器主要有:ROM:只读存储器包含路由器正在使用的IOS的一份副本;RAM:IOS 将随机访问存储器分成共享和主存。
主要用来存储运行中的路由器配置和与路由协议有关的IOS 数据结构;FLASH (闪存):用来存储IOS 软件映像文件,闪存是可以擦除内存,它能够用IOS 的新版本覆写,IOS 升级主要是闪存中的IOS 映像文件进行更换。
NVRAM :非易失性随机访问存储器,用来存储系统的配置文件。
交换机的IOS 升级主要是闪存中的IOS 映像文件进行更换,现将CISCO 2950 交换机IOS 升级的步骤描述如下:一、前期准备1、准备进行IOS 升级的Cisco2950 交换机一台;2、电脑一台(台式机、笔记本均可)需要用串口,或者用USB 转串口,用于对交换机进行配置操作和作为TFTP 服务器.3、直连网线一根(即两段线序一致),用于向交换机传输IOS 文件;4、交换机配置线一根;5、TFTP 服务器软件一套,本次使用的是“ tftpd32 v3.33 ”;6、IOS 升级文件一份。
二、开始升级1、用配置线连接交换机的Console 口与电脑的COM1 口(或USB 口,依据配置线不同而定),网线连接交换机F0/1 口与电脑的以太网口。
电脑IP设为192.168.0.1 。
2、将电脑作为TFTP 服务器,打开TFTP 服务器软件,并将其根目录设为IOS 文件所在目录。
3、为使交换机能与TFTP 服务器相互通信,我们需要为交换机设置IP 地址。
使用Windows 自带的超级终端软件,将交换机F0/1 的地址设为与电脑的IP 地址同网段。
CISCO路由器的IOS升级
IOS升级方法一在对能够正常启动的CISCO路由器的IOS进行升级时,比较简单。
具体步骤如下:1、寻找一种TFTP服务器软件(有CISCO公司的TFTPServer或3COM公司的3Cserver等,在升级较大IOS映象文件时,建议用3Cserver),安装在一台计算机上,将要升级的IOS映象文件拷贝到相关的目录中(例:D:\),并运行TFTP服务器软件,通过菜单设置Root目录为拷贝IOS映象文件所在目录(如D:\)。
假设该计算机的IP地址为10.32.10.1;2、连接路由器的console口和PC机的COM1,使用PC的终极终端软件访问路由器,将路由器的地址设为10.32.10.32(和计算机的IP地址同网段即可)。
建议在进行IOS升级前将原有IOS文件备份下来,防止待升级的IOS文件存在问题不可用;QUOTE:Router# dir flash: (查看目前IOS映象文件名,也可用Router#Show version)Directory of flash:/1 -rw- 5998292 C2600-I-MZ.122-11.BIN8388608 bytes total (2390252 bytes free)Router#copy flash tftp (备份IOS文件)Source filename []?c2600-i-mz.122-11.binAddress or name of remote host []? 10.32.10.1 (TFTP服务器地址)Destination filename [c2600-i-mz.122-11.bin]?!!!!!!!!!!!!!!!!!!!!!!!!!!!!!!!!!!!!!!!!!!!!!!!!!!!!!!!!!!!!!!!!!!!!!!!!!!!!!!!!…!!!!!!!!!!!!!!!!!!!!!!!!!!!!!!!!!!!!!!!!!!!!!!!!!!!!!5998292 bytes copied in 324.071 secs (18509 bytes/sec)Router#3、对路由器进行IOS升级;QUOTE:Router#copy tftp flashAddress or name of remote host []? 10.32.10.1 (TFTP服务器地址)Source filename []? c2600-i-mz.122-11.bin (需升级的新IOS映象文件名)Destination filename [c2600-i-mz.122-11.bin]?Do you want to over write? [confirm]Accessing tftp://10.32.10.1/c2600-i-mz.122-11.bin...Erase flash: before copying? [confirm]Erasing the flash filesystem will remove all files! Continue? [confirm]Erasing device... eeeeeeeeeeeeeeeeeeeeeeeeeeeeeeee ...erasedeeErase of flash: completeLoading c2600-i-mz.122-11.bin from 10.32.10.1 (via Ethernet0/0): !!!!!!!!!!!!!!!!!!!!!!!!!!!!!!!!!!!!!!!!!!!!!!!!!!!!!!!!!!!!!!!!!!!!!!!!!!!!!!!!!!!!!!!!!!!!!!…!!!!!!!!!!!!!!!!!!!!!!!!!!!!!!!!!!!!!![OK - 5998292 bytes]Verifying checksum... OK (0xA0C0)5998292 bytes copied in 318.282 secs (18846 bytes/sec)Router#++++++++++++++++++++++++++++++++++++++++++++++++++++++++++++++IOS升级方法二由于升级失败后或路由器的config-register寄存器值为0x2101时,开启路由器时、或在开启(某些型号)Cisco路由器的电源开关后30秒内按下Ctrl+break键,中断路由器的正常启动,路由器都会进入rom监视模式,即Router(boot)>,在这种情形下,对路由器的IOS 进行升级,也比较简单。
思科路由器的IOS升级与备份
思科路由器的IOS升级与备份一、实验基础已搭建好的网络实验环境二、实验设备PC机一台、路由器一台、TFTP软件、交叉线一根三、实验步骤 1、用交叉线连接PC机和路由器(PC机装有TFTP服务器)2、配制PC机IP地址和路由器EO口 IP地址,在同一网段,并3、#show version4、# show flash5、# copy flash tftp6、# copy tftp flash四、注意事项查看IOS的版本查看flash空间大小备份升级1确保PC与路由器之间互通2 升级与备份过程中不能断电3 要升级的路由器要有足够的空4、source file ?源文件5、destination or host address思科路由器破解密码2500系列1 开机60秒内按ctrl + pause break进入监控模式2 >o/r 0x2142 不加载IOS>1 初始状态3 路由器自动重启提示" would you like to en ter the in itial con figurati on dialog ” 回答” no ”4 Router(root)> en 进入特权模式Router(root)# copy startup-c onfig runnin g-c onfig 将以前的配置调入内存5 Route(root)# show runnin g-co nfig 查看以前配置的密码Router(root-c on fig)# no en able password 删除明文密码Router(root-c on fig)# no en able secret 删除特权密码6 Router(root-co nfig)# con fig-register 0x2102 改回寄存器值7 Router(root)# copy runnin g-c onfig startup-c onfig 保存配置文件8 Router(root)#reload 重启2600系列(方法一样)ping 通Rommon #co nfreg 0x2142Copy runnin g-c onfig startup-c onfig ===write memoryCopy startup-c onfig runnin g-c onfig ===c onfig memory倚窗远眺,目光目光尽处必有一座山,那影影绰绰的黛绿色的影,是春天的颜色。
cisco交换机升级ios
创建 举例在本文我们在实验室环境使用以下交换机带有被清除配置 :
运行Native IOS 12.1(8b)EX4Catalyst 6500 ቤተ መጻሕፍቲ ባይዱ 换机
运行12.1(9a)Cisco 7500路由 器 交换机配置在本文适用于运行集成 Cisco IOS (Native Mode)所有Catalyst 6000和任何Catalyst 系列 4000系列交换机
line vty 0 4 ! end Cisco 7500路由器(没有VLAN中继) (....Output is suppressed) ! erface Port-channel1 ip address 11.1.1.1 255.255.255.0 hold-queue 300 in ! erface FastEthernet0/0 no ip address full-duplex channel-group 1 ! erface FastEthernet0/1 no ip address full-duplex channel-group 1 (....Output is suppressed) debug 及show 命令
Cisco 7500路由器 show erface port-channel < 信道id >
Router# show erface Port-channel 1
Port-channel1 is up, line protocol is up
Hardware is FastEtherChannel, address is 00e0.1476.7600 (bia
系统要求实现以太网信道 注意事项 在开辟物理接口的前如果端口信道接口配置首先 消除端口信道接口通过输入信道组 发出命令端口信道接口 自动地被创建
CISCO路由器IOS升级方法总结

CISCO路由器IOS升级方法总结概述在网络设备中,CISCO路由器是一种常见且广泛使用的设备。
为了保持设备的正常运行和维护安全性,定期升级路由器的操作系统(IOS)是必要的。
本文将总结CISCO路由器IOS升级的方法,以帮助用户顺利完成相关操作。
准备工作在开始升级路由器IOS之前,需要完成以下准备工作: 1. 确定当前路由器的型号和支持的IOS版本。
2. 下载最新的IOS版本文件,确保文件的完整性和正确性。
3. 使用一个TFTP(Trivial File Transfer Protocol)服务器,用于从服务器传输IOS文件到路由器上。
确保服务器能够正常工作,并连接到路由器所在的网络。
步骤一:备份当前的配置在进行任何升级操作之前,最重要的是备份当前的路由器配置。
这样,在升级过程中出现问题时,可以恢复到之前的配置状态。
以下是备份配置的步骤: 1. 连接到路由器的控制台界面或使用SSH(Secure Shell)进行远程登录。
2. 输入以下命令进入特权模式:enable3.进入全局配置模式:configure terminal4.输入以下命令将路由器配置保存到TFTP服务器上:copy running-config tftp:5.根据提示输入TFTP服务器的IP地址和备份文件保存的位置。
6.验证备份文件是否成功保存。
步骤二:升级IOS完成备份操作后,接下来是升级路由器的IOS。
根据下载的IOS版本文件以及路由器型号,执行以下步骤: 1. 确认当前IOS版本:show version2.通过TFTP服务器将新的IOS版本文件上传到路由器上:copy tftp: flash:3.根据提示输入TFTP服务器的IP地址和IOS文件的名称。
4.确认升级文件的完整性和正确性。
5.设置路由器引导文件指向新的IOS版本:boot system flash <IOS文件名>6.保存配置并重新启动路由器:write memoryreload7.确认路由器已经成功升级并正常运行。
原创 pix525 6.3(5) 升级到8.04 过程

INFO: converting 'fixup protocol ftp 21' to MPF commands
INFO: converting 'fixup protocol h323_h225 1720' to MPF commands
9、配上接口地址,TFTP服务器地址等等,开始TFTP下载新版PIXOS。
monitor> address 192.168.1.1
address 192.168.1.1
monitor> server 192.168.1.2
server 192.168.1.2
monitor> ping 192.168.1.2
Sending 5, 100-byte 0x7970 ICMP Echoes to 10.32.2.78, timeout is 4 seconds:
!!!!!
Success rate is 100 percent (5/5)
monitor> file pix804.bin
file pix701.bin
flashfs[7]: erasing block 125...done.
flashfs[7]: 0 files, 1 directories
flashfs[7]: 0 orphaned files, 0 orphaned directories
flashfs[7]: Total bytes: 16128000
pixfirewall(config)# exit
Cisco交换机IOS升级步骤

Cisco光纤交换机IOS升级步骤
一、 准备工作
1登录,
点击“support”
点击“select a task”
下载system software文件
下载kick start文件
下载完成后,使用md5校验工具校验是否文件是否正常。
2tftp工具(3CDaemon)
启动3CDaemon,
设置路径及重新启动TFTP服务。
二、 IOS的上传
Telnet进入交换机
显示当前的微码版本:show version
显示当前bootflash里的文件:dir bootflash:
上传文件,如果上传的过程中报错,试试重启tftp服务,可能解决问题
copy tftp://本机IP/m9200‐s2ek9‐kickstart‐mz.3.3.5.bin bootflash:
m9200‐s2ek9‐kickstart‐mz.3.3.5.bin
copy tftp://本机IP/m9200‐s2ek9‐mz.3.3.5.bin bootflash: m9200‐s2ek9‐mz.3.3.5.bin
dir bootflash
安装IOS
install all kickstart bootflash:m9200‐s2ek9‐kickstart‐mz.3.3.5.bin sys bootflash:
m9200‐s2ek9‐mz.3.3.5.bin
交换机将自动load文件,选择”y”,升级完毕后,将自动重启交换机,重启后,使用show
version显示IOS的版本是否已经升级正常。
交换机IOS升级
交换机IOS升级首先需要有IOS文件,如果没有备份原文件的话,可以找个同一版本的IOS来替代。
第一种方法:X-Modem以前我曾经尝试过一种方法,就是当Flash被删除后,启动无法进入系统,可以用X-Modem来恢复它。
当时我不小心删除了一台Cisco2950交换机的Flash IOS,导致系统无法启动,在查过不少资料后得到一个结论:唯一的方法通过X-Modem来恢复。
我的恢复方法如下:1、用控制线连接交换机console口与计算机串口1,用带有xmodem功能的终端软件连接(win2000 and xp的超级终端就带这功能)。
2、设置连接方式为串口1(如果连接的是其他串口就选择其他串口),速率9600,无校验,无流控,停止位1。
或者点击默认设置也可以。
3、连接以后计算机回车出现交换机无ios的界面,一般的提示符是:switch:4、拔掉交换机后的电源线重新启动交换机5、在超级终端输入:switch:flash_init会出现如下提示:Initializing Flash...6:输入拷贝指令:switch:copy xmodem: flash:image_filename.bin出现如下提示:Begin the Xmodem or Xmodem-1K transfer now...7、系统提示不断出现C这个字母就可以开始传文件了8、点击超级终端菜单:传送---发送文件,在协议选项中选择Xmodem或者Xmodem-1K协议,然后选择ios的影像文件(*.bin),开始传送。
9、因为不能改速率,所以传送得很慢,我的大概传送了80分钟左右,请耐心等待。
10、传送完毕后提示:File "xmodem:" successfully copied to ....switch:11、在提示符下输入switch:boot启用新的ios系统12、重新加电完成恢复工作。
这个是我恢复的方法,现在看来非常的不科学,效率低。
Cisco路由器IOS映像恢复及升级方法

Cisco路由器IOS映像恢复及升级方法一、Cisco 1000,1600,2500,4000系列1、IOS映像恢复的方法及步骤1) 连接PC的COM1口与路由器的console口,使用PC的超级终端软件访问该路由器;2) 开启路由器的电源开关,并在30秒内按下键盘的Ctrl+break,中断路由器的正常启动以进入rom监视模式,屏幕上提示符如下:>3) 键入如下命令:>o /r 0x2101改变路由器虚拟寄存器的默认值(0x2102);4) 键入重启命令:>i路由器重启,当屏幕显示以下信息表明路由器重启完毕:System Bootstrap, Version 5.2(8a), RELEASE SOFTWARECopyright (c) 1986-1995 by cisco Systems2500 processor with 1024 Kbytes of main memory…Press RETURN to get started!5) 路由器在虚拟寄存器的值为0x2101时自动进入rom启动模式:router(boot)>6) 此时,将TFTP服务器上的IOS映像文件恢复至路由器flash memory中,依次键入以下命令:router(boot)>enrouter(boot)#copy tftp flashSystem flash directory:No files in System flash[0 bytes used, available, total]Address or name of remote host [255.255.255.255]?192.168.18.168(IP地址已作技术处理,下同)Source file name? igs-i-l.110-22a.bin(IOS映像文件名)Destination file name [igs-i-l.110-22a.bin]?Accessing file 'igs-i-l.110-22a.bin' on 192.168.18.168...Loading igs-i-l.110-22a.bin from 192.168.18.168 (via Ethernet0): ! [OK]Device needs erasure before copying new fileErase flash device before writing? [confirm]Copy 'igs-i-l.110-22a.bin' from serveras 'igs-i-l.110-22a.bin' into Flash WITH erase? [yes/no]yErasing device... eeeeeeeeeeeeeeee ...erasedLoading igs-i-l.110-22a.bin from 192.168.18.168 (via Ethernet0): (!表示恢复成功)7) 还原路由器虚拟寄存器的默认值(0x2102),恢复路由器的正常启动顺序,依次键入以下命令:router(boot)#conf trouter(boot)(config)#config-register 0x2102router(boot)(config)#exitrouter(boot)#wrrouter(boot)#reload2、IOS映像升级的方法及步骤1) 升级之前先备份,将相关文件备份至TFTP服务器,键入如下命令:router#copy bootflash tftp(Cisco 2500系列路由器不存在bootflash,相应的是rom)router#copy flash tftprouter#copy startup-config tftp2) 因为Cisco 1000,1600,2500,4000系列路由器不允许在正常工作状态下重写flash memory,所以只有进入rom(或bootflash)启动模式才能升级IOS映像,依次键入以下命令:router#conf trouter(config)#config-register 0x2101router(config)#exitrouter#wrrouter#reload3) 路由器重启完毕后进入rom(或bootflash)启动模式,从TFTP服务器将新的IOS 映像文件拷贝至路由器的flash memory中:router(boot)#copy tftp flash4) 还原路由器虚拟寄存器的默认值(0x2102),恢复路由器的正常启动顺序,依次键入以下命令:router(boot)#conf trouter(boot)(config)#config-register 0x2102router(boot)(config)#exitrouter(boot)#wrrouter(boot)#reload二、Cisco 1700,2600,3600,7200系列1、IOS映像恢复的方法及步骤1) 连接PC的COM1口与路由器的console口,使用PC的超级终端软件访问该路由器;2) 开启路由器的电源开关,并在30秒内按下键盘的Ctrl+break,中断路由器的正常启动以进入rom监视模式,屏幕上提示符如下:rommon 1>3) 键入xmodem命令:rommon 1>xmodem c3640-i-mz.120-10.bin(IOS映像文件名)4) 然后,路由器一直等待从PC上接收该IOS映像文件,此时在超级终端软件中点击发送选项,选择存放在PC本地硬盘中的IOS映像文件,确定后即开始下载文件至路由器的flash memory中,由于通讯带宽只有9600波特,整个文件下载时间约为1.5小时(依文件大小而定),屏幕显示信息如下:Do not start the sending program yet...device does not contain a valid magic numberdir: cannot open device flash:W ARNING: All existing data in flash will be lost!Invoke this application only for disaster recovery.Do you wish to continue? y/n[n]:yReady to receive file c3640-i-mz.120-10.bin ...Erasing flash at 0x307c0000program flash location 0xDownload Complete!program load complete, entry point: 0x, size: 0x38f4105) 接着,路由器将自动重启,屏幕显示信息如下:Self decompressing the image : ################################# [OK]…Press RETURN to get started!2、IOS映像升级的方法及步骤1) 同理,升级之前先备份,将关键文件备份至TFTP服务器,键入下列命令:router#copy bootflash tftp(Cisco 3600系列路由器不存在bootflash)router#copy flash tftprouter#copy startup-config tftp2) 因为Cisco 1700,2600,3600,7200系列路由器允许在正常工作状态下重写flash memory,所以直接键入以下命令就可完成IOS映像的在线升级:router#copy tftp flashrouter#reload或者,为保险起见(以路由器停止服务为代价),在进入rom监视模式后才进行IOS映像的升级,则依次进行下列操作:2) 在路由器重启加电后30秒内按下键盘的Ctrl+break,中断路由器的正常启动直接进入rom监视模式,屏幕上提示符如下:rommon 1>或者,在路由器重启过程完成后进行以下操作,同样可以进入路由器的rom监视模式:router#conf trouter(config)#config-register 0x0router(config)#exitrouter#wrrouter#reloadrommon 1>3) 键入以下命令,将IOS映像的升级文件从TFTP服务器复制至路由器的flash memory 中:rommon 1>b c3640-i-mz.121-2.T 192.168.18.168program load complete, entry point: 0x, size: 0x4ed478Self decompressing the image : ##################################[OK]Loading c3640-i-mz.121-2.T from 192.168.18.168 (via Ethernet0/0):[OK - / bytes]4) 还原路由器虚拟寄存器的默认值(0x2102),恢复路由器的正常启动顺序,依次键入以下命令:rommon 1>confreg 0x21025) 键入重启命令,使得新配置生效,完成IOS映像的离线升级:rommon 2>reset路由器IOS软件升级方法时间:2003-02-09 08:00来源:中国网管联盟bitsCN编辑字体:[大中小]1,在Windows操作系统的计算机上安装Cisco TFTP Server软件(文件名为TFTPServer1-1-.exe);2,用Winzip软件将c2500-i-l.113-6.zip文件进行解压,解压后的文件名为c2500-i-l.113-6.bin,将此文件拷入硬盘中一子目录,如D:\cisco。
Cisco 升级IOS的四种简单方法

在“为什么要升级Cisco IOS”一文中为大家讲述了Cisco网络设备升级IOS的意义和作用,接下来我们就为大家介绍四种Cisco 升级IOS的方法,供大家参考!Cisco升级IOS的四种简单方法1、最简单的:向思科购买IOS升级包把购买到的IOS升级包直接解压到思科网络设备的Flash中,这是最正式和最简单的一种升级IOS的方法。
当需要升级IOS时,我们可以向山东思科总代理购买相应的IOS(一般是一个IOS的压缩包),其中包括操作系统文件和其他的一套配套文件(如支持网页化管理的文件)。
把这个压缩包直接解压释放到Cisco网络设备的Flash中,就可以完成升级。
2、最常用的:直接复制新版的IOS到Flash芯片中,替换老版IOS具体操作是:通过TFTP服务器,直接将IOS文件复制到Cisco设备的Flash芯片中替换原有的IOS文件。
大多有经验的思科网络工程师都喜欢用这种方式升级IOS。
对于资深的网络工程师,即使在购买了IOS升级包的情况下,他们也喜欢用这种方式来进行Cisco IOS升级。
3、最慢的:通过XMODEM升级IOS这种升级是利用Cisco设备的AUX接口来升级IOS。
与通过以太网接口升级不同的是,这种方法传输文件的速度是相当的慢!因为它是通过AUX(实际上属于COM口)来进行的,其速度受到串行接口的限制。
这种升级IOS的方法只有在以下情况才用的到:1)设备以太网端口无法使用或损坏;2)异地操作,网络中没有TFTP服务器。
这种情况下的具体操作是:在Cisco路由器的AUX口上连一台MODEM,通过远程连接到设备上,然后进行IOS的升级操作,很慢哦:)升级IOS一般是为了使用思科网络设备更高性能,但有些时候却是不得已而为之。
大家有没有遇到过这种情况:思科网络设备启动后自动进入了rommon monitor配置模式,这时出现的提示符为"rommon"。
这是怎么回事呢?这说明你的IOS被误删了。
思科双主控设备升级流程

思科双主控设备升级流程下载温馨提示:该文档是我店铺精心编制而成,希望大家下载以后,能够帮助大家解决实际的问题。
文档下载后可定制随意修改,请根据实际需要进行相应的调整和使用,谢谢!并且,本店铺为大家提供各种各样类型的实用资料,如教育随笔、日记赏析、句子摘抄、古诗大全、经典美文、话题作文、工作总结、词语解析、文案摘录、其他资料等等,如想了解不同资料格式和写法,敬请关注!Download tips: This document is carefully compiled by theeditor. I hope that after you download them,they can help yousolve practical problems. The document can be customized andmodified after downloading,please adjust and use it according toactual needs, thank you!In addition, our shop provides you with various types ofpractical materials,such as educational essays, diaryappreciation,sentence excerpts,ancient poems,classic articles,topic composition,work summary,word parsing,copy excerpts,other materials and so on,want to know different data formats andwriting methods,please pay attention!思科双主控设备升级流程如下:1. 准备工作确认设备型号和当前软件版本。
……Cisco 升级IOS的四种简单方法

在“为什么要升级Cisco IOS”一文中为大家讲述了Cisco网络设备升级IOS的意义和作用,接下来我们就为大家介绍四种Cisco 升级IOS的方法,供大家参考!Cisco升级IOS的四种简单方法1、最简单的:向思科购买IOS升级包把购买到的IOS升级包直接解压到思科网络设备的Flash中,这是最正式和最简单的一种升级IOS的方法。
当需要升级IOS时,我们可以向山东思科总代理购买相应的IOS(一般是一个IOS的压缩包),其中包括操作系统文件和其他的一套配套文件(如支持网页化管理的文件)。
把这个压缩包直接解压释放到Cisco网络设备的Flash中,就可以完成升级。
2、最常用的:直接复制新版的IOS到Flash芯片中,替换老版IOS具体操作是:通过TFTP服务器,直接将IOS文件复制到Cisco设备的Flash芯片中替换原有的IOS文件。
大多有经验的思科网络工程师都喜欢用这种方式升级IOS。
对于资深的网络工程师,即使在购买了IOS升级包的情况下,他们也喜欢用这种方式来进行Cisco IOS升级。
3、最慢的:通过XMODEM升级IOS这种升级是利用Cisco设备的AUX接口来升级IOS。
与通过以太网接口升级不同的是,这种方法传输文件的速度是相当的慢!因为它是通过AUX(实际上属于COM口)来进行的,其速度受到串行接口的限制。
这种升级IOS的方法只有在以下情况才用的到:1)设备以太网端口无法使用或损坏;2)异地操作,网络中没有TFTP服务器。
这种情况下的具体操作是:在Cisco路由器的AUX口上连一台MODEM,通过远程连接到设备上,然后进行IOS的升级操作,很慢哦:)升级IOS一般是为了使用思科网络设备更高性能,但有些时候却是不得已而为之。
大家有没有遇到过这种情况:思科网络设备启动后自动进入了rommon monitor配置模式,这时出现的提示符为"rommon"。
这是怎么回事呢?这说明你的IOS被误删了。
CISCO 升级update ios

The router reboots but ignores its saved configuration.
Type no after each setup question or press Ctrl-C to skip the initial setup procedure.
Processor board ID JAB031202NK (3878188963)
M860 processor: part number 0, mask 49
Bridging software.
X.25 software, Version 3.0.0.
Basic Rate ISDN software, Version 1.1.
3) 键入以下命令,将IOS映像的升级文件从TFTP服务器复制至路由器的flash memory中:
rommon 1>b c3640-i-mz.121-2.T 192.168.18.168
program load complete, entry point: 0x80008000, size: 0x4ed478
Cisco 1003
Cisco 1004
Cisco 1005
Cisco 1600
Cisco 1700
Cisco 2600
Cisco 3600
Cisco 4500
Cisco 4700
Cisco AS5x00
Cisco 6x00
Cisco 7000 (RSP7000)
Router uptime is 3 minutes
System returned to ROM by abort at PC 0x802D0B60
Cisco路由器存储器及IOS升级

Cisco路由器调用系统映像和配置文件这里主要介绍怎样把系统映象和配置文件拷贝到服务器里留作备份,又怎样把服务器里配置文件和系统映象拷贝到路由器内作系统升级.另外还有系统启动,运行情况。
系统启动说明•获得系统映象和配置文件o把系统映象从网络服务器拷贝到Flash Memoryo把配置文件从网络服务器拷贝到路由器NVRAMo显示系统映象和配置信息•启动系统o进入配置模式o从终端上配置操作系统o从网上调取配置文件o直接从startup配置o更改配置寄存器值o指定路由器启动系统映象•备份系统映象和配置文件o拷贝系统映象到网络服务器o拷贝配置文件到网络服务器配置一个路由器作TFTP服务器系统启动说明这一章介绍怎样调用和管理系统映象,微码映象和配置文件.•系统映象包含系统软件.•微码映象包括各种下载的硬件代码.•配置文件包括Cisco IOS操作系统软件里的命令行实现一些功能.Cisco把它的系统软件存放在Flash memory里,每次启动路由器时,从Flash memory里调出系统并执行它.类似主机的操作系统。
开机后,进入初始化配置或用"configer","setup"作配置后,所作的配置要保存起来以便下一次启动直接运行,这就是配置文件了.配置文件存在非易失的NVRAM中.配置文件分成start-up configer和running configer两种. Start-up configer是开机时启动NVRAM 配置.由于Cisco路由器指令系统是即时生效的,故运行的配置可能与启动时的配置不同,把running configer写到NVRAM中才是start-up configer.路由器的系统文件和配置文件都可以象主机一样拷贝进来,拷贝出去.获得系统映象和配置文件当系统出现故障,系统升级,配置文件拷贝,需要把服务器里软件拷贝到路由器里.1、把系统映象从网络服务器拷贝到Flash Memory网络上要有服务器作TFTP Server,用TFTP把系统文件拷贝到路由器的Flash memeory中.功能命令拷贝系统文件到Flash memorycopy tftp flashcopy tftp file-id (Cisco 7000,7200和7500系列)env-chassis# copy tftp flashIP address or name of remote host [255.255.255.255]?172.16.1.111Name of file to copy? gs7-kCopy gs7-k from 172.16.13.111 into flash memory? [confirm]Flash is filled to capacity.Erasure is needed before flash may be written.Erase flash before writing? [confirm]eeeeeeeeeeeeeeee...Loading from 172.16.1.111:...[OK - 1906676/4194240 bytes]Verifying via checksum... vvvvvvvvvvvvvvvvvvvvvvvvvvvvvvvvvvvvvvvvvvvvvvvvvvvvvvvvvvvvvvvvvvvvvvvvvvvvvvv vvvvvvv vvvvvvvvvvvvvvvvvvvvvvvvvvvvvvvvvvvvvvvvvvvvvvvvvvvvvvvvvvvvvvvvvvvvvvvvvvvvvvv vvvvvvv vvvvvvvvvvvvvvvvvvvvvvvvvvvvvvvvvvvvvvvvvvvvvvvvvvvvvvvvvvvvvvvvvvvvvvvvvvvvvvv vvvvvvv vvvvvvvvvvvvvvvvvvvvvvvvvvvvvvvvvvvvvvvvvvvvvvvvvvvvvvvvvvvvvvvvvvvvvvvvvvvvvvv vvvvvvv vvvvvvvvvvvvvvvvvvvvvvvvvvvvvFlash verification successful. Length = 1906676, checksum = 0x12AD注意:√在作系统升级时,为防止不正确操作等引起的升级失败,请先把路由器原有的系统备份下来.参阅拷贝系统映象到网络服务器.√作系统升级时,请指定ip default路由.2、把配置文件从网络服务器拷贝到路由器NVRAM功能命令从TFTP Server中把文件拷入路由器copy tftp running-config或copy tftp startup-config3、显示系统映象和配置信息•show boot---Cisco 7000,7200,7500系列,显示BOOT环境内容.•show flash---显示系统文件名,大小等信息.•show running-config---显示当前正在运行的配置.•show startup-config---显示开机NVRAM配置.•show version---显示软件版本,BOOT版本信息和flash,DRAM大小及所配的端口等等.•erase startup-config---清除NVRAM,进入初始配置状态.启动系统1、进入配置模式在Privileded EXEC模式,configure命令进入配置模式.•从终端上配置操作系统---configure terminal•从网上调取配置文件---configure memory•直接从startup配置---setup2、更改配置寄存器值配置寄存器引导域决定路由器是否调系统映象,从哪获得系统映象.•0x0 ---路由器不调用系统映象,而是进入ROM监控或维护模式.•0x1 ---路由器调用boot ROM映象•0x2-0xF ---路由器调用boot system命令指定的系统映象.show version获得目前配置寄存器值configure terminal进入配置模式config-register value更改配置寄存器的值^Z退出配置模式reload重新启动路由器使配置生效3、指定路由器启动系统映象boot system flash [filename]boot system flash flash:[filename]boot system flash slot0:[filename] (Cisco 7000 series only)boot system flash bootflash:[filename]boot system flash slot0:[filename]boot system flash slot1:[filename] (Cisco 7200 series and Cisco 7500 series only)备份系统映象和配置文件把系统文件和配置文件保存在网中的服务器上是一个很好的做法,帮助你在系统或配置文件丢失时,尽快恢复系统正常运行.1、拷贝系统映象到网络服务器拷贝系统文件给TFTP服务器,首先要在TFTP服务器上指定目录下生成一个具有读,写和可执行的文件.show flash all或show flash [device:](Cisco 7000,7200和7500系列)显示(可选的)Flash memory中系统的文件名copy flash tftp或copy file-id tftp (Cisco 7000,7200和7500系列)拷贝系统文件到TFTP Server2、拷贝配置文件到网络服务器copy running-config tftp或copy startup-config tftp配置一个路由器作TFTP服务器configure terminal从终端进入配置模式tftp-server flash [partition-number:]filename1 [alias filename2] [access-list-number]tftp-server rom alias filename1 [access-list-number]tftp-server flash device:filename(Cisco 7000 series, Cisco 7200 series, or Cisco 7500 series only)指定TFTP server操作注意:作系统升级时,请在你的代理帮助下进行,以免丢失操作系统文件,不能启动系统.Cisco路由器存储器及IOS升级一、首先介绍Cisco路由器的存储器路由器与计算机有相似点是,它也有内存、操作系统、配置和用户界面,Cisco路由器中,操作系统叫做互连网操作系统(Internetwork Operating System)或IOS。
pix_ios升级
IntroductionThis document explains how to upgrade the software on your PIX Firewall and how to upgrade your PIX Device Manager (PDM).Before You BeginConventionsFor more information on document conventions, see the Cisco Technical Tips Conventions.PrerequisitesBefore upgrading to a later version of PIX code, please do the following things:∙Use the write command to save the current PIX configuration to a text file or a TFTP server.∙Use the show version command to view the serial number and activation key, and write them down. (You can also save the output of the show version command to a text file.) If you need to revert back to an older version of code, you may need the original activation key. To learnmore about activation keys, refer to PIX Firewall Frequently Asked Questions.∙Read the release notes for your PIX Software version in the Cisco Secure PIX Firewall Documentation.Components UsedThe information in this document is based on the software and hardware versions below.∙PIX Classic, 10000, 501, 506, 515, 520, 525, and 535∙PIX Software versions 4.4, 5.0, 5.1, 5.2, 5.3, 6.0, 6.1, 6.2, and 6.3The information presented in this document was created from devices in a specific lab environment. All of the devices used in this document started with a cleared (default) configuration. If you are working in a live network, ensure that you understand the potential impact of any command before using it.Minimum System Requirements∙PIX Software version 4.4(x) - 2 MB Flash, 16 MB RAM∙PIX Software version 5.0(x) - 2 MB Flash, 32 MB RAM∙PIX Software version 5.1(x) - 2 MB Flash, 32 MB RAM∙PIX Software version 5.2(x) - 8 MB Flash, 32 MB RAM∙PIX Software version 5.3(x) - 8 MB Flash, 32 MB RAM∙PIX Software version 6.0(x) - 8 MB Flash, 32 MB RAM∙PIX Software version 6.1(x) - 8 MB Flash, 32 MB RAM∙PIX Software version 6.2(x) - 8 MB Flash, 32 MB RAMPIX Software version 6.3(x) - 32 MB RAM (except the Cisco PIX 501 Security Appliance, which requires 16 MB RAM), 16 MB Flash (except the Cisco PIX 501, 506, and 506E SecurityAppliance models, which require 8 MB Flash)Note: You can determine the Flash and memory size of your PIX by using the show version command. Refer to PIX Firewall Frequently Asked Questions for more details. For corresponding PDM support, please see the PDM release notes for details.Upgrading Your PIX FirewallFind your PIX Firewall model and current software version in the table below, and then select the link to see instructions for upgrading your PIX Firewall.Note: The PIX Firewall Classic, 10000, and 510 have been discontinued and cannot run PIX Firewall software 6.0 or later. If you have a PIX Classic, 10000, or 510, and you want to run PIX Firewall software 6.0 or later, please contact your local Cisco Account Team or Reseller to purchase a newer PIX Firewall.Software DownloadsVisit the software center to download PIX software (registered customers only) . TFTP server software is no longer available from , but you can find many TFTP servers by searching for "tftp server" on your favorite Internet search engine. Cisco does not specifically recommend any particular TFTP implementation. For more information, please refer to the TFTP server page (registered customers only) .Upgrading the PIX Firewall from Versions 4.x.x or 5.0.xNote: These instructions apply to the PIX Classic, 10000, 510 and 520. To upgrade the PIX 515 from 4.4 to 5.1 or higher, please follow the instructions under Entering Monitor Mode on a PIX 501, 506, 515, 525 or 535.Step 1: Create a bootable diskette.Step 2: Follow the instructions under Upgrading the PIX Firewall from Boothelper or Monitor Mode.Creating a Bootable Diskette from Microsoft WindowsNote: The steps described below apply only to PIX devices that have a floppy drive. Specifically, this group is limited to the PIX Classic, 10000, 510 and 520. Even if you are operating one of these PIX models, there are only two reasons you would need to create a bootable floppy disk:∙You are currently running PIX Software version 5.0(x) or 4.x and would like to upgrade to a newer version.∙You need to upgrade the activation key on your PIX and you are currently running PIX Software version 6.1 or earlier.For PIX devices running PIX Software versions 6.2 or later, use the activation-key command to enter a new activation key. See the PIX Command Reference for more information.Follow the steps below to create a bootable diskette in Windows.1. Go to the PIX Software Download page and download the rawrite.exe utility, which you will useto write the PIX binary image onto a floppy diskette.2. Download the PIX binary image (.bin file) that corresponds to the software version that you areupgrading to. PIX image filenames are in the format pixnnx.bin, where nn is the versionnumber and x is the release number.Example: The file pix611.bin is for PIX Software release 6.1.1.3. If you are upgrading to PIX versions 5.2 or later, you will also need to download thecorresponding boothelper binary file that matches the version you are upgrading to.Example: If you are upgrading from PIX Software version 4.4(8) to 6.1(1), you will need to download three files: rawrite.exe, pix611.bin, and bh61.bin.4. Locate a high-density, IBM-formatted diskette that does not contain any files.Note: Do not use the PIX Firewall boot diskette that came with your original PIX Firewallpurchase. You will need this diskette for system recovery if you choose to reinstall the original version. The rawrite.exe program erases all the files on the diskette.If you format the diskette from Windows, choose the long version, not the quick format. The quick format does not adequately prepare the diskette for rawrite. The best way to format the diskette is from the MS-DOS command prompt. Enter format a:, where a is the letter of the floppy drive where the diskette is located. Once the diskette is properly formatted, execute the rawrite.exe file, then enter the source .bin file name and the destination drive when prompted.5. Place the blank diskette in your computer's floppy drive and bring up a DOS prompt. Change tothe directory where you saved the rawrite.exe utility and the PIX files.6. Run the rawrite.exe program by typing rawrite at the DOS prompt. When prompted, type thename of the file that you want written to the floppy diskette.Note: If you are upgrading to PIX versions 5.1 or earlier, specify the file for the PIX image itself.It is in the format of pixnnx.bin. If you are upgrading to PIX versions 5.2 or later, specify the PIX boothelper file, in the format of bh nn.bin.Example: Creating a Bootable Diskette from WindowsC:\>rawriteRaWrite 1.2 - Write disk file to raw floppy disketteEnter source file name: bh61.binEnter destination drive: a:Please insert a formatted diskette into drive A: and press -ENTER- :Number of sectors per track for this disk is 18.Writing image to drive A:. Press ^C to abort.Track: 11 Head: 1 Sector: 16Done.C:\>07. Once the rawrite process finishes, eject the diskette and insert it in the PIX Firewall diskettedrive. Perform one of the following actions to make the PIX boot from the image on thediskette.o Power cycle the PIX.oro Use the PIX's reset switch.oro Enter the reload command from the PIX console.8. When the PIX finishes rebooting, perform the appropriate step below.o If you are upgrading to PIX 5.1 or earlier, remove the floppy diskette from the drive, and you are finished.o If you are upgrading to PIX 5.2 or later, then you loaded the boothelper program on the floppy, and the PIX will come up in boothelper mode. Proceed to Upgrading the PIXFirewall from Boothelper or Monitor Mode to complete the upgrade.Entering Monitor Mode on a PIX 501, 506, 515, 525 or 535PIX devices that do not have an internal floppy drive come with a ROM boot monitor program that is used for upgrading the PIX Firewall's image. Follow the instructions below to enter monitor mode on these PIX devices.1. Power cycle or reload the PIX. During bootup you will be prompted to Use BREAK or ESC tointerrupt Flash boot. You have 10 seconds to interrupt the normal boot process.2. Press the ESC key or send a BREAK character to enter monitor mode.o If you are using Windows HyperTerminal, you can press the ESC key or send a BREAK character by pressing Ctrl+Break.o If you are Telnetting through a terminal server to access the console port of the PIX, you will need to press Ctrl ] to get to the Telnet command prompt. Then enter thesend break command.3. The monitor> prompt is displayed.4. Proceed to the Upgrading the PIX Firewall from Boothelper or Monitor Mode section.Upgrading the PIX Firewall from Boothelper or Monitor ModeIf you are upgrading your PIX Firewall from versions 5.0.x or earlier to versions 5.1.x or later, you need to use the boothelper or monitor mode method for the upgrade. This is because before version 5.1, the PIX Firewall Software did not provide a way to TFTP an image directly into the Flash. Starting with PIX Firewall Software version 5.1, the copy tftp flash command was introduced to copy a new image directly into the PIX's Flash.Note: If you wish to change the PIX Firewall's activation key (to add an additional feature), you must install a new PIX image using the boothelper or monitor mode method. You cannot use the copy tftp flash method to change the activation key on the PIX Firewall.1. Copy the PIX Firewall binary image (pixnnn.bin) to the root directory of the TFTP server.2. For PIX Classic, 10000, 510 and 520s use the procedure for Creating a Bootable Diskette. Usethe boothelper file that most closely corresponds to the PIX image you are upgrading to. Boot the PIX from the boothelper floppy to enter the boothelper mode.All other PIX devices (501, 506, 515, 525 and 535) do not contain a floppy drive; instead, they have an internal boot monitor mode. Please see the instructions for Entering Monitor Mode ona PIX 501, 506, 515, 525 or 535.Once in monitor or boothelper mode, you can use the ? key to see a list of available options.3. Type interface number The interface command specifies which PIX interface the TFTP serveris connected out of. The default is interface 1 (inside).Note: The PIX Firewall cannot initialize a Gigabit Ethernet interface from monitor or boothelper mode. Use a Fast Ethernet or Token Ring interface instead.4. Type address pix_interface_ip_address The address command specifies the IP address ofthe PIX Firewall unit's interface.5. Type server tftp_server_ip_address The server command specifies the TFTP server's IPaddress.6. Type file filename The file command specifies the filename of the PIX Firewall image.7. Type ping tftp_server_ip_address Ping the server to verify accessibility. If this command fails,double-check your cables, IP address of the server and of the PIX, and IP address of thegateway (if needed). The pings must succeed before you can continue.Note: Use the gateway command to specify the IP address of a router gateway through which the server is accessible: gateway ip_address of the gateway interface8. Type tftp to start the download of image from the TFTP server.9. After the image downloads, you are prompted to install the new image. Enter y to install theimage to Flash.10. When prompted to enter a new activation key, enter y if you wish to enter a new activation key,or n to keep your existing activation key. See Upgrading the Activation Key for moreinformation about the activation key and how to obtain a new one.11. If you used the boothelper mode, you are prompted to remove the boothelper diskette. Youhave 30 seconds to remove the diskette before the PIX automatically reboots. Please remove the diskette now. Once the PIX reboots it will load the new image from Flash.This completes the upgrade process.Once the PIX has been upgraded to 5.1 or later, it is no longer necessary to use a floppydiskette to load new images onto the PIX. Starting with PIX Software version 5.1, the copy tftp flash command allows you to TFTP your new PIX image directly to the PIX from a TFTPserver. See the PIX Command Reference for further details.Example - Upgrading the PIX Firewall from Boothelper or Monitor Modemonitor> interface 10: i8255X @ PCI(bus:0 dev:14 irq:10)1: i8255X @ PCI(bus:0 dev:13 irq:11)Using 1: i82557 @ PCI(bus:0 dev:13 irq:11), MAC: 0002.b945.a23cmonitor> address 172.18.124.154address 172.18.124.154monitor> server 172.18.125.3server 172.18.125.3monitor> file pix611.binfile pix611.binmonitor> ping 172.18.125.3Sending 5, 100-byte 0xcde2 ICMP Echoes to 172.18.125.3, timeout is 4seconds:!!!!!Success rate is 100 percent (5/5)monitor> tftptftp pix611.bin@172.18.125.3..........................................Received 2562048 bytesCisco Secure PIX Firewall admin loader (3.0) #0: Tue Dec 517:35:46 PST2000System Flash=E28F128J3 @ 0xfff00000BIOS Flash=am29f400b @ 0xd8000Flash version 6.1.1, Install version 6.1.1Do you wish to copy the install image into flash? [n] yInstalling to flashSerial Number: 480380761 (0x1ca20759)Activation Key: 760754d0 39f62229 a4a0245f b5b87e80Do you want to enter a new activation key? [n] nWriting 2469944 bytes image into flash...Upgrading the PIX Firewall from Versions 5.1.1 or LaterIf the PIX Firewall is running PIX Software versions 5.1.1 or later, you can use the copy tftp flash command to download a software image with TFTP. The copy tftp flash command can be used with any PIX Firewall model running PIX Software versions 5.1.1 or later. The image you download is madeavailable to the PIX Firewall on the next reload (reboot). For more information on this command refer to the PIX Command Reference.Note: If you wish to enter a new activation key into the PIX Firewall, you need to follow the instructions for Upgrading the PIX Firewall from boot helper or monitor mode.Using the copy tftp flash Command to Upgrade the PIXFollowing these directions to upgrade the PIX using the copy tftp flash command.1. Copy the PIX Firewall binary image (pix nnn.bin) to the root directory of the TFTP server.2. From the PIX prompt, issue the copy tftp flash command.3. Enter the remote host IP address.4. Enter the PIX binary filename (has the pixnnn.bin name format).5. Type yes.Example - Upgrading the PIX Firewall with the copy tftp flash Commandpixfirewall# copy tftp flashAddress or name of remote host [127.0.0.1]? 172.18.125.3Source file name [cdisk]? pix611.bincopying tftp://172.18.125.3/pix611.bin to flash[yes|no|again]? yes!!!!!!!!!!!!!!!!!!!!!!!!!!!!!!!!!!!!!!!!!!!!!!!!!!!!!!!!!!!!!!!!!!!!!!!!Received 2562048 bytes.Erasing current image.Writing 2469944 bytes of image.!!!!!!!!!!!!!!!!!!!!!!!!!!!!!!!!!!!!!!!!!!!!!!!!!!!!!!!!!!!!!!!!!!!!!!!!Image installed.pixfirewall#Upgrading PIX Devices in a Failover Set with Minimal DowntimeTo use this procedure, the PIX devices must be running PIX Software versions 5.1.x or later. These instructions are valid for all PIX devices that are capable of running in a failover set. For more information about failover, see How Failover Works on the Cisco Secure PIX Firewall.Two different options are listed below for upgrading your PIX with minimal downtime. The first option is the safest way to upgrade your failover set. If anything goes wrong with the upgrade process, you would always have one operational PIX to pass your network traffic. The second option is simpler but riskier. The risk resides in the possibility that the new image loaded on the PIX devices is corrupt in some way. Both options are presented so that you can choose the best method for your specific network.Option 1This is a quick way to upgrade your failover set.1. Copy the PIX Firewall binary image (pixnnn.bin) to the root directory of the TFTP server.2. Power off the Primary (this causes the Secondary to become active).3. Disconnect all cables from the Primary (including failover cable).4. Power on the Primary and attach a PC with a TFTP server on it.5. Use copy tftp flash to upgrade the Primary.6. Reload the Primary and verify the new version and configuration.7. Power off the Primary.8. Reconnect all cables back to the Primary.9. Quickly power off the Secondary, and then immediately power on the Primary.Note: Your downtime will occur while the Primary is booting up.Once the Primary is up, it will be active and passing traffic.10. Repeat steps 2 - 7, but for the Secondary PIX.11. Power on the Secondary; it comes up as Standby.12. Both PIX devices are now running the upgraded version and are back to normal operation. Option 2Here's another option for upgrading your failover set.1. Copy the PIX Firewall binary image (pixnnn.bin) to the root directory of the TFTP server.2. Use the copy tftp flash command to copy the new PIX image to the Primary PIX.3. Use the copy tftp flash command to copy the new PIX image to the Secondary PIX.4. Power off both PIX devices.5. Power on the Primary PIX.6. Wait 10 Seconds (to ensure that the Primary PIX becomes the Active PIX).7. Power on the Secondary PIX. It will come up at Standby.8. Both PIX devices are now running the upgraded version and are back to normal operation.Upgrading the Activation KeyThere are a couple of reasons that you may need to upgrade the activation key on your PIX.∙Your PIX does not currently have VPN-DES or VPN-3DES encryption enabled.Note: VPN-DES encryption must be enabled for you to manage your PIX using PDM.Registered users may obtain a free 56-bit VPN-DES activation key by completing the PIX56-bit License Upgrade Key form. VPN-3DES activation keys must be purchased through your local reseller or Cisco sales representative.∙Your PIX currently does not have failover activated.∙You are upgrading from a connection-based license to a feature-based license.If you fall into one of the above categories and have obtained a new activation key for your PIX, the next step is to connect to your PIX, issue the show version command, and save the output to a text file. The output of the show version command contains your existing version, serial number, and activation key. You will need this information if there are any problems upgrading your activation key.The PIX activation key based on the PIX's serial number and is therefore unique for each PIX. The activation key tells the PIX what features it is licensed for. The serial number of your PIX is saved in Flash, so if you replace the Flash card in your PIX, then your PIX will have a new serial number (different from the number shown on the sticker on the outside of the box). Always use the serial number displayed in the output of the show version command.PIX Devices Running Versions 6.1 and EarlierIf your PIX is currently running versions 6.1 or earlier, follow the instructions in Upgrading the PIX Firewall from Boothelper or Monitor Mode. Step 10 is where you are prompted to enter a new activation key.PIX Devices Running Versions 6.2 and LaterIf your PIX is currently running versions 6.2 or later, use the activation-key command to change your activation key. See the PIX Command Reference for more information.Example: Upgrading the Activation Key on a PIX Running Versions 6.2 or Laterpixfirewall(config)# activation-key 54bf4b80 b7237e20 05022c63 f09e3302Updating flash...Done.Serial Number: 480490644 (0x1ca3b494)Flash Activation Key: 0x54bf4b80 0xb7237e20 0x05022c63 0xf09e3302Licensed Features:Failover: EnabledVPN-DES: EnabledVPN-3DES: EnabledMaximum Interfaces: 10Cut-through Proxy: EnabledGuards: EnabledURL-filtering: EnabledInside Hosts: UnlimitedThroughput: UnlimitedIKE peers: UnlimitedThe flash activation key has been modified.The flash activation key is now DIFFERENT from the running key.The flash activation key will be used when the unit is reloaded.pixfirewall(config)#pixfirewall(config)#reloadUpgrading PIX Device ManagerThe process of upgrading PDM is the same as that used for a new installation. For detailed instructions, refer to the installation guide in the PDM product documentation for the appropriate version.Related Information∙Documentation for PIX Firewall∙Cisco Secure PIX Firewall Frequently Asked Questions∙PIX Support Page∙Requests for Comments (RFCs)∙Technical Support - Cisco Systemsqhltpix# sh versionCisco Secure PIX Firewall Version 5.3(2)Compiled on Tue 03-Jul-01 21:57 by morleeqhltpix up 2 days 6 hoursHardware: SE440BX2, 128 MB RAM, CPU Pentium II 350 MHzFlash i28F640J5 @ 0x300, 16MBBIOS Flash AT29C257 @ 0xfffd8000, 32KB0: ethernet0: address is 0002.b341.2799, irq 111: ethernet1: address is 0002.b341.279d, irq 10Licensed Features:Failover: EnabledVPN-DES: EnabledVPN-3DES: EnabledMaximum Interfaces: 6Cut-through Proxy: EnabledGuards: EnabledWebsense: EnabledThroughput: UnlimitedISAKMP peers: UnlimitedSerial Number: 18056505 (0x1138539)Activation Key: 0xd678c5f0 0x37474c5b 0x44c5f671 0xdfb17c98qhltpix#PIX passwd:Welcome to the PIX firewallType help or '?' for a list of available commands.qhltpix> enPassword: ***************qhltpix# sh runType help or '?' for a list of available commands.qhltpix# sh conf: Saved:PIX Version 5.3(2)nameif ethernet0 outside security0nameif ethernet1 inside security100enable password fkt5v6i/t3a2NE2C encryptedpasswd lK7tmN1XySOc6i2O encryptedhostname qhltpixfixup protocol ftp 21fixup protocol http 80fixup protocol h323 1720fixup protocol rsh 514fixup protocol rtsp 554fixup protocol smtp 25fixup protocol sqlnet 1521fixup protocol sip 5060namesaccess-list acl-in permit icmp any anyaccess-list acl-in permit tcp any any eq wwwaccess-list acl-in permit udp any host 211.93.8.81 eq domain access-list acl-in permit tcp any any eq telnetaccess-list acl-in permit tcp any any eq smtpaccess-list acl-in permit tcp any any eq pop3access-list acl-in permit tcp any any eq 143access-list acl-in permit udp any any eq 8000access-list acl-in permit tcp any any eq 8000access-list acl-in permit tcp any any eq 8018access-list acl-in permit tcp any any eq ftpaccess-list acl-in permit tcp any any eq 8017access-list acl-in permit tcp any any eq 45678access-list acl-in permit tcp any any eq 8008access-list acl-in permit tcp any any eq 82access-list acl-in permit tcp any any eq 1918access-list acl-in permit tcp any any eq 81access-list acl-in permit tcp any any eq 443access-list acl-in permit tcp any any eq 8001access-list acl-in permit tcp any any eq 8002access-list acl-in permit tcp any any eq 8003access-list acl-in permit tcp any any eq 8004access-list acl-in permit tcp any any eq 8005access-list acl-in permit tcp any any eq 8006access-list acl-in permit tcp any any eq 8007access-list acl-in permit tcp any any eq 8888access-list acl-in permit tcp any any eq 2705access-list acl-in permit tcp any host 211.93.8.81 eq domain access-list acl-in permit tcp any any eq 90access-list acl-in permit tcp any any eq nntpaccess-list acl-in permit tcp any any eq 4661access-list acl-in permit udp any any eq 4665access-list acl-in permit tcp any any eq 1645access-list acl-in permit tcp any any eq 1646access-list acl-in permit tcp any any eq 56321access-list acl-in permit tcp any any eq 121access-list acl-in permit tcp any any eq 8080access-list acl-in permit tcp any any eq 2600access-list acl-in permit tcp any any eq 7777access-list acl-in permit tcp any any eq 163access-list acl-in permit tcp any any eq 19110access-list acl-in permit tcp any any eq 19159access-list acl-in permit tcp any any eq 19130access-list acl-in permit tcp any any eq 19090access-list acl-in permit tcp any any eq 19277access-list acl-in permit tcp any any eq 19828access-list acl-in permit tcp any any eq sqlnetaccess-list acl-in permit tcp any any eq 8082access-list acl-in permit udp any any eq 27015access-list acl-in permit tcp any any eq 27015access-list acl-in permit tcp any any eq 5190access-list acl-in permit tcp any any eq 6667access-list acl-in permit udp any any eq ntpaccess-list acl-in permit tcp any any eq 4662access-list acl-in permit tcp any any eq 12000access-list acl-in permit tcp any any eq 1755access-list acl-in permit tcp any any eq 8181access-list acl-in permit tcp any any eq 800access-list acl-in permit tcp any any eq 6882access-list acl-in permit tcp any any eq 6883access-list acl-in permit tcp any any eq 6884access-list acl-in permit tcp any any eq 6885access-list acl-in permit tcp any any eq 2633access-list acl-in permit tcp any any eq 6000access-list acl-in permit tcp any any eq 16900access-list acl-in permit tcp any any eq 1233access-list acl-in permit tcp any any eq 554access-list acl-in permit udp any any eq 21access-list acl-in permit tcp any any eq ftp-dataaccess-list acl-in permit udp any any eq 20access-list acl-in permit tcp any any eq 8021access-list acl-in permit udp any any eq 1521access-list acl-in permit tcp any any eq 6888access-list acl-in permit tcp any any eq 6969access-list acl-in permit tcp any any eq 20003access-list acl-in permit tcp any any eq 1723access-list acl-in permit udp any any eq 1723access-list acl-out permit icmp any anyaccess-list acl-out permit tcp any any eq 4662access-list acl-out permit udp any any eq 4665access-list acl-out permit udp any any eq 6881access-list acl-out permit udp any any eq 6882access-list acl-out permit tcp any host 211.93.8.71 eq telnet access-list acl-out permit tcp any host 211.93.8.73 eq www access-list acl-out permit tcp any host 211.93.8.73 eq 8020 access-list acl-out permit tcp any host 211.93.8.73 eq telnet access-list acl-out permit tcp any host 211.93.8.75 eq www access-list acl-out permit tcp any host 211.93.8.75 eq telnet access-list acl-out permit tcp any host 211.93.8.75 eq 2633 access-list acl-out permit tcp any host 211.93.8.75 eq ftp access-list acl-out permit tcp any host 211.93.8.76 eq telnet access-list acl-out permit tcp any host 211.93.8.76 eq ftp pager lines 40logging onlogging timestamplogging standbyno logging consoleno logging monitorno logging bufferedno logging trapno logging historylogging facility 20logging queue 512interface ethernet0 autointerface ethernet1 automtu outside 1500mtu inside 1500ip address outside 211.93.8.72 255.255.255.240ip address inside 10.251.8.249 255.255.255.0ip audit info action alarmip audit attack action alarmno failoverfailover timeout 0:00:00failover poll 15failover ip address outside 0.0.0.0failover ip address inside 0.0.0.0arp timeout 14400global (outside) 1 211.93.8.74 netmask 255.255.255.240nat (inside) 1 0.0.0.0 0.0.0.0 0 0static (inside,outside) 211.93.8.73 10.251.8.63 netmask 255.255.255.255 0 0 static (inside,outside) 211.93.8.75 130.70.1.58 netmask 255.255.255.255 0 0 access-group acl-out in interface outsideaccess-group acl-in in interface insideroute outside 0.0.0.0 0.0.0.0 211.93.8.78 1route inside 10.156.116.0 255.255.255.0 10.251.8.252 2route inside 130.70.1.0 255.255.255.0 10.251.8.252 2route inside 130.76.1.0 255.255.255.0 10.251.8.252 2route inside 130.77.1.0 255.255.255.0 10.251.8.252 2route inside 192.168.0.0 255.255.255.0 10.251.8.252 2route inside 196.196.196.0 255.255.255.0 10.251.8.252 2timeout xlate 3:00:00timeout conn 1:00:00 half-closed 0:10:00 udp 0:02:00 rpc 0:10:00 h323 0:05:00 si p 0:30:00 sip_media 0:02:00timeout uauth 0:05:00 absoluteaaa-server TACACS+ protocol tacacs+aaa-server RADIUS protocol radiusno snmp-server locationno snmp-server contactsnmp-server community publicno snmp-server enable trapsfloodguard enableno sysopt route dnatisakmp identity hostnametelnet 130.70.1.199 255.255.255.255 insidetelnet 130.70.1.162 255.255.255.255 inside。
- 1、下载文档前请自行甄别文档内容的完整性,平台不提供额外的编辑、内容补充、找答案等附加服务。
- 2、"仅部分预览"的文档,不可在线预览部分如存在完整性等问题,可反馈申请退款(可完整预览的文档不适用该条件!)。
- 3、如文档侵犯您的权益,请联系客服反馈,我们会尽快为您处理(人工客服工作时间:9:00-18:30)。
经常在这里请教大家问题,得到了很多帮助. 在此表示衷心的感谢
为了让和我一样菜的弟兄们能看懂.请各位大虾不要嘲笑啊!~
下面就是正是配置了:
由于一般的PIX系列的防火墙出场时候预装的IOS是6.X的版本而只有7.0以上才支持透明模式.所以第一步是升级IOS 准备工作:
下载一个7.0的bin文件(我下载的是pix701.bin)放到tftp服务器的根目录下
正式开始:
防火墙通电,按ESC进入monitor> 状态下。
monitor> address 192.1.1.1 --设置防火墙IP
address 192.1.1.1
monitor> server 192.1.1.2 --设置tftp服务器的IP
server 192.1.1.2
monitor> ping 192.1.1.2 --检测一下是否能ping通
Sending 5, 100-byte 0x7970 ICMP Echoes to 10.32.2.78, timeout is 4 seconds:
!!!!!
Success rate is 100 percent (5/5)
monitor> file pix701.bin --声明你下载的那个bin文件的全称
file pix704.bin
monitor> tftp --开始灌入
tftp pix704.bin@192.168.1.80...........................
耐心等待.一直到出现非特权模式的那个">"符号.下面要吧bin文件考到flash里面去,以后启动的时候才能正常使用pixfirewall> en
Password:
pixfirewall# con t
pixfirewall(config)# interface ethernet1 --进入端口模式
pixfirewall(config-if)# ip address 192.1.11 255.255.255.0 --配置e1口的IP
pixfirewall(config-if)# nameif inside --配置e1口为防火墙的inside口
INFO: Security level for "inside" set to 100 by default.
pixfirewall(config-if)# no shutdown --激活inside口
pixfirewall(config-if)# ping 192.1.1.2 --测试一下
Sending 5, 100-byte ICMP Echos to 192.1.1.2, timeout is 2 seconds:
!!!!!
Success rate is 100 percent (5/5), round-trip min/avg/max = 1/1/1 ms
pixfirewall(config-if)# exit --退出端口模式
pixfirewall(config)# copy tftp flash: --copybin文件
Address or name of remote host []? 192.1.1.2 --tftp服务器IP
Source filename []? pix701.bin --文件名
Destination filename [pix701.bin]? pix701.bin --确认
Accessing tftp://192.1.1.2/pix701.bin...!! --开始copy 耐心等待
Writing file flash:pix701.bin...!!!!!!!!!!!!!
5124096 bytes copied in 82.80 secs (62488 bytes/sec)
pixfirewall(config)# reload --升级完成.重启!!!!!!!ps.第一次启动时间会稍长不要着急
下面才是配置.也很简单了,和刚才配置差不多配置outside口和inside口并激活,只是注意不要配置IP.这可是透明模式.谁见过一根网线两端还有IP的?
pixfirewall> en
Password:
pixfirewall# con t
pixfirewall(config)# interface ethernet0
pixfirewall(config-if)# nameif outside
INFO: Security level for "outside" set to 0 by default.
pixfirewall(config-if)# no shutdown
pixfirewall(config-if)# exit
pixfirewall(config)# interface ethernet1
pixfirewall(config-if)# nameif inside
INFO: Security level for "inside" set to 100 by default.
pixfirewall(config-if)# no shutdown
pixfirewall(config-if)# exit
铛铛铛~~~~~~~~这里可是最重要的了其实就是5句话
pixfirewall(config)# firewall transparent --设置防火墙为透明模式pixfirewall(config)# access-list out-list extended permit icmp any any --设置允许通过所有的协议pixfirewall(config)# access-list out-list extended permit ip any any --设置允许通过所有的IP pixfirewall(config)# access-group out-list in interface outside --把刚才的访问列表绑在outside口pixfirewall(config)# access-group out-list out interface outside --把刚才的访问列表绑在outside口pixfirewall(config)# ip address 192.1.1.1 255.255.255.0 --设置一个以后配置防火墙的IP
OK大功告成,怎么样够简单把.
PIX upgrade to PIX OS 7.0
在升级前先要检查所要升级的版本需要的RAM 和Flash 大小.
以下是升级到7.0所需要的内存和flash.
PIX Model RAM Requirements Flash Requirements
Restricted (R) UnRestricted (UR) / Failover Only (FO)
PIX-515 64 MB* 128 MB* 16 MB(flas h)
PIX-515 E 64 MB* 128 MB* 16 MB(flash)
PIX-525 128 MB 256 MB 16 MB
PIX-535 512 MB 1 GB 16 MB
以下是在PIX-525上进行的升级
根据提示键入enable命令,然后使用copy tftp flash命令.
pixfirewall> enable
Password:
<密码>
pixfirewall# copy tftp flash
Address or name of remote host [0.0.0.0]? <tftp服务器IP地址>
Source file name [cdisk]?
<输入在TFTP服务器上的新软件的文件名>
copying tftp://172.18.173.123/pix701.bin to flash:image
[yes|no|again]? yes
!!!!!!!!!!!!!!!!!!!!!!!!!!!!!!!!!!!!!!!!!!!!!!!!!!!!!!!!!!!!!
Received 5124096 bytes
Erasing current image
Writing 5066808 bytes of image
!!!!!!!!!!!!!!!!!!!!!!!!!!!!!!!!!!!!!!!!!!!!!!!!!!!!!!!!!!!!!
Image installed
pixfirewall#
pixfirewall# reload
Proceed with reload? [confirm]
<enter>
Rebooting....
完成升级工作.现在PIX使用的是7.0版本的软件.。
