盈信HCD0008(228)TSD电话使用说明书
飞利浦CORD281使用说明

-贵 宾 键可将显示的号码锁定保护(转存为贵宾号码) 屏幕左边
显示
符号 再按一下 贵 宾 键解除锁定
符号消失
在查阅来电号码时 带
符号的号码就是贵宾号码
12.查阅去电号码和通话时长(即时间长短)
本话机可保存 约 40 组最后拨出去的电话号码和通话时长(如
下图) 需要查阅时 挂机状态按 查 询 键 接着按
来电会自动校正月 日 时 分 只需人工设置年份即可)
注意:在设置操作过程中 每步骤之间停顿的时间若大于 20 秒 话机自动退出设置状态 除了上述按键外 按其它任何按 键也会立即退出设置状态
2.设置本地码(本地区号) 挂机状态输入 * 3 * + 本地码 + # (例如深圳 * 3 * 0 7 5 5 # )
挂机状态按 IP 键 按数字键
选择 IP 按住
-暂 停 键约3秒 显示
输入容易记忆的
密码 显示
即 可 重 新 选 择 IP时 显 示
表示需输入密码才能设置为当前的自动I P
4. 设置自动 IP 开 /关
若设置自动 IP 打开后 在查阅来电号码时 首位不显示 0的拨该
8.使用指示灯 9.液晶显示屏 10.查询键 11.上下翻键 12.删除键 13.保持键 14.加 0 回拨键
2
15.回拨键 16.重拨键 17.免提 ( )键 18.暂停键 19.免提送话器 20.R 键 21.IP键
概述
尊敬的顾客 欢迎您使用本公司生产的CORD 281来电 显示 IP免提电话机 本话机采用了最新的性能稳定的集成电 路设计而成 各项指标均符合中国标准 外形独特大方 线 条流畅 按键手感极为舒适 配合交换机使用 能显示及大 容量保存来电方的电话号码 来电时间等内容 便于查阅及 回拨 同时具有良好的抗干扰及防雷击性能 质量稳定可 靠 是理想的办公和家用通讯终端设备
HCD868(88)TSD说明书2
目录本机主要功能特点: ................................................................................. 2各部分功能一览表: ................................................................................. 3电话使用说明:......................................................................................... 5一、在待机时可执行如下操作:........................................................ 5二、SD卡的使用:............................................................................ 5三、话机设置 ..................................................................................... 7四、功能说明及使用方法: ........................................................... 10保养和注意事项: ................................................................................. 17售后贮存、运输: ................................................................................. 17执行标准:............................................................................................ 17线路图 ................................................................................................... 19话机配件清单:..................................................................................... 211本机主要功能特点:1、FSK/DTMF双制式兼容来电显示功能。
Philips D200电话系统用户手册说明书

Standby Access the main menu Phonebook Call log Make and receive calls Make intercom call Lock/unlock the keypad Make and receive calls through the speaker
Record an announcement (for D205 only)
1 Press . 2 Select [Answ. Machine] > [Announcement]. 3 Follow on-screen instructions.
Register additional handsets
Call log
Call from the call log 1 Press . 2 Select a record and press . Add record 1 Press > > [Save number]. 2 Follow on-screen instructions. Delete record 1 Press > > [Delete]. 2 Follow on-screen instructions.
The ringer is off. (for D205 only) Answering machine: it flashes when there is a new message. It remains steadily on when the telephone answering machine is turned on. Voice messages indicator: flashes for new messages, is steady for reviewed messages. * This is network dependent It displays when you scroll up/down a list or increase and decrease the volume. There are more digits on the right. Press to read. ECO+ The ECO+ mode is activated.
电话机(泰丰888)使用说明

《一般电话机使用说明书》-----为方便大家,特撰此文举例:电话机(泰丰)HCD888TSD系列来电显示多功能电话机。
执行标准“YD/T1277.1-2003”、“GB/T15279-2002”。
主要功能特点:1》FSK/DTMF来电制式兼容来电显示功能。
2》存储50组来电号码信息。
3》存储16组最新的去电号码和通话时长。
4》免提通话和手柄通话状态可任意转换。
5》8位本地码设置来电自动过滤。
6》具有挂机预置拨号、修改功能。
7》年月日、星期、时钟显示功能、屏幕高度可调。
8》16首个性铃声选择。
9》免提音量及铃声大小可调。
电话安装及注意事项:1》安装电话机前请到当地电信部门申请开通来电显示信息服务否则不具有此功能但可做多功能电话使用。
2》安装时将接线盒与局线接通然后将随机配置的电话线两端分别接通接线盒和话机的外线插座。
3》将曲线的两端分别插到手柄末端及话机左侧的插座。
4》电话机应安装在干燥、通风及无腐蚀性气体的地方。
5》接好线后提一下手柄即可开始使用。
使用时请尽可能少用分线器或防盗器以免影响来电显示功能的正常使用。
功能设置:挂机状态按一下“设置”键话机进入功能待选项目并显示“SET 12345678”直接按18数家键可选择。
①“1-dA TE 2-CL”设置日期/时间。
②“r - lr2u lP3uoL”铃声选择及铃声音量调节。
③“RL 1-2-3”闹铃设置。
④“OFF-r 00-00-”免打扰时间设置。
⑤“1-F 2-PT 3-d”闪断时间、拨号方式及防盗开关设置。
⑥“1-LOC”2–OL”设置本地码和出局码。
⑦“LCD con 4”设置屏幕亮度。
⑧“1–AU 2-3 lp”功能设置。
注意在设置操作过程中按“删除”键可返回上层按“免提”键则立即退出设置状态停顿的时间若大于60秒钟话机也会自动退出设置状态。
1》设置日期/时间:在按“设置”键显示“SET 12345678”→按1→显示“1dATE 2-CL”→按1选“d2009 01-01”设置年月日或按2选“C L00-01”设置小时-分钟→确定所选项目后按“设置”键然后按数字键输入数字→按“删除”键再选其他设置或都按“免提”键退出。
HCD868(88)TSD说明书
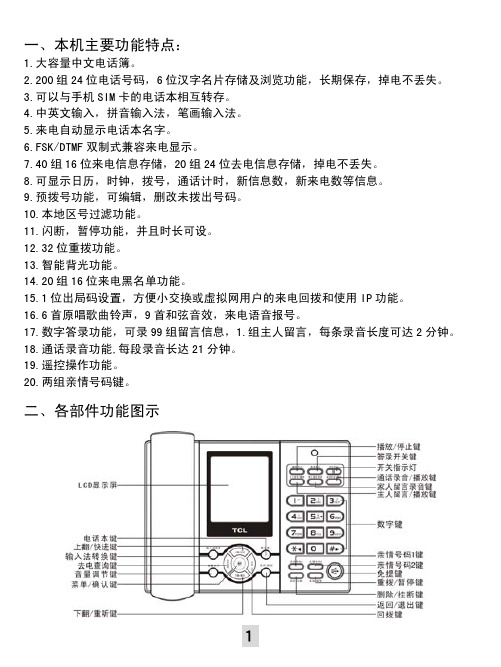
一、本机主要功能特点:1.大容量中文电话簿。
2.200组24位电话号码,6位汉字名片存储及浏览功能,长期保存,掉电不丢失。
3.可以与手机SIM卡的电话本相互转存。
4.中英文输入,拼音输入法,笔画输入法。
5.来电自动显示电话本名字。
6.FSK/DTMF双制式兼容来电显示。
7.40组16位来电信息存储,20组24位去电信息存储,掉电不丢失。
8.可显示日历,时钟,拨号,通话计时,新信息数,新来电数等信息。
9.预拨号功能,可编辑,删改未拨出号码。
10.本地区号过滤功能。
11.闪断,暂停功能,并且时长可设。
12.32位重拨功能。
13.智能背光功能。
14.20组16位来电黑名单功能。
15.1位出局码设置,方便小交换或虚拟网用户的来电回拨和使用IP功能。
16.6首原唱歌曲铃声,9首和弦音效,来电语音报号。
17.数字答录功能,可录99组留言信息,1.组主人留言,每条录音长度可达2分钟。
18.通话录音功能,每段录音长达21分钟。
19.遥控操作功能。
20.两组亲情号码键。
二、各部件功能图示三、使用说明菜单操作主菜单中包含:1.名片簿 2.通话记录 3.读卡 4.铃声 5.话机设置。
在挂机或摘机状态下,按<菜单/确认>键进入主菜单,按<上翻/快进>或<下翻/重听>键选择,按<菜单/确认>键进入相应的菜单操作,按<返回/退出>键返回上一级菜单:1.名片簿:名片簿子菜单包含: 1.新增名片,2.浏览名片,3.清空名片,用户可按<上翻/快进>或<下翻/重听>键选择,按<菜单/确认>键进入相应的菜单操作:新增名片: 可以新建一组电话名片,最多可建立200组名片。
名片包括姓名、电话。
进入新增名片以后,屏幕提示您输入姓名,此时话机默认拼音输入法,您可以按<输入法转换>键选择英文大小写、数字、拼音输入法、笔画输入法。
在输入的过程中您可以按<删除/挂断>键删除已输入的字符。
电话交换机说明书

1.2 特点....................................................................................................................................5
2.1 基本结构.............................................................................................................................6
3.2.8 设置分机免拨“0”直通外线.............................................................................18
3.2.9 取消内外热线服务功能 ..............................................................................18 3.2.10 清除分机自行设置的外线呼出密码 .....................................................18 3.2.11 外线呼叫等待功能 .....................................................................................18 3.3 外线编程 ........................................................................................................................18 3.3.1 设置外线出局字头(如拨 0 出局)........................................................18 3.3.2 设置外线出局方式(直局/间局)........................................................19 3.3.3 设置外线呼入为听电脑话务员引导或是经总机转接........................20 3.3.4 设置打开或关闭某条外线..........................................................................21 3.3.5 设置外线呼出用双音频或脉冲.................................................................21 3.3.6 设置某条外线开始计费起始时间(延时/反极) ............................21 3.3.7 设置将外线分组 ............................................................................................22 3.4 计费编程 ........................................................................................................................23 3.4.1 选择集团电话以半价或全价方式计费 ...................................................23 3.4.2 设置市话需要计费或不计费 .....................................................................24
电话机使用说明
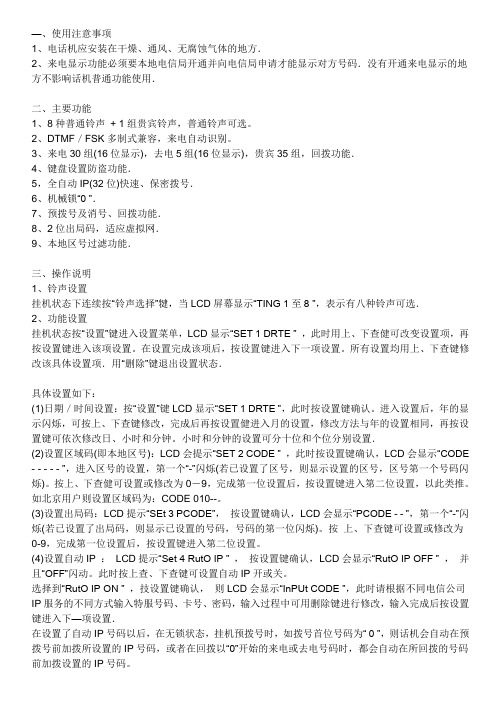
—、使用注意事项1、电话机应安装在干燥、通风、无腐蚀气体的地方.2、来电显示功能必须要本地电信局开通并向电信局申请才能显示对方号码.没有开通来电显示的地方不影响话机普通功能使用.二、主要功能1、8种普通铃声+ 1组贵宾铃声,普通铃声可选。
2、DTMF/FSK多制式兼容,来电自动识别。
3、来电30组(16位显示),去电5组(16位显示),贵宾35组,回拨功能.4、键盘设置防盗功能.5,全自动IP(32位)快速、保密拨号.6、机械锁―0 ‖.7、预拨号及消号、回拨功能.8、2位出局码,适应虚拟网.9、本地区号过滤功能.三、操作说明1、铃声设置挂机状态下连续按―铃声选择‖犍,当LCD屏幕显示―TING 1至8 ‖,表示有八种铃声可选.2、功能设置挂机状态按―设置‖键进入设置菜单,LCD显示―SET 1 DRTE ‖ ,此时用上、下查健可改变设置项,再按设置键进入该项设置。
在设置完成该项后,按设置键进入下一项设置。
所有设置均用上、下查键修改该具体设置项.用―删除‖键退出设置状态.具体设置如下:(1)日期/时间设置:按―设置‖键LCD显示―SET 1 DRTE ‖,此时按设置键确认。
进入设置后,年的显示闪烁,可按上、下查键修改,完成后再按设置健进入月的设置,修改方法与年的设置相同,再按设置键可依次修改日、小时和分钟。
小时和分钟的设置可分十位和个位分别设置.(2)设置区域码(即本地区号):LCD会提示―SET 2 CODE ‖ ,此时按设置键确认,LCD会显示―CODE - - - - - ‖,进入区号的设置,第一个―-‖闪烁(若已设置了区号,则显示设置的区号,区号第一个号码闪烁)。
按上、下查健可设置或修改为0-9,完成第一位设置后,按设置键进入第二位设置,以此类推。
如北京用户则设置区域码为:CODE 010--。
(3)设置出局码:LCD提示―SEt 3 PCODE‖,按设置键确认,LCD会显示―PCODE - - ‖,第一个―-‖闪烁(若已设置了出局码,则显示已设置的号码,号码的第一位闪烁)。
得力779竖式电话机说明书

HCD6238(28)P/TSD01目录1 本机特点 ------------------------ 12 安装方法 ------------------------ 13 使用说明 ------------------------ 14 功能操作 ------------------------ 65 电路原理图 ---------------------- 86 常见故障及处理 ------------------- 97 有毒有害物质申明表 ---------------- 98 售后服务 ------------------------10设置了IP号码后,预拨号、翻查来去电或贵宾号码后按IP键,可将所设置的IP号码先拨出,待IP号码拨完后,再自动拨出所需呼叫的号码。
注:当锁“0”时,话机将禁止使用IP功能。
■ 去电查询在挂机或摘机状态,按“去电”键进入去电翻查状态,然后再“上查”或“下查”键可查阅去电信息;在挂机状态,长按“*” 键3秒,也可进入去电翻查状态。
■ 音量/贵宾功能在挂机状态下按“音量/贵宾”键为铃声大小调节,免提摘机状态时为音量大小调节功能(铃声音量为4级循环可调,免提音量为2级循环可调,默认为最大档)。
在来电查询状态下,循环按“音量/贵宾”键可存储或取消该号码为贵宾号码。
■ 重拨功能摘机状态下按“重拨/暂停”键,重拨前次所拨号码(最大32位)。
■ 暂停功能拨号、预拨号期间,按“重拨/暂停”键为暂停功能,暂停时间为3.6秒。
■ 闪断/设置功能在挂机状态下,按“闪断/设置”键为功能设置键。
在摘机状态下,按“闪断/设置”键话机装自动收线600毫秒,时间长短可设置,参见闪断时间设置操作说明。
6 常见故障及处理故障无法显示来电号码请向邮局咨询您的话机是否申请来电显示服务请拔掉外线,约20分钟后重新插上外线再试可能接了防盗分线器,请取消防盗分线器操作出现异常按任意键不起作用显示号码不全处理7 有毒有害物质申明表部件名称说明书、彩盒、纸箱其他部件塑胶壳印刷电路板主件LCD屏金属导电胶曲、直线铅(Pb)汞(Hg)镉(Cd)六价铬(Cr+6)多溴联苯(PBB)多溴二苯醚(PBDE)有毒有害物质或元素:表示该有毒有害物质在该部件的所有均质材料中的含量均在SJ/T11363-2006标准规定的限量要求以下。
家庭电话增值服务用户指南说明书
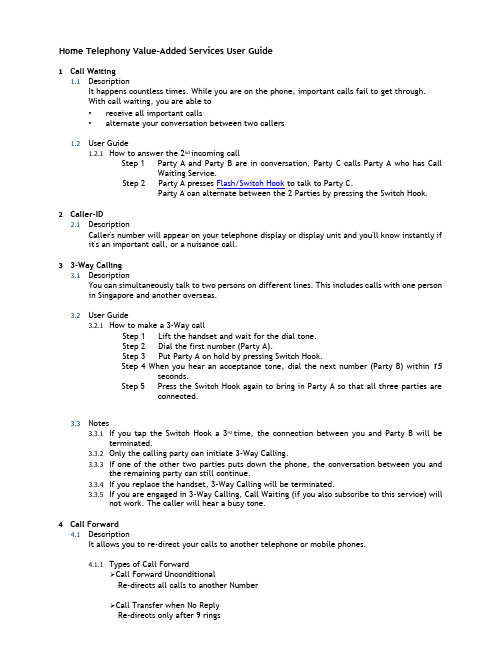
Home Telephony Value-Added Services User Guide1Call Waiting1.1DescriptionIt happens countless times. While you are on the phone, important calls fail to get through.With call waiting, you are able to•receive all important calls•alternate your conversation between two callers1.2User Guide1.2.1How to answer the 2nd incoming callStep 1 Party A and Party B are in conversation, Party C calls Party A who has CallWaiting Service.Step 2 Party A presses Flash/Switch Hook to talk to Party C.Party A can alternate between the 2 Parties by pressing the Switch Hook.2Caller-ID2.1DescriptionCaller's number will appear on your telephone display or display unit and you'll know instantly if it's an important call, or a nuisance call.33-Way Calling3.1DescriptionYou can simultaneously talk to two persons on different lines. This includes calls with one person in Singapore and another overseas.3.2User Guide3.2.1How to make a 3-Way callStep 1 Lift the handset and wait for the dial tone.Step 2 Dial the first number (Party A).Step 3 Put Party A on hold by pressing Switch Hook.Step 4 When you hear an acceptance tone, dial the next number (Party B) within 15seconds.Step 5 Press the Switch Hook again to bring in Party A so that all three parties areconnected.3.3Notes3.3.1If you tap the Switch Hook a 3rd time, the connection between you and Party B will beterminated.3.3.2Only the calling party can initiate 3-Way Calling.3.3.3If one of the other two parties puts down the phone, the conversation between you andthe remaining party can still continue.3.3.4If you replace the handset, 3-Way Calling will be terminated.3.3.5If you are engaged in 3-Way Calling, Call Waiting (if you also subscribe to this service) willnot work. The caller will hear a busy tone.4Call Forward4.1DescriptionIt allows you to re-direct your calls to another telephone or mobile phones.4.1.1Types of Call Forward➢C all Forward UnconditionalRe-directs all calls to another Number➢C all Transfer when No ReplyRe-directs only after 9 rings➢C all Transfer when BusyRe-directs only when the line is busy4.2User Guide4.2.1To activate Call Forward UnconditionalStep 1 Lift the handset and wait for the dial tone.Step 2 Key # 2 1 0 x x x x x x x x # where x x x x x x x x is the phone numberthat you wish to transfer your calls to.Step 3 Hear acceptance tone, and then replace thehandset. If you do not hear the acceptance tone, repeat Steps 1and 2.4.2.2To de-activate Call Forward UnconditionalStep 1 Lift the handset and wait for the dial tone.Step 2 Key # 2 1 1 #Step 3 Hear acceptance tone, and then replace the handset.4.2.3To activate Call Forwarding when No ReplyStep 1 Lift the handset and wait for the dial tone.Step 2 Key # 2 2 0 x x x x x x x x # where x x x x x x x x is the phone numberthat you wish to transfer your calls to.Step 3 Hear acceptance tone, and then replace thehandset. If you do not hear the acceptance tone, repeat Steps 1and 2.4.2.4To de-activate Call Forwarding when No ReplyStep 1 Lift the handset and wait for the dial tone.Step 2 Key # 2 2 1 #Step 3 Hear acceptance tone, and then replace the handset.4.2.5To activate Call Forwarding when BusyStep 1 Lift the handset and wait for the dial tone.Step 2 Key # 2 3 0 x x x x x x x x# where x x x x x x x x is the phone numberthat you wish to transfer your calls to.Step 3 Hear acceptance tone, and then replace thehandset. If you do not hear the acceptance tone, repeat Steps 1and 2.4.2.6To de-activate Call Forwarding when BusyStep 1 Lift the handset and wait for the dial tone.Step 2 Key # 2 3 1 #Step 3 Hear acceptance tone, and then replace the handset.4.3Notes4.3.1If customer uses <# 210 xxxxxxxx #> to activate Call Forward, it must be deactivated with<# 211 #>. This also applies to <# 220 xxxxxxxx #> and <# 221 #>.4.3.2Call Forward must be cancelled before activating Call Forward When No Reply and CallForward When Busy.4.3.3Call Forward When No Reply and Call Forward When Busy can be activated at the sametime provided that the calls are diverted to the same designated number or differentnumber.5Caller Number Non-Display5.1DescriptionTo allow the subscriber to withhold the telephone number information on all calls made from the subscriber line.5.2User Guide5.2.1To activate Caller Non-IDStep 1 Lift the handset and wait for the dial tone.Step 2 Key # 3 3 0 #5.2.2To de-activate Caller Non-IDStep 1 Lift the handset and wait for the dial tone.Step 2 Key # 3 3 1 #6Unlisted Number Service6.1DescriptionUnlist your telephone numbers in Phone Book, Enquiry 100 and Electronic Listing (Internet).7Do Not Disturb7.1DescriptionIt allows you to programme your phone to re-direct all incoming calls to a standard message inEnglish that says the subscriber is not available.Incoming Calls▪will not receive incoming callsOutgoing Calls▪repeated tone will be heard when you lift up the handset (if DND is activated).▪tone will last 4 to 5 seconds before the usual dial tone comes on.▪can still make outgoing calls when DND service is activated.▪wait for the dial tone before dialing the required number.7.2User Guide7.2.1To activate Do Not DisturbStep 1 Lift the handset and wait for the dial tone.Step 2 Key # 7 3 0 #Step 3 Hear acceptance tone, and then replace the handset.Step 4 To confirm that DND has been programmed, just dial your own number from yourphone.Step 5 You'll hear the recorded message.7.2.2To de-activate Do Not DisturbStep 1 Lift the handset and wait for the dial tone.Step 2 Key # 7 3 1 #Step 3 Hear acceptance tone, and then replace the handset.8Phone Lock8.1DescriptionIt prevents unauthorized outgoing calls from your phone.It’s available in barring of: STD & Audioline•STD, Local* & Audioline•STD, IDD, Budget Call & Audioline•STD, IDD, Budget Call, Local* & Audioline•IDD & Budget Call(* Local does not include barring of 999, 995 & 1608.)8.2User Guide8.2.1To activate Phone LockStep 1 Lift the handset and wait for the dial tone.Step 2 Key # 5 7 1 PIN # whereby default PIN is ‘1 2 3 4 5’.Step 3 Hear acceptance tone.Step 4 To confirm,When your phone is locked, you will hear a SingTel recorded message if youtry to make a barred call.Note The phone will function normally for incoming calls.8.2.2To de-activate Phone LockStep 1 Lift the handset and wait for the dial tone.Step 2 Key # 5 7 0 PIN # whereby default PIN is ‘1 2 3 4 5’.Step 3 Hear acceptance tone.Note You may make outgoing calls as usual. However, you need to relock the phoneagain to prevent unauthorised outgoing calls.9VoiceMail9.1DescriptionIt answers your calls when your line is busy. It takes messages (each message up to 2 minute) when your call is not answered (after 6 rings). Messages can be retrieved from any telephone (local or overseas).Please note there will be roaming rates for overseas retrieval9.2User Guide9.2.1How to retrieve VoiceMail messages in your mailboxStep 1 Lift the handset and wait for the dial tone.Step 2 Press ‘1383’, or 02 62341383 (Malaysia) or +65 62341383 (overseas).Step 3 Enter PIN # whereby default PIN is ‘1 1 2 2’.Note 1 If you are retrieving from another phone, enter your 8-digit Home Digital Linenumber followed by #. You will hear a voice message informing you of thenumber of new messages.2Please ensure that you are using a different PIN if you also subscribed toVoiceMail Service.3VoiceMail cannot co-exist with Caller Alert.。
电话商务录音系统使用说明书
第一章简介本公司将先进语音技术同大容量磁盘存储技术相结合推出性能优异的新一代多路电话商务录音管理系统是对电话双方通话过程进行实行自动录音和实时监听功能的软硬件集成系统。
能对多路电话同时进行超长时间录音显示记录主叫号码、被叫号码及通话时长等通话信息并保存于电脑系统管理人员可以对任意正在通话的通道进行实时监听而通话不受任何影响。
录音采用国际通用语音处理及压缩技术符合CCITT标准将话音信号经取样数字化压缩后存储在计算机磁盘中。
放音则是通过对磁盘上的语音数据进行解压后通过外接音箱(耳机)播放。
是生产调度、服务热、110、火警、防讯报警、银行委托、证卷行业等领域不可缺少的工具。
产品已布及国家和地区:美国、港澳台地区新加坡马来西亚印度尼西亚等东南亚国家南美诸国中东地区以及西亚地区出口品质值得信赖。
产品通过CE/FCC认证.系统基本功能:●支持Windows 98/NT/2000/XP/2003操作环境。
●提供USB接口2路PCI接口单卡4路8路16路数字30B+D(30路)。
●可实时监听每一条线路的通话内容。
●支持三种录音模式自动录音(压控)声控可手动录音(键控)。
●可以对所有的拨入、拨出未接电话进行清单列表、打印、支持条件查询及添加通话备注。
●支持直线交换机的内线分机接入同时录音。
●系统支持自动备份可将语音文件自动备刻录到DVD支持自动循环录音。
●系统附带来电客户信息管理系统可识别来电身份及自定义来电座席弹屏。
●录音起始时间可以灵活设置可以是一段时间内录音也可以是每天24小时录音。
●用户可在特殊号码表里自定义不录音的电话号码如拨打95555,163上网录音系统不启动录音)。
●系统具有完整的操作日志可以记录对系统的所有操作。
●支持每个用户对某些线路拥有操作的权限可设定不同等级的密码保护除了系统管理员使用最高级的密码外还有用户密码、录音文档查询密码等多种保护措施。
●线路适用于普通电话外线、分机内线、ISDN引出的模拟线、无线对讲机的音频输出线等。
力盈力泰无线座机(无线固话)录音盒使用说明

力盈力泰无线座机/无线固话录音盒使用说明7无线座机/无线固话录音使用说明本章主要介绍无线座机或无线固话录音的使用说明。
如果是对普通模拟电话录音的用户,可以跳过本章。
7.1背景到2010年为止,国内三大运营商都推出了无线座机或无线固话这样的产品。
它们外观和普通电话机相似,但内置了sim卡,是基于GSM、CDMA或TD-SCDMA无线网络的一种通信终端产品。
由于采用了移动通信技术,无需等待运营商的安装和布线,可以随需增加话机数量,而且资费比固定电话更优惠,因此逐渐受到了市场的欢迎,尤其是一些申请固定电话比较困难的地方,比如新建小区、新建写字楼或市场中的商铺等。
在无线固话的使用过程中,产生了录音的需求。
为了满足客户的需求,更好地为客户服务,力盈力泰迅速对无线座机的录音进行了研发,通过技术创新,于2010年底推出了可以对无线座机/无线固话进行录音的Rx00-FE-WP系列录音设备。
为了保证录音的效果,对市场上大多数无线座机/无线固话进行录音测试,结果证明,录音音质清晰,可以满足客户的要求。
其后的市场的表现也证实了这一点,大多数使用过的客户都表示了认可。
7.2产品特点无线座机录音解决方案,由本电话录音软件,以及Rx00-FE-WP系列的无线座机录音设备组成,具有以下的特点:支持市场上绝大多数的无线座机和无线固话,涵盖移动、联通和电信定制的座机可同时对1至100部无线座机同时录音通话双方的声音都能录下来;拨入拨出的电话都能录下来声音录到电脑上,存储时间由电脑硬盘的存储空间决定。
1G容量,最大可以录170个小时设备通过网口和电脑通信,无需安装设备驱动,而且可以采用分布式架构,布线方便从座机的手柄接出线来,可以清晰地录下通话双方的声音支持两种录音启动方式,包括声控以及力盈力泰特有的混合启动方式,支持自动录音需要注意以下一些情况:无法记录来电号码。
因为无线座机采用移动通信方式,手柄上没有来电号码,而且座机厂家也没有留出其它的通信接口用于接收来电号码,因此录音系统无法记录来电号码可以记录大部分座机的去电号码,但少数的几个座机除外。
详细的电话机使用说明书
中诺HCD高科HCD电话设置

中诺H C D高科H C D电话设置Standardization of sany group #QS8QHH-HHGX8Q8-GNHHJ8-HHMHGN#使用说明进入设置挂机状态下按“设置/闪断”键, lcd 显示:set ,表示进入主菜单,此时按“上翻”、“下翻”键或直接输入数字(1~8)进入下一菜单设置。
在某项功能设置完成后,再按“设置/闪断”键进行确认,后按“删除/免ip”键退回上一目录或按“免提”键完全退出而回到待机状态。
待机状态下,lcd 显示:2005,具体功能设置项目如下:以上所有设定按“设置”键确认,按“删除”键退回上一目录,按“免提”键退出。
日期、时间设置挂机状态下按“设置/闪断”键,直接输入数字“1”,液晶屏幕显示:1-date 2-cl ,表示进入日期和时间设置子菜单,再直接输入数字“1”,液晶屏幕显示:d 2005 01-01 ,进入日期设置状态,同时数字光标在闪烁,提示输入日期,输入完后,再按“设置/闪断”键确认。
日期设置成功后,按“删除/免ip”键退回上一菜单,液晶屏幕显示:1-date 2-cl ,输入数字“2”进行时间设置,时间设定状态下液晶屏幕显示:cl 00-00 ,其设定与日期设定的方法相同。
设置成功后,按“删除/免ip”键退到主菜单或按“免提”键退到待机状态。
铃声选择与铃声音量调节挂机状态下按“设置/闪断”键,直接输入数字“2”,液晶屏幕显示:r1r 2vip3vol ,表示进入铃声设置子菜单,直接输入数字“1”此时进入铃声选择状态,液晶屏幕会提示:ring type 01 ,(若已设置了某种铃声,则显示已设置的铃声代号),按“上翻”、“下翻”键选择所需铃声后按“设置/闪断”键确认。
选择铃声成功后,按“删除/免ip”键退回到上一菜单即铃声设置子菜单,输入数字“3”,液晶屏幕显示:ring vol 04 ,表示进入铃声音量选择状态,同时字体04 在闪烁,按“上翻”、“下翻”键选择所需铃声音量后按“设置/闪断”键确认(铃声音量为01~04 四级调节,黩认值为最大档)。
COSUN侨兴.HCD8188TSD说明书

3.显示亮度调节:
按设置键,再按数字键7,LCD显示LCD CON3,此时按上、下查键选择满意亮度后按设置确认。
4.IP功能设定:
自动IP设定:按设置键,再按数字键8、1,LCD显示AU IP OFF,并且OFF闪烁(本机初始化自动IP为关,即OFF),表示进入自动IP设定,则按上、下查键选择所需的IP号码。(197 17969 190 17951等等IP接入号码)。设定好后按设置键确认。(拨长途时会自动加入所设置的IP网络号)
1.设置日期/时间:
按设置键,LCD显示SE 12345678,并且12345678闪烁,此时按1表示进入日期(1-DATE)及时间(2-CL)的设置。
① 设置日期:在1-DATE 2-CL闪烁时,按数字键1,进入日期的设置,此时LCD显示D 2003 01-01,并且03 01-01闪烁(若已设置了日期,则显示设置的日期),表示进入年(03)月(01)日(01)的设置,同时LCD右上角显示11,表示进入设置中的第一大项第一小项设置,即日期设置。此时按各数字键输入年、月、日,再按设置键确认。例如2004年5月28日的设置是:按设置键,按数字键1,再按数字键1,然后依次按数字键040528,按设置键确认。同时LCD上排的日期修改为设置的日期,中排的星期会自动显示对应的星期,右上角显示的11中,后一个1闪烁,表示可设置第一大项中的其它小项。
② 设置时间:在上项设置完成后,即右上角显示的11中,后一个1闪烁时,按数字键2,右上角显示12,即进入时间的设置。LCD显示CL 00-00,并且00-00闪烁(若已设置了时间,则显示设置的时间),此时按各数字键输入小时和分钟。例如21点8分的设置是:依次按数字键2108,按设置键确认。同时LCD上排的时间修改为设置的时间。完成设置后,按删除键退回上一目录再进行下项设置。也可按删除键退出设置。
座机电话的使用方法和常用按键说明
座机电话的使用方法和常用按键说明如今,电话已经成为我们日常生活中不可缺少的工具,当然即便手机再普及,座机电话还是家庭尤其是办公室必不可少的,座机电话除了打/接之外的一些功能想必很多人还没用过,下面就以“步步高HCD007(182)TSDL ”型号的座机电话为例,给大家介绍下座机电话的使用方法及常用按键说明,虽然座机电话的功能不一,布局也不同,但主要的功能都差不多,希望给读者一个参考。
座机电话的使用方法及常用按键说明在以下使用方法叙述中,除特别说明外,其他操作均指在座机挂机状态下进行。
接听电话听到电话铃声,拿起手柄或按(免提)键即可与对方通话,通话完毕挂好手柄或按(免提)键。
在用手柄通话时若需转为免提通话,则按一下(免提)键,放回手柄即可转为免提通话;在用免提通话时若需转为手柄通话,则拿起手柄即可。
拨打电话拿起手柄或按(免提)键,听到拨号音后拨号,当听到回铃音时,等待对方应答。
如果听到忙音,只按(重拨/回拨)键即可将刚才所拨的电话号码拨出去,通话完毕挂好手柄或按(免提)键。
预置拨号预拨电话号码,如果输入错误,可按匠删除/刚键删除再重新输入。
待确认无误,按(重拨/回拨)键即可拨出。
重拨键拨出电话号码,听到忙音时,可以收线后再摘机,听到拨号音后,再按(重拨/回拨)键;或无须收线直接按(重拨/回拨)键,本机就会自动拨出您前次输入的号码。
闪断键(闪断)键又称快速收线键。
在摘机状态下按(闪断/铃声)键,可实现与按下收线开关同样的效果,当您连续拨打几个电话时,该键就显得尤其方便、快捷。
该键作用时间可作更改,具体操作请见后述第四页中的“设置闪断时间”。
暂停键拨号时,若两组号码之间需要暂停,可按(暂停/闹钟)键。
该键尤适用于内线分机拨打外线时使用。
铃声选择本机提供6种和弦音乐铃声。
4种特效铃声及1种普通铃声供选择。
您可在待机状态下按住(闪断/铃声,键大约2秒后,待显示屏显示“ring”或“song xx”字样时松开(“xx”为当前铃声种类,本机出厂时默认响普通铃声),再连续按(闪断/铃声)键循环选择您所喜爱的和弦音乐铃声。
盈能对讲系统使用说明书[TOP2395]
![盈能对讲系统使用说明书[TOP2395]](https://img.taocdn.com/s3/m/204d1780b9d528ea81c7790e.png)
盈能TOP2300系列可视对讲系统工程使用指导手册常州市盈能电气有限公司目录第一篇产品使用说明第一章中心与网络设备第一节小区对讲管理主机TOP2301第二节小区门卫主机TOP2302第三节中继分支器TOP2319第四节视频分配器TOP2318第五节视频切换器TOP2313第六节层间隔离器TOP2312第七节双门洞切换器TOP2317第二章数码单元主机TOP2372系列第三章免提可视户机TOP2395系列第四章户机编程器TOP2308第五章对讲电源第一节对讲电源TOP2802第二节对讲电源TOP2803第二篇通用安装技术第三篇对讲系统安装调试说明第一章系统概述第二章系统布线第三章系统安装调试第四章电源配置第五章典型接线图第一篇 产品使用说明第一章 中心与网络设备 第一节 小区对讲管理主机TOP2301一、产品概述小区对讲管理主机TOP2301放置在管理中心,它是对讲系统在联网状态下的管理枢纽,可以和户机、单元主机、小区门卫主机互相呼叫及对讲。
通常情况下,小区对讲管理主机和各单元主机、别墅联网转换器及小区门卫主机间采用RS485方式组网。
在安保型对讲系统中,小区对讲管理主机TOP2301可以再通过RS232接口和电脑联接,由安防软件对安防报警进行操作和管理。
二、外形结构来电S1S2S4S3去电警情上查下查时钟音乐删除转接7412589630开 锁确认取消124378659111210151413TOP2301结构示意图(正面)结构说明:1、振铃音量:调整来电铃声音量的大小,分小、中、大三档。
2、MIC 音量旋钮:可调手柄上MIC 音量大小。
3、喇叭音量旋钮:可调手柄上喇叭音量大小。
4、音频平衡旋钮:通话时发生啸叫可用此旋钮调整抑制啸叫。
5、电源插口:DC12V 供电。
6、总线接口:包括RS485通讯线及语音线。
7、RS232串口:用于和安防管理电脑连接。
8、视频控制:在管理主机与单元主机相互呼叫通话时提供一组常开/常闭继电器干节点触点。
TELEDEX Pearl S 电话使用手册说明书

PACKAGE CONTENTSCheck to be sure that you have all of the following components in your package (see figure below) :• Telephone base unit• Handset coil cord• User guide• Handset• Line cordINSTALLATION1)Plug one end of the handset coiled cord into the handset. Plugthe other end of the cord into the handset jack located on theleft side of the phone base. (Refer to diagram on reverse.)2)Place the handset in the handset cradle. Plug one end of the linecord into the LINE jack on the back of your phone.3)Plug the other end of the modular cord into the wall jack. WALL MOUNTINGThe Pearl S telephone can easily be attached to a wall mount plate.1)Remove the wall mount clip (located on the front of thetelephone, above the speaker grill) by firmly pushing upward(toward the hook switch.)2)Rotate the clip 180 degrees, so that the side with the protrudingedge is towards the top of the telephone. This edge will helphold the handset on the cradle.3)Place the handset in the handset cradle.4)Connect the line cord into the LINE jack on the back of yourphone. Route the line cord through channel on the bottom ofthe telephone. Connect the other end of the line cord to thejack on the wall mount plate.5)Slip the phone onto the wall plate; slide the telephone downso it is firmly in place.USING THE DATA PORTThe data port is located on the right hand side of the telephone. Use this jack to connect a computer or fax machine in parallel to the same phone line to which the telephone is connected. ADJUSTING THE RINGER VOLUMEY our Pearl S telephone has two ringer volume levels: “Low” and “High.”T o adjust the ringer volume, slide the ringer volume switch (located on the backside of the telephone) to the desired level. HANDSET VOLUME CONTROLThere are three (3) volume levels for the handset volume. T o increase or decrease the handset volume, slide the handset volume switch (located on the right hand side of the telephone) to the desired setting. SPEAKER VOLUME CONTROLT o increase or decrease the speakerphone volume, move the speaker volume slider control (located on the right hand side of the telephone) until speaker volume is at a satisfactory level.PLACING AND ANSWERING CALLST o make a call, pick up the handset or press the SPEAKER key. When you hear the dial tone, dial the desired phone number. T o answer an incoming call, pick up the handset or press the SPEAKER key. T o end a call, place the handset back on the base, or press the SPEAKER key again.SWITCHING BETWEEN HANDSET AND SPEAKERPHONET o switch from the handset to the speakerphone during a call, press the SPEAKER key, and place the handset on the base. T o switch from the speakerphone to the handset, lift the handset; the speakerphone will automatically turn off.USING REDIALThe redial function allows you to redial the last dialed number. Pick up the handset, or press the SPEAKER key, and press the REDIAL key. The number will be dialed automatically.USING FLASHFlash supports custom calling services, such as call waiting. For example, if you have subscribed to call waiting, press FLASH to answer an incoming call, without disconnecting the current call. Press FLASH again to return to the first call.USING HOLDT o place a call on hold, press the HOLD key. The HOLD LED flashes. You may now hang up the handset without disconnecting the call.T o resume the call, press the HOLD key again, or press the SPEAKER key. The call will once again be active.USING MUTEPressing the MUTE key will silence the handset or speakerphone micro-phone. You will be able to hear the other party, but they will not be able to hear you. The MUTE LED will light. Press the MUTE key again to resume your conversation.PROGRAMMING GUEST SERVICE KEYSFollow these steps to program a number into one of the three memory locations, for one-touch access to guest services, or for accessing special PBX/Centrex services or features. Each memory location can store up to sixteen (16) digits.1)Lift the handset, then press the STORE key (For key location,refer to diagram on reverse.)2)On the dial pad, enter the number you wish to store. Onceyou have entered the number completely, press the memorybutton corresponding to the desired location.DIALING A STORED NUMBERPick up the handset or press the SPEAKER key, wait for a dial tone, then press the desired memory (guest service) key. The telephone will automatically dial the stored number.MESSAGE WAITINGThe message waiting indicator flashes to indicate that there is a message waiting. Consult your system administrator or service provider for instructions on how to access these messages.CARE AND MAINTENANCEYour Pearl S telephone has been designed to provide years of trouble free service. T o ensure its longevity, please follow these maintenance instructions:1)Keep the Pearl S away from heat, as high temperatures can shortenthe life of the electrical components, and distort or melt plasticparts.2)The telephone should be kept free of dust and moisture. If itgets wet, wipe it dry immediately. Liquids may contain minerals that can corrode electronic circuits.3)Handle your telephone gently and carefully. Dropping it cancause serious damage to internal circuitry or the plastic case,which may result in malfunction.4)Do not use any type of chemical or abrasive powder to clean theouter casing. Use only mild detergents on a soft, damp cloth to clean the telephone.5)In case of trouble with the telephone, do not attempt to repairthe telephone yourself. Contact your distributor for assistance.If the trouble is affecting the telephone lines, the phone company or service provider may ask you to disconnect the telephoneuntil the problem is resolved.PEARL SGuestroom SpeakerphoneUsers GuidePACKAGE CONTENTSBASE UNIT HANDSETCOIL CORDLINE CORD USER GUIDEREQUIREMENTS OF PART 68 - FCC RULESThis device has been granted a registration number by the Federal Communications Commission,under Part 68 rules and regulations for direct connection to the telephone lines. In order to comply with these FCC rules, the following instructions must be carefully read and applicable portions fol-lowed completely:1) Direct connection to the telephone lines may be made only through the standard modular cord furnished, to the utility installed jack. No connection may be made to party or coin phone lines.On the bottom of the phone is a label that contains, among other information, the FCC Registration Number and the Ringer Equivalence number (REN) for this equipment. If requested this information must be provided to the telephone company. The USOC Jack for this equipment is RJ11C.2) The telephone company, under certain circumstances, may temporarily discontinue and make changes in facilities and services which may affect the operation of the users' equipment. However,the user shall be given adequate notice in writing to allow the user to maintain uninterrupted service.3) In certain circumstances, it may be necessary for the telephone company to request information from you concerning the equipment which you have connected to your telephone line. Upon request of the telephone company, provide the FCC registration number and the ringer equivalence number of the equipment which is connected to your line; this information will be found on the device.4) If any of your telephone equipment is not operating properly, you should immediately remove it from the telephone line. It may cause harm to the telephone network.5) If the telephone company notes a problem, they may temporarily discontinue service. When practical,they will notify you in advance of disconnection. If advance notice is not feasible, the telephone com-pany must; promptly notify you of such temporary discontinuance; afford the opportunity to correct the condition; inform you of your rights to bring a complaint to the FCC under their rules.6) Repairs to the device may be made only by the manufacturer or an authorized service agency.This applies at any time during and after warranty. If unauthorized repair is performed, registration,connection to the telephone lines and remainder of warranty period all become null and void.7) This equipment is hearing aid compatible.REQUIREMENTS OF PART 15 - FCC RULESNOTE: This equipment has been tested and found to comply with the limits for a Class B digital device, pursuant to Part 15 of the FCC Rules. These limits are designed to provide reasonable pro-tection against harmful interference in a residential installation. This equipment generates, uses, and can radiate radio frequency energy and, if not installed and used in accordance with the instruction,may cause harmful interference to radio communications. However, there is not a guarantee that interference will not occur in a particular installation. If this equipment does cause harmful interference to radio or television reception, which can be determined by turning the equipment off and on, the user is encouraged to try to correct the interference by one or more of the following measures:a) move the telephone away from the receiver. b) consult the dealer or an experienced radio/TV technician for help. Any changes made by the user not approved by the manufacturer can void the user's authorty to operate the telephone.INDUSTRY OF CANADA REQUIREMENTSNOTICE: The Industry Canada label identifies certified equipment. This certification means that the equipment meets certain telecommunications network protective operational and safety requirements as prescribed in the appropriate T erminal Equipment T echnical Requirements documents. Thedepartment does not guarantee the equipment will operate to the users satisfaction. Before installing this equipment, users should ensure that it is permissible to be connected to the facilities of the local telecommunications company. The equipment must also be installed using an acceptable method of connection. The customer should be aware that compliance with the above conditions may not pre-vent degradation of service in some situations. Repairs to certified equipment should be coordinated by a representative designated by the supplier. Any repairs or alterations made by the user to this equipment, or equipment malfunctions, may give the telecommunications company cause to request the user to disconnect the equipment. Users should ensure for their own protection that the electrical ground connections of the power utility, telephone lines, and internal metallic water pipe systems, if present, are connected together. This precaustion may be particularly important in rural areas.Caution: Users should not attempt to make such connections themselves, but should contact the appropriate electric inspection authority or electrician, as appropriate. The Ringer Equivalence Number (REN) of this device is z.NOTICE: The Ringer Equivalence Number (REN) assigned to each terminal device provides an indi-cation of the maximum number of terminals allowed to be connected to a telephone interface. The termination on an interface may consist of any combination of devices subject only to the requirement that the sum of the Ringer Equivalence Numbers of all the devices does not exceed 5. This telephone connects to the telephone network under the connecting arrangement code CA11A.IMPORTANT SAFETY INSTRUCTIONSWHEN USING YOUR TELEPHONE EQUIPMENT , BASIC SAFETY PRECAUTIONS SHOULD ALWAYS BE FOLLOWED TO REDUCE THE RISK OF FIRE, ELECTRIC SHOCK AND INJURY TO PERSONS, INCLUDING THE FOLLOWING:1. READ AND UNDERSTAND ALL INSTRUCTIONS.2. FOLLOW ALL WARNINGS AND INSTRUCTIONS MARKED ON THE PRODUCT .3. UNPLUG THE PRODUCT FROM THE WALL OUTLET BEFORE CLEANING. DO NOT USE LIQUID CLEANER OR AEROSOL CLEANERS. USE A DAMP CLOTH FOR CLEANING.4. DO NOT USE THIS PRODUCT NEAR WATER, FOR EXAMPLE: NEAR A BATHTUB, WASHBOWL, KITCHEN SINK OR LAUNDRY TUB, IN A WET BASEMENT , OR NEAR A SWIMMING POOL.5. DO NOT PLACE THIS PRODUCT ON AN UNSTABLE CART , STAND OR TABLE. THE PROD-UCT MAY FALL, CAUSING SERIOUS DAMAGE TO THE PRODUCT .6. SLOTS AND OPENINGS IN THE CABINET AND THE BACK OF BOTTOM ARE PROVIDED FOR VENTILATION. THESE OPENINGS MUST NOT BE BLOCKED OR COVERED. THEOPENINGS SHOULD NEVER BE BLOCKED BY PLACING THE PRODUCT ON A BED, SOFA,RUG OR ANY OTHER SIMILAR SURFACE. THIS PRODUCT SHOULD NEVER BE PLACED NEAR OR OVER A RADIATOR OR HEAT REGISTER. THIS PRODUCT SHOULD NOT BE PLACED IN A BUILT-IN INSTALLATION UNLESS PROPER VENTILATION IS PROVIDED.7. NEVER PUSH OBJECTS OF ANY KIND INTO THIS PRODUCT THROUGH CABINET SLOTS AS THEY MAY TOUCH DANGEROUS VOLTAGE POINTS OR CAUSE A SHORT CIRCUIT THAT COULD RESULT IN A FIRE OR ELECTRIC SHOCK. NEVER SPILL LIQUID OF ANY KIND ON THE PRODUCT .8. TO REDUCE THE RISK OF ELECTRIC SHOCK, DO NOT DISASSEMBLE THIS PRODUCT .IF SERVICE IS NECESSARY , SEND OR TAKE THE TELEPHONE TO A QUALIFIED SERVICE FACILITY . OPENING OR REMOVING COVERS MAY EXPOSE YOU TO DANGEROUS VOLT-AGES OR OTHER RISKS. INCORRECT REASSEMBLY CAN CAUSE ELECTRIC SHOCK WHEN THE APPLIANCE IS SUBSEQUENTLY USED.9. UNPLUG THIS PRODUCT FROM THE WALL OUTLET AND REFER SERVICING TO QUALI-FIED SERVICE PERSONNEL UNDER THE FOLLOWING CONDITIONS: •IF THE POWER SUPPLY CORD OR PLUG IS DAMAGED OR FRAYED •ID LIQUID HAS BEEN SPILLED INTO THE PRODUCT •IF THE PRODUCT HAS BEEN EXPOSED TO RAIN OR WATER •IF THE PRODUCT DOES NOT OPERATE NORMALLY BY FOLLOWING THEOPERATING INSTRUCTIONS. ADJUST ONLY THOSE CONTROLS THAT ARECOVERED BY THE OPERATING INSTRUCTIONS, AS IMPROPER ADJUSTMENT OF OTHER CONTROLS MAY RESULT IN DAMAGE AND WILL OFTEN REQUIREEXTENSIVE WORK BY A QUALIFED TECHNICIAN TO RESTORE THE PRODUCT TO NORMAL OPERATION.•IF THE PRODUCT HAS BEEN DROPPED OR THE CABINET HAS BEEN DAMAGED. •IF THE PRODUCT EXHIBITS A DISTINCT CHANGE IN PERFORMANCE.10. AVOID USING THE TELEPHONE DURING AN ELECTRICAL STORM. THERE MAY BE A REMOTE RISK OF ELECTRIC SHOCK FROM LIGHTNING.11. DO NOT USE THE TELEPHONE TO REPORT A GAS LEAK IN THE VICINITY OF THE LEAK.IF YOUR PRODUCT USES BATTERIES, FOLLOW THESE ADDITIONAL PRECAUTIONS:1. USE ONLY THE TYPE AND SIZE OF THE BATTERY SPECIFIED.2. DO NOT DISPOSE OF BATTERIES IN A FIRE. THE BATTERIES CAN OR MAY EXPLODE.CHECK LOCAL CODES FOR PROPER BATTERY DISPOSAL INSTRUCTIONS.Teledex,LLC6311 San Ignacio Avenue San Jose,CA 95119Telephone:(408) 363-3100Fax:(408) 363-3136email:*****************Internet:Copyright ©2002 Teledex LLC All Rights Reserved.Part Number: 600-0480-59MAIN DIAGRAMRIGHT VIEWLEFT VIEWWALL MOUNTINGHandset VolumeSpeaker VolumeHandset Coil CordHandset JackData PortCord ChannelWall JackFOR CUSTOMER SERVICE CALL1-800-783-8353Wall Mount Clip (under handset)HandsetRinger VolumeData Port Line JackHandset Volume Mute Key Redial Key Flash KeySpeaker VolumeStore Key (hidden)Guest Service KeysDial PadSpeakerphone Key Hold Key Message Waiting Indicator。
HCD系列电话机内控技术条件(修改)

4.6.2.3 可适应下列消息数据头标识
头标识为“A”
头标识为“B”
头标识为“C”
头标识为“D”
头标识为“*,#,null”
4.6.2.4 可适应下列消息数据尾标识
尾标识为“A”
尾标识为“B”
8
Qn/DKF.23-1999
尾标识为“C” 尾标识为“D” 尾标识为“*,#,null” 4.6.2.5 可适应下列呼叫前转 “A******D*******C” “A******D*******D*******C” “D******D*******C” “D******D*******D*******C” 4.6.2.6 单组号码接收长度不少于14位 4.6.2.7 传输序列的时间特性 4.6.2.7.1 话机能够在反极信号结束后,经过不少于80ms的空闲时间接收交换机关送来的 DTMF消息数据信号. 4.6.2.7.2 话机在收到最后一次DTMF消息数据信号后80ms内能够正常接收振铃信号.(A类 方式). 4.6.2.7.3 话机能够正确接收DTMF消息数据信号字符/间隔时间为48/48ms的数据串. 4.6.2.8 信号接收能力 4.6.2.8.1 接收的标准信号频率:见表1
3. 术语
主叫识别信息显示(CID)----是指被叫用户终端设备上显示主叫号码、主叫用户姓 名、呼叫日期、时间等主叫识别信息,并进行存储,以供用户查阅的一种服务项目。