瀚迪空调遥控器说明书 K-1600
空调的使用说明书
空调的使用说明书空调的正确使用方法空调的正确使用方法1、首次使用空调时应详细阅读《使用说明书》,并按照上面介绍的方法进行操作。
2、设定合适的温度:一般设定在26℃-27℃的范围对人的感觉比较适合,由于现在许多空调都具有经济睡眠功能,所以睡觉前最好启动该功能,以保证睡着和醒来时不会觉得太凉。
3、选择合适的出风口角度,尽量避免对准人体,特别是人在睡眠中直接吹冷风容易得病。
目前空调器的双向科学送风功能一般都可以解决这一问题,可以自动设定制冷时角度朝上,制热时角度朝下。
4、有效使用定时器。
睡眠及外出时,请利用定时器。
使其仅在必要时间内运转,以便省电。
5、经常清洁空气过滤网,过滤往被堵塞会降低运转性能,从而导致电费增加,应半月左右清扫一次。
6、不要让阳光和热风进入房间,在冷气开放时最好用窗帘或百叶窗遮挡阳光;同时开启空调后尽量少开门窗,减少冷量的损耗,节约用电。
7、切物有物体挡住市内外的进出风口,否则会降低制冷制热效果,浪费电力,严重的回导致空调器无法正常工作。
8、仅在必要时候开启空调器,既可以使空调得到有效利用又可以节约用电。
9、在开机时首先将制冷或制热开在强劲档,如果您的空调没有强劲功能,那么最好开在高风档,当温度适宜时再将设置改到中档或抵挡,减少能耗,减低噪音。
10、空调器停、开操作时间,应间隔3分钟以上,不能连续停、开。
11、开空调时室内要保持一定的新鲜空气,可以避免人在空调房间患“空调病”。
如果您的空调没有换气功能,呢么可以将门窗开个小缝,让新风从门窗缝自然渗入。
12、室内空调运转时,请勿将手指或木棍等物品插入空气的进出风口,因为空调内的风扇在高速运转,有可能引起伤害事故。
13、空调器应该使用专用的电源插座,请勿将电源连接到中间插座上,禁止使用加长线或与其他电器功用,有可能引起触电、发热或火灾事故。
14、请勿损伤或改造电源线,有可能引起触电、发热或火灾事故。
15、请按照说明书介绍的方法正确开关机、勿采用插入或拔出电源线的方法来起动或停止空调机的运转,这样有可能会引起触电或火灾事故。
那些你不知道的空调遥控器用法,全都在这里。

那些你不知道的空调遥控器用法,全都在这里。
“麻雀虽小,五脏俱全”,对于遥控器来说是最好不过的诠释。
格力遥控器基本功能都是一样的,空调遥控器使用的好,不仅可以让房间环境更舒适,还可以节能省电。
今天,我们一起来学习遥控器的用法。
(注:部分系列机型无左右扫风功能,如按左右扫风按键,空调器蜂鸣器会发出“嘀”的声响,空调会保持原来的运行状态不变。
单冷机型接收制热信号会无任何回应声。
)1、遥控器使用前提条件1-1、红外遥控器:有效遥控接收直线距离一般8m左右,可同时开/关多台空调。
1-2、射频遥控器:一般作为高档机型配置遥控器,遥控有效接收直线距离50m左右,一般需配对处理,只能实际控制一台空调属单一控制。
配对成功后就不需要再配对了。
1-3、格力新款遥控器:一般可替代旧款遥控器(如YAPOF3可替代YBOF2),但是旧款遥控器不能用于新款机型。
1-4、重点注意事项:家庭安装多台遥控器一定要一一对应使用,不能交叉使用防止出现新机遥控器不能开机的现象。
2、遥控器功能说明2-1、开/关按键:按此键可开/关空调。
开/关时清除原来设定的定时、睡眠等功能。
如电源电池电力不够时会满屏显示复位或者电池灯闪。
2-2、风速按键:按此键,风速循环变化如下图:注:除湿模式下按此键不能调节风速,此时为低档风速。
2-3、△ / ▽ 按键:每按一次“△”或“▽”键设定温度下降或上升1℃,连续2秒以上按住“△”或“▽”键,温度值快速变化,直至松开后才发射信息,温度设定范围为16~30℃。
注:同时按住△ / ▽ 按键,遥控器键盘锁定,此时其他操作无效。
再次同时按住△ / ▽ 按键,即可解锁。
(出现锁定图标,同时按住△ / ▽ 按键,即可解锁)2-4、上下扫风按键:简单扫风时,用于选择扫风和停止扫风。
定格扫风时,用于选择上下扫风状态。
在关机状态下,同时按“△”键和“上下扫风”按键,可在简单扫风模式与定格扫风模式之间切换,切换时遥控器上的闪烁两秒。
空调遥控器说明书

遥控器说明书按键功能(1)“开/关”键:待机时按一下开机,进入运行状态,开机后按一下关机,进入关机待机状态;(2)“模式”键:开机后,按此键,模式按“自动→制冷→除湿→送风→制热→自动”方式顺序循环;(3)“风速”键:按此键,内风机风速按“自动→低风→中风→高风→自动”方式循环;(4)“风向”键:按此键,导风片角度按“自动→位置[1]→位置[2]→位置[3]→位置[4]→位置[5]→自动”方式顺序循环;(5)“摆风”键:按此键,摆风可设置为连续摆动和点动两种方式循环;(6)“温度▼”键:按一下设定温度下降一度,控制范围:16℃—31℃,无连击功能;(7)“温度▲”键:按一下设定温度上升一度,控制范围:16℃—31℃,无连击功能;(8)“定时开”键:时间设置好后,按一下“定时开”键,数字显示区显示上次设定的定时开机时间,通过“小时”键和“分钟”键调整设定时间,空调到设定时间开机;再次按“定时开”键,可取消定时开设定;(9)“定时关”键:时间设置好后,在开机状态下,按一下“定时关”键,数字显示区显示上次设定的定时关机时间,通过“小时”键和“分钟”键调整设定时间,空调到设定时间关机;再次按“定时关”键,可取消定时关设定;(10)“小时”键:在定时和时间设置状态下,按一下增加一小时,有连击功能;(11)“分钟”键:在定时和时间设置状态下,按一下增加十分钟,有连击功能;(12)“睡眠”键:按此键,遥控器显示睡眠模式设定,在睡眠显示区域一直显示“”符号,室内风机自动转为低风,8小时后睡眠结束,睡眠符号取消,室内风机恢复原来风速运行;再次按“睡眠”键或按一下“模式”键或“风向”键可退出睡眠功能;(13)“复位”键:用直径1mm的小圆棒按此按键,遥控器恢复出厂设置;(14)“时间”键:用直径1mm的小圆棒按此按键,进入时间设置状态,设定好后,再次按此按键表示设定完成且退出时间设置;注:每次有效操作遥控器按键,液晶屏显示发射信号的符号“”亮一秒后消失。
空调万能遥控器的使用方法

空调万能遥控器的使用方法空调万能遥控器是一种方便实用的智能设备,它可以控制不同品牌、不同型号的空调,让我们在家中或办公室中更加便捷地享受清凉。
但是,对于一些用户来说,使用空调万能遥控器可能会感到困惑,不知道该如何正确操作。
下面,我将为大家介绍空调万能遥控器的使用方法,希望能够帮助大家更好地使用这一智能设备。
首先,当我们拿到空调万能遥控器时,需要先了解它的基本功能按钮。
通常,空调万能遥控器的按钮包括开关机按钮、模式选择按钮、温度调节按钮、风速调节按钮、定时开关按钮等。
这些按钮的功能和位置可能会有所不同,因此在使用前,我们需要仔细查看说明书或者参考相关资料,熟悉遥控器的各个按钮及其功能。
接下来,我们需要将空调万能遥控器与空调进行匹配。
首先,确保空调的电源已经连接并处于开启状态,然后按下遥控器上的“匹配”按钮或者按照说明书上的操作步骤进行匹配。
在匹配成功后,我们就可以开始使用遥控器来控制空调的各项功能了。
在实际使用中,我们可以根据需要选择不同的模式。
比如,夏天时可以选择制冷模式,冬天时可以选择制热模式,而在春秋季节则可以选择送风模式。
此外,还可以根据个人喜好和需要调节空调的风速和温度,以达到舒适的使用效果。
除了基本的功能操作外,空调万能遥控器还可能具有一些特殊功能,比如定时开关机功能。
通过设置定时开关机,我们可以在未来的某个时间点自动开启或关闭空调,这样就可以在不影响舒适度的前提下节约能源。
在使用空调万能遥控器时,我们还需要注意一些使用技巧。
比如,遥控器的电池需要定期更换,以保证遥控器的正常使用;在操作遥控器时,需要注意避免受潮和摔落,以免影响遥控器的使用寿命。
总的来说,空调万能遥控器是一种非常实用的智能设备,它可以为我们的生活带来便利。
通过本文介绍的使用方法,相信大家已经对空调万能遥控器有了更深入的了解,希望大家可以更好地利用空调万能遥控器,享受清凉舒适的生活。
智能电动冷暖空调产品说明书

智能电动冷暖空调产品说明书一、产品概述智能电动冷暖空调是一款高效节能、智能控制的家用空调产品。
本产品采用先进的技术和设计,以满足用户对于室内空气质量、舒适度和节能环保的需求。
本说明书将详细介绍产品的功能、使用方法以及注意事项,以帮助用户更好地了解和使用本产品。
二、产品特点1. 冷暖空调一体化:本产品既具备制冷功能,也具备制热功能,可在不同季节灵活调节室内温度,满足用户的需求。
2. 智能控制系统:配备智能控制系统,用户可通过手机APP远程控制空调开关、温度调节、定时开关等功能,方便快捷。
3. 节能环保:采用先进的制冷制热技术,能有效降低能耗,减少对环境的影响,符合节能环保要求。
4. 空气净化功能:配备空气净化器,可除去室内的灰尘、异味和有害物质,提供清洁健康的室内空气。
5. 静音设计:采用静音技术,工作时噪音低,不会影响用户的日常生活和休息。
三、使用方法1. 安装:请确保在安装前已阅读本说明书,并按照说明进行正确安装。
产品应安装在通风良好的室内空间,避免阳光直射和潮湿环境。
2. 电源连接:将产品正确地连接到电源,确保电源稳定和接地良好。
3. 遥控器操作:使用遥控器可开启、关闭空调,调节温度,设置定时开关等功能。
请在使用遥控器前确保电池安装正确。
4. 手机APP使用:用户可下载并安装产品对应的手机APP,通过手机APP可实现远程控制功能。
首次使用需要进行设备绑定和网络连接的设置。
四、注意事项1. 请勿长时间连续使用空调,适当开窗通风有助于室内空气流通和健康。
2. 使用过程中如发现异常情况,应立即停止使用,并拨打售后服务热线咨询。
3. 定期清洁过滤网和空气净化器,以保证产品工作效果和空气质量。
4. 请勿将水或其他液体倒入产品中,以免发生电路短路和故障。
5. 请勿将物品放置在产品上,以免影响产品散热和正常运行。
6. 如需进行维修或更换零部件,请联系官方售后服务渠道,不要私自拆卸或维修。
五、常见问题解答Q:空调无法启动?A:请先确认产品是否正常接通电源,并检查遥控器电池是否安装正确。
空调功能说明资料

上,关闭压缩机和外风机,内风机按设定风速运行;若内 盘温度 ≥ 7℃,退出此保护; 6、制冷运行时,风门按键可控制摆叶的摆动和停止;
制冷模式 (二)
7、自动风速控制:
环境温度 - 设置温度≥3℃时,风速按高风运行;
设置温度 +1℃≤环境温度<设置温度 +3℃时,风速 按中风运行;
输入条件,通过软件(程序)计算,决定各种输出。
电源 见图1
输入
1、温度传感器 用负温度系数的热敏电阻,电阻值随着温度的增加而降低, 一般有两个常规指标:基准电阻值 (25℃时的阻值,我公 司常用的是5k),B值:表示电阻随温度变化的规律:我公 司常用的是3750)
2、按键:开关 3、遥控器信号:是有一定编码规则的红外信号
我公司使用的是4相8拍的步进电机,接线图如下图:电源 电压为12V。
单相异步电动机
单相压缩机、内外风机 电容移相:单相交流电动机只有二个绕组(主、副绕组),
转子是鼠笼式的。当单相正弦电流通过定子绕组时,电动 机就会产生一个交变磁场,这个磁场的强弱和方向随时间 作正弦规律变化,但在空间方位上是固定的,所以又称这 个磁场是交变脉动磁场。这个交变脉动磁场可分解为两个 以相同转速、旋转方向互为相反的旋转磁场,当转子静止 时,这两个旋转磁场在转子中产生两个大小相等、方向相 反的转矩,使得合成转矩为零,所以电动机无法旋转。当 我们用外力使电动机向某一方向旋转时(如顺时针方向旋 转),这时转子与顺时针旋转方向的旋转磁场间的切割磁 力线运动变小;转子与逆时针旋转方向的旋转磁场间的切 割磁力线运动变大。这样平衡就打破了,转子所产生的总 的电磁转矩将不再是零,转子将顺着推动方向旋转起来。
Keystone KSTAP05PHA KSTAP07PHA 便携式空调用户手册说明书

19.7inch
19.7inch
19.7 inch
Your installation location should meet the following requirements: - Make sure that you install your unit on an even surface to minimize noise and vibration. - The unit must be installed near a grounded outlet, and the Collection Tray Drain (found on the back of the unit) must be accessible. - The unit should be located at least 19.7 inches from the nearest wall to ensure proper air conditioning. - DO NOT cover the Intakes, Outlets, or Remote Signal Receptor of the unit, as this could cause damage to the unit.
- DO NOT install the unit in a location that may be exposed to combustible gas, as this could cause a fire.
- The unit has wheels to facilitate movement. Make sure not to use the wheels on thick carpet or to roll over objects, as this could cause the unit to fall.
空调操作方法

空调操作方法空调作为现代生活中不可或缺的家电设备,已经成为了我们生活中的重要组成部分。
正确的操作空调不仅可以带来舒适的室内环境,还可以延长空调的使用寿命。
下面,我将为大家介绍空调的正确操作方法,希望能够帮助大家更好地使用空调。
首先,我们需要了解空调的遥控器功能。
在使用空调之前,首先需要打开空调的电源开关,然后使用遥控器对空调进行操作。
一般来说,空调遥控器上会有开关机按钮、模式选择按钮、温度调节按钮、风速调节按钮等功能。
在使用空调时,我们需要根据实际需求选择合适的模式,比如制冷模式、制热模式、除湿模式等。
同时,根据室内温度调节空调的温度,以及调节风速来达到舒适的效果。
其次,我们需要注意空调的定时功能。
现在的空调大多都配备了定时功能,可以根据自己的作息时间来设置空调的开关机时间。
这样不仅可以提高空调的使用效率,还可以节省能源,延长空调的使用寿命。
在使用空调的定时功能时,我们需要根据实际情况合理设置开关机时间,避免浪费电能。
另外,空调的清洁和维护也是非常重要的。
定期清洁空调的滤网和散热器可以保持空调的通风性能,避免因灰尘堵塞而导致的散热不良。
同时,定期清洁空调的内部和外部也可以保持空调的整洁,延长空调的使用寿命。
另外,空调的维护也需要注意,如果发现空调有异常情况,及时联系专业技术人员进行维修,避免因小问题影响空调的正常使用。
最后,我们需要注意空调的节能使用。
在使用空调时,可以通过合理设置温度、选择合适的模式、定时开关机等方式来节约能源。
另外,室内外温差不宜过大,适当调高空调的温度也可以节约能源。
在不需要使用空调时,要及时关闭空调的电源开关,避免长时间空调待机耗电。
综上所述,正确的操作空调不仅可以带来舒适的室内环境,还可以延长空调的使用寿命,节约能源。
希望大家在日常生活中能够按照以上方法正确操作空调,享受舒适的生活。
谢谢!。
SF423000A电柜空调控制器厂家使用说明书
SF423000A电柜空调控制器厂家使用说明书在安装使用控制器之前,详细阅读该使用说明书!2017-03-09软件版本:X1.AC032A.F42.001-1.V100A00版权所有,翻印必究目录1 使用须知 (1)2 规格说明 (1)3 面板及操作说明 (1)3.1 版本及机型说明 (1)3.2 按键操作 (1)3.3 参数初始化 (2)3.4 强制制冷启动 (2)4 用户参数设置 (2)5 厂家参数设置 (2)6控制逻辑 (2)7 故障说明 (3)8 电气连接示意图 (3)9 安装尺寸图 (4)1 使用须知尊敬的客户:感谢您选择无锡康狄空调器有限公司的产品!为了方便您的使用,请仔细阅读说明书,并按照说明书的步骤进行操作。
2 规格说明序号规格参数规格说明序号规格参数规格说明1 额定输入电压220-240VAC 50/60HZ7 开关量输出2路继电器RY1:240VAC,16A,单刀单掷RY3:250VAC,10A,单刀双掷2 温度显示范围-40℃~99.9℃3 温度显示精度0.1℃4 测量精度0.1℃@25℃8 继电器负载类型RY1:接触器/阀;RY3:报警器5 工作环境-10℃~60℃,≤85%RH非凝露8 开关量输入3路无源信号输入6 存储环境-20℃~70℃,≤85%RH非凝露9 模拟量输入1路NTC温度探头3 面板及操作说明3.1 版本及机型说明1、控制器上电后,前7s显示软件版本号(F42/V100/A00)。
倒计时完成之后数码管显示进风温度值。
2、机型区分:标准型:无湿度传感器模块和电加热控制继电器。
无湿度传感器故障和制热控制逻辑。
全功能型:有湿度传感器模块和电加热控制继电器。
有湿度传感器故障和制热控制逻辑。
3、机型切换:上电倒计时结束后,按住键15s,等蜂鸣器响一声后,切换机型成功,控制器将重启;机型可相互切换。
3.2 按键操作上电后,进风温度值达到条件值后,控制器自动运行控制逻辑。
多功能隐形柜式空调系列用户指南说明书

Technical Product GuideCONCEALED DUCTSModels:DUCT09HP230V1ADDUCT12HP230V1ADTable of ContentsProduct Overview . . . . . . . . . . . . . . . . . . . . . . . . . . . . . . . . .2-3 Features and Benefits . . . . . . . . . . . . . . . . . . . . . . . . . . . . . .4-5 Product Nomenclature . . . . . . . . . . . . . . . . . . . . . . . . . . . . . .6 Product Performance Data . . . . . . . . . . . . . . . . . . . . . . . . .6-9 Dimensional Specifications . . . . . . . . . . . . . . . . . . . . . . . .10-12 Duct Design . . . . . . . . . . . . . . . . . . . . . . . . . . . . . . . . . . . . . . .13 Sizing Specifications . . . . . . . . . . . . . . . . . . . . . . . . . . . . . . . .14 Installation of Mounting Hangers . . . . . . . . . . . . . . . . . . . . . .14 Condensate Drain Designs . . . . . . . . . . . . . . . . . . . . . . . . . . .15 Limited Warranty Statement . . . . . . . . . . . . . . . . . . . . . .16-17PRODUCT OVERVIEWSUPERIOR DESIGNS PROVIDE EASY SOLUTIONS TO COMPLEX PROBLEMSGREE Ductless Multi Zone systems provide quiet comfort and energy efficient heating and cooling in up to five different rooms – without ductwork . For most residential and light commercial applications, this is the ideal solution to balance comfort, efficiency and ease of installation. This Inverter-driven system offers Seasonal Energy Efficiency Ratings (SEER) up to 16. With individual room control and variable speed compressor operation, comfort is boosted throughout your home or office, while utility bills are held in check.Gree’s exclusive G-10 Inverter technology powers the twin rotary compressor inside the Multi Zone outdoor compressor section. The G-10 Inverter constantly adjusts the compressor speed to maintain a comfortable room temperature. This saves energy, reduces outdoor noise and maintains a steady room temperature by eliminating the harsh starts and stops of conventional systems.When laying out a new project, you’ll appreciate the flexibility of Gree’s Multi Zone Systems. A single outdoor unit can simultaneously power up to five indoor units while eliminating expensive ductwork. Without those ducts, your installation is simpler, faster and more cost-effective. And the flexibility doesn’t stop there, as you can also mix and match your choice of Wall Mount, Ceiling Cassette, Concealed Duct, Universal Floor/Ceiling and Mini Floor Console indoor units to create a unique heating and cooling system to perfectly fit any project.No pipe sweatingNo sweating is needed for the pipe connection between the indoor and outdoor units. All piping connections are flared to simplify and ease the piping installation.Simple WiringNo special or hard-to-find communication wire is needed between the indoor and outdoor units. The system uses common 14-4 AWG stranded copper THHN 600V wire. The system’s communication is ready as soon as the electrical wiring between the indoor and outdoor units is complete.High Lift DesignGree’s High Lift design allows for extended piping length, up to 262 feet total, as well as 50 feet of vertical lift from the condensing units. This allows for greater flexibility in the layout of the system.Outdoor UnitIndoor UnitPower SupplyTransmission SystemEnergy SavingMulti Zone systems allow each room to be individually controlled. Only those rooms requiring air conditioning (or heating) are cooled (or heated), and all of it is accomplished without ductwork. In addition, Gree’s G-10 inverter technology reduces energy waste, maximizes efficiency and achieves up to 16 SEER.1st Branching SectionHeight Difference Between Indoor Unit and Outdoor Unit:PRODUCT OVERVIEWSelf-Diagnostics SystemEach indoor and outdoor unit continuously runs a series of multi-point diagnostic tests on the system, to automatically scan for unacceptable operating conditions or malfunctions. If such conditions occur, the system takes corrective action or stops. The fault code will be shownon the indoor, outdoor and wired controller displays. Problems and system status are displayed with comprehensive diagnostic codes to simplify system troubleshooting and shorten repair times.Flexible DesignGree’s Multi Zone systems have many advantages for both the property owner and the installer.Up to five indoor units, powered by a single outdoor unit, results in flexible zoning solutions for almost any application. Various styles of indoor units may be mixed and matched in any combination to create a unique, multiple zone heating and cooling system. Choose from Wall Mount, Ceiling Cassette, Slim Duct, Universal Floor/Ceiling and Mini Floor Console indoor units. All are lightweight and compact enough to be installed on the wall or in any ceiling space.Intelligent ControlGree’s Multi Zone components use state-of-theart intelligent controls to generate the ultimatein room comfort. G-10 Inverter technology delivers the exact level of required capacity (from 10% to 100%) to maintain room temperature and humidity in the comfort range. The optimized PID controls maintain the room temperature within less than ±1.0°F of the room setpoint temperature. The result is a virtually constant room temperature without the typical fluctuations that occur with a conventional fixed speed ON/OFF system.Ductless Saves MoneyRealize energy savings by eliminating heat loss from inefficient and leaky ductwork. The average ducted air distribution system could reduce overall system efficiency by up to 30 percent. Eliminating ductwork allows you to downsize equipment while upsizing performance.DiagnosticCodeE1E2E3E4E5E6E7E9F4MalfunctionCompressor High Pressure ProtectionIndoor Coil Anti-Freeze ProtectionLow Pressure ProtectionHigh Discharge T emperature ProtectionCompressor High T emperature ProtectionIndoor/Outdoor Communication FailureHeating & Cooling Modes ConflictCondensate Water T oo HighOutdoor Coil Sensor FailureWhisper QuietNot only are the Gree systems energy efficient but they are quiet too. Wall mounted units operate with sound levels starting as low as 31 dB(A).Convenient Size (12K and 18K only)The Gree ceiling cassettes can be easily mounted in a hard ceiling (with an access panel for servicing) or in 2’x2’ drop ceiling. They provide great air distribution, quiet operation and a less obtrusive style.Multi Fan SpeedsThe indoor fan can run at up to three different speeds (Low, Medium or High) for either COOLING or HEATING mode for maximum comfort and quiet operation.Built In Condensate Lift PumpThe unit features a built-in drain pump that lifts condensation up to 11 inches above the drain pan to a gravity condensate drain system. In most cases, the internal condensate lift mechanism will avoid the need for an external condensate pump.Condensate SentryThe unit’s fail-safe mechanism recognizes when there is a high level in the condensate pan and shuts off the system to prevent overflow problems.Intelligent Pre-HeatingThe Multi Zone system guards against the annoying COLD BLOW in heating mode. The system constantly monitors the discharge air temperature. It will delay the indoor fan until the indoor coil has warmed up to prevent blowing uncomfortable cool air into the room.Tether ControllerThe Gree wired tether controller mounts to the wall up to 25 feet from the unit. It provides complete control over your unit’s operation mode, desired temperature, fan speed, airflow direction and more.FEATURES AND BENEFITSCompact and power ful, the Gr ee Multi+ Concealed Duct indoor units offer the ultimate in flexibility and discr etion. These slim indoor units ar e designed to be concealed above suspended ceilings or within open closet spaces to deliver conditioned air via ducting and suitable ceiling or wall grilles. This arrangement provides immense flexibility, in terms of both the distribution of conditioned air and the type of grille or diffuser that best complements the room’s styling. Each unit comes with an easy-to-operate wall mounted wired tether controller.+Multi Slim Concealed DuctsFEATURES AND BENEFITSMode ButtonThe units can be set to five different operating modes: HEAT, COOL, DRY, FAN ONL Y and AUTO.Note: AUTO MODE has fixed setpoints of 68° F heating and 78° F cooling, which are not changeable.The system will automatically select heating or cooling to maintain room temperature within this band.Timer ModeThe unit can be programmed to turn ON or OFF after a specific amount of time. The time period is adjustable between one half and 24 hours.Sleep ModeThe unit will automatically adjust room temperature during your sleep time. This slight change intemperature will not affect your comfort level due to the natural effects that sleeping has on thebody, but it will save on energy consumption and will lower electric bills.Fahrenheit °F / Celsius °CThe wired tether controller can be set to display in either °F or °C.Power Failure ModePower interruptions are no problem. User selections and system parameters are stored in non-volatile memory. These parameters are retained during a power failure. When power is returned, the system will automatically return to the last operating mode.Self-DiagnosisWith an on-board computer using real-time diagnostics, the Gree Multi Zone system helps to prolong its own life. The automatic diagnosis feature continuously scans for unacceptable operating conditions or malfunctions. If such conditions occur, the system takes corrective action or stops. Fault codes are shown on the unit display to facilitate easy troubleshooting and repair.Privacy Lock ModeThe wired tether controller has a Privacy Lock. The Privacy Lock averts unauthorized access and stops tampering with system settings.Agency ListingsAll systems are listed with AHRI (Air conditioning, Heating, and Refrigeration Institute) and are ETL certified per UL Standards.7/5 Year Limited WarrantyEnjoy one of the most comprehensive warranties in the industry. Seven (7) years on compressorand Five (5) years on all parts.NOMENCLATURE+Multi Slim Concealed DuctsPERFORMANCE SPECIFICATIONS AND DATADUCT 121A DSeries DesignationDUCT - Slim Duct Indoor UnitMULTI - Multiple Port Outdoor Unit NEO - Neo Indoor High Wall CAS - Ceiling Cassette FLR - Floor/Ceiling Unit CONS - Mini Console Product Type S - SystemO - Outdoor Units H - Indoor High Wall D - Indoor Duct C - Indoor Cassette F - Indoor Floor/Ceiling Revision LevelStyle/Color Designation Electrical Rating230V - 208/230V 60Hz 1PH 115V - 115V 60Hz 1PHHP 230V Cooling Capacity 9 - 9,000 BtuH 12 - 12,000 BtuH 18 - 18,000 BtuH 24 - 24,000 BtuH Model TypeAC - Cooling Only HP - Heat Pump HC - Heat/CoolDUCT12HP230V1AD 177 235 324 DUCT18HP230V1AD 294 353 412 DUCT24HP230V1AD324441589DUCT12HP230V1AD 177 235 324 DUCT18HP230V1AD 294 353 412 DUCT24HP230V1AD324441589DUCT09HP230V1AD 8,533 9,556 1.69 DUCT12HP230V1AD 11,946 13,140 2.96 DUCT18HP230V1AD 15,359 18,772 3.80 DUCT24HP230V1AD24,23227,3045.28PRODUCT WEIGHTDUCT12HP230V1AD 51 lbs. 64 lbs. DUCT18HP230V1AD 60 lbs. 79 lbs. DUCT24HP230V1AD68 lbs.90 lbs.SOUND DATAELECTRICAL DATASlim Concealed DuctDUCT09HP230V1AD 41 31 44 34 47 37 DUCT12HP230V1AD 42 32 45 35 49 39 DUCT18HP230V1AD 43 33 47 37 51 41 DUCT24HP230V1AD443448385242DUCT12HP230V1AD 208/230v-1ph-60hz 187-253 0.35 80 DUCT12HP230V1AD 208/230v-1ph-60hz 187-253 0.35 80 DUCT18HP230V1AD 208/230v-1ph-60hz 187-253 0.43 100 DUCT24HP230V1AD208/230v-1ph-60hz187-2530.54124Note: 1. Sound pressure ratings are estimated sound pressure measurements, 3 feet from unit.2. Sound power ratings are per AHRI 270 and AHRI 350Legend: RLA – Rated Load AmpsINDOOR FAN PERFORMANCE AND AIR FLOW+Multi Slim Concealed DuctsModel No: DUCT12HP230V1AD 12,000 BtuHModel No: DUCT09HP230V1AD 9,000 BtuHINDOOR FAN PERFORMANCE AND AIR FLOW Model No: DUCT18HP230V1AD 18,000 BtuHModel No: DUCT24HP230V1AD 24,000 BtuHDIMENSIONAL SPECIFICATIONS+Multi Slim Concealed DuctsModel No: DUCT09HP230V1AD 9,000 BtuH Model No: DUCT12HP230V1AD 12,000 BtuHNote: Size refrigerant lines based onevaporator port sizes.Side Return AirBottom Return AirElectric Box A F GIHB DJCEDIMENSIONAL SPECIFICATIONSModel No: DUCT18HP230V1AD 18,000 BtuHNote: Size refrigerant lines based onevaporator port sizes.Side Return AirBottom Return AirElectric Box A F GIHB DJCEDIMENSIONAL SPECIFICATIONS+Multi Slim Concealed DuctsModel No: DUCT24HP230V1AD 24,000 BtuHNote: Size refrigerant lines based onevaporator port sizes.Side Return AirBottom Return AirA F GIHB DJCEDUCT DESIGNReturn AirOption 1Return AirOption 2Supply AirBack Return AirCover Plate Concealed DuctTypical Ductwork LayoutDUCT SIZING SPECIFICATIONS+Multi Slim Concealed DuctsINSTALLATION OF MOUNTING HANGERSThreaded Hanger BoltWasherWasherNutNutNutDepending on the type of ceiling, threaded hanger bolts (field supplied) are recommended for securing the Concealed Duct to the ceiling or support studs.Proper mounting hardware is critical, which includes upper nuts, lower flat washers (with insulation), top flat washers (without insulation), top nuts and locking nuts (double) on the threaded hanger bolts as show in diagram below.DUCT12P230V1AD 6.1/156 26.1/662 22.8/580 6.4/162 0.8/21 DUCT18P230V1AD 6.1/156 33.9/862 30.7/780 6.4/162 0.8/21 DUCT24P230V1AD6.1/15641.8/106238.6/9806.4/1620.8/21ADBCCONDENSATE DRAIN DESIGNSGravity Drainage Systems with P-trap & VentPitch the condensate drain pipes at a gradual 2.5% pitch (Example: 1/4-in. drop over a 10-in. length) without obstructions. Use pipe hanger/brackets to support the condensate drain pipe from drooping. Insulate all pipes to prevent sweating and water damage.Multiple Units with Common DrainThe following is the recommended condensate drainage system for multiple units that share a common drain line. Connecting multiple units to one trap allows air to be pulled through one or more of the units, bypassing the trap. An alternate method is having individual drains and traps for each unit.Vertical Lift Drainage SystemIf a gradual pitch from the drainage port is not obtainable, the Concealed Duct contains an internal condensate pump with limited head or lift. The condensate drain pipe may have a vertical height of 11-in. (280 mm) maximum above the unit drainage port within the first 12-in. (300 mm) as long as the remaining condensate drain pipe gradually descends from that point and aligns with drainage port. Use an auxiliary condensate pump with float valve for vertical height greater than 11-in.(280 mm) above the unit drainage port. A float valve is recommended to shut off the system if the auxiliary pump fails.It’s recommended to build the condensate drain system with hard polyvinyl chloride (PVC) pipe and matching connectors. Use pipe with either the same diameter or larger than the unit drainage port.CeilingCeilingHangersHangersW a l lW a l l11-in max12-in maxLimited Warranty StatementDUCTLESS HEAT PUMP MULTI-SPLIT SYSTEMSEffective on new GREE Ductless purchases on or after March 1, 2013DUCT09HP230V1ADDUCT12HP230V1ADDUCT18HP230V1ADDUCT24HP230V1ADGREE distributor (hereinafter “Company”) warrants this product against failure due to defect in materials or workmanship under normal use and maintenance as follows. All warranty periodsbegin on the date of original installation. If the date cannot be verified, the warranty period begins one hundred twenty (120) days from date of manufacture. If a part fails due to defect during the applicable warranty period Company will provide a new or remanufactured part, at Company’s option, to replace the failed defective part at no charge for the part. This limited warranty issubject to all provisions, conditions, limitations and exclusions listed below.• A warranty period of Seven (7) years on compressor to the original registered end user.• A warranty period of Five (5) years on all parts to the original registered end user.• A warranty period of One (1) year on the remote control provided with the original unit.• L imited warranty applies only to systems that are properly installed by a state certified or licensed HVAC contractor, under applicable local and state law in accordance with allapplicable building codes and permits; GREE installation and operation instructions andgood trade practices.• Warranty applies only to products remaining in their original installation location.• D efective parts must be returned to the distributor through a registered servicing dealer for credit.All implied warranties and/or conditions (including implied warranties or conditions of merchantability and fitness for a particular use or purpose) are limited to the duration of this limited warranty, some states or provinces do not allow limitations on how long an implied warranty or condition lasts, so the above may not apply to you. The express warranties madein this warranty are exclusive and may not be altered, enlarged, or changed by any distributor, dealer, or other person, whatsoever.THIS WARRANTY DOES NOT COVER:1. L abor or other costs incurred for diagnosing, repairing, removing, installing, shipping, servicingor handling of either defective parts, or replacement parts, or new units.2. Product cleaning required prior to warranty service and repair.3. N ormal maintenance as outlined in the installation and servicing instructions or Owner’sManual, including filter cleaning and/or replacement and lubrication.4. F ailure, damage or repairs due to faulty installation, misapplication, abuse, improper servicing,unauthorized alteration or improper operation.5. F ailure to start due to voltage conditions, blown fuses, open circuit breakers, or damages dueto the inadequacy or interruption of electrical service.6. F ailure or damage due to floods, winds, fires, lightning, accidents, corrosive environments(rust, etc.) or other conditions beyond the control of the Company.7. F ailure or damage of coils or piping due to corrosion on installations within one (1) mile ofsea coast or corrosive body.8. Parts not supplied or designated by Company, or damages resulting from their use.9. Products installed outside continental USA and Canada.10. E lectricity or fuel costs, or increases in electricity or fuel costs for any reason whatsoever,including additional or unusual use of supplemental electric heat.11. Any cost to replace, refill or dispose of refrigerant, including the cost of refrigerant.12. Shipping damage or damage as a result of transporting the unit.13. Accessories such as condensate pumps, line sets and so forth are not covered.14. A ny special, indirect or consequential property or commercial damage of any nature whatsoever.Some states or provinces do not allow the exclusion of incidental or consequential damages, so the above limitation may not apply to you.FOR WARRANTY SERVICE OR REPAIR:Contact your installing contractor. You may find the installer’s name on the equipment or inyour Owner’s packet.This warranty gives you specific legal rights, and you may also have otherrights which vary from state to state or province to province.WSO021513-DLSWARR-MULTI – Rev. 10-15-14LIMITATIONS OF WARRANTIESSpecifications in this booklet are subject to change without notice. Manufacturer reserves the right to discontinue or modify specifications or designs without notice or without incurring obligations. All rights reserved. Cat# +MULTI-CD-1TPG Version: Original© 2014 Gree Electric Appliance, Inc.。
K-808万能空调遥控器说明书
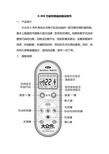
K-808万能空调遥控器说明书一、产品简介大众合K-808是由众合电子实业出品的一款万能空调机遥控器。
基本上能遥控市面绝大部分品牌,型号的空调机。
他具有数字式自动搜索代码的功能,功耗低功能齐全,发射距离足够远,设置容易操作简单,外观新颖,手感舒适自然,带给您无尽方便的享受。
同时,他采用大屏幕液晶显示,使您的设置,操作一目了然。
二.面板说明三、遥控器的设置该遥控器有三种设置方法(A\B\C ),请任选其中的一种进行操作。
A.数字式自动搜索使用机型。
1.手动打开空调机电源,将遥控器对着空调机接收窗口。
2.按住“设置”键(约3秒)不放,带机型代码在窗口中闪烁时松开,再按“电源”键(约6秒),带机型代码再次闪烁时松开,此时进入每秒代码增加“1”的自动搜索适用机型状态。
注意留意您空调机的状态,直到空调机自动开启时,按“确认”键,设置完毕。
B.人工输入代码法1. 手动代开空调机电源,从“代码表”中查出你所要遥控的空调机所对应的机型,并找出代码。
例如:格力代码为020-0392. 按住“设置”键(约3秒)不放,带机型代码在窗口中闪烁时松开,按“温度▲”键,直到所需代码显示在窗口上并闪烁;3. 按“确认”键,机型代码将停止闪烁。
4. 测试遥控器按键是否有效,有效设置完毕。
无效则重复步骤2-4.C.人工搜索代码法1.手动打开空调机电源,将遥控器对着空调机接受窗口;2. 按住“设置”键(约3秒)不放,带机型代码在窗口中闪烁时松开,一下一下按“温度▲”键,注意留意您空调机的状态,直到空调机自动开启时,按“确认”键,设置完毕。
四、注意事项关于恢复出厂设置的方法:把电池取出,等待35分钟后,重新装上电池就可以恢复正常。
如果以上设置方法不能正常设置您的遥控器,请进入众合遥控器官网查找对应产品的最新说明书和代码表。
如以上方法都不能解决您遥控器的设置问题,请致电我们免费售后客服热线:400-883-1883 或020-******** 寻求帮助。
遥控器使用说明书
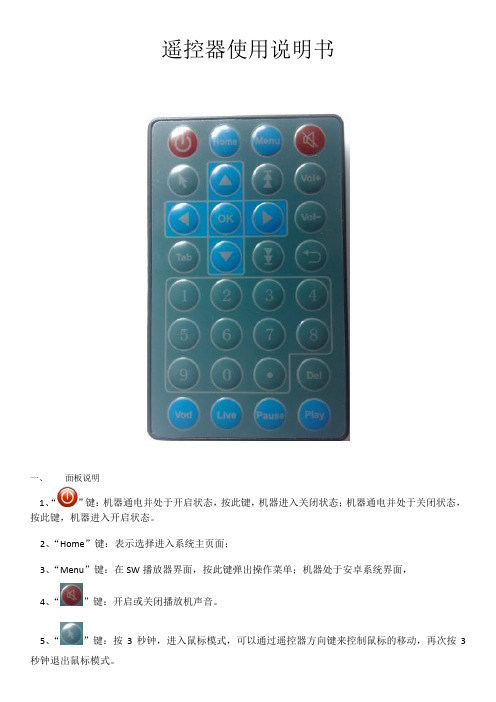
遥控器使用说明书一、面板说明1、“”键:机器通电并处于开启状态,按此键,机器进入关闭状态;机器通电并处于关闭状态,按此键,机器进入开启状态。
2、“Home”键:表示选择进入系统主页面;3、“Menu”键:在SW播放器界面,按此键弹出操作菜单;机器处于安卓系统界面,4、“”键:开启或关闭播放机声音。
5、“”键:按3秒钟,进入鼠标模式,可以通过遥控器方向键来控制鼠标的移动,再次按3秒钟退出鼠标模式。
6、“”键:方向键,可以向上移动光标;在鼠标模式可以向上移动鼠标7、“”键:方向键,可以向左移动光标;在鼠标模式可以向左移动鼠标8、“”键:方向键,可以向右移动光标;在鼠标模式可以向右移动鼠标9、“”键:方向键,可以向下移动光标;在鼠标模式可以向下移动鼠标10、“”键:此按键无功能11、“Vol+”键:调大播放机音量12、“OK”键:确定按钮13、“Vol-”键:调小音量14、“Tab”键:切换光标位置15、“”键:此按键无功能16、“”键:在SW播放器界面,按此键弹出操作菜单;安卓系统界面,返回上一级界面。
17、“1”键:输入数字1。
18、“2”键:输入数字219、“3”键:输入数字320、“4”键:输入数字421、“5”键:输入数字522、“6”键:输入数字623、“7”键:输入数字724、“8”键:输入数字825、“9”键:输入数字926、“0”键:输入数字027、“.”键:输入符号“.”28、“Del”键:删除文件或字符29、“Vod”键:此按键无功能30、“Live”键:此按键无功能31、“Pause”键:此按键无功能32、“Play”键:此按键无功能方向键包含:“”键、“”键、“”键和“”键。
数字键包含:“1”“2”“3”“4”“5”“6”“7”“8”“9”“0”“.”二、常用操作1,如何退出SW播放器按“Menu”键,弹出选择菜单,按向下方向键“”到“退出”,按“OK”键退出SW播放器。
2,如何设置网络连接2.1设置有线网络连接将RJ45网线连接播放机的有线网络插孔和网络交换机网络接口,播放机会自动识别有线网络并获取相应的IP地址。
KFR_22GW空调遥控器使用说明书
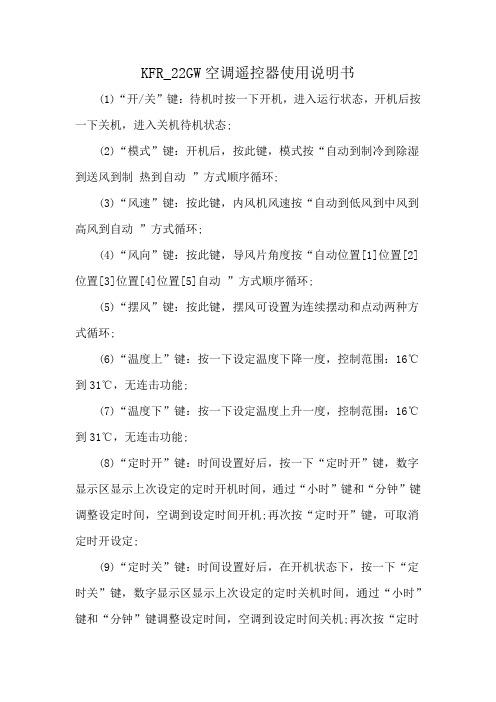
KFR_22GW空调遥控器使用说明书(1)“开/关”键:待机时按一下开机,进入运行状态,开机后按一下关机,进入关机待机状态;(2)“模式”键:开机后,按此键,模式按“自动到制冷到除湿到送风到制热到自动”方式顺序循环;(3)“风速”键:按此键,内风机风速按“自动到低风到中风到高风到自动”方式循环;(4)“风向”键:按此键,导风片角度按“自动位置[1]位置[2]位置[3]位置[4]位置[5]自动”方式顺序循环;(5)“摆风”键:按此键,摆风可设置为连续摆动和点动两种方式循环;(6)“温度上”键:按一下设定温度下降一度,控制范围:16℃到31℃,无连击功能;(7)“温度下”键:按一下设定温度上升一度,控制范围:16℃到31℃,无连击功能;(8)“定时开”键:时间设置好后,按一下“定时开”键,数字显示区显示上次设定的定时开机时间,通过“小时”键和“分钟”键调整设定时间,空调到设定时间开机;再次按“定时开”键,可取消定时开设定;(9)“定时关”键:时间设置好后,在开机状态下,按一下“定时关”键,数字显示区显示上次设定的定时关机时间,通过“小时”键和“分钟”键调整设定时间,空调到设定时间关机;再次按“定时关”键,可取消定时关设定;(10)“小时”键:在定时和时间设置状态下,按一下增加一小时,有连击功能;(11)“分钟”键:在定时和时间设置状态下,按一下增加十分钟,有连击功能;(12)“睡眠”键:按此键,遥控器显示睡眠模式设定,在睡眠显示区域一直显示“”符号,室内风机自动转为低风,8小时后睡眠结束,睡眠符号取消,室内风机恢复原来风速运行;再次按“睡眠”键或按一下“模式”键或“风向”键可退出睡眠功能;(13)“复位”键:用直径1mm的小圆棒按此按键,遥控器恢复出厂设置;(14)“时间”键:用直径1mm的小圆棒按此按键,进入时间设置状态,设定好后,再次按此按键表示设定完成且退出时间设置; 注:每次有效操作遥控器按键,液晶屏显示发射信号的符号“”亮一秒后消失。
k1170空调遥控器使用说明书

品牌
JOHNSO 东新宝
凉宇 华美 佳乐 江南空调 博士
AKIRA 胜风
北京京电
TECO 长府(长谷)
高士达 星和 冬夏
格兰仕 小鸭
威特力 新飞
NIKKO SHARP RAYBO National GLEE 夏普/声宝
大金 伊莱克斯 三菱机电
代码号 861 862
863-864 865-866 867-868 869-870 871-872
故障排除 1. 如果液晶屏不显示,请检查电池的接触与性能 2. 如果不能遥控,请检查空调机接收器是否正常 3. 本遥控器不能增加空调的功能,如原机无定时功能,使用本遥控器也无法实现定时开关机 4. 遥控器操作不当可能引起内部程序混乱,需要取出遥控器电池,半小时后重新装上电池即可。
空调万能遥控器好而易 K1170 代码表
1,一直按住可以连加或连减 2. 再按一下“时钟”键,“分钟”显示,调整分钟 3. 再按一下“时钟”键,“小时”“分钟”停止闪烁,时钟设置完成
定时开机与定时关机的设置 1. 定时开机---在关机状态下,每按一次“定时开”键,定时时间加 1 小时,一直按到需要的时间。 2. 定时开机---在开机状态下,每按一次“定时关”键,定时时间加 1 小时,一直按到需要的时间。 注:按“开/关”键可以取消定时功能
代码时,松开按键,对准空调机,当空调开机立即按“设置”键退出,设置完成。 注:如果按住“设置”键 2 秒,型号开始闪烁后松开,此时再按“温度+”键,“温度-”键可以采用步 进键搜索,长按“温度-”,“温度-”可以快速增减型号到指定型号。 恢复出厂状态:一直按住“时钟”键 8 秒钟。
时钟设置 1. 按住“时钟”键 2 秒,“小时”显示闪烁,用“温度+”“温度-”来调整,按一次,小时增加或者减小
众合chunghop万能空调遥控器及万能电视遥控器使用方法.

众合chunghop万能空调遥控器K100A使用说明(说明书)(一)手动设置步骤:1. 从“代码表”中查出你所需遥控的空调机对应的机型代码,并打开空调机电源;2. 连续(间断)按“设置”键,直至所需代码显示在窗口上并闪烁;注:此机型代码即为您空调机所对应的代码。
3. 按确认键,机型代码将停止闪烁,设置完毕,这样本遥控器就可以遥控您所选的空调机了。
查找代码→打开空调机电源→连续按“设置”键设置→机型代码在“型号”窗口闪烁→按确认键确认→机型代码停止闪烁→设置完毕(二)数字式自动搜索适用机型:1. 打开空调机电源;2. 将遥控器正对着空调机接收头,循环按“设置”键,直到空调机自动开启/关闭,按“确认”键;注:此机型代码即为您空调所对应的代码。
3. 设置完毕。
打开空调机电源→将遥控器对向空调机→循环按“设置”键否空调机自动开启/关是按“确认”键→自动查找代码设置完成(三)、使用注意1. 本遥控器不能增加您空调上的功能。
如果您的空调机上无风向功能,则遥控器的风向键无效。
2. 本遥控器为低耗产品,正常情况下,电池寿命为6 个月,若使用不当电池寿命缩短,更换电池要两节一起换,不要新旧电池或不同型号电池混用。
3. 要确保您的空调机接收器正常,本遥控器才有效。
4. 如果出现电池漏液,必须将电池仓清洁干净后换上新电池。
为防漏液,请您在备长期不使用时,最好将电池取出。
(四)、适用品牌及代码一览表万能控遥控器代码表众合chunghop,大众合万能电视遥控器代码表及使用说明书万能遥控器使用方法代码自定义搜索万能遥控器的代码自定义搜索的方法:1、左手先按住“设置”键不松手,再用右手按一下“电源”键,指示灯变成长亮。
2、输入三个“0”,使指示灯熄灭,这时遥控器的代码为“000”3、再重复第一条所说,使指示灯长亮4、将遥控器对准电视机的接收窗,开始按遥控器的“音量+”键,按一下数一下写数字,“1、2、3、4、5、6、.......300”,耐心点,直接接某一个数字后,电视机出现了“音量指示线”,就松开遥控器按钮,并记下该数字,这个数字就是你的电视机的“代码”。
空调网络集中控制器使用说明书

网络集中控制器中宇冷气科技发展有限公司◆室内温度指示范围0℃~50℃。
◆LCD液晶显示联网每一台空调机组的所有状态。
◆具有报警功能,当所联空调有一台有故障时,通过LCD指示故障代码。
◆单机远距离控制(1000米)。
◆联网控制可直接控制1~16台空调。
3、模式按钮用于选择运转模式,每按一次,运转模式按“自动→制冷→除湿→送风→制热”的顺序变化。
4、定时开按钮在关机状态下设定定时开机,并可通过其它按钮设置定时开机后的运转模式,定时范围为1-12小时,该按钮在开机状态下无效。
5、定时关按钮在开机状态下设定定时关机,定时范围为1-12小时,该按钮在关机状态下无效。
6、风速按钮用于调节风速,每按一下,风速按照“自动→高→中→低”的顺序变化。
(除湿模式此按钮无效,且风速为低速显示)7、全开按钮此按钮控制总线上所有存在的室内机的开启。
8、全关按钮此按钮控制总线上所有存在的室内机的关闭。
9、辅热按钮用于制热模式下增强制热量(只在制热模式下有效)。
10、末端选择按钮按“▲”按钮,被控的室内机对象转为上一个总线上存在的室内机。
按“▼”按钮,被控的室内机对象转为下一个总线上存在的室内机。
被控的室内机对象由室内机编号图标中“M”来指示。
11、风向按钮此按钮无效。
七、工作说明1、集控器可以控制总线上不超过16台室内机的数据,并实时查询室内机状态,具有定时开关机功能。
2、集控器刚通电时,HOST灯会闪9秒钟,搜索总线上的室内机及数据,这是正常现象。
如果HOST灯一直闪下去则表明该台集控器做从机,但总线上又没有主机信号,这是主机通讯故障现象。
如果HOST灯常亮,则表明有其它总线控制器(如电话遥控器)接管了总线,是正常现象。
3、在关机状态下,按任一功能设置键,液晶屏会显示当前受控室内对象是该编号室内机,液晶屏显示数据也是该编号室内机,按末端选择键,“M”按次序轮流在总线上存在的室内机编号处显示,“ON”显示时,表明该编号室内机是开机的,例如:8M,表明当前受控的ON室内机对象是8号机,液晶显示的数据也是8号机的,且此时8号机是处于开机状态。
空调遥控器

空调遥控器空调遥控器空调遥控器是一种用来远控空调的装置,它主要是由集成电路电板和用来产生不同讯息的按钮所组成。
空调遥控器设置步骤(一)手动设置步骤:1.“代码表”中查出你所需遥控的空调机对应的机型代码,并打开空调机电源。
2.连续(间断)按“设置”键,直至所需代码显示在窗口上并闪烁; 注:此机型代码即为您空调机所对应的代码。
3.按确认键,机型代码将停止闪烁,设置完毕,这样本遥控器就可以遥控您所选的空调机了。
查找代码→打开空调机电源→连续按“设置”键设置→机型代码在“型号”窗口闪烁→按确认键确认→机型代码停止闪烁→设置完毕。
(二)数字式自动搜索适用机型:1.打开空调机电源。
2.将遥控器正对着空调机接收头,循环按“设置”键,直到空调机自动开启/关闭,按“确认”键;注:此机型代码即为您空调所对应的代码。
3.设置完毕。
打开空调机电源→将遥控器对向空调机→循环按“设置”键否空调机自动开启/关是按“确认”键→自动查找代码设置完成。
使用注意1.遥控器不能增加您空调上的功能。
如果您的空调机上无风向功能,则遥控器的风向键无效。
2.遥控器为低耗产品,正常情况下,电池寿命为6个月,若使用不当电池寿命缩短,更换电池要两节一起换,不要新旧电池或不同型号电池混用,电池安装时候要注意正负级。
3.要确保您的空调机接收器正常,本遥控器才有效。
4. 如果出现电池漏液,必须将电池仓清洁干净后换上新电池。
为防漏液,请您在备长期不使用时,最好将电池取出。
失灵判断要判断到底是不是遥控器除了问题可以有两种方:1、现在的手机一般都带有摄像功能,你打开手机的摄像功能,然后用遥控器对准手机按几下。
再检查一下刚刚的录像里面能不能看到遥控器发出的红外光,如果有的话遥控器基本没问题,如果没有就有问题。
2、找一个能接收中波段(MW)的收音机,用遥控器靠近收音机,按遥控器的按键,如果收音机有嘟嘟声说明遥控器是好的,反之则证明遥控器坏了。
失灵处理遥控器失灵,一般大家都会怀疑遥控器坏了,但实际情况并不一定,有三种可能性:1、遥控器发光二级管坏。
