ASIO4ALL_v2中文手册
AtlasIED Atmosphere AZA404四通道网络放大器说明书

S o u n d L P . T h e A t l a s “C i r c l e A ”, S o u n d o l i e r , a n d A t l a s S o u n d a r e t r a d e m a r k s o f A t l a s S o u n d L .P . I E D i s a R e g i s t e r e d T r a d e m a r k o f I n n o v a t i v e E l e c t r o n i c D e s i g n s L L C . A l l r i g h t s r e s e r v e d . d e m a r k s a r e p r o p e r t y o f t h e i r r e s p e c t i v e o w n e r s . N o e n d o r s e m e n t i s i m p l i e d . D u e t o c o n t i n u a l p r o d u c t d e v e l o p m e n t , s p e c i f i c a t i o n s a r e s u b j e c t t o c h a n g e w i t h o u t n o t i c e . A T S 006181 R e v C 8/20AZA404Multi-Channel Network AmplifierApplicationsAZA Series amplifiers integrate with Atmosphere signal processors which makes them ideal for use in restaurants, presentation rooms,classrooms, conference rooms, and retail background / foreground music applications.General DescriptionThe AtlasIED Atmosphere AZA404 four-channel amplifier is designed to interface with the Atmosphere family of products, such as the AZM series of processors. The AZA amplifiers can be configured in three different configurations to meet the design requirements of any installation. These AZA models are factory preconfigured in a four-channel, 70V mode. If the design requires four channels of low impedance amplification, the AZA amplifiers can be configured as four-channel models with either 4Ω or 8Ω load impedances. Many system designs require both low and high impedance amplification. These AZA models can be configured to deliver 70V / 100V for apaging / background system on two (2) channels plus two (2) additional 4Ω or 8Ω amplifier channels for foreground stereo application.These AZA models come standard with four (4) balanced line inputs and an accessory slot for an optional four-channel Dante™ receiver card (model DPA-DAC4), giving the AZA404 and AZA804 a total of up to eight (8) inputs. All inputs can be mixed and routed to any of the four amplifier channels. All four (4) amplifier channels have an assortment of advanced DSP tools.The AZA404 is ready to use out of the box in four-channel, 70V mode, with no configuration or network connectivity required, making them easily paired for use with AtlasIED Atmosphere Signal Processors.Features• 4 Amplified Channels• AZA404 Configuration Power Levels • 4 x 100-Watt 70V (Factory Default) • 4 x 100-Watt 100V • 4 x 75-Watt @ 8Ω • 4 x 50-Watt @ 4Ω• 2 x 100-Watt 70V/100V & 2 x 75-Watt @ 8Ω • 2 x 100-Watt 70V/100V & 2 x 75 -Watt @ 4Ω• Integrates with Atmosphere AZM Zone Master • Energy Efficient• Convection Cool / Fan Assist • Accepts Low Z & Hi Z Loads• Onboard Web UI for Remote Monitoring of Status & Levels • Front Panel Power Switch Disable• APD - Auto Power Down with Audio Sense Turn On •Dante™ Optional Accessory Card SlotS o u n d L P . T h e A t l a s “C i r c l e A ”, S o u n d o l i e r , a n d A t l a s S o u n d a r e t r a d e m a r k s o f A t l a s S o u n d L .P . I E D i s a R e g i s t e r e d T r a d e m a r k o f I n n o v a t i v e E l e c t r o n i c D e s i g n s L L C . A l l r i g h t s r e s e r v e d . d e m a r k s a r e p r o p e r t y o f t h e i r r e s p e c t i v e o w n e r s . N o e n d o r s e m e n t i s i m p l i e d . D u e t o c o n t i n u a l p r o d u c t d e v e l o p m e n t , s p e c i f i c a t i o n s a r e s u b j e c t t o c h a n g e w i t h o u t n o t i c e . A T S 006181 R e v C 8/20S o u n d L P . T h e A t l a s “C i r c l e A ”, S o u n d o l i e r , a n d A t l a s S o u n d a r e t r a d e m a r k s o f A t l a s S o u n d L .P . I E D i s a R e g i s t e r e d T r a d e m a r k o f I n n o v a t i v e E l e c t r o n i c D e s i g n s L L C . A l l r i g h t s r e s e r v e d . d e m a r k s a r e p r o p e r t y o f t h e i r r e s p e c t i v e o w n e r s . N o e n d o r s e m e n t i s i m p l i e d . D u e t o c o n t i n u a l p r o d u c t d e v e l o p m e n t , s p e c i f i c a t i o n s a r e s u b j e c t t o c h a n g e w i t h o u t n o t i c e . A T S 006181 R e v C 8/20S o u n d L P . T h e A t l a s “C i r c l e A ”, S o u n d o l i e r , a n d A t l a s S o u n d a r e t r a d e m a r k s o f A t l a s S o u n d L .P . I E D i s a R e g i s t e r e d T r a d e m a r k o f I n n o v a t i v e E l e c t r o n i c D e s i g n s L L C . A l l r i g h t s r e s e r v e d . d e m a r k s a r e p r o p e r t y o f t h e i r r e s p e c t i v e o w n e r s . N o e n d o r s e m e n t i s i m p l i e d . D u e t o c o n t i n u a l p r o d u c t d e v e l o p m e n t , s p e c i f i c a t i o n s a r e s u b j e c t t o c h a n g e w i t h o u t n o t i c e . A T S 006181 R e v C 8/20Notes:1. Power level measurement is defined as follows: 1KHz Sine wave signal burst of 20 cycles (20mS) at 1% THD+N, followed by 480 cycles of a 1kHz sine wave at 10% of the max power. Other power measurements are available upon requests.2. Power measurement with Ethernet connected. Without Ethernet connected deduct 0.2W3. Average Power is defined as Pink Noise input signal applied to achieve 1/4 of the 4 Ohm or 70.7V power rating.4. Max Power is defined as 1 KHz input signal applied to achieve the maximum power output before clipping into a 4 Ohm or 70.7V load.5. BTU is calculated by the AC Mains Power consumed minus the total power output measured at the specified load and condition, multiplied by 3.412. Example: 785 Watts from the AC Source - 600 Watts Total Output power = 185 x 3.412 = 631 BTUS o u n d L P . T h e A t l a s “C i r c l e A ”, S o u n d o l i e r , a n d A t l a s S o u n d a r e t r a d e m a r k s o f A t l a s S o u n d L .P . I E D i s a R e g i s t e r e d T r a d e m a r k o f I n n o v a t i v e E l e c t r o n i c D e s i g n s L L C . A l l r i g h t s r e s e r v e d . d e m a r k s a r e p r o p e r t y o f t h e i r r e s p e c t i v e o w n e r s . N o e n d o r s e m e n t i s i m p l i e d . D u e t o c o n t i n u a l p r o d u c t d e v e l o p m e n t , s p e c i f i c a t i o n s a r e s u b j e c t t o c h a n g e w i t h o u t n o t i c e . A T S 006181 R e v C 8/20Dimensional Drawings1"(25.4mm)S o u n d L P . T h e A t l a s “C i r c l e A ”, S o u n d o l i e r , a n d A t l a s S o u n d a r e t r a d e m a r k s o f A t l a s S o u n d L .P . I E D i s a R e g i s t e r e d T r a d e m a r k o f I n n o v a t i v e E l e c t r o n i c D e s i g n s L L C . A l l r i g h t s r e s e r v e d . d e m a r k s a r e p r o p e r t y o f t h e i r r e s p e c t i v e o w n e r s . N o e n d o r s e m e n t i s i m p l i e d . D u e t o c o n t i n u a l p r o d u c t d e v e l o p m e n t , s p e c i f i c a t i o n s a r e s u b j e c t t o c h a n g e w i t h o u t n o t i c e . A T S 006181 R e v C 8/20The rear-mounted Input connectors for inputs 1 - 4 shall be individually removable 3-way 3.5mm Phoenix type connectors that accept balanced line input signals (+) (–) and (GND) pins and will support unbalanced signals by connecting the (–) and (GND) pins together. The amplifier configuration and I/O Routing shall be done in the UI. Any Input shall be capable of being routed to any Output.The rear-mounted Output connector shall be a screw terminal block type for connecting speakers to the amplifier. The recommended wire to use shall be Class 3 rated,14-gauge wire or lower for speaker wiring. Amplifier output channel configurations shall be done in the amplifier UI. The amplifier shall be shipped with two speaker output terminal covers for safety. Included in the carton with the amplifier shall be eight (8) spade crimp terminals that accept 12-gauge wire and four (4) security cover screws (M3 x 8mm). Terminal block screws shall be M4. The amplifier shall be pre-configured at the factory for four-channel 70.7V / 100V mode.The amplifier shall have one (1) rear mounted Accessory Card Slot to add accessory modules. Accessory modules shall make available 4 additional inputs (for a total of 8) that can be routed to any of the four output channels. The DPA-DAC4 optional accessory card shall include a four-channel Dante™ Digital Audio inputs.The amplifier shall have a rear-mounted Ethernet connector to connect to a Local Area Network (LAN), computer, or router / switch using a standard RJ45 cable to access the amplifiers control settings.When network enabled, the amplifier shall have a UI home page with Output active meters, Output Configuration indicators and Network settings. All four amplifier channels shall have an assortment of DSP tools.The amplifier shall have four (4) rear-mounted Control Ports to allow assigned / configured Remote Level or Mute functions to be activated by external contact closure relay or controlled by voltage. Each Control Port pin shall be assigned to one function such as Mute or Level, but not both. Control Port assignment shall be done in the UI Mute, Link, Port Assignment Page. The factory default assignments for the Amplifier Control Ports are assign as a Remote Level & shall be as follows: C1 controls Output 1, C2 controls Output 2, C3 = controls Output 3, C4 controls Output 4. The Control Ports shall provide +10V and GND connections for Remote Level Control Port using 10k Ω Linear Taper pots.The AZA404 amplifier shall be ready to use, out of the box infour-channel, 70V mode, with no configuration or network connectivity required, The AZA404 shall be ideally suited to be used with AtlasIED Atmosphere Signal ProcessorsThe amplifier shall be an AtlasIED AZA404.Architect and Engineer SpecificationsThe AZA404 amplifier shall be ready to use, out of the box infour-channel, 70V mode, with no configuration or network connectivity required. The AZA404 shall be ideally suited to be used with AtlasIED Atmosphere Signal Processors. The AZA404 shall be configurable as four-channel high impedance 70V / 100V or four- channel low impedance 4Ω or 8Ω or two-channel low impedance 4Ω or 8Ω and two-channel high impedance 70V/100V mode. The I/O router shall be configured as follows: Input 1 routed to Outputs 1, Input 2 to Output 2, Input 3 to Output 3 and Input 4 to Output 4. This out of box configuration will not require a computer or network to operate.The performance specifications shall match or exceed the following: 70V / 100V = 4CH x 100W; 8Ω = 4CH x 75W, 4Ω = 4CH x 50W; 70V / 100V = 2CH x 100W & 8Ω = 2 CH x 75W; 70V / 100V = 2CH x 100W & 4Ω = 4CH x 50W;(reference specifications Notes 1-4); Input Sensitivity 750mV Balanced, 0dBU; Input Impedance Balanced 40K Ohms; Max Input Level channels 1-4, +14dBU, 7dBU inputs 5-8 with Dante™; THD 1% at rated output, .2% Typical; Frequency Response -3dB 20Hz @ 20kHz (DSP set to flat); Signal to Noise Ratio -100dB Below Rated Output A Weighted; Crosstalk >70dB @1kHz; Protection circuits =Thermal, Short, Signal Limiter; Sleep Mode (Ethernet Active) 3.5W, 12BTU; Standby/ADP mode 14W, 48BTU; Max Power All CH driven 70.7V/100V (default mode) = 704W, 390BTU. Dimensions: 1 x RU, 19" W x 1.72" H x 15.5" D. Weight 13.1 lbs.The power amplifier shall have a front panel power switch and three states of idle power: Idle Active Mode, Sleep Mode, and Standby Auto Power Down (APD) Mode. Each mode shall have an LED indicator on the front panel indicating the power status. When in Sleep Mode, the Ethernet shall remain active for access to the amplifiers on board UI.The amplifier shall include convection cooling with dynamic fan assist for extreme conditions. If the unit is not being used or in Standby mode, the fan shall not be needed for cooling and shall remain Off until the unit is in heavy use. As heat is generated in the amplifier during use, the fan shall activate at a low speed and increase as needed to maintain the amplifier at safe operating temperature. The amplifiers air flow shall be from rear to front.The front panel controls shall consist of power switch that is defeatable in the UI. Each channel shall have LED indicators for Signal andLimit / Protect / Mute. The four-channel output operating mode shall be displayed to the right of the output indicators by 4 multicolor LEDs. These indicators illustrate if Channels 1 and 2 and 3 and 4 are low impedance 4Ω or 8Ω or 70V / 100V output. Amplifier operation mode settings shall be completed using the internal DSP UI.On the rear panel, the amplifier shall have an IEC AC receptacle that operates from 110V - 120V & 220V - 240V and shall automatically sense the AC Mains voltage and change voltage settings. A removable AC Mains fuse shall be provided for protection.。
Cubase图文教程

Cubase/Nuendo图文教程/快速上手Cubase/Nuendo工作时需要ASIO驱动,但它自带的ASIO驱动性能很差。
如果你没有专业声卡,用的板载AC97的话,我们可以安装一个第三方驱动[ASIO4All v2],它能让Cubase/Nuendo在极低的延迟下工作。
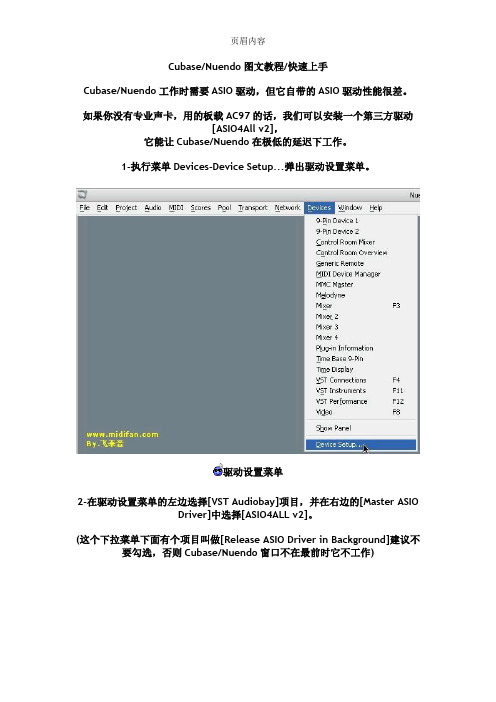
1-执行菜单Devices-Device Setup...弹出驱动设置菜单。
驱动设置菜单2-在驱动设置菜单的左边选择[VST Audiobay]项目,并在右边的[Master ASIODriver]中选择[ASIO4ALL v2]。
(这个下拉菜单下面有个项目叫做[Release ASIO Driver in Background]建议不要勾选,否则Cubase/Nuendo窗口不在最前时它不工作)选择[ASIO4ALL v2]驱动3-选择[ASIO4ALL v2]驱动后,在左边[VST Audiobay]下面就会有[ASIO4ALL v2]的项目,选中它,可以看到延迟时间,然后在下面点[Control Panel]可以调整当前ASIO驱动的延迟时间。
选择Control Panel如果你有专业声卡,用同样方法直接选中专业声卡的ASIO驱动就行,但专业声卡的ASIO驱动延迟时间设置非常重要,如果资源使用不紧张且莫名其妙爆音,请增大延迟时间,这个值只要不超过20ms人耳很难分辨出来。
软件设置:Cubase/Nuendo可以针对个人进行偏好设置,这样可以让你的工作效率大增。
由于可设置的项目太多,这里并不一一罗列,仅示例两个常用设置。
1-每次播放停止后,需要让播放指针回到在上一次开始播放的地方,而不是回到最开始,执行菜单File-Preferences-Transport,在右边勾选[Return to StartPosition on Stop]。
选择Return to Start Position on Stop2-每次新建MIDI轨后,需要让MIDI轨上的音符跟随节拍变化的开关自动开启,即时钟变成小音符(适合Nuendo用户),执行菜单File-Preferences-Editing,在右边[Default Track Time Type]中选择[Musical]。
FOTIGATE_V2_v2.50_VPN
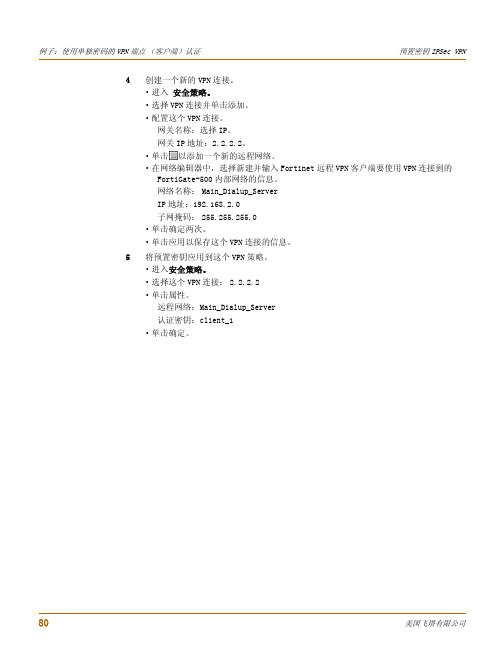
4创建一个新的VPN连接。
·进入安全策略。
·选择VPN连接并单击添加。
·配置这个VPN连接。
网关名称:选择IP。
网关IP地址:2.2.2.2。
·单击以添加一个新的远程网络。
·在网络编辑器中,选择新建并输入Fortinet远程VPN客户端要使用VPN连接到的FortiGate-500内部网络的信息。
网络名称: Main_Dialup_ServerIP地址:192.168.2.0子网掩码: 255.255.255.0·单击确定两次。
·单击应用以保存这个VPN连接的信息。
5将预置密钥应用到这个VPN策略。
·进入安全策略。
·选择这个VPN连接: 2.2.2.2·单击属性。
远程网络:Main_Dialup_Server认证密钥:client_1·单击确定。
6配置提议设置。
·进入安全策略。
·选择这个VPN连接: 2.2.2.2·单击属性。
·在 IPSec/IKE 提议中,单击设置。
·选择 IKE 提议的参数。
加密算法:3DES完整性验证:SHA-1IKE 模式:进取模式IKE 组:MODP 1024 (组 2)·选择IPSec提议参数。
加密算法:3DES完整性验证: HMAC-SHA-1PFS 组: MODP 1024 (组 2)·单击只将选定的值附加到这个提议。
·单击确定。
·进入规则属性>高级。
·对于安全组合的有效期,单击设置。
IKE 安全组合:以分钟为单位的有效期: 480,以兆字节为单位的有效期: 0IPSec 安全组合:以分钟为单位的有效期: 60,以兆字节为单位的有效期:400·单击确定。
·(可选) 高级选项:单击在启动时打开。
·单击确定两次。
·单击应用以保存提议设置。
客所思外置声卡机架电音教程
客所思外置声卡机架教程图文:楚风/2015年11月说明:以下教程为个人观点,不确保100%可移植。
所用软件自网上下载,借鉴了部分教程,并经楚风亲测和修改,将个人使用心得以图文形式整理而成。
希望玩家们不断完善。
如果觉得喜欢,或者对创新、客所思等声卡调试有更好的效果设置及建议,可以来VV713002楚风音乐频道一起分享。
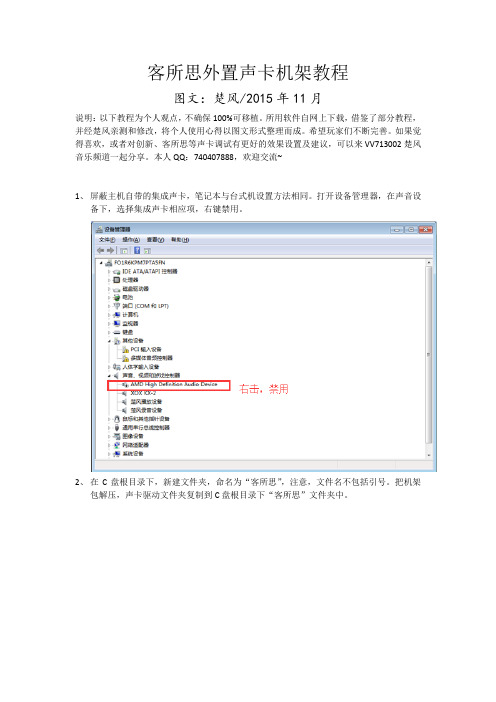
本人QQ:740407888,欢迎交流~1、屏蔽主机自带的集成声卡,笔记本与台式机设置方法相同。
打开设备管理器,在声音设备下,选择集成声卡相应项,右键禁用。
2、在C盘根目录下,新建文件夹,命名为“客所思”,注意,文件名不包括引号。
把机架包解压,声卡驱动文件夹复制到C盘根目录下“客所思”文件夹中。
3、在声卡驱动中,根据系统类型选择32位或64位的驱动安装。
注意WIN7请右键选择用管理员身份运行。
遇有拦截,一概允许运行。
4、安装机架,“机架效果安装”右键以管理员身份运行,机架自动释放到相应的文件夹中。
注意,把PK3的驱动面板删除。
如果是该型号的除外。
究极版和传奇版无须该控制面板。
5、右键电脑系统栏小喇叭,选择录音设备,默认选择“楚风播放设备”。
把线路录音设备级别调到最小。
切换到播放设备栏下,相应的默认选择是录音设备。
(注意此处有交叉,录音至播放,播放至录音)。
6、在声卡上关混音。
一般是左侧大按钮。
把模式切换到音乐,一般是右侧大按钮。
设置麦克风静音。
以上设置,在传奇版,可用电脑控制端进行控制,究极版也可以通过遥控器设置。
7、机架运行并设置。
机架在桌面已建立快捷方式,双击便可打开。
指定ASIO设备。
如果没有效果,可以查找有无插件没有正确连接通道。
运行过程中,ASIO虚拟面板一般不要轻易打开。
否则可能出现声音中断,效果丢失等现象。
在菜单栏点击选项。
选中其下的ASIO驱动设置,弹出设置框。
此处须注意,为方便使用,一定要在“启动时打开最后所保存的工程”前打勾,这样会自动加载效果。
此处设置方法:选择ASIO4ALLV2,下面的采样率默认,控制面板,延迟一般设为8毫秒。
asio4all
asio4allASIO4ALL: A Comprehensive Guide to Understanding and Utilizing the Audio Processing ToolIntroductionASIO4ALL is a powerful and versatile audio processing tool that allows users to enhance their audio experience on Windows-based systems. It provides an ASIO (Audio Stream Input/Output) driver which bypasses the audio stack of the operating system, resulting in reduced latency and improved audio quality. This document serves as a comprehensive guide to understanding and utilizing ASIO4ALL, covering its features, installation process, configuration options, and troubleshooting tips.Section 1: Installing ASIO4ALL1.1 System RequirementsBefore installing ASIO4ALL, ensure that your system meets the minimum requirements, including the Windows operating system version and hardware specifications.1.2 Downloading ASIO4ALLVisit the official ASIO4ALL website to download the latest version of the software. Follow the instructions provided on the website to begin the download process.1.3 Installing ASIO4ALLOnce the download is complete, locate the setup file and run it. Follow the on-screen instructions to complete the installation. Restart your computer if prompted.Section 2: Configuring ASIO4ALL2.1 Accessing the ASIO4ALL Control PanelTo configure ASIO4ALL, you will need to access its Control Panel. This can be done through the system tray icon or by opening the control panel application directly.2.2 Device SelectionIn the ASIO4ALL Control Panel, you will find a list of available audio devices. Select the device you want to use withASIO4ALL by selecting the corresponding checkbox.2.3 Buffer Size AdjustmentThe buffer size determines the amount of audio data processed in a single cycle. Adjusting the buffer size can help optimize the audio performance based on your needs. Detailed information and recommendations regarding buffer size settings are provided in the ASIO4ALL documentation.2.4 Latency SettingsASIO4ALL allows you to adjust the latency settings to minimize audio delay and improve synchronization. The exact latency settings will depend on your hardware and operating system. Experiment with different settings to find the optimal balance between audio quality and responsiveness.Section 3: Using ASIO4ALL with Applications3.1 Digital Audio Workstations (DAWs)ASIO4ALL is widely used in digital audio workstations, such as Ableton Live, FL Studio, and Pro Tools. These applications usually have built-in support for ASIO drivers. SelectASIO4ALL as your audio device within the DAW's settings to utilize its features.3.2 Media PlayersASIO4ALL can also be used with media players, allowing for improved audio playback quality. Some media players, such as Foobar2000 and Winamp, have native support for ASIO. Alternatively, you can use a standalone ASIO player like ASIO DirectShow Filter or Voxengo Sound Delay.Section 4: Troubleshooting Common Issues4.1 ASIO4ALL Not Detecting Audio DevicesIf ASIO4ALL is not detecting your audio devices, ensure that they are properly connected and recognized by the operating system. Check for any hardware or driver conflicts that may be preventing ASIO4ALL from accessing your audio devices.4.2 Audio Glitches or DropoutsTo address audio glitches or dropouts, try increasing the buffer size in the ASIO4ALL Control Panel. Additionally, ensure that your system meets the minimum system requirements to handle the audio processing load.4.3 Compatibility IssuesIf you are experiencing compatibility issues with certain applications or plugins, consider checking for updates for both ASIO4ALL and the specific software. Developers often release updates to address compatibility issues and improve overall performance.ConclusionASIO4ALL is an essential audio processing tool for anyone looking to enhance their audio experience on Windows-based systems. By bypassing the operating system's audio stack, ASIO4ALL offers reduced latency and improved audio quality, making it an ideal choice for musicians, producers, and avid audio enthusiasts. This comprehensive guide has provided an overview of ASIO4ALL, including installation instructions, configuration options, and troubleshooting tips. With the knowledge gained from this document, users can make the most of ASIO4ALL and unlock its full potential.。
ASIO4ALL V2说明书
ASIO4ALL v2Universal ASIO Driver For WDM Audio- Instruction Manual -Last reviewed: 01/20/08目录介绍 (1)1 .......................................................................................................起步,建立你的声音软体 (1)2 .....................................................................................基本配置,高阶配置 (4)一般用法例6 ........................................................................优化使用“ReWuschel7 .............................................................................................”8 .........................................................................................故障介绍欢迎来到ASIO4ALL v2 !这本手册让你充分利用你的ASIO4ALL安装,尤其是进入新引进先进功能,在这个版本的ASIO4ALL。
ASIO4ALL v2安装的应该加入了2种新的图标加到你的桌面,其中之一是一个链接文件和另一个开展ASIO4ALL在离线模式控制面板。
开始建立你的音频软件为了利用ASIO4ALL,你需要设置你的声音软体进行相应的调整。
你将如何做这取决于你的特定的应用。
一般来说,你总是进入音频配置菜单,然后选择ASIO - > ASIO4ALL 1996,2。
Cubase 5设置及控制器攻略

在 Cubase 或 Nuendo 中把 VST 插件装在其他盘的设置及各控制 器使用作者:布鲁斯小伙 | |在安装软件时,通常我们会把 Cubase 或 Nuendo 装在 C 盘,而一些体积较大的音 源插件我们通常会装在其他盘。
比如在安装插件时一般默认的路径都是:C:\Program Files\Steinberg\Vstplugins ,我们可以改变路径把插件装在其它的盘或者其他的文件夹,我 通常是把盘符改一下, 后面的文件路径不去管它, 这样的话比较方便。
比如我是把 C 改成 D, 那就是:D:\Program Files\Steinberg\Vstplugins 。
下面我们打开软件 Cubase,在里面设置一下插件的共享路径。
打开软件后,点击菜单的 Devices 的 Plug-in Information ,如下图:接着就会跳出 Plug-in Information 的界面,点击 ADD 按键。
在跳出的目录对话框中指定目录到 D:\Program Files\Steinberg\Vstplugins ,然后点击 OK,如下图:接着点击跳出的对话框的 Apply,如下图:现在我们可以看到在黑色的对话框里已经多出了一个新的, 我们指定的 VST 插件目录, 接下来点击 Update 按键,让 Cubaser 搜索一下我们已经安装到 D:\Program Files\Steinberg\Vstplugins 里面的插件。
然后关掉 Cubase 再从新打开,插件就全出来了。
以后再装插件的时候我们都可以装进 D 盘这个目录里,当然我们还可以在 E 盘、F 盘 再建立更多新的新的共享目录。
Cubase 3.0版本的设置和 Cubase 2.0都是一样的,而且搜索 过后不用关掉再打开就可以显示出新增加的这个目录里的插件。
——全文完——用电子琴学习做 MIDI作者:网络 | 来源:网络转摘 | 时间:2008-09-12电子琴有一个好处,就是它能进行半自动伴奏,你只要左手按住几个键,选中某一种自动节 奏型,就可以听到电子琴在不知疲倦地一直响着,重复着一种模式的鼓点、钢琴或其它音色 的和声音型、低音贝司、弦乐长音。
SiAECOSYS V2 IV代 EM系列控制器程序手册说明书
VOTOL EM Controller Program ManualIt is forbidden to non-specialists use!This manual was explained in detail for the IV generation EM series controller,which update download illustrates and parameter adjustment.Before using the software,please read this manual.In order to facilitate the operation,please keep this manual.In order to make the software of maximum utility,please make sure the end user to use this manual.Please be sure to read the manual carefully before starting the operation.Disclaimer:For theⅣgeneration of EM series controller program updates and parameter adjustment can only bedone by professional and technical personnel.If without the written permission of our company for theⅣVOTOL generation EM series,theapplication update to download and parameter of the controller adjustment is not allowed.It is forbidden to non-professional personnel operate this software.In the above event,our company will no longer be responsible for accident happens by controller.1.Software installation(only support win7/10)1.1USB Driver Installation(1)Download the“USB-to-serial-win10-20150814”file,decompressing file.(2)choose the suitable driver with your computer for installation.win7,win8,win10are available.1.11.Decompress the operation first2.Unzip the YH-340USB package and select CH341SER.EXE to install it.Follow the steps above to install(3)After installation,pls.connect the USB cable with controller and computer.If it’s unable to connect,pls.Check below steps.Right click“my computer”in the desktopthen click“device manager”choose“port(COM&LPT)”choose the COM with“!”,click“serach automatically for updated driver software”Close the software when you finishAfter running,please run the software directly:EM_V3series debugging program;If the port has”自2012已停产,请联系供货商处理方法(Pls contact supplier if it is stop production since2012)”First step:Install driver PL2303_Prolific_DriverInstaller_v110Second:Right click to update the driver and select Browse Computer to find the driver software.Thrid:Click to select from the list of drivers for your computer;Select version3.3.10.140(2009-11-19),click Next,close the window when finished;2.Controller connection2.1Connect controllerController host computer simple wiring diagramDescription:controller B+connects battery B+controller B-connects battery B-,controller electric door locks connect battery or controller B+;The USB debug line is connected to the controller debug port;2.1.1According to the controller with CAN or without CAN to select the appropriate USB debug line;with CAN controller need to check the CAN enable,without CAN does not need to check;EM200controller needs to exchange the debug line CAN-H and CAN-L ,otherwise can’t connect the controller;2.1.2Host computer selectionEM50EM100EM150without CAN chooseEM50EM100EM150with CAN chooseEM200chooseSpecific host model needs to inquire the related sales;3Open the computer device manager before connecting to the computer to check whether the USB port is successfullyinstalled.Select the appropriate host computer to connect the host computer to the serial port when the controller is not powered.After selecting the corresponding serial port on the device port,click CreatFile.2.2Then power on(connect with e-lock),click connect(in setting1page),the nominal voltage should not be0.If it’s0,click connect again.3.The settingSetting page11.1:Voltage equipment1.1.1、Battery voltage setting:Corresponding to the ECU voltage,absolutely not allowe overpressure.1.1.2、Lead-acid battery overvoltage,undervoltage,soft undervoltage basic value default:due to software settings defects,the original voltage compensation+1V.1.1.3、The lithium battery is set according to the actual lithium battery parameter value.Due to software setting defects,the original voltage compensation+1V.The original lithium battery parameters are compensated for+1V,and the total compensation is+2V.1.1.4、Attention1.1.4.1、Overvoltage fault:After open the electric door lock,the vehicle doesn’t move.The Controller overvoltage protection function starts.1.1.4.2、ECU undervoltage fault:due to the lithium battery protection board overvoltage device is too high or the undervoltage setting is too low,resulting in lithium battery protection,burning MOS.Please adjust suitable battery voltage before running the motor and controller(for lithium battery).Overvoltage:real overvoltage+3VUndervoltage:real undervoltage+1VSoft undervoltage:undervoltage +3Vg.real overvoltage 84V,set 87V.real undervotlage 60V,set 61V.Soft undervotlage:64V.1.2:Current device1.2.2、Phase current setting:can only be adjusted downwards.1.2.3、Attention1.2.3.1、Setting the busbar current too high,causing the ECU burn MOS.1.2.3.2、As the phase current value decreases,the corresponding motor stall protection time is shortened.Setting page 21throttle voltage adjust(1)low protection value:The throttle error is shown(2)Starting voltage:when the value is reached,the motor starts running(3)End voltage:when the value is reached,the controller thinks the full voltage is reached (it is recommended to set the voltage lower 0.2v compared with thactual torque voltage).(4)High protection value:when the value is higher than that,the torque fault will be displayed2Start setting adjustment (for tricycle gear box only)(1)Starting torque:used for gear combination(2)Combined torque:a force of lifting after gear clearance is combined(3)Upward slope:upward slope of motor torque(4)Downward slope:downward slope of motor torque3Controller and motor temperature protection function adjustment(1)Start:Enter into the function of temperature protection,limit the motor torque.(2)Over temperature:Cut off the output of motor torque(3)Recover:When the motor temperature lower than the temperature protection value,you can re-twist the throttle, then the motor will restore motivation(4)Maximum:The motor maximum temperature is150Setting for page23.1:Parameters setting for sports mode(S gear)3.2.1、Busbar current setting:According to the controller type current corresponding to the selection,the vehicle speed is adjusted according to the motor parameters.BOOST weak magnetic value>high speed weak magnetic value3.2.3、Automatic logout enablers,confirm by select:Check the jog button /uncheck the long press button,choose one3.2.3.1、Check to make the jog effective.The weak magnetic time enters the exit and can be adjusted. 3.2:Downhill electric brake assist:start by select“HDC Enable”,downhill electric brake assist(slow down in steep slopes)function.Enable electric brake by enter minimum speed,if less than the speed,the function will be invalid.3.2.1Value400corresponding to speed around15kmh(it depends on motor feature,sometimes with a3.2.2、Note:The drum motor is not suitable for use,resulting in loose motor shaft.3.3、Flux weakening compensation:only valid when the inner rotor motor type is selected as V-shaped magnetic steelNote:The maximum value of255is generally filled in953.4、Three gear setting:Confirm the motor base speed value adjustment setting parameter value.The basic speed is filled in according to the<Appendix EM_V3Parameter Adjustment Calculation Formula>.3.4.1、The low,medium,high,and third speed values are valid within100%of the parameter value,and the medium,high,and high speed values are exceeded and the100%parameter value is filled.Exceeded by weak magnetic file(medium,high,BOST)3.4.2、In the flux weakening area,the actual parameters of the motor are adjusted,and the vehicle speed is based on the road test.3.4.3、Single voltage mode:The high voltage value is invalid.3.4.4、Attention3.4.4.1、Drum motor:60KM/H motor weak magnetic speed is less than<120%,80KM/H motor weak magnetic speed is less than<125%,110KM/H motor weak magnetic speed is less than<135%.2.4.4.3Inner rotor motor Hall:The built-in Hall weak magnetic speed is less than<135%,and the external Hall weak magnetic speed is less than170%.3.4.4.3、Internal rotor motor magnetic knitting:Built-in flux weakening speed<230%.3.4.4.4The motor base speed exceeds100%of the motor speed value and enters the weak value zone adjustment parameter.BOOST>High speed weak magnetic file.3.4.4.5Weak magnetic failure:The flux weakening value exceeds the motor and controller parameter values,causing the motor to demagnetize and the controller to burn MOS.3.5、Jog/push selection:choose one3.6、The three-speed default gear:the electric door lock opens the default several options.3.7、Soft start setting:The smaller the value,the softer the start.3.8、Speed limit setting:3.8.1、Function selection:speed limit,unlimited speed,two choices,default speed limit3.8.2、The speed limit speed is calculated based on vehicle parameter requirements.<Appendix EM_V3 parameter adjustment calculation formula>3.8.3、The upper limit speed and the solution speed limit are determined according to customer requirements.Setting page33.1、Motor Setting:3.1.1、Motor pole pairs:Fill in according to the motor manufacturer parameters.3.1.2、Hall phase shift angle:Fill in according to the motor manufacturer parameters.3.1.3、Motor type:Fill in according to the motor manufacturer parameters.Note:Wheel Hub motor is surface mount3.1.4、Hall,phase line exchange:exchange the motor forward and reverse.3.2、The controller to speedometer date output has2types:Single-line speedometer and hall speedometer, it needs to be decided by the vehicle’s speedometer.3.3、Moving assist and cruising function:Used in two-wheelersNote:Speed"3KM/H,torque9~19N.M3.4Cruise function:function selection,the default does not open.3.5Dual voltage setting:default single voltage。
ASIO4ALL V2说明书
ASIO4ALL v2Universal ASIO Driver For WDM Audio- Instruction Manual -Last reviewed: 01/20/08目录介绍 (1)1 .......................................................................................................起步,建立你的声音软体 (1)2 .....................................................................................基本配置,高阶配置 (4)一般用法例6 ........................................................................优化使用“ReWuschel7 .............................................................................................”8 .........................................................................................故障介绍欢迎来到ASIO4ALL v2 !这本手册让你充分利用你的ASIO4ALL安装,尤其是进入新引进先进功能,在这个版本的ASIO4ALL。
ASIO4ALL v2安装的应该加入了2种新的图标加到你的桌面,其中之一是一个链接文件和另一个开展ASIO4ALL在离线模式控制面板。
开始建立你的音频软件为了利用ASIO4ALL,你需要设置你的声音软体进行相应的调整。
你将如何做这取决于你的特定的应用。
一般来说,你总是进入音频配置菜单,然后选择ASIO - > ASIO4ALL 1996,2。
ASIO4ALL V2 down_2012_2_15_634649184659531250
ห้องสมุดไป่ตู้ 基本的 构造
第1 插图:基本的控制面板意见
1. 设备目录 这是WDM的目录在你的系统里找到的音频的设备。 最精彩场面你想要做的设备 转换成。
注释: 全部参数兑换总是只适用于目前强调的设备!
如果一个设备名字在大胆,这个设备里出现,被使成为可能。 在上面的图,CMI8738/C 3 DX PCI里 当全部其它人是时,音频的设备将被使成为可能。
每个设备的当前状态被一张小图象显示并且可能是这两个中任何一个: unning - 音频的发动机已经成功开始设备。 vailable - 设备应该在这个会议上适用于使用,但是还没开始。 navailable - 设备因为或者其它对本届会议不可获得另一个过程使用中。 eyond 逻辑 - 如果一些未知的原因的装置拒绝开始和/或展示,你得到这 任何种类的不稳定行为。 有时,关闭和重开控制面板可以治愈形势, USB 设备的象可以拔下的电源插头的那样并且重新插入。 有时,这也能意味着与相同的职责 navailable 设备到返回在其中不报告它的当今的可用性或者缺乏 ASIO4ALL。
普通用法情况最优化
玩软件音响合成器住 在这脚本里,你不需要音频的输入。 因此,你最好伤残他们全部,哪个通常将 在小的ASIO更好的稳定缓冲区尺寸,或者允许更小的缓冲区尺寸在方面 第一个地方。 更进一步,你也应该使你其实不需要的全部音频的生产无能力。 使海峡无能力, 使用先进的控制面板,扩大在WDM 设备目录里的项目并且使你做的一切事情无能力 不想要在这次安装过程中使用!
建立你的音频的软件
为了利用ASIO4ALL,你需要照着使你的音频的软件成形。 你将怎样 做这依靠你特别应用。 通常,你总是进入音频的构造
菜单和选择ASIO -> ASIO4ALL v2。 那里现在应该启动ASIO控制面板的一枚钮扣。 这枚钮扣怎样被贴标签,这取决于你的 特别的软件。 一旦你按这只按钮,ASIO4ALL控制面板应该出现。 请商议 如有必要,更进一步的帮助的你的音频的软件的手册! 有时,音频的软件的确将不提供一种ASIO控制面板选择。 情况是如此 由于例如 Winamp和Foobar 2000,为此ASIO产量插座存在。 为使ASIO4ALL成形用 无论如何这些应用,你能从台式机中启动离线的控制面板。 注意离线 控制面板发射器象它自己的一位袖珍ASIO 主人一样工作并且不反映出现行设备地位 可能同时是开的的ASIO4ALL的任何实例! 只在你重新开始音频的应用之后,在离线的控制面板方面做的变化将有一种影响。 底座在离线的控制面板里做,不过,为的应用根本将没有影响 被ASIO4ALL(在线)成形了 控制面板从内部音频的选择对话启动 应用。 一旦你使它成为ASIO4ALL控制面板,你现在能继续一些基本的构造。
FL Studio 新手向教程
FL Studio 8完整版教程FL Studio 8 教程第一章注意:本页面图片较多,第一次打开时,要等待一段时间才能把全部图片显示出来。
如果遇到显示为X的或者没显示出来的图片,请刷新页面。
由于各地的网络和网速问题,一些网络不好的地方可能需要多次刷新才能看到全部图片。
FL Studio 8 教程第一章-----------------------------------------------------------------注意:1.如果发现有文字错误,请发贴指出,谢谢合作。
2.欢迎转载,不过请注明作者:西西,论坛:MIDIFan-----------------------------------------------------------------1.FL Studio 印象前言: 即使你有世界上最优秀的音乐制作软件,你也不一定能制作出世界上最优秀的曲子什么是FL Studio? 它是干什么用的?做DJ? 做舞曲?音频编辑?混音?做现场?任何人都不能小看FL Studio的无限潜力,但任何人又无法逃避自身的局限性来认识它。
听完之后,你也许会问,用什么软件做的?事实上,包括我所在的大学的艺术老师,他听完后第一句话也是问我用什么软件做的。
仿佛,只要有了我用的软件,他就能做出这样的音乐。
以上的曲子是用FL Studio做的,不过也用了一些别的音源、录音等,但MIDI制作和总体混音全部是用FL Studio 完成。
那么,如果你有了这个软件,你是否能做出这样的音乐?答案是不确定的。
举个简单的例子,某位专业音乐制作人,换了一套音乐制作软件,请问他还能制作出好音乐吗?其他不懂音乐的人,看见他用这套音乐制作软件做出很牛逼的音乐,因此也来用它制作音乐,请问,这些人是否能做出好音乐?好音乐= 文化素养+ 文学功底+ 乐理+ 音乐制作软件可见,音乐制作软件只是做出好音乐所需的4样中的一样,因此,你想做出好音乐,除了会使用音乐制作软件外,还必须有其它三样基础。
ASIO4ALL v2 Instruction Manual
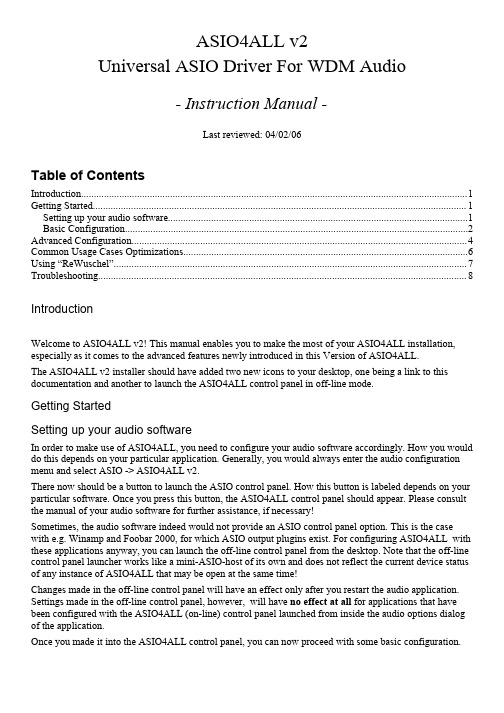
ASIO4ALL v2Universal ASIO Driver For WDM Audio- Instruction Manual -Last reviewed: 04/02/06Table of Contents Introduction (1)Getting Started (1)Setting up your audio software (1)Basic Configuration (2)Advanced Configuration (4)Common Usage Cases Optimizations (6)Using “ReWuschel” (7)Troubleshooting (8)IntroductionWelcome to ASIO4ALL v2! This manual enables you to make the most of your ASIO4ALL installation, especially as it comes to the advanced features newly introduced in this Version of ASIO4ALL.The ASIO4ALL v2 installer should have added two new icons to your desktop, one being a link to this documentation and another to launch the ASIO4ALL control panel in off-line mode.Getting StartedSetting up your audio softwareIn order to make use of ASIO4ALL, you need to configure your audio software accordingly. How you would do this depends on your particular application. Generally, you would always enter the audio configuration menu and select ASIO -> ASIO4ALL v2.There now should be a button to launch the ASIO control panel. How this button is labeled depends on your particular software. Once you press this button, the ASIO4ALL control panel should appear. Please consult the manual of your audio software for further assistance, if necessary!Sometimes, the audio software indeed would not provide an ASIO control panel option. This is the case with e.g. Winamp and Foobar 2000, for which ASIO output plugins exist. For configuring ASIO4ALL with these applications anyway, you can launch the off-line control panel from the desktop. Note that the off-line control panel launcher works like a mini-ASIO-host of its own and does not reflect the current device status of any instance of ASIO4ALL that may be open at the same time!Changes made in the off-line control panel will have an effect only after you restart the audio application. Settings made in the off-line control panel, however, will have no effect at all for applications that have been configured with the ASIO4ALL (on-line) control panel launched from inside the audio options dialog of the application.Once you made it into the ASIO4ALL control panel, you can now proceed with some basic configuration.Basic ConfigurationIllustration 1: Basic Control Panel View1.Device ListThis is the list of WDM audio devices found in your system. Highlight the device that you want to make changes to.Note: All parameter changes always only apply to the currently highlighted device!If a device name appears in bold, this device is enabled. In the picture above, the CMI8738/C3DX PCI Audio Device would be enabled while all others are not.The current state of each device is shown by a small icon and can be either of these:“Running” - The device has been successfully started by the audio engine.“Available” - The device should be available for use in this session but has not been started yet.“Unavailable” - The device is in use by another process or otherwise unavailable to the current session.“Beyond Logic” - You get this if the device for some unknown reason refuses to start and/or displays erratic behavior of any kind. Sometimes, closing and re-opening the control panel may cure the situation, as may unplugging and re-inserting of USB devices. Sometimes, this can also mean the same as“Unavailable”, whenever the device does not report its current availability or the lack thereof back to ASIO4ALL.Note: If the device list is empty, this means that you do not have a single WDM audio device in your system. Please check with your audio hardware manufacturer for a WDM driver!2.ASIO Buffer SizeUse the slider to adjust the ASIO buffer size for the device currently highlighted. Smaller buffer size means lower latency. Once you hear crackles or audio becomes distorted, you need to increase the buffer size. ASIO buffer size directly relates to audio latency. Thus, you want to get a rather small value here.3.Multi-Function ButtonAllows you to enable/disable/select the device list item currently highlighted.Use this to select the currently highlighted device for ASIO operation. In basic mode, you can only select one device at a time.If there is no valid action that can be performed with the current item, this button acts as an additional “Exit”- button.You can always close the control panel using the “Close” button in the title bar, which has the same effect.4.Switch To Advanced ModeSwitches the control panel into “advanced” mode, where you can fix things or completely mess them up at your disposal. “Advanced” mode is explained in the “Advanced Configuration” section of thisdocument.5.Load Default SettingsPressing this button will reset all configuration options to their initial defaults. Use when audio initially worked and you later got lost in the configuration process.6.Status BarThe most important bit of the status bar is the overload indicator (right where the “6” mark is in the picture). If the overload indicator flashes, it means just that. You may either want to increase the ASIO buffer size, or, if it just flashes briefly when there is heavy system load (e.g. When loading a project), you may just want to ignore it and merely appreciate the coolness of this new feature.Advanced ConfigurationIllustration 2: Advanced Control Panel ViewOnce the control panel has been switched to advanced mode, things begin to look a little more complicated. You will have noticed that the items in the device list are now expandable. By expanding the device list, you can now fully explore the WDM audio architecture of your system.The device list contains Devices, Device Interfaces and so called “Pins” (this is Microsoft(r) lingo). The figure above illustrates how they interrelate in the WDM KS hierarchy.Using the “Action”-button, you can now selectively enable/disable each particular item in the device list. This way, you can also create multi-device-setups.Multi-device-setups require that all the devices involved are running from the same clock source. You can achieve this by daisy-chaining devices via S/PDIF etc. Fortunately, most USB devices will automatically syncronize themselves for as long as the host controllers they are connected to have a common clock source, which is trivially true for the USB host controllers embedded in the south bridge on any mainboard.Note: If devices are not accurately synced, their audio streams are likely to drift apart over time!On the right side of the panel are the advanced controls (1..5).tency CompensationSince ASIO4ALL does not have sufficient knowledge of the underlying hardware/driver architecture, it can only guess the actual latencies involved.With these sliders you can compensate for the latencies unknown to ASIO4ALL such that recordings in your sequencer Software are properly aligned with the rest.Note: In multi-device-setups the largest respective value of all devices will be used. Therefore, ifdifferent devices have different inherent latencies, audio placement will not be accurate for some devices!2.Hardware Buffer on/offEnables the hardware buffer for the highlighted device. This only works for so called “WavePCI”miniports, as other types of WDM drivers do not usually allow direct access to the hardware buffer.Adjustment for best hardware buffer performance involves the “ASIO Buffer Size” slider and the “Buffer Offset” slider (see below). Hardware buffering works best for rather small ASIO buffer sizes. Trysomething between 128 and 256 samples as a starter!The biggest advantage of using the hardware buffer is that this method uses a lot less CPU. In addition, it may be possible to decrease latencies even further.In multi-device-setups, it is possible to mix Hardware-buffered devices with devices that are not. This, however, is not particularly recommended!If hardware buffering is not supported by a particular audio device, there will be an additional latency of a couple hundred milliseconds, which is clearly audible.3.Kernel Buffers/Buffer OffsetIf hardware buffering is disabled, this control lets you add up to two more buffers to be queued for audio output. Each additional buffer increases the output latency of the device by the time it takes to play one buffer. Therefore, the initial setting of “2” should only be changed on less powerful machines, where reasonably small ASIO buffer sizes cannot be achieved with the default setting.If hardware buffering is enabled, this control determines the amount of clearance (in ms) between where ASIO4ALL will insert data into/read data from the hardware buffer, and the position where ASIO4ALL currently thinks the hardware read/write position is. Sound complicated already? You haven't even seen the code that calculates this...As a general rule: Higher settings increase latencies and stability, lower settings have the adverse effect.You should, however, be able to achieve a setting that is very close to zero (“4ms” would still beconsidered “very close to zero”, while “10ms”, the default, would indicate that there is room forimprovement.)With Envy24-based PCI-sound cards, there may be an option in your sound card control panel that reads “DMA Buffer Transfer Latency” (Seen with Terratec products) or similar. You should set this to the lowest possible value, e.g. “1ms” for best results.4.Always Resample 44.1<->48 kHzASIO4ALL can do real time resampling of 44.1 kHz audio to/from 48 kHz. Resampling willautomatically take place whenever ASIO4ALL is opened for 44.1 kHz and the WDM driver does not support this sample rate.There may, however, be instances in which case an AC97 will support 44.1 kHz by resampling internally.More often than not, however, AC97 resampling quality is extremely poor and/or prone to stability issues. To work around this, you can enable this option. With at least one incarnation of the SoundMax WDM driver (smwdm.sys), this option absolutely must be enabled in order to make it work at 44.1 kHz at all.5.Force WDM driver to 16 BitThis option only has an effect if the supported bit depth of the WDM driver is larger than 16, but less than 24. Some AC97 devices report e.g. 20 Bits resolution but cannot actually be opened for more than16 Bits resolution. Should this be the case on your system, this option provides a workaround. Originally,this was introduced as a workaround for an issue with the SigmaTel AC97 WDM driver.Common Usage Cases Optimizations•Playing Software Synths LiveIn this scenario, you do not need audio inputs. Therefore, you best disable them all, which normally will provide you with a better stability at very small ASIO buffer sizes, or allow smaller buffer sizes in the first place. Further, you should also disable all audio outputs you do not really need. To disable channels, use the advanced control panel, expand the items in the WDM device list and disable everything you do not want to use in this setup!•Computer As Effects ProcessorObviously, in this scenario you do need inputs. But, as always, you should disable all channels you do not want to use. Disable 44.1KHz resampling if it is not really necessary!•General Purpose Sequencer SetupNormally it matters most that you do not get any dropouts even when the CPU load goes through the roof. Thus, it is recommended that you relax the latency requirements a little and work with an ASIO buffer size that feels comfortable with all your favorite VST plugins active. This especially applies when you are recording audio, in which case dropouts are a little worse than just moderately annoying. If your sequencer provides latency compensation, you probably want to check that recorded audio is aligned properly, and, if not, make the necessary adjustments in the “Latency Compensation” section in the advanced settings dialog.•Latency Does Not Matter A LotIn certain configurations, ASIO4ALL allows for bit transparent audio where the Windows driver stack does not. Hence, audiophiles prefer ASIO output over DirectSound or MME, which most likely does mangle audio data. In these scenarios, latency is of little concern and audio input is not asked for.Naturally, you would make sure that all inputs are disabled, set the ASIO buffer size to the maximum and be happy!Using “ReWuschel”If you selected the ReWuschel install option, the audio inputs ASIO4ALL provides to your host application are now also accessible as ReWire inputs. This makes sense for applications that only allow for ASIO output, but support ReWire. One such application is Reason.Now, in order to get real-time audio input in Reason, you need to make sure that ASIO4ALL v2 is the current ASIO driver. Then: Create->ReBirth Input Machine - that's it! The ASIO4ALL inputs are now mapped to the outputs of the ReBirth Input Machine.Note that, once you have ReWuschel installed, you cannot use ReBirth in Reason. In order to re-enable ReBirth input for Reason you need to re-install ASIO4ALL with the ReWuschel install option left unchecked!TroubleshootingSince ASIO4ALL presents itself to the audio software as a single ASIO driver, but due to its various configuration options, can act like a chameleon, there are numerous things that can go wrong without ASIO4ALL being at fault. Most notably, if you change the device setup in the ASIO4ALL control panel, the number of available input and output channels is likely to change, as well as the names of the channels that are seen by the host application. Therefore, it is always advisable to restart your audio host application after any change in the audio device setup whenever you find that the particular application does not appear to be able to handle these kinds of changes on the fly.More potential problems and possible solutions:•ASIO4ALL v2 not visible in host audio configuration menuThere are two possible reasons for this: Either your audio application does not support ASIO or you installed ASIO4ALL v2 as an underprivileged user. In the latter case, please log on as Administrator and install ASIO4ALL v2 again. Once successfully installed, ASIO4ALL v2 should not require Administrator privileges anymore in order to run.•Audio device flagged as “Unavailable” or “Beyond Logic” even though it is not in use elsewhere You want to make sure the “MS GS Software Wavetable Synth” or anything by a similar name is not enabled anywhere in you MIDI setup. The ASIO4ALL Web Site has further information on that.If any such “Software Wavetable Synth” (sometimes in disguise as “...DLS Synth...”) can be ruled out as the cause, try to restart the audio host application. Sometimes, when switching from another driver to ASIO4ALL v2, the previous driver will not release the audio device in time.If the device is an USB/PCMCIA/FireWire device, close the ASIO4ALL control panel, unplug the device, plug it in again and re-open the ASIO4ALL control panel.•Changes made in the control panel do not propagate between different audio applications ...Neither do they propagate between different users! This is not a bug, it's a feature! ASIO4ALL v2 stores settings per host application/per user! This makes it possible to have several instances ofASIO4ALL run at the same time for as long as they do not try to use the same piece of audio hardware exclusively. This further allows having ASIO4ALL run in educational/computer lab type environments without “user666” being able to f**** things up for any user on the same machine, with the exception of “user666” him/her/itself.•The latencies displayed in e.g. Cubase SX 3 do not match the values that would result from the ASIO buffer size.ASIO4ALL supports the latency compensation features of ASIO hosts that perform latencycompensation. This support is still a bit under development and will be improved as time passes. The values reported here are not just the latencies ASIO4LL adds to the audio stream, but rather the represent the whole shebang as far as driver/OS/hardware inherent latencies. If the guess was correct, that is...Earlier Versions of ASIO4ALL did not make this attempt at guessing, so you may obtain a smaller latency display with v1.x and other WDM->ASIO wrappers. The true (i.e. Perceived) latencies are at least as good as with earlier versions and on top of that, they do not change anymore when CPUutilization goes up!Copyright 2004, Michael Tippach.This document contains statements that may/may not be true. Particular combinations of colors or black and white contrast may/may not cause epilepsy, nausea, or the urge to do weird things to domestic animals. Either way, I shall not be held responsible for any of that.。
Cubase图文教程
Cubase/Nuendo图文教程/快速上手Cubase/Nuendo工作时需要ASIO驱动,但它自带的ASIO驱动性能很差。
如果你没有专业声卡,用的板载AC97的话,我们可以安装一个第三方驱动[ASIO4All v2],它能让Cubase/Nuendo在极低的延迟下工作。
1-执行菜单Devices-Device Setup...弹出驱动设置菜单。
驱动设置菜单2-在驱动设置菜单的左边选择[VST Audiobay]项目,并在右边的[Master ASIODriver]中选择[ASIO4ALL v2]。
(这个下拉菜单下面有个项目叫做[Release ASIO Driver in Background]建议不要勾选,否则Cubase/Nuendo窗口不在最前时它不工作)选择[ASIO4ALL v2]驱动3-选择[ASIO4ALL v2]驱动后,在左边[VST Audiobay]下面就会有[ASIO4ALL v2]的项目,选中它,可以看到延迟时间,然后在下面点[Control Panel]可以调整当前ASIO驱动的延迟时间。
选择Control Panel如果你有专业声卡,用同样方法直接选中专业声卡的ASIO驱动就行,但专业声卡的ASIO驱动延迟时间设置非常重要,如果资源使用不紧张且莫名其妙爆音,请增大延迟时间,这个值只要不超过20ms人耳很难分辨出来。
软件设置:Cubase/Nuendo可以针对个人进行偏好设置,这样可以让你的工作效率大增。
由于可设置的项目太多,这里并不一一罗列,仅示例两个常用设置。
1-每次播放停止后,需要让播放指针回到在上一次开始播放的地方,而不是回到最开始,执行菜单File-Preferences-Transport,在右边勾选[Return to StartPosition on Stop]。
选择Return to Start Position on Stop2-每次新建MIDI轨后,需要让MIDI轨上的音符跟随节拍变化的开关自动开启,即时钟变成小音符(适合Nuendo用户),执行菜单File-Preferences-Editing,在右边[Default Track Time Type]中选择[Musical]。
ASIO4ALL_v2中文手册

ASIO4ALL v2中文手册ASIO4ALL v2通用 ASIO 驱动 & 适应于 WDM 音频- 中文手册 -(发布日期: 12/07/04)目录简介 (1)入门指南 (1)软件配置 (1)简易设置 (2)高级设置 (3)应用指南 (5)疑难解答 (5)简介欢迎使用ASIO4ALL v2!这份手册希望能帮助你充分使用好已安装的ASIO4ALL,本手册尤其将重点介绍最新加入到这个ASIO4ALL版本中的高级功能。
ASIO4ALL v2在安装之后将自动添加两个新的快捷方式图标到你的系统桌面上,一个链接到本手册,另一个则用来以脱机状态调用ASIO4ALL的控制面板。
入门指南软件配置在使用ASIO4ALL之前,你需要对相关的音频软件进行适当地配置。
要如何设置,这完全取决于你指定的应用程序。
通常,你可以在该软件的音频配置菜单中将ASIO驱动指定为“ASIO4ALL v2”。
现在你应该可以找到一个用来开启ASIO 控制面板的按钮。
这个按钮被定义到哪个选项卡内也完全取决于应用程序本身。
当你找到并按下此按钮,ASIO4ALL控制面板将弹出。
如果需要的话,请查阅该音频软件的联机帮助以获取更多信息。
有时,音频软件并没有提供可用的ASIO控制面板选项。
像Winamp和Foobar2000 的某些ASIO 输出插件就存在这种情况。
不管怎样,为配置ASIO4ALL 和这些应用程序,你还是可以从桌面上调用ASIO4ALL 的脱机控制面板。
注意,脱机控制面板在工作上如同自身的ASIO宿主,它无法同时反映出任何ASIO4ALL请求所打开的当前设备状态!只有当你重新启动音频软件后,脱机控制面板中所作的设置更改才会生效。
也就是说,相对于从已进行了适当配置的音频软件内部加载ASIO4ALL(联机)控制面板的方式而言,用户在脱机控制面板所作的设置将完全无法取得实时效果。
一旦你进入ASIO4ALL控制面板,就已经可以进行一些基本的设置操作了。
asio4all使用方法
asio4all使用方法asio4all 呀,这可是个好东西呢!对于很多音乐爱好者和音频工作者来说,它就像是一把神奇的钥匙,能打开更美妙的音频世界大门。
咱先来说说安装。
就跟安装其他软件差不多,找到下载的文件,双击运行,然后按照提示一步步来就行啦。
这有啥难的呀,对吧?安装好了,接下来就是设置啦。
打开音频软件,在音频设置里找到asio4all 选项。
嘿,这时候就好像找到了宝藏的入口一样。
然后根据你的设备和需求来调整各种参数。
比如说缓冲区大小啊,采样率啊等等。
这就好比给自己的音频之旅打造一条最合适的道路。
你想想看,要是缓冲区设置得太小,可能就会出现卡顿或者爆音的情况,那可就糟糕啦,就好像车子在路上老是颠簸一样。
但要是设置得太大呢,又可能会有延迟,感觉就像反应迟钝了似的。
所以得找到那个恰到好处的点,让音频像溪水一样流畅地流淌。
再说说采样率,这就像是给音频世界选择一个合适的分辨率。
选得合适了,声音就清晰又好听;选得不合适,那可就有点别扭啦。
在使用asio4all 的过程中,还可能会遇到一些小问题呢。
但别怕呀,这就跟走路遇到个小坑一样,跨过去就好啦。
比如说有时候可能会出现兼容性问题,这时候就得耐心地去调整设置,或者找找有没有更新的版本。
还有啊,不同的音频设备可能会有不同的表现哦。
就像不同的车子在同一条路上跑,速度和感觉可能都不一样呢。
所以要多试试,多摸索,找到最适合自己的那一套设置。
你说,这么好用的 asio4all,咱不好好利用起来,那不就太可惜了嘛!它能让我们的音频体验提升好几个档次呢。
咱可不能错过这个机会呀,得把它用得溜溜的,让自己沉浸在美妙的音乐世界里。
所以呀,大家都赶紧去试试吧,相信你们一定会爱上它的!。
foobar2000使用ASIO插件教程
ASIO是专业声卡驱动。
由 Steinberg 公司开发.应用很广泛的个人电脑声卡专业驱动。
它的全称是Audio Stream Input Output,直接翻译过来就是音频流输入输出接口的意思。
通常这是专业声卡或高档音频工作站才会具备的性能。
它能实现在音频处理软件与硬件之间进行多通道传输的同时,将系统对音频流的响应时间降至最短。
同样一块声卡,假设使用MME驱动1时的延迟时间为750毫秒,那么当换成ASIO驱动后延迟量就有可能会降低到40毫秒以下。
几乎所有的声卡甚至 AC97 板载声卡都能支持 ASIO。
将软件的音频输出设置为ASIO设备后,播放多轨音频、使用实时效果器以及使用VSTi软音源时就会得到近乎完美的效果。
(想详细了解ASIO请百度)简单点说就是ASIO绕过了操作系统杂七杂八的弯弯,直接了当的进行音频输出处理,因而音质干静.纯脆,听起来就有玲珑剔透的感觉啦!!!1 装有foobar2000(这不废话吗。
)我用的是这个版本(我比较懒。
不想更新)2 要有foo_out_asio.dll插件。
一些foobar2000改版里带有(可到foobar2000安装目录下的组件(components)里找找看),纯净版的可去找相应版本的插件(上百度搜)foobar2000的官方网站:可下载foo_out_asio.dll这个文件,注意要对应你的foobar2000版本,不然有可能出错。
下好的foo_out_asio.dll插件放在foobar2000安装目录下的组件(components)里。
不会找foo_out_asio插件的朋友请看22楼3 去下ASIO驱动程序。
我比较喜欢ASIO4all(其他ASIO驱动不认识我。
^-^ )这里是ASIO4all的官方网站:/里面有简体中文版(下好直接双击安装)4 设置(眼睛睁大了看)打开foobar2000播放器。
在电脑右下角foobar2000图标上点右键-->参数选项打开选择-->DSP管理器,双击-->可使用的DSP 框内重采样器(PPHS) (它会乖乖跑到左边已激活的DSP框内)就可以激活PPHS打开重采样器的配置所选,将目标采样调到48000HZ 确定选择-->输出 -->ASIO Virtual Devices 点选Add New 按钮(如果没有安装ASIO4ALL会提示驱动没有安装)弹出的框框中选OK(我用的板载HD AUDIO声卡,推荐独立声卡,效果更好。
【精品】Cubase5设置及控制器攻略

.在 Cubase 或 Nuendo 中把 VST 插件装在其他盘的设置及各控制器 使用作者:布鲁斯小伙 | |在安装软件时,通常我们会把 Cubase 或 Nuendo 装在 C 盘,而一些体积较大的音源 插件我们通常会装在其他盘。
比如在安装插件时一般默认的路径都是:C:\Program Files\Steinberg\Vstplugins ,我们可以改变路径把插件装在其它的盘或者其他的文件夹, 我通常是把盘符改一下,后面的文件路径不去管它,这样的话比较方便。
比如我是把 C 改成 D,那就是:D:\Program Files\Steinberg\Vstplugins 。
下面我们打开软件 Cubase,在里面设置一下插件的共享路径。
打开软件后,点击菜单的 Devices 的 Plug-in Information ,如下图:接着就会跳出 Plug-in Information 的界面,点击 ADD 按键。
..在跳出的目录对话框中指定目录到 D:\Program Files\Steinberg\Vstplugins ,然后 点击 OK,如下图:..接着点击跳出的对话框的 Apply,如下图:现在我们可以看到在黑色的对话框里已经多出了一个新的,我们指定的 VST 插件目录, 接下来点击 Update 按键,让 Cubaser 搜索一下我们已经安装到 D:\Program Files\Steinberg\Vstplugins 里面的插件。
然后关掉 Cubase 再从新打开,插件就全出来了。
..以后再装插件的时候我们都可以装进 D 盘这个目录里,当然我们还可以在 E 盘、F 盘再 建立更多新的新的共享目录。
Cubase 3.0版本的设置和 Cubase 2.0都是一样的,而且搜索 过后不用关掉再打开就可以显示出新增加的这个目录里的插件。
——全文完——用电子琴学习做 MIDI作者:网络 | 来源:网络转摘 | 时间:2008-09-12电子琴有一个好处,就是它能进行半自动伴奏,你只要左手按住几个键,选中某一种自动节 奏型,就可以听到电子琴在不知疲倦地一直响着,重复着一种模式的鼓点、钢琴或其它音色 的和声音型、低音贝司、弦乐长音。
- 1、下载文档前请自行甄别文档内容的完整性,平台不提供额外的编辑、内容补充、找答案等附加服务。
- 2、"仅部分预览"的文档,不可在线预览部分如存在完整性等问题,可反馈申请退款(可完整预览的文档不适用该条件!)。
- 3、如文档侵犯您的权益,请联系客服反馈,我们会尽快为您处理(人工客服工作时间:9:00-18:30)。
ASIO4ALL v2中文手册ASIO4ALL v2通用 ASIO 驱动 & 适应于 WDM 音频- 中文手册 -(发布日期: 12/07/04)目录简介 (1)入门指南 (1)软件配置 (1)简易设置 (2)高级设置 (3)应用指南 (5)疑难解答 (5)简介欢迎使用ASIO4ALL v2!这份手册希望能帮助你充分使用好已安装的ASIO4ALL,本手册尤其将重点介绍最新加入到这个ASIO4ALL版本中的高级功能。
ASIO4ALL v2在安装之后将自动添加两个新的快捷方式图标到你的系统桌面上,一个链接到本手册,另一个则用来以脱机状态调用ASIO4ALL的控制面板。
入门指南软件配置在使用ASIO4ALL之前,你需要对相关的音频软件进行适当地配置。
要如何设置,这完全取决于你指定的应用程序。
通常,你可以在该软件的音频配置菜单中将ASIO驱动指定为“ASIO4ALL v2”。
现在你应该可以找到一个用来开启ASIO 控制面板的按钮。
这个按钮被定义到哪个选项卡内也完全取决于应用程序本身。
当你找到并按下此按钮,ASIO4ALL控制面板将弹出。
如果需要的话,请查阅该音频软件的联机帮助以获取更多信息。
有时,音频软件并没有提供可用的ASIO控制面板选项。
像Winamp和Foobar2000 的某些ASIO 输出插件就存在这种情况。
不管怎样,为配置ASIO4ALL 和这些应用程序,你还是可以从桌面上调用ASIO4ALL 的脱机控制面板。
注意,脱机控制面板在工作上如同自身的ASIO宿主,它无法同时反映出任何ASIO4ALL请求所打开的当前设备状态!只有当你重新启动音频软件后,脱机控制面板中所作的设置更改才会生效。
也就是说,相对于从已进行了适当配置的音频软件内部加载ASIO4ALL(联机)控制面板的方式而言,用户在脱机控制面板所作的设置将完全无法取得实时效果。
一旦你进入ASIO4ALL控制面板,就已经可以进行一些基本的设置操作了。
简易设置(插图一:简易设置面板视图)1、设备列表这是在你系统中找到的WDM音频设备列表。
请加亮你想要更改参数的设备。
注意:所有的参数更改只能应用到当前高亮显示的设备上!如果设备名以粗体显示,则表明设备可用。
上图中,“CMI8738/C3DX PCI音频设备”就是可用的,而其它非粗体显示的设备则表明不可用。
每个设备的当前状态都显示为一个小图标,图标可能是如下列出的其中一种:“工作中”- 表示该设备的音频驱动引擎已成功启用。
“可用”- 表示该设备在此期间可以使用,但还没有正式运作。
“不可用”- 表示该设备已处在其它进程的使用当中而无法在此期间使用。
“无法解释”- 如果该设备由于某些未知原因而拒绝使用,或者表现出任何不稳定状态的行为,那么尝试关闭并重新打开控制面板可能会解决此问题,像插拔US B设备时就有可能如此。
某些时候,只要一返回ASIO4ALL设备就不报告或缺乏它的当前可用性时,这个图标也就意味着等同于“不可用”。
注意:如果设备列表为空,则表明在你的系统中没有一个WDM音频设备。
请检查你所使用的音频硬件的制造厂商是否为其提供了WDM驱动程序!2、ASIO 缓冲区大小你可以借助拖动滑块方便地调节当前已高亮显示设备的ASIO缓冲区大小。
很显然,小的缓冲区能带来低的延迟。
当你一旦听到存在明显的爆音现象或声音严重失真,你就必须适当地增大ASIO缓冲区,然而缓冲区越大,延迟时间也就越长。
因此,你有必要在这里设置一个小且恰当的取值。
3、可切换按钮允许你“启用/禁用/选择”当前已高亮显示的设备列表内项目。
借助此按钮可以用来执行当前高亮设备相关的ASIO 操作。
在简易设置模式中,你一次只能选择一个设备。
如果没有可对当前项目执行的有效操作,此按钮将自动切换为一个附加的“退出”按钮。
无论什么时候你都可以通过点击顶部标题栏上的“关闭”按钮来关闭控制面板,这和“退出”按钮的作用是一样的。
4、切换到高级设置模式切换控制面板到“高级设置”模式,在这里,你可以调整所有的设置细节,但也完全有可能把你的配置弄得一团糟。
有关“高级设置”模式的具体阐述请查阅本文档的“高级设置”部分。
5、载入默认设置点击此按钮将把所有的配置项恢复到它们在安装时的默认状态。
当音频设备开始工作之前或你在以后自行设置的过程当中迷失时,你可能会用到它。
6、状态栏状态栏最重要的部位是过载指示器(正好处在标记⑥所在的位置上)。
如果过载指示器出现闪烁,即表明已达到了过载状态,你可能需要增加ASIO 缓冲区大小。
如果闪烁的时间较短暂,则可能是某些任务加重了系统的负担(比如在载入某个工程时),你可以忽略它,但这个新增加的功能可以帮助你引起警觉并采取可能的措施以减轻系统负担。
高级设置(插图二:高级设置面板视图)控制面板切换到高级设置模式后,事情开始变得稍微复杂起来。
你应该会注意到设备列表内的项目现在已经变成可展开/折叠的了。
通过观察展开的设备列表,存在于你系统中的WDM音频体系结构也就一目了然。
设备列表包含设备,设备接口也叫做“Pin”(这是微软的独有行话)。
上图中展示了设备列表内各项目在WDM KS驱动中的层次关系。
借助可切换的操作按钮,你现在就可以自主选择启用/禁用设备列表内的指定项目。
你也可以通过这种方式进行多个设备的配置。
在安装有多个设备时需要所有相关设备从同一时钟源开始工作。
你可以通过采用可菊链式连接的S/PDIF等接口来控制多个设备从而达成此目的。
注意:如果设备不能精确同步,设备间传输的音频流将可能随着时间的增加其不同步越来越严重!上图中面板右侧依次标记了各高级设置选项(①..⑤)。
1、延迟补偿由于ASIO4ALL在开发过程中缺乏足够多的对硬件/驱动程序底层结构方面的了解,它只能以猜测的方式来估算已牵涉到的延迟情况。
借助图中所示的拖动滑块,你可以在ASIO4ALL中对延迟时间进行一定的补偿,从而使得在你的音序器软件中录音或其他工作时得到适当的校正。
注意:在安装有多个设备时,所有设备将以其中某个具有最大取值的设备为准。
因此,如果不同的设备内部存在不同延迟情况,某些设备将无法取得精准的音频定位!2、硬件缓冲 [开启/关闭]启用已高亮设备的硬件加速功能。
这只能在使用“WavePCI”的miniport 驱动模式下工作,其它类型的WDM驱动通常不允许直接访问硬件缓冲区。
要获得最佳的硬件加速性能,有必要配合“ASIO缓冲区大小”滑块和“缓冲区位移”滑块(参阅下文)一起调节。
设置较小的ASIO缓冲区有益于给硬件缓冲带来最佳的工作状态,不妨尝试在128到256的采样数之间进行选择!使用硬件缓冲的最大好处就是占用的CPU较少。
此外,这种方式还可能带来更低的延迟。
在安装有多个设备时,支持和不支持硬件缓冲的设备可能会被同等对待,故此不推荐勾选此项!如果指定的音频设备不支持硬件加速而开启了此项的话,将可能额外增加数百毫秒的延迟,这可以清楚地听到。
3、内核缓冲区/缓冲区位移如果禁用了硬件缓冲,该设置项将允许你加入两个以上的缓冲区队列到音频输出。
每个附加的缓冲区将在播放某个缓冲区的同时增加设备的输出延迟时间。
因此,如果要更改初始设定(默认的内核缓冲区数目已设为“2”),只有在比较强劲的机器配置上且预设值和小的ASIO缓冲区搭配不能取得满意的效果时我们才推荐你这么做。
如果启用了硬件缓冲,该设置项将允许你指定ASIO4ALL当前正在读/写和下一次准备读/写硬件缓冲区数据之间的时间间隔数(单位为毫秒)。
你是否已经觉得头大起来?音频流的控制开始变得越来越复杂,你甚至无法估算出它的实际效果,呵呵,不用担心...一般说来:较高的取值会加大延迟但更趋稳定,较低的取值可能存在不利的影响。
无论如何,你应该尽量以达到接近零的取值为目标(比如“4毫秒”就可以看待为“极其接近于零”了,如果是默认的“10毫秒”,这显然表明还存在着改进的余地)。
如果使用的是基于威盛Envy24系列芯片的PCI声卡,声卡控制面板中可以看到类似于“以DMA(直接内存存取)缓冲区传输方式调整延迟”的选项(以德国坦克出品的音频卡为例)。
你应该将DMA缓冲区大小设置为一个尽可能低的取值,例如“1毫秒”,这是最好的情形。
4、总是以 44.1< 44.1<->48 kHz >重采样ASIO4ALL 允许以44.1 kHz<->48 kHz的采样率实时重采样。
只要ASIO4ALL工作于4 4.1 kHz且WDM驱动不支持此采样率时,重采样就会自动进行。
虽然也存在AC97 本身就支持以44.1khz内部重采样的情况。
然而,AC97 的重采样品质往往极为低劣并且很不稳定。
要在这种环境中进行工作,请勾选此项。
至少作为SoundMax WDM驱动(smwdm.sys)的一个典型来说,绝对有必要启用该项以使其完全工作在44.1 kHz的采样环境下。
5、强制 WDM 驱动以 16 位工作如果WDM驱动支持的采样精度高于16位但低于24位,这个选项就有用了。
例如,某些AC97设备虽然声称具备20 位的采样精度工作指标,实际工作时却无法超过16 位。
假如你的系统存在这种情况,该选项等于是提供了一个有效的变通方法。
在起初的版本中,它被当作SigmaTel AC97 WDM驱动的一个问题解决方案而介绍了。
应用指南●软件合成器的现场演奏此种情形下,你无需音频输入。
因此,你最好禁止所有的音频输入,然后将ASIO缓冲区设置一个极小且保证能够稳定工作的取值。
此外,你也可以禁止所有无需用到的音频输出。
如果要禁用通道的话,在高级设置面板中就可以办到,通过展开WDM设备列表内的项目然后选择禁用该配置无需使用的每个项目即可!●计算机充任效果器很显然,在这种场合你需要音频输入。
但是和往常一样,你有必要禁用所有无需使用的通道。
另外,如果不是特别需要,也请禁止重采样!●音序器中的大体设置通常最重要的是要避免CPU负载激增时引起的任何丢失数据的现象。
因此,建议你稍稍放宽对延迟的要求以及使用一个能够让你绝大多数常用的VST/VSTi插件舒适工作的ASI O缓冲区设置。
这在录音的时候尤为适用,毕竟相较而言此时任何少许的数据丢失都是难以令人容忍的。
如果你的音序器提供了延迟补偿,你或许需要检查一下录音是否已经得到了适当的校正,否则将有必要在高级设置面板的“延迟补偿”选项中继续进行调节。
●不重视延迟的场合在某些配置中,ASIO4ALL允许位透明音频编码不进入Windows驱动程序堆栈。
考虑到由此可能带来的音频数据损失,音响爱好者更喜欢ASIO绕过DirectSound或MME输出。
如果你希望这样,显然延迟已经不是你的主要关心对象而且也无需用到音频输入。
当然,你同样要做的是确认已禁止了所有的音频输入、ASIO缓冲区大小的取值已设到最大且没有问题的话!疑难解答虽然ASIO4ALL在音频软件中表现为一个独立的ASIO驱动,但由于其配置选项的复杂性,表现也各异,抛开ASIO4ALL本身的缺陷来说,仍然可能存在着大量的各种各样的问题。