panasonic操作手册
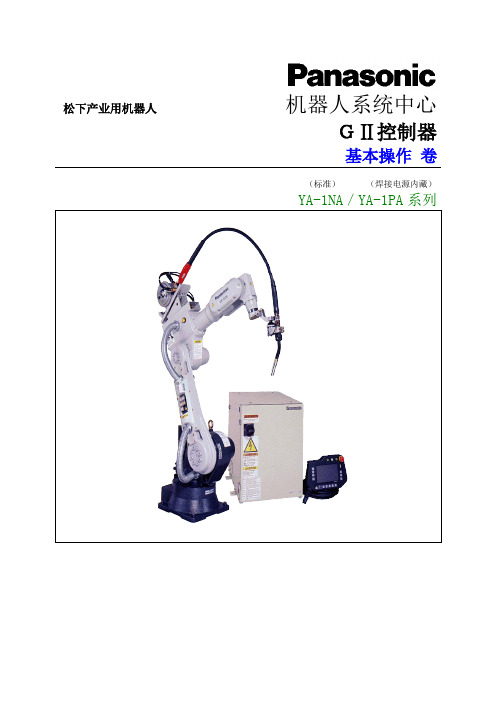
松下机器人操作手册
或者
登录
②窗口显示事例(焊接开始点) ※19
※18
空走
※19
③窗口显示事例(焊接中间点) ※20
焊接
※20
④窗口显示事例(焊接结束点) ※21
P10
焊接
※21
空走
7.退出当前示教模式
1)按下 窗口切换 键 2)打开[文件]菜单 3)选择 文件保存 选项
※22 ※23 ※24
※22
窗口切换
※23
+
文件
安全开关按下过轻 [力度适中]
伺服电源打开 <可以打开>
安全开关按下力量过大 伺服电源关闭
[力度过大]
<不能打开>
※1 ※2
※3
伺服打开
2 打开 机器人运转 图标 3.选择坐标系
※2 ※3
按下 右转换键 后,可以使用 键切换坐标
关闭
打开
关节
切换
直角
切换
工具
切换
圆柱
用户
(需要使用扩张机能设定)
+
右转换键
①
①②两种操作均可
②
+
持续按下
+ +
前进键
※6向后跟踪
①
+
未到达示教点 到达示教点
持续按下
・向前跟踪到1以外的其它示教点
②
- +
后退键
.
未到达 到达
P13
B.从所选择的程序跟踪修正
1.将模式选择开关打到 示教 一侧 ※1
※1
2.打开 文件 菜单
※2
3.在 文件 菜单上选择 [打开] 选项 ※3 4.选择「程序」或「最近打开过的文件」
1)打开 MORE 菜单
※1
2)选择 扩张设定
松下管理系统用户操作手册.doc
松下知识管理系统用户操作手册PISCCN版本: V1.1日期:2015-11-09未经松下电器(中国)销售有限公司事先书面许可,本手册的任何部分不得以任何形式进行增删、改编、节选、翻译、翻印或仿制。
本手册的全部内容松下电器(中国)销售有限公司可能随时加以更改,此类更改将不另行通知。
具体应用以软件实际功能为准。
本手册的著作权属于松下电器(中国)销售有限公司版权所有·翻制必究。
在中华人民共和国印制。
文件变更记录*A -增加M -修订 D -删除目录第一部分:用户操作说明 (4)1.扩展信息 (4)1.1 登陆页面 (4)1.2 首页 (8)1.3 我的收藏 (8)1.4我的消息 (10)1.5我的推荐 (14)1.6我的反馈 (15)1.7我的订阅 (16)1.8培训考试 (17)1.9用户档案 (22)1.10技术论坛 (23)1.11VOE (25)第一部分:用户操作说明1.扩展信息扩展信息模块主要包括十二个子模块:登陆页面、首页、我的收藏、我的消息、我的推荐、我的反馈、我的订阅、在线考试、用户档案、技术论坛、VOE这十一个模块通过权限设置分配给系统用户,下面介绍这十一个模块。
注:IE11浏览器下载附件会有格式问题,需要修改兼容性设置!方法一添加邮箱网站域名到兼容性视图列表.按下ALT键激活菜单栏,在工具菜单下打开“兼容性视图设置”对话框,将网站域名(http://114.141.188.136/utry_ckms/)添加到兼容性视图列表即可。
方法二更改组策略。
运行“gpedit.msc”打开本地组策略编辑器,在左铡窗格依次选择“计算机配置---管理模板---WINDOWS组件---INTERNET EXPLORER”,在右侧双击“自定义用户代理字符串”,打开属性对话框,选择“已启用”,下面的“输入IE版本字符串”文本框中直接输入“MSIE8.0”,后重启电脑即可。
1.1 登陆页面该子模块开放给前台登录用户,前台用户可以在首页上查看知识、检索知识、查看我的常用、对知识反馈以及对知识评价等操作。
松下机器人操作手册

安全开关按下过轻 [力度适中]
伺服电源打开 <可以打开>
安全开关按下力量过大 伺服电源关闭
[力度过大]
<不能打开>
※1 ※2
※3
伺服打开
2 打开 机器人运转 图标 3.选择坐标系
※2 ※3
按下 右转换键 后,可以使用 键切换坐标
关闭
打开
关节
切换
直角
切换
工具
切换
圆柱
用户
(需要使用扩张机能设定)
+
右转换键
<在示教模式下使用用户功能键>
※24
+ 保存
使用这些键 进行换页
F1 F2 F3 F4 F5
开始跟踪 检气・送丝 示教内容切换 追加次序指令 切替 *速度变换 焊接/空走 插补方式变换 坐标系变换 切替
上面的设定仅仅是假设,用户可以根据需要随意改变设定内容。
* 在示教以外的其他操作方式时,功能键的使用会随着操作方式的不同而不同。 如果要了解进一步的详细信息,请参考用户功能键使用说明。
向前微动
微动键
TP正面
液晶显示屏
向后微动
+加
-减
确认/登录键 窗口切换键
(背面) 右转换键
取消键
安全开关
TP背面
右转换键
左转换键
模式选择开关
用户功能键
中文名称 非常停止开关
启动开关 暂停开关 伺服启动开关 Jog 微动键 登录键(确认键) 窗口切换键 取消键 用户功能键 模式选择开关 运动功能键 右转换键 左转换键 3 点安全开关
ファンクションキーⅠ
4.运转 推荐坐标(直角坐标/运动)(工具坐标/角度)
1)各轴运动时坐标系的选择
直角
焊枪的运动
松下机器人操作手册

R-Shift Key L-Shift Key 3Point Deadman Switch (Deadman Switch) +key(Plus key) -key(Minus key)
P2
安全开关
示意图
2.如何正确使用示教器 (将示教器电缆缠绕在胳膊上,使示教器拿的平稳、安全)
设定
控制器
・在设定窗口 |
输入用户ID
「robot」(英文小写字母)
(允许使用浏览功能)
・在设定窗口 |
输入登录密
码「0000」(数字)。
◎标准设定 (系统管理员级)
用户ID
robot
用户登录密码
0000
当输入错误需要修正时,可以使用BS清除+
・B2以后的版本 【允许使用自动登录功能】 设定 → 管理工具 → 用户管理→
1)打开 MORE 菜单
※1
2)选择 扩张设定
※5
a.焊接区间转换
b.示教中使用焊丝接触监测功能
c.使用转换缓冲器
d.程序测试功能
e.跟踪设定
取消
※5
扩张设定
P12
④文件(程序)的检查・修正操作
A.当前示教程序的跟踪修正
※1
1.选择机器人运动OFF ※1
功能键
ON(灯亮)
OFF(灯灭)
2.移动指针到[程序窗口]的指定行程序上 ※2
①
①②两种操作均可
②
+
持续按下
+ +
前进键
※6向后跟踪
①
+
未到达示教点 到达示教点
持续按下
・向前跟踪到1以外的其它示教点
松下Panasonic高速扫描仪(中文)说明书
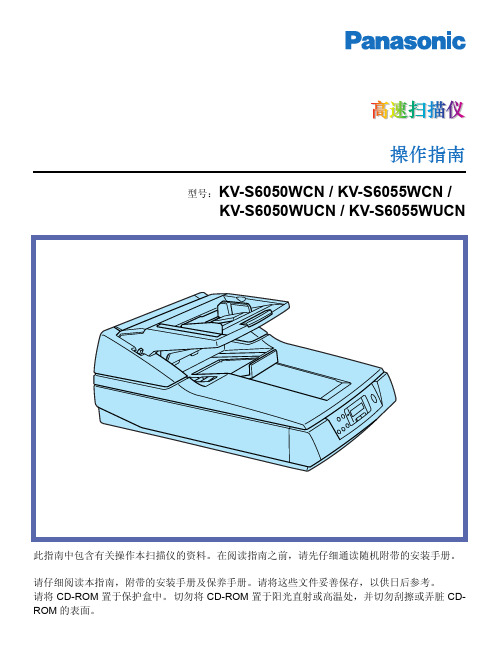
型号:KV-S6050WCN / KV-S6055WCN / KV-S6050WUCN / KV-S6055WUCN此指南中包含有关操作本扫描仪的资料。
在阅读指南之前,请先仔细通读随机附带的安装手册。
请仔细阅读本指南,附带的安装手册及保养手册。
请将这些文件妥善保存,以供日后参考。
请将CD-ROM 置于保护盒中。
切勿将CD-ROM 置于阳光直射或高温处,并切勿刮擦或弄脏CD-ROM 的表面。
操作指南3页码注意事项 (4)预防措施 (10)部件说明 (13)液晶屏显示指南 (15)• 液晶屏和按键 .................................................................................................15• 设定语言 ........................................................................................................16• 设定扫描仪.. (17)在ADF 上装入文件 (34)在平板上装入文件 (37)• 用平板方法扫描一次时...................................................................................37• 重复用平板方法扫描时...................................................................................38• 扫描厚文件.. (39)手动送进文件 (40)其它 (41)• 如何使用控制纸 (41)清除纸张夹塞 (42)• 从进纸部件处取出夹塞的纸............................................................................42• 从出纸通道处取出夹塞的纸. (43)清洁本机 (44)• 扫描仪外部.....................................................................................................44• 扫描仪内部.....................................................................................................44• 清洁滚筒.........................................................................................................44• 清洁扫描区镜片、CIS 镜片、传感器板、传感器滚筒、文件传感器、双页进纸检测传感器和纸张检测传感器 (47)• 文件镜片和盖纸..............................................................................................51• 滚筒清洁纸.. (51)更换消耗滚筒组件 (52)重新包装指南 (58)技术规格 (59)故障检修 (61)索引 (65)※ 液晶屏上的德文显示在P.16页上介绍。
松下机器人操作说明

产业机器人操作说明书基本操作型号No.YA-1 NA 系列VR Ⅱ系列GⅡ控制器内容1. 结构2. 如何使用示教盒3. 工作时得到的协助 (帮助)4. 示教模式操作 (示教)5. AUTO 模式6. 查看7. 有用的文件编辑功能 8. 错误和警报 9. 图标 10. 次序指令目录使用本产品之前,请仔细阅读本手册并保存本手册以备以后使用。
OM0105045E00(0105045)0108Panasonic机器人VRⅡ系列的"操作手册"系统 名字 描述和备注 用法安全手册 Panasonic机器人是在使用者遵守本手册内容的前提上被设计和制造的。
使用者在使用本列表中其他手册前一定要首先阅读并了解本手册的内容。
本手册解释了与工业机器人相关的基本法律和规则以及在逐步进行安装,维护和修理时的安全规程。
本文件用于机器人安装时的培训程序以及对所有机器人操作人员定期的安全操作培训。
机器人系统操作手册文件解释了标准机器人系统的配置和安装,例如通常的CO2焊接机器人系统。
本文件用于了解机器人系统的配置和安装中通常的系统连接。
机器人本体操作手册本文件解释了机器人本体的运输,安装,连接,初始设定,维护和修理。
文件的内容被限制在设备的硬件。
本文件供从事安装及维护的人员使用。
机器人控制器操作手册本文件解释了机器人控制器的运输,安装,连接,初始设定,维护和修理。
本文件的内容仅限于设备的硬件。
注意)机器人安装时软件的初始设定见"操作手册,高级操作"。
本文件供从事安装及维护的人员使用。
可选设备操作手册本文件解释GⅡ系列可选设备的安装,连接和修理。
本文件的内容仅限于设备的硬件。
注意)机器人安装时软件的初始设定见"操作手册高级操作"。
本文件用于可选设备。
本文件供从事安装及维护的人员使用。
操作手册基本操作本文件针对首次操作 Panasonic GⅡ机器人的操作人员。
本文件解释了基本的机器人功能和基本的机器人焊接操作。
Panasonic NV-HD82 操作
Panasonic NV-HD82 操作手册目录• 1. 产品概述• 2. 连接与设置• 3. 操作控制• 4. 附加功能• 5. 常见问题解决• 6. 安全注意事项1. 产品概述Panasonic NV-HD82 是一款高性能的录像机,具有出色的影音录制和播放功能,可满足用户个人和家庭娱乐需求。
本手册旨在为您提供NV-HD82 录像机的详细操作步骤和功能说明。
2. 连接与设置在开始使用 Panasonic NV-HD82 录像机之前,您需要完成以下连接和设置步骤:2.1 连接到电视机1.首先,确定您的电视机具有正确的音频/视频输入接口。
2.使用一条合适的音频/视频连接线将录像机的视频输出连接到电视机的视频输入接口。
视频接口通常为黄色RCA 接口。
3.使用另一条音频/视频连接线将录像机的音频输出连接到电视机的音频输入接口。
音频接口通常为红色和白色RCA 接口。
4.确保连接线的接头正确插入相应的接口,并紧固连接。
2.2 电源连接1.使用附带的电源线将录像机的电源输入连接到适当的电源插座。
2.确保电源线的插头正确插入录像机的电源输入接口,并紧固连接。
2.3 其他设置1.打开电视机和录像机的电源开关。
2.将电视机切换到正确的输入源。
根据您所连接的视频接口,切换到相应的 AV 或 HDMI 输入。
3.现在,您已经完成了 Panasonic NV-HD82 录像机的连接和设置。
3. 操作控制NV-HD82 录像机具有一组直观的操作控制按钮和功能。
以下是录像机的常见操作控制示例:3.1 录制录制是 NV-HD82 录像机的主要功能之一。
要录制视频,请按照以下步骤操作:1.确保所需的录制介质(如 VHS 磁带)已正确插入到录像机的录制槽中。
2.在录像机面板上或遥控器上,找到“录制”按钮,并按下。
3.在录像机面板上或遥控器上,选择合适的录制模式和其他设置,如录制模式(普通、长时间、定时等)和录制质量(标准、高清等)。
Panasonic空調器操作說明書说明书
Model No.Indoor UnitOutdoor UnitCS-V7RWA CS-V9RWA CS-V12RWA CU-V7RWA CU-V9RWA CU-V12RWAOperating InstructionsAir Conditioner操作說明書空調器感謝您購買Panasonic 空調器。
附帶安裝說明。
在操作空調器前,請細讀此操作說明,並保存此書以備日後參考。
Operating Instructions Air ConditionerThank you for purchasing Panasonic Air Conditioner.Installation instructions attached.Before operating the unit, read these operating instructions thoroughly and keep them for futurereference.安全措施 ....................................................4-5如何使用 ....................................................6-7清洗說明 .......................................................8故障檢修 .......................................................9信息 .........................................................封底附件• 遙控器• AAA 或 R03 電池 × 2• 遙控器托架• 用於遙控器托架的螺釘 × 2Table of contentsSafety precautions .................................10-11How to use.............................................12-13Cleaning instructions ..................................14Troubleshooting .........................................15Information...................................Back coverAccessories• Remote control• AAA or R03 batteries × 2• Remote control holder• Screws for remote control holder × 2安全措施為了防止個人傷害,危害其他人或財物的損失,請遵守以下指示:因不遵守以下指示導致的錯誤操作將引起傷害或損壞,其嚴重程度分類如下:要遵守的指示按下列符號分類:室内機及室外機此裝置不適合殘疾、感應欠佳或智障,經驗與知識不足的人士(包括兒童)使用。
松下说明书1
目录一、系统总述 (2)二、开关、按钮及外部端子功能简述 (3)三、门机控制器操作面板说明 (4)四、控制状态监控 (5)五、控制曲线及相关参数说明 (6)六、功能参数一览表 (7)七、故障代码表 (12)八、使用过程中应注意的问题 (13)一、系统总述:非常感谢使用我公司生产的门机控制器,SYD300A-VF型变频门机是我公司为适应市场需求而开发的门机控制系统,系统采用日本松下公司AAD03010系列变频器,该系统具有性能稳定可靠、低噪音、调试简单易懂等特点。
1.门机控制器元器件位置,如图所示:2.门机控制器控制端子功能二、开关、按钮及外部端子功能简述:1.转换开关(KZ)当开关置于调试状态时,按下手动开、关门按钮,门机按要求开门或关门;当开关置于运行状态时,系统只响应外部开关门信号,手动开、关门按钮不起作用。
2.手动开门按钮(KM)当转换开关置于调试状态时,按下该按钮,门机作开门运动,停止按该按钮,门机立即停止开门运动;当转换开关置于运行状态时,该按钮不起作用。
3.手动关门按钮(GM)当转换开关置于调试状态时,按下该按钮,门机作关门运动,停止按该按钮,门机立即停止关门运动;当转换开关置于运行状态时,该按钮不起作用。
4.输入端子4.1 门位置信号输入K1~K4为门位置控制信号,21#:关门限位(K1)22#:开门限位(K4)23#:关门变速(K2)24#:开门变速(K3)4.2 外部控制信号输入6#:输入公共端8#:开门信号输入9#:关门信号输入4.3 控制输出10#:输出公共端11#:关门到位信号输出12#:开门到位信号输出4.4 电源输入部分要求使用单相交流220V电源(电压容许范围:+10%,-15%),14、15为电源输入,13为接地线。
三、门机控制器操作面板说明:1.操作面板功能键简介2.功能参数修改步骤●使控制器处于停止状态:显示区显示“000”。
●按模式键[MODE],连按四次:直至显示区显示“P01”。
松下机器人操作说明

产业机器人操作说明书基本操作型号No.YA-1 NA 系列VR Ⅱ系列GⅡ控制器内容1. 结构2. 如何使用示教盒3. 工作时得到的协助 (帮助)4. 示教模式操作 (示教)5. AUTO 模式6. 查看7. 有用的文件编辑功能 8. 错误和警报 9. 图标 10. 次序指令目录使用本产品之前,请仔细阅读本手册并保存本手册以备以后使用。
OM0105045E00(0105045)0108Panasonic机器人VRⅡ系列的"操作手册"系统 名字 描述和备注 用法安全手册 Panasonic机器人是在使用者遵守本手册内容的前提上被设计和制造的。
使用者在使用本列表中其他手册前一定要首先阅读并了解本手册的内容。
本手册解释了与工业机器人相关的基本法律和规则以及在逐步进行安装,维护和修理时的安全规程。
本文件用于机器人安装时的培训程序以及对所有机器人操作人员定期的安全操作培训。
机器人系统操作手册文件解释了标准机器人系统的配置和安装,例如通常的CO2焊接机器人系统。
本文件用于了解机器人系统的配置和安装中通常的系统连接。
机器人本体操作手册本文件解释了机器人本体的运输,安装,连接,初始设定,维护和修理。
文件的内容被限制在设备的硬件。
本文件供从事安装及维护的人员使用。
机器人控制器操作手册本文件解释了机器人控制器的运输,安装,连接,初始设定,维护和修理。
本文件的内容仅限于设备的硬件。
注意)机器人安装时软件的初始设定见"操作手册,高级操作"。
本文件供从事安装及维护的人员使用。
可选设备操作手册本文件解释GⅡ系列可选设备的安装,连接和修理。
本文件的内容仅限于设备的硬件。
注意)机器人安装时软件的初始设定见"操作手册高级操作"。
本文件用于可选设备。
本文件供从事安装及维护的人员使用。
操作手册基本操作本文件针对首次操作 Panasonic GⅡ机器人的操作人员。
本文件解释了基本的机器人功能和基本的机器人焊接操作。
松下机器人操作说明
产业机器人操作说明书基本操作型号No.YA-1 NA 系列VR Ⅱ系列GⅡ控制器内容1. 结构2. 如何使用示教盒3. 工作时得到的协助 (帮助)4. 示教模式操作 (示教)5. AUTO 模式6. 查看7. 有用的文件编辑功能 8. 错误和警报 9. 图标 10. 次序指令目录使用本产品之前,请仔细阅读本手册并保存本手册以备以后使用。
OM0105045E00(0105045)0108Panasonic机器人VRⅡ系列的"操作手册"系统 名字 描述和备注 用法安全手册 Panasonic机器人是在使用者遵守本手册内容的前提上被设计和制造的。
使用者在使用本列表中其他手册前一定要首先阅读并了解本手册的内容。
本手册解释了与工业机器人相关的基本法律和规则以及在逐步进行安装,维护和修理时的安全规程。
本文件用于机器人安装时的培训程序以及对所有机器人操作人员定期的安全操作培训。
机器人系统操作手册文件解释了标准机器人系统的配置和安装,例如通常的CO2焊接机器人系统。
本文件用于了解机器人系统的配置和安装中通常的系统连接。
机器人本体操作手册本文件解释了机器人本体的运输,安装,连接,初始设定,维护和修理。
文件的内容被限制在设备的硬件。
本文件供从事安装及维护的人员使用。
机器人控制器操作手册本文件解释了机器人控制器的运输,安装,连接,初始设定,维护和修理。
本文件的内容仅限于设备的硬件。
注意)机器人安装时软件的初始设定见"操作手册,高级操作"。
本文件供从事安装及维护的人员使用。
可选设备操作手册本文件解释GⅡ系列可选设备的安装,连接和修理。
本文件的内容仅限于设备的硬件。
注意)机器人安装时软件的初始设定见"操作手册高级操作"。
本文件用于可选设备。
本文件供从事安装及维护的人员使用。
操作手册基本操作本文件针对首次操作 Panasonic GⅡ机器人的操作人员。
本文件解释了基本的机器人功能和基本的机器人焊接操作。
Panasonic DMC-FP2 DMC-FP1 基本操作说明书

PC VQT2K16-2M1209KZ2030Basic Operating InstructionsDigital CameraDear Customer,Thank you for choosing Panasonic!You have purchased one of the most sophisticated and reliable products on the market today. Used properly, we’re sure it will bring you and your family years of enjoyment. Please take the time to fill in the information below.The serial number is on the tag located on the underside of your Camera. Be sure to retain this manual as your convenient Camera information source. Please note that the actual controls and components, menu items, etc. of your Digital Camera may look somewhat different from those shown in the illustrations in these Operating Instructions.Carefully observe copyright laws.•Recording of pre-recorded tapes or discs or other published orbroadcast material for purposes other than your own private use may infringe copyright laws. Even for the purpose of private use, recording of certain material may be restricted.Serial No.Model No.THE SOCKET OUTLET SHALL BE INSTALLED NEAR THEEQUIPMENT AND SHALL BE EASILY ACCESSIBLE.This Class B digital apparatus complies with Canadian ICES-003.2 VQT2K16 (ENG)WARNING:TO REDUCE THE RISK OF FIRE, ELECTRIC SHOCK OR PRODUCT DAMAGE,•DO NOT EXPOSE THIS APPARATUS TO RAIN, MOISTURE, DRIPPING OR SPLASHING AND THAT NO OBJECTS FILLED WITH LIQUIDS,SUCH AS VASES, SHALL BE PLACED ON THE APPARATUS.•USE ONLY THE RECOMMENDED ACCESSORIES.•DO NOT REMOVE THE COVER (OR BACK); THERE ARE NOUSER SERVICEABLE PARTS INSIDE. REFER SERVICING TOQUALIFIED SERVICE PERSONNEL.Product Identification Marking is located on the bottom of units.■About the battery packCAUTIONBattery pack (Lithium ion battery pack)•Use the specified unit to recharge the battery pack.•Do not use the battery pack with equipment other than the specified unit.•Do not get dirt, sand, liquids, or other foreign matter on the terminals.•Do not touch the plug terminals (+ and −) with metal objects.•Do not disassemble, remodel, heat or throw into fire.If any electrolyte should come into contact with your hands or clothes, wash it off thoroughly with water.If any electrolyte should come into contact with your eyes, never rubthe eyes. Rinse eyes thoroughly with water, and then consult a doctor.CAUTIONDanger of explosion if battery is incorrectly replaced. Replace onlywith the same or equivalent type recommended by the manufacturer. Dispose of used batteries according to the manufacturer’s instructions.•Do not heat or expose to flame.•Do not leave the battery(ies) in an automobile exposed to direct sunlight for a long period of time with doors and windows closed.WarningRisk of fire, explosion and burns. Do not disassemble, heat above 60 °C (140 °F) or incinerate.(ENG) VQT2K16 3■About the battery chargerCAUTION!DO NOT INSTALL OR PLACE THIS UNIT IN A BOOKCASE, BUILT-IN CABINET OR IN ANOTHER CONFINED SPACE. ENSURE THE UNIT IS WELL VENTILATED. TO PREVENT RISK OF ELECTRIC SHOCK OR FIRE HAZARD DUE TO OVERHEATING, ENSURETHAT CURTAINS AND ANY OTHER MATERIALS DO NOTOBSTRUCT THE VENTILATION VENTS.Battery chargerThis battery charger operates on AC between 110 V and 240 V.But•In the U.S.A. and Canada, the battery charger must be connected toa 120 V AC power supply only.•When connecting to an AC supply outside of the U.S.A. or Canada, use a plug adaptor to suit the AC outlet configuration.■Cautions for Use•Do not use any other AV cables except the supplied one.•Do not use any other USB connection cables except the supplied one.Keep the camera as far away as possible from electromagnetic equipment (such as microwave ovens, TVs, video games etc.).•If you use the camera on top of or near a TV, the pictures and sound on thecamera may be disrupted by electromagnetic wave radiation.•Do not use the camera near cell phones because doing so may result in noise adversely affecting the pictures and sound.•Recorded data may be damaged, or pictures may be distorted, by strongmagnetic fields created by speakers or large motors.•Electromagnetic wave radiation generated by microprocessors may adversely affect the camera, disturbing the pictures and sound.•If the camera is adversely affected by electromagnetic equipment and stops functioning properly, turn the camera off and remove the battery or disconnect AC adaptor (DMW-AC5PP; optional). Then reinsert the battery or reconnect AC adaptor and turn the camera on.Do not use the camera near radio transmitters or high-voltage lines.•If you record near radio transmitters or high-voltage lines, the recorded pictures and sound may be adversely affected.4 VQT2K16 (ENG)(ENG) VQT2K16 56 VQT2K16 (ENG)ContentsStandard accessories (7)Names of parts (8)Cursor button (9)Charging the battery (10)Inserting and removing the card(optional)/the battery (12)Picture save destination(cards and built-in memory) (13)Setting the Clock (14)Setting the menu ......................15 Taking pictures with automatic settings [INTELLIGENT AUTO] Mode ....16Selecting the [REC] Mode .......18 Taking motion pictures [MOTION PICTURE] Mode ........19Viewing your pictures [NORMAL PLAY] .......................20Deleting pictures ......................20 Others Reading the Operating Instructions (PDF format) ........21Specifications ...........................23Optional accessories (26)Information for Your Safety (2)(ENG) VQT2K16 7Standard accessoriesCheck that all the accessories are included before using the camera. Partnumbers are as of January 2010.Battery PackDMW-BCH7PP•Charge the batterybefore use.Battery Pack is indicated asbattery pack or battery in thetext.Battery ChargerDE-A75Bbattery charger or charger inthe text.Battery CaseVGQ0J54Hand StrapVFC4297USB Connection CableK1HA08AD0002AV CableK1HA08CD0028CD-ROM VFF0588 •Software:Use it to install the software on yourPC.•OperatingInstructions•Cards are optional. You can record or play back pictures on the built-in memory when you are not using a card.•If any accessories are lost, customers should contact 1 800 99-LUMIX (1-800-995-8649) for further information about obtaining replacement parts.•Please dispose of all packaging appropriately.●We recommend you use a battery with sufficient battery power or theAC adaptor when recording motion pictures.8 VQT2K16 (ENG)The illustrations and screens in this manual may differ from the actual product. This manual uses the screens from DMC-FP1 as examples inits explanations.supply is cut off due to a power cut or if the AC adaptor is disconnected etc., the motion picture being recorded will not be recorded.(ENG) VQT2K16 910 VQT2K16 (ENG) ■About batteries that you can use with this unit The battery that can be used with this unit is DMW-BCH7PP .It has been found that counterfeit battery packs which look very similar to the genuine products are made available to purchase in some markets. Some of these battery packs are not adequately protected with internal protection to meet the requirements of appropriate safety standards. There is a possibility that these battery packs may lead to fire or explosion. Please be advised that we are not liable for any accident or failure occurring as a result of use of a counterfeit battery pack. To ensure that safe products are used we recommend that a genuine Panasonic battery pack is used.•Use the dedicated charger and battery.•The camera has a function for distinguishing batteries which can be used safely. The dedicated battery (DMW-BCH7PP) supports this function. The only batteries suitable for use with this unit are genuine Panasonic products and batteries manufactured by other companies and certified by Panasonic. (Batteries which do not support this function cannot be used). Panasonic cannot in any way guarantee the quality, performance or safety of batteries which have been manufactured by other companies and are not genuine Panasonic products.•The battery is not charged when the camera is shipped. Charge the battery and set the clock before use.•Charge the battery with the charger indoors (10 °C - 35 °C)(50 °F - 95 °F).Ensure [LUMIX] faces outwards.■Guidelines for the number of recordable pictures and recording timeRecording conditions by CIPA standard•CIPA is an abbreviation of [Camera & Imaging Products Association].•[NORMAL PICTURE] Mode.•Temperature: 23 °C (73.4 °F)/Humidity: 50 % when LCD monitor is on.∗•Using a Panasonic SD Memory Card (32 MB).•Using the supplied battery.•Starting recording 30 seconds after the camera is turned on. (When the Optical Image Stabilizer function is set to [AUTO].)•Recording once every 30 seconds with full flash every second recording.•Rotating the zoom lever from Tele to Wide or vice versa in every recording.•Turning the camera off every 10 recordings and leaving it until the temperature of the battery decreases.∗T he number of recordable pictures decreases in Auto Power LCDMode and Power LCD Mode.●Always use genuine Panasonic batteries (DMW-BCH7PP).●If you use other batteries, we cannot guarantee the quality of this product.●The card may be damaged if it is not fully inserted.●Keep the Memory Card out of reach of children to prevent swallowing.Picture save destination (cards and built-in memory) ■Built-in memory (approx. 40 MB)●The built-in memory can be used as a temporary storage device when the card being used becomes full.●The access time for the built-in memory may be longer than the access time for a card.■Compatible memory cards (optional)The following SD standard-based cards●If the write-protect switch is set to ‘LOCK’, the card cannot be used to record or delete pictures, and it cannot be formatted.●Latest information:http://panasonic.jp/support/global/cs/dsc/(This Site is English only.)■To change time settingRefer to the procedure example below when operating the [SETUP] menu, [REC] menu and [PLAYBACK] menu.Example: S etting [LCD MODE] from [OFF] to in the [NORMAL PICTURE] ModeOptimum settings are made automatically from information such as ‘face,’make settings manually.A )Press halfway (press lightly and focus) •If jitter becomes noticeable, use both hands, keep your arms close to yourbody, and stand with your feet at shoulder width.•Focus display (B )(In focus: lit / Not in focus: flashing) •The AF area (C ) is displayed around the subject’s face by the Face Detection function. In other cases, it is displayed at the point on the subject which is in focus. •Focus: M ax. W: 10 cm (0.33 feet)/Max. T: 50 cm (1.64 feet) and aboveB C■Automatic Scene DetectionCamera identifies the scene when pointed at the subject, and makes optimum settings automatically. The type of scene detected is indicatedIf the camera automatically identifies the scene and determines that people appear as subjects in the picture or , Face Detection is activated, and the focus and exposure are adjusted for the recognized faces.Taking motion pictures [MOTION PICTURE] ModeRecording Mode:Record motion picture with audio as follows. (Note that recording without audio is not possible.)▲ or ▼to select [MOTION PICTURE] ModeElapsed recording timeRemaining recording time(approx.)Hold down halfway (adjust the focus)Press fully (start recording)Press fully●The focus and zoom will remain as they were at the beginning of recording.●Immediately release the shutter button after pressing it all the way. ●When there is no space left to store the motion picture, recording automatically ends.●Motion pictures can be recorded continuously up to 2GB. To record more than 2 GB, press the shutter button again. (Remaining time for continuous recording is displayed on the screen.)To play back a motion picture, select an image with to start playback.Deleting picturesPlayback Mode(ENG) VQT2K1621•You have practised the basic operations introduced in these Operating Instructions and want to progress to advanced operations.•You want to check the Troubleshooting.In these kinds of situations refer to the Operating Instructions (PDF format) contained on the CD-ROM (supplied).A To return to the install menu.BS ee next page.Double click the ‘Operating Instructions’ shortcut icon on the desktop22VQT2K16 (ENG)■When the Operating Instructions (PDF format) will not open You will need Adobe Acrobat Reader 5.0 or later or Adobe Reader 7.0 or later to browse or print the Operating Instructions (PDF format).Insert the CD-ROM containing the Operating Instructions (supplied),click B and then follow the messages on the screen to patible OS: Windows 2000 SP4/Windows XP SP2 or SP3/Windows Vista SP1 or SP2/Windows 7•You can download and install a version of Adobe Reader that you can use with your OS from the following Web Site./reader/otherversions■To uninstall the Operating Instructions (PDF format)Delete the PDF file from the ‘Program Files\Panasonic\Lumix\’ folder. •When the contents in the Program Files folder cannot be displayed, click the [Show the contents of this folder] to display them.(ENG) VQT2K162324 VQT2K16 (ENG)Battery chargerEquipment mobility: MovableBattery Pack (lithium-ion)(ENG) VQT2K16 2526VQT2K16 (ENG)Product name: Battery PackProduct no.: DMW-BCH7PP●Performance identical to supplied battery pack.●Product numbers are correct as of January 2010. These may be subject to change.●Accessories and/or model numbers may vary between countries. Consult your local dealer.MEMO(ENG) VQT2K16 27•SDXC Logo is a trademark of SD-3C, LLC.•QuickTime and the QuickTime logo are trademarks orregistered trademarks of Apple Inc., used under licensetherefrom.•Other names, company names, and product namesprinted in these instructions are trademarks orregistered trademarks of the companies concerned.Panasonic Canada Inc.5770 Ambler Drive,Mississauga, OntarioL4W 2T3(905) 624-5010www.panasonic.ca© Panasonic Corporation 2010Printed in China。
Panasonic产品安装使用说明书
安装使用说明书型号:感谢您选用Panasonic 产品。
安装、使用和维护Panasonic 产品前,请仔细阅读本说明书。
特别是「安装注意事项」(3~4页19~20页)请务必在使用前或施工前仔细阅读。
不遵照此说明书进行操作有可能导致人员受伤或财产损失。
安装完成后,请向顾客说明如何使用和维护Panasonic 产品,并将此说明书交给顾客保管。
请妥善保管好此说明书以备日后参考。
(保留备用)购机时请认真填写保修证,并经商店填写盖章后妥善保管好本保修证以作保修用。
执行标准:GB/T 21087全热交换器标准型PM2.5净化型FY-15ZU1C FY-25ZU1C FY-35ZU1C FY-50ZU1C FY-15ZDP1C FY-25ZDP1C FY-35ZDP1C FY-50ZDP1C※表示液晶控制器 的LCD 全部显示 状态24是结合了「24小时换气」和「热交换」的节能、舒适的换气设备。
交换小时换气热缓慢的置换室内的空气,使室内一直处于新鲜空气的状态。
排出室内的污浊空气和导入室外的新鲜空气之间通过热交换芯,在相互隔离的状态下,可以进行温湿度能量的交换。
全热交换器是什么2为了避免对您或其他人造成伤害或财物损害,请仔细阅读并遵守本说明书中的安全注意事项。
■以下标志是根据错误使用所产生的危险或受伤程度进行分类。
■以下标志为务必遵守的指示种类。
345以下尺寸为除隔热材料厚度之外的全热交换器上的尺寸。
回风过滤网热交换芯电机风口框架名称8NO.6123457PPABS 材质数量142111备注风轮吊装部件初效过滤网19电源箱14镀锌钢板特殊纸+树脂无纺布镀锌钢板镀锌钢板名称NO.材质数量备注6■FY-25ZU1C■FY-35ZU1C适用管道直径Φ150■FY-50ZU1C7②设置检修口(图2)(1)双点划线内部为检修保留区不 应设置其他装置。
(2)逆向安装时,检修口的位置也 要满足右记尺寸关系。
且由于无法进行下检修,可不设置过滤器检修口。
Panasonic 基本水浴疗浴机操作手册说明书
OPERATING MANUAL[Basic Water Bath]Model : BW ? 05B, 10B, 20BManual No : 00HAA0001200(Rev.1)This operating manual describes the important subjects to maintain the product¡s functions and to use it safely. Especially, be sure to read <Safety Precaution> carefully before you use this equipment. Please keep this operating manual close to the equipment to use it after reading through it once. Please place it where the new user can find it easily for the safety use when you hand over or lend the equipment to othersTable of ContentsChapter 1 : Introduction⏹Caution about the operating manual ---------------------------- 4⏹Warning mark ------------------------------------------ 4⏹Caution for safe operation and unauthorized modification ---------5⏹Disclaimer ----------------------------------------------------------------- 5 Chapter 2 : Check the condition of unit ----------------------6,7 Chapter 3 : Installation⏹Contents-------------------------------------------------------------------- 9⏹Installation -----------------------------------------------------------------9 Chapter 4 : Safety Alert and Caution⏹Safety Alert --------------------------------------------------------------- 12⏹Safety Caution ----------------------------------------------------------- 13⏹Warning Label ----------------------------------------------------------- 14 Chapter 5 : Names of each component & functions⏹Part names and functions◆Main Body ---------------------------------------------------------- 16◆Over temp limit ---------------------------------------------------- 17 Chapter 6 : Controls and functional element⏹Operating and functional element------------------------------------ 19⏹Temperature setting procedure----------------------------------------20 Chapter 7 : Maintenance and Troubleshooting⏹Maintenance ------------------------------------------------------------ 22⏹Safekeeping and Cleaning -------------------------------------------- 23⏹Troubleshooting--------------------------------------------------------- 24 Chapter 8 : Specifications and Circuit diagram⏹Specifications ----------------------------------------------------------- 27⏹Circuit diagram --------------------------------------------------------- 28 Chapter 9 : Warranty and Service⏹Warranty service -------------------------------------------------------- 30⏹Exceptions from warranty ----------------------------------------------30⏹Service request ----------------------------------------------------------30⏹Return process ---------------------------------------------------------- 30Chapter 1IntroductionThank you for purchasing the Lab Companion Bath.Lab Companion Baths are realized perfectly the control andBath circumstance related to the operator¡s experimental condition. Excellent Incoloy sheath heater positioned below bath widely and offers prompt temp compensation and accurate temp uniformity. Before using the Bath, please comprehend the manual in detail.Including;●Caution about the operating manual●Warning mark●Caution for safe operation and unauthorized modification●DisclaimerCaution about the operating manual1.Always keep this instruction near to the instrument.2.Copying and distributing part or the whole of this the operating instruction with no permissionare prohibited with the law.3. The operating instruction promised perfection but please ask an agent or us if you have anyquestion about insufficient points, error and omission on the operating instruction. Warning mark1.This operating instruction uses the warning Signal Word for safe operation to prevent theusers from accidents or damage beforehand.2.Defined by the Symbol Mark about the safety caution.¡Warning¡ means that the user may have seriousdamage and even die by improper handling on thisunit.¡Caution¡ means that the user may have minordamage and unit may have physical damage byimproper handling on this unit.Protective Ground TerminalIt marks the terminal must be connected Groundprior to operating the product.It marks additional information on the operation andfeatures of the product.3.Be fully aware of the warning contents during operation.4.Please exchange original label to the new warning label when it is unreadable from warningout.☞ Please request the new label to an agent or us.Caution for safe operation and unauthorized modification1.In order to protect the product and system, please use the product in accordance with theinstructions.2.We shall not be responsible for any incidental or abnormal operation for breach of anyexpress or implied warranty on this product or any part thereof.3.It forbids reorganization of Inside of the product or adds.4.Please contact the agent or us in case of the component and the consumable parts of theproduct will be replaced.5.Do not give a strong shock to the product. It becomes the cause of product damage andwrong operations.Disclaimer1.In no event will Jeio Tech industries be liable for any incidental or consequential damages forbreach of any implied warranty relating to the product.2.Any special indirect or consequential property or commercial damage of any naturewhatsoever. Some cases do not allow the exclusion of incidental or consequential damages, so the above limitation may apply to you.Chapter 2Check the condition of unit Before you install Shaker, inspect it for damage that may have occurred in transportation. Confirm any damage for compensating following the Compensation regulations and transportation of Lab Companion.Check the condition of unit before unpackProtection from any damage occurring in transit, Lab Companion administers excellent packing and radical transportation.Any damage or loss during transit, all responsibility is filled with the delivery carrier.After receiving the unit, carefully unpack and inspect it for damage.If the unit is damaged or loss during transit, Make sure as follows to be protected from the ¡Lab Companion Regulations¡.Confirmation a damaged unit1. Check the front and rear sides of the unit under packed condition.2. Carefully unpack the package.3. Check with care any damage during the transportation of the unit4. Check the parts (i.e. accessories- Page 9) of the unit.Compensation regulation of damaged unitIf the unit is damaged, contact the delivery service company immediately.1. Keep the condition as it delivered and wait for the confirmation by the carrier.2. Within 15 days, submit an application be made in writing to the delivery service company.Do not discard the carton or packing materialfor the unit until you have checked all of thedamaged parts.Compensation regulation of transport1.Any damage that is occurred during the transport is responsible to the delivery servicecompany.2.Except for all damage from the transport, we Jeio T ech will service or return.3. 3. If Jeio Tech or our authorized dealers do not deliver the unit, Jeio Tech disclaims all theresponsibility for the damage.Chapter 3InstallationBefore installation, be sure to check the electric conditions for electric safe. All persons expected to carry out operation, installation and maintenance of the unit, read and understand the safety information and operating instructions.Including;●contents●Installation⏹Check points⏹Select a proper place⏹Level off⏹Power connectionContentsAfter unpacking, Please check listed Bath component description as follows.If you didn¡t receive one or more component as follow, Contact the Jeio Tech Service center or the distributor where you purchased .Operating manualAfter unpacking, check the operating manual. If you receive the operating manual, Contact distributor or the Jeio T ech service center .InstallationThe machine should be installed on a safe and proper environment following to the belowCheck Points- Select a proper place, Level off the machine, - Power connectionSelect a proper place1. Operating conditionRoom condition of temperature and humidity should be normal as 18 ℃ ~ 25℃, below 80%RH.2. Environmental conditionDo not expose the machine to direct ray of light.3. Setting placeThe floor should be on flat and leveled ground.4. SpaceThe machine should be kept at least 1.5m from any illuminators and 20 cm from walls.Level offAll of the bottom sides should be leveled.Power connectionCheck the ID Plate on the back side of the machine to find the electric conditions. Power must be used upper 2 classes grounded.1. Check if the plug condition and electric wires are normal.2. Check the connection of ground wire.Chapter 4Safety Alert and Caution¡Signal Word¡ is used in the operation manual for safe and proper operation and keeps users from being damaged by accidents.Each ¡Symbol Mark¡ is identified following to the degree of importance and danger.Pay attention to the ¡Alert¡ and ¡Notice¡ in the manual to avoid from any accidents.Safety Alert⏹Check the voltage, phase and capacity on the ID plate before installation. Sources of electricity should be separately wired.⏹The sources of electricity should be grounded. The sources of electricity without ground connection can cause serious damage to users or the machine. Don¡t earth the machine to gas pipes or water pipes. ⏹Do not connect multiple power cord. It can cause fire and malfunction.⏹Running water recommended must be non-flammability.In case of flammability, the flashing point of running water must be over 40℃.⏹Running water can be circulated and pumped below 20degrees.⏹Running water circulated and pumped can be used below ambient 20℃. Running water must be lower 5℃ from the flashing point. (Fp-5)⏹Don¡t install the machine near to places where inflammable gas can be leaked .Do not use the machine near to places where explosion can be happened due to organic evaporating gases.Explosive materials: Acid, Esther , Nitro compoundInflammable materials: salt peroxides, inorganic peroxide, salt acids⏹Do not put inflammables and explosives in the machine.⏹Put off the power plug if some sounds and smell, smokes are happened.⏹Keep out the machine from heating source and sun direct. Install the unit ambient 5~40and below ℃℃80%RH.⏹Do not use the machine at places where moisture is high and flooding can be happened.⏹Do not disassemble or fix, change the machine.⏹Do not move the machine when running water heated. Must drain running water completely when moving theMain PowerSafetymachine.Overflowing running water can cause malfunction and burn.⏹At least 2 persons should move the machine when it is necessary.⏹Be careful to enter moisture, organic solvents, dust and corrosiveness gas.Caution⏹Do not put heavy things on the power line. Do not put the machine on the line.It causes fire and electric shock.⏹Connect the plug correctly and do not touch it with hands.It can cause fire if the connection is not fit. It can cause fire and damage to users.⏹Install the machine near to the power cord can be easily reached.⏹Do not install the machine near the high frequency noise place.Keep out a high-frequency welder and mass capacity SCR Controller .⏹Do not put inflammables and explosives in the machine.⏹Do not install the machine near to the organic solvents.It may cause fire and malfunction.⏹ Do not make the machine wet while cleaning. Do notput liquid on the machine.If the machine is wet, off the power and contact where you purchase the machine to check it.⏹ Do not shock the machine or vibrate it.It can cause damage to the machine.⏹Do not clean the machine with solvent abstergent. Use smooth cloths.Cleaning with solvent can cause fire and deformity.Main PowerSafetyAlert LabelAlert labels are attached on the body for informing of safety and danger.Keep the alerts in mind and follow the instructionAsk extra labels to where you purchased the equipment if they¡re damaged.* WarningIt informs not to put flammable or explosive samples in thechamber.* CautionUsers can be burnt by the hot surface of thechamber due to the high temperature.Chapter 5Names of each Component & FunctionsPlease, we recommend that operator learns name of each part of main body and function & and operation of display before using unit.If you do not understand any, please, contact with agent or Jeio tech. Including;●Part names and functions⏹Main Body⏹Over temp. limitPart names and functions1. Main Body3. FuseSafety device is for preventing internal flow from overcuuent.For replacement;Fuse Specification Model 230V 120V 100V BW-05B 5A 8A 8A BW-10B 5A 10A 12A BW-20B10A10A12A4. Main Power Plug & Cable1. Control PanelSetting controls and operating2. Main Power Switch43122. Over Temp. LimitOver Temp. LimitThis safety device cuts mains of equipment andthe unit stops when it detects high temperatureover set temperature.Indication : Buzzer and O/T LED blinking.To start the unit again, press START/STOP key.Note) Please, eliminate the potential dangerousfactor.How to set :1.Turn the knob (red color) of over temperature limit to clockwise with screw driver.℃℃2.Set the value 10~15 higher than set temperature.Chapter 6Controls and functional element Please, learn controls and functional element before operating unit. Including;●Operating and Functional element●Temperature setting procedureOperating and functional element1. Rotary knob for temperatureTuning the aim of analogue rotary knob to set temperature.2. Status indicationRUN LED: operating status.HEAT LED: operating of heating element.O/T LED: It is ON when overtemperature device is activated.3. Over Temp. LimitTo prevent overheat of the unit or higher temperature than set temperature.12Temperature setting procedure① Press Main Power Switch.A. RUN LED is ON.B.The unit starts operating.② Tune the aim (temperature) of rotary knob.Switch Range()℃0 ~ 110A.HEAT LED blinks and is ON after tuning.③ Set Over temp. limit 10 ~ 15℃ higher than set temperature.ValueChapter 7Maintenance & Troubleshooting This chapter shows symptoms while operation. Please contact us referring to the contents when the equipment has problems.Please keep in mind how to clean the equipment and maintain it regularly.Including;●Maintenance⏹Every week/month/quarter/year●Safekeeping and cleaning⏹Storage/Cleaning/Cleaning accessories●TroubleshootingMaintenance⏹ Check the connection of the accessories. ⏹ Keep clean the surface of the equipment..⏹ Check the condition of power plug or wires.⏹ Check the button input condition, set values are input correctly ⏹ Check the condition of ¡Over T emp. Limit¡⏹ Check the every week/month ¡check point¡.⏹ Check if vibration or noise happens in the equipment.⏹ Check the every week/month/quarter ¡check point¡.⏹ Check the temperature is controlled properly. Check if theconstant temperature is maintained.Maintain the equipment following to the maintenance standard for keeping the equipment under the best condition.Every WeekEvery MonthEvery QuarterEvery YearSafekeeping and CleaningStorageKeep the equipment following to the orders below in case no operation for a long time. 1. Power off .2. Get rid of all solvents in the chamber .3. Keep the equipment after packing for dust protection.CleaningExternal cleaning1. Clean the external body by detergent.2. Clean the external body by soft towel with pure water .3. Clean the display with dry towel.Inner cleaning 1. Power off .2. Clean in the bath by soft towel with detergent.3. Clean it with dry towel.Cleaning accessories1. Soak accessories in detergent.2. Clean it with pure water .3. Keep it after drying.Cleaning AccessoriesInner cleaningExternal cleaningStorageTroubleshootingFollow the below when problems happen.Please ask service if problems not included in the table happen or can¡t be solved by the mentioned solutions.SymptomsCausesSolutionsThe equipment is not on.⏹ Wrong electric standard. - Or -⏹Circuit breaker is off or power failure - Or -⏹The plug is not fit into the socket properly . - Or -⏹ Fuses are disconnected. - Or -⏹Socket/plug/power lines are damaged.1.Check the ID plate on the back to find electric condition whether it¡s fit to the socket power . If not sloved¡.2.Check if the power is off. If the circuit breaker is off, fix it and operate the equipment again. If not solved¡3. Plug the power to the socket again. If not solved¡4.Check if the fuse set on the back of the equipment is short circuitted. Replace with a new one when short circuitted. Fuse capacity: Refer to Specifications (Page 27)If not solved¡5. Check the socket/plug/power lines and replce with new one if they are damaged.6.Contact your local dealer to fix the equipment if the problems are not yest solved.Fuses are short circuitted friquently.⏹ Electric standare of fuses are not fit. - Or - ⏹ Wires are damaged or shorted. - Or - ⏹ Power input parts are wet. 1. Connect the fuse tightly after checking voltage and amphere. Refer to ¡Specifications¡ (Page 27) If not solved¡2. Replace with a new wires if they are damaged or shorted.If not solved¡3. If the power connecting parts are wet,dry them and reconnect.4. Contact your local dealer to fix theequipment if the problems are not yet solved.If circuit breakage is shorted continually.⏹T oo many plugs are connected. 1.Check the voltage capacity supplied to the circuit breaker .2.Check many similar equipments are connected on the socket. Use separate socket not exceeded of the voltage capacity . 3.Contact your local dealer to fix the equipment if the problems are not yet solved.Symptoms Causes SolutionsDisplay does not show anything when power is on. ⏹Innter harness fails- Or -⏹Controller & Display fails.1.Check the equipment by contacting thelocal dealer.The equipment stops working automatically. ⏹The equipment is affected bystrong noise.1.Check equipments with strong noises areinstalled near to the equipment and keepit far from them.2.Contact your local dealer to fix theequipment if the problems are not yetsolved.The equipment stops working by ¡Over Temp Limit¡. ⏹Over T emp. Limit is setwrongly.Reset the ¡Over T emp. Limit¡.1.Operate the equipment again to find anyproblems.2.Contact your local dealer to fix theequipment if the problems are not yetsolved.Chapter 8Specifications and Circuit diagramCheck the specifications and circuit diagrams of the basic baths for proper operation.Including;●Specifications●Circuit diagramSpecificationsModelBW-05BBW-10BBW-20BChamber volume3.5ℓ11.5ℓ20ℓRange Amb. +7℃ ~ 100℃(lid off)Accuracy±0.5℃ at 50℃ Uniformity ±0.3℃ at 50℃ Heat up Time 50℃ within 40min TemperatureControllerAnalog controller typePermissibleEnvironment conditionTemperature 5℃ to 40℃ Maximum relative humidity 80%Altitude up to 2,000mInternalStainless steel, 0.6tMaterialExternalSteel, 1.2t, Double painted & bakedHeater 700W/230V 700W/120V 700W/100V1000W/230V 1000W/120V 1000W/100V 2000W/230V 1000W/120V 1000W/100VSensorPt 100 Ω Bath240¡136¡115 300¡240¡165 498¡300¡165 Top open 240¡136 300¡240 498¡300 Size(mm) (W¡D¡H)Overall (Lid off)303¡242¡245357¡330¡290564¡392¡295 Safety deviceOver temp limit / Current fuse230VAC, 60/50Hz 3.0A 4.4A 8.7A 120VAC, 60Hz 5.8A 8.3A 8.3A Electricrequirement100VAC, 60Hz7.0A 10.0A 10.0A Weight(Net)6.5Kg 10Kg18.5KgAccuracy, Uniformity and Heat up time are changed by room temp. condition of heating ※load, power voltages.Circuit diagram Models ?BW-05B, 10B, 20BChapter 9Warranty & ServiceThe equipment is covered by the warranty standard regulated by Jeio tech. Exceptions from the standards can¡t be covered by warranty. Including;●Warranty and Service⏹Warranty service⏹Exceptions from warranty⏹Service request⏹Return processWarranty and ServiceWarranty serviceIf trouble occurs during product use, User can get free service for one year from the date of purchase.Exceptions from warrantyUser can not be credited by warranty in case of as below. 1. If trouble occurs by an act of God.2. If the equipment breaks down due to misusing of availablevoltage.3. If damage occurs by dropping a product, or impact.4. If damage occurs in an appearance by organic solvents such asthinner , benzene.5. If damage occurs without following to notice in themanual6. If damage occurs by fixing the equipment by any personwho is not related with Jeio tech.7. If damage occurs by a mistake of a customerService request1. Contact the local agent with claim form including the belowconditions.* Date of purchase* Name/Address/Contact no./E-mail * Serial Number * SymptomsReturn processContact the local agent with claim form including the below conditions* Date of purchase* Name/Address/Contact no./E-mail * Serial Number * Symptoms* Causes of returns * Forwarder informationReturnsServiceExceptionUnder WarrantyPage 31Service contactKorea (Head office-Overseas department) 4F Hosu B/D, 379-13, Seogyo-dong, Mapo-ku, Seoul,Republic of Korea. (121-839)TEL: +82 - (0)2 - 3143 - 1823 / 1825FAX: +82 - (0)2 - 3143 - 1824E-mail:*********************U.S.A.2400 East Devon Ave, Suite 2005, Des Plaines, IL 60018, USA TEL: 1-847-298-6613FAX: 1-847-699-8487E-mail:********************ChinaRM107,No.68 Line, 569 Xin Hua Road, Shanghai, China Postcode: 200052TEL: 86-21-62940608FAX: 86-21-62940602E-mail:******************South East AsiaNo.7A, Jalan Kemboja 1 B/2, 48300 Bandar BukitBeruntung, Selangor Darul Ehsan, MalaysiaTEL: 603-60285833, 603-60285825FAX: 603-60285822E-mail:********************England (UK)Unit 33 , Monument Business Park Warpsgrove Lane , Chalgrove , Oxfordshire OX44 7RW , UKTEL: +44-1865-400321FAX: +44-1865-400736E-mail:**************************Service contact。
Panasonic JX600系列智能电视用户手册说明书

RSAG2.025.7653(0002)SS A感谢您购买Panasonic的产品。
请在使用本机之前,仔细阅读使用说明书,并保存以供参考。
本说明书中的图示仅为示意图。
松下智能电视松下服务目录重要提示2安全注意事项3附件5电视机控制面板7遥控器8连接9首次开机12菜单使用12系统升级14媒体中心15常见问题解答16保养16规格17特别声明:说明书中的图片和说明仅供参考,可能和实际产品不同,请以实物为准。
(此声明贯穿整本说明书)品质升级,产品设计和规格如有变更,恕不另行通知。
本产品适用的软件内容服务取决于第三方提供商,部分软件可能因网络、地区、服务周期等问题不能使用,与本产品质量无关,请与第三方提供商联系了解相关细节。
此标志标识产品的环保使用期限为10年,在环保使用期限内,产品中含有的有害物质或元素在正常使用下不会发生外泄或突变,用户使用该产品不会对环境造成严重污染或对其人身、财产造成严重损害。
产品过了环保使用期要废弃时,必须按国家相关法律法规进行合理处理。
《废弃电器电子产品回收处理管理条例》提示性说明:为了更好地关爱及保护地球,当用户不再需要此产品或产品寿命终止时请遵守国家废弃电器电子产品回收处理相关法律法规,将其交给当地具有国家认可的回收处理资质的厂商进行回收处理。
本机为II类设备,不需要接地使用。
HDMI、HDMI高清晰度多媒体接口以及HDMI标志是HDMI Licensing Administrator,Inc.在美国和其他国家的商标或注册商标。
本产品经过杜比实验室的许可而制造。
Dolby、杜比、Dolby Audio、和双D符号是杜比实验室特许公司的注册商标。
43/50英寸机型包含型号核准代码为:CMIIT ID:2020DP4741的无线电发射模块。
55英寸机型包含型号核准代码为:CMIIT ID:2020AP6849的无线电发射模块。
65/75英寸机型包含型号核准代码为:CMIIT ID:2019AP0740的无线电发射模块。
松下操作说明书
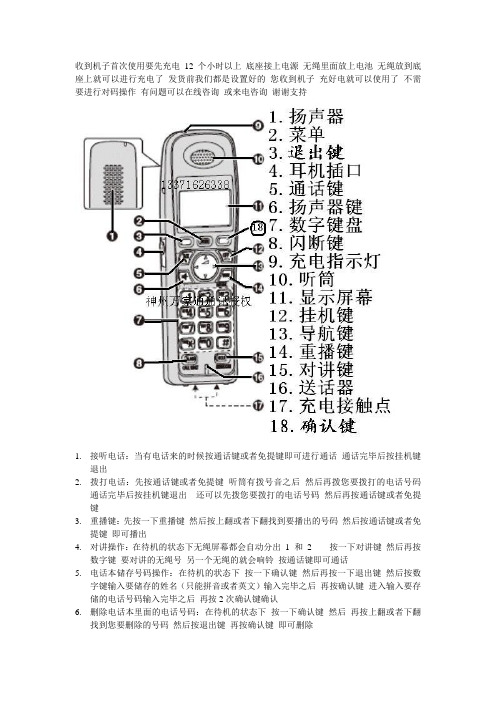
收到机子首次使用要先充电12个小时以上底座接上电源无绳里面放上电池无绳放到底座上就可以进行充电了发货前我们都是设置好的您收到机子充好电就可以使用了不需要进行对码操作有问题可以在线咨询或来电咨询谢谢支持1.接听电话:当有电话来的时候按通话键或者免提键即可进行通话通话完毕后按挂机键退出2.拨打电话:先按通话键或者免提键听筒有拨号音之后然后再拨您要拨打的电话号码通话完毕后按挂机键退出还可以先拨您要拨打的电话号码然后再按通话键或者免提键3.重播键:先按一下重播键然后按上翻或者下翻找到要播出的号码然后按通话键或者免提键即可播出4.对讲操作:在待机的状态下无绳屏幕都会自动分出 1 和2 按一下对讲键然后再按数字键要对讲的无绳号另一个无绳的就会响铃按通话键即可通话5.电话本储存号码操作:在待机的状态下按一下确认键然后再按一下退出键然后按数字键输入要储存的姓名(只能拼音或者英文)输入完毕之后再按确认键进入输入要存储的电话号码输入完毕之后再按2次确认键确认6.删除电话本里面的电话号码:在待机的状态下按一下确认键然后再按上翻或者下翻找到您要删除的号码然后按退出键再按确认键即可删除7.进入菜单操作(以下操作都是在待机的状态下操作)(1)Ringer setting 铃声设定:按一次菜单键然后按4次下翻屏幕显示Ringer srtting 时按一次确认键然后再按1次下翻屏幕显示Ringer tone时再按1次确认然后再按上翻或者下翻就可以选择铃声了按确认键确认(2)Ringer volume 铃声音量:按一下菜单键然后按4次下翻键然后按2次确认键按上翻或者下翻选择铃声音量大小OFF为关闭铃音按确认键确认(3)Set date & time 设置日期时间:按一下菜单键然后按5次下翻键然后按2次确认键进入设置如期时间直接按数字键输入按退出键可以选择上午和下午AM为上网PM为下午按确认键确认(4)Alarm 闹钟:按一下菜单键然后按5次下翻键然后按1次确认键然后再按1次下翻键再按确认键进入按上翻或者下翻选择(OFF为关闭ONCE为一次Daily/每日)再按1次确认键进入闹钟时间设置按退出键选择上午或者下午(AM为上午PM为下午)再按2次确认键进入闹钟铃声选择按确认键确认(5)Night mode 休息模式/外来电话铃声静音状态:按一下菜单键然后按3次下翻键在按2次确认键然后再按上翻或者下翻现在ON为开启静音模式OFF为关闭静音模式按确认键确认(6)LCD contrast 液晶显示对比度设置:按一次菜单键然后按8次下翻键然后再按一次确认键再按3次下翻键然后再按确认键进入按上翻或者下翻选择按确认键确认(7)Set dial mode/拨号方式音频和脉冲设置:按一次菜单键然后按8次下翻键再按1次确认键然后再按7次下翻键再按2次确认键然后按上翻或者下翻选择Tone/音频Pulse/脉冲按确认键确认(8)按键音开关设置:按一次菜单键然后按8次下翻键再按1次确认键然后按4次下翻键再按1次确认键进入选择ON为开启OFF为关闭按确认键确认(9)子机听留言:按一下菜单键然后按确认键即可听取按导航键的右箭头可以听取下一条按导航键的左箭头可以重复听取(10)设置自动应答响铃次数:按一次菜单键然后按8次下翻键再按3次确认键然后按上翻或者下翻选择2-7次按确认键确认(11)语音报号开关设置:按1次菜单键然后按下翻键至屏幕显示Talking Caller ID 时再按确认键进入然后按上翻或者下翻选择ON或者OFF ON为开OFF为关闭按确认键确认8.底座留言操作:(1)主人留言:按2次REC主人留言键听见“滴”声后开始录制录制完之后再按一下REC主人留言键即可完成。
Panasonic 电冰箱 使用说明书
使用说明书家用电冰箱(冷藏冷冻箱)承蒙购买Panasonic 电冰箱, 特此向您表示诚挚的感谢。
● 请仔细阅读使用说明书之后,正确、安全地使用。
● 特别是在使用前, 请仔细阅读“安全使用须知”(P .4 ~ P .5), 确保安全使用。
● 请仔细阅读本说明书和保修证后妥为使用。
阅读完以后要妥善保管起来, 以备需要时重读。
型号NR-E435TX-N5型号NR-E435TX-H5另附保修证2“新鲜冻结”使用新鲜冻结功能后,解冻时更好地保留食物原味。
热腾腾直接冻结。
尽可能减少对肉质的破坏和营养流失,更好地锁住食物原味。
热食也能直接冻结,且对其它食物几乎没有影响。
(请让食物之间留有至少 5 mm 的间隙)控制面板显示屏为减少耗电量,显示屏通常熄灭,但在下列情况下,显示屏将亮起。
新鲜冻结过程中• 快速制冰运转过程中• 智冷导航运转过程中• 接通电源后,所有显示屏将会亮起约 5 秒。
• *1 根据周围温度、周围亮度、冰箱门开/关的次数及时间,以及食物存放的情况,效果有所不同。
*2照度感应器探测到亮度在3至10 lx 或更低时。
智冷导航运转感应冰箱门的开/关动作以及周围亮度,并自动控制操作以达到节能目的*1智冷导航指示灯照度感应器智冷导航动作中指示灯亮起从冰箱门的开/关动作洞悉您和家人的生活方式,进而预测不常使用的• 时间段,执行智冷导航运转。
冰箱利用前三周了解您的生活方式,并从第四周开始利用所收集到的信息。
因此从第四周起,智冷导航信号灯的亮起和熄灭时间可能发生改变。
当周围环境变暗*• 2 时,例如休息时间,运转智冷导航功能当指示灯亮起大约 5 分钟后,其亮度会减弱。
如有需要,可关闭指示灯。
(P . 26)目次3关于如何检查和使用控制面板,请参阅 P . 8。
如欲使用新鲜冻结功能,请参阅 P . 14。
根据冰箱的使用状况可能无法使用智冷导航功能,详情请参阅 P . 29。
如何启用智冷导航功能只有等冷冻室和冷藏室的温度均设定为 “中” 时,• 才会自动启动智冷导航功能。
PanasonicSJ-MR200简易中文说明书
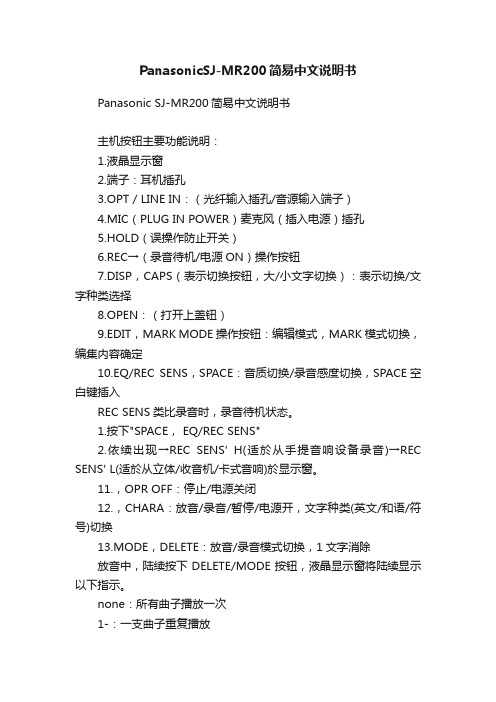
PanasonicSJ-MR200简易中文说明书Panasonic SJ-MR200简易中文说明书主机按钮主要功能说明:1.液晶显示窗2.端子:耳机插孔3.OPT / LINE IN:(光纤输入插孔/音源输入端子)4.MIC(PLUG IN POWER)麦克风(插入电源)插孔5.HOLD(误操作防止开关)6.REC→(录音待机/电源ON)操作按钮7.DISP,CAPS(表示切换按钮,大/小文字切换):表示切换/文字种类选择8.OPEN:(打开上盖钮)9.EDIT,MARK MODE操作按钮:编辑模式,MARK模式切换,编集内容确定10.EQ/REC SENS,SPACE:音质切换/录音感度切换,SPACE空白键插入REC SENS类比录音时,录音待机状态。
1.按下"SPACE, EQ/REC SENS"2.依续出现→REC SENS' H(适於从手提音响设备录音)→REC SENS' L(适於从立体/收音机/卡式音响)於显示窗。
11.,OPR OFF:停止/电源关闭12.,CHARA:放音/录音/暂停/电源开,文字种类(英文/和语/符号)切换13.MODE,DELETE:放音/录音模式切换,1文字消除放音中,陆续按下DELETE/MODE按钮,液晶显示窗将陆续显示以下指示。
none:所有曲子播放一次1-:一支曲子重复播放:重复播放全部曲子RANDOM:任意顺序播放乐曲可以随便以任意的顺序播放雷射唱盘中的乐曲※注意:在任意放音中是不能用按下或以便回到前後一支曲子。
14.触控显示开关A.,→:选曲,MENU选择,曲目选择,文字选择B.ENTER:前项A.选择後之确定键C.←,+→,VOL/CURSOR:音量调节/CURSOR移动液晶显示窗主要功能说明:1.SYNC:同步录音表示2.录音音平表示3.DISC MARK4.S-XBS,TRAIN:音质表示5.文字显示区6.REC REMAIN:录音残存时间7.1.RANDOM:放音模式表示8..电池残量显示9.MONO:MONO放音/录音表示本机通常处於标准录音(立体声)模式。
- 1、下载文档前请自行甄别文档内容的完整性,平台不提供额外的编辑、内容补充、找答案等附加服务。
- 2、"仅部分预览"的文档,不可在线预览部分如存在完整性等问题,可反馈申请退款(可完整预览的文档不适用该条件!)。
- 3、如文档侵犯您的权益,请联系客服反馈,我们会尽快为您处理(人工客服工作时间:9:00-18:30)。
i
目录
使用前注意事项............................................... v 菜单选项一览.................................................. vi
3.2 基本的按键操作........................................................36
4.7 设定检查区域和条件(检查设定).........................91 4.7.1 检查设定的种类和概述.......................................91 4.7.2 作成检查设定......................................................94
4.4.3 在“分支执行”模式中检测...............................71 4.4.4 在“指定执行”模式中检测...............................73
4.5 拍摄图像....................................................................74
4.6 图像预处理(2 值化/预处理).................................75 4.6.1 对灰度图像执行预处理(2 值化层级・灰度预处
4.6.2 4.6.3
理).....................................................................76 对图像执行 2 值化(2 值化层级)........................76 设定灰度变换......................................................77
4.4 检测划分的品种(执行模式).................................69 4.4.1 选择执行模式......................................................69 4.4.2 在“全执行”模式中检测...................................70
2.3 安装摄像机................................................................22 2.3.1 选择镜头(视野表)..........................................22 2.3.2 安装摄像机.........................................................25 2.3.3 安装注意事项 .....................................................25
电线与连接器接触不良时,会引 起异常发热或冒烟。
请勿在通电状态下实施作业(连 接、拆卸等)。
否则可能会造成触电。
前言 承蒙购买 IMAGECHECKER PV200,谨致以诚挚的谢意。 本手册对 PV200 的安装、配线方法等硬件以及所配备的功 能和设定方法等软件进行说明。请在充分理解内容的基础 上正确地加以使用。
2.4 安装XGA 监控器......................................................26
2.5 连接电缆....................................................................27 2.5.1 连接外围设备 .....................................................27 2.5.2 接通 XGA 监控器的电源....................................28 2.5.3 接通 PV200 的电源............................................28
4.7.3 同时移动检查设定..............................................99 4.7.4 线走查...............................................................100
4.7.5 2 值化窗口........................................................104
使用本产品之前请务必熟读该用户手册,以便正确地使用本产品。
安全注意事项
在安装、运行、维护保养以及检查之前,请务必阅读本手册并正确使用设备。 本手册中,有两种区分等级的安全警告:警告事项和注意事项。 有关安全方面的注意事项,请务必严格遵守。
:对本产品进行误操作时,可能导致用户死亡或重伤的紧急情况 :对本产品进行误操作时,可能导致用户伤害或仅发生物品损坏的紧急情况
1.1 PV200 本体...............................................................12
1.2 摄像机........................................................................14 1.2.1 摄像机种类与使用注意事项...............................14 1.2.2 各部分的名称和功能..........................................14 1.2.3 摄像机电缆.........................................................15
1.3 操作手柄....................................................................16
4 设定检查条件...........................................53
4.1 设定测试的流程.........................................................54
1.4 XGA 监控器...............................................................17
2 安装与接线...............................................18
2.1 基本系统配置............................................................19
1 各部分的名称和功能................................11
3.2.1 3.2.2 3.2.3 3.2.4 3.2.5
选择项目,输入数值和字符...............................36 选择要显示的图像(图像菜单).......................37 放大/缩小图像显示(图像菜单)......................45 指定检查设定区域..............................................47 对画面进行截屏(Print Screen) .....................51
2.2 安装PV200 本体......................................................20 2.2.1 安装方法.............................................................20 2.2.2 安装注意事项 .....................................................21
请勿在有可燃性气体的环境中 使用。
否则可能会引起爆炸。
请勿透过镜头直视太阳。 否则可能严重伤害眼睛。
请勿将本产品投入火中。
禁止
否则会造成电池及电子零部件等 的破裂。
请在本产品外部采取安全措施,
禁止
请勿将镜头放在阳光直射的地 方。
否则可能会引起火灾。
必须遵守
这样当本产品发生故障或因外 部原因发生异常情况时,可保 障整个系统的安全性。
4.3 设定摄像机的拍摄条件.............................................58 4.3.1 选择摄像机种类(环境)...................................58 4.3.2 设定各机型的个别拍摄条件...............................59
4.3.3 选择拍摄时间设定(触发)...............................60 4.3.4 设定各摄像机的拍摄条件...................................61
4.3.5 检查区域超出图像范围时出错...........................67 4.3.6 选择颜色抽出模式..............................................68
3 基本操作...................................................31
3.1 关于画面....................................................................32 3.1.1 语言选择画面(1.10 版本或更新版本)...........32 3.1.2 运转画面和设定画面..........................................33
