Cisco TelePresence Precision 60 摄像头
Cisco TelePresence MX800 Dual Wall Mount 安装指南说明书

Installation guidefor Cisco TelePresence MX800 Dual Monitor with Dual Cameramounted on the wallThis guide covers MX800 Dual, mounted on the wall.ManpowerWe recommend four people working togetherto mount this system. Follow local regulations.DimensionsHeight: 1258 mm / 49.6 in.Width: 3169 mm / 124.8 in.Depth: 148 mm / 5.9 in.Weight:224 kg / 494 lb4Safety informationDue to the size and mass of this product it is important that the wall-mounted system is safely installed according to these installation instructions.The wall and mounting hardware must be able to safely support the product.The wall-mounted system must be installed by qualified personnel, in accordance with state and local building regulations.Room setupExplore the Cisco Project Workplace to find inspiration andguidelines when preparing your office or meeting room for video conferencing:https:///go/projectworkplaceDocumentationVisit one of these websites to find out more about setup, management, and use of this product:https:// https:///go/mx-docsUse the first link if your device is registered to the Cisco Webex service and the second link if the device is registered to another service.PackagingOpen the plastic snap locks and remove the side walls.Lay the box marked with F-J+L +M flat on the floor. Remove the lid. Boxes F to J, L, and M are inside. Lay the box marked with A and B+C+E+K flat on the floor. Remove the lid. Boxes B, C, E, and K are inside.Boxes are labeled A to M. This guide refers to the labels.AM...Shows which boxes are inside.Tools and screws are in this box.mm mmTorx T20Screws and toolsThe screw kit contains more screws than you need,because the same kit is shipped with all mounting options.M6x90, countersunkTool: Allen key, 4 mm M6x35, countersunk Tool: Allen key, 4mm M6x12, countersunk Tool: Allen key, 4 mm M6x12, panTool: Allen key, 4mm M4x8, panTool: Allen key, 2.5 mmPT4x10, pan Tool: Torx T20M6x100, panTool: Allen key, 4 mm EMC Class A declarationWARNING: This is a class A product. In a domestic environment this product may cause radio interference in which case the user may be required to take adequate measures.Check that the wall bracket is level and mark the required screw hole positions on the wall. Use at least four screws when fastening the wall bracket. The wall bracket can be fastened through any of the horizontal slots.Fasten the wall bracket in a secure manner ensuring that the wall’s structure is sufficient to support the system load (screws and mounting hardware notprovided; not shown in illustration).The lower edge of the screen image will be at the height of these horizontal slots.We recommend that thedistance from the floor to this line is 70 cm / 27.6 in.**If you mount the system higher, note the following consequences:-You may need to increase the distance between the video system and the table in order for the camera to capture the closest participants.-The camera gives an elevated view of the room. This view is not optimal for video conferencing.Further information: https:///go/projectworkplace2D CAD drawings with measurements: https:///go/mx-docs (Technical References)Snap the top wall brackets onto2the spacers. Face the narrow slotsagainst the wall.Fasten the top wall brackets ina secure manner ensuring thatthe wall’s structure is sufficientto support the system (screws/mounting hardware not provided;not shown in illustration).1Mount spacers onto thewall brackets.Fasten each spacer withtwo screws (not provided;not shown in illustration).While the monitors are still in the package, mount the clamps on the rear side of bothmonitors.Use the Allen key 2.5 mmand loosen, but do notremove, the pre-mountedscrews.Push the support bracket tight against the back plate of the monitor.Tighten the screws andcheck that the clamp isproperly fastened. Slide the clamp in place on the monitor and make sure that all the small clamps are properly fitted.Keep the monitor close to the wall so the clamps on the rear side of the monitor slide fully onto the top wall bracket.Make sure that the screw with wing nut enters the center slot on both sides.Do not let go of the monitor before it is securely placed on the lower frame.1Rear viewRear view90 kg / 200 lb4Front viewFront viewTighten the wing nuts on both sides. They are accessed from the sides of the monitor.2Rear viewEnter the following screws:• Four M6x12 screws, from front.• Two M6x90 screws, from underneath.• Two M6x100 screws and their brackets, from underneath.Then, tighten all screws.1Connect power cableA power cable is strapped at the rear of the monitor. Connect it to the close-by socket. Let the other end hang freely. It will be connected to the right monitor in step 12.22 × M6x90, countersunk4 × M6x12, countersunk2 ×M6x100, pan2 ×BracketRight side of the monitor, viewed from underneathLeft side of the monitor, viewed from underneathRear viewRear view84 kg / 185 lb4Front viewFront viewTighten the wing nuts on both sides. They are accessed from the sides of the monitor.2Keep the monitor close to the wall so the clamps on the rear side of the monitor slide fully onto the top wall bracket.Make sure that the screw with wing nut enters the center slot on both sides.Keep the outer side a bit lower than the side toward the left monitor when lowering the right monitor onto the lower frame.Do not let go of the monitor before it is securely placed on the lower frame.1Rear view2 × M6x90, countersunk4 × M6x12, countersunk2 ×M6x100, pan2 × BracketEnter the following screws:• Four M6x12 screws, from front.• Two M6x90 screws, from underneath.• Two M6x100 screws and their brackets, from underneath. Then, tighten all screws.12Right side of the monitor, viewed from underneathLeft side of the monitor, viewed from underneathConnect power cableConnect the loose end of the power cable fromstep 10 to the close-by socket at the rear of the right monitor. The socket must be reached from below.Make sure that the power switch next to the socket is in its ON position.Stretch out the cables in the channel on top of the monitors, and place them as illustrated. Do not unplug any cables.This arrangement makes the installation of the camera modulein step 20 and connecting cables in steps 19, 21 and 22 easier.To the left of camera moduleOn the right side of monitorIn center Power (step 21)Ethernet (step 21)Loudspeaker cables 4-5 (step 22)2 ×Loudspeaker cables 2-6 (step 22). Cable 1 is not usedHDMI (step 19)HDMI (step 21)USB, type B (step 19)Power over Ethernet (step 19)Loudspeaker cable 6 (step 22)HDMI (step 21)To the right of camera module5 ×Power over Ethernet injectorEthernetRight monitor connector panelHDMICOLOR CALIBRATION12DO NOT REMOVEUSB (type B)HDMI SWITCHWe recommend two people working together to mount the camera. One person to insert the camera module; the other person making sure that no cables are pinched.Make sure that the HDMI cable for the left camera and loudspeaker cable 6 can be accessed through the hole in the bottom plate of the camera module.124 × M4x8, pan36 × M4x8, pan (three on each bracket)First, fasten the right camera support bracket to the upper right corner of the right camera with one screw from the front. Then, fasten it to the top profile with two screws from underneath.Similarly, fasten the left camera support bracket to the upper left corner of the left camera and to the top profile.Camera support bracketsLeft RightEnter the camera cover in the clips at the bottom, and align it with the back panels. The cover snaps to magnets.51 ×Speaker clip1 × M4x8, pan 4Fasten the speaker clip for the center loudspeaker.Connect the cable to the loudspeaker. Use the cable that is marked with the correct loudspeaker position.1Enter the loudspeaker onto the speaker clip. Make sure that no cables are pinched.2Three loudspeakers are pre-installed. Follow steps 1-3 for the remaining eight loudspeakers.234162465353Fasten with one screw.8 × PT4x10 (one for each loudspeaker)The loudspeaker cables are marked with a number. These numbers must match the position of the loudspeakers, as shown here.Cable 1 above the right monitor is not used.and DVI/Euroblock ↔ VGA/mini jack.Touch 10 3AP3The Ethernet socket is behind the lid at the rear of Touch 10. Use one of the provided PoE rated CAT 5e Ethernet cables, 12.5 or 4 m, flat.Route the cables along the lower frame, and place them in the cable bridge.• Remove the protection foil from the displays.• Make sure that the cameras can move freely.• Insert the network and power cables into the wall outlets.• Switch on the system.The power switch is located directly below the codec, next to the power connector.Wait a few minutes while the system starts up. The start-up may include automatic software upgrade and restart of Touch 10 and cameras.If the right monitor does not turn on after the start-up sequence, check that the power cable between the monitors are properlyconnected (refer to step 10 and step 12).• Follow the instructions on the Touch controller.Cisco Webex: To find more information on how to get started, visit https:// and look for Getting Startedarticles for room devices.Other services: For further information on set-up and configuration, download the Getting Started Guide from the Cisco web site,https:///go/mx-docsMount covers and textile grillesUse the provided gloves whenhandling the textile grilles.The top and bottom covers arefastened by clips.The side covers and grilles snapto magnets.For a list of offices, visit the Cisco website at https:///go/officesCisco and the Cisco logo are trademarks or registered trademarks of Cisco and/or itsaffiliates in the U.S. and other countries. To view a list of Cisco trademarks, go to this URL: /go/trademarks. Third-party trademarks mentioned are the property of their respective owners. The use of the word partner does not imply a partnership relationship between Cisco and any other company. (1110R)。
SX20 产品简介

适应飞速发展的数字显示技术
避免多次数/模转换,大幅度提升图像质量
越来越多的投影和显示设备支持数字视频接口
通过DVI-I电缆兼容现有模拟VGA接口
思科SX20的视频输入端口:
HDMI×1,支持1080P 60帧/秒
DVI-I(兼容数字和模拟信号)×1:可转接至XGA等模拟信号,分辨率最高还支持1920×1080P
主要特色
1.支持inTouch
SX20可以选配inTouch作为控制方式,不仅使视频通信系统更加美观时尚,同时能够以更直观的方式实现对联系人、会议、摄像头的全方位控制。
2.全编全解内置MCU:
全编全解内置4方MCU,满足用户灵活建立小型会议的需求,每个参会方可以自主调节分屏方式,以不同分辨率、带宽、加密均不会对其他参与方产生影响。
思科SX20提供多种的实时视频分辨率,充分满足用户需求:
1Hale Waihona Puke 6×144@30、60fps(QCIF)
640×480@30、60fps(VGA)
352×288@30、60fps(CIF)
800×600@30、60fps(SVGA)
512×288@30、60fps(w288p)
1024×768@30fps(XGA)
完备的QoS设置,针对网络出现拥塞情况下,实现视频通信质量的保障;
支持ITU-T H.460.18/19,安全穿越防火墙;
视频通信码流的加密:ITU-T H.235 V2/V3和AES加密
同时支持H.235和网络802.1X身份认证;
视频输出端口:
HDMI×1
DVI-I×1
数字高清双显
同时,SX20还具有丰富的音频输入端口:
活力(ACTI)E936 2MP 视频分析型室外мини域眼镜摄像头说明书

CE (EN 55022 Class B, EN 55024), FCC (Part15 Subpart B Class B), IK10, IP68, NEMA 4X, EN50155
Dome Cover
PDCX-1111
2-inch, smoke, vandal proof (IK10)
Popular Mounting Solutsories not required
Power Supply
Wall
PMAX-0316
PPOE-0001
IEEE 802.3af PoE Injector for Class 1, 2 or
3 devices, with universal adapter
Pendant
PMAX-0111
PMAX-1400
+
Gang Box PMAX-0805
NPT
PMAX-0809
Standard PMAX-1400
+
Mounts
Unit: mm [inch]
* Latest product information: /products/ * Accessory information: /mountingselector
• Alarm
Alarm Trigger
Alarm Response
• Interface
Local Storage
• General
Power Source / Consumption Weight Dimensions (Ø x H) Environmental Casing Mount Type Starting Temperature Operating Temperature Operating Humidity Approvals
思科视频监控审核播放器使用手册说明书
Americas Headquarters:Cisco Systems, Inc., 170 West Tasman Drive, San Jose, CA 95134-1706USACisco Video Surveillance Review Player User GuideRevised August 2013OL-27380-05This guide describes how to open and view video clips using the Cisco Review Player.Contents•Overview, page 2•Supported File Formats, page 2 •Requirements, page 3 •Installing the Player, page 3 •Opening Video Clips, page 4•Creating Tamper-Proof MPX Files, page 4 •Viewing Clips, page 5•Creating a Snapshot Image, page 8 •Using the Pop-Up Menu, page 8 •Getting Help, page 9•Related Documentation, page 9OverviewOverviewThe Cisco Review Player is a stand-alone Windows utility that plays video archive clips without abrowser. The Cisco Review Player can also convert MP4 files into a tamper-proof MPX format.Supported File FormatsThe Cisco Review Player supports playback of the following format types:•CVA—Cisco video archives (CVA) can include multiple video panes that synchronize to the same time. CVA files can only be opened in applications that support the CVA format (such as the CiscoReview Player). CVA files do not support audio playback.•CVX—A tamper proof CVA file. CVX files require a password that is entered when the file is created. You must enter the password to open and view the video file. CVX video playback will shutdown if the file is tampered with. CVX files do not support audio.•MP4—A standard video file format that is playable on most computers and useful for sending to 3rd parties. MP4 clips support a single video pane. Audio playback is supported only with the CiscoVSM Review Player or VLC media player.•MPX—A tamper proof MP4 file. MPX file include a password that is entered when the file is created. You must enter the password to open and view the video file. Audio playback is supportedonly with the Cisco VSM Review Player or VLC media player.Note The Cisco Review Player also supports the ability to save snapshots of video in BMP, JPEG, PNG, and TIFF formats.Cisco Video Surveillance Review Player User GuideCisco Video Surveillance Review Player User GuideRequirementsRequirementsYou can use the Cisco Cisco Review Player on any PC that meets the following requirements:Installing the PlayerThe Cisco Review Player is installed automatically when you access the Cisco VSM Operations Manager web page and install the Cisco Multi-Pane client software.NoteThe Cisco Multi-Pane client software an Active X client that enables video playback and other features. You must have administrative privileges on the PC workstation to install the software.Double-click the Cisco Multipane Review Player icon on your desktop, or navigate to the program file in Start > Programs > Cisco Multipane Client > Cisco Multipane Review Player .TipYou can also install the Cisco Review Player from the Operations page of the browser-based Operations Manager. See the Cisco Video Surveillance Operations Manager User Guide for more information.Manual InstallationTo manually install the player:Step 1Log in to the Cisco VSM Operation Manager.Step 2Click System Settings .Step 3Click Review Player EX .Step 4Select your Windows platform and follow the onscreen instructions to download the Review Player EX zip file.T able 1-1RequirementsRequirementsRequirement Complete? (✓)A PC or laptop running Windows 7 (32-bit or 64-bit).☐Cisco Multi-Pane client software, an Active X client that enables video playback and other features.•You will be prompted to install this utility the first time you log in to theCisco VSM Operations Manager. Follow the on-screen instructions if prompted. You must have administrative privileges on the PC workstation to install the software.•You will also be prompted to install the required Microsoft .Net 4.0 component, if necessary. If your workstation does not have Internet access, the .Net 4.0 installer can be downloaded from/en-us/download/details.aspx?id=17718.☐Cisco Video Surveillance Review Player User GuideOpening Video ClipsStep 5Uncompress the .zip file.Step 6Double-click the ReviewPlayer.exe file. No installation is required.Opening Video ClipsTo open an existing video clip, launch the application and choose File > Open , or drag and drop a CVA file into the viewing pane.•The 32-bit Review Player can open CVA files 4GB or less. •The 64-bit Review Player can open CVA files greater than 4GB.ProcedureStep 1Double-click the Cisco Multipane Review Player shortcut on your desktop.TipYou can also select Start > Programs > Cisco Multipane Client > Cisco Multipane Review Player .Step 2Choose File > Open .Step 3Select a file format from the drop-down menu.Step 4Browse to choose the clip, and choose Open .Step 5(Tamper Proof file formats only) Enter the file password.TipCVA and CVX files can display multiple video panes. To create clips with multiple panes, see the Cisco Video Surveillance Operations Manager User Guide .Creating Tamper-Proof MPX FilesTo convert a CVA or MP4 file to a tamper proof MPX format, open the file and choose Tools > Create Tamper-Proof File . Enter a password between 6 and 64 characters and click OK. The password is required to access the file.NoteTamper-proof CVX files are created when the clip is saved using the Cisco Video Surveillance Safety and Security Desktop application or browser-based Operations Manager.Cisco Video Surveillance Review Player User GuideViewing ClipsViewing ClipsFigure 1-1 describes the viewing features and controls.TipSee the Cisco Video Surveillance Operations Manager User Guide for instructions to create and save single pane or multipane video clips.Figure 1-1Viewing Recorded Video1Clip file name, indicating the video source.2Timestamp for the currently displayed video image. For example:Cisco Video Surveillance Review Player User GuideViewing Clips3Range Bar—The span of video to work with. The entire range bar represents the entire span of available recorded video.Range Bar selectors— Drag the Range Bar selectors to narrow the time span of video you want to review. For example, drag the selectors to create a 3 minute range. You can then drag that range left to right to the appropriate place in the recorded span.TipClick and drag the Seek Bar selector in the lower (green) bar to choose the playback time. The green Seek Bar represents the span of video chosen by the Range Bars.TipDouble-click a range bar selector to playback the video from the beginning of that range.4Seek Bar —Represents the video range, and is used to select a playback time. Drag the selector to play video from the selected time (as indicated by the timestamp).For example, if the Range Bar selection is 3 minutes, then the seek bar represents 3 minutes of video.Tip Right-click the Seek Bar and select Seek to... to select a specific date and time.NoteGaps in the recorded video are shown in gray. Recording gaps occur if video was unavailable for that time (due to network connectivity issues, device malfunctions, or other events).Cisco Video Surveillance Review Player User GuideViewing Clips5Video playback controls.•—Step Reverse button—(Archived video only) Pauses the playback and steps back one frame at a time. •—Play Reverse button—(Archived video only) Plays the video archive in reverse at normal speed. •—Pause button—Pause the video playback.•—Play Forward button—Play the video forward at normal speed.•—Step Forward button—(Archived video only) Pauses the playback and steps forward one frame at a time.Variable Speed PlaybackRight-click the Play Reverse or Play Forward button to play the video slower or faster.For example, select 0.50X to play the video at half speed (forward or reverse). Select 4.00X to play at 4 times the normal rate (forward or reverse).6—Click the triangle to pin the control bar to the screen, or auto-hide it when the cursor is moved.7—The synchronization icon appears if multiple video panes are included in a clip. This indicates that the video in each pane displays the same time span.Creating a Snapshot ImageCreating a Snapshot ImageRight click the video image and select one of the following options from the menu:Menu Selection DescriptionTake Snapshot Save a snapshot of a single video pane (excluding control icons,timestamps and other information) in BMP, JPEG, PNG, or TIFFformat.Take Composite Snapshot Save a snapshot of a multiple video panes (including control icons,timestamps and other information) in BMP, JPEG, PNG, or TIFFformat.Using the Pop-Up MenuSelect a video pane and right-click on the image to open a menu with the following options.T able 1-2Camera Actions Available by Right-Clicking the Video ImageCamera Menu Item DescriptionPan, Tilt, and Zoom(Disabled) PTZ controls are not available when viewing recordedvideo.Digital zoom Digitally enlarges the image to zoom in on a specific area.Double click the enlarged image to use a window-in window view.Adjust the viewing area in the small window to define the portion ofenlarged video to display.Full screen mode Enlarges the video image to fill your display screen.Tip To exit, press Esc, or right-click and choose Full Screen Modeagain.Take snapshot See the “Creating a Snapshot Image” section on page 8.Take composite snapshot See the “Creating a Snapshot Image” section on page 8.Record now(Disabled) Recording is available for live video streams only.Audio settings(Clips with audio only). Opens a window used to adjust video playbackvolume and balance.Smooth video settings(Live video only) Creates a smooth video playback if the playback ischoppy or delayed due to network or other performance issues.See the Cisco Video Surveillance Operations Manager User Guide formore information.Global settings Provides the settings that apply to all video panes, allowing you tozoom the video to fit the pane.Cisco Video Surveillance Review Player User GuideGetting HelpGetting HelpUse the Help menu to view the information included in this guide.Related DocumentationSee the Cisco Video Surveillance 7 Documentation Roadmap for descriptions and links to Cisco VideoSurveillance documentation, server and storage platform documentation, and other relateddocumentation.Cisco and the Cisco logo are trademarks or registered trademarks of Cisco and/or its affiliates in the U.S. and other countries. To view a list ofCisco trademarks, go to this URL: /go/trademarks. Third-party trademarks mentioned are the property of their respective owners. Theuse of the word partner does not imply a partnership relationship between Cisco and any other company. (1110R)Any Internet Protocol (IP) addresses and phone numbers used in this document are not intended to be actual addresses and phone numbers. Anyexamples, command display output, network topology diagrams, and other figures included in the document are shown for illustrative purposes only.Any use of actual IP addresses or phone numbers in illustrative content is unintentional and coincidental.©2012-2013 Cisco Systems, Inc. All rights reserved.Cisco Video Surveillance Review Player User GuideRelated DocumentationCisco Video Surveillance Review Player User Guide。
Cisco TelePresence SpeakerTrack 60 摄像头
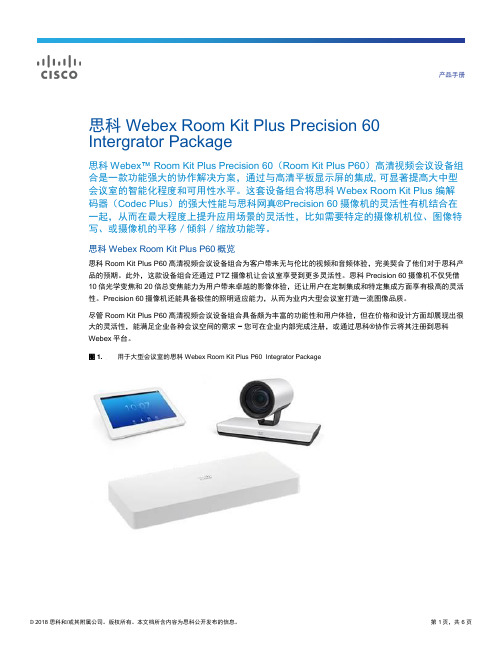
产品手册思科 Webex Room Kit Plus Precision 60 Intergrator Package思科Webex™ Room Kit Plus Precision 60(Room Kit Plus P60)高清视频会议设备组合是一款功能强大的协作解决方案,通过与高清平板显示屏的集成, 可显著提高大中型会议室的智能化程度和可用性水平。
这套设备组合将思科Webex Room Kit Plus 编解码器(Codec Plus)的强大性能与思科网真®Precision 60摄像机的灵活性有机结合在一起,从而在最大程度上提升应用场景的灵活性,比如需要特定的摄像机机位、图像特写、或摄像机的平移/倾斜/缩放功能等。
思科 Webex Room Kit Plus P60概览思科Room Kit Plus P60高清视频会议设备组合为客户带来无与伦比的视频和音频体验,完美契合了他们对于思科产品的预期。
此外,这款设备组合还通过PTZ摄像机让会议室享受到更多灵活性。
思科Precision 60摄像机不仅凭借10倍光学变焦和20倍总变焦能力为用户带来卓越的影像体验,还让用户在定制集成和特定集成方面享有极高的灵活性。
Precision 60摄像机还能具备极佳的照明适应能力,从而为业内大型会议室打造一流图像品质。
尽管Room Kit Plus P60高清视频会议设备组合具备颇为丰富的功能性和用户体验,但在价格和设计方面却展现出很大的灵活性,能满足企业各种会议空间的需求–您可在企业内部完成注册,或通过思科®协作云将其注册到思科Webex平台。
用于大型会议室的思科 Webex Room Kit Plus P60 Integrator Package图 1.产品规格表 1.规格音频特性●高品质 20 kHz 音频●支持低音炮(线性输出)●支持感应回路(线性输出)●自动增益控制 (AGC)●自动降噪●主动唇音同步音频输入●3个麦克风,4 针 mini-jack●2路HDMI 音频输入音频输出(外部)●1 个线性输出mini-jack(立体声)(Codec Plus)●1路用于低音炮的 RCA 输出●2路 HDMI 输出●1路支持音频回传通道 (ARC) 的 HDMI 输入。
洛雷克 IP瞭视球摄像头说明书
NVR
2. Connect the other end of the Ethernet cable to the NVR’s PoE ports. The camera may take up to 1 minute to power up after being connected to the NVR. OR Connect the other end of the Ethernet cable to a router or switch on your network. See the NVR Instruction Manual for details on connecting the camera to your NVR.
• Point the camera where there is the least amount of obstructions (i.e. tree branches)
• Install the camera in a location that is difficult for vandals to reach
Dimensions
75mm / 3.0”
72mm / 2.8”
Features
• High definition 1080p image sensor delivers superior detail* • Infrared cut filter ensures accurate color representation • Anti-glare feature ensures clear images under strong lighting conditions • Split glass design minimizes IR reflection • Weatherproof for outdoor & indoor installation (IP66 Rated)** • Vandal resistant design with cable pass-through bracket • Heavy-duty durable metal housing • Simple installation of video and power on a single cable with Power over
海康产品介绍

高速智能球机
高速智能球机
485故障诊断 485故障诊断 支持全自动的485故障诊断显示功能,可在内置的OSD菜单上提 示故障信息,极大地方便安装人员排除安装过程中出现的人为误 操作(如线路连接异常、地址设置错误等)。
130万(720P)像素高清球机 130万(720P)像素高清球机
主要特性 采用1/3” 130万像素逐行扫描CCD,最大可到1280x960输出 基于以太网控制,同时支持模拟接入 可通过IE浏览器观看图像并实现控制 一体化集成设计,结构紧凑,内部设置数据断电不丢失 水平360°连续旋转无监视盲区,可设定手动限位 完全实现对HIKVISION、Pelco-P/D协议、安防行业协议的自动识别 三维智能定位功能,配合客户端软件或DVR可实现点击跟踪和放大 屏幕中英文菜单功能及屏幕操作提示功能,可用密码保护设置数据
采用H.264视频压缩算法和TI高性价比的最新达芬奇处理芯片和平台,性能可靠稳定
支持预置点/巡航扫描/花样扫描/自动扫描/随机扫描/帧扫描/全景扫描等自动模式,可设定手动 限位 4个花样扫描功能,花样扫描总记录操作时间可达10分钟以上 内置1个报警输入,可在报警后调用预置点或花样扫描功能 自动归位和空闲动作功能,以及上电动作功能 具有防雷、防浪涌保护功能 机件密封设计,室外罩通过IP66检测 1个辅助开关控制,可被报警联动输出 应用场景 可广泛应用于需要大范围监控的场所,如:河流、森林、公路、铁路、机场、港口、油田、岗哨 、广场、公园、景区、街道、车站、大型场馆、小区外围监控等要求高清画质的大范围监控场所。
海康威视产品介绍
网络监控系统图
强光抑制摄像机
主要特性 • 采用高性能SONY CCD 采用高性能SONY • 分辨率高,彩色 540 TVL,黑白 600TVL,图像清晰、细腻 TVL,黑白 600TVL,图像清晰、细腻 • 低照度,彩色 0.1Lux @ F1.2,0.0003Lux @ (F1.2,感光度X256), F1.2, F1.2,感光度X256) 黑白 0.01Lux @ F1.2,0.00003Lux @ (F1.2,感光度X256) F1.2, F1.2,感光度X256) • 支持ICR红外滤片式自动切换,自动彩转黑功能,实现昼夜监控 支持ICR红外滤片式自动切换,自动彩转黑功能,实现昼夜监控 • 支持强光抑制功能 • 支持OSD菜单控制,适合客户自定义设置 支持OSD菜单控制,适合客户自定义设置 • 支持自动光圈功能(直流驱动或视频驱动) • 方便的背焦调节方式 应用场景 • 适用于金融、超市、电信、政府、学校、机场、工厂、酒店、博物馆 等要求高清画质的场所; • 尤其适用于大技术特点
Cisco TelePresence Touch 设备
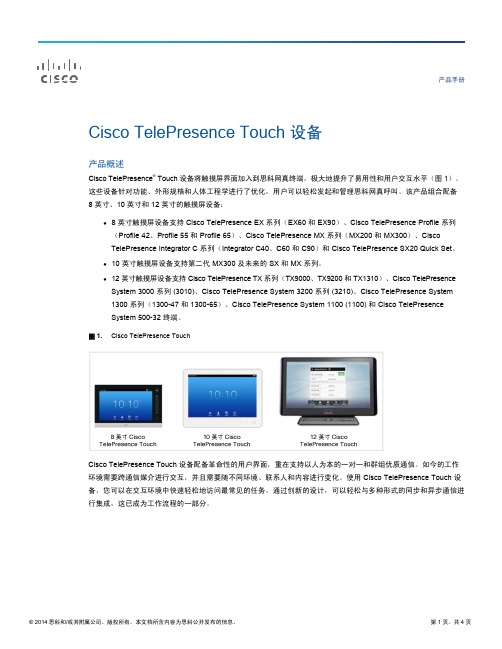
产品手册Cisco TelePresence Touch 设备产品概述Cisco TelePresence ® Touch 设备将触摸屏界面加入到思科网真终端,极大地提升了易用性和用户交互水平(图 1)。
这些设备针对功能、外形规格和人体工程学进行了优化,用户可以轻松发起和管理思科网真呼叫。
该产品组合配备 8 英寸、10 英寸和 12 英寸的触摸屏设备:● 8 英寸触摸屏设备支持 Cisco TelePresence EX 系列(EX60 和 EX90)、Cisco TelePresence Profile 系列(Profile 42、Profile 55 和 Profile 65)、Cisco TelePresence MX 系列(MX200 和 MX300)、Cisco TelePresence Integrator C 系列(Integrator C40、C60 和 C90)和 Cisco TelePresence SX20 Quick Set 。
● 10 英寸触摸屏设备支持第二代 MX300 及未来的 SX 和 MX 系列。
● 12 英寸触摸屏设备支持 Cisco TelePresence TX 系列(TX9000、TX9200 和 TX1310)、Cisco TelePresenceSystem 3000 系列(3010)、Cisco TelePresence System 3200 系列 (3210)、Cisco TelePresence System 1300 系列(1300-47 和 1300-65)、Cisco TelePresence System 1100 (1100) 和 Cisco TelePresence System 500-32 终端。
图 1. Cisco TelePresence TouchCisco TelePresence Touch 设备配备革命性的用户界面,重在支持以人为本的一对一和群组优质通信。
思科SX20性能参数手册
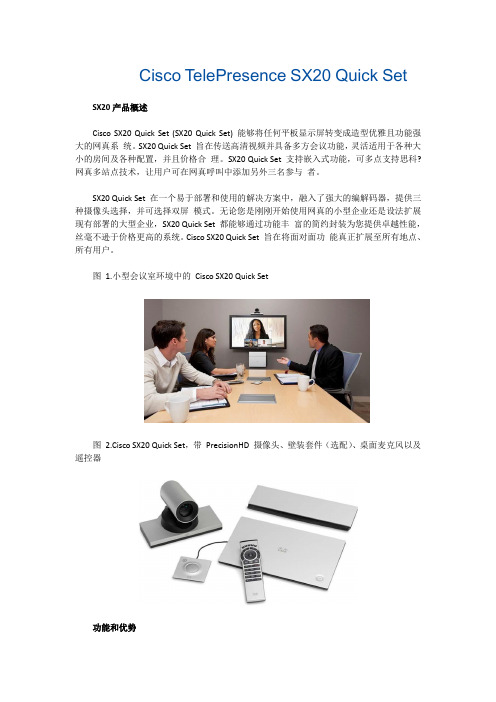
Cisco TelePresence SX20 Quick Set SX20产品概述Cisco SX20 Quick Set (SX20 Quick Set) 能够将任何平板显示屏转变成造型优雅且功能强大的网真系统。
SX20 Quick Set 旨在传送高清视频并具备多方会议功能,灵活适用于各种大小的房间及各种配置,并且价格合理。
SX20 Quick Set 支持嵌入式功能,可多点支持思科?网真多站点技术,让用户可在网真呼叫中添加另外三名参与者。
SX20 Quick Set 在一个易于部署和使用的解决方案中,融入了强大的编解码器,提供三种摄像头选择,并可选择双屏模式。
无论您是刚刚开始使用网真的小型企业还是设法扩展现有部署的大型企业,SX20 Quick Set 都能够通过功能丰富的简约封装为您提供卓越性能,丝毫不逊于价格更高的系统。
Cisco SX20 Quick Set 旨在将面对面功能真正扩展至所有地点、所有用户。
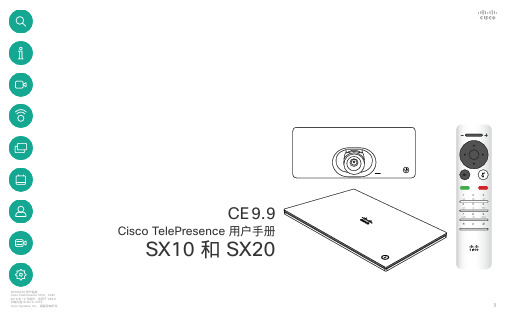
图 1.小型会议室环境中的Cisco SX20 Quick Set图2.Cisco SX20 Quick Set,带PrecisionHD 摄像头、壁装套件(选配)、桌面麦克风以及遥控器功能和优势1 总结了Cisco SX20 Quick Set 的主要特点。
1.Cisco SX20 Quick Set 特点总结特点总结设计特点●将平板显示屏转变成1080p 高清会议设备●连接直观,让设置如同连接DVD 播放器一样容易●提供高达1080p60 的分辨率,与基于标准的视频相兼容而不会牺牲功能●设计优雅简约应用特点●轻触按钮即可共享多媒体和演示文稿●通过IP(Telnet 或安全外壳协议[SSH])提供基本API●可选择双屏模式●高清内容共享,分辨率高达1080p15●通过一键式操作(OBTP) 召开会议性能特点●最佳分辨率高达1080p60●H.323/SIP 高达6 Mbps●内置单独转码的多点会议功能,可添加另外三名呼叫者●利用Cisco Unified Communications Manager (CUCM)、思科网真视频通信服务器(VCS) 或Cisco Callway轻松进行调配和自行配置●充分利用思科网真总体解决方案方法,包括思科网真Multiway 功能、录制和流媒体以及防火墙穿越服务●原生支持Cisco Unified Communications Manager(需要Cisco Unified CommunicationsManager 8.6 或以上版本)图3.Cisco SX20 Quick Set 壁挂式安装产品规格2 列出了Cisco TelePresence SX20 Quick Set 的产品功能规格。
Honeywell 60系列IP摄像头产品介绍说明书

60 SERIES IP CAMERASTake Advantage of Honeywell’s 60 Series IP CamerasHoneywell is taking quality and reliability to the next level with the new 60 Series line of 4MP and 5MP IP cameras including a 2MP outdoor speed dome. The Honeywell cameras, including indoor and outdoor dome, bullet and outdoor speed dome offer exceptional picture clarity, flexible system integration, secure data transmission and easy installation.SUPERIOR HD IMAGE QUALITY, UP TO 5MP• Up to 5MP (2560x1920) cameras• True WDR (>120 dB) ensures glare-free images• True day/night provides vivid color images by day and clear black and white images at night using a removable IR cut filter • Excellent low-light performance with 2D/3D noise reduction saving storage and bandwidth together with smart codec (2)•For use as part of Video Systems which comply with NDAA Section 889FLEXIBLE SURVEILLANCE SOLUTION• A wide range of lenses and zoom options for all types of installations• H.265(1), H.264, Smart Codec (2) and MJPEG supported with triple streaming• Adaptive smart IR Technology provides even distribution of IR LEDs in dimly lit or nighttime scenes• Water/Dust proof (IP 66/67) and IK10 and NEMA 4X (outdoor dome and bullet)• ONVIF Profile S and G compliant•FIPS 140-2 Certified chipset Bu ilt-in for the stream encryption and SD card encryption und er AES 256 to provide the secure data integrity and privacy•Built-in video analytics (4) to reduce the false alarms in perimeter protection, including Intrusion Detection, Loitering Detection, Line Crossing Detection, Unattended Object Detection, Missing Object Detection and Face DetectionONBOARD VIDEO STORAGE•Supports microSD (Class 10) card up to 256GB for encrypted local video storage (card not included)EASY TO INSTALL AND USE•Built-in PoE eliminates separate power supply and associated wiring; 24VAC/24VDC/12VDC inputs where PoE power is unavailable• Camera configuration via Wi-Fi (3) (mobile Device), WebClient or NVR to adjust Zoom, Auto Focus, etc...• Multiple mounting options to support a wide range of security applications• Multiple language GUI (4) (9 countries)•Unified camera configuration tool for the batch configurationMARKET OPPORTUNITIESThese fully featured attractive cameras are perfect for various types of security installations, from complete area coverage with speed dome cameras to high resolution True Day/Night cameras for any scenario. The 60 Series provides excellent picture clarity at minimal bandwidth whilst offering maximum protection against dust and water. Boasting modern designs and offering up to 5MP high definition images, these cameras are suited for a widerange of security applications.(1): Covered by one or more claims of the patents listed at .(2): Smart Codec saves up to 50 percent on bandwidth and storage compared to standard H.264/H.265 (Scene Dependant)(3): Supplied with English, German, Spanish, French, Italian, Japanese, Portuguese , Russian and Traditional Chinese packages, support the customizable language string edit.(4): Not available on HC60W34R2L, HC60W44R2L and HC60WB4R2LHC60 W 4 5 R2 L3 = 3” INDOOR DOME CAMERA4 = 4” RUGGED DOME CAMERA B = BULLET CAMERA Z = PTZ CAMERA2 = 2.7-13.5MM MFZ LENS 4 = 7-22MM MFZ LENS 5 = 5-50MM MFZ LENS 30 = 4.3-129MM MFZ LENS2 = 2MP 4 = 4MP 5 = 5MPW = WDR 120DB60 = 60 SERIES R = IR LEDS L = NO VA INCLUDED(EMPTY) = VA INCLUDED60 SERIES IP CAMERASHSV-60Series-05-US(1220)DS-Z © 2020 Honeywell International Inc.For more informationHoneywell Commercial Security 715 Peachtree St. NE Atlanta, GA ONVIF and the ONVIF logo are trademarks of ONVIF Inc. HEVC and the HEVC logo are trademarks of HEVC Advance.Honeywell reserves the right, without notification, tomake changes in product design or specifications.(*): 4S Box might be needed (depth no less than 2-1/8”, to purchase from market)Learn more about 60 Series accessories。
高分辨率爆破防护网络直视相机系列(HS-2XE68x5G0-IZHS)说明书

DS-2XE68x5G0-IZHSHigh Resolution Explosion-Proof Network Bullet Camera Series● 2 MP or 8 MP High Resolution Options ● 2.8 mm to 12 mm or 8 mm to 32 mm Lens Option ● 120 dB Wide Dynamic Range ● H.265, H.265+, H.264, H.264+ ● On-Board Storage up to 256 GB● ATEX: Ex II 2 G D Ex db IIC T6 Gb/Ex tb IIIC T80°C Db IP68 ● IECEx: Ex db IIC T6 Gb/Ex tb IIIC T80°C Db IP68 ● UL(Zone): Class I, Zone 1, AEx db IIC T6 Zone 21, AEx tb IIIC T80°C ● cUL(Zone): Ex db IIC T6 Gb X Ex tb IIIC T80°C Db X ● UL/cUL (Division): Class I, Division 2, Groups A,B,C and D,T6; Class II, Division 2, Groups F and G,T80°CHikvision’s DS-2XE68x5G0-IZHS Explosion-ProofNetwork Bullet Camera Series feature 2 MP or8 MP resolution and 2.8 mm to 12 mm or 8 mm to32 mm Lens options. On-board storage of up to256 GB via a microSD card offers addedfunctionality. H.265, H.265+, H.264, and H.264+video compression options saves storage space and bandwidth.Available ModelsDS-2XE6825G0-IZHS (2.8 mm to 12 mm): 2 MP DS-2XE6825G0-IZHS (8 mm to 32 mm): 2 MP DS-2XE6885G0-IZHS (2.8 mm to 12 mm): 8 MP DS-2XE6885G0-IZHS (8 mm to 32 mm): 8 MPSpecificationsDS-2XE6825G0-IZHSDS-2XE6885G0-IZHSCamera Image Sensor1/2.8" progressive scan CMOS 1/2" progressive scan CMOS Minimum Illumination 2.8 to 12 mm Color: 0.012 lux @ (ƒ/1.4, AGC on), B/W: 0.0012 lux @ (ƒ/1.4, AGC on), 0 lux with IR 8 to 32 mmColor: 0.018 lux @ (ƒ/1.7, AGC on), B/W: 0.0018 lux @ (ƒ/1.7, AGC on), 0 lux with IR Shutter Speed 1s to 1/100,000 s Slow Shutter YesDay/NightIR cut filter WDR 120 dBLens Lens Type Varifocal lens, 2.8 mm to 12 mm or 8 mm to 32 mm lens Auto-IrisDC drive Aperture2.8 mm to 12 mmƒ/1.4ƒ/1.7, constant ƒ/1.7 throughout the zoom range 8 mm to 32 mmFocusAuto, semi-auto, manualFOV2.8 mm to 12 mm Horizontal FOV 115° to 42°, vertical FOV 59° to 24°, diagonal FOV 141° to 48° Horizontal FOV 112° to 41°, vertical FOV 58° to 23°,diagonal FOV 137° to 47°8 mm to 32 mm Horizontal FOV 43° to 15°, vertical FOV 23° to 9°, diagonal FOV 50° to 17° Horizontal FOV 42° to 15°, vertical FOV 23° to 8°,diagonal FOV 49° to 17°Lens MountIntegrated IlluminatorIR Range Up to 330 ft (100 m) Wavelength 850 nmVideoMaximum Resolution 1920 × 10803840 × 2160 Video Streams 5 defined streamsMain Stream 50 Hz 50 fps (1920 × 1080, 1280 × 720) 25 fps (3840 × 2160, 3072 × 1728, 2560 × 1440,1920 × 1080, 1280 × 720)60 Hz 60 fps (1920 × 1080, 1280 × 720) 30 fps (3840 × 2160, 3072 × 1728, 2560 × 1440,1920 × 1080, 1280 × 720) Sub-Stream50 Hz 25 fps (704 × 576, 640 × 480)60 Hz 30 fps (704 × 480, 640 × 480)Third Stream50 Hz 25 fps (1920 × 1080, 1280 × 720, 704 × 576, 640 × 480)60 Hz 30 fps (1920 × 1080, 1280 ×720, 704 × 480, 640 × 480) Fourth Stream50 Hz 25 fps (704 × 576, 640 × 480)60 Hz 30 fps (704 × 480, 640 × 480) Fifth Stream50 Hz 25 fps (704 × 576, 640 × 480)60 Hz 30 fps (704 × 480, 640 × 480) Video CompressionMain stream H.265+/H.265/H.264+/H.264 Sub stream H.265/H.264/MJPEGThird stream H.265/H.264/MJPEGFourth stream H.265/H.264/MJPEG Fifth stream H.265/H.264/MJPEGH.264 Type Baseline Profile/Main Profile/High ProfileH.264+ Main stream supports H.265 Type Main profileH.265+ Main stream supports Video Bit Rate 32 Kbps to 16 MbpsSVC H.265 and H.264 support AudioAudio Compression G.711/G.722.1/G.726/MP2L2/PCMAudio Bit Rate 64 Kbps (G.711)/16 Kbps (G.722.1)/16 Kbps (G.726)/32–192 Kbps (MP2L2)Environment Noise Filtering YesAudio Sampling Rate 8 kHz/16 kHz/32 kHz/44.1 kHz/48 kHzSmart FeaturesSmart Event Line crossing detection, up to 4 lines configurable Intrusion detection, up to 4 regions configurableRegion entrance detection, up to 4 regions configurableRegion exiting detection, up to 4 regions configurableUnattended baggage detection, up to 4 regions configurable Object removal detection, up to 4 regions configurableScene change detection, audio exception detection, defocus detectionBasic Event Motion detection, video tampering alarm, exception (network disconnected, IP address conflict,illegal login, HDD full, HDD error)Face Capture Detects up to 40 faces simultaneouslyHard Hat Detection Detects up to 30 human targets simultaneouslySupports up to 4 shield regionsLinkage Method Upload to FTP/NAS/memory card, notify surveillance center, send e-mail, trigger alarm output,trigger recording, trigger captureRegion of Interest 4 fixed regions for main stream, sub stream, and third stream, and dynamic face trackingSpecifications (continued)DS-2XE6825G0-IZHSDS-2XE6885G0-IZHSImageImage EnhancementBLC, HLC, defog, EIS, distortion correction, 3D DNRImage Settings Saturation, brightness, contrast, sharpness, AGC, and white balance are adjustable by client software or Web browser Target Cropping YesDay/Night Switch Day/Night/Auto/Schedule/Triggered by alarm inPicture OverlayLogo picture can be overlaid on video with 128 × 128 24-bit bmp formatNetwork Network StorageSupports microSD/SDHC/SDXC card (256 GB), local storage, and NAS (NFS, SMB/CIFS), ANRIf used with a Hikvision high-end class memory card 1, memory card encryption and health detection are supportedProtocolsTCP/IP, ICMP, HTTP, HTTPS, FTP, DHCP, DNS, DDNS, RTP, RTSP, RTCP, PPPoE, NTP, UPnP, SMTP, SNMP, IGMP, 802.1x, QoS, IPv6, UDP, Bonjour, SSL/TLS API ONVIF (PROFILE S, PROFILE G), ISAPI, SDKSecurityPassword protection, complicated password, HTTPS encryption, 802.1x authentication (EAP-MD5), watermark, IP address filter, basic and digest authentication for HTTP/HTTPS, WSSE and digest authentication for ONVIF, TLS1.2 Simultaneous Live ViewUp to 20 channelsUser/HostUp to 32 users. 3 user levels: administrator, operator, and user ClientiVMS-4200, Hik-Connect, HikCentral Web BrowserPlug-in required live view: IE8–11Plug-in free live view: Mozilla Firefox 52+InterfaceCommunication Interface1 RJ-45 10M/100M self-adaptive Ethernet port, optical interface FC RS-485 (half duplex, HIKVISION, Pelco-P, Pelco-D, self-adaptive) Audio 1 line in/outAlarm1 input, 1 output (maximum 24 VDC, 1 A or 110 VAC 500 mA) Interface StyleConnector panelVideo Out1Vp-p composite output (75 Ω/CVBS)On-Board StorageBuilt-in microSD/SDHC/SDXC slot, up to 256 GBGeneralFirmware VersionV5.5.96Web Client Language 32 languages: English, Russian, Estonian, Bulgarian, Hungarian, Greek, German, Italian, Czech, Slovak, French, Polish, Dutch, Portuguese, Spanish, Romanian, Danish, Swedish, Norwegian, Finnish, Croatian,Slovenian, Serbian, Turkish, Korean, Traditional Chinese, Thai, Vietnamese, Japanese, Latvian, Lithuanian,Portuguese (Brazil)General Function Anti-flicker, heartbeat, mirror, privacy mask, pixel counterReset Reset via reset button on camera body, Web browser, and client softwareStartup and Operating Conditions -40° to +60° C (-40° to +140° F), humidity 95% or less (non-condensing)Storage Conditions -30° to +60° C (-22° to +140° F), humidity 95% or less (non-condensing)Power Supply 100 to 240 VAC, PoE (42.5 to 57 V, 802.3 at), terminal blockPower Consumption and Current 100 to 240 VAC, 0.4 A, maximum 18 W; PoE (802.3at, 42.5 to 57 V), 0.55 to 0.45 A, maximum 18 WMaterial Stainless steel 316L and anti-corrosion coating Heater YesDimensions Camera: 352 mm × 200 mm × 214 mm (13.6" × 7.9" × 8.4")With package: 438 mm × 283 mm × 303 mm (17.2" × 11.1" × 11.9")Weight Camera: 14 kg (37.5 lb)With package: 15 kg (40.2 lb) ApprovalsEMC 47 CFR Part 15, Subpart B; EN 55032: 2015, EN 61000-3-2: 2014, EN 61000-3-3: 2013, EN 50130-4: 2011+A1: 2014; AS/NZS CISPR 32: 2015; ICES-003: Issue 6, 2016; KN 32: 2015, KN 35: 2015Safety UL 60950-1, IEC 60950-1:2005 + Am 1:2009 + Am 2:2013, EN 60950-1:2005 + Am 1:2009 + Am 2:2013, IS13252(Part 1):2010+A1:2013+A2:2015Environment 2011/65/EU, 2012/19/EU, Regulation (EC) No 1907/2006Protection IP68 (IEC 60529-2013) Explosion-proof:ATEX: Ex II 2 G D Ex db IIC T6 Gb/Ex tb IIIC T80°C Db IP68IECEx: Ex db IIC T6 Gb/Ex tb IIIC T80°C Db IP68 UL(Zone): Class I, Zone 1, AEx db IIC T6 Zone 21, AEx tb IIIC T80°CcUL(Zone): Ex db IIC T6 Gb X Ex tb IIIC T80°C Db XUL/cUL (Division): Class I, Division 2, Groups A,B,C and D,T6; Class II, Division 2, Groups F and G,T80°C Anti-Corrosion: NEMA 4X (NEMA 250-2014), C5 (ISO 6270-1, ISO 9227) Explosion-Proof Certificate ATEX: Ex II 2 G D Ex db IIC T6 Gb/Ex tb IIIC T80°C Db IP68 IECEx: Ex db IIC T6 Gb/Ex tb IIIC T80°C Db IP68For explosive gas atmospheres, the maximum surface temperature is 85° CFor flammable dust atmospheres, the maximum surface temperature is 80° CIIC: for explosive gas atmospheres other than mines susceptible to firedamp For explosive gas mixture atmospheres: Zone 1, Zone 2, Zone 21, Zone 221You are recommended to purchase the memory card together with the product if needed. After ordering, the memory card will be installed to product during manufacturing.DimensionsAccessoriesNOT INCLUDEDDS-1707ZJ-Y-AC (OS)Wall Mount。
Cisco TelePresence 用户手册 SX10 和 SX20 CE 9.9说明书
Cisco TelePresence 用户手册SX10 和 SX20CE 9.9本指南内容目录所有目录条目都是可点击的超链接,点击即可打开相应的文章。
要在章节之间切换浏览,还可以单击侧边栏中的图标。
注意!本用户手册中介绍的某些功能是可选的,因此可能不适用于您的系统。
视频会议简介触摸屏一览 ..............................................................................4操作提示 ...............................................................................4遥控器一览 (I) ..........................................................................5操作提示 ...............................................................................5遥控器一览 (II) .........................................................................6操作提示 ...............................................................................6视频呼叫从联系人列表发出呼叫 .............................................................8关于联系人列表 .....................................................................8呼叫之前编辑联系人 .................................................................9关于编辑 ...............................................................................9编辑呼叫速率,然后发出呼叫 ................................................10关于呼叫速率 .....................................................................10使用姓名、号码或 IP 地址发出呼叫 ........................................11关于发出呼叫 .....................................................................11将其他参加者添加到现有呼叫 ................................................12关于视频会议 .....................................................................12断开会议参加者的连接 ..........................................................13关于视频会议 .....................................................................13接收呼叫 ..............................................................................14如果有人呼叫您 ..................................................................14在通话期间接收其他呼叫 .......................................................15扩展呼叫 ............................................................................15转接正在进行的呼叫 ..............................................................16更改屏幕的布局 .....................................................................17关于布局 ............................................................................17启用免打扰 ...........................................................................18关于免打扰 ........................................................................18启用待机 ...............................................................................19关于待机 ............................................................................19前转所有呼叫 ........................................................................20关于前转 . (20)Intelligent Proximity关于 Cisco Proximity 超声波信号 ...........................................22关于 Proximity 功能 ............................................................22内容共享启动和停止演示 .....................................................................24关于内容共享 .....................................................................24在通话期间更改演示布局 .......................................................25关于演示布局 .....................................................................25预定的会议加入预定会议 ........................................................................27加入会议 ............................................................................27联系人非通话期间,将某人添加到收藏夹 .........................................29关于通讯录、最近呼叫和收藏夹 ..........................................29通话期间,将某人添加到收藏夹 .............................................30关于收藏夹 ........................................................................30摄像机控制查看摄像机设置(本地摄像机) .............................................32关于摄像机设置 ..................................................................32远端摄像机控制 .....................................................................33关于远端摄像机控制 ...........................................................33移动本端视频 PiP ..................................................................34为什么要移动本端视频? ....................................................34打开或关闭摄像机 .................................................................35关于视频关闭 .....................................................................35设置访问“设置” ............................................................................37关于设置 ............................................................................37使用遥控器的光标控件可在屏幕上四处移动,然后按确定/输入将打开所选菜单字段。
Cisco TelePresence SX80 编解码器
产品功能
表 2 列出了 SX80 编解码器的产品功能规格。
表 2.
产品规格
规格 软件兼容性 语言支持
带宽 分辨率/帧率 (H.264) 的 最低带宽
防火墙穿越 视频标准
说明
● 网真软件 TC 7.1 版或更高版本 ● 思科协作终端软件 8.0 版或更高版本 ● 英语、阿拉伯语、加泰罗尼亚语、捷克语、丹麦语、荷兰语、芬兰语、法语、德语、希伯来语、匈牙利语、意
SX80 最高可提供 1080p60 的端到端高清 (HD) 视频,且是业界首批支持 H.265 的产品,从而为此新标准未来可能 实现的带宽效率奠定基础。 该编解码器提供丰富的输入和输出设置以及灵活的媒体引擎,且支持 3 个屏幕的功能 可以支持各种使用案例,从而满足您的特定需求。
图 1.
Cisco TelePresence SX80 编解码器
● 四路均衡线路电平输入,Euroblock 连接器 ● 三路 HDMI,数字:立体声 PC/DVD 输入 ● 六路均衡线路电平输出,Euroblock 连接器 ● 两路 HDMI 输出
● H.239 (H.323) 双视频流 ● BFCP (SIP) 双视频流 ● 支持的最高分辨率为 1080p30,独立于主视频流分辨率 ● 五路嵌入式 SIP/H.323 多点支持(参考 MultiSite) ● 思科临时会议(需要 CUCM、思科网真服务器和 Cisco TelePresence Conductor) ● 思科会议活动控件 ● 交换会议 (SVC)*
第 3 页,共 7页
规格 视频输出(三路输 出)
实时视频分辨率(编 码和解码)
音频标准 音频特点
音频输入(十五路 输入) 音频输出(八路输出 ) 双视频流 多点支持
ATCS-60
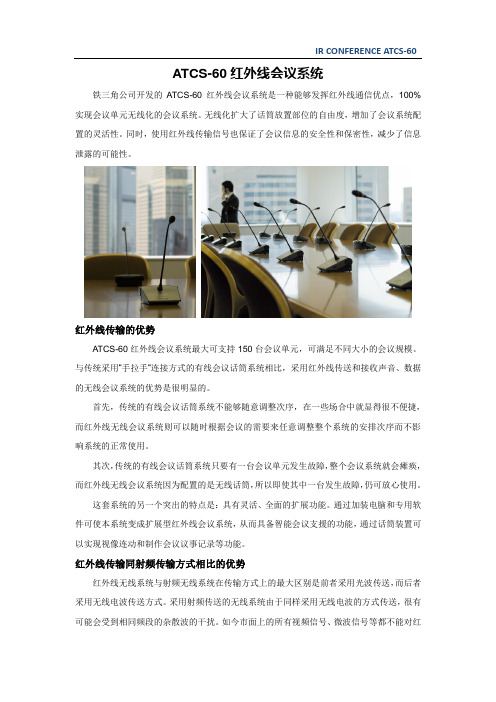
ATCS-60红外线会议系统铁三角公司开发的ATCS-60红外线会议系统是一种能够发挥红外线通信优点,100%实现会议单元无线化的会议系统。
无线化扩大了话筒放置部位的自由度,增加了会议系统配置的灵活性。
同时,使用红外线传输信号也保证了会议信息的安全性和保密性,减少了信息泄露的可能性。
红外线传输的优势ATCS-60红外线会议系统最大可支持150台会议单元,可满足不同大小的会议规模。
与传统采用“手拉手“连接方式的有线会议话筒系统相比,采用红外线传送和接收声音、数据的无线会议系统的优势是很明显的。
首先,传统的有线会议话筒系统不能够随意调整次序,在一些场合中就显得很不便捷,而红外线无线会议系统则可以随时根据会议的需要来任意调整整个系统的安排次序而不影响系统的正常使用。
其次,传统的有线会议话筒系统只要有一台会议单元发生故障,整个会议系统就会瘫痪,而红外线无线会议系统因为配置的是无线话筒,所以即使其中一台发生故障,仍可放心使用。
这套系统的另一个突出的特点是:具有灵活、全面的扩展功能。
通过加装电脑和专用软件可使本系统变成扩展型红外线会议系统,从而具备智能会议支援的功能,通过话筒装置可以实现视像连动和制作会议议事记录等功能。
红外线传输同射频传输方式相比的优势红外线无线系统与射频无线系统在传输方式上的最大区别是前者采用光波传送,而后者采用无线电波传送方式。
采用射频传送的无线系统由于同样采用无线电波的方式传送,很有可能会受到相同频段的杂散波的干扰。
如今市面上的所有视频信号、微波信号等都不能对红外线无线系统造成影响。
由于红外线会议系统的发送和接收都是以光波多点传送,因此不但稳定性很高,更不会受到外界杂散无线电波的干扰,经常遇到的杂散波有手机信号、对讲机信号、电台和电视信号等。
射频传输设备在同一个场合使用时由于频点的限制很难做到很多台设备同时使用,当达到使用数量上限时,如果当地环境具有其它射频频率使用,系统使用的通道总数就会下降,否则会出现设备被外界干扰或者自身频率干扰的情况。
思科 Cisco TelePresence SX80 编解码器产品手册说明书
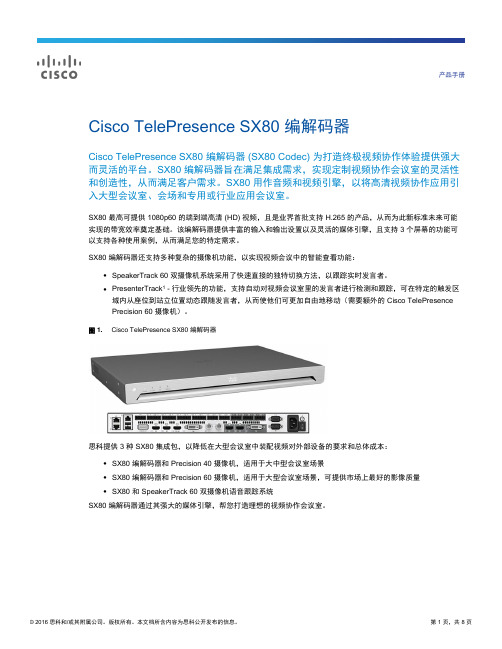
产品手册Cisco TelePresence SX80 编解码器Cisco TelePresence SX80 编解码器 (SX80 Codec) 为打造终极视频协作体验提供强大而灵活的平台。
SX80 编解码器旨在满足集成需求,实现定制视频协作会议室的灵活性和创造性,从而满足客户需求。
SX80 用作音频和视频引擎,以将高清视频协作应用引入大型会议室、会场和专用或行业应用会议室。
SX80 最高可提供 1080p60 的端到端高清 (HD) 视频,且是业界首批支持 H.265 的产品,从而为此新标准未来可能实现的带宽效率奠定基础。
该编解码器提供丰富的输入和输出设置以及灵活的媒体引擎,且支持 3 个屏幕的功能可以支持各种使用案例,从而满足您的特定需求。
SX80 编解码器还支持多种复杂的摄像机功能,以实现视频会议中的智能查看功能:●SpeakerTrack 60 双摄像机系统采用了快速直接的独特切换方法,以跟踪实时发言者。
●PresenterTrack1 - 行业领先的功能,支持自动对视频会议室里的发言者进行检测和跟踪,可在特定的触发区域内从座位到站立位置动态跟随发言者,从而使他们可更加自由地移动(需要额外的 Cisco TelePresence Precision 60 摄像机)。
图 1. Cisco TelePresence SX80 编解码器思科提供 3 种 SX80 集成包,以降低在大型会议室中装配视频对外部设备的要求和总体成本:●SX80 编解码器和 Precision 40 摄像机,适用于大中型会议室场景●SX80 编解码器和 Precision 60 摄像机,适用于大型会议室场景,可提供市场上最好的影像质量●SX80 和 SpeakerTrack 60 双摄像机语音跟踪系统SX80 编解码器通过其强大的媒体引擎,帮您打造理想的视频协作会议室。
图 2. 配备有 Touch 10 和 SpeakerTrack 60 的 Cisco TelePresence SX80 集成包产品特性表 1 总结了 SX80 编解码器的主要特性。
莫紫 VPort P16-2MR 系列1080P无人机视频监控相机说明说明书

VPort P16-2MR SeriesEN50155,1080P image,infrared IP camerasFeatures and Benefits•1/3”progressive scan camera with maximum1920x1080resolution at up to30fps•Built-in IR illuminator and ICR(Infrared Cut Filter Removal)for day&nightimages•High quality video imaging with DNR and WDR•Up to4H.264or MJPEG independent simultaneous video streams•DynaStream™for optimized network efficiency•CBR Pro™for high image quality in limited bandwidth transmissions•Supports SDXC(up to2TB SD card)for local storage•1built-in microphone for audio input,and1digital input for external sensor•ONVIF support for standardization and interoperabilityCertificationsIntroductionThe rugged VPort P16-2MR cameras produce Full HD(1920x1080)video images and feature4H.264/MJPEG video streams,giving them the versatility and ruggedness needed for mobile IP video surveillance applications in a variety of different installations and environments.In addition, the cameras feature vandal-proofing(EN62262IK8),a-25to55°C or-40to70°C(T models)operating temperature,a rugged M12Ethernet port, PoE power input,a built-in microphone,a digital input,IP66rain and dust protection,an IR illuminator for day and night image capabilities,and are compliant with the mandatory sections of EN50155.1SpecificationsMemorymicroSD Slot SDXCInput/Output InterfaceDigital Input Channels1Digital Inputs+13to+30V for state1-30to+1V for state0Max.input current:8mAConnector5-pin A-coded male M12connector with20cm cableEthernet Interface1PoE Ports(10/100BaseT(X),M12D-coded4-pinfemale connector)Standards IEEE802.3af for PoEEthernet Software FeaturesProtocols TCP/IP,IPv4/IPv6,UDP,HTTP,RTP/RTSP,ARP,UPnP,FTP,TFTP,SMTP,NTP Client,DNS,DDNS,QoS,IGMP v3,ICMP,SNMPv1/v2c/v3,DHCP Opt66/67,HTTPS1.This product is suitable for rolling stock railway applications,as defined by the EN50155standard.For a more detailed statement,refer to:/doc/specs/EN_50155_Compliance.pdfSecurity FunctionsPassword User-level password protectionFilter IP addressEncryption HTTPSPower ParametersNo.of Power Inputs1Source of Input Power PoE(IEEE802.3af)Input Current0.26A@48VDCCamera CharacteristicsSensor1/3-in1080P progressive scan CMOSLens VPort P16-2MR36M Series:f=3.6mm,F1.6,Diagonal99°,Horizontal70°,Vertical39°VPort P16-2MR42M Series:f=4.2mm,F1.6,Diagonal82°,Horizontal62°,Vertical34°VPort P16-2MR60M Series:f=6.0mm,F1.8,Diagonal62°,Horizontal43°,Vertical24°VPort P16-2MR80M Series:f=8.0mm,F1.6,Diagonal42°,Horizontal33°,Vertical17°Minimum Illumination Color:0.2lux,at F1.2(Gain High,50IRE,1/30sec)B/W:0.05lux,at F1.2(Gain High,50IRE,1/30sec)Note:0lux if IR illuminator is onCamera Angle Pan350°,Tilt65°(controlled manually)Day&Night Auto/Color/BW;ICR controlSynchronization InternalWhite Balance ATW/AWBElectronic Shutter Auto,Fixed(1/30to1/25000sec)S/N Ratio Maximum50dB(AGC off;DNR on)ICR Control Auto(light sensor control)or DI controlIR Illumination IR LED illuminators,5-meter(max.)effective distance;On/Off controlled manually(nightmode)or by the light sensorDNR(digital noise reduction)Built-in2D/3D DNRWDR(wide dynamic range)100dBAGC(auto gain control)2X,4X,8X,16XFlickerless Control Automatic,50Hz,60Hz modesImage Rotation Flip,Mirror,90°,180°,270°rotationImage Setting Manual tuning with saturation,sharpness,and contrastVideo InterfaceVideo Compression H.264(ISO/IEC14496-10)or MJPEGVideo Output via EthernetVideo Streams4independent H.264or MJPEG video streamsVideo Resolution and FPS(frames per second)QCIF176x11230176x14425CIF352x24030352x28825VGA640x48030640x480254CIF704x48030704x57625Full D1720x48030720x57625SVGA800x60030800x60025HD1280x720301280x72025WXGA1280x800301280x80025Full HD1920x1080301920x108025 Video Viewing DynaStream™support for changing the video frame rate automaticallyCBR Pro™for good image quality in limited bandwidth transmissions3privacy mask areas providedAdjustable image size and qualityTimestamp and text overlayOSD(On Screen Display)position adjustableMaximum of5simultaneous unicast connections,50multicast clientsAudio InterfaceAudio Format Mono,PCM(G.711)AACAudio Inputs1x built-in microphoneCamera Software DevelopmentVideo Standards ONVIF Profile SCamera Alarm Software FeaturesIntelligent Video Camera tampering detectionVideo Motion Detection3independently configurable areasShock Detection Built-in G sensorScheduling Daily repeat timing scheduleImaging JPEG snapshots for pre/trigger/post alarm imagesCustom Alarms HTTP event servers for setting customized alarm actionsEmail/FTP Messaging Automatic transfer of stored images via email or FTP as event-triggered actions Pre-Alarm Buffer50MB video buffer for JPEG snapshot imagesVideo Recording Event recordings stored on the SD cardSoftware RequirementsMemory Size2GBOperating System Windows7or aboveBrowser Internet Explorer9.x or aboveMultimedia DirectX9.0C or abovePhysical CharacteristicsHousing IP66rain and dust protectionMetal housing,PC dome coverIK8vandal resistant protectionDimensions125x125x120.7mm(4.92x4.92x4.8in)Weight890g(1.96lb)Installation Panel mountingProtection-CT models:PCB conformal coatingEnvironmental LimitsOperating Temperature Standard Models:-25to55°C(-13to131°F)Wide Temp.Models:-40to70°C(-40to158°F)Storage Temperature(package included)-40to85°C(-40to185°F)Ambient Relative Humidity5to95%(non-condensing)Ingress Protection IEC60529,IP66Salt Spray Test ASTM-B117Vandal Resistance EN62262,IK8Altitude2000mStandards and CertificationsEMI CISPR32,FCC Part15B Class AEMS IEC61000-4-2ESD:Contact:6kV;Air:8kVIEC61000-4-3RS:80MHz to1GHz:20V/mIEC61000-4-4EFT:Power:2kV;Signal:2kVIEC61000-4-5Surge:Power:2kV;Signal:2kVIEC61000-4-6CS:10VIEC61000-4-8PFMFFreefall IEC60068-2-31Railway Fire Protection EN45545-2Safety UL60950-1Shock IEC60068-2-27,IEC61373,EN50155Vibration IEC60068-2-64,IEC61373,EN50155Railway EN50155(complies with a portion of EN50155specifications)MTBFTime997,474hrsStandards Telcordia SR332WarrantyWarranty Period5yearsNote:Limited warranty on moving parts;see Moxa's online warranty policy for details. Details See /warrantyPackage ContentsDevice1x VPort P16-2MR Series cameraInstallation Kit1x sticker1x L-type Torx screwdriver4x indented hexagonal head tapping screws,nuts,gaskets,and spring washers Documentation1x document and software CD1x quick installation guide1x warranty cardDimensionsOrdering InformationModel Name Lens Local Storage Operating Temp.Conformal CoatingVPort P16-2MR36M 3.6mm microSD slot,SDXCinterface-25to55°C–VPort P16-2MR42M 4.2mm microSD slot,SDXCinterface-25to55°C–VPort P16-2MR60M 6.0mm microSD slot,SDXCinterface-25to55°C–VPort P16-2MR80M8.0mm microSD slot,SDXCinterface-25to55°C–VPort P16-2MR36M-T 3.6mm microSD slot,SDXCinterface-40to70°C–VPort P16-2MR42M-T 4.2mm microSD slot,SDXCinterface-40to70°C–VPort P16-2MR60M-T 6.0mm microSD slot,SDXCinterface-40to70°C–VPort P16-2MR80M-T8.0mm microSD slot,SDXCinterface-40to70°C–VPort P16-2MR36M-CT 3.6mm microSD slot,SDXCinterface-25to55°C✓VPort P16-2MR42M-CT 4.2mm microSD slot,SDXCinterface-25to55°C✓VPort P16-2MR60M-CT 6.0mm microSD slot,SDXCinterface-25to55°C✓VPort P16-2MR80M-CT8.0mm microSD slot,SDXCinterface-25to55°C✓VPort P16-2MR36M-CT-T 3.6mm microSD slot,SDXCinterface-40to70°C✓VPort P16-2MR42M-CT-T 4.2mm microSD slot,SDXCinterface-40to70°C✓VPort P16-2MR60M-CT-T 6.0mm microSD slot,SDXCinterface-40to70°C✓VPort P16-2MR80M-CT-T8.0mm microSD slot,SDXCinterface-40to70°C✓Accessories(sold separately)Camera Mounting KitsVP-FMK1Flush-mounting kit for the VPort P16©Moxa Inc.All rights reserved.Updated Dec30,2019.This document and any portion thereof may not be reproduced or used in any manner whatsoever without the express written permission of Moxa Inc.Product specifications subject to change without notice.Visit our website for the most up-to-date product information.。
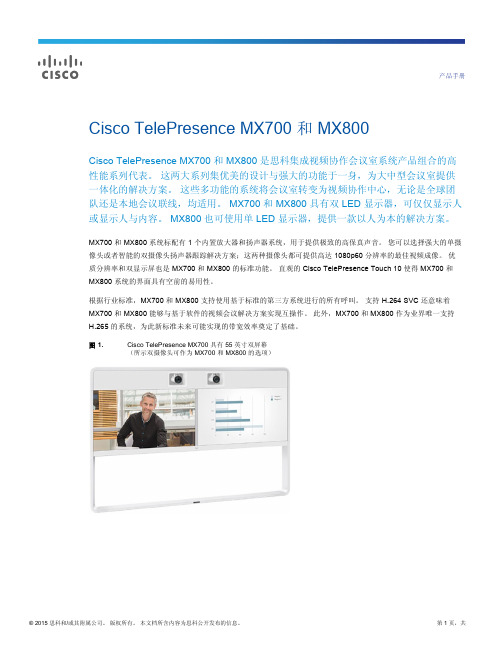
Cisco TelePresence MX700 和 MX800
● 一路标准输入(复合视频或 S 最高为 1080p (1920 x 1080)
Cisco TelePresence MX700 和 MX800 ● 20 倍总变焦(10 倍光学变焦,2 倍数字变焦) ● 电动倾斜 +20°/-20° ,电动平移 +/-90° ● 水平视野:80° ● 垂直视野:48.8° ● 光圈 1.5 ● 分辨率:1080p60 和 720p60 ● 自动或手动变焦、亮度调节和白平衡 ● 远端摄像头控制 ● 通过以太网控制摄像头 ● 对焦距离 3.28 英尺(1 米)至无穷远 ● 集成全音域多信道低音扬声器 ● 200W 放大器系统 pr 屏幕 ● 有关编解码器音频功能的详细信息,请参阅表 3
显示
PC 和第二源视频输入 支持的 PC 输入分 辨率 摄像头概述
音响系统 用户界面 语言支持
Cisco TelePresence MX700:
Cisco TelePresence MX800 单显示器
● 2x 55 英寸 (1.4 米)TFT-LCD 显示器,侧光式 LED
● 分辨率:1920 x 1080 (16:9)
产品功能
表 1 概述了 MX700 和 MX800 系统的主要特性。
表 1.
特点总结
特点总结 设计特点
应用特点
● 市场上性能最强的多功能视频系统之一,可提供最优质的视频和音频 ● 下一代高清视频协作编解码器 ● 下一代高清 PTZ 摄像头 ● 将所有您需要的设备集于一体(屏幕、扬声器、编解码器、摄像头、用户界面、麦克风和安装配件) ● 壁装式或落地式(包括 2 种落地式选项:独立式和固定于墙上的落地式) ● 提供业界首个内置扬声器跟踪系统选项 ● 支持 Cisco Intelligent Proximity 将内容共享到移动设备,以及从 Mac 和 PC 进行无线共享* ● 支持 Switched Conferencing (SVC) 用于增强布局及在双屏幕终端的两个屏幕上启用视频* ● 1080p30 高清嵌入式思科网真 MultiSite 功能,支持单独转码 ● 通过四路同步视频输入进行协作 ● 高清协作,支持 1080p60 主视频和 1080p30 内容 ● 通过一键式操作 (OBTP) 即可召开会议 ● 基于团队的协作、会场、会议室以及以视频为中心的会议室的理想之选 ● 在呼叫外提供双演示(增加呼叫外系统的使用率 - 使用 MX700 双屏幕来比较 2 个演示/文档)
AXIS Q6045 Mk II PTZ 巡视网络摄像头说明书

DatasheetAXIS Q6045Mk II PTZ Dome Network Camera Indoor,high-speed PTZ dome with HDTV1080pAXIS Q6045Mk II is a top-of-the-line PTZ dome with HDTV1080p,32x optical zoom,and fast and precise pan/tilt performance for wide area coverage and detailed surveillance at great distances.With endless360°pan,it can be automatically directed to256preset positions using guard tour.It has built-in analytics such as highlight compensation, object removed,fence detector,object counter,enter/exit detection and autotracking.Active Gatekeeper automatically moves the camera to a preset position when motion is detected in a pre-defined area,tracking the detected object.The camera supports two-way audio,audio detection,input/output ports and AC/DC power.>HDTV1080p and32x optical zoom>IP52-rated protection against dust and dripping water>Shock detection>Enhanced intelligent video>Power over Ethernet Plus(IEEE802.3at)AXIS Q6045Mk II PTZ Dome Network Camera Models AXIS Q6045Mk II60HzAXIS Q6045Mk II50HzCameraImage sensor1/2.8”Progressive Scan CMOSLens 4.44-142.6mm,F1.6-4.41Horizontal angle of view:62.8˚-2.23˚Vertical angle of view:36.8˚-1.3˚Autofocus,Auto-irisDay and night Automatically removable infrared-cut filterMinimum illumination Color:0.3lux at30IRE F1.6 B/W:0.03lux at30IRE F1.6 Color:0.5lux at50IRE F1.6 B/W:0.04lux at50IRE F1.6Shutter time1/33000s to1/3s with50Hz1/33000s to1/4s with60HzPan/Tilt/Zoom Pan:360°endless,0.05°-450°/sTilt:180°,0.05°-450°/s32x optical zoom and12x digital zoom,total384x zoomE-flip,256preset positions,Tour recording,Guard tour,Controlqueue,On-screen directional indicator,Set new pan0°,Adjustable zoom speedVideoVideo compression H.264(MPEG-4Part10/AVC)Baseline and Main Profiles Motion JPEGResolution HDTV1080p1920x1080to320x180HDTV720p1280x720to320x180Frame rate Up to60/50fps(60/50Hz)in HDTV720pUp to30/25fps(60/50Hz)in HDTV1080pVideo streaming Multiple,individually configurable streams in H.264and Motion JPEGControllable frame rate and bandwidthVBR/MBR H.264Image settings Wide Dynamic Range(WDR):Up to120dB depending on scene, manual shutter time,compression,color,brightness,sharpness,white balance,exposure control,exposure zones,backlightcompensation,fine tuning of behavior at low light,rotation:0°,180°,text and image overlay,32individual3D privacy masks,image freeze on PTZ,highlight compensation,automatic defog AudioAudio streaming Two-wayAudio compression AAC-LC8/16kHz,G.711PCM8kHz,G.726ADPCM8kHz Configurable bit rateAudio input/output Requires multi-connector cable(sold separately)for external microphone or line input,and line outputNetworkSecurity Password protection,IP address filtering,HTTPS a encryption,IEEE802.1X a network access control,Digest authentication,Useraccess log,Centralized Certificate ManagementSupported protocols IPv4/v6,HTTP,HTTPS a,SSL/TLS a,QoS Layer3DiffServ,FTP, CIFS/SMB,SMTP,Bonjour,UPnP TM,SNMP v1/v2c/v3(MIB-II), DNS,DynDNS,NTP,RTSP,RTP,SFTP,TCP,UDP,IGMP,RTCP,ICMP, DHCP,ARP,SOCKS,SSH,NTCIPSystem integrationApplication Programming Interface Open API for software integration,including VAPIX®and AXIS Camera Application Platform;specifications at AXIS Video Hosting System(AVHS)with One-Click Connection ONVIF Profile S,specifications at Analytics IncludedVideo motion detection,Shock detection,Autotracking,ActiveGatekeeperHighlight compensationBasic Analytics(not to be compared with third-party analytics):Object removed,Enter/Exit detector,Fence detector,Objectcounter,Highlight compensationSupportedAXIS Perimeter DefenderSupport for AXIS Camera Application Platform enablinginstallation of third-party applications,see /acap Event triggers Analytics,Fan,Temperature,Manual trigger,PTZ moving,PTZpreset,Edge storage eventsEvent actions File upload:FTP,SFTP,HTTP,HTTPS network share and emailNotification:email,HTTP,HTTPS and TCPExternal output activationVideo recording to edge storagePre-and post-alarm video bufferingPTZ preset,overlay text,send SNMP trapPlay audio clip,audio recording to edge storageData streaming Event dataBuilt-ininstallation aidsPixel counterGeneralCasing IP52-rated metal casing(aluminum),Acrylic(PMMA)clear domePVC freeMemory512MB RAM,128MB FlashBattery backed-up real-time clockPower Axis PoE+midspan1–port:100–240V AC,max37WIEEE802.3at,Type2Class4Camera consumption:max25.5WMulti-connector cable:24–34V DC,max19W20–24V AC,max27VAConnectors RJ4510BASE-T/100BASE-TX PoE,Multi-connector(cable soldseparately)for AC/DC power,4configurable alarm inputs/outputs,Mic in,Line mono input,Line mono output to active speaker Storage Support for SD/SDHC/SDXC cardSupport for SD card encryptionSupport for recording to network-attached storage(NAS)For SD card and NAS recommendations see Operatingconditions0°C to50°C(32°F to122°F)Humidity10-85%RH(non-condensing)Storageconditions-40°C to60°C(-40°F to140°F)Approvals EN55022Class A,EN61000-3-2,EN61000-3-3,EN61000-6-1,EN61000-6-2,EN55024,FCC Part15Subpart B Class A,ICES-003Class A,VCCI Class A,RCM AS/NZS CISPR22Class AKCC KN22Class A,KN24,IEC/EN/UL60950-1IEC/EN60529IP52,IEC60721-4-3Class3K3,3M3,IEC60068-2-1,IEC60068-2-2,IEC60068-2-6,IEC60068-2-14,IEC60068-2-27,IEC60068-2-78Midspan:EN60950-1,GS,UL,cUL,CE,FCC,VCCI,CB,KCC,UL-ARWeight Camera:2.6kg(5.7lb);with drop-ceiling mount:3.2kg(7.1lb) Dimensions Hard-ceiling:Ø198x240mm(Ø7.8x9.4in),Drop-ceiling:Ø248x243mm(Ø9.8x9.6in)IncludedaccessoriesAxis High PoE Midspan1-port,Recessed mount for hard and dropceilings,Smoked dome coverInstallation Guide,Windows decoder1-user licenseOptionalaccessoriesMulti-connector cable,AXIS T91A Mounting Accessories,AXIST81B22DC30W MidspanAXIS T90Illuminators,AXIS T8310Video Surveillance ControlBoard,AXIS T8415Wireless Installation Tool,Multi-user decoderlicense packFor more accessories,see VideomanagementsoftwareAXIS Companion,AXIS Camera Station,Video managementsoftware from Axis’Application Development Partners availableon /support/downloadsLanguages English,German,French,Spanish,Italian,Russian,SimplifiedChinese,Japanese,Korean,Portuguese,Traditional Chinese Warranty Axis3-year warranty and AXIS Extended Warranty option,see/warrantya.This product includes software developed by the OpenSSL Project for use in the OpenSSL Toolkit.(),and cryptographic software written by Eric Young(*****************).Environmental responsibility:T10056505/EN/M5.2/1905 /environmental-responsibility©2014-2019Axis Communications AB.AXIS COMMUNICATIONS,AXIS,and VAPIX are registered trademarks or trademarkapplications of Axis AB in various jurisdictions.All other company names and products are trademarks or registeredtrademarks of their respective companies.We reserve the right to introduce modifications without notice.。
CiscoTelePresencePrecision60摄像头
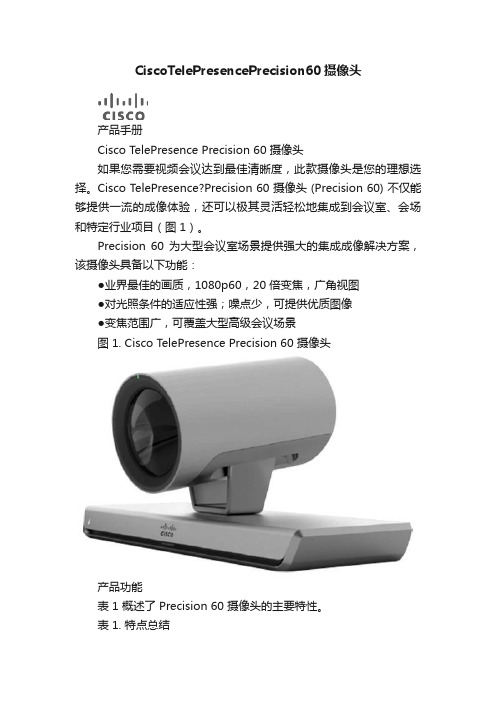
CiscoTelePresencePrecision60摄像头产品手册Cisco TelePresence Precision 60 摄像头如果您需要视频会议达到最佳清晰度,此款摄像头是您的理想选择。
Cisco TelePresence?Precision 60 摄像头 (Precision 60) 不仅能够提供一流的成像体验,还可以极其灵活轻松地集成到会议室、会场和特定行业项目(图 1)。
Precision 60 为大型会议室场景提供强大的集成成像解决方案,该摄像头具备以下功能:●业界最佳的画质,1080p60,20 倍变焦,广角视图●对光照条件的适应性强;噪点少,可提供优质图像●变焦范围广,可覆盖大型高级会议场景图 1. Cisco TelePresence Precision 60 摄像头产品功能表 1 概述了 Precision 60 摄像头的主要特性。
表 1. 特点总结产品功能表 2 列出了 Precision 60 摄像头的产品功能规格。
表 2. 产品规格规格说明解决方法●在 60 fps 时分辨率为 1920 x 1080变焦●10 倍光学变焦●2 倍数字变焦●20 倍总变焦平移和倾斜●平移活动范围:+/-100°●倾斜活动范围:+/-20°视野(FoV) ●水平视野:80°●垂直视野:48.8°对焦距离●1.0 米至无穷远(广角)光圈●1.5摄像头控制●以太网对焦、白平衡和亮度●手动或自动IP 网络特点●DNS 服务配置查询●N TP 日期和时间支持●TCP/IP●DHCP网络接口●一个局域网/以太网 (RJ-45) 10/100 Mbit 接口视频接口●HDMI 1.4●3G-SDI功率●12V/3A●100-120/200-240 VAC,50/60 Hz工作温度和湿度●环境温度:0°C 至40°C(32°F 至104°F)●相对湿度 (RH):10% 至 90%存储和运输温度●相对湿度为 10% 至 90%(非冷凝)时,温度为-20°C 至60°C(-4°F 至140°F)尺寸●长度:10.6 英寸(26.8 厘米)●高度:6 英寸(15.2 厘米)●深度:6.4 英寸(16.3 厘米)●重量:5.5 磅(2.5 千克)订购信息如需订购,请联系您当地的思科代表并参阅表 3。
- 1、下载文档前请自行甄别文档内容的完整性,平台不提供额外的编辑、内容补充、找答案等附加服务。
- 2、"仅部分预览"的文档,不可在线预览部分如存在完整性等问题,可反馈申请退款(可完整预览的文档不适用该条件!)。
- 3、如文档侵犯您的权益,请联系客服反馈,我们会尽快为您处理(人工客服工作时间:9:00-18:30)。
产品手册
Cisco TelePresence Precision 60 摄像头
如果您需要视频会议达到最佳清晰度,此款摄像头是您的理想选择。
Cisco TelePresence®Precision 60 摄像头 (Precision 60) 不仅能够提供一流的成像体验,还可以极其灵活轻松地集成到会议室、会场和特定行业项目(图 1)。
Precision 60 为大型会议室场景提供强大的集成成像解决方案,该摄像头具备以下功能:
●业界最佳的画质,1080p60,20 倍变焦,广角视图
●对光照条件的适应性强;噪点少,可提供优质图像
●变焦范围广,可覆盖大型高级会议场景
图 1. Cisco TelePresence Precision 60 摄像头
产品功能
表 1 概述了 Precision 60 摄像头的主要特性。
表 1. 特点总结
产品功能
表 2 列出了 Precision 60 摄像头的产品功能规格。
表 2. 产品规格
规格说明
解决方法●在 60 fps 时分辨率为 1920 x 1080
变焦●10 倍光学变焦
●2 倍数字变焦
●20 倍总变焦
平移和倾斜●平移活动范围:+/-100°
●倾斜活动范围:+/-20°
视野 (FoV) ●水平视野:80°
●垂直视野:48.8°
对焦距离●1.0 米至无穷远(广角)
光圈●1.5
摄像头控制●以太网
对焦、白平衡和亮度●手动或自动
IP 网络特点●DNS 服务配置查询
●NTP 日期和时间支持
●TCP/IP
●DHCP
网络接口●一个局域网/以太网 (RJ-45) 10/100 Mbit 接口
视频接口●HDMI 1.4
●3G-SDI
功率●12V/3A
●100-120/200-240 VAC,50/60 Hz
工作温度和湿度●环境温度:0°C 至 40°C(32°F 至 104°F)
●相对湿度 (RH):10% 至 90%
存储和运输温度●相对湿度为 10% 至 90%(非冷凝)时,温度为 -20°C 至 60°C(-4°F 至 140°F)尺寸●长度:10.6 英寸(26.8 厘米)
●高度:6 英寸(15.2 厘米)
●深度:6.4 英寸(16.3 厘米)
●重量:5.5 磅(2.5 千克)
订购信息
如需订购,请联系您当地的思科代表并参阅表 3。
表 3. 订购信息
思科服务与支持
思科和我们的合作伙伴提供广泛的个性化智能服务和支持组合,可以通过提高业务灵活性和网络畅通性帮助您实现思
科网真投资的全部业务价值。
该服务产品组合利用网络作为强大的业务平台加快业务创新。
有关这些服务的详细信息,
请访问:/go/telepresenceservices。
美国印刷C78-731234-00 03/14。