Line6 POD2.0的中文说明书
lin6 pod xt live 说明书

1 line6 pod xt中文说明书当EDIT(编辑),SA VE(储存)或TUNER(对音器)亮着,“SELECT”表示选择页面。
如没有,“SELECT”则用作频道记忆。
COMP(压缩),STOMP(效果盒),MOD(模式)和DELAY(延时)灯亮着时,代表效果正在使用CAB/A.I.R.亮着时表示正独立使用音箱效果重复按两下各效果按钮,便会进入它们的编辑页面1.功放设定2.A.I.R.设定3.压缩器及门限设定4.效果盒选择及设定5.模式选择及设定6.模式设定(第2页)7.延时选择及设定8.延时设定(第2页)9.混响选择及设定10.哇音及音量设定11.修改效果及节拍设定1.储存音色到频道记忆2.储存个人的功放模形3.储存个人的效果设定4.重设厂方设定的单独频道5.重设厂方设定6.MIDI传送1.对音器2.您连接了什幺?3.显示缩写4.MIDI5.PODxt软件版本功放模形0BYPASS(跳过功放模形)1TUBEPREAMP真空管乐器前级2LINE6CLEANLINE621世纪清声3LINE6JTS-45LINE6原创4LINE6CLASSALINE6原创5.LINE6MOODLINE6原创6SPINALPUPPETLINE6原创7LINE6CHEMXLINE6化学品X8LINE6INSANEWAYTOOMANYHOURSOFSHEDDING 9LINE6ACO2LINE6PIEZO电声210ZENMASTERBUDDA TWINMASTER2x12音箱11SMALLTWEED’53芬达DELUXE12TWEEDB-MAN‘58芬达BASSMAN13TINYTWEED’60TWEED芬达CHAMP14BLACKFACELUX‘65芬达BLACKFACETWIN15DOUBLEVERB‘64芬达DELUXEREVERB16TWO-TONEGRETSCH615617HIWAYTOOHIWAIICUSTOMTOO18PLEXI45’65马歇尔JTM-4519PLEXILEAD’68马歇尔‘PLEXI’SUPERLEAD 20PLEXIJUMPLEADJUMPERED马歇尔SUPERLEAD 21PLEXIVARIACV ARIAC’D马歇尔SUPERLEAD 22BRITJ-800马歇尔JCM80023BRITJMPRE马歇尔JMP-1前级功放24MA TCHCHIEF’96MATCHLESSCHIEFTAIN25MA TCHD-30MA TCHLESSDC-3026RECTODUAL2001MESABOOGIEDUALRECTIFIER 27CALICRUNCH’85MESABOOGIEMARKIIC+28JAZZCLEAN’87罗兰DJC-12029SOLO100SOLDANOSLO-100HEAD30SUPER0SUPROS661631CLASSA-15’60VOXAC-1532CLASSA-30TB’67VOXAC-30TOPBOOST音箱模式0NOCAB无11X6SUPER0SUPROS661621X8TWEED’60TWEED芬达CHAMP31X10GIBTONEGIBSONEXPLORER41X10G-BRANDGRETSCH51X12LINE6LINE6ORIGINAL61X12TWEED’53芬达DELUXEREVERB71X12BLACKFACE’65芬达DELUXEREVERB 81X12CLASSA VOXAC-15W/GRAYBELLS92X2MINIT芬达MINITWIN102X12LINE6LINE6ORIGINAL112X12BLACKFACE’65芬达BLACKFACETWIN 122X12MATCH’96MATCHLESSCHIEFTAIN132X12JAZZ罗兰JC-120142X12CLASSA VOXAC-30TB154X10LINE6LINE6原创164X10TWEED‘58芬达BASSMAN174X12LINE6LINE6原创184X12GREEN20’S马歇尔带GREENBACK20’S 194X12GREEN25’S马歇尔带GREENBACK25’S 204X12BRITT75马歇尔带GR-T75’S214X12BRITV30’S马歇尔带VINTAGE30’S224X12RECTO马歇尔带CUSTOMCLESTIONS机身编号可于PODxt背板上找到,这号码会在(21)部用上,请先记下以备将来使用。
效果器pod2.0说明书

效果器目录•效果器的概述[编辑本段]所谓效果器,顾名思义,给音色施加effect(效果、影响),不仅是电吉他,许多乐器、合唱等都使用它,当您听到的音乐,基本上都是经过加工而制成的。
而不经过加工的音乐(no,effector)就给人一种美中不足的感觉。
可以说效果器在音乐的构成中,已经是必不可少的了。
在此,就电吉他所使用的代表性的效果器作一解说。
作为有效地使用效果器的入门指南,希望在制造出优质音响的同时,能把这作为研究效果器在其他乐器中的使用方法,在构成音乐全体中效果器的理想状态等方面问题的第一步。
吉他演奏如果只能弹奏的话,是不能称为合格的。
弹奏曲子、乐句时,必须能迅速定出与弹奏本人的个性相适合的音色来。
如果音色、音量错了,好好的乐句就成了毫无意义的东西,又破坏了它的协调性(统一性)。
效果器的产生与发展[编辑本段]那么,效果器是怎样的一种电子仪器呢?拉胡琴或拉小提琴时,演奏者常常将捺弦的左手指在弦上放意的作抖动使发出的声音随之微微颤抖,听起来很优美,这种添加的吸音就称为效果。
又如卡拉OK演唱者通过混响器之后的声音,变得丰满、宽广,这种混响也是效果。
效果有增润音色和改变音色的作用,效果器就是专用于产生以上各种效果的电子仪器。
它的作用是改变原有声音的波形,调制或延迟声波的相位、增强声波的偕波成分等一系列措施,产生各种特殊声效。
效果装置最早出现干电子风琴中,是电子风琴的重要组成部分。
早期的电子风琴用涮簧装置产生混响。
利用一组旋转的扬声器和一组固定的扬声器的相对运动,产生回旋音响。
又在电子线路中用附加的振荡器调制音频电讯号,产生颤震音。
人们将这些效果装置提取出来,加以改进与发展,单独制成混响器(Reverb)、延时器(Delay)、移相器(Phaser)、弗兰格(Flanger)等,用于电吉他或其他电声乐器演奏摇滚乐。
近年来,效果器不断的创新、发展,形成多达十余种的一个系列,供各种摇滚乐队不同风格流派选用。
LINE6 PODxt 中文说明书连接的
简介欢迎进入PODxt…多谢让PODxt进入您的生活,当您使用PODxt做为录音器材,强力的前级,练习的伙伴或数字讯号处理工具—我想您会同意,PODxt是一台能令您的电吉它至吉它功放间发挥神奇作用的东西。
PODxt藉由Line6的点对点模形技术,提供无与伦比的音色(跟我们的Vetta系列功放一样),而㩦带方便,简单易用,这已是吉它录音世界里的多年标准。
现在您已拥有过去一世纪以来的经典吉它功放和效果盒,另加不折不扣的录音及完美音色—只等您一一选用。
模形模形:是什么东西呢?又为什么如此重要呢?要回答这问题,我们会先由真空管开始。
我们所有人都会同意,真空管是每种驻名功放的灵魂和心脏,也是这些功放能发出温暖而丰满音色的关键,电子管(晶体管)是无法轻易复制真空管的温暖和表现的,而”hybrids”—由一组晶体管加上真空管造成的电路—则能有效地提升由晶体管为基础的音色,它们会模仿出百份百的真空管电路。
就是这样,真空管…或什么都不要,对吗?您看看,Line6的工程师-吉它手团队,花了很多年的时间,领会出真空管设备里,各种不同真空管配合不同吉它功放设计所产生的细微变化。
真空管怎样处理输入的讯号,怎样在讯号上加上色彩及形状,在什么地方开始失真,与及失真的量及个性,当讯号进入系统其它部份时会发生什么事情,将整个过程,做出各种电子数据。
由吉它的拾音输出,变成电子讯号,经过真空管至各样器材,一系列的讯号处理过程都已考虑过.确定了各项细节后,Line6的工程师便开始将这一切利用软件模仿出由吉它功放的真空管至各种电子设备的讯号处理过程,造成一份数字蓝图,够利害了吧?之后Line6再将精神集中到了解吉它音箱单元与产生美妙的吉它音色的关系上,再添上各种吉它手爱用的效果脚踏和机架式效果,他们将这一切翻译到这更强大的软件里,这划时代的DSP(数字讯号处理)软件基础模形技术,赋与Line6力量,创造出这台PODxt.功放,音箱及效果模形Line6借着对音色及技术的认识,将吉它手世界里的真正”经典音色”,归纳到Amp(功放),Cab(音箱)及Effect(效果)模形之中。
[原创]line6podhd300400效果器中文说明书
![[原创]line6podhd300400效果器中文说明书](https://img.taocdn.com/s3/m/2244f60e974bcf84b9d528ea81c758f5f61f294e.png)
line6 pod hd300 400效果器中文说明书line6 pod hd300 400效果器中文说明书中文操作手册1. 详细设置这一章节将会详细介绍如何设置POD HD300和POD HD400,如何校正踏板和恢复出厂设置。
设置选项通过设置菜单,你可以对系统进行设置。
设置后,大部分的设置在你下次开机时会保持不变。
而且这些设置是全局性的设置,不会因你选择的预设而改变。
要进入设置菜单,按下PRESETS钮,并且使用方向键进行菜单浏览。
如下图:输出模式——LIVE模式选项HD300的背后有一个输出模式选择拨档,上图中的菜单就是用来设置LIVE模式的下级模式的。
有四种模式供选择:● ComboFrt: 连接至一体箱的前级输入(默认)● ComboAmp: 连接到一体箱的后级输入● StackFrt: 连接至分体箱箱头的前级输入● StackAmp: 连接至分体箱箱头的后级输入AutoFX● AutoFX-Disabled: 在选择不同的音箱模拟的时候,不会改变当前的效果链的设置● AutoFX-AmpSetFX: 在选择不同的音箱模拟的时候,效果链会自动按出厂预设值改变。
USB 监听音量当HD300作为USB音频设备使用的时候,这里可设置USB监听音量。
脚钉控制模式选择有两种脚钉模式来对“预设”,“单块”和“循环乐句”功能进行操作。
● Normal:正常模式。
在此模式下,每踩动一次MODE开关都会在这三个模式中变换:“预设”(绿灯),“单块”(黄灯)和“循环乐句”(红灯)● Hold4Lpr:在这个模式下,只有长按(踩)MODE开关才会进入“循环乐句”控制模式,离开“循环乐句”只需再轻踩一次MODE。
瞬时轻按(踩)MODE只会在“预设”和“单块”两个模式之间变换。
AC Rate所有POD HD 的音箱模拟都包含了交流电电流声的模拟,这是电子管音箱音色的重要组成部分。
美国音箱设置在60Hz,英国音箱设置在50Hz可获得更逼真的模拟效果。
Line 6 POD HD Edit 安装指南说明书
2•1
Installation on Mac OS X
Welcome
When the installer starts, you will see the Welcome screen - read the text and click Continue.
You’ll then be prompted to accept this License Agreement. Select Agree if you consent to the terms and the Installer will allow you to proceed. If you disagree, you cannot install POD HD Edit.
1•2
Installation on Mac OS X
Installation on Mac OS® X
To follow are illustrated steps for installing POD® HD Edit on Mac OS® X 10.5 (Leopard®). The installation process is the same if installing on Mac OS® X 10.4 (Tiger®) or 10.6 (Snow Leopard®) versions. Exit all other applications, and then proceed with the following steps.
2•2
Installation on Mac OS X
Line 6 Bass POD XT Live Bass Floor POD 产品说明书

*Tous les noms de produits sont des marques commerciales de leurs détenteurs respectifs. Ces noms ne sont nulle-ment associés ni affiliés à Line 6. Les noms de produits, descriptions et illustrations servent uniquement à faciliter l’identification des produits étudiés par Line 6 pour élaborer ses modèles. MESA/BOOGIE est une marque déposée de Mesa/Boogie, Limited. Mini-Brute est une marque déposée de Pamco Enterprises, Inc.
l’identification des produits étudiés par Line 6 pour élaborer ses modèles. MXR est une marque déposée de Applied Research and Technology, Inc. Jazz Bass est une marque déposée de Fender Musical Instrument Corporation. AGUI-LAR est une marque déposée de David Boonshoft. ROLLS-ROYCE est une marque déposée de Rolls-Royce PLC. FERRARI est une marque déposée de Ferrari S.P
Line6 Bass PODxt 产品说明书
parleurs JBL. Le son de cette enceinte nous rappelle un peu le thème de Barney Miller et évoque ces jours (et nuits) de répétition avec le groupe jazz local de notre lycée. Jouez donc le thème de “Peter Gunn”…
LINE 6 POD 2.0说明书

POD 2.0说明书(完整版)POD 2.0中文说明1 开关- 在POD 2.0右侧。
按下它可以开启你的POD2.0。
2 输入- 在POD 2.0右下侧。
把你的吉他连接在这里。
3 耳机接口- 在POD 2.0的左下侧。
连接你的耳机以做静音练习。
音量由OUTPUT控制。
其耳机放大器可供所有型号的耳机使用。
4 输出- 在POD 2.0面板的最左边(OUTPUT)。
控制主输出音量。
当储存音色时,这一值是不被记录的。
改变主音量并不改变音色。
《注:在主输出音量开到最大时,POD 2.0会给您最佳的信噪比。
相反,当主音量开得较小时,会出现嘶噪。
所以当您录音时,尽量将您的OUTPUT开到最大。
请确定您所连接的设备的输入口属于“线输入”(LINE LEVEL), 而不是麦克风/吉他输入。
线输入可以允许POD 2.0的总输出开到最大(或接近最大)从而得到最佳的音色。
如果您的设备的输入类型为麦克风或吉他,请把输入放到较低,把POD 2.0的输出放到较大。
》5 左右输出- 在POD 2.0的左上侧。
在左右输出的中间有DIRECT/AMP字样,输出时将你的调音台/录音设备连接到左输出(DIRECT),吉他音箱/监听音箱连接到右输出(AMP)6 A.I.R Mode拨档- 在POD 2.0的左右输出中间,A. I. R.定向录音输出属Line6独有,专门为直路录音设计,将A.I.R Mode拨档调到左输出(DIRECT)一边即可。
7 踏板接口- 在POD 2.0上方,可与LINE6 Floor Board/FB连接。
POD 2.0不支持LINE6FBV4.8 MIDI输入与输出- 在POD 2.0右上方。
通过MIDI线与MIDI设备间接9 Drive- 其控制您所选择的放大器(Amp)的Drive。
就像吉他放大器上的输入音量,调得越高,音色越脏。
10 音色控制- 低音(BASS),中音(MIDDLE),高音(TREBLE),真实度(Presence)。
LINE6 POD2.0带图片解释,史上最详细说明书
POD 2.0中文说明,音色列表1 开关- 在POD 2.0右侧。
按下它可以开启你的POD2.0。
2 输入- 在POD 2.0右下侧。
把你的吉他连接在这里。
3 耳机接口- 在POD 2.0的左下侧。
连接你的耳机以做静音练习。
音量由OUTPUT控制。
其耳机放大器可供所有型号的耳机使用。
4 输出- 在POD 2.0面板的最左边(OUTPUT)。
控制主输出音量。
当储存音色时,这一值是不被记录的。
改变主音量并不改变音色。
《注:在主输出音量开到最大时,POD 2.0会给您最佳的信噪比。
相反,当主音量开得较小时,会出现嘶噪。
所以当您录音时,尽量将您的OUTPUT开到最大。
请确定您所连接的设备的输入口属于“线输入”(LINE LEVEL), 而不是麦克风/吉他输入。
线输入可以允许POD 2.0的总输出开到最大(或接近最大)从而得到最佳的音色。
如果您的设备的输入类型为麦克风或吉他,请把输入放到较低,把POD 2.0的输出放到较大。
》5 左右输出- 在POD 2.0的左上侧。
在左右输出的中间有DIRECT/AMP字样,输出时将你的调音台/录音设备连接到左输出(DIRECT),吉他音箱/监听音箱连接到右输出(AMP)6 A.I.R Mode拨档- 在POD 2.0的左右输出中间,A. I. R.定向录音输出属Line6独有,专门为直路录音设计,将A.I.R Mode拨档调到左输出(DIRECT)一边即可。
7 踏板接口- 在POD 2.0上方,可与LINE6 Floor Board/FB连接。
POD 2.0不支持LINE6 FBV4.8 MIDI输入与输出- 在POD 2.0右上方。
通过MIDI线与MIDI设备间接9 Drive- 其控制您所选择的放大器(Amp)的Drive。
就像吉他放大器上的输入音量,调得越高,音色越脏。
10 音色控制- 低音(BASS),中音(MIDDLE),高音(TREBLE),真实度(Presence)。
Line 6 Pocket POD 商品说明书

®POCKET PODPILOT’S GUIDE 40-00-0121 Rev. B /manuals © 2022 Yamaha Guitar Group, Inc. All rights reserved.Supplier’s Declaration of Conformity47 CFR § 2.1077 Compliance InformationUnique Identifiers: Line 6® Pocket POD®Responsible Party - U.S. Contact Information:Yamaha Guitar Group, Inc.26580 Agoura RoadCalabasas, CA 91302-1921(818) 575-3600https:///FCC Compliance Statement:This device complies with Part 15 of the FCC Rules. Operation is subject to the following two conditions: (1) This device may not cause harmful interference, and (2) this device must accept any interference received, including interference that may cause undesired operation.2What’s in the BoxPocket POD®, (4) AAA batteries, Pilot’s Guide. HookuporRECORDINGIf output is too loud foryour headphones or otherequipment:use to avoid draining batteries.Selecting PresetsPress repeatedly toselect Browse mode:SelectFWDprevious presetAdjusting Amp ToneSelecting Amp ModelsAdjusting Effectstweakeddepends oneffect loadedDelay Rate / Effect SpeedSelecting Effect ModelsPreviousEffect ModelNext5Enabling the Noise GateGate OffUsing the Built-in Tuner436-445 Hz67Saving User Presets1. Press Save2. Select User Preset to replace3. Press Save againChoose a destination(User Preset 01A - 31D)4. Rename User Preset5. Press Save againChange letter, number,or character8Cabinet Tuning ModeBy default the AMP OUT is tuned for ideal sound when connected to the instrument input of an open-back guitaramplifier. If connecting to something else, you can change the Cabinet Tuning Mode.1.3.- no amp or speaker cabs connected (to recording device, mixer, live P .A., etc.) - for connecting to a guitar combo/head with a closed back speaker cabinet. - for connecting to a guitar combo/head with an open back speaker cabinet. - for connecting to a power amp with an open back speaker cabinet. - for connecting to a power amp with a closed back speaker cabinet.Press9Factory ResetWARNING!All custom User Presets will be lost after a Factory Reset.1.2.ConnectNo drivers needed!10Edit and ShareT build your own personal tone collection, download POD editor/librarian software at /software.* Then visit CustomT to download any of 10,000+ free Pocket POD-compatible presets and share your own unique tones with guitarists from around the world.*NOTE: Please see the Release Notes for the current Vyzex Pocket POD edit application for information regarding supported Mac and Windows computer systems./manualsSelect Pocket POD in our online manual archive to download the companion manual that describes the details of all the amps and effects featured in your Pocket POD.Serial No.: _____________________________All specifications subject to change.© 2022 Yamaha Guitar Group, Inc. All rights reserved.Line 6, the Line 6 logo, and POD are trademarks or registered trademarks of Yamaha Guitar Group, Inc. in the U.S. and/or other jurisdictions. Mac is a trademark of Apple, Inc. registered in the U.S. and other countries. Apple is not responsible for the operation of this device or its compliance with safety and regulatory standards. Windows is a registered trademark of Microsoft Corporation in the United States and/or other countries.。
Line6POD2.0的中文说明书解读

Line6 2.0的中文说明书Line 6 POD 2.0 控制与连接中文简易说明1 开关- 在POD 2.0右侧。
按下它可以开启你的POD2.0。
2 输入- 在POD 2.0右下侧。
把你的吉他连接在这里。
3 耳机接口- 在POD 2.0的左下侧。
连接你的耳机以做静音练习。
音量由OUTPUT控制。
其耳机放大器可供所有型号的耳机使用。
4 输出- 在POD 2.0面板的最左边(OUTPUT)。
控制主输出音量。
当储存音色时,这一值是不被记录的。
改变主音量并不改变音色。
《注:在主输出音量开到最大时,POD 2.0会给您最佳的信噪比。
相反,当主音量开得较小时,会出现嘶噪。
所以当您录音时,尽量将您的OUTPUT开到最大。
请确定您所连接的设备的输入口属于“线输入”(LINE LEVEL), 而不是麦克风/吉他输入。
线输入可以允许POD 2.0的总输出开到最大(或接近最大)从而得到最佳的音色。
如果您的设备的输入类型为麦克风或吉他,请把输入放到较低,把POD 2.0的输出放到较大。
》5 左右输出- 在POD 2.0的左上侧。
在左右输出的中间有DIRECT/AMP字样,输出时将你的调音台/录音设备连接到左输出(DIRECT),吉他音箱/监听音箱连接到右输出(AMP)6 A.I.R Mode拨档- 在POD 2.0的左右输出中间,A. I. R.定向录音输出属Line6独有,专门为直路录音设计,将A.I.R Mode拨档调到左输出(DIRECT)一边即可。
7 踏板接口- 在POD 2.0上方,可与LINE6 Floor Board/FB连接。
POD 2.0不支持LINE6 FBV4.8 MIDI输入与输出- 在POD 2.0右上方。
通过MIDI线与MIDI设备间接9 Drive- 其控制您所选择的放大器(Amp)的Drive。
就像吉他放大器上的输入音量,调得越高,音色越脏。
10 音色控制- 低音(BASS),中音(MIDDLE),高音(TREBLE),真实度(Presence)。
Line 6 Spider V 20音箱操作指南说明书
SPIDER V 20PILOT’S GUIDE40-00-0395 Rev A Pilot’s Guide also available at /manuals © 2017 Line 6, Inc.MANUEL DE PILOTAGEPILOTENHANDBUCH MANUAL DEL PILOTO パイロット・ガイド新手指南For details on other Spider V amplifier models, please see the Spider V Family Pilot's Guide, available at /manuals.Welcome to the descriptions of the Line 6®functionality.The SPIDER V 20 SPIDER Familya compact combo form factor features of the SPIDER V 20 Features:•use of the Spider V Remote• Extended-range speakerelectric guitar•• Built-in T uner•••free Spider V Remote•and PC computers• Stereo headphone output••and parameters••••backup at any time1. INPUT Jack – Plug in your guitar here.2. PRESET Encoder – T urn to select one of the 16 available presets. Apreset stores the value of each knob, as well as the FX 1, 2 & 3 model types and their bypass states.3. DRIVE Knob – Drive is like the volume or gain knob on other amps;it controls how much “dirt” or “distortion” you get in your sound. 4. TONE Knob –This knob is a macro control for the overall tonalsettings for each amp, utilizing bass, mid and treble controls under-the-hood. T urn this down for a warmer tone, or up for a brighter sound, with a flatter or "scooped" sound at 12 o'clock.5. VOLUME Knob – Controls the volume of the preset independentlyof the MASTER Volume Knob. Use this knob to match volumes between presets.6. REVERB Knob – Controls the mix and depth of the Reverb effect.T urn it up or down for more or less ambience.7. FX Knob – Controls how much of each of the three enabled on-board effects are applied. T o adjust a particular effect amount, select and enable the desired effect using the three FX Buttons.8. FX 1, 2 & 3 Buttons – These buttons select and control the bypassstate of the three on-board effects. The FX Knob controls how much of the currently selected effect is applied to the sound.There are five different types of effects available, with each type displaying a corresponding color: yellow for Dynamics/Compression, orange for Distortion, blue for Modulation, green for Delay/Echo, and purple for Filter/Pitch/Synth.9. SAVE Button – Press to store the values of the knobs and state ofthe FX buttons within the currently selected preset.10. T AP/TUNER Button – T apping this button a few times sets thetempo of your delay and modulation effects in use.Pressing and holding this button for 2 seconds engages the T uner.The T uner mutes the guitar signal and utilizes the three FX Buttons' lights to indicate your pitch by displaying red on the left (flat), red on the right (sharp) or green in the middle (in-tune). Press the T AP/ TUNER button once to exit the T uner.11. MASTER Volume Knob – Y ou can choose the overall volume of theamplifier (or headphones, if connected), without affecting the overall tone or saturation. Always start with the MASTER knob set to minimum!12. PHONES Output – Connect a pair of headphones here. When youdo so, the speaker is muted. This jack also doubles as a direct output.Use a stereo TRS cable to connect to a mixer or recording device.13. USB (Micro B connector) – Connect a Mac, PC, iOS device (withApple USB Camera Connection Kit) or Android device (with OTG adapter), to edit tones using the Spider V Remote application, or to playback and record audio.Controls and ConnectionsAC PowerThe amplifier's Power Switch and AC Connector, for use with the included power cable, are located on the rear panel of the amplifier.Changing PresetsT urn the PRESET Encoder to choose the desired preset. Each preset is designed for a particular style or application and includes one type of amp model, the 3 Smart FX and their settings.Editing Your ToneSelect the preset from which you wish to base your tone and use the knobs and buttons to modify the sound to your liking (see "Controls and Connections" for details). The Drive, T one, Volume, Reverb amount, Effects amounts and their bypass states can all be modified using the controls on the front panel of the amplifier. Y ou can utilize the Spider V Remote editor application to further modify the type of amp or effects you want to use within the preset.Saving PresetsSave your settings to the current PRESET Encoder location by pressing the SAVE button once. The SAVE button will blink twice to indicate the preset is now saved. Y ou can utilize the Spider V Remote app to copy or rearrange your presets.Using Smart FXThe SPIDER V 20 amplifier includes a built-in Reverb effect as well at 3 assignable Smart FX per preset.The assignable Smart FX types are Dynamics (yellow), Drives (orange), Modulation (blue), Delay (green), and Filter/Pitch/Synth (purple). There are multiple models to choose from for each effect type. Y ou can utilize the Spider V Remote app to change the effect type or model.1. Press the FX Buttons 1-3to turn each effect on or off. Whenilluminated brightly, the effect is on (enabled). When an effect is off (bypassed), it is lit dimly.2. The FX Knob controls how much of the effects are being applied.This only applies to whichever effects that are currently enabled, all at once. T o modify only a single effect's amount, turn off the other two effects. This control functions in a relative manner, so you may have to move it back and forth to find the right amount.3.Once you are pleased with the amount of the effects, press theSAVE Button to retain these settings as part of the preset. Using the Spider V Remote Application for Mac & PC Spider V Remote is a FREE editor and librarian application for Mac and PC, available at /software. T o connect a Spider V 20 amp to your computer, use a standard USB-A to USB-Micro B cable or adapter (not included). Simply install and launch the application and it will automatically sync up with your Spider V 20 amplifier.*NOTE: For USB operation with Windows®computers, it is necessary to install the latest Line 6 Spider V ASIO driver from /software. There is no driver installation necessary for Mac computers.Application OverviewThe application displays a preset's contents within its three panels: the Signal Flow, Model Browser and Editor panels. The Signal Flow panel shows the various types of "blocks" that make up the current preset. All available amp & effects models are selectable within the Model Browser, arranged by type. All available parameters for the currently-selected block appear within the Editor, located in the lower right pane. T o edit a parameter value, click and drag on the slider handles within the Editor panel.Changing Amps and EffectsT o change the model for any amp or effects block, select the block within the Signal Flow, then choose the desired model from the Model Browser. Loading and Saving PresetsT o save your tone from within the application, click the LOAD/SAVE button and select Save T one to SPIDER V 20. The current preset slot will be highlighted. Alternatively, you may select a different save destination slot if desired. Click Save to complete the operation. T o follow are additional options available from this menu for managing your Preset Library.• Save T one to Spider V 20 – Saves the tone with all its current settings to a preset slot of your choosing.• Save T one to Disk – Saves the current tone to a folder on disk as an .l6p tone file.• Load T one – Loads a tone from disk, but does not save the tone to the current preset slot.• Import T one to Spider V 20 – Loads a .l6p tone file from disk and saves it to a preset slot of the of your choosing.• Export T one from Spider V 20 – Saves a different tone than the one currently loaded to a folder on disk.• Back Up Spider V 20 to File – Creates a "bundle" backup file which includes all the tones currently loaded on your Spider V 20 amp and saves the file to disk.• Restore Spider V 20 from File – Overwrites all presets on your Spider V 20 amp with the tones in the backup file from disk. Using Spider V Remote App on iOS and Android Devices Spider V Remote is also offered as a FREE editor, librarian and updater app for iOS and Android mobile devices. The functionality of the mobile application is very similar to that of the Spider V Remote Mac & PC application (please see preceding section).For iOS Devices -An Apple USB Camera Connection Kit adapter is required for connecting to your Spider V 20 amp's USB port. The Spider V Remote mobile app is available free from the Apple App Store.For Android Devices -An Android "On-The-Go" (OTG) Adapter is required for connecting to your Spider V 20 amp's USB port. The Spider V Remote mobile app is available free from the Google Play™ store.Steinberg Cubase® LE Recording SoftwareT o get your FREE copy of Steinberg Cubase LE software for Mac or PC, please register your Spider V 20 amplifier at https:///account/ registergear/. Once registered, you'll receive a software activation code and download link on the online registration page.Spider V 20 Amplifier Firmware UpdatesFor optimal performance, always run the latest firmware in your Spider V 20 amplifier. The Spider V Remote mobile application will inform you whenever a firmware update is available, so you'll always know you have the latest version! If a firmware update is available, you can perform the update from within the Spider V Remote mobile application - just follow the prompts to complete the update on your connected Spider V 20 amplifier.If your Spider V 20 amp is connected to a Mac or Windows computer, you'll need use the Line 6 Updater application to check for and perform firmware updates - available free from /software. The Line 6 Updater app contains all instructions for successful firmware updates, and best of all, completes the update in just a few minutes.。
Line 6 Spider II 电钢吉他电路图指南说明书

********************************************************.comRevDPilot’s Guide for Spider II 15, 30 & HD75All product names referred to in this manual are trademarks of their respective owners, which are in no way associated or affiliated with Line 6. These trademarks of other manufacturers are used solely to identify the products of those manufacturers whose tones and sounds were studied during Line 6’s sound model development.CAUTION: This equipment has been tested and found to comply with the limits for a Class B digital device pursuant to Part 15 of FCC Rules. Operation is subject to the following two conditions: (1) This device may not cause harmful interference,and (2) this device must accept any interference received, including interference that may cause undesired operation.Spider II Pilot’s Guide © 2005, Line 6, Inc.Line 6, Spider II, FBV, FBV Shortboard, FBV4, FBV2, Floor Board, FB4 and Vetta are trademarks of Line 6, Inc. All other product names, trademarks, and artists’ names are the property of their respective owners, which are in no way associated or affiliated with Line 6. Product names, images,song names and artists’ names are used solely to identify the products whose tones and sounds were studied during Line 6’s sound model development for this product. The use of these products,trademarks, images, and artists’ names does not imply any cooperation or endorsement.CAUTION: To reduce the risk of fire or electric shock, do not remove screws. No user-serviceable parts inside. Refer servicing to qualified service personnel.The lightning symbol within a triangle means,“Electrical caution!” It indicates the presence of information about operating voltage and potential risks of electrical shock.This symbol within a triangle means, “Caution!Hot surface!” It is shown in areas that may become too hot to touch when the device is in operation.WARNING: To reduce the risk of fire or electric shock, do not expose this appliance to rain or moisture.The exclamation point within a triangle means,“Caution!” Please read the information next toall caution signs.Y ou should read these Important Safety Instructions.Keep these instructions in a safe place.Before using your Spider II, carefully read the applicable items of these operating instructions and the safety suggestions.1.Obey all warnings on the amp and in the Spider II Manual.2.Connect only to AC power outlets rated 100-120V or 200-240V 47-63Hz (depending on voltage range of the unit; refer to back panel).3.Do not perform service operations beyond those described in the Spider II Manual. Service is required when the apparatus has beendamaged in any way, such as:•power-supply cord or plug is damaged•liquid has been spilled or objects have fallen into the apparatus•the unit has been exposed to rain or moisture•the unit does not operate normally or changes in performance in a significant way•the unit is dropped or the enclosure is damaged.4.The bottom of the metal chassis can get hot during operation. Do not touch during operation or shortly after.5.Do not place near heat sources, such as radiators, heat registers, or appliances which produce heat. Keep the rear of the unit at leastthree inches from walls or other items that might block heat radiation.6.Do not block any of the ventilation openings or use in an enclosed space.7.Guard against objects or liquids entering the enclosure. Do not use or place unit near water.8.Do not step on power cords. Do not place items on top of power cords so that they are pinched or leaned on. Pay particular attentionto the cord at the plug end and the point where it connects to the amp.9.Unplug the amp when not in use for extended periods of time. Unplug the amp during lightning storms.10. Clean only with a damp cloth.11. Do not defeat the safety purpose of the grounding type plug. A grounding type plug has two blades and a third grounding prong.The third prong is provided for your safety. When the provided plug does not fit into your outlet, consult an electrician for replacement of the obsolete outlet.12. Only use attachments/accessories specified by the manufacturer.13.Prolonged listening at high volume levels may cause irreparable hearing loss and/or damage. Always be sure to practice “safe listening.”Bass, Mid, and T reble controls are customized for each Channel to give you optimal tonal control.channels. See (2) above for the low-down on channels.subtle to overpowering—for each effect. The second knob picks tape echo, sweep echo or reverb with a range of mix settings from low to high. When you select an echo effect the Tap Delay Time light flashes the delay time; tap it to change the time.without affectingyour tone.9Headphone/Record OutListen with headphones, or use this as a direct out forMP3 tracks byconnecting tothis 1/8-inchinput.T ap Delay TimeT ap the T ap Delay Time button at least two times 6CleanSelect this Amp Model and adjust the tone controls to get crisp, amazing clean tones, great warm jazz tones, and all the high-end shimmer you’ll need with a generous amount of bottom end to boot. Then dial up a little chorus and delay to get the ultimate clean sound!CrunchPlexi On Fire! This Amp Model is based on a ‘68 Marshall Plexi 100 watt with a few added extras; The combination of a Variac and the jumpered input channels creates that infamous brown sound that will feel like flames are shooting out the input jack! “Come on Dave… Give me a break!”MetalThis Amp Model is based on the Mesa Dual Rectifier. For Spider II, we made careful enhancements to this classic tone. The resulting Amp Model has a definite modern flavor. This monster truck of tone delivers a tight bottom end that’s big, powerful, tight and fast. Use this Amp Model to get a tight and punchy, high gain Metal sound.InsaneOur goal with Insane was to provide you with as much input gain distortion as possible short of complete meltdown. You get an obscene helping of distortion, while still retaining tonal definition and character. As a result, you get way more bottom end and cabinet character than other small amps. Crank up the Drive control and prepare to dominate!Welcome The Spider II...Thank you for inviting Spider II home with you. This amp mines the tonal heritage of the past forty years of guitar amplifier design and matches it up with the kind of digital signal processing magic that will still be ahead of its time ten years from now.Each of the four programmable channels is built on a different Amp Model with its own unique tone:Tap Button Extra FunctionsThe T ap Delay Time button, in addition to setting the time of your echo effects, also lets you access a Distortion Boost and a built-in Noise Gate.Distortion BoostPress and hold the T ap Delay Time button as you turn the Drive knob up past twelve o’clock. As you do this, Spider II’s CLEAN Channel light comes on to indicate that the Distortion Boost is on. This gives the kind of extra ‘dirt’ that you’d expect from a Distortion pedal with the distortion control set low and the output control set high. It boosts your guitar signal before it reaches the Amp Model, so that you hit the model harder and get a more distorted sound.Noise GatePress and hold the T ap Delay Time button as you turn the echo/reverb FX knob up past twelve o’clock, and you’ll turn on a built-in Noise Gate to help cut down on hiss and noise. As you do this, the IN SAN E Channel light comes on to indicate the Gate is on.Special Hidden FunctionsWhen you select an Amp Model, Spider II automatically sets its tone controls and effects to match that Amp Model. You can disable the auto-FX selection (but not tone control auto-selection) by powering up Spider II with the INSANE Channel button held. The auto-selection will be re-enabled next time you power up.You can also reset your Spider II’s programmable channels to their factory-programmed states by holding down the CLEAN Channel button as you turn on the power. Warning: This will erase ALL custom sounds you might have saved. Ask yourself, “Do I really want to do this?” If your answer is yes, then go for it!Note for Spider II HD75 UsersThe Spider II HD75’s speaker outputs are set up for 4 ohm cabinets only. Cabinets of other impedances may cause the HD75 to overheat and shutdown to prevent damage.Footwork(Spider II 30 & HD75 only)Two optional foot controllers can be used with the Spider II 30 and HD75: the FBV Express for channel switching and delay time tap, or the FBV2 for channel scroll. Note that the FBV, FBV Shortboard, Floor Board and FB4 foot controllers will not work with Spider II 30 and HD75.FBV foot controllers come with a RJ-45 cable. Connect it between the front panel of the Spider II and the side of the FBV. If you ever need a replacement cable, look for a Category 5 (or higher), “10 Base-T” or “RJ-45”cable with male connectors on both ends. These can be found at almost any computer supply retailer.FBV2The FBV2 functions as a two button channel scroll foot switch. Step on its switches to scroll through the four channels (Clean, Crunch, Metal, and Insane) of your Spider II 30 or HD75.FBV ExpressStep on a switch to choose from your Spider II's four channels. Want to change your Delay Time? Just tap the lit footswitch two or more times to the drummer’s beat and presto—you’re locked in! Press down the toe of the pedal to switch between wah and volume control. NOTE: The tuner on the FBV Express is not supportedby the Spider II 30 and HD75.Pilot's LogGet tone settings for a collection of great guitar songs from our web site, . Make a note of your favorite settings here by marking which channel is selected, the positions of the knobs, and the Tap Delay Time.DRIVE BASS MID TREBLECHAN VOLDRIVE BASS MID TREBLE CHAN VOLDRIVE BASS MID TREBLECHAN VOLDRIVE BASS MID TREBLE CHAN VOLDRIVE BASS MID TREBLECHAN VOLDRIVE BASS MID TREBLE CHAN VOLDRIVE BASS MID TREBLECHAN VOLDRIVE BASS MID TREBLE CHAN VOLDRIVE BASS MID TREBLECHAN VOLDRIVE BASS MID TREBLE CHAN VOL。
Line 6 Pocket POD Express 高级指南说明书
Overview
• When the other 5 strings are in good tune with the low E, fine-tune each string by observing the red LEDs. If only the flat LED lights up, tune up a bit. If only the sharp LED lights up, tune down. They’ll both light up solid when you’re in tune.
As with our Smart FX controls, there are actually several pre-programmed presets within
each Amp Model’s sweep range. These include subtle changes to Drive, Bass, Mid, Treble
1•2
and Channel Volume.
In general terms, you can think of the Amp Model Select knob as a ‘less to mlowest point of each Amp Model’s sweep, you get less of that model’s characteristic sound. At the top of the sweep, you get more of it.
®
Pocket POD® Express
Advanced Guide
An in-depth guide to the features and functionality of the Pocket POD Express.
Line6 POD2.0的中文说明书

Line6 2.0的中文说明书Line 6 POD 2.0 控制与连接中文简易说明1 开关- 在POD 2.0右侧。
按下它可以开启你的POD2.0。
2 输入- 在POD 2.0右下侧。
把你的吉他连接在这里。
3 耳机接口- 在POD 2.0的左下侧。
连接你的耳机以做静音练习。
音量由OUTPUT控制。
其耳机放大器可供所有型号的耳机使用。
4 输出- 在POD 2.0面板的最左边(OUTPUT)。
控制主输出音量。
当储存音色时,这一值是不被记录的。
改变主音量并不改变音色。
《注:在主输出音量开到最大时,POD 2.0会给您最佳的信噪比。
相反,当主音量开得较小时,会出现嘶噪。
所以当您录音时,尽量将您的OUTPUT开到最大。
请确定您所连接的设备的输入口属于“线输入”(LINE LEVEL), 而不是麦克风/吉他输入。
线输入可以允许POD 2.0的总输出开到最大(或接近最大)从而得到最佳的音色。
如果您的设备的输入类型为麦克风或吉他,请把输入放到较低,把POD 2.0的输出放到较大。
》5 左右输出- 在POD 2.0的左上侧。
在左右输出的中间有DIRECT/AMP字样,输出时将你的调音台/录音设备连接到左输出(DIRECT),吉他音箱/监听音箱连接到右输出(AMP)6 A.I.R Mode拨档- 在POD 2.0的左右输出中间,A. I. R.定向录音输出属Line6独有,专门为直路录音设计,将A.I.R Mode拨档调到左输出(DIRECT)一边即可。
7 踏板接口- 在POD 2.0上方,可与LINE6 Floor Board/FB连接。
POD 2.0不支持LINE6 FBV4.8 MIDI输入与输出- 在POD 2.0右上方。
通过MIDI线与MIDI设备间接9 Drive- 其控制您所选择的放大器(Amp)的Drive。
就像吉他放大器上的输入音量,调得越高,音色越脏。
10 音色控制- 低音(BASS),中音(MIDDLE),高音(TREBLE),真实度(Presence)。
line6 Back Track_中文 使用说明书
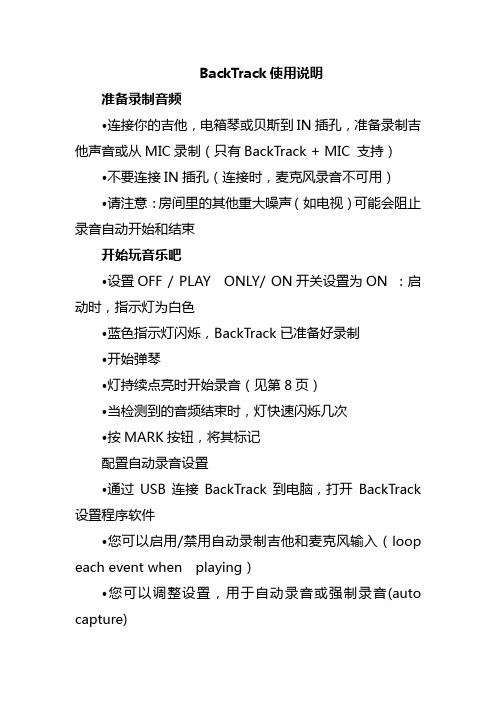
BackTrack使用说明准备录制音频•连接你的吉他,电箱琴或贝斯到IN插孔,准备录制吉他声音或从MIC录制(只有BackTrack + MIC 支持)•不要连接IN插孔(连接时,麦克风录音不可用)•请注意:房间里的其他重大噪声(如电视)可能会阻止录音自动开始和结束开始玩音乐吧•设置OFF / PLAY ONLY/ ON开关设置为ON :启动时,指示灯为白色•蓝色指示灯闪烁,BackTrack已准备好录制•开始弹琴•灯持续点亮时开始录音(见第8页)•当检测到的音频结束时,灯快速闪烁几次•按MARK按钮,将其标记配置自动录音设置•通过USB连接BackTrack到电脑,打开BackTrack 设置程序软件•您可以启用/禁用自动录制吉他和麦克风输入(loop each event when playing)•您可以调整设置,用于自动录音或强制录音(auto capture)•连接吉他到IN插孔,或者使用麦克风录音(BackTrack + MIC )不要连接IN插孔•当按住 (play),同时按MARK•灯是红色,表示你强制录制当前段落•按MARK结束录音播放方法•想要录制的音频直接从吉他的输出,把OUT插孔连接到音箱•或连接(耳机输出)至耳机或其他扬声器系统(吉他音箱)•设置PLAY MARKED/ALL到 PLAY MARKED进行回放时只能听到标记的录音•设置PLAY MARKED/ALL to 到ALL播放时,当选择音频播放时,将听到所有的声音,包括标记和未标记,•按 听到最近的录音•按 从当前录音开始•按 反复播放以前的录音•按 从头播放录音•按 播放下一个录音•按 从最后一段开始播放听到播放。
这是首选的集合起来,例如,如果你从话筒记录。
LOOP播放•通过BackTrack设置软件,您可以启用或禁用循环播放•当启用时,播放过程到了该段录音结束时,它会立即再次播放•要暂时启用/禁用循环播放,按住 (play),然后按 or •当电源关闭,BackTrack临时启用/禁用循环播放将失效•在播放音频时,按住 MARK开始录制正在播放的音频作为新的录音•放开MARK即可停止录音•按 (play)即可听到新录制的音频回放。
(叉烧投稿)Line6 AMPLIFI FX100效果器、AMPLIFi 75和AMPLIFi150吉他音箱使用说明书

使用说明书- 1 -AMPLIFi主要特点:声明:AMPLIFi FX100吉他效果器与AMPLIFi75/150吉他音箱APP操作一致1.蓝牙连接功能AMPLIFi FX100可以直接连接你的蓝牙设备,无论电脑和手机,只要有蓝牙功能就可以连接AMPLIFi FX100并播放音乐。
你就可以一边弹吉他,一边与你的“虚拟乐队”排练了!(兼容iOS、Android、Mac 与 PC)2.云端音色共享社区借助全球的音色共享社区(cloud)功能,可上传、下载、储存与共享音色,并给别人的音色打分。
最重要的是它支持中文命名的音色,使你可在中国找到大师的音色,甚至找到全球的音色并下载给自己用。
想想你之前很久都调不出来的音色,现在它已难不倒你了!3.音色搜索功能一旦播放音乐库上的歌曲,AMPLIFi APP就会自动进行相关音色搜索;或者输入你想要搜索的歌曲名称,系统将会自动识别与歌曲最接近的吉他音色。
甚至输入大师的名字,系统将会为您全球搜索。
AMPLIFi能让你与大师更近一些,搜索后音色可直接下载并保存使用,这非常有利于吉他音色模仿学习。
你甚至可以在原音色基础上再进行调节,使它转变为自己喜欢的音色。
4.AMPLIFi Remote APP控制(在App Store免费下载)安装AMPLIFi APP后,注册后便可直接在APP上进行音色调节。
支持iOS 7系统连接设备包括iPod touch (5代), iPhone 5s, iPhone 5c, iPhone 4s, iPhone 4, iPad Air, iPad (2、3、4代)、iPad mini和iPad mini 2。
AMPLIFi APP拥有漂亮的画面、强大的 DSP,它可以同时运行8个效果器,并且可细调每个参数。
5.融合英美经典吉他箱音色APP软件支持8个效果器同时使用,并且随时可以调换效果器的连接顺序!它带有200个功放箱体,单块和周边效果器。
它融合了20世纪到21世纪,从晶体管到电子管,从英国到美国、融汇全球最经典的吉他箱体。
- 1、下载文档前请自行甄别文档内容的完整性,平台不提供额外的编辑、内容补充、找答案等附加服务。
- 2、"仅部分预览"的文档,不可在线预览部分如存在完整性等问题,可反馈申请退款(可完整预览的文档不适用该条件!)。
- 3、如文档侵犯您的权益,请联系客服反馈,我们会尽快为您处理(人工客服工作时间:9:00-18:30)。
Line6 2.0的中文说明书Line 6 POD 2.0 控制与连接中文简易说明1 开关- 在POD 2.0右侧。
按下它可以开启你的POD2.0。
2 输入- 在POD 2.0右下侧。
把你的吉他连接在这里。
3 耳机接口- 在POD 2.0的左下侧。
连接你的耳机以做静音练习。
音量由OUTPUT控制。
其耳机放大器可供所有型号的耳机使用。
4 输出- 在POD 2.0面板的最左边(OUTPUT)。
控制主输出音量。
当储存音色时,这一值是不被记录的。
改变主音量并不改变音色。
《注:在主输出音量开到最大时,POD 2.0会给您最佳的信噪比。
相反,当主音量开得较小时,会出现嘶噪。
所以当您录音时,尽量将您的OUTPUT开到最大。
请确定您所连接的设备的输入口属于“线输入”(LINE LEVEL), 而不是麦克风/吉他输入。
线输入可以允许POD 2.0的总输出开到最大(或接近最大)从而得到最佳的音色。
如果您的设备的输入类型为麦克风或吉他,请把输入放到较低,把POD 2.0的输出放到较大。
》5 左右输出- 在POD 2.0的左上侧。
在左右输出的中间有DIRECT/AMP字样,输出时将你的调音台/录音设备连接到左输出(DIRECT),吉他音箱/监听音箱连接到右输出(AMP)6 A.I.R Mode拨档- 在POD 2.0的左右输出中间,A. I. R.定向录音输出属Line6独有,专门为直路录音设计,将A.I.R Mode拨档调到左输出(DIRECT)一边即可。
7 踏板接口- 在POD 2.0上方,可与LINE6 Floor Board/FB连接。
POD 2.0不支持LINE6 FBV4.8 MIDI输入与输出- 在POD 2.0右上方。
通过MIDI线与MIDI设备间接9 Drive- 其控制您所选择的放大器(Amp)的Drive。
就像吉他放大器上的输入音量,调得越高,音色越脏。
10 音色控制- 低音(BASS),中音(MIDDLE),高音(TREBLE),真实度(Presence)。
通过这些旋钮来控制你所选择的吉他放大器的这些参数。
《注:POD2.0面板上面并没有这个键,真实度(Presence)需要通过按键组合(TAP+TREBLE)调节真实度(Presence)》11 通道音量(Channel V olume)- 与主输出不同的是,当储存音色时,这个值会被记录。
一般来说,Chan V ol 越高越好,因为你可以得到较好的信噪比。
12 混响(Reverb)- 控制混响深度13 效果(Effects)- 选择你所需要添加的效果器音色,《注:POD 2.0的箱体模拟也在这个里面控制,但同样需要通过按键组合(TAP+Effects)来选择箱体》14 效果调整(Effects Tweak)- 调整你所选择的效果器的参数,比如失真深度,延时时间等。
效果的速度(speed)一般用Tap键点出来(所选择的速度参照Tap 键闪的频率)15 音箱类型(Amp Models)- 当你旋转它时,它会改变POD 2.0的音箱模拟类型。
当你选择一种音箱模拟时,箱体模拟也会随之载入。
比如,当你选择“Brit Hi Gain”(模拟Marshall JCM 800 head)时,基于该音箱模拟(Marshall JCM 800 head)的4x12的箱体模拟也会被载入。
《注:转动Amp Models旋钮只可调节出16个音箱模拟,而众所周知POD 2.0的音箱模拟一共是32种,其余的16种音箱模拟需要通过组合键(TAP+Amp Models)来调出》16 POD 2.0屏幕上的八个键* 上/下键- POD 2.0有36个原厂音色(Channels),9个库,每个库有4个音色。
你可以通过按动上/下键来选择音色。
* Manual键- 按下Manual键,现在你听到的音色就是来自你现在POD 2.0面板上的调节状态。
* Tuner键- 按下Tuner键,现在可以来调准你的琴弦了。
* Midi键- 按下Midi键, MIDI输入/输出打开/关闭。
* Noise Gate键- 按下Noise Gate键,噪音门打开/关闭。
* Save键- 按下Save键,调节的音色被存储* Tap Tempo键- 按下Tap Tempo键,加上其他选钮组成组合键。
以一定的频率点击它,可以改变你想要的效果的速度(比如延迟时间)以上就是POD 2.0的各控制旋钮/按键/接口的基本说明,下面附上POD 2.0的32种音箱与16种箱体名称与介绍:一32种音箱模拟:1 Line 6 Clean2 Line 6 Crunch3 Line 6 Drive4 Line 6 Layer5 Small Tweed6 Tweed Blues7 Black Panel8 Modern Class A9 Brit Class A10 Brit Blues11 Brit Classic12 Brit Hi Gain13 Rectified14 Modern Hi Gain15 Fuzz Box16 Tube Preamp17 Line 6 Twang18 Line 6 Crunch #219 Line 6 Blues20 Line 6 Insane21 Small Tweed #222 Boutique #323 Black Panel #224 Brit Class A #325 Brit Class A #226 California Crunch #127 California Crunch #228 Boutique #129 Rectified #230 Modern Hi Gain #231 Boutique #232 Jazz Clean二16种箱体模拟:1x8箱体模拟:1 1x8 1960 Fender Tweed Champ1x12箱体模拟:2 1x12s 1952 Fender Tweed Deluxe3 1960 V ox AC-154 1964 Fender Blackface Deluxe5 Line6 1x122x12箱体模拟:6 2x12s 1965 Fender Blackface Twin7 1967 V ox AC-308 1995 Matchless Chieftain9 Line 6 2x124x10箱体模拟:10 4x10s 1959 Fender Bassman12 Line 6 4x104x12箱体模拟:13 4x12s 1996 Marshall with Vintage 30s14 1978 Marshall with stock 70s15 1968 Marshall Basketweave with Greenbacks16 Line 6 4x12向大家介绍一下POD2。
0模拟音音色库的列表32种放大器模式(Amp Models)Jazz Clean:?1987 Roland JC-120Small Tweed:1952 Fender DeluxeSmall Tweed #2:1960 Fender Tweed Champ Tweed Blues:1959 Fender BassmanBlack Panel:1964 Fender DeluxeBlack Panel #2:1965 Fender Blackface Twin Modern Class A:1996 Matchless ChieftainBrit Class A:1966 V ox AC 30 with Top Boost Brit Class A #2:1960 V ox AC 30 non-Top Boost Brit Class A #3:1961 V ox AC 15Brit Blues:1965 Marshall JTM-45Brit Classic:1968 Marshall Plexi 50 WattBrit Hi Gain:1986 Marshall JCM-800Boutique #1:Dumble Overdrive Special Clean Channel Boutique #2:Dumble Overdrive Special Drive Channel Boutique #3:Budda Twinmaster headCalifornia Crunch #1:1985 Mesa Boogie Mark IIc+ Clean Channel California Crunch #2:1985 Mesa Boogie Mark IIc+ Drive Channel Rectified:1995 Mesa Boogie Dual Rectifier Tremoverb Combo Rectified #2:1994 Mesa Boogie Dual Rectifier HeadModern Hi Gain:1988 Soldano X88R PreampModern Hi Gain #2:1989 Soldano SLO Super Lead OverdriveFuzz Box:1960s Arbiter Fuzz FaceLine 6 Clean:Line 6 21st Century CleanLine 6 Blues:Marshall JTM-45 meets Budda Twinmaster meets Line 6Line 6 Twang:Fender Deluxe and BassmanLine 6 Crunch:Line 6 Thick GrindageLine 6 Crunch #2:1968 Marshall Plexi 50 Watt with more tone control rangeLine 6 Drive:Line 6 Industrial Strength OverdriveLine 6 Insane:Way too many hours of shreddingLine 6 Layer:Line 6 Clean meets Psychotic DriveTube Preamp:Tube Instrument Preamp ideal for non-guitar sources 15种音箱模式(Cabinet Models)1 x 8:1960 Fender Tweed Champ1x12:1952 Fender Tweed Deluxe1x12:1961 V ox AC-151x12:1964 Fender Blackface Deluxe1x12:Line 6 1x122x12:1965 Fender Blackface Twin2x12:1966 V ox AC-30 with "Blue Bell" speakers2x12:1995 Matchless Chieftain with Celestion Vintage 30s2x12:Line 6 2x124x10:1959 Fender Bassman4x10:Line 6 4x104x12:1996 Marshall with Vintage 30s4x12:1978 Marshall with stock 70s4x12:1968 Marshall Basketweave with Greenbacks4x12:Line 6 4x12---------------------------------------------------------------------------------- 作者:黑椒牛排-- 发布时间:2005-12-11 13:49:36--无论你在棚内录音,现场演出,个人练习,或是想有一台可创造数字效果的处理工具,POD都将会使你感到电吉他设备的一场革命!一模拟技术:电子管,作为吉他音箱的心脏与灵魂,因能产生出丰满而激烈的音色效果而得到了广泛的认可,而晶体管是做不出这种效果的,于是出现了HYBRIDS——即把电子管用于晶体管电路中,可是它产生的声音远不如电子管电路的声音,所以,最佳的选择还是电子管。