VCS教程
VCS仿真指南

VCS仿真指南1.安装和设置VCS2.创建仿真环境- 源文件:将被测设计的源代码保存为以“.v”或“.sv”为扩展名的文件。
可以使用Verilog或SystemVerilog进行描述。
- 测试文件:编写一些测试文件来测试被测设计的功能。
可以使用Verilog或SystemVerilog进行编写,并将其保存为以“.v”或“.sv”为扩展名的文件。
```-vcs -debug_all -R +vcs+lic+wait```3.编译和仿真一旦仿真环境创建好了,就可以开始进行编译和仿真了。
首先,使用VCS的编译器将源文件和测试文件编译成一个可执行文件。
可以使用以下命令进行编译:```vcs -f <source_file_list> <test_file_list> -o <output_file> ```其中,`<source_file_list>`和`<test_file_list>`分别是包含被测设计和测试文件路径的文本文件,`<output_file>`是编译后生成的可执行文件的名称。
编译成功后,可以使用以下命令运行仿真:```./<output_file> -l <log_file> -gui```其中,`<log_file>`是仿真日志文件的名称。
4.调试仿真在进行仿真时,可能会遇到很多问题,如设计错误、仿真停滞等。
为了解决这些问题,可以使用VCS提供的一些调试工具和功能。
- Dump Variables:在仿真过程中,可以使用`+dumpvars`命令行选项来跟踪和显示特定的变量值。
例如,输入以下命令:```./<output_file> -l <log_file> +dumpvars=<variable_name>```这将在仿真日志中显示`<variable_name>`的值。
vcs用户手册
vcs用户手册一、概述本手册旨在为使用VCS(VersionControlSystem,版本控制系统)的用户提供全面的指南,帮助用户了解VCS的基本概念、功能和使用方法。
本手册适用于各种使用场景,包括软件开发、项目管理、文档管理等领域。
二、VCS基本概念VCS是一种用于跟踪和管理代码、文档、配置文件等版本信息的工具。
它可以帮助用户有效地管理多个版本的相同文件,并记录文件的变化历史。
通过VCS,用户可以轻松地回滚到以前的版本,比较不同版本的差异,以及协作开发。
三、VCS功能和使用方法1.安装和配置:介绍如何安装和配置VCS,包括选择合适的版本控制系统(如Git、SVN等)以及设置本地环境。
2.初始化仓库:介绍如何创建一个新的VCS仓库,并设置仓库的基本结构和权限。
3.添加文件:介绍如何将文件添加到VCS仓库中,包括添加单个文件和添加整个目录。
4.提交变更:介绍如何提交对文件的变更,包括添加注释和描述变更内容。
5.版本控制:介绍如何管理文件的版本,包括创建分支、合并分支、回滚变更等操作。
6.协作开发:介绍如何与他人协同开发,包括协同编辑文件、跟踪冲突等操作。
7.工具和插件:介绍常用的VCS工具和插件,以及如何使用它们提高效率。
8.安全性和最佳实践:强调在VCS使用中的安全性和最佳实践,包括隐私保护、备份数据、遵循版本控制规则等。
四、示例和操作指南提供一些实际操作示例,帮助用户更好地理解和掌握VCS的使用方法。
例如:1.如何使用Git进行版本控制,包括创建仓库、添加文件、提交变更、管理版本等操作。
2.如何与他人协同开发,包括协同编辑文件、解决冲突等操作。
3.如何使用Git的分支和合并功能,以及如何查看变更历史等。
五、常见问题和故障排除列举在使用VCS过程中可能遇到的问题和解决方法,例如:1.无法连接到远程仓库怎么办?2.提交变更时出现冲突如何解决?3.如何恢复到以前的版本?4.如何避免VCS的使用误区?六、附录和资源推荐提供一些有用的附录和资源推荐,包括:1.VCS的常见问题和故障排除技巧。
vcs使用手册
vcs使用手册版本控制系统(Version Control System,简称VCS)是软件开发中非常重要的工具,用于管理和跟踪代码的版本和变更。
本手册将介绍VCS的基本概念、常用命令和最佳实践,以帮助开发人员更好地使用版本控制系统。
一、基本概念1. 仓库(Repository)仓库是VCS存储代码的地方,包括所有版本的代码和历史记录。
2. 分支(Branch)分支是仓库中的一个独立的代码副本,用于开展不同的开发工作,例如新功能开发、修复bug等。
3. 提交(Commit)提交是对代码进行的修改操作,每次提交都会记录代码的状态和变更信息。
4. 标签(Tag)标签是用于标记特定版本的标识符,通常用于发布版本。
二、常用命令1. 初始化仓库:`git init`2. 添加文件到仓库:`git add <file>`3. 提交变更:`git commit -m "commit message"`4. 查看提交历史:`git log`5. 切换分支:`git checkout <branch>`6. 创建分支:`git branch <branch>`7. 合并分支:`git merge <branch>`8. 标签管理:`git tag <tag>`9. 查看标签:`git tag`10. 推送分支到远程仓库:`git push origin <branch>`11. 拉取远程仓库的分支:`git pull origin <branch>`三、最佳实践1. 遵循简洁的提交信息:在提交信息中简要描述变更内容,方便日后查看和理解。
2. 分支管理规范:合理使用分支,避免在主分支上进行日常开发,及时合并分支。
3. 定期推送和拉取代码:保持本地仓库与远程仓库同步,避免出现冲突。
4. 使用标签管理版本:为每个发布版本打上标签,方便回溯和发布。
VCS Lab Guide自学笔记——快速入门VCS

VCS Lab Guide自学笔记——快速入门VCSfrom Monchy(蒙奇)在2020年秋招前根据Synopsys的VCS Lab Guide自学如何VCS(verilog compiled simulation)工具,在此分享前三章详细的学习笔记,几乎是指南的中文翻译,大量的过程截图对初学者很友好。
(VCS Lab Guide是Synopsys给出的VCS官方入门指南,里面包涵源码和实验指导,可以在网上自行下载)1VCS Simulation Basics用VCS编译和仿真8位进位选择加法器的Verilog设计Lab1实验使用8位进位选择加法器。
各模块代码:1fa.v(带进位的一位加法器)2add4.v(带进位4位加法器)3add8.v(8位加法器)4addertb.v(测试平台)代码所在位置如图:Part A:两步仿真过程Task1:用VCS编译verilog源码,生成可执行文件.simvshell>vcs addertb.v fa.v add4.v add8.v如果编译后在终端看到waning,最好先把warning解决了。
Task2:运行testbench,通过simv文件仿真设计shell>./simv如果想要直接通过名字执行必须要先在.bashrc文件中设置。
实际指令是“./simv”,如果没有加“./”刚开始是认不到到。
所以在“.bashrc”文件中加入"export PATH=$PATH:."。
相当与把“./”加入到了PATH中,样再输入“simv”就可以认到了。
具体加到哪我不知道。
task3:使用-o开关重命名可执行文件vcs编译生成的可执行文件的名默认为simv,如果想要改名字需要使用-o开关。
在终端输入下列命令,可以修改simv名字为addertest。
shell>vcs addertb.v fa.v add4.v add8.vPart B:在不同的程序目录下仿真Task1:使用设计库目录编译并仿真addertb.v和add8.v位于/lab1/partb目录下,fa.v和add4.v位于lib库目录内。
VCS简易用户手册
简易用户手册TANDBERG VCS统一通讯服务器版本1.0目录一、物理接线 (3)二、开启系统 (4)三、主要配置 (5)3.1主页 (5)3.2状态 (5)3.3通过VCS挂断呼叫 (6)3.4系统配置 (6)3.5 H.323配置 (6)3.6 SIP配置 (7)3.7与奥科网关配置 (9)3.8号码转换配置 (9)3.9号码转换测试小工具 (11)四、故障排查 (12)4.1注册历史 (12)4.2呼叫历史 (13)4.3配置日志 (15)4.4系统升级 (16)4.5备份与恢复 (17)一、物理接线液晶屏串口以太网口二、 开启系统开机:先开物理开关,再开软开关。
(只开物理开关不能使设备启动)关机:先在Web 界面关机,再关物理开关。
由于设备内部有硬盘,建议严格按步骤操作。
Web 界面关机:Maintenance > Shutdown.物理开关软开关三、主要配置3.1主页Overview软件版本,软件选项3.2状态注册Status->Registrations->by device 注册的号码,协议和IP地址呼叫Status->calls->calls呼叫的带宽,呼叫的协议(H323-H323,SIP-SIP,H323-SIP)3.3通过VCS挂断呼叫Status->calls->calls勾选一个呼叫,Disconnect按钮自动生效,点击即可3.4系统配置3.5 H.323配置注册端口号和呼叫信令端口号VCS Configuration->Protocols->H.323重复E.164号码处理方式3.6 SIP配置VCS Configuration->Protocols->SIP->configuration3.7与奥科网关配置VCS configuration->ZonesZones3.8号码转换配置VCS configuration->transforms转换规则转换规则说明:4位短号转换为5813+4位短号的长号并发送到奥科网关10.128.241.35 ▪Pattern string: (....)(@10.128.241.21)▪Replace string: 5813\1@10.128.241.35▪不匹配前面几条规则的所有其他呼叫保留第一组数字后都转到奥科语音网关,▪Pattern string: (.*)(@10.128.241.21)▪Replace string: \1@10.128.241.353.9号码转换测试小工具规则测试,例如规则:(40..)(@10.128.241.21)替换为:5813\1\2该规则为以40开头的4位数字,并以@10.128.241.21结尾的都在前面加前缀5813,后面的两组数字保留,实现了E20之间的短号互相呼叫。
VCS仿真指南

VCS仿真指南
VCS(Verification Continuity Simulator)是一款由Synopsys开发的仿真工具,用于验证硬件设计的正确性。
本指南旨在帮助初学者快速上手VCS仿真工具,完成硬件设计的验证工作。
本指南为第二版,对于第一版中的错误和不足之处进行了修正和补充。
一、VCS概述
1.什么是VCS?
VCS是一款基于Verilog和SystemVerilog硬件描述语言的仿真器,用于验证硬件设计的正确性。
VCS提供了高性能的仿真引擎和全面的仿真调试功能。
2.安装VCS
请参考VCS官方的安装指导手册进行安装,确保安装正确。
3.编写测试代码
使用Verilog或SystemVerilog语言编写测试代码,设计测试用例来验证硬件模块的功能。
可以使用assert语句来检查设计是否满足预期行为。
二、编译和仿真流程
1.编译测试代码
使用vcs命令将测试代码编译成仿真可执行文件。
例如:
```
vcs -sverilog testbench.sv design.sv -o simv
```
其中,testbench.sv为测试代码,design.sv为设计代码,simv为编译后的仿真执行文件。
2.运行仿真
运行编译后的仿真可执行文件,启动仿真。
例如:
```
./simv
```
3.调试仿真
在仿真过程中,可以使用一些命令对仿真进行调试,例如:
```
finish - 结束仿真
restart - 重新开始仿真
```。
VCS使用中文教程

in2_reg, sum, carry); II can-y); end // #1 $finish(2); end always begin #50 clk_reg= ~cl k_reg; end always @(sum) begin //$display($stime,,"inl_reg +%d in2_reg, sum, can-y_reg); $邮play($stime,,"now at a clock posedge,the operation is :: %d + %ct", inl_reg, in2_reg, sum, can-y); //$stop; end endmodule %ct = %ct and carry is in2_reg+ %d = sum %d carry_reg is %d", inl_reg, $strobe($stime,,"inl_ reg %b in2_reg %b sum %b carry %b", in l r _ eg, in2_reg, sum, cany); $display($stjme,," %b + %b = %b and car内is %b", inl_reg, in2_reg, sum,
验证隔要 一 个支持的平台 , 这就是 test_bench, 在这个测试平台上 , 有激励信号产生器 、 被测模块、 响应分析和监测器 , (下图) 激励与控制: 输入端口设置 , 测试向址, 测试模式设置 , 同步。
响应分析 器和监测器:可以及时监控输出信号变化, 可以判断输出信号是正确、合法、错误、 非法等等 。
然后再根据这个模块写 一 个测试模块 , 也称之为 testbench, 存为 top.v ,
VCS简明使用教程
VCS简明使用教程VCS是版本控制系统的缩写,是一种管理和跟踪软件开发过程中代码变化的工具。
常见的VCS工具有Git、SVN等。
本文将为您简要介绍如何使用VCS进行代码管理。
1.安装VCS2.创建版本库版本库是用来存储代码信息的地方。
要在本地创建一个版本库,您可以选择一个目录并在命令行中进入该目录下,然后运行`git init`命令。
这将在该目录下创建一个空的版本库。
3.添加文件现在,您可以将代码文件添加到版本库中以进行管理。
您可以将已有的代码文件复制到该目录下,然后运行`git add <file>`命令将文件添加到版本库中。
您还可以使用`git add .`命令将该目录下的所有文件添加到版本库。
4.提交文件5.查看历史记录6.切换版本7.创建分支分支是用来独立开发一些功能或模块的副本。
要创建一个分支,可以运行`git branch <branch name>`命令。
该命令将在当前版本的基础上创建一个新的分支。
8.切换分支要切换到另一个分支,可以使用`git checkout <branch name>`命令。
这将使您能够在不同的分支之间切换,并在每个分支上进行独立的开发。
9.合并分支当您在一个分支上完成了一些功能的开发,可以将其合并到主分支上。
要合并分支,您可以运行`git merge <branch name>`命令。
这将将指定的分支合并到当前分支中。
10.推送到远程仓库如果您需要与他人共享代码,可以将本地的版本库推送到远程仓库。
首先,您需要在远程仓库中创建一个空的Git仓库。
然后,运行`git remote add origin <remote repository URL>`命令将本地版本库与远程仓库关联起来。
最后,使用`git push -u origin master`命令将本地版本库中的代码推送到远程仓库。
11.从远程仓库拉取如果其他人在远程仓库中做了更新,并且您需要获取这些更新,可以运行`git pull origin master`命令从远程仓库中拉取更新到本地版本库中。
VCS简明使用教程

VCS简明使用教程VCS(VCS Version Control System)是版本控制系统的简称,它能够让开发者跟踪和管理代码的历史记录。
使用VCS可以方便地回滚代码、找到问题所在以及协作开发。
本文将简要介绍VCS的使用教程。
VCS的基本概念:1. 仓库(Repository):存储代码和历史记录的地方。
3. 分支(Branch):在仓库中可以创建多个分支,每个分支独立存在,可以并行开发。
4. 合并(Merge):将一个或多个分支的修改合并到另一个分支中。
VCS的基本操作:1.创建仓库:可以使用VCS提供的命令或图形界面工具来创建一个新的仓库。
2.克隆仓库:克隆仓库意味着将远程仓库克隆到本地。
可以使用以下命令克隆仓库:`git clone <仓库地址>`。
3.添加文件:使用`git add <文件名>`命令可以将文件添加到仓库中,`gitadd .`可以添加所有文件。
4.提交修改:5.查看修改:使用`git status`命令可以查看当前代码的状态,`git diff`可以查看未提交的修改。
6.回滚修改:使用`git checkout`命令可以撤销对一些文件的修改,`git revert`可以撤销一次或多次提交。
7.创建分支:使用`git branch <分支名>`命令可以创建一个新的分支。
8.切换分支:使用`git checkout <分支名>`命令可以切换到指定的分支,`git checkout -b <分支名>`可以创建一个新的分支并切换到该分支。
9.合并分支:使用`git merge <分支名>`命令可以将指定分支的修改合并到当前分支中。
10.推送修改:使用`git push`命令可以将修改推送到远程仓库中。
11.拉取修改:使用`git pull`命令可以拉取远程仓库最新的修改。
12.查看历史记录:使用`git log`命令可以查看仓库的提交历史记录。
vcs的仿真流程及相关命令
vcs的仿真流程及相关命令下载温馨提示:该文档是我店铺精心编制而成,希望大家下载以后,能够帮助大家解决实际的问题。
文档下载后可定制随意修改,请根据实际需要进行相应的调整和使用,谢谢!并且,本店铺为大家提供各种各样类型的实用资料,如教育随笔、日记赏析、句子摘抄、古诗大全、经典美文、话题作文、工作总结、词语解析、文案摘录、其他资料等等,如想了解不同资料格式和写法,敬请关注!Download tips: This document is carefully compiled by theeditor. I hope that after you download them,they can help yousolve practical problems. The document can be customized andmodified after downloading,please adjust and use it according toactual needs, thank you!In addition, our shop provides you with various types ofpractical materials,such as educational essays, diaryappreciation,sentence excerpts,ancient poems,classic articles,topic composition,work summary,word parsing,copy excerpts,other materials and so on,want to know different data formats andwriting methods,please pay attention!VCS 是一款常用的 Verilog 仿真工具,用于验证和调试数字电路设计。
VCS简易图文教程
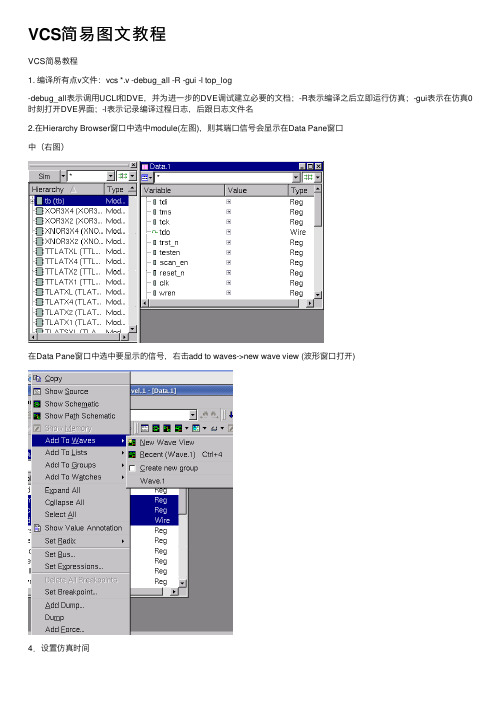
VCS简易图⽂教程VCS简易教程1. 编译所有点v⽂件:vcs *.v -debug_all -R -gui -l top_log-debug_all表⽰调⽤UCLI和DVE,并为进⼀步的DVE调试建⽴必要的⽂档;-R表⽰编译之后⽴即运⾏仿真;-gui表⽰在仿真0时刻打开DVE界⾯;-l表⽰记录编译过程⽇志,后跟⽇志⽂件名2.在Hierarchy Browser窗⼝中选中module(左图),则其端⼝信号会显⽰在Data Pane窗⼝中(右图)在Data Pane窗⼝中选中要显⽰的信号,右击add to waves->new wave view (波形窗⼝打开)4.设置仿真时间在空格栏中输⼊仿真时间,点击左边的下箭头,开始仿真,右下⾓的2,1/2是波形放⼤缩⼩5.调试波形显⽰后,如果⼜添加了新的信号,则重新点restart图标,这时波形不显⽰(modelsim 仍然保留),点击⼯具栏的加载波形,如下图的下拉箭头如果要调试内部某个模块的信号,先在Hierarchy Browser窗⼝选中module(上⾯的第3步),可以通过RTL代码的例化名查找,如上例:例化了双⼝RAM 例化名为code_u,添加code_u 的所有信号都波形窗⼝,信号很多,包括内部的很多wire,buffer等。
可在波形窗⼝中过滤这些信号,只留下输⼊输出端⼝,⽅法如下:点击上图中过滤信号下拉箭头,将不需要的信号过滤(把勾号去掉,默认为所有勾都选上)Wave窗⼝中只剩下输⼊输出信号。
然后进⾏仿真。
若要区分不同的信号组,以便观察,可以插⼊分割信号:菜单signale->Insert Divider后端⽹表仿真》后仿真,需在tb⽂件中加⼊sdf⽂件,如下:initialbegin$sdf_annotate("XXXX.sdf",top_module_name); // 例:(“xxx.sdf”,soc_i) end(sdf要在PT中⽣成,DC输出的sdf可能会有写warning)》标准单元库⽂件有两种,分别为tsmc18_neg 和tsmc18 ,前者⽀持neg_tchk负延迟检查,后者不⽀持。
VCS简明使用教程
一、编译:VCS
一个常见的编译命令如下: vcs design.v -f file.f -y lib_dir +libext+.v -v lib_file pli.c \
-P pli.tab -Mupdate -o bin_name -l log_file +v2k -R -RI -s \ -debug_all +vcsd +define+m1+m2 +timopt+<period> -line \ +incdir+dir1+dir2 +memopt[+2] -sverilog -mhdl +ad \ -full64 -comp64 +nospecify +notimingcheck -ntb +race \ -ova_file file_ova +vpdfile+file_vpd +vpdfilesize+nMB \ +vpdupdate +cli+1|2|3|4 +vcs+initmem+0|1|x|z \ +vcs+initreg+0|1|x|z +vc -cm line|tgl|cond|fsm|path|branch -cm_dir dir \
+vcs+dumpvars 代替源代码中没有参数的$dumpvars任务
一、编译:VCS——脉冲控制
VCS默认的路径延迟(module path delay)、sdf文件反标的互联延迟 (INTERCONNECT delay)为惯性延迟;而原语门、开关、连续赋值语句和MIPD (module input port delay)的延迟则只能是惯性延迟。
vcs worklib用法 -回复
vcs worklib用法-回复VCS工作库(VCS Worklib)是一个版本控制系统的重要组成部分,它用于管理和组织源代码文件和其他相关文件。
在这篇文章中,我们将详细介绍VCS工作库的用法,并逐步回答与其相关的问题。
第一部分:什么是VCS工作库?VCS工作库是一个用于版本控制系统的存储库,它用于保存和管理源代码文件和其他相关文件。
它是一个集中存储的地方,开发人员可以在其中创建、编辑和共享文件,并随时回滚或还原文件的早期版本。
第二部分:VCS工作库的基本功能与使用方法1. 创建新的VCS工作库- 打开版本控制系统的命令行界面- 使用命令`vcs create worklib`创建一个新的工作库- 工作库将在当前目录下创建并分配一个唯一的标识符2. 将文件添加到工作库- 使用命令`vcs add file.py`将文件`file.py`添加到工作库中- 添加的文件将被复制到工作库中的一个特定目录,并保留其原始目录结构3. 编辑文件并保存更改- 使用命令`vcs edit file.py`将文件`file.py`标记为编辑状态- 编辑该文件,保存更改后将其提交到工作库中4. 提交更改- 使用命令`vcs commit -m "Commit message"`提交更改- 提交信息应包含对更改的简要描述,以便其他开发人员了解更改的内容5. 查看文件历史记录- 使用命令`vcs log file.py`查看文件`file.py`的历史记录- 历史记录将显示文件的每个版本、提交时间和提交者的详细信息6. 回滚到早期版本- 使用命令`vcs checkout -r <revision> file.py`将文件`file.py`回滚到指定版本- `<revision>`应替换为要回滚到的版本号或标签7. 分支和合并- 使用命令`vcs branch new_branch`创建一个新的分支- 使用命令`vcs merge branch_to_merge`将当前分支与`branch_to_merge`分支合并第三部分:VCS工作库的优势和用途1. 团队协作:VCS工作库使团队成员可以协同开发代码,每个人都可以独立地进行编辑和提交更改,确保代码变更的一致性和可追踪性。
VCS使用中文教程
VCS使用中文教程什么是VCS?VCS(Version Control System)是一种管理和追踪软件代码变更的工具。
它允许多个开发者在同一个项目中协同工作,并且记录和管理代码的变更历史。
通过使用VCS,开发者可以轻松地创建新的分支和合并已有的分支,方便团队合作和代码管理。
最常见的VCS工具是Git。
为什么要使用VCS?使用VCS有许多好处。
首先,VCS可以追踪和记录代码的变更历史,包括哪些文件被修改、何时被修改以及具体修改的内容。
这个功能很有用,可以帮助团队成员回顾和理解代码的演变过程,同时也方便排查代码错误。
其次,VCS可以支持并行开发。
多个开发者可以在同一个项目上并行工作,每个人都可以创建自己的分支,将自己的修改提交到主分支之前先合并。
这种并行开发的方式避免了多人同时修改同一个文件引发的冲突,提高了团队的工作效率。
此外,VCS也可以支持版本回滚。
如果在次代码提交后发现了问题,可以轻松地回退到之前的版本,修复问题后再次提交。
这样避免了错误代码的传播和部署。
VCS的基本操作使用VCS的第一步是在本地计算机上安装VCS工具,如Git。
安装完成后,可以通过以下几个基本操作来管理代码仓库:1. 创建代码仓库:在计算机中选择一个目录作为代码仓库的根目录,使用命令`git init`来初始化一个新的仓库。
2. 添加文件:将需要管理的文件复制到代码仓库中,使用命令`git add <file>`将文件添加到仓库的暂存区。
5. 创建分支:使用命令`git branch <branchname>`可以创建一个新的分支。
分支是用来开发新功能或修复错误的独立代码片段。
6. 切换分支:使用命令`git checkout <branchname>`可以切换到指定的分支上。
7. 合并分支:使用命令`git merge <branchname>`可以将指定分支的代码合并到当前分支上。
VCS使用中文教程
VCS使用中文教程Version Control System (VCS) 是一种用来管理和追踪代码变更的工具。
它允许开发人员在多个终端上协同工作,记录和恢复历史记录,并解决代码冲突。
本教程将介绍VCS的基本概念、工作流程以及如何使用常见的VCS工具,如Git。
1.为什么需要VCS?在软件开发过程中,代码的变化是无法避免的。
而VCS的存在可以让我们更好地管理和追踪这些变化。
它有以下优点:-历史记录追踪:VCS可以记录每次代码变更的详细信息,包括谁修改了代码、何时修改的以及修改了哪些部分。
这允许开发人员在需要时回溯历史并找到特定的代码状态。
-多人协作:VCS允许多个开发人员在同一个项目上协同工作,避免了手动合并代码带来的麻烦。
开发人员可以在各自的分支上工作,并通过合并操作将代码整合到主分支。
-冲突解决:当多个开发人员同时修改同一部分代码时,VCS可以帮助解决冲突。
它可以检测到冲突并提醒开发人员进行手动合并或选择合适的代码版本。
2.基本概念在使用VCS之前,我们需要了解一些基本概念:- 仓库(Repository):一个VCS仓库是存储代码和相关历史记录的地方。
它可以存储在本地或远程服务器上。
- 分支(Branch):分支是基于主分支或其他分支创建的独立开发线。
它允许团队成员在不同的分支上开发不同的功能,并在合适时将代码合并到主分支。
- 合并(Merge):合并是将一个分支上的代码变更合并到另一个分支的过程。
这通常涉及手动解决冲突。
- 冲突(Conflict):当两个分支同时修改了同一个文件的相同部分,就会发生冲突。
VCS会提示开发人员解决冲突。
3. Git的使用Git是目前最流行的VCS工具之一,下面是Git的基本使用教程:- 初始化仓库:首先,使用"git init"命令在本地创建一个新的仓库。
这将在当前目录下创建一个名为".git"的隐藏文件夹,它存储了Git仓库的相关信息。
vcs开发流程
vcs开发流程VCS开发流程版本控制系统(VCS)是一种管理代码和其他文件的工具。
它可以跟踪文件的更改、协调多人开发、还原历史版本等。
在软件开发中,使用VCS是非常必要的。
下面将介绍一下VCS的开发流程。
一、选择合适的VCS在开始使用VCS之前,需要选择一个合适的版本控制系统。
常见的版本控制系统有Git、SVN、Mercurial等。
需要根据自己团队的实际情况来选择。
二、创建仓库创建仓库是使用VCS的第一步。
在Git中,可以通过git init命令来创建一个空白的仓库。
在SVN中,可以通过svnadmin create命令来创建一个新的仓库。
三、添加代码添加代码是使用VCS的第二步。
在Git中,可以通过git add命令将文件添加到暂存区中。
在SVN中,可以通过svn add命令将文件添加到版本控制中。
四、提交代码提交代码是使用VCS的第三步。
在Git中,可以通过git commit命令将暂存区中的文件提交到本地分支上。
在SVN中,可以通过svn commit命令将修改后的文件提交到服务器上。
五、分支管理分支管理是使用VCS非常重要的一部分。
它允许多人同时进行开发,并且可以在不影响主干的情况下进行实验性的开发。
在Git中,可以通过git branch命令创建分支。
在SVN中,可以通过svn copy命令创建分支。
六、合并代码合并代码是将多个分支的代码合并到一起。
在Git中,可以通过git merge命令将分支合并到主干上。
在SVN中,可以通过svn merge 命令将修改后的文件合并到主干上。
七、解决冲突当两个人同时修改了同一个文件时,就会发生冲突。
需要手动解决这些冲突。
在Git中,可以通过git mergetool命令打开一个图形化的工具来解决冲突。
在SVN中,可以通过svn resolve命令手动解决冲突。
八、回滚版本当出现问题时,需要回滚到之前的某个版本。
在Git中,可以使用git reset或git revert命令回滚版本。
- 1、下载文档前请自行甄别文档内容的完整性,平台不提供额外的编辑、内容补充、找答案等附加服务。
- 2、"仅部分预览"的文档,不可在线预览部分如存在完整性等问题,可反馈申请退款(可完整预览的文档不适用该条件!)。
- 3、如文档侵犯您的权益,请联系客服反馈,我们会尽快为您处理(人工客服工作时间:9:00-18:30)。
SAN JOSE STATE UNIVERSITYCollege of EngineeringDEPARTMENT OF ELECTRICAL ENGINEERINGEE271Tutorial on Using Synopsys Verilog Compiler Simulator This tutorial basically describes how to use the Synopsys Verilog Compiler Simulator (vcs) to simulate a Verilog description of a design and how to display graphical waveforms.Apply for An AccountIf you already have an account on Cadence lab then use it. There is no need for having multiple accounts. If you’re an engineering student or are taking an engineering class, you already have one UNIX account. You can (re)set your password by following the instruction at Once you have already had an account, you can login to your account from workstations in room ENGR289 and room ENGR291. You can remote login to your account from you PC by using SSH remote Secure Shell together with the X-Server for Window software, the Exceed Hummingbird.The Synopsys VCS SimulatorVCS (Verilog Compiler Simulator) is a tool suite from Synopsys. It includes VirSim, a graphical user interface to VCS for debugging and viewing waveforms.The methodology of debugging your project design involves three steps:1) Compiling your verilog source code,2) Running the simulation, and3) Viewing the generated waveforms.The VCS tools will allow you to combine these steps to debug your design interactively. VCS works by compiling your Verilog source code into object files, or translating them into C source files. VCS invokes a C compiler (cc, gcc, or egcs) to create an executable file that will simulate your design. This simulator can be executed on the command line, and can create a waveform file. Alternately, the design can be simulated interactively using VirSim, and the waveforms can be viewed as you step through the simulation.The rest of this document will give a brief overview of the tools and show you how to compile and simulate a down-counter example.Initial SetupThe VCS package is installed at /apps/synopsys/X-2005.06-SP2/bin/vcs. For convenience, set the following environment variables to your .cshrc file. Remember that anytime you changed/modified .cshrc file, you must source it (by command “source .cshrc”) or by logging-out and then logging back in.setenv MYPATH $PATHsetenv SYNOPSYS /apps/synopsyssetenv SNPSLMD $SYNOPSYS/Y-2006.06-SP1setenv VCS_ARCH_OVERRIDE redhat30setenv SYNOPSYS_SIM $SYNOPSYS/X-2005.06-SP2setenv CLS_CSD_COMPATIBILITY_LOCKING NOsetenv SKIP_CDS_DIALOGsetenv VCS_HOME $SYNOPSYS_SIMset path=($path $SNPSLMD/linux/bin )set path=($path $SYNOPSYS )set path=($path $SYNOPSYS/Y-2006.06-SP1/linux/syn/bin )source $SYNOPSYS_SIM/bin/environ.cshCreate a directory where you want to do the tutorial and create the following three text files named count.v, test_count.v, and main_count.f in that directory. Listings of count.v and test_count.v are at the end of this tutorial. The main_count.f file has only 1 line as shown below:test_count.v count.vCompiling and Simulating in post-processing mode1. Change to tutorial directory that contains count.v, test_count.v, andmain_count.f (in this tutorial it is tutorial)2. Compile the verilog source code by typing the following at the machine prompt/export/home/staff/thuyle/tutorial> vcs -f main_count.f option means that the file specified (-f main_count.fThe ) contains a list of command line options for vcs. In this case, the command-line options are just a list of file names and note that the testbench is listed first. The following command line would have the same effect:/export/home/staff/thuyle/tutorial> vcs test_count.v count.v/export/home/staff/thuyle/tutorial> vcs -f main_count.fChronologic VCS (TM)Version X-2005.06-SP2 -- Wed Oct 11 20:20:03 2006Copyright (c) 1991-2005 by Synopsys Inc.ALL RIGHTS RESERVEDThis program is proprietary and confidential information of Synopsys Inc.and may be used and disclosed only as authorized in a license agreement controlling such use and disclosure.Parsing design file 'test_count.v'Parsing design file 'count.v'Top Level Modules:test_countNo TimeScale specifiedStarting vcs inline pass...1 module and 0 UDP read.recompiling module test_countif [ -x ../simv ]; then chmod -x ../simv; fig++ -o ../simv -melf_i386 -m32 5NrI_d.o 5NrIB_d.o wx0S_1_d.o SIM_l.o /apps/synopsys/X-2005.06-SP2/redhat30/lib/libvirsim.a /apps/synopsys/X-2005.06-SP2/redhat30/lib/libvcsnew.so /apps/synopsys/X-2005.06-SP2/redhat30/lib/ctype-stubs_32.a -ldl -lc -lm -ldl/usr/bin/ld: warning: libstdc++.so.5, needed by /apps/synopsys/X-2005.06-SP2/redhat30/lib/libvcsnew.so, may conflict with libstdc++.so.6../simv up to dateCPU time: .053 seconds to compile + .226 seconds to linkYou should now have an executable file called in your working directory.simv3. Execute simv on the command line with no arguments. You should see outputfrom both vcs and the simulation and it should produce a waveform file called count.dump in your working directory./export/home/staff/thuyle/tutorial> simvChronologic VCS simulator copyright 1991-2005Contains Synopsys proprietary information.Compiler version X-2005.06-SP2; Runtime version X-2005.06-SP2; Oct 11 20:24 2006$finish at simulation time 136V C S S i m u l a t i o n R e p o r tTime: 136CPU Time: 0.040 seconds; Data structure size: 0.0MbWed Oct 11 20:24:53 2006/export/home/staff/thuyle/tutorial>4. We are now going to re-invoke vcs to view the waveform. At the prompt, type:/export/home/staff/thuyle/tutorial> vcs -RPP count.v/export/home/staff/thuyle/tutorial> vcs -RPP count.vVirSim X-2005.06-SP1-12 Virtual Simulator EnvironmentCopyright (C) 1993-2005 by Synopsys, Inc.Licensed Software. All Rights Reserved.Use "virsim [help_arg]" for usage information.help_arg: -help or -verilog_help or -vhdl_help or -epic_help-RPPThe option tells vcs that we are opening it in post-processing mode. This should open up a new window as below:5. In this window, click on open under the File menu option. Change the file type thatyou want to open to VCD (not VCD+). (VCD has .dump file extension and VCD+ has .vcd file extension). They are both waveform files but VCD files are text files, and VCD+ are condensed binary files.count.dump6. Select and open the file and then click OK (also click O.K. on theinformation pop-up screen). Click on the test_count button, and you should see all signals instantiated in the signal window: clock, dec, in[3:0],load, andzero.New Waveform Window to open a waveform window as below: 7. Clickon8. In the Hierarchy window, highlight all signals in the signal list with the left mousebutton. Then with the middle mouse button, drag the selected signals over to the black space in the waveform window. At this point, you should see the waveforms starting at time 0 of the simulation.9. In the waveform window, the menu option Display -> Time Scale can be used tochange the display unit and the display precision. You can also use Zoom on the menu to change the appearance as shown below:10. Because we used the system command in our$dumpvars (0, test_count) verilog simulation, we should be able to view all signals at any hierarchical level of the design. Hence if you go back to the hierarchy window and click on the green arrow next to the test_count button, you can traverse down the hierarchy and select more signals to view. Before exiting the waveform viewer, you can save your settings in a configuration file under the File -> Save Configurations option. Compiling and Simulating in interactive mode1. Now we are going to simulate the design again but in interactive mode. First let'sexit VirSim if you have not already done so. Recompile your source code with the following command line:vcs -RI -Mupdate -f main.fThe-Mupdate is a compile-time option that tells vcs to compile incrementally.When you use this option, it will create a sub-directory called csrc. This directory will contain a Makefile and object files for each module that is compiled. When you compile incrementally, only the modules that change between compilations will need to be recompiled. The -RI means we are going to simulate in interactive mode. As soon as the code is compiled, VirSim will be invoked and the simulation will start./export/home/staff/thuyle/tutorial> vcs -RI -Mupdate -f main_count.fChronologic VCS (TM)Version X-2005.06-SP2 -- Thu Oct 12 13:23:01 2006Copyright (c) 1991-2005 by Synopsys Inc.ALL RIGHTS RESERVEDThis program is proprietary and confidential information of Synopsys Inc.and may be used and disclosed only as authorized in a license agreement controlling such use and disclosure.***** Warning: ACC/CLI capabilities have been enabled for the entire design.For faster performance enable module specific capability in pli.tab file Parsing design file 'test_count.v'Parsing design file 'count.v'Top Level Modules:test_countNo TimeScale specifiedStarting vcs inline pass...1 module and 0 UDP read.recompiling module test_count because:Some compilation options have been changed.if [ -x ../simv ]; then chmod -x ../simv; fig++ -o ../simv -melf_i386 -m32 5NrI_d.o 5NrIB_d.o wx0S_1_d.o SIM_l.o /apps/synopsys/X-2005.06-SP2/redhat30/lib/libvirsim.a /apps/synopsys/X-2005.06-SP2/redhat30/lib/libvcsnew.so /apps/synopsys/X-2005.06-SP2/redhat30/lib/ctype-stubs_32.a -ldl -lm -lc -ldl/usr/bin/ld: warning: libstdc++.so.5, needed by /apps/synopsys/X-2005.06-SP2/redhat30/lib/libvcsnew.so, may conflict with libstdc++.so.6../simv up to dateVirSim X-2005.06-SP1-12 Virtual Simulator EnvironmentCopyright (C) 1993-2005 by Synopsys, Inc.Licensed Software. All Rights Reserved.Use "virsim [help_arg]" for usage information.help_arg: -help or -verilog_help or -vhdl_help or -epic_helpInteractive window of VirSim should have popped up by now. In the History Thepanel, it says $stop at time 0. Whenever you invoke vcs with the -RI option, the simulation will always be paused at time 0.2. Now you can open the Hierarchy window, open the Waveform window, either loadyour configuration file (using Ctrl-L) or browse through the hierarchy to select signals to view as in GUI part described above. The time scale can be changed by Step Time button in the Simulator Control panel in the Interactive window. When you simulate interactively, the waveforms are only recorded for the signals that appear in the Waveform Window. Hence you should select any signals of interest before the simulation time that you want to view them. If at any time you want to restart the simulation, select Re-exec or Invoke Sim under the Sim option in the Interactive window.3. You can also view your source code in the following manner. Select Source underWindow menu of the Interactive window to open a Source Window and Select Hierarchy under Window menu of the Interactive window to open a Hierarchy window. Then in the Hierarchy window, select a module instance, say text_count, and drag it (using the middle mouse button) to the large black panel in the Source window as shown below. If you want to edit your code, VCS will then invoke a text editor.module test_count;reg clock;reg load, dec;reg [3:0] in;wire zero;initialbegin$dumpfile("count.dump"); // save waveforms in this file$dumpvars (0, test_count); // saves all waveformsclock = 0; load = 0; dec = 0;in = 4'b0110;#16 load = 1; // switch to 1 after the clock edge to reduce confusion#10 load = 0; // wait for 1 clock cycle#10 dec = 1;#100 $finish;endalways #5 clock = ~clock; // Make 10ns clockcounter u1 (clock, in, load, dec, zero);endmodule/* downcounter with zero flag */module counter (clock, in, load, dec, zero);input clock;input [3:0] in;input load;input dec;output zero;reg [3:0] value;wire zero;assign zero = ~|value;always @ (posedge clock)beginif (load) value <= in;else if (dec && !zero) value <= value - 1'b1;endendmodule11。
