Impulse(霍尼韦尔) X4 系列使用说明书
Honeywell WEBs-N4 软件说明书

Honeywell WEBs-N4 Installation GuideVersion 4.9.0.198September 2020Table of ContentsA BOUT THIS G UIDE (3)D OCUMENTATION (3)S YSTEM R EQUIREMENT FOR WEB STATION-N4 (3)Operating System & Software Dependencies (4)Using Web Launcher with Niagara 4.9 (5)WEB STATION-N4I NSTALLATION P ROCEDURE (6)About this GuideThis document is part of the WEBStation-N4 documentation library. WEBStation-N4 software is distributed via the Honeywell Buildings Forum. The platform requirements needed are mentioned in WEBs N4.9.0.198 Software Release Bulletin.For the latest product data, visit or Honeywell Building Controls.NOTE: This version of Honeywell WEBs-N4.9.0.198 is compatible with Spyder Model 5, CIPer Model 10, and WEB-8000 controllers. CIPer Model 30 and CIPer Model 50 controllers are not compatible with this release. DocumentationEach view/dialog is provided with a Help button. Click the Help button to open a help window, that explains the functionality of the displayed view. Alternatively, each view has a help page which can be opened by pressing the F1 key on the keyboard or navigate to Help tab in menu items and click Help On View.Refer the Honeywell Buildings Forum Documents for all latest WEBs-N4 product related documentation. System Requirement for WEBstation-N4IMPORTANT NOTEN4.9 supports only 64-bit installations. So, installing N4.9 will generate a new host ID, if you made a 32-bit in-stallation in the previous N4.X versions. Be sure to transfer your Niagara Workbench license from your previous32-bit host ID to your new 64-bit host ID.To use Lon devices with station running in Windows, use LON tunneling with JACE or use LON/IP.Operating System & Software DependenciesWEBs-N4 is supported on the following listed Microsoft Windows operating systems. The application installation in-cludes Oracle’s Java Runtime Environ ment (JRE) and does not depend on any other software to run.Using Web Launcher with Niagara 4.9Web Launcher 20.1.3 was recently revamped for N4.9 to include essential software dependencies updates along with critical defect fixes. This version of Web Launcher has Java version 8 update 252 and certificate management has been updated to work with N4.9 along with any legacy or prospective release. Prior to using Web Launcher with N4.9, customer should update Web Launcher accordingly (see steps below).How to update Web Launcher?Web Launcher has a feature to check for updates over the internet and prompts the user when a new version is avail-able in the cloud. However, existing version of Web Launcher has a bug that prevents a smooth update. Users will be required to perform a fresh install by downloading the latest version from the cloud via the station web Login page. Click on the Niagara Web Launcher Installer link on the station's Web Launcher Web Page, which can be reached via the link on the Login page itself. Once the download is successful, click on the msi file and follow the installation wiz-ard. You do not have to uninstall the older version. The new installation will automatically update to the latest version.WEBstation-N4 Installation Procedure1.Double click the executable file (Installer_x64.exe)The WEBStation-N4 Installation Program window opens, showing information such as build version, date etc.Click Next to proceed the installation.2.Click Yes to agree with the End User License Agreement [EULA] and Next to continue the installation.Or Click No to cancel the installation.3.The installer loads C:\Honeywell\WEBStation-N4-4.9.0.198 path by default. If this path does not exist,the installer displays warning message, Click Yes to create the folder. Click Next to continue installation.4.If you do not wish to install the WEBStation-N4 in the default directory, click Browse to change the path,and click Next to continue.NOTE: If you are performing a new installation, the installer prompts you to set a system passphrase for en-cryption purposes, as shown in the following image.The system passphrase is used to protect sensitive information stored on all WEBs systems, and on the SD card in WEB-8000 controllers. The system passphrase i s assigned as the file passphrase for “portable files, such as backups and station copies, and is used to encrypt those files. During operations in which you transfer encrypted files to a system (restoring backups, transferring a station, etc.) you are prompted to sup-ply the file passphrase, if it doesn’t match the system passphrase. The system passphrase defaults to the factory default platform password.During commissioning, you will be prompted to change the default system passphrase.NOTE: It is important to remember the system passphrase and keep it safe. If you lose the system pass-phrase, you will lose access to encrypted data. To change the system passphrase, use the Platform Admin-istration tool.5.Niagara Deamon User Home directory is used to store Niagara Deamon user’s data and to run Niagarastations. By default, the directory is created under C:\ProgramData\Niagara4.9\Webs as shown below.If this path does not exist, the installer displays warning message, requesting to create the folder. Click Yes to continuee the Browse option to change default folder location, if desired.Or Click Next to continue.7.Check the options to install Desktop Shortcuts, if needed. Click Next to run the installation.8.After completing of the installation, the installer displays message “WEBStation-N4 installation iscomplete".9.Check the required options and click Finish to complete the installation process.10.Once the installation is finished, license get installed automatically. Click Continue to run WEBstation-N4.WEBs-N4 Workbench opens as shown below.。
霍尼韦尔进口impulsexp单一检测仪
霍尼韦尔进口impulsexp单一检测仪霍尼韦尔单一气体检测仪,霍尼韦尔XP单一检测仪,霍尼韦尔impulsexp单一气体检测仪在各个方面而言都是您的首选。
XP是全部关于优选项的。
霍尼韦尔单一气体检测仪的操作:a:开机或需要时,显示屏、电池、传感器、声光震动报警设备进行自检。
b:通过使用带有TempraSUREZtm热冲击修正和Reflex/tm传感器保护的SureCe/tm传感器,XP能确保在不利操作条件中提高准确度和可靠性。
AB:相对而言,维护并不是那么容易。
内置元件衰变补偿将校准时间间隔延长到了12个月。
由于具有典型的传感器寿命(至少两年)和三年的电池寿命*,操作成本降到了最低。
用户可以轻易地替换电池和传感器。
霍尼韦尔进口XP单一气体检测仪的产品特性:1、坚固耐用的外壳体积小、重量轻坚固,防冲击,可应对各种天气状况配备鳄鱼夹一防止意外丢失2、操作可靠开机或褥要时,显示屏、电池、传感器、声光振动报警设备进行自检使用已获专利的SureCeIITM和ReflexTM传感器技术TempraSURETM温度补偿和冲击防护周期性频闪和声音提示,提高可靠性。
卓越的EMC/RFI性能靠近无线电话或手机不会误报警RFI抗忧性能超过最严格的工业标准3、使用便捷开机即用单键操作适合各种语言的直观图标用户可通过菜单进行设置提供软件模拟使用指导标配有振动报警4、成本效益佳传感器哀减补偿技术使得标定间隔达12个月(仅H2S/C0) 可替换的传感器与电池传感器寿命至少2年电池寿命通常为3年*(低电池电量警告)尺寸:93mm (H) *50MM(W)*27MM(D) 初始及运行成本低5、高清晰背光显示屏持续显示气体浓度TWA/STEL和两级瞬时报警并带峰值保持显示电池寿命、标定及自检状态6、有效的气体报警指示报警和背光相互结合,加强提示独特的95分贝双音频报警霍尼韦尔进口impulsexp单一检测仪公司相关产品:霍尼韦尔进口XP单一气体检测仪、霍尼韦尔四合一气体检测仪、加拿大BW气体检测仪、加拿大BW多功能气体检测仪、正压式空气呼吸器、送风式空气呼吸器、自吸式10米长管空气呼吸器、固定式气体泄漏报警器、家用天然气泄漏报警器、救援三脚架、消防救援三脚架、井口爬梯、防坠器、有限空间作业设备等。
霍尼韦尔氢气浓度检测仪IMPULSE-XP中文使用说明
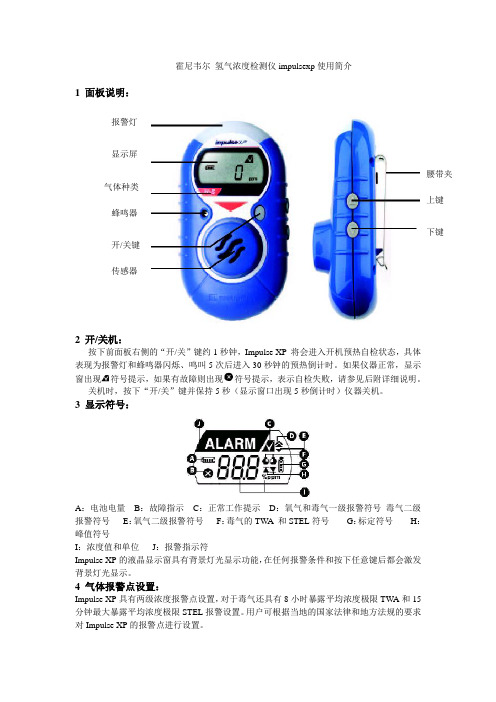
霍尼韦尔 氢气浓度检测仪impulsexp 使用简介1 面板说明:2 开/关机:按下前面板右侧的“开/关”键约1秒钟,Impulse XP 将会进入开机预热自检状态,具体表现为报警灯和蜂鸣器闪烁、鸣叫5次后进入30秒钟的预热倒计时。
如果仪器正常,显示窗出现符号提示,如果有故障则出现符号提示,表示自检失败,请参见后附详细说明。
关机时,按下“开/关”键并保持5秒(显示窗口出现5秒倒计时)仪器关机。
3 显示符号:A :电池电量B :故障指示C :正常工作提示D :氧气和毒气一级报警符号 毒气二级报警符号E :氧气二级报警符号F :毒气的TW A 和STEL 符号G :标定符号H :峰值符号I :浓度值和单位 J :报警指示符Impulse XP 的液晶显示窗具有背景灯光显示功能,在任何报警条件和按下任意键后都会激发背景灯光显示。
4 气体报警点设置:Impulse XP 具有两级浓度报警点设置,对于毒气还具有8小时暴露平均浓度极限TW A 和15分钟最大暴露平均浓度极限STEL 报警设置。
用户可根据当地的国家法律和地方法规的要求对Impulse XP 的报警点进行设置。
出厂设置如下:(英国标准)气体类型量程一级报警点二级报警点TWA报警点STEL报警点氧气0-30%vol 23.5%vol 19.5%vol ------- ------一氧化碳0-1000ppm 35ppm 100ppm 35ppm 400ppm 硫化氢0-250ppm 10ppm 15ppm 10ppm 15ppm 氢气0-1000ppm 100ppm 500ppm ------- ------ 二氧化氮0-150ppm 3ppm 5ppm 3ppm 5ppm 氯气0-50ppm 0.5ppm 1ppm 0.5ppm 1ppm 二氧化硫0-150ppm 2ppm 5ppm 2ppm 5ppm 氢氰酸0-100ppm 5ppm 10ppm 5ppm 10ppm 氨气0-100ppm 25ppm 50ppm 25ppm 35ppm 报警描述:报警类型显示声音报警灯光报警振动报警一级报警每秒3声每秒闪烁3次每秒两次二级报警每秒5声每秒闪烁5次每秒两次STEL报警每秒5声每秒闪烁5次每秒两次TW A报警每秒5声每秒闪烁5次每秒两次5 峰值,TWA和STEL显示模式:a. 正常显示b. TW A/STEL显示模式c. 峰值显示STEL模式TWA 模式如果想清除峰值,则在屏幕显示峰值时,按下“开/关”键一次,清除当前峰值并返回到正常的检测状态。
霍尼韦尔 全自动流量分析仪说明手册说明书

THE NEEDSEvides Waterbedrijf required measurement of turbidity and flow to monitor water quality in the distribution network and manage the network. Until recently, this data had been recorded manually and analysed with outdated equipment. This process no longer fitted with the strategic pillar “digitising primary processes” which was an important aim of the Netherlands water provider. Evides Waterbedrijf developed an all-in-one measuring device which allowed them to make all distribution network measurements. During the measurement process, turbidity, flow and GPS location were all recorded and logged in real-time from the field. This data could be used to determine water quality of the distribution network, assess the effectiveness of previously implemented drainage actions and continue to optimise drainage plans. The process being largely automated. The flow meter was part of the total standpipe solution which was lightweight and easy to dismantle in the field.THE SOLUTIONTo support the needs of EvidesWaterbedrijf, Honeywell Smart Energyoffered their Q4000 electromagneticmeter as part of the standpipe solution.Featuring high quality design andengineering, Honeywell’s Q4000electromagnetic water meter is builtfor maintaining highly accurateperformance and lasting durabilityin demanding environments.With an unrestricted flow tube with nomoving parts and a 10-year batterylife, the Q4000 offers unrivalledperformance for an electromagneticwater meter. Delivering consistentaccuracy over a wide flow-ratemeasuring range, the meter can beadapted to suit either predominantlyhigh or low flow rates, and is ideal fordistribution network applications.The Q4000 is a high-performingelectromagnetic meter, ideal for networkmanagement and leakage monitoring.HON EYWELL’SW A TER M ETERCase StudySupports Accurate Real-Time Distribution Network AnalysisGood quality water supply is provided for the entire population in the Netherlands. Water consumption is one of the lowest in developed countries at 128 litres per capita per day and water leakage in the distribution network is one of the lowest in the world at only 6%.The Q4000 water meter forms part of the total standpipe solution.The Q4000 from Honeywell Smart Energy is a high-performing electromagnetic meter, ideal for bulk flow metering applications such as network management and leakage monitoring.-It has a fast continuous sampling rate, providing highly accurate and reliable measurement.-The Q4000’s extremely tough stainless steel constructionensures a long working life, while its lightweight body makes storage, transportation and installation both simpler and safer.-With an unrestricted flow tube, the Q4000 ensures minimal pressureABOUT EVIDES WATERBEDRIJFEvides Waterbedrijf supplies safe and clean drinking water 24 hours a day, 365 days a year to 2.5 millioncustomers and the business community in Zeeland, in the South West of Holland and the Brabantse Wal.Additionally, Evides Waterbedrijf offers tailor-made industrial water services to large industrial customers in the Netherlands, Belgium and Germany.THE BENEFITSloss, even at the highest flowrates, resulting in reduced network system pressures, helping to prevent leakage from burst pipes. -A large, bright and easy-to-read LCD, showing volume and instantaneous flow rate, is ideal for real-time network control and water management. -With the Q4000’s 10-yearcontinuous battery life and no need for calibration, expensive regular maintenance is a thing of the past. -With bi-directional pulse outputs, the Q4000 provides dependable connectivity to critical water management systems including AMR and data logging devices.All rights reserved.The company’s policy is one of continuous product improvement and the right is reserved to modify the specifications contained herein without notice. These products have been manufactured with current technology and in accordance with the applicable referenced standards.SS-20-2 ENG | 02/20© 2020 Honeywell International Inc.For more informationElster Water Metering Ltd130 Camford Way Sundon Park, Luton Bedfordshire, LU3 3AN United Kingdom T +44 1582 846400F +44 1582 564728*************************。
霍尼韦尔说明书
霍尼韦尔说明书霍尼韦尔说明书简介霍尼韦尔(Honeywell)是一家全球领先的多元化科技和制造公司,总部位于美国,成立于1906年。
公司的业务涵盖航空航天、楼宇技术、性能材料、可持续性解决方案和安全解决方案等领域。
霍尼韦尔以其创新的技术、高品质的产品和可靠的性能享誉全球。
本文档旨在向用户提供关于霍尼韦尔产品的说明,并介绍如何正确使用和维护这些产品。
产品列表1. 霍尼韦尔智能温控器* 产品名称:霍尼韦尔智能温控器* 产品型号:TH9320WF5003* 产品特点:- 可与智能手机和智能家居系统连接,实现远程控制- 可编程设置温度和计划,提高能源效率- 大屏幕显示温度和湿度等信息* 使用说明:1. 将温控器与电源连接,并按照说明书设置温度和计划。
2. 下载并安装霍尼韦尔智能手机应用。
3. 打开应用,按照提示添加温控器设备。
4. 连接温控器和手机,即可实现远程控制。
2. 霍尼韦尔空气净化器* 产品名称:霍尼韦尔空气净化器* 产品型号:HFD-120-Q* 产品特点:- 高效过滤空气中的颗粒物和有害物质- 自动检测空气质量,并自动调整清洁模式- 低噪音设计,不影响正常生活* 使用说明:1. 将空气净化器放置在需要净化的房间内,并连接电源。
2. 按下电源开关,启动空气净化器。
3. 空气净化器将自动检测空气质量,并根据需要调整清洁模式。
4. 定期更换空气净化器中的滤网,以确保最佳的净化效果。
常见问题与解答Q1:为什么温控器无法连接智能手机?A:请确保智能手机和温控器处于相同的Wi-Fi网络下,并且已经下载并安装了霍尼韦尔智能手机应用。
如果问题仍然存在,请尝试重新连接温控器。
Q2:空气净化器何时需要更换滤网?A:根据使用环境和空气质量,滤网的寿命可能会有所不同。
一般建议每3至6个月更换一次滤网,或者根据空气净化器上的指示灯提示更换。
维护与保养为了保证霍尼韦尔产品的正常运行和延长使用寿命,以下是一些维护与保养的建议:1. 定期检查产品的电源和连接线,确保其无损坏和松动。
蜂鸟Analyzer X4系列可汗针多气体检测仪手册说明书

USER AND MAINTENANCE MANUAL SAA VERSIONWarnings and Cautions Contacting Honeywell AnalyticsWARNINGS AND CAUTIONS• Substitution of any components may impair intrinsic safety.se only approved memory cards, part # 2566-0435, which are available from HoneywellCrocodile ClipFrontBottomRightLeftBattery Holder13. Alarm Level 1 IconAlarm Level 2 Icon(for flammable and toxic) 14. Zero Calibration Icon Span Calibration Icon The LCD display has a backlight that will operate automatically whenever an alarm occurs, and also whenever any button is pressed. To turn on the backlight while staying in the measuring mode in a low light area, press the UP or DOWN button once.1314When “no” is selected, the recorded STEL and TWA values will be used as initial STEL and TWA values for the current session. When “YES” is selected, the STEL and TWA values will be cleared.2-1-3. CHECKING THE MEMORY CARDThe detector will check the memory card in the memory card slot. When a properly formatted FAT16 memory card with a data full condition is detected, a “Data Fu” message will be displayed followed by a “Delete no” prompt. (When a properly formatted FAT16 memory card is not full of data, the “Data Fu” message and the “Delete no” prompt willnot be displayed).Press the UP or DOWN buttons to scroll to “no” or “YES” and press theselect.When “no” is selected, the detector keeps the current data file and the Data Logging iconwill not be displayed in the measuring mode which indicates that no data is being logged. When “Yes” is selected, the detector deletes the current data file and creates a new filefor data logging. The Data Logging icon will be displayed in the measuring mode whichThe Data Logging icon will not be displayed in the measuringmode which indicates that no data is being logged.2-1-4. POWER-UP SELF-TESTThe detector will beep and perform a power-up Self-Test. If the detector passes the Self-Test, the Test Pass icon is displayed. If the Test Fail icon is displayed and the Test Pass icon blinks with 1 beep and 1 flash every 5 seconds, then the detector has failed the Self-Test (See Section 3-1 Performing a Self-Test).2-1-5. CHECKING THE CALIBRATION DUE DATEThe detector checks the calibration due date stored in the detector after the Power-UpSelf-Test. When the number of days remaining until calibration is due reaches zero, a "CAL2-2. TURNING THE DETECTOR OFFTo turn off the detector, press and hold theA countdown will be displayed for 5 seconds, and then the detector will beep and turn off.• D isplay the level 1 (flammable and toxic low, O2 excess) and level 2 (flammable and toxic high, O2 deficiency) alarm set points• Display the STEL and TWA alarm set points (for CO & H2S only)Level 1Level 2STEL TWA*Examples shown for default settings of each gas for the MiniMAX4 series.Test Pass Test FailSelf-Test Result Display Audible AlarmPass NoneFail 1 beepevery 5 secondsAdditionally, the detector will periodically check its batteries, electronic circuit and sensors. If it passes, the Test Pass icon will be displayed. If it fails, the Test Fail icon will be displayed and the Test Pass icon will blink with 1 beep and 1 flash every 5 seconds. Note: If the Self-Test has failed, repeat the Self-Test. If a second failure occurs, contact3-3. GAS ALARMSThe detector has two levels of instantaneous gas alarms, of which the level 2 (flammable and toxic high, O2 deficiency) alarm is more urgent than the level 1 (flammable and toxic low, O2 excess) alarm for flammable and toxic. The Oimportant. It also has a 15-minute STEL alarm and an 8-hour TWA alarm for the carbon monoxide and hydrogen sulfide sensors.Note: STEL (Short Term Exposure Limit) and TWA (Time-Weighted Average) comply with relevant agency standards.If an alarm occurs, the icons blink and relevant alarm level icons, (Level 1 for flammable and toxic, and O2 excess), (Level 2 for flammable and toxic), (O(STEL), or (TWA) will be displayed according to the alarm level for the gas type in question.* Examples shown for default settings of each gas for the MiniMAX4 series.Note: In latching alarm mode, once an alarm occurs, the audible, visual and vibrating alarms continue to operate even after the atmospheric hazard has cleared. By pressing the ON/OFF button, the alarm will be cleared (after the atmospheric hazard has cleared). Any subsequent alarm will reactivate the audible, visual and vibrating alarms.it is not already on. The exposure status can be scrolled through in the order of( ), Low Peak ( ), ( ), and ( ), followed byDate, and Current Time by pressing the UP button or in reverse order by pressing the High PeakLow PeakSTELTWA* Examples shown for the status review for the MiniMAX4 seriesis low and needs replacing by generating a beep and flashing the alarm LED once every 5 seconds. Also, the Test Fail icon will be displayed and the Low Battery icon and Test Pass icon will blink alternately. When the battery is finally exhausted, the Test Fail icon and Low Battery icon will blink simultaneously with seven beeps and “bAttEry oFF” will be displayed. Pressing the ON/OFFif card is installed. When a properly formatted blank memory card is detected, the Data Logging icon will be displayed in the measuring mode which indicates that data is beingWhen the memory card becomes full in the measuring mode,the detector will stop data logging and the Data Logging icon will blink which indicates that no data is being logged.Note: The detector cannot format the memory card.Warning: The detector ignores the write-protect feature of the SD memory card.Warning: When the Data Logging icon is either blinking or not displayed, it indicates that no data is being logged.To install or remove the memory card, see Section 6-2 Installing or Removing the Memory Card.4. CALIBRATIONWhen “no” is selected, the calibration will be aborted. When “YES” is selected, the calibration will be performed.• When the ZERO calibration has been completed successfully for all sensors, the Test Pass icon will blink for 5 seconds.• I f the ZERO calibration fails for one or more sensors, the detector will give a single beep and a single flash and both the Test Pass icon and Test Fail icon will blink for 5 seconds.• If the ZERO calibration fails for all sensors, the detector will give a single beep and a single flash and only the Test Fail icon will blink for 5 seconds.All Pass Some Pass/Fail All FailNote: If any sensor has failed, repeat the ZERO calibration ensuring that the detector is in fresh air. If a second failure occurs, contact Honeywell Analytics or their agent.Warning: Under proper calibration procedures, repetitive calibration failures could indicate that the sensor is either approaching its end of life, or it has been seriously contaminated, or both.4-3. SPAN CALIBRATION (FOR FLAMMABLE AND TOXIC SENSORS ONLY) Calibrate the detector at least every 6 months (CH4, CO, H S), depending on use and exposure to contaminants. User can perform the SPAN calibration with 4 gases at the same time or with a single gas. When SPAN calibration is performed with a single gas,ON/OFFValveGas TubeFlow Adaptor Carry out the ZERO calibration procedure as described in Section 4-2 Zero Calibration(Span Calibration for Oxygen).nly if the ZERO calibration is successful can a SPAN calibration be performed.t the end of the ZERO calibration procedure, the ON/OFF button must be pressed and held continuously for 5 seconds in order to proceed to SPAN calibration while the Test Pass icon is still blinking. If pass code protection is activated proceed to Section 4-3-1 Pass Code Input, otherwise proceed to Section 4-3-2 Span Gas Information.f no actions are performed at the end of the zero calibration the detector will return to4-3-1. PASS CODE INPUTIf the Pass Code Protection feature has been activated, the detector prompts the user to Press the UP or DOWNand hold the UP orON/OFF button to enter the pass code.Note: If the user fails to input the correct pass code 3 times consecutively, the detector will return to measuring mode.Note: For lost pass code, contact Honeywell Analytics or their agent.Only the gas label and SPAN gas concentration of the flammable and/or toxic sensor(s) that passed the ZERO calibration will be shown on the LCD display.4-3-3. SPAN GAS SETTINGThe SPAN gas information will be displayed.• T he span gas concentration can be changed by pressing theseconds during the display of the span gas information.• T he user can adjust the value with theSelect Exp Gas Change Concentrationfrom 50 to 40 %LEL4-3-4. GAS SEARCH AND COUNTDOWNFor SPAN calibration, apply the gas to the detector when the SPAN Calibration icon blinks. The detector will monitor sensor signals for supplied gas.Gas SearchingThe detector detects gas and executes SPAN calibrationNote: If no gas is detected within 30 seconds, the detector will give a single beep and a single flash, indicate an error “Err” for all gases on the LCD display, blink the Test Fail iconfor 5 seconds, and then exit calibration mode.No gas detected4-3-5. SPAN CALIBRATION RESULTIf one or more gases are detected, the detector will display the SPAN calibration results after the countdown.• W hen the SPAN calibration has been completed successfully for all sensors, the Test Pass icon will blink for 5 seconds.f the SPAN calibration has failed for some sensor(s), the detector will give a single beep and a single flash and indicate an error “Err” for the gas type in question on the LCD display. Both the Test Pass icon and the Test Fail icon will blink for 5 seconds.f the SPAN calibration has failed for all sensors, the detector will give a single beep and a single flash and indicate an error “Err” for all gases on the LCD display. The Test Fail icon will blink for 5 seconds.Note: If the span calibration fails, the calibration of failed sensor(s) will remain as it was beforeAll Pass Some Pass/Fail All FailAfter SPAN calibration, the detector saves the successful SPAN calibration value(s) and exits SPAN calibration mode unless the ON/OFF button is pressed and held within 5 seconds. If the ON/OFF button is pressed and held for 5 seconds while the Test Pass icon and/or Test Fail icon are still blinking (depending on the calibration result), the detector will save successful SPAN calibration value(s) and repeat the SPAN calibration procedure.for 3 seconds to enter the set-up mode. The detector will generate a single beep, display the icon, generate a beep, and then enter the set-up mode. If the Pass Code Protection feature has been activated, the detector prompts the user to enter the pass code. (See Section 4-3-1 Pass Code Input.)Note: If the user fails to input the correct pass code 3 times consecutively, the detector will return to measuring mode5-2. CHANGING THE DETECTOR SETThe set-up mode menu structure is shown in Appendix A (A-3, A-4, A-5, and A-6).In set-up mode, pressing theON/OFF button selects the function, so that the displayed value or status may be changed.Turn 90Note: Periodically inspect the battery holder terminal contacts for build up of dirt. Remove any debris using soft cloth and industrial alcohol.Card SlotMemory CardNote: The data contacts side faces upwards6-3. CLEANINGWarning: Do not use solvents, soap, polishes and any product containing silicon compounds to clean the detector as these can cause damage to the sensors.• Clean the exterior of the detector with a clean damp cloth.• Clean the sensor grilles with a soft brush.< UP >to increaseor < DOWN >to decrease the value---------------------< ON/OFF >Fail (all)Fail (some)Zero Cal.Success (all)Set Span Gas Concentration Span Gas Information Span GasSearch SpanCalibration20 seconds countdownwith zero calibration icon blinkingwait for 10 seconds< ON/OFF > for 5 secondswhile " " is blinking for 5 secondsspan gas search for up to 30 seconds 60 seconds countdownwith span calibration icon blinkingCalibrationFoundFail (all)Fail (some)Success (all)Search Span Calibrationspan gas searchfor up to 30 seconds 60 seconds countdownwith span calibration icon blinkingDetectedFailSpan Cal.Success < Continued from SpanGas Information>Setting O 2 Excess/Alarm 1 Setting Alarm 1Set O 2 Defi-ciency/Alarm 2O 2 Deficiency/Alarm 2 Setting Set STEL Alarm STEL Alarm Setting TWA Alarm Setting Set TWA Alarm < UP > or < DOWN >< UP > or < DOWN >< UP > or < DOWN >< UP > or < DOWN >< UP > or < DOWN >Signals< UP > or < DOWNPass CodeSetting< UP > or < DOWN >Interval< UP > or < DOWN Date Setting< UP > or < DOWN< UP > or < DOWN >LEL / VolSetting< UP > or < DOWN > Correction Factor Setting< UP > or < DOWN > Cal Due DateSetting< UP > or < DOWNUser ID NoSetting< UP > or < DOWN(on / off) (on / off)UP > or < DOWN >。
霍尼韦尔X4操作说明

X4的操作步骤
(1)、按住开/关键2秒钟,仪器开机
(2)、执行自检
接下来屏幕显示如下:
·显示一级报警点(可燃气和有毒气,氧气高浓度报警) ·显示二级报警点(可燃气和有毒气,氧气低浓度报警) ·显示STEL 和TWA 报警点(只对一氧化碳和硫化氢)
当按下开/关键后,仪器将检查传感器,电路,电池,声音,灯光,振动报警。
仪器将执行如下:(1)显示所有的数字和字符提示信息
(2)检查声音,灯光,振动报警 (3)检查电池,电路和传感器
(3)、自检是否通过
另外,仪器将会定期的检查电池,电路和传感器。
!注意:如果自检失败,应重新进行自检,如果再次失败请联系当地代理/服务商。
(4)、进入测量模式
(5)、解除报警
自检通过
正常显示
报警提示符号将
警符号(一级)
报警提示符号将
警符号(二级)
(6)、关机
修改报警值步骤
(1)、打开仪器至正常显示 (2)、同时按住上/下键,直到声音响起后松手
(3)、再按上键或下键选择到报警值界面 (4)、再按开关键,选择需要设置的气体
(5)、按上键或下键进行报警值的设置
(5)都设置完了,等20秒仪器自动回到检测模式
如何装电池。
霍尼韦尔impulsexp使用说明

impulse XP使用简介1 面板说明:报警灯显示屏腰带夹气体种类上键蜂鸣器下键开/关键传感器2 开/关机:按下前面板右侧的“开/关”键约1秒钟,Impulse XP 将会进入开机预热自检状态,具体表现为报警灯和蜂鸣器闪烁、鸣叫5次后进入30秒钟的预热倒计时。
如果仪器正常,显示窗出现符号提示,如果有故障则出现符号提示,表示自检失败,请参见后附详细说明。
关机时,按下“开/关”键并保持5秒(显示窗口出现5秒倒计时)仪器关机。
3 显示符号:A:电池电量B:故障指示C:正常工作提示D:氧气和毒气一级报警符号毒气二级报警符号E:氧气二级报警符号F:毒气的TWA 和STEL符号G:标定符号H:峰值符号I:浓度值和单位J:报警指示符Impulse XP的液晶显示窗具有背景灯光显示功能,在任何报警条件和按下任意键后都会激发背景灯光显示。
4 气体报警点设置:Impulse XP具有两级浓度报警点设置,对于毒气还具有8小时暴露平均浓度极限TWA和15分钟最大暴露平均浓度极限STEL报警设置。
用户可根据当地的国家法律和地方法规的要求对Impulse XP 的报警点进行设置。
出厂设置如下:(英国标准)气体类型量程一级报警点二级报警点TWA报警点STEL报警点氧气0-30%vol %vol %vol ------- ------一氧化碳0-1000ppm 35ppm 100ppm 35ppm 400ppm硫化氢0-250ppm 10ppm 15ppm 10ppm 15ppm氢气0-1000ppm 100ppm 500ppm ------- ------二氧化氮0-150ppm 3ppm 5ppm 3ppm 5ppm氯气0-50ppm 1ppm 1ppm二氧化硫0-150ppm 2ppm 5ppm 2ppm 5ppm氢氰酸0-100ppm 5ppm 10ppm 5ppm 10ppm氨气0-100ppm 25ppm 50ppm 25ppm 35ppm报警描述:报警类型显示声音报警灯光报警振动报警一级报警每秒3声每秒闪烁3次每秒两次二级报警每秒5声每秒闪烁5次每秒两次STEL报警每秒5声每秒闪烁5次每秒两次TWA报警每秒5声每秒闪烁5次每秒两次5 峰值,TWA和STEL显示模式:a. 正常显示b. TWA/STEL显示模式c. 峰值显示STEL模式TWA 模式如果想清除峰值,则在屏幕显示峰值时,按下“开/关”键一次,清除当前峰值并返回到正常的检测状态。
MICAPS4帮助文档

目录
0 快速入门手册.........................................................................................................................6 0.1 安装.............................................................................................................................. 6 0.2 快速配置......................................................................................................................6 0.2.1 数据源配置.......................................................................................................6 0.2.2 综合图配置.......................................................................................................7 0.2.3 单站雷达默认配置(工具栏)...................................................................... 9 0.2.4 模式剖面默认配置(工具栏)...................................................................... 9 0.2.5 累积降水默认配置(工具栏).................................................................... 10 0.2.6 表格数据默认配置(工具栏).....................................................................11 0.2.7 模式探空默认配置.........................................................................................11 0.2.8 基础地图信息配置.........................................................................................12 0.2.9 交互层“另存为”保存................................................................................ 13 0.2.10 系统启动配置与出图配置.......................................................................... 14 0.2.11 传真图配置.................................................................................................15
霍尼韦尔 WEBs-N4 监控器 产品说明书
® U.S. Registered TrademarkCopyright © 2020 Honeywell Inc. • All Rights Reserved31-00263-02PRODUCT DEFINITIONThe WEBs-N4 Supervisor is part of the portfolio of Java-based controller/ server products, software applications and tools powered by the Niagara Framework®. Itprovides server-level functions for a network of WEBs, CIPer and other field device clients. The WEBs-N4 Supervisor serves real-time graphical information to standard web-browser clients and performs other functions like centralized data logging/trending, archiving to external databases, alarming,dashboarding, system navigation, master scheduling, database management and integration with other enterprise software applications through an XML interface (oBIX standard). It also provides acomprehensive graphical engineering toolset for application development.KEY FEATURES• Centralized system management• Utilize tags to quickly navigate to buildings, systems and equipment when diagnosing operational problems or emergencies • Compare data between buildings• Export system data to external databases • Integrate BAS to other enterprise applications • Integrate to other applications, such as work order management, analytics, etc. • Single tool used to program WEB and Edge controllers and Supervisor • Remotely back up WEB and Edge applications to Supervisor • Batch provisioning of WEB-8000 and CIPer Model 10 firmware upgrades, security credentials, applications, and commissioning options from Supervisor • Robust built-in analytic capabilities supported by standard Niagara components and visualizations • Includes Niagara Analytics, which features data source, functional and mathematical programming blocks that enable sophisticated analytic algorithms • Compatibility with WEBs Enterprise Security access control and security application. Allows integration of BAS and access control to save energy and optimize operations • Eligible for accreditation under the Federal Risk Management Framework (RMF) • FIPS 140-2 Level 1 conformance availableThe WEBs Niagara Supervisor allows the networking of multiple Niagara- based controllers like WEB-8000 and CIPer Model 10, CIPer Model 30 and CIPer Model 50. It enables the design, configuration and maintenance of a unified, real-time controls network.SPECIFICATIONSHTML5 and Java-enabled user interface (UI); JavaScript data interface library included (BajaScript)Supports an unlimited number of users over theinternet/intranet with a standard web browser (depending on the host PC resources)Optional enterprise-level data archival using SQL,MySQL or Oracle databases, and HTTP/HTML/ XML, CSV or text formats“Audit Trail” of database changes, database storage and backup, global time functions, calendar, centralscheduling, control and energy management routines Sophisticated alarm processing and routing, including email alarm acknowledgingAccess to alarms, logs, graphics, schedules and configuration data with a standard web browserNiagara follows industry best practices for cyber security, with support for features such as strong, hashed passwords, TLS for secure communications and certificate management tools for authentication. A built-in Security Dashboard provides a comprehensive and actionable view of the security posture of your Niagara deploymentHTML-based help system that includes comprehensive online system documentationSupports multiple Niagara-based stations connected to a local Ethernet network or the internetProvides online/offline use of the Niagara Framework® Workbench graphical configuration tool and a comprehensive Java Object LibraryOptional direct Ethernet-based driver support for most Open IP field bus protocols (see supported drivers document )WEBs-N4 SUPERVISOR – PRODUCT DATA31-00263-02 2SOFTWARE & DRIVERSEvery WEBs-N4 Supervisor comes with a Niagara 4 software license, along with multiple open-protocol IP drivers that are compatible with standard control networks. If required, other drivers can be purchase separately. For an up-to-date list of supported drivers, contact customer support.SOFTWARE MAINTENANCEPurchase of a Software Maintenance Agreement (SMA) is required with initial WEBs-N4 Supervisor licensing. The initial SMA is for 18 months, with extended agreements of 3 years and 5 years available for discounted rates. If a Software Maintenance Agreement is not in effect for any period, the price of maintenance for the next period for which it is purchased will be priced at a cost equal to the maintenance fee for the period(s) for whichmaintenance was not purchased, up to a maximum of 5 years, plus the maintenance fee for the next year.ORDERING INFORMATIONPart numberDescriptionWEB-S-0-N4 No Niagara network connections – Devices only. (18mo SMA required)SUP-0-SMA-INIT 18mo initial SMA required (3YR or 5YR can be substituted) WEB-S -1-N4 1 Niagara network connection* (18mo SMA required)SUP-1-SMA-INIT 18mo initial SMA required (3YR or 5YR can be substituted) WEB-S-2-N4 2 Niagara network connections* (18mo SMA required) SUP-2-SMA-INIT 18mo initial SMA required (3YR or 5YR can be substituted) WEB-S-3-N4 3 Niagara network connections* (18mo SMA required) SUP-3-SMA-INIT 18mo initial SMA required (3YR or 5YR can be substituted) WEB-S-10-N4 10 Niagara network connections* (18mo SMA required) SUP-10-SMA-INIT 18mo initial SMA required (3YR or 5YR can be substituted) WEB-S-100-N4 100 Niagara network connections* (18mo SMA required) SUP-100-SMA-INIT 18mo initial SMA required (3YR or 5YR can be substituted) WEB-S-UNL-N4 Unlimited Niagara network connections* (18mo SMA required) SUP-UNL-SMA-INIT 18mo initial SMA required (3YR or 5YR can be substituted) WEB-S-DEMO-N4 Niagara 4 Supervisor demoSUP-UP-1 Adds one additional Niagara connection to Supervisor SUP-UP-100Upgrades small Supervisor to 100 Niagara connectionsWEBs-N4 SUPERVISOR – PRODUCT DATA3 31-00263-02Part numberDescriptionSUP-UP-UNL Upgrades Supervisor 100 to unlimited Niagara connections SUP-DEVICE-10 10 device upgrade (standard drivers included) SUP-DEVICE-25 25 device upgrade (standard drivers included) SUP-DEVICE-50 50 device upgrade (standard drivers included) SUP-DEVICE-100 100 device upgrade (standard drivers included) SUP-DEVICE-200 200 device upgrade (standard drivers included) SUP-DEVICE-500 500 device upgrade (standard drivers included) SUP-DEVICE-1000 1000 device upgrade (standard drivers included)SUP-STATION-5UP Allows running multiple stations with 1 Niagara licenseEach instance of the part purchased increases the limit by 5 stations SP-S-FIPSProvides FIPS 140-2 Level 1 conformance for 4.6 and later SUP-[0-UNL]-SMA-[1,3,5]YRSupervisor [0-UNL] Maintenance – [1,3,5] YR extensions*CIPer Model 10 and the CIPer Model 30 with a 150 points or less based capacity license now count as a 1/10 of a standard Niagara Network connectionCOMPATIBILITYIn any given WEBs Niagara system, the WEBs-N4 Supervisor must be running the highest version of any WEBs-N4 instance in the architecture.When connecting to WEBs controllers that are running older versions of WEBs-N4, these compatibility guidelines apply:• WEBs-AX: WEBs-N4 Supervisors can connect to WEBs JACE running WEBs-AX versions 3.8 and higher.• R2: WEBs-N4 Supervisors can connect to WEBs JACE running R2 through the oBIX XML interface only.PLATFORM REQUIREMENTS FOR NIAGARA SUPERVISORWEBs-N4 Supervisors may run acceptably on lower-rated platforms, or may even require more powerful platforms,depending on the application, number of data points integrated, data poll rate, number of concurrent users, performance expectations, etc.• Processor: Intel® Xeon® CPU E5-2640 x64 (or better), compatible with dual- and quad-core processors• Operating System:o Windows 10 (64-bit) o Windows Server 2016 o Windows Server 2019o Red Hat Enterprise Linux 7.7/8.1 (64-bit)• Mobile operating system: iOS 12, iOS 13, Android 8 Oreo, Android 9 Pie, Android 10.0WEBs-N4 SUPERVISOR – PRODUCT DATAThe material in this document is for information purposes only. The content and the product described are subject to change without notice. Honeywell makes no representations or warranties with respect to this document. In no event shall Honeywell be liable for technical or editorial omissions or mistakes in this document, nor shall it be liable for any damages, direct or incidental, arising out of or related to the use of this document. No part of this document may be reproduced in any form or by any means without prior written permission from Honeywell.Honeywell Building Technologies1985 Douglas DriveGolden Valley MWFor more information:Honeywell Building Controls© 2020 Honeywell, Inc. 31-00263-02 |Rev. 07-21•Browser: Chrome, Firefox, Microsoft Edge•Mobile Browser: Safari on iOS, Chrome on Android•Database: MySQL 5.7, 8.0, 9.0; Oracle Express 11g; Oracle 12, 18, 19c; MSSQL 2012, 2016, 2017, 2019•Memory: 6 GB minimum, 8 GB or more recommended for larger systems•Hard Drive: 4 GB minimum, 10 GB recommended for any Supervisor•Display: Video card and monitor capable of displaying 1024 x 768-pixel resolution, 1080p (1920 x 1080) minimum resolution recommended•Network Support: Ethernet adapter (10/100 Mb with RJ-45 connector), 100 Mbit or 1 Gbit NIC(network interface card) with TCP/IP•Connectivity: Full-time high-speed ISP connection recommended for remote site access (i.e., T1, ADSL, cable modem) and IPv6 compliantPlatform requirements for older versions of WEBs Supervisors are included in the release notes for each particular version.。
SIR4中文说明书中文图最终版 (1)

高频电源安装操作运行维护手册
目录
1. 概述 .................................................................................................................................................................. 9 1.1. 型 号 .................................................................................................................................................... 10 1.2. SIR: 静 电 除 尘 器 控 制 装 置 系 列 的 一 员 ....................................................................................... 10
4. 电气数据 ........................................................................................................................................................ 26 4.1. 概 述 .................................................................................................................................................... 26 4.2. 电 源 电 流 ........................................................................................................................................... 27 4.3. 要 求 的 电 缆 ....................................................................................................................................... 27
霍尼韦尔IMPULSEXP使用说明(DOC)

impulse XP使用简介1 面板说明:报警灯显示屏腰带夹气体种类上键蜂鸣器下键开/关键传感器2 开/关机:按下前面板右侧的“开/关”键约1秒钟,Impulse XP 将会进入开机预热自检状态,具体表现为报警灯和蜂鸣器闪烁、鸣叫5次后进入30秒钟的预热倒计时。
如果仪器正常,显示窗出现符号提示,如果有故障则出现符号提示,表示自检失败,请参见后附详细说明。
关机时,按下“开/关”键并保持5秒(显示窗口出现5秒倒计时)仪器关机。
3 显示符号:A:电池电量B:故障指示C:正常工作提示D:氧气和毒气一级报警符号毒气二级报警符号E:氧气二级报警符号F:毒气的TW A 和STEL符号G:标定符号H:峰值符号I:浓度值和单位J:报警指示符Impulse XP的液晶显示窗具有背景灯光显示功能,在任何报警条件和按下任意键后都会激发背景灯光显示。
4 气体报警点设置:Impulse XP具有两级浓度报警点设置,对于毒气还具有8小时暴露平均浓度极限TW A和15分钟最大暴露平均浓度极限STEL报警设置。
用户可根据当地的国家法律和地方法规的要求对Impulse XP的报警点进行设置。
出厂设置如下:(英国标准)气体类型量程一级报警点二级报警点TW A报警点STEL报警点氧气0-30%vol 23.5%vol 19.5%vol ------- ------一氧化碳0-1000ppm 35ppm 100ppm 35ppm 400ppm硫化氢0-250ppm 10ppm 15ppm 10ppm 15ppm氢气0-1000ppm 100ppm 500ppm ------- ------二氧化氮0-150ppm 3ppm 5ppm 3ppm 5ppm氯气0-50ppm 0.5ppm 1ppm 0.5ppm 1ppm二氧化硫0-150ppm 2ppm 5ppm 2ppm 5ppm氢氰酸0-100ppm 5ppm 10ppm 5ppm 10ppm氨气0-100ppm 25ppm 50ppm 25ppm 35ppm报警描述:报警类型显示声音报警灯光报警振动报警一级报警每秒3声每秒闪烁3次每秒两次二级报警每秒5声每秒闪烁5次每秒两次STEL报警每秒5声每秒闪烁5次每秒两次TW A报警每秒5声每秒闪烁5次每秒两次5 峰值,TWA和STEL显示模式:a. 正常显示b. TW A/STEL显示模式c. 峰值显示STEL模式TWA 模式如果想清除峰值,则在屏幕显示峰值时,按下“开/关”键一次,清除当前峰值并返回到正常的检测状态。
霍尼韦尔IMPULSE XP使用说明
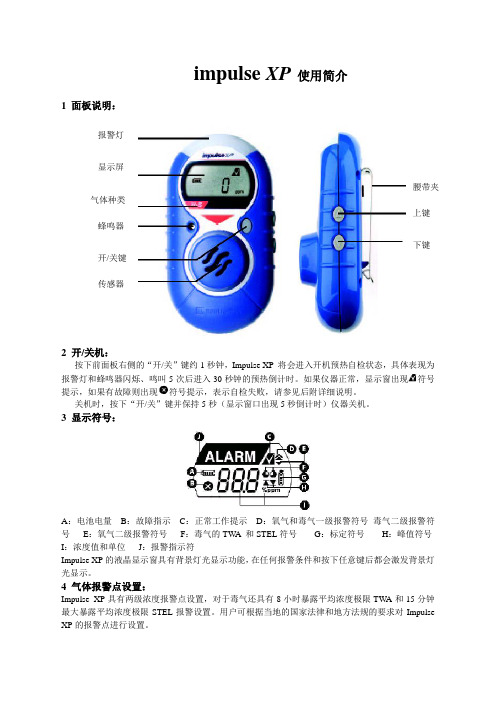
impulse XP使用简介1 面板说明:报警灯显示屏腰带夹气体种类上键蜂鸣器下键开/关键传感器2 开/关机:按下前面板右侧的“开/关”键约1秒钟,Impulse XP 将会进入开机预热自检状态,具体表现为报警灯和蜂鸣器闪烁、鸣叫5次后进入30秒钟的预热倒计时。
如果仪器正常,显示窗出现符号提示,如果有故障则出现符号提示,表示自检失败,请参见后附详细说明。
关机时,按下“开/关”键并保持5秒(显示窗口出现5秒倒计时)仪器关机。
3 显示符号:A:电池电量B:故障指示C:正常工作提示D:氧气和毒气一级报警符号毒气二级报警符号E:氧气二级报警符号F:毒气的TW A 和STEL符号G:标定符号H:峰值符号I:浓度值和单位J:报警指示符Impulse XP的液晶显示窗具有背景灯光显示功能,在任何报警条件和按下任意键后都会激发背景灯光显示。
4 气体报警点设置:Impulse XP具有两级浓度报警点设置,对于毒气还具有8小时暴露平均浓度极限TW A和15分钟最大暴露平均浓度极限STEL报警设置。
用户可根据当地的国家法律和地方法规的要求对Impulse XP的报警点进行设置。
出厂设置如下:(英国标准)气体类型量程一级报警点二级报警点TW A报警点STEL报警点氧气0-30%vol 23.5%vol 19.5%vol ------- ------一氧化碳0-1000ppm 35ppm 100ppm 35ppm 400ppm硫化氢0-250ppm 10ppm 15ppm 10ppm 15ppm氢气0-1000ppm 100ppm 500ppm ------- ------二氧化氮0-150ppm 3ppm 5ppm 3ppm 5ppm氯气0-50ppm 0.5ppm 1ppm 0.5ppm 1ppm二氧化硫0-150ppm 2ppm 5ppm 2ppm 5ppm氢氰酸0-100ppm 5ppm 10ppm 5ppm 10ppm氨气0-100ppm 25ppm 50ppm 25ppm 35ppm报警描述:报警类型显示声音报警灯光报警振动报警一级报警每秒3声每秒闪烁3次每秒两次二级报警每秒5声每秒闪烁5次每秒两次STEL报警每秒5声每秒闪烁5次每秒两次TW A报警每秒5声每秒闪烁5次每秒两次5 峰值,TWA和STEL显示模式:a. 正常显示b. TW A/STEL显示模式c. 峰值显示STEL模式TWA 模式如果想清除峰值,则在屏幕显示峰值时,按下“开/关”键一次,清除当前峰值并返回到正常的检测状态。
霍尼韦尔氢气纯度仪说明书模板
目录1.前言………………………………………………………………………………2 1.1概述……………………………………………………………….........2 1.2传感单元 (2)1.37866数字控制器 (3)1.4操作原理 (4)2.技术参数和选型 (6)2.1技术参数……………………………………………………………………62.2选型 (8)3.安装……………………………………………………………………….........9 3.1传感单元要求条件和定位 (9)3.2安装传感单元 (9)3.3管路连接 (9)3.4传感单元与数字控制器接线 (10)4.设置模式………………………………………………………………………11 4.1概述………………………………………………………………………11 4.2结构概述……………………………………………………………………...11 4.3单元设置组群 (11)4.4报警设置组群 (12)4.5M o d B U S通讯设置组群 (12)4.6校准组群………………………………………………………………………13 4.7状态组群………………………………………………………………………13 5.校准……………………………………………………………………………14 5.1概述……………………………………………………………………...14 5.2传感单元校准 (14)5.37866分析仪输入校准 (14)5.4模拟输出校准 (15)5.7安全锁定……………………………………………………………………...16 5.8设置报警极限 (17)6.操作………………………………………………………………………………18 6.1启动………………………………………………………………………18 7.排除故障…………………………………………………………………………19 7.1概述……………………………………………………………………...19 7.27866数字控制器检测 (20)附录 (21)1.前言1.1 概述美国HONEYWELL公司7866氢气纯度分析仪由三个基本部件组成: 传感单元( 变送器) , 控制单元( 接收器) ( 图1-1) 和电源。
霍尼韦尔视频监控 简易操作手册

视频监控系统使用手册1客户端1.1概述客户端集成了实时视频监控、历史视频回放、电子地图的编辑浏览以及对配置数据的管理功能。
用于对视频监控系统的集中和统一管理以及通过地图显示方式实现设备信息及报警事件的综合管理。
1.2登陆、退出1.2.1登录和管理站点双击桌面上的“客户端”图标或在“开始”菜单打开所有程序Honeywell HUS客户端。
打开客户端,显示如下登录画面:输入用户名和密码。
点击【确定】开始加载数据,如下图所示:加载完成后,进入主界面1.2.2退出要退出客户端,有两种方式:在菜单栏选择用户退出。
点击客户端主界面右上角按钮。
1.3客户端主界面介绍客户端主界面如下:在客户端主界面“工作区”左侧“系统设备”子菜单里,能看到设备分类。
分别有“16屏视频”“诺金酒店”“谭阁美酒店”“首旅出租区”“系统设备”。
1.4本地实时视频播放选择“工具栏”最上面的图标选择“本地”切换到本地播放。
一窗口四窗口六窗口一当“显示模式”设置为“本地”时显示这些窗口布局选项。
点击六窗口二相应的按钮选择视频窗口布局。
八窗口九窗口十六窗口环绕视频把“系统设备”里面对应的摄像机拖动到窗口里面,就可以观看了。
1.5大屏实时视频播放1.5.1选择“工具栏”最上面的图标选择“大屏”切换到大屏播放。
选择“工具栏”图标选择对应的,“大屏布局”用大屏中间拼接屏播放视频选择“工具栏”布局对应“窗口布局”,拖动所需摄像机,到所对应的窗口,则对应的显示屏上显示出相应的图像。
1.6本地视频历史回放和下载1.6.1选择“功能标签导航栏”对应的“历史视频”一项根据条件进行查找历史录像播放历史视频按照如下两种方式中的一种播放历史视频:右键点击历史视频查询结果中的一条记录并选择“播放”或者直接双击该条记录。
选中查找到的历史视频,拖拽到一个视频播放窗口。
可在历史视频窗口进行相关播放窗口操作以及时间轴操作。
历史视频播放窗口操作在历史视频播放窗口,使用右键菜单可拍摄快照、全屏显示和停止视频,如下图所示:1.6.2也可以在“系统设备”里“诺金酒店”“谭阁美酒店”“首旅出租区”这几子项里对应摄像机上点击右键,点击“历史视频”也会切换到“历史视频”界面,这时直接选择时间段就可以查找到这个摄像机的历史视频了。
霍尼韦尔IMPULSE-XP使用说明

impulse XP使用简介1 面板说明:报警灯显示屏腰带夹气体种类上键蜂鸣器下键开/关键传感器2 开/关机:按下前面板右侧的“开/关”键约1秒钟,Impulse XP 将会进入开机预热自检状态,具体表现为报警灯和蜂鸣器闪烁、鸣叫5次后进入30秒钟的预热倒计时。
如果仪器正常,显示窗出现符号提示,如果有故障则出现符号提示,表示自检失败,请参见后附详细说明。
关机时,按下“开/关”键并保持5秒(显示窗口出现5秒倒计时)仪器关机。
3 显示符号:A:电池电量B:故障指示C:正常工作提示D:氧气和毒气一级报警符号毒气二级报警符号E:氧气二级报警符号F:毒气的TW A 和STEL符号G:标定符号H:峰值符号I:浓度值和单位J:报警指示符Impulse XP的液晶显示窗具有背景灯光显示功能,在任何报警条件和按下任意键后都会激发背景灯光显示。
4 气体报警点设置:Impulse XP具有两级浓度报警点设置,对于毒气还具有8小时暴露平均浓度极限TW A和15分钟最大暴露平均浓度极限STEL报警设置。
用户可根据当地的国家法律和地方法规的要求对Impulse XP的报警点进行设置。
出厂设置如下:(英国标准)气体类型量程一级报警点二级报警点TW A报警点STEL报警点氧气0-30%vol 23.5%vol 19.5%vol ------- ------一氧化碳0-1000ppm 35ppm 100ppm 35ppm 400ppm硫化氢0-250ppm 10ppm 15ppm 10ppm 15ppm氢气0-1000ppm 100ppm 500ppm ------- ------二氧化氮0-150ppm 3ppm 5ppm 3ppm 5ppm氯气0-50ppm 0.5ppm 1ppm 0.5ppm 1ppm二氧化硫0-150ppm 2ppm 5ppm 2ppm 5ppm氢氰酸0-100ppm 5ppm 10ppm 5ppm 10ppm氨气0-100ppm 25ppm 50ppm 25ppm 35ppm报警描述:报警类型显示声音报警灯光报警振动报警一级报警每秒3声每秒闪烁3次每秒两次二级报警每秒5声每秒闪烁5次每秒两次STEL报警每秒5声每秒闪烁5次每秒两次TW A报警每秒5声每秒闪烁5次每秒两次5 峰值,TWA和STEL显示模式:a. 正常显示b. TW A/STEL显示模式c. 峰值显示STEL模式TWA 模式如果想清除峰值,则在屏幕显示峰值时,按下“开/关”键一次,清除当前峰值并返回到正常的检测状态。
HONEYWELL表设定方法
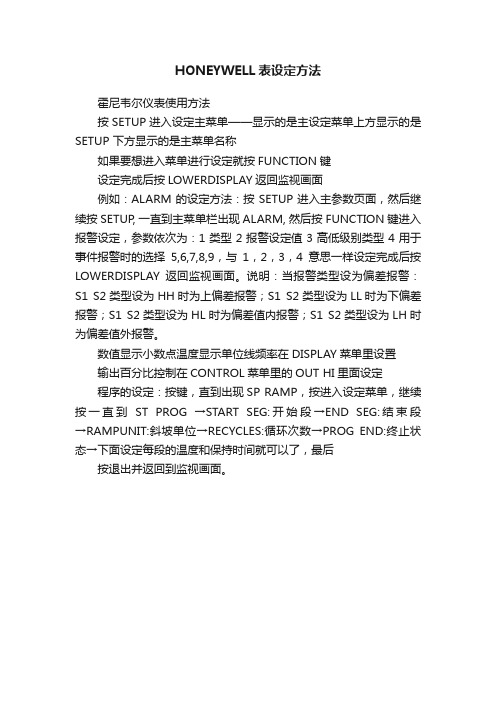
HONEYWELL表设定方法
霍尼韦尔仪表使用方法
按SETUP进入设定主菜单——显示的是主设定菜单上方显示的是SETUP 下方显示的是主菜单名称
如果要想进入菜单进行设定就按FUNCTION键
设定完成后按LOWERDISPLAY返回监视画面
例如:ALARM的设定方法:按SETUP进入主参数页面,然后继续按SETUP, 一直到主菜单栏出现ALARM, 然后按FUNCTION键进入报警设定,参数依次为:1类型2报警设定值3高低级别类型4用于事件报警时的选择5,6,7,8,9,与1,2,3,4意思一样设定完成后按LOWERDISPLAY返回监视画面。
说明:当报警类型设为偏差报警:S1 S2类型设为HH时为上偏差报警;S1 S2类型设为LL时为下偏差报警;S1 S2类型设为HL时为偏差值内报警;S1 S2类型设为LH时为偏差值外报警。
数值显示小数点温度显示单位线频率在DISPLAY菜单里设置
输出百分比控制在CONTROL菜单里的OUT HI里面设定
程序的设定:按键,直到出现SP RAMP,按进入设定菜单,继续按一直到ST PROG →START SEG:开始段→END SEG:结束段→RAMPUNIT:斜坡单位→RECYCLES:循环次数→PROG END:终止状态→下面设定每段的温度和保持时间就可以了,最后
按退出并返回到监视画面。
- 1、下载文档前请自行甄别文档内容的完整性,平台不提供额外的编辑、内容补充、找答案等附加服务。
- 2、"仅部分预览"的文档,不可在线预览部分如存在完整性等问题,可反馈申请退款(可完整预览的文档不适用该条件!)。
- 3、如文档侵犯您的权益,请联系客服反馈,我们会尽快为您处理(人工客服工作时间:9:00-18:30)。
Impulse X4 系列便携式复合气体检测仪操作说明书!重要提示:!在首次使用仪器以前请认真阅读本手册,您将会掌握仪器正确的使用方法和了解仪器的功能,包括操作,维护,功能设置等内容。
!为了使操作者更安全,请按照手册中的要求,定期对仪器进行标定。
!如果在使用过程中,遇到的故障或问题在本手册中没有提到,请直接联系制造商Zellweger Analytics,或联系当地的代理商/服务商。
!警告和注意:·更换任何元器件都有可能损坏仪器的本质安全结构。
·如果需要使用存储卡,请选用Zellweger Analytics 提供的存储卡(订货号2566-0435),使用其它的存储卡有可能损坏仪器的本质安全结构。
·在允许的储存期之后激活检测器,有可能影响仪器的使用性能和保质期。
·应使用许可的5号干电池,如劲量电池,不要使用质量低下的干电池,以免影响仪器的本质安全性能。
·在更换电池时,应同时更换2节型号相同的新电池。
·在电池欠压提示后,应尽快更换新电池,以免旧电池漏液损坏仪器。
·在低温环境下,电池的寿命会缩短。
·更换电池时,应该在安全环境下进行。
·当更换任何一个传感器的情况下,都需要对仪器进行标定。
·在每天使用以前,应完成仪器的自检过程。
·定期的对仪器用标气进行测试,检查声、光、振动报警是否正常。
·标定时应选用厂家或国家认证合格企业提供的标准气体。
·标定时应在良好通风的环境下进行,以避免污染。
·不要在仪器电量不足的情况下标定。
·不要在富氧的环境下使用本仪器。
·可燃气体传感器的灵敏度会受到高浓度硫化物,卤素化合物,含硅化合物,以及含铅气体或蒸汽的影响,也叫“中毒”,应避免在以上的环境中使用仪器,如果必须使用,则使用完后应对仪器进行检测和标定,以免影响以后的使用。
·仪器不能长时间在高浓度可燃气体的环境下使用,以免损坏可燃气传感器,如果必须使用,则使用后必须进行标定,如果可燃气传感器已经损坏,需要更换新的传感器才能重新使用。
·不要使用有机溶剂,肥皂或含硅的溶液清洗仪器,以免损坏传感器。
·不要让仪器直接受到电或机械冲击,受到冲击后应对仪器进行自检或标定。
·当某个传感器失效后,应及时更换新传感器,以免影响仪器的使用。
·处于安全考虑,仪器应该由完全阅读使用说明书的人员使用和维护。
·如果选用了存储卡,则不要在危险的环境下安装,更换,或使用计算机和读卡器读、写卡。
也不要在仪器带电的情况下直接安装或取下存储卡,这样会损坏存储卡。
·在仪器预热时,不要进入危险环境检测,以免造成事故。
·桌面USB读卡器和数据采集器为非本质安全设计,不要在危险场所使用。
1. 介绍impulse X4系列是一种使用简便的个人防护气体检测仪,用于检测危险环境下的可燃气体,氧气,一氧化碳和硫化氢。
前面板上的大屏幕液晶可以显示所检测气体的浓度和其他用于的信息,大分贝的蜂鸣器、报警指示灯和振动报警提示用于当气体的浓度超过设定的报警点后提示操作者。
内置的传感器损耗补偿,热冲击防护,专利的传感器检测Reflex TM 技术保证仪器的可信赖性。
1.1 产品描述左侧视图 正视图右侧视图 底视图开/关键标定罩固定孔灯光报警传感器封盖 蜂鸣器液晶显示上键 下键电池盖锁定片鳄鱼夹1.2 操作键的功能描述开/关键上键下键·开机·选择菜单·选择菜单·关机·增加数值·减少数值·自检·激发倒转显示·激发背景灯光·零点标定·激发背景灯光·灵敏度标定·设置确认1.3 液晶显示液晶显示屏具有背景灯光显示功能当气体浓度超过报警点激发报警或按下任意键时自动激发,在正常检测过程中,如果处于光线很弱的环境下,按下一次上键或下键也可激发背景灯光显示。
1 检测通过符号2 检测失败符号3 高峰值符号4 低峰值符号(限氧气)5 报警符号6 数据采集符号7 电池符号8 密码保护符号9 %V ol单位符号10 %LEL单位符号11 STEL值符号12 TW A值符号13 一级报警符号;二级报警符号14 零点标定符号;灵敏度标定符号15 气体标识符号16 氧气低报警符号17 氧气高报警符号1.4 标准配置·出厂检测认证·快速用户使用指导·碱性5号干电池(2节)·标定罩·导气管·鳄鱼夹·用户手册2. 开/关机如果第一次使用检测仪,首先应该将2节5号干电池安装好(见6.1更换电池章节),如果订购了可选的数据采集功能和存储卡,这时也应一并安装(见6.2安装和更换存储卡章节)。
2.1 开机按住开/关键2秒钟,仪器开机。
2.1.1 显示运行版本开机后仪器自动显示运行的软件版本,如下图:2.1.2 清除STEL和TW A值当先前测量的STEL和TWA值非零时,屏幕出现STEL和TWA符号并且显示“delete no”(删除否)提示(当STEL和TWA值为零时不会出现该提示)如下图:按下上键或下键选择NO(否)或YES(是)屏幕提示,按下开/关键确认选项或当选择“NO”(否)时,原来的STEL和TW A值将保留为当前检测的初始值,如果选择“YES”(是)则清除原来的STEL和TW A值。
2.1.3 检查存储卡如果用户使用了可选的存储卡,开机后将检查存储卡,当正确的FAT16制式的存储卡被检测到存储信息已满时,屏幕将显示容量满提示“Data Fu”(数据满)信息,接下来屏幕提示“Delete no”(删除否)信息。
(如果检测到的存储信息没有满时,将不会出现以上的提示)按上键或下键选择NO(否)或YES(是)屏幕提示,按下开/关键确认选项或当选中“no”(否)时,检测仪保留当前的数据文件同时数据采集符号不会在屏幕上出现,这表示在测量过程中检测数据不会被采集。
当选中“YES”(是)时,检测仪将删除原来的数据文件并创建新的文件用于数据采集,在测量过程中屏幕出现数据采集符号这表示检测数据将被仪器采集。
检测仪不支持FAT32或NTFS制式的存储卡,当非FAT16制式的存储卡应用时,屏幕出现“Card Er”(卡错误)提示,同时出现声音报警提示。
(如果使用了正确地FAT16制式的存储卡,则不会出现上述提示)出现错误提示后,数据采集符号将不会显示数据采集功能将不能使用。
2.1.4 开机自检仪器开机完成上述步骤后,激发报警提示并开始功能自检,如果自检通过出现,则检测通过符号将会出现。
如果出现检测失败符号同时检测通过符号闪烁,声光报警提示5秒钟出现一次,表示仪器的自检失败(见3.1功能自检章节)。
2.1.5 检查标定预期日期当自检通过后,屏幕会显示离预期标定时间所剩余的天数,如果屏幕出现“CAL due day 0”(标定预期天数0 )时,表明用户需要对仪器进行标定。
标定的步骤见第4章2.2 关机如果需要关机,在正常的检测模式中按住开/关键,屏幕出现5秒钟的倒计时,然后声音提示关机。
3. 操作3.1 执行自检当按下开/关键后,仪器将检查传感器,电路,电池,声音,灯光,振动报警。
仪器将执行如下:·显示所有的数字和字符提示信息·检查声音,灯光,振动报警·检查电池,电路和传感器接下来屏幕显示如下:·显示一级报警点(可燃气和有毒气,氧气高浓度报警)和二级报警点(可燃气和有毒气,氧气低浓度报警)·显示STEL和TW A报警点(只对一氧化碳和硫化氢)一级报警点二级报警点STEL报警点TW A报警点·自检结果的显示如下:自检通过自检失败另外,仪器将会定期的检查电池,电路和传感器。
!注意:如果自检失败,应重新进行自检,如果再次失败请联系Zellweger Analytics或当地代理/服务商。
3.2 测量模式检测仪可以应用“扩散”或“吸气”测量方式,在正常的操作过程中,仪器可以固定在腰带或手持使用。
一旦开机,检测仪将连续测量,周围的空气可以通过扩散方式进入传感器,通常空气的流动可以将测量目标气体直接送入传感器,传感器就会对气体的浓度有反应并会给出测量结果。
扩散式检测原理就是利用以上方式直接检测仪器周围的气体浓度,扩散式的优点是响应的时间迅速。
如果需要对采样位置的气体进行远程检测,就需要使用吸气方式进行测量,这时仪器需要使用标定罩和可选的手动泵,在使用标定罩时,应确保采气的方向按照箭头指示的方向。
气体的类型和浓度值为同一显示屏的独立显示,如果传感器的安装少于4个,则未安装的传感器位置显示为空白。
正常显示3.2.1 反向显示液晶显示屏可以通过按住上键2秒钟,转换为反向显示模式。
这在使用者将仪器固定在腰带和胸带上时更方便地观察仪器读数。
反向显示模式注意:反向显示不能用于标定和设置操作。
3.3 气体报警检测仪具有两个瞬时的气体报警等级,二级报警点(可燃气和有毒气高浓度报警,氧气低浓度报警)比一级报警点(可燃气和有毒气低浓度报警,氧气高浓度报警)对可燃气和有毒气而言更需要紧急处理,对于氧气浓度过高或过低同样重要。
对于一氧化碳和硫化氢还有15分钟允许的平均暴露浓度STEL报警点和8小时允许的平均暴露浓度TW A报警点。
用户可在设置工作模式中完成对一级报警点,二级报警点,STEL报警点,TWA报警点和报警锁闭的设置。
说明:STEL为英文Short Time Exposure Limit的缩写,TW A为英文Time-Weighted Average 的缩写。
3.3.1 impulse X4系列的报警设置!注意:对于可燃气、一氧化碳、硫化氢气体,一级报警点设定值要不能超过二级报警点设定值,如果两者设定值相同,仪器将执行二级报警功能。
如果有报警发生,报警提示符号将显示并闪烁,同时相应的报警符号(一级) ,(二级),(氧气低报),(STEL),(TWA)将会按照发生报警的气体类型和等级相应显示。
报警类型显示(举例)声音灯光振动一级报警每秒2声每秒2次每2秒一次二级报警每秒4声每秒4次每秒一次STEL报警每秒4声每秒4次每秒一次TW A报警每秒4声每秒4次每秒一次注意:在锁闭报警模式,一旦发生报警,即便离开危险环境,声、光、振动报警提示将一直保持。
如果要解除报警,按下开/关键即可。
在非锁闭报警模式,一旦发生气体的浓度低于报警设定值,将自动解除报警。
如果检测气体的浓度超过测量范围,在报警的同时,满量程值还将闪烁。
3.4 气体暴露状态查看!警告:在气体暴露状态查看的过程中,仪器不要用于检测周围的气体浓度。
