Eclipse for C++使用说明
Eclipse IDE开发环境使用教程说明书
iAbout the T utorialEclipse is an integrated development environment (IDE) for Java and other programming languages like C, C++, PHP, and Ruby etc. Development environment provided by Eclipse includes the Eclipse Java development tools (JDT) for Java, Eclipse CDT for C/C++, and Eclipse PDT for PHP, among others.This tutorial will teach you how to use Eclipse in your day-2-day life while developing any software project using Eclipse IDE. We will give special emphasis on Java project. AudienceThis tutorial has been prepared for beginners to help them understand basic functionality of Eclipse tool. After completing this tutorial, you will find yourself at a moderate level of expertise in using Eclipse IDE from where you can take yourself to next levels. PrerequisitesWe assume you are going to use Eclipse IDE to handle all levels of Java projects development. So it will be good if you have knowledge of software development using any programming language specially Java programming.Copyright & Disclaimer© Copyright 2015 by Tutorials Point (I) Pvt. Ltd.All the content and graphics published in this e-book are the property of Tutorials Point (I) Pvt. Ltd. The user of this e-book can retain a copy for future reference but commercial use of this data is not allowed. Distribution or republishing any content or a part of the content of this e-book in any manner is also not allowed without written consent of the publisher. We strive to update the contents of our website and tutorials as timely and as precisely as possible, however, the contents may contain inaccuracies or errors. Tutorials Point (I) Pvt. Ltd. provides no guarantee regarding the accuracy, timeliness or completeness of our website or its contents including this tutorial. If you discover any errors on our website or inthistutorial,******************************************iT able of ContentsAbout the Tutorial (i)Audience (i)Prerequisites (i)Copyright & Disclaimer (i)Table of Contents .................................................................................................................................... i i 1.OVERVIEW (1)What is Eclipse? (1)Licensing (1)Eclipse Releases (1)2.INSTALLATION (3)Downloading Eclipse (3)Installing Eclipse (3)Launching Eclipse (4)3.EXPLORE WINDOWS (5)Parts of an Eclipse Window (5)Using Multiple Windows (6)4.EXPLORE MENUS (7)Typical Eclipse Menus (7)Brief Description of Menus (8)Customizing Menus (8)5.EXPLORE VIEWS (9)About Views (9)Organizing Views (9)Moving Views (9)Creating View Folders (10)Opening a view (10)6.PERSPECTIVES (13)What is a Perspective? (13)Opening a Perspective (13)Switching between Perspectives (13)Closing a Perspective (14)Customizing a Perspective (14)7.WORKSPACES (16)About Eclipse Workspace (16)UI Elements for Managing the Workspace (16)8.CREATE JAVA PROJECT (18)Opening the New Java Project wizard (18)Using the New Java Project wizard (18)Viewing the Newly Created Project (20)9.CREATE JAVA PACKAGE (21)Opening the New Java Package wizard (21)Using the New Java Package Wizard (21)Viewing the Newly Created Package (22)10.CREATE JAVA CLASS (23)Opening the New Java Class Wizard (23)Using the New Java Class Wizard (23)Viewing the Newly Created Java class (24)11.CREATE JAVA INTERFACE (25)Opening the New Java Interface Wizard (25)Using the New Java Interface Wizard (25)Viewing the Newly Created Java Interface (26)12.CREATE XML FILE (27)Opening the New XML File wizard (27)Using the New XML File wizard (28)Viewing the Newly Created XML File (29)13.JAVA BUILD PATH (30)Setting the Java Build Path (30)14.RUN CONFIGURATION (31)Creating and Using a Run Configuration (31)15.RUNNING A PROGRAM (33)Running a Java Program (33)16.CREATE JAR FILES (35)Opening the Jar File wizard (35)Using the Jar File wizard (35)17.CLOSE PROJECT (37)Why Close a Project? (37)How to Close a Project? (37)Closed Project in Package Explorer (38)18.REOPEN PROJECT (39)Reopening a Closed Project (39)19.BUILD PROJECT (40)Building a Java Project (40)20.DEBUG CONFIGURATION (42)Creating and Using a Debug Configuration (42)21.DEBUGGING A PROGRAM (44)Debugging a Java Program (44)22.PREFERENCES (48)Setting Preferences (48)23.CONTENT ASSIST (50)Using Content Assist (50)24.QUICK FIX (52)Using Quix Fix (52)25.HOVER HELP (54)Using Hover Help (54)26.SEARCH MENU (56)Searching the Workspace (56)27.NAVIGATION (58)Navigating the Eclipse Workspace (58)Open Type (58)Open Type in Hierarchy (60)Open Resource (61)28.REFACTORING (63)Refactoring using Eclipse (63)29.ADD BOOKMARKS (64)About Bookmarks (64)Adding a Bookmark (64)Opening the Bookmarks View (64)Using the Bookmarks View (65)30.TASK MANAGEMENT (66)Managing Tasks (66)Opening the Tasks View (67)Using the Tasks View (67)31.INSTALL PLUGINS (69)Locating and Installing Plug-ins (69)32.CODE TEMPLATES (73)Using Code Templates (73)Modifying/Adding code templates (74)33.SHORTCUTS (75)About Shortcuts (75)34.RESTART OPTION (78)Restarting Eclipse (78)35.TIPS & TRICKS (79)36.WEB BROWSERS (81)Internal Web Browser (81)Eclipse 7What is Eclipse?In the context of computing, Eclipse is an integrated development environment (IDE) for developing applications using the Java programming language and other programming languages such as C/C++, Python, PERL, Ruby etc.The Eclipse platform which provides the foundation for the Eclipse IDE is composed of plug-ins and is designed to be extensible using additional plug-ins. Developed using Java, the Eclipse platform can be used to develop rich client applications, integrated development environments, and other tools. Eclipse can be used as an IDE for any programming language for which a plug-in is available.The Java Development Tools (JDT) project provides a plug-in that allows Eclipse to be used as a Java IDE, PyDev is a plugin that allows Eclipse to be used as a Python IDE, C/C++ Development Tools (CDT) is a plug-in that allows Eclipse to be used for developing application using C/C++, the Eclipse Scala plug-in allows Eclipse to be used an IDE to develop Scala applications and PHPeclipse is a plug-in to eclipse that provides complete development tool for PHP.LicensingEclipse platform and other plug-ins from the Eclipse foundation is released under the Eclipse Public License (EPL). EPL ensures that Eclipse is free to download and install. It also allows Eclipse to be modified and distributed.Eclipse ReleasesEvery year, since 2006, the Eclipse foundation releases the Eclipse Platform and a number of other plug-ins in June.1.Eclipse8Eclipse 9Downloading EclipseYou can download eclipse from /downloads/. The download page lists a number of flavors of eclipse.The capabilities of each packaging of eclipse are different. Java developers typically use Eclipse Classic or Eclipse IDE for developing Java applications.The drop down box in the right corner of the download page allows you to set the operating system on which eclipse is to be installed. You can choose between Windows, Linux and Mac. Eclipse is packaged as a zip file.Installing EclipseTo install on windows, you need a tool that can extract the contents of a zip file. For example you can use:∙7-zip ∙PeaZip ∙ IZArcUsing any one of these tools, extract the contents of the eclipse zip file to any folder of your choice.2.Launching EclipseOn the windows platform, if you extracted the contents of the zip file to c:\, then you can start eclipse by using c:\eclipse\eclipse.exeWhen eclipse starts up for the first time it prompts you for the location of the workspace folder. All your data will be stored in the workspace folder. You can accept the default or choose a new location.1011If you select "Use this as the default and do not ask again", this dialog box will not come up again. You can change this preference using the Workspaces Preference Page. See the Preference tutorialpage for more details.Eclipse 12Parts of an Eclipse WindowThe major visible parts of an eclipse window are:∙Views ∙Editors (all appear in one editor area) ∙Menu Bar ∙ ToolbarAn eclipse perspective is the name given to an initial collection and arrangement of views and an editor area. The default perspective is called java. An eclipse window can have multiple perspectives open in it but only one perspective can be active at any point of time. A user can switch between open perspectives or open a new perspective. A perspective controls what appears in some menus and tool bars.3.EclipseA perspective has only one editor area in which multiple editors can be open. The editor area is usually surrounded by multiple views. In general, editors are used to edit the project data and views are used to view the project metadata. For example, the package explorer shows the java files in the project and the java editor is used to edit a java file.The eclipse window can contain multiple editors and views but only one of them is active at any given point of time. The title bar of the active editor or view looks different from all the others.The UI elements on the menu bar and tool bar represent commands that can be triggered by an end user.Using Multiple WindowsMultiple Eclipse Windows can be open at the same time. To open a new window, click on the Windows menu and select the New Window menu item.Each window can have a different perspective open in them. For example you could open two Eclipse windows one in the Java perspective and the other in the Debug perspective. The window showing the Java perspective can be used for editing the java code and the window showing the debug perspective can be used for debugging the application being developed.13Eclipse 14T ypical Eclipse MenusThe typical menus available on the menu bar of an Eclipse window are:∙File menu ∙Edit menu ∙Navigate menu ∙Search menu ∙Project menu ∙Run menu ∙Window menu ∙ Help menu4.Plug-ins can add new menus and menu items. For example when the java editor is open, you will see the Source menu and when the XML editor is open, you will see the Design menu. Brief Description of Menus15Customizing MenusThe visible menu items on a menu depend on the installed plug-ins and customization done using the Customize Perspective dialog box.16Eclipse 17About ViewsEclipse views allow users to see a graphical representation of project metadata. For example the project navigator view presents a graphical representation of the folders and files associated with a project and properties view presents a graphical representation of an element selected in another view or editor.An eclipse perspective can show any number of views and editors. All editor instances appear in a single editor area, whereas views are placed inside view folders. A workbench window can display any number of view folders. Each view folder can display one or more views. Organizing ViewsThe following picture shows four views arranged in a view folder.The picture given below shows the same four views arranged in two view folders.5.Moving ViewsTo move a view from one view folder to another, just click on the view title and drag to the title bar area of another view folder. The green line shown below is a result of dragging the title bar of the Properties view from one view folder to the title bar area of another view folder. The Properties view can be moved to where the green line is by releasing the mouse button and sending out a drop event.Creating View FoldersView folders can be dynamically created by dragging the title bar of a view to anywhere outside the editor area and title bar of another view folder. As you drag the title bar around, green lines will indicate where exactly the new view folder will be created.Moving the drag icon to the bottom of a window allows you to create a view folder that spans the entire width of the window. Moving the drag icon to the left or right edge of window allows you to create a view folder that spans the entire height of the window.18Opening a viewTo open a view, click on the Window menu and select the Show View menu item.19Clicking on the Other menu item brings up the Show View dialog box that allows you to locate and activate a view.20The views are organized by category. To quickly locate a view, just type the name of a view into the filter text box. To open a view, select it and click on the OK button. The subsequent pages of this tutorial introduce you to a number of useful views.21End of ebook previewIf you liked what you saw…Buy it from our store @ https://22。
Eclipse代码提示功能设置(JavaEclipse+CDTCC++)
Eclipse代码提⽰功能设置(JavaEclipse+CDTCC++)/art/200907/136242.htm最近在Linux下开发,由于长期使⽤Visual Studio 2010,对代码提⽰功能情有独钟,现在在Linux下,使⽤Eclipse做开发,当然免不了怀念Visual Studio强悍的代码提⽰,于是在⽹上搜索了⼀些⽂章,整理出关于Eclipse代码提⽰功能设置的⽅法。
Java:增强Eclipse 的代码提⽰功能,具体怎么样来配置?下⾯开始说步骤:1. 打开Eclipse,然后“window”→“Preferences”2. 选择“java”,展开,“Editor”,选择“Content Assist”。
3. 选择“Content Assist”,然后看到右边,右边的“Auto-Activation”下⾯的“Auto Activation triggers for java”这个选项。
其实就是指触发代码提⽰的就是“.”这个符号。
4. “Auto Activation triggers for java”这个选项,在“.”后加abc字母,⽅便后⾯的查找修改。
然后“apply”,点击“OK”。
5. 然后,“File”→“Export”,在弹出的窗⼝中选择“Perferences”,点击“下⼀步”。
6. 选择导出⽂件路径,本⼈导出到桌⾯,输⼊“test”作为⽂件名,点击“保存”。
7. 在桌⾯找到刚在保存的⽂件“test.epf”,右键选择“⽤记事本打开”。
8. 可以看到很多配置Eclipse的信息9. 按“ctrl + F”快捷键,输⼊“.abc”,点击“查找下⼀个”。
10. 查找到“.abc”的配置信息如下:11. 把“.abc”改成“.abcdefghijklmnopqrstuvwxyz(,”,保存,关闭“test.epf”。
12. 回到Eclipse界⾯,“File”→“Import”,在弹出的窗⼝中选择“Perferences”,点击“下⼀步”,选择刚在已经修改的“test.epf”⽂件,点击“打开”,点击“Finish”。
Mac安装Eclipse

Mac安装Eclipse⼀:下载教程前置条件:jdk以安装好第⼀次使⽤mac,装了⼀下午eclipse,终于搞定,特来分享下载eclispe前,请阅读该⽂档:/Eclipse/Installation此⽂档介绍了所有eclipse版本和其所需环境,⼀定要与选择与⾃⼰java版本对应的eclipse,笔者在此⾛了很多弯路,浪费了很多时间,在此希望⼤家注意摘取⽚段,供⼤家参考Eclipse 4.7 (Oxygen)Eclipse 4.7 () was released on June 28, 2017. See .Consider using the Installer. Please see .A Java 8 JRE/JDK is required to run all Oxygen packages based on Eclipse 4.7. The reasoning behind requiring Java 8 are discussed .Eclipse 4.6 (Neon)Eclipse 4.6 () was released on June 22, 2016. See .Consider using the Installer. Please see .A Java 8 JRE/JDK is required to run all Neon packages based on Eclipse 4.6. The reasoning behind requiring Java 8 are discussed .Eclipse 4.5 (Mars)Eclipse 4.5 (Mars) was released on June 24, 2015.Consider using the new Installer! Please see .A Java 7 JRE/JDK is required for all Mars package downloads based on Eclipse 4.5. Information concerning tested configurations for Eclipse 4.5 is provided . Eclipse 4.4 (Luna)Eclipse 4.4 (Luna) was released on June 25, 2014.A Java 7 JRE/JDK is required for most of the Luna package downloads based on Eclipse 4.4. Information concerning tested configurations for Eclipse 4.4 is provided . Eclipse 4.3 (Kepler)Eclipse 4.3 (Kepler) was released in June 2013.A Java 6 JRE/JDK is recommended for Eclipse 4.3. More information concerning tested configurations for Eclipse 4.3 is provided .OK,看完⽂档就可以下载了,我⽤的jdk1.7,因此可以使⽤对应的4.4(Luna)和 4.5(Mars)版本,下载地址如下,当然⼤家可以根据⾃⼰的需要下载所需版本Luna:/downloads/packages/eclipse-ide-java-ee-developers/lunarMars:/downloads/packages/eclipse-ide-java-ee-developers/mars2此处下载的是tar.gz⽂件,要解压之后才能使⽤,不太熟悉mac的同学可以找到下载该⽂件的地⽅,直接使⽤如下命令解压:tar -zxf eclipse-jee-mars-2-macosx-cocoa-x86_64.tar.gz解压完成后会看到eclipse.app,直接双击即可使⽤⼆:安装教程1.安装Eclipse前先确认你的Mac上是否已安装java运⾏环境。
PMD安装和使用说明_CPD
PMD安装和使用说明——for CPD 1简介PMD是一个针对Java语言的静态的代码分析器,它检查Java源文件中的潜在问题,也包含一些编码规范的问题。
另外,Eclipse 的 PMD 插件提供了一项叫做 CPD(或复制粘贴探测器)的功能,用于寻找重复的代码。
为在 Eclipse 中使用这项便利的工具,需要安装具有 PMD 的 Eclipse 插件,该插件具有 CPD 功能。
PMD的官方网站:官方的文档/products.html2安装安装PMD的eclipse插件版,最简单的方法是使用远程站点进行安装和更新。
步骤如下:1.打开Eclipse;2.在菜单中选择Help | Software Updates | Find and Install...3.选择“Search for new features to install”(如果是更新而不是新装,则选择“Search for updates of the currently install features”),点击Next;4.点击New Remote Site...;5.输入Nam e和URL,点击OK按钮;Name:PMDURL: /eclipse6." PMD "将出现在Sites to include in search页面中,选中PMD,点击Finish;7.In the Search Results页面,选中PMD,点击Next。
8.选中“I Accept the terms of the license agreements”,点击Next;9.确认安装路径正确,点击Finish;10.等待Eclipse下载需要的jar文件包,点击Install;11.根据提示,选择Yes重启Eclipse。
3CPD使用方法1.选中你的Java项目,右键=>PMD=>子菜单项里有“Find Suspect Cut And Paste”一项,如下图所示:2.点中“Find Suspect Cut And Paste”,出现如下对话框。
Ubuntu_下使用Eclipse_CDT开发C、C++简易教程

一、预备工作 1.安装 Java 开发环境(Eclipse CDT 运行必须环境):
sudo apt-get install sun-java6-jdk sudo apt-get install sun-java6-jre
2.安装 C++开发环境 sudo apt-get install g++
由于本工程无命令行参数,所以不需要进行任何设置,点击Close按钮即可。 (3)Debug 点击菜单Run->Debug或使用快捷键F11进行调试,调试过程中使用快捷键F5进行逐步
调试。
结尾语
由于时间仓促,只完成了C语言篇,C++篇类似。如读者需要最新版本,请发E-mail至笔 者gmail:yyhoo2.young@
(3)编写 main.c
点击菜单File->New->Source File新建一个头文件main.c,其内容如下所示:
/* * main.c *
* Created on: 20: young
*/
#include "hello.h"
int main() {
say_hello();
3.下载 Eclipse CDT 进入 Eclipse 官方主页下载页面 /downloads/,找到如下图所 示 Eclipse ID for C/C++ Developers:
选择 Linux 32bit(如果读者安装的是 64bit 的 Ubuntu,请选择后者),进行下载。
当然程序不是一编写完毕,就可以通过编译的,需要调试。
(1)设置断点 选中main.c页面,将鼠标放在该页面的左边框上,点击鼠标右键,弹出菜单,选择 Toggle Breakpoint选项,如下图所示:
JDK环境配置和eclipse的基本使用教程(包括调试)
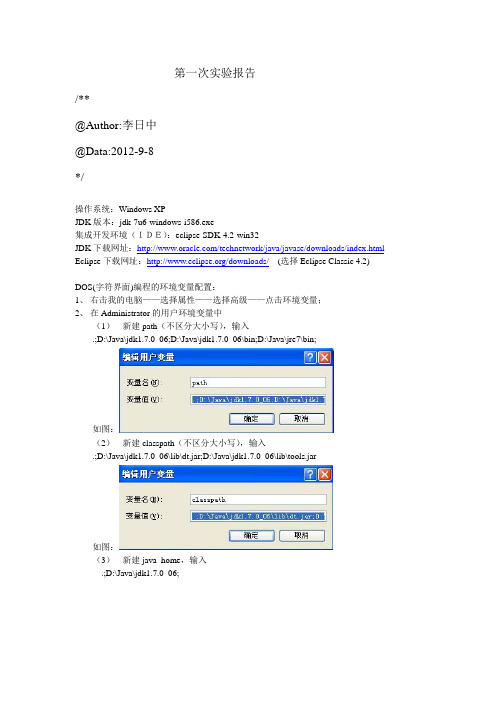
第一次实验报告/**@Author:李日中@Data:2012-9-8*/操作系统:Windows XPJDK版本:jdk-7u6-windows-i586.exe集成开发环境(IDE):eclipse-SDK-4.2-win32JDK下载网址:/technetwork/java/javase/downloads/index.html Eclipse下载网址:/downloads/(选择Eclipse Classic 4.2)DOS(字符界面)编程的环境变量配置:1、右击我的电脑——选择属性——选择高级——点击环境变量;2、在Administrator的用户环境变量中(1)新建path(不区分大小写),输入.;D:\Java\jdk1.7.0_06;D:\Java\jdk1.7.0_06\bin;D:\Java\jre7\bin;如图:(2)新建classpath(不区分大小写),输入.;D:\Java\jdk1.7.0_06\lib\dt.jar;D:\Java\jdk1.7.0_06\lib\tools.jar如图:(3)新建java_home,输入.;D:\Java\jdk1.7.0_06;如图:说明:1、(3)步骤不是必须的,因为(1)(2)步骤中我采取了绝对路径;2、变量的命名是不区分大小写的;3、配置完环境变量后,有的机器需要重新启动,看情况。
3、DOS界面的编程(1)基础知识1、dos界面下,是不区分大小写,但区分中英文符号,路径可以是中文,也可以是英文,不过建议全英文,因为dos的debug状态下,中文可能会乱码;2、目录切换的基本命令如:输入cmd,Enter 后输入D:如图:Enter后的结果,如图:再输入cd D:\JA V A培训\javaDOS (注意cd后有空格),Enter后的结果,如图:(2)DOS界面下建立、编译、翻译执行JA V A Application,1、如:在D:\JA V A培训\javaDOS目录下,新建一个文本文件,重命名为InnerClass.java注意去掉“隐藏已知文件类型的拓展名”前面的钩,如图:3、使用UltraEdit打开该文件,输入代码如下:class Outer{private int num = 100;//内置类可以访问private的,public,protected肯定可以class Inner //定义内置类{private int num = 90;void output(){int num = 80;System.out.println(num);//局部变量System.out.println(this.num);//内置类私有成员System.out.println(Outer.this.num);//引用外部类中的私有成员}}class InnerForTest{}class InnerTest{}void output(){Inner inner = new Inner();inner.output();//外部类成员函数调用内部类成员函数}Inner GetInner(){return new Inner();}}class InnerClass{public static void main(String[] args){Outer outer = new Outer();outer.output();//outer.output().inner.output(); //能使用在外部类一个成员函数中已经定义好的内置类对象?}}然后保存,在dos界面下,输入javac InnerClass.java,按下回车键,如图所示:你会发现,什么也没输出,这就对了。
Ecilpse搭建C语言开发环境
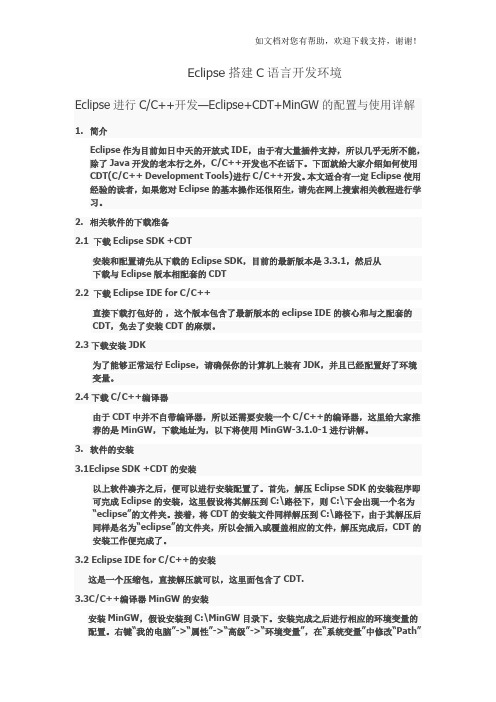
Eclipse搭建C语言开发环境Eclipse进行C/C++开发—Eclipse+CDT+MinGW的配置与使用详解1.简介Eclipse作为目前如日中天的开放式IDE,由于有大量插件支持,所以几乎无所不能,除了Java开发的老本行之外,C/C++开发也不在话下。
下面就给大家介绍如何使用CDT(C/C++ Development Tools)进行C/C++开发。
本文适合有一定Eclipse使用经验的读者,如果您对Eclipse的基本操作还很陌生,请先在网上搜索相关教程进行学习。
2.相关软件的下载准备2.1 下载Eclipse SDK +CDT安装和配置请先从下载的Eclipse SDK,目前的最新版本是3.3.1,然后从下载与Eclipse版本相配套的CDT2.2 下载Eclipse IDE for C/C++直接下载打包好的,这个版本包含了最新版本的eclipse IDE的核心和与之配套的CDT,免去了安装CDT的麻烦。
2.3下载安装JDK为了能够正常运行Eclipse,请确保你的计算机上装有JDK,并且已经配置好了环境变量。
2.4下载C/C++编译器由于CDT中并不自带编译器,所以还需要安装一个C/C++的编译器,这里给大家推荐的是MinGW,下载地址为,以下将使用MinGW-3.1.0-1进行讲解。
3.软件的安装3.1Eclipse SDK +CDT的安装以上软件凑齐之后,便可以进行安装配置了。
首先,解压Eclipse SDK的安装程序即可完成Eclipse的安装,这里假设将其解压到C:\路径下,则C:\下会出现一个名为“eclipse”的文件夹。
接着,将CDT的安装文件同样解压到C:\路径下,由于其解压后同样是名为“eclipse”的文件夹,所以会插入或覆盖相应的文件,解压完成后,CDT的安装工作便完成了。
3.2 Eclipse IDE for C/C++的安装这是一个压缩包,直接解压就可以,这里面包含了CDT.3.3C/C++编译器MinGW的安装安装MinGW,假设安装到C:\MinGW目录下。
XP系统下Cygwin + CDT + eclipse搭建c,cpp环境
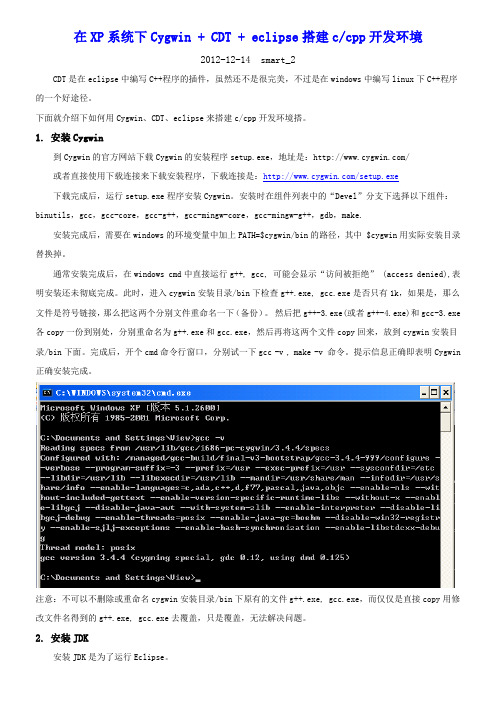
在XP系统下Cygwin + CDT + eclipse搭建c/cpp开发环境2012-12-14 smart_2CDT是在eclipse中编写C++程序的插件,虽然还不是很完美,不过是在windows中编写linux下C++程序的一个好途径。
下面就介绍下如何用Cygwin、CDT、eclipse来搭建c/cpp开发环境搭。
1. 安装Cygwin到Cygwin的官方网站下载Cygwin的安装程序setup.exe,地址是:/或者直接使用下载连接来下载安装程序,下载连接是:/setup.exe下载完成后,运行setup.exe程序安装Cygwin。
安装时在组件列表中的“Devel”分支下选择以下组件:binutils,gcc,gcc-core,gcc-g++,gcc-mingw-core,gcc-mingw-g++,gdb,make.安装完成后,需要在windows的环境变量中加上PATH=$cygwin/bin的路径,其中 $cygwin用实际安装目录替换掉。
通常安装完成后,在windows cmd中直接运行g++, gcc, 可能会显示“访问被拒绝” (access denied),表明安装还未彻底完成。
此时,进入cygwin安装目录/bin下检查g++.exe, gcc.exe是否只有1k,如果是,那么文件是符号链接,那么把这两个分别文件重命名一下(备份)。
然后把g++-3.exe(或者g++-4.exe)和gcc-3.exe 各copy一份到别处,分别重命名为g++.exe和gcc.exe,然后再将这两个文件copy回来,放到cygwin安装目录/bin下面。
完成后,开个cmd命令行窗口,分别试一下gcc -v , make -v 命令。
提示信息正确即表明Cygwin 正确安装完成。
注意:不可以不删除或重命名cygwin安装目录/bin下原有的文件g++.exe, gcc.exe,而仅仅是直接copy用修改文件名得到的g++.exe, gcc.exe去覆盖,只是覆盖,无法解决问题。
图解Eclipse建立、配置、运行GTK 项目
图解Eclipse建立、配置、运行GTK项目关键字:Ubuntu12.04;Eclipse IDE for C/C++Developers;GTK;C语言1、打开Eclipse,File-->New-->C Project2、File-->New-->Source file3、Project-->Properties-->C/C++Build-->Settings-->GCC C Compiler-->Includes 添加以下目录/usr/include/gtk-2.0/usr/include/glib-2.0。
/usr/lib/i386-linux-gnu/glib-2.0/include/usr/include/cairo/usr/include/pango-1.0/usr/lib/i386-linux-gnu/gtk-2.0/include/usr/include/gdk-pixbuf-2.0/usr/include/atk-1.04、Project-->Properties-->C/C++Build-->Settings-->GCC C Linker,在Command line Pattern中,将${FLAGS}移到最后,即:${COMMAND}${OUTPUT_FLAG}${OUTPUT_PREFIX}${OUTPUT}${INPUTS}${FLAGS}或者将${INPUTS}移到${FLAGS}的前面,即:${COMMAND}${INPUTS}${FLAGS}${OUTPUT_FLAG}${OUTPUT_PREFIX}${OUTPUT}5、Project-->Properties-->C/C++Build-->Settings-->GCC C Compiler-->Miscellaneous 在Other flags中的-c-fmessage-length=0后添加`pkg-config--cflagsgtk+-2.0`,成为-c-fmessage-length=0`pkg-config--cflags gtk+-2.0`。
ECLIPSE油藏数值模拟软件操作技巧2009v1
ECLIPSE 数值模拟软件使用技巧 数值模拟软件使用技巧
I
目
录
第一部分 ECLIPSE 前后处理软件使用技巧 ..............................................................................1 如何使用 PVTi 进行 PVT 实验拟合.........................................................................................1 如何使用近井筒模型创建水力压裂裂缝..................................................................................7 如何在 GRAF 软件中生成沿随水平段的产量曲线 ................................................................10 如何将 Petrel 网格导入 Eclipse ...........................................................................................12 如何简便调整网格水体的大小 ..............................................................................................13 如何使用结构化网格模型创建非结构化网格模型 .................................................................16 如何用 SCAL 查看端点标定曲线 ..........................................................................................26 如何创建观测数据并在 Office 中进行显示............................................................................29 如何从 SUMMARY 文件统计月度生产数据 ..........................................................................34 如何在 ECLIPSE Office 里可视化编辑网格属性 ..................................................................36 如何把角点网格转化成块中心网格 .......................................................................................39 第二部分 ECLIPSE 关键字使用技巧........................................................................................43 如何使用示踪剂功能分析注采情况 .......................................................................................43 如何灵活使用 UDQ、UDA 与 ACTIONX..............................................................................45 如何修改负压缩体积错误 .....................................................................................................51 如何正确理解 ECLIPSE 中井/井组控制................................................................................53 如何分层输出井的生产数据 ..................................................................................................58 如何使用井列表和动态井列表(E300)进行多井批操作 .....................................................59 如何在数模模型中建立倾斜的油水界面................................................................................61 如何使用 ACTIONX 按顺序和条件自动射孔完井 .................................................................63 如何用动态分区和 ACTION 关键词进行生产控制 ................................................................65 如何使用多段井(MSW)模拟多分支井 ..............................................................................66 第三部分 ECLIPSE 综合使用技巧 ...........................................................................................69 如何在 PETREL 中生成油柱高度等值线图 ..........................................................................69 如何将 VIP 模型数据转化为 ECLIPSE 数据格式..................................................................71 如何在 Linux 系统中配置 ECLIPSE 许可证随开机自动启动 ................................................73
Eclipse+Keil MDK 3.5 stm32开发入门
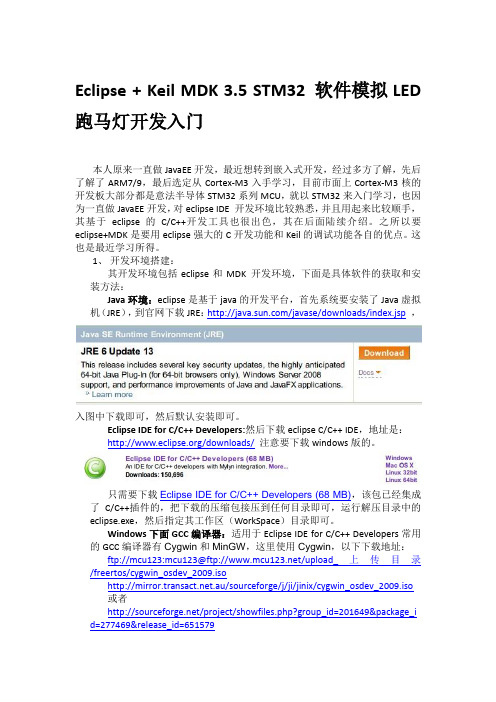
Eclipse + Keil MDK 3.5 STM32 软件模拟LED 跑马灯开发入门本人原来一直做JavaEE开发,最近想转到嵌入式开发,经过多方了解,先后了解了ARM7/9,最后选定从Cortex‐M3入手学习,目前市面上Cortex‐M3核的开发板大部分都是意法半导体STM32系列MCU,就以STM32来入门学习,也因为一直做JavaEE开发,对eclipse IDE 开发环境比较熟悉,并且用起来比较顺手,其基于eclipse的C/C++开发工具也很出色,其在后面陆续介绍。
之所以要eclipse+MDK是要用eclipse强大的C开发功能和Keil的调试功能各自的优点。
这也是最近学习所得。
1、开发环境搭建:其开发环境包括eclipse和MDK 开发环境,下面是具体软件的获取和安装方法:Java环境:eclipse是基于java的开发平台,首先系统要安装了Java虚拟机(JRE),到官网下载JRE:/javase/downloads/index.jsp,入图中下载即可,然后默认安装即可。
Eclipse IDE for C/C++ Developers:然后下载eclipse C/C++ IDE,地址是:/downloads/注意要下载windows版的。
只需要下载Eclipse IDE for C/C++ Developers (68 MB),该包已经集成了C/C++插件的,把下载的压缩包接压到任何目录即可,运行解压目录中的eclipse.exe,然后指定其工作区(WorkSpace)目录即可。
Windows下面GCC编译器:适用于Eclipse IDE for C/C++ Developers常用的GCC编译器有Cygwin和MinGW,这里使用Cygwin,以下下载地址:ftp://mcu123:mcu123@ftp:///upload_上传目录/freertos/cygwin_osdev_2009.iso.au/sourceforge/j/ji/jinix/cygwin_osdev_2009.iso或者/project/showfiles.php?group_id=201649&package_i d=277469&release_id=651579以上提供的Cygwin的其GCC版本都是最新版4.3.3,也可以下载其他的但大部分gcc都是3.4的,在本文的使用中其并无影响,这里只使用Eclipse IDE for C/C++ Developers开发功能和Keil的ARM编译器和调试功能。
EclipseforJavaEE中文版安装配置和使用完美教程(附汉化下载)
EclipseforJavaEE中⽂版安装配置和使⽤完美教程(附汉化下载)做java开发的朋友,都应该有⼀个适合⾃⼰的开发环境,⽽Eclipse IDE for Java EE Developers就是这么⼀个适合java开发的集成环境,完全免费,⽽且免安装,是java开发⼈员的必备平台。
那么怎么安装和使⽤Eclipse IDE for Java EE Developers?下⾯就带⼤家来看看安装及使⽤教程,希望对⼤家有所帮助!Eclipse IDE for Java EE Developers 4.8 简体中⽂绿⾊版(附汉化包) 64位类型:编程⼯具⼤⼩:355MB语⾔:简体中⽂时间:2018-11-29查看详情Eclipse IDE 开发⼯具 2018 v4.9.0 中⽂正式绿⾊版(附汉化教程) 64位类型:编程⼯具⼤⼩:307MB语⾔:简体中⽂时间:2018-11-29查看详情Eclipse IDE for Java EE Developers 4.8 Mars.1官⽅简体中⽂版类型:编程⼯具⼤⼩:343MB语⾔:简体中⽂时间:2018-11-29查看详情下载与安装1、,完全免费。
下载下来的是⼀个压缩包,⽆需安装,直接右键解压到当前⽂件夹,并且可以根据需要将加压后的⽂件放到其他位置。
2、设置桌⾯快捷⽅式将eclipse⽂件放置好后,打开eclipse⽂件,选择eclipse.exe,点击右键--->发送到--->桌⾯快捷⽅式。
但此时eclipse.exe是打不开的,接下来还需安装jdk搭建环境。
JDK安装与环境搭建1、JDK下载,根据电脑情况选择下载Java SE Development Kit(JDK1.8) 8u131 java8 64位 java运⾏库正式版类型:编程⼯具⼤⼩:196MB语⾔:简体中⽂时间:2017-04-21查看详情2、安装JDK双击打开安装程序根据提⽰⼀步⼀步安装,并记住安装位置3、开始搭建环境依次按照以下顺序右键我的电脑--->属性--->⾼级系统设置--->⾼级--->环境变量4、新建变量在系统变量中新建以下3个系统变量(以下全在英⽂状态下输⼊):填⼊变量名:JAVA_HOME变量值填jdk的具体安装路径(⽐如刚才的路径C:\Java\jdk1.8.0_102)同样新建变量名 CLASSPATH变量值 .;%JAVA_HOME%\lib\dt.jar;%JAVA_HOME%\lib\tools.jar;(注意最前⾯有个点)编辑Path变量名:Path变量值:%JAVA_HOME%\jre\bin;%JAVA_HOME%\bin(点击编辑在后⾯加上这个值)上⼀页12下⼀页阅读全⽂。
Eclipse开发工具
6
6
Eclipse基本功能
√
1、运行Eclipse
7
7
Eclipse基本功能
√
2.新建Java工程
8
8
Eclipse基本功能
√
2.新建Java类
9
9
Eclipse基本功能
√
3.运行Java程序
10
10
Eclipse小技巧
√ √
自动生成 快速修正
11
11
+
总结
1 Eclipse开发工具下载途径 2 Eclipse基本功能 3 Eclipse编程和调试运行
Eclipse开发工具简介
Eclipse Introduce
+
本节大纲
01 Eclipse简介
02 Eclipse基本功能 03 使用小技巧
2
2
+
教学任务
教学目标: 了解什么是Eclipse;
掌握clipse基本功能及使用方法;
教学重点: 如何掌握Eclipse基本功能及使用方法; 教学难点: 使用Eclipse编程及调试运行。
√ √ √
12
谢 谢!
403243270@
4
4
Eclipse开发工具简介
√
下载和安装Eclipse
安装前提:安装Java Se环境 Eclipse官网网站(/downloads/) 选择Eclipse IDE for Java Developers 下载
5
5
Eclipse开发工具简介
√
Eclipse的基本功能 1、运行Eclipse 2、新建Java工程 3、新建Java类 4、运行Java程序
eclipse for arm的编译环境搭建
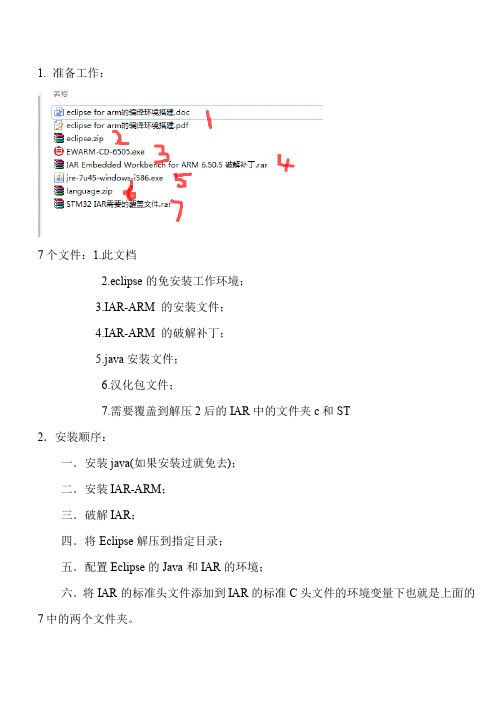
1.准备工作:7个文件:1.此文档2.eclipse的免安装工作环境;3.IAR-ARM的安装文件;4.IAR-ARM的破解补丁;5.java安装文件;6.汉化包文件;7.需要覆盖到解压2后的IAR中的文件夹c和ST2.安装顺序:一.安装java(如果安装过就免去);二.安装IAR-ARM;三.破解IAR;四.将Eclipse解压到指定目录;五.配置Eclipse的Java和IAR的环境;六.将IAR的标准头文件添加到IAR的标准C头文件的环境变量下也就是上面的7中的两个文件夹。
七.汉化eclipse3.安装截图:A.安装java如果更改了目录请记住,后面要用。
默认是C盘。
B.安装IAR-ARM点是点掉钩因为没有破解这个安装时间比较长可能需要40分钟左右,安装后的大小有4G多。
C.破解D解压Eclipse运行:E添加环境变量如果看到进度条,说明java的环境已经OK,如果java安装在C盘的话应该是可以直接运行的,更改java虚拟机的路径在eclipse的根目录下的eclipse.ini文件中如果更改了java环境安装路径的话,在这里修正java虚拟机路径即可,下一步配置IAR的编译器环境变量找到IAR的安装目录,系统会自动识别当前IAR版本F现在我们可以使用eclipse调用IAR的编译器新建一个工程这里选择IAR的可执行文件类型给工程取一个名字然后下一步这里选择MCU型号这个自行探索选择完毕后finish即可如果你有已经完成的IAR工程,这里可以直接导入同时还支持压缩包的导入打开后,最好手动拖动一下改变下文件结构,添加工程头文件目录在左边选中工程,右键或者在目录中选择属性操作完成后点OKPS:添加头文件目录的时候可以多选PPS:…..如果用到了特殊的头文件公共的,推荐放到IAR的目录下的公共头文件中我的在C:\Program Files\IAR Systems\Embedded Workbench6.5\arm\inc\cG.添加STM32的一些公共文件因为IAR安装后并没有STM32的所有头文件,所以需要将上面的7文件加压后覆盖IAR文件夹里面的c和ST,如图覆盖的目录如图H.汉化:方法1:将压缩包文件夹language.zip\language\eclipse中的features和plugins的内容拷贝到eclipse的同名的文件夹中,启动eclipse就可以了。
代码格式化模版导入eclipse说明书
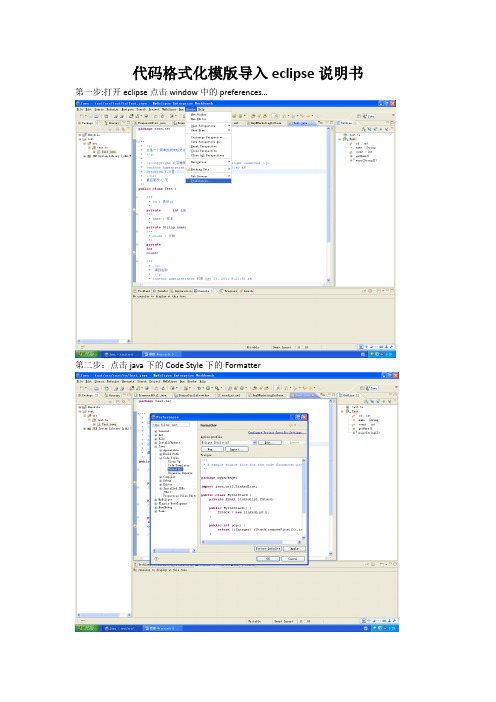
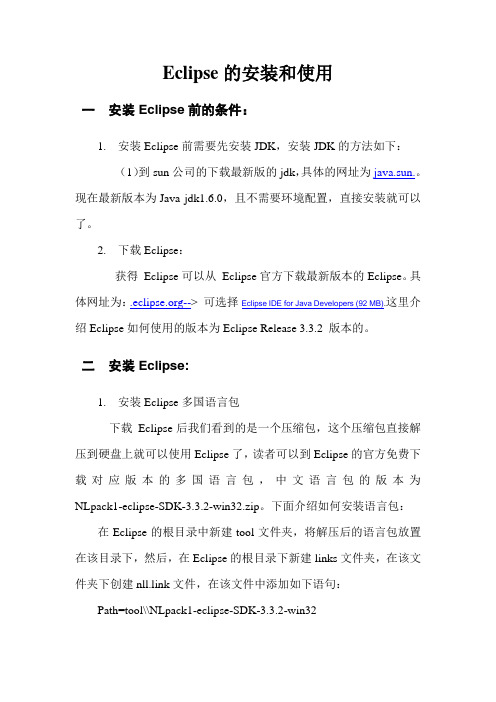
代码格式化模版导入eclipse说明书第一步:打开eclipse点击window中的preferences…第二步:点击java下的Code Style下的Formatter第三步:点击import按钮选择要导入的模版第四步:点击打开按钮后进入的页面然后点击Apply模版就导入成功了格式化代码的快捷键Ctril+Shift+F; 格式化前:格式后:格式化代码模版:〈?xml version="1.0" encoding=”UTF—8"?〉<profiles ver sion="11”〉<profile kind="CodeFormatterProfile" name=”hisoft-Formatter" version=”11"><setting id="org.eclipse.jdt。
core.formatter.insert_space_before_closing_paren_in_if" value="insert"/><setting id=”org.eclipse。
jdt。
core。
formatter.insert_space_after_colon_in_assert" value=”insert"/><setting id=”org.eclipse.jdt.core.formatter.brace_position_for_enum_constant" value="end_of_line”/>〈setting id="org。
eclipse。
jdt.core.formatter.insert_space_before_semicolon" value=”do not insert”/>〈setting id=”org.eclipse。
尼康D-Eclipse C1共聚焦显微镜用户指南说明书

Nikon D-Eclipse C1 Confocal MicroscopeUser GuideUniversity of Puget Sound – Department of BiologyJune 2015Table of ContentsI. Disclaimer! (2)II. Safety Considerations (2)III. Confocal Microscopy (2)IV. Operation of the Microscope (2)A. Start-up procedures (2)B. Finding your sample with conventional microscopy (3)C. Visualizing your sample with epifluorescence (4)V. Using NIS Elements to Image Epifluorescence (4)A. Adjusting Image Appearance in NIS Elements (4)B. Capturing and Saving Epifluorescent Images (6)C. Merging Captured Epifluorescent Images in NIS Elements (7)D. Stitching Multiple Epifluorescent Images together in NIS Elements (7)E. Annotating Images in NIS Elements (8)1. Add a Scale Bar (8)2. Take Measurements (10)I. Disclaimer!Please note: this is an abbreviated guide. The actual manual for this microscope + software package is easily over 300 pages. While it is a good exercise for any student to read the user manual when beginning work on a new instrument, this User Guide can serve as a guide to general use of the instrument and may be sufficient for many uses. However, in the event that you encounter trouble, need more information, or require assistance, contact Amy (email: ************************;location:Room117H,ThompsonHall;phone:253-879-2829)orrefer to the manual for the instrument or software.II. Safety ConsiderationsThe confocal microscope utilizes high powered lasers which emit intense beams of light. Though risk is minimal since the system is enclosed, some hazards remain. Exposure to lasers may result in damage to the eyes or skin, among other hazards. For these reasons, please use the following precautions when working on the confocal microscope:∙Never look directly into any laser beam light source.∙Adhere to all safety warning labels found on the microscope and lasers.∙Notify a supervisor, faculty member, or other responsible individual immediately if a laser is malfunctioning or losing power.For additional information on laser safety associated with using the confocal microscope, consult the Nikon website at /articles/fluorescence/lasersafety.html.III. Confocal MicroscopyConfocal microscopy is an imaging technique commonly used in the biomedical and life sciences to visualize fixed or living cells and tissues, among other applications. Confocal imaging is based on principles invented by Marvin Minsky in 1957, and involves the use of point illumination and elimination of light transmitted from the out-of-focus planes via a pinhole located in front of the detector. This imaging technique provides a significant increase in optical resolution and contrast over traditional wide-field fluorescent microscopy, and thus allows for the resolution of fine structure, acquisition of 3D images, and achievement of exquisitely-fine focus.IV. Operation of the MicroscopeStudents should always have training on the microscope prior to use! To arrange to be trained, or forotherassistance,pleaseseeAmyin117HThompsonHall(****************************** 879-2829).A. Start-up proceduresThe following sequence should be used when turning on the microscope (summary located on the wall next to the microscope):1. Sign up on the online instrument calendar located on the science core facility webpage:/sciencecorefacility.2. Turn on 2) the power strip for the lasers and the epifluorescence camera. This is located in thecorner on the bench to the left of the microscope.3. Turn on 3) each laser individually, only if you are planning to do confocal microscopy. These DONOT need to be turned on if you are performing epifluorescence. Ideally, the lasers should be onfor 20-30 minutes prior to use. The time that it takes to turn everything on and set up the microscope is generally enough time for the lasers to warm up properly. However, in the case of quantitative analysis of multiple samples, be sure to wait for an appropriate amount of time (ie, 20-30 minutes) from start-up to begin collecting images and data.a. 405 nm laser: Silver control box on the back of main lasers box. Turn the key located onthe back of the laser. Key in the horizontal (o) position is off. Key in the vertical (l) positionis on.b. 488 nm laser:i. Turn the key located on the black controller box to the left of the main lasers box(key in the vertical position (o) is off, key in the horizontal position (l) is on);ii. When green light stops flashing, push down the green “laser on” button.c. 561 nm laser: Silver control box to the front of the main control lasers box. Switch in thevertical (o) position is off. Switch in the horizontal (l) position is on.4. Turn on 4) the powerstrip by the computer. This controls power to the controller and detector.5. Turn on 5) the computer and monitor.6. Open the appropriate software for imaging. EZ-C1 for confocal laser scanning or NIS Elements forepifluorescence.B. Finding your sample with conventional microscopy1. Make sure the lowest objective is in place, and stage is lowered with the course focus to reducethe risk of running the objective into the stage or slide.2. Place the slide, coverslip-down, on the platform (remember, this is an inverted microscope, so theobjective is underneath the sample).3. Be sure the port knobs (located on the right side of the microscope) is pointing to the indicator for“EYE”, the shutter is open (lever located just behind the filter turret on the right side of the microscope, pushed back to the “O” position), and the filter turret (located ju st below the objectives) is in the transmitted light position “ ”, which is used for bright field imaging to initially find your specimen before switching to fluorescence.4. Turn on the transmitted light by pressing the white button on the lower left-hand side of themicroscope. You can adjust the intensity by turning the dial just below the white button.5. Using the eyepieces, find your cells/tissues/etc., and focus using the coarse focus dial or theremote fine focus controller dial. The platform can be moved to reposition your specimen using the rod on the right side of the microscope, rather than actually manually moving your slide.Note: Depending on your tissue, it might be hard to see with bright field microscopy. If that is the case, you might find it helpful to focus on the edge of your coverslip to get you close to the plane of focus, then position where you think your sample is over the objective and continue on to the next section “Visualizing your sample with epifluorescence”.6. Start with the 10x objective, find your cells/tissue/etc., and then switch to the 20x, 60x, or 100xobjective if needed. If using the 60x WI objective, place a drop of double distilled DI water on the top of the objective before use. If using the 100x Oil objective, place a small drop of immersion oil on your slide.Note: The 100x objective is kept the shelf to the left of the microscope. You must be trained prior to use of the 100X objective. Please use it carefully, be sure to clean itcorrectly after use, and take care when mounting and unmounting it. If you need assistance, please contact Amy.C. Visualizing your sample with epifluorescence1. Once you have found and focused on your sample using bright field microscopy, turn off thetransmitted light.2. Place the filter turret (located just below the objectives) to the correct position for the fluorescenceyou wish to view. Filters are labeled as follows:∙“UV”: UV excitation, used to visualize DAPI∙“B”: blue excitation, used to visualize GFP and FITC∙“G”: green excitation, used to visualize Cy3, TRITC3. Turn the LED light source on by tapping the foot pedal located on the floor underneath the tablethe microscope is sitting on. Note: Be sure to turn off the LED light source by tapping the foot pedal again w hen you don’t need to visualize fluorescence or if you have switched to confocal microscopy. You never want your sample exposed to unnecessary light as this might quench your fluorophore, resulting in reduced fluorescence.V. Using NIS Elements to Image EpifluorescenceA. Adjusting Image Appearance in NIS Elements1. Switch to the computer view: Turn the top portal knob (on the right side of the microscope, acrossfrom the CoolSnapEZ camera) to “SIDE”.2. Open the NIS Elements software by double-clicking the icon on the desktop, select RoperScientific and click OK.3. To view the live image, click the button in the upper left hand corner of the software. You willalso need to indicate what filter you are currently using for your image to appear the correct color.There are several presets in the tool bar, one for each emission color (see image below). Once you choose the correct fluorophore the tab at the lower left corner of your live image will display the correct label (see image below).4. If you need to change the label, or if the presets have been changed, right click the tab circled inred above and choose Properties. In the Name drop-down menu you can choose from a variety of fluorophores. Sometimes you may also need to change the color of those presets. Click Close when finished.5. To adjust the brightness of the image you will first want to select “Auto Exposure” from theCoolSNAP ES Settings on the right-hand side of the screen.6. To adjust the appearance of your image you can adjust the LUTs (Lookup Tables) located on theright-hand side of the screen.∙During the imaging process, the camera collects the transmitted light and assigns a value to each pixel based on its intensity. Brighter pixels are assigned higher intensity values. The intensity values are arranged in histograms along the x-axis, with lower intensity values on the left and higher intensity values on the right. The height of the bar at a particular intensity value represents its pixel population. Higher bars indicate more pixels at that intensity value.∙How these intensity values are assigned, or ‘mapped’, greatly affects the visual appearance of the image, although it does not affect the data or quantification in any way. The curve overlaying the histogram represents how the intensity values of the data map to the available display values. Adjusting the curve changes which of the intensity values are mapped to specific display values, and whether they are mapped linearly or logarithmically.∙There are three points on the curve that can be adjusted:a. The Max Point is at the right of the curve. Moving the Max Point to the left is similar toincreasing the Contrast. As more of the intensity values are mapped to the brightestdisplay values, fluorescence becomes brighter.b. The Min Point is at the left of the curves and marks the lowest display value that is not inthe background color. Moving the Min Point to the right shades more of the lower intensityvalues to lower display values, creating a visually cleaner background.c. The middle point represents the K value. Adjusting it smoothly changes the mapping fromlinear to logarithmic. Changing to a more logarithmic mapping reduces the contrastbetween the higher and lower intensity values by applying a log scale, so higher and lowerintensity values are mapped to display values that are closer together. This ‘compression’of the intensity values may improve the appearance of the less intense bands, whileavoiding very bright bands.Min PointB. Capturing and Saving Epifluorescent Images1. To capture the image click the camera icon in the tool bar. This will open a new window with yourcaptured image.2. To save the image, go to “File” then choose “Save As” and find your folder. Note all students musthave a subfolder within their adviser’s folder.3. Give your file a name and select what kind of file type you’d like to save your image as. There arethree recommendations. NOTE: If you save your image in TIFF or JPEG formats you must include the magnification in your image name or write it down in your lab notebook in order to go back and calibrate the image to the correct scale bar or make measurements.a. ND2 Image File Format. This saves your image in the proprietary NIS Elements formatsthat allows you to keep information about the instrumentation such as instrument type andmagnification with your image. This is particularly helpful if you don’t have a file namingconvention that includes the magnification your image was acquired at. You can processyour image in this file format and then save it in one of the following formats without therisk of losing image quality.b. TIFF, Tagged Image Format. This is a powerful image format that is the standard forgraphic artists, publishing, and photography. TIFFs are a lossless formatting meaning thata TIFF image may be edited and re-saved without losing image quality. One disadvantageto TIFFs is that they can’t always be viewed on all devices.c. JPEG, Tagged Image Format. This is a particularly useful file type that can be viewed onvirtually any device. The disadvantage to using JPEGs is that image quality may be lostwhen editing and resaving your image.C. Merging Captured Epifluorescent Images in NIS ElementsIf you have a sample with more than one fluorophore you can merge together two fluorescent images and/or merge a fluorescent image with a brightfield image.1. Go to the “File” tab then click “Merge Images…”.2. In the “Merge Images” window that appears you will select the file name of the images you want tomerge from the drop down menu under the appropriately colored component or Brightfield option, then click “OK”.3. Save the image according to the instructions in section B above. If you need to annotate your imagewith text, arrows, scale bar, or make measurements see section 5E below.D. Stitching Multiple Epifluorescent Images together in NIS ElementsIf you have a large sample or piece of tissue you want to see all together at once you can capture multiple images and then stitch them together.1. Capture your images in a systematic way by always moving across in the same direction or down ina column. Also make sure you capture the image for all fluorophores or under brightfield beforemoving on to the next area. Note: Images must be saved in a file format other than .ND2, such as JPEG or TIFF in order to stitch them together.2. Go to the “File” tab then click “Stitch Larger Image from Files…”, then open your image sequenceby navigating to the folder for the images that you want to stitch together.3. Select the correct layout options so that your image is stitched together in the correct order. It’shelpful if you remember the direction you moved to obtain images and how many columns you captured. Click Stitch.E. Annotating Images in NIS Elements1. Scale Barsa. Adding a scale bari. On the right hand side of your image there will be a tool bar. To add a scale bar,select the icon that that has “µm” on it.ii. If you are adding it to a .ND2 file, a calibrated scale will be added and you canproceed with editing the scale bar properties. If you are adding it to any other filetype you will need to calibrate the scale bar from pixels to µm.iii. To calibrate your scale you will need to right click on “Uncalibrated” which is locatedon the bottom of your image window to bring up the calibration menu.iv. Select “Calibrate using Objective” and then click on the appropriate objective. Youshould not have a scale bar on your image (see example below) and proceed with editing scale bar properties.b. Edit scale bar propertiesi. To change the appearance of your scale bar, click on the small arrow to the right ofthe “µm” icon and select “Scale Properties…”ii. In the new window that opens you can select the orientation, appearance, size, and font of your scale bar, then click “OK”.c. Saving an image with a scale barIn NIS Elements, annotations act like layers (or overlays) in an image. In order to have the scale bar appear on your saved image you first need to insert the overlay by going to the “Edit” tab, then select “Insert Overlay”. You can now save the image according to theinstructions in section 5B above. Note: It is recommended to save your annotated image as a new file name so you always have your original image to go back to.2. Take Measurementsa. Annotations and Measurements toolboxi. There are a number of measurements that the NIS Elements software can do with acalibrated (correctly scaled image) that a pretty self-explanatory once you find thetools. The “Annotations and Measurements” toolbox can be found in the lower lefthand side of the screen beneath the “CoolSNAP ES Settings” and “LUTs” toolboxes.Sometimes this toolbox accidently gets closed. To view it again go to the “Measure”tab at the top of the screen and select the measurement you would like to make.ii. One nice feature of the “Annotations and Measurements” toolbox is that it will keep track of any measurements or counts that you have made in an Excel Spreadsheetacross a set of pictures. This spreadsheet can be exported and saved.b. Saving an image with annotationsRemember: In NIS Elements, annotations act like layers (or overlays) in an image. In order to have the scale bar appear on your saved image you first need to insert the overlay bygoing to the “Edit” tab, then select “Insert Overlay”. You can now save the image according to the instructions in section 5B above. Note: It is recommended to save your annotated image as a new file name so you always have your original image to go back to.。
ecilipse的安装和使用_实验一参考资料全
Eclipse的安装和使用一安装Eclipse前的条件:1. 安装Eclipse前需要先安装JDK,安装JDK的方法如下:(1)到sun公司的下载最新版的jdk,具体的网址为java.sun.。
现在最新版本为Java jdk1.6.0,且不需要环境配置,直接安装就可以了。
2. 下载Eclipse:获得Eclipse可以从Eclipse官方下载最新版本的Eclipse。
具体网址为:--> 可选择Eclipse IDE for Java Developers (92 MB).这里介绍Eclipse如何使用的版本为Eclipse Release 3.3.2 版本的。
二安装Eclipse:1. 安装Eclipse多国语言包下载Eclipse后我们看到的是一个压缩包,这个压缩包直接解压到硬盘上就可以使用Eclipse了,读者可以到Eclipse的官方免费下载对应版本的多国语言包,中文语言包的版本为NLpack1-eclipse-SDK-3.3.2-win32.zip。
下面介绍如何安装语言包:在Eclipse的根目录中新建tool文件夹,将解压后的语言包放置在该目录下,然后,在Eclipse的根目录下新建links文件夹,在该文件夹下创建nll.link文件,在该文件中添加如下语句:Path=tool\\NLpack1-eclipse-SDK-3.3.2-win32然后,启动Eclipse,此时即可看到汉化的Eclipse。
有关汉化的问题可以参考网页:/love01px/archive/2006/06/04/772653.aspx2. 启动Eclipse初次启动Eclipse时,需要设置工作空间,读者可以根据自己的需要将工作空间设置在任意盘中。
三使用Eclipse编写java程序1.新建java项目(1)检查确认Eclipse中的JRE的安装是否正确。
选择“窗口”、“首选项”(preferences)命令,打开“首选项”对话框,选择“java” /“已安装的JRE”项,确认JRE安装正确。
Eclipse快捷键、文档注释、多行注释的快捷键
Eclipse快捷键、⽂档注释、多⾏注释的快捷键关于快捷键Eclipse 的很多操作都提供了快捷键功能,我们可以通过键盘就能很好的控制 Eclipse 各个功能:⼀、多⾏注释快捷键1.选中你要加注释的区域,⽤ctrl+shift+C 或者ctrl+/ 会加上//注释2.先把你要注释的东西选中,⽤shit+ctrl+/ 会加上/* */注释3.以上快捷在重复按⼀下就会去掉加上的注释4.要修改在eclispe中的命令的快捷键⽅式我们只需进⼊windows -> preference -> General -> key设置就⾏了⼆、Eclipse中添加⽂档注释快捷键1.例如默认的⽂档注释:/*** XX**/2.快捷键为:ALT + SHIFT +J3.修改⽂档注释的注释格式内容,修改的⽅法有两种:A.直接在eclipse给的模板下进⾏修改打开eclipseWindow-->Preferences-->Java-->Code Style --> Code Templates --> Comments --> types --> Edit例如:/**** 项⽬名称:project n ame∗类名称:{type_name}* 类描述:* 创建⼈:user∗创建时间:{date} ${time}* @version*/B.⾃⼰编写⼀个xml⽂档导⼊进去打开eclipseWindow-->Preferences-->Java-->Code Style --> Code Templates --> Comments --> types --> import选择你写好的模板.xml⽂件######################################################################<?xml version="1.0" encoding="UTF-8" standalone="no"?><templates><template autoinsert="false" context="filecomment_context" deleted="false" description="Comment forcreated Java files" enabled="true" id="org.eclipse.jdt.ui.text.codetemplates.filecomment" name="filecomment"/><template autoinsert="false"context="constructorcomment_context" deleted="false" description="Comment for created constructors" enabled="true"id="org.eclipse.jdt.ui.text.codetemplates.constructorcomment" name="constructorcomment">/*** Description:* hp DateTime date{time}*tags∗/</template><templateautoinsert="false"context="methodcomment c ontext"deleted="false"description="Commentfornon−overridingmethods"enabled="true"id="org. {date} time∗{tags}*/</template><template autoinsert="false" context="fieldcomment_context" deleted="false" description="Comment for fields" enabled="true"id="org.eclipse.jdt.ui.text.codetemplates.fieldcomment" name="fieldcomment">/*** Description:* hp DateTimedate∗∗/</template><templateautoinsert="false"context="typecomment c ontext"deleted="false"description="Commentforcreatedtypes"enabled="true"id="org.eclipse.jdt. {file_name}* Description:* hp DateTime date{time}* @company bvit* hu.peng@* @version 1.0*tags∗/</template><templateautoinsert="false"context="gettercomment c ontext"deleted="false"description="Commentforgettermethod"enabled="true"id="org.eclipse.jdt.ui {bare_field_name}*/</template><template autoinsert="false" context="overridecomment_context" deleted="false" description="Comment for overriding methods" enabled="true"id="org.eclipse.jdt.ui.text.codetemplates.overridecomment" name="overridecomment">/*** Description:* hp DateTime date{time}*tags∗/</template><templateautoinsert="false"context="delegatecomment c ontext"deleted="false"description="Commentfordelegatemethods"enabled="true"id="org.eclips {date}* tags∗{see_to_target}*/</template><template autoinsert="false" context="settercomment_context" deleted="false" description="Comment for setter method" enabled="true"id="org.eclipse.jdt.ui.text.codetemplates.settercomment" name="settercomment">/*** @param paramset{bare_field_name}*/</template></templates>######################################################################三、Eclipse中的所有快捷键列表:(转)Ctrl+1 快速修复(最经典的快捷键,就不⽤多说了)Ctrl+D: 删除当前⾏Ctrl+Alt+↓复制当前⾏到下⼀⾏(复制增加)Ctrl+Alt+↑复制当前⾏到上⼀⾏(复制增加)Alt+↓当前⾏和下⾯⼀⾏交互位置(特别实⽤,可以省去先剪切,再粘贴了)Alt+↑当前⾏和上⾯⼀⾏交互位置(同上)Alt+←前⼀个编辑的页⾯Alt+→下⼀个编辑的页⾯(当然是针对上⾯那条来说了)Alt+Enter 显⽰当前选择资源(⼯程,or ⽂件 or⽂件)的属性Shift+Enter 在当前⾏的下⼀⾏插⼊空⾏(这时⿏标可以在当前⾏的任⼀位置,不⼀定是最后)Shift+Ctrl+Enter 在当前⾏插⼊空⾏(原理同上条)Ctrl+Q 定位到最后编辑的地⽅Ctrl+L 定位在某⾏ (对于程序超过100的⼈就有福⾳了)Ctrl+M 最⼤化当前的Edit或View (再按则反之)Ctrl+/ 注释当前⾏,再按则取消注释Ctrl+O 快速显⽰ OutLineCtrl+T 快速显⽰当前类的继承结构Ctrl+W 关闭当前EditerCtrl+K 参照选中的Word快速定位到下⼀个Ctrl+E 快速显⽰当前Editer的下拉列表(如果当前页⾯没有显⽰的⽤⿊体表⽰)Ctrl+/(⼩键盘) 折叠当前类中的所有代码Ctrl+×(⼩键盘) 展开当前类中的所有代码Ctrl+Space 代码助⼿完成⼀些代码的插⼊(但⼀般和输⼊法有冲突,可以修改输⼊法的热键,也可以暂⽤Alt+/来代替)Ctrl+Shift+E 显⽰管理当前打开的所有的View的管理器(可以选择关闭,激活等操作)Ctrl+J 正向增量查找(按下Ctrl+J后,你所输⼊的每个字母编辑器都提供快速匹配定位到某个单词,如果没有,则在stutes line中显⽰没有找到了,查⼀个单词时,特别实⽤,这个功能Idea 两年前就有了)Ctrl+Shift+J 反向增量查找(和上条相同,只不过是从后往前查)Ctrl+Shift+F4 关闭所有打开的EditerCtrl+Shift+X 把当前选中的⽂本全部变味⼩写Ctrl+Shift+Y 把当前选中的⽂本全部变为⼩写Ctrl+Shift+F 格式化当前代码Ctrl+Shift+P 定位到对于的匹配符(譬如{}) (从前⾯定位后⾯时,光标要在匹配符⾥⾯,后⾯到前⾯,则反之)下⾯的快捷键是重构⾥⾯常⽤的,本⼈就⾃⼰喜欢且常⽤的整理⼀下(注:⼀般重构的快捷键都是Alt+Shift开头的了)Alt+Shift+R 重命名 (是我⾃⼰最爱⽤的⼀个了,尤其是变量和类的Rename,⽐⼿⼯⽅法能节省很多劳动⼒)Alt+Shift+M 抽取⽅法 (这是重构⾥⾯最常⽤的⽅法之⼀了,尤其是对⼀⼤堆泥团代码有⽤)Alt+Shift+C 修改函数结构(⽐较实⽤,有N个函数调⽤了这个⽅法,修改⼀次搞定)Alt+Shift+L 抽取本地变量( 可以直接把⼀些魔法数字和字符串抽取成⼀个变量,尤其是多处调⽤的时候)Alt+Shift+F 把Class中的local变量变为field变量 (⽐较实⽤的功能)Alt+Shift+I 合并变量(可能这样说有点不妥Inline)Alt+Shift+V 移动函数和变量(不怎么常⽤)Alt+Shift+Z 重构的后悔药(Undo)编辑作⽤域功能快捷键全局查找并替换 Ctrl+F⽂本编辑器查找上⼀个 Ctrl+Shift+K⽂本编辑器查找下⼀个 Ctrl+K全局撤销 Ctrl+Z全局复制 Ctrl+C全局恢复上⼀个选择 Alt+Shift+↓全局剪切 Ctrl+X全局快速修正 Ctrl1+1全局内容辅助 Alt+/全局全部选中 Ctrl+A全局删除 Delete全局上下⽂信息 Alt+?Alt+Shift+?Ctrl+Shift+SpaceJava编辑器显⽰⼯具提⽰描述 F2Java编辑器选择封装元素 Alt+Shift+↑Java编辑器选择上⼀个元素 Alt+Shift+←Java编辑器选择下⼀个元素 Alt+Shift+→⽂本编辑器增量查找 Ctrl+J⽂本编辑器增量逆向查找 Ctrl+Shift+J全局粘贴 Ctrl+V全局重做 Ctrl+Y查看作⽤域功能快捷键全局放⼤ Ctrl+=全局缩⼩ Ctrl+-窗⼝作⽤域功能快捷键全局激活编辑器 F12全局切换编辑器 Ctrl+Shift+W全局上⼀个编辑器 Ctrl+Shift+F6全局上⼀个视图 Ctrl+Shift+F7全局上⼀个透视图 Ctrl+Shift+F8全局下⼀个编辑器 Ctrl+F6全局下⼀个视图 Ctrl+F7全局下⼀个透视图 Ctrl+F8⽂本编辑器显⽰标尺上下⽂菜单 Ctrl+W 全局显⽰视图菜单 Ctrl+F10全局显⽰系统菜单 Alt+-导航作⽤域功能快捷键Java编辑器打开结构 Ctrl+F3全局打开类型 Ctrl+Shift+T全局打开类型层次结构 F4全局打开声明 F3全局打开外部javadoc Shift+F2全局打开资源 Ctrl+Shift+R全局后退历史记录 Alt+←全局前进历史记录 Alt+→全局上⼀个 Ctrl+,全局下⼀个 Ctrl+.Java编辑器显⽰⼤纲 Ctrl+O全局在层次结构中打开类型 Ctrl+Shift+H 全局转⾄匹配的括号 Ctrl+Shift+P全局转⾄上⼀个编辑位置 Ctrl+QJava编辑器转⾄上⼀个成员 Ctrl+Shift+↑Java编辑器转⾄下⼀个成员 Ctrl+Shift+↓⽂本编辑器转⾄⾏ Ctrl+L搜索作⽤域功能快捷键全局出现在⽂件中 Ctrl+Shift+U全局打开搜索对话框 Ctrl+H全局⼯作区中的声明 Ctrl+G全局⼯作区中的引⽤ Ctrl+Shift+G⽂本编辑作⽤域功能快捷键⽂本编辑器改写切换 Insert⽂本编辑器上滚⾏ Ctrl+↑⽂本编辑器下滚⾏ Ctrl+↓⽂件作⽤域功能快捷键全局保存 Ctrl+XCtrl+S全局打印 Ctrl+P全局关闭 Ctrl+F4全局全部保存 Ctrl+Shift+S全局全部关闭 Ctrl+Shift+F4全局属性 Alt+Enter全局新建 Ctrl+N项⽬作⽤域功能快捷键全局全部构建 Ctrl+B源代码作⽤域功能快捷键Java编辑器格式化 Ctrl+Shift+FJava编辑器取消注释 Ctrl+\Java编辑器注释 Ctrl+/Java编辑器添加导⼊ Ctrl+Shift+MJava编辑器组织导⼊ Ctrl+Shift+OJava编辑器使⽤try/catch块来包围未设置,太常⽤了,所以在这⾥列出,建议⾃⼰设置。
- 1、下载文档前请自行甄别文档内容的完整性,平台不提供额外的编辑、内容补充、找答案等附加服务。
- 2、"仅部分预览"的文档,不可在线预览部分如存在完整性等问题,可反馈申请退款(可完整预览的文档不适用该条件!)。
- 3、如文档侵犯您的权益,请联系客服反馈,我们会尽快为您处理(人工客服工作时间:9:00-18:30)。
Eclipse(for C++)使用说明
1、启动eclipse,在命令行中输入eclipse,出现窗口,如下图所示:
2、添加工程
在file菜单中选择import,出现窗口如下:
3、在General下选择Existing Projects into Workspace,单击next,出现如下窗口:
4、点击Browse,选择工程位置,出现下图所示
5、单击Finish,工作区如下图所示:
6、修改build选项,有两种方法
方法一:在项目名称上单击右键,选择Properties
方法二:选中项目,在菜单栏,选择Project/Properties
出现下图:
在左边选择C/C++ Build,修改Build directory:选择File system,选择makefile所在的文件夹,点击OK
7、在菜单栏选择Project/Build All,整个项目开始编译,如下图所示:
8、Run,在菜单栏选择Run/Run Configurations,出现窗口如下:
选择Arguments,点击File System,然后选择可执行文件所在目录,点击Apply,Close
然后在工具栏点击,程序即可运行
9、Debug
在Project explorer中,选择可执行文件,然后在菜单栏选择Run/Debug As,出现如下对话框,或者在工具栏点击图标,配置如下图:
点击OK,会弹出如下窗口:
选择Yes,整个工作区将切换到debug模式,如下图所示:
10、切换工作区视图
11、其他
A、查看函数的定义,按下CTRL键后,将鼠标移动到函数名称上左键单击,即可跳转
到函数的定义处。
B、如果想返回到上一视图,在工具栏点击
C、将鼠标移动到函数定义处,然后按下F2键,即可在浮出的窗口中查看该函数的代码
D、在左边Project explore中双击文件,即可在工作区中打开该文件进行编辑
12、在Eclipse中使用CVS
在项目名上单击鼠标右键,在弹出的菜单中选择Team,会出现相关选项。