centos6.5 Linux+ftp+kickstart无人值守安装
无人职守网络安装Linux系统
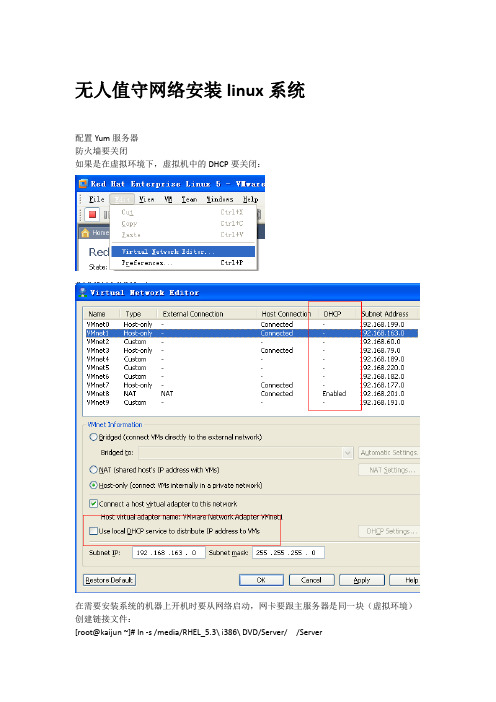
无人值守网络安装linux系统配置Yum服务器防火墙要关闭如果是在虚拟环境下,虚拟机中的DHCP要关闭:在需要安装系统的机器上开机时要从网络启动,网卡要跟主服务器是同一块(虚拟环境)创建链接文件:[root@kaijun ~]# ln -s /media/RHEL_5.3\ i386\ DVD/Server/ /Server创建、修改配置文件:[root@localhost ~]# cd /etc/yum.repos.d/[root@localhost yum.repos.d]#[root@localhost yum.repos.d]# cp rhel-debuginfo.repo core.repo[root@localhost yum.repos.d]# vim core.repo[core]name=corebaseurl=file:///Serverenabled=1gpgcheck=0在文件的最下面自己手动打出来使用测试:[root@localhost ~]# yum list // 列出所有可用的rpm包[root@localhost ~]# yum list | grep httpd // 列出指定的rpm包[root@localhost ~]# yum install httpd.i386 // yum安装httpd服务[root@localhost ~]#yum install system-config-kickstart dhcp vsftpd //安装实际需要的软件包配置DHCP服务器[root@localhost ~]# vim /etc/dhcpd.confddns-update-style none;default-lease-time 21600;max-lease-time 43200;subnet 192.168.1.0 netmask 255.255.255.0 {range 192.168.1.100 192.168.1.200;option subnet-mask 255.255.255.0;next-server 192.168.1.1; //本机IP地址filename “pxelinux.0”//是零}[root@localhost ~]# chkconfig dhcpd on[root@localhost ~]# /etc/init.d/dhcpd start配置TFTP服务器[root@localhost ~]# cp /usr/lib/syslinux/pxelinux.0 /tftpboot[root@localhost ~]# mkdir /tftpboot/pxelinux.cfg[root@localhost ~]# cd /media/RHEL_5.3\ i386\ DVD/cp isolinux/isolinux.cfg /tftpboot/pxelinux.cfg/defaultcp /image/pxeboot/initrd.img 和vmlinux 到/tftpboot 目录中cp /isolinux/*.msg /tftpboot[root@localhost ~]# chkconfig tftp on[root@localhost ~]# /etc/init.d/xinetd restart配置FTP服务器[root@localhost ~]# mkdir /var/ftp/disk[root@localhost ~]# mount /dev/cdrom /var/ftp/disk[root@localhost ~]# chkconfig vsftpd on[root@localhost ~]# /etc/init.d/vsftpd start生成ks.cfg自动安装文件[root@localhost ~]# system-config-kickstart软件包选择建议全部选上,因为你不知道以后系统要用来做什么。
无人值守安装
实训项目(一)---Linux无人值守安装项目内容:内容配置PXE+DHCP+vsftp,实现客户端网络安装linux操作系统阶段目的:目的是让你体验如何通过网络引导,安装redhat系统,解决了很多时候没有光驱,却需要装系统的需求。
步骤:服务器端配置:1.将光盘插入光驱2.使用df命令查看光盘挂载路径,一般在/media/下以RHEL开头3.安装vsftpd这个软件进入光盘挂载点目录,安装vsftpd软件cd /media/RHEL+TAB/Serverrpm -ivh vsftpd........rpm 安装vsftpd这个软件包service vsftpd restart 刷新vsftpd这个服务,让别人可以登录你的ftp服务器mkdir /var/ftp/isomount /dev/cdrom /var/ftp/iso 将光盘挂载到/var/ftp/iso目录方便其他电脑下载文件1、配置YUM仓库,具体步骤参考软件安装章节中的本地yum源搭建。
目的是:安装我们需要的软件2、配置yum源客户端repo文件内容如下:cd /etc/yum.repos.d/[root@DS-Education1 yum.repos.d]# cat diskyum.repo[server]name=isobaseurl=file:///var/ftp/iso/Server ##需将镜像光盘挂载到/var/ftp/iso目录下enabled=1gpgcheck=0gpgkey=file:///etc/pki/rpm-gpg/RPM-GPG-KEY-redhat-release[root@DS-Education1 yum.repos.d]#1、刷新yum表[root@DS-Education1 yum.repos.d]# yum clean all2、安装必要软件[root@DS-Education1 yum.repos.d]# yum install dhcp vsftpd tftp tftp-server -y3、配置dhcp[root@DS-Education1 /]# cp /usr/share/doc/dhcp-3.0.5/dhcpd.conf.sample /etc/dhcpd.conf [root@DS-Education1 yum.repos.d]# vim /etc/dhcpd.conf[root@DS-Education1 yum.repos.d]# cat /etc/dhcpd.confddns-update-style interim;ignore client-updates;subnet 192.168.1.0 netmask 255.255.255.0 {option routers 192.168.1.1;option subnet-mask 255.255.255.0;option time-offset -18000; # Eastern Standard Timerange dynamic-bootp 192.168.1.1 192.168.1.99;default-lease-time 21600;max-lease-time 43200;filename "pxelinux.0";next-server 192.168.1.100; ###无人值守服务器ip}[root@DS-Education1 yum.repos.d]#启动[root@DS-Education1 etc]# service dhcpd restart启动dhcpd:[确定][root@DS-Education1 etc]#4、将光盘中重要内核文件和重要的配置文件拷贝到/tftpboot目录中挂载光盘到本地[root@DS-Education1 yum.repos.d]#mkdir /var/ftp/iso[root@DS-Education1 yum.repos.d]#mount –o loop rhel5u5.iso /var/ftp/iso/拷贝文件[root@DS-Education1 yum.repos.d]# cp /var/ftp/iso/isolinux/* /tftpboot/(实际需要的是vmlinuz,initrd.img ,*.msg 这几个文件,但为了操作方便,我直接把isolinux 目录下的文件全cp过来)5、创建default文件default配置文件的作用是告诉主机从哪里去加载操作系统内核[root@DS-Education1 yum.repos.d]# cd /tftpboot/[root@DS-Education1 tftpboot]# mkdir pxelinux.cfg[root@DS-Education1 tftpboot]# mv isolinux.cfg pxelinux.cfg/default6、将启动加载文件拷贝到/tftpboot目录下[root@DS-Education1 tftpboot]# cp /usr/lib/syslinux/pxelinux.0 ./7、配置tftp[root@DS-Education1 tftpboot]# vi /etc/xinetd.d/tftp[root@DS-Education1 tftpboot]# cat /etc/xinetd.d/tftp# default: off# description: The tftp server serves files using the trivial file transfer \# protocol. The tftp protocol is often used to boot diskless \# workstations, download configuration files to network-aware printers, \# and to start the installation process for some operating systems.service tftp{socket_type = dgramprotocol = udpwait = yesuser = rootserver = /usr/sbin/in.tftpdserver_args = -s /tftpbootdisable = noper_source = 11cps = 100 2flags = IPv4}[root@DS-Education1 tftpboot]#8、设置tftp开机启动并启动tftp[root@DS-Education1 tftpboot]# chkconfig tftp on[root@DS-Education1 tftpboot]# service xinetd restart停止xinetd:[确定]启动xinetd:[确定][root@DS-Education1 tftpboot]#9、配置ftp因为我们在第一阶段最后,已经将镜像拷贝到了/var/ftp/iso/中,这里我们只需要启动ftp服务即可。
kickstart无人值守自动安装Linux系统
KickStart 无人值守批量安装Linux系统一:需求分析不适合本地安装的情况如下:(1)无软驱和光驱:如果计算机不带光驱或软驱,则无法通过本地安装。
(2)非标准的软驱和光驱:虽然笔记本电脑都会配置光驱。
但是并不一定都是标准的IDE设备,有些通过USB接口或1394接口(例如Samsung的Q10)连接。
在Linux安装时所引导的Linux内核一般都不会带这些接口的驱动,所以也无法通过本地安装。
(3)在一些场合,如机房中有大量的计算机需要同时安装Linux。
如果通过光驱的方式逐台安装,不仅效率低,也不利于维护。
(4)光驱或安装光盘故障。
基于以上所属情况,kickstart服务就可以解决这些问题。
二:方案设计什么是PXE:所有系统的网络安装和无人职守安装都是基于PXE,PXE技术与RPL技术不同之处为RPL是静态路由,PXE是动态路由。
RPL是根据网卡上的ID 号加上其他记录组成的一个Frame(帧)向服务器发出请求。
而服务器中已有这个ID数据,匹配成功则进行远程启动。
PXE则是根据服务器端收到的工件站MAC地址,使用DHCP服务为这个MAC地址指定个IP地址。
每次启动可能同一台工作站有与上次启动有不同的IP,即动态分配地址。
下以客户端引导过程说明PXE的原理。
(1)客户端开机后,PXE BootROM(自启动芯片)获得控制权之前执行自我测试,然后以广播形式发出一个请求FIND帧。
(2)如果服务器收到客户端所送出的要求,就会送回DHCP回应,包括用户端的IP地址、预设通信通道,以及开机映像文件;否则服务器会忽略这个要求。
(3)客户端收到服务器发回的响应后则会回应一个帧,以请求传送启动所需文件,并把自己的MAC地址写到服务器端的Netnames.db文件中。
(4)将有更多的消息在客户端与服务器之间应答,用于决定启动参数。
BootROM由TFTP通信协议从服务器下载开机映像文档。
客户端使用TFTP 协议接收启动文件后,将控制权转交启动块以引导操作系统,完成远程启动。
使用kickstar搭建无人值守安装服务器

# System bootloader configuration
bootloader --location=mbr
# Clear the Master Boot Record
zerombr
# Partition clearing information
xconfig --defaultdesktop=GNOME --depth=8 --resolution=640x480
# Disk partitioning information
part /boot --asprimary --bytes-per-inode=4096 --fstype="ext3" --size=200
host=$(($RANDOM%195+60))
hostname=""
ip=10.1.1.$host
echo "IPADDR=$ip" >> ./ifcfg-$iface
echo "NETMASK=255.255.255.0" >> ./ifcfg-$iface
echo "GATEWAY=10.1.1.1" >> ./ifcfg-$iface
CustomLog logs/-access_log common
Alias /forum/ /wwwroot/bbs/
<Location /forum >
Order deny,allow
deny from all
@text-internet
@editors
%post
Linux无人值守安装(光盘)步骤
Linux无人值守安装(光盘)步骤一:准备安装系统的iso镜像,作者在此以rhel6系统为例。
[root@localhost /]#mkdir -p /opt/rhel6[root@localhost /]#mount /dev/cdrom /media[root@localhost /]#cp -arf /media/. /opt/rhel6 //参数-a表示权限不变制作ks.cfg文件,也就是kickstart生产的配置文件。
1.在命令行中输入system-config-kickstart即可打开kickstart的配置向导。
也可修改之前安装好的anaconda-ks.cfg文件,路径:/root[root@localhost /]#system-config-kickstart注意:前提是已近安装好system-config-kickstart,没有则执行yum -y install system-config-kickstart进行安装。
注意:安装方法选项,需要选择cdrom,而不是ftp或其他,/boot分区至少200M。
以下配置是根据已经安装好的anaconda-ks.cfg文件修改,因为新建无法进行软件包选择三、拷贝ks.cfg文件到系统镜像目录,并修改isolinux.cfg 配置文件。
[root@localhost /]#cp /root/ks.cfg /opt/rhel6/isolinux/[root@localhost /]#vim /opt/rhel6/isolinux/isolinux.cfg四、重新封装iso镜像文件(win下操作)1、打开原版iso镜像文件(删除自动的isolinux.cfg文件,然后把我们重新编辑过的文件添加进去)2、添加我们制作的ks.cfg文件到光盘根目录下,然后进行iso文件生成即可五、安装系统。
上述的四步操作已经将一个一键安装rhel6的iso镜像配置完成了,现在需要测试此iso镜像文件是否可用,我们可以使用虚拟机进行测试,新建虚拟机,使用rhel6.iso进行安装,出现安装界面后,需要等待60s左右就开始自动安装了,不需要其他操作将自动安装。
无人值守批量安装linux操作系统
无人值守批量安装linux操作系统(实验总结)每天都看对着电脑的操作系统,有时候出现了什么问题实在解决不了,我们肯定会选择重做系统的,当然一台两台系统我们还是可以一一搞定,可是我们是否想过要是一次性需要我们安装10台,100台甚至更多台的操作系统的时候,我们还是会那样傻乎乎的一台一台机械性的重复着这样的工作吗?可想而知,答案是否定的,那我们能不能找到很好的方法来解决这个问题呢?答案是肯定的,我们的前辈们肯定都遇到过这种问题他们也使用了很好的方法来解决这个问题.那就是---通过网络批量安装操作系统!这样做的好处就是当你的计算机没有光驱或者光驱损坏时,或者是没有安装介质的时候都是可以安装上我们的linux操作系统的~超棒O(∩_∩)o 哈哈不过安装之前我们还是要了解一下相关知识一.PXEPXE(Pre-boot Execution Environment)是由Intel设计的协议,它可以使计算机通过网络启动。
协议分为client和server两端,PXE client在网卡的ROM中,当计算机引导时,BIOS 把PXE client调入内存执行,并显示出命令菜单,经用户选择后,PXE client将放置在远端的操作系统通过网络下载到本地运行。
既然是通过网络传输,就需要IP地址;也就是说在其启动过程中,客户端请求服务器分配IP地址,之后PXE Client使用TFTP Client 通过TFTP(Trivial File Transfer Protocol)协议下载启动安装程序所需的文件。
PXE技术与RPL技术不同之处为RPL是静态路由,PXE 是动态路由。
RPL是根据网卡上的ID号加上其他记录组成的一个Frame(帧)向服务器发出请求。
而服务器中已有这个ID数据,匹配成功则进行远程启动。
PXE则是根据服务器端收到的工件站MAC地址,使用DHCP服务为这个MAC地址指定一个IP地址。
每次启动可能同一台工作站有与上次启动时不同的IP,即动态分配地址。
第六章:无人值守网络安装Linux系统
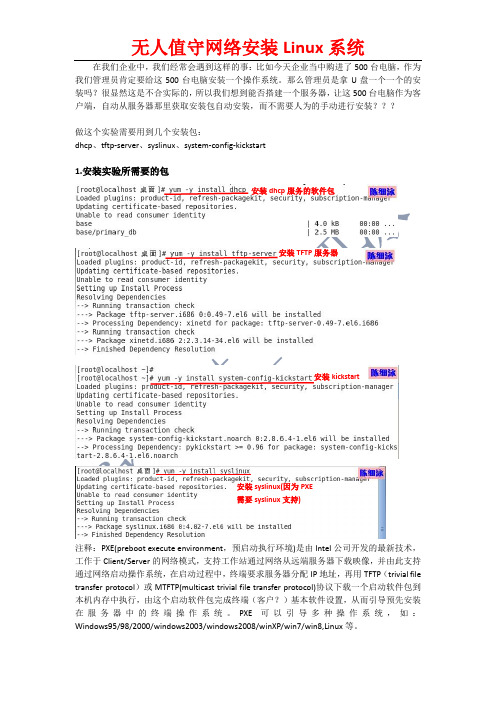
在我们企业中,我们经常会遇到这样的事:比如今天企业当中购进了500台电脑,作为我们管理员肯定要给这500台电脑安装一个操作系统。
那么管理员是拿U 盘一个一个的安装吗?很显然这是不合实际的,所以我们想到能否搭建一个服务器,让这500台电脑作为客户端,自动从服务器那里获取安装包自动安装,而不需要人为的手动进行安装???做这个实验需要用到几个安装包:dhcp 、tftp-server 、syslinux 、system-config-kickstart1.安装实验所需要的包注释:PXE(preboot execute environment ,预启动执行环境)是由Intel 公司开发的最新技术,工作于Client/Server 的网络模式,支持工作站通过网络从远端服务器下载映像,并由此支持通过网络启动操作系统,在启动过程中,终端要求服务器分配IP 地址,再用TFTP (trivial file transfer protocol )或MTFTP(multicast trivial file transfer protocol)协议下载一个启动软件包到本机内存中执行,由这个启动软件包完成终端(客户?)基本软件设置,从而引导预先安装在服务器中的终端操作系统。
PXE 可以引导多种操作系统,如:Windows95/98/2000/windows2003/windows2008/winXP/win7/win8,Linux 等。
安装dhcp 服务的软件包安装TFTP 服务器kickstart安装需要启动TFTP服务(由于TFTP是非独立式服务,是由独立式服务xinetd控制,所以要先启动xinetd,再启动TFTP)。
2.配置系统启动文件启动xinetd让xinetd下次生效启动TFTP服务查看TFTP是否启用这个目录中是我当前ISO的启动文件进入TFTP主目录复制启动文件到TFTP的主目录复制PXE文件到TFTP共享目录创建目录复制PXE文件到该目录下,并改名为default启动文件label。
linux自动化安装 kickstart配置文件详解
kickstart配置文件详解kickstart是什么许多系统管理员宁愿使用自动化的安装方法来安装红帽企业Linux.为了满足这种需要,红帽创建了kickstart安装方法.使用kickstart,系统管理员可以创建一个文件,这个文件包含了在典型的安装过程中所遇到的问题的答案.Kickstart文件可以存放于单一的服务器上,在安装过程中被独立的机器所读取.这个安装方法可以支持使用单一kickstart文件在多台机器上安装红帽企业Linux,这对于网络和系统管理员来说是个理想的选择.Kickstart给用户提供了一种自动化安装红帽企业Linux的方法.如何执行kickstart安装kickstart 安装可以使用本地光盘,本地硬盘驱动器,或通过NFS,FTP,HTTP 来执行.要使用kickstart,必须:1.创建一个kickstart文件.2.创建有kickstart文件的引导介质或者使这个文件在网络上可用.3.筹备安装树.4.开始kickstart安装.创建kickstart文件kickstart文件是一个简单的文本文件,它包含了一个项目列表,每个项目由一个关键字来识别.可以用「Kickstart 配置」应用程序创建它或是自己从头编写.红帽企业Linux安装程序也根据在安装过程中的选择创建一个简单的kickstart文件,这个文件被写入到/root/anaconda-ks.cfg.可以用任何能够把文件保存为ASCII文本的文本编辑器或字处理器来编辑它.首先,在创建kickstart文件时留意下列问题:1.每节必须按顺序指定.除非特别申明,每节内的项目则不必按序排列.小节的顺序为:命令部分,这里应该包括必需的选项.%packages部分,这部分选择需要安装的软件包.%pre和%post部分,这两个部分可以按任何顺序排列而且不是必需的.2.不必需的项目可以被省略.3.如果忽略任何必需的项目,安装程序会提示用户输入相关的项目的选择,就象用户在典型的安装过程中所遇到的一样.一旦用户进行了选择,安装会以非交互的方式(unattended)继续(除非找到另外一个没有指定的项目).4.以井号("#")开头的行被当作注释行并被忽略.对于kickstart 升级,下列项目是必需的:1.语言2.安装方法3.设备规格(如果这个设备是在安装过程中所需要的)4.键盘设置5.upgrade 关键字6.引导装载程序配置7.如果任何其他的项目被指定为upgrade,这些项目将被忽略(注意这包括了软件包选择).kickstart命令选项下面的选项可以放入kickstart文件.如果喜欢使用图形化的界面来创建kickstart文件,可以使用"Kickstart 配置"应用程序.(注:如果某选项后面跟随了一个等号(=),它后面就必须指定一个值.在示例命令中,括号([])中的选项是命令的可选参数.)autopart(可选)自动创建分区,大于1GB的根分区(/),交换分区和适合于不同体系结构的引导分区.一个或多个缺省分区的大小可以用part指令重新定义.ignoredisk(可选)导致安装程序忽略指定的磁盘.如果使用自动分区并希望忽略某些磁盘的话,这就很有用.例如,没有ignoredisk,如要试图在SAN-cluster系统里部署,kickstart就会失败,因为安装程序检测到SAN不返回分区表的被动路径(passive path).如果有磁盘的多个路径时,ignoredisk选项也有用处.语法是:ignoredisk --drives=drive1,drive2,...这里driveN是sda,sdb... hda等等中的一个.autostep(可选)和interactive相似,除了它进入下一屏幕,它通常用于调试.--autoscreenshot,安装过程中的每一步都截屏并在安装完成后把图片复制到/root/anaconda-screenshots.这对于制作文档很有用.auth或authconfig(必需)为系统设置验证选项.这和在安装后运行的authconfig命令相似.在缺省情况下,密码通常被加密但不使用影子文件(shadowed).--enablemd5,每个用户口令都使用md5加密.--enablenis,启用NIS支持.在缺省情况下,--enablenis使用在网络上找到的域.域应该总是用--nisdomain=选项手工设置.--nisdomain=,用在NIS服务的NIS域名.--nisserver=,用来提供NIS服务的服务器(默认通过广播).--useshadow或--enableshadow,使用屏蔽口令.--enableldap,在/etc/nsswitch.conf启用LDAP支持,允许系统从LDAP目录获取用户的信息(UIDs,主目录,shell 等等).要使用这个选项,必须安装nss_ldap软件包.也必须用--ldapserver=和--ldapbasedn=指定服务器和base DN(distinguished name).--enableldapauth,把LDAP作为一个验证方法使用.这启用了用于验证和更改密码的使用LDAP目录的pam_ldap模块.要使用这个选项,必须安装nss_ldap软件包.也必须用--ldapserver=和--ldapbasedn=指定服务器和base DN.--ldapserver=,如果指定了--enableldap或--enableldapauth,使用这个选项来指定所使用的LDAP服务器的名字.这个选项在/etc/ldap.conf文件里设定.--ldapbasedn=,如果指定了--enableldap或--enableldapauth,使用这个选项来指定用户信息存放的LDAP目录树里的DN.这个选项在/etc/ldap.conf文件里设置.--enableldaptls,使用TLS(传输层安全)查寻.该选项允许LDAP在验证前向LDAP服务器发送加密的用户名和口令.--enablekrb5,使用Kerberos 5验证用户.Kerberos自己不知道主目录,UID或shell.如果启用了Kerberos,必须启用LDAP,NIS,Hesiod或者使用/usr/sbin/useradd命令来使这个工作站获知用户的帐号.如果使用这个选项,必须安装pam_krb5软件包.--krb5realm=,工作站所属的Kerberos 5领域.--krb5kdc=,为领域请求提供服务的KDC.如果的领域内有多个KDC,使用逗号(,)来分隔它们.--krb5adminserver=,领域内还运行kadmind的KDC.该服务器处理改变口令以及其它管理请求.如果有不止一个KDC,该服务器必须是主KDC.--enablehesiod,启用Hesiod支持来查找用户主目录,UID 和shell.在网络中设置和使用Hesiod 的更多信息,可以在glibc 软件包里包括的/usr/share/doc/glibc-2.x.x/README.hesiod里找到.Hesiod是使用DNS记录来存储用户,组和其他信息的DNS 的扩展.--hesiodlhs,Hesiod LHS("left-hand side")选项在/etc/hesiod.conf里设置.Hesiod 库使用这个选项来决定查找信息时搜索DNS的名字,类似于LDAP对base DN的使用.--hesiodrhs,Hesiod RHS("right-hand side")选项在/etc/hesiod.conf里设置.Hesiod 库使用这个选项来决定查找信息时搜索DNS的名字,类似于LDAP对base DN的使用.--enablesmbauth,启用对SMB服务器(典型的是Samba或Windows服务器)的用户验证.SMB验证支持不知道主目录,UID 或shell.如果启用SMB,必须通过启用LDAP,NIS,Hesiod或者用/usr/sbin/useradd命令来使用户帐号为工作站所知.要使用这个选项,必须安装pam_smb软件包.--smbservers=,用来做SMB验证的服务器名称.要指定不止一个服务器,用逗号(,)来分隔它们.--smbworkgroup=,SMB服务器的工作组名称.--enablecache,启用nscd服务.nscd服务缓存用户,组和其他类型的信息.如果选择在网络上用NIS,LDAP或hesiod分发用户和组的信息,缓存就尤其有用.bootloader(必需)指定引导装载程序怎样被安装.对于安装和升级,这个选项都是必需的.--append=,指定内核参数.要指定多个参数,使用空格分隔它们.例如:bootloader --location=mbr --append="hdd=ide-scsi ide=nodma"--driveorder,指定在BIOS引导顺序中居首的驱动器.例如:bootloader --driveorder=sda,hda--location=,指定引导记录被写入的位置.有效的值如下:mbr(缺省),partition(在包含内核的分区的第一个扇区安装引导装载程序)或none(不安装引导装载程序).--password=,如果使用GRUB,把GRUB引导装载程序的密码设置到这个选项指定的位置.这应该被用来限制对可以传入任意内核参数的GRUB shell的访问.--md5pass=,如果使用GRUB,这和--password=类似,只是密码已经被加密.--upgrade,升级现存的引导装载程序配置,保留其中原有的项目.该选项仅可用于升级.clearpart(可选)在创建新分区之前,从系统上删除分区.默认不会删除任何分区.注:如果使用了clearpart命令,--onpart命令就不能够用在逻辑分区上.--all,删除系统上所有分区.--drives=,指定从哪个驱动器上清除分区.例如,下面的命令清除了主IDE控制器上的前两个驱动器上所有分区clearpart --drives=hda,hdb --all--initlabel,根据不同体系结构把磁盘标签初始化为缺省设置(例如,msdos用于x86而gpt用于Itanium).当安装到一个崭新的硬盘时,这很有用,安装程序不会询问是否应该初始化磁盘标签.--linux,删除所有Linux分区.--none(缺省),不要删除任何分区.cmdline(可选)在完全的非交互式的命令行模式下进行安装.任何交互式的提示都会终止安装.这个模式对于有x3270控制台的IBM System z系统很有用.device(可选)在多数的PCI系统里,安装程序会正确地自动探测以太网卡和SCSI卡.然而,在老的系统和某些PCI系统里,kickstart需要提示来找到正确的设备.device命令用来告诉安装程序安装额外的模块,它有着这样的格式:device <type><moduleName> --opts=<options><type>,用scsi或eth代替<moduleName>,使用应该被安装的内核模块的名称来替换.--opts=,传递给内核模块的选项.注意,如果把选项放在引号里,可以传递多个选项.例如:--opts="aic152x=0x340 io=11"driverdisk(可选)可以在kickstart安装过程中使用驱动软盘.必须把驱动软盘的内容复制到系统的硬盘分区的根目录下.然后必须使用driverdisk 命令来告诉安装程序到哪去寻找驱动磁盘.driverdisk <partition> [--type=<fstype>]另外,也可以为驱动程序盘指定一个网络位置:driverdisk --source=ftp://path/to/dd.imgdriverdisk --source=http://path/to/dd.imgdriverdisk --source=nfs:host:/path/to/img<partition>,包含驱动程序盘的分区.--type=,文件系统类型(如:vfat,ext2,ext3).firewall(可选)这个选项对应安装程序里的「防火墙配置」屏幕:firewall --enabled|--disabled [--trust=] <device> [--port=]--enabled或者--enable,拒绝不是答复输出请求如DNS答复或DHCP请求的进入连接.如果需要使用在这个机器上运行的服务,可以选择允许指定的服务穿过防火墙.--disabled或--disable,不要配置任何iptables规则.--trust=,在此列出设备,如eth0,这允许所有经由这个设备的数据包通过防火墙.如果需要列出多个设备,使用--trust eth0 --trust eth1.不要使用以逗号分隔的格式,如--trust eth0, eth1.<incoming>,使用以下服务中的一个或多个来替换,从而允许指定的服务穿过防火墙.--ssh--telnet--smtp--http--ftp--port=,可以用端口:协议(port:protocal)格式指定允许通过防火墙的端口.例如,如果想允许IMAP通过的防火墙,可以指定imap:tcp.还可以具体指定端口号码,要允许UDP分组在端口1234通过防火墙,输入1234:udp.要指定多个端口,用逗号将它们隔开.firstboot(可选)决定是否在系统第一次引导时启动"设置代理".如果启用,firstboot软件包必须被安装.如果不指定,这个选项是缺省为禁用的.--enable或--enabled,系统第一次引导时,启动"设置代理".--disable或--disabled,系统第一次引导时,不启动"设置代理".--reconfig,在系统引导时在重配置(reconfiguration)模式下启用"设置代理".这个模式启用了语言,鼠标,键盘,根密码,安全级别,时区和缺省网络配置之外的选项.halt(可选)在成功地完成安装后关闭系统.这和手工安装相似,手工安装的anaconda会显示一条信息并等待用户按任意键来重启系统.在kickstart安装过程中,如果没有指定完成方法(completion method),将缺省使用reboot选项.halt选项基本和shutdown -h命令相同.关于其他的完成方法,请参考kickstart的poweroff,reboot和shutdown选项.graphical(可选)在图形模式下执行kickstart安装.kickstart安装默认在图形模式下安装.install(可选)告诉系统来安装全新的系统而不是在现有系统上升级.这是缺省的模式.必须指定安装的类型,如cdrom,harddrive,nfs或url(FTP 或HTTP安装).install命令和安装方法命令必须处于不同的行上.cdrom从系统上的第一个光盘驱动器中安装.harddrive从本地驱动器的vfat或ext2格式的红帽安装树来安装.--biospart=,从BIOS分区来安装(如82).--partition=,从分区安装(如sdb2).--dir=,包含安装树的variant目录的目录.例如:harddrive --partition=hdb2 --dir=/tmp/install-treenfs从指定的NFS服务器安装.--server=,要从中安装的服务器(主机名或IP).--dir=,包含安装树的variant目录的目录.--opts=,用于挂载NFS输出的Mount选项(可选).例如:nfs --server= --dir=/tmp/install-treeurl通过FTP或HTTP从远程服务器上的安装树中安装.例如:url --url http://<server>/<dir>或:url --url ftp://<username>:<password>@<server>/<dir>ignore disk(可选)用来指定在分区,格式化和清除时anaconda不应该访问的磁盘.这个命令有一个必需的参数,就是用逗号隔开的需要忽略的驱动器列表.例如:ignoredisk --drives=[disk1,disk2,...]interactive(可选)在安装过程中使用kickstart文件里提供的信息,但允许检查和修改给定的值.将遇到安装程序的每个屏幕以及kickstart文件里给出的值.通过点击"下一步"接受给定的值或是改变值后点击"下一步"继续.请参考autostep命令.iscsi(可选)issci --ipaddr= [options].--target--port=--user=--password=iscsiname(可选)key(可选)指定安装密钥,它在软件包选择和获取支持时设别系统的时候是必需的.这个命令是红帽企业Linux-specific,它对Fedora来说没有意义并且会被忽略.--skip,跳过输入密钥.通常,如果没有key命令,anaconda将暂停并提示输入密钥.如果没有密钥或不想提供它,这个选项允许继续自动化安装.keyboard(必需)设置系统键盘类型.这里是i386,Itanium,和Alpha 机器上可用键盘的列表:be-latin1, bg, br-abnt2, cf, cz-lat2, cz-us-qwertz, de, de-latin1,de-latin1-nodeadkeys, dk, dk-latin1, dvorak, es, et, fi, fi-latin1,fr, fr-latin0, fr-latin1, fr-pc, fr_CH, fr_CH-latin1, gr, hu, hu101,is-latin1, it, it-ibm, it2, jp106, la-latin1, mk-utf, no, no-latin1,pl, pt-latin1, ro_win, ru, ru-cp1251, ru-ms, ru1, ru2, ru_win,se-latin1, sg, sg-latin1, sk-qwerty, slovene, speakup, speakup-lt,sv-latin1, sg, sg-latin1, sk-querty, slovene, trq, ua, uk, us, us-acentos文件/usr/lib/python2.2/site-packages/rhpl/keyboard_models.py 也包含这个列表而且是rhpl 软件包的一部分.lang(必需)设置在安装过程中使用的语言以及系统的缺省语言.例如,要把语言设置为英语,kickstart文件应该包含下面的一行:lang en_US文件/usr/share/system-config-language/locale-list里每一行的第一个字段提供了一个有效语言代码的列表,它是system-config-language软件包的一部分.文本模式的安装过程不支持某些语言(主要是中文,日语,韩文和印度的语言).如果用lang命令指定这些语言中的一种,安装过程仍然会使用英语,但是系统会缺省使用指定的语言.langsupport(不赞成)langsupport关键字已经被取消而且使用它将导致屏幕出现错误信息及终止安装.作为代替,应该在kickstart文件里的%packages 部分列出所支持的语言的支持软件包组.例如,要支持法语,应该把下面的语句加入到%packages:@french-supportlogvol(可选)使用以下语法来为逻辑卷管理(LVM)创建逻辑卷:logvol <mntpoint> --vgname=<name> --size=<size> --name=<name><options>这些选项如下所示:--noformat,使用一个现存的逻辑卷,不进行格式化.--useexisting,使用一个现存的逻辑卷,重新格式化它.--fstype=,为逻辑卷设置文件系统类型.合法值有:ext2,ext3,swap和vfat.--fsoptions=,为逻辑卷设置文件系统类型.合法值有:ext2,ext3,swap和vfat.--bytes-per-inode=,指定在逻辑卷上创建的文件系统的节点的大小.因为并不是所有的文件系统都支持这个选项,所以在其他情况下它都被忽略.--grow=,告诉逻辑卷使用所有可用空间(若有),或使用设置的最大值.--maxsize=,当逻辑卷被设置为可扩充时,以MB为单位的分区最大值.在这里指定一个整数值,不要在数字后加MB.--recommended=,自动决定逻辑卷的大小.--percent=,用卷组里可用空间的百分比来指定逻辑卷的大小.首先创建分区,然后创建逻辑卷组,再创建逻辑卷.例如:part pv.01 --size 3000volgroup myvg pv.01logvol / --vgname=myvg --size=2000 --name=rootvollogging(可选)这个命令控制安装过程中anaconda的错误日志.它对安装好的系统没有影响.--host=,发送日志信息到给定的远程主机,这个主机必须运行配置为可接受远程日志的syslogd进程.--port=,如果远程的syslogd进程没有使用缺省端口,这个选项必须被指定.--level=,debug,info,warning,error或critical中的一个.指定tty3上显示的信息的最小级别.然而,无论这个级别怎么设置,所有的信息仍将发送到日志文件.mediacheck(可选)如果指定的话,anaconda将在安装介质上运行mediacheck.这个命令只适用于交互式的安装,所以缺省是禁用的.monitor(可选)如果monitor命令没有指定,anaconda将使用X来自动检测的显示器设置.请在手工配置显示器之前尝试这个命令.--hsync=,指定显示器的水平频率.--vsync=,指定显示器的垂直频率.--monitor=,使用指定的显示器;显示器的名字应该在hwdata软件包里的/usr/share/hwdata/MonitorsDB列表上.这个显示器的列表也可以在Kickstart Configurator的X 配置屏幕上找到.如果提供了--hsync或--vsync,它将被忽略.如果没有提供显示器信息,安装程序将自动探测显示器.--noprobe=,不要试图探测显示器.mouse(已取消)mouse 关键字已经被取消,使用它将导致屏幕出现错误信息并终止安装.network(可选)为系统配置网络信息.如果kickstart安装不要求联网(换句话说,不从NFS,HTTP或FTP安装),就不需要为系统配置网络.如果安装要求联网而kickstart文件里没有提供网络信息,安装程序会假定从eth0通过动态IP地址(BOOTP/DHCP)来安装,并配置安装完的系统动态决定IP地址.network选项为通过网络的kickstart安装以及所安装的系统配置联网信息.--bootproto=,dhcp,bootp或static中的一种,缺省值是dhcp.bootp和dhcp被认为是相同的.static方法要求在kickstart文件里输入所有的网络信息.顾名思义,这些信息是静态的且在安装过程中和安装后所有.静态网络的设置行更为复杂,因为必须包括所有的网络配置信息.必须指定IP地址,网络,网关和命名服务器.例如("\"表示连续的行):network --bootproto=static --ip=10.0.2.15 --netmask=255.255.255.0 \--gateway=10.0.2.254 --nameserver=10.0.2.1如果使用静态方法,请注意以下两个限制:所有静态联网配置信息都必须在一行上指定,不能使用反斜线来换行.在这里只能够指定一个命名服务器.然而,如果需要的话,可以使用kickstart文件的%post段落来添加更多的命名服务器.--device=,用来选择用于安装的特定的以太设备.注意,除非kickstart文件是一个本地文件(如ks=floppy),否则--device=的使用是无效的.这是因为安装程序会配置网络来寻找kickstart文件.例如: network --bootproto=dhcp --device=eth0--ip=,要安装的机器的IP地址.--gateway=,IP地址格式的默认网关.--nameserver=,主名称服务器,IP地址格式.--nodns,不要配置任何DNS 服务器.--netmask=,安装的系统的子网掩码.--hostname=,安装的系统的主机名.--ethtool=,指定传给ethtool程序的网络设备的其他底层设置.--essid=,无线网络的网络ID.--wepkey=,无线网络的加密密钥.--onboot=,是否在引导时启用该设备.--class=,DHCP类型.--mtu=,该设备的MTU.--noipv4=,禁用此设备的IPv4.--noipv6=,禁用此设备的IPv6.multipath(可选)multipath --name= --device= --rule=part或partition(对于安装是必需的,升级可忽略).在系统上创建分区.如果不同分区里有多个红帽企业Linux系统,安装程序会提示用户升级哪个系统.警告:作为安装过程的一部分,所有被创建的分区都会被格式化,除非使用了--noformat和--onpart.<mntpoint>,<mntpoint>是分区的挂载点,它必须是下列形式中的一种:/<path>,例如,/,/usr,/homeswap,该分区被用作交换空间,要自动决定交换分区的大小,使用--recommended选项.swap --recommended自动生成的交换分区的最小值大于系统内存的数量,但小于系统内存的两倍.raid.<id>,该分区用于software RAID(参考raid).pv.<id>,该分区用于LVM(参考logvol).--size=,以MB为单位的分区最小值.在此处指定一个整数值,如500.不要在数字后面加MB.--grow,告诉分区使用所有可用空间(若有),或使用设置的最大值.--maxsize=,当分区被设置为可扩充时,以MB为单位的分区最大值.在这里指定一个整数值,不要在数字后加MB.--noformat,用--onpart命令来告诉安装程序不要格式化分区.--onpart=或--usepart=,把分区放在已存在的设备上.例如:partition /home --onpart=hda1,把/home置于必须已经存在的/dev/hda1上.--ondisk=或--ondrive=,强迫分区在指定磁盘上创建.例如:--ondisk=sdb把分区置于系统的第二个SCSI磁盘上.--asprimary,强迫把分区分配为主分区,否则提示分区失败.--type=(用fstype代替),这个选项不再可用了.应该使用fstype.--fstype=,为分区设置文件系统类型.有效的类型为ext2,ext3,swap和vfat.--start=,指定分区的起始柱面,它要求用--ondisk=或ondrive=指定驱动器.它也要求用--end=指定结束柱面或用--size=指定分区大小.--end=,指定分区的结束柱面.它要求用--start=指定起始柱面.--bytes-per-inode=,指定此分区上创建的文件系统的节点大小.不是所有的文件系统都支持这个选项,所以在其他情况下它都被忽略.--recommended,自动决定分区的大小.--onbiosdisk,强迫在BIOS 找到的特定磁盘上创建分区.注:如果因为某种原因分区失败了,虚拟终端3上会显示诊断信息.poweroff(可选)在安装成功后关闭系统并断电.通常,在手工安装过程中,anaconda会显示一条信息并等待用户按任意键来重新启动系统.在kickstart的安装过程中,如果没有指定完成方法,将使用缺省的reboot选项.raid(可选)组成软件RAID设备.该命令的格式是:raid <mntpoint> --level=<level> --device=<mddevice><partitions*><mntpoint>,RAID文件系统被挂载的位置.如果是/,除非已经有引导分区存在(/boot),RAID级别必须是1.如果已经有引导分区,/boot分区必须是级别1且根分区(/)可以是任何可用的类型.<partitions*>(这表示可以有多个分区)列出了加入到RAID阵列的RAID 标识符.--level=,要使用的RAID级别(0,1,或5).--device=,要使用的RAID设备的名称(如md0或md1).RAID设备的范围从md0直到md7,每个设备只能被使用一次.--bytes-per-inode=,指定RAID设备上创建的文件系统的节点大小.不是所有的文件系统都支持这个选项,所以对于那些文件系统它都会被忽略.--spares=,指定RAID阵列应该被指派N个备用驱动器.备用驱动器可以被用来在驱动器失败时重建阵列.--fstype=,为RAID阵列设置文件系统类型.合法值有:ext2,ext3,swap和vfat.--fsoptions=,指定当挂载文件系统时使用的free form字符串.这个字符串将被复制到系统的/etc/fstab文件里且应该用引号括起来.--noformat,使用现存的RAID设备,不要格式化RAID阵列.--useexisting,使用现存的RAID设备,重新格式化它.reboot(可选)在成功完成安装(没有参数)后重新启动.通常,kickstart会显示信息并等待用户按任意键来重新启动系统.repo(可选)配置用于软件包安装来源的额外的yum库.可以指定多个repo行.repo --name=<repoid> [--baseline=<url>| --mirrorlist=<url>]--name=,repo id.这个选项是必需的.--baseurl=,库的URL.这里不支持yum repo配置文件里使用的变量.可以使用它或者--mirrorlist,亦或两者都不使用.--mirrorlist=,指向库镜像的列表的URL.这里不支持yum repo配置文件里可能使用的变量.可以使用它或者--baseurl,亦或两者都不使用.rootpw(必需)把系统的根口令设置为<password>参数.rootpw [--iscrypted] <password>--iscrypted,如果该选项存在,口令就会假定已被加密.selinux(可选)在系统里设置SELinux状态.在anaconda里,SELinux缺省为enforcing.selinux [--disabled|--enforcing|--permissive]--enforcing,启用SELinux,实施缺省的targeted policy.注:如果kickstart文件里没有selinux选项,SELinux将被启用并缺省设置为--enforcing.--permissive,输出基于SELinux策略的警告,但实际上不执行这个策略.--disabled,在系统里完全地禁用SELinux.services(可选)修改运行在缺省运行级别下的缺省的服务集.在disabled列表里列出的服务将在enabled列表里的服务启用之前被禁用.--disabled,禁用用逗号隔开的列表里的服务.--enabled,启用用逗号隔开的列表里的服务.shutdown(可选)在成功完成安装后关闭系统.在kickstart安装过程中,如果没有指定完成方法,将使用缺省的reboot选项.skipx(可选)如果存在,安装的系统上就不会配置X.text(可选)在文本模式下执行kickstart安装. kickstart安装默认在图形模式下安装.timezone(可选)把系统时区设置为<timezone>,它可以是timeconfig列出的任何时区.timezone [--utc] <timezone>--utc,如果存在,系统就会假定硬件时钟被设置为UTC(格林威治标准)时间.upgrade(可选)告诉系统升级现有的系统而不是安装一个全新的系统.必须指定cdrom,harddrive,nfs或url(对于FTP和HTTP而言)中的一个作为安装树的位置.详情请参考install.user(可选)在系统上创建新用户.user --name=<username> [--groups=<list>] [--homedir=<homedir>] [--password=<password>] [--iscrypted] [--shell=<shell>] [--uid=<uid>]--name=,提供用户的名字.这个选项是必需的.--groups=,除了缺省的组以外,用户应该属于的用逗号隔开的组的列表.--homedir=,用户的主目录.如果没有指定,缺省为/home/<username>.--password=,新用户的密码.如果没有指定,这个帐号将缺省被锁住.--iscrypted=,所提供的密码是否已经加密?--shell=,用户的登录shell.如果不提供,缺省为系统的缺省设置.--uid=,用户的UID.如果未提供,缺省为下一个可用的非系统UID.vnc(可选)允许通过VNC远程地查看图形化的安装.文本模式的安装通常更喜欢使用这个方法,因为在文本模式下有某些大小和语言的限制.如果为no,这个命令将启动不需要密码的VNC服务器并打印出需要用来连接远程机器的命令.vnc [--host=<hostname>] [--port=<port>] [--password=<password>]。
centos无人值守自动安装
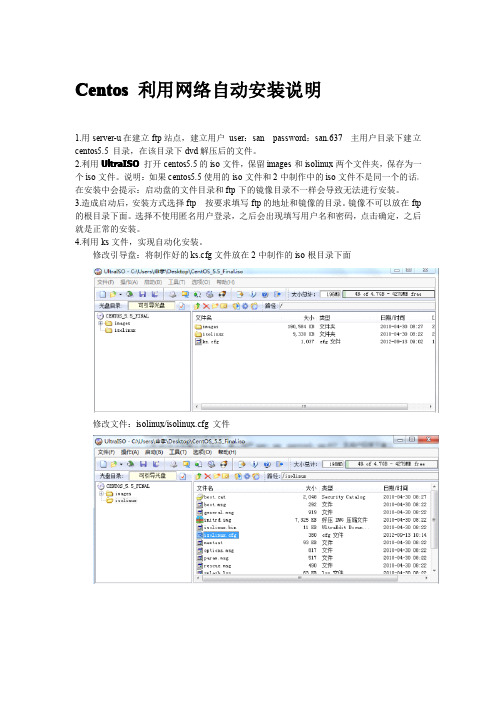
Centos利用网络自动安装说明1.用server-u在建立ftp站点,建立用户user:san password:san.637主用户目录下建立centos5.5目录,在该目录下dvd解压后的文件。
2.利用UltraISO打开centos5.5的iso文件,保留images和isolinux两个文件夹,保存为一个iso文件。
说明:如果centos5.5使用的iso文件和2中制作中的iso文件不是同一个的话。
在安装中会提示:启动盘的文件目录和ftp下的镜像目录不一样会导致无法进行安装。
3.造成启动后,安装方式选择ftp按要求填写ftp的地址和镜像的目录。
镜像不可以放在ftp 的根目录下面。
选择不使用匿名用户登录,之后会出现填写用户名和密码,点击确定,之后就是正常的安装。
4.利用ks文件,实现自动化安装。
修改引导盘:将制作好的ks.cfg文件放在2中制作的iso根目录下面修改文件:isolinux/isolinux.cfg文件Ks文件可以根据安装好的系统修改重命名即可,在/root/anaconda-ks.cfg #Kickstart file automatically generated by anaconda.installurl--url ftp://san:san.637@192.168.6.1//ftplang en_US.UTF-8keyboard usnetwork--device eth0--bootproto dhcprootpw--iscrypted$1$0ARa1dSI$fiMYZDU1lSJO4VbCEQ.yT1firewall--enabled--port=22:tcpauthconfig--enableshadow--enablemd5selinux--enforcingtimezone--utc Asia/Shanghaibootloader--location=mbr--driveorder=sda#The following is the partition information you requested#Note that any partitions you deleted are not expressed#here so unless you clear all partitions first,this is#not guaranteed to work#clearpart--linux--drives=sda#part/boot--fstype ext3--size=100--ondisk=sda#part pv.2--size=0--grow--ondisk=sda#volgroup VolGroup00--pesize=32768pv.2#logvol swap--fstype swap--name=LogVol01--vgname=V olGroup00--size=1024--grow --maxsize=2048#logvol/--fstype ext3--name=LogVol00--vgname=V olGroup00--size=1024--grow%packages@base@core@dialup@editors@text-internetkeyutilstrousersfipscheckdevice-mapper-multipath.利用光盘引导,在启动界面输入ks回车。
CentOS6.5下网络启动服务器安装和配置方法(pxe+tftp+dhcpd+kickstart)
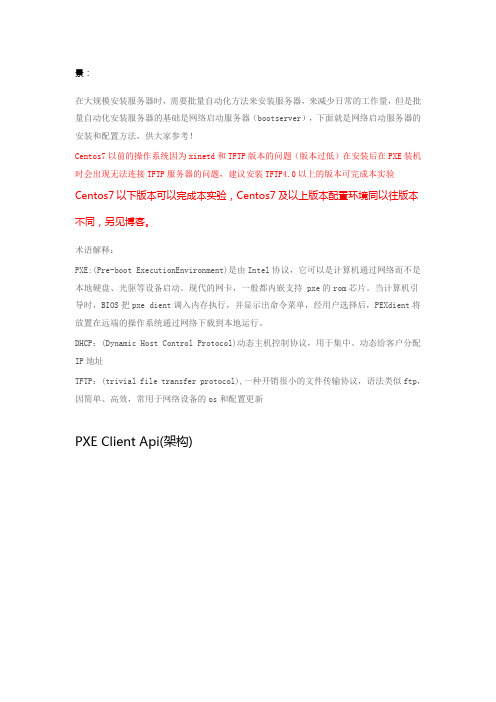
景:在大规模安装服务器时,需要批量自动化方法来安装服务器,来减少日常的工作量,但是批量自动化安装服务器的基础是网络启动服务器(bootserver),下面就是网络启动服务器的安装和配置方法,供大家参考!Centos7以前的操作系统因为xinetd和TFTP版本的问题(版本过低)在安装后在PXE装机时会出现无法连接TFTP服务器的问题,建议安装TFTP4.0以上的版本可完成本实验Centos7以下版本可以完成本实验,Centos7及以上版本配置环境同以往版本不同,另见博客。
术语解释:PXE:(Pre-boot ExecutionEnvironment)是由Intel协议,它可以是计算机通过网络而不是本地硬盘、光驱等设备启动。
现代的网卡,一般都内嵌支持 pxe的rom芯片。
当计算机引导时,BIOS把pxe dient调入内存执行,并显示出命令菜单,经用户选择后,PEXdient将放置在远端的操作系统通过网络下载到本地运行。
DHCP:(Dynamic Host Control Protocol)动态主机控制协议,用于集中、动态给客户分配IP地址TFTP:(trivial file transfer protocol),一种开销很小的文件传输协议,语法类似ftp,因简单、高效,常用于网络设备的os和配置更新PXE Client Api(架构)上图说明: 当BIOS把PXE Client载入记忆体,此时便具有DHCP Client及TFTP Client 的能力。
PXE Client具备DHCP Client能力,可以透过DHCP Server来取得IP位址。
PXE Client具备TFTP Client能力”,可通过TFTP来下载kernel image等文件。
PXE启动流程图(pxe boot)上图启动流程说明如下:1.PXE Client 向UDP 67端口广播DHCPDDISCOVER 消息.2.DHCP SERVER 或者DHCP Proxy 收到广播消息后,发送DHCPOFFER(包含ip地址)消息到PXE Client的68 端口.3.PXE Client 发送DHCPREQUEST 消息到DHCP SERVER ,获取启动文件(boot file name).4.DHCP SERVER 发送DHCPACK(包含Network Bootstrap Program file name)消息到PXE Client.5.PXE Client 向Boot Server 获取NBP(Network Bootstrap Program) 文件.6.PXE Client 从TFTP SERVER 下载NBP,然后在客户端执行NBP文件注意: 在NBP执行初始化后,NBP会按照自己默认的方式从TFTP SERVER中下载其他所需的配置文件.这个时候PXE 启动流程已经完成了,剩下的工作都是有NBP来执行完成的.例如: pxelinux.0(NBP) 他会下载default 配置文件,来显示菜单,根据需要启动不同的kernel image.如果是RIS(window安装)的NBP,会启动Windows boot loader 来执行安装部署widows任务安装前关闭selinux及配置好iptables规则,详细过程此处不再给出1.PXE BOOT Server配置过程[root@node1 ~]# yum install tfpt tftp-server dhcp vsftpd syslinux #安装所需的软件包[root@node1 ~]# mkdir /var/ftp/pub/centos-6.5-x86_64 -pv[root@node1 ~]# mount -r /dev/cdrom /var/ftp/pub/centos-6.5x86_64/[root@node1 centos-6.5-x86_64]# lsCentOS_BuildTag isolinux RPM-GPG-KEY-CentOS -Debug-6EFI Packages RPM-GP G-KEY-CentOS-Security-6EULA RELEASE-NOTES-en-US.html RPM-GPG-KEY-CentOS-Test ing-6GPL repodata TRANS. TBLimages RPM-GPG-KEY-CentOS-62.配置DHCP服务:在PXE引导过程中,PXE Client通过DHCP Server获取ip地址,NBP文件名称,然后从TFTP SERVER下载NBP文件并在客户端执行,从而启动计算机[root@node1 ~]# cp /usr/share/doc/dhcp-4.1.1/dhcpd.conf.sample/etc/dhcp/dhcpd.conf[root@node1 ~]# vim /etc/dhcp/dhcpd.confoption domain-name "";option domain-name-servers 192.168.1.10;default-lease-time 43200;max-lease-time 86200;# No service will be given on thissubnet, but declaring it helps the# DHCP server to understand the network topology.#自定义一个subnetsubnet 192.168.1.0netmask 255.255.255.0{range 192.168.1.11 192.168.1.100;option routers 192.168.1.10;next-server 192.168.1.10;#TFTP Server的ip地址filename="pxelinux.0";#bootstrap 文件(NBP)}注意:在/etc/dhcpd.conf 配置文件中filename "pxelinux.0";文件目录是相对于tftp 的根目录(默认是tftpboot),所以文件的相对路径就是:tftpboot/pxelinux.0";当然也可以指定为其它的路径.重启dhcpd服务[root@node1 ~]# service dhcpd restartShutting downdhcpd:[ OK ]Startingdhcpd:[ OK ][root@node1 ~]# ss -uanlp | grep dhcpdUNCONN 0 0*:67 *:* users:(("dhcp d",4883,7))3.配置tftp服务器[root@node1 xinetd.d]# chkconfig tftp on[root@node1 xinetd.d]# service xinetd restartStoppingxinetd:[FAILED]Startingxinetd:[ OK ][root@node1 xinetd.d]# service xinetd restartStoppingxinetd:[ OK ]Startingxinetd:[ OK ][root@node1 ~]# ss -uanlp | grep xinetdUNCONN 0 0*:69 *:* users:(("xine td",5007,5))UNCONN 0 0*:69 *:* users:(("xine td",5000,5))准备引导文件:[root@node1 ~]# cp /usr/share/syslinux/pxelinux.0/var/lib/tftpboot/[root@node1 ~]# cp/var/ftp/pub/centos-6.5-x86_64/isolinux/{boot.msg,splash.jpg,vesamenu.c32}/var/lib/tftpboot/[root@node1 ~]# ls /var/lib/tftpboot/boot.msg pxelinux.0 splash.jpg vesamenu.c32[root@node1 ~]# cp/var/ftp/pub/centos-7-x86_64/images/pxeboot/{vmlinuz,initrd.img}/var/lib/tftpboot/[root@node1 ~]# ls /var/lib/tftpboot/boot.msg initrd.img pxelinux.0 splash.jpg vesamenu.c32 vmlinuz [root@node1 tftpboot]# mkdir pxelinux.cfg[root@node1 tftpboot]# cd pxelinux.cfg/[root@node1 pxelinux.cfg]# cp/var/ftp/pub/centos-6.5-x86_64/isolinux/isolinux.cfg default[root@node1 pxelinux.cfg]# chmod +w default[root@node1 pxelinux.cfg]# mkdir /var/ftp/pub/kickstart/[root@node1 pxelinux.cfg]# vim defaultmenu background splash.jpgmenu title Welcome to CentOS 6.5 from PXE!labellinuxmenu label^Install or upgrade an existing systemmenu defaultkernel vmlinuzappend initrd=initrd.img ks=ftp://192.168.1.10/pub/kickstart/centos6.cfg #此处路径是相对路径4.安装kickstart,配置cfg文件[root@node1 ~]# yum -y install system-config-kickstart[root@node1 ~]#system-config-kickstart所有设置完成后将文件保存到指定目录,名称跟前面/var/lib/tftpboot/pxelinux.cfg/default中ks路径保持一致,名字为centos6.5.cfg,添加分区信息,在以上步骤中,有时选择软件时会出现没有安装包的情况,一定要提前下载并解压好操作系统的镜像文件,另外,在cfg文件生成后可以手工配置,但要注意磁盘分区时最好图形配置,手工配置会出现一些问题,导致不能安装,注意FTP服务器最好配置为允许匿名登录,若有账户密码,在以上配置过程中添加即可,以下给出本人cfg文件:#platform=x86, AMD64, 或 Intel EM64T#version=DEVEL# Firewall configurationfirewall --disabled# Install OS instead of upgradeinstall# Use network installationurl --url="http://192.168.1.10/pub/centos-6.5-x86_64"# Root passwordrootpw --iscrypted $1$Lk5nHdlh$oRSE67690ang4GObxj9dm0 # System authorization informationauth --useshadow --passalgo=sha512# Use graphical installgraphicalfirstboot --disable# System keyboardkeyboard us# System languagelang zh_CN# SELinux configurationselinux --enforcing# Installation logging levellogging --level=info# Reboot after installationreboot# System timezonetimezone Asia/Shanghai# System bootloader configurationbootloader --location=mbr# Partition clearing informationclearpart --all%packages@basic-desktop@chinese-support@debugging@desktop-platform@guest-agents@ha@ha-management@input-methods@legacy-x@load-balancer@mysql@mysql-client@network-server@network-tools@nfs-file-server@remote-desktop-clients@resilient-storage@storage-server@virtualization@virtualization-client@virtualization-platform@virtualization-tools@x11%end[root@node1 ~]# service vsftpd start整个server端配置完毕,可启动客户机进行安装.。
菜鸟专用-PXE无人值守linux安装
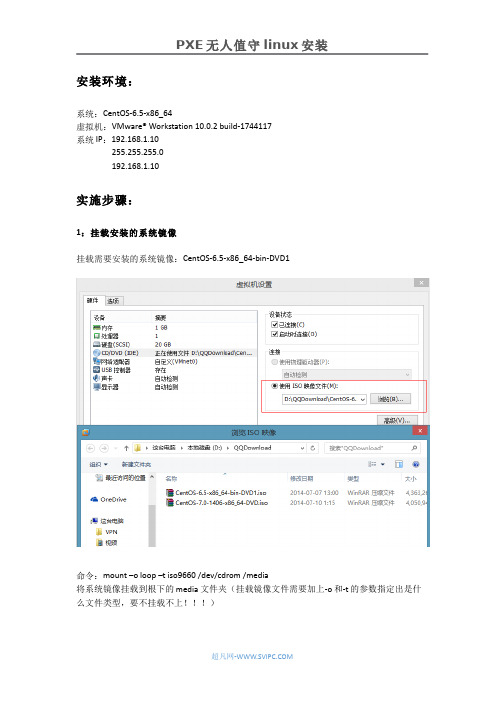
安装环境:系统:CentOS-6.5-x86_64虚拟机:VMware® Workstation 10.0.2 build-1744117系统IP:192.168.1.10255.255.255.0192.168.1.10实施步骤:1:挂载安装的系统镜像挂载需要安装的系统镜像:CentOS-6.5-x86_64-bin-DVD1命令:mount –o loop –t iso9660 /dev/cdrom /media将系统镜像挂载到根下的media文件夹(挂载镜像文件需要加上-o和-t的参数指定出是什么文件类型,要不挂载不上!!!)2:配置yum软件源命令:cd /etc/yum.repos.d/进入yum源的配置文件目录当系统未联网的情况下需要删除其默认的yum源配置文件,要不配置的本地yum源就得不到更新,会显示联网超时的报错。
默认情况下6.5的系统Centos-Base.repo里面有开启的yum源,所有我们可以备份下此文件再删除即可。
(当然实验环境下可以直接全部删除,新建yum源配置文件,生产环境下最好删除配置文件之前先进行备份!)命令:cp Centos-Base.repo ./ Centos-Base.repo.bak复制Centos-Base.repo配置文件在当前文件夹并命名为Centos-Base.repo.bak命令:rm –rf Centos-Base.repo强制删除Centos-Base.repo这个配置文件命令:vim Centos-Debug.repo编辑Centos-Debug.repo这个yum源的配置将baseurl的路径修改成media这个文件夹(因为镜像挂载在此文件夹)gpgcheck=1修改成gpgcheck=0(关闭验证)gpgkey这一行也注释掉enabled=0修改成enabled=1(开启此yum源)修改完成保存文件并退出命令:yum clean all清除yum缓存命令:yum list或者yum grouplist更新yum源测试是否配置成功3:安装配置TFTP:命令:yum –y install tftp tftp-server安装tftp服务,最后显示complete表示安装成功。
无人值守网络安装Linux系统
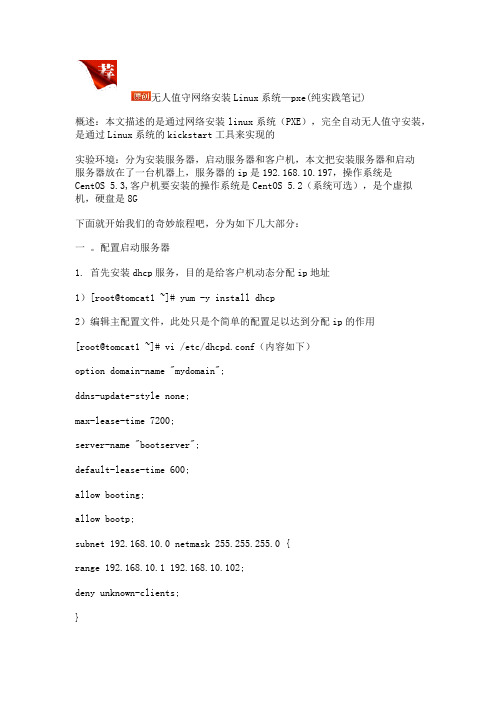
无人值守网络安装Linux系统—pxe(纯实践笔记)概述:本文描述的是通过网络安装linux系统(PXE),完全自动无人值守安装,是通过Linux系统的kickstart工具来实现的实验环境:分为安装服务器,启动服务器和客户机,本文把安装服务器和启动服务器放在了一台机器上,服务器的ip是192.168.10.197,操作系统是CentOS 5.3,客户机要安装的操作系统是CentOS 5.2(系统可选),是个虚拟机,硬盘是8G下面就开始我们的奇妙旅程吧,分为如下几大部分:一。
配置启动服务器1. 首先安装dhcp服务,目的是给客户机动态分配ip地址1)[root@tomcat1 ~]# yum -y install dhcp2)编辑主配置文件,此处只是个简单的配置足以达到分配ip的作用[root@tomcat1 ~]# vi /etc/dhcpd.conf(内容如下)option domain-name "mydomain";ddns-update-style none;max-lease-time 7200;server-name "bootserver";default-lease-time 600;allow booting;allow bootp;subnet 192.168.10.0 netmask 255.255.255.0 {range 192.168.10.1 192.168.10.102;deny unknown-clients;}group pxe {next-server 192.168.10.197;filename "pxelinux.0";host testserver { hardware ethernet 00:0c:29:31:fc:38; fixed-address 192.168.10.112; }}注意分配的ip段,掩码等信息不要错误,filename "pxelinux.0"(在 TFTP 服务器的根目录中)将作为启动映像被网卡ROM里的PXE客户端载入内存并运行,hardware ethernet 00:0c:29:31:fc:38; fixed-address 192.168.10.112此处是绑定了客户机的MAC地址,每当要部署一个客户机的时候都要添加一条绑定记录3)然后启动dhcp服务器[root@tomcat1 ~]# /etc/init.d/dhcpd start2. 安装和配置tftp服务器以获取安装包1)[root@tomcat1 ~]# yum install tftp-server2)编辑主配置文件[root@tomcat1 ~]# vi /etc/xinetd.d/tftp(内容如下)service tftp{socket_type = dgramprotocol = udpwait = yesuser = rootserver = /usr/sbin/in.tftpdserver_args = -s /tftpboot(指定根目录)disable = no}3)挂载系统的iso文件,本文只有一个CentOS系统故只挂载了一个1)创建挂载点[root@tomcat1 ~]# mkdir /mnt/iso/2)挂载iso[root@tomcat1~]#mount-o loop,ro CentOS-5.3-i386-bin-DVD.iso/mnt/iso/3) isolinux目录下会包含Linux安装程序的内核/根文件系统文件,将其复制到tftp的根目录[root@tomcat1 ~]# cd /mnt/iso/[root@tomcat1 iso]# ls[root@tomcat1 iso]# cp isolinux/initrd.img /tftpboot/[root@tomcat1 iso]# cp isolinux/ vmlinuz /tftpboot/4) 然后按照系统重命名[root@tomcat1 tftpboot]# mv initrd.img initrd-centos-5.3-i386.img [root@tomcat1 tftpboot]# mv vmlinuz vmlinuz-centos-5.3-i3865)将启动镜像文件pxelinux.0复制到TFTP服务器根目录。
linux 无人值守的安装
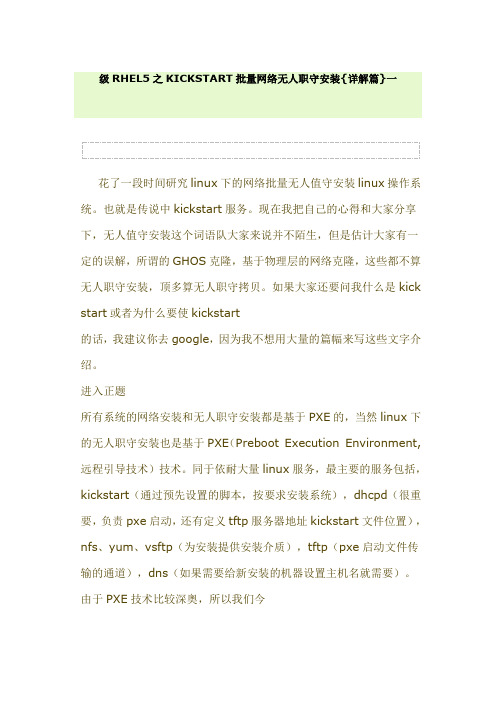
级RHEL5之KICKSTART批量网络无人职守安装{详解篇}一花了一段时间研究linux下的网络批量无人值守安装linux操作系统。
也就是传说中kickstart服务。
现在我把自己的心得和大家分享下,无人值守安装这个词语队大家来说并不陌生,但是估计大家有一定的误解,所谓的GHOS克隆,基于物理层的网络克隆,这些都不算无人职守安装,顶多算无人职守拷贝。
如果大家还要问我什么是kick start或者为什么要使kickstart的话,我建议你去google,因为我不想用大量的篇幅来写这些文字介绍。
进入正题所有系统的网络安装和无人职守安装都是基于PXE的,当然linux下的无人职守安装也是基于PXE(Preboot Execution Environment,远程引导技术)技术。
同于依耐大量linux服务,最主要的服务包括,kickstart(通过预先设置的脚本,按要求安装系统),dhcpd(很重要,负责pxe启动,还有定义tftp服务器地址kickstart文件位置),nfs、yum、vsftp(为安装提供安装介质),tftp(pxe启动文件传输的通道),dns(如果需要给新安装的机器设置主机名就需要)。
由于PXE技术比较深奥,所以我们今天不做探讨,只做应用。
下面我介绍下kickstart的工作架构。
首先,完成这个服务需要3个角色1、启动服务器:给clinet提供启动的相关参数和连接安装服务器使用的IP地址。
2、安装服务器:提供安装所需的配置文件和安装文件。
3、客户端:需要无人职守安装的机器(网卡要支持PXE,也就是可以从网卡启动,现在的电脑基本都支持,只要你的爱机不是古董)下面是工作流程本来想画个示意图给大家看的,由于美工太差,画出来我自己都看不懂了。
所以我就讲述下吧1、pxe启动,就去广告寻找dhcp服务器获取ip地址hebootstrap 文件,成功以后进入第二步(DHCP提供IP地址,还有bootstrap 配置文件的位置)2、client通过tftp连接到服务器,下载bootstrap文件。
centos无人值守安装
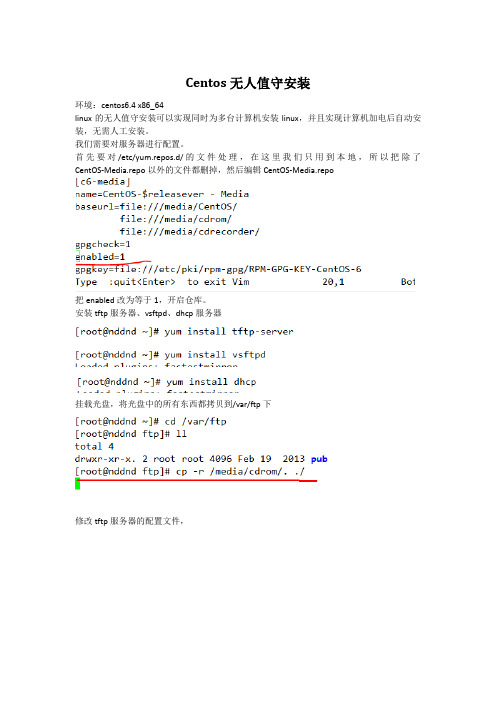
Centos无人值守安装环境:centos6.4 x86_64linux的无人值守安装可以实现同时为多台计算机安装linux,并且实现计算机加电后自动安装,无需人工安装。
我们需要对服务器进行配置。
首先要对/etc/yum.repos.d/的文件处理,在这里我们只用到本地,所以把除了CentOS-Media.repo以外的文件都删掉,然后编辑CentOS-Media.repo把enabled改为等于1,开启仓库。
安装tftp服务器、vsftpd、dhcp服务器挂载光盘,将光盘中的所有东西都拷贝到/var/ftp下修改tftp服务器的配置文件,然后启动tftp切换到光盘中的images/pexboot目录中,将vmlinuz和initrd.img拷贝到/var/lib/tftpboot目录中切换到/usr/share/syslinux/目录中,将pxelinus.0拷贝到/var/lib/tftpboot目录中再到/var/lib/tftpboot目录中就可以看到刚刚拷贝的三个文件在该目录下创建pxelinux.cfg目录将光盘上的isolinux.cfg拷贝到pxelinux.cfg目录中,并改名为default编辑default文件开启vsftpd,并设为开机启动。
配置dhcp配置文件,设置dhcp作用域安装kickstart工具运行kickstart,运行kicksatart需要在图形界面运行,因为我用的终端xshell再带图形界面然后进行配置基本设置安装类型Bootloader安装选项磁盘选项设置分区网络配置验证防火墙设置安装包选择后脚本编写脚本内容IPSTARING=`ifconfig eth0 |grep '\<inet>\'|awk '{print $2}`IPADDR1=${IPSIARING##*.}sed -i "s/HOSTNAME.*/HOSTNAME=station$" /etc/sysconfig/network sed -i 's/BOOTPROTO.*/BOOTPROTO=static/' /etc/sysconfig/network-scrpts/ifcfg-eth0 echo "IPADDR=192.168.29.$IPADDR1" >>/etc/sysconfig/network-scrpts/ifcf-eth0echo "NETMASK=255.255.255.0" >>/etc/sysconfig/network-scrpts/ifcf-eth0 保存保存后将文件拷贝到/var/ftp目录下测试打开需要安装系统的计算机,首先自动获取地址获取到地址,并且开始下载,并安装。
pxe无人值守自动安装
CentOS6.5下PXE+Kickstart无人值守安装操作系统1、PXE简介PXE(Pre-boot Execution Environment,预启动执行环境)是由Intel公司开发的最新技术,工作于Client/Server的网络模式,支持工作站通过网络从远端服务器下载映像,并由此支持通过网络启动操作系统,在启动过程中,终端要求服务器分配IP地址,再用TFTP(trivial file transfer protocol)或MTFTP(multicast trivial file transfer protocol)协议下载一个启动软件包到本机内存中执行,由这个启动软件包完成终端基本软件设置,从而引导预先安装在服务器中的终端操作系统。
严格来说,PXE 并不是一种安装方式,而是一种引导方式。
进行PXE 安装的必要条件是在要安装的计算机中必须包含一个PXE 支持的网卡(NIC),即网卡中必须要有PXE Client。
PXE 协议可以使计算机通过网络启动。
此协议分为Client端和Server 端,而PXE Client则在网卡的ROM 中。
当计算机引导时,BIOS 把PXE Client 调入内存中执行,然后由PXE Client 将放置在远端的文件通过网络下载到本地运行。
运行PXE 协议需要设置DHCP 服务器和TFTP 服务器。
DHCP 服务器会给PXE Client(将要安装系统的主机)分配一个IP 地址,由于是给PXE Client 分配IP 地址,所以在配置DHCP 服务器时需要增加相应的PXE 设置。
此外,在PXE Client 的ROM 中,已经存在了TFTP Client,那么它就可以通过TFTP 协议到TFTP Server 上下载所需的文件了。
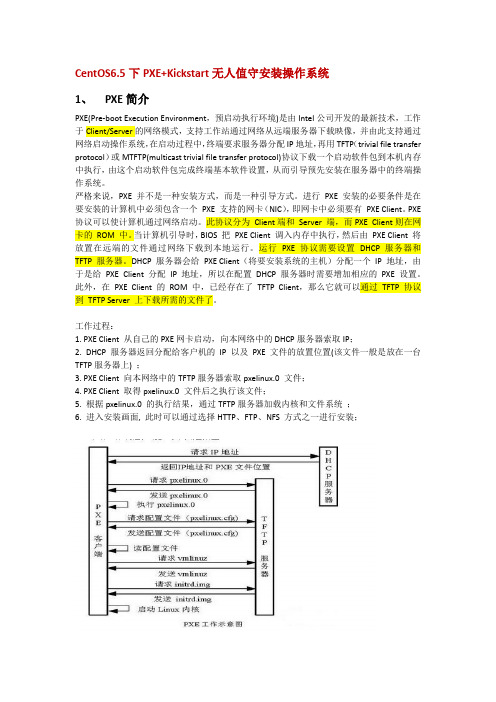
工作过程:1. PXE Client 从自己的PXE网卡启动,向本网络中的DHCP服务器索取IP;2. DHCP 服务器返回分配给客户机的IP 以及PXE文件的放置位置(该文件一般是放在一台TFTP服务器上) ;3. PXE Client 向本网络中的TFTP服务器索取pxelinux.0 文件;4. PXE Client 取得pxelinux.0 文件后之执行该文件;5. 根据pxelinux.0 的执行结果,通过TFTP服务器加载内核和文件系统;6. 进入安装画面, 此时可以通过选择HTTP、FTP、NFS 方式之一进行安装;2、Kickstart简介Kickstart是一种无人值守的安装方式。
linux_无人值守kickstart
Linux Kickstart无人值守安装在我们的网络维护生涯中,有不少朋友,感觉到自己在机械的做一件事情,在无聊、无趣和无奈中工作。
尤其一些简单重复的操作更容易让大家感到工作的无趣。
今天将给大家介绍如何大规模的部署RedHat Linux操作系统,避免了手工安装的繁琐。
当然本方法也使用于一些特殊场合,譬如没有光驱或光驱坏掉的计算机、手中没有安装光盘等情况。
在安装RedHat Linux企业版的过程中,我们都知道它允许通过NFS、HTTP或FTP协议来进行网络安装。
但是在一般情况下我们需要有一个安装引导介质(引导光盘、引导软盘、U盘等),有没有一种方法不通过引导光盘方式来安装呢,而直接通过网络来进行安装?答案是有,即通过PXE技术实现。
一、基本原理那么PXE到底是什么呢?PXE(Pre-boot Execution Environment)是由Intel设计的协议,它可以使计算机通过网络启动。
协议分为client和server两端,PXE client在网卡的ROM中,当计算机引导时,BIOS把PXE client调入内存执行,并显示出命令菜单,经用户选择后,PXE client将放置在远端的操作系统通过网络下载到本地运行。
既然是通过网络传输,就需要IP地址;也就是说在其启动过程中,客户端请求服务器分配IP地址,之后PXE Client使用TFTP Client 通过TFTP(Trivial File Transfer Protocol)协议下载启动安装程序所需的文件。
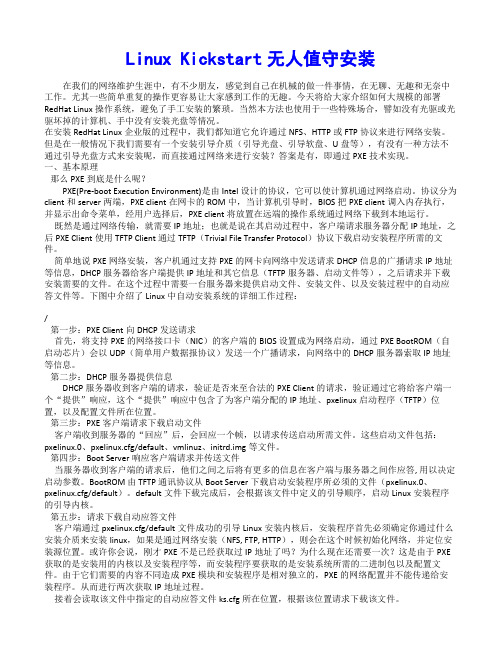
简单地说PXE网络安装,客户机通过支持PXE的网卡向网络中发送请求DHCP信息的广播请求IP地址等信息,DHCP服务器给客户端提供IP地址和其它信息(TFTP服务器、启动文件等),之后请求并下载安装需要的文件。
在这个过程中需要一台服务器来提供启动文件、安装文件、以及安装过程中的自动应答文件等。
下图中介绍了Linux中自动安装系统的详细工作过程:/第一步:PXE Client向DHCP发送请求首先,将支持PXE的网络接口卡(NIC)的客户端的BIOS设置成为网络启动,通过PXE BootROM(自启动芯片)会以UDP(简单用户数据报协议)发送一个广播请求,向网络中的DHCP服务器索取IP地址等信息。
无人值守安装 linux客户端

*选择的安装方式是通过NFS网络文件系统安装;
*选择的分区方法是不管客户机磁盘多大,都分三个必须分区,并指定分区的大小,剩余空间备用;
*选择的数据包不能包含图形界面开发工具或者开发工具,否则安装过程中会报错
后面手动添加的一行:filename "/pxelinux.0";
完成之后启动服务:
# service dhcpd restart
在客户端启动之后通过查看文件/var/lib/dhcp/dhcpd.leases可以得知客户端是否正常获得IP地
址
2.配置DNS服务:
按照刚才DHCP配置文件中的内容去配置DNS即可,这个步骤不是必须;
[root@server1 RPMS]# rpm -ihv system-config-kickstart-2.5.16-2.noarch.rpm --aid
warning: system-config-kickstart-2.5.16-2.noarch.rpm: V3 DSA signature: NOKEY, key ID
server_args = -s /tftpboot
per_source = 11
cps = 100 2
flags = IPv4
}
之后重启TFTP服务:/etc/rc.d/init.d/xinetd restart或者干脆chkconfig tftp on即可
4.配置NFS服务:
# vi /etc/exports
添加安装树的路径:
/installing/var/ftp/pub 192.1681.0/24(ro,async)
使用PXE+Kickstart无人值守安装服务
第十九章使用PXE+Kickstart无人值守安装服务如果我们是公司的运维,一次性来了100台服务器,你还是一台台安装,那就等死了,我们可以使用PXE + TFTP + FTP + DHCP + Kickstart等服务程序,搭建一套自动话安装的系统,进行批量安装。
无人值守系统第1章讲解了使用光盘镜像来安装Linux系统的方法,坦白讲,该方法适用于只安装少量Linux系统的情况。
如果生产环境中有数百台服务器都需要安装系统,这种方式就不合时宜了。
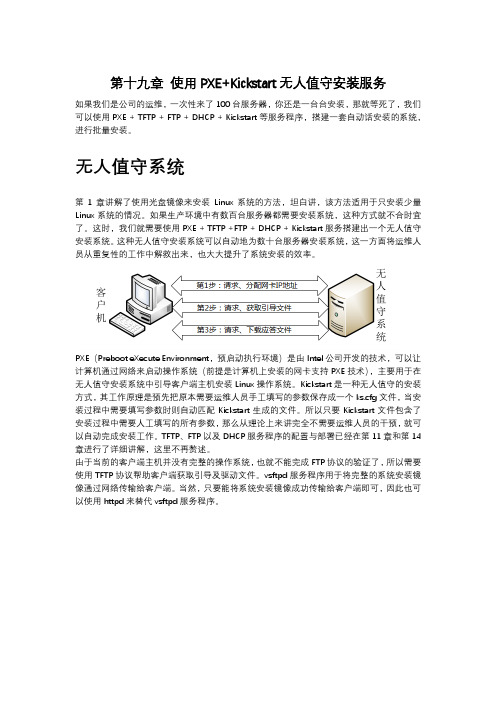
这时,我们就需要使用PXE + TFTP +FTP + DHCP + Kickstart服务搭建出一个无人值守安装系统。
这种无人值守安装系统可以自动地为数十台服务器安装系统,这一方面将运维人员从重复性的工作中解救出来,也大大提升了系统安装的效率。
PXE(Preboot eXecute Environment,预启动执行环境)是由Intel公司开发的技术,可以让计算机通过网络来启动操作系统(前提是计算机上安装的网卡支持PXE技术),主要用于在无人值守安装系统中引导客户端主机安装Linux操作系统。
Kickstart是一种无人值守的安装方式,其工作原理是预先把原本需要运维人员手工填写的参数保存成一个ks.cfg文件,当安装过程中需要填写参数时则自动匹配Kickstart生成的文件。
所以只要Kickstart文件包含了安装过程中需要人工填写的所有参数,那么从理论上来讲完全不需要运维人员的干预,就可以自动完成安装工作。
TFTP、FTP以及DHCP服务程序的配置与部署已经在第11章和第14章进行了详细讲解,这里不再赘述。
由于当前的客户端主机并没有完整的操作系统,也就不能完成FTP协议的验证了,所以需要使用TFTP协议帮助客户端获取引导及驱动文件。
vsftpd服务程序用于将完整的系统安装镜像通过网络传输给客户端。
当然,只要能将系统安装镜像成功传输给客户端即可,因此也可以使用httpd来替代vsftpd服务程序。
- 1、下载文档前请自行甄别文档内容的完整性,平台不提供额外的编辑、内容补充、找答案等附加服务。
- 2、"仅部分预览"的文档,不可在线预览部分如存在完整性等问题,可反馈申请退款(可完整预览的文档不适用该条件!)。
- 3、如文档侵犯您的权益,请联系客服反馈,我们会尽快为您处理(人工客服工作时间:9:00-18:30)。
centos6.5 Linux+ftp+kickstart无人值守安装大概原理:待安装主机通过PXE技术向服务器发起请求;首先请求IP,服务器通过dhcp向安装端分配IP地址,请求到了IP后接着下载default文件,该文件是定义安装信息,也就是安装系统的初始界面,接着,读取default里的ks.cfg文件路径,并下载到安装端,安装接着安装定义好的ks.cfg 开始自动安装系统,大概就这么个过程。
1.DHCP 服务器2.TFTP 服务器3.KickStart所生成的ks.cfg配置文件4.一台存放系统安装文件的服务器,如NFS、HTTP 或FTP 服务器5.带有一个PXE 支持网卡的将安装的主机把系统安装光盘mount到主机上最好虚拟机桥接并且联网1、搭建Yum源(本地光盘镜像)# mount /dev/cdrom /media/cdrom# vim /etc/yum.repos.d/base.repo[base]name=base repobaseurl=file:///media/cdromenabled=1gpgcheck=0安装所需要的服务yum -y install dhcp* tftp* vsftpd* syslinux配置TFTP,制定可供下载文件的目录。
vim /etc/xinetd.d/tftp1、编辑TFTP配置文件# default: off# description: The tftp server serves files using the trivial file transfer \# protocol. The tftp protocol is often used to boot diskless \# workstations, download configuration files to network-aware printers, \# and to start the installation process for some operating systems.service tftp{disable = no #找到disable,将yes修改为nosocket_type = dgramprotocol = udpwait = yesuser = rootserver = /usr/sbin/in.tftpdserver_args = -s /tftpboot #此处为TFTP提供下载的位置,默认为:/var/lib/tftpboot/per_source = 11cps = 100 2flags = IPv4}. ps:/tftpboot目录是要手动建立的,该目录用于存放系统安装的引导文件2,TFTP目录建立与设置#mkdir /tftpboot#cp /usr/share/syslinux/pxelinux.0 /tftpboot/ #注意这里用红色标注的地方因系统版本的不一样可能会出现不一样的路径。
建议用find查找pxelinux.0#mkdir /tftpboot/pxelinux.cfg#cp /mnt/cdrom/isolinux/isolinux.cfg /tftpboot/pxelinux.cfg/default#cp /mnt/cdrom/isolinux/* /tftpboot #把光盘中isolinux里的所有文件复制到/tftpboot下重启动TFTP:service xinetd restartDHCP服务器设置# DHCP Server Configuration file.# see /usr/share/doc/dhcp*/dhcpd.conf.sample# see 'man 5 dhcpd.conf'#ddns-update-style interim;ignore client-updates;subnet 192.168.1.0 netmask 255.255.255.0 {option routers 192.168.1.1;option subnet-mask 255.255.255.0;option domain-name-servers 192.168.1.1;range dynamic-bootp 192.168.1.246 192.168.1.250;default-lease-time 21600;max-lease-time 43200;next-server 192.168.1.20; #注意这里filename "pxelinux.0";#注意这里}重启动DHCP:service dhcpd restart启动dhcp失败时,编辑/etc/rc.d/init.d/dhcpd 文件,将其中的user=dhcpdgroup=dhcpd改为user=rootgroup=root编辑/tftpboot/pxelinux.cfg/defaultdefault vesamenu.c32#prompt 1timeout 10display boot.msgmenu background splash.jpgmenu title Welcome to CentOS 6.5!menu color border 0 #ffffffff #00000000menu color sel 7 #ffffffff #ff000000menu color title 0 #ffffffff #00000000menu color tabmsg 0 #ffffffff #00000000menu color unsel 0 #ffffffff #00000000menu color hotsel 0 #ff000000 #ffffffffmenu color hotkey 7 #ffffffff #ff000000menu color scrollbar 0 #ffffffff #00000000label linuxmenu label ^Install or upgrade an existing systemmenu defaultkernel vmlinuzappend ks=ftp://192.168.1.20/pub/ks.cfg initrd=initrd.img #这里是指出通过ftp下载的ks.cfg的路径label vesamenu label Install system with ^basic video driverkernel vmlinuzappend initrd=initrd.img xdriver=vesa nomodesetlabel rescuemenu label ^Rescue installed systemkernel vmlinuzappend initrd=initrd.img rescuelabel localmenu label Boot from ^local drivelocalboot 0xfffflabel memtest86menu label ^Memory testkernel memtestappend –对安装光盘的定制安装yum install –y system-config-kickstart打开:#system-config-kickstart ,注意,这是软件,要在图形化桌面下打开配置好以上的内容,然后编辑ks.cfg #vim /var/ftp/pub/ks.cfg以下是ks.cfg的内容,ks.cfg就是自动安装的执行文件,其中红色部分是没有的,需要到宿主目录下“~”,找到anaconda-ks.cfg打开复制红色部分#platform=x86, AMD64, 或 Intel EM64T#version=DEVEL# Firewall configurationfirewall --disabled# Install OS instead of upgradeinstall# Use network installationurl --url="ftp://192.168.1.20/pub" ---该URL是指,安装盘的文件位置,不是ks.cfg位置。
# Root passwordrootpw --iscrypted $1$UAPj5GQy$.gTmhXLyjhi1SscNjQRkA0# System authorization informationauth --useshadow --passalgo=sha512# Use graphical installgraphicalfirstboot --disable# System keyboardkeyboard us# System languagelang zh_CN# SELinux configurationselinux --disabled# Installation logging levellogging --level=info# System timezonetimezone Asia/Shanghai# Network informationnetwork --bootproto=dhcp --device=eth0 --onboot=on # System bootloader configurationbootloader --location=mbr# Clear the Master Boot Recordzerombr# Partition clearing informationclearpart --all --initlabel# Disk partitioning informationpart /boot --fstype="ext4" --size=200part / --fstype="ext4" --size=10000part swap --fstype="swap" --size=2048%packages@base@chinese-support@console-internet@core@debugging@basic-desktop@development@directory-client@hardware-monitoring@java-platform@large-systems@network-file-system-client@performance@perl-runtime@system-management-snmp@server-platform@server-policy@x11mtoolspaxoddjobsgpiodevice-mapper-persistent-datasystemtap-clientjpackage-utilssamba-winbindcertmongerpam_krb5krb5-workstationperl-DBD-SQLite%end安装vsftpd之后默认允许匿名访问FTP公共目录/var/ftp/pub,所以无需对vsftd配置文件进行修改。
