Oviyam开源WebDICOM浏览器简介
ohif中viewport用法

OHIF(Open Health Imaging Foundation)是一个开源的医学图像查看器,它提供了丰富的功能和灵活的界面,使得医学图像的查看和处理更加便捷和高效。
其中,viewport是OHIF中非常重要的组件之一,它负责展示医学图像和执行相关操作。
在本文中,我们将介绍OHIF中viewport的基本用法,包括其功能特点、常用操作、技术要点等内容,希望能够帮助大家更好地使用OHIF进行医学图像的查看和处理。
一、viewport的功能特点1.1 支持多种医学图像格式OHIF中的viewport组件支持常见的医学图像格式,包括DICOM、NIfTI、Minc等,用户可以直接加载这些格式的图像进行查看和处理。
1.2 提供丰富的显示功能viewport组件具有丰富的显示功能,包括放大、缩小、旋转、平移等操作,同时支持调整窗宽窗位、翻转、标注等功能,可以满足用户对医学图像显示的各种需求。
1.3 支持多种交互模式用户可以通过鼠标、键盘等多种方式进行交互操作,比如拖拽、滚动、点击等,以及通过快捷键执行特定的操作,这些交互模式使得用户能够更加灵活地进行图像的查看和处理。
二、viewport的常用操作2.1 图像的加载和显示用户可以通过简单的操作将医学图像加载到viewport中进行显示,支持单个图像和多个图像的显示,同时可以显示不同方向、不同序列的图像,帮助用户更好地理解医学图像的结构和特征。
2.2 图像的调整和编辑viewport组件提供了丰富的图像调整和编辑功能,用户可以自由调整窗宽窗位、进行图像的放大缩小、旋转平移等操作,同时还可以进行图像的标注、绘制等编辑,从而更好地分析和处理医学图像。
2.3 图像的信息查看和比较在viewport中,用户可以方便地查看图像的信息,比如图像的尺寸、像素值等,同时还可以进行多图像的比较和分析,帮助用户更好地理解和诊断疾病。
三、viewport的技术要点3.1 基于Cornerstone.jsOHIF中的viewport组件是基于Cornerstone.js实现的,Cornerstone.js是一个专门用于医学图像处理的开源库,提供了丰富的功能和灵活的接口,为用户提供了便捷和可靠的图像查看和处理能力。
学习使用医学影像软件DICOMViewer
学习使用医学影像软件DICOMViewer第一章:医学影像技术的发展和应用医学影像技术是现代医学中不可或缺的重要手段,它可以通过获取人体内部的图像信息,帮助医生进行诊断、治疗和手术规划等工作。
随着科技的不断发展,医学影像软件也得到了极大的改进和创新,其中一款重要的软件就是DICOMViewer。
第二章:DICOMViewer的介绍和功能DICOMViewer,全称Digital Imaging and Communications in Medicine Viewer,是一种专业的医学影像软件。
它采用DICOM标准格式,可以快速加载、显示和处理医学影像数据。
DICOMViewer具有多种功能,包括影像的浏览、窗宽窗位调整、多序列对比、测量分析、三维重建等。
通过这些功能,医生可以更方便地分析和解读医学影像。
第三章:DICOMViewer的使用技巧和操作方法DICOMViewer的使用方法并不复杂,但需要一些专业的技巧。
首先,用户需要打开软件,并加载DICOM格式的影像数据。
加载完成后,可以在软件界面上进行窗宽窗位的调整,以改变图像的对比度和亮度。
此外,用户还可以选择不同序列的影像进行对比,以帮助更全面地了解患者的病情。
另外,软件还提供了多种测量工具,如长度、面积、角度的测量,以及多个影像的叠加和三维重建。
用户可以根据需要选择合适的功能来处理影像。
第四章:DICOMViewer在临床应用中的价值DICOMViewer在临床应用中具有重要的价值。
首先,它可以帮助医生更直观地观察和分析患者的病情,准确判断疾病的位置和程度。
其次,DICOMViewer可以进行影像的测量和分析,提供客观的数据支持,辅助医生做出准确的诊断和治疗方案。
再次,DICOMViewer还可以进行三维重建,使医生可以更全面地了解患者的解剖结构,为手术规划提供帮助。
总之,DICOMViewer在临床应用中的价值不可低估。
第五章:DICOMViewer的发展趋势和挑战随着医学影像技术的不断发展,DICOMViewer也面临着一些发展趋势和挑战。
DICOM Viewer V3.1 User Guide

Contacting GE Support
To contact GE Support with questions about this product, contact GE CARES at 1-800-437-1171.
Documentation conventions
Text
The following table lists text conventions in this manual.
• the electrical installation of the relevant room complies with the requirements of the appropriate regulations
• the device is used in accordance with the instructions for use.
• The GE Healthcare Integrated IT Solutions' quality management system complies with the international standards ISO 9001:2000, ISO13485:2003 and the Council Directive on Medical Devices 93/42/EEC Annex V Section 3.
DOC0299699 2036400-001 Revision 1
4 Centricity DICOM Viewer V3.1 User Guide
About Centricity DICOM Viewer
The DICOM Viewer allows DICOM images to be viewed straight from a CD or DVD without needing to have any other viewing software installed. It is NOT INTENDED FOR CLINICAL OR DIAGNOSTIC USE. DICOM Viewer lets you load and display medical images or patient study that can consist of an individual or a series of digital images. With it, you can view CT, MR, X-ray, Digital X-ray (DX), Digital Mammography X-Ray (MG), Digital Intraoral X-ray (IO), XA, NM, RF, US multiframe, CR and many other types of image.
小赛看看 教程
小赛看看教程【前言】本文主要介绍一个优秀的DICOM阅读器:小赛看看,包括文字版和视频版,文字版需要3分钟。
本文阅读群体为医学影像、放射诊疗、核医学、骨科、五官科、心内科、神经内外科、康复科等工作者,也对计算机编程、通信工程、信息工程开发者有提示意义。
【目录】一、DICOM阅读器简介二、国产免费优秀Dicom阅读器:小赛看看【内容】一、DICOM阅读器简介DICOM viewer,中文名称可以翻译为浏览器、查看器、阅读器、看图器,都是正确的,特指单机或网络版可以阅读、浏览、查看标准DICOM文件的应用程序。
如何评定一款DICOM阅读器的优秀与否,笔者认为主要包括以下几点(纯个人观点,不必挂心):1、运行稳定,一个成熟版本软件的基本素质,小赛看看运行中读取巨量数据(2000条以上)有类似死机状态。
Radiant dicom viewer非常稳定,没有出现错误、死机。
2、读取速度,Radiant是笔者用过(近20个)dicom阅读器中速度最快的,称得上王者,数量越多越明显,最大读取过近5000个文件,不到1分钟,还有一个是文件解锁功能,即文件读取结束后,可删除、修改原文件,不占用源文件,其他阅读器无此功能。
小赛看看读取速度中等,但是文件越多,速度越慢。
3、显示效果,小赛看看MPR多曲面重建显示效果很好,很方便观看图像,成像质量不错。
Radiant显示效果清晰、锐利,成像质量标准。
4、渲染速度,特指3D渲染速度,小赛看看无此功能,估计重点在PET-CT 图像融合,没有增加此模块。
Radiant渲染速度超快,但是三维图像显示效果略粗糙。
5、测量数据,二者中规中矩,基本测量数据都有。
6、前后对比,小赛看看提供前后图像对比,Radiant无此功能。
7、快捷键支持,这个对于提高工作效率有极大的帮助,笔者非常喜欢用快捷键,曾经跟小赛看看开发者联系过,提示过此事,后续版本未见增加,无此功能。
Radiant非常好,所有均支持快捷键,速度超快,无系统键占用。
vulmap 用法

vulmap 用法Vulmap是一款开源的漏洞扫描框架,用于自动化地扫描和检测Web应用程序的安全漏洞。
它能够帮助安全测试人员和开发人员发现和修复潜在的漏洞,以提高Web应用程序的安全性。
Vulmap的使用方法如下:1.安装及部署:首先,需要在支持PHP的服务器上安装Vulmap。
可以通过克隆Vulmap的GitHub仓库来获取源代码,并将源代码放置在web服务器的根目录下。
然后,通过访问Vulmap的URL来完成Vulmap的部署。
2.目标配置:在Vulmap的管理界面中,可以添加和配置目标,以指定需要扫描的Web应用程序。
目标可以是单个URL或者是URL列表。
配置目标后,可以为目标设置一些扫描参数,如漏洞扫描深度和并发请求数等。
3.漏洞扫描:在目标配置完成后,可以开始进行漏洞扫描。
Vulmap会自动化地进行漏洞检测,并将检测结果以易于阅读的报告形式呈现出来。
扫描过程中会涉及到诸多漏洞检测模块,如SQL注入、XSS、CSRF等。
除了以上基本的使用方法外,可以进一步拓展Vulmap的功能,例如:1.自定义漏洞检测规则:Vulmap提供了一些常见漏洞检测模块,但也可以根据具体需求自定义漏洞检测规则。
通过编写自定义脚本,可以检测特定的漏洞类型或者特定的漏洞细节。
2.集成到CI/CD流程:Vulmap可以与CI/CD工具集成,实现自动化的安全测试。
可以将Vulmap加入到持续集成和持续交付流水线中,定期执行漏洞扫描,并将结果与开发团队共享。
总结来说,Vulmap是一款功能强大的漏洞扫描框架,能够辅助安全测试人员和开发人员快速发现和修复Web应用程序中的安全漏洞。
它的用法包括安装及部署、目标配置、漏洞扫描等。
此外,还可以通过自定义漏洞检测规则和集成到CI/CD流程等方式进行功能拓展。
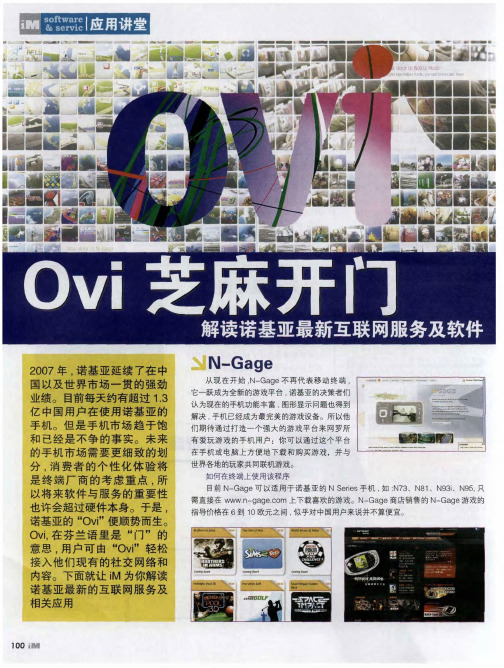
Ovi芝麻开门——解读诺基亚最新互联网服务及软件
,
维信应 用程 序 开 始使 用
,
。
N 区 的功 能 : 7 0 N 7 2 N 7 6 N 9 3 N 9 3 i N 9 5
。
S 60
S60
,
触摸用户界面
一
In t
,
e
c
i ¨s V n
移动套件是
通讯录
c
一
作为
个 成 熟 的智 能 手 机 用 户 界
,
ln l e …s v n
个 综合
曾经 打 造 出 众 多风 靡 全 球 的 机 型 而
m
这个 网 站来 真 实地感 受
下 。诚
,
简洁 的页 面 看 起 来 非 常舒 服
P ho to
s
、
M却∥
等 四 项 服 务赫 然列 在 网 页 之_ 不 过 里 中
国四
:
淄
■
。
,
。
。
i浏
鲤_
■
J
≯
幽幽逝 凼? 毫 固
浏
q
—
j
■ -
卅
粤璺 : 叁圈 叁当 蚪 蝤 捌 笪
警
d
盈誊
心
圈
魁
嗣
卧
瞄即
.
霎墅殛理 卫要霍甄
■■ ■ ■ 凿 豳 邋 蓝圆 ■ 甾 ■盈 躺 隧
,
重
一
卜
妇
它
一
卫
基亚 延 续 了在 中 市场 贯 的 强 劲 r 卜 1 3 ] 每天 约 有 超 过 11 ' 在使用诺基亚韵 手机 一‘市 场 趋 于 饱 争 的事 实 未来 需 要 更 细 致 的划 的个 性 化 体 验 将 的考虑重 点 所 与 服 务 的重 要 性 硬件本 身 于 是 )v i 便顺 势而 生 语 里是 门 的 可 由 O lVi 轻 松 有 的社 交 网 络 和 就让 i M 为 你 解 读 的互 联 网服 务 及
谷歌3D人体浏览器开源 浏览器可看人体构造
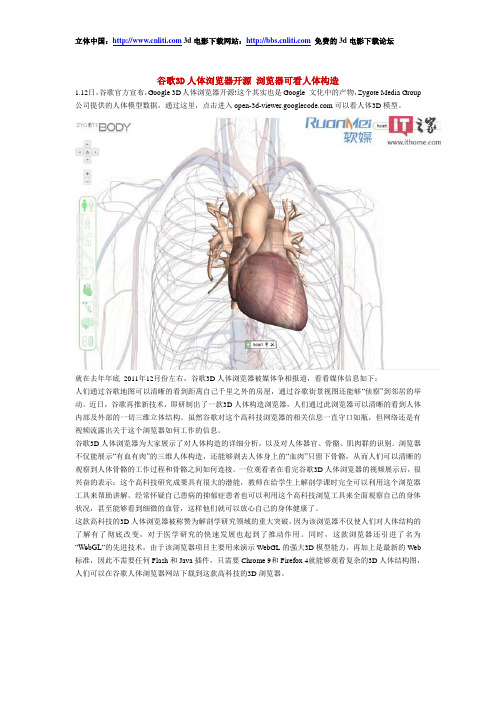
谷歌3D人体浏览器开源浏览器可看人体构造1.12日,谷歌官方宣布,Google 3D人体浏览器开源!这个其实也是Google 文化中的产物,Zygote Media Group 公司提供的人体模型数据,通过这里,点击进入可以看人体3D模型。
就在去年年底2011年12月份左右,谷歌3D人体浏览器被媒体争相报道,看看媒体信息如下:人们通过谷歌地图可以清晰的看到距离自己千里之外的房屋,通过谷歌街景视图还能够“侦察”到邻居的举动。
近日,谷歌再推新技术,即研制出了一款3D人体构造浏览器,人们通过此浏览器可以清晰的看到人体内部及外部的一切三维立体结构。
虽然谷歌对这个高科技浏览器的相关信息一直守口如瓶,但网络还是有视频流露出关于这个浏览器如何工作的信息。
谷歌3D人体浏览器为大家展示了对人体构造的详细分析,以及对人体器官、骨骼、肌肉群的识别。
浏览器不仅能展示“有血有肉”的三维人体构造,还能够剥去人体身上的“血肉”只留下骨骼,从而人们可以清晰的观察到人体骨骼的工作过程和骨骼之间如何连接。
一位观看者在看完谷歌3D人体浏览器的视频展示后,很兴奋的表示:这个高科技研究成果具有很大的潜能,教师在给学生上解剖学课时完全可以利用这个浏览器工具来帮助讲解。
经常怀疑自己患病的抑郁症患者也可以利用这个高科技浏览工具来全面观察自己的身体状况,甚至能够看到细微的血管,这样他们就可以放心自己的身体健康了。
这款高科技的3D人体浏览器被称赞为解剖学研究领域的重大突破,因为该浏览器不仅使人们对人体结构的了解有了彻底改变,对于医学研究的快速发展也起到了推动作用。
同时,这款浏览器还引进了名为“WebGL“的先进技术,由于该浏览器项目主要用来演示WebGL的强大3D模型能力,再加上是最新的Web 标准,因此不需要任何Flash和Java插件,只需要Chrome 9和Firefox 4就能够观看复杂的3D人体结构图,人们可以在谷歌人体浏览器网站下载到这款高科技的3D浏览器。
基于DICOM动态图像的Web浏览系统开发

3个问题: (1)DICOM 格式 图 像 无 法 直 接 在 通 用 浏 览 器 或
看图软件中打开,而 需 要 使 用 专 用 的 影 像 工 作 站 或 安 装 专 用 浏 览 软 件 ;如 果 医 生 或 科 研 工 作 者 需 要 在 医 院 、 实验室等以外的场所观看影像极为不便;
Abstract:A Webinteractivebrowsingsystem basedontheDICOM (digitalimagingandcommunicationsin medicine)standardandcontinuous multiGframedynamic medicalimageisestablished.Thecontinuous multiG framedynamic DICOM image system with theinteractive realGtime browsing is realized by using the technologiessuchasthevideocompression,streaming mediatransmission,Web,etc.Theuserscanbrowse thecontinuousmultiGframeimageofthedynamicDICOMimagedirectlyontheordinary Webbrowsertogeta singleframelosslessimageforaspecificpurpose.Thissystem canbeusedforthe wideareasharingofthe medicalimageandremoteimageteachingandresearch. Keywords:medicaldynamicimage;onlinebrowsing;videocompressiontechnology;DICOM
Ovid使用指南

Ovid使用指南一、数据库介绍美国Ovid Technologies公司是世界知名的数据库提供商, 属于Wolters Kluwer 子公司之一。
于2001 年六月与银盘公司(SilverPlatter Information) 合并,组成全球最大的电子数据库出版公司。
Ovid 将多种资源集中在同一平台OvidSP 上,并通过资源间的链接实现数据库、期刊及其它资源均可在同一平台上检索及浏览。
我校校园网用户可通过Ovid 平台使用如下数据库:CAB Abstracts,AGRICOLA(Agricultural Online Access),Agris(Agricultural Sciences and Techno),FSTA (Food Science and Technology Abstracts),Medline,BIOSIS Previews 等文摘数据库。
网址/autologin.cgi二、数据库操作指南(一)选择数据库进入Ovid 平台后,首先进入数据库选择界面(如图1),点击数据库前的按钮可查看该数据库介绍;选择需要检索的数据库,直接单击数据库名称可进入该库检索,也可在数据库名称前的选择框中打勾选择多个数据库进行检索。
系统提供了英文、简体中文(如图2)、繁体中文等不同语种的检索界面,可根据需要选择,注意,在检索时必须输入英文检索词。
数据库可全选数据库可单选或多选点击数据库名称可直接进库检索查看该数据库介绍图 1 选择数据库图2 选择数据库(简体中文)(二)检索方式1.Avanced Ovid Search(Ovid高级检索)是OVID 系统默认的检索界面,通过点击Avanced Ovid Search(Ovid高级检索)图标也可进入高级检索界面。
高级检索包括关键词检索(默认)、著者(Author)检索、题名(Title)检索、刊名(Journal)检索。
(见图3)(1)关键词检索(Keyword):系统默认的检索方式。
Orthanc+OHIFDICOMViewer最佳Dicom解析、在线浏览实践指南(解决方案)
Orthanc+OHIFDICOMViewer最佳Dicom解析、在线浏览实践指南(解决⽅案)概念DICOM identifiersVery importantly, the DICOM standard specifies DICOM tags that allow to index each single DICOM resource:Patients are indexed with PatientID (0x0010, 0x0020) (part of the patient module).Studies are indexed with StudyInstanceUID (0x0020, 0x000d) (part of the study module).Series are indexed with SeriesInstanceUID (0x0020, 0x000e) (part of the series module).Instances are indexed with SOPInstanceUID (0x0008, 0x0018) (part of the SOP module).The DICOM standard orders StudyInstanceUID, SeriesInstanceUID and SOPInstanceUID to be . In other words, it is mandatory for two different imaging devices to never generate the same identifiers, even if they are manufactured by different vendors. Orthanc exploits this rule to derive its .Importantly, even if the PatientID must be unique inside a given hospital, it is not guaranteed to be globally unique. This means that different patients imaged in different hospitals might share the same PatientID. For this reason, you should always browse from the study level (and not from the patient level) as soon as you deal with an application that handles patients from different hospitals.Configuration of OrthancConfiguring Orthanc simply consists in copying and adapting the . This file is in the file format. You can generate a sample configuration file with the following call:$ Orthanc --config=Configuration.jsonThen, start Orthanc by giving it the path to the modified Configuration.json path as a command-line argument:$ Orthanc ./Configuration.jsonThe default configuration file would:Create a DICOM server with the DICOM AET (Application Entity Title) ORTHANC that listens on the port 4242.Create a HTTP server for the REST API that listens on the port 8042.Store the Orthanc database in a folder called OrthancStorage.Remark: When specifying paths under Microsoft Windows, backslashes (i.e. \) should be either escaped by doubling them (as in \\), or replaced by forward slashes (as in /).To obtain more diagnostic, you can use the --verbose or the --trace options:$ Orthanc ./Configuration.json --verbose$ Orthanc ./Configuration.json --traceStarting with Orthanc 0.9.1, you can also start Orthanc with the path to a directory. In such a case, Orthanc will load all the files with a .json extension in this directory, and merge them to construct the configuration file. This allows to split the global configuration into several files.搭建关闭防⽕墙systemctl stop firewalld安装orthanc-server依赖环境yum install unzip make automake gcc gcc-c++ python cmake curl-devel \libpng-devel sqlite-devel libuuid-devel openssl-devel \lua-devel mercurial patch tar编译安装解压Orthanc-1.4.2.tar.gz到 /opt/context/Orthanc-1.4.2,进⼊⽬录执⾏:cmake -DALLOW_DOWNLOADS=ON \-DUSE_SYSTEM_JSONCPP=OFF \-DUSE_SYSTEM_MONGOOSE=OFF \-DUSE_SYSTEM_PUGIXML=OFF \-DUSE_SYSTEM_SQLITE=OFF \-DUSE_SYSTEM_BOOST=OFF \-DUSE_SYSTEM_DCMTK=OFF \-DUSE_SYSTEM_GOOGLE_TEST=OFF \-DUSE_SYSTEM_LIBJPEG=OFF \-DCMAKE_BUILD_TYPE=Release \/opt/context/Orthanc-1.4.2cmake -DALLOW_DOWNLOADS=ON \-DUSE_SYSTEM_JSONCPP=OFF \-DUSE_SYSTEM_CIVETWEB=OFF \-DUSE_SYSTEM_PUGIXML=OFF \-DUSE_SYSTEM_SQLITE=OFF \-DUSE_SYSTEM_BOOST=OFF \-DUSE_SYSTEM_DCMTK=OFF \-DUSE_SYSTEM_GOOGLE_TEST=OFF \-DUSE_SYSTEM_LIBJPEG=OFF \-DCMAKE_BUILD_TYPE=Release \/opt/context/Orthanc-1.5.6makesee:其中/opt/context/Orthanc-1.4.2是解压到的⽬录,根据实际情况酌情修改。
PythonWeb框架PyroCMS

PythonWeb框架PyroCMSPyroCMS是一款基于Python的开源Web框架,它提供了一套完整的工具和功能,用于帮助开发人员构建功能强大、可扩展且易于维护的Web应用程序。
本文将介绍PyroCMS的特点、优势以及如何使用该框架来开发Web应用程序。
一、简介PyroCMS是一个模块化的Web应用程序开发框架,使用Python语言编写,基于流行的客户端-服务器架构模型。
它提供了一套丰富的库和功能,用于处理常见的Web开发任务,包括路由、模板引擎、数据库访问、表单验证等。
PyroCMS还支持可扩展性,可以根据项目的需求添加新的模块和插件。
二、特点1. 简单易用:PyroCMS提供了直观且易于理解的API,使开发人员能够快速上手并开发出高质量的Web应用程序。
2. 模块化设计:PyroCMS采用了模块化的设计理念,开发人员可以根据需要组合各种功能模块,以便快速构建符合自身需求的应用程序。
3. 丰富的库和功能:PyroCMS内置了许多常用功能和组件,例如用户认证、文件上传、缓存等,开发人员可以通过简单的配置即可使用。
4. 高性能:PyroCMS通过优化代码结构和数据库访问方式,提高了整体性能,可以处理大量并发请求。
5. 可扩展性:PyroCMS支持通过添加新的模块和插件来扩展其功能,开发人员可以根据项目需求自由定制和拓展。
三、优势1. 易于学习和使用:PyroCMS采用了简洁的API和清晰的文档,使得初学者也能够迅速掌握框架的使用方法,无论是新手还是经验丰富的开发人员都可以轻松上手。
2. 灵活性:PyroCMS提供了灵活的配置选项,可以根据实际需求进行自定义设置,以满足不同项目的要求。
3. 社区支持:PyroCMS拥有活跃的开发者社区,可以获得来自世界各地开发人员的技术支持和帮助,使得开发过程更加顺利。
4. 安全性:PyroCMS内置了一些常见的安全特性,如输入验证、防止跨站脚本攻击等,以保护Web应用程序的安全。
DICOM图像浏览器

Image Viewer using Digital Imaging and Communications inMedicine (DICOM)Trupti N. BaraskarDepartment of Information Technology, Maharashtra Institute of Technology, Pune University, Maharashtra, India Email: trupti_001@, baraskartn@Mobile No. +91-9922789956, +91-20-25462867Abstract- Digital Imaging and Communications in Medicine is a standard for handling, storing, printing, and transmitting information in medical imaging. The National Electrical Manufacturers Association holds the copyright to this standard. It was developed by the DICOM Standards committee. The other image viewers cannot collectively store the image details as well as the patient's information. So the image may get separated from the details, but DICOM file format stores the patient's information and the image details. Main objective is to develop a DICOM image viewer. The image viewer will open .dcm i.e. DICOM image file and also will have additional features such as zoom in, zoom out, black and white inverter, magnifier, blur, B/W inverter, horizontal and vertical flipping, sharpening, contrast, brightness and .gif converter are incorporated.Keyword - Digital Imaging and Communication in Medicine (DICOM), National Electrical Manufacturers Association (NEMA), Information Object Definitions (IOD), Value Representation (VR).I.IntroductionDICOM stands for Digital Imaging and Communication in Medicine. The DICOM standard addresses the basic connectivity between different imaging devices and also the workflow in a medical imaging department. The DICOM standard was created by the National Electrical Manufacturers Association (NEMA) and it also addresses distribution and viewing of medical images. The standard comprises of 16 parts [1] and it is freely available at the NEMA website: ./dicom.html[2] .Within the innards of the standard are also contained a detailed specification of the file format for images. The latest version of the document is as of 2008[3]. In this article present a viewer for DICOM images DICOM Image File FormatThis present a brief description of the DICOM image file format. Like other image file formats, a DICOM file consists of a header, followed by pixel data. The header comprises of the patient name and other patient particulars and image details. Important in the image details are the image dimensions - width, height and image bits per pixel. All these details are hidden inside the DICOM file in the form of tags and their values. Before it gets into tags and values, a brief about DICOM itself and related terminology is in place. In what follows, this explains only those terms and concepts related to a DICOM file. In particular, this does not discuss the communication and network aspects of the DICOM standard. Everything in DICOM is an object - medical device, patient, etc. An object, as in object oriented programming is characterized by attributes. DICOM objects are standardized according to IODs (Information Object Definitions). An IOD is a collection of attributes describing a data object. In other words, an IOD is a data abstraction of a class of similar real world objects which defines the nature and attributes relevant to that class [4]. DICOM has also standardized on the most commonly used attributes and these are listed in the DICOM data dictionary [6]. An application which does not find a needed attribute name in this standardized list may add its own private entry, termed as a private tag; proprietary attributes are therefore possible in DICOM. Examples of attributes are study date, patient name, modality, transfer syntax UID, etc. As it can be seen, the attributes require different data types for correct representation. This “data type” is termed as Value Representation (VR) in DICOM. There are 27 such VRs defined[5], and these are AE, AS, AT, CS, DA, DS, DT, FL, FD, IS, LO, LT, OB, OF, OW, PN,SH, SL, SQ, SS, ST, TM, UI, UL, UN, US, and UT. For example, DT represents Date Time, a concatenated date time character string in the format YYYYMMDDHHMMSS.FFFFFF&ZZXX. An important characteristic of VR is its length, which should always be even. Characterizing an attribute are its tag, VR, VM (Value Multiplicity) and value. A tag is a 4 byte value which uniquely identifies that attribute. A tag is divided into two parts, the Group Tag and the Element Tag, each of which is of length 2 bytes. For example, the tag 0010 0020 (in hexadecimal) represents Patient ID, with a VR of LO (Long String). In this example, 0010 (hex) is the group tag, and 0020 (hex) is the element tag. The DICOM data dictionary gives a list of all the standardized group and element tags. Also important is to know whether a tag is mandatory or not. For data element type, five categories are defined - Type 1, Type 1C, Type 2, Type 2C, and Type 3. One more important concept is transfer syntax. In simple terms, it tells whether a device can accept the data sent by another device. EachCP1324,I nt e r nat i onal Conf e r e nc e on M e t hods and M ode l s i n Sc i e nc e and Te c hnol ogy (I CM 2ST-10)e di t e d by R. B. Pa t e l a nd B. P. Si ngh© 2010 A m e r i c a n I ns t i t ut e of Phys i c s 978-0-7354-0879-1/10/$30.00device comes with its own DICOM conformance statement, which lists all transfer syntaxes acceptableto the device. Transfer syntax tells how the transferred data and messages are encoded. Part [5 ] of the DICOM standard gives the transfer syntax as a set of encoding rules that allow application entities to unambiguously negotiate the encoding techniques (e.g., data element structure[8], byte ordering, compression) they are able to support, thereby allowing these application entities to communicate. (One more term here - Application Entity is the nameof a DICOM device or program used to uniquely identify it.)Transfer syntaxes for non-compressed images are:x Implicit VR Little Endian, with UID1.2.840.10008.1.2x Explicit VR Little Endian, with UID1.2.840.10008.1.2.1x Explicit VR Big Endian, with UID1.2.840.10008.1.2.2Images compressed using JPEG Lossy or Lossless compression techniques have their own transfer syntax UIDs. A viewer should be able to identify the transfer syntax and decode the image data accordingly; or display appropriate error messages if it cannot handle it. More points on a DICOM file, it is a binary file, which means that an ASCII-character-based text editor like notepad does not show it properly. A DICOM file may be encoded in Little Endian or Big Endian byte orders. Elements in a DICOM file are always in ascending order of tags. Private tags are always odd numbered. With this background, it is now time to develop into the DICOM File Format. A DICOM file consists of Preamble: comprising of 128 bytes, followed by, Prefix: comprising of the characters 'D', 'I', 'C', 'M', followed by, File Meta Header: This comprises, among others, of the Media SOP Class UID, Media SOP Instance UID, and the transfer syntax UID. By default, these are encoded in explicit VR, Little Endian. The data is to be read and interpreted depending upon the VR type. Data Set comprising of a number of DICOM Elements, characterized by tags and their values. The main functionality of a DICOM Image Reader is to read the different tags as per the transfer syntax and then use these values appropriately. An image viewer needs to read the image attributes - image width, height, bits per pixel and the actual pixel data. The viewer presented here can be used to view DICOM images with non-compressed transfer syntax. Open DICOM files with Explicit VR and Implicit VR Transfer Syntax, read DICOM files where image bit depth is 8 or 16 bits. Read a DICOM file with just one image inside it. Read a DICONDE file (a DICONDE file is a DICOM file with NDE - Non Destructive Evaluation - tags inside it). Display the tags in a DICOM file.Enable user to save a DICOM image as JPEG/GIF. This viewer is not intended to check whether all mandatory tags are present, open files with VR other than Explicit and Implicit - in particular, not to open JPEG compressed loss and lossless files. To read old DICOM files - requires the preamble and prefix for sure. Earlier DICOM files do not have the preamble and prefix, and just contain the string 1.2.840.10008 somewhere in the beginning. For the viewer, the preamble and prefix are necessary to read images which are not 8 bit or 16 bit in bit depth. In particular not to open color images, to read a sequence of images. Problem:Other file format used in modern times doesn’t have the facility to obtain the image of the patient and the related details together in the same document thus more storage space is required and difficulties are faced by the user.Solution:We can develop a viewer that that displays the patient details and image details in just one click and in just one file thus making it convenient for the end user. It also takes less storage space.II.Block Diagram Of DICOM FileStructureFigure 1. Block Diagram of DICOM file formatFile Header:The header consists of a 128 byte File Preamble, followed by a 4 byte DICOM prefix. The header may or may not be included in the file [9].Preamble Prefix128 bytes=??? ???4 bytes = ‘D’, ‘I’, ‘C’, ‘M’Table 1: DICOM File HeaderThe DICOM standard does not require any structure for the fixed size preamble. It is not required to be structured as a DICOM data element with a tag and a length. It is intended to facilitate access to the imagesand other data in the DICOM file by providing compatibility with a number of commonly used computer image file formats. If the File preamble is not used by an application profile or a specific implementation, all 128 bytes shall be set to 00H. This is intended to facilitate the recognition that the preamble is used when all 128 bytes are not set as specified above. The file preamble may for example contain information enabling a multi-media application to randomly access images stored in a DICOM data set. The same file can be accessed in two ways: First by a multi-media application using the preamble and second by a DICOM application which ignores the preamble. The four byte DICOM prefix shall contain the character string "DICM" encoded as uppercase characters of the ISO 8859 G0 Character Repertoire. This four byte prefix is not structured as a DICOM data element with a tag and a length.Sample output:Figure 2. Image view at DICOM file formatData Set:Data Element: A unit of information as defined by a single entry in the data dictionary [6]. An encoded Information Object Definition (IOD) attribute that is composed at a minimum three fields: Data Element Tag, Value Length, and Value Field. For some specific transfer syntaxes, a data element also contains a VR field where the value representation of that data element is specified explicitly.Data Element Tag: A unique identifier for a data element composed of an ordered pair of numbers (a group number followed by an element number).Data Element Type: Used to specify whether an attribute of an Information Object Definition. This translates to whether a Data Element of a Data Set is mandatory, mandatory only under certain conditions, or optional.Data Set: Exchanged information consisting of a structured set of Attribute values directly or indirectly related to Information Objects. The value of each Attribute in a Data Set is expressed as a Data Element. A collection of data elements ordered by increasingdata element tag number that is an encoding of the values of attributes of a real world object.Pixel Data: Graphical data (e.g., images or overlays) of variable pixel-depth encoded in the pixel data element, with value representation OW or OB. Additional descriptor data elements are often used to describe the contents of the pixel data element.Value Field: The field within a data element that contains the value(s) of that data element.Value Length: The field within a data element that contains the length of the value field of the data elementValue Representation (VR): Specifies the data type and format of the value(s) contained in the value field of a data element. A data set represents an instance of a real world information object. A data set is constructed of data elements. Data elements contain the encoded values of attributes of that object. The construction, characteristics, and encoding of a data set and its data elements are discussed here.Data Elements: A Data Element is uniquely identified by a Data Element Tag. The Data Elements in a Data Set shall be ordered by increasing Data Element Tag Number and shall occur at most once in a Data Set. There are 2 types of data elementStandard Data Elements have an even Group Number that is not (0000, eeee), (0002, eeee), (0004, eeee), or (0006, eeee). [5]Private Data Elements have an odd Group Number that is not (0001, eeee), (0003, eeee), (0005, eeee), (0007, eeee), or (FFFF, eeee).Although similar or related Data Elements often have the same Group Number; a Data Group does not convey any semantic meaningNote: A Data Element shall have one of three structures. Two of these structures contain the VR of the Data Element (Explicit VR) but differ in the way their lengths are expressed, while the other structure does not contain the VR (Implicit VR). All three structures contain the Data Element Tag, Value Length and Value for the Data Element. See Figure 2.Implicit and Explicit VR Data Elements shall not coexist in a Data Set and Data Sets nested within it. Whether a Data Set uses Explicit or Implicit VR, among other characteristics, is determined by the negotiated Transfer SyntaxFigure 3. Data set and Data elements structureData Element Field:A data element is made up of fields. Three fields are common to all three data element structures; these are the Data Element Tag, Value Length, and Value Field.A fourth field, Value Representation is only present in the two Explicit VR Data Element structures. The definitions of the fields are [6]:Data Element Tag: An ordered pair of 16-bit unsigned integers representing the group number followed by element number.Value Representation: A two byte character string contains the VR of the data element. The VR for a given data element tag shall be as defined by the data dictionary. The two characters VR shall be encoded using characters from the DICOM default character set.Value Length:A 16 or 32-bit (dependent on VR and whether VR is explicit or implicit) unsigned integer containing the explicit length of the value field as the number of bytes (even) that make up the value. It does not include the length of the data element tag, value representation, and value length fields.A 2-bit length field set to undefined length (FFFFFFFFH). Undefined lengths may be used for data elements having the Value Representation (VR) Sequence of Items (SQ) and Unknown (UN). For data elements with value representation OW or OB undefined length may be used depending n the negotiated transfer syntax.Value Field: An even number of bytes containing the Value(s) of the Data Element. The data type of value(s) stored in this field is specified by the data element's VR. The VR for a given data element tag can be determined using the data dictionary [6], or using the VR field if it is contained explicitly within the data element. The VR of standard data elements shall agree with those specified in the data dictionary. The value multiplicity specifies how many values with this VR can be placed in the value field. If the VM is greater than one, multiple values shall be delimited within the value field. The VMs of standard data elements are specified in the data dictionary value fields with undefined length are delimited through the use of sequence delimitation items and item delimitation data elements.RGB Color Model:A color in the RGB color model is described by indicating how much of each of the red, green, and blue is included. The color is expressed as an RGB triplet (r, g, b), each component of which can vary from zero to a defined maximum value. If all the components are at zero the result is black; if all are at maximum, the result is the brightest represent able white [11, 12, and 13].These ranges may be quantified in several different ways: From 0 to 1, with any fractional value in between. This representation is used in theoretical analyses, and in systems that use floating-point representations. Each color component value can also be written as a percentage, from 0% to 100%.ting, the component values are often stored as integer numbers in the range 0 to 255, the range that a single 8-bit byte can offer (by encoding 256 distinct values).High-end digital image equipment can deal with the integer range 0 to 65,535 for each primary color, by employing 16-bit words instead of 8-bit bytes. For example, the full intensity red is written in the different RGB notations as given table 2:Notation RGB tripletArithmetic(1.0, 0.0, 0.0) Percentage(100%, 0%, 0%)Digital 8-bit per channel(255, 0, 0)Table 2. RGB NotationIn this paper the digital 8-bit model as the input file is in binary for the RGB model and the ASCII code of the color has been used in almost all the algorithms of the features of the DICOM Image Viewer.III.System ArchitectureDescription:Parser: It is the first and the most important part of the project. It separates the data set and the image. The input to parser is .dcm file (i.e. a binary file) which is version 1.3, standardized by NEMA [10]. The output i.e. image and data set is then passed on to next stage. DICOM Header: The header is the part which makes DICOM different from all the other file formats. The header encompasses of patient details and image information like pixel representation, height, width, file data length etc. Thus in this stage we read patient details and image information so that they can be processed further.Display Details: The Header details which are processed in the above stage are displayed.Image Processing: In this stage, various features like Zoom In, Zoom Out, Blur, B/W inverter, Horizontal and Vertical flipping, Sharpening, Contrast, Brightness and .gif converter are incorporated. The final processed image in then passed onto the next stage.DICOM Image Viewer: The final image is displayed in this stage.IV.Implementation Images:Figure 5. Image and Text ViewerFigure 6. Invert ImageFigure 7. Blur imageFigure 8. White Inverter imageFigure 9. Zoom In ImageFigure 10. Sharpen ImageFigure 11. Flip Horizontal Image[10]Boqiang Liu, Minghui Zhu, Zhenwang Zhang, CongYin, Zhongguo Liu and Jason Gu* “Medical ImageConversion with DICOM” IEEE2007[11]Foley J., A. van Dam, Fejner S. Hughes J., Computergraphics - principles and practice, Second edition,Addison-Wesley, 1996[12]Gonzales R., R. Woods, Digital Image Processing,Adison Wesley, 1993[13]Marion A., An Introduction to Image Processing,Chapman and Hall, 1991Figure 11. Save Image FileV.ConclusionThe primary aim of this paper is to study “.dcm” fileformat and develop an image viewer with someenhanced features like Zoom, invert, brightness,sharpen and save image as “.gif” format.Implementation of algorithms e.g.. blur, horizontalflipping, vertical flipping black and white inversionetc. Benefits of the “.dcm” file format and imageviewer provides a greater leap to the present medicalscenario further helps for the future development ofvideo player for CT scan and MRI. Display the x-rayimage and the patient details together. Converts“.dcm” file to “.gif” file format. It is cost-effective inand helpful to health care industry. Because of theDICOM viewer images can be captured andcommunicated more quickly helps physician tomake diagnosis sooner and treatment decision can bemade quickly.References[1]Mario Mustra, Kresimir Delac, Mislav Grgic “Overviewof the DICOM Standard” 50th International SymposiumELMAR-2008, 10-12 September 2008, Zadar, Croatia[2]The DICOM Standard, /[3]Digital Imaging and Communications in Medicine(DICOM), NEMA Publications,"DICOM Standard",2008, available at:ftp:///medical/dicom/2008/[4]National Electrical Manufacturers Association “DigitalImaging and Communications in Medicine (DICOM)”Standards Publication PS 3.3-2004, 2009[5]National Electrical Manufacturers Association “DigitalImaging and Communications in Medicine (DICOM)”Standards Publication PS 3.5-2004, 2009[6]National Electrical Manufacturers Association “DigitalImaging and Communications in Medicine (DICOM)”Standards Publication PS 3.6-2004, 2009[7]National Electrical Manufacturers Association “DigitalImaging and Communications in Medicine (DICOM)”Standards Publication PS 3.7-2004, 2009[8]National Electrical Manufacturers Association “DigitalImaging and Communications in Medicine (DICOM)”Standards Publication PS 3.10-2004, 2009[9] “DICOM file structure.htmlCopyright of AIP Conference Proceedings is the property of American Institute of Physics and its content may not be copied or emailed to multiple sites or posted to a listserv without the copyright holder's express written permission. However, users may print, download, or email articles for individual use.。
Dicom基础概述
• Part3:信息对象定义
– 定义了应用于数字医学图像以及相关信息(如波形,格式化报告、 放射治疗药剂等)通信的真实世界实体的抽象说明。 – 定义了标准信息对象类和复合信息对象类; – 描述了现实世界模型及在信息对象定义中反映的相应信息模型。
DICOM - 2008文档结构
• Part4:服务类描述
– 1996版增加了媒体交换标准; – 新的图像定义, 比如:X线心血管成像, X光数字乳腺 成像…… – Modality Performed Procedure Step (MPPS), 结构化报 告……
DICOM Storage & Query/Retrieve
CT,MR CR,US, Sec Capt X线心血管成像 X线荧光镜成像 核医学 新的超声图像
• Part6:数据字典
– 定义了所有的DICOM数据单元以及UIDs。
• Part7:消息交换
– 定义了DICOM消息服务单元(DIMSE),以及所有的DICOM网络服务。
DICOM - 2008文档结构
• Part8:消息交换的网络通信支持
DicomViewer(Iphone版)使用手册2014.6.23
西安翼展电子科技有限公司Dicom ViewerV1.0(Iphone版)《用户使用手册》目次1 Dicom Viewer主界面介绍 (5)2 导入 (6)3 本地 (7)4图像操作功能介绍 (7)4.1 平移 (8)4.2 镜像 (8)4.3 缩/放 (8)4.4 调窗 (8)4.5 播放 (9)4.6 还原 (9)4.7 便签 (9)5 用户 (10)6 缓存清理 (10)7 反馈 (11)8 分享 (11)9 关于 (12)10 售后服务 (13)10.1 服务体系 (13)10.2 联系方式 (14)声明:➢ 未经西安翼展电子科技有限公司事先书面许可,本手册的任何部分不得以任何形式进行增删、改编、节选、翻译、翻印或仿制。
➢ 本手册的全部内容西安翼展电子科技有限公司可能随时加以更改,此类更改将不另行通知,手册内容会与软件版本同步更新。
➢ 具体应用以软件实际功能为准。
➢ 本手册的著作权属于西安翼展电子科技有限公司。
➢ 版权所有·翻制必究。
工具简介DicomViewer V1.0是一款使用方便、功能强大的绿色版Dicom看图工具。
工具特点:➢ 可以实现Dicom图像的高质量显示。
➢ 支持多种专业的Dicom图像操作功能。
➢ 支持多图像的顺序播放功能。
➢ 便签功能,看图时可以记录随笔,方便下次阅读。
➢ 支持图像的导出。
1 Dicom Viewer主界面介绍图1-1如图1-1是Dicom Viewer工具的主界面,包含以下几项功能:1)本地管理:可查看本地图像列表。
2)用户管理:点击图标进入页面,可操作用户登陆或注册。
3)便签:可对当前图像添加便签。
4)播放:可匀速播放所有本地图像。
5)更多选项:点击可弹出其他功能按钮,如:导入、清理、反馈、分享等功能按钮。
2 导入用户登陆后才可以使用所有功能。
2.1 点击“导入”弹出界面,点击快速传输文档的圆圈按钮使其变为绿色,如图2-1所示:图2-12.2 按照操作说明,在个人电脑上输入要求的网址,如下图2-2所示:图2-2点击“浏览”,选择Dicom文件,点击“确认上传”,在Ipad上“导入”界面显示“接收到新dcm文件”,则导入文件成功。
DicomObjects用户手册 中文版

1.1结构............................................ ................................................. (3)1.2支持的语言............................................... .................................................................... .......... .4 1.3使用COM对象模型的效果.......................................... .. (4)1.4 DicomObjects中的集合.............................................. .. (4)1.5 Dicom对象的DICOM数据表示........................................................................ .. (5)1.6解释和使用序列............................................. .. (7)1.7私有属性............................................... .................................................................... (7)2第一步- 阅读,查看和写入DICOM文件................................................................... . (9)2.1您的第一个DICOM计划............................................. . (9)2.2将映像写入磁盘............................................ . (10)3通过网络简单地发送和接收图像........................................ . (11)3.1发送图像.................................................. ................................................................ .. (11)3.2接收图像............................................... ..................................................................... (11)4查询/检索(SCU)........................................... .......................................................... .. (13)4.1公共特性............................................... ................................................................... .. (13)4.2 DoQuery ............................................... ................................................................................ . 14 4.3 GetImages ............................................... . (14)4.4 GetUsingMove ................................................ (15)4.5 DoRawQuery ................................................ (15)4.6 MoveSync ................................................ .. (15)4.7 MoveImages ................................................ . (15)4.8基于Dicom连接的Q / R方法........................................... ............................ ....... ......... .. (15)5离线媒体............................................. ................................................. ..... ....... (17)5.1阅读............................................... ................................................. .......... ....... ....... .. (17)5.2创建................................................ ................................................. (18)5.3更新............................................... ................................................. . (19)5.4乘以引用的目录记录............................................. . (19)6打印............................................ ................................................. . (20)6.1使用DicomPrint打印.................................................. .. (20)6.2使用标准化操作打印............................................. . (22)6.3将DICOM图像打印到Windows打印机.......................................... . (22)7将DICOM图像导出到其他格式........................................... . (23)7.1单帧............................................... ................................................. . (23)7.2多帧图像/电影........................................... .. (23)7.3非文件导出............................................. ...................................................................... (23)8高级图像审查站............................................. (24)8.1基本查看控件................................................ . (24)8.2多帧(电影)图像.......................................... .. (24)8.3注释............................................ ................................................. . (25)8.4查找表............................................... ................................................. (28)8.5 DICOM灰度呈现状态............................................. . (28)8.6显示速度优化................................................ . (29)9.1在Web服务器上运行DicomObjects . .... .......................................... .. (31)9.2在Web客户端上运行DicomObjects .......... .... .................................. . (33)10写路由器/修改器.................................. .... .... .............. ...................................................... (35)11编写DICOM服务器............................................. ................................................................ (36)11.1聆听协会的对象........................................... (36)11.2验证协会............................................... .. (37)11.3处理C-STORE操作............................................ . (37)11.4处理查询/检索请求............................................ .. (38)11.5处理C-ECHO请求............................................ .. (42)11.6传输语法和质量问题............................................ (42)11.7性能和可靠性问题............................................. (43)11.8模态WorkList SCP .............................................. (44)11.9打印SCP ............................................... ................................................. (44)11.10存储承诺SCP ................................................ (45)12访问和修改像素数据............................................ (46)12.1原始指针的语言............................................. . (46)12.2使用变量数组的语言............................................. .. (47)13创建DICOM图像.............................................. .................................................................. (48)13.1导入其他格式................................................ .. (48)13.2导入多帧图像.................................................. (49)13.3从划痕............................................... ................................................................... (50)14使用模态WorkList作为SCU ........................................... (52)15语言特定功能.............................................. . (53)15.1 Visual Basic ............................................... .................................................. . (53)15.2 VBScript ................................................ ................................................. (53)15.3应用程序的Visual Basic(例如MS Access)........................................ .. (53)15.4 Microsoft Visual C ++ ................................................ ........................................................ (53)15.5 Borland Delphi和Borland C ++ Builder ........................................... (55)15.6 Java ................................................ ................................................. . (56)15.7其他环境............................................... ................................................. (56)16日志记录................................................ ................................................. .. (57)16.1日志详细信息和级别............................................. ........................................................... .. 57 16.2文件记录............................................... ................................................. (57)16.3 DicomLog控制................................................ . (58)17高级使用............................................... ................................................. (59)17.1超车注册表值............................................ (59)17.2更改默认SOP类的列表.......................................... (59)17.3传输语法选择.................................................. (60)17.4私人SOP类................................................ .................................................................. . (61)17.5私有传输语法 (61)17.6存储承诺............................................... ............................................................................ (61)1简介本用户手册是DicomObjects帮助文件的重要补充。
Oviyam开源WebDICOM浏览器简介

O v i y a m开源W e b D I C O M浏览器简介SANY标准化小组 #QS8QHH-HHGX8Q8-GNHHJ8-HHMHGN#O v i y a m开源W e b D I C O M浏览器简介本文将对WADO服务进行介绍,并以Oviyam作为Web客户端进行分析,WADO服务端使用DCM4CHEE开源PACS系统。
1.Oviyam功能分析Oviyam主要功能包含Web客户端配置、查询患者列表、图像信息查看、DICOM信息查看、图像的放大、缩小和移动、多帧图像的动态显示等功能。
1.1Web客户端配置配置客户端获取图像的服务器应用实体,主要配置查询目标应用实体(AE)、主机名或IP地址、端口号(查询)、WADO端口号(获取图像)以及采用的协议(DICOM协议和DICOM安全协议),操作过程如下:在菜单上点击“Config”,弹出配置界面,如图下所示,设置完成后点击“Change”按钮。
1.2查询患者列表可以通过各类查询条件来查询图像信息,主要提供图像生成日期、患者信息(患者ID、患者姓名等)、查询图像类型(CT、MR、US等),操作如下:在菜单上点击“Search”按钮,弹出“查询”窗口,如图1所示,主要分三部分:检查时间、患者信息和图像类型,输入要查询的检查时间、患者ID或患者姓名以及要查询的图像类型,点击“Search”按钮,将向服务器发送查询请求,服务器将根据查询条件获取患者信息列表,如图2所示。
图1图21.3图像信息查看可以查看图像信息,在图2显示的患者列表中,点击“”按钮,直到显示序列信息,点击“序列信息”,将向WADO服务器发送查看图像信息,WADO服务器将根据所选图像的参数信息(检查UID、序列UID、对象UID等参数),获取此DICOM图像对象,并将此DICOM对象转换为JPEG,并将JPEG图像返回给客户端并在浏览器中显示出来。
1.4DICOM信息查看可以查看DICOM文件的详细信息(图像只是DICOM文件的一部分),操作过程如下:在菜单上点击“DICOMInfo”按钮,将弹出DICOM文件的详细信息,如图所示:1.5图像的放大、缩小和移动可以对图像进行放大、缩小和移动等基本操作,操作过程如下:(1)放大与缩小:点击菜单上的“Zoomon”按钮,将出“Zoomin”和“Zoomout”按钮,将鼠标放在“Zoomin”按钮图像将逐渐放大,将鼠标放在“Zoomout”按钮图像将逐渐缩小。
ybimagebrowser用法

ybimagebrowser用法
ybimagebrowser是一个用于在iOS应用程序中显示图片浏览器的开源库。
它可以让用户以全屏幻灯片的方式浏览图片,并支持手势缩放、旋转和拖动等操作。
要使用ybimagebrowser,首先需要在项目中集成该库。
你可以通过CocoaPods或手动下载源代码的方式进行集成。
使用CocoaPods集成ybimagebrowser时,你需要在你的Podfile文件中添加以下代码:
pod 'YBImageBrowser'。
然后在终端中执行`pod install`命令来安装ybimagebrowser 库。
如果你选择手动集成ybimagebrowser,你需要从GitHub上下载该库的源代码,并将其添加到你的项目中。
确保在项目设置中添加依赖库,并在需要使用ybimagebrowser的地方引入头文件。
一旦集成完毕,你可以在需要显示图片浏览器的地方创建一个
YBImageBrowser对象,并设置需要显示的图片数组。
你可以自定义图片浏览器的外观和行为,比如设置动画效果、添加自定义的操作按钮等。
另外,ybimagebrowser还提供了丰富的回调方法和代理方法,可以让你在图片浏览器显示、关闭、滑动等各种状态下进行处理。
通过这些回调方法,你可以实现一些自定义的交互逻辑,比如在图片被长按时弹出自定义的操作菜单等。
总的来说,ybimagebrowser是一个功能强大、灵活且易于集成的图片浏览器库,可以帮助你在iOS应用程序中实现优秀的图片浏览体验。
希望这些信息能够帮助你更好地了解ybimagebrowser的用法。
DICOM:Ubuntu14环境下安装dcm4chee+oviyam2.1

DICOM:Ubuntu14环境下安装dcm4chee+oviyam2.1背景:之前博⽂中曾介绍过在Windows7环境下安装部署dcm4chee。
近期公司项⽬需要与部署到Linux系统的远端基于dcm4chee框架的DICOM服务器进⾏交互。
由于⽹络问题,为了提⾼调试效率,就在本地Ubuntu14虚拟机中尝试安装部署了⼀套dcm4chee服务以及oviyam2客户端。
虽然官⽹对dcm4chee在Linux环境的安装介绍⽐较详细,但是在安装过程中还是遇到了许多问题,遂决定记录下来以备以后所⽤。
官⽅说明:中对于Linux环境下的安装步骤与Windows系统相似,包括:1、下载dcm4chee⼆进制包我这⾥下载的是最新的,本地下载路径为/home/zssure/Downloads/dcm4chee-2.18.1-mysql.zip在Ubuntu的Terminal终端中输⼊:sudo unzip dcm4chee-2.18.1-mysql.zip即可完成解压。
2、下载JBoss因为dcm4chee是托管在JBoss AS服务器的应⽤,因此需要下载相应的JBoss服务端。
这⾥为了省去⿇烦,直接在。
本地路径依然是/home/zssure/Downloads/,随后输⼊sudo unzip jboss-4.2.3.GA-jdk6.zip进⾏解压。
3、拷贝JBoss启动必备⽂件到dcm4chee⽬录下这⼀步的主要⽬的是⽅便后续直接在dcm4chee-XXX⽬录下直接启动dcm4chee,⽽不需要将其部署到单独的JBoss⽬录下。
进⼊dcm4chee-2.18.1-mysql/bin⽬录,输⼊sudo ./install_jboss.sh /home/zssure/Downloads/jboss-4.2.3.GA即可完成拷贝。
4、安装数据库与dcm4chee-2.18.1-mysql对应安装mysql数据库。
输⼊sudo apt-get install mysql-server可完成mysql安装,随后按照官⽹指⽰创建pacsdb 数据库即可。
GE ZFP DICOM浏览器工具栏使用介绍
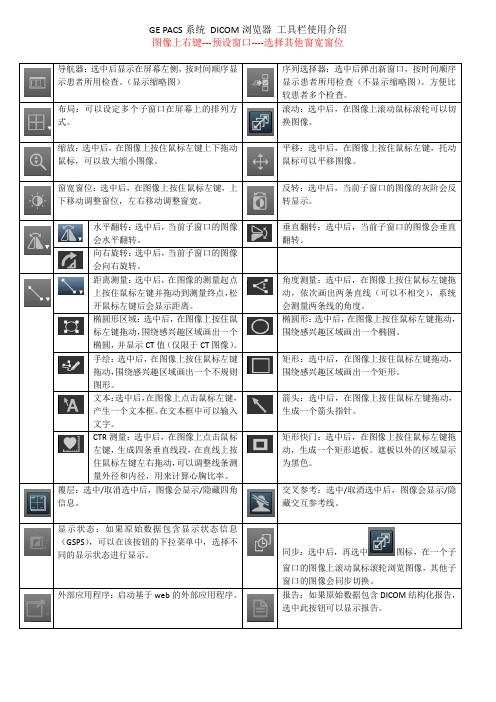
GE PACS系统DICOM浏览器工具栏使用介绍图像上右键---预设窗口----选择其他窗宽窗位导航器:按时间顺序显示患者所用检查。
序列选择器:选中后弹出新窗口,按时间顺序显示患者所用检查(不显示缩略图)较患者多个检查。
布局:可以设定多个子窗口在屏幕上的排列方式。
滚动:选中后,在图像上滚动鼠标滚轮可以切换图像。
缩放:在图像上按住鼠标左键上下拖动鼠标,可以放大缩小图像。
平移:选中后,在图像上按住鼠标左键,托动鼠标可以平移图像。
窗宽窗位:上下移动调整窗位,左右移动调整窗宽。
反转:选中后,当前子窗口的图像的灰阶会反转显示。
水平翻转:当前子窗口的图像会水平翻转。
垂直翻转:选中后,当前子窗口的图像会垂直翻转。
向右旋转:当前子窗口的图像会向右旋转。
距离测量:在图像的测量起点上按住鼠标左键并拖动到测量终点,松开鼠标左键后会显示距离。
角度测量:选中后,在图像上按住鼠标左键拖动,依次画出两条直线(可以不相交)会测量两条线的角度。
椭圆形区域:在图像上按住鼠标左键拖动,围绕感兴趣区域画出一个椭圆,图像)。
椭圆形:围绕感兴趣区域画出一个椭圆。
手绘:在图像上按住鼠标左键拖动,围绕感兴趣区域画出一个不规则图形。
矩形:选中后,在图像上按住鼠标左键拖动,围绕感兴趣区域画出一个矩形。
文本:在图像上点击鼠标左键,产生一个文本框。
在文本框中可以输入文字。
箭头:选中后,在图像上按住鼠标左键拖动,生成一个箭头指针。
CTR在图像上点击鼠标左键,在直线上按住鼠标左键左右拖动,可以调整线条测量外径和内径,用来计算心胸比率。
矩形快门:选中后,在图像上按住鼠标左键拖动,生成一个矩形遮板。
遮板以外的区域显示为黑色。
覆层:选中隐藏四角信息。
交叉参考:选中藏交互参考线。
显示状态:如果原始数据包含显示状态信息(,可以在该按钮的下拉菜单中,选择不同的显示状态进行显示。
同步:选中后,再选中图标,在一个子窗口的图像上滚动鼠标滚轮浏览图像,其他子窗口的图像会同步切换。
chromiumwebbrowser原理

chromiumwebbrowser原理Chromium WebBrowser 的原理是基于 Chromium 内核实现的,同时使用了各种其他开源库和框架。
以下是 Chromium WebBrowser 的一些主要组件和工作原理:1. **渲染引擎(Renderer)**:Chromium 使用一个基于 WebKit 的渲染引擎来呈现网页内容。
这个渲染引擎负责解析 HTML、CSS 和 JavaScript,并将它们转换为可视化的页面。
2. **浏览器引擎(Browser Engine)**:这是 Chromium 的核心组件,负责管理多个进程,包括渲染进程、网络进程、GPU 进程等。
浏览器引擎还负责处理用户界面、书签管理、历史记录等功能。
3. **网络层(Network Layer)**:Chromium 使用一个高效的网络栈来处理 HTTP 请求。
它支持多种网络协议,并提供了强大的网络诊断工具。
4. **图形层(Graphics Layer)**:Chromium 使用一个高效的图形库来绘制网页内容。
它还支持硬件加速渲染和多线程渲染,以提供流畅的用户体验。
5. **扩展系统(Extension System)**:Chromium 支持各种扩展,如 Chrome 插件和 Android 插件。
扩展系统允许开发者为浏览器添加新功能或修改现有功能。
6. **安全性和沙箱模型(Security and Sandboxing)**:Chromium 使用了多种安全机制来保护用户数据和隐私。
它通过沙箱模型隔离不同网页的进程,防止恶意网页访问用户数据或操纵系统资源。
7. **跨平台支持(Cross-platform Support)**:Chromium 可以在多个操作系统上运行,包括 Windows、macOS、Linux 和 Android。
这得益于其模块化和跨平台的架构设计。
总的来说,Chromium WebBrowser 的原理是利用高效的渲染引擎、强大的网络层、高效的图形层、扩展系统、安全性和沙箱模型以及跨平台支持,为用户提供快速、安全和功能丰富的网页浏览体验。
- 1、下载文档前请自行甄别文档内容的完整性,平台不提供额外的编辑、内容补充、找答案等附加服务。
- 2、"仅部分预览"的文档,不可在线预览部分如存在完整性等问题,可反馈申请退款(可完整预览的文档不适用该条件!)。
- 3、如文档侵犯您的权益,请联系客服反馈,我们会尽快为您处理(人工客服工作时间:9:00-18:30)。
O v i y a m开源
W e b D I C O M浏览器简
介
集团企业公司编码:(LL3698-KKI1269-TM2483-LUI12689-ITT289-
O v i y a m开源W e b D I C O M浏览器简介
本文将对WADO服务进行介绍,并以Oviyam作为Web客户端进行分析,WADO服务端使用DCM4CHEE开源PACS系统。
1.Oviyam功能分析
Oviyam主要功能包含Web客户端配置、查询患者列表、图像信息查看、DICOM信息查看、图像的放大、缩小和移动、多帧图像的动态显示等功能。
1.1Web客户端配置
配置客户端获取图像的服务器应用实体,主要配置查询目标应用实体(AE)、主机名或IP地址、端口号(查询)、WADO端口号(获取图像)以及采用的协议(DICOM协议和DICOM安全协议),操作过程如下:在菜单上点击“Config”,弹出配置界面,如图下所示,设置完成后点击“Change”按钮。
1.2查询患者列表
可以通过各类查询条件来查询图像信息,主要提供图像生成日期、患者信息(患者ID、患者姓名等)、查询图像类型(CT、MR、US等),操作如下:
在菜单上点击“Search”按钮,弹出“查询”窗口,如图1所示,主要分三部分:检查时间、患者信息和图像类型,输入要查询的检查时间、患者ID或患者姓名以及要查询的图像类型,点击
“Search”按钮,将向服务器发送查询请求,服务器将根据查询条件获取患者信息列表,如图2所示。
图1
图2
1.3图像信息查看
可以查看图像信息,在图2显示的患者列表中,点击“”按钮,直到显示序列信息,点击“序列信息”,将向WADO服务器发送查看图像信息,WADO服务器将根据所选图像的参数信息(检查UID、序列UID、对象UID等参数),获取此DICOM图像对象,并将此DICOM对象转换为JPEG,并将JPEG图像返回给客户端并在浏览器中显示出来。
1.4DICOM信息查看
可以查看DICOM文件的详细信息(图像只是DICOM文件的一部分),操作过程如下:
在菜单上点击“DICOMInfo”按钮,将弹出DICOM文件的详细信息,如图所示:
1.5图像的放大、缩小和移动
可以对图像进行放大、缩小和移动等基本操作,操作过程如下:
(1)放大与缩小:点击菜单上的“Zoomon”按钮,将出“Zoomin”和“Zoomout”按钮,将鼠标放在“Zoomin”按钮图像将逐渐放大,将鼠标放在“Zoomout”按钮图像将逐渐缩小。
(2)图像移动:点击菜单上的“Move”按钮,将鼠标移动到图像上,按下鼠标左键并移动鼠标,图像将跟随鼠标移动。
1.6多帧图像的动态显示
可以将多帧图像以顺序方式显示,形成动画,在图像显示窗口中点击右上角的图像缩略图,在图像显示窗口将顺序方式显示形成动画效果。
注:对多帧图像,将显示图像当前帧和总帧数。