交换机初始化配置操作
锐捷交换机配置手册完整

锐捷 S3550配置手册第一部分:交换机概述一:交换机的几种配置方法本部分包括以下内容:控制台远程登录其它配置方法本部分内容适用于交换机、路由器等网络设备。
控制台用一台计算机作为控制台和网络设备相连,通过计算机对网络设备进行配置。
1、硬件连接:把 Console线一端连接在计算机的串行口上,另一端连接在网络设备的Console口上。
Console线在购置网络设备时会提供,它是一条反转线,你也可以自己用双绞线进行制作。
按照上面的线序制作一根双绞线,一端通过一个转接头连接在计算机的串行口上,另一端连接在网络设备的 Console 口上。
注意:不要把反转线连接在网络设备的其他接口上,这有可能导致设备损坏。
2、软件安装:在计算机上需要安装一个终端仿真软件来登录网络设备。
通常我们使用 Windows 自带的“超级终端”。
超级终端的安装方法:开始|程序|附件|通信|超级终端。
按照提示的步骤进行安装,其中连接的接口应选择“COM1”,端口的速率应选择“9600”,数据流控制应选择“无”,其它都使用默认值。
登录后,就可以对网络设备进行配置了。
说明:超级终端只需安装一次,下次再使用时可从“开始 | 程序 | 附件 | 通信 | 超级终端”中找到上次安装的超级终端,直接使用即可。
远程登录通过一台连接在网络中的计算机,用Telnet命令登录网络设备进行配置。
远程登录条件:1 、网络设备已经配置了IP 地址、远程登录密码和特权密码。
2、网络设备已经连入网络工作。
3、计算机也连入网络,并且可以和网络设备通信。
说明:远程登录的计算机不是连接在网络设备 Console 口上的计算机,而是网络中任一台计算机。
远程登录方法:在计算机的命令行中,输入命令“telnet 网络设备 IP 地址”,输入登录密码就可以进入网络设备的命令配置模式。
说明:远程登录方式不能用来配置新设备,新设备应该用控制台配置IP 地址等参数,以后才能使用远程登录进行配置。
锐捷交换机配置手册完整2

锐捷S3550配置手册第一部分:交换机概述一:交换机的几种配置方法控制台用一台计算机作为控制台和网络设备相连,通过计算机对网络设备进行配置。
远程登录通过一台连接在网络中的计算机,用Telnet命令登录网络设备进行配置。
其它配置方法除了控制台和远程登录之外,还有其它一些配置方法配置网络设备。
二:命令行(CLI)操作命令模式交换机和路由器的命令是按模式分组的,每种模式中定义了一组命令集,所以想要使用某命令模式的切换交换机和路由器的模式大体可分为四层:用户模式→特权模式→全局配置模式→其它配置CLI命令的编辑技巧CLI(命令行)有以下特点。
常见CLI错误提示% Ambiguous command: "show c"使用no 和default 选项很多命令都有no 选项和default 选项。
三:交换机的初始化配置交换机的初始化配置setup命令四:配置文件的保存、查看与备份查看配置文件模式:特权配置模式。
保存配置文件就是把running-config 保存为startup-config。
删除配置文件删除配置文件就是把NVRAM中的startup-config 删除。
通常我们把配置文件备份到TFTP服务器上,在需要时可以再从TFTP服务器上把配置文五:文件系统文件系统概述交换机和路由器用一个并行Flash作为辅助存储器存储文件,Flash是一个可读可写的存文件操作所有文件操作都是在特权模式下进行。
目录操作Flash中的文件可以使用树形的目录结构,文件可以存放在不同的子目录中,也可以在目六:系统文件的备份与升级搭建环境在备份和升级时需要搭建通信环境,让设备和计算机间可以传输文件。
有三个方案:用TFTP传输文件准备工作:用Xmodem传输文件准备工作:ROM监控模式进入ROM监控模式有两种方法:七:密码丢失的解决方法第二部分:交换机的基本配置一:配置主机名主机名用于标识交换机和路由器,通常它会作为提示符的一部分显示在命令提示符的前二:配置口令配置控制台口令控制台口令是通过控制台登录交换机或路由器时设置的口令。
交换机初始化配置
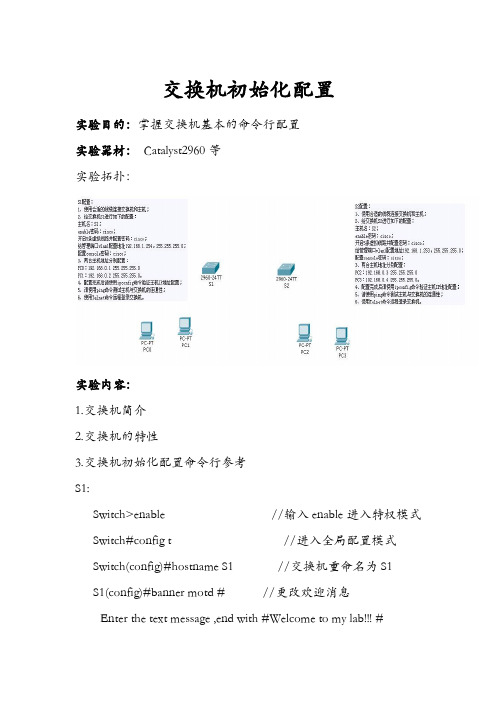
交换机初始化配置实验目的:掌握交换机基本的命令行配置实验器材:Catalyst2960等实验拓扑:实验内容:1.交换机简介2.交换机的特性3.交换机初始化配置命令行参考S1:Switch>enable //输入enable进入特权模式Switch#config t //进入全局配置模式Switch(config)#hostname S1 //交换机重命名为S1S1(config)#banner motd # //更改欢迎消息Enter the text message ,end with #Welcome to my lab!!! #S1(config)#no logging console //关闭日志文件从console口输出S1(config)#enable secret cisco //设置enable密文密码cisco S1(config)#line console 0 //进入console配置子模式S1(config-line)#login //设置登陆S1(config-line)#password cisco //设置console登陆密码cisco S1(config-line)#line vty 0 4 //设置5条远程登录虚拟线路S1(config-line)#login // 设置登陆S1(config-line)#password cisco //设置登陆密码ciscoS1(config)#interface VLAN 1 //进入端口配置子模式S1(config-if)#no ip add //注销以前ip地址S1(config-if)#ip add 192.168.0.254 255.255.255.0 //设置ip地址S1(config-if)#no shutdown //打开端口S2:Switch>enable //输入enable进入特权模式Switch#config t //进入全局配置模式Switch(config)#hostname S2 //交换机重命名为S2S2(config)#banner motd # //更改欢迎消息Enter the text message ,end with #Welcome to my lab!!! # S2(config)#no logging console //关闭日志文件从console口输出S2(config)#enable secret cisco //设置enable密文密码ciscoS2(config)#line console 0 //进入console配置子模式S2(config-line)#login //设置登陆S2(config-line)#password cisco //设置console登陆密码cisco S2(config-line)#line vty 0 4 //设置5条远程登录虚拟线路S2(config-line)#login // 设置登陆S2(config-line)#password cisco //设置登陆密码ciscoS2(config)#interface VLAN 1 //进入端口配置子模式S2(config-if)#no ip add //注销以前ip地址S2(config-if)#ip add 192.168.0.254 255.255.255.0 //设置ip地址S2(config-if)#no shutdown //打开端口。
如何初始化配置H3C交换机
交换机如何初始化配置H3CH3C 3100交换机。
现将配置过程中的方法总结下配置了一批1、连接配置电缆PC的串口上;1.1 将配置电缆的DB-9孔式插头接到要对交换机进行配置的Console 口上。
RJ-45 的一端连到交换机的1.2 将配置电缆的2、设置终端参数上运行终端仿真程序(如超级终端),并在PC 2.1 打开PC 的超级终端为例)设置终端参数(以Windows XP 2.2,流18,奇偶校验为无,停止位为,数据位为2.2.1 参数要求:波特率为9600 量控制为无属性】菜单项,进入属性窗口。
点击/2.2.2 在超级终端属性对话框中选择【文件,页签,进入属性设置窗口,在其中选择终端仿真为VT100属性窗口中的“设置”>按钮。
选择完成后,单击<确定3、起动交换机接通交换机电源,起动交换机。
4、设置交换机名称进入系统视图模式<H3C> system-view //为设备命名[H3C] sysname h3c-3100 //[h3c-3100]XXXX XXXX sysname 就可以重命名为:注:修改交换机名称,只需重新输入VLAN 管理地址5、设置VLAN 1 // 进入[h3c-3100] interface vlan-interface 1VLAN 1 设置// [h3c-3100] ip address 192.168.12.11 255.255.255.0192.168.12.11/24的管理地址为: . . . . 命令即可用新地址ip address 命令,只需重新输入undo 注:修改地址不需用替换原地址为:ip // 修改[h3c-3100] ip address 192.168.12.12255.255.255.0192.168.12.12/24、设置默认网关路由6 外通信如果不设置路由,交换机将不能与LAN设192.168.12.1 // 0.0.0.0 255.255.255.0 [h3c-3100] iproute-static为网关路由地址192.168.12.1/24 置undo 命令删除原来的路由注:修改、替换网关路由,需首先用删除[h3c-3100] undo ip route-static 0.0.0.0 255.255.255.0 192.168.12.1 // 原有路由设192.168.12.254 // [h3c-3100] ip route-static 0.0.0.0255.255.255.0置新的网关路由用户登陆的口令认证、设置Console 7 用户有如下三种认证方式:Console不需要口令认证:None(cipher) (Simple)和密文Password: 需要简单的本地口令认证,包含明文服务器或本地提供用户名和认证口令Scheme:通过RADIUS配置命令如下:<H3C> system-view[H3C] user-interface aux 0[H3C-ui-aux0] authentication-mode password[H3C-ui-aux0] set authentication password simple h3c退出重新启动后,交换机提示用户输入访问口令Login authentication Password:用户的命令控制级别设置[H3C-ui-aux0] user privilege level 0. . . .[H3C] super password level 1 simple 111111[H3C] super password level 2 simple 222222[H3C] super password level 3 simple 333333密码验证配置、TELNET840 [h3c-3100] user-interface vty设置认证方// [h3c-3100-ui-vty0-4] authentication-mode password式为密码验证设置登陆验证[h3c-3100-ui-vty0-4] set authentication password simple h3c //)h3c(明文保存密码为设置登陆用户// [h3c-3100-ui-vty0-4] user privilege level 3)1的级别为最高级3(缺省为本地用户名和密码验证配置9、TELNET 需要输入用户名和密码才可以登陆交换机。
交换机配置—设备初始化配置案例

交换机配置—设备初始化配置案例下面我们来介绍一个交换机初始化配置的案例。
某家高科技涂料生产企业,由于企业的规模不断扩大,公司员工人数增加了很多,为了解决办公空间狭小的问题,公司请求区政府相关部门协调解决。
由于现在的办公场所与政府旧楼只有一墙之隔,经协商,区委办公室将区政府的旧办公楼的其中两层暂时租借给公司使用。
公司的办公人员进入到旧楼之后,网络接入的数量增加不少。
政府旧楼中有一些原来应用的网络设备,但大多由Hub和非网管型交换机组成,现有设备的接入能力将不能满足需求。
公司决定购置一些新的网络设备,其中包括一台Catalyst 2960和另外一台Catalyst 3560交换机,需要将交换机配置远程管理功能并将所有客户端接入到交换机。
但由于政府楼中仍然有一些客户端,要求公司这边自己铺设一根光纤到政府楼内。
对这些交换机第一期工程的需求很简单,只要配置成远程可以管理的设备即可,然后用双绞线成品跳线将所有客户端通过配线架上的端口连通,最后通过光纤测试两边网络的相互可以访问即可。
在开始部署交换机之前,为了今后能够易于管理和排错,必须对交换机进行配置。
那么,交换机的基本配置管理参数都有什么呢?●设备名称;●远程管理和本地管理的密码;●配置管理IP 地址;●时钟和网络时间协议(Network Time Protocol,NTP);●启用远程管理服务;●DNS查找功能。
1.测试交换机要将一台刚关闭或者由供货商刚刚送来的交换机变成一台网络上具备网络通信功能的设备,这需要一系列的步骤。
第1步:检查清单根据上述需求描述,将供货商送来的交换机执行如下步骤:开包、配置、上架、连接跳线和检查配置。
因此,首先要打开交换机的包装检查配件是否齐全,如图18所示,包含了Catalyst 2960交换机包装箱内的所有物品。
图18 Catalyst 2960交换机运输箱内清单第2步:配置超级终端交换机通常没有用于开启和关闭的电源开关,这和路由器与防火墙是不同的,它只是通过连通和断开电源进行控制。
交换机恢复出厂设置

2)switch: flash_init //初始化flash文件系统
3)switch: dir flash: //命令显示flash中所保存的配置文件的名称。
4)switch: rename flash:config.text flash:config.old //命令把原来的配置文件改名为config.old。(NVRAM是从flash虚拟的,flash:config.text =startup-config)
7)switch# rename flash:config.old flash:config.text //把配置文件名字修改回来
8)switch#copy flash:config.text running-config //把配置文件从FLASH中装载到RAM中。
9)Switch# config terminal //进入全局配置模ห้องสมุดไป่ตู้
10)Switch(config)# no enable password //删除使能密码
11)Switch(config)# no enable secret //删除加密的密码
12)Switch(config)# end //直接返回到特权模式
13)Switch# show runnig-config //查看正在进行的配置文件,请注意查看密码
5)switch: reset //命令把原来的配置文件改名为config.old。重新启动交换机,这时交换机找不到其配置文件(所以配置文件中的特权密码也就无效),系统就会提示是否进入“配置对话(configuration dialog)” ,选择“N” 。
Cisco思科光纤交换机配置说明.doc
Cisco思科光纤交换机配置说明Cisco思科光纤交换机配置说明的方法1. 初始化信息首次设置,必须通过console进行连接(需要U口转DB9针的接口线,专门卖接口线的有卖大约30元),然后进行初始化设计,以后设定IP后可通过LAN进行登陆具体步骤:(红色字体部分着重注意,需要进行设置,大部分按照默认设置即可,而且设置的部分进入管理工具软件可以更改) ---- System Admin Account Setup ----Enter the password for admin : passwordConfirm the password for admin : password--- Basic System Configuration Dialog ---This setup utility will guide you through the basic configuration of the system. Setup configures only enough connectivity for management of the system.Press Enter at any time to skip any dialog. Use ctrl-c at anytime to skip the remaining dialogs.Would you like to enter the basic configuration dialog (yes/no): y Create another login account (yes/no) [n]:Configure read-only SNMP community string (yes/no) [n]: Configure read-write SNMP community string (yes/no) [n]:Enter the switch name: Pxx-MDS-x (where xx is your pod number and x is the switch number; for example:P01-MDS-1)Continue with Out-of-band (mgmt0) management configuration? (yes/no) [y]:Mgmt0 IPv4 address : 10.0.x.y (where x is your pod number and y is 5 for MDS-1 and 3 for MDS-2)(客户)0.16Mgmt0 IPv4 netmask : 255.255.255.0Configure the default gateway? (yes/no) [y]:IPv4 address of the default gateway : 10.0.x.254 (where x is your pod number)Configure advanced IP options? (yes/no) [n]:Enable the telnet service? (yes/no) [y]:Enable the ssh service? (yes/no) [n]:Configure the ntp server? (yes/no) [n]:Configure default switchport interface state (shut/noshut) [shut]: (注意一下)noshutConfigure default switchport trunk mode (on/off/auto) [on]:Configure default zone policy (permit/deny) [deny]:Enable full zoneset distribution (yes/no) [n]:NOTE:初始设定的配置对新的VSAN起作用,即原始VSAN1无这些配置解决办法:1 zone default-zone permit VSAN2 新建NEW VSAN2 将port转移VSAN2里面。
交换机初始化(setup,以及命令形式)

交换机初始化(setup,以及命令形式) 交换机的初始化配置⽅式分为两种,⼀种是steup的交互式配置模式,⼀种是逐条命令的配置模式提要1:同时配置明⽂密码与暗⽂密码时,暗⽂密码⽣效⽽明⽂密码不⽣效这⾥将⾸先演⽰setup的⽅式配置 进⼊特权模式 Switch> enable 输⼊setup Switch#setup 确认配置 Continue with configuration dialog? [yes/no]: yes 输⼊主机名sd Enter host name [Switch]: sd 输⼊加密密码 Enter enable secret: 123 输⼊明⽂密码 Enter enable password: 456 输⼊远程链接密码 Enter virtual terminal password: 789 不启动snmp Configure SNMP Network Management? [no]:no 进⼊接⼝vlan1 management network from the above interface summary: vlan1 是否配置vlan1 Configuring interface Vlan1: Configure IP on this interface? [yes]:yes 配置vlan1的ip并确认 IP address for this interface: 192.168.0.1 配置IP Subnet mask for this interface [255.255.255.0] : 确认⼦⽹掩码 Would you like to enable as a cluster command switch? [yes/no]:yes 确认 确认配置保存 [0] Go to the IOS command prompt without saving this config. [1] Return back to the setup without saving this config. [2] Save this configuration to nvram and exit. Enter your selection [2]: 2命令配置模式 enable 进⼊特权模式 conf t 进⼊全局配置模式 no ip domain-lookup 去除域名解析(使命令误输⼊之后不会陷⼊假死状态) hostname qsq 更改交换机名称 enable password 123 设置明⽂密码 enable secret 456 设置暗⽂密码 line vty 0 4 设置远程登陆终端上限 password 789 设置远程登陆密码 login 启⽤远程登陆密码验证 exit 退出 interface vlan1 进⼊vlan1 ip address 192.168.1.1 255.255.255.0 配置vlan1的IP地址与⼦⽹掩码 no shutdown 激活vlan1 end 返回⾄特权模式 copy running-config startup-config 保存配置。
Cisco Nexus 数据中心交换机配置介绍

Journey2011.11一、 Nexus 5000 基础配置Ø 为N5K交换机配管理接口及 管理接口及IP地址。
Ø 激活Layer 3 License Ø 软件升级1.1 初始化配置系统加电自检通过后,进入系统初始化界面 进入系统初始化界面,如下操作: ---- System Admin Account Setup ---Do you want to enforce secure password standard (yes/no): no Enter the password for "admin": P@ssw0rd Confirm the password for "admin": P@ssw0rd Would you like to enter the basic configuration dialog (yes/no): no 输入管理账号和密码进入配置模式配置管理 IP:switch login: admin Password: P@ssw0rd switch # configure terminal switch #(config)# interface mgmt0 (config)# switch (config-if)# ip address 192.168.2.82 255.255.255.0 if)# switch (config-if)#no shut down no switch (config-if)#exit switch (config)# copy run start1.2 用购买的 License 激活 Layer 3 License:首先需要查看 hostid, ,用来绑定 License,命令如下 switch# show license host-id idLicense hostid: VDH=FOX17 731KTV5 “FOX1731KTV5”即为该设备的 hostid,复制出来备用。
S5700交换机初始化和配置
华为S5700交换机初始化和配置TELNET远程登录方法:1,交换机开启Telnet服务<Huawei>system-view #进入系统视图[Huawei]telnet server ? #查看有enable还是disable选项,选择对应的开启方式。
[Huawei]telnet server enable #enable选项开启Telnet服务(普通系列一般为这个)[Huawei]undo telnet server disable #disable选项开启Telnet服务(CE高端系列一般为这个)2,配置VTY用户界面的最大个数(同时可以登录的最大数)[Huawei]user-interface maximum-vty 15 #默认是5,这个可以不设置3,配置VTY用户界面的终端属性[Huawei]user-interface vty 0 14 #上面是15所有这里是0 14 如果选择默认这里是0 4 [Huawei-ui-vty0-14]protocol inbound telnet #配置vty支持telnet协议4,配置VTY用户界面的用户验证方式[Huawei-ui-vty0-14]authentication-mode aaa #配置用户终端的身份验证模式为aaa认证为aaa认证[Huawei-ui-vty0-14]quit #退出vty配置界面5,配置登录验证方式[Huawei]aaa #进入aaa配置模式[Huawei-aaa]local-user admin1234 password ? #查看可以选择的密码选择[Huawei-aaa]local-user admin1234 password simple Huawei1234 #密码选项simple 账号admin1234 密码Huawei1234 (普通系列一般为这个)[Huawei-aaa]local-user admin1234 password irreversible-cipher Huawei12#$ #密码选项irreversible-cipher 账号admin1234 密码Huawei12#$ (CE高端系列一般为这个)[Huawei-aaa]local-user admin1234 service-type telnet #配置接入服务类型,如果还需要SSH 登录请加上[Huawei-aaa]local-user admin1234 privilege level 3 #配置账号的级别,默认3级是超级管理员的权限[Huawei-aaa]quit #退出<Huawei>telnet 127.0.0.1 #测试telnet配置是否OK<Huawei>save #保存配置===================================================================华为S5700交换机初始化和配置SSH和TELNET远程登录方法:AAA是指:authentication(认证)、authorization(授权)、accounting(计费)的简称,是网络安全的一种管理机制;Authentication是本地认证/授权,authorization和accounting是由远处radius(远程拨号认证系统)服务或hwtacacs(华为终端访问控制系统)服务器完成认证/授权;AAA是基于用户进行认证、授权、计费的,而NAC方案是基于接入设备接口进行认证的,在实际应用中,可以使用AAA的一种或两种服务。
SC2000 初始化及配置全过程 -Double SC FC Port

SC2000 初始化及配置全过程此文档是针对SVC2000初始化过程(双控 FC Port)步骤如下:1.升级好EM后打开EM管理软件出现如下画面,打开EM Client;2.点击第一个Discover and configure Uninitialized SCv2000 Series Storage Centers3.去Discover SC2000->Next4.发现网络中的SC2000,有ST,HSN,MAC5.选择Next,输入相关的管理IP,控制器的IP,网关和DNS->Next6.设置Admin的密码和SMTP的邮件告警邮箱->Next7.确认配置信息是否正确->Apply Configuration8.开始初始化存储9.完成后如下,需要点时间去初始化->Next10.只有Virtual Port模式没有legacy模式,链接2个交换机划分2个Domain,以后端口IP 要对应正确->Next11. 8个端口都选择上后选择ok;12.前端开始配置->Next13.配置时间14.配置SMTP邮件服务器->Next(可以自己搭建一个邮件服务器,如果存储不能上外网的话)15.选择SupportAssist->Next;16.填写相关报警信息,戴尔收到邮件后会通过这个优先联系客户->Next16.第一次部署会先联网下载最新固件更新SCOS->Next17.这个时间比较久,可以选择跳过,如果后面要更新可以通过SCUU来更新,这里没有连接到网络->Next18.在这个最后的界面可以直接配置卷和主机的映射,就可以使用。
19.点Configure this host to access a Storage Center,就会连接这台安装EM客户端的服务器与SC2000之间连接;20. Create Server21.自动配置主机的MPIO22.这里创建失败了网络可能有点问题(检查是否按照最佳实践配置的网络,后面会告诉你为什么不行),跳过这个继续;23.选择Create a volume->Next24.大小->Next;25.没主机->Next26.Next->Finish27.选择Configure Embedded iSCSI Ports输入相关IP后点OK28.再回头创建主机看是否可以,现在可以了如下,因为之前没有和其连接的iSCSI IP->Login29.Create Server30.可以这个时候选择创建卷,也可以直接finish31.最后Finish这样这个初始化基本完成了。
VH24配置指南

目录第1章.VH2402 初始化配置指南 (2)1.1.加电进入配置状态 (2)1.2.交换机管理地址配置 (2)第2章.VH2402 WebView配置指南 (5)2.1.进入WebView (5)2.2.创建VLAN (6)2.3.关闭/打开端口 (7)2.4.端口MAC地址绑定 (8)第1章.VH2402 初始化配置指南一台全新的VH2402交换机,初始时只能通过串口线进行配置。
1.1.加电进入配置状态一台全新的交换机在加电后,首先进入“登陆主界面”,如下:初始用户名为:admin(超级用户权限)或guest(普通用户权限);密码均为空。
正确输入用户名和密码后,即可对交换机进行配置:1.2.交换机管理地址配置首先要进行交换机管理地址的配置。
配置交换机的管理地址主要是便于用户通过Telent或WebView的方式进行交换机的管理。
配置方法如下:A.选择如下图例中的,主菜单中的“Management Setup Menu”选项;B.进入“Management Setup Menu”菜单后,选择如下图例中的,“Network Configuration”选项;C.进入“Network Configuration”菜单后,选择“IP Configuration”菜单;D.进入“IP Configuration”菜单后,既可以配置交换机的IP地址、子网掩码、网关等基本的配置。
E.配置完成后,选择<APPL Y>使配置生效。
第2章.VH2402 WebView配置指南基本配置完成后,我们即可以通过WEB方式进行配置。
2.1.进入WebView在浏览器中输入:HTTP://交换机的管理地址,系统提示输入用户名和密码,如下图所示:输入用户名(admin或guest)、密码即可进入WebView主界面,如下图:2.2.创建VLAN选择主界面左侧的菜单栏“VLAN”,进入如下主界面:在VLAN界面内可以实现VLAN的创建、修改主引擎必须安装在8插槽。
交换机的初始化及其端口流量的SNMP监控

交换机的初始化及其端口流量的SNMP监控一.交换机的配置本文从使用console口配置交换机开始,如何通过usb2console的线缆连接交换机,这里将不再赘述。
1.使用linux下的minicom或者windows下的putty,xshell之类的工具连接交换机因为交换机配置过,存在旧的配置以及各类未知密码,为了避免影响,我们需要初始化交换机设置。
交换机型号为,H3C S5024P,该型号交换机软件具有多个版本,对于重置密码的方式,请参考以下信息:R0103~R0108,提供条码和MAC,联系H3C工程师计算E0101~E0102P01,需要通过特殊软件计算,联系H3C工程师指导操作R0109通过console口登陆输入SYS,即可重置密码重置交换机设置,查看当前交换机ip设置本地ip地址跟管理地址在同一子网内,登陆管理页面,默认密码为admin,当设置了超级用户密码的情况下,请使用超级密码登陆。
点击恢复按钮,交换机将初始化为出厂状态交换机重置后的设置1.设置主机名2.设置超级用户密码3.更改默认的管理ip4.配置SNMP演示的认证字符为hintsoft,可按实际要求更改,该值会在最后的监控环节使用到5.保存设置以上的设置只是当前生效,需要将配置长期保存,不受重启的影响6.测试SNMP是否生效使用linux的snmpwalk命令,查看能否收集到信息,正确情况如下如果未能有以上显示,请检查测试机器与交换机直接的连通性以及交换机上的snmp设置信息,确保信息无误。
二、通过zabbix proxy方式监控内网交换机的端口流量1.配置好yum源,安装编译zabbix_proxy所需的安装包#yum install mysql mysql-server mysql-devel net-snmp net-snmp-devel curl-devel gcc gcc-c++autoconf-y2.编译安装zabbix proxy#cd/root/zabbix-2.2.4#./configure--prefix=/usr/local/zabbix--enable-proxy--with-mysql--with-net-snmp --with-libcurl#make&&make install3.数据库配置#service mysqld start#chkconfig mysqld on#mysql_secure_installation<交互完成安全配置工作>#mysql-uroot-pMysql>create database zabbix character set utf8;Mysql>GRANT ALL ON zabbix.*TO zabbix@'localhost'IDENTIFIED BY'zabbix'; Mysql>flush privileges;Mysql>use zabbixMysql>source/root/zabbix-2.2.4/database/mysql/schema.sql4.zabbix proxy的配置#useradd zabbix修改/usr/local/zabbix/etc/zabbix_proxy.conf文件的以下参数为实际环境值ServerHOSTNAMEDBNameDBUserDBPassword5.Proxy的添加启动zabbix proxy并在server的web界面添加proxy,注意查看日志信息上图显示的Proxy_Interal为/usr/local/zabbix/etc/zabbix_proxy.conf定义的HOSTNAME的参数,请在web界面添加proxy时注意保持名称的一致性。
1.1 交换机的初始化配置

任务1 交换机的初始化配置【项目情境】你是某公司的网络管理员,现在新买了一台二层交换机,需要安装在某个车间,要对其进行初台化配置,配置的内容包括:终端密码(控制台console口)、虚拟终端密码(远程登录密码)、用户特权密码、管理地址以及默认网关。
【项目目的】1.能对交换机进行初始化配置的拓扑搭建与正确连线。
2.能正确使用PC机的超级终端,会配置交换机名称与控制台密码。
3.会配置和验证交换机的远程登录密码。
4.会配置和验证交换机的特权密码(加密和非加密两种方式)。
5.会配置交换机的管理地址与默认网关。
6.会配置PC机的网卡地址与默认网关。
7.会保存配置命令、配置文件和提交作业。
【相关设备】二层交换机一台、PC机一台、交换机配置线1根、直连线1根。
【项目拓扑】【项目任务】1.先通过配置线进行网络拓扑搭建(如下图),指定相关端口(console和RS232)并进行正确连线,并对交换机和PC机进行名称标注。
2.通过PC机的超级终端(开始→程序→附件→通讯→超级终端)进入交换机(如下图),配置交换机名为SW2950。
3.设置交换机的控制台密码为123456。
退出到用户模式,退出超级终端,重新进入,验证控制台密码的有效性。
4.设置交换机的特权密码(非加密)为swpassword,特权密码(加密)为swsecret,注意两种密码同时设置时,加密的密码有效,非加密的变为无效。
退出到用户模式,再进入特权模式并验证特权密码的有效性。
5.配置交换机的管理IP为192.168.0.10/24,配置交换机的默认网关为192.168.0.254。
6.设置交换机的远程登录密码为abcdef。
7.配置PC1的IP为192.168.0.1/24,默认网关为192.168.0.2548.(1)如下图,删除配置线,用直连线对交换机和PC机连接,注意端口 (F0/1和网卡)的变化。
(2)在PC1上测试自己的地址和交换机地址的连通性(ping命令),一定要调通。
aruba交换机配置-实战篇

一,忘记密码按以下操作超级账号密码passwordforgetme!!Admin 密码修改ArubaS2500-24P) (config) #mgmt-user admin rootPassword:******** //admin123!Re-Type password:******** //admin123!(ArubaS2500-24P) (config) #endEnable 密码重新设置(ArubaS2500-24P) (config) #enable secret?secret Enter the enable password(ArubaS2500-24P) (config) #enable secretPassword:****** 、直接输入新密码、Re-Type password:****** 再次输入这个账号只能用于需改密码,需要配置的话要退出用admin账号进入才能操作二,交换机初始化<<<<< Welcome to Aruba Networks - Aruba S2500-24P >>>>>User: adminPassword: ******** ///admin123//默认密码(ArubaS2500-24P) >enablePassword:****** //enableQuick-setup helps in setting the basic configuration of the system Autoconfiguration of system will be stopped, if Quick-setup is launched by userInvoke Quick-setup (y|n) [y]:y***************** Welcome to the ArubaS2500-24P setup dialog ***************** This dialog will help you to set the basic configuration for the switch.These settings, except for the Country Code, can later be changed from the Command Line Interface or Graphical User Interface.Commands: <Enter> Submit input or use [default value], <ctrl-I> Help<ctrl-B> Back, <ctrl-F> Forward, <ctrl-A> Line begin, <ctrl-E> Line end<ctrl-D> Delete, <BackSpace> Delete back, <ctrl-K> Delete to end of line<ctrl-P> Previous question <ctrl-X>, Restart beginning, <ctrl-C> to exitEnter System name [ArubaS2500-24P]: aruba2500-xmu-2fConfigure inband management VLAN [yes|no]: yes 是否开启管理VLANInband management vlan id [1]: 711 管理VLAN段Enter the member interfaces for management VLAN (Example 0/0/0,0/0/1): 0/0/23,0/1/1 添加需要trunk的端口Enter management VLAN IP address [172.16.0.254]: 172.31.11.2 管理ipEnter mgmt VLAN interface subnet mask [255.255.255.0]: 回车Enter Out of band management interface IP address [none]: 回车Enter IP Default gateway [none]: 172.31.11.1 网关Enter Country code (ISO-3166), <ctrl-I> for supported list: CN 中国You have chosen Country code CN for China (yes|no)?: yesEnter Time Zone [PST-8:0]: CST+8:0Enter Time in UTC [03:48:15]:Enter Date (MM/DD/YYYY) [7/4/2013]:Enter Password for admin login (up to 32 chars): ********* //admin123!Re-type Password for admin login: ********* //admin123!Enter Password for enable mode (up to 15 chars): ****** //enablleRe-type Password for enable mode: ****** //enable Current choices are:System name: aruba2500-xmu-2fConfigure inband management VLAN: yesvlan id for inband management [1-4094]: 711Members interfaces of management VLAN: 0/0/23,0/1/1IP address of management VLAN: 172.31.11.2Management VLAN interface subnet mask: 255.255.255.0IP Default gateway: 172.31.11.1Country code: CNTime Zone: CST+8:0Type <ctrl-P> to go back and change answer for any questionDo you wish to accept the changes (yes|no|abort): yesCreating configuration...Done.Configuring...Saving Configuration...Configuration Saved.(aruba2500-xmu-2f) #configure terEnter Configuration commands, one per line. End with CNTL/Z(aruba2500-xmu-2f) (config) #telnet cli //开启telnet功能(aruba2500-xmu-2f) (config) #end(aruba2500-xmu-2f) #show ip interface briefInterface IP Address / IP Netmask Admin Protocolvlan 711 172.31.11.2 / 255.255.255.0 Up Upmgmt unassigned / unassigned Up Down(aruba2500-xmu-2f) #ping 172.31.11.1Press 'q' to abort.Sending 5, 100-byte ICMP Echos to 172.31.11.1, timeout is 2 seconds:.....Success rate is 0 percent (0/5)(aruba2500-xmu-2f) #ping 172.31.11.1(aruba2500-xmu-2f) #configure ter(aruba2500-xmu-2f) (config) #interface-group gigabitethernet ap 创建端口组(aruba2500-xmu-2f) (gigabitethernet "ap") #apply-to 0/0/0-0/0/23 把0/0/0-0/0/23加入组中(aruba2500-xmu-2f) (gigabitethernet "ap") #exit(aruba2500-xmu-2f) (switching profile "ap") #vlan 712 创建vlan712(我给AP用的)(aruba2500-xmu-2f) (VLAN "712") #exit(aruba2500-xmu-2f) (config) #interface-profile switching-profile ap(aruba2500-xmu-2f) (switching profile "ap") #access-vlan 712 关联(aruba2500-xmu-2f) (switching profile "ap") #exit(aruba2500-xmu-2f) (config) #interface-profile poe-profile ap(aruba2500-xmhu-2f) (Power over Ethernet profile "ap") #enable 开启POE供电功能(aruba2500-xmu-2f) (Power over Ethernet profile "ap") #exit(aruba2500-xmu-2f) (config) #interface-group gigabitethernet ap(aruba2500-xmu-2f) (gigabitethernet "ap") #switching-profile ap 应用到端口(aruba2500-xmu-2f) (gigabitethernet "ap") #poe-profile ap 应用到端口(aruba2500-xmu-2f) (gigabitethernet "ap") #end如果想把那个端口trunk,可以这样(aruba2500-xmu-2f) (config) #interface g 0/0/2(aruba2500-xmu-2f) #switching-profile Upstream-profile删除的话就加no(aruba2500-xmu-2f) #no switching-profile Upstream-profile如果要把那个端口加入vlan20(aruba2500-xmu-2f) #vlan 20(aruba2500-xmu-2f) (VLAN "20") #exit(aruba2500-xmu-2f) (config) #interface-profile switching-profile 20(aruba2500-xmu-2f) (switching profile "ap") #access-vlan 20(aruba2500-xmu-2f) (config) #interface g 0/0/2(aruba2500-xmu-2f) #switching-profile 20删除就加no(aruba2500-xmu-2f) #no switching-profile 20或者(aruba2500-xmu-2f) #no switching-profile三,升级配置把网线接到23口,电脑开启tftp服务器软件ArubaS2500-24P) (config) #interface-profile switching-profile ftp //--创建模板FTP (ArubaS2500-24P) (switching profile "ftp") #access-vlan 1 关联vlan1(ArubaS2500-24P) (switching profile "ftp") #exit(ArubaS2500-24P) (config) #interface gigabitethernet 0/0/23(ArubaS2500-24P) (gigabitethernet "0/0/23") #switching-profile ftp //启用ftp(ArubaS2500-24P) (gigabitethernet "0/0/23") #exit(ArubaS2500-24P) (config) #interface vlan 1(ArubaS2500-24P) (vlan "1") #ip address 10.0.0.1 255.0.0.0(ArubaS2500-24P) (vlan "1") #exit(ArubaS2500-24P) (config) #end(ArubaS2500-24P) #ping 10.0.0.5(ArubaS2500-24P) #(ArubaS2500-24P) #(ArubaS2500-24P) #copy ftp: 10.0.0.5 admin ArubaOS_MAS_7.2.2.1_38712 system: partition 0 Password:****** //---admin和密码是ftp的用户名和没密码,10.0.0.5是电脑的ip Press 'q' to abort.Copying file:............................................................File copied successfully.Saving file to flash:...Member-0:The system will boot from partition 0 during the next reboot.(ArubaS2500-24P) #re?reload Coldstart the switchrename rename a filerestore restore file or configuration(ArubaS2500-24P) #reloadDo you want to save the configuration(y/n): nDo you really want to restart the system(y/n): y System will now restart!Shutdown processing started(aruba2500-xmu-2f) #write memory 保存Saving Configuration...Configuration Saved.(aruba2500-xmu-2f) #show running-config Building Configuration...## Configuration file for ArubaOSversion 7.2enable secret "******"telnet clihostname "aruba2500-xmu-2f"clock timezone CST 8location "Building1.floor1"controller config 3ip access-list eth validuserethaclpermit any!!!ip access-list stateless dns-acl-statelessany any svc-dns permit!ip access-list stateless http-acl-statelessany any svc-http permit!ip access-list stateless https-acl-statelessany any svc-https permit!ip access-list stateless icmp-acl-statelessany any svc-icmp permitip access-list stateless logon-control-statelessany any svc-icmp permitany any svc-dns permitany any svc-dhcp permitany any svc-natt permit!ip access-list session validusernetwork 169.254.0.0 255.255.0.0 any any denyany any any permitipv6 alias any6 alias any6 any permit!user-role authenticatedaccess-list stateless allowall-stateless!user-role denyall!user-role guestaccess-list stateless http-acl-statelessaccess-list stateless https-acl-statelessaccess-list stateless dhcp-acl-statelessaccess-list stateless icmp-acl-statelessaccess-list stateless dns-acl-stateless!user-role logonaccess-list stateless logon-control-stateless!!crypto ipsec transform-set default-boc-bm-transform esp-3des esp-sha-hmac crypto ipsec transform-set default-rap-transform esp-aes256 esp-sha-hmac crypto isakmp eap-passthrough eap-tlscrypto isakmp eap-passthrough eap-peapcrypto isakmp eap-passthrough eap-mschapv2mgmt-user admin root 9a05893a01941ea9fadbe8f7f92075bc5b5c8189ef96622520no firewall attack-rate cp 1024ipv6 firewall ext-hdr-parse-len 100!!firewall cppacket-capture-defaults tcp disable udp disable sysmsg disable other disable !ip domain lookup!country CNaaa authentication mac "default"!aaa authentication dot1x "default"!aaa server-group "default"auth-server Internalset role condition role value-of!aaa profile "default"!aaa authentication captive-portal "default"!aaa authentication vpn "default"!aaa authentication mgmt!aaa authentication wired!web-server!aaa password-policy mgmt!traceoptions!qos-profile "default"!policer-profile "default"!ip-profiledefault-gateway 172.31.11.1!lcd-menu!interface-profile ospf-profile "default"area 0.0.0.0!interface-profile pim-profile "default"!interface-profile igmp-profile "default"!stack-profile!ipv6-profile!interface-profile switching-profile "ap"access-vlan 712!interface-profile switching-profile "default"!interface-profile switching-profile "Upstream-profile"switchport-mode trunk!interface-profile poe-profile "ap"enable!interface-profile poe-profile "default"!interface-profile poe-profile "poe-factory-initial"enable!interface-profile enet-link-profile "default"!interface-profile lldp-profile "default"!interface-profile lldp-profile "lldp-factory-initial"lldp transmitlldp receivemed enable!interface-profile mstp-profile "default"!interface-profile pvst-port-profile "default"!vlan-profile mld-snooping-profile "default"!vlan-profile igmp-snooping-profile "default"!vlan-profile igmp-snooping-profile "igmp-snooping-factory-initial" !spanning-treemode mstp!gvrp!mstp!lacp!vlan "1"igmp-snooping-profile "igmp-snooping-factory-initial"!vlan "711"!vlan "712"!interface gigabitethernet "0/1/1"switching-profile "Upstream-profile"!interface vlan "711"ip address 172.31.11.2 255.255.255.0!interface mgmt!interface-group gigabitethernet "ap"apply-to 0/0/0-0/0/23poe-profile "ap"switching-profile "ap"!interface-group gigabitethernet "default"apply-to ALLlldp-profile "lldp-factory-initial"poe-profile "poe-factory-initial"!snmp-server view ALL oid-tree iso includedsnmp-server group ALLPRIV v1 read ALL notify ALLsnmp-server group ALLPRIV v2c read ALL notify ALLsnmp-server group ALLPRIV v3 noauth read ALL notify ALL snmp-server group AUTHPRIV v3 priv read ALL notify ALL snmp-server group AUTHNOPRIV v3 auth read ALL notify ALLsnmp-server enable trapprocess monitor logend(aruba2500-xmu-2f) #(aruba2500-xmu-2f) #(aruba2500-xmu-2f) #(aruba2500-xmu-2f) #write memorySaving Configuration...Configuration Saved.(aruba2500-xmu-2f) #show ip interface briefInterface IP Address / IP Netmask Admin Protocol vlan 711 172.31.11.2 / 255.255.255.0 Up Up mgmt unassigned / unassigned Up Down(aruba2500-xmu-2f) #ping 172.31.11.1Press 'q' to abort.Sending 5, 100-byte ICMP Echos to 172.31.11.1, timeout is 2 seconds:Success rate is 100 percent (5/5), round-trip min/avg/max = 1.525/1.922/2.534 ms(aruba2500-xmu-2f) #write memorySaving Configuration...Configuration Saved.(aruba2500-xmu-2f) #configure terminalEnter Configuration commands, one per line. End with CNTL/Z(aruba2500-xmu-2f) (config) #end(aruba2500-xmu-2f) #(aruba2500-xmu-2f) #(aruba2500-xmu-2f) #(aruba2500-xmu-2f) #copy ftp: 172.1.1.1.1 ?<user> Enter the user name(aruba2500-xmu-2f) #copy ftp: 172.1.1.1.1 endwin ?<filename> Enter the file name(aruba2500-xmu-2f) #copy ftp: 172.1.1.1.1 endwin ArubaOS_MAS_7.2.2.1_38712 ? flash: Copy to the flash file systemmember: Copy to a stack membersystem: System Partition(aruba2500-xmu-2f) #copy ftp: 172.1.1.1.1 endwin ArubaOS_MAS_7.2.2.1_38712 system: partition 0 ?<cr>(aruba2500-xmu-2f) #copy ftp: 172.1.1.1.1 endwin ArubaOS_MAS_7.2.2.1_38712 system: partition 0 ?<cr>(aruba2500-xmu-2f) #dir-rw-r--r-- 1 root root 35729264 Jul 4 09:36 ArubaOS_MAS_7.2.2.1_38712.1_38712-rw-r--r-- 1 root root 4905 Jul 4 11:55 default.cfg-rw-r--r-- 1 root root 40 Jul 4 11:46 stack_db.dbdrwx------ 2 root root 4096 Jul 4 11:00 tpm(aruba2500-xmu-2f) #copy running-config ?flash: Copy to the flash file systemftp: Ftp file systemstartup-config Copy to Startup configurationtftp: TFTP file system(aruba2500-xmu-2f) #configure terEnter Configuration commands, one per line. End with CNTL/Z(aruba2500-xmu-2f) (config) #interface vlan 1(aruba2500-xmu-2f) (vlan "1") #ip address 192.168.100.1 255.255.255.0(aruba2500-xmu-2f) (vlan "1") #exit(aruba2500-xmu-2f) (config) #interface gigabitethernet 0/0/23(aruba2500-xmu-2f) (gigabitethernet "0/0/23") #switching-profile ?<profile_name> Profile name(aruba2500-xmu-2f) (gigabitethernet "0/0/23") #exit(aruba2500-xmu-2f) (config) #interface-profile switching-profile ftp(aruba2500-xmu-2f) (switching profile "ftp") #access-vlan vlan 1^% Invalid input detected at '^' marker.(aruba2500-xmu-2f) (switching profile "ftp") #access-vlan 1(aruba2500-xmu-2f) (switching profile "ftp") #exit(aruba2500-xmu-2f) (config) #interface gigabitethernet 0/0/23(aruba2500-xmu-2f) (gigabitethernet "0/0/23") #switching-profile ftp(aruba2500-xmu-2f) (gigabitethernet "0/0/23") #end(aruba2500-xmu-2f) #ping 192.168.100.100Press 'q' to abort.Sending 5, 100-byte ICMP Echos to 192.168.100.100, timeout is 2 seconds:Success rate is 100 percent (5/5), round-trip min/avg/max = 1.641/4.102/13.924 ms(aruba2500-xmu-2f) #copy running-config ?flash: Copy to the flash file systemftp: Ftp file systemstartup-config Copy to Startup configurationtftp: TFTP file system(aruba2500-xmu-2f) #copy running-config ftp: ?<ftphost> Enter the ftp server ip address(aruba2500-xmu-2f) #copy running-config ftp: 192.168.100.100 ?<user> Enter the ftp user name(aruba2500-xmu-2f) #copy running-config ftp: 192.168.100.100 endwin ?<password> Enter the ftp user password(aruba2500-xmu-2f) #copy running-config ftp: 192.168.100.100 endwin endwin ?<filename> Enter the file name(aruba2500-xmu-2f) #copy running-config ftp: 192.168.100.100 endwin endwin s2500.cfg (aruba2500-xmu-2f) #(aruba2500-xmu-2f) #(aruba2500-xmu-2f) #copy running-config ftp: 192.168.100.100 endwin endwin s25001.txt (aruba2500-xmu-2f) #。
华为交换机初始设置

1、初始化过程:连上console 线后,设置超级终端,(参数选默认)
进入后reset saved-configuration选择main ,切记交换机加电重启,否则不生效;(此时,交换机会变成出厂默认状态)
2、进行设置
A、syetem 进入配置模式
B、sysname name ;name 为需要的交换机名称
C、vlan n ;n为需添加的vlan 号(vlan1 为默认,不能创建及删除)
D、manage n ;将VLAN n 设为管理VLAN
E、int eth 0/25 ; 进入25 口进行配置
F、des to_ly_ ma5200_eth0/8 ;端口描述
G、port link-type trunk ;将25 口定义为上连口
H、port trunk permit vlan all ;上连口允许所有vlan 通过
I、q
J、int vlan n ;配置管理vlan n
K、ip addr *.*.*.* ;配置管理IP及子网掩码
L、IP route *.*.*.* ;配置交换机缺省路由
M、super password level 3 cipher 123456 ;配置超级密码为123456
N、local-user root ;配置超级用户
O、password cipher 123456 ; 配置密码
P、service-type telnet level 3 ; 定义用户级别
Q、q。
aruba交换机配置-实战篇

aruba交换机配置-实战篇一,忘记密码按以下操作超级账号密码passwordforgetme!!Admin 密码修改ArubaS2500-24P) (config) #mgmt-user admin rootPassword:******** //admin123!Re-Type password:******** //admin123!(ArubaS2500-24P) (config) #endEnable 密码重新设置(ArubaS2500-24P) (config) #enable secret?secret Enter the enable password(ArubaS2500-24P) (config) #enable secretPassword:****** 、直接输入新密码、Re-Type password:****** 再次输入这个账号只能用于需改密码,需要配置的话要退出用admin账号进入才能操作二,交换机初始化<<<<< Welcome to Aruba Networks - Aruba S2500-24P >>>>>User: adminPassword: ******** ///admin123//默认密码(ArubaS2500-24P) >enablePassword:****** //enableQuick-setup helps in setting the basic configuration of the system Autoconfiguration of system will be stopped, if Quick-setup is launched by userInvoke Quick-setup (y|n) [y]:y***************** Welcome to the ArubaS2500-24P setup dialog ***************** This dialog will help you to set the basic configuration for the switch.These settings, except for the Country Code, can later be changed from the Command Line Interface or Graphical User Interface.Commands: Submit input or use [default value], HelpBack, Forward, Line begin, Line endDelete, Delete back, Delete to end of linePrevious question , Restart beginning, to exitEnter System name [ArubaS2500-24P]: aruba2500-xmu-2fConfigure inband management VLAN [yes|no]: yes 是否开启管理VLANInband management vlan id [1]: 711 管理VLAN段Enter the member interfaces for management VLAN (Example 0/0/0,0/0/1): 0/0/23,0/1/1 添加需要trunk的端口Enter management VLAN IP address [172.16.0.254]: 172.31.11.2 管理ipEnter mgmt VLAN interface subnet mask [255.255.255.0]: 回车Enter Out of band management interface IP address [none]: 回车Enter IP Default gateway [none]: 172.31.11.1 网关Enter Country code (ISO-3166), for supported list: CN 中国You have chosen Country code CN for China (yes|no)?: yes Enter Time Zone [PST-8:0]: CST+8:0Enter Time in UTC [03:48:15]:Enter Date (MM/DD/YYYY) [7/4/2013]:Enter Password for admin login (up to 32 chars): *********//admin123!Re-type Password for admin login: ********* //admin123!Enter Password for enable mode (up to 15 chars): ****** //enablleRe-type Password for enable mode: ****** //enable Current choices are:System name: aruba2500-xmu-2fConfigure inband management VLAN: yesvlan id for inband management [1-4094]: 711Members interfaces of management VLAN: 0/0/23,0/1/1IP address of management VLAN: 172.31.11.2Management VLAN interface subnet mask: 255.255.255.0IP Default gateway: 172.31.11.1Country code: CNTime Zone: CST+8:0Type to go back and change answer for any questionDo you wish to accept the changes (yes|no|abort): yesCreating configuration...Done.Configuring...Saving Configuration...Configuration Saved.(aruba2500-xmu-2f) #configure terEnter Configuration commands, one per line. End with CNTL/Z(aruba2500-xmu-2f) (config) #telnet cli //开启telnet功能(aruba2500-xmu-2f) (config) #end(aruba2500-xmu-2f) #show ip interface briefInterface IP Address / IP Netmask Admin Protocolvlan 711 172.31.11.2 / 255.255.255.0 Up Upmgmt unassigned / unassigned Up Down(aruba2500-xmu-2f) #ping 172.31.11.1Press 'q' to abort.Sending 5, 100-byte ICMP Echos to 172.31.11.1, timeout is 2 seconds:.....Success rate is 0 percent (0/5)(aruba2500-xmu-2f) #ping 172.31.11.1(aruba2500-xmu-2f) #configure ter(aruba2500-xmu-2f) (config) #interface-group gigabitethernet ap 创建端口组(aruba2500-xmu-2f) (gigabitethernet "ap") #apply-to 0/0/0-0/0/23 把0/0/0-0/0/23加入组中(aruba2500-xmu-2f) (gigabitethernet "ap") #exit(aruba2500-xmu-2f) (switching profile "ap") #vlan 712 创建vlan712(我给AP用的)(aruba2500-xmu-2f) (VLAN "712") #exit (aruba2500-xmu-2f) (config) #interface-profile switching-profile ap(aruba2500-xmu-2f) (switching profile "ap") #access-vlan 712 关联(aruba2500-xmu-2f) (switching profile "ap") #exit(aruba2500-xmu-2f) (config) #interface-profile poe-profile ap(aruba2500-xmhu-2f) (Power over Ethernet profile "ap") #enable 开启POE供电功能(aruba2500-xmu-2f) (Power over Ethernet profile "ap") #exit(aruba2500-xmu-2f) (config) #interface-group gigabitethernet ap(aruba2500-xmu-2f) (gigabitethernet "ap") #switching-profile ap 应用到端口(aruba2500-xmu-2f) (gigabitethernet "ap")#poe-profile ap 应用到端口(aruba2500-xmu-2f) (gigabitethernet "ap") #end如果想把那个端口trunk,可以这样(aruba2500-xmu-2f) (config) #interface g 0/0/2(aruba2500-xmu-2f) #switching-profile Upstream-profile删除的话就加no(aruba2500-xmu-2f) #no switching-profile Upstream-profile 如果要把那个端口加入vlan20(aruba2500-xmu-2f) #vlan 20(aruba2500-xmu-2f) (VLAN "20") #exit(aruba2500-xmu-2f) (config) #interface-profile switching-profile 20(aruba2500-xmu-2f) (switching profile "ap") #access-vlan 20 (aruba2500-xmu-2f) (config) #interface g 0/0/2(aruba2500-xmu-2f) #switching-profile 20删除就加no(aruba2500-xmu-2f) #no switching-profile 20或者(aruba2500-xmu-2f) #no switching-profile三,升级配置把网线接到23口,电脑开启tftp服务器软件ArubaS2500-24P) (config) #interface-profile switching-profile ftp //--创建模板FTP (ArubaS2500-24P) (switching profile "ftp") #access-vlan 1 关联vlan1(ArubaS2500-24P) (switching profile "ftp") #exit(ArubaS2500-24P) (config) #interface gigabitethernet 0/0/23 (ArubaS2500-24P) (gigabitethernet "0/0/23") #switching-profile ftp //启用ftp(ArubaS2500-24P) (gigabitethernet "0/0/23") #exit(ArubaS2500-24P) (config) #interface vlan 1(ArubaS2500-24P) (vlan "1") #ip address 10.0.0.1 255.0.0.0 (ArubaS2500-24P) (vlan "1") #exit(ArubaS2500-24P) (config) #end(ArubaS2500-24P) #ping 10.0.0.5(ArubaS2500-24P) #(ArubaS2500-24P) #(ArubaS2500-24P) #copy ftp: 10.0.0.5 admin ArubaOS_MAS_7.2.2.1_38712 system: partition 0 Password:****** //---admin和密码是ftp的用户名和没密码,10.0.0.5是电脑的ip Press 'q' to abort.Copying file:............................................................File copied successfully.Saving file to flash:...Member-0:The system will boot from partition 0 during the next reboot.(ArubaS2500-24P) #re?reload Coldstart the switchrename rename a filerestore restore file or configuration(ArubaS2500-24P) #reloadDo you want to save the configuration(y/n): nDo you really want to restart the system(y/n): y System will now restart!Shutdown processing started(aruba2500-xmu-2f) #write memory 保存Saving Configuration...Configuration Saved.(aruba2500-xmu-2f) #show running-config Building Configuration...## Configuration file for ArubaOSversion 7.2enable secret "******"telnet clihostname "aruba2500-xmu-2f"clock timezone CST 8location "Building1.floor1"controller config 3ip access-list eth validuserethaclpermit any!!!ip access-list stateless dns-acl-statelessany any svc-dns permit!ip access-list stateless http-acl-statelessany any svc-http permit!ip access-list stateless https-acl-statelessany any svc-https permit!ip access-list stateless icmp-acl-statelessany any svc-icmp permitip access-list stateless logon-control-stateless any any svc-icmp permitany any svc-dns permitany any svc-dhcp permitany any svc-natt permit!ip access-list session validusernetwork 169.254.0.0 255.255.0.0 any any denyany any any permitipv6 alias any6 alias any6 any permit!user-role authenticatedaccess-list stateless allowall-stateless!user-role denyall!user-role guestaccess-list stateless http-acl-statelessaccess-list stateless https-acl-statelessaccess-list stateless dhcp-acl-statelessaccess-list stateless icmp-acl-statelessaccess-list stateless dns-acl-stateless!user-role logonaccess-list stateless logon-control-stateless!!crypto ipsec transform-set default-boc-bm-transform esp-3des esp-sha-hmac crypto ipsec transform-set default-rap-transform esp-aes256 esp-sha-hmac crypto isakmp eap-passthrough eap-tlscrypto isakmp eap-passthrough eap-peapcrypto isakmp eap-passthrough eap-mschapv2mgmt-user admin root 9a05893a01941ea9fadbe8f7f92075bc5b5c8189ef96622520 no firewall attack-rate cp 1024ipv6 firewall ext-hdr-parse-len 100!firewall cppacket-capture-defaults tcp disable udp disable sysmsg disable other disable !ip domain lookup!country CNaaa authentication mac "default"!aaa authentication dot1x "default"!aaa server-group "default"auth-server Internalset role condition role value-of!aaa profile "default"!aaa authentication captive-portal "default"!aaa authentication vpn "default"!aaa authentication mgmt!aaa authentication wired!web-server!aaa password-policy mgmt!traceoptionsqos-profile "default"!policer-profile "default"!ip-profiledefault-gateway 172.31.11.1!lcd-menu!interface-profile ospf-profile "default"area 0.0.0.0!interface-profile pim-profile "default"!interface-profile igmp-profile "default"!stack-profile!ipv6-profile!interface-profile switching-profile "ap"access-vlan 712!interface-profile switching-profile "default"!interface-profile switching-profile "Upstream-profile" switchport-mode trunk!interface-profile poe-profile "ap"enable!interface-profile poe-profile "default"!interface-profile poe-profile "poe-factory-initial"enable!interface-profile enet-link-profile "default"!interface-profile lldp-profile "default"!interface-profile lldp-profile "lldp-factory-initial"lldp transmitlldp receivemed enable!interface-profile mstp-profile "default"!interface-profile pvst-port-profile "default"!vlan-profile mld-snooping-profile "default"!vlan-profile igmp-snooping-profile "default"!vlan-profile igmp-snooping-profile "igmp-snooping-factory-initial" !spanning-treemode mstp!gvrp!mstp!lacp!vlan "1"igmp-snooping-profile "igmp-snooping-factory-initial" !vlan "711"!vlan "712"!interface gigabitethernet "0/1/1"switching-profile "Upstream-profile"!interface vlan "711"ip address 172.31.11.2 255.255.255.0!interface mgmt!interface-group gigabitethernet "ap"apply-to 0/0/0-0/0/23poe-profile "ap"switching-profile "ap"!interface-group gigabitethernet "default"apply-to ALLlldp-profile "lldp-factory-initial"poe-profile "poe-factory-initial"!snmp-server view ALL oid-tree iso includedsnmp-server group ALLPRIV v1 read ALL notify ALLsnmp-server group ALLPRIV v2c read ALL notify ALLsnmp-server group ALLPRIV v3 noauth read ALL notify ALL snmp-server group AUTHPRIV v3 priv read ALL notify ALL snmp-server group AUTHNOPRIV v3 auth read ALL notify ALL snmp-server enable trapprocess monitor logend(aruba2500-xmu-2f) #(aruba2500-xmu-2f) #(aruba2500-xmu-2f) #(aruba2500-xmu-2f) #write memorySaving Configuration...Configuration Saved.(aruba2500-xmu-2f) #show ip interface briefInterface IP Address / IP Netmask Admin Protocol vlan 711 172.31.11.2 / 255.255.255.0 Up Up mgmt unassigned / unassigned Up Down(aruba2500-xmu-2f) #ping 172.31.11.1Press 'q' to abort.Sending 5, 100-byte ICMP Echos to 172.31.11.1, timeout is 2 seconds:Success rate is 100 percent (5/5), round-trip min/avg/max = 1.525/1.922/2.534 ms(aruba2500-xmu-2f) #write memorySaving Configuration...Configuration Saved.(aruba2500-xmu-2f) #configure terminalCNTL/Z(aruba2500-xmu-2f) (config) #end(aruba2500-xmu-2f) #(aruba2500-xmu-2f) #(aruba2500-xmu-2f) #(aruba2500-xmu-2f) #copy ftp: 172.1.1.1.1 ?Enter the user name(aruba2500-xmu-2f) #copy ftp: 172.1.1.1.1 endwin ?Enter the file name(aruba2500-xmu-2f) #copy ftp: 172.1.1.1.1 endwin ArubaOS_MAS_7.2.2.1_38712 ? flash: Copy to the flash file system member: Copy to a stack membersystem: System Partition(aruba2500-xmu-2f) #copy ftp: 172.1.1.1.1 endwin ArubaOS_MAS_7.2.2.1_38712 system: partition 0 ?(aruba2500-xmu-2f) #copy ftp: 172.1.1.1.1 endwin ArubaOS_MAS_7.2.2.1_38712 system: partition 0 ?(aruba2500-xmu-2f) #dir-rw-r--r-- 1 root root 35729264 Jul 4 09:36 ArubaOS_MAS_7.2.2.1_38712.1_38712-rw-r--r-- 1 root root 4905 Jul 4 11:55 default.cfg-rw-r--r-- 1 root root 40 Jul 4 11:46 stack_db.dbdrwx------ 2 root root 4096 Jul 4 11:00 tpm(aruba2500-xmu-2f) #copy running-config ?flash: Copy to the flash file systemftp: Ftp file systemstartup-config Copy to Startup configurationtftp: TFTP file system(aruba2500-xmu-2f) #configure terCNTL/Z(aruba2500-xmu-2f) (config) #interface vlan 1(aruba2500-xmu-2f) (vlan "1") #ip address 192.168.100.1 255.255.255.0(aruba2500-xmu-2f) (vlan "1") #exit(aruba2500-xmu-2f) (config) #interface gigabitethernet 0/0/23(aruba2500-xmu-2f) (gigabitethernet "0/0/23") #switching-profile ?Profile name(aruba2500-xmu-2f) (gigabitethernet "0/0/23") #exit(aruba2500-xmu-2f) (config) #interface-profile switching-profile ftp(aruba2500-xmu-2f) (switching profile "ftp") #access-vlan vlan 1^% Invalid input detected at '^' marker.(aruba2500-xmu-2f) (switching profile "ftp") #access-vlan 1 (aruba2500-xmu-2f) (switching profile "ftp") #exit(aruba2500-xmu-2f) (config) #interface gigabitethernet 0/0/23(aruba2500-xmu-2f) (gigabitethernet "0/0/23") #switching-profile ftp(aruba2500-xmu-2f) (gigabitethernet "0/0/23") #end(aruba2500-xmu-2f) #ping 192.168.100.100Press 'q' to abort.Sending 5, 100-byte ICMP Echos to 192.168.100.100, timeout is 2 seconds:Success rate is 100 percent (5/5), round-trip min/avg/max = 1.641/4.102/13.924 ms(aruba2500-xmu-2f) #copy running-config ?flash: Copy to the flash file systemftp: Ftp file systemstartup-config Copy to Startup configurationtftp: TFTP file system(aruba2500-xmu-2f) #copy running-config ftp: ?Enter the ftp server ip address(aruba2500-xmu-2f) #copy running-config ftp: 192.168.100.100 ?Enter the ftp user name(aruba2500-xmu-2f) #copy running-config ftp: 192.168.100.100 endwin ?Enter the ftp user password(aruba2500-xmu-2f) #copy running-config ftp: 192.168.100.100 endwin endwin ?Enter the file name(aruba2500-xmu-2f) #copy running-config ftp: 192.168.100.100 endwin endwin s2500.cfg (aruba2500-xmu-2f) # (aruba2500-xmu-2f) #(aruba2500-xmu-2f) #copy running-config ftp: 192.168.100.100 endwin endwin s25001.txt (aruba2500-xmu-2f) #。
交换机初始化配置的教程

Cisco交换机初始化配置的教程Cisco交换机初始化配置的教程的方法首先进入全局模式enableconfig terminal一、telnet登录line vty 0 4password ********login二、主机名hostname ****三、enable密码enable secret *******四、管理IP及网关交换机的IP都会绑定在vlan上。
默认会带有vlan1,查看vlan1有哪些接口,enable模式下:show vlan例:FenHangHuiJu#show vlanVLAN Name Status Ports---- -------------------------------- --------- ------------------------------- 1 default active Et0/1, Et0/2, Et0/3.......四.1.新建vlanvlan 2name Managementexit四.2.启用vlan IPinterface vlan 2ip address 192.168.100.250 255.255.255.0no shutdownexit四.3.将一个接口加入vlaninterface Et0/0no switchport access vlan 1switchport access vlan 2exit如果批量操作Eth0/0 - Eth0/3,使用:interface range Eth0/0 - 3四.4.配置网关ip default-gateway 192.168.100.253看了Cisco交换机初始化配置的教程还想看:1.cisco路由器如何重启2.CISCO系列交换机如何清空配置3.思科交换机配置命令教程4.cisco交换机如何清空配置5.Cisco常用的路由器交换机配置命令。
Cisco 2960S 交换机初始配置操作方法
附录A:Cisco 2960S交换机配置操作规范1.将交换机上电,约一分半钟进入工作模式,此时指示灯SYST和STAT是亮的,DUPLX,SPEED不亮。
2.按住交换机前面板的MODE按钮约3秒后,放开MODE按钮重新按住,直到所有灯转为琥珀色,松开按钮,此时交换机会自动清空配置,并自动重启。
约一分半钟后重启完毕,进入工作模式,进行步骤3操作。
必须在工作模式下(仅指示灯SYST和STAT是亮)进行下面的配置,否则无效3.通过交换机自带的一根配置线缆连接交换机配置端口和电脑的串口。
该线缆一端为RJ45接头,连接交换机正面的CONSOLE端口,一端为DB9母头,连接电脑串口。
4.设置串口通讯工具PuTTY。
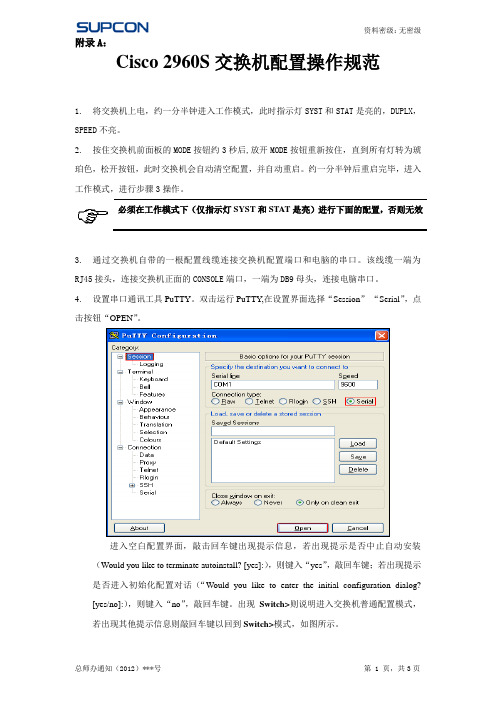
双击运行PuTTY,在设置界面选择“Session”-“Serial”,点击按钮“OPEN”。
进入空白配置界面,敲击回车键出现提示信息,若出现提示是否中止自动安装(Would you like to terminate autoinstall? [yes]:),则键入“yes”,敲回车键;若出现提示是否进入初始化配置对话(“Would you like to enter the initial configuration dialog?[yes/no]:),则键入“no”,敲回车键。
出现Switch>则说明进入交换机普通配置模式,若出现其他提示信息则敲回车键以回到Switch>模式,如图所示。
5.打开相应的配置文件,选中配置内容,点击右键-“复制”(或快捷键Ctrl+C),以某一配置文件为例,见下图:6.将鼠标定位至配置界面命令Switch>之后,单击鼠标右键可将配置内容复制至交换机。
7.复制完毕之后,敲回车键直至出现Switch#提示符,键入命令show star可查看配置文件,图示中“--More--”表示还没有显示完全,继续敲回车键直到出现“Switch#”。
8.将交换机断电重启,用双绞线连接计算机网口和交换机端口,若该交换机端口指示灯为绿色,则说明配置成功,若交换机端口呈现琥珀色,约30S之后转变为绿色,则说明配置有误,检查操作步骤,重新配置。
最新整理Cisco思科交换机怎么初始化

C i s c o思科交换机怎么初始化交换机的主要功能包括物理编址、网络拓扑结构、错误校验、帧序列以及流控。
交换机还具备了一些新的功能,如对V L A N(虚拟局域网)的支持、对链路汇聚的支持,甚至有的还具有防火墙的功能。
有时候我们需要重新设置某些参数,该怎么初始化呢?下面我们以C i s c o思科交换机为例,分享交换机的初始化设置教程,需要的朋友可以参考下方法步骤1、首先我们先了解一下交换机的内部组成:C P U交换机使用特殊用途集成电路芯片A S I C,以实现高速的数据传输。
R A M/D R A M主存储器,存储运行配置(类似于电脑内存)。
N V R A M(非易失性R A M)存储启动配置文件等。
F l a s h R O M(快闪存储器)存储I O S系统(类似于电脑硬盘)。
R O M存储开机诊断程序、引导程序和操作系统软件。
2、交换机启动流程:R O M自检,执行引导程序;加载f l a s h中的I O S;加载N V R A M的初始配置文件;拷贝初始配置文件到r a m成为运行配置文件;3、交换机端口的三种链路类型,以太网端口有三种链路类型:a c c e s s、t r u n k、h y b i r d;转发速率不同传输距离不一样所接传输介质不一样4、C i s c o交换机配置:I O S内置W e b浏览器(视窗)和命令行解释器(C L I)(D O S) ,采用W e b能实现部分配置管理功能,而C L I 可全部配置管理功能5、连接交换机方式:交换机本身不带输入输出设备(如键盘、显示器);只有通过终端设备或普通的计算机来实现对其网络操作系统的访问,从而对其配置和管理 ;配置方式:通过C o n s o l e口(近距离)T e l n e t(远程,通过网络)W e b或网管软件(远程,通过网络)T F T P(远程,通过网络),主要用于升级6、C i s c o I O S命令行规则简写规则:无歧义情况下,可以尽量少些字母1.?可以显示当前模式下所有可以执行的命令2.命令的开始字母后面加?可以显示提示3.使用t a b键可以补全无歧义的命令4.不知道参数,就在命令后面空格,再写?打回车,可以看到提示5.如果要去掉某条配置命令,就在前面输入n o,再执行一次6.要终止运行的命令,使用补充:交换机基本使用方法作为基本核心交换机使用,连接多个有线设备使用:网络结构如下图,基本连接参考上面的作为网络隔离使用:对于一些功能好的交换机,可以通过模式选择开关选择网络隔离模式,实现网络隔离的作用,可以只允许普通端口和U P l i n k端口通讯,普通端口之间是相互隔离不可以通讯的除了作为核心交换机(中心交换机)使用,还可以作为扩展交换机(接入交换机)来扩展网络放在路由器上方,扩展网络供应商的网络线路(用于一条线路多个I P的网络),连接之后不同的路由器用不同的I P连接至公网相关阅读:交换机硬件故障常见问题电源故障:由于外部供电不稳定,或者电源线路老化或者雷击等原因导致电源损坏或者风扇停止,从而不能正常工作。
- 1、下载文档前请自行甄别文档内容的完整性,平台不提供额外的编辑、内容补充、找答案等附加服务。
- 2、"仅部分预览"的文档,不可在线预览部分如存在完整性等问题,可反馈申请退款(可完整预览的文档不适用该条件!)。
- 3、如文档侵犯您的权益,请联系客服反馈,我们会尽快为您处理(人工客服工作时间:9:00-18:30)。
交换机初始化配置操作
思科二层交换机初始化配置操作
configure terminal
#修改主机名,用于区分存放位置
hostname switch1
enable password 123456
vlan 1
interface vlan 1
#配置管理地址
ip address 192.168.1.10 255.255.240.0
exit
#配置网关,用于远程管理
ip default-gateway 192.168.1.1
line vty 0 4
#配置telnet密码
password 123456
login
exit
interface range gigabitEthernet1/0/23 - 28
switchport mode trunk
exit
exit
copy running-config startup-config
H3C二层交换机初始化配置操作
system-view
sysname swithch1
interface vlan-interface1
ip address 192.168.1.10 255.255.240.0
ip gateway 192.168.1.1
quit
user-interface vty 0
set authentication password 123456
quit
interface GigabitEthernet0/47
port link-type trunk
port trunk permit vlan all
quit
interface GigabitEthernet0/48
port link-type trunk
port trunk permit vlan all
quit
quit
save
思科核心交换机初始化配置
configure terminal
#修改主机名,用于区分存放位置
hostname main
enable password 123456
vlan 1
vlan 16
vlan 20
vlan 24
vlan 700
interface vlan 1
#配置管理地址
ip address 192.168.1.1 255.255.240.0
interface vlan 16
description jiankong
ip address 192.168.16.1 255.255.252.0 interface vlan 20
description chaiwu
ip address 192.168.20.1 255.255.255.0 interface vlan 24
description xingzheng
ip address 192.168.24.1 255.255.255.0 interface vlan 700
description zhuanxian
ip address 172.18.0.2 255.255.255.0
exit
line vty 0 4
privilege level 15
#配置telnet密码
password 123456
login
exit
ip route 0.0.0.0 0.0.0.0 192.168.1.254
#配置专线网关
ip route 192.168.0.0 255.255.240.0 172.18.0.1 interface range gigabitEthernet2/1 - 24 switchport mode trunk
interface range gigabitEthernet6/1 - 24
switchport mode trunk
exit
#ACL策略
ip access-list extended test
permit tcp any any eq telnet
#允许访问vlan1
permit ip any 192.168.0.0 0.0.15.255
#允许行政查看监控录像
permit ip 192.168.24.0 0.0.0.255 192.168.16.0 0.0.3.255
permit ip 192.168.16.0 0.0.3.255 192.168.24.0 0.0.0.255
#拒绝vlan互访
deny ip any 192.168.0.0 0.0.255.255
permit ip any any
exit
interface range vlan 16,vlan20,vlan24
ip access-group test in
exit
exit
copy running-config startup-config
交换机配置备份
思科
copy running-config tftp:
Address or name of remote host []? 192.168.8.186
Destination filename [master-confg]? master.cfg
H3C
Dir /all
tftp 192.168.8.186 put startup.cfg master.cfg
#其中startup.cfg为交换机上的启动配置文件,master.cfg为备份时的文件名。
