Oracle Goldengate Monitor12c安装配置指南12.1.3
oracle12c安装、启动、卸载图文教程
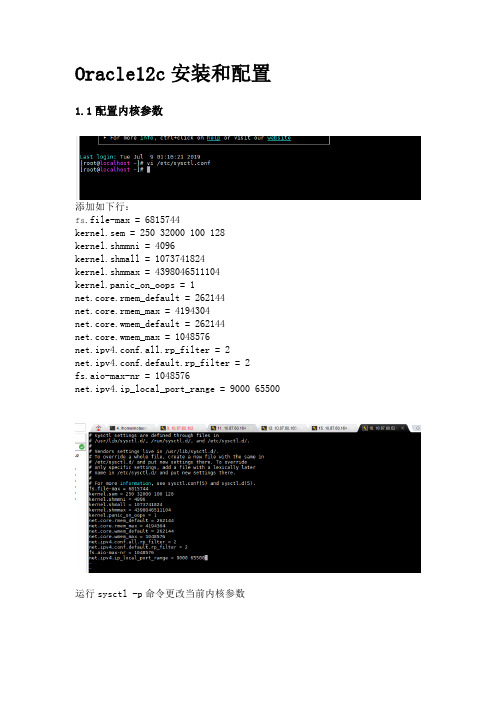
Oracle12c安装和配置1.1配置内核参数添加如下行:fs.file-max = 6815744kernel.sem = 250 32000 100 128kernel.shmmni = 4096kernel.shmall = 1073741824kernel.shmmax = 4398046511104kernel.panic_on_oops = 1net.core.rmem_default = 262144net.core.rmem_max = 4194304net.core.wmem_default = 262144net.core.wmem_max = 1048576net.ipv4.conf.all.rp_filter = 2net.ipv4.conf.default.rp_filter = 2fs.aio-max-nr = 1048576net.ipv4.ip_local_port_range = 9000 65500 运行sysctl -p命令更改当前内核参数1.2限制oracle用户资源使用vi /etc/security/limits.conf添加如下行:oracle soft nofile 1024oracle hard nofile 65536 oracle soft nproc 16384 oracle hard nproc 16384 oracle soft stack 10240 oracle hard stack 32768 oracle hard memlock 134217728 oracle soft memlock 1342177281.3安装依赖软件包yum install binutils -yyum install compat-libcap1 -yyum install compat-libstdc++-33 -yyum install compat-libstdc++-33.i686 -y yum install glibc -yyum install glibc.i686 -yyum install glibc-devel -yyum install glibc-devel.i686 -yyum install ksh -yyum install libaio -yyum install libaio.i686 -yyum install libaio-devel -yyum install libaio-devel.i686 -yyum install libX11 -yyum install libX11.i686 -yyum install libXau -yyum install libXau.i686 -yyum install libXi -yyum install libXi.i686 -yyum install libXtst -yyum install libXtst.i686 -yyum install libgcc -yyum install libgcc.i686 -yyum install libstdc++ -yyum install libstdc++.i686 -yyum install libstdc++-devel -yyum install libstdc++-devel.i686 -y yum install libxcb -yyum install libxcb.i686 -yyum install make -yyum install nfs-utils -yyum install net-tools -yyum install smartmontools -yyum install sysstat -yyum install unixODBC -yyum install unixODBC-devel -y1.4创建新组和新用户groupadd -g 54321 oinstallgroupadd -g 54322 dbagroupadd -g 54323 operuseradd -u 54321 -g oinstall -G dba,oper oracle2附加设置2.1为oracle用户设置密码2.2修改设置SELINUXvi /etc/selinux/config## 将`SELINUX`修改为permissiveSELINUX=permissivesetenforce Permissive2.3确保禁用防火墙systemctl stop firewalldsystemctl disable firewalld2.4创建Oracle安装目录mkdir -p /usr/local/products/oracle12cchown -R oracle:oinstall /usr/localchmod -R 775 /usr/local/2.5配置Oracle环境变量并验证切换到新添加的oracle用户名下,在oracle用户下配置环境变量su oraclevi .bash_profileexport TMP=/tmpexport TMPDIR=$TMPexport ORACLE_HOSTNAME=DEV-ORACLE-12C-164export ORACLE_UNQNAME=orclexport ORACLE_BASE=/usr/local/productsexport ORACLE_HOME=$ORACLE_BASE/oracle12cexport ORACLE_SID=orclexport PATH=/usr/sbin:/usr/local/bin:$PATHexport PATH=$ORACLE_HOME/bin:$PATHexport LD_LIBRARY_PATH=$ORACLE_HOME/lib:/lib:/usr/lib export CLASSPATH=$ORACLE_HOME/jlib:$ORACLE_HOME/rdbms/jlib使配置立即生效source .bash_profileecho $ORACLE_HOME/usr/local/products/oracle12c3 Oracle安装3.1上传解压将下载的linuxx64_12201_database.zip上传到Linux系统/home/oracle目录下解压unzip linuxx64_12201_database.zip如果没有unzip要先安装yum install zip unzip3.2修改响应文件压缩包解压完成后得到名为database的文件夹,其中包含安装文件。
goldengate如何安装和配置

goldengate如何安装和配置要安装goldengate,第一步当然要先下载软件,您可以到/网站上下载相关软件,注意goldengate是在oracle fusion middleware大类下面,它和操作系统版本,数据库版本都有关系,下载时注意别下错版本。
对于源端数据库,要做以下准备,这里以oracle为例,其它数据库请查找相关手册:a.在源端操作系统上,创建GoldenGate系统用户,设置该用户环境变量(如果是oracle数据库的话,ORACLE_SID,ORACLE_HOME等等),也可以采用oracle 安装用户运行GoldenGate。
建议采用oracle的安装用户安装运行GoldenGate,无需建立新用户,否则还得给新用户授一堆权限,具体请参考安装手册。
b.在数据库中创建GoldenGate数据库用户,名称无所谓,这里以goldengate 为例,用户至少应该有connect,resource,select any dictionary,select any table的权限,当然如果能给dba,一切就都覆盖了:CREATE USER goldengate IDENTIFIED BY goldengate;GRANT dba TO goldengate;c.检查源端数据库是否为归档模式,若为非归档模式,建议将其改为归档模式,其实在非归档模式下也能运行,但以防万一,还是配置归档保险:SQL> alter database archivelog;(需要在数据库mount状态下执行);SQL>archive log list;d.检查源端数据库附加日志是否打开SQL>select supplemental_log_data_min from v$database;将数据库附加日志打开SQL>alter database add supplemental log data;切换日志以使附加日志生效:SQL〉ALTER SYSTEM ARCHIVE LOG CURRENT;在目标数据库上,也需要建立一个goldengate用户,或者利用现有用户也行,该用户应该至少有connect,resource,select any table,select any dictionary以及对应同步表的insert/update/delete权限。
Centos7Oracle12C超详细安装
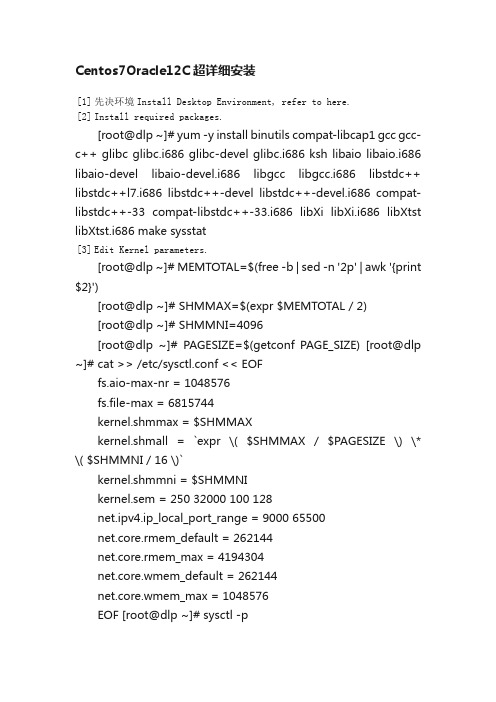
Centos7Oracle12C超详细安装[1] 先决环境Install Desktop Environment, refer to here.[2] Install required packages.[root@dlp ~]# yum -y install binutils compat-libcap1 gcc gcc-c++ glibc glibc.i686 glibc-devel glibc.i686 ksh libaio libaio.i686 libaio-devel libaio-devel.i686 libgcc libgcc.i686 libstdc++ libstdc++l7.i686 libstdc++-devel libstdc++-devel.i686 compat-libstdc++-33 compat-libstdc++-33.i686 libXi libXi.i686 libXtst libXtst.i686 make sysstat[3] Edit Kernel parameters.[root@dlp ~]# MEMTOTAL=$(free -b | sed -n '2p' | awk '{print $2}')[root@dlp ~]# SHMMAX=$(expr $MEMTOTAL / 2)[root@dlp ~]# SHMMNI=4096[root@dlp ~]# PAGESIZE=$(getconf PAGE_SIZE) [root@dlp ~]# cat >> /etc/sysctl.conf << EOFfs.aio-max-nr = 1048576fs.file-max = 6815744kernel.shmmax = $SHMMAXkernel.shmall = `expr \( $SHMMAX / $PAGESIZE \) \* \( $SHMMNI / 16 \)`kernel.shmmni = $SHMMNIkernel.sem = 250 32000 100 128net.ipv4.ip_local_port_range = 9000 65500net.core.rmem_default = 262144net.core.rmem_max = 4194304net.core.wmem_default = 262144net.core.wmem_max = 1048576EOF [root@dlp ~]# sysctl -pfs.aio-max-nr = 1048576 fs.file-max = 6815744 kernel.shmmax = 6274715648 kernel.shmall = 392169728 kernel.shmmni = 4096kernel.sem = 250 32000 100 128net.ipv4.ip_local_port_range = 9000 65500 net.core.rmem_default = 262144 net.core.rmem_max = 4194304 net.core.wmem_default = 262144 net.core.wmem_max = 1048576[4] Create user and groups for Oracle Database service.[root@dlp ~]# i=54321; for group in oinstall dba backupdba oper dgdba kmdba; dogroupadd -g $i $group; i=`expr $i + 1` done [root@dlp~]#useradd-u1200-goinstall-Gdba,oper,backupdba,dgdba,kmdba -d /home/oracle oracle[root@dlp ~]# passwd oracle Changing password for user oracle. New password: Retype new password:passwd: all authentication tokens updated successfully. [root@dlp ~]# mkdir -p /u01/app/oracle [root@dlp ~]# chown -R oracle:oinstall /u01/app [root@dlp ~]# chmod -R 775 /u01[root@dlp ~]# vi /etc/pam.d/login # near line 14: add1 2 session required pam_selinux.so open session required pam_namespace.so1 s ession required pam_limits.so1 2 3 session optional pam_keyinit.so force revoke session include system-auth -session optional pam_ck_connector.so[root@dlp ~]# vi /etc/security/limits.conf # add to the end1 2 3 4 5 6 oracle softnproc 2047 oracle hard nproc 16384 oracle soft nofile 1024 oracle hard nofile 65536 oracle soft stack 10240 oraclehardstack 32768[5]图形化安装Oracle 12C Login with the user "oracle" and set environment variables.dlp login: oracle Password:[oracle@dlp ~]$ vi ~/.bash_profile # add to the end umask 022export ORACLE_BASE=/u01/app/oracle # create a temporary directory for installation[oracle@dlp ~]$ mkdir tmp[1]Login and work with oracle admin user which you create in pre-requirements settings.[2] Download Oracle Databse 12c for Linux and upload on your server. ?/technology/software/products/database/index.html [3] After uploading Oracle files, move to a tmp directory and run an Installer like follows.[oracle@dlp ~]$ cd tmp [oracle@dlp tmp]$ unzip linuxamd64_12102_database_1of2.zip [oracle@dlptmp]$unziplinuxamd64_12102_database_2of2.zip[oracle@dlp tmp]$ ./database/runInstaller[4] Oracle Installer starts like follows. First, Set your email address and password for receiving some infomation from Oracle likesecurity issues and so on.[5] On this example, Select "Install database software only".[6] On this example, Select "Single Instance Database ***".[7] Select your language.[8] Select which edition you install.[9]Specify the base directory and files for Oracle. On this example, keep default and proceed to next.[10]Specify the installed directory. On this example, keep default and proceed to next.[11]Specify the priviledged group. On this example, keep default and proceed to next.[12] Pre-requirements are checked. If some settings are not configuredfor recomendations, notification is displayed likefollows.Confirm them again.[13]The summary is shown for configuration. Click "Install" if it's OK all.[14] Installation starts.[15]Following screen is shown, then open a terminal and execute follwong commands with the root user.[root@dlp ~]# /u01/app/oraInventory/orainstRoot.sh1 2 Changing permissions of /u01/app/oraInventory. Adding read,write permissions for group.3 4 5 6 7Removing read,write,execute permissions for world. Changing groupname of /u01/app/oraInventory to oinstall. The execution of the script is complete. [root@dlp ~]# [root@dlp~]#/u01/app/oracle/product/12.1.0/dbhome_1/root.sh12345Performing root user operation. The following environment variables are set as: ORACLE_OWNER= oracle ORACLE_HOME= /u01/app/oracle/product/12.1.0/dbhome_1 Enter the full pathname of the local bin directory: [/usr/local/bin]: # Enter12 3 4 5 6 7 8 9 10Copying dbhome to /usr/local/bin ... Copying oraenv to /usr/local/bin ... Copying coraenv to /usr/local/bin ... Creating /etc/oratab file...Entries will be added to the /etc/oratab file as needed by Database Configuration Assistant when a database is created Finished running generic part of root script.Now product-specific root actions will be performed.[16] Installation completed. Click "Close" button.[17] Set Environment variables for Oracle user.[oracle@dlp ~]$ vi ~/.bash_profile # add to the end exportORACLE_HOME=/u01/app/oracle/product/12.1.0/dbhome_1exportPATH=$PATH:$ORACLE_HOME/bin[oracle@dlp~]$ source ~/.bash_profile[oracle@dlp ~]$ rm -rf tmp创建监听Create Oracle Net Listener that is the network service onOracle.[1]Login with the oracle admin user and input a command "netca" like follows.[oracle@dlp ~]$ netca[2] Check a box "Listener Configuration" and go next.[3] Go next.[4] Set Listner's name. Input any one you like.[5] This example goes next with keeping default "TCP".[6] Set a port. This example goes next with keeping default.[7]If you'd like to create more Listeners, Answer "Yes". This example selects "No".[8] Configuration completed.[9]After creating Listener, tnslsnr listens on the port you configured like follows.[oracle@dlp ~]$ ss -napt123456789StateRecv-QSend-QLocalAddress:Port Peer Address:Port LISTEN 0 128 *:22 *:* LISTEN 0 128 127.0.0.1:631 *:* LISTEN 0 100 127.0.0.1:25 *:* ESTAB 0 52 10.0.0.30:22 10.0.0.5:50113 LISTEN 0 128 :::1521 :::* users:(("tnslsnr",3988,9)) LISTEN 0 128 :::22 :::* LISTEN 0 128 ::1:631 :::*LISTEN 0 100 ::1:25 :::* [oracle@dlp ~]$ tnsping localhost 12TNS Ping Utility for Linux: Version 12.1.0.2.0 - Productionon 04-JUL-2015 01:03:0734567891 0 Copyright (c) 1997, 2014, Oracle. All rights reserved. Used parameter files:Used HOSTNAME adapter to resolve the alias Attempting to contact(DESCRIPTION=(CONNECT_DATA=(SERVICE_NAME=))(ADD RESS=(PROTOCOL=TCP)(HOST=127.0.0.1)(PORT=1521)))OK (0 msec)创建数据库 Create a Database.[1] Login with the oracle admin user and input acommand "dbca" like follows.[oracle@dlp ~]$ dbc[2] Select "Create Database" and go next.[3] On this example, select "Advanced Mode" and go next.[4] This example selects "General Purpose ***" and go next.[5]Set Grobal Database name and SID like follows. Input any one you like.[6] This example goes next with keeping default.[7] Set passwords. Please set a password for a user for security.[8] Configure Listener. On this example, keep default and go next.[9]Configure Storage settings. On this example, keep default and go next.[10]Configure sample schema and scripts. If you'd like to add them, Set them.[11] Configure memory settings. After setting, go to next tab.[12] Specify max processes.[13] Set Character setting.[14] Select a connection mode. If your server does not have many clients, Select Dedicated server mode. If your server has manyclients, Select Shared server mode.[15] Go next.[16] Configuration completed. Click "Finish" button to finish.[17] Database creation starts.[18] After completing to create a database, Click "Close" to finish.[19] Add Database SID to the environment variables.[oracle@dlp ~]$ vi /etc/oratab # change like followsdlp:/u01/app/oracle/product/12.1.0/dbhome_1: Y [oracle@dlp ~]$ vi ~/.bash_profile # add to the endexport ORACLE_SID=dlpTo access to the Enterprise Manager, it's possible to manage Database on Web GUI.[1] After creating database, database service is running and it'spossible to access to Enterprise Manager, too. Access to the URL which was displayed when database creation finished, then Login form is shown and it's possible to login with a database user.[2] Just logined. It's possible to manage Database on here.Create Systemd file for Oracle Database services.[1] Login as root user and create Systemd files.[root@dlp ~]# vi /etc/sysconfig/dlp.oracledb # create new : define environment variablesORACLE_BASE=/u01/app/oracleORACLE_HOME=/u01/app/oracle/product/12.1.0/dbhome_1ORACLE_SID=dlp # configure listener service[root@dlp~]#vi/usr/lib/systemd/system/*******************#thisis an example, modify for free12 3 4 5 6 7 8 9 10 11 12 13[Unit]Description=oracle net listener After=network.target [Service] Type=forkingEnvironmentFile=/etc/sysconfig/dlp.oracledbExecStart=/u01/app/oracle/product/12.1.0/dbhome_1/bin/lsnrctl start ExecStop=/u01/app/oracle/product/12.1.0/dbhome_1/bin/lsnrctl stop User=oracle [Install] WantedBy=multi-user.target # configure database service[root@dlp~]#vi/usr/lib/systemd/system/********************#this is an example, modify for free1 2 3 4 5 6 7 8 9 10 11 12 13 [Unit]Description=oracle net listenerAfter=network.target lsnrctl.service [Service] Type=forkingEnvironmentFile=/etc/sysconfig/dlp.oracledbExecStart=/u01/app/oracle/product/12.1.0/dbhome_1/bin/dbstart /u01/app/oracle/product/12.1.0/dbhome_1ExecStop=/u01/app/oracle/product/12.1.0/dbhome_1/bin/dbshut /u01/app/oracle/product/12.1.0/dbhome_1 User=oracle [Install] WantedBy=multi-user.target[root@dlp ~]# systemctl daemon-reload[root@dlp ~]# systemctl enable dlp@lsnrctl dlp@oracledb。
Oracle12c在Win10上的安装配置实践
Oracle12c在Win10上的安装配置实践1、环境操作系统:Win10专业版(64位)数据库:Oracle 12c Release 2(Version 12.2.0.1.0,64位)2、下载Oracle12c3、安装3.1、右键以管理员⾝份运⾏setup.exe3.2、配置安全更新在安装界⾯⾥,取消勾选“我希望通过My Oracle Support接收安全更新”,点击下⼀步。
提⽰出现尚未提供电⼦邮件地址,选择是。
3.3、安装选项选择“创建和配置数据库”(默认),点击下⼀步。
3.4、系统类选择“桌⾯类”(默认),如果是安装到服务器上,请选择“服务器类”,点击下⼀步。
3.5、Oracle主⽬录⽤户使⽤虚拟账户:⽤于 Oracle 数据库单实例安装的 Oracle 主⽬录⽤户。
使⽤现有windows⽤户:如果选择该项,则需要指定没有管理权限的⽤户。
创建新Windows⽤户:创建⼀个新⽤户,输⼊⽤户名和密码,这个新建的⽤户没有Windows登录权限。
使⽤Windows内置账户:微软在开Windows时预先为⽤户设置的能够登录系统的账户。
此处本⼈选择虚拟账户,也是oracle的官⽅建议之⼀。
注意:如果选择第⼆项,创建的⽤户名和已有的不能发⽣冲突,否则后⾯的安装会报错!3.6、典型安装设置oracle安装位置,字符集选择AL32UTF8或者ZHS16GBK,设置密码,如果密码过于简单会报警告,忽略即可,点击下⼀步。
注意:字符集AL32UTF8,sqlplus会存在乱码问题,需要配置TNS环境变量。
本⽂后⾯有字符集如何更改相关内容。
图省事的话建议此处选择ZHS16GBK字符集。
3.7、先决条件检查3.8、概要3.93.104、测试Oracle是否安装成功两种⽅式4.1、SQL Plus4.2、em5、相关问题5.1、PLSQL Developer⽆法连接64位Oracle数据库5.1.1、PLSQL数据库选项为空如图所⽰:原因在于:PLSQL不可以直接连接64位Oracle数据库,只能连接32位的。
安装goldengate monitor 12.2.1.0.0

1.安装goldengate monitor java -jar fmw_12.2.1.0.0_ogg.jar2.配置数据库cd /ggmonitor/Oracle/Middleware/Oracle_Home/oracle_common/bin ./rcu在数据库创建用户为上一步创建的用户设置密码a123456为新用户创建表空间3.配置域cd /ggmonitor/Oracle/Middleware/Oracle_Home/oracle_common/common/bin ./config.sh配置weblogic密码weblogic123使用第2步配置的用户名DEV3_STB密码a123456输入用户名和密码均为zxWEB.JMX.PASSWORD jmxuser oracleMONITOR.KEYSTORE.PASSWORD keystoreuser oracle MONITOR.TRUSTSTORE.PASSWORD truststoreuser oracle WEB.SMTP.EMAIL.PASSWORD emailuser oracleMONITORSERVER_server1(第5步要用)/ggmonitor/Oracle/Middleware/Oracle_Home/user_projects/domains/base_domainhttp://192.168.56.2:7001/console4.配置monitor servercd /ggmonitor/Oracle/Middleware/Oracle_Home/oggmon/monitor_server/bin./updateOGGMonitorConfig.sh[oracle@rhel6 bin]$ ./updateOGGMonitorConfig.shThis script utility is used to update configuration information for monitor server. All feilds are mandatory. Press Ctrl+C to exit.Enter absolute path for oggmon domain:/ggmonitor/Oracle/Middleware/Oracle_Home/user_projects/domains/base_domainYou have entered the domain path as : /ggmonitor/Oracle/Middleware/Oracle_Home/user_projects/domains/base_domainEnter JMX HOST NAME/IP:192.168.56.2Enter JMX Server Port:6502Enter JMX Server Username:jmxuserEnter the database type for Monitor Installation.For Oracle Database, Press 1. For SQL Server, Press 2:1Jul 08, 2016 3:57:13 PM oracle.security.jps.JpsStartup startINFO: Jps initializing.log4j:WARN No appenders could be found for logger (org.jboss.logging).log4j:WARN Please initialize the log4j system properly.Jul 08, 2016 3:57:27 PM oracle.security.jps.JpsStartup startINFO: Jps started.Jul 08, 2016 3:57:29 PM oracle.security.audit.Auditor initWARNING: IAU:IAU-6012: Unable to determine the audit log directory. No log directory specified. Jul 08, 2016 3:57:29 PM oracle.security.jps.util.JpsUtil disableAuditINFO: JpsUtil: isAuditDisabled set to trueJul 08, 2016 3:57:29 PM oracle.security.jps.internal.audit.AuditServiceImpl validateLogPossible WARNING: No audit log directory is set. Cannot perform audit operations for component JPS.Created Secure Key properties file.Added Secure Key into Monitor Server Oracle Wallet.5.启动monitor server5.1启动weblogic administrator servercd /ggmonitor/Oracle/Middleware/Oracle_Home/user_projects/domains/base_domain./startWebLogic.sh输入第3步设置的weblogic/weblogic123用户名和密码ie打开http://192.168.56.2:7001:/console5.2启动WebLogic Managed Servercd /ggmonitor/Oracle/Middleware/Oracle_Home/user_projects/domains/base_domain/bin./startManagedWebLogic.sh MONITORSERVER_server1 http://192.168.56.2:7001输入第3步设置的weblogic/weblogic123用户名和密码ie打开http://192.168.56.2:7003/monitor/faces/loginPage.jspx6.配置monitor server用户登录weblogic 管理界面新建ggmon 密码ggmon123配置所属组登录monitor serverhttp://192.168.56.2:7003/monitor/faces/loginPage.jspx ggmon/ggmon1237.安装配置monitor agent7.1安装monitor agent 已在第1步中安装/ggmonitor/Oracle/Middleware/Oracle_Home/oggmon/ogg_agent7.2配置cd /ggmonitor/Oracle/Middleware/Oracle_Home/oggmon/ogg_agent./createMonitorAgentInstance.sh[oracle@rhel6 ogg_agent]$ ./createMonitorAgentInstance.shPlease enter absolute path of Oracle GoldenGate home directory : /goldengatePlease enter absolute path of OGG Agent instance : /goldengate/ggmon/gg_agentPlease enter unique name to replace timestamp in startMonitorAgent script (startMonitorAgentInstance_20160708115016.sh) : 回车Sucessfully created OGG Agent instance.7.2.1把oggmon.properties复制到agent端cp/ggmonitor/Oracle/Middleware/Oracle_Home/user_projects/domains/base_domain/config/mo nitorserver/cfg/oggmon.properties /goldengate/ggmon/gg_agent/cfg/7.2.2编辑Config.propertiescd /goldengate/ggmon/gg_agent/cfg/vi Config.propertiesjagent.host=192.168.56.2jagent.jmx.port=5555interval.regular=60interval.quick=30monitor.host=192.168.56.2monitor.jmx.port=6502ername=jmxuserername=rootreg.retry.interval=10instance.query.initial.interval=5incremental.registration.quiet.interval=5maximum.message.retrieval=500jagent.rmi.port=5559agent.type.enabled=OGGMONstatus.polling.interval=5message.polling.interval=5reg.retry.times=-1patibility=falsejagent.ssl=falsejagent.keystore.file=jagentKeyStorejagent.truststore.file=jagentKeyStorejagent.restful.ws.timeout=15000jagent.ggsci.timeout=307.2.3 Create Wallet Credentials[oracle@rhel6 bin]$ ./pw_agent_util.sh -createPlease create a password for Java Agent: oraclePlease confirm password for Java Agent: oraclePlease enter Monitor Server JMX password: oraclePlease confirm Monitor Server JMX password: oracleJul 08, 2016 12:09:07 PM oracle.security.jps.JpsStartup startINFO: Jps initializing.Jul 08, 2016 12:09:08 PM oracle.security.jps.JpsStartup startINFO: Jps started.Wallet is created successfully.7.2.3 Prepare the Oracle GoldenGate Monitor Agent Instance for Monitoring1. Create a file named GLOBALS in the OGG_HOME directory, if this file does not exist.2. Edit the GLOBALS file.3. Add ENABLEMONITORING on a new line.4. Close and save the file.5. Create the datastore using the CREATE DATASTORE command:GGSCI> CREATE DATASTOREGGSCI (rhel6) 2> CREATE DATASTORE2016-07-08 12:17:47 INFO OGG-06489 Datastore created.7.2.4 Start the Oracle GoldenGate Monitor AgentGo to the Oracle GoldenGate Core GGSCI console and start Oracle GoldenGateMonitor Agent by executing the start jagent command:GGSCI>start jagent7.2.5 Check Oracle GoldenGate Monitor Agent Instance Log FilesOnce you have completed the preceding steps and Oracle GoldenGate Monitor Agentis running, the Oracle GoldenGate Monitor Agent log details will be written to ogg_agent.log, which is in OGG_AGENT_INST_HOME/logs.8.查看监控页面。
Oracle_GoldenGate安装、配置、管理

Oracle GoldenGate主要由如下一些组件组成● Extract● Data pump● Replicat● Trails or extract files● Checkpoints● Manager● Collector1、Data Pump是一个次级的Extract Group,如果你的GG环境中不使用Data Pump的话,那么Primary Extract Group必须直接将trail通过网络写到Target系统上.参见后面的示例6:配置Data Pump实现一对多拓扑方案.2、默认情况下,Replicat是实时复制的,如果因为某种需要需要延迟复制的话,那么可以通过Replicat Group的如下DEFERAPPLYINTERVAL参数来控制,该参数允许delay的最大时间是7天。
按照Oracle GoldenGate的工作原理和体系结构,在每个复制数据源和目标端都需要安装一套GoldenGate软件,同时需要分别启动一个 GoldenGate实例,一个GoldenGate实例就是一个管理进程(Manager process),这个管理进程也是整个GoldenGate实例运行时最主要的控制进程。
GoldenGate操作系统内存的使用是通过操作系统来控制的,而不是通过GoldenGate程序控制的,GoldenGate进程会根据需要从OS 那里分配相应的virtual memory.●GoldenGate GGSCI命令接口工具对于每个GoldenGate实例可以支持并发300个Extract和Replicat进程。
●每个Extract和Replicat进程需要大约25-55 MB内存,这主要取决于transaction的大小和并发的transaction数量。
所以,根据上面2个条件,GoldenGate对操作系统内存的需求主要取决于Extract和Replicat进程数。
工作目录每个GoldenGate实例的工作目录(working directories and binaries),大约需要40M的空间,如果你要同一台Server安装多个GoldenGate实例到不同的目录/文件系统下话,那么就需要多倍的空间分配,在考虑空间分配的时候,也需要考虑这个因数。
ORACLE GoldenGate搭建实验

ORACLE GoldenGate搭建实验实验环境说明:操作系统版本:Red hat Enterprise 6.5(Linux系统)Windows Server 2012R2(Windows系统)数据库ORACLE版本:11.2.0.4Goldengate版本:12.1.2.1.0一、GoldenGate搭建前的准备工作1.1Goldengate软件下载建议去ORACLE官网下载,根据需要下载不同版本的GoldenGate软件,本次试验下载的GoldenGate软件版本是12.1.2.1.01.2数据库配置1.2.1创建ORACLE GoldenGate的管理用户--创建管理用户所对应的表空间SQL>create tablespace oggtb datafile '/oradata/ogg01.dbf' size 1000M autoextend on next 5M maxsize unlimited;--创建管理用户ogg,源端用户ogg1,目标端用户ogg2SQL>create user ogg identified by oggtest default tablespace oggtb;SQL>create user ogg1 identified by ogg1 default tablespace oggtb;SQL>create user ogg2 identified by ogg2 default tablespace oggtb;--给用户授权SQL>grant connect,resource,dba to ogg;SQL>grant connect,resource,dba to ogg1;SQL>grant connect,resource,dba to ogg2;1.2.2开启数据库归档--查看当前数据库是否开启归档。
Oracle GoldenGate 12c 用户指南.pdf_1701870649.8259318说

Oracle GoldenGate 12c for Oracle Database 12cJagdev DhillonVice PresidentNick WagnerProduct ManagerSafe Harbor StatementThe following is intended to outline our general product direction. It is intended for information purposes only, and may not be incorporated into any contract. It is not a commitment to deliver any material, code, or functionality, and should not be relied upon in making purchasing decisions. The development, release, and timing of any features or functionality described for Oracle’s products remains at the sole discretion of Oracle.Program Agenda1 2 3 4 Oracle GoldenGate 12.1.2 Review Oracle GoldenGate 12.1.2.1 New Features Streams to GoldenGate ConversionsQ&AOracle GoldenGate 12c Generic Enhancements•DDL Trigger is no longer needed–Works with Oracle 11.2.0.4 and up and requires Integrated Extract–Works with Oracle Standard Edition as well as Enterprise Edition•DISCARDFILE now has defaults, and no longer needs to be specified for each Replicat •Improved Schema Wildcard resolution within the parameter files–Only captures first TABLE parameter for SCOTT.EMP DMLTABLE SCOTT.EMP, COLMAP(…);TABLE *.EMP;•Oracle 12c Expanded Data Type Support–Support for VARCHAR2 / NVARCHAR2 / RAW MAX options (32k length)Integrated Replicat•Integrated Replicat for Oracle target databases only–11.2.0.4 and 12c (12.1.+)•Leverages database parallel apply servers for automatic dependency aware parallel apply•Minimal changes to replicat configuration–Single replicat parameter file for all tables–No split transaction semanticsIntegrated ReplicatInbound Server (Database Apply Process) Delivery Lightweight Streaming API Receiver Preparer Coordinator Inbound Server Applier NApplier 2 Applier 1 Oracle DatabaseDelivery Delivery Delivery Delivery Customer defined splitSQL SQLSQL SQLTargetOracle and Non-Oracle DatabasesMAP sales.acct1, TARGET sales.acct1; MAP sales.acct2, TARGET sales.acct2; MAP sales.acct3, TARGET sales.acct3;Trail Files Thread Customer defined split SQL SQLSQLSQL Single replicationprocess forcustomerGoldenGatecoordinatesthread for barrieroperations TargetOracle and Non-Oracle DatabasesMAP sales.acct1, TARGET sales.acct1, THREAD (2); MAP sales.acct2, TARGET sales.acct2, THREAD (3); MAP sales.acct,3 TARGET sales.acct3, THREADANGE (4-9);Credential Store/Oracle Wallet•Oracle Wallet and Credential Store functionality now built into the Oracle GoldenGate Installation•Credential Store for storing usernames and passwords•Once a credential has been added to the wallet–Remove USERID, MININGDBUSERID, etc–Replace with USERIDALIAS, MININGDBUSERIDALIAS, etcHA Features for GoldenGate in 12.1.2•Oracle Active Data Guard and Oracle GoldenGate High-Availability Best Practices [CON7715]–Tuesday, Sep 30, 10:45 AM - 11:30 AM- Moscone South – 308•Full Integration with ASYNC FSFO–GoldenGate can now safely follow bounded data-loss failovers–Support enabled in Integrated Extract with the addition of the following parameter:TRANLOGOPTIONS HANDLEDLFAILOVER•Works for Oracle DB 11g and 12c•Full integration with Oracle’s XAG–XAG allows you to register a GoldenGate instance to improve HA–XAG provides increased availability in the face a loss of an instance or Primary databaseProgram Agenda1 2 3 4 Oracle GoldenGate 12.1.2 Review Oracle GoldenGate 12.1.2.1 New Features Streams to GoldenGate ConversionsQ&A12.1.2.1 Major Enhancements•Capture Enhancements–Integrated Extract Enhancements–Certification for Oracle 12.1.0.2 and In-Memory Database (IMDB) –Support for Capturing from ADG Standby database •Integrated Delivery Enhancements–Dependency Aware Batching–DDL and DML Handlers–Error Queue Support•Support for multiple Editions (Edition Based Redefinition) •Column Level Character Set Support•SOCKS 5 SupportIntegrated Extract Specific Enhancements•Continues to support Oracle SE and EE databases•Improved Startup Performance and Scalability (shared mining dictionary) •Tagged transaction can be excluded for Active-Active replication–EXCLUDETAG•Create Table As Select… can be applied as DDL + DML rather than DDL –TRANLOGOPTIONS GETCTASDML•Added redo log capture for ANYDATA and UDTs–TRANLOGOPTIONS USENATIVEOBJSUPPORT•Support for Edition Based Redefinition and multiple editionsClassic Extract can now capture from an ADG Standby database •Extract can be configured to run on the Standby Database•Configuration on the Primary database–Setup DDL capture (optional)–Configure Supplemental log data•Configuration on the Standby database–USERID Parameter points to the Primary database (USERID username@primary ) –Set TRANLOGOPTIONS MINEFROMACTIVEDGShared Logminer Dictionary•REGISTER EXTRACT ecap DATABASE•REGISTER EXTRACT ename DATABASE SHARE ecap–Ename is created as a “clone” of ecap–2nd extract (ename) uses same internal dictionary as ecap•Fast start of 2nd extract (no dictionary processing required)•Single extract does dictionary maintenance•REGISTER EXTRACT eother DATABASE SCN startatscn SHARE ecap –SCN parameter meaning is different when combined with SHAREEXCLUDETAG Functionality•TRANLOGOPTIONS EXCLUDETAG takes a single string value, but allows multiple lines to specify multiple tags•Extend EXCLUDETAG to exclude any tagged operation–EXCLUDETAG +–Similar to Streams is_null_tag setting.•Filtering of tagged transactions can be done in the Extract pump and REPLICAT12.1.2.1 Integrated Delivery Enhancements Dependency-Aware Batching for Integrated Replicat•Through the use of INTEGRATEDPARAMS BATCHSQL_MODE–Controls the ordering of transactions in BATCHSQL mode–Options:•SEQUENTIAL – transaction batched in sequential order•DEPENDENT – Dependency grouping, schedule when no active dependencies•DEPENDENT_EAGER – dependency grouping but allow scheduling when there are active dependencies–Default is DEPENDENT for Oracle 12.1.0.2–Requires new OGG/RDBMS bundled patch (bp2) but not available for 11.2.0.4.•Without patch, default is SEQUENTIAL•COMMIT_SERIALIZATION=FULL sets BATCHSQL_MODE=SEQUENTIALIntegrated Replicat Apply Handler Configuration•Uses the same package calls to set up as Streams does–DBMS_APPLY_ADM package•DML: Set_dml_handler or Add_stmt_handler•DDL: Alter_apply–The scope of handler is dependent on the configuration•Per Table , Per Operation (Ins/Upd/Del)•It is associated with the Inbound Server (Integrated Replicat process inside thedatabase)•Operations processed by the DML/DDL handler will not be applied by the Replicat •Integrated Replicat needs to be stopped and restarted when adding or removing handlers.PL/SQL Update Handler on DEMO.ORDERS table BEGINDBMS_APPLY_ADM.SET_DML_HANDLER(object_name => '"DEMO"."ORDERS"',object_type => 'TABLE',operation_name => 'UPDATE',error_handler => FALSE, ## if FALSE, then the handler replaces normal apply processing, ## if TRUE, then the handler is only executed on error.user_procedure => 'DEMO.ORDERS_DML_HANDLER',apply_database_link => NULL,apply_name => NULL); ## If NULL, then handler is used for ALL apply & inbound servers END;/12.1.2.1 Integrated Delivery Enhancements Statement DML Handlers•Statement DML handlers are up to 4x faster than procedural DML handlers –Statement DML handlers should be used to replace SQLEXEC in the Replicat when possible •Easy to Use–SQL statements, rather than PL/SQL procedures–DBMS_APPLY_ADM.ADD_STMT_HANDLER•Creates handler with SQL statement AND•Registers to Apply process–DBMS_STREAMS_HANDLER_ADM package procedures•Create or Drop handler•Add or Remove statements to/from handler•Register with apply12.1.2.1 Integrated Delivery EnhancementsEnable Error Queue Handling•In older versions of OGG, if an error occurs it falls back and lets the Replicat retry the operation. If the OGG retry fails it abends•Allow DBMS_Apply_Adm.Execute_Error capability for Integrated Replicat to retry operations in the error queue. Handles whether is message is added to the error queue.–DBOPTIONS _NO_DISABLE_ON_RETRY_ERROR•Allow OGG to retry, but if OGG fails, continue processing. If OGG successfully applies transaction, OGG deletes error from queue. Default behavior.–DBOPTIONS _NO_DISABLE_OR_RETRY_ERROR•Disable OGG retry and continue processing, recommended with COMMIT_SERIALIZATION=FULLManaging Apply Errors12.1.2.1 Integrated Delivery EnhancementsEdition Based Redefinition•DDL Replication now supports CREATE/DROP EDITION–Replicat will grant the user permission to use if it exists on target•Extract will capture the EDITION NAME owner•Replicat will switch session to the EDITION owner before applying DDL •DDL operations on editions can be filtered as well–DDL INCLUDE ALL, EXCLUDE OBJTYPE EDITION•Support for Column Level Character Sets–For cases where a table has column(s) with a character set that is different from the database character set.–Use SOURCECHARSET to enable this functionality•In MAP / TABLE statements use CHARSET to use your own settings•In DEFGEN use COLCHARSET to use your own settings•Enhanced Cloud support–SOCKS v5 Support•SOCKet Secure is a protocol that supports routing between client and server •Allows authentication•SOCKS can encrypt all traffic between client and server•Alternative to VPN for cloud to on-premise or vice-versa–New parameter SOCKSPROXY•SOCKSPROXY host:port, [PROXYCSALIAS <alias> [, PROXYCSDOMAIN domain]]•Enhanced Cloud support–Example for sending trail data from on-premise to cloud.•GoldenGate installed on with manager port 9000•Firewall only allows incoming connections on SSH port.–Use SSH as SOCKS proxy server on-premise•ssh –i ssh-key –N –f –D 1080 ******************************.com•Port 1080 is the client port that will route to an OGG installation on –Extract Parameter file:•RMTHOST , MGRPORT 9000, SOCKSPROXY localhost:1080Program Agenda1 2 3 4 Oracle GoldenGate 12.1.2 Review Oracle GoldenGate 12.1.2.1 New Features Streams to GoldenGate ConversionsQ&AMOS 1912338.1 Oracle Streams to Oracle GoldenGate Conversion •Streams is now deprecated (as of Oracle 12c)•Designed to help existing Streams users convert their replication into Oracle GoldenGate replication.–The streams2ogg tool will generate the appropriate GoldenGate 12c configuration files allowing for an easier way to migrate the Streams implementation into a GoldenGate implementation.•This tool will help–Eliminate manual conversion errors–Minimize the GoldenGate learning curve for Streams customers–Implement GoldenGate best practicesMOS 1912338.1 Oracle Streams to Oracle GoldenGate Conversion•The streams2ogg migration tool is run at the database level–connecting to the Streams Administrator schema–Load and execute the streams2ogg package–Oracle GoldenGate Parameter files are produced•OGG configuration files can be generated to run on a different database or machine to allowing for testing and platform migrations.NOTE:This tool does not provide the environment or process for switching from Streams over to your GoldenGate implementation. And does not support complete conversion of the CDC (Change Data Capture) feature of Oracle DB. Ideally suited for environments where the source and target object structure is the same.Streams2oggMOS 1912338.1 Oracle Streams to Oracle GoldenGate Conversion •Database package streams2ogg–Download from MOS Doc ID 1912338.1•Load package as Streams Administrator and answer 2 questions –@streams2ogg–Name of Oracle GoldenGate administrator schema–Name of staging directory for storing the generated files•Run procedure from Streams Administrator schema using either: –exec streams2ogg.main–exec streams2ogg.customize (if performing customizations)•All generated files will be in the staging directory.Streams2ogg Files GeneratedFile Name Descriptione capname.prm Extract file name based on capture namep capname.prm Pump file name based on capture name/propagation namer appname.prm Replicat file name based on apply namemgr.prm Manager file name - contains PORT number,other OGG mgr Best Practiceparameters (These are not based on Streams configuration) handlers.sql Sql script to configure Streams handlers after replicat process isregistered (does not include handler code)streams2ogg.trc Debug/Trace file – always generatedstreams2ogg.rpt Report file – always generatedFile Name Descriptionggconfig.oby GGSCI obey file to create extract, pump, replicat processes ggconfig2.oby GGSCI obey file to create additional extract processes based on firstextract SCNggconfig_trandata.oby GGSCI obey file to configure database supplemental logging create_subdirectories.sh Shell script to generate directory structure under the trail file storagedirectoryreg_extract.sh Helper shell script for ggconfig2.oby OGG 12.1.2.0 Register extract….SCN optionwatch.sh, watch.sql watch_status.sql Helper shell and sql script for ggconfig2.oby for OGG 12.1.2.1 Register extract….SHARE optionwatch_status.sql can be used to get status of capture initializationogg_name_map.csv Comma-separated name/value pairs for customizing streams2ogg filegenerationStreams2ogg Files Generated (continued)Streams2ogg Post Execution StepsMOS 1912338.1 Oracle Streams to Oracle GoldenGate Conversion •Parameter files and obey files need to be edited–Choose method to login: dblogin or dbloginalias–For dblogin, set password•Pump parameter file also needs to identify the host name for the RMTHOST command–If PORT number is changed in mgr.port, modify port number in pump file, too. •wait.sh script needs sqlplus login passwordProgram Agenda1 2 3 4 Oracle GoldenGate 12.1.2 Review Oracle GoldenGate 12.1.2.1 New Features Streams to GoldenGate ConversionsQ&A。
Linux下安装Oracle12C详解
Linux下安装Oracle12C详解Linux下安装Oracle12C详解本例操作系统版本:CentOS 7.8、数据库版本:Oracle 12c(12.201)安装步骤如下分解:主机信息hostname: ol7-122.localdomainhosts: 10.0.0.10 ol7-122.localdomain ol7-1221.关闭防⽕墙,禁⽌防⽕墙开机⾃启# 关闭防⽕墙systemctl stop firewalld.service# 禁⽌防⽕墙开机启动systemctl disable firewalld.service# 查看防⽕墙状态systemctl status firewalld.service2.关闭selinux# 编辑⽂件vi /etc/selinux/config# 修改内容SELINUX=disabled3.yum安装必要安装包使⽤ yum 批量安装依赖包,若执⾏⼀遍失败则继续执⾏第⼆遍(多次执⾏不会出现其他问题)yum install binutils -yyum install compat-libcap1 -yyum install compat-libstdc++-33 -yyum install compat-libstdc++-33.i686 -yyum install glibc -yyum install glibc.i686 -yyum install glibc-devel -yyum install glibc-devel.i686 -yyum install ksh -yyum install libaio -yyum install libaio.i686 -yyum install libaio-devel -yyum install libaio-devel.i686 -yyum install libX11 -yyum install libX11.i686 -yyum install libXau -yyum install libXau.i686 -yyum install libXi -yyum install libXi.i686 -yyum install libXtst -yyum install libXtst.i686 -yyum install libgcc -yyum install libgcc.i686 -yyum install libstdc++ -yyum install libstdc++.i686 -yyum install libstdc++-devel -yyum install libstdc++-devel.i686 -yyum install libxcb -yyum install libxcb.i686 -yyum install make -yyum install nfs-utils -yyum install net-tools -yyum install smartmontools -yyum install sysstat -yyum install unixODBC -yyum install unixODBC-devel -y检查是否安装成功(31个安装包)rpm -q binutils compat-libcap1 compat-libstdc++-33gcc gcc-c++ glibc glibc-devel ksh libaio libaio-devel libgcc libstdc++ libstdc++-devel libXi libXtst make sysstat unixODBC unixODBC-devel4.创建 swap详见⽂章:5.创建 oracle 分区(可选)如果你操作系统原有分区都合适,这步可以忽略# 查看硬盘及分区信息(启动Disk开头的就是硬盘,Device开头的就是分区)fdisk -l# 创建分区(/dev/sdb 是硬盘,是你需要创建分区的硬盘,创建分区后会⽣成 /dev/sdb1,如果本来有sdb1,则会出现sdb2)fdisk /dev/sdb# 格式化新创建的分区mkfs.xfs /dev/sdb1# 将分区添加到 /etc/fstab ⽂件中,使之开机⾃动挂载(编辑保存 fstab ⽂件后不会⽴即⽣效)vim /etc/fstab/dev/sdb1 /u01 xfs defaults 006.创建 oracle data ⽬录(同第5步可选)# 创建⽬录mkdir /u01# 重新加载⽂件 /etc/fstab 所有内容。
Oracle12C安装实例
Oracle 12C 安装实例■ 陕西 王金国 解宝琦本实例所在的系统环境为:操作系统:CentOS7.5;数据库版本:12.1.0.2.0;主机名:Oracle 12C ;ORACLE_SID :Oracle12c ;容器数据库:Oracle12cp db操作系统环境准备及数据库安装要点因为操作系统安装相关文章已经非常多了。
笔者认为安装Oracle 数据库的重点和难点在于操作系统环境准备部分以及补丁安装部分,因此将略过操作系统安装和数据库安装过程,重点详细描述以上环境准备和补丁安装内容。
1.安装centos7.5,安装过程中需要选择gnome 图形桌面,并配置磁盘为LVM 管编者按:Oracle 作为企业级数据库产品。
目前依然是各大中型企业数据库管理软件的翘楚。
本文以生产环境为应用场景。
详细阐述了CentOS7.5系统下Oracle 12C 数据库的安装及补丁升级涉及的重点过程,包含了完整的数据库日志模式启用及全库备份需要进行的配置,很好的满足了生产环境对Oracle 稳定性和日常备份的要求。
理模式。
便于未来数据增长后进行磁盘的动态扩展和管理。
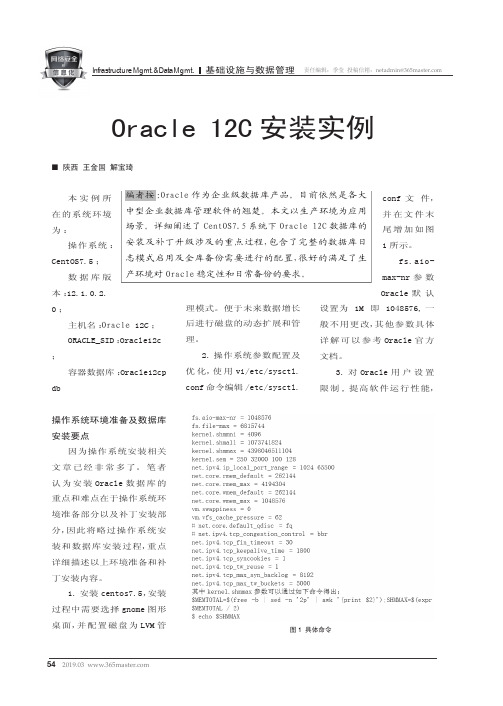
2.操作系统参数配置及优化,使用vi/etc/sysctl.conf 命令编辑/etc/sysctl.conf 文件,并在文件末尾增加如图1所示。
fs.aio-max-nr 参数Oracle 默认设置为 1M 即 1048576,一般不用更改,其他参数具体详解可以参考Oracle 官方文档。
3.对Oracle 用户设置限制,提高软件运行性能,图1 具体命令通过命令vi etc/security/limits.conf 编辑该文件,并加入如下内容:oracle soft nofile 1024oracle hard nofile 65536o r a c l e s o f t n p r o c 2047o r a c l e h a r d n p r o c 16384o r a c l e s o f t s t a c k 10240o r a c l e h a r d s t a c k 327684.关联设置,通过命令vi /etc/pam.d/login,添加如下内容:s e s s i o n r e q u i r e d /l i b 64/s e c u r i t y /p a m _limits.sosession required pam_limits.so5.设置环境变量,通过命令vi etc/profile 添加如图2所示。
Oracle Recovery Manager 12c数据保护在12cR1的介绍说明书
Oracle Recovery Manager 12c Data Protection in 12c R1Sridhar RanganathanSr. Principal Product Manager, Oracle Database High Availability Rao S. KasinadhuniSenior Oracle DBA, Vice President J.P. Morgan, AM Infrastructure October 29, 2015Presented withProgram AgendaRecovery Manager New Features in Oracle 12cJ.P .Morgan – Cross Platform Migration: Real World Use Case New Backup Solutions using RMAN Flashback Technologies in Oracle 12c Oracle Secure Backup 12.1 Maximum Availability Architecture1 2 3 4 5 6RMAN in Oracle Database 12c Release 1 18 Years of Innovation (Introduced in Oracle 8 Circa 1997)Import 12cRMAN Backups RMAN RestoreSource Database Clone Database 12c 12c: Over the Network Recovery for Data Guard12c 12c: Over the Network Recovery for Data Guard12c 12cRMAN Backup - CDBFor Source databases 10.2 and aboveScripts Updated using new RMAN 12c Features Phase 3: TransportLast read-only L1 andtransferExport & Import metadataPhase 2: Roll-Forward (Reduce Downtime) Perform L1 and transferwhile source is in r/wRepeat this until cut-offperiodPhase 1: PrepareInstall Target SystemPerform L0 and transferNewRMAN 12c: Enhancements for Cross Platform Migration •Support for BACKUPSET format–Unused block compression, smaller transport size, multi-section•New keywords in RMAN 12c–FOR TRANSPORT at source platform–TO PLATFORM (conversion at source to a specific platform)–FROM PLATFORM (conversion at destination from a specific platform)–ALLOW INCONSISTENT to create inconsistent backups of tablespace (during incremental backups) •No longer require CONVERT TABLESPACE or CONVERT DATAFILE procedure•Can include tablespace metadata if that tablespace is read-only (final step) •XTTS with incremental backups reduces downtime up to 8X•Backups from 10g, 11g can be restored to a 12c destinationcSource Platform Destination Platform1. Level 0 Full Backup2. Restore L0 Backup 6. Final Recovery L1Real World Cross Platform Migration Using Oracle 12c RMANRao S. KasinadhuniSenior Oracle DBA, Vice PresidentJ.P. Morgan, AM InfrastructureOctober 29, 2015Source Environment •Colorado Data Center •10+ Oracle Databases •11gR1 and 11gR2 •HP-UX RISC Platform •Stand-alone (non-RAC) •Database Sizes range from 12 TB to 30 TBDestination Environment•Atlanta Data Center•Oracle Enterprise Linux6.x Platform•Oracle 12.1.0.2•Oracle RACChallenges & Solution•Challenges–Migration across datacenters (~800 miles)–Migration across platforms–Migration across versions•Solution–Use Staging Servers atDestination–Use Active Data Guardbetween Data Centers–Use Cross-Platformmigration (MOS 1389592.1 )Databases Migration ProjectCross Platform MigrationTopology through Big PictureStep 1: Synchronize Data Between Data Centers•Build Staging Server at the Destination Data center (Atlanta)–Same OS HP-UX but Different Processor Architecture •Staging Host: IA-64 based with HP-UX•Create Physical Standby on Staging Host –Performed RMAN Hot backup from source database–Shipped the storage media to the destination–Restore Media on the staging host•Keep Synchronizing Physical Standby using Active Data GuardStaging using Active Data GuardStep 2: Cross-Platform Transport•Destination Servers: Linux / X86 Blade•One time Level 0 Backup–Take Initial Level 0 backup from Staging Server (which is a Standby Server)–Use NFS mount point for backups–Restore Backups at Destination RAC Server •Repeated Incremental Level 1 Backups–Keep taking Incremental (L1) Backups on Staging–Keep Restoring Incremental (L1) Backups at DestinationData Migration Between Staging & Destination ServerStep 3: Cutting Over to Destination Database •Ensure Physical standby (Staging) Synchronized to Last Archive log•Shutdown Source (Production) database •Final Incremental Backup (L1)–Physical standby is already in read-only mode –Take final incremental L1 backup–Restore the last L1 at Destination•Meta Data Plug-in–Export Meta Data from the Stage Server–Import Meta data into Destination database •Open Destination databaseFinal Plug-In Procedure on the Cut-Off DayObservation, Best Practices & Future Plans•Very smooth & efficient migration completed using Oracle supplied Cross-Platform Scripts (MOS 1389592.1)•Performed multiple incremental backups to keep the destination server data as close to production•Use Multi-Section Incremental Backups•Use NFS (SAN based) mounted file system for cross-platform migration between staging & destination servers–Avoids additional steps required to copy backups between servrs•Future Plans–Implement backup & recovery procedures using RMAN 12c capabilities–Identify and Migrate other HP-UX databases to future Oracle version using 12c enhancementsProgram AgendaRecovery Manager New Features in 12cJ.P .Morgan – Cross Platform Migration: Real World Use Case New Backup Solutions using RMAN Flashback Technologies in 12c Oracle Secure Backup 12.1 Maximum Availability Architecture1 2 3 4 5 6Stores validated, compressed DB changes on diskFast restores to any point-in-time using deltasBuilt on Exadata scaling and resilienceEnterprise Manager end-to-end control Replicates to RemoteRecovery ApplianceInstant Offsite StorageCost Effective On-demand Scalability End-to-End Security RMAN EncryptionRMAN Compression 3-Way Protection 24x7 Data AvailabilityOracle Database BackupCloud ServiceOracle DBaaS / Exadata Cloud ServiceOn-Premises Databases10.2 and abovePlatform as a ServiceProgram AgendaRecovery Manager New Features in 12c & 12c R2J.P .Morgan – Cross Platform Migration: Real World Use Case New Backup Solutions using RMAN Flashback Technologies in 12c Oracle Secure Backup 12.1 Maximum Availability Architecture1 2 3 4 5 6Flashback Database for Continuous Data ProtectionCDB/PDBs @ t1 (test_grp)FLASHBACK to test_grp In Oracle Database 12c Release 1, Flashback Database capabilities arePDBs @ t2Program AgendaRecovery Manager New Features in 12cJ.P .Morgan – Cross Platform Migration: Real World Use Case New Backup Solutions using RMAN Flashback Technologies Technologies in 12c Oracle Secure Backup 12.1 Maximum Availability Architecture1 2 3 4 5 6Clients – Unix / Linux/ Windows / NASMedia ManagerDisk Storage Tape LibraryProgram AgendaRecovery Manager New Features in 12cJ.P .Morgan – Cross Platform Migration: Real World Use Case New Backup Solutions using RMAN Flashback Technologies in 12c Oracle Secure Backup 12.1 Maximum Availability Architecture1 2 3 4 5 6TechnologyProtectionAgainst Type ofFailureDowntimeRecovery Time Objective ,RTOData Loss ExposureRecovery Point Objective , RPOOracle Secure Backup Physical Hours/Days Days/Hours(from last backup)Recovery Manager (RMAN)Physical Hours/Days Hours(from last backup)Flashback Technologies Logical Minutes/Hours Minutes/Hours(from point-in-time) (Active) Data Guard Site Failure / DR Seconds/Minutes Zero/SecondsEdition-based Redefinition,Online Redefinition, Data Guard, GoldenGate–Minimal downtime maintenance, upgrades, migrationsActive Data Guard–Data Protection, DR–Query OffloadGoldenGate–Active-active replication –HeterogeneousActive ReplicaRMAN, Oracle Secure Backup, Zero Data Loss Recovery ApplianceEnterprise Manager Cloud Control–Site Guard, Coordinated Site FailoverApplication Continuity–Application HAGlobal Data Services–Service Failover / Load BalancingRAC–Scalability –Server HAASM–Local storage protectionProduction SiteFlashback–Human error correctionOracle Maximum Availability Architecture (MAA)Reference•/goto/rman•/goto/flashback•/goto/ha•/goto/maa•Master RMAN Note (Doc ID 1116484.1)Social–/maa–Follow us @OracleMAA******************************Copyright © 2015, Oracle and/or its affiliates. All rights reserved.31。
oracle12使用手册

oracle12使用手册Oracle 12 使用手册Oracle是一种广泛应用的关系型数据库管理系统(RDBMS),它提供了一种高效、可靠的数据存储和管理解决方案。
本文将向您介绍Oracle 12的使用手册,让您能够更好地了解和操作这个强大的数据库系统。
一、安装和配置Oracle 121. 下载Oracle 12c安装包,并解压缩到指定目录。
2. 执行安装程序,按照向导提示进行安装。
3. 配置数据库实例,包括设置监听器、初始化参数等。
4. 启动数据库实例,确保数据库能够正常运行。
二、创建和管理数据库1. 使用SQL*Plus或SQL Developer等工具登录数据库。
2. 创建数据库表空间,用于存储数据和索引。
3. 创建用户,并为其分配适当的权限。
4. 创建表、视图、索引等数据库对象。
5. 管理数据库对象的权限和存取控制。
6. 备份和恢复数据库,确保数据的安全性和可靠性。
三、数据查询与操作1. 使用SQL语言进行数据查询和操作。
2. 编写SQL查询语句,包括条件查询、排序、分组等。
3. 使用内置函数进行数据计算和转换。
4. 联接多个表进行复杂查询。
5. 插入、更新和删除数据。
6. 事务管理,确保数据的一致性和完整性。
四、PL/SQL编程1. 了解PL/SQL语言的基本语法和数据类型。
2. 编写存储过程、函数和触发器。
3. 使用游标进行数据检索和遍历。
4. 异常处理和事务控制。
5. 调用PL/SQL代码并进行测试。
五、性能优化和调试1. 了解Oracle的查询优化器和执行计划。
2. 使用索引和分区等技术提升查询性能。
3. 分析和优化SQL查询语句。
4. 监控和调优数据库的性能。
5. 诊断和解决数据库故障和性能问题。
六、高可用性和容灾备份1. 配置备份和恢复策略,确保数据的可靠性。
2. 实施数据复制和故障转移,提高系统的可用性。
3. 使用Oracle Data Guard实现数据库的容灾备份。
4. 备份和恢复数据库和表空间。
Linux下安装oracle12C数据库,附带问题解决方法
Linux下安装oracle12C数据库,附带问题解决方法Linux安装Oracle12c1.1.配置核心参数1、修改用户的SHELL的限制,修改/etc/security/limits.conf文件命令:vi/etc/security/limits.conf,添加下列文件如图:编辑完成后按Esc键,输入“:wq”存盘退出。
2、修改/etc/pam.d/login文件输入命令:vi/etc/pam.d/login,添加下列文件如图:编辑完成后按Esc键,输入“:wq”存盘退出。
3、通过修改/etc/sysctl.conf文件,修改linux内核命令:vi/etc/sysctl.conf,添加下列内容如图:编辑完成后按Esc键,输入“:wq”存盘退出。
将更改的内容生效激活:sysctl-p,显示结果如下图4、编辑文件/etc/profile,命令:vi /etc/profile,添加下列内容编辑完成后按Esc键,输入“:wq”存盘退出。
5、创建相关用户和组,作为软件安装和支持组的拥有者。
(1)、创建用户组,命令如下:groupadd oinstallgroupadd dbagroupadd oper如图:(2)创建Oracle用户和密码,命令如下:useradd -g oinstall -G dba,oper -m oraclepasswd oracle然后会让你输入密码,密码任意输入2次,但必须保持一致,回车确认。
如图:6、创建数据库软件目录和数据文件存放目录,目录的位置,根据自己的情况来定,注意磁盘空间即可,示例命令如下:mkdir /datamkdir /data/oraclemkdir /data/oracle/appmkdir /data/oracle/app/oraclemkdir /data/oracle/app/oradatamkdir /data/oracle/app/oracle/productmkdir /data/oracle/app/oracle/oralnventory7、更改目录属主为Oracle用户所有,输入命令:chown -R oracle:oinstall /data/oracle/app8、配置oracle用户的环境变量(1)切换oracle用户命令:su– oracle编辑文件.bash_profile,命令:vi .bash_profile添加内容如下:编辑完成后按Esc键,输入“:wq”存盘退出。
Oracle Goldengate Monitor12c安装配置指南12.1.3
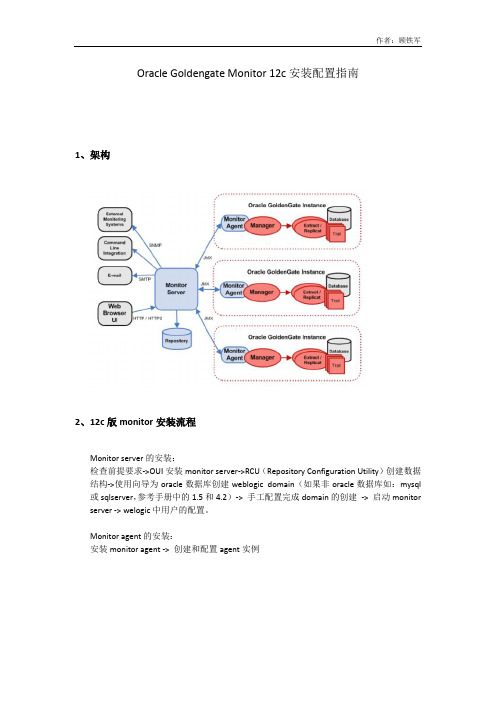
Oracle Goldengate Monitor 12c安装配置指南1、架构2、12c版monitor安装流程Monitor server的安装:检查前提要求->OUI安装monitor server->RCU(Repository Configuration Utility)创建数据结构->使用向导为oracle数据库创建weblogic domain(如果非oracle数据库如:mysql 或sqlserver,参考手册中的1.5和4.2)-> 手工配置完成domain的创建-> 启动monitor server -> welogic中用户的配置。
Monitor agent的安装:安装monitor agent -> 创建和配置agent实例3、Monitor Server的安装3.1 前提要求Monitor server:需要安装JDK1.7(参考director安装)Orace11g或12c(mysql5.5、sqlserver2008,2012),字符集AL32UTF8Weblogic12c(12.1.3),但是需要下载的包是:Oracle Fusion Middleware 12c (12.1.3.0.0) Infrastructure,单weblogic无效。
/etc/hosts文件:Monitor server和被监控的主机之间配置上hosts文件解析,都含有monitor server和agent 的条目建议monitor server单独放一台机器,和agent所在不混用。
3.2 安装Oracle Fusion Middleware 12c (12.1.3.0.0) Infrastructure3.3 Monitor server安装java -jar -Xmx1024m fmw_12.1.3.0.0_ogg.jar3.4 创建RCU首先确认字符集是否是AL32UTF8SQL> select * from nls_database_parameters where parameter='NLS_CHARACTERSET';PARAMETER------------------------------VALUE--------------------------------------------------------------------------------NLS_CHARACTERSETAL32UTF8;然后执行:$ORACLE_HOME下面的rcu,这里是Middleware/ORACLE_HOME的目录密码统一设置为oracle:3.5 配置domaincd /u01/app/Middleware/Oracle_Home/wlserver/common/bin ./config.sh设置weblogic的密码:welcome1设置相关信息,密码:oracle,然后点击:获取RCU配置:口令统一为oracle点击:创建3.6 monitor Server打patchMonitor server需要打patch:19915967打patch之前先停止weblogic manageserver和admin server检查当前OPTCH版本:export ORACLE_HOME=/u01/app/Middleware/Oracle_Home[oracle@oggsource OPatch]$ ./opatch versionOPatch Version: 13.2.0.0.0OPatch succeeded.打agent的patch要求的opatch版本:(OPatch version 13.2.0.0.0 or higher) 这里满足要求,就不升级opatch了。
goldengate_安装配置指南
goldengate_安装配置指南goldengate_安装配置指南2011-09-23 14:56解压安装包(用oracle用户来做,用root会出现权限问题)$tar -xvf xxxx.tar$ls -l --检查全线问题配置环境(两边都要配置)$env --查看环境变量LD_LIBRARY_PATH=/u01/app/oracle/prodcut/10.2.0/db_1/lib是否设置$vi .profile设置验证ggsci命令$./ggsciGGSCI>help --可以查看gg的各种命令新建一些目录GGSCI>create subdirs --不需要指定路径,默认在当前目录下(所以进入ggsci的时候,一定要在gg的当前目录)新建出来的目录有:name Purpose--dirchk Checkpoint files存放检查点(Checkpoint)文件(和Oracle的checkpoint含义不同,如oralce的一个实例失败,从最近一次的checkpoint开始recorver, oracle的一次checkpoint是让dbwrt进程把被修改的数据从数据缓冲区中写入数据文件。
而OGG的checkpoint是OGG捕捉了很多事务日志,哪些被传输了,哪些未被传输。
每隔一段时间,执行一次checkpoint,之前的所有数据都要传送过去。
如果soure or target db断电了,那下次启动的时候,就要支持断点续传,那那个断点位置就是最后一次OGG执行checkpoint的位置)--dirdat GoldenGate trails, 存放Trail与Extract文件--dirdef Data Definition files,过DEFGEN工具生成的源或目标的数据定义文件--dirprm Parameter files, 存放参数文件--dirpcs Process status files, 存放进程状态文件--dirrpt Report files, 存放进程报告文件--dirsql SQL script files,存放SQL脚本文件--dirtmp Temporary files,当事务所需要的内存超过已分配内存时,缺省存储于此5.Configure Oracle Database for Goldengate5.1 Create Goldengate User -- 创建Goldengate用户[oracle@grid_ogg] sqlplus /as sysdbaCreate user ogg for both source system and target system, and grant appropriate privileges--创建源端和目标端的用户,并授予权限Create tablespace tbs_gguser datafile '/u01/app/oracle/oradata/gguser.dbf' size 50m autoextend on--gg建议创建一个50M的表空间个gg的用户作为默认表空间Create usr ogg identified by ogg default tablespace tbs_ggusre temporary tablespace temp quota unlimited on tbs_gguser--创建一个ogg用户用户grant CONNECT, RESOURCE to ogg; --内部的角色grant CREATE SESSION, ALTER SESSION to ogg; --这两个可以省略,CONNECTION,RESOURCE已经包含了grant SELECT ANY DICTIONARY, SELECT ANY TABLE to ogg; --可以看所有的数据字典,可以看所有的表的权限grant ALTER ANY TABLE to ogg;grant FLASHBACK ANY TABLE to ogg;grant EXECUTE on DBMS_FLASHBACK to ogg; --执行xxx包的权限--在源端创建两张同步的测试表SQL>conn soctt/tiggerSQL>select * from emp_egg;SQL>seelct * from dept_egg;目标端:建立相同的用户,表空间,权限,并授予测试表的DML 权限Create user ogg for both source system and target system, and grant appropriate privilegesCreate tablespace tbs_gguser datafile '/u01/app/oracle/oradata/gguser.dbf' size 50m autoextend on Create usr ogg identified by ogg default tablespace tbs_ggusre temporary tablespace temp quota unlimited on tbs_ggusergrant CONNECT, RESOURCE to ogg;grant CREATE SESSION, ALTER SESSION to ogg;grant SELECT ANY DICTIONARY, SELECT ANY TABLE to ogg;grant CREATE TABLE to ogg;--Create empty test table and grant DML privilege to GG user SQL>connect scott/tiggerSQL>grant INSERT,UPDATE, DELETE on socktt.emp_ogg to oggSQL>grant INSERT,UPDATE,DELETE on socott.dept_ogg to ogg5.2. Enable supplemental log mode(打开附加日志模式) in source system(源数据库是否打开supplemental log)--这里的库级的附加日志区别于表级的附加日志(见trandata的说明)--supplemental log意思是说除了relog以外的一些额外的redolog,也是放在redlog文件中,如要修改一个表,oracle记录更多的一些列的该表的信息记录到redolog中,这些信息对OGG是非常重要的.check supplemental log mode is enabled or not by following querySQL>select SUPPLEMENTAL_LOG_DATA_MIN from v$database;if not, enable itSQL>alter database add supplemental log dataSQL>alter system switch logfile5.3 Enable archive log mode(打开归档日志模式) in source system(在源端打开归档日志模式--必须要做)因为OGG的捕捉进程比oracle的进程级别低,从redo log中捕捉不到的日志,要到archive log中捕捉enable archive log mode[oracle@db_ogg]sqlplus /as sysdbaSQL>alter system set log_archive_dest='/u01/app/oracle/oradata/arch' --要考虑如何定期清理归档日志的内容,否则会占用磁盘SQL>shutdown immediateSQL>startup mountSQL>alter database archivelog --打开/alter database noarchivelog --关闭归档日志SQL>alter database openSQL>archive log list;SQL>select name from v$ARCHIVED_LOG WHERE FIRST_NAME =(SELECT MAX(FIRST_TIME) FROM v$ARCHIVED_LOG)5.4 Enable force logging(强制日志模式) in source system(因为当我们对oracle进行数据操作的时候,有时为了提高效率,会用no logging模式,不产生日志,这样操作更快但是带来的问题是,不再产生redo log日志,这样导致无法做recovery, gg也无法捕捉到日志.所以在gg备份的情况下,配置成强制需要生成redo log的模式(no logging失效)Check force logging mode is enabled or not by following querySQL>SELECT force logging FROM v$databaseif not, enable itSQL>alter database force logging--在源端设置哪些表被加入到TRANDATAEnable transaction data change capture for these two table in source systemGGSCI>DBLOGIN USERID ogg, PASSWORD ogg #dblogin 是OGG里面的一个命令GGSCI>ADD TRANDATA scott.EMP_OGG #ADD TRANDATA是将源端和目标端的两张对应表执行第一次同步(即初始化同步操作)GGSCI>ADD TRANDATA scott.DEPT_OGG #删除表补全日志如果该表没有主键或唯一索引,那么指定唯一标示的字段,否则会用所有的字段来标示,同时其还有字段列数限制GGSCI>ADD TRANDATA OWNER.table_name, nokey, cols(column,column,....)Verify that supplemental logging has been turned on for these tables (验证一下归档日志是否确实被打开)GGSCI>INFO TRANDATA scott.emp* #查看scott用户中以emp开头的表是否打开了trandata设置,是否会执行初始化同步Logging of supplemental redo log data is disabled[未打开](enabled[已打开])for table SCOTT.EMP1附加解释:这里的TRANDATA和5.2的alter database add supplemental log data的区别是只有在库级的附加日志打开的情况下,表级的附加日志才有效果。
- 1、下载文档前请自行甄别文档内容的完整性,平台不提供额外的编辑、内容补充、找答案等附加服务。
- 2、"仅部分预览"的文档,不可在线预览部分如存在完整性等问题,可反馈申请退款(可完整预览的文档不适用该条件!)。
- 3、如文档侵犯您的权益,请联系客服反馈,我们会尽快为您处理(人工客服工作时间:9:00-18:30)。
Oracle Goldengate Monitor 12c安装配置指南1、架构2、12c版monitor安装流程Monitor server的安装:检查前提要求->OUI安装monitor server->RCU(Repository Configuration Utility)创建数据结构->使用向导为oracle数据库创建weblogic domain(如果非oracle数据库如:mysql 或sqlserver,参考手册中的1.5和4.2)-> 手工配置完成domain的创建-> 启动monitor server -> welogic中用户的配置。
Monitor agent的安装:安装monitor agent -> 创建和配置agent实例3、Monitor Server的安装3.1 前提要求Monitor server:需要安装JDK1.7(参考director安装)Orace11g或12c(mysql5.5、sqlserver2008,2012),字符集AL32UTF8Weblogic12c(12.1.3),但是需要下载的包是:Oracle Fusion Middleware 12c (12.1.3.0.0) Infrastructure,单weblogic无效。
/etc/hosts文件:Monitor server和被监控的主机之间配置上hosts文件解析,都含有monitor server和agent 的条目建议monitor server单独放一台机器,和agent所在不混用。
3.2 安装Oracle Fusion Middleware 12c (12.1.3.0.0) Infrastructure3.3 Monitor server安装java -jar -Xmx1024m fmw_12.1.3.0.0_ogg.jar3.4 创建RCU首先确认字符集是否是AL32UTF8SQL> select * from nls_database_parameters where parameter='NLS_CHARACTERSET';PARAMETER------------------------------VALUE--------------------------------------------------------------------------------NLS_CHARACTERSETAL32UTF8;然后执行:$ORACLE_HOME下面的rcu,这里是Middleware/ORACLE_HOME的目录密码统一设置为oracle:3.5 配置domaincd /u01/app/Middleware/Oracle_Home/wlserver/common/bin ./config.sh设置weblogic的密码:welcome1设置相关信息,密码:oracle,然后点击:获取RCU配置:口令统一为oracle点击:创建3.6 monitor Server打patchMonitor server需要打patch:19915967打patch之前先停止weblogic manageserver和admin server检查当前OPTCH版本:export ORACLE_HOME=/u01/app/Middleware/Oracle_Home[oracle@oggsource OPatch]$ ./opatch versionOPatch Version: 13.2.0.0.0OPatch succeeded.打agent的patch要求的opatch版本:(OPatch version 13.2.0.0.0 or higher) 这里满足要求,就不升级opatch了。
打补丁前确认:1、ORACLE_HOME已经设置到了middleware对应的Oracle_Home下2、Welogic的managed server和admin server已经stopexport ORACLE_HOME=/u01/app/Middleware/Oracle_Homecd /home/oracle/monitoragentpatch/19915967/u01/app/Middleware/Oracle_Home/OPatch/opatch apply最后检查/u01/app/Middleware/Oracle_Home/OPatch/opatch lsinventory3.7 修改配置并启动weblogicMonitor server的配置文件位置:/u01/app/Middleware/Oracle_Home/oggmon1213_domain/config/monitorserver/cfg/monitor.p roperties修改monitor.jmx.server.host= oggmonitorer=oggmsjmxusr --该值也可以配置成jmxuser启动weblogic server:用户名:weblogic 密码:welcome1cd /u01/app/Middleware/Oracle_Home/oggmon1213_domain./startWebLogic.shcd /u01/app/Middleware/Oracle_Home/oggmon1213_domain/bin设置用户名和密码,不设置有可能登陆web界面有问题。
vi startManagedWebLogic.sh./setDomainEnv.sh./startManagedWebLogic.sh MONITORSERVER_server1 http://134.178.1.181:7001 -Djava.awt.headless=true登陆weblogic console:http://134.178.1.181:7001/console/weblogic/welcome1登陆后选择:安全领域,选择myrealm选择用户和组:新建一个用户:oggadmin,密码为welcome1配置oggadmin的组:登陆monitor:http://134.178.1.181:7003/monitor4、Monitor agent安装4.1 前提要求Monitor agent:JDK1.7Goldengate实例所在的主机Monitor Server已经安装好无需安装Oracle Fusion Middleware 12c (12.1.3.0.0) Infrastructure 已经配置好/etc/hosts中monitor server和agent的解析4.2 Monitor agent安装java -jar -Xmx1024m fmw_12.1.3.0.0_ogg.jar4.3 打patch注意是给agent打patch。
所以建议不要把monitor server和agent放一台机器,agent应该和ogg实例同一台机器。
按照文档要求,需要打19916072的patch(agent的patch)检查当前OPTCH版本:export ORACLE_HOME=/u01/app/Middleware/Oracle_Home[oracle@oggsource OPatch]$ ./opatch versionOPatch Version: 13.2.0.0.0OPatch succeeded.打agent的patch要求的opatch版本:(OPatch version 13.2.0.0.0 or higher)这里满足要求,就不升级opatch了。
打补丁前确认:ORACLE_HOME已经设置到了middleware对应的Oracle_Home下export ORACLE_HOME=/u01/app/Middleware/Oracle_Homecd /home/oracle/monitoragentpatch/19916072/u01/app/Middleware/Oracle_Home/OPatch/opatch apply最后检查/u01/app/Middleware/Oracle_Home/OPatch/opatch lsinventory4.4 创建和配置agent实例cd /u01/app/Middleware/Oracle_Home/oggmon/ogg_agent对每个实例都要指定不同的目录:[oracle@oggsource ogg_agent]$ ./create_ogg_agent_instance.shPlease enter absolute path of Oracle GoldenGate home directory : /home/oracle/oggPlease enter absolute path of OGG Agent instance : /home/oracle/oggagent1Please enter unique name to replace timestamp in startMonitorAgent script (startMonitorAgentInstance_20150313153030.sh) : startMonitorAgentInstance1Sucessfully created OGG Agent instance.配置新建的agent实例属性:cd /home/oracle/oggagent1/cfgvi Config.properties对应的设置要和monitor server的设置匹配:/u01/app/Middleware/Oracle_Home/oggmon1213_domain/config/monitorserver/cfg/monitor.p roperties记得要配置被监控的ogg实例信息(mgr.port等,以及用户名的一致)agent参数文件样例:jagent.host=oggsourcemonitor.host=oggmonitorername=root ---该值可以任意ername=oggmsjmxusr --如果不通,该值配置成jmxuser进行尝试agent.type.enabled=OGGMON#mgr.host=localhost ---该值可以不用去掉注释,因为在agent和ogg在同一台主机上#mgr.port=7089 ---该值可以不用去掉注释,因为在agent和ogg在同一台主机上Monitor Server端参数文件样例:(/u01/app/Middleware/Oracle_Home/oggmon1213_domain/config/monitorserver/cfg/monitor .properties)monitor.jmx.server.host= oggmonitorer=oggmsjmxusr --如果不通,该值配置成jmxuser进行尝试创建wallet身份验证:cd /home/oracle/oggagent1/bin./pw_agent_util.sh -create输入的4个密码均为oracle4.5 启动monitor agent先把monitor server上的weblogic admin server和manage server启动好;首先配置ogg主目录:cd /home/oracle/oggggsciggsci>edit param ./GLOBALSENABLEMONITORING创建datastore(Berkeley DB,在ogg的dirbdb目录中存储):ggsci>create datastore退出ggsci,然后再次登陆ggscistart mgrstart jagent作者:顾铁军4.6 登陆web页面查询自动注册信息,无需discoverhttp://<monitor server ip>:7003/monitor本例中:http://134.178.1.181:7003/monitor。
