伊莱克斯Manual_EWF1268滚筒洗衣机说明书
Whirlpool 洗衣機说明书
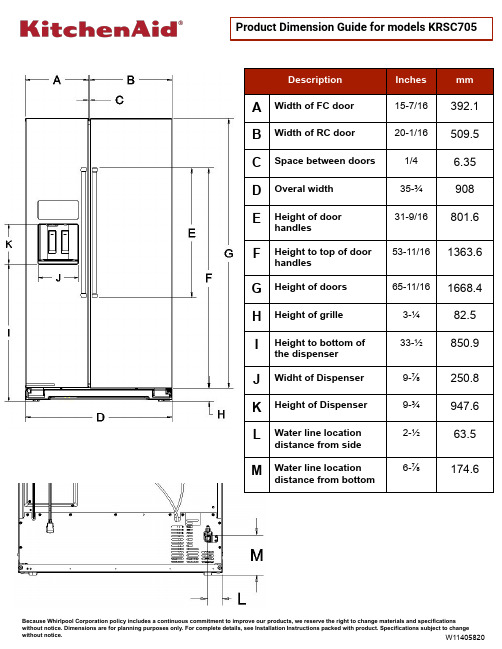
Description Inches mmA Width of FC door15-7/16392.1B Width of RC door20-1/16509.5C Space between doors1/4 6.35D Overal width35-¾90831-9/16801.6 E Height of doorhandles53-11/161363.6 F Height to top of doorhandlesG Height of doors65-11/161668.4H Height of grille3-¼82.533-½850.9 I Height to bottom ofthe dispenserJ Widht of Dispenser9-⅞250.8 K Height of Dispenser9-¾947.62-½63.5 L Water line locationdistance from side6-⅞174.6 M Water line locationdistance from bottomElectrical : A 115 volt, 60 Hz, AC only, 15- or 20-amp fused, grounded electrical supply is required. It is recommended that a separate circuit serving only your refrigerator be provided. Use an outlet that cannot be turned off by a switch. Do not use an extension cord.Water lines:are not foamed in and are externalPower chord locationWater : A cold water supply with water pressure of between 30 and 120 psi (207 and 827 kPa) is required to operate the water dispenser and ice maker. If you have questions about your water pPower chordTypeLenghtInches mmStandard75-⅝1920Description Inches mm11-⅜288.9 A Width from FC side of refrigerator tohandle - door fully open 135°2-¾69.8 B Width from FC side of refrigerator tohandle - door open 90°14-⅝365.1 C Width from RC side of refrigerator tohandle - door fully open 135°D Depth without doors29736.6E Depth with doors32-1/16814.3F Depth with handles34-¾882.65G Depth with doors open 90°50-½1282.7250.8 H Space required for water linesand power chordTo ensure proper ventilation for your refrigerator, allow for ¹⁄₂" (1.27 cm) of space on each side and at the top.Allow for 1" (2.54 cm) of space behind the refrigerator. If your refrigerator has an ice maker, allow extra space at the back for the water line connections. When installing your refrigerator next to a fixed wall, leave a 2" (5.08 cm)minimum space on each side (depending on your model) to allow the doors to swing open.NOTES :■ This refrigerator is intended for use in a location where the temperature ranges from a minimum of 55°F (13°C) to a maximum of 110°F (43°C). The preferred room temperature range for optimum performance, which reduces electricity usage and provides superior cooling, is between 60°F (15°C) and 90°F (32°C). It is recommended that you do not install the refrigerator near a heat source, such as an oven or radiator.■ Normal minimum cabinet cut-out width required for product installation is 36" (91.44 cm). However, if the product is placed against an extended wall and the ability to remove the crisper pans is desired, an additional 18" (45.72 cm) of cabinet width is required, so a total cabinet opening width of 54" (137.16 cm) is recommended.Location RequirementsDescriptionInches mmA Height of recessed refrigerator68-⅜1736.7B Height to top of hinges 68-13/161747.8C Total height691752.6D Depth to back of hinges 26-5/16668.3E Depth without doors 29736.6F Depth with doors 32-1/16814.3GDepth with handles34-3/4882.6Interior dimensions Width HeightRefrigerator Compartment 17 ⅝ in 447.6 mm 62 ⅛ in 1577.5 mm Freezer Compartment12-⅛ in 307.9 mm60 ⅛ in(1527.5 mmRefrigerator Compartment FeaturesDescriptionAwidthBheightCdepthMeat Pan17-½ in 444.5 mm 8-⅞ in 225.4 mm 16-3/8 in 415.9 mm Crisper pan17-½ in 444.5 mm9-⅛ in 231.7 mm16-3/8 in 415.9 mmSnack Pan17-½ in 444.5 mm 6-⅛ in 155.5 mm 19-⅞ in 504.8 mm Shelf17-½ in 17-¾ in Meat Pan Crisper PanSnack PanShelfTop binFreezer Compartment FeaturesDescriptionAwidthBheightCdepthBottom bin11-¾ in 298.4 mm 7-⅝ in 193.6 mm 16-¼ in 412.7 mm Top bin11-¾ in 298.4 mm 9 in228.6 mm 16-¼ in 412.7 mmBottom Shelf11-¾ in 298.4 mm N/A 14-3/4 in 374.6 mmTop Shelf11-¾ in N/A16-¼ in Bottom bin Top ShelfBottom Shelf。
Electrolux Professional 电子洗衣机产品说明书
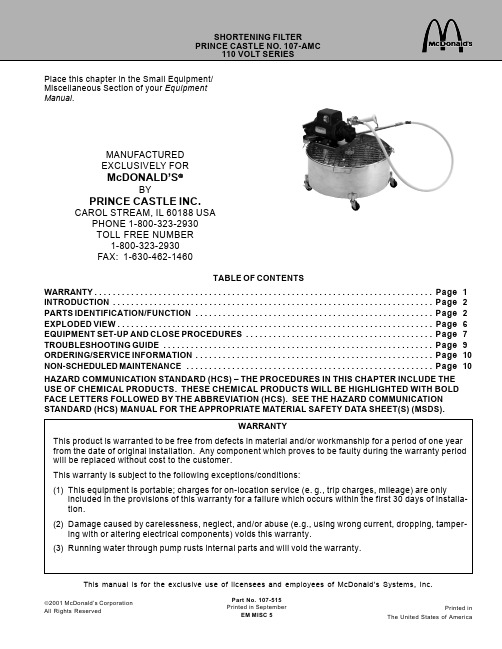
TABLE OF CONTENTSWARRANTY. . . . . . . . . . . . . . . . . . . . . . . . . . . . . . . . . . . . . . . . . . . . . . . . . . . . . . . . . . . . . . . . . . . . . . . . . . Page 1INTRODUCTION . . . . . . . . . . . . . . . . . . . . . . . . . . . . . . . . . . . . . . . . . . . . . . . . . . . . . . . . . . . . . . . . . . . . . . Page 2PARTS IDENTIFICATION/FUNCTION . . . . . . . . . . . . . . . . . . . . . . . . . . . . . . . . . . . . . . . . . . . . . . . . . . . . Page 2EXPLODED VIEW . . . . . . . . . . . . . . . . . . . . . . . . . . . . . . . . . . . . . . . . . . . . . . . . . . . . . . . . . . . . . . . . . . . . . Page 6EQUIPMENT SET-UP AND CLOSE PROCEDURES . . . . . . . . . . . . . . . . . . . . . . . . . . . . . . . . . . . . . . . . . Page 7TROUBLESHOOTING GUIDE . . . . . . . . . . . . . . . . . . . . . . . . . . . . . . . . . . . . . . . . . . . . . . . . . . . . . . . . . . . Page 9ORDERING/SERVICE INFORMATION . . . . . . . . . . . . . . . . . . . . . . . . . . . . . . . . . . . . . . . . . . . . . . . . . . . . Page 10NON-SCHEDULED MAINTENANCE . . . . . . . . . . . . . . . . . . . . . . . . . . . . . . . . . . . . . . . . . . . . . . . . . . . . . . Page 10Place this chapter in the Small Equipment/Miscellaneous Section of your Equipment Manual.MANUFACTURED EXCLUSIVELY FORMcDONALD’SBYPRINCE CASTLE INC.CAROL STREAM, IL 60188 USAPHONE 1-800-323-2930TOLL FREE NUMBER1-800-323-2930FAX: 1-630-462-1460WARRANTYThis product is warranted to be free from defects in material and/or workmanship for a period of one year from the date of original installation. Any component which proves to be faulty during the warranty period will be replaced without cost to the customer.This warranty is subject to the following exceptions/conditions:(1)This equipment is portable; charges for on-location service (e. g., trip charges, mileage) are onlyincluded in the provisions of this warranty for a failure which occurs within the first 30 days of installa-tion.(2)Damage caused by carelessness, neglect, and/or abuse (e.g., using wrong current, dropping, tamper-ing with or altering electrical components) voids this warranty.(3)Running water through pump rusts internal parts and will void the warranty.This manual is for the exclusive use of licensees and employees of McDonald’s Systems, Inc.2001 McDonald’s Corporation All Rights ReservedPrinted inThe United States of AmericaPart No. 107-515Printed in SeptemberEM MISC 5HAZARD COMMUNICATION STANDARD (HCS) – THE PROCEDURES IN THIS CHAPTER INCLUDE THE USE OF CHEMICAL PRODUCTS. THESE CHEMICAL PRODUCTS WILL BE HIGHLIGHTED WITH BOLD FACE LETTERS FOLLOWED BY THE ABBREVIATION (HCS). SEE THE HAZARD COMMUNICATIONSTANDARD (HCS) MANUAL FOR THE APPROPRIATE MATERIAL SAFETY DATA SHEET(S) (MSDS).INTRODUCTIONThis filter is used for cleaning the shortening used infrying. The Filter Aid (HCS) is sprinkled evenly onto the filter paper (refer to your Operations and Training Manual ).2The shortening is drained from the fry vats to the filter.The shortening is recirculated thru the filter paper and Filter Aid (HCS) to remove impurities.PARTS IDENTIFICATION/FUNCTION* Not Shown1102-32Union Nut, Knurled 2Used to attach hose assembly and standpipe to pump.2102-33Female Union2When used with male union, forms a seal.3100-593/8” NPT x 1” (10 X 252Used to attach female union to the standpipe mm)coupling.102-1103/8” NPT x 11/4” (10 X 321mm) Long Close Nipple (For 102-117)4100-57c” (10 mm)– 18 NPT 1Used to attach female union to the hose coupling.Street Elbow5102-171Three way Valve 1Directs the flow of the shortening to the ose or the & Bushingrecirculating nipple.693-027Nipple 1/2” NPT X 11/2”1Parts used for recirculating the hot shortening into Longthe filter bowl.793-026Elbow (1/2” NPT 90°)1893-023Nipple (1/2” NPT)19107-087Motor Base Assembly1Attaches to the motor and holds up the motor and pump when it is placed on top of the filter bowl. Also holds the hose nozzle when not in use.1093-003Close Nipple 1/2” NPT 1Attaches 3-way valve to the pump.11105-152Handle1Used for carrying the motor and pump assembly.12100-58Reducing Bushing 1/2” to 1Used to attach the motor and pump to the standpipe 3/8 NPT assembly.X 3/4” Long13102-117Standpipe Coupling1Used to attach the motor and pump to the standpipe assembly.1472-296S Power Cord 1Transfers electrical power from the wall outlet to the motor.15100-22Rubber Strip2Absorbs vibrations from the motor when it is running.16105-77Pump Assembly (Blue)1Creates a vacuum and pulls the hot shortening thru the paper and filter powder up the standpipe, thru the pump and out the filter hose.*16A 102-219Set Screws (Pkg. of 3)1Mounts blue pump to blue motor.PART NO.ITEM DESCRIPTION QTY.FUNCTION3* Not Shown17108-385S Motor Assembly (Blue)1Turns the gears in the blue pump (or turns theimpeller in the gray pump) creating a vacuum, which then moves the shortening from the filter bowl the through standpipe, and pump assembly to the hose and into the fry vat.*88-409Strain Relief (Not shown)1Securely holds power cord to motor.*100-19Strain Relief (Wire Mesh)1(not shown)A76-0611/4” #20 X 3/4”Hardware used to attach motor and pump Hex Head Screwassembly to base.79-0281/4” I.D. Split Lockwasher 79-0301/4” I.D. Flatwasher 73-0221/4” – #20 Hex Nut B76-0495/16” – 18 X 5/8”Hex Head Screw 79-0465/16” I.D. Split Lockwasher C 76-0611/4” – 20 X 3/4”Hex Head Screw 79-0281/4” Split Lockwasher79-0301/4” I.D. Flatwasher 73-0221/4” –20 Hex Nut D 100-5Hose Coupling Assembly 1Used to attach hose assembly to pump.18102-286Hose Assembly 1Transfers the hot shortening from the pump to the fry vats.19110Anti-Splash Tube1Prevents the hot shortening from splashing onto the floor when draining the shortening from the fry vat into the filter bowl.20102-125Safety Screen 1Prevents hands and feet from accidentally going into the bowl.21105-22Ring Weight 1Seals the filter paper to the filter bowl.22102-10Standpipe1Connects the filter pump with the screen assembly and transfers the shortening from the bowl to the pump.23–Filter Paper (available 1Removes unwanted solids. When used with filter-aid from your purveyor)also removes moisture and frees fatty acids,extending the life of the shortening.24100-13Screen1Support for the filter paper and powder. Provides attachment for standpipe.25105-21Bowl with Casters1Holds the filter paper, screen, ring weight and shortening for filtering.PART NO.ITEM DESCRIPTION QTY.FUNCTION4* Not Shown2689-112Caster2Used to easily move the shortening filter from one 89-410Caster (Locking)2one fry vat to another.27126Maple Wood Paddle1Used to stir the shortening after the filter powder has been added.*28Transfers the shortening through the filter paper into the fry vat.107-088Complete Motor and Pump 1Assembly 110VPART NO.ITEM DESCRIPTION QTY.FUNCTION*37578-61Switch Guard1Provides protection for switch against accidental activation or breakage.3878-120Overload Protector Switch 1Protects motor from overheating. Must be reset manually.3963-077Starting Capacitor 1Provides extra power to start motor.4078-129ON/OFF Toggle Switch1Turns unit ON when switch is up and OFF when switch is down.41102-202Starting Switch 1When ON/OFF Switch is activated, turns ON capacitor.42102-211Insulator1Protects switches from shorting.43102-210Spring Wave Washer 1Keeps bearing and shaft from binding on end cap.44102-209Bearing1Allows armature and shaft to rotate freely.45102-93Rotor Switch (115V)1Provides power to field when first starting, at higher R.P.M. moves out of circuit.4688-409Strain Relief 1Protects power cord from misuse.*47578-61Switch Guard 1Provides protection for switch against accidental activation or breakage.48100-62Male Union Fitting1Provides connection for hose assembly to pump union nut.49102-240S Handle w/Hardware1Allows a safe method to hold the nozzle when returning the shortening to the fry vat.FUNCTIONPART NO.ITEM DESCRIPTION QTY.5* Not Shown611105-140Casting 1Holds the gears.12105-144Cover1Holds the gears in the casting.13105-145S Screw (Pkg. of 4)1Hold the cover in place.14102-128S Drive Gear 1Provides movement to idler gear which moves shortening.15105-73S Idler Gear1When turning creates a vacuum which moves the shortening1693-021SPackage of one Oil Seal 1Seals the pump to the motor.and 2 O-RingsFUNCTIONPART NO.ITEMDESCRIPTION QTY.EQUIPMENT SET-UP, CALIBRATION, CLEANING AND CLOSE PROCEDURES Set-upIMPORTANT:Clean out any remaining water from filter machine bowl.1.Place the screen, with its thread facing up, inside thefiltering bowl. See figure 1.2.Place filter paper (manufactured to McDonaldsspecifications) over the threads and on top of thescreen. Be sure the hole in the paper is centered to fit over the shoulder so the paper will lay flat. Seefigure 2.3.Screw on the standpipe. Tighten by hand. See figure3.4.Place the ring weight on the filter paper. Make surepaper is not folded or creased under the ring. Seefigure 4.5.Center safety grid over standpipe. This will allow thegrid to suspend over the rim of the filtering bowl. Seefigure 5.6.Set the motor on the edge of bowl and screw the unionto the standpipe by hand. Make sure the connectionis hand tight. See figure 6.7figure 1 figure 2 figure 3figure 4 figure 5figure 687.Place the anti-splash tube on filter bowl by doing thefollowing:A.Grasp tube by handle.B.Hook prongs under lip of bowl.C.Rotate downward until tube rest is against theshortening filter bowl.The anti-splash tube has 2 ends. One end has a diffuser plate attached inside the tube, and theopposite end is open. Hook the tube over the filtering bowl rim so that the end with the diffuser is closest to the safety grid.8.Attach hose to pump. Make sure the connection ishand tight. Put the nozzle in its holder.CAUTION: This hose is made to bend up to a radius of six inches (15.2 cm). If the hose is bent under six inches (15.2 cm) or if the hose is crimped, it could crack, causing it to leak hot oil which may cause burns. If the hose is cracked and/or leaking, do not use until it has been replaced or repaired.When finished filtering each vat, roll the unit to the next vat by using the handle attached to the motor and pump assembly.CAUTION: Do not pull the unit by the power cord or the hose.OPERATING INSTRUCTIONSRefer to yourMcDonald’s Operations andTraining Manual for the proper procedures tofilter your Fry Vats. If your manual does not contain this procedure, contact your Regional Training Department.CloseAfter the filtering, the filter must be cleaned and stored so that it will be ready for next use. Follow these cleaning procedures:CAUTION: Parts are hot. Handle with care,and use filter shortening gloves.1.Unplug the power cord. Return the filtering machineto the back sink to disassemble.2.IMMEDIATELY disconnect the hose from the pumpand drain the shortening from the hose into the bowl.3.Unscrew the pump from the standpipe and lift themotor assembly from the bowl.4.Remove the safety grid, ring weight, anti-splash tube,and place them in the back sink. Unscrew the standpipe assembly from the screen assembly and place in the back sink.5.Remove and discard filter paper.7.Discard any shortening left in the bowl into theshortening disposal cart/shortening drum.8.Wash the ring weight, standpipe, screen and bowlwith the hottest water possible and fryer cleanser to prevent carbon buildup. (Do not use APC.)9.Wipe dry with a clean towel.10.Wipe the motor assembly and filter hose using aclean towel.11.Reassemble bowl, filter screen and ring weight.Place the standpipe assembly, and filter hose inside the bowl.12.Roll filtering equipment into storage location.CAUTION: Do not store motor and pump assembly on the screen assembly. This could cause the screen to warp, tear away from the welds or cause grease to damage the power cord and motor.CAUTION: Do not pump water through the motor and pump assembly. This will cause the pump gears to rust and void the war-ranty.9TROUBLESHOOTING CHARTFilter will not pump Filter paper too thick.Use new sheet of paper.shortening.Dirt or nick on standpipe pump Clean off dirt.fittings which results in leaking Replace standpipe assembly.air into the pump intake.Replace standpipe coupling.Leaking gaskets.Return for service.Oil seal leaking.Return for service.Motor not running.Check power supply.Return for service.Cold shortening.Ensure vat is at operating temperature.Hose clogged. Hose not drained at Soak in hot water until loose.finish of previous operation.CAUTION: Make sure there is not water CAUTION: HOSE MAY BURST IF in hose before reconnecting to ED IN THIS CONDITION Pump not operating.Consult operating procedures.Return for service.Filter paper clogged. 2” (5 cm) of Spread filter powder around ring weight.shortening in bowl.See sealing procedure on page 11.Examine ring weight and bowl for defects (ie, warps, dents). If defective, replace.Lost seal. See sealing procedure on page ing too much Gycor (HCS) or Use recommended amount 1 McD portion filter aid.pak (HCS) 10.5 oz. (300 grams).Machine pumping Shortening too cool (will causeKeep vat at cooking temperature until shortening slowly.paper to clog and machine to pump emptied into filter machine.slowly).CAUTION: Vat must be turned OFF just before vat is drained.Using too much Gycor (HCS) or Use recommended amount of McD portion filter aid.pak (HCS) 10.5 oz. (300 grams).Power cord attached improperly or Return for service.not in good repair (Motor will not run at full power).Motor not operating correctly.Return for service.Shortening cannot be Filter paper not centered or creased See sealing procedure on page 11.completely pumped under ring.Ensure paper is centered and placed flat.out (Shortening Ring weight is bent or warped See sealing procedure on page 11.covering surface (should be flat).Badly warped or bent rings should be of filter paper.)replaced.Bowl rim is bent or not clean (buildup See sealing procedure on page 11.of hardened shortening).Clean bowl thoroughly.Remove dents or replace bowl.PROBABLE CAUSEPROBLEMCORRECTIVE ACTIONSEALING PROCEDURE:Sprinkle 5 oz. (142 g) of Gycor (HCS) around the edge of the ring weight. Drain the vat and re-circulate the short-ening. This process should “seal” air leaks around the ring.CAUTION: Use this procedure only when a leak occurs and all shortening cannot be drained. Using excess Gycor (HCS) can cause the machine to clog during filtering of last vats. THIS SHOULD ONLY BE AN INTERIM PROCEDURE UNTIL EQUIPMENT CAN BE REPAIRED OR REPLACED.ORDERING/SERVICE INFORMATION1.WHERE AND HOW TO ORDERREPLACEMENT PARTSTo order replacement parts, look on the back of your Prince Castle Price List for the name and phone number of your local Prince Castle Service Center.You may also call Prince Castle at 1-800-323-2930(or fax us at 630-462-1460) for the name of your local Service Center.2.PARTS RETURNSTo return parts to your Service Center for credit, you must obtain authorization from your Service Center.iMPORTANT: All warranty situations should be handled by your center.3.PRICES:A.All prices are F.O.B. Prince Castle Service Center or F.O.B. factory, Carol Stream, Illinois.B.All prices are subject to change without notice.These prices are exclusive of all sales taxes or any special taxes which may be levied by federal, state,or city governments.OUTSIDE THE U.S.Contact your kitchen equipment supplier or designated repair facility for parts and service.NON-SCHEDULED MAINTENANCEIMPORTANT: No user-serviceable parts are inside this motor and pump assembly. This motor and pump assembly must be serviced by a Prince Castle Autho-rized Service Center. Failure to do so can void the warranty.10TROUBLESHOOTING CHARTShortening cannot be Bowl not level (Can cause See sealing procedures on page 11.completely pumped out “seal” to break).Repair or replace wheels on filter machine.(shortening covering Filter paper clogged.Machine must be broken down, cleaned,surface of filter paper).and set up again.(cont.)Too much Gycor or Filter Aid Must use recommended amounts to prevent (HCS).clogging.Excessive food particles.Skim vats more often and before filtering.Shortening too cool.Shortening must be at cooking temperatureprior to filtering.Filter powderRing weight bent.Replace ring weight.pumped back into fryer.Nick or debris on seal surface Replace bowl.on bowl.Screen assembly bent.Replace screen assembly.Filter paper torn.Replace filter paper.PROBABLE CAUSEPROBLEMCORRECTIVE ACTIONPRINTED ON RECYCLED PAPER10%Post-Consumer Content40% Pre-Consumer Content12。
滚筒干衣机 使用说明书
EDV6552EDV7552EDV7552SUser Manual Tumble DryerENMS ZH12222 Mesin Pengering Manual Pengguna使用说明书滚筒干衣机2 Visit our website to:Subject to change without notice.WE’RE THINKING OF YOUCUSTOMER CARE AND SERVICEThank you for purchasing an Electrolux appliance. You’ve chosen a product that brings with it decades of professional experience and innovation. Ingenious and stylish, it has been designed with you in mind. So whenever you use it, you can be safe in the knowledge that you’ll get great results every time. Welcome to Electrolux.We recommend the use of original spare parts.When contacting Service, ensure that you have the following data available. The information can be found on the rating plate. Model, PNC, Serial Number.Get usage advice, brochures, trouble shooter, service information, buy accessories& spare parts, online product registration : CONTENTS1.1 Dryer Safety 1.2 Fire Hazards 1.3 Cleaning The Lint Filter 1.4 Drying Guide 1. IMPORTANT SAFETY INSTRUCTIONS2. INSTALLATION INSTRUCTIONS ................................................................................................................. 3................................................................................................................ 3................................................................................................ 4................................................................................................................ 43.1 The Control Panel 3.2 Operating Sequence ........................................................................................................ 6.................................................................................................... 8. (11)...................................................................................... 53. USE4. HINTS ................................................................................................................................ 95. TROUBLESHOOTING Caution, risk of fire.Warning / Caution-Safety information. General information and tips Environmental information.ENGLISH 3IMPORTANT SAFETY INSTRUCTIONS1.The final part of a tumble dryer cycle occurs without heat (cooling cycle) to ensure that the items are left at the temperature that ensures that the items will not be damaged.1.1 Dryer Safety1.2 Fire HazardsLint must not be allowed to accumulate around the tumble dryer.Do not dry unwashed items in the tumble dryer.These dryers are for drying clothes, towels and linen at home. Do not use them for any other purpose.If the electrical cord of this appliance is damaged, it must be replaced by theManufacturer, Authorised Service Agent or similarly qualified person in order to avoid a hazard.IMPORTANT:WARNING:Never stop a tumble dryer before the end of the drying cycle unless all items are quickly removed and spread out so that the heat is dissipated.This appliance is not intended for use by persons (including children) with reduced physical, sensory or mental capabilities, or lack of experience andknowledge, unless they have been given supervision or instruction concerning use of the appliance by a person responsible for their safety.Children should be supervised to ensure that they do not play with the appliance.See the serial number sticker located on the bottom of the door opening for voltage information.Never operate your dryer without the lint filter.Do not allow lint to build around your dryer.A torn or damaged lint filter must be replaced immediately.Overloading can increase lint build-up because the airflow is reduced.1.3 Cleaning The Lint Filter 1.4 Drying Guide6.5 kg for the EDV6552 dryer7.5 kg for the EDV7552, EDV7552S dryerENGLISH 5INSTALLATION INSTRUCTIONS2.Mains CableAir Inlet DuctOutlet CoverBack Feet6 USE3.123These two buttons used to select dryness program or dry time as below:Program Button (Up “ ” and Down “ ”)This button is a feature that permits you to start the dryer after a defined number of hours, ranging from 6 or 9 hours.To abort Delayed start, press Start/Pause ( ) to pause the machine then modify or cancel delay time.Delay ButtonIs used to select one of the following options :Boost: Higher temperature during drying cycle. Low Heat: Lower Temperature during drying cycle.Airing: No Heating.Option ButtonWhen a new program is selected while the dryer is already running, the drying process will continue using the setting from the new program.NOTE: Make sure you have set thedesired program before setting the delay.For best result we recommend to sort out your laundry according to fabric type and spin dry at highest speed available in your washing machine.ProgramPress “ ” and “ ” buttons to select programs as below:Program Table GuidesIf you wish to carry out a timed drying program, pressing “ ” and “ ” buttons to select desired time, time available are:Corresponding LED for selected program will turn on.: Extra Dry, Normal Dry, Iron Dry;: 90 min, 60 min, 30 min: Fast 40, Delicate, Refresh.* Depend on model of Dryer (6.5 or 7.5 kg capacity)ENGLISH 7Press and hold the Program “ ” “ ” buttons simultaneously until Anti Crease LED turns on.45This button allows you to start or pause the dryer to check the contents or perhaps add more clothes.NOTE: The dryer will not start unless the door safety button is pressed in. If the safety button is not pressed in a door switch fault will be indicated (“beeps” 6 times).Start/Pause Button ( )This feature helps prevent creases forming in the clothes after normal drying cycle has ended.When activated, after the normal drying cycle has finished, the drum will rotate about 5 seconds every minute. This cycle will continue for 3 hours.Anti Crease is not activated by default. This option must be activated manually for each cycle if desired.Anti Crease Default BehaviorActivating Anti CreaseAnti Crease Feature6When activated, the options and start/pause buttons are disabled.Child Lock ( )7The Clean Filter LED turns on and blinks at the end of each dry cycle to serve as a reminder to user to clean lint filter at the end of each load.Clean Filter Reminder8This button is used to switch the appliance ON or OFF.On/Off Button9These indicators show at which phase the drying cycle is.Progress Indicator Lights10The Buzser feature is designed to remind user when the dry cycle has ended, with a “beep” sound.BuzzerNote: If Child Lock is activated clean filter reminder LED will turn on but will not blink. It remains solid.If Anti Crease LED is on, to deactivate press and hold the Program “ ” “ ” buttons simultaneously until Anti Crease LED turns off.Deactivating Anti Creasesimultaneously until the “ ” & Clean Filter LED turns on.Activating Child LockPress and hold the Program “ ” and “Delay” buttons simultaneously until a long beep is heard.Activating BuzzerPress and hold the same buttons until a short beep is heard.Deactivating Buzzersimultaneously until the “ ” & Clean Filter LED turns off.Deactivating Child Lock8 To obtain the best drying results with small loads it is recommended to use “Time drying” program.Press “ ” button or “ ” button “Airing” is NOT available in Drying program.Program.drying levels.Do not load clothes or other articles which are dripping wet or have sand and grit on them into your dryer.Auto sensingManual timing programYou can use your dryer 2 ways 1. Select Drying Program or Set Drying Time Step 1Step 2Do not select the “Extra Dry” option for delicates fabric such polyester as shrinking may occur.See program table guides for load size info.3.2 Operating SequenceDrying ProgramENGLISH 9atWARNING: Never stop a tumble dryer before the end of the drying cycle unless all items are quickly removed and spread out so that the heat is dissipated.bothStep 4Switch OffWhen you have finished using the dryer, press the On/Off button, to turn off the power, then switch off at the power point. It is recommended to power off the appliance when not in use.Step 5Clean Lint FilterAfter every load clean the lint filter to reduce drying time and avoid overheating.Checking the LoadCoolingHints4.10 Due to variations in dryer load fabric texture and thickness it is possible that not all items will be dried evenly. It you experience uneven dryness on Normal Dry program please use either Extra Dry or Timer Program but be mindful of the type of fabric being dried to avoid overdrying certain types of fabric. Always follow drying instructions attached to the items intended to be dried in a clothes dryer.ENGLISH 11TROUBLESHOOTING5.Check the points listed here before you call for help, and make sure that you have followed the Important safety Instructions on pages 3 and 4.ImportantTroubleshootingElectrolux Customer CarePlaza Kuningan - Menara Utara 2nd Fl. Suite 201JI. HR. Rasuna SaidKav. C11-14, Jakarta 12940Office Tel : (+62 21) 522 7099Office Fax : (+62 21) 522 7099Email:**************************.id103109th Floor, AB Tower76 Le Lai Street, Ben Thanh Ward, District 1, Ho Chi Minh City.Office Tel: (+84 8) 3910 5465Office Fax: (+84 8) 3910 5470Email:*********************G 0013617-001-A 06636603。
洗衣机 用户手册说明书

EWF 1497 HDW2ZH洗衣机用户手册2 MS Washing Machine Manual pengguna25内容1. 安全信息.............................................................................................................32. 安全说明.............................................................................................................43. 产品说明.............................................................................................................54. 控制板.................................................................................................................65. 程序 ....................................................................................................................76. 消费价值...........................................................................................................107. OPTIONS(选项)...........................................................................................118. 设置...................................................................................................................129. 初次使用前........................................................................................................1310. 日常使用.........................................................................................................1311. 建议和提示......................................................................................................1612. 养护和清洁......................................................................................................1713. 故障排除.........................................................................................................2014. 应急机门开启..................................................................................................2315. 技术数据 (23)伊莱克斯 - 想你所想!感谢您选购伊莱克斯设备。
伊莱克斯洗衣机说明书

伊莱克斯洗衣机说明书篇一:上海伊莱克斯洗衣机常见故障伊莱克斯洗衣机不脱水友情提供上海伊莱克斯洗衣机维修中心提供故障咨询热线:021——64035382伊莱克斯洗衣机脱水一转就报警,换了水位传感器,短路门开关了,也是同样报警,怎么回事,该是那的问题?甩干时水排掉了吗?1.检查离合器卡簧是否正常,可掰动拨叉使制动杆与转动轴分离,逆时针转动皮带轮,如果甩桶能转动,证明离合器是好的,否则是离合器损坏。
2.检查洗衣机电容容量,一般电容小于原值的1/3时,洗衣机甩干会启动无力或根本无法转动。
3.检查电脑板有无电压信号输出,电脑板可用代换法确定好坏。
洗衣机漏电原因1.洗衣机正常使用中漏电(一)洗衣机电线绝缘皮破损,导致与外壳相连,此种情况比较容易维修,找到破损处用防水胶布缠好即可。
(二)捞衣服时,手有麻痹感,这种现象都是洗衣机电器元件受潮所致,把洗衣机放到干燥通风处,问题自己便可去除。
2.洗衣机不转,外壳带电一般为洗衣机电机线圈短路所致伊莱克斯滚筒洗衣机开机跳闸?滚筒洗衣机跳闸故障也是常见故障之一,此机器插电后显示正常,但是一按开机键,漏电保护就会动作,易发生故障原因如下:1.电脑板部分元器件短路,可直接更换电脑板。
2.电机进水或线圈对壳都阻值,此种故障直接更换电机3.加热管对壳短路,更换加热管。
伊莱克斯滚筒式干衣机用户手册说明书
EDH804H5WB中文 滚筒式干衣机用户手册目录想您所想请访问我们的网站:客户关怀与服务2感谢您选购伊莱克斯电器。
您选择的产品蕴含着我们数十年的专业经验和创新。
该产品集独创性和时尚性于一身,在设计过程中想您所想,是您的不二之选。
每次使用时,都可安心畅享其超凡效果。
欢迎来到伊莱克斯的世界。
请始终使用原厂备件。
在联系我们的授权服务中心时,请确保提供下列信息:型号、PNC 和序列号。
您可在铭牌上找到这些信息。
警告/安全警示信息 一般信息和温馨提示 环保信息获取使用建议、手册、故障排除和维修服务信息:1. 安全信息...........................................................................................................32. 安全说明...........................................................................................................53. 产品描述...........................................................................................................74. 控制面板...........................................................................................................75. 程序表...............................................................................................................96. 选项..................................................................................................................107. 设置..................................................................................................................118. 首次使用前准备................................................................................................139. 日常使用...........................................................................................................1310. 提示与技巧.....................................................................................................1411. 保养与清洁.....................................................................................................1512. 故障检修.........................................................................................................1813. 技术参数.........................................................................................................2014. 快速指南.........................................................................................................2115. 环保信息.........................................................................................................2316. 产品中有害物质名称和含量............................................................................2417. 维修服务指南.. (25)中文1. 安全信息1.1 儿童和弱势群体安全注意事项在开始安装和使用本机前,请仔细阅读随附的说明书。
Whirlpool 电子洗衣机用户手册说明书
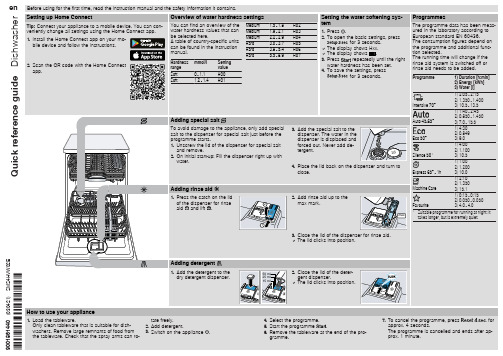
7. To cancel the programme, press
for
approx. 4 seconds.
The programme is cancelled and ends after ap-
prox. 1 minute.
Cleaning filters
1. After each wash check the filters for
Cause and troubleshooting
Supply hose is kinked. ▶ Install the supply hose without kinks.
Water tap is turned off. ▶ Turn on the water tap.
Water tap is jammed or furred up. ▶ Turn on the water tap.
The flow rate must be at least 10 l/min when the water supply is open.
The filters in the water connection of the supply or AquaStop hose are blocked. 1. Switch off the appliance. 2. Pull out the mains plug. 3. Turn off the water tap. 4. Unscrew the water connection. 5. Remove the filter from the sup-
4. Place the lid back on the dispenser and turn to close.
Whirlpool 机器人洗衣机说明书

配合衣物類型的洗衣劑使用建議 白色厚重衣物 白色纖細衣物 淺色/粉色 彩色 / 多色 / 色彩鮮艷 黑色/深色
(冷水 - 95°C) (冷水 - 40°C) (冷水 - 60°C) (冷水 - 60°C) (冷水 - 60°C)
帶漂白效果的強效洗衣劑 帶漂白效果的溫和型洗衣劑和/或螢光增白劑 帶漂白效果的洗衣劑和/或螢光增白劑 不帶漂白效果/螢光增白劑的護色洗衣劑 黑色/ 深色衣物專用洗衣劑
8. 變更正在運行的程序 (如有需要)
您仍可在程序運行時更改設定。當相應的程序階段尚未結束,變 更程序將被應用。
• 按下需變更的相關按鍵(例如「脫水轉速」鍵來改變轉速),使 該數值閃爍幾秒鐘。
• 當指示燈閃爍時,可以轉動旋鈕調整設定。如果該值停止閃 爍,再次按下按鈕。
• 按下旋鈕以確認修改。如果沒有按下旋鈕確認,修改仍會自動 確認 - 修改後的數值隨即停止閃爍。
6 . 加入洗衣劑
• 如果您不使用「洗衣劑計量助手」,可拉出洗衣劑盒 並按〈洗衣劑盒〉篇章的建議加入洗衣劑 (及添加劑/ 柔順劑)。 請遵守洗衣劑包裝上的建議劑量。 如果您選擇了「預洗」或「預校結束時間」,請參 閱〈選項,功能及指示燈〉篇章的建議,並小心關 閉洗衣劑盒。
CH
• 如果您使用「洗衣劑計量助手」的功能,在啟動該程序後添加 洗衣劑。詳情請參閱〈選項,功能及指示燈〉篇章。
60° 40°
1. (Reset/Drain if pressed and held down) 2. Programme button 3. Colours 15° button 4. Fresh Care button 5. Dosing Aid button 6. Knob (Turn to select/
全自动滚筒洗衣机说明书

1引言本篇设计说明书针对全自动滚筒洗衣机的基本整体结构、传动部分、控制部分进行详细的计算说明,并结合数据绘制三维装配图。
采用PLC为基础的主控制电路编制程序。
该设计包括全自动滚筒洗衣机的PLC控制,主要介绍了全自动洗衣机的工作原理,控制系统的PLC的选型和资源的配置,控制系统程序设计与调试,控制系统PLC程序。
传动系统设计,主要包括带轮的设计,滚筒轴系的设计,V带的设计。
2.全自动滚筒洗衣机的总体设计方案2.1滚筒洗衣机的基本结构滚筒洗衣机种类很多,但是通常情况下其大致结构可分为四部分:外观支撑部分、给水排水部分、传动部分、电气控制和操作系统部分。
外观支撑部分主要是滚筒洗衣机的外形框架,给水排水部分主要指洗衣机的给水系统和排水系统,传动部分主要指洗衣机的带传动及滚筒轮系的传动结构,电气控制部分主要指洗衣机依靠各种电器元件及控制器实现的自动控制部分。
个部分具体组成如下:(1)外观部分包括:箱体、后盖、过滤器门、底板等(2)给水排水部分包括:进水管、排水管、储水槽、电磁阀、洗涤剂回收槽等(3)传动部分包括:多频电机、V带、大小带轮、滚筒轴系等(4)控制部分包括:电脑版、电子模块、电磁阀、程控器、温控器、水位压力开关、水加热管、恒温器、电容、定时器等(5)操作部分包括:操作面板、程序标牌、琴键开关、琴键按钮、调温器旋钮、程控器旋钮、指示灯等12.2滚筒洗衣机各部分的设计方案2.2.1主体部分洗涤部分主要由内筒(不锈钢滚筒)、外筒(盛洗涤液用,又称盛水桶)、内筒叉形架、转轴、外筒叉形架、滚动轴承等组成。
(1)内筒及内筒叉形架内筒又称滚筒。
滚筒是滚筒式洗衣机对衣物进行洗涤,洗涤效果有着直接关系。
内筒用厚度为2-3毫米的抛光不锈钢板卷制而成的。
有直径为3.5-5毫米的圆孔,孔与孔之间的距离大约为15-20毫米。
圆孔自内向外冲刷,翻边向外,内壁光滑,以防洗涤时刮伤衣物。
在滚筒内壁沿轴向有三条凸筋,这三条凸筋在洗涤过程中起举升织物的作用。
滚筒洗衣机消费指南说明书

滚筒洗衣机消费指南滚筒洗衣机发源于欧洲,洗衣方法是模滚筒洗衣机由微电脑控制,衣物无缠绕、洗涤均匀、磨损率要比波轮洗衣机小10%,可洗涤羊绒、羊毛、真丝等衣物,做到全面洗涤。
也可以加热,使洗涤剂充分溶解,充分发挥出洗衣粉的去污效能。
可以在桶内形成高浓度洗衣液,在节水的情况下带来理想的洗衣效果。
一些滚筒洗衣机较波轮洗衣机,除了洗衣、脱水外,还有消毒除菌、烘干、上排水等功能,满足了不同地域和生活环境消费者的需求。
☺基本结构的质量可靠滚筒式洗衣机虽然经过了80年的发展历程,但是在结构上没有多大的变化,基本上都是不锈钢内筒,使用机械程序控制器,其外壳经过磷化、电泳和喷漆三重处理工艺,其使用寿命可以达到15年,远高于塑料件的波轮使用寿命。
☺制作精巧紧凑滚筒式洗衣机的外形美观,结构相对波轮式洗衣机更加精巧、紧凑,一般滚筒式洗衣机的机身是波轮式洗衣机机身体积的一半大小,不但占用空间小,而且安全和方便使用。
☺节省用水滚筒式洗衣机都采用了控制水量大小的节水技术,加热洗技术以及雨淋、浸泡、摔打三重洗涤、三维立体式水流等模式和防水溢出功能,不但衣物无磨损,洗净度高,而且水的作用被发挥到了极致,所以能节约用水。
一般滚筒式洗衣机洗涤5KG衣物的标准用水为50L,仅为波轮式洗衣机的1/3。
传统的滚筒洗衣机具有耗时这一缺点,时间一般在一小时左右,而老式的滚筒洗衣机一旦关上门,洗衣过程中无法打开,添加衣物不方便。
但新式的洗衣机具有中途添衣功能,就解决了这个问题。
还有一个问题是新旧机型都无法避免的,那就是耗电,相对于其他类型洗衣机,滚筒洗衣机更加消耗电量。
不过,市场中的变频技术可以稍缓解耗电的劣势。
同时,由于滚筒洗衣机的特别洗衣原理,它的的体重远远高于波轮洗衣机,不易被移动,位置更需固定。
●功能选择滚筒洗衣机推出"全智能"型,有些洗衣机的功能多不胜数,到底我们是否真的需要这些功能,那就要根据每个家庭的不同需求来决定。
海尔 XQGF140-HB1268U1 14公斤双子分区洗烘一体机 使用说明书

洗衣机使用说明书型号XQGF140-HB1268U1• 本说明书为通用手册• 本公司保留说明书解释权• 产品外观请以实物为准• 阅后请与发票一并妥善保存• 如遇产品技术或软件升级,恕不另行通知• 本产品只适合在中国大陆销售和使用1. 产品介绍1 1.1. 产品部件1 1.1.1. 正面1 1.1.2. 背面1 1.1.3. 附件2 1.2. 技术规格2 1.2.1. 技术数据2 1.2.2. 产品尺寸及安装要求31.2.3. 测试程序42. Wi-Fi连接6 2.1. APP下载6 2.2. 智慧物联功能6 2.2.1. 智慧物联62.2.2. 联网配置方法63. 使用说明7 3.1. 安全注意事项7 3.1.1. 图示说明7 3.1.2. 警告类7 3.1.3. 注意类7 3.2. 洗衣机安装8 3.2.1. 包装运输部件的拆卸8 3.2.2. 底脚的调节12 3.2.3. 连接进水管12 3.2.4. 放置排水管14 3.2.5. 粘贴吸音海绵15 3.3. 洗涤注意事项16 3.3.1. 不可洗涤和烘干的衣物16 3.3.2. 不可烘干的衣物17 3.3.3. 检查待洗衣物17 3.3.4. 衣物分类洗涤19 3.3.5. 重污衣物预处理22 3.3.6. 衣物洗涤重量参考24 3.4. 洗衣操作25 3.4.1. 基本操作步骤25 3.4.2. 控制面板26 3.4.3. 显示屏27 3.4.4. 程序指南27 3.4.5. 功能介绍293.4.6. 空气洗护理30 3.4.7. 洗涤剂添加30 3.5. 清洁保养31 3.5.1. 排水过滤器31 3.5.2. 进水阀接头过滤网343.5.3. 箱体、内筒374. 售后服务39 4.1. 疑问解答39 4.1.1. 故障排除39 4.1.2. 显示代码及处理方法41 4.1.3. 应急开门操作41 4.2. 有害物质42 4.2.1. 有害物质名称与含量42 4.3. 保修说明44 4.3.1. 洗衣机保修说明441. 产品介绍1.1. 产品部件1.1.1. 正面洗衣机各部分构件名称(正面)本说明书中所有的图片均为示意图,您所得到的产品外观、颜色及功能部件可能与图片不一致,请以实际产品为准。
滚筒洗衣机使用说明书.pdf_1694052769.6412337

滚筒洗衣机使用说明书目录使用说明服务指南洗涤注意事项 ............................................控制面板介绍 ............................................程序/功能介绍 ...........................................清洁保养 ...................................................故障现象及处理方法 ...................................规格及技术参数 .........................................售后服务 ...................................................包修卡 ......................................................快速入门快速入门 ...................................................安装说明洗衣机简图 ...............................................安装洗衣机 ...............................................安全警示安全警示 (23671011121719202121)智能配网介绍.............................................洗涤剂盒介绍.............................................1616安装说明快速入门安全警示使用说明服务指南注意:本图片仅为示意图,由于产品改进及系列化扩展,您所得到的产品外观,色及功能部 件可能与此图片不一致,请以实际产品为准。
Whirlpool 洗衣机用户指南说明书
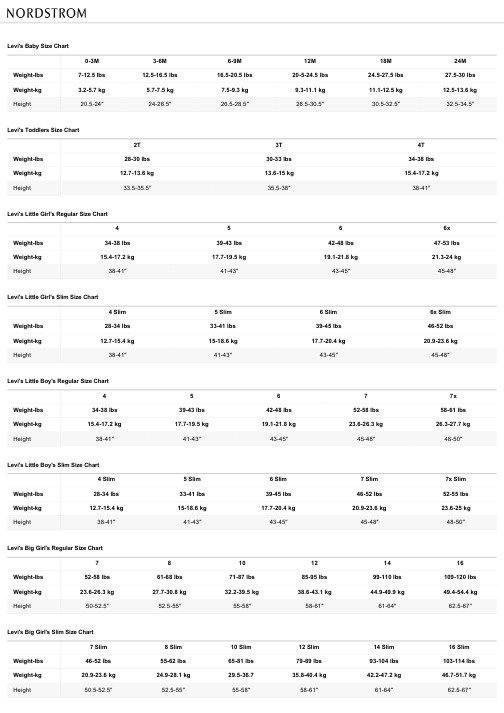
Weightkg
15.417.2 kg
Height
3841″
5 3943 lbs 17.719.5 kg
4143″
6 4248 lbs 19.121.8 kg
4345″
6x 4753 lbs 21.324 kg
4548″
Levi's Little Girl's Slim Size Chart
Levi's Baby Size Chart
03M
Weightlbs
712.5 lbs
Weightkg
3.25.7 kg
Height
20.524″
36M 12.516.5 lbs
5.77.5 kg 2426.5″
69M 16.520.5 lbs
7.59.3 kg 26.528.5″
10.5 (Plus) 8190 lbs 36.740.8 kg 54.557.5″
12.5 (Plus) 91108 lbs 41.349 kg 57.560.5″
14.5 (Plus) 109120 lbs 49.454.4 kg
60.562″
16.5 (Plus) 121132 lbs 54.959.9 kg
16 Slim 103114 lbs 46.751.7 kg
62.567″
Levi's Big Girl's Plus Size Chart
7.5 (Plus)
Weightlbs
6371 lbs
Weightkg
28.630.4 kg
Height
50.552.5″
伊莱克斯 EFB60680BX EFB90680BX EFB12680BX 中文 吸油烟机 用户手册

请始终使用原厂备件。 在联系我们的授权服务中心时,请确保提供下列信息:型号、PNC 和序列号。 您可在铭牌上找到这些信息。
警告 / 安全警示信息 一般信息和温馨提示 环保信息
中文 3
1. 推荐和建议
请务必按照随附说明书指示进行各项操作,否则可能发生 安全事故。在安装和使用本电器前,请仔细阅读随附的说 明书。对于因安装或使用不当造成的任何伤害或损坏,制 造商概不承担任何责任。应始终将说明书放置在安全便利、 触手可及的位置,以便日后查阅。
EFB60680BX EFB90680BX EFB12680BX
中文 用户手册
吸油烟机
2
目录
1. 推荐和建议 .......................................................................................................................................3 2. 使 用 .................................................................................................................................................6 3. 维 护 .................................................................................................................................................6 4. 控 件 ..................................................................................................................................................7 5. 照 明 ..................................................................................................................................................7 6. 维修服务指南 ..................................................................................................................................8
Whirlpool 高压洗衣机用户手册说明书
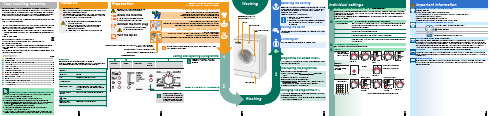
1234: detergent for the main wash, water softener,bleach, stain removerCongratulations ä you have opted for a modern, high-qualitydomestic appliance manufactured by Bosch. This washing machine is distinguished by its economical water and energy consumption.Each machine that leaves our factory has been inspected thoroughly to ensure that it functions properly and is in perfect condition.For further information and a selection of our products go to our web site: You can find the contact details for your nearest after-sales service here or in the after-sales service directory (depending on model),see also Installation Instructions, page 7.–GB 0844 8928979 Calls from a BT landline will be charged at up to 3 pence per minute. A call set-up fee of up to 6 pence may apply.–IE 01450 2655Environmentally friendly waste disposalAll packaging must be disposed of in accordance with environmental guidelines.This appliance is certified in accordance with European Directive 2002/96/EEC on waste electrical and electronic equipment (WEEE).This directive provides the framework for the EU-wide collection and reuse of used appliances.ContentsPageʋIntended use .......................................................................................1ʋProgrammes .......................................................................................1ʋSetting and adjusting the programme ...........................................3ʋWashing ...........................................................................................3/4ʋAfter washing ......................................................................................4ʋIndividual settings ..........................................................................5/6ʋImportant information ....................................................................... 6ʋOverview of programmes ................................................................7ʋSafety instructions .............................................................................8ʋConsumption values .........................................................................8ʋCare .....................................................................................................9ʋInformation on the indicator lights ..................................................9ʋMaintenance ....................................................................................10ʋWhat to do if (11): fabric softener, starch Turning the tap offNot required for Aqua-Stop models9Before washing for the first timeDo not load any laundry into the machine. Turn on the tap. Add the following to compartment II Pause). At the end of the programme, turn the programme selector to Spento (Machine housing, control panel–––Cleaning the detergent drawer ...... if it contains detergent or fabric softener residues.1.2.3.Clean the detergent dispenser tray and insert with water and a brush andDescaling Ensure there is no laundry in the machineDescale the appliance according to the descaler manufacturer's instructions. This should not be necessary if the correct dosage of detergent is used.Information on the indicator lights model-dependentA signal sounds and indicator lights for the spin speed flash:¤¤¤¤¤Close the washing machine door properly; laundry may be caught.¤¤¤¤¤Detergent solution pumpblocked; Clean the detergent solution pump –> page 10.Drainage hose/waste pipe blocked; Clean the drainagehose at the siphon –> page 10.¤¤¤¤¤Open the tap completely, supply hose kinked or trapped;Clean the filter –> page 10,Water pressure too low.¤¤¤¤¤Motor fault. Call the after-sales service.¤¤¤¤¤Water in the base tub, appliance leaking. Call theafter-sales service.10Detergent solution pumpTurn the programme selector to 1.2.To prevent unused detergent from flowing straight into the drain during the next wash: pour 1 litre of water into compartment Drainage hose at the siphonTurn the programme selector to 1.2.3.Reattach the drainage hose and secure the connection with the hose clamp.Filter in the water supply1.2.Instruction manual Washing machineenObserve the safety instructions on page 8.Read these instructions and the separate installation instructions before operating the washing machine.12: detergent for the main wash, water softener,bleach, stain removerCongratulations ä you have opted for a modern, high-qualitydomestic appliance manufactured by Bosch. This washing machine is distinguished by its economical water and energy consumption.Each machine that leaves our factory has been inspected thoroughly to ensure that it functions properly and is in perfect condition.For further information and a selection of our products go to our web site: You can find the contact details for your nearest after-sales service here or in the after-sales service directory (depending on model),see also Installation Instructions, page 7.–GB 0844 8928979 Calls from a BT landline will be charged at up to 3 pence per minute. A call set-up fee of up to 6 pence may apply.–IE 01450 2655Environmentally friendly waste disposalAll packaging must be disposed of in accordance with environmental guidelines.This appliance is certified in accordance with European Directive 2002/96/EEC on waste electrical and electronic equipment (WEEE).This directive provides the framework for the EU-wide collection and reuse of used appliances.ContentsPageʋIntended use .......................................................................................1ʋProgrammes .......................................................................................1ʋSetting and adjusting the programme ...........................................3ʋWashing ...........................................................................................3/4ʋAfter washing ......................................................................................4ʋIndividual settings ..........................................................................5/6ʋImportant information ....................................................................... 6ʋOverview of programmes ................................................................7ʋSafety instructions .............................................................................8ʋConsumption values .........................................................................8ʋCare .....................................................................................................9ʋInformation on the indicator lights ..................................................9ʋMaintenance ....................................................................................10ʋWhat to do if (11): fabric softener, starch (*model-dependent)Turning the tap offNot required for Aqua-Stop models349Before washing for the first timeDo not load any laundry into the machine. Turn on the tap. Add the following to compartment II Pause). At the end of the programme, turn the programme selector to Spento (Machine housing, control panel–––Cleaning the detergent drawer ...... if it contains detergent or fabric softener residues.1.2.3.Clean the detergent dispenser tray and insert with water and a brush and5.Push in the detergent drawer.Descaling Ensure there is no laundry in the machineDescale the appliance according to the descaler manufacturer's instructions. This should not be necessary if the correct dosage of detergent is used.Information on the indicator lights model-dependentA signal sounds and indicator lights for the spin speed flash:¤¤¤¤¤Close the washing machine door properly; laundry may be caught.¤¤¤¤¤Detergent solution pumpblocked; Clean thedetergent solution pump –> page 10.Drainage hose/waste pipe blocked; Clean the drainagehose at the siphon –> page 10.¤¤¤¤¤Open the tap completely, supply hose kinked or trapped;Clean the filter –> page 10,Water pressure too low.¤¤¤¤¤Motor fault. Call the after-sales service.¤¤¤¤¤Water in the base tub, appliance leaking. Call theafter-sales service.10Detergent solution pumpTurn the programme selector to 1.2.To prevent unused detergent from flowing straight into the drain during the next wash: pour 1 litre of water into compartment Drainage hose at the siphonTurn the programme selector to 1.2.3.Reattach the drainage hose and secure the connection with the hose clamp.Filter in the water supply1.2.Instruction manualWashing machineenObserve the safety instructions on page 8.Read these instructions and the separate installation instructions beforeoperating the washing machine.。
伊莱克斯洗衣机 600系列 洗衣机使用说明书

PROFESSIONAL LAUNDRYCMIS 5Certus Management Information System TMFeatures and benefits• CMIS is a software which provides laundry professionals with vital information about their washer extractors,tumble dryers and ironers. All in order to minimize costs and maximize uptime of the equipment• CMIS provides the following process information:- statistics (running hours, idle time, consumption figures*, machine usage, total consumption etc.)- process validation (print of receipt)- maintenance intervals (actions are logged)- error alerts (recommend actions)- weight of wash load**• Up to 30 machines can be installed in a network connected to a PC• All the data provided by CMIS is easily transferable to other computer programs such as Microsoft Excel• CMIS is easy to install and use. Most average-sized laundries can be fully equipped in less than one day• For latest software version please check /professionalPC requirements• A computer according to specification on page 3 should be provided by the customer at site of installation• The computer must be in operation the same time as the laundry to collect data from the laundry processCertified in accordance with ISO 9001 and ISO 14001 and approved IP 24D.* Consumption is measured in time and calculated to litres, ml or kWh by using a factory made constanttable. This table is possible to calibrate locally for best precision.** Weight of wash load only available on Clarus Control and Compass Pro Barrier washers with IWS,and Compass Pro washers with AWS (firmware version 8.14 and above).Available accessoriesDescription Quantity Product No Description/contentPC-software, kit English 1 per site988916189Software (CD), CMIS Interface PC, transformer24V DC, serial wire, manualsPC-software, kit Swedish 1 per site988916192Software (CD), CMIS interface PC, transformer24V DC, serial wire, manualsPC-software, kit German 1 per site988916193Software (CD), CMIS interface PC, transformer24V DC, serial wire, manualsPC-software, kit French 1 per site988916194Software (CD), CMIS interface PC, transformer24V DC, serial wire, manualsPC-software, kit Japanese 1 per site988916250Software (CD), CMIS interface PC, transformer24V DC, serial wire, manualsPC-software, kit Spanish 1 per site988916254Software (CD), CMIS interface PC, transformer24V DC, serial wire, manualsSoftware upgrade kit 1 per site988802254Software (CD), operating manualMachine interface, kit No. 11 per machine988916190Machine interface, wires, installation manual.For all washers with Clarus Control exceptW3400H/W4400H to W31100H/W41100H.Machine interface, kit No. 21 per machine988916191Machine interface, wires, installation ma-nual. For washers W3400H and W4400H/W4600H (– 980/1571), W3850H/W31100H andW4850H/W41100H (– 1220/730), with CPU inFront electric cabinet.Machine interface, kit No. 31 per machine988916198Com-module, installation manual. For dryerswith Selecta Control version 1.Machine interface, kit No. 41 per machine988916199Machine interface, wires, connectors, installa-tion manual. For ironers with electronic controlpanel.Machine interface, kit No. 51 per machine988916251Wires, connectors, installation manual. Fordryers T4130 and T4190.Machine interface, kit No. 61 per machine988916252Wires, connectors, installation manual. Fordryer T4300S.Machine interface, kit No. 71 per machine988916253Wires, connectors, installation manual. For alldryers with Selecta Control version 2/Com-pass Control, except T4130, T4190, T4300.Machine interface, kit No. 81 per machine988919402Machine interface, wires, installation manual.For washers and dryers with Compass Pro.Machine interface, kit No. 91 per machine988916249Machine interface, wires, installation manual.For washers W4400H, W4600H (980/1572 – )and W4850H, W41100H (1220/731 –), with CPUin rear electric cabinet.Machine interface, kit No. 101 per machine988916257Machine interface, wires, installation manual.For barrier washers with Clarus TS.(WP/WPB4700H-WP/WPB41100H,WH/WHB5500H)Network wire acc. to site988916195Reel with 100 m, 4 x 0,22 mm2 or 4 x AWG24cableWashers with Clarus ControlWashers with Compass ProDryers with Selecta Control version 1 or 2Dryers with Compass ProIroners with Electronic control panelBarrier Washers with Clarus TSShare more of our thinking at A r t. N o . 438919493E N /2017.07.05W e r e s e r v e t h e r i g h t t o a l t e r s p e c i fi c a t i o n s w i t h o u t n o t i c e ./professional。
Whirlpool 洗衣机说明书
Model : TDLR70123產品型號 : TDLR70123Health & Safety, Use & Care, Installation Guide andOnline Warranty Registration Information產品安全指引、使用說明、安裝指南及網上登記保養資料.sg 2繁體中文312EN3 USER MANUALUSER MANUAL3 INDEXWarranty information are at page 24 of the User Manual.44445566678-910-11 Control PanelProgramme ChartProduct DescriptionDetergent DispenserProgrammesFirst Time UseDaily UsePause or Change a Running ProgrammeD oor Open IndicatorProgramme EndOptionsChild LockBleachingHints & TipsCleaning & MaintenanceTransport and HandlingTroubleshootingSafety InstructionsInstallation Guide55555666CLEANING & MAINTENANCEFor any cleaning and maintenance, switch off and unplug the washing machine. Do not use flammable fluids to clean the washing machine. Clean and maintain your washing machine periodically (at least 4 times per year).Cleaning the outside of the washing machineUse a soft damp cloth to clean the outer parts of the washing machine. Do not use glass or general purpose cleaners, scouring powder or similar to clean the control panel – these substances might damage the printing.Detergent dispenserClean regularly, at least three or four times a year, to prevent detergent build-up:Press the release button to release the detergent dispenser and remove it. A small quantity of water can remain in the dispenser, thus you should carry it in an upright position. Wash the dispenser using running water. Youcan also remove the siphon cap on the back of the dispenser for cleaning. Replace the siphon cap in the dispenser (if removed) Reinstall the dispenser by locating the dispenser’s bottom tabs into the appropriate openings on the lid, and by pushing the dispenser against the lid until it locks into place. Make sure that the detergent dispenser is correctly reinstalled.Checking the water supply hoseCheck the inlet hose regularly for brittleness and cracks. If damaged, replace it by a new hose available through our After-Sales Service or your specialist dealer. Depending on the hose type: If the inlet hose has a transparent red, the water stop function was triggered, and the hose must be replaced by a new one. For unscrewing this hose, press the release button (if available) while unscrewing the hose.TRANSPORT AND HANDLINGPull out the mains plug, and close the water tap. Disconnect the inlet hose from the water tap, and remove the drain hose from your draining point. Remove all rest water from the hoses and washing machine and fix hoses so that they cannot get damaged during transport. To facilitate moving the machine, pull the mobility lever situated at the bottom front (if available on your model) out a little by hand. Pull the washing machine out to the stop with the foot. Afterwards push the mobility lever back into the original stable position. Refit the transport bracket. Follow the instructions for removing thetransport bracket in the INSTALATION GUIDE in reverse order.left to right (picture b , c ) by hand it will fall into the drum.4. Open the drum. You can recover the object through the hole in the drum.5. Refit the lifter from inside the drum: Position the plastic tip above the hole on the right side of the drum (picture d ). Then slide the plastic lifter from right to left until it clips.6. Close the drum flaps again, turn the drum through half a turn and check the positioning of the blade at all its anchorage points.7. Plug the washing machine in again.EN7TROUBLESHOOTINGThe washing machine may sometimes not work properly for certain reasons. Before calling the After-sales service, it is recommended to check to see if the problem can be easily resolved using the following list.8SAFETY INSTRUCTIONSIMPORTANT TO BE READ AND OBSERVEDBefore using the appliance, read these safety instructions. Keep them nearby for future reference. These instructions and the appliance itself provide important safety warnings, to be observed at all times. The manufacturer declines any liability for failure to observe these safety instructions, for inappropriate use of the appliance or incorrect setting of controls.Very young children (0-3 years) should be keptshould be kept away from theappliance unless continuously supervised. Children from 8 years old and above and persons with reduced physical, sensory or mental capabilities or lack of experience and knowledge can use this appliance only if they aresupervised or have been given instructions on safe use and understand the hazards involved. Childrenmust not play with the appliance. Cleaning and user maintenance must not be carried outby children without supervision.Never open the door forcibly or use it as a step.CAUTION: The appliance is notintended to beas a timer, or separate remote controlled system.This appliance is intended to be used in household andkitchen areas in shops,offices and other working environments; farm houses; by clients in hotels, motels, bed & breakfastand other residential environments.Do not load themachine above the maximum (kg of drycloth) indicated in the programme table.This appliance is not for professional use. Do not useDo not use any solvents (e.g. turpentine, benzene),containing solvents, scouring powder, glass or general purposecleaners, or flammable fluids; do not machinewash fabrics that have been treated with solvents or flammable liquids.The appliance must be handled and installed by two to unpack and install - risk of cuts.If you want to stack a dryer on top of your washingmachine, first contact our After-Sales Service or yourspecialist dealer toverify whether this is possible. This is only possible ifthe dryer is attached to the washing machine by means of appropriate stacking kit availablethrough our After- Sales Service or your specialist dealer.Move the appliance without lifting it by the Installation, including water supply (if any) and a qualified technician. Do not repair or replace any part of the appliance unless specifically stated in the user manual. Keep children away from the installation site. After unpacking the appliance, make sure that it has not been damaged during transport. In the event ofproblems, contact the dealer or your nearest After-sales Service. Once installed, packaging waste (plastic, styrofoam parts etc.) must be stored out of reach of children - risk of suff ocation. The appliance must be disconnected from the power supply before any installation operation - risk of electric shock. During installation, make sure the appliance does not damage the power cable - risk of file or electric shock. Only activate the appliance when the installation has been completed.Do not install your appliance where it may be to extreme conditions, such as: poor ventilation, temperatures below 5 °C or above 35 °C.When installing the appliance make sure that the feet are stable and resting on the floor, adjustingthem as required, and check that the appliance is perfectly to level using a spirit level.If the appliance is being installed on wood or secure a 60 x 60 x 3 cm (at least) sheet of plywood to thefloor then place the appliance on top of this.Connect the water inlet hose(s) to the water supply with the regulations of your local water company.For cold fill only models: do not connect to the hot For models with hot fill: the hot water inlet The washing machine is fitted with transport bolts to any possible damage to the interior during transport. Before using the machine, it is imperative thatthe transport bolts are removed. After their removal,cover the openings with the 4 enclosed plastic caps.After installation of the device, wait a few hours starting it so that it acclimates to the environmental conditions of the room.Make sure that the ventilation openings in the base not obstructed by a carpet or other material.EN9CLEANING AND MAINTENANCEdisconnected from the power supply before performing any maintenance operation. To avoid risk of personal injury use protective gloves (risk of laceration) and safety shoes (risk of contusion); be sure to handle by two persons (reduce load); never use steam cleaning equipment (risk of electric shock).Non-professional repairs not authorized by the manufacturer could result in a risk to health and safety, for which the manufacturer cannot be held liable. Any defect or damage caused from non-professional repairs or maintenance will not be covered by the guarantee.Use only new hoses to connect the appliance to theThe supply water pressure must bein theIt must be possible to disconnect the appliance from or by a multi-poleswitch installed upstream of thesocket in accordancewith the wiring rules and the appliance must be earthed in conformity with national electrical safety standards.Do not use extension leads, multiple sockets or The electricalcomponents must not be accessible to the user after installation. Do not use the appliance when you are wet or barefoot . Do not operate this appliance if it has a damaged power cable or plug, if it is not working properly, or if it has been damaged ordropped.If the supply cord is damaged, it must be replaced an identical one by the manufacturer, its serviceagent or similarly qualified persons in order to avoid a hazard - risk of electric shock.DISPOSAL OF PACKAGING MATERIALS The packaging material is 100% recyclable and ismarked with the recycle symbol .The various parts of the packaging must therefore be disposed of responsibly and in full compliance with local authority regulations governing waste disposal.DISPOSAL OF HOUSEHOLD APPLIANCESThis appliance is manufactured with recyclable or reusable materials. Dispose of it in accordance with local waste disposal regulations. For further information on the treatment, recovery and recycling of householdelectrical appliances, contact your local authority, the collection service for household waste or the store where you purchased the appliance. This appliance is marked in compliance with European Directive 2012/19/EU, Waste Electrical and Electronic Equipment (WEEE). By ensuring this product is disposed of correctly, you will help prevent negative consequences for theenvironment and human health.The symbol on the product theaccompanying documentation indicates that it should not be treated taken to an appropriate collection center for the recycling of electrical and electronic equipment.INSTALLATION GUIDE10ENABmax 100 cm/39 inch min 55 cm/22 inchm a x 2,5m/8,2 f e e tmax 100 cm/39 inch min 55 cm/22 inch6使用說明書感謝您購買惠而浦產品為了獲得更完善的服務,有關保養資訊請參考第24頁索引使用說明書12131313131414141414控制面板 程序表 產品介紹 洗滌劑投放盒 洗衣程序説明首次使用日常使用程序運行過程中暫停或變更設定 開門指示燈 程序結束功能選項童鎖使用含氯漂白劑提示與貼士保養及維護搬運及處理故障排除指南安全説明安裝指引141515151617-1819-20141515CH保養及維護若需進行任何保養和維護,請關閉電源並拔下電源插頭。
伊萊克斯 EWW12853 洗脫烘衣機 使用手冊说明书
E WW12853洗脫烘衣機使用手冊2.產品圖解....................................................................................53.控制面板.................................................................................64.首次使用前 (12)5.日常使用-洗衣...........................................................................136.日常使用-乾衣 (18)7.日常使用-洗衣和乾衣…………………………………………………………188.洗衣和乾衣提示…………………………………………………………………1910.保養和清潔……………………………………………………………………23為您設想目錄1.安全資訊…………………………………………………………………………2 11.故障診斷………………………………………………………………………28警告/注意安全的資訊 一般資訊和技巧環境資訊9.國際洗衣代碼符號………………………………………………………………22歡迎使用Electrolux 產品,本產品由台灣櫻花公司總代理,請立即寄回回函卡,以獲得延長的三年保固服務並確保自身權益。
感謝您購買Electrolux 家電,您選擇的產品其製造商具有數十年的專業和創新經驗,本產品設計精巧時尚且充分為您設想,無論何時使用本產品,都能獲得絕佳的效果,使生活更加舒適,歡迎使用Electrolux 家電,可參考下列網址:註冊所購買的產品已取得更佳的服務:www.sakura .com.tw /import客戶維護和服務隨時使用原廠零件聯絡本公司的授權服務中心時,應確保提供下列資訊:機型、PNC 和序號。
伊莱克斯Manual_EWF1268滚筒洗衣机说明书

亲爱的用户:在使用本产品之前,请仔细阅读本说明书,尤其是注意事项说明。
并请妥善保管,以备将来使用参考。
产品运输检查:拆开产品包装后立即检查洗衣机在运输过程中有无损伤,如有问题请与售后服务中心联系。
本说明书中出现的下列图标,请详细阅读:此标志提供洗衣机使用中的附加说明和实用技巧。
目录注意事项3-4废弃处理4环保提示4技术规格5安装6拆除包装6洗衣机放置6进水6排水7电气连接7您的新洗衣机8机器说明8门锁指示灯8洗涤剂抽屉盒8使用9控制面板描述9-13洗衣指南14衣物分类14温度设定14衣物检查14最大洗衣量14衣物重量14污渍预处理15洗涤剂和添加剂15洗涤剂用量15国际洗涤标志16操作步骤17-19程序表20维护保养21门封21机身21洗涤剂抽屉盒21排水泵21进水阀过滤器22紧急事故处理22预防冻结22故障诊断23儿童保护·本洗衣机专为成人使用设计,不允许儿童接触、玩弄。
·用于包装的零部件(塑料薄膜、泡沫垫等)会对儿童造成伤害、窒息,请妥善保存在儿童不能取到的地方。
·所有洗涤剂请放置在安全的地方,以防儿童触摸。
·确保儿童及宠物不会爬进洗衣筒中。
为避免此类情况的发生,本机设有特殊装置。
要使用此装置,请使用一枚硬币,顺时针旋转机门内的旋钮(不要按下),直至凹槽呈水平状态;若要取消此功能,使机门恢复可关闭状态,可逆时针旋转旋钮,直至凹槽呈垂直状态。
·废弃洗衣机时,应剪断电源线并销毁带有剩余电线的电源插头。
使门锁失效,以防止儿童游戏时受困。
环保提示为了节水节能和保护环境,我们建议遵循下列提示:·为了节省洗涤剂用量、缩短洗衣时间及降低耗水量,建议脏污程度一般的衣物不需要进行预洗。
(同时也保护了环境!)·若进行满负荷洗涤,洗衣机运行更经济,但不要超出最大洗涤容量。
·对衣物进行适当预处理,以去除污渍和局部的脏污,以便以较低温度洗涤衣物,节省能源。
- 1、下载文档前请自行甄别文档内容的完整性,平台不提供额外的编辑、内容补充、找答案等附加服务。
- 2、"仅部分预览"的文档,不可在线预览部分如存在完整性等问题,可反馈申请退款(可完整预览的文档不适用该条件!)。
- 3、如文档侵犯您的权益,请联系客服反馈,我们会尽快为您处理(人工客服工作时间:9:00-18:30)。
· 确保洗衣机周围空气流通, 没有被地毯、 垫子等阻塞。 ·检查洗衣机没有紧靠墙壁或其它物体。 ·通过左右旋转洗衣机可调底脚,使洗衣 机水平放置,否则,洗衣机在洗涤或脱水 中会产生较大的噪音或震动。不要在洗衣 机底部放置垫片、木块或其它类似物体来 调节水平。
入内外筒之间。 ·使用厂家推荐的适量洗涤剂和柔软剂, 避免在衣物中有过多的洗涤剂残留物,防 止过多的柔软剂损伤衣物。 · 洗衣机不使用时, 请将玻璃门微微打开, 可保护洗衣机门封,并可防止洗涤筒内 产生异味。 ·打开机门之前,请确认筒内的水已经排 干。如没有,请按照说明书说明排水。 ·洗衣机使用后,请拔下电源插头并关闭 水龙头。
此标志提供有关经济和环保方面的提示和信息。
1
目录
注意事项 废弃处理 环保提示 技术规格 安装
拆除包装 洗衣机放置 进水 排水 7 电气连接 7
3-4 4 4 5 6
6 6 6
操作步骤 程序表
17-19 20
维护保养
尺寸 高 宽 深 额定最大容量 棉麻织物 化纤织物 精细织物 羊毛/手洗织物 丝绸 脱水转速 电源电压/频率 总输入功率 额定电流 水压 最小 最大 噪音值 洗涤噪音 脱水噪音 能源效率等级 耗电量 耗水量 洗净比 依据国家标准: GB12021.4-2004 最大 85cm 60cm 63cm 洗涤量 7kg 3kg 3kg 2kg 2kg 1200 转/分钟 AC 220V/50Hz 2000W 10A 50kPa 800kPa 52.8dB 61.8dB 1级 1.26 kWh/cycle 70 L/cycle 1.03
·请勿使用旧的进水管。
电气连接 重要!
在连接新的进水管或长久未使用的进水 管前,请用水冲洗,以去除水管中可能积 留的残渣。 ·此洗衣机使用单相 220V/50Hz 电源。 ·确保家用供电线路能承受所要求的最大 负载,同时须考虑其它电器同时工作时的 负载。 ·洗衣机应使用单独的电源插座,禁止使 用引出线及多路拖线板连接。 ·洗衣机必须连接至可靠接地的三孔电源 插座。 任何不遵从上述安全规定而造成的 后果,制造商概不负责。 电源线的更换必须由售后服务中心 完成 。
使用 ห้องสมุดไป่ตู้
·本产品专为家庭使用而设计,请勿用于 商业、工业和其它用途。 ·只有适宜机洗的衣物面料才可进行洗 涤,请参考衣物标签说明。 ·请勿超过额定洗涤容量,按照说明书要 求使用。 ·洗涤衣物前,请清空口袋。衣服上的别 针、徽章、硬币、螺丝等异物会损伤洗衣 机和衣物。 ·不要用洗衣机洗涤沾有汽油、香蕉水等 挥发性易燃液体,若洗衣前使用上述液体 去除污渍,请等完全挥发后再把衣物放入 洗衣机。 ·请把小物件(如手绢、袜子、丝带等) 放在洗衣袋或枕头套中进行洗涤,防止落
5 脱水转速选择按钮
如果不想使用机器自动设定的脱水转速, 可通过重复按动此钮改变脱水转速,相应 指示灯点亮。 不同织物的最大脱水转速如下: 棉麻:1200 转/分钟 化纤、精细、羊毛、手洗:900 转/分钟 丝绸:700 转/分钟
免排水:选择此功能时,最后一次漂洗的 水不排出,以防织物起皱。洗涤结束时, “启动/暂停” 指示灯熄灭, 免排水指示灯 亮,显示窗显示静态的数字 0,表明筒内 的水必须排出。 为了结束此过程,首先按下“复位”按钮 (显示窗显示三条横线) ,然后选择下列 任一项:
洗衣机
将您的旧洗衣机放置在指定废弃物处理 地点,请保持环境整洁。
环保提示
为了节水节能和保护环境,我们建议遵循 下列提示: ·为了节省洗涤剂用量、缩短洗衣时间及 降低耗水量,建议脏污程度一般的衣物不 需要进行预洗。 (同时也保护了环境! ) · 若进行满负荷洗涤, 洗衣机运行更经济, 但不要超出最大洗涤容量。 ·对衣物进行适当预处理,以去除污渍和 局部的脏污,以便以较低温度洗涤衣物, 节省能源。 ·根据水质硬度、衣物脏污的程度以及洗 衣量选择合适的洗涤剂用量。
·废弃洗衣机时,应剪断电源线并销毁带 有剩余电线的电源插头。使门锁失效,以 防止儿童游戏时受困。
废弃处理
包装材料
如材料上有“ 用。 >PE<=聚乙烯 >PS<=聚苯乙烯 >PP<=聚丙烯 经过适当的收集后可以回收再利用。 ”标志表明可以再循环利
4
技术规格
亲爱的用户:
在使用本产品之前, 请仔细阅读本说明书, 尤其是注意事项说明。并请妥善保管,以 备将来使用参考。
产品运输检查:
拆开产品包装后立即检查洗衣机在运输过 程中有无损伤,如有问题请与售后服务中 心联系。
本说明书中出现的下列图标,请详细阅读:
此警告标志及其关键词(警告!注意! ) 强调:这些信息对您的安全和洗衣机的正确使用非常重要。 此标志提供洗衣机使用中的附加说明和实用技巧。
9
9-13 14 14 14 14 14 14 15 15 15 16
2
注意事项
下列警示提供了所有有关安全的事项,在 安装及使用本产品之前请仔细阅读:
安装
·使用产品前请去除所有包装物,如果在 使用前没有拆除或没有完全拆除运输过 程中的保护装置,会严重损害洗衣机或邻 近家具,请留意说明书中相关章节。 ·所有电气及管道连接必须由专业人员安 装。 ·安装结束后确保洗衣机没有压着电源 线。 ·若将洗衣机放置在地毯上,须确保洗衣 机底面与地板之间的空气流通。
3
儿童保护
·本洗衣机专为成人使用设计,不允许儿 童接触、玩弄。 ·用于包装的零部件(塑料薄膜、泡沫垫 等)会对儿童造成伤害、窒息,请妥善保 存在儿童不能取到的地方。 ·所有洗涤剂请放置在安全的地方,以防 儿童触摸。 ·确保儿童及宠物不会爬进洗衣筒中。为 避免此类情况的发生,本机设有特殊装 置。要使用此装置,请使用一枚硬币,顺 时针旋转机门内的旋钮(不要按下) ,直 至凹槽呈水平状态;若要取消此功能,使 机门恢复可关闭状态,可逆时针旋转旋 钮,直至凹槽呈垂直状态。
4 温度选择按钮
如果不想使用机器自动设定的温度,可通 过重复按动此钮增加或减少洗涤温度,相 应指示灯点亮。 纯棉的最高洗涤温度为 95 ℃,化纤的最高洗涤温度为 60℃,精细、 羊毛和手洗、织物的最高洗涤温度为 40 ℃,丝绸的最高洗涤温度为 30℃。 当选择“杀菌 95℃”时,水温将在高温处 保持 10 分钟,达到杀菌作用。 选择“冷水*”位置时,洗衣机将用冷水 洗涤。用于特别精致的织物,如窗帘。另 外,用冷水洗涤可相应的缩短洗涤时间。
2 电源指示灯
按下电源“开/关”按钮,电源指示灯点亮 或熄灭。
3 护理程序选择按钮
依照所需洗涤的织物类型重复按动此钮 选择洗涤程序,直到相应指示灯点亮。洗 衣机会根据所选的洗涤护理程序自动设 定洗涤温度和最高脱水转速。您可以通过 按钮 4、5 改变温度和转速。 手洗 当你选择了这个程序,机器会进行特别轻 柔的洗涤,适合洗涤衣物标签上标明必须 手洗的衣物。 9
排水
排水管末端可用三种方式放置: ·使用随机提供的塑料弯夹装在排水管末 端上,将其挂在水槽壁上。在此情况下, 应确保洗衣机在排水时,排水管不能掉下。 可将排水管系在水龙头上或固定在墙上。
重要!
确保安装好的洗衣机便于连接电源插座。 ·排水管接于水槽的排水分支。排水分支 必须位于下水道上方并使弯曲部分最少
7
您的新洗衣机
这台洗衣机采用了欧洲目前最新的功能和洗涤技术,以最好的制造工艺和质量标准生 产,可提供最佳的洗涤性能,省水省电并有特殊的衣物护理选择: ·7 公斤大洗涤容量,可以洗更多的衣物以节省时间。 ·1200 转超高脱水转速,衣服脱水更干 ·用水量和用电量可以根据洗衣量和衣物种类自动调节,所以不用担心水电浪费。 ·活力魔术球确保更低的耗水量、耗电量和洗涤剂用量,经济环保。 · “预约”和“暂停”功能,满足随时按需洗涤。 ·轻触式按键控制系统,操作更方便。 · “95 度杀菌”洗涤功能,可清洁脏污程度较大的棉织物。 ·由意大利衣物护理专家研发的针对“羊毛、手洗织物、丝绸和精细织物”的特殊洗涤 程序可给您的精细衣物以特别护理。 ·若时间紧促,可选择“超快洗” ;使用冷水,最快可完成 23 分钟洗涤。
安全事项
·洗衣机必须由专业人员维修,非专业人 员维修可能会产生严重危险。请咨询当地 维修中心。 ·拔掉电源插头时,必须手握前端插头部 分,切勿拉扯电线。 ·高温洗涤或烘干时,请勿碰触机门玻璃 以免烫伤。 ·在清洁和修理洗衣机前,请拔下电源插 头。 ·高温洗涤时,门玻璃可能是烫的,请勿 触摸。 ·不要让洗衣机曝晒或雨淋。 ·不要把水直接浇到洗衣机上。
门封 机身 洗涤剂抽屉盒 排水泵 进水阀过滤器 紧急事故处理 预防冻结
21
21 21 21 21 22 22 22
您的新洗衣机 机器说明
门锁指示灯 洗涤剂抽屉盒
8 8
8 8
故障诊断
23
使用
控制面板描述 洗衣指南 衣物分类 温度设定 衣物检查 最大洗衣量 衣物重量 污渍预处理 洗涤剂和添加剂 洗涤剂用量 国际洗涤标志
部件说明
1. 2. 3. 4. 5. 6. 洗涤剂抽屉盒 控制面板 门锁指示灯 门把手 排水泵 水平调整脚
门锁指示灯
整个程序运行时,指示灯亮,表明门处于关闭状态。 如灯熄灭,表明门可以开启 洗涤剂抽屉盒 预洗洗涤剂投放格 主洗洗涤剂投放格 柔软剂、上浆剂投放格
6. 把洗衣机放正,然后从洗衣机后背 取出剩余的运输螺栓,取出塑料护套。
高于洗衣机放置平面 60cm。 ·应避免进水管过度弯曲造成损伤。 ·与洗衣机相连的进水管的另一端可以朝 任意方向旋转。 松开连接装置, 旋转软管, 重新上紧,确认没漏水。 ·进水管不应太长,如太短且不想移动水 龙头,您可以另购一根加长进水管。 ·直接将排水管末端与排水管道相连,排 水管道高度在 60~90cm 之间。 ·排水管口必须保持畅通,排水管道的内 径必须大于排水管的外径。 ·排水管不应扭结。