钲铭科最新投光灯方案SM15106T产品中文说明书
投光灯说明书
LED 投光灯说明书LED投光灯是本公司新开发的一种新型集光照明灯具,该灯采用铝合金压铸底壳,进口材料面罩,超高亮度LED光源,具有外观时尚,坚固可靠,防水防尘,亮度高,光线柔和,节能环保等特点。
灯具特点:灯具特点1、单色性好,光线柔和,发光效率高。
2、冷光源、无热幅射、无有害金属汞、绿色环保。
3、功率低、耗电小、寿命长、稳定性好、可靠性高。
4、消耗能量较同光效的白炽灯减少80%。
5、工作温度可达-30℃~40℃,低温启动正常,响应速度快。
6、灯体采用金属制成,抗冲击性好,面罩采用PC材料,光线均匀柔和,坚固耐用。
7、灯体设计新颖别致,典雅美观,具有现代照明灯具特点,安装简单,调节方便。
技术参数:技术参数光源组成:超高亮白色大功率LED输入电压:AC85~264V频率范围:47~63HZ额定亮度:>0.9发光亮度:≥53Lux(6m),≥30Lux(8m),≥18Lux(10m),≥13Lux(12m)安装高度:6~12米使用寿命:≥30.000小时工作温度:-30℃~40℃灯体与灯罩材质:铝合金和pc材料防护等级:IP65净重:2.5Kg使用说明:使用说明根据灯具的安装位置,预先埋好灯杆,将灯具安装到灯杆上,接好电源线即可。
造用场所:造用场所造合花园,小区,园林,道路等场所的照明。
大功率LED投光灯系列产品简介大功率LED投光灯系列产品主要规格有30W、50W、70W、100W、140W等,还可根据用户要求开发特殊规格的产品,该灯具还可用作高速公路隧道照明灯、广告牌射灯、厂矿照明灯、庭院灯和路灯。
该产品的主要特点有:发光强度高,,照射距离远1、发光强度高目前LED的发光效率已经达到120Lm/W,已远远超过高压钠灯(80 Lm/W)、日光灯(60 Lm/W)和其他光源,而且LED发光角度为160º~180º,所有光能量可以全部投射到被照物表面,其他光源的发光角度均为360º,所以通常只有一半光能量投射到被照物表面,因此在同样光效的情况下,LED灯的发光强度(单位角度内的光通量)比其他灯具要高一倍,因此LED灯的发光强度(即通常人们感知的灯光亮度)比其他光源高得多。
投光灯使用说明
使用说明1产品使用工作电压:AC100V~240V 50/60Hz。
勿超出工作电压。
2.储存环境温度-60℃~+50℃,工作温度:-30℃~+50℃,最佳工作环境温度-0℃~+30℃3.由于灯具有玻璃配件,在搬运,储存的时候请注意轻拿轻放,勿重压。
安装说明1.通过产品安装支架上的安装孔位可直接用螺丝固定与安装杆或者安装面上。
2.固定好产品后,可将调节角度螺丝调松,然后转换支架的角度,也就是相当于调节灯具的安装角度。
3.安装灯具时,接线与接线处封闭好,防漏电,外接电源时,必须采取相应的防水措施。
4.该灯具使用时不能违反任何防火法规,不能覆盖灯具表面。
5.安装请找专业的安装人员。
6.要定期对灯具表面进行清洁,清洁前请确定已经断电,清洁时不能用水或者腐蚀性强的溶剂进行清洁,最好用干抹布。
LED Flood light installation instructionsInstructions for use:1. Using working voltage:AC100V~240V 50/60Hz,do not exceed the operating voltage range.2.Storage environment temperature:-60 ℃ ~+50 ℃, the working temperature: -30 ℃ ~+50 ℃, the optimum temperature of working environment: -0 ℃~+30 ℃.3. As a result of the light with glass lamp fittings, when carry, please pay attention to handling gently, don't stressThe installation diagram1. Through the mounting hole on the mounting bracket to be directly fixed withscrews and the installation rod or mounting surface.2. After products fixed, to loose adjustable screw, then transform the bracket angle, which is to adjust the installation angle of the lamp.3. Installation of lamps, wiring and wiring goods sealing good to prevent leakage. Using external power must be take measures for waterproof.4. The lamp be used can’t violate for any of fire regulation, can’t cover the surface of the product.5. Please find professional installer to installation.6. Please regular cleaning of the lamp body surface, and please be sure the power is cut off before cleaning. Do not use water or strong corrosion of solvent to cleaning, preferably with a dry cloth.7.。
Spectrophotometer Alphalook 1601 说明书
Edition : May 2016有关Alphalook的详细内容, 您可以在 (株)S-Connect网站上确认。
www.alphalook.co.krAlphalook是 (株)S-CONNECT分光光度计系列的注册商标。
未经 (株)S-CONNECT书面同意或许可, 含本使用说明在内的Alphalook的任何系列, 均不得以任何形态或方法(包含电子文件的存储及检索, 外语翻译)进行修改。
NoticesContents5产品规格P. 121安全信息P. 042Alphalook安装环境P. 063产品特征P. 084分光光度计概要P. 107Alphalook配件P. 186各部名称及功能P. 14Alphalook主机及组件8Alphalook安装及启动P. 209软件构成及功能P. 32PC版本1.Android版本2Alphalook主机与PC连接Alphalook主机与平板电脑(tablet)连接应用程序安装应用程序删除应用程序登录P. 4210试验PC版本主界面界面构成及功能说明测量数据确认扫描SCANNING1.2.3.4.主界面界面构成及功能说明测量数据确认动力学测量KINETICS1.2.3.4.主界面界面构成及功能说明测量标准曲线STANDARD1.2.3.- 测量模式- 用户模式Android版本–初始界面主界面界面构成及功能说明测量数据确认扫描SCANNING1.2.3.4.主界面界面构成及功能说明测量数据确认动力学测量KINETICS1.2.3.4.主界面界面构成及功能说明标准曲线绘制标准曲线STANDARD1.2.3.主界面界面构成及功能说明数据管理EXPLORER1.2.Operator’s ManualAlphalook01安全信息●安全信息中使用的符号请仔细阅读下面的记号和内容, 以免产品受损, 用户受伤或死亡。
CAUTION (注意)违反指示事项时, 可能损坏重要数据或造成财产损失的内容WARNING (警告)违反指示事项时, 可能造成用户死亡或受重伤的内容Operator’s ManualAlphalook03产品特征1各种应用分析Alphalook是一种专业的分析设备, 用于化学, 生命科学, 环境, 制药, 食品等各领域的应用分析研究。
感应投光灯使用说明

LED感应投光灯说明书
主要技术参数:
探测范围:180°
探测距离:最大12m(25℃)
延时时间:5秒~ 6分(可调)
环境照度:2 ~ 2000LUX (可调)
工作电压:
灯珠:集成芯片
灯光颜色:白光
外壳颜色:黑色
工作温度:–10℃ ~ +40℃
工作湿度:小于93% RH
产品尺寸:102*115*152mm
安装高度:1.8m ~ 2.5m
安装方式:安装时,调节钮面向下。
LUX 调节白天或晚上工作,当调到太阳位置时,感应器全天工作;
当调到月亮位置时,感应器白天不工作,到晚上自动进入工作状态。
TIME 调节感应器延时时间(5±2sec~6±1min),延时时间是指感应器感应到人体后,人离开开感应区域,感应器延时关闭的时间。
SENS 是调节感应器的灵敏度。
一般不需要调节。
太阳能安全灯 1600 产品说明书

V1.1-M1Nov2019Solar Security Light 1600User ManualWARNING: Read carefully and understand all ASSEMBLY AND OPERATIONINSTRUCTIONS before operating. Failure to follow the safety rules and other basic safetyprecautions may result in serious personal injury.Item #22245SAVE THESE INSTRUCTIONS⚠WARNINGRead and understand all instructions. Failure to follow all instructions may result in serious injury or property damage. The warnings, cautions, and instructions in this manual cannot cover all possible conditions orsituations that could occur. Exercise common sense and caution when using this tool. Always be aware of the environment and ensure that the tool is used in a safe and responsible manner.Do not allow persons to operate or assemble the product until they have read this manual and have developed a thorough understanding of how it works.Do not modify this product in any way. Unauthorized modification may impair the function and/or safety and could affect the life of the product. There are specific applications for which theproduct was designed.Use the right tool for the job. DO NOT attempt to force small equipment to do the work of larger industrial equipment. There are certain applications for which this equipment was designed. Itwill be a safer experience and do the job better at the capacity for which it was intended. DONOT use this equipment for a purpose for which it was not intended.Industrial or commercial applications must follow OSHA requirements.Important Safety InformationThank you for choosing a Nature Power Product.Save the receipt and these instructions. It is important that you read the entire manual to become familiar with this product before you begin using it.This product is designed for certain applications only. the distributor cannot be responsible forissues arising from modification. We strongly recommend this product not be modified and/or used for any application other than that for which it was designed. If you have any question relative to a particular application, Do not use the product until you have first contacted the distributor todetermine if it can or should be performed on the product.For technical question please call 1800-588-0590WARNINGThis product can expose you to chemicals, including Di (2-ethylhexyl) phthalate (DEHP) which is known to the State of California to cause cancer, birth defects or other reproductive harm. For more information, go to ATTENTIONce produit peut vous exposer aux produits chimiques, y compris les di (2 - éthylhexyl) phthalate (dehp) qui est connu de l'État de californie pour causer le cancer, les malformations congénitales ou d'autres dommages de reproduction.pour de plus amples renseignements, aller à Parts List Reference Part Description Quantity 1Lamp 1 2Solar Panel 1 3Screws and Anchors (pack) 1 4Light Mounting Bracket (Removable ) 1 5 Manual 113452Intended UseThe 205-LED Solar-Powered Motion Security Light delivers twice the illumination and versatility. With the included mounting plate, you have the option of positioning on a flat wall to illuminate a large area or on a corner to light two separate areas. Each light head adjusts to suit your needs. Motion detection automatically activates the lights when motion is detected from up to 40 feet.Technical SpecificationsPropertySpecification Lumen1600 Lumens Max / 10 Lumens at night light mode LEDs205 LEDs (6000K / 3000K )Motion Sensor Distance and Range 40 feet and 120 degrees•Once the mounting bracket is installed, ensuring all screws are tight, you are ready to position your light.•Carefully route the wire from the solar panel to the lamp and plug it into the power socket.•Adjust the motion sensor to your desired position. Your light is now installed and ready to charge. Note: The lamp unit should be mounted 6.5-9 feet (2-3 meters), from the ground to ensure motion detection is optimized.2,Wall or deck mounting of solar panelSecure the bracket to the solar panel with the screw providedSet the bracket on the surface and secure in place with larger screws provided.Adjust the angle of the solar panel to ensure it receives optimum sunlight.Note: The Solar Panel is equipped with a length of wire. Ensure that the wire will reach the desired position of the lamp before making the final installation.3,Location of the Solar LightSolar powered lights require sunlight to recharge the internal batteries. For best results, locate the Solar Panel in a position where it will receive direct sunlight, and is generally free from cover and shade.Before Each UseSolar lights require sunlight to function properly. Extended periods of cloudy weather will cause shorter runtimes. Shade on the solar panel is to be avoided. The solar panel may be cleaned with a clean damp cloth. Do not use soap, solvents, or abrasives. A regular visual inspection is recommended. Ensure the solar panel is free from debris and in a location where it will receive several hours of sunlight each day. Ensure the light is facing the desired direction and that there are no nearby alternate light sources that may interfere with the motion sensor.Located at the back of the light housing, push the button toswitch light color, 3000K Warm white or 6000K White.4,How to Use Control DialsThe Solar Motion Light has 3 dials which control the light’s duration,sensitivity to light, and sensitivity to motion.LUX (Light Level)The LUX dial adjusts the sensitivity to darkness. If set to the maximumlevel, the light will go on in daylight. If set to the minimum level,the sensor will only trigger the light to turn on at dusk or when it is darkout. This is the ideal position for general use. Please note that ambientlight will affect the sensor.TimeThe time dial sets the duration the light will stay on when triggered.The duration is adjustable from 8 seconds to 2 minutes. Rotating thedial clockwise will increase the duration the light will stay on.SENS (Sensitivity)The SENS dial adjusts the sensitivity of motion detection:1.Minimum position – Low Range: large movement is required to trigger the light to turn on.2.Mid Position - Medium setting.3.Maximum position - Maximum range: the smaller movements will trigger the light to turn on.1,Before the Solar Motion Light can operate to its full capacity, allow the unit to charge in sunlight for 2 days with the solar panel wire connected to the light. Charging should be done with the unit in the “OFF ” position.2,Located at the bottom of the Battery Housing there is a OFF/AUTO /ON switch:“AUTO” position, the light will turn on automatically when motion is detected. then both light head turns on after the motion detect, Red warning will be flashing all the time at night.“OFF” position, the light will remain off and will not detect any movement"ON" Position, all the three light head on and maximum brightness.3,Light Color switchMaintain the solar powered light by adopting a program of conscientious repair and maintenance in accordance with the following recommended proceduresUse the table below to troubleshoot problems before contacting service personnel or your local dealer. If the problem continues after troubleshooting, call your local dealer for assistance.Limited WarrantyNature Power warrants our products to the original purchaser that this product is free from defects in materials and workmanship for the period of one year from date of purchase. In the case of product defect, contact Nature Power customer service to receive troubleshooting. If defective part or unit should be returned, a Return Authorization Number must be issued by Nature Power and the defective part or unit should be returned to the authorized location at the purchasers’ expense. A dated proof of purchase is required to receive warranty service. Once received at authorized location and defect proves to be the result of defective material and workmanship, the defective part or unit will be replaced at warrantors’ option and returned to the original purchaser at warrantors’ expense. No refunds will be granted by the warrantor, in the event of buyer’s remorse please contact your point of purchase within and in adherence to their return policy. Refunds are granted at the retailers’ discretions.Please contact Nature Power Products to acquire more information:1-800-588-0590****************************Made in China。
柔光系列LED说明书 Manual of LED Soft Light Series
柔光系列LED说明书Manual of LED Soft Light Series注:产品如有技术更改,恕不另行通知 / Note:The technical data are subject to change without notice.Model No.R-S60RGB保养及注意事项 Warning And Notes01. 使用环境应保持干燥、通风;02. 使用中不得有水或其它液体滴入产品中,以免造成内部电路短路,而损坏产品;03. 不要使用超过额定的电压;04. 灯体稍微有发热为正常现象;05. 移动或安装时,需轻拿轻放,切勿撞击其它物体,以免造成灯体损坏;06. 摄影/摄像LED灯点亮时,请勿直视,避免伤害眼睛;07. 避免将摄影/摄像灯放置在如洒灯或汽油等易挥发的溶剂附近;08. 请用干软布来清洁摄像/摄影灯,您可以用布稍稍沾上一些中性的清洁剂来擦去较难去除的污垢, 然后用软布将其擦干;09. 请勿在儿童伸手可及之内保管本产品;10. 各灯保险丝请勿超过规定电流值;11. 非专业人士,请勿随便拆卸、否则后果自负;12. LED影视灯长时间不用时请切断电源;13. 请遵守此注意事项,否则将可能导致受伤。
1. The environment should be kept dry and ventilated when using the light.2. Please do not let the device be exposed to rain or moisture, to avoid circuit problem.3. Please do not use the light with over- rated voltage.4. It’s normal the fixture will be a little hot when working.5. During transportation and installation process, please do not hit against other items, or else it may cause deformation to the lamp shade and damage to the light.6. Please do not directly look at the light bulb with naked eyes when the light is on.7. Please do not place the light near by such as alcohol or gasoline and other flammable or volatile solvents.8. Please use the soft dry cloth to clean the light. You can wash with a cloth with some neutral detergent to remove the dirt that is difficult to remove, and then dry with a soft cloth.9. Keep the light out of reach from children.10. Please do not work when over-current.11. Do not disassemble equipment. Touch the product’s internal part could result in injury. In the event of malfunction, the product should be repaired only by a qualified technician.12. Please cut off power when the light isn’t used for long time.13. Please note the precautions, or could result in injury.工厂地址:广东省东莞市厚街镇溪头村溪头工业区溪宝路15号电话(国际):0086-769-8592 4988 8599 9808 传真: 0086-769-8590 5228咨询热线 (国内):400-900-3829Factory in china:15 Xibao Rd, Xitou Industrial Park, Xitou Village, Houjie, Dongguan Tel(Internatinal):0086-769-8592 4988 8599 9808 Fax:0086-769-8590 5228Tolifo (Dongguan) Photographic Equipment Co., Ltd: / 4. In the mode of RGB, wheel to change hue 0-360°, and short press then wheel to change saturation from 0% to 100%. Shotlypress goes to the control between hue and saturation. Wheel always changing intensity from 0 % to 100 %.5. In the mode of HSI, long press MODE button allows to change another 8 different special effects from F1 to F8, shortly press to change speed from 1 to 9.“I” for battery power supply, “O”for Power off,“II”for Adapter power supplyDimmer / Channel knob1112DMX512 input/outputPower switch1315DMX Channel selector button16Power socketRotating to select address 14142.4G remote selector buttonRotating to select address 14141010101010Cop Car / Party / Fireworks / Disco / Ambulance / Fire Siren / RGB Loop / WeldingScan QR Code to Download App - Linklite扫描二维码下载手机 App - Linklite4. 在RGB模式下,旋转 改变调整色调范围 0-360°,短按 则进入饱和度控制,然后旋转 选择0%到100%. 此状态下旋钮在短按时选择控制色调或饱和度。
照明设备操作指南说明书

照明设备操作指南说明书一、概述本操作指南旨在向用户提供照明设备的详细操作说明,帮助用户正确认识和使用照明设备,确保其安全性和寿命,并提高用户的使用体验。
二、安全注意事项在使用照明设备之前,请务必遵守以下安全注意事项:1. 请仔细阅读并遵守设备的使用说明书,确保正确操作;2. 在使用前,请确保电源和电源线都稳定可靠;3. 请避免在湿气较大或者有明显磁场干扰的环境使用;4. 使用或更换灯泡时,请确保断电,并等待数分钟后进行操作;5. 对于高温的灯泡或设备,请使用隔热手套进行操作,以免烫伤;6. 长时间使用设备时,请适当休息,避免过度疲劳。
三、基本操作步骤1. 装置a. 在安装照明设备之前,请确保设备与电源线断开连接,并关闭电源开关;b. 根据设备的特点和使用场景选择适当的安装方式;c. 将照明设备固定好,并确保其稳定性;d. 连接设备与电源线,并确保连接牢固;e. 打开电源开关,检查设备是否正常工作。
2. 开关控制a. 通过手动开关控制- 手动开关通常分为两个或三个档位,根据需要选择合适的档位;- 按下开关打开或关闭照明设备。
b. 通过遥控器控制- 将遥控器与照明设备进行配对,确保其有效连接;- 使用遥控器上的功能按钮来控制照明设备的开关、亮度、颜色等功能。
c. 通过手机APP控制- 安装并打开相关的手机APP,确保手机与设备处于同一网络环境中;- 打开APP,并通过搜索或扫描设备上的二维码将设备添加到APP中;- 在APP上选择相应的设备,并进行相应的操作,如开关、亮度、颜色等。
四、高级功能操作1. 亮度调节a. 根据设备的调光功能,可通过手动、遥控器或者手机APP来调节照明设备的亮度;b. 通过手动操作,按照调光按钮的上下左右滑动来调整亮度,一般可显示当前亮度百分比;c. 通过遥控器操作,使用遥控器上的亮度加减按钮来调整亮度;d. 通过手机APP,在APP界面上拖动亮度滑块来调整亮度。
2. 色温调节a. 对于支持色温调节的照明设备,可通过手动、遥控器或者手机APP来调节照明设备的色温;b. 通过手动操作,在照明设备上找到色温调节按钮,根据按钮的设计,来回调整色温;c. 通过遥控器操作,在遥控器上找到色温调节按钮,通过按钮的设计增加或减少色温;d. 通过手机APP操作,在APP界面上找到色温调节区域,拖动滑块或直接输入数值来调整色温。
方案投光灯
方案投光灯摘要本文档介绍了方案投光灯的基本原理、应用场景以及操作指南。
方案投光灯是一种常用于照明和照射特定区域的灯具,其通过调整光源的角度和亮度,能够满足不同环境的需求。
本文档将帮助用户了解方案投光灯的工作原理,并提供详细的操作指南,帮助用户正确使用方案投光灯。
1. 引言方案投光灯是一种用于照明和照射特定区域的灯具。
其通过调整光源的角度和亮度,能够满足不同环境的需求。
方案投光灯具有光效高、节能环保等特点,广泛应用于景观照明、建筑物外观照明、舞台照明等场景。
2. 工作原理方案投光灯的工作原理主要是通过调整光源的角度和亮度来实现不同的照明效果。
方案投光灯通常由灯体、光源、反射器和镜片组成。
光源是方案投光灯的核心部件,常用的光源有白炽灯、卤素灯、LED灯等。
光源的选择将直接影响到灯具的亮度、寿命和能效。
随着LED技术的不断发展,LED灯逐渐成为了方案投光灯的主流光源,具备高亮度、高光效和长寿命的优点。
反射器是方案投光灯的重要组成部分,它能够将光源发出的光线集中到一个较小的角度范围内。
这样可以提高照明效果,减少能量的浪费,并减少光污染。
反射器的设计和材料的选择对于方案投光灯的照度和照射距离有着重要影响。
镜片是方案投光灯的另一个关键组件,它能够调整光源的角度和分布,实现不同的照明效果。
镜片通常采用透明材料制成,具有一定的透光性和光散射性,用来控制光线的方向和角度。
通过更换不同的镜片,可以实现投光灯的调光和聚光效果。
3. 应用场景方案投光灯广泛应用于各个领域,包括但不限于以下几个方面:3.1 景观照明方案投光灯在景观照明中起到了关键作用。
通过调整光源的角度和亮度,可以突出景观物体的轮廓和细节,并营造出独特的氛围。
常见的应用包括景观广场、公园、花园等场所。
3.2 建筑物外观照明方案投光灯可以用于照明和彩色灯光展示建筑物的外观。
通过巧妙地使用不同颜色的光源和镜片,可以展示出建筑物的纹理和形状,提升建筑物的美感和视觉效果。
5.0mm x 6.0mm 全彩LED灯泡说明书

Lens Type
Blue (InGaN)
AAF5060QBFSEEZGC
Hyper Red (AlGaInP)
WATER CLEAR
Green (InGaN)
Notes: 1. θ1/2 is the angle from optical centerline where the luminous intensity is 1/2 of the optical peak value. 2. *Luminous intensity with asterisk is measured at 50mA; Luminous intensity/ luminous Flux: +/-15%.
PACKING & LABEL SPECIFICATIONS
AAF5060QBFSEEZGC
SPEC NO: DSAJ8731 APPROVED: WYNEC
REV NO: V.1 CHECKED: Allen Liu
DATE: OCT/23/2009 DRAWN: M.L.Xu
PAGE: 6 OF 6 ERP: 1201005517
Parameter
Blue
Power dissipation[2]
DC Forward Current
30
Peak Forward Current [1]
150
Reverse Voltage
Operating / Storage Temperature
Lead Solder Temperature [3]
Description
The Blue source color devices are made with InGaN Light Emitting Diode. The Hyper Red source color devices are made with AlGaInP on GaAs substrate Light Emitting Diode. The Green source color devices are made with InGaN on Sapphire Light Emitting Diode. Static electricity and surge damage the LEDS. It is recommended to use a wrist band or anti-electrostatic glove when handling the LEDs. All devices, equipment and machinery must be electrically grounded.
SECO-LARM U.S.A., Inc. 款LED闪光灯说明文件说明书

ManualLED Strobe Lights5 LED Strips10 LED Strips(SL-1301-BAQ shown)Operating life of over 50,000 hours (over 5.7 years)6 different flashing options Adjustable flashing speed Simple 2-wire installation4 lens colors available for each model Same size as the SL-126Q strobe light Backup battery available for continuous lighting applications Visible in all directionsLED Strobe LightsSECO-LARM ®U.S.A., Inc.ENFORCER SL-1301-B Series LED Strobe Lights provide all of the functions of a regular strobe light and much more. Each strobe light has an operating life of 50,000 hours —over 160 times the operating life of a regular strobe light.The SL-1301-B series also has 6 selectable flashing options with adjustable flashing speed, making the LED strobe light suitable for many applications. It has a 9-Volt backup battery option making it ideal for continuous lighting applications and is engineered so that it is visible from all directions.SL-1301-B Series LED Strobe Lights come in two models —a 5 LED series or a brighter 10 LED series.IntroductionSpecificationsDimensionsTop ViewBottom ViewParts List1 x LED Strobe Light 1 x ManualFront View2 x Mounting Screw with “O” ringLED S TROBE L IGHTSOverview Installation5. Connect the wires to their respective locations on an alarm control panel or other security panel.6. Remove the lens and mount the LED strobe light to the surface using the two included mounting screws. If screws are fastened too tightly, the “O” rings will be damaged.7. Select the flash pattern using the DIP Switch (see back page for details) and adjust the speed using the control pot (clockwise to increase, counterclockwise to decrease).8. If needed, install backup battery. (See below.)9. Replace lens. If lens is fastened too tightly, the “O” ring will be damaged.WARRANTY: This SECO-LARM product is warranted against defects in material and workmanship while used in normal service for a period of one (1) year from the date of sale to the original consumer customer. SECO-LARM’s obligation is limited to the repair orreplacement of any defective part if the unit is returned, transportation prepaid, to SECO-LARM. This warranty is void if damage is caused by or attributed to acts of God, physical or electrical misuse or abuse, neglect, repair, or alteration, improper or abnormal usage, or faulty installation, or if for any other reason SECO-LARM determines that such equipment is not operating properly as a result of causes other than defects in material and workmanship.The sole obligation of SECO-LARM, and the purchaser’s exclusive remedy, shall be limited to replacement or repair only, at SECO-LARM’s option. In no event shall SECO-LARM be liable for any special, collateral, incidental, or consequential personal or property damages of any kind to the purchaser or anyone else.TroubleshootingThe LED strobe light does not turn on. Check the LED strobe light’s power source. The LED strobe light does not flash correctly.Disconnect power, configure correct flash pattern, and reconnect power.Backup battery1. Before starting, please read this manual carefully and keep it for future reference.2. Be sure to use the LED strobe light within the given electrical limits.3. Decide where the LED strobe light is to be mounted. Use a pencil to mark the location of the two mounting screws.4. Drill a hole through the wall or surface where the LED strobe light is to be mounted. Run the LED strobe light’s ground (black) and power (red) wires through the wall. Note: For surface wiring applications, remove the thinned-out slot with a pair of pliers.screwRubber “O” ring LED strips (5 or 10)Circuit boardLED Strobe LightsSECO-LARM ®U.S.A., Inc.NOTICEThe information and specifications printed in this manual are current at the time of publication. However, the SECO-LARM policy is one of continual development and improvement. For this reason, SECO-LARM reserves the right to change specifications without notice. SECO-LARM is also not responsible for misprints or typographical errors.Copyright © 2010 SECO-LARM U.S.A., Inc. All rights reserved. This material may not be reproduced or copied, in whole or in part, without the written permission of SECO-LARM.U.S.A., Inc .16842 Millikan Avenue, Irvine, CA 92606Website: Tel: 800-662-0800 / 949-261-2999 Fax: 949-261-7326 E-mail:*******************PITSW1 Configuring Flash PatternsMiSL-1301-B_1001.docxIMPORTANT: Before changing flash pattern, disconnect power. Change flash pattern beforereconnecting power. Visit for animated flash pattern samples.Order Part # 762-509%。
Q Light S100DS S125DS 信号灯产品说明书

S100DS / S125DSThank you for purchasing QLight product. Please read thismanual carefully before installing this product for safe and longuse.▪ Signal sound built-in product employing strong xenon lamp andpossible to transmit both visual and auditory signal at same time.▪ Having a built-in switch for controlling the frequency ofcontinuous flashing. (Controllable from 2 times to 4 times)▪ Lamp of connector type whose replacement is easy and simple.▪Material: Lens-AS, Body-ABS▪Signal sound volume: MAX 105dB/m▪Flashes(Flashing Type): 60-80/Min.▪Protection Class: IP54▪General Specification▪S100DS External View Drawing▪S125DS External View Drawing1) Warning!Must turn off power supply and change bulb after 1 minute atleast.▪Xenon lamp emits superheat when working. Please be awareyou should not touch bulb before lowering its heat preventfrom a burn.▪Xenon lamp work with a high voltage, if you touch aassembling board or lamp without power-off, you may receivean electric shock.2) Lens RemovalRemove lens by turning it counterclockwise. and make surerelated parts on the assembling board.3) Change Lamp▪Our company’s xenon lamp (1) is made as a connector typelamp. If you pull out with a small strength, it can be separatedeasily.▪Please fit the lamp by checking a connector pin location (2) asbelow picture.OPERATING MANUALStrobe Light with PhoneSound Tone Combination of Standard ProductChange Bulb4) Lens AssemblingAssemble the product in reverse order of separating.Power lines and signal sound tone lines come out from the product.Please connect them correctly after referring to below instruction.▸Power line▪Power line: UL1015-NO.18(0.75sq) Ⅹ2c 400mm▪In case of product using AC voltage, connect the line withoutPolarity(wire color).▪In case of product using DC voltage, black line is negative(-).▸Signal line▪Signal line: UL1007-NO.22(0.3sq) 400mm▪This product was manufactured with the structure for indoor use.Installing in any direction is okay for indoor use.▪Outdoor use is limited at a place where no water or very littlewater percolates. Mounting also should be done only on thevertical standing direction.▪Mount at the place where exists low vibration, low impact, lowmoisture and low dust as long as possible.▪Please make a hole by a drill where you need to attach ourproduct and refer to below picture for a hole size. (Make surePCD from external view drawing.)▪Fix the product by using nuts(M5-3EA) originally equipped onmounting bolt on bottom of the product.▪ If using voltage is seriously higher or lower than rated voltage, itcan reduce the self-life of the product or can cause a problem onproduct operating. Make sure the using voltage does not exceed+/-5% of the rated voltage.▪ If lens or body of the product is contaminated by chemicals suchas thinner, benzene, the product can be damaged, discolored ordeformed. Please be careful.▪ Do not give strong impact to the product. It can be a reason ofwire disconnection or short circuit.▪ Do not strongly pull the wire out from the product. It can cause adisorder.Wiring InstructionMountingCautionTrouble shootingQLIGHT CO., LTD.E-mail:****************Overseas Marketing Team / FactoryTel) +82-55-328-4082 Fax) +82-55-328-3883185-25 Mukbang-ro Sangdong-Myeon, Gimhae-Si, Gyeongsangnam-do, KoreaInquiry for Product and C/S。
投光灯说明书
投光灯说明书一、产品介绍投光灯是一种常见的照明设备,常用于户外景观照明、建筑物照明等场景。
投光灯具有高亮度、广泛照射范围和节能环保等特点,因此受到了广大用户的喜爱。
本说明书将为您详细介绍投光灯的使用方法、注意事项和维护保养等内容,以确保您正确、安全地使用该产品。
二、产品特点1. 高亮度:投光灯采用高亮度的LED灯珠作为光源,具有较高的亮度和照射效果,能够满足各种场景的需要。
2. 广泛照射范围:投光灯设计出色的光学系统,使得其能够实现广泛的照射范围,满足不同场景的需求。
3. 节能环保:投光灯采用LED灯珠作为光源,具有较低的能耗和较长的使用寿命,有效减少了能源浪费和排放。
4. 高可靠性:投光灯采用优质的材料和先进的工艺,具有良好的防水、防尘和抗震性能,可在恶劣的环境中稳定运行。
三、使用方法1. 安装:在安装投光灯之前,请确保电源已经关闭,并遵循以下步骤:a) 将投光灯固定在合适的位置,确保灯具能够实现最佳的照射效果;b) 连接电源线,请注意接线的正确性,并确保接头处防水;c) 打开电源,检查投光灯是否正常工作。
2. 照明调节:根据实际需要,您可以调节投光灯的照明角度和亮度。
请注意不要向人眼直接照射,以避免对视力造成伤害。
4. 维护保养:定期清洁投光灯表面,以确保光线的透明度和亮度。
清洁时,请轻柔地使用干净的布料,避免使用化学清洁剂和尖锐工具。
四、注意事项1. 请在产品使用之前阅读并严格遵守本说明书的相关内容;2. 不得私自拆卸或更改投光灯内部结构;3. 请确保投光灯与电源的连接安全可靠,避免电气事故;4. 请勿将投光灯长时间暴露在高温、高湿、酸碱等恶劣环境中;5. 不得将投光灯放置在易燃物品附近或易燃气体环境中使用;6. 如遇产品故障,请立即断开电源,并联系专业技术人员进行维修。
五、售后服务我们提供全面的售后服务,如果您在使用过程中遇到任何问题或需要帮助,请随时联系我们的客服人员,我们将尽快为您解决问题。
LED投光灯系列产品安装指导说明书

安装LED大功率投光灯说起来是很简单的,不过要安装好,就要费心了,我在很多地方都看到,安装LED投光灯都是直接把投光灯安装固定上去,再接上电源线,(彩色接信号线)其实这样的方法是对的,不过由于不同厂家生产的产品质量各有不同,很多质量不好的,或者有问题的投光灯,反复这样安装好几次,由于不是技术人员,安装来安装去都不知道LED投光灯为什么不正常亮(特别是彩色需要连接控制器的)。
分享下我个人安装LED投光灯的的经验,第一保证LED投光灯在收到货时是好的,在收到LED投光灯的时候尽量检查下LED投光灯的外观看有没损坏,第二投光灯到工地后准备安装,应该先按照工厂附的安装图纸,先把安装人员组织起来,先接上几台投光灯试试安装图纸正确不,如果有条件可以安排一个人一台一台的试亮下,避免拿到楼上安装好以后有坏的,又要拆下来。
第三就是提醒安装工人固定和接线的重要性,尤其是室外接线防水非常重要,在固定和接线的时候最好复查下,第四在LED投光灯固定好接好线后,准备试亮时,最好在主电源上用万能表打一下,是否有接错线短路等情况,第五在全部做好试亮后,尽量多亮一段时间,第二天,第三天再复查下,这样做过以后,全部都是好的,后面一般就不会出现什么问题了。
注意事项安装LED大功率投光灯,一定要让安装工人知道固定、接线、线头防水这些的重要性。
LED投光灯系列产品安装指导说明书一、安装前注意事项说明:1. 使用前请祥细阅读本说明书。
2. 非专业技术人员,请不要擅自维修或改装本产品。
3. 安装之前请先关闭电源,以免操作不当触电。
4. 安装之前请注意检查投光灯上所标识的电压与即将连接的输入电压是否一致,以免损坏LED投光灯。
5. 为保证产品的使用寿命,请不要在酸雾气浓的地方使用。
6.在安装和运输过程中注意防震。
7.安装前确保安装位置可以承受10倍于该产品的重量,安装于无震动无摇摆,无火灾隐患的平坦地方;8. 如灯具出现故障,请将灯具集中放置于一个地方,然后一起寄回本公司检测维修;9. 如发现灯体电线破损,请立即断电停止使用。
LED-510

操作说明书专业舞台灯光LED-510摇头灯2014 ver06.30拆除包装:感谢购买 LED-510, 每个LED-510均已通过测试并完好包装出货,请仔细检查运货包装是否在运输途中产生损坏,如果包装损坏,请仔细检验配件是否有损伤,以确保所有操作组件完整运抵。
万一发现损坏或者零件丢失,请联系生产商或者您的经销商获取进一步的指引,不要未经联系,直接退货给经销商。
为了您的安全,在产品LED-510通电或安装前,请仔细阅读该使用手册,并保留作为以后参考注意!请不要自行维修,部件不是原装,厂家不予保修,当不得已情况,您的设备需要服务,请联系生产商或经销商请尽可能注意包装的环保回收利用一般指引:为了达到最佳的产品使用,请仔细阅读操作指引,熟悉基本操作。
这些指引包括使用和维护设备的重要安全信息产品特征:·单、多种颜色选择·数码显示·国际通用标准DM-512数据协议·主机、从机设置·三棱镜正反旋转、15光束·单点控制安全预防·为防止或降低触电或火灾危险,请不要将设备暴露在雨水或潮湿地方;·不要洒水或其他液体到你的设备里面或外部·请确保当地电压与设备要求供电电压相符·当电源线磨损时请不要操作设备,不要移走或折断电源线的地线分叉,该分叉是用来降低短路时候触电和火灾危险·任何接驳操作前请切断主电源·任何情况下都不要移除保护壳,内里没有用户可维修部件(意思拆除后厂家不予保修)·当外壳被拆除后,请不要操作设备·不要安装该设备到调光器装置上·确保设备安装在通风良好的地方,允许设备与墙壁6“(15厘米)距离·如果设备开始损坏,不要尝试任何设备操作·设备仅供室内使用;在户外使用将不受任何质保·长期不使用设备,请切断电源·总在安全和稳定情况下安装此产品。
盏煤光照明灯说明文件说明书
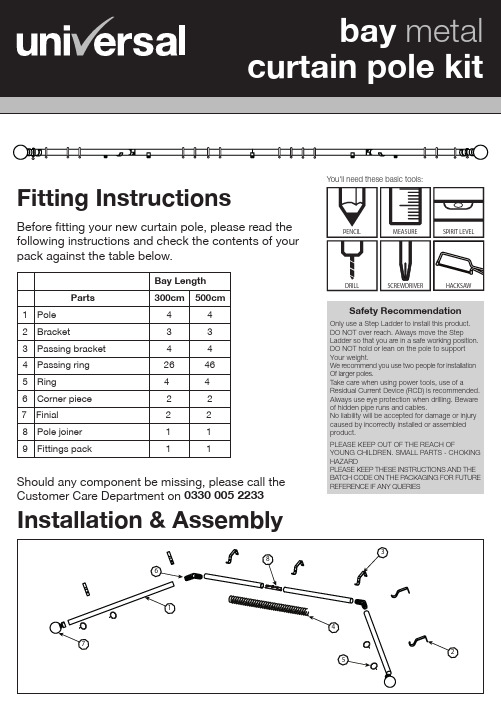
Parts 1 Pole 2 Bracket 3 Passing bracket 4 Passing ring 5 Ring 6 Corner piece 7 Finial 8 Pole joiner 9 Fittings pack
Bay Length
300cm 500cm
4
4
3
3
4
4
26
46
4
4
2
11
ring
12
Fit the nial (place the remaining
solid ring between the bracket and the nial)
13
Tighten grub screw Tighten nial grub screw
6642L/ISS1
Sunflex , Keys Park Road, Hednesford, Cannock, WS12 2FR
Preparing the bracket installation
10cm
W
W
10cm
2
W
10cm
W
Mark the pole centre line on the wall and then mark the positions of the brackets on the wall ensuring the centre bracket is central to the window
bracket centres, add 4cm to the poles
connecting to a bend (1), add 14cm to
Bend
the poles connecting to the nial (2)
SL-510-SA高强度太阳LED海洋灯说明书
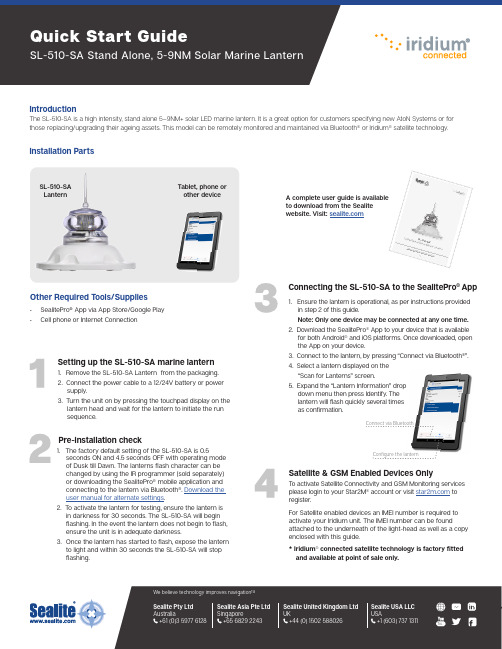
IntroductionThe SL-510-SA is a high intensity, stand alone 5–9NM+ solar LED marine lantern. It is a great option for customers specifying new AtoN Systems or for those replacing/upgrading their ageing assets. This model can be remotely monitored and maintained via Bluetooth® or Iridium® satellite technology.Installation PartsOther Required Tools/SuppliesSetting up the SL-510-SA marine lantern1. Remove the SL-510-SA Lantern from the packaging.2. Connect the power cable to a 12/24V battery or powersupply.3. Turn the unit on by pressing the touchpad display on thelantern head and wait for the lantern to initiate the runsequence.Tablet, phone orother devicePre-installation check1. The factory default setting of the SL-510-SA is 0.5seconds ON and 4.5 seconds OFF with operating modeof Dusk till Dawn. The lanterns flash character can bechanged by using the IR programmer (sold separately)or downloading the SealitePro® mobile application andconnecting to the lantern via Bluetooth®. Download theuser manual for alternate settings.2. To activate the lantern for testing, ensure the lantern isin darkness for 30 seconds. The SL-510-SA will beginflashing. In the event the lantern does not begin to flash,ensure the unit is in adequate darkness.3. Once the lantern has started to flash, expose the lanternto light and within 30 seconds the SL-510-SA will stopflashing.• SealitePro® App via App Store/Google Play• Cell phone or Internet ConnectionConnect via BluetoothConfigure the lanternConnecting the SL-510-SA to the SealitePro® App1. Ensure the lantern is operational, as per instructions providedin step 2 of this guide.Note: Only one device may be connected at any one time.2. Download the SealitePro® App to your device that is availablefor both Android® and iOS platforms. Once downloaded, openthe App on your device.3. Connect to the lantern, by pressing “Connect via Bluetooth®”.4. Select a lantern displayed on the“Scan for Lanterns” screen.5. Expand the “Lantern Information” dropdown menu then press Identify. Thelantern will flash quickly several timesas confirmation.A complete user guide is availableto download from the Sealitewebsite. Visit: SL-510-SALantern* Iridium® connected satellite technology is factory fittedand available at point of sale only.To activate Satellite Connectivity and GSM Monitoring servicesplease login to your Star2M® account or visit toregister.For Satellite enabled devices an IMEI number is required toactivate your Iridium unit. The IMEI number can be foundattached to the underneath of the light-head as well as a copyenclosed with this guide.Satellite & GSM Enabled Devices Only。
星海无线五寸 六寸蜗牛智能指灯说明书(Satco Products S11260)

STARFISH WIFI SMART 5"/6" LED DOWNLIGHTModel: S11260Satco Products, Inc.Brentwood, NY 11717INSTALLATIONINSTALLATION AND SAFETY INSTRUCTIONSIMPORTANT: Read before installing fixture. Retain for future reference.Dimensions© Copyright 2020 Satco Products, Inc. 9/20STEP 1: Turn OFF power prior to installation.STEP 2: Remove existing trim installed in recessed housing (if necessary).STEP 3: If applicable, slide lamp holder bracket to its upward maximum position. If the lamp holder bracket is less than 4 1/2" from the bottom edge of the fixture enclosure, the lamp holder bracket must be removed.STEP 4: If necessary, remove the lamp holder mounting bracket and the lamp holder from the bracket, then attach the provided label to the existing luminaire. See Figure A.STEP 5: Install adapter into socket. See Figure B.STEP 6: Connect the orange terminals together. See Figure C.STEP 7: Insert torsion springs into luminaire housing brackets. See Figure D.STEP 8: Gently push up trim and torsion springs so they begin to expand and lift trim in place. See Figure E. Installation is complete. Turn power ON.STEP 9: App Connection: To connect your device, download the free “Starfish Smart Lighting” App from the app store. Please refer to our Starfish User Guide for detailed instructions on how to pair your device.For Installation into existing recessed LED luminaire with compatible connectors:• Follow STEPS 1 and 2 above. STEP 3: Discard medium base adapter.• S kip STEPS 4 and 5 above. Continue with STEPS 6, 7 and 8 above.WARNING: Risk of Fire or Electric Shock• L ED Retrofit Kit installation requires knowledge of luminaries electrical systems. If not qualified, do not attempt installation. Contact a qualified electrician. • T o reduce risk of fire and over-heating, secure all connections.• TURN OFF the electrical power before proceeding.• I nstall this kit only in luminaires that have the construction features and dimensions shown in the photographs and/or drawings and where the input rating of the retrofit kit does not exceed the input rating of the luminaire.• The electrical rating of this product is 120V/60Hz. • T o prevent wiring damage or abrasion, do not expose wiring to edges of sheet metal or other sharp objects.• D o not make or alter any open holes in an enclosure of wiring or electrical components during kit installation.• T his retrofit kit is accepted as a component of a luminaire where the suitability of the combination shall be determined by authorities having jurisdiction. • T his device is not intended for use with emergency exits.• Suitable for wet locations, covered ceiling-mounted luminaire.WARRANTY: This product is guaranteed for a 5-year warranty. Any quality issue in normal use within the warranty period, will be repaired or replaced according to the situation and under the condition specifications can be provided. Visit for full warranty details and dimmer compatibility information.Min: 5 3/8" (135mm)Orange CAdaptorBLamp holder bracketADEDownload theSTARFISH App。
- 1、下载文档前请自行甄别文档内容的完整性,平台不提供额外的编辑、内容补充、找答案等附加服务。
- 2、"仅部分预览"的文档,不可在线预览部分如存在完整性等问题,可反馈申请退款(可完整预览的文档不适用该条件!)。
- 3、如文档侵犯您的权益,请联系客服反馈,我们会尽快为您处理(人工客服工作时间:9:00-18:30)。
SM15106T
内部功能框图
DIM
Fig. SM15106T
内部功能框图
管脚说明
订购信息
若无特殊说明,环境温度为25°C。
注1:散热表现与散热片尺寸、PCB厚度与层数息息相关。
实际应用条件下的热阻值会与测试值存在一定差异,使用者可选择适当的封装与PCB布局,以达到理想的散热表现。
电气特性
若无特殊说明,VDD=5V,环境温度为25°C。
注2:电流负温度补偿起始点为芯片内部设定温度150°C。
若无特殊说明,VDD=5V,环境温度为25°C。
注3、注4:如下图所示
Fig. OUT端口开关响应测试示意图
1)SM15106T 可实现低电压恒流开启且输出电流精度高,片间输出电流偏差小于±4%; 2)如下图所示,达到恒流拐点后,输出电流受OUT 端口电压V DS 影响极小。
Fig. SM15106T 输出电流I OUT 与OUT 端口电压V DS 关系图
输出电流设置
SM15106T 的输出电流由外接rext 电阻设定,输出电流I OUT 与R EXT 电阻值之间的计算公式如下:
1000
1160)Ω(R )
V (V )mA (I EXT REXT OUT ×
×=
其中V REXT 为REXT 端口电压,V REXT =1.22V ,输出电流I OUT 与R EXT 电阻关系如下图所示:
Fig. SM15106T 输出电流
I OUT 与R EXT 电阻关系图
I OUT =1200mA I OUT =1000mA
I OUT =600mA I OUT =300mA
SM15106T 内置温度补偿功能,当芯片内部达到150ºC 时,开始减小输出电流,保证芯片工作温度不会过高,提升芯片工作可靠性。
典型应用
Fig. SM15106T 典型应用方案图
上图中,VCC 是外部输入电源,C S 是电源滤波电容,C D
是芯片滤波电容,OUT 端口负载的单路LED 串联数量N 由VCC 电压决定,多路LED 并联可适用于客户不同功率需求。
R L1~R LN 分别是OUT 端口分压电阻,R D 是芯片VDD 端口的限流电阻,R EXT1和R EXT2电阻分别用于设置1#和2#芯片输出电流值,R DIM 电阻为DIM 端口保护电阻,PWM 信号通过R DIM 电阻输入,DIM 端口以实现调光功能。
电源滤波电容C S 用于降低电源波动,可根据实际应用的负载情况选择4.7~470uF ,芯片滤波电容C D 取值100nF 。
芯片工作电压D DD R I VCC VDD ×=-,其中I DD 是芯片静态电流,R D 阻值必须保证VDD>4V 。
R D 电阻越大,系统功耗越低,但系统抗干扰能力弱;R D 电阻越小,系统功耗越大,工作温度较高,设计时需根据系统应用环境合理选择OUT 端口分压电阻R L 限制OUT 端口电压,防止芯片工作温度过高,R L 阻值计算如下:
OUT
LED
DS L I V N V VCC )Ω(R ×=
--
其中V LED 是LED 灯导通电压降,V DS 是芯片OUT 端口电压,I OUT 是OUT 端口输出电流。
V DS 电压取值应高于I OUT
恒流拐点电压,应用时可根据恒流拐点及芯片功率适当选取分压电阻R L 的阻值。
当DIM 端口悬空时,芯片无调光功能,即输出电流占空比100%。
当DIM 端口输入PWM 信号时,端口保护电阻R DIM 一般取值510Ω。
封装焊接制程
明微电子所生产的半导体产品遵循欧洲RoHs标准,封装焊接制程锡炉温度符合J-STD-020标准。
封装形式TO252-5
TO252-4。
