英文版patran实例教程hole_Plate
第6章 在Patran界面中建立Dytran模型及后处理的操作过程实例2
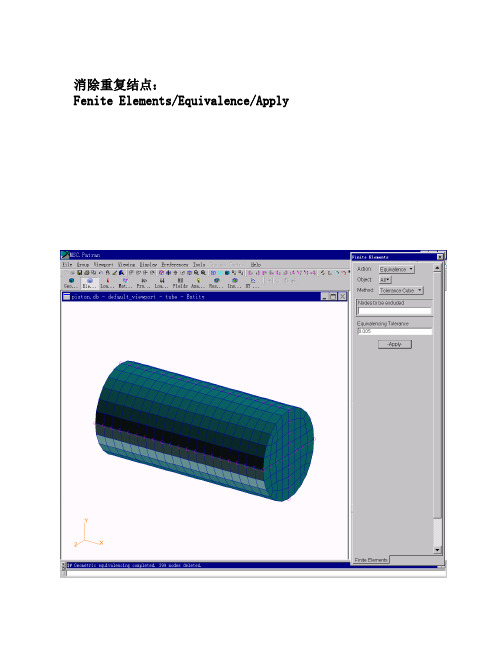
定义哑板元网格物理特性:
Properties/Create/2D/Dummy Shell/Property Set Name=Dum/Select Members=拾取所有板元/Add/Apply
定义钢的材料特性。采用多项式状态方程(EOSPOL)作为本构 模型来定义钢的材料特性: Materials/Create/Isotropic/Manual Input/Material Name=Steel/Input Properties/Constitutive Model=ElasPlas (DMAT)/Element Type=Lagrangian Solid/Yield Model=Johnson-Cook/Strain Rate=N/A / Failure Model=None/Spallation Model = Spallation Pressure/Input properties….etc./Apply/Apply
输出管内空气的有关物理参数,然后生成数据文件: Output Requests/Result Name=Tube/File Type=Archive/Result Type=Element Output/Steps for Output= 0 thru end by 5/Add/Select Groups for Output=Tube/Entity Type=Eulerian Elements/Result Types=x-vel,y-vel,z-vel,density of material,specific internal energy,pressure/Apply/OK/Apply
密度 = 7890 系数 A1 = 1.642E11 系数 A2 = 2.307E11 系数 A3 = 2.23E11 系数 B0 = 1.67 (下页续)
patran实例教程6.doc
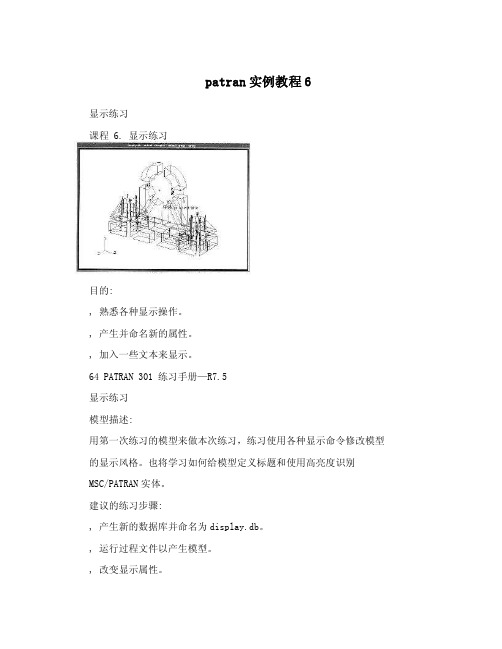
patran实例教程6显示练习课程 6. 显示练习目的:, 熟悉各种显示操作。
, 产生并命名新的属性。
, 加入一些文本来显示。
64 PATRAN 301 练习手册—R7.5显示练习模型描述:用第一次练习的模型来做本次练习,练习使用各种显示命令修改模型的显示风格。
也将学习如何给模型定义标题和使用高亮度识别MSC/PATRAN实体。
建议的练习步骤:, 产生新的数据库并命名为display.db。
, 运行过程文件以产生模型。
, 改变显示属性。
—关闭所有实体标号,打开表面标号,把显示风格改变成Shaded/Flat, 然后返回到Wireframe模式。
—按如下调整几何显示属性。
显示线=0 ,, 参数方向=ON, 弦的容差=1.0检查模型的显示,然后设置—, 弦的容差=0.005, 几何收缩=0.30—加入文本并显示。
产生标题:This is attest title 。
设置字符大小为18, 颜色为红色。
, 用高亮度来识别所显示的不同实体,如识别体19和体23的位置。
练习过程:1 产生新数据库并命名display.dbFile/New DatabaseNew Database Name display.dbOKNew Model PreferenceTolerance DefaultOK65 PATRAN 301 练习手册—R7.5显示练习2. 运行过程文件exercise_1.ses 来建立模型。
File/Session/Play…Play From File exercise_1.sesApply模型产生后,如下图。
3. 关掉表面标号。
Dis play/Entity Color/Label/Render…Entity Types Colors and Labels Surface: Label Apply4. 显示风格变为Shaded/flat, 并改变阴影颜色。
在Entity Color/Label/Render框上。
Patran PPT教程_第5章 场(Field)
Non-Spatial Field 用于定义随时间或频率的变化,自变量为时间('t)或频率('f )
Material Property Fields
用于定义材料特性随应变,应变率,温度等变化 自变量为应变('e),应变率('r),温度('T) 等
4. Field 界面
4. Field 输入方法
产生FEM Field 产生
(1)将相应标量或矢量信息显示到视窗(viewport) (2)用Create / Spatial / FEM来创建该field
FEM Field是从一分析程序向另一分析程序(如从热分析向结构分析,从 是从一分析程序向另一分析程序 ABAQUS向NASTRAN),从一种网格向另一种网格(如网格重分,局部和全局分析) 映射数据方法 FEM Field可分为连续(continuous)和离散(discrete) 可分为连续( 和离散( 可分为连续 和离散 )
四种Field输入方法 输入方法 四种
PCL Function Spatial Field Material Field Non-spatial Field
√ x x
Tabular Input
√ √ √
General
√ √ √
FEM
√ x x
通过表格输入 通过表格输入(Tabular Input) 表格输入 通过PCL函数输入 函数输入(PCL Function) 通过 函数输入 屏幕显示输入( 根据屏幕显示输入 ) 根据屏幕显示输入(FEM Field)
Spatial Field
用于定义随空间位置变化 自变量为坐标' );' 自变量为坐标'X,'Y,'Z(直角坐标 x,y,z);'R,'T,'Z(柱 ( ); ( 坐标r,theta,z); 'R,'T,'P(即球坐标 坐标 ; (即球坐标r,theta,phi) ) 或'C1,'C2,'C3(即参数坐标 ,2,3) (即参数坐标1, , )
patran实例教程10
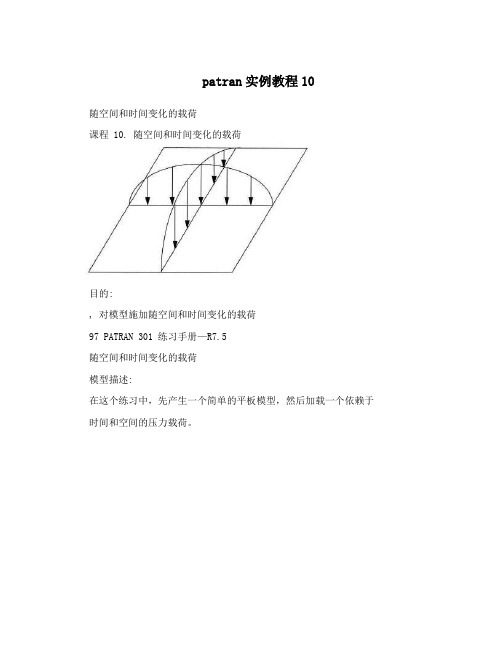
patran实例教程10随空间和时间变化的载荷课程 10. 随空间和时间变化的载荷目的:, 对模型施加随空间和时间变化的载荷97 PATRAN 301 练习手册—R7.5随空间和时间变化的载荷模型描述:在这个练习中,先产生一个简单的平板模型,然后加载一个依赖于时间和空间的压力载荷。
分析代码: MSC/NASTRAN单元类型: Quad4单元总体边长: 1.0压力载荷:P(x,y,z,t)=100sinr(πX/10)sinr(πy/10)cosr(10t)且 0? X ?10; 0? y ?10 ; 0? t ?230次增量;π=3.14159图 10-1建议的练习步骤:, 产生新数据库并命名为Variable_Loads.db。
, 把容差设置为缺省,分析代码设置为MSC/NASTRAN。
, 按图10-1,产生几何模型和有限元网格。
, 产生与时间相关的载荷工况,并命名my_load_case_1。
98 PATRAN 301 练习手册—R7.5随空间和时间变化的载荷 , 定义一个空间表达式并命名为:Pressure_Spatial: 100*sinr(3.14159*’X/10)*sinr(3.14159*’Y/10)。
, 定义一个时间相关表达式,并命名为Pressure_temporal:cosr(10*’t)。
, 通过XY—Plot功能来校验两个表达式。
, 生成压力载荷并命名为Pressure_1,把它包含在时间相关载荷工况my_load_case_1内。
用时间表达式和空间表达式来定义压力变量,并在全部单元的上表面施加这个压力。
, 关闭压力标号,只显示压力矢量。
, 关闭压力矢量,通过绘制压力载荷等高线来校验指定的压力。
练习过程:1(产生新数据库并命名为Variable_Loads.db。
File/New DatabaseNew Database Name Variable_Loads.dbOK2(把容差设置为缺省,分析代码设置为MSC/NASTRAN。
[整理版]patran三维无限元网格划分实例
![[整理版]patran三维无限元网格划分实例](https://img.taocdn.com/s3/m/3f5f78bcf18583d048645910.png)
[整理版]patran三维无限元网格划分实例课程 8. 另一种U形夹的三维有限元网格目的:, 用链接生成一条曲线。
, 生成一个修剪表面。
, 用表面网格延伸成体单元。
, 使用有限元转化操作。
模型描述:在本练习中,将生成如下图所示的U形夹几何模型。
它由一个简单表面和一个平面修剪面构成。
首先,在表面上生产四边形网格,然后由这些网格经延伸生成体单元。
最后转化这些单元,完成模型。
建议的练习步骤:, 生成新数据库并命名deja_vu.db。
设置近似最大模型尺寸为8单位,用MSC/NASTRAN作为分析代码。
, 生成一个表面来定义U形夹的主体,用线来定义孔的内、外表面边界。
, 链接外部曲线产生一个连续的环,用曲线定义孔并产生第二条环。
, 用外环产生一个修剪面并产生“孔洞”。
, 用相同网格来划分简单表面的网格,用平铺网格来划分修剪面的网格。
然后按U形夹各部分的厚度来拉伸网格。
, 转换孔区域的网格,最后完成U形夹有限元模型。
练习过程:1.生成新数据库并命名deja_vu.db。
设置近似最大模型尺寸为8单位,用MSC/NASTRAN作为分析代码。
File/New DatabaseNew Database Name deja_vu.dbOKNew Model PreferenceTolerance Based on Model Approximate Maximum 8 Model Dimension:Analysis Code: MSC/NASTRANOK2.生成一个表面来定义U形夹的主体,用线来定义孔的内、外表面边界。
生成第一个表面,将用来构成U形夹的主体。
GeometryAction: Create Object: Surface Method: XYZ Vector Coordinate List: < 4, 4, 0 >Apply将在总体坐标系下产生一个4×4的正方形平面。
接着,定义U形夹的其余界,首先是孔。
patran,初学,入门,自学,实例1

课程 1. 入门目的:本次练习中,学习内容如下:⏹进入MSC/PATRAN并运行一个过程文件⏹对窗口和框架进行移动、调整尺寸及图标化操作⏹熟悉屏幕拾取⏹熟悉在线帮助的使用模型描述:本练习中,将学习如何进入MSC/PATRAN、生成一个MSC/PATRAN数据库及运行一个已存在的过程文件以生成一个用于这次练习的MSC/PATRAN模型。
还将练习对图形窗口和主框架进行移动、调整尺寸及图标化操作。
此外,还要学习如何使用在线帮助。
由于本次练习的重点是学习MSC/PATRAN的基本知识,因此,在练习的过程中穿插讨论了一些MSC/PATRAN的通用命令格式及操作。
练习过程:1.在X—窗口中键入patran。
此窗口中将会显示有关状态信息。
之后MSC/PATRAN主框架将出现。
Main Form如下图:最初,除File菜单外,主框架中的其它菜单都是灰色的。
通常,为利于操作,MSC/PATRAN将把不可能执行的选项设成灰色。
例如,移动鼠标光标到Main Form的File上,单击鼠标左键。
在下拉式菜单中,只出现与数据库有关的操作。
因为运行MSC/PATRAN之后的第一件事是创建或打开一个数据库。
建立一个新的数据库并命名为exereise_1.db。
File/NewNew Database Name:片刻之后,出现绘图窗口。
当建立一个新数据库时,将出现New Model Preferences对话框。
选择框中容差区的不同选项,可使MSC/PATRAN以两种不同方式区分模型中相邻的两个点。
在Tolerance中选Based on Model时,是以模型中最大尺寸的0.05%做为容差,若选Default,则以缺省值0.005作为模型的容差。
在这个练习中,选择Default选项。
在New Model Preferences对话框中,还可以选择Analysis Code 和Analysis Type,它们将影响建模期间各种对话框的内容。
Patran操作步骤仅供参考,照搬的切小JJ
Patran操作步骤仅供参考,照搬的切小JJ3.1.1创建数据库文件1)任务栏中点【File】,选择New,文件名输入yuan,点。
2)会出现如图3-1这样的一个选择项,Analysis Code下选项选择MSC.Nastran,Analysis Type下的选项选择Structural,点。
图3-1 创建文件选择区3.1.2创建几何模型1)任务栏中点【Geometry】,Action→Create,Object→Solid,Method→Primitive,点击按钮,弹出如图3-2所示菜单:图3-2 创建平板菜单栏2)设定长宽高X Length list→60, Y Length list→40, Z Length list→1, 选择基点Base Origin Point List→[-30 -20 0],点,得到如图3-3所示平板。
图3-3 创建平板3)创建圆柱:点击按钮,出现如图3-4所示菜单:图3-4 创建圆柱菜单栏4)设定圆柱高Height List→5,半径Radius List→2,基点Base Origin Point List →[0 0 0],点。
得到如图3-5所示模型:图3-5 带圆柱板5)【Geometry】菜单栏中,Action→Edit,Object→Solid,Method→Boolean,点击按钮,弹出如图3-6所示菜单:图3-6 Boolean菜单6)选中Target Solid下的命令框,左键单击平板,选中Subtracting Solid List 下命令框,左键单击圆柱,点,得到图3-7所示带圆孔板:图3-7 带圆孔板模型3.1.3有限元网络划分1)任务栏中点【Meshing】,Action→Create,Object→Mesh,Type→Solid,弹出如图3-8所示菜单:图3-8 有限元网络划分2)这里我们选用四面体自动划分网格Elem Shape→Ted, Mesher→TetMesh, Topology→Ted4, Input List→Solid 1,取消Automatic Calculation选项前的√,在Value后的命令框中输入1.0,点,得到图3-9模型。
PATRAN参数化建模教程
18
PARAMETRIC MODELING SCENARIOS
Using variables and configurations Marco definitions and usage Output definitions
MSC.Patran 2003 Features and Capabilities
6 * cyl_radius
11
cyl_height cyl_height / 2
CASE STUDY: PARAMETRIC MODELING
Step 1: Define variables
MSC.Patran 2003 Features and Capabilities
12
CASE STUDY: PARAMETRIC MODELING
MSC.Patran 2003 Features and Capabilities
2
PARAMETRIC MODELING
A new toolbox implemented as an adaptive form accessed from the main menu bar and called “Parametric Modeling” has been developed
my_config_2.dat
cyl_height = 45 cyl_radius = 25 hole_radius = 2
my_config_3.dat
MSC.Patran 2003 Features and Capabilities
16
CASE STUDY: PARAMETRIC MODELING
Step 2: Create a cylinder using the variables
patran入门实例13
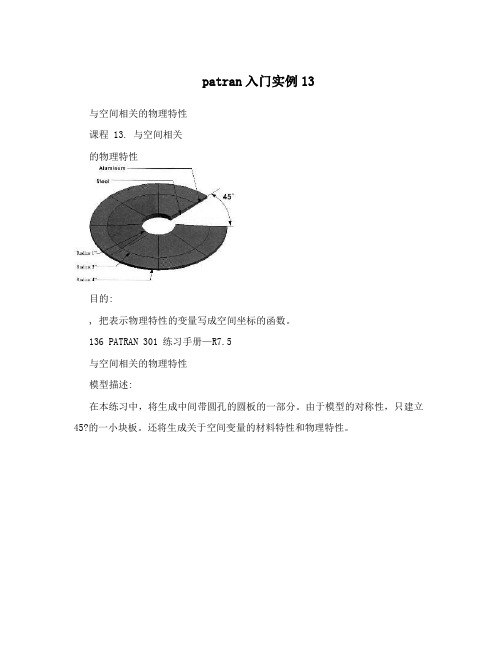
patran入门实例13与空间相关的物理特性课程 13. 与空间相关的物理特性目的:, 把表示物理特性的变量写成空间坐标的函数。
136 PATRAN 301 练习手册—R7.5与空间相关的物理特性模型描述:在本练习中,将生成中间带圆孔的圆板的一部分。
由于模型的对称性,只建立45?的一小块板。
还将生成关于空间变量的材料特性和物理特性。
表13-1分析代码: MSC/NASTRAN有限元网格单元类型: 四边形单元Quad4总体边长: 0.5英寸材料常数描述: 钢(Steel) 铝(Aluminum) 弹性模量,E(psi): 30E6 10E6 泊松比,ν: 0.30 0.20 24密度,ρ(lb-sec/in): 0.0007324 0.0002588 137 PATRAN 301 练习手册—R7.5与空间相关的物理特性建议的练习步骤:, 产生新的数据库,并命名为Circular_Plate.db。
, 把Tolerance设为Default, Analysis Code设为MSC/NASTRAN。
, 按图13-1, 生成一块圆板的45?几何体。
, 参照表13-1,生成有限元网格。
, 生成一个圆柱坐标系,原点位于,0,0,0,。
R轴、T轴、Z轴分别与总体坐标系的X轴、Y轴、Z轴一致。
, 在圆柱坐标系下,定义一个空间变量表达式,并命名为Thickness_spatial。
它表达模型的厚度变化,通过绘制XY图来校验。
, 用表13-1的数据,生成各向同性的钢和铝的材料特性。
, 检查每种材料类型的刚度矩阵C。
ijkl, 用材料类型与单元厚度生成模型的单元特性。
并把单元特性定义分别命名为Prop_1和Prop_2。
, 通过显示厚度比例图,来校验单元厚度的空间变量是否与模型相一致。
练习过程:1. 产生新的数据库,并命名为Circular_Plate.db。
File/New DatabaseNew Database Name Circular_Plate.dbOK2. 在New Model Preferences 框中,把Tolerance设为Default, 设为MSC/NASTRAN, Analysis Type分析类型设为Analysis Code Structural。
patran定义复合材料实例
patran定义复合材料实例复合材料是由两种或两种以上的材料组合而成的材料,具有优异的力学性能和轻质化特点,广泛应用于航空、航天、汽车和建筑等领域。
在有限元分析中,合理的定义复合材料实例对于准确模拟和预测复合材料结构的行为至关重要。
本文将介绍如何使用Patran软件定义复合材料实例,并结合实例进行详细说明。
一、Patran概述Patran是一款强大的有限元前后处理软件,被广泛应用于航空航天、汽车和机械等领域,用于模型建立、网格划分、边界条件设置和结果后处理。
其用户友好的界面和丰富的功能使得用户可以轻松进行有限元分析。
二、定义复合材料材料属性要定义复合材料实例,首先需要定义复合材料的材料属性。
在Patran中,可以通过以下步骤进行设置:1. 打开Patran软件,新建一个工作空间。
2. 在"Materials"中选择"Engineering Data",进入材料属性编辑界面。
3. 在材料属性编辑界面,选择"Composite"选项,并填写相应的参数,包括复合材料的弹性模量、剪切模量和泊松比等。
4. 点击"OK"保存设置。
三、定义复合材料层次在Patran中,复合材料通常由多个层次构成,每个层次具有不同的材料属性和厚度。
以下是如何定义复合材料层次的步骤:1. 在"Materials"中选择"Engineering Data",进入材料属性编辑界面。
2. 在材料属性编辑界面,选择"Composite"选项,并点击"Add"按钮添加新的层次。
3. 填写层次的材料属性,包括层次的名称、材料类型、厚度和定向角等。
4. 点击"OK"保存设置。
四、定义复合材料实例在完成复合材料层次的定义后,可以通过以下步骤来定义复合材料实例:1. 在"Materials"中选择"Composite Materials",进入复合材料实例编辑界面。
patran实例教程12
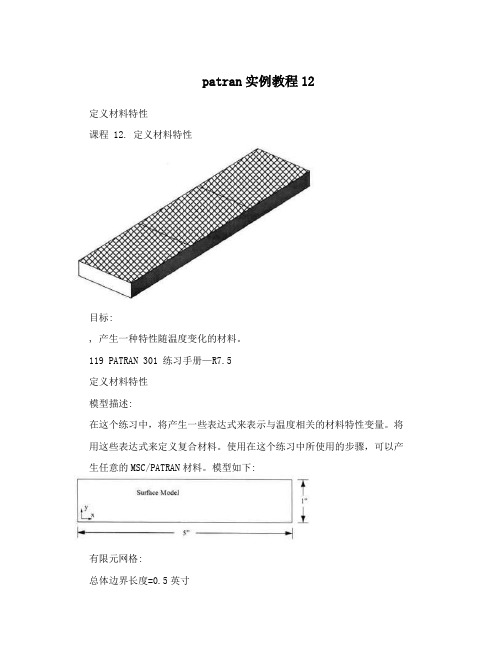
patran实例教程12定义材料特性课程 12. 定义材料特性目标:, 产生一种特性随温度变化的材料。
119 PATRAN 301 练习手册—R7.5定义材料特性模型描述:在这个练习中,将产生一些表达式来表示与温度相关的材料特性变量。
将用这些表达式来定义复合材料。
使用在这个练习中所使用的步骤,可以产生任意的MSC/PATRAN材料。
模型如下:有限元网格:总体边界长度=0.5英寸四边形单元QUAD4分析代码: MSC/NASTRAN特性:厚度=0.020英寸二维正交各向异性材料名: mat_orth2d图 12-1表1: 与时间相关的材料特性表。
T E G G α α EG11 221223131122(?) (Msi) (Msi) ν (Msi) (Msi) (Msi) (Mils/(Mils/12in/?) in/?) 800 1.47 0.364 0.320 0.119 0.227 0.335 0.50 58.90 1200 1.33 0.183 0.320 0.060 0.196 0.303 0.00 71.10 1500 1.25 0.161 0.320 0.053 0.199 0.300 -0.25 15.60建议的练习步骤:, 生成新的数据库,并命名为material.db。
120 PATRAN 301 练习手册—R7.5定义材料特性, 把Tolerance设置为default, Analysis Code设置为MSC/NASTRAN。
, 生成几何体,并用图12-1的参数划分网格。
, 对表1所列的每个与时间相关的材料特性生成单独的表达式,用E11、E22、G12、G13、G23、ALPHA11 和ALPHA22 做表达式名称。
, 生成一个二维正交各向异性材料,并命名mat_orth2d, 并把各材料特性表达式加入到该材料中。
, 定义一个壳单元的特性,并命名为Prop_1。
用mat_orth2d材料完成它的定义,并施加到模型的所有单元上。
patran操作实例文档
158
大型工程软件应用(一)指导教程
2.进行模态分析, 1)进行分析:Action→Analyze,Object→Entire Model,Type→Full Run,Job Name→plate_static,
Translation Parameters…,Data Output→ XDB and Print,OK,Solution Type…→NOMAL MODES, OK,Apply。
图 9-2-1 1)显示三阶模态(2弯):Action→Create,Object→Quick Plot,Select Result Cases→Default Mode 3:Freq.=48.895,Select Fringe Result→Eigenvectors Translational,Quantity→Magnitude,Select Deformation Result→Eigenvectors Translational,Apply。则会显示出平板结构的位移变形和变形的云 纹图,如图9-2-2所示。
划分了网格的板如图 9-1-1 所示,板边缘上的小圆是网格种子。
图 9-1-1
4.施加边界条件 1)施加固定约束:Action→Create,Object→Displacement,Type→Nodal,New Set Name→fixed,
Input Data…,Translations<T1 T2 T3>→<0 0 0 >,Rotations<R1 R2 R3>→<0 0 0>,OK,select
大型工程软件应用(一)指导教程
第九章 应用实例
patran培训教材(有限元分析)_图文
目录第一章 Patran基础知识 (2)第二章悬臂梁的有限元建模与变形分析 (12)第三章受热载荷作用的薄板的有限元建模与温度场求解 (20)第四章带孔平板的受力分析(平面) (23)第五章厚壁圆筒的受内压作用时的应力分析 (27)第六章受压力载荷作用时板的受力分析 (31)第七章板的模态分析 (34)第八章板的瞬态响应分析 (37)第九章板的频率响应分析 (40)第十章提取车架中性面的模态分析 (43)第一章 Patran 基础知识一.Patran 的用户界面介绍Patran 具有良好的用户界面,清晰、简单、易于使用且方便记忆,其用户界面如图1-1所示。
图1-1 patran 界面按照各部分的功能,可将Patran 界面划分为四个区域:菜单和工具栏区、操作面板区、图形编辑区、信息显示和命令行输入区。
下面,就分别对这几个区域进行介绍。
1.菜单和工具栏区如图1-2所示,patran 的界面上有一行菜单,两行工具栏。
图1-2 菜单工具栏Patran 的菜单是该软件的重要组成部分,使用菜单项,可以完成多设置和操作。
本来,菜单与各种工具是配合使用的,两者是不能独立区分的。
这里对菜单栏进行简单的介绍,一般情况下,Patran 有九个主菜单项,如图1-2所示,文件菜单栏应用菜单按钮工具栏管理(File)菜单主要用于Patran数据库文件的打开/关闭,同时也用来从其他CAD系统输入模型;组(Group)菜单主要用于组的操作,作用类似CAD系统中的“层”;视窗管理(Viewport)菜单用于视窗设置;视图操作(Viewing)菜单用于图形显示设置,包括了工具栏中一些工具的功能;元素显示管理(Display)菜单用于设置各种元素的显示方式;参数设置(Preferences)菜单用于选择求解器,定制用户自己的环境等操作;工具选项(Tools)菜单中提供了许多非常有用的工具;在线帮助(Help)菜单为使用者提供在线帮助。
(完整版)patran静力学分析操作
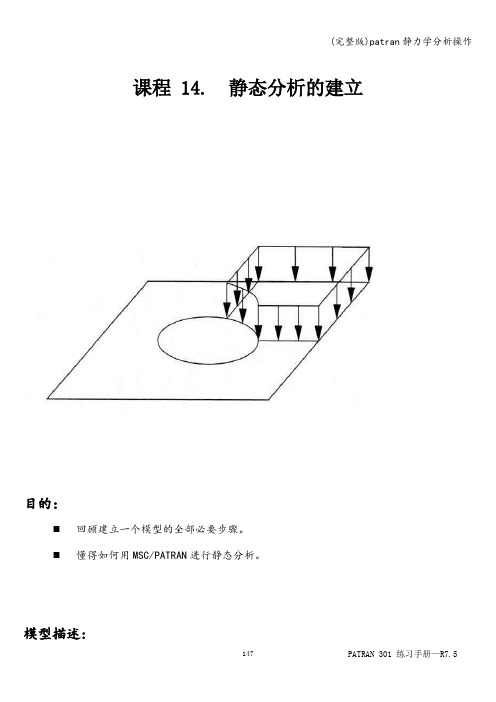
课程 14. 静态分析的建立目的:⏹回顾建立一个模型的全部必要步骤。
⏹懂得如何用MSC/PATRAN进行静态分析。
模型描述:在本练习中,将建立完整的MSC/PATRAN主框架模型,并用MSC/NASTRAN进行相应静态分析。
图14—1具有网格控制点的四分之一对称模型。
图14-2表14-1单元类型:四边形单元Quad8单元总体边界长度: 1.0”材料常数描述:名称: Steel弹性模量,E(psi): 29E6泊松比,ν: 0。
30线弹性各向同性材料单元特性:名称: Prop1材料: Stee1厚度: 0。
2”分析代码: MSC/NASTRAN分析类型:完全线性静态分析分析求解参数: 线性静态。
分析翻译器:文本输出 2(Text Output 2)格式.分析输出项:位移、单元应力、单元应变能建议的练习步骤:⏹生成新的数据库并命名为Plate_hole.db。
⏹把Tolerance设为Default,Analysis Code设为MSC/NASTRAN。
⏹产生四分之一对称模型,用图14-2和表14—1的数据来划分有限元网格。
⏹等效并优化整个模型,校验是否所有单元的法向方向相同。
⏹根据表14-1定义材料特性和单元特性。
⏹对全部单元的上表面施加不均匀压力Pressure1。
⏹在模型适当位置载加位移边界条件。
把模型上下左右边界的位移约束分别命名为disp_lf, disp_rt, disp_tp和disp_bt。
⏹根据表14—1,为把模型用于分析运行做准备。
练习过程:1.生成新的数据库并命名为Plate_hole。
db。
File/New Database。
.。
New Database Name Plate_hole。
dbOK2.把Tolerance设为Default,Analysis Code设为MSC/NASTRAN. New Model PreferenceTolerance DefaultAnalysis Code: MSC/NASTRANOK3。
PATRAN参数化建模教程

z Define a variable name and its default value to be used during the modeling process
Response variables creation mode
z Search through and manipulate the results of analysis to define meaningful metrics for export to an external file
Step 4: Run the session file created earlier
Assign the configuration file using an environment variable: parametric_modeling_config_file
Or assign the configuration file using the following command: In the command line In the session file
my_config_2.dat
cyl_height = 45 cyl_radius = 25 hole_radius = 2
my_config_3.dat
MSC.Patran 2003 Features and Capabilities
16
CASE STUDY: PARAMETRIC MODELING
Step 2: Create a cylinder using the variables
MSC.Patran 2003 Features and Capabilities
patran操作实例文档

159
大型工程软件应用(一)指导教程
§9-3 预应力模态分析
问题描述:
用 MSC.Patran 进行预应力模态分析,分析模型在拉力作用下的 1× 1 正方形铝板(如图 1),目
标是:
• 用 SOL103 进行模态分析; • 用 SOL106 进行预应力模态分析; • 比较这两个分析的固有频率与振型。
8.后处理, 1)显示位移云纹图:Action→Create,Object→Quick Plot,Select Result Cases→Default Static
Subcase,Select Fringe Result→Displacements Translational,Quantity→Magnitude,Apply。此时,平 板模型的位移云纹图就显示出来,如图 9-1-3 所示。
2. 创建几何模型 1)创建几何点:Action→Create,Object →Point,Method →XYZ,Point 1→[0 0 0],Apply,Point
2→[100 0 0] ,Apply,Point 3→[100 50 0] ,Apply,Point 4→[0 50 0] ,Apply。 2)创建曲线:Action→Create,Object→Curve,Method→Point,Option→2 Point,Curve 1,Starting
§9-2 模态分析
结构的模态分析也是工程中经常遇到的问题,本节就以 9-1 节中的平板结构为例,说明模态分 析的过程。 1.删除 9-1 节结构中的载荷,
1)删除载荷:Action→Delete,Object→Force,Existing Sets→force1,Apply。模态是结构本身 的特性,当结构确定、约束条件确定之后,结构的模态也就相应的确定下来,所以,这里将施加的 载荷去掉。
- 1、下载文档前请自行甄别文档内容的完整性,平台不提供额外的编辑、内容补充、找答案等附加服务。
- 2、"仅部分预览"的文档,不可在线预览部分如存在完整性等问题,可反馈申请退款(可完整预览的文档不适用该条件!)。
- 3、如文档侵犯您的权益,请联系客服反馈,我们会尽快为您处理(人工客服工作时间:9:00-18:30)。
● Results: plot Max principal of stress and displacement results
PAT301, Workshop 2, September 2007 Copyright 2007 MSC.Software Corporation
WS2-3
Step 1. Create a Database
a d
g
b
c f
PAT301, Workshop 2, September 2007 Copyright 2007 MSC.Software Corporation WS2-10
e
Step 4. Create a Displacement at right End(Cont.)
a. Click under Select Nodes and select the right node as shown in the figure. b. Click Add. c. Click OK. d. Click Apply.
b
c
c
d
PAT301, Workshop 2, September 2007 Copyright 2007 MSC.Software Corporation
WS2-9
e
Step 4. Create a Displacement at right End
A displacement will be applied to a group of nodes at the end of the hole plate: a. Loads / BCs: Create / Displacement / Nodal b. Click under New Set Name and enter displacemen. c. Select Input Data. d. Enter < 0.2 , , >on Translations <T1 T2 T3>. e. Click OK. f. Click Select Application Region. g. Select FEM on Geometry Filter.
HOLE PLATE
PAT301, Workshop 2, September 2007 Copyright 2007 MSC.Software Corporation
WS2-1
l
Workshop Objectives
l
Model a hole plate, using shell elements, subjected to a displacement loading. The shell elements will undergo plane strain. MD Patran and MD Nastran will be used to create or analyze the linear static model.
a
d
Create a database named cantilevered_plate.db and specify the model preferences: a. File / New b. Enter Hole_plate as the file name. c. Click OK. d. Choose Default Tolerance. e. Select MD Nastran as the Analysis Code. f. Select Structural as the Analysis Type. g. Click OK.
● Database: create a new database with Analysis Code = MD Nastran and ● ● ● ●
●
● ●
Analysis Type = Structural Geometry: create a geometric surface to represent the hole plate Elements: mesh the surface with plate elements Loads/BCs: constrain one end of the plate model, and apply the displacement load to the other end of the plate model. Materials: specify an isotropic material for Aluminum Properties: create a 2D shell/plate property Analysis: Solution Type = Nastran Linear Static, Solution Sequence = 101, Method = Full Run Analysis: access analysis results by attaching the XDB file to database
a
b
c
PAT301, Workshop 2, September 2007 Copyright 2007 MSC.Software Corporation
WS2-5
Step 2. Create Geometry of the Plate(Cont.)
a. b. c. d.
Geometry: Create / Curve / 2D Circle Input the radius 0.3 Input Center point [1 0.8 0] Click Apply
a
b
c d
PAT301, Workshop 2, September 2007 Copyright 2007 MSC.Software Corporation WS2-6
Step 2. Create Geometry of the Plate(Cont.)
a. b. c. d. e.
Geometry: Edit / Surface / Break Select ‘Delete Original Surfaces’ Input Surface 1 Input Curve 1 Click Apply
a
b c b
PAT301, Workshop 2, September 2007 Copyright 2007 MSC.Software Corporation
WS2-8
Step 3. Meshing with Quad4 Elements
a
a. Elements: Create / Mesh / Surface b. Select Elem Shape: Quad Mesher: Paver Topology: Quad4 c. Click on Surface List and select Surface 2. d. Input global Length : 0.1 e. Click Apply.
l l
பைடு நூலகம்
l
Software Version
l l
MD Patran R2 MD Nastran R2
PAT301, Workshop 2, September 2007 Copyright 2007 MSC.Software Corporation
WS2-2
Key Concepts and Steps:
e f b
c
g
PAT301, Workshop 2, September 2007 Copyright 2007 MSC.Software Corporation
WS2-4
Step 2. Create Geometry of the Plate
a. Geometry: Create / Surface / XYZ b. Click under Vector Coordinates List and enter <2 1.6 0>. c. Click Apply.
a
c
d
b
PAT301, Workshop 2, September 2007 Copyright 2007 MSC.Software Corporation WS2-13
e
Step 5. Create Constraints on the Plate(Fixed_2)
g a
Constrain the hole plate, fixing five degrees of freedom at other left nodes: a. Loads / BCs: Create / Displacements / Nodal b. Click under New Set Name, and enter fix_2. c. Select Input Data. d. Enter <0 , , 0> for Translations <T1 T2 T3 > and <0 0 0> for Rotations <R1 R2 R3>. e. Click OK. f. Click on Select Application Region. g. Select FEM on Geometry Filter.
d
b
c
f
PAT301, Workshop 2, September 2007 Copyright 2007 MSC.Software Corporation WS2-14
d
b
c
f
PAT301, Workshop 2, September 2007 Copyright 2007 MSC.Software Corporation WS2-12
e
Step 5. Create Constraints on the Plate (Fixed_1 Cont.)
