TUXEDO中间件安装手册
tuxedo2010在window下安装步骤
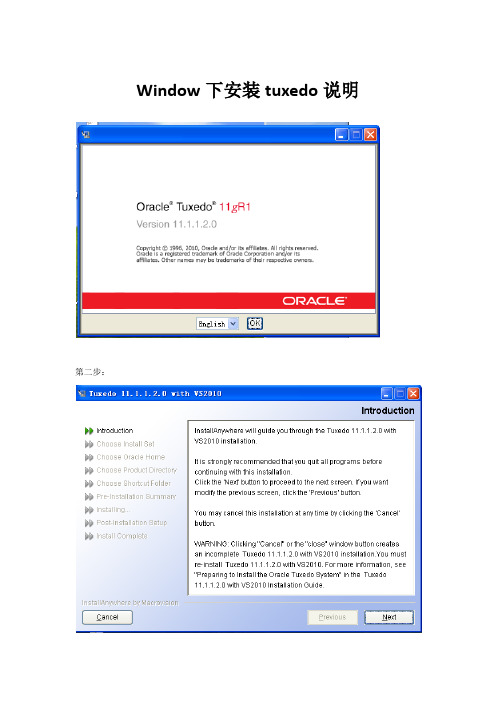
Window下安装tuxedo说明
第二步:
第三步:选择第一个Full install 将客户端和服务端都安装
第四步:选择tuxedo安装路径
第五步:将Install Samples选中安装示例程序
第六步:这一步是关键一步应该选中don’t create icons选项,不然会导致在windows下tuxedo 的客户端无法连接到外部服务端。
第七步:按install安装
第七步
第八步:
第九步:
到这里tuxedo已经安装完毕,如果想知道如何修改配置文件请参照
/wxb_nudt/article/details/3991060这篇文章进行修改。
如果安装之后需要用公司tuxedoclient对服务进行测试还需要配置两个环境变量。
右键点击“我的电脑”选择“属性”,在选择“高级”
在点击“环境变量”点击系统变量下的“新建”来新建系统变量
第一个变量名字为:TUXEDO_INCLUDE_PATH 变量值为:tuxedo安装路径下的include文件夹路径点击确定
然后在新建
创建一个变量名为:TUXEDO_LIB_PATH的环境变量变量值为tuxedo安装目录下的lib文件夹全目录,点击“确定”,“应用”即可。
Tuxedo安装及试用
Tuxedo软件安装及使用1前言Tuxedo是ORACLE公司的分布式运算环境下开发和管理三层客户/服务器结构应用系统的中间件产品,具备分布式事务处理和应用通信功能,并提供完善的各种服务来建立、运行和管理关键任务应用系统。
Tuxedo屏蔽分布式环境中各种通信协议、硬件体系结构、操作系统、数据库和其它应用服务等方面的差异,使得分布于网络节点上的应用程序的各个单元部件之间能够进行互操作,并协调操作的一致性和完整性,最大限度地节省系统资源,提高系统性能。
开发人员能够用它建立跨多个硬件平台、数据库和操作系统的可互操作的分布式应用系统,因而广泛地应用于金融、电信、制造业等各行各业的核心业务系统。
本文简要介绍Tuxedo的安装和使用,使得读者可以快速入门。
2软件安装为避免多机部署时可能出现的用户组、用户、目录位置问题,建议各机器的安装tuxedo 的用户组、用户名、目录位置均相同。
各资源规划如下表:2.1创建组及用户为避免安全性问题,应创建专属的用户和用户组运行tuxedo,并不得使用root。
本文档假定用户名是tuxedo,用户组也是tuxedo。
(1)创建tuxedo组;(2)创建tuxedo用户;(3)设置tuxedo用户登录密码;(4)创建安装目标目录并授权。
2.2安装GCCTuxedo示例程序使用C语言编写,为编译示例程序,需安装C语言开发环境。
将安装光盘介质mount到操作系统相应目录(如/media)后,参考下列命令安装开发环境。
安装开发环境的详细命令,可以参考操作系统相关手册。
2.3安装JRETuxedo的安装包需要JRE才能运行,因此需要先安装JRE,并设置JA V A_HOME环境变量指向新安装的JRE,设置PA TH添加java所在的目录。
本文档选择JDK的server-rumtime 版本作为JA V A运行环境。
(1)上传安装包server-jre-8u162-linux-x64.tar.gz到/tmp。
第一次安装tuxedo for linux 全过程

/tmp/install.dir.22860/Linux/resource/jre/bin/i386/native_threads/java: error while loading shared libraries: libstdc++-libc6.1-1.so.2: cannot open shared object file: No such file or directory
The included VM could not be uncompressed. Please try to download
the installer agng 'binary'
mode. Please do not attempt to install this currently downloaded copy.
解决办法:
ubb文件中主机名大小写弄错,即ubb文件中主机名要与实际相一致,包括大小写,改正即可
出错9------------------------------------------------------------------
[tuxedo@TUXSVR4 tuxedo]$ tmboot -y
参考:
https:///archives/fedora-list/2004-July/msg00315.html
出错4-----------------------------------------------------------------
Xlib: connection to ":0.0" refused by server
TUXEDO教程

2003.8
1.中间件 1.中间件
定义:中间件是一种独立的系统软件或服务程序,分布式应用软件借助这种软件在不 同的技术之间共享资源,中间件位于客户机服务器的操作系统之上,管理计算资源和 网络通讯 。 工作机制:客户端上的应用程序需要从网络中的某个地方获取一定的数据或服务,这 些数据或服务可能处于一个运行着不同操作系统和特定查询语言数据库的服务器中。 而C/S应用程序中负责寻找数据的部分只需访问一个中间件系统,由中间件完成到网络 C/S应用程序中负责寻找数据的部分只需访问一个中间件系统,由中间件完成到网络 中找到数据源或服务,进而传输客户请求、重组答复信息,最后将结果送回应用程序对象请求代理的标准,分别是CORBA和DCOM
事务处理中间件(TPM, Monitor) 事务处理中间件(TPM,Transaction Processing Monitor) IBM cics Bea Tuxedo
2.Tuxedo简介 2.Tuxedo简介
1.中间件(续) 1.中间件( 中间件
中间件的分类 :
数据库中间件(DM,Database Middleware) Middleware) 数据库中间件(DM,
ODBC是一种基于数据库的中间件标准 ODBC是一种基于数据库的中间件标准
远程过程调用中间件( Call) 远程过程调用中间件(RPC, Remote Procedure Call) 面向消息中间件(MOM, Middleware) 面向消息中间件(MOM,Message Oriented Middleware) IBM MQ 基于对象请求代理(ORB, Broker) 基于对象请求代理(ORB,Object Request Broker)的中间件
linux系统tuxedo安装指导
linux系统tuxedo安装指导[置顶]Linux系统下Tuxedo安装Linux系统下Tuxedo安装1. 在Linux 环境中新建⼀个⽤户tuxdeo/tuxdeo,从⽹上下载⽀持该Linux系统的tuxedo软件包。
2. 将⽂件通过ftp ,U盘或其他⽅式将软件包传到该⽤户的⽬录下/home/tuxedo/tuxedo111120_32_Linux_01_x86.bin执⾏sh tuxedo111120_32_Linux_01_x86.bin –i console命令开始安装tuxedo3. 安装开始进⼊如下界⾯,按Enter键继续:4. 选择安装设置,选择1- Full Instll,完全安装模式,按Enter键继续。
5. 选择tuxedo安装所放的路径/home/tuxedo/oracle6. 确定安装⽬录,还是要修改安装⽬录,选择2 ,选择现在的⽬录。
7. 显⽰之前选择的安装信息,按Enter键继续。
8. 准备安装,按Enter键继续。
9. 安装中出现,Configure tlisten Service,输⼊密码tuxedo10. 选择安装SSL,选择1,按Enter键继续11. 设置LDAPLDAP Service Name:LdapserLDAP PortID: 123456LDAP BaseObject: LdapbsojLDAP Filter File Location:按Enter 键继续12. 安装成功,按Enter键继续13. 接下来要⽤例⼦检查服务的联通性,在装完tuxedo的⽬录下有个⽂档⾥有tuxedo例⼦/home/tuxedo/oracle/tuxedo11gR1/samples1). 在⽬录/home/tuxedo/oracle/tuxedo11gR1/下有个tux.env⽂件,将该⽂件拷贝到该⽤户根⽬录下的 .bash_profile⽂件中,⽤命令source .bash_profile使环境变量⽣效,再注销系统,重新登陆。
中间件操作指引-Tuxedo

中间件操作指引Bea Tuxedo广东亿迅科技有限公司2008年7月项目名称/代码:集成部版本: 1.0状态:所有人:系统组作者/创建时间:唐彪批准人/批准时间:文档更改历史记录目录第1章BEA TUXEDO产品 (5)1.1T UXEDO是什么 (5)1.2T UXEDO系统特点 (5)第2章TUXEDO安装 (6)2.1在UNIX系统安装 (6)2.2在WINDOWS系统安装 (7)2.3安装LICENSE (7)2.4T UXEDO环境变量 (7)2.5T UXEDO目录结构 (8)2.6T UXEDO应用步署过程 (8)第3章配臵管理 (8)3.1配臵文件 (8)3.2资源定义 (9)3.3机器的信息 (10)3.4组定义 (11)3.5服务定义 (11)3.6交易定义 (12)3.7生成TUXCONFIG文件 (13)第4章管理命令 (13)4.1TMBOOT命令 (13)4.2TMSHUTDOWN命令 (14)4.3TMADMIN命令 (14)4.3.1查看services状态 (15)4.3.2查看server状态 (16)4.3.3查看队列状态 (16)4.3.4查看客户端状态 (17)4.4查看日志 (18)第5章常见故障 (18)5.1UBB编译类 (18)5.2服务启动类 (19)5.3服务关闭类 (20)5.4域间通信类 (20)第1章Bea Tuxedo产品1.1 Tuxedo是什么BEA TUXEDO是在企业、Internet 这样的分布式运算环境中开发和管理三层结构的客户/服务器型关键任务应用系统的强有力工具。
它具备分布式事务处理和应用通信功能,并提供完善的各种服务来建立、运行和管理关键任务应用系统。
开发人员能够用它建立跨多个硬件平台、数据库和操作系统的可互操作的应用系统。
BEA TUXEDO是企业、Internet 分布式应用中的基础主干平台。
它提供了一个开放的环境,支持各种各样的客户、数据库、网络、遗留系统和通讯方式。
tuxedo安装手册
Tuxedo安装我用的是radhat5.0配置环境:1,首先要创建一个用户(我这里是tuxedo,密码123)2,防火墙什么的必须要关配置:在根目录里面打setup3,要改一个主机名主机名改动配置文件:/etc/hosts 直接添加一个主机名(我这里是info)命令:vim /etc/hosts/etc/sysconfig/network 把文件直接修改成info命令:vim /etc/sysconfig/network4,需要安装gcc环境这个可能有依赖包,但是耐心点一定能装完,知道打rpm –ivh gcc*出现下面的界面就说明安装好了5;把tuxedo111120_32_Linux_01_x86.bin 文件传到/home/tuxedo文件下记得改一下权限chmod 777 tuxedo111120_32_Linux_01_x86.bin传完之后reboot启动一下系统Tuxedo安装然后用tuxedo用户登录(这里必须用tuxedo用户安装这个文件)执行:./ tuxedo111120_32_Linux_01_x86.bin –i console第一项是选择语言:1这个是按enter继续按1选择完全安装,按1选择创建一个oracle目录下面是写路径/dev/tuxedo/tux -------------tux是我创建的这个文件夹名字这个选择2,确定选择创建的文件路径下面选择y,确认然后就开始安装了这个是为tuxedo创建密码我写的是tuxedo这个地方是说你的服务器是否要安装SSL,我们就不安装了选择2(NO)就可以了,如果你需要SSL 支持你可以选择,这里我就省略了。
这样tuxedo就算安装好了环境变量配置进入配置文件cd /home/tuxedo/tux/tuxedo11gR1下面我们为tuxedo成功启动做一个服务在/home/tuxedo/tux/tuxedo11gR1 目录下创建一个目录Mkdir Myserver将/home/tuxedo/tux/tuxedo11gR1/samples/atmi/simpapp中的所有文件拷贝到Myserver目录下cp samples/atmi/simpapp/* Myservercp ./tux.env ./Myserver/进入Myserver文件夹Cd Myserver编译vim tux.env添加行:TUXCONFIG=/home/tuxedo/tux/tuxedo11gR1/Myserver/tuxconfig ; export TUXCONFIG编译vim ubbsimple第一个是Ipckey 改成123456第二个就是路径了第三个就是主机名改写第四个就是修改vim /home/tuxedo/.bash_profile 文件里面加载一下TUXCONFIG=”/home/tuxedo/tux/tuxedo11gR1/Myserver/tuxconfig”现在reboot重新启动一下还是用tuxedo进入进入目录cd /home/tuxedo/tux/tuxedo11gR1/Myserver 下面先运行一下tux.env文件. ./tux.envbuildserver -o simpserv -f simpserv.c –s TOUPPER buildclient -o simpcl -f simpcl.c如果出现下面的情况就说明好了下面启动服务试试看加载ubbsimple文件tmloadcf –y ubbsimple 启动tuxedo程序tmboot –y这样的就成功了./simpcl Jianheng这就成功了进入管理界面Tmadminpsc查看服务运行状况psr查看服务程序运行状况这就是弄成了,你可以看一下效果。
2024年度中间件技术及Tuxedo课件

2024/3/23
25
06
Tuxedo运维管理与最 佳实践
2024/3/23
26
监控和日志分析工具介绍及使用技巧
监控工具
介绍Tuxedo提供的监控工具,如tmadmin、tmloadcf等,以及如 何使用这些工具进行实时监控和性能分析。
日志分析
详细阐述Tuxedo日志文件的格式和内容,如何通过日志分析工具 进行日志的解析、筛选和统计,以便快速定位问题。
02
2024/3/23
03
调优实践
分享在实际运维过程中遇到的性能问 题及其解决方案,以及在进行性能调 优时需要注意的事项。
29
版本升级注意事项及迁移方案
版本升级流程
详细介绍Tuxedo版本升级的流程和步骤,包括前期准备、升级过程、后期验证等。
注意事项
列举在进行版本升级时需要特别注意的事项,如兼容性问题、数据迁移问题、配置变更 问题等。
01 安装过程中遇到错误提示,如何解决?
02 Tuxedo服务无法启动或异常退出,如何处 理?
03
Tuxedo交易执行失败或性能不佳,如何优 化?
04
如何备份和恢复Tuxedo配置信息及数据?
20
05
Tuxedo应用开发实践
2024/3/23
Байду номын сангаас
21
基于Tuxedo构建分布式系统架构
2024/3/23
2024/3/23
迁移方案
针对可能遇到的数据迁移问题,提供相应的解决方案和操作步骤,如数据备份、数据转 换、数据验证等。同时,分享一些成功的迁移案例和经验教训。
30
THANK YOU
2024/3/23
TopWorx D-Series 控制器安装、操作与维护指南说明书

TopWorx ™ D-Series Valve ControllersMaster Installation, Operation & Maintenance Manual35 Series GO™ Switches35-13319M Option L2/L4 - SPDT35-83358M Option Z2/Z4 - DPDT Stainless SteelSwitch / Module Replacement KitsAV-FFD2-1Foundation Fieldbus module replacement ( with piezo pilots) AV-FFD2-2Foundation Fieldbus module replacement ( without piezo pilots) AV-AS1-1AS-Interface moduleAV-DN1-1DeviceNet moduleAV-PB1-1Profibus ModuleAV-MSW1 (M) SPDT mechanical switch replacementAV-E1 (E) P+F NJ2-V3-N sensor replacementAV-TSW1 (T) DPDT mechanical switch replacementAV-420TBD4-20mA transmitter replacement assemblyAV-420HBD Hart Board ReplacementIndicator / Dome Replacement KitsAV-GB00290º, Green/Open, Red/Closed, Buna O-RingAV-YB00290º, Yellow/Open, Black/Closed, Buna O-RingAV-BB00290º, Black/Open, Yellow/Closed, Buna O-RingAV-4B00245º, Green/Open, Red/Closed, Buna O-RingShaft Replacement KitsMechanical Switches (M2 or T2)AV-SSB201 Standard shaftBuna-N O-Rings & (2) cam Assembly w/ HardwareAV-NSB201 NAMUR ShaftBuna-N O-Rings & (2) cam Assembly w/ HardwareShaft Replacement KitsGO™ Switches (L2 - Manufactured after July 1, 2007)AV-SSB205 Standard shaftBuna-N O-Rings & (2) Target Assembly w/ HardwareAV-SNB205 NAMUR shaftBuna-N O-Rings & (2) Target Assembly w/ HardwareShaft Replacement Kits SCMs with Reed Switches (R2)AV-NSB202NAMUR ShaftBuna-N O-Rings & (2) cam Assembly w/ HardwareAV-SSB202Standard ShaftBuna-N O-Rings & (2) cam Assembly w/ HardwareConsult FactoryTo order replacement parts or for information concerning parts or spool valve options not listed callTopWorx™ at 502-969-800052Pilot Replacement KitsAV -S24VPMRK 24vdc pilot/manifold replacement kitAV-S110VPMRK 110vac pilot/manifold replacement kitAV-A220PMRK220 VAC pilot/manifold replacement kitAV-SP20PMRK Piezo pilot/manifold replacement kitSpool Valve Replacement AssembliesAV-AB1A20ASCO 8551 Spool Valve, Fail Open/Closed, Aluminum AV-AB1620ASCO 8551 Spool Valve, Fail Open/Closed, SSTAV-AV2A20ASCO 8551 Spool Valve, Fail Last, AluminumAV-AB2620ASCO 8551 Spool Valve, Fail Last, SSTAV-AB1A30ASCO 8553 Spool Valve, Fail Open/Closed, Aluminum AV-AB1630ASCO 8553 Spool Valve, Fail Open/Closed, SSTAV-AB2A30ASCO 8553 Spool Valve, Fail Last, AluminumAV-AB2630ASCO 8533 Spool Valve, Fail Last, SST53。
第一次安装tuxedo for linux 全过程

n file
tmboot: internal error: CMDTUX_CAT:1360: ERROR: configuration file not found
[tuxedo@TUXSVR4 tuxedo]$ tmboot -y
Booting all admin and server processes in /home/tuxedo/appdir/tuxconfig
INFO: BEA Tuxedo, Version 8.1
INFO: Serial #: 650522264138-1743831940315, Expiration NONE, Maxusers 30
[tuxedo@TUXSVR4 tuxedo]$ sh tuxedo81_linux.bin
Preparing to install...
/tmp/install.dir.22860/Linux/resource/jre/bin/i386/native_threads/java: error while loading shared libraries: libstdc++-libc6.1-1.so.2: cannot open shared object file: No such file or directory
gcc -shared -fpic -o libcwait.so libcwait.c
chmod a+x /home/tuxedo/tuxedo81_linux.bin
LD_PRELOAD=/home/tuxedo/libcwait.so /home/tuxedo/tuxedo81_linux.bin
Tuxedo+配置维护手册
Tuxedo配置维护手册Tuxedo作为系统的中间件,其配置主要包括:资源文件的配置和应用环境的配置;其管理和维护主要包括:系统的启动和关闭、日志的跟踪查看工作。
Tuxedo应用系统的配置一、应用系统的资源配置,全都包含在两个资源配置文件中(ubbconfig和dmconfig),在这两个配置文件中包含了系统所有的应用资源(文件)。
1、对于ubbconfig文件,可以任意使用一个文件名(如:ubb.txt),使用一种文本编辑工具,将应用系统的资源分类进行配置,相关进程启动数量等等都应该配置在其中,然后设置环境变量TUXCONFIG,使用系统命令:tmloadcf来将文本文件ubb.txt,转化生成环境变量TUXCONFIG制定的二进制文件。
在该文件中主要包含了几个参数的设置:系统所使用的共享内存的键值IPCKEY,针对workstation客户端的监听进程的端口(WSL),多台机器之间互连(登记中心与各网关)的网络地址和端口(NADDR,NLSADDR),数据依赖路由的设定等等。
详细的内容参看《Ubbconfig配置.doc》参看模版来实现移植或添加应用进程等等。
2、对于dmconfig文件,可以任意使用一个文件名(如:dm.txt),使用一种文本编辑工具,将应用系统的多域互联及互相调用的关系进行配置,包括多域之间互联的地址和端口,然后使用系统命令:dmloadcf来将文本文件dm.txt,转化成环境变量BDMCONFIG所指定的二进制文件。
在该文件中主要包含了在多个域互连时用到的一些设置,主要包括:各个域的定义,各个域通讯连接的地址和端口(NWADDR),本地服务(DM_LOCAL_SERVICES)和远端服务(DM_REMOTE_SERVICES)以及数据依赖路由等等。
详细的内容参看《dmconfig配置.doc》参看模版来实现移植或添加应用远端或本地服务等等。
3、客户端代码:是指使用编译工具buildclient编译生成的执行代码。
tuxedo配置维护手册
Tuxedo 配置维护手册Tuxedo 作为系统的中间件,其配置主要包括:资源文件的配置和应用环境的配置;其管理和维护主要包括:系统的启动和关闭、日志的跟踪查看工作。
Tuxedo应用系统的配置一、应用系统的资源配置,全都包含在两个资源配置文件中(ubbconfig 和dmconfig ),在这两个配置文件中包含了系统所有的应用资源(文件)。
1、对于ubbconfig文件,可以任意使用一个文件名(如:ubb.txt),使用一种文本编辑工具,将应用系统的资源分类进行配置,相关进程启动数量等等都应该配置在其中,然后设置环境变量TUXCONFIG,使用系统命令:tmloadcf 来将文本文件ubb.txt,转化生成环境变量TUXCONFIG制定的二进制文件。
在该文件中主要包含了几个参数的设置:系统所使用的共享内存的键值IPCKEY,针对workstation客户端的监听进程的端口(WSL),多台机器之间互连(登记中心与各网关)的网络地址和端口(NADDR,NLSADDR),数据依赖路由的设定等等。
详细的内容参看《Ubbconfig配置.doc》参看模版来实现移植或添加应用进程等等。
2、对于dmconfig文件,可以任意使用一个文件名(如:dm.txt),使用一种文本编辑工具,将应用系统的多域互联及互相调用的关系进行配置,包括多域之间互联的地址和端口,然后使用系统命令:dmloadcf 来将文本文件dm.txt,转化成环境变量BDMCONFIG所指定的二进制文件。
在该文件中主要包含了在多个域互连时用到的一些设置,主要包括:各个域的定义,各个域通讯连接的地址和端口(NWADDR),本地服务(DM_LOCAL_SERVICES)和远端服务(DM_REMOTE_SERVICES)以及数据依赖路由等等。
详细的内容参看《dmconfig配置.doc》参看模版来实现移植或添加应用远端或本地服务等等。
3、客户端代码:是指使用编译工具buildclient编译生成的执行代码。
Oracle Tuxedo Mainframe Adapter for OSI TP 安装指南说明书
Oracle® Tuxedo Mainframe Adapter for OSI TP Installation GuideRelease 11g R1August 2010Tuxedo® Mainframe Adapter for OSI TP Installation Guide , Release 11g R1Copyright © 2007, 2010, Oracle and/or its affiliates. All rights reserved.This software and related documentation are provided under a license agreement containing restrictions on use and disclosure and are protected by intellectual property laws. Except as expressly permitted in your license agreement or allowed by law, you may not use, copy, reproduce, translate, broadcast, modify, license, transmit, distribute, exhibit, perform, publish, or display any part, in any form, or by any means. Reverse engineering, disassembly, or decompilation of this software, unless required by law for interoperability, is prohibited.The information contained herein is subject to change without notice and is not warranted to be error-free. If you find any errors, please report them to us in writing.If this software or related documentation is delivered to the U.S. Government or anyone licensing it on behalf of the U.S. Government, the following notice is applicable:U.S. GOVERNMENT RIGHTS Programs, software, databases, and related documentation and technical data delivered to U.S. Government customers are "commercial computer software" or "commercial technical data" pursuant to the applicable Federal Acquisition Regulation and agency-specific supplemental regulations. As such, the use, duplication, disclosure, modification, and adaptation shall be subject to the restrictions and license terms set forth in the applicable Government contract, and, to the extent applicable by the terms of the Government contract, the additional rights set forth in FAR 52.227-19, Commercial Computer Software License (December 2007). Oracle USA, Inc., 500 Oracle Parkway, Redwood City, CA 94065.This software is developed for general use in a variety of information management applications. It is not developed or intended for use in any inherently dangerous applications, including applications which may create a risk of personal injury. If you use this software in dangerous applications, then you shall be responsible to take all appropriate fail-safe, backup, redundancy, and other measures to ensure the safe use of this software. Oracle Corporation and its affiliates disclaim any liability for any damages caused by use of this software in dangerous applications.Oracle is a registered trademark of Oracle Corporation and/or its affiliates. Other names may be trademarks of their respective owners.This software and documentation may provide access to or information on content, products and services from third parties. Oracle Corporation and its affiliates are not responsible for and expressly disclaim all warranties of any kind with respect to third-party content, products, and services. Oracle Corporation and its affiliates will not be responsible for any loss, costs, or damages incurred due to your access to or use of third-party content, products, or services.ContentsInstalling the Oracle Tuxedo Mainframe Adapter for OSI TP ProductPre-Installation Considerations . . . . . . . . . . . . . . . . . . . . . . . . . . . . . . . . . . . . . . . . . . . . . .-1 Configuring the Environment to Install TMA OSI TP. . . . . . . . . . . . . . . . . . . . . . . . .-1Upgrading from eLink OSI TP 4.0. . . . . . . . . . . . . . . . . . . . . . . . . . . . . . . . . . . . . . . .-2 Installing Oracle TMA OSI TP on UNIX Platforms in Console Mode. . . . . . . . . . . . . . . .-2 Distribution Libraries and Executables for AIX. . . . . . . . . . . . . . . . . . . . . . . . . . . . . .-4Distribution Libraries and Executables for Solaris. . . . . . . . . . . . . . . . . . . . . . . . . . . .-5 Installing Oracle TMA OSI TP in Graphics Mode . . . . . . . . . . . . . . . . . . . . . . . . . . . . . . .-6 Distribution Libraries and Executables for Windows. . . . . . . . . . . . . . . . . . . . . . . . . .-8Uninstalling Oracle TMA OSI TP on UNIX Platforms in Console Mode. . . . . . . . . .-9Uninstalling Oracle TMA OSI TP in Graphics Mode . . . . . . . . . . . . . . . . . . . . . . . .-10Oracle Tuxedo Mainframe Adapter for OSI TP Installation Guide iiiiv Oracle Tuxedo Mainframe Adapter for OSI TP Installation GuideInstalling the Oracle Tuxedo Mainframe Adapter for OSI TP ProductThis section covers the following information:z“Pre-Installation Considerations”z“Installing Oracle TMA OSI TP on UNIX Platforms in Console Mode”z“Installing Oracle TMA OSI TP in Graphics Mode”Pre-Installation ConsiderationsComplete the following tasks prior to installing the TMA OSI TP product:z Read the Oracle Tuxedo Mainframe Adapter for OSI TP Release Notes for supportedplatform information.z Install and verify the operation of the Oracle Tuxedo product.z On a UNIX operating system, if you are upgrading to Tuxedo 11gR1 (11.1.1.2.0) from aprevious version of Tuxedo, you must remove the old version of Tuxedo before you installTuxedo 11gR1 (11.1.1.2.0) or you must install Tuxedo 11gR1 (11.1.1.2.0) in a differentdirectory. Do not overwrite the old version of Tuxedo.Configuring the Environment to Install TMA OSI TPBefore installing the TMA OSI TP product, you must ensure that the Oracle Tuxedo system is installed and configured properly for your environment. Refer to your Tuxedo documentation for more information about setting the Tuxedo environment variables.Oracle Tuxedo Mainframe Adapter for OSI TP Installation Guide1A JDK is required by the InstallAnywhere installation product to install TMA OSI TP. A JDK isinstalled with Tuxedo. Verify that the system PATH environment variable is set to the correct version of the JDK installed by Tuxedo.In addition to the Tuxedo environment variables, the TMA OSI TP system requires an additional environment variable, OSIRUNDIR, before you can boot the gateway or run the osiadmin utility.Refer to the Oracle Tuxedo Mainframe Adapter for OSI TP User Guide for more information about the osiadmin utility. If you do not set the OSIRUNDIR environment variable before you boot the gateway, you will receive a message telling you to set OSIRUNDIR. This environment variable specifies the path that the TMA gateway uses for runtime files. You can set theOSIRUNDIR environment variable through a script, a command line entry, or, for Windowsoperating systems, through the Windows System Properties in the Control Panel. The variable value should include the path and directory as appropriate for your operating system.Upgrading from eLink OSI TP 4.0If you are upgrading from eLink OSI TP 4.0, you do not need to modify your udmconfig input file. Perform a dmloadcf of the udmconfig file to create the dmconfig binary file, BDMCONFIG.If you are running eLink OSI TP 4.0, uninstall eLink OSI TP 4.0Note:Beginning with eLink OSI TP 4.1, the version 4.0 udmloadcf utility, the BUDMCONFIG binary file and the eLink OSI TP Administrative Server UDADM no longer exist. Thefunction performed by the version 4.0 udmloadcf command is now done by thedmloadcf command. The information contained in the version 4.0 BUDMCONFIG file isnow incorporated within the BDMCONFIG file. If your ubbconfig contains the UDMADMServer, delete it and perform a tmloadcf of the modified ubbconfig file. Installing Oracle TMA OSI TP on UNIX Platforms in Console ModePerform the following steps to install the Tuxedo Mainframe Adapter for OSITP software in console mode:1.Log on as root.$ su -Password:2.Execute the appropriate installation program for your operating system in character-basedmode. For example, execute the AIX program to install only the Tuxedo Mainframe Adapter for OSITP Gateway:2Oracle Tuxedo Mainframe Adapter for OSI TP Installation GuideInstalling Oracle TMA OSI TP on UNIX Platforms in Console Mode# sh <installer>.bin -i console3.The installation program runs and prompts you for responses (see Listing0-1 for an example). Listing0-1 UNIX Console Mode Installation Example, Gateway on AIX 53Preparing to install...Preparing CONSOLE Mode Installation...============================================================================== BEA Tuxedo Mainframe Adapter OSITP (created with InstallAnywhere by Zero G)------------------------------------------------------------------------------============================================================================== Introduction------------InstallAnywhere will guide you through the installation of Tuxedo Mainframe Adapter for OSITP.It is strongly recommended that you quit all programs before continuing with this installation.Respond to each prompt to proceed to the next step in the installation. If you want to change something on a previous step, type 'back'.You may cancel this installation at any time by typing 'quit'.PRESS <ENTER> TO CONTINUE: ENTER============================================================================== Choose BEA Home Directory-------------------------1- Create a New BEA Home2- Use Existing BEA HomeEnter a number: 21- /bea/2- /bea/tuxedoExisting BEA Home: 2============================================================================== Pre-Installation SummaryOracle Tuxedo Mainframe Adapter for OSI TP Installation Guide3------------------------Please Review the Following Before Continuing:Product Name:Tuxedo Mainframe Adapter for OSITPInstall Folder:/bea/tuxedoJava VM to be Used by Installed Product:/bea/tuxedo/jreProduct VersionxxxDisk Space Information (for Installation Target):Required: 7,117,715 bytesAvailable: 531,012,902,912 bytesPRESS <ENTER> TO CONTINUE: ENTER============================================================================== Installing...-------------[==================|==================|==================|==================] [------------------|------------------|------------------|------------------] Press <ENTER> to continue.:============================================================================== Install Complete----------------Congratulations. 'Tuxedo Mainframe Adapter for OSITP' has been successfully installed to:/bea/tuxedoPRESS <ENTER> TO EXIT THE INSTALLER: ENTERDistribution Libraries and Executables for AIXThe TMA OSI TP software contains the following libraries and executable programs for the AIX operating system:4Oracle Tuxedo Mainframe Adapter for OSI TP Installation GuideInstalling Oracle TMA OSI TP on UNIX Platforms in Console ModeTable1 TMA OSI TP Distribution Libraries for AIX 5.3Directory Files/bin getulogpfxGWOSITPosiadminosiltmainportproxyprdebuginfosetPROXYpriv/lib libgwo.solibnwunisys.solibtasn1.so/locale/C LIBGWO.textLIBGWO_CATlibnwunisys.cat/udataobj gbebc2u.fldjbis82u.fldksc2u.fldu2gbebc.fldu2jbis8.fldu2ksc.fldDistribution Libraries and Executables for SolarisThe TMA OSI TP software contains the following libraries and executable programs for the Solaris operating system:Oracle Tuxedo Mainframe Adapter for OSI TP Installation Guide5Table2 TMA OSI TP Distribution Libraries for SolarisDirectory Files/bin getulogpfxGWOSITPosiadminosiltmainportproxyprdebuginfosetPROXYpriv/lib libgwo.solibnwunisys.solibtasn1.so/locale/C LIBGWO.textLIBGWO_CATlibnwunisys.cat/udataobj gbebc2u.fldjbis82u.fldksc2u.fldu2gbebc.fldu2jbis8.fldu2ksc.fldNote:The $TUXDIR/bin/portproxy executable listens on privileged ports (< 1024) on behalf of GWOSITP. The script $TUXDIR/bin/setPROXYpriv is used to set the appropriatepermissions. For UNIX platforms, please login as root and run setPROXYpriv manuallyafter the installation.Installing Oracle TMA OSI TP in Graphics ModePerform the following steps to install the Tuxedo Mainframe Adapter for OSITP Gateway on a Windows or UNIX platform in Graphics Mode:1.Do one of the following, depending on your platform:On Windows:a.Choose Start→Run. The Run dialog displays.b.Click Browse to navigate to the installer folder.6Oracle Tuxedo Mainframe Adapter for OSI TP Installation GuideInstalling Oracle TMA OSI TP in Graphics Modec.Select the installer program.d.Click Open. The selected path and executable appear in the Run dialog.e.Click OK to begin the installation. The Introduction screen displays.Note:All screen illustrations in this section are for Windows.On UNIX:a.Log on as root to install the Tuxedo Mainframe Adapter for OSITP software.$ su -Password:b.Execute the appropriate installation program for your operating system. For example,execute the AIX program:/mnt/> sh <installer>.binThe Introduction screen displays.2.Click Next to proceed with the installation. The Choose BEA Home Directory screendisplays.3.Select a New or Existing BEA Home option to specify the BEA Home directory (the defaultis c:\bea). The BEA Home directory is the root directory in which you install all Oracle products. This directory was set up when you installed Tuxedo.If you want to create a new BEA Home directory, follow these steps:a.Select the Create a New BEA Home option.b.Accept the default location for your BEA Home directory or click Browse to specify adifferent location. If you accept the default location, your BEA Home directory will be c:\bea, and your Tuxedo Mainframe Adapter for OSITP software default installation directory will be the Tuxedo Home directory.c.Click Next to proceed with the installation.If you already have one or more BEA Home directories on your system, you can use one of those directories as follows:a.Select the Use Existing BEA Home option.b.Select a BEA Home directory from the list displayed to the right of the options. All validBEA Home directories are displayed in this list. Valid BEA Home directories aredirectories where Oracle products have been installed using the standard installationprogram.c.Click Next to proceed with the installation.4.If the installation program encounters a previous version of Tuxedo Mainframe Adapter forOSITP in the selected BEA Home directory, the Previous Installation Found message box displays .From this message box, do one of the following:–Click Continue to install over the previous version.–Click Cancel to return to the Choose BEA Home Directory Screen and select anotherdirectory.–Click Exit to exit the installation program.5.If you do not have a successful installation of Tuxedo in the BEA Home directory, the TuxedoNot Found! message box displaysFrom this message box, do one of the following:–Click Exit to exit the installation program so you can install Tuxedo.–Click Previous to return to the Choose BEA Home Directory Screen and select another directory.6.If you have a successful installation of Tuxedo, the pre-installaton Summary screen displays,From this message box, do one of the following:–Click Next to begin installing–Click Previous to return to the Choose BEA Home Directory Screen and select another directory.7.Then Installing Tuxedo Mainframe Adapter message srceen displays8.After the product is installed, the Install Complete screen displays9.Click Done to exit the installation program.Distribution Libraries and Executables for WindowsThe TMA OSI TP software contains the following libraries and executable programs for Windows operating systems. After installing the TMA OSI TP product, verify that these files and programs are installed on your system.Installing Oracle TMA OSI TP in Graphics ModeUninstalling Oracle TMA OSI TP on UNIX Platforms inConsole ModeTo remove Tuxedo Mainframe Adapter for OSITP from a UNIX platform:1. Change directories to your uninstaller_TMAOSI directory with a command similar to thefollowing example:> cd /bea/tuxedo/uninstaller_TMAOSI2.Start the uninstall program with the following command:/bea/tuxedo/uninstaller_TMAOSI> sh UninstallTMAOSI -i consoleTable 3 TMA OSI TP Distribution Libraries for WindowsDirectoryFiles /bin DbgHelp.dllgwo.dllGWOSITP.exenwunisys.dllosiadmin.exeosilt.dllosiltmain.exeosiltpp.dllosiltppmain.exeosimsg.dllPsapi.dlltasn1.dll/locale/C LIBGWO.textLIBGWO_CAT/udataobj gbebc2u.fldjbis82u.fldksc2u.fldu2gbebc.fldu2jbis8.fldu2ksc.fld$TUXDIR/tma/osi/samples/simpappdmconfigubbsimple tailor.txtListing0-1 displays an Tuxedo Mainframe Adapter for OSITP uninstallation.Note:The single-dash bar just beneath the double-dash bar in Listing0-1 is a progress indicator. When the single-dash bar becomes the same length as the double-dash bar,uninstallation is complete.Listing0-1 UNIX Console Mode Uninstall ExamplePreparing CONSOLE Uninstall...============================================================================== BEA Tuxedo Mainframe Adapter for OSITP (InstallAnywhere Uninstaller by Zero G) ------------------------------------------------------------------------------Uninstall Tuxedo Mainframe Adapter for OSITP----------------------------------------------About to uninstall...BEA Tuxedo Mainframe Adapter for OSITPThis will remove features installed by InstallAnywhere. It will not remove files and folders created after the installation.PRESS <ENTER> TO CONTINUE: <ENTER>============================================================================== Uninstalling...------------[==================|==================|==================|==================] [------------------|------------------|------------------|------------------] ============================================================================== Uninstall Complete------------------All items were successfully uninstalled.PRESS <ENTER> TO EXIT THE UNINSTALLER: <ENTER>Uninstalling Oracle TMA OSI TP in Graphics ModePerform the following steps to remove the Tuxedo Mainframe Adapter for OSITP software froma Windows or UNIX platform:Installing Oracle TMA OSI TP in Graphics ModeNote:Make sure that TMA OSI TP is shut down before you uninstall.1.Choose Start→Programs→BEA WebLogic E-Business Platform→Tuxedo MainframeAdapter for OSITP→Uninstall BEA Tuxedo Mainframe Adapter for OSITP from the Start menu. The Tuxedo Mainframe Adapter for OSITP Uninstaller screen displays2.Click Uninstall to start removing Tuxedo Mainframe Adapter for OSITP. When the processis complete, the Uninstall complete screen displays.3.Click Exit to complete the uninstallation.Note:Some files may not be removed because they are required for another Oracle product.。
TUXEDO三层程序安装、配置及开发流程
三层改造程序安装、配置及开发第一部分前台的安装和配置一、TUXEDO安装插入安装盘,运行setup,按照安装程序的提示进行安装,使用缺省路径,安装在C:\TUXEDO下。
二、TUXEDO安装后的配置1、win98,win95的配置点击开始菜单中的“运行”,键入“sysedit”,回车后,在AUTOEXEC.BAT 文件中配置以下环境参数:SET TUXDIR=C:\TUXEDO(按缺省安装配置)SET LIB=C:\Program files\BEA SYSTEMS\TUXEDO\LIB(按缺省安装配置)SET INCLUDE=C:\TUXEDO\INCLUDE(按缺省安装配置)SET WSNADDR=//192.168.100.57:10000(按实际情况填写)在Path中加入"C:\TUXEDO\BIN";CY注:安装目录最好不要有空格,例如C:\TUXEDO而不要用C:\ Program files\BEA SYSTEMS\TUXEDO,带空格的路径AUTOEXEC.BAT可能不认,造成找不到wtuxws32.dll的错误。
配置完毕后,重起机器,看看MSDOS中相应变量是否也已设置,若没有,则在DOS下也进行相应的设置,重起机器。
2、winNT的配置右击“我的电脑”,点属性,选择菜单,“用户配置文件”,选择相应的用户,再点“环境”菜单,设置环境参数:TUXDIR=C:\TUXEDO(按缺省安装配置)LIB=C:\TUXEDO\LIB(按缺省安装配置)INCLUDE=C:\TUXEDO\INCLUDEWSNADDR=//192.168.100.57:10000(按实际情况填写,参照ubb)在Path中加入C:\TUXEDO\BIN;不用重新启动机器。
3、注意!!!!经过以上设置,如果win98和95还是找不到tuxedo所提供的一些函数,这时,设置查看为“显示所有文件包括隐藏文件”,将\TUXEDO\BIN\wtuxws32.dll 拷贝到windows目录下,即可。
LINUX下TUXEDO安装手册
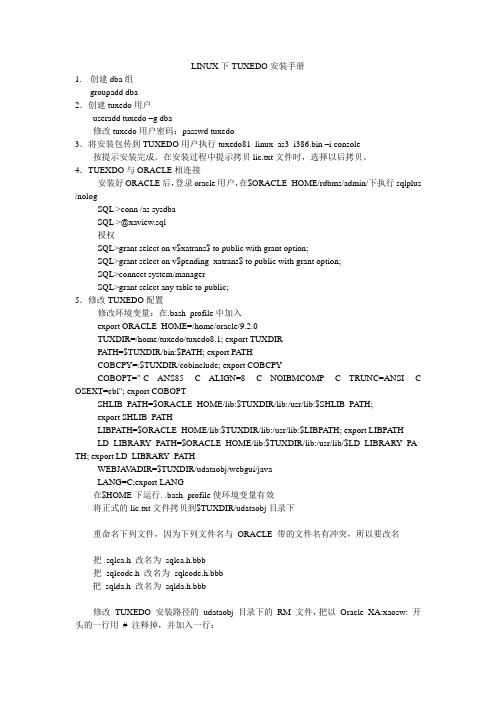
LINUX下TUXEDO安装手册1.创建dba组groupadd dba2.创建tuxedo用户useradd tuxedo –g dba修改tuxedo用户密码:passwd tuxedo3.将安装包传到TUXEDO用户执行tuxedo81_linux_as3_i386.bin –i console 按提示安装完成。
在安装过程中提示拷贝lic.txt文件时,选择以后拷贝。
4.TUEXDO与ORACLE相连接安装好ORACLE后,登录oracle用户,在$ORACLE_HOME/rdbms/admin/下执行sqlplus /nologSQL >conn /as sysdbaSQL >@xaview.sql授权SQL>grant select on v$xatrans$ to public with grant option;SQL>grant select on v$pending_xatrans$ to public with grant option;SQL>connect system/managerSQL>grant select any table to public;5.修改TUXEDO配置修改环境变量:在.bash_profile中加入export ORACLE_HOME=/home/oracle/9.2.0TUXDIR=/home/tuxedo/tuxedo8.1; export TUXDIRPATH=$TUXDIR/bin:$PA TH; export PATHCOBCPY=:$TUXDIR/cobinclude; export COBCPYCOBOPT="-C ANS85 -C ALIGN=8 -C NOIBMCOMP -C TRUNC=ANSI -C OSEXT=cbl"; export COBOPTSHLIB_PATH=$ORACLE_HOME/lib:$TUXDIR/lib:/usr/lib:$SHLIB_PATH;export SHLIB_PATHLIBPATH=$ORACLE_HOME/lib:$TUXDIR/lib:/usr/lib:$LIBPA TH; export LIBPATHLD_LIBRARY_PA TH=$ORACLE_HOME/lib:$TUXDIR/lib:/usr/lib/$LD_LIBRARY_PA TH; export LD_LIBRARY_PATHWEBJA V ADIR=$TUXDIR/udataobj/webgui/javaLANG=C;export LANG在$HOME下运行. .bash_profile使环境变量有效将正式的lic.txt文件拷贝到$TUXDIR/udataobj目录下重命名下列文件,因为下列文件名与ORACLE 带的文件名有冲突,所以要改名把sqlca.h 改名为sqlca.h.bbb把sqlcode.h 改名为sqlcode.h.bbb把sqlda.h 改名为sqlda.h.bbb修改TUXEDO 安装路径的udataobj 目录下的RM 文件,把以Oracle_XA:xaosw: 开头的一行用# 注释掉,并加入一行:Oracle_XA:xaosw:-L${ORACLE_HOME}/lib -lclntsh 在TUXEDO 用户下创建TMS 文件:Oracle_XA buildtms -o $TUXDIR/bin/ Oracle_XA -r Oracle_XA。
Tuxedo实时接口系统安装手册
文件版本:V1.0目录1 概述 (4)1.1 目的 (4)1.2 适用范围 (4)2 安装环境 (4)2.1 软件环境 (4)2.2 硬件环境 (4)3 系统搭建 (4)4 应用程序安装 (4)4.1 服务端安装 (4)4.2 客户端安装 (6)5 参数配置 (7)5.1 服务端参数配置 (7)5.1.1 XA的配置(RM文件的修改及编译) (8)5.1.2 ubbconfig文件的设置及编译 (8)5.1.3 创建TLOG交易日志 (9)5.2 客户端参数配置 (10)5.2.1 数据库的配置 (10)5.2.2 INI文件的配置 (10)5.2.3 ubbconfig文件的设置及编译............................................. 错误!未定义书签。
5.3 编译服务端可执行程序 (12)5.4 启动服务端程序 (12)5.5 客户端启动指令 (12)5.6 监控配置 (13)5.6.1 注意 (13)5.6.2 Console监控 (13)5.6.3 web监控 (14)6 验证标准 (16)7 注意事项 (16)1概述1.1目的为了使用户掌握Tuxedo实时接口的安装过程,及参数的配置方法,方便用户使用Tuxedo实时接口模块。
1.2适用范围本文档只限于Tuxedo实时接口模块的使用。
2安装环境2.1软件环境LINUX。
2.2硬件环境3系统搭建参见<<Tuxedo系统管理指南.doc>>系统安装节4应用程序安装4.1服务端安装第一步:服务端的应用需要Oracle的支持。
Oracle8i以上版本客户端即可,需要在环境变量中设置ORACLE_HOME,以及在PATH和LD_LIBRARY_PATH加入响应的oracle 部分的内容。
第二步:在主机上建立一个server目录,将源代码放至该目录下。
第三步:设置Tuxedo服务端程序所需要的环境变量,在文件setenv.sh中。
linux下 tuxedo 安装说明
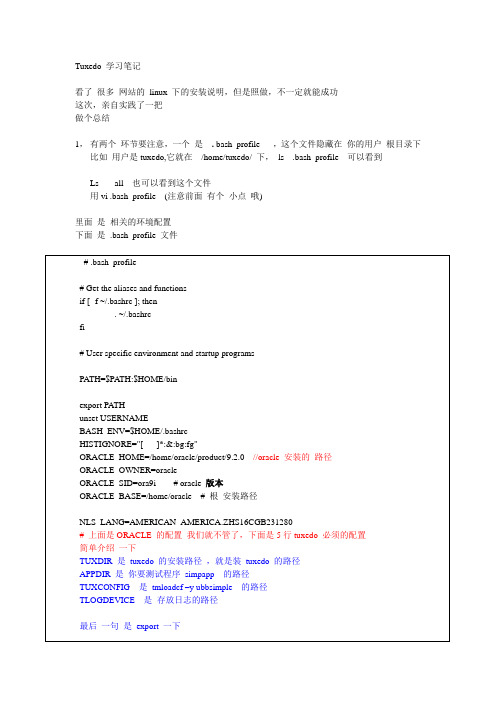
Tuxedo 学习笔记看了很多网站的linux 下的安装说明,但是照做,不一定就能成功这次,亲自实践了一把做个总结1,有两个环节要注意,一个是. bash_profile ,这个文件隐藏在你的用户根目录下比如用户是tuxedo,它就在/home/tuxedo/ 下,ls .bash_profile 可以看到Ls -all 也可以看到这个文件用vi .bash_profile (注意前面有个小点哦)里面是相关的环境配置下面是.bash_profile 文件下面简单一下安装过程操作系统是在fedoro 8 上(Linux zc 2.4.22)的,声明一下,fedoro 10 上报错,(内核2.6 上的)安装文件名:tuxedo81_linux.bin命令:sh tuxedo81_linux.bin -i console然后就是稍微等待几秒钟,叫你选择English ,选择1继续Enter只到叫你输入tuxedo 的密码然后输入KEY ,lic,txt这个等安装好了,在搞吧,很简单Cp ,lic,txt /tuxedo8.1/udataobj/拷到这个目录下面就OK了到这,tuxedo 算是安装完了,下面是配置,说实话,配置比安装难啊先看tmadmin 有没用,如果有用,说明你的key 安装正确了下面就是配置ubbsimple 了建议把atmi 下面的例子拷到tuxedo8.1下面来,这样在ubbsimple 里面就好配置了看下ubbsimple 文件带# 的先不管了# (c) 2003 BEA Systems, Inc. All Rights Reserved.#ident "@(#) samples/atmi/simpapp/ubbsimple $Revision: 1.5 $"#Skeleton UBBCONFIG file for the TUXEDO Simple Application.#Replace the <bracketed> items with the appropriate values.*RESOURCESIPCKEY 123457 这个值是唯一的取值在3万到26万之间,且必须是唯一的(32768-262143)DOMAINID simpapp 管理域的标识符,随便取,没实在意义MASTER simple site1,site2 主节点,用于多机环境中,起作用,site2备用MAXACCESSERS 10MAXSERVERS 5MAXSERVICES 10MODEL SHM # 单台主机,MP多台主机LDBAL NBLOCKTIME 6 #客户端等待服务响应的最长时间6*10 60秒*MACHINESDEFAULT:这个强烈要求.bash_proflie 里面一定要一致APPDIR="/home/tuxedo/tuxedo8.1/simpapp" 应用程序路径TUXCONFIG="/home/tuxedo/tuxedo8.1/simpapp/tuxconfig" tuxconfig 路径TUXDIR="/home/tuxedo/tuxedo8.1" tuxedo 安装的路径zc是用户名在命令下可以用hostname 可以看出来zc LMID=simple*GROUPSGROUP1LMID=simple GRPNO=1 OPENINFO=NONE*SERVERSDEFAULT:CLOPT="-A"simpserv 服务端生成的程序名称simpserv SRVGRP=GROUP1 SRVID=1*SERVICESTOUPPER服务端的services 名称下面还有就是客户端的编译,服务端的编译buildserver -s TOUPPER -o simpserv -f simpserv.cbuildclient –o client -f simpcl.c下面是创建日志的方法敲tmadmin 后Crdl –b 2000 –z//home/tuxedo/tuxedo8.1/simpapp/TLOGcrlog -m tibs_bill创建日志文件Tmipcrm -y 强制停掉所有的服务编译服务端命令:[tuxedo@zc simpapp]$ buildserver -o AGENT_BILL -s GET_OWE_ACCT -f AGENT_BILL.cpp编译客户端命令:[tuxedo@zc simpapp]$ buildclient -o Agentcl -f Agentcl.cpp编译fml 文件设置FML的环境变量set FIELDTBLS32=transfml.fmlset FLDTBLDIR32=%TUXDIR%udataobj;mkfldhdr32 transfmlpclt 客户端的信息查看buildsever -t 表示支持多线程server 是服务进程,service 是服务进程实现的服务source .bash_profile 立马生效. . profile 立即生效命令/bdccutysj/blog/item/7a5e853*******f01b4cff71.html IPCKEY 123457 这个值是唯一的DOMAINID simpapp 这个值也是唯一的,否则会有冲突tar cvzf xxx.tar.gz xxx/tar -xzvf XX.tar.gzBo 的生成步骤1:注意点因为新242 的环境与原245 等的内核不一致,且LINUX, ORACLE, TUXEDO版本都不一致故base 不能完全拷贝原来SVN上的,只能覆盖一个文件BOCCIHelperRegistry.cppBase_kenel 下面文件不动或将gen_bohelper_source/BOCCIHelperRegistry.cpp移到base目录下Bo 涉及四张表:BO_DETAILS_EXBO_EXBO_DETAILS_TEMP (空表)BO_OPERATER (操作员表)操作步骤:1,bointerface 下面的文件全部拷贝base/ gen_bohandler_source/ gen_bohelper_source/ lib/ ott/ 注意点:编译前LIB 下的三个.A 文件可以先删除但这个文件夹一定要存在,最后.文件生成,会CP到该目录下2,先执行ott/ 文件下的两个脚本,createHead.sh genc++.sh3,然后编译base4,再编译gen_bohandler_source因为gen_bohelper_source 这个编译速度比较慢,这个可以和component 一起编译注意; 编译component ,确保public ,include, 必须有并且public 必须编译过,会链接接BO bointface/ lib/ .a 的文件Bbc 清理死掉的进程和IPC资源编译BO偷懒方法:只需改三个文件测试时使用:1,Billoccitype.h,Billoccitype.cppSet ,get 方法在这两个文件里加申明,和成员函数get,set 的实现方法同时,记住,此时在ott下面不需要执行两个.sh 文件2,在这个文件里面InvoicePrintOCCIHelper.cpp添加相应的xml的节点,总共改5处这个就是相应的bo 名称下面BillQueryOCCIHelper.cpp BillHisQueryOCCIHelper.cppBillQuery ,BillHisQuery 增加了文件# ---------TUXEDO ENV--------export TUXDIR=/app/bea/tuxedo8.1_64 export APPDIR=/app/acct/tibs_bill/binexport TUXCONFIG=$APPDIR/tuxconfig export BDMCONFIG=$APPDIR/BDMCONFIG export TLOGDEVICE=$APPDIR/TLOG export PATH=$PATH:$TUXDIR/bin路径,加一个path路径。
tuxedo详细安装步骤
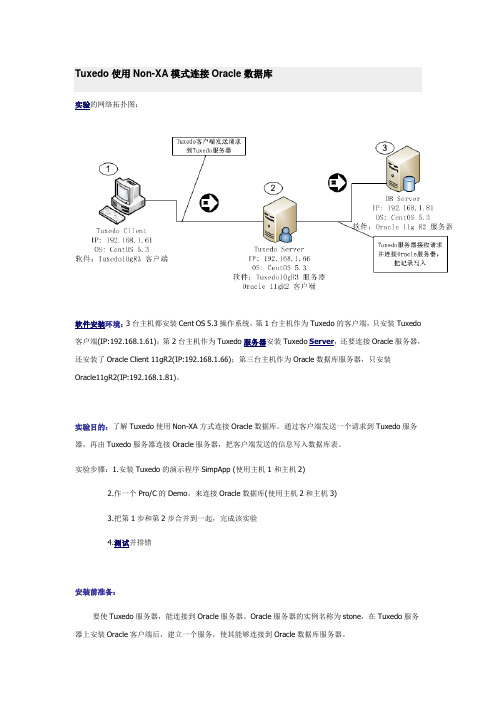
Tuxedo使用Non-XA模式连接Oracle数据库实验的网络拓扑图:软件安装环境:3台主机都安装Cent OS 5.3操作系统,第1台主机作为Tuxedo的客户端,只安装Tuxedo 客户端(IP:192.168.1.61);第2台主机作为Tuxedo服务器安装Tuxedo Server,还要连接Oracle服务器,还安装了Oracle Client 11gR2(IP:192.168.1.66);第三台主机作为Oracle数据库服务器,只安装Oracle11gR2(IP:192.168.1.81)。
实验目的:了解Tuxedo使用Non-XA方式连接Oracle数据库。
通过客户端发送一个请求到Tuxedo服务器,再由Tuxedo服务器连接Oracle服务器,把客户端发送的信息写入数据库表。
实验步骤:1.安装Tuxedo的演示程序SimpApp (使用主机1和主机2)2.作一个Pro/C的Demo,来连接Oracle数据库(使用主机2和主机3)3.把第1步和第2步合并到一起,完成该实验4.测试并排错安装前准备:要使Tuxedo服务器,能连接到Oracle服务器。
Oracle服务器的实例名称为stone,在Tuxedo服务器上安装Oracle客户端后,建立一个服务,使其能够连接到Oracle数据库服务器。
在Tuxedo Server(主机2)上,先建立网络服务,再连接到Oracle数据库服务器,使用hr用户,并建立一个测试表:◆网络服务的名称为stone,结果为$ORACLE_HOME/network/admin目录下的tnsnames.ora文件[oracle@myapache ~]$cd /u01/app/oracle/product/11.2.0/client_1/network/admin/ [oracle@myapache admin]$lssamples shrept.lst sqlnet10031011AM2455.bak sqlnet.ora tnsnames.ora[oracle@myapache admin]$vi tnsnames.ora# tnsnames.ora Network Configuration File:/u01/app/oracle/product/11.2.0/client_1/network/admin/tnsnames.ora# Generated by Oracle configuration tools.STONE =(DESCRIPTION =(ADDRESS_LIST =(ADDRESS = (PROTOCOL = TCP)(HOST = 192.168.1.81)(PORT = 1521)))(CONNECT_DATA =(SERVICE_NAME = stone)))◆建立测试表[oracle@myapache ~]$sqlplus hr/hr@stoneSQL*Plus: Release11.2.0.1.0 Production on Wed Mar 10 21:17:22 2010Copyright (c) 1982, 2009, Oracle. All rights reserved.Connected to:Oracle Database11gEnterpriseEdition Release11.2.0.1.0 - ProductionWith the Partitioning, OLAP, Data Mining and Real Application Testing options SQL>create table t_test1(2 zj number,3 name varchar2(20)4 );Table created.SQL>insert into t_test1 values(1, 'aaa');1 row created.SQL>commit;Commit complete.SQL>select * from t_test1;ZJ NAME---------- --------------------1 aaaSQL>◆在主机2上还要把Oracle用户的环境变量设置好,使其能正确编译pro/c程序[oracle@myapache ~]$ vi .bash_profile设置好以下环境变量# User specific environment and startup programsORACLE_HOME=/u01/app/oracle/product/11.2.0/client_1export ORACLE_HOMELD_LIBRARY_PATH=$ORACLE_HOME/libLD_LIBRARY_PATH=${LD_LIBRARY_PATH}:$ORACLE_HOME/oracm/lib LD_LIBRARY_PATH=${LD_LIBRARY_PATH}:/lib:/usr/lib:/usr/local/lib export LD_LIBRARY_PATHPATH=$PATH:$ORACLE_HOME/binexport PATHstty erase ^H(完)测试一下Pro/C是否正确[oracle@myapache ~]$procPro*C/C++: Release11.2.0.1.0 - Production on Thu Mar 11 01:16:42 2010Copyright (c) 1982, 2009, Oracle and/or its affiliates. All rights reserved.System default option values taken from:/u01/app/oracle/product/11.2.0/client_1/precomp/admin/pcscfg.cfg(下面内容从略)一、安装Tuxedo的演示程序SimpApp,并完成Tuxedo客户端访问服务器的配置1.在主机2上安装Tuxedo10gR3 Server建议采用字符安装界面,在安装过程中选择安装上Sample,以便运行SimpApp例子[root@myapache ~]#cd /home/OraFile/[root@myapache OraFile]#unzip tuxedo10gR3_32_Linux_01_x86.zip[root@myapache OraFile]#chmod +x tuxedo10gR3_32_Linux_01_x86.bin[root@myapache OraFile]#./tuxedo10gR3_32_Linux_01_x86.bin -i consoleExtracting the JRE from the installer archive...Unpacking the JRE...Extracting the installation resources from the installer archive...Configuring the installer for this system's environment...Launching installer...(比较重要的地方)Choose Oracle Home------------------1- Create new Oracle HomeEnter a number:1Specify a new Oracle Home directory:/bea=============================================================== ================Choose Product Directory------------------------1- Modify Current Selection (/bea/tuxedo10gR3)2- Use Current Selection (/bea/tuxedo10gR3)Enter a number:1Specify Product Installation Directory:/bea/tux10 (为操作方便,把安装目录修改为:/bea/tux10) Install Samples (Y/N):Y (选择安装Samples)2.在Tuxedo Server上运行SimpApp例子(1)把SimpApp例子拷贝到/home/myTuxeSrv目录下[oracle@myapache ~]$cp -R /bea/tux10/samples/atmi/simpapp/ /home/myTuxSrv/再拷贝环境变量[oracle@myapache ~]$cp /bea/tux10/tux.env /home/myTuxSrv/simpapp/[oracle@myapache ~]$cd /home/myTuxSrv/simpapp/[oracle@myapache simpapp]$lsREADME simpcl.c simpserv.c tux.env ubbsimple[oracle@myapache simpapp]$(2)编辑simpapp的配置文件[oracle@myapache simpapp]$ cp ubbsimple ubb[oracle@myapache simpapp]$ vi ubb修改结果:#Example:IPCKEY <Replace with a valid IPC Key># TUXCONFIG="/home/me/simpapp/tuxconfig"# APPDIR="/home/me/simpapp"#Example:TUXDIR="/bea/tux10"# (c) 2003 BEA Systems, Inc. All Rights Reserved.#ident "@(#) samples/atmi/simpapp/ubbsimple $Revision: 1.5 $"#Skeleton UBBCONFIG file for the TUXEDO Simple Application.#Replace the <bracketed> items with the appropriate values.*RESOURCESIPCKEY 123456DOMAINID simpappMASTER simpleMAXACCESSERS 10MAXSERVERS 5MAXSERVICES 10MODEL SHMLDBAL N*MACHINESDEFAULT:APPDIR="/home/myTuxSrv/simpapp"TUXCONFIG="/home/myTuxSrv/simpapp/tuxconfig" TUXDIR="/bea/tux10"myapache LMID=simple*GROUPSGROUP1LMID=simple GRPNO=1 PENINFO=NONE*SERVERSDEFAULT:CLOPT="-A"simpserv SRVGRP=GROUP1 SRVID=1*SERVICESTOUPPER(配置文件完)(3)修改环境变量文件tux.env[oracle@myapache simpapp]$ vi tux.env在最后加入两行TUXDIR=/bea/tux10; export TUXDIRJAVA_HOME=$TUXDIR/jre; export JAVA_HOMEJVMLIBS=$JAVA_HOME/lib/i386/server:$JAVA_HOME/jre/binPATH=$TUXDIR/bin:$JAVA_HOME/bin:$PATH; export PATHCOBCPY=:$TUXDIR/cobinclude; export COBCPYCOBOPT="-C ANS85 -C ALIGN=8 -C NOIBMCOMP -C TRUNC=ANSI -C SEXT=cbl"; export COBOPT SHLIB_PATH=$TUXDIR/lib:$JVMLIBS:$SHLIB_PATH; export SHLIB_PATHLIBPATH=$TUXDIR/lib:$JVMLIBS:$LIBPATH; export LIBPATHLD_LIBRARY_PATH=$TUXDIR/lib:$JVMLIBS:$LD_LIBRARY_PATH; export LD_LIBRARY_PATH WEBJAVADIR=$TUXDIR/udataobj/webgui/java; export WEBJAVADIRAPPDIR=/home/myTuxSrv/simpapp; export APPDIRTUXCONFIG=$APPDIR/tuxconfig; export TUXCONFIG(4)在服务器本地运行simpapp例子程序使环境变量生效[oracle@myapache simpapp]$. ./tux.env[oracle@myapache simpapp]$lsREADME simpcl.c simpserv.c tux.env ubb ubbsimple[oracle@myapache simpapp]$env | grep TUXTUXCONFIG=/home/myTuxSrv/simpapp/tuxconfigTUXDIR=/bea/tux10[oracle@myapache simpapp]$编译ubb (生成tuxconfig)[oracle@myapache simpapp]$ tmloadcf -y ubb[oracle@myapache simpapp]$ lsREADME simpcl.c simpserv.c tuxconfig tux.env ubb ubbsimple ULOG.031010编译simpserv.c文件和simpcl.c文件(生成可执行文件)[oracle@myapache simpapp]$buildserver -f simpserv.c -o simpserv -s TOUPPER (我这里有一些警告信息,不影响程序运行)[oracle@myapache simpapp]$buildclient -f simpcl.c -o simpcl[oracle@myapache simpapp]$lsREADME simpcl.c simpserv.c tux.env ubbsimplesimpcl simpserv tuxconfig ubb ULOG.031010运行服务器端程序[oracle@myapache simpapp]$tmboot -yBooting all admin and server processes in /home/myTuxSrv/simpapp/tuxconfig INFO: Oracle Tuxedo, Version10.3.0.0, 32-bit, Patch Level (none)Booting admin processes ...exec BBL -A :process id=11402 ... Started.Booting server processes ...exec simpserv -A :process id=11403 ... Started.2 processes started.[oracle@myapache simpapp]$测试一下运行情况:[oracle@myapache simpapp]$./simpcl hello_aleiReturned string is: HELLO_ALEI[oracle@myapache simpapp]$看到以上结果,程序在本地已经可以使用了3.把客户端程序转移到主机1上运行(1)在服务器端(主机2)先做一些设置,首先关闭服务程序[oracle@myapache simpapp]$tmshutdown -yShutting down all admin and server processes in /home/myTuxSrv/simpapp/tuxconfig Shutting down server processes ...Server Id = 1 Group Id = GROUP1 Machine = simple: shutdown succeededShutting down admin processes ...Server Id = 0 Group Id = simple Machine = simple: shutdown succeeded 2 processes stopped.[oracle@myapache simpapp]$(2)修改配置文件ubb,添加一些配置;并重新编译[oracle@myapache simpapp]$vi ubb修改了以下内容(标红部分)IPCKEY 123456DOMAINID simpappMASTER simpleMAXACCESSERS 10MAXSERVERS 5MAXSERVICES 10MODEL SHMLDBAL N*MACHINESDEFAULT:APPDIR="/home/myTuxSrv/simpapp"TUXCONFIG="/home/myTuxSrv/simpapp/tuxconfig"TUXDIR="/bea/tux10"myapache LMID=simpleMAXWSCLIENTS=5*GROUPSGROUP1LMID=simple GRPNO=1 PENINFO=NONE*SERVERSDEFAULT:CLOPT="-A"simpserv SRVGRP=GROUP1 SRVID=1WSL SRVGRP=GROUP1 SRVID=10CLOPT="-A -- -n//192.168.1.66:3200 -m 2 -M 5 -x 5"*SERVICESTOUPPER(配置文件完)重新编译生成配置文件tuxconfig[oracle@myapache simpapp]$lsaccess.031010 simpcl simpserv stderr tuxconfig ubb ULOG.031010 README simpcl.c simpserv.c stdout tux.env ubbsimple[oracle@myapache simpapp]$rm -rf tuxconfig (先删除)[oracle@myapache simpapp]$tmloadcf -y ubb[oracle@myapache simpapp]$tmboot -yBooting all admin and server processes in /home/myTuxSrv/simpapp/tuxconfigINFO: Oracle Tuxedo, Version10.3.0.0, 32-bit, Patch Level (none)Booting admin processes ...exec BBL -A :process id=13105 ... Started.Booting server processes ...exec simpserv -A :process id=13106 ... Started.exec WSL -A -- -n//192.168.1.66:3200 -m 2 -M 5 -x 5 :process id=13107 ... Started.3 processes started.[oracle@myapache simpapp]$[oracle@myapache simpapp]$netstat -anp可以看到WSL也已经侦听了(3)在Tuxedo Client (主机1)上运行simpapp的客户端程序在Tuxedo客户端上,也要安装Tuxedo10gR3,但只安装Tuxedo的客户端就行了,其安装目录也是:/bea/tux10;客户端程序在/home/myTuxClient/simpapp目录中运行。
Tuxedo安装与配置v1
湖南IP网认证计费系统中间件安装与配置手册1、Tuxedo安装、所需软件Tuxedo 或者以后的版本Oracle Tuxedo 11gR1的软件包(),下载地址:客户端Altibase客户端gcc编译器License文件License文件Tuxedo 10gR3之后不需要、软件安装、选择控制台安装(非图形方式)$ ls$ ./ -i console、选择安装语言Preparing to install...Extracting the JRE from the installer archive...Unpacking the JRE...Extracting the installation resources from the installer archive...Configuring the installer for this system's environment...Launching installer...Preparing CONSOLE Mode Installation...=============================================================Choose Locale...----------------->1- EnglishCHOOSE LOCALE BY NUMBER: 1(语言为英文)=============================================================Tuxedo .0 (created with InstallAnywhere by Macrovision)、同意协议==============================================================Introduction------------InstallAnywhere will guide you through the Tuxedo .0 installation.It is strongly recommended that you quit all programs before continuing with this installation.Enter "next' to proceed to the next screen. Enter "back" to modify the previous screen.You may cancel this installation at any time by typing "quit".WARNING: "Quitting" creates an incomplete Tuxedo .0must re-install Tuxedo .0. For more information, see "Preparing toInstall the Oracle Tuxedo System" in the Tuxedo .0 Installation Guide.PRESS <ENTER> TO CONTINUE:显示许可协议内容(一直回车)DO YOU ACCEPT THE TERMS OF THIS LICENSE AGREEMENT (Y/N): y(输入y同意协议)=============================================================Choose Install Set------------------、选择安装方式Please choose the Install Set to be installed by this installer.->1- Full Install2- Server Install3- Full Client Install4- Jolt Client Install5- ATMI Client Install6- CORBA Client Install7- Customize...ENTER THE NUMBER FOR THE INSTALL SET, OR PRESS <ENTER> TO ACCEPT THE DEFAULT: 1(完全安装:包括server和client两个组件,安装在一台机器上)、创建目录=============================================================Choose Oracle Home------------------1- Create new Oracle Home2- Use existing Oracle HomeEnter a number: 1(创建一个新目录)Specify a new Oracle Home directory: /app1/tux11g、选择产品目录==============================================================Choose Product Directory------------------------1- Modify Current Selection (/app1/tux11g/tuxedo11gR1)2- Use Current Selection (/app1/tux11g/tuxedo11gR1)Enter a number: 1(修改)Specify Product Installation Directory: /home/tuxedo/tux11g Install Samples (Y/N): Y、安装预览============================================================== Pre-Installation SummaryPlease Review the Following Before Continuing:Product Name:Tuxedo .0Install Folder:/home/tuxedo/tux11gLink Folder:/home/tuxedoDisk Space Information (for Installation Target):Required: 209,943,511 bytesAvailable: 2,432,757,760 bytesPRESS <ENTER> TO CONTINUE: (回车,继续安装)=============================================================、软件安装进度开始Ready To Install----------------InstallAnywhere is now ready to install Tuxedo .0 onto your system atthe following location:/home/tuxedo/tux11gPRESS <ENTER> TO INSTALL: (回车,安装软件)、安装进度结束=============================================================Installing...-------------[==================|==================|==================|==================][------------------|------------------|------------------|------------------]、配置监听密码==============================================================Configure tlisten Service-------------------------Password: hniiosbea(tlisten密码,这个tlisten是在集群环境下使用的)Verify Password: hniiosbea(tlisten密码,这个tlisten是在集群环境下使用的)Password Accepted! Please wait...、配置ssl支持=============================================================SSL Installation Choice.------------------------Would you like to install SSL Support->1- Yes2- NoENTER THE NUMBER FOR YOUR CHOICE, OR PRESS <ENTER> TO ACCEPT THE DEFAULT:: 2(不支持ssl)、安装完成=============================================================Installation Complete---------------------Congratulations. Tuxedo .0 has been successfully installed to:/home/tuxedo/tux11gPRESS <ENTER> TO EXIT THE INSTALLER: (回车,退出)[tuxedo@node1 ~]$、安装完成后确认$ lsbin cobinclude help include inventory jre lib locale logs samples udataobj uninstaller$ pwd/home/tuxedo/tux11g确认安装是否成功,可以用两种方法:1. 用tmadmin检查一下,如果执行不出错说明OK;2. 部署simpapp应用进行测试,运行成功,说明OK .执行命令检查首先要设置一下环境变量,执行自动产生的脚本即可:$ . ./$ tmadmin -vINFO: Oracle Tuxedo, Version .0, 32-bit, Patch Level (none)部署simpappSimpapp是一个产品自带的示例程序,功能是将客户端发过来的小写字符串改为大写字符串之后再返回给客户端。
- 1、下载文档前请自行甄别文档内容的完整性,平台不提供额外的编辑、内容补充、找答案等附加服务。
- 2、"仅部分预览"的文档,不可在线预览部分如存在完整性等问题,可反馈申请退款(可完整预览的文档不适用该条件!)。
- 3、如文档侵犯您的权益,请联系客服反馈,我们会尽快为您处理(人工客服工作时间:9:00-18:30)。
全国邮政综合计算机网应用软件系统版本号:V1.00 文档编号:邮区中心局生产系统TUXEDO中间件安装手册方正奥德计算机系统有限公司二○○三年五月文档管理信息表文档修改记录目录1TUXEDO安装环境 (4)1.1 服务端 (4)1.2 客户端 (4)2安装步骤 (4)2.1 安装T UXEDO8.0 FOR L INUX: (4)2.1.1用Tuxedo8.0 for Linux光盘进行安装: (4)2.1.2用Tuxedo8.0 for Linux 的tar 包进行安装 (4)2.2配置UBB文件(有关各参数的详细说明请参阅有关文档) (5)3相关设置 (6)3.1 SERVER端环境变量(在用户环境变量中加入以下设置) (7)3.2CLIENT端环境变量(在用户环境变量中加入以下设置) (8)1Tuxedo安装环境1.1 服务端操作系统:RedFlag Linux网络协议:TCP/IPTuxedo版本: BEA Tuxedo8.0 for Linux1.2 客户端操作系统:RedFlag Linux网络协议:TCP/IPTuxedo版本: BEA Tuxedo8.0 for Linux2 安装步骤2.1 安装Tuxedo8.0 for Linux2.1.1 用Tuxedo8.0 for Linux光盘进行安装2.1.1.1 CLIENT的安装a.先建一tuxedo用户;b.插入tuxedo's sdk盘,mount上之后;c.执行./LinuxTuxedo80.bin。
按界面提示操作即可完成安装。
2.1.1.2 SERVER的安装a.先建一tuxedo用户;b.插入tuxedo's sdk盘,mount上之后;c.执行./LinuxTuxedo80.bin。
按界面提示操作即可完成安装。
2.1.2 用Tuxedo8.0 for Linux的tar 包进行安装a.先建一tuxedo用户;b.将tuxedo8.0 for linux 的tar 包(假定名称为tuxedo8.0.tar.gz) ftp 至tuxedo用户的$HOME下;c.以tuxedo 的用户执行tar zxvf tuxedo8.0.tar.gz ,解开压缩包。
d.安装完毕。
前后台安装方式一致。
2.2 配置ubb文件(有关各参数的详细说明请参阅有关文档)西安中心局ubbcfg模板见附件一*RESOURCESIPCKEY 32820(该代码须唯一)UID 205(用户ID)GID 50 (用户所在组号)SCANUNIT 5SANITYSCAN 24BLOCKTIME 120PERM 0660MAXACCESSERS 250(MAXWSCLIENTS + MAXSERVERS)MAXSERVERS 150MAXSERVICES 400MAXBUFTYPE 500MAXBUFSTYPE 700MAXCONV 10MAXGTT 10MASTER zxj_app1(机器名称)SCANUNIT 10MODEL SHM (决定是否使用MP模式)LDBAL Y(是否使用MSSQ进行负载均衡)*MACHINESsite110(机器名称)LMID= zxj_app1(该项值须于MASTER相同)TUXDIR="/usr/tuxedo"APPDIR="/usr/server/bin" (指定执行档位置)TUXCONFIG="/usr/server/etc/tuxconfig" (指定tuxconfig档位置)ULOGPFX="/usr/server/log/ULOG" (指定UTLOG档位置)MAXWSCLIENTS=100 (最大客户端连接数)*GROUPSLDMGRP_1 LMID=zxj_app1 GRPNO=1LGWGRP_1 LMID=zxj_app1 GRPNO=2LAPPGRP_1 LMID=zxj_app1 GRPNO=3LAPPGRP_2 LMID=zxj_app1 GRPNO=4APPGRP_SJ LMID=zxj_app1 GRPNO=5*SERVERSDEFAULT:CLOPT="-A -- zxj@yz post"FileService SRVGRP=LAPPGRP_1 SRVID=10REPL YQ = Y RESTART = N GRACE = 0 MIN = 3 MAX = 5 MAXGEN=2RQADDR=FileSvr (使用MSSQ进行负载均衡)OpenClose SRVGRP=LAPPGRP_1 SRVID=16REPL YQ = Y RESTART = N GRACE = 0 MIN =3(决定了该服务的个数) MAX = 5 MAXGEN=2RQADDR=OpenCloseWSL SRVGRP=LAPPGRP_1 SRVID=30CLOPT="-A -- -n //10.62.3.7:9436(监听地址及端口号必须为一)-m 5 -M 5 -x 5"zb_SJJS SRVGRP=LAPPGRP_2 SRVID=2200REPL YQ = Y RESTART = N GRACE = 0 MIN = 5 MAX = 5 MAXGEN=2RQADDR=zb_SJJSzb_GETLSH SRVGRP=LAPPGRP_2 SRVID=2210REPL YQ = Y RESTART = N GRACE = 0 MIN =5 MAX = 5 MAXGEN=2RQADDR=zb_GETLSHzb_SJJS_WSQS SRVGRP=LAPPGRP_2 SRVID=2220REPL YQ = Y RESTART = N GRACE = 0 MIN = 3 MAX = 5 MAXGEN=2RQADDR=zb_SJJS_WSQSzb_SJJS_WSCX SRVGRP=LAPPGRP_2 SRVID=2230REPL YQ = Y RESTART = N GRACE = 0 MIN = 1 MAX = 5 MAXGEN=2RQADDR=zb_SJJS_WSCXDMADM SRVGRP=LDMGRP_1 SRVID=50REPL YQ = N RESTART = N GRACE = 0MIN = 1 MAX = 3 MAXGEN=2GW ADM SRVGRP=LDMGRP_1 SRVID=40REPL YQ = Y RESTART = N GRACE = 0MIN = 1 MAX = 3 MAXGEN=2GWTDOMAIN SRVGRP=LDMGRP_1 SRVID=35REPL YQ = Y RESTART = N GRACE = 0MIN = 1 MAX = 3 MAXGEN=2*SERVICES3 相关设置3.1 SERVER端环境变量(在用户环境变量中加入以下设置)#--Tuxedo EnvTUXDIR=/usr/tuxedo; export TUXDIRPATH=$TUXDIR/bin:$PA TH; export PA THCOBCPY=:$TUXDIR/cobinclude; export COBCPYCOBOPT="-C ANS85 -C ALIGN=8 -C NOIBMCOMP -C TRUNC=ANSI -C OSEXT=cbl"; export COBOPTSHLIB_PATH=$TUXDIR/lib; export SHLIB_PATHLD_LIBRARY_PA TH=$LD_LIBRARY_PATH:$TUXDIR/lib; export LD_LIBRARY_PA THLC_MESSAGES=C#LANG=en_US.iso88591;export LC_MESSAGES LANGLANG=en_GB.ISO8859-1;export LC_MESSAGES LANGTUXCONFIG=$HOME/etc/utuxconfigBDMCONFIG=$HOME/etc/udmconfigexport TUXCONFIG BDMCONFIG#-- View EnvFLDTBLDIR32=$HOME/fmlviewFIELDTBLS32=BankFlds,FileFlds,zbFML,sysFML,sjFMLVIEWDIR32=$HOME/fmlviewVIEWFILES32=zbVIEW.V,sysVIEW.V,sjVIEW.Va) 生成tuxconfig文件:在UNIX提示符下执行如下命令:tmloadcf -y ubbcfg注:西安中心局服务端环境模板见附件二3.2 CLIENT端环境变量(在用户环境变量中加入以下设置)TUXDIR=/usr/tuxedo; export TUXDIRPATH=$PATH:$TUXDIR/bin; export PA THCOBCPY=:$TUXDIR/cobinclude; export COBCPYCOBOPT="-C ANS85 -C ALIGN=8 -C NOIBMCOMP -C TRUNC=ANSI -C OSEXT=cbl"; export COBOPTSHLIB_PATH=$SHLIB_PA TH:$TUXDIR/lib; export SHLIB_PATHLIBPATH=$LIBPA TH:$TUXDIR/lib; export LIBPATHLD_LIBRARY_PA TH=$TUXDIR/lib:$LD_LIBRARY_PATH:$HOME/lib:/home/client/lib:/home /postgresql/lib;export LD_LIBRARY_PA THTUXCONFIG=$TUXDIR/t1/ubbsimp; export TUXCONFIGULOGPFX=$TUXDIR/t1/zyg ;export ULOGPFXFSCONFIG=$TUXDIR/t1/tux_LOG;export FSCONFIGLC_MESSAGES=C;export LC_MESSAGES注:西安中心局客户端环境模板见附件三。
