恒强HQPDS 制版系统更新 中文
PDS软件操作书
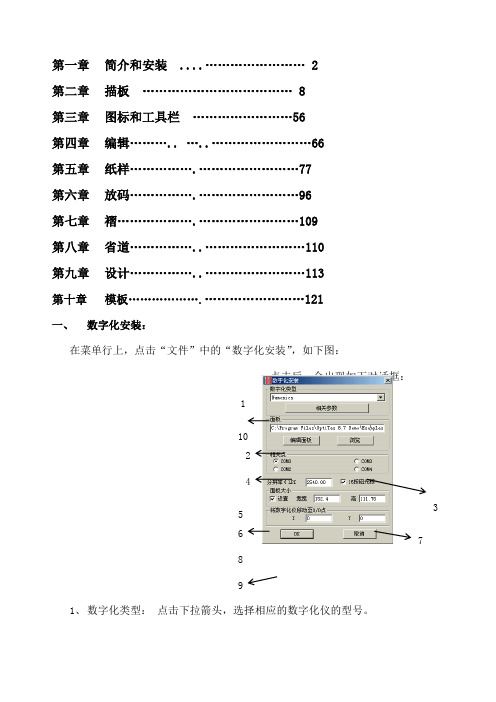
1 102 4 5 376 8 9第一章 简介和安装 ............................ 2 第二章 描板 .................................... 8 第三章 图标和工具栏 ........................56 第四章 编辑........... .............................66 第五章 纸样........................................77 第六章 放码........................................96 第七章 褶...........................................109 第八章 省道.........................................110 第九章 设计.. (113)第十章 模板 (121)一、 数字化安装:在菜单行上,点击“文件”中的“数字化安装”,如下图:点击后,会出现如下对话框:1、 数字化类型: 点击下拉箭头,选择相应的数字化仪的型号。
2、面板:输入路径。
3、浏览:面板的路径可以在此进行浏览选择。
4、编辑面板:点击后出现如右对话框:此面板可用来编辑纸样的名字等文字,在读图时,直接输入。
5、相关点:在这里选择连接埠。
6、分辨率:输入读图板的分辨率,以象素为单位。
例如:Numonics型号的读图板的分辨率为2540象素。
7、16键光标:打勾即为16键光标;不打勾即为4键光标。
8、面板大小:在设置处打上勾,即可后面设定面板的大小。
9、将数字化移动至0/0点:是指原点,即读图板有效范围区的左下角位置。
10. 相关参数:点击后会出现如下对话框:将此对话框中的参数记下来,然后在桌面上“我的电脑”的图标上点击右键,选择“属性”,出现如下对话框,选择“设备管理器:双击com口的连接埠,出现如下对话框,选择“端口设置”将“端口设置”中的参数修改成和“相关参数”中一致,点击“确定”,5 即已将“数字化”安装完成。
HQPDS 恒强制版更新 中文
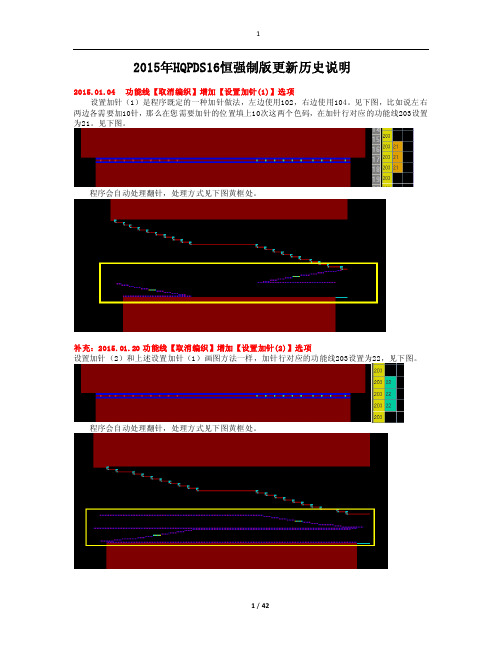
2015年HQPDS16恒强制版更新历史说明2015.01.04 功能线【取消编织】增加【设置加针(1)】选项设置加针(1)是程序既定的一种加针做法,左边使用102,右边使用104。
见下图,比如说左右两边各需要加10针,那么在您需要加针的位置填上10次这两个色码,在加针行对应的功能线203设置为21。
见下图。
程序会自动处理翻针,处理方式见下图黄框处。
补充:2015.01.20 功能线【取消编织】增加【设置加针(2)】选项设置加针(2)和上述设置加针(1)画图方法一样,加针行对应的功能线203设置为22,见下图。
程序会自动处理翻针,处理方式见下图黄框处。
2015.01.05 功能线【取消编织】增加【自动加针】选项自动加针是程序既定的一种加针做法,不需要特定的符号,比如说左右两边各需要加10针,那么在您画图按下面图片的方法,然后在加针行对应的功能线203设置为12。
见下图。
程序会自动计算针数来实现加针。
2015.01.06 工艺单参数增加【分别翻针】开关意思是在下图中将“分别翻针”打勾,则生成的图形对应的功能线224里会自动设置为分别翻针1,不需要手工在功能线224里面设置分别翻针了。
2015.01.07 工艺单参数支持设置【缩针】段数意思是支持我们制版者自由设置缩针行的度目段。
见下图。
2015.01.08 工艺单参数增加【主纱落布行数】设置用于设置主纱落布行数,见下图,设置为20行则生成的图形中箭头处为20行,见下图。
2015.01.09 工艺单其他类型支持【加针】选项是指工艺单输入中支持设置加针,见下图。
2015.01.10 编译选项增加【展开节约(2)】设置见下图,在功能线201设置了节约(2)为3次编译时,将展开节约(2)打勾,见下图编译后,可以看到程序自动将3次节约展开了。
见下图。
2015.01.13 高级设置中支持设置横机【F3切换"花样<-->引塔夏"】开关意思是按快捷键F3 ,可以切换下面这几个图层。
维护红宝书自动升级和自动更新的说明文档
维护红宝书:自动升级和自动更新的说明文档文档记录:程序安装文件的自动升级1.自动升级工具Autoupex客户端安装包中的Autoupex程序除支持新的按文件分别升级方式外,也支持老的按ZIP 包升级方式。
如果要需要升级autoupex.exe文件本身,请将之改名为autoup1.exe放在升级包或升级目录下。
如果是带皮肤文件的升级工具,除了autoupex.exe改名外,也需要将res_autoup.dll 改名为res_autoup1.dll放在升级包或升级目录下。
升级程序V2(需定制)1.支持先下载升级包再升级,非交易时间或程序退出后仍后台升级,下次启动时完成升级。
2.支持流控3.提高升级过程的稳健性4.支持某版本前不提示安装,支持强制、静默、提示等升级方式5.全新的升级界面,简洁易用,支持换肤,过程中支持图片轮播等2.ZIP包方式进行整体升级对于ZIP包升级方式,直接将要升级的所有文件打一个zip包(注意:不要在zip包里面再打了一个同名目录,直接将这些文件打包),同时要人工制作一个同文件名的txt文件,这个txt文件只写明此次升级的版本号,这个版本号要与行情主站中的autoupinfo*.txt中设置的此次升级的版本号一致。
将这两个文件放在网站上同一个目录,同时在autoupinfo*.txt 中指明这个URL路径。
注意:如果对升级过程不非常清楚的情况下,建议按ZIP包方式进行升级。
3.按文件进行分别升级自动升级文件制作工具AutoMakeUpdateInfoFile用以下自动升级文件制作工具来处理:a)将需要更新的文件放在一个目录下,设为文件本地目录注意:目录下必要包含一个tdxw.daq,这个文件中配置的必须是本次升级的版本号。
b)新的升级除了提供txt文件(记录各文件的信息),还必须在txt同目录下放一个目录,这目录下放所有的可能需要更新的文件。
如果考虑到兼容性,也可以将此目录打成一个zip包,放在网站上(同原来一样)c)输入本次的升级版本号。
使用ProSave进行“操作系统更新”或“恢复到出厂设置.docx
Operat ing system update with ProSave ProSaveFAQ July 2008h(1p •.ViMjppCffl 如WeTWGC miSIEMENS冲Qi!巧 戶艸白鬥曲利日空Q K 列rviE* off 尊r*41®%Service & SupportSIEMENSAn swers for in .4=2」U^ruqBirQuesti onThis entry is from the Service&Support portal of Sieme ns AG, Sector In dustry, Industry Automati on and Drive Tech no logies. The con diti ons of use specified thereapply (/nutzungsbedingungen ).Go to the following link to download this document.http://support.automatio n.sieme /WW/view/de/19701610QuestionHow do you do an operati ng system update (OS update) on operator pan els withProSave?AnswerFollow the in struct ions and no tes listed in this docume nt for a detailed an swer tothe above questi on.OS_Update_ProSaveContentsOS_Update_ProSave Contents1 Operating system update with ProSave ...................................................... 4 1.1 Operat ing system update (OS update) (4)1.2 Resett ing the operati ng system to the factory sett ings via the "Reset to factorysett in gs" fun cti on and PPI Multi Master cable (5)1.3 Resett ing the operat ing system to the factory sett ings via Ether net connection7 2 Additional Information ................................................................................................ 122.1 Cable conn ecti on betwee n PC and operator panel ................................................. 12 2.1.1 Operati ng system update ........................................................................................... 12 2.1.2 Resetting the operating system to the factory settings (booting) ................................ 12 2.2 Set the image path / file in ProSave ........................................................................... 14 2.3 Determ ining the MAC address ................................................................................... 15 3 Problem Analysis ........................................................................................................ 163.1 Disco nn ected conn ection whe n usi ng the RS232/PPI multi-master cable..... 16 3.2 Check box not available in ProSave ........................................................................... 16 3.3 Error message during transfer of the configuration .................................................... 16 3.4 MP 377 "Reset to factory setti ngs" (booting) ............................................................. 16 3.5 A connection to the operator panel cannot be established ......................................... 17 3.5.1 Check tran sfer type and address on the operator panel and in ProSave .... 17 3.6 Check cable connection and connector ...................................................................... 18 3.6.1 Check the PG/PC in terface on the con figurati on computer ..................................... 19 4History (20)1 Operat ing system update with ProSaveBelow is a summary of how to do an operating system update with ProSave. « The operat ing system of the operator panel depe nds on the versi on of WinCCflexible and ProTool used.You should do an operat ing system update whe never the operati ng system of the operator panel does not match the software versi on used. In formati on on this is available in sect ion 1.1 . « If no operable operator panel image exists on the operator pan el, you can only update the operat ing system by means of a reset to factory setti ngs. In formati on on this is available in sect ion 1.2 and secti on 1.3 . « If you have questi ons on establishi ng the conn ecti on or problems with theoperati ng system update, please refer to chapter 2 and chapter 3 respectively.Operati ng system update (OS update)Please proceed as follows to perform an operati ng system update.Table 1-11.11 Operat ing system update with ProSaveOS_Update_ProSave1 Operati ng system update with ProSaveOS_Update_ProSaveResetting the operating system to the factory settings via the "Reset to factorysett in gs" fun ctio n and PPI Multi Master cableProceed as follows to reset an operator panel to the factory sett ings.Table 1-21.21 Operat ing system update with ProSave9. OS_Update_ProSave No.Procedure8765 4321The DIP switch sett ings are marked with 0 and 1 on the cable hous ing.Note:Make sure that the correct Image path is set.This applies in particular if WinCC flexible and ProTool are in stalled jointly on your computer (see also section 2.2 ).Check the " Reset to factory settings " check box or the " Boot" check box (in earlier versions of ProSave).Note:If the " Reset to factory settings " check box is not displayed, refer to section 3 2 Click on the " Update OS " butt on and switch the operator panel back on. A connection is established betwee n "ProSave" and the operator panel and the operati ng system update is started.After tran sfer of the data, "ProSave" requests you to reboot the operator pan el (switch off and on).The operator panel the n performs additi onal in stallati on steps.Tran sfer the project4. 5.6.Note:If you reset the operat ing system to the factory sett in gs, you cannot use all the com muni catio n connections and cables.Information on which cable you can use for which operator panel is available in section 2.1.2 .ProSaveStart ProSave via "Start > SIMATIC > ProSave > ProSave".In the ProSave menu bar you select the General menu and define the device type and connection.For a PPI connection you select " Serial " as the connection type. You do not have to set the baud rate on the multi-master cable for an operati ng system update.Switch to the " OS Update " menu in the menu bar.Now, by default, an Image vers ion appropriate for your operator panel is displayed.7.8.10.1 Operati ng system update with ProSaveOS_Update_ProSaveResetti ng the operat ing system to the factory setti ngs via Ether net conn ecti onBelow we take the example of an MP 377 Touch to show how to reset an operator panel to the factory sett ings via Ether net.1.3Note1 Operat ing system update with ProSaveOS_Update_ProSave ProcedureAssig n IP addressAssig n a unique IP address to your PG/PC and your operator pan el. Make sure that the IP addresses are in the same sub network. Sample PG/PC IP: 192.168.0.200Subn etwork: 255.255.255.0 Sample operator panel IP: 192.168.0.210Subn etwork: 255.255.255.0 More in formati on on how to establish an Ether net connection betwee n a PG/PC and an operator panel is available in Entry ID: 23800567Set the PG/PC in terfaceIn the SIMATIC Man ager you select the menu comma nd "Tools > Set PG/PC In terface...".Set the in terface parameters used to "TCP/IP -> Your network card ".PG/PC - Sdinittstelle EiinsteleinZugai 门口wpu 门kt Appljk^iun:*7 口 HLINE忸TEP?]-'T 匚円 IF :[StandaidliiSTEPTl4. 5.IHPC/PPI cablclPPIIJ^TCP/IP-□H TCF /IF ->1394 Net Adapter—1HICP/IP-:G浄:|TCP /IP ->[Parametnerung Ihrsf NDIS-CF? mil 1TFMF PiatokoipFC-lDDej)i-Sch™»3lelerHinzuluQen/EnlfeirmOKAus^ahlenAbbiechen HifeMake tran sfer sett ings on the operator panelNo tran sfer sett ings n eed to be made on the operator pan el.Keep a record of the operator pan el's MAC address.Refer to sect ion 2.3 for how to determ ine the MAC address.6. Switch off the power supply for the operator pan el.No. 2.3.1 Operati ng system update with ProSaveOS_Update_ProSaveNo. 7.ProcedureEstablish cable connectionConnect the operator panel and the PG/PC using an Ether net cable (cross-over or patch cable).8.ProSaveStart ProSave via "Start > SIMATIC > ProSave > ProSave"p tcnmjniMtioii卜 西 OFFtft AppitiMcns卜 * UtlitiK卜ficcessories bf ebook ^ppkatiar Panel StartupWlrdovt, Messtnger Wnd^s Mpve Mgl^tWM WK Pdwer5MlJ0怖rd 】储 MtdA Pl&rtr(■ pToSave►£"t ProSave卜百 STEP 7卜□ WWC flenNERurtimE200B二| ID Keypad Deiiener ¥1.0.6.35t Q Dacuinentatkjn 卜□ Harmed on*9.Switch to the " General " menu in the ProSave menu bar.Select the appropriate device type and defi ne "Ether net" asconnection. For "C onn ecti on parameters" you en ter the IP address of the operator pan el.1 Operat ing system update with ProSaveOS_Update_ProSaveProcedureSwitch to the " OS Update " menu in the menu bar.Now, by default, an Image vers ion appropriate for your operator panel is displayed.Note:Make sure that the correct Image path is set.This applies, in particular, if WinCC flexible and ProTool are in stalled jointly on your computer (see also section 2.2 ).Check the " Reset to factory settings " check box or "Boot" check box (in earlierversions of ProSave).The "MAC address" option field is then displayed. En ter the operator pan el's "MAC address" here.Note:If the " Reset to factory settings " check box is not displayed, refer tosect ion 3.2 .Click on the " Update OS " butt on and switch the operator panel back on. A connection is established betwee n "ProSave" and the "operator pan el".No. 10.11.1 Operati ng system update with ProSaveProcedureYou will the n receive a security warni ng.Ack no wledge it with "Yes" if you have no lice nses in stalled on the pan el.If you ack no wledge with " Yes", the process continu es.The memory is deleted and the selected data is tran sferred.13.Tran sfer the projectAfter the in stallati on is complete, the "Con trol Pan el" is displayed on the operator pan el.For a subseque nt project tran sfer, you first make the required tran sfer sett in gs.In the case of Touch operator pan els, you should calibrate the scree n beforeha nd un der"Control Panel > OP > Touch".14.Now you can tran sfer the con figurati on.No. 12.2 Additi onal In formati onAdditi onal In formati onCable connection betwee n PC and operator panelOperati ng system updateWhe n perform ing an operati ng system update, you can use all the com muni cati on conn ecti ons supported by your operator pan el.Resett ing the operat ing system to the factory sett ings (boot ing)If you reset the operati ng system to the factory sett in gs, you cannot use all the com muni cati on conn ecti ons and cables.In formati on on which cable you can use for which operator panel is available in the table below.22.12.1.12.1.22 Additi onal In formati on* For the RS232/PPI multi-master cable, you set DIP switches 1 to 3 accord ing to the baud rate selected in ProSave.DIP switches 4 to 8 must all be set to ZERO.2 Additi onal In formati onSet the image path / file in ProSave2.2In the following cases, you must change the image path or the image file accord ingly:1. After you have set the ProTool image path for the operator panel displayed, youmust set the image path for WinCC flexible if you now wish to use the sameoperator panel in WinCC flexible.2. If you n eed an earlier vers ion of Image tha n the one curre ntly displayed.Note * The image path sett ing is device-related. The sett ing is reta ined for the selected panel type after ProSave is closed.« Beforeha nd, make sure that the correct Image path is set. This applies in particular if WinCC flexible and ProTool are in stalled joi ntly on your computer.In order to set the image path in ProSave, click the butt on to the right of the imagepath and browse through the folder tree to specify the folder path in which the imagefiles are located.In the folders you find the image files required for the respective operator panel.Figure 2-1Imago path|CAFiDgiam Fi«\-5iemmS5IMAriC Wr£C liswtiteWrJCr flE»db c IDpenrig I mallei: WhtosCE IrTiage-'H-eruan: OkE APiognm FfesX^iErrerflXSIMATIC 册C匚IfeHhfeWirJCEMcUe P" 277, MP 277 6" Kty. MP OT fr' MF 拧71 tT K J!卑M户訂715.03 Problem An alysisMP 377 "Reset to factory setti ngs" (booti ng)If the MP 377 operator panel cannot be reset to the factory sett in gs, the n check the Image vers ion of the MP 377.MP 377 operator pan els with Image vers ion as fromWinCC flexible 2008 (Image versio n as from V01.00.02.00_01.83) in stalled have the new parameter " Prepare for Reset ". In this case refer to Entry ID: 35677293 .33.13.23.3Problem An alysisDisc onn ected conn ecti on whe n using the RS232/PPI multi-master cableIf the connection is disconnected when updating the operating system, set a lower bit rate.If you are using high bit rates, then you must implement the RS232/PPI multi-master cable with "E-Stand 03" (development status 03) or higher.Check box not available in ProSaveIf the "Reset to factory sett in gs" check box is not displayed, the n recheck the connection setti ngs made in ProSave. It is possible that the operator panel does not support the tra nsfer type required for this opti on. Refer here to Table 2-1 in section 2.1.2 .Error message duri ng tran sfer of the con figurati onYou have cha nged the operati ng system of your operator panel and duri ng tran sfer of the con figurati on you receive the message that the operat ing system vers ion of the operator panel does not match the software vers ion used.In this case, prior to updating the operating system, check that the image path has bee n set correctly and that you have selected the correct image file. Refer here to section 2.2 .Example of an error message in WinCC flexible 2008.3.4 Figure 3-1Some points are give n below, which you should check if no conn ecti on is established口 th t l d P S 3 P bl A —LiA conn ecti on to the operator panel cannot be establishedSome points are given below, which you should check if no connection is establishedbetwee n the operator panel and ProSave.Check tran sfer type and address on the operator panel and in ProSaveCompare the tran sfer sett in gs on the operator panel with those in ProSave. Example:ProSave specificati on Tran sfer via PROFIBUS; Panel address 10Make sure that "Pa nel is the only master on the bus" is checked for the tran sfer sett ings on the operator pan el.More information on the topic of "transfer settings" is available at the following link. http://support.automati on .sieme /WW/view/de/238024043.5 3.5.1 Figure 3-23 Problem An alysisCheck cable connection and conn ector3.6MPI/PROFIBUS cablePlease check the follow ing poin ts:« Cable connection betwee n the operator panel and the con figurati on computer.-Check the cable for damage.« Bus conn ector especially the conn ecti on of the term in ati ng resistors.-Term in ati ng resistors ON/OFF.The following guideline value applies:« Bus term in at ing resistor OFF:-Bus conn ector with "two" cables conn ected.« Bus term in at ing resistor ON:-Bus conn ector with "one" cable conn ected.More in formati on on the topic of "bus term in ati ng resistors" is available at thefollowing link.http://support.automati on. sieme /WW/view/de/187276RS232/PPI multi-master cableWhe n using an RS232/PPI multi-master cable, please note the switch setti ngs.Refer here to the entry at the following link:http://support.automatio n.sieme /WW/view/de/16532946Ether net cableUse a "crossed" Ether net cable for the conn ecti on betwee n a PG/PC and anoperator pan el.If you use a "patch" cable, you need a switch in addition.Check the PG/PC in terface on your con figurati on computer. 3 Problem An alysis Check the PG/PC in terface on the con figurati on computer361Check the PG/PC in terface on your con figurati on computer.・ In Windows XP—"Start > SIMATIC > SIMATIC NET > Set PG/PC in terface".« In STEP 7—"Me nu bar: Tools > Set PG/PC in terface..."Make sure that the node address is set to "0".We also recomme nd that you check the "PG/PC is the only master on the bus" option.Figure 3-34 History4 HistoryTable 4-1。
系统升级说明文档
系统升级说明文档第一篇:系统升级说明文档系统升级功能培训文档一、系统调整及升级功能培训1、异动表模板单位异动表导出:失业保险-> 人员管理-> 人员异动【失业人员申领资格初审表打印】:导出单位当前失业状态人员的领取资格初审表【导出人员异动信息表】:导出单位当前在业状态人员的标准异动格式表新版异动表格式:对于从本地转出后又重新转入的人员,可在人员编号出带入系统中已经存在的个人编号。
个人月度应缴会根据异动时间自动按照对应的比例进行费用核算新版失业人员申领资格初审表:2、人员基本情况及缴费登记表表格导出位置:失业保险-> 年度登记管理-> 年度登记:【导出当年个人信息表】:导出单位当前系统中的在业缴费人员【导出当年个人信息表】:导出单位指定年份的在业人员,指定年份3月份的数据新版人员基本情况及缴费登记表:个人缴费比例:默认为0.007,如果需要年审2014年之前的数据,则需要调整该比例为0.01。
3、人员缴费月数变更业务针对业务办理过程中出现的一些特殊状况(比如人员的合理视同缴费没有在参保时带入系统、参保后从外地有正式的缴费记录转入记录等),系统提供这个功能,通过申请、审核、审批的多级审核后即可将这部分数据修改进系统。
4、人员异动记录变更业务由于单位在人员异动办理过程中异动原因的填报错误,后续提出申请需要进行修改的,可通过此业务进行异动原因的修正。
5、在职职工转迁针对在职职工提供的一种转入和转出操作。
转出操作是只需要该人员在失业状态并且不在领取状态即可通过该功能转出(比如领取人员在未全部领取完毕后在外地就业的转移,由于不需要转移待遇,所以无法从待遇人员处转移)。
转入主要提供人员异动进入系统是就附带了转移单的状况。
人员异动进入后可通过该功能对转移的月数进行保存。
6、人员基本信息的变更处理系统中所有人员(含失业人员和待遇享受人员)的基本信息的变更登记。
待遇部分不再提供基本信息的变更处理。
系统升级情况说明范文
系统升级情况说明范文英文回答:System Upgrade Status Report.Purpose:This report provides a comprehensive overview of the system upgrade process, including its current status, key milestones, potential risks, and mitigation strategies.Background:The system upgrade was initiated to address critical security vulnerabilities, improve system performance, and enhance user experience. A thorough assessment of the system's current state was conducted, and a detailed upgrade plan was developed.Current Status:The upgrade process is currently underway and has progressed according to schedule. The following key milestones have been completed:Phase 1: Preparatory Phase.System backup and data migration.Installation of upgrade software.Phase 2: Upgrade Execution.Upgrade and testing of system components.Rollback plan preparation.Phase 3: Post-Upgrade Validation.System verification and testing.Performance monitoring.The system is currently in the post-upgrade validation phase, where it is undergoing rigorous testing to ensure stability and optimal performance.Potential Risks and Mitigation Strategies:The following potential risks have been identified during the upgrade process:Data Loss: The risk of data loss during the backup and migration process is mitigated by implementing a robust backup strategy and conducting data integrity checks.System Downtime: Unplanned system downtime can occur during the upgrade execution phase. To minimize this risk, the upgrade process is scheduled during off-peak hours, and a rollback plan is in place to restore the system in case of any unexpected issues.Performance Degradation: The upgrade may introduce performance issues in some system components. Thoroughtesting and performance monitoring are conducted during the post-upgrade validation phase to identify and address any performance bottlenecks.Security Vulnerabilities: The new system version may introduce new security vulnerabilities. Regular security audits and patch management processes are implemented to mitigate this risk.Conclusion:The system upgrade process is progressing smoothly, and all key milestones have been met. The system is currentlyin the post-upgrade validation phase, where rigoroustesting is conducted to ensure stability and optimal performance. Potential risks have been identified and mitigated through a comprehensive risk management plan. The system is expected to be fully operational and upgraded by the target completion date.中文回答:系统升级情况说明。
PDS软件操作书
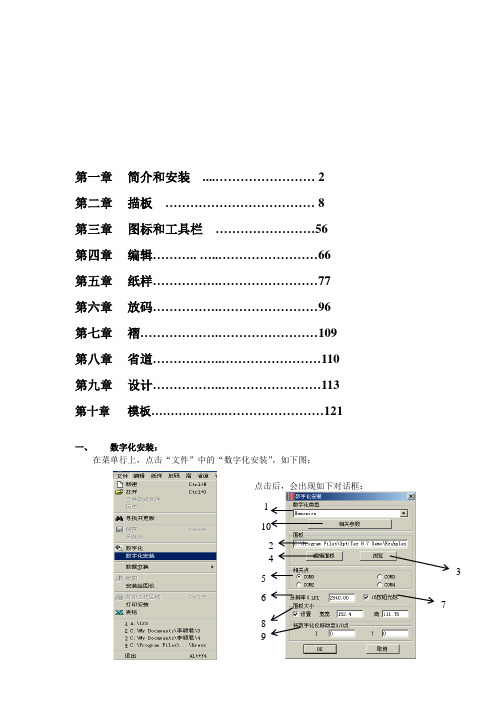
1 102 4 53 76 8 9第一章 简介和安装 ............................ 2 第二章 描板 .................................... 8 第三章 图标和工具栏 ........................56 第四章 编辑........... .............................66 第五章 纸样........................................77 第六章 放码........................................96 第七章 褶...........................................109 第八章 省道.........................................110 第九章 设计.. (113)第十章 模板 (121)一、 数字化安装:在菜单行上,点击“文件”中的“数字化安装”,如下图: 点击后,会出现如下对话框:1、数字化类型:点击下拉箭头,选择相应的数字化仪的型号。
2、面板:输入路径。
3、浏览:面板的路径可以在此进行浏览选择。
4、编辑面板:点击后出现如右对话框:此面板可用来编辑纸样的名字等文字,在读图时,直接输入。
5、相关点:在这里选择连接埠。
6、分辨率:输入读图板的分辨率,以象素为单位。
例如:Numonics型号的读图板的分辨率为2540象素。
7、16键光标:打勾即为16键光标;不打勾即为4键光标。
8、面板大小:在设置处打上勾,即可后面设定面板的大小。
9、将数字化移动至0/0点:是指原点,即读图板有效范围区的左下角位置。
10. 相关参数:点击后会出现如下对话框:将此对话框中的参数记下来,然后在桌面上“我的电脑”的图标上点击右键,选择“属性”,出现如下对话框,选择“设备管理器:双击com口的连接埠,出现如下对话框,选择“端口设置”将“端口设置”中的参数修改成和“相关参数”中一致,点击“确定”,即已将“数字化”安装完成。
新一代恒强制版新功能实务教材
说明1、新一代制版软件(16把纱咀),它是在原先制版软件(8把纱咀)的基础上增加了一些更加注重智能化功能的内容,从而使制图更加容易,快捷的实现编织程序。
这个软件既可以按照智能方式进行花型程序的设计,也可以按照以往的制版模式来进行花型程序的设计。
2、新一代恒强制版系统制作的花版需要在拥有配套的电控程序的机器上才能使用。
3、新一代恒强制版可以打开、编缉、处理原制版软件的花版,也可以转换原制版软件的上机文件。
原制版系统不可以打开新一代恒强制版软件的花版。
4、由于恒强公司仍在不断完善和更新软件,往后我们将根据新的软件继续做相应的补充。
5、在使用软件的过程中,如果发现错误,或者有建议,请与恒强公司联系。
本教材最终解释权归浙江恒强科技股份有限公司所有新一代制版与原制版的文件区别1,原恒强制版软件所产生的文件有:2,新一代恒强制版软件所产生的文件有:新一代制版新功能列表新一代制版新功能使用1、新增横机工具为方便制版者使用,新一代恒强制版系统增加了几个横机工具,如下图:1)导入CNT文件在制版中是否经常会发生这样一种情况呢?一个衣片的PDS和BMP文件都没有,只有从机器上拷贝出来的上机文件。
如何在制版系统中打开呢?这就需要用到“导入CNT 文件”这个功能了,但前提条件是PAT图和CNT动作这两个要素条件必须同时存在。
首先新建一个空白文档,点横机——工具——导入CNT文件——在弹出的画面中进行操作——找到需要导入的CNT文件——确定,这样就可以把图形导进来,并且相应的功能线也都会自动填好,我们可以把它保存为PDS,可以对它进行编译,再次编译的结果和这个CNT是相同的。
如下图:2)转到后床编织3)显示纱嘴停放点下图中,1号和7号纱咀要有拖出的一条线形轨迹,由16号色码形成的轨迹,但在图上并没有显示出16号色。
上述花样编译完成以后,单击图标,系统会自动显示其合理停放点。
如下图:该功能在本软件只做参考,不需使用,因为系统会自动将纱嘴做带入带出处理。
工缝机PDS打版软件操作说明书
恒强制版说明书
恒强制版系统使用说明
10.2 首次使用 ................................................................................................................. 139 10.3 画图 ......................................................................................................................... 145 10.4 纱嘴设置 ................................................................................................................. 150 10.6 自动编程(自动出带).............................................................................................. 151 10.7 拆分图查看 ............................................................................................................. 152 10.8 拆分图示例(ABC.EXE 编译) .................................................................................... 152 11. 部分针法图解........................................................................................................................155 11.1 单面正针(前床) ...................................................................................................... 155 11.2 单面反针(后床) ...................................................................................................... 156 11.3 四平编织(总针)....................................................................................................... 157 11.4 1X1 单罗纹 ............................................................................................................ 157 11.5 2X1 双罗纹(2X1 坑条).......................................................................................... 158 11.6 2X2 双罗纹(2X2 坑条).......................................................................................... 159 11.7 挑孔(网眼/纱罗组织) .......................................................................................... 159 11.8 绞花(扭绳) ............................................................................................................... 160 11.10 提花(单面提花/单面拉虚线) .............................................................................. 161 11.11 嵌花(INTARSIA) ........................................................................................................ 162 12. 附件 色块表..........................................................................................................................163
Glunz-Jensen G NUCII 软件升级说明书
the upper side panel (top figure),
•
or 2
• through the upper side panel (bottom figure).
ppp = processor platform (e.g. hdx)
sss = software version (e.g. 20100316)
51436 ...pdf Quick Intro, Control Panel
(English)
51464 ...pdf Control Panel, Service Guide
51412 ...pdf Control Panel, Users Guide (English)
Manuals reflecting the software update are available on the software download site. User manuals are available in English, German, French, Spanish and Chinese. Print manuals as colour prints.
This upgrade will take approx. 1/4 hour.
"
1 Insert the memory stick into a USB port on a PC. Please visit /support for download of software.
$
Visit /support. Enter the software download site. 2 If it is not clear which software to download, a table showing processor types will
PivotWare System v6.15.x.x 安装和升级手册说明书
升级软件............................................... 35
升级 CORE.HOST 服务.................................... 35
mm
A/B
100
B
174
C
270
将工作站连接到电源 将附带的电源适配器(140/240VAC)连接到工作站。
英寸 3.94 6.85 10.63
- 10 -
6159924340 - 03/2018
使用以下任一电源线将电源适配器连接到电源。 只使用以下电源线。
电源线(欧洲) Power cord (US) Power cord (UK) 电源线(中国)
安装 Micro 远程 IO 盒 ............................ 18
软件安装 .................................................. 22
安装软件............................................... 22
CVI FUSION
操作系统
.NET 版本
可用磁盘空间 显示器分辨率 内存
Windows 7-SP1(32 位和 64 位) Windows 10(32 位和 64 位) 要求 .NET 4.6.2。 推荐最新版本 500 MB 1366 x 768 或更高 2GB 内存(建议 4GB 内存)
数据库
• INFINITY 纳米和微型远程 I/O 盒专用于控制 I/O 设备(传感器或灯 等)或通过 I/O 进行通信的工具。
恒强制版7月新增功能详细说明
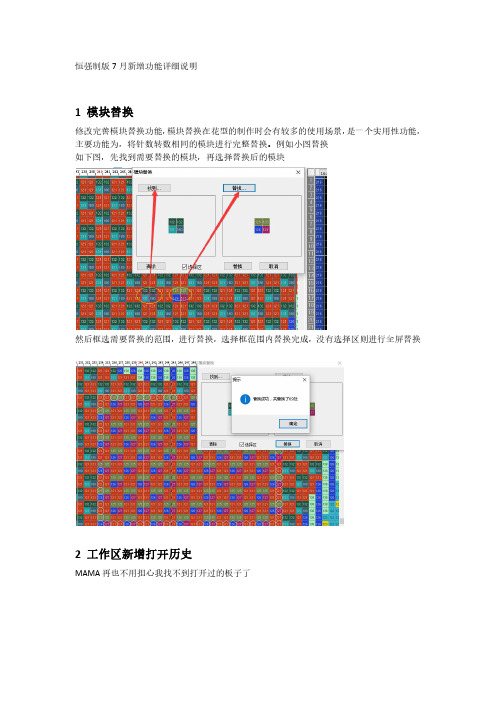
恒强制版7月新增功能详细说明1模块替换修改完善模块替换功能,模块替换在花型的制作时会有较多的使用场景,是一个实用性功能,主要功能为,将针数转数相同的模块进行完整替换。
例如小图替换如下图,先找到需要替换的模块,再选择替换后的模块然后框选需要替换的范围,进行替换,选择框范围内替换完成,没有选择区则进行全屏替换2工作区新增打开历史MAMA再也不用担心我找不到打开过的板子了3单面修边支持指定色码修边对于需要进行锁边的花型,可以不用再滑动描绘,快速制作锁边花型框选需要锁边范围,使用此工具,输入锁边色码即可4SHIFT键显示当前色码小图动作长按SHIFT键,鼠标移动到小图位置,显示小图当前动作,方便查看小图花型动作5局部仿真允许编译以后进行局部区域的3D仿真,框选需要仿真的区域,选择局部仿真即可提高仿真速度,局部仿真效果更好。
鞋面制版功能更新1菲林处理(CDR)对于CDR软件导出的BMP,可以直接选择菲林处理(CDR)模式,保留CDR导出的单针线条,不需要再进行高斯,二值等处理,直接可以进行区域填充颜色,如下图2DPI反算对于非扫描图片,程序无法自动获取实物长度宽度,需要在DPI反算中设置实物大小,根据量尺的实物长度/宽度设置,DPI反算之后就能准确放码DPI反算要在裁剪之后进行,否则其他多余空白部分也会被算入实际长宽,这样会影响结果。
我们也可以简单的理解为,在放码之前进行DPI反算的设置是最准确的。
DPI反算以后进行放码处理,此时放码处理中显示DPI反算的实物长宽。
局部误差可以在上方进行微调。
3工艺生成区域图在工艺处理同时,在花型上方生成区域图,在压光后对比菲林的区域修改完全可以在区域图中完成。
可以实现的区域修改功能包括但不限于以下几种类型:中心线绘制,尺码数字输入,区域线条的调整,区域大小的调整,以及加针工艺的制作制作完成以后直接在图片上右键复制,粘贴到恒强图片处理中,再次工艺处理即可粘贴到图片处理加针方式可以选择偷吃,自动完成加针偷吃工艺工艺处理后的加针大货模式,自动生成废纱处理,只要第一个初版做好区域匹配属性,一键完成裁剪款所有工艺。
恒强制版系统教材

恒强制版系统教材 Revised by Hanlin on 10 January 2021恒强制版系统—右键—打开—文件—新建花板—设置画布大小F2:回到画布原点F3:切换花样—引塔夏F5:上一色F6:下一色F9:切换网络线F10: 扩到最大/缩到最小F11:缩小F12:扩大注意:开始制版时需将画布扩大到能看到模拟组织然后按F2让画布回到原点,每一个版子,必须从原点开点。
工艺单上面,一转等于画布两行。
画笔:在画布任一位置点击一针一行。
直线:在画布里画出一行选定的色码。
填充距行:在画布里画出要求的行数及针数,另一用法当画错时可选定0号色将其区域涂上。
复制工具:1.选取选择框将框住的区域进行任意地方的挪动。
2.线行复制将框住的区域进行360度的有规律复制。
3.阵列复制将框住的区域进行直列或竖列的复制。
4.多重复制将框住的区域按照自己选择的规律进行复制(做收针时候用的最多)复制工具用法:一.左键点击需要的复制工具。
二.在画布里选择需要的复制的区域点击左键确定。
三.在区域里继续点左键移动鼠标进行复制。
四.达到要求后点作键确定注意:当需要取消选择框时,点击键盘ESC键Ctrl+Z撤销前面步骤设置撤销步骤:高级—设置—高级—撤销数量—当前制版系统开始时没有选择机型及画布大小时:高级—设置—高级—禁止选择机器类型上的勾去掉,确定。
文字:在画布里输入文字填充填充需要的区域(用复制工具将需要填充的区域框住然后在点填充工具)填充行:一行一行的进行填充制版的原理每一个版子都是通过色码,色码对应的针法和功能线搭配而成。
色码共有256种,120种色码为制版时常用色码 120—183为使用者巨集(模块)色码共64种,184—255无法使用。
色码讲解正常编织色码:1.前编织(有翻针动作)2.后编织(有翻针动作)3.前后编织(有翻针动作)8.前编织(无翻针动作)9.后编织(无翻针动作)10.前后编织(无翻针动作)吊目色码(元宝色码)4.前吊目5.后吊目6.前编织后吊目7.前吊目后编织14.前后吊目落布色码15. 前落布17. 后落布落布指将当前针数的衣片(线圈)落下16.无选针踢纱嘴指将纱嘴带出编织区域之外。
师慧CVS电脑视频制作系统中文环境升级方法
师慧CVS电脑视频制作系统中文环境升级方法
张树敏
【期刊名称】《电视字幕.特技与动画》
【年(卷),期】1997(004)006
【摘要】我单位电视节目后期制作使用的字幕机是1993年购买的由师慧公司生产的CVS-6M分量式电脑视频制作系统。
最近,为了升级原视频制作系统中的486计算机,我们配置了一台AcerAtlos7800。
在升级的过程中,却出现了一些意想不到的问题。
下面我将解决问题的方法介绍给大家,希望对可能遇到类似问题的同行有所启迪和帮助。
将字幕机的接口卡及字幕系统的软件全部安装到新计算机上。
【总页数】1页(P44)
【作者】张树敏
【作者单位】国家技术监督局信息中心
【正文语种】中文
【中图分类】TN948.4
【相关文献】
1.CVS—6M型电脑视频创作系统 [J], 景湖
2.基于人工智能方法判断环境信息的变电站视频及环境监控系统升级方案设计 [J], 张建华
3.专业升级面子兼取——三菱MDL231CV专业图形视频处理显示器 [J],
4.专业升级面子兼取三菱MDL231CV专业图形视频处理显示器 [J],
5.师慧提供的非线性编辑设备 REEL TIME师慧RT实时非线性视频工作站 [J],
因版权原因,仅展示原文概要,查看原文内容请购买。
合强智能办公系统V3.81升级说明

合强智能办公系统V3.81升级说明合强软件机构2006年10月本文以合强智能办公系统 V3.8升级到合强智能办公系统V3.81为例,详细说明合强智能办公系统升级的操作步骤。
系统升级前请务必做好系统数据备份工作,建议备份整个Lotus文件夹;系统升级前建议将“日常办公”中所有未流转完的“工作文档”流转完成并归档。
【升级步骤】:1.1 升级前准备1、关闭Lotus Domino Server,断开服务器的网络(断开网线);2、系统数据备份,请参照《合强智能办公系统的备份与恢复》或备份整个Lotus文件夹;1.2 Lotus Domino环境整理1、删除Lotus\Domino\Data目录下的2个文件:servlets.properties、SysMember.txt; (注:在Linux操作系统上是在local\notesdata 目录下)2、删除Lotus\Domino\Data\domino\html目录下的:hqrs文件夹;(注:在Linux操作系统上是在local\notesdata\domino\html 目录下)3、删除Lotus\Domino\Data\domino\java目录下的4个文件:HQServer.jar、beandt.jar、poi-2.0-final-20040126.jar和dx.jar;(注:在Linux操作系统上是在local\notesdata\domino\java 目录下)1.3 程序安装具体步骤请参照“《合强智能办公系统 V3.81安装说明》中1.1.1 程序安装”。
注意:升级操作时,程序安装完成后,无需自动进行“系统初始化”。
1.4 模板文件签名1、打开Lotus Domino Administrator,切换标识符为服务器标识符 (Server.id) ;2、选择V3.81版本的模板库文件安装目录下(以下假设V3.81的模板安装目录为Lotus\Notes\Data\V381)的所有文件进行签名,签名时请选择“当前用户ID签名”;3、签名结束后,切换回管理员标识符(User.id),退出Lotus Domino Administrator。
2015年HQPDS16恒强制版更新(中文)
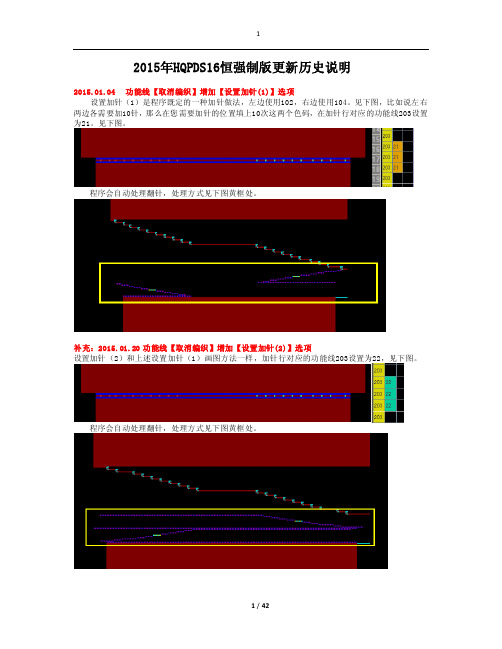
2015年HQPDS16恒强制版更新历史说明2015.01.04 功能线【取消编织】增加【设置加针(1)】选项设置加针(1)是程序既定的一种加针做法,左边使用102,右边使用104。
见下图,比如说左右两边各需要加10针,那么在您需要加针的位置填上10次这两个色码,在加针行对应的功能线203设置为21。
见下图。
程序会自动处理翻针,处理方式见下图黄框处。
补充:2015.01.20 功能线【取消编织】增加【设置加针(2)】选项设置加针(2)和上述设置加针(1)画图方法一样,加针行对应的功能线203设置为22,见下图。
程序会自动处理翻针,处理方式见下图黄框处。
2015.01.05 功能线【取消编织】增加【自动加针】选项自动加针是程序既定的一种加针做法,不需要特定的符号,比如说左右两边各需要加10针,那么在您画图按下面图片的方法,然后在加针行对应的功能线203设置为12。
见下图。
程序会自动计算针数来实现加针。
2015.01.06 工艺单参数增加【分别翻针】开关意思是在下图中将“分别翻针”打勾,则生成的图形对应的功能线224里会自动设置为分别翻针1,不需要手工在功能线224里面设置分别翻针了。
2015.01.07 工艺单参数支持设置【缩针】段数意思是支持我们制版者自由设置缩针行的度目段。
见下图。
2015.01.08 工艺单参数增加【主纱落布行数】设置用于设置主纱落布行数,见下图,设置为20行则生成的图形中箭头处为20行,见下图。
2015.01.09 工艺单其他类型支持【加针】选项是指工艺单输入中支持设置加针,见下图。
2015.01.10 编译选项增加【展开节约(2)】设置见下图,在功能线201设置了节约(2)为3次编译时,将展开节约(2)打勾,见下图编译后,可以看到程序自动将3次节约展开了。
见下图。
2015.01.13 高级设置中支持设置横机【F3切换"花样<-->引塔夏"】开关意思是按快捷键F3 ,可以切换下面这几个图层。
- 1、下载文档前请自行甄别文档内容的完整性,平台不提供额外的编辑、内容补充、找答案等附加服务。
- 2、"仅部分预览"的文档,不可在线预览部分如存在完整性等问题,可反馈申请退款(可完整预览的文档不适用该条件!)。
- 3、如文档侵犯您的权益,请联系客服反馈,我们会尽快为您处理(人工客服工作时间:9:00-18:30)。
2016年恒强HQPDS16制版系统更新说明
您好!首先,请知悉:
1、新建时,机器类型选择鞋面机(H2-5 H2-6 H3-5 H3-6),编译以后会自动生成HSD上机文件,提供给鞋面机电控系统配套使用。
2、鞋面制版花样限制350针。
左右两边等宽的花样边针(加针或减针)最大差不大于10针。
3、选择鞋面机型以后使用转换到HCD文件功能,支持将CNT等上级文件转成HSD文件。
今后制版系统如有升级,本说明会持续更新,请多多关注。
如有建议,请向我们反馈。
真诚感谢您对恒强制版系统的支持!
2016.01.04 修正提花组织图功能支持IC/IJ色码的不同处理【方式】
看上图,局部提花时箭头处的位置需要做出修正,那么可以使用这个工具,让程序自动进行修正,方式有三种,见下图。
修正后的结果见下图。
2016.01.06 增加【编织+粗目】色码
前床编织后粗目,意思是前床正常度目后床二段度目,后床线圈为紧目。
后床编织前粗目,意思是后床正常度目前床二段度目,前床线圈为紧目。
2016.01.07 横机工具增加【设置纱嘴度目】功能
2016.01.09 编译选项支持设置提花【按纱嘴翻针】
提花含有翻针,一般情况下是提花的一组纱嘴全部织完再翻针,见下图:
如果编译时将“按纱嘴翻针”勾选,则织完前床纱嘴就会翻针,见下图:
2016.01.08 高级参数中支持自定义花型权限控制【帐号】
见下图箭头处的红圈内,支持我们在花型控制权限这里自由设定帐号,设定后请将帐号记牢。
比如给某花样设定了帐号为335,见下图。
当您把设定了帐号为335的花样发送给别人以后,别人打开此花样时,程序都会自动提示请输入帐号,见下图。
届时输入帐号335即可。
2016.01.09 高级参数中支持设置横机【自动加载编译选项】
意思是当打开某个花样时,程序会自动将此花样最后一次的编译选项加载进来。
2016.01.11 高级参数中支持设置横机【自动加载工艺单】
意思是当打开某个花样时,会同步将当初生成此花样的工艺单自动加载为当前工艺。
2016.01.12 工艺单支持【直位留边】设置
用于夹边连续收针部位的留边。
上图,直位留边为0的状态。
下图,直位留边为2的状态。
2016.01.20 横机工具增加【自动设置IC/IJ标记】功能
意思是花样中画有IC类、IJ类色码的时候,可以自动在功能线202添加99标识。
见下图
2016.01.21 颜色屏蔽设置增加【禁用颜色屏蔽】开关
意思是添加进来的颜色不用清除,将“禁用颜色屏蔽”打勾就可以了。
2016.01.22 右键菜单增加【粘贴(插入)】功能
以前复制插入粘贴需要先插入空行,现在不需要了。
看下图说明:
将这两行框选以后点击复制
想要将复制的部分粘贴到哪一行,直接将鼠标放在哪一行上,点右键“粘贴插入(左边/右边)”,程序会自动将复制的部分插入,并且包含功能线。
插入后的效果见下图。
2016.01.25 喷枪属性增加【渐变】设置
用于喷涂。
操作方法如下:
1、将需要喷涂的图形框选起来,框选以后,点击喷枪右键属性,设定渐变密度百分比。
2、点击喷枪以后,选个颜色,接着在框选区内拉一条线,任意角度的线都可以,见下图。
3、程序会自动按照您手工拉的线来做喷涂。
见下图。
自2016.02.16开始以后的版本,不需要二次注册,不需要联网,所有功能都可以使用您电脑进行本地编译。
请知悉!
2016.02.16 绘图工具增加【不规则选择框】功能
可以框选任意不规则的区域。
使用方法是:起始点,鼠标左键单击一次,接着任意拖拽到某一点再左键单击一次,重复此动作,至结束点时,双击左键。
2016.02.23 功能线【取消编织】增加【设置缩针(7)】选项
左边用102,画2针102意思是将它左边的4针分两次(每次2针)并到102的针上,并针以后等于102身上一共有3层,特点是102这两针的线圈在第一层。
画3针102和画两针102是同样道理。
右边对应的用104。
翻针效果见下图。
左边用101,画2针101意思是将这两针101先翻到后床,接着将它左边的4针分两次(每次2次)并到101的针上,并针以后等于101身上有三层,特点是101这两针的线圈在第三层。
画4针101和画两针101是同样道理。
右边对应的用103。
翻针效果见下图。
2016.02.25 功能线【取消编织】增加【设置缩针(8)】选项
左边使用101和102,右边使用103和104,可实现中间留辫子的八字形移针,画图方式见上图,这样的效果是中间8号色为留的2支辫子。
2016.03.01 常规工具栏中增加【例子】花样列表
2016.03.02 高级设置中支持设置横机【启用IC/IJ色码】开关
2016.03.05 工艺单参数【加针方式】增加【纱嘴方向+偷吃】选项
2016.03.07 工艺单参数支持【平收挂针】设置
2016.03.08 单面接提花编译选项增加【插入1X1B】方式
2016.03.10 编译选项增加设置【加针】后【编织(留边)】方式
2016.03.14 工艺单参数支持设置罗拉机【纱嘴对齐】及其位置
2016.03.15 选择框功能属性增加【中心点】参数设置2016.03.16 右键菜单增加【重设中心点】功能
2016.03.17 工艺单支持【底1×1罗纹】选项。
