魅影显卡使用手册
AMD Radeon 带有 AMD Eyefinity 的显卡使用指南说明书

Graphics Card RequirementComputer with Mini DisplayPort 1.2-compatible graphics card (e.g. AMD Radeon with AMD Eyefinity) required for video wall mode. Backward compatible with most Mini DisplayPort 1.1a equipment running current graphics drivers with feature set limited to that of your equipment. Compatibility with older graphics cards not guaranteed. MST compliant DisplayPort 1.2 graphics cards are limited to a bandwidth of 21.6 Gbps amongst all monitors, with higher resolution monitors using up more bandwidth. 1080p monitors will use up approximately 22% of bandwidth, whereas 4K monitors will use 40% or more. As each monitor will be different, it is necessary to verify the percentage of bandwidth being used by each monitor in the display settings interface for your graphics card. If the total percentage of bandwidth taken up by all of the connected monitors exceeds 100%, an image will not display on one or more of them.Maximum supported video resolutions and number of monitors depend on your graphics card. Check graphics card specifications to determine its capabilities.2-Port Mini DisplayPort to DVI Multi-Monitor Splitter, MST Hub, DP1.2, TAAMODEL NUMBER:B155-002-DVI-V2Displays the same image on 2 DVI monitors, extends the desktop across them, or combines both into one large monitor. Ideal for digital signage in schools, churches, conference rooms, trade shows and retail outlets.DescriptionThe B155-002-DVI-V2 2-Port Mini DisplayPort 1.2 to DVI MST Hub connects two DVI monitors to the Mini DisplayPort output on your computer. Ideal for digital signage in schools, churches, conference rooms, trade shows, hotels and retail outlets, this hub allows you to display the same image on both monitors, extend the desktop across them, or combine both as one large monitor in video wall mode.The B155-002-DVI-V2 is compliant with Mini DisplayPort 1.2 and backward compatible with versions 1.1 and 1.1a with the feature set being limited to that of your equipment. It supports high-definition video resolutions up to 1080p @ 60 Hz (1920 x 1080) on each monitor. Expanded video resolutions are supported when displaying in video wall mode, such as 3840 x 1080 in a horizontal 1 x 2 monitor configuration or 1920 x 2160 in a vertical 2 x 1 monitor configuration. The B155-002-DVI-V2 also supports HDCP, EDID, DDC and 48-bit Deep Color (16 bits per channel), as well as DTS-HD, Dolby TrueHD and 7.1-channel surround sound audio.This MST hub works with all operating systems. Plug-and-play convenience means no software, drivers or external power supply is needed. A built-in six-inch cable connects directly to a Mini DisplayPort source. LEDs indicate when the monitors are receiving a signal. The B155-002-DVI-V2 complies with the Federal Trade Agreements Act (TAA) for GSA Schedule purchases.Features HighlightsSupports HD video resolutionsup to 1080p @ 60 Hz (1920 x1080)qBuilt-in 6 in. cable connectsdirectly to Mini DisplayPortsourceqSupports up to 48-bit DeepColor (16 bits per channel)qWorks with all operatingsystemsqSupports DTS-HD, DolbyTrueHD and 7.1-channelsurround soundqSystem RequirementsComputer with Mini DisplayPort1.2-compatible graphics card(e.g. AMD Radeon with AMDEyefinity) required for video wall mode.qBackward compatible with mostMini DisplayPort 1.1a equipment running current graphics drivers with feature set limited to that of your equipment. Compatibilitywith older graphics cards notguaranteed.qMac OS X does not supportMST for NVIDIA and IntelGraphics Processor Units,limiting video display onconnected monitors to mirrormode.qMaximum supported videoresolutions and number ofmonitors depend on yourgraphics card. Check graphicscard specifications to determine its capabilities.qMonitor(s) with DVI input.qPackage IncludesB155-002-DVI-V2 2-Port MiniDisplayPort 1.2 to DVI MST Hub qUSB Micro-B cable, 3 ft.qOwner’s manualqSpecificationsConnects 2 DVI Monitors to Your Computer’s Mini DisplayPort Output Ideal for digital signs inschools, churches, conference rooms, trade shows and retail settingsDisplays same image on 2 monitors simultaneously in mirror modeExtends desktop across 2 monitors in extended modeCombines 2 monitors into one large monitor in video wall modeBuilt-in 6 in. cable connects directly to Mini DisplayPort sourceLEDs indicate when monitors are receiving a signalMeets the Latest Performance Standards Supports HD video resolutions up to 1080p @ 60 Hz (1920 x 1080)Expanded video resolutions are supported in video wall mode, such as 3840 x 1080 in a horizontal 1x 2 monitor configuration or 1920 x 2160 in a vertical 2 x 1 configurationSupports HDCP, EDID andDDCSupports 48-bit Deep Color (16 bits per channel)Supports DTS-HD, Dolby TrueHD and 7.1-channel surround sound audioEasy to Use Almost Anywhere Works with all operating systemsPlug and play—no software, drivers or external power supply requiredIncluded USB Micro-B cable provides powerTAA Compliant Complies with Federal Trade Agreements Act (TAA) for GSA Schedule purchases© 2023 Eaton. All Rights Reserved. Eaton is a registered trademark. All other trademarks are the property of their respective owners.。
NVIDIA Quadro 显卡说明书

1 VGA/DVI/HDMI support via adapter/connector/bracket |2 Windows 7, 8, 8.1, 10 and Linux |3 Product is based on a published Khronos Specification, and is expected to pass the Khronos Conformance Testing Process when available. Current conformance status can be found at /conformance |4 GPU supports DX12.0 API, Hardware Feature Level 12_1© 2020 NVIDIA Corporation and PNY. All rights reserved. NVIDIA, the NVIDIA logo, Quadro, nView, CUDA, and NVIDIA Pascal are trademarks and/or registered trademarks of NVIDIA Corporation in the U.S. and other countries. The PNY logotype is a registered trademark of PNY Technologies. OpenCL is a trademark of Apple Inc. used under license to the Khronos Group Inc. All other trademarks and copyrights are the property of their respective owners. JAN20PNY Technologies, Inc.100 Jefferson Road, Parsippany, NJ 07054Tel 408 567 5500 | Fax 408 855 0680For more information visit: /quadroPowerful Professional Graphics with Expansive 4K Visual WorkspaceThe NVIDIA Quadro P620 combines a 512 CUDA core Pascal GPU, large on-board memory and advanced display technologies to deliver amazing performance for a range of professional workflows. 2 GB of ultra-fast GPU memory enables the creation of complex 2D and 3D models and a flexible single-slot, low-profile form factor makes it compatible with even the most space and power-constrained chassis. Support for up to four 4K displays (4096x2160 @ 60 Hz) with HDR color gives you an expansive visual workspace to view your creations in stunning detail.Quadro cards are certified with a broad range of sophisticated professional applications, tested by leading workstation manufacturers, and backed bya global team of support specialists, giving you the peace of mind to focus on doing your best work. Whether you’re developing revolutionary products or telling spectacularly vivid visual stories, Quadro gives you the performance to do it brilliantly.THE PNY ADVANTAGEPNY provides unsurpassed service and commitment to its professional graphics customers. In addition, PNY delivers a complete solution including the appropriate adapters, cables, brackets, driver software installation disc and documentation to ensure a quick and successful install.FEATURES>Four Mini DisplayPort 1.4Connectors1>DisplayPort with Audio>NVIDIA nView® DesktopManagement Software>HDCP 2.2 Support>NVIDIA Mosaic2PACKAGE CONTENTS>NVIDIA® Quadro® P620Professional Graphics Board>Aattached full-height (ATX)bracket>Unattached low-profile (SFF)bracket>Four mDP to DP adapters>Printed Quick Start Guide>Printed Support GuideWARRANTY AND SUPPORT>3-Year Warranty>Pre- and Post-Sales TechnicalSupport>Dedicated Field ApplicationEngineers>Direct Tech Support Hot LinesPNY PART NUMBER VCQP620V2-PBSPECIFICATIONSGPU Memory 2 GB GDDR5Memory Interface 128-bitMemory Bandwidth Up to 80 GB/sNVIDIA CUDA® Cores 512System Interface PCI Express 3.0 x16Max Power Consumption 40 WThermal Solution ActiveForm Factor 2.713” H x 5.906” L,Single Slot, Low ProfileDisplay Connectors4x Mini DisplayPort 1.4Max SimultaneousDisplays4 direct, 4x DisplayPort1.4 Multi-StreamDisplay Resolution4x 4096x2160 @ 60 Hz4x 5120x2880 @ 60HzGraphics APIs Shader Model 5.1,OpenGL 4.53,DirectX 12.04,Vulkan 1.03Compute APIs CUDA, DirectCompute,OpenCL™UNMATCHED POWER. UNMATCHED CREATIVE FREEDOM.NVIDIA® QUADRO® P620。
NVIDIA显卡控制面板设置方法详解
NVIDIA显卡控制面板设置方法详解首先,要打开NVIDIA显卡控制面板,可以在计算机的系统托盘中找到NVIDIA显卡驱动程序图标,右键单击该图标,选择“打开NVIDIA控制面板”选项。
另一种方法是通过桌面上的NVIDIA控制面板图标来打开。
一、显示设置在NVIDIA控制面板中,显示设置是一个重要的选项,可以用来调整显示器的分辨率、刷新率以及显示模式。
1.分辨率:在“显示”选项卡中,点击“更改分辨率”可以调整显示器的分辨率。
分辨率指的是屏幕上像素的数量,通常以宽度像素×高度像素的形式表示。
可以根据自己的需要选择合适的分辨率。
2.刷新率:刷新率指的是显示器每秒更新图像的次数,以赫兹为单位表示。
可以在“显示”选项卡中的“更改分辨率”下拉菜单中选择合适的刷新率。
3.显示模式:在“显示”选项卡中的“显示模式”下拉菜单中,可以选择显示器的显示模式,包括单显示器、扩展桌面和复制显示等。
二、3D设置在NVIDIA显卡控制面板中,3D设置提供了一些用于优化3D游戏和应用程序的选项。
1.全局设置:在“3D设置”选项卡的“全局设置”中,可以设置一些全局的3D性能选项,如图形处理器性能模式和纹理过滤等。
2.特定程序设置:在“3D设置”选项卡的“特定程序设置”中,可以为特定的应用程序进行3D设置。
可以选择应用程序的执行文件,并对其进行优化设置。
三、显卡设置显卡设置选项提供了一些用于调整显卡性能和图像质量的选项。
1.性能:在“调整图形设置”选项卡中的“性能”下拉菜单中,可以选择显卡的性能模式,如“高性能”和“省电模式”。
2.图像质量:在“调整图形设置”选项卡的“图像设置”中,可以对图像质量进行调整,如安全性、多重采样和纹理过滤等。
四、显示调整在NVIDIA显卡控制面板中,还可以对屏幕进行一些调整,以适应用户的偏好。
1.辐射系数:在“显示”选项卡的“调整颜色设置”中,可以对屏幕的颜色进行调整。
可以通过修改亮度、对比度、伽马值和辐射系数等参数来改变屏幕显示的效果。
NVIDIA使用方法
配置:NVIDIA GeForce 6800 GTO - PCI Expressx16计算机随附的基于NVIDIA GeForce 6800 GTO PCIe 的图形卡已预先配置为最佳使用状态,无需进一步调整。
但是,如果您需要更改设置,请按以下部分的说明操作。
▪更改显示模式▪配置图形卡▪受支持的显示模式更改显示模式▪大多数应用程序要求高于256 色的颜色设置,可通过Windows 注:▪要以特定的屏幕分辨率和所需的刷新率显示图象,图形卡和显示设请参阅显示设备随附的说明文档和受支持的显示模式列表,其中含有受支更改颜色和屏幕设置1. 从Windows 任务栏中,单击开始> 设置> 控制面板。
2. 双击显示图标,打开显示属性窗口。
3. 单击设置选项卡,打开"设置"页。
4. 在各列表中设置所需的颜色深度和屏幕分辨率。
5. 单击应用,然后单击确定退出显示属性窗口。
6. 提示您重新启动计算机时,请根据提示操作,使变更生效。
更改刷新率1. 从Windows 任务栏中,单击开始> 设置> 控制面板。
2. 双击显示图标,打开显示属性窗口。
3. 单击设置选项卡,打开"设置"页。
4. 单击高级选项。
5. 单击监视器选项卡。
6. 从刷新频率列表中选择所需的刷新率。
(您必须选择显示器支持的刷新率值。
有关受支持的刷新率,请参见受支持的显示模式。
)7. 单击应用。
8. 单击确定,然后再次单击确定退出显示属性窗口。
9. 提示您重新启动计算机时,请根据提示操作,使变更生效。
配置图形卡要讨论的主题有:I. NVIDIA 显示控制面板和菜单II. 上下文帮助和工具提示III. nView 显示设置IV. 电视设置和调节V. 性能和质量设置VI. 彩色校正VII. 覆盖控制VIII 显示方向IX. 刷新率覆盖I. NVIDIA 显示控制面板和菜单要进入NV1. 右键2. 选择带菜单的▪适配▪系统▪驱动下续... NVIDIA 显示菜单(出现在GeForce 6800 页的左侧,如上所示),是各NVIDIA显示控制面板页的一个组成部分。
显卡设置说明

【ATI 经典驱动面板设置】安装好驱动,首先看DVI或FPD口有无打开?【复制模式】确认左上角监视器(M)为主屏,右下角FPD(F)为副屏然后选择-覆盖---剧院模式或全都相同【扩展模式】如果需要后台播放,则如下设置,主屏VGA设置1,副屏DVI设置成2扩展窗口模式,后台播放时,覆盖下剧院模式不可用。
【ATI 新驱动面板设置】安装好驱动后,在桌面点击右键弹出菜单选择点击“高级”进入设置界面在这里,如果安装的驱动是官方驱动,需要用鼠标在“数字2”上点击一下,并启用,按提示操作。
【请注意:用我们产品所配的驱动可直接显示复制模式,不需要另外设置】启用第二个显示设备后,显示桌面1,桌面2,在桌面2右键,弹出菜单中,选择复制桌面1.,按提示,保留设置,如果要播放视频则展开”视频”选择”剧院模式”.在”复制模式显示覆盖”下选择”在所有显示器上都相同”单击”应用”按钮.如果要设置后台播放则选择”将主显示器扩展至数字面板”常见问题【FAQ】【故障现象 1】在某些主机板上,PCI或PCI-E DVI显卡开机不能显示解决步骤------1:检查电脑有无板载集成显卡,如果有的话,将显示信号线接在集成显卡上,看能否正常显示?可显示的话,参考下面步骤,不显示则更换显卡----开机,按DEL(如果是DELL或HP等品牌机,要按F2,或F12)进入CMOS设置进入advanced chipset features 高级芯片组特性设置看是否有屏蔽集成显卡的选项,通常是onboard disable掉如果没有屏蔽选项,则找到已安装图形适配器选项(init graphic adapter),或主显示设备(active video)选择启动顺序:IGD:是集成显卡,PEG:是外接PCI-E显卡,PCI:是外接PCI显卡如果用的是PCI显卡,则选择PCI/PEG 或 PCI/IGD,PCI如果用的是PCI-E显卡,则选择PEG/PCI 或 PEG/IGD,PEG按照上面设置,应该就可以正常从DVI显卡开机并进入系统了,在有些Windows 2000或XP 系统中,可能还需要F8进入安全模式下,在设备管理器中停用板载显卡.(否则有可能出现进入系统后黑屏,或者在进入系统的时候死机)如果没有集成显卡,也不能显示,有可能是DVI显卡与您的主机不兼容,这种情况多见于主机板型号比较新的情况。
ATI显卡设置说明

显卡设置
此说明仅以ATI的镭(RADEON)系列9550 计算机显卡为例说明,若您用其他显卡,请以此为参考调试。
注意:显卡设置部分有3个设置项,并必须满足。
:2,3选项在显卡驱动软件中条件,所以您必须安装适合显卡类型的显卡驱动软件.
1 屏幕刷新频率必须为 60HZ 否则无画面显示.
2 显示器选项中需要在”复制”模式中(不同显卡表达意思不同,请注意).
3 显卡的显示选项中应有一项”全部相同”(ATI 9550在显卡条件软件中
的“视频—影院模式—全部相同(下拉菜单中)”
如有疑问请咨询计算机供应商,以便方便迅速解决您的问题。
Razer Core X Chroma 外接顯示卡擴充盒使用者手冊说明书

.進階指南目錄1. 包裝内容 / 系統需求 (2)2. 註冊即可獲得保固 (3)3. 探索你的外接顯示卡擴充盒 (4)4. 設定你的 RAZER CORE X CHROMA (6)5. 安裝 RAZER SYNAPSE 3 來設定你的 RAZER CORE X CHROMA (14)6. 透過 RAZER SYNAPSE 3 設定你的 RAZER CORE X CHROMA (15)7. 安全與維護 (22)8. 法律條文 (23)1. 包裝内容 / 系統需求包裝內容▪Razer Core X Chroma 外接顯示卡擴充盒▪Thunderbolt™ 3 (USB-C) 纜線▪電源線*▪重要產品資訊指南*可能包括特定地區專用電源線。
系統需求硬體▪支援 Thunderbolt™ 3 外接顯示卡的 PC 或 Mac▪Windows®10 64 位元 RS5 / macOS High Sierra 10.13.4(或更新版本)▪相容 Razer Core X Chroma 的 PCI-E 顯示卡▪Windows 版 Thunderbolt™軟體RAZER SYNAPSE 3▪Windows® 10 64 位元(或更新版本)▪網際網路連線▪500 MB 的可用硬碟空間前往rzr.to/core-x以獲得相容性資訊;同時也可在此下載驅動程式與韌體更新。
2. 註冊即可獲得保固你不僅擁有一台超棒的裝置,更享有 1 年有限保固服務。
前往註冊,即可讓裝置發揮所有潛力並享受獨家 Razer 好處有問題嗎?歡迎來信詢問 Razer 支援小組: 你可在此找到產品序號。
3. 探索你的外接顯示卡擴充盒散熱孔擴充槽開啟把手電源插孔電源開關USB 3.1 連接埠乙太網路連接埠Thunderbolt 3 (USB-C) 連接埠PCI-E 插槽護蓋Thunderbolt 3 (USB-C) 纜線PCI-E 連接埠6+2-pin 供電接頭Razer Chroma 內部發光模組Razer Chroma 下方發光模組內部最大尺寸:鎖定銷斜面▪長度:12.99 吋 / 330 公釐▪高度:6.29 吋 / 160 公釐▪寬度:2.36 吋 / 60 公釐* 從 PCIe 連接埠頂端測量到鎖定銷斜面底部的高度。
PNY NVIDIA NVS显卡用户手册说明书

PNY Technologies, Inc. 100 Jefferson Road, Parsippany, NJ 07054Tel 408 567 5500 | Fax 408 855 0680For more information visit: /nvs NVIDIA NVS FeaturesPNY PART NUMBERVCNVS510DP-PB /VCNVS510DVI-PBVCNVS315DP-PB /VCNVS315DVI-PB VCNVS810DP-PB /VCNVS810DVI-PB >Eight, four, two display support >Locking display connectors >Up to 4K (UHD) display resolution >Low power consumption >NVIDIA MOSAIC support >NVIDIA nView support >Bezel correction >DisplayPort, HDMI, DVI connectors or adapters available >DP 1.2 MST and cloning >Long product lifecycles >NVWMI and NVAPI management support availableNVS Display Support>NVS 810 up to 8 displays >NVS 510 up to 4 displays >NVS 315 up to 2 displays >NVS 310 up to 2 displays Accessories IncludedWARRANTY AND SUPPORT >3-year warranty >Pre- and post-sales support >Dedicated FAEs >Direct technical support hot lines >Email technical support VCNVS310DP -1GB -PB /VCNVS310DVI-1GB-PB >Full height and low profile brackets with SFF boards >Locking display adapters (varies by product)>Software installation disc with PDF documentation >Printed Quick Start Guide NVIDIA ® NVS ™KEY SELLING FEATURES AND BENEFITS NVIDIA Unified Driver Architecture (UDA)NVIDIA UDA is the industry's first unified architecture designed to dynamically allocate GPU resources for optimized performance. NVIDIA UDA guarantees forward and backward compatibility with software drivers, simplifying upgrading to a new NVIDIA NVS solution since the latest driver supports all current NVS products.Ultra-Quiet Cooling Solutions NVS products are built with a highly reliable, ultra-quite fansink that efficiently cools the graphics without taxing system fans resulting in a quieter desktop environment.NVIDIA Enterprise Management Tools Exhaustive enterprise management tools for maximizing system uptime by enabling seamless wide-scale deployment. Allows remote query and control of graphics and display settings for systems spread across the globe.NVIDIA nView Desktop Management Software Provides maximum flexibility for single large-display or multi-display options. This provides unprecedented end-user control of the desktop experience for increased productivity.NVIDIA Mosaic TechnologyEnables seamless taskbar spanning as well as transparent scaling of any application across up to 16 displays. Works over multiple displays or one ultra-high resolution display using a single or multiple NVS graphics boards.Ultimate Image and Video QualityIndustry's best image and video quality from SD to HD and even UHD with striking picture clarity and accurate color - all with low CPU utilization and power consumption.© 2016 NVIDIA Corporation and PNY. All rights reserved. NVIDIA, the NVIDIA logo and NVS are trademarks and/or registered trademarks of NVIDIA Corporation in the U.S. and other countries. The PNY logotype is a registered trademark of PNY Technologies. All other trademarks and copyrights are the property of their respective owners. MAR16。
EVGA GTX 285 图形卡说明书
To install the EVGA GTX 285 graphics card:
1. Turn off your Mac Pro.
2. Touch the metal on top of the computer to discharge any static electricity from your body, and then unplug the Mac Pro power cord.
Unpacking
Your EVGA GTX 285 graphics card 1 is shipped with two power cables 2 that connect to the logic board of the Mac Pro (see Figure 3). You will not need any tools to perform this installation.
Follow the instructions in this guide to install your EVGA GTX 285 graphics card. To avoid exposing the card to static electric charges, keep it in its protective wrapper until you are ready to install it. Do not walk around unnecessarily while holding the card because this can cause a static charge to build up.
GV-NX78X512VP-B GeForce 7800 GTX显示卡 说明书
()
Video In
GV-NX78X512VP-B
DVI Output
13 -4-
VIVO ( )
DVI-I Connector 2
DVI-I Connector 1
1. 2.
3.
0
0
BIOS
BIOS
VGA
BIOS
-5-
2.2.
1.
2. ( )
3.
1.
PCI Express x 16 *
GV-NX78X512VP-B
nVidia
- 13 -
5.
nVidia WDM A/V Crossbar
"
(
"
)"
"
6. nVidia WDM A/V Crossbar
""
7. "
" Crossbar (universal)
nVidia WDM A/V nVidia WDM Video Capture
GV-NX78X512VP-B
3.1.2. DirectX ................................................................................................. 10
3.1.3.
............................................................................................. 11
1.1.
................................................................................................. 3
显卡怎么用

显卡怎么用显卡是计算机硬件的重要组成部分,它负责处理图形和图像相关的数据,为电脑显示器输出高质量的影像。
无论是日常使用还是进行高性能任务,显卡的正确使用对于电脑性能的提升都具有重要作用。
下面将介绍显卡的正确使用方法。
首先,显卡的安装是显卡使用的前提。
首先,关闭电脑并断开电源。
然后,打开机箱,找到PCI-E插槽,根据显卡的接口类型,选择合适的插槽。
将显卡插入插槽,并确保插槽固定螺丝正确固定。
接下来,将显示器连接到显卡的输出接口。
最后,重新组装机箱,接通电源并启动电脑。
其次,显卡安装好后,就需要正确设置显卡。
首先,打开电脑,进入操作系统。
然后,找到显卡相关的驱动程序,可以通过厂商官网下载最新版本的显卡驱动程序。
安装好驱动程序后,重新启动电脑。
接下来,进入操作系统的显示设置,选择适合自己需求的分辨率和刷新率。
同时,还可以根据需要调整色彩、对比度等显示效果。
最后,还需要合理利用显卡的性能。
首先,在进行图形渲染等高性能任务时,可以通过显卡驱动程序或第三方软件调整显卡的性能参数,如核心频率、显存频率等,以满足任务需求。
其次,在打开3D游戏等需要较大显存和计算能力的应用程序时,可以根据需要选择合适的显存大小和显卡型号。
同时,也需要及时更新显卡驱动程序,以获得更好的性能和兼容性。
除了以上提到的,还需要注意一些显卡的保养和防护。
首先,保持显卡通风良好,定期清理机箱内的灰尘,确保显卡散热器不被堵塞。
其次,避免过度超频和过度使用显卡,以免导致显卡过热和损坏。
最后,注意静电防护,在操作显卡时,应该从静电大的物品上释放静电,并在操作时尽量使用防静电手腕带。
综上所述,显卡作为计算机硬件的重要组成部分,正确使用显卡可以提升电脑性能和显示效果。
安装显卡后需要进行驱动程序设置,并根据需要调整显卡性能参数。
同时,还需要保养和防护显卡,以延长显卡的使用寿命。
使用显卡时注意以上几点,可以更好地发挥显卡的性能,提升计算机的使用体验。
NVIDIA DOCA虚拟功能用户指南说明书

User GuideTable of ContentsChapter 1. Introduction (1)Chapter 2. Prerequisites (2)Chapter 3. VF Creation (3)Chapter 4. Running DOCA Application on Host (4)Chapter 5. Topology Example (5)Chapter 6. VF Creation on ConnectX-6 DX (7)Chapter 1.IntroductionSingle root IO virtualization (SR-IOV) is a technology that allows a physical PCIe device to present itself multiple times through the PCIe bus. This technology enables multiple virtual instances of the device with separate resources. NVIDIA adapters are able to expose virtual instances or functions (VFs) for each port individually. These virtual functions can then be provisioned separately.Each VF can be seen as an additional device connected to the physical interface or function (PF). It shares the same resources with the PF, and its number of ports equals those of the PF. SR-IOV is commonly used in conjunction with an SR-IOV-enabled hypervisor to provide virtual machines direct hardware access to network resources, thereby increasing its performance. There are several benefits to running applications on the host. For example, one may wantto utilize a strong and high-resource host machine, or to start DOCA integration on the host before offloading it to the BlueField DPU.The configuration in this document allows the entire application to run on the host's memory, while utilizing the HW accelerators on BlueField (e.g., using RegEx the accelerator on BlueField via a daemon running on it).When VFs are enabled on the host, VF representors are visible on the Arm side whichcan be bridged to corresponding PF representors (e.g., the uplink representor and thehost representor). This allows the application to only scan traffic forwarded to the VFs as configured by the user and to behave as a simple "bump-on-the-wire". DOCA installed onthe host allows access to the hardware capabilities of the BlueField DPU without comprising features such as the stateful table (SFT) which uses HW offload and additional HW steering elements embedded inside the eSwitch.Chapter 2.PrerequisitesRunning applications on the host and using the RegEx accelerator on the BlueField requires enabling the RegEx engine.To run all the reference applications over the host, you must install the host DOCA package. Refer to NVIDIA DOCA Installation Guide for Linux for more information on host installation. VFs must be configured as trusted for the hardware jump action to work as intended. The following steps configure "trusted" mode for VFs:1.Delete all existing VFs/SFs.a).To delete all VFs on a PF run the following on the host:$ echo 0 > /sys/class/net/<physical_function>/device/sriov_numvfsFor example:$ echo 0 > /sys/class/net/ens1f0/device/sriov_numvfsb).Refer to Scalable Function Setup Guide for instructions on deleting SFs.2.Stop the main driver on the host:/etc/init.d/openibd stop3.Before creating the VFs, set them to "trusted" mode on the device by running the followingcommands on the Arm side.a).Setting VFs on port 0:$ mlxreg -d /dev/mst/mt41686_pciconf0 --reg_id 0xc007 --reg_len 0x40 --indexes "0x0.0:32=0x80000000" --yes --set "0x4.0:32=0x1"b).Setting VFs on port 1:$ mlxreg -d /dev/mst/mt41686_pciconf0.1 --reg_id 0xc007 --reg_len 0x40 --indexes "0x0.0:32=0x80000000" --yes --set "0x4.0:32=0x1"Note: These commands set trusted mode for all created VFs/SFs after their execution onArm.Note: Setting trusted mode should be performed once per reboot.4.Restart the main driver on the host by running the following command:/etc/init.d/openibd restartChapter 3.VF Creation1.Enable SR-IOV. Run:host$ mlxconfig -y -d /dev/mst/mt41686_pciconf0 s SRIOV_EN=12.Set number of VFs. Run:host$ mlxconfig -y -d /dev/mst/mt41686_pciconf0 s NUM_OF_VFS=XNote: Requires power cycle.host$ echo X > /sys/class/net/<physical_function>/device/sriov_numvfsFor example:host $ mlxconfig -y -d /dev/mst/mt41686_pciconf0 s NUM_OF_VFS=2host $ reboothost $ echo 2 > /sys/class/net/ens1f0/device/sriov_numvfsAfter enabling VF, the representor appears on the DPU. The function itself is seen at the host.3.To verify that the VFs have been created. Run:$ lspci | grep Mellanox05:00.0 Ethernet controller: Mellanox Technologies Device a2d605:00.1 Ethernet controller: Mellanox Technologies Device a2d605:00.2 DMA controller: Mellanox Technologies Device c2d305:00.3 Ethernet controller: Mellanox Technologies MT2885005:00.4 Ethernet controller: Mellanox Technologies MT28850Note: 2 new virtual Ethernet devices are created in this example.Chapter 4.Running DOCA Applicationon HostThe following steps are required only if the application utilizes the RegEx engine:1.Stop the driver on the host. Run:host$ sudo /etc/init.d/openibd stop2.On the Arm, start the driver. Run:dpu$ sudo /etc/init.d/openibd start3.On the Arm, enable RegEx (only if the application requires it). Run:dpu$ echo 1 > /sys/class/net/p0/smart_nic/pf/regex_en4.On the Arm, add 200 huge pages. Run:dpu$ current_huge=$(cat /sys/kernel/mm/hugepages/hugepages-2048kB/nr_hugepages) dpu$ sudo echo $((200 + current_huge)) > /sys/kernel/mm/hugepages/hugepages-2048kB/nr_hugepages5.On the Arm, start mlx RegEx. Run:dpu$ systemctl start mlx-regexNote: If it has not been set before, the previous value of huge pages should be 2048 orhigher (depending on the number of cores).6.Verify that the service is running. Run:dpu$ systemctl status mlx-regex7.The host can now run RegEx. Run:host$ sudo /etc/init.d/openibd startNote: Running DPDK over the host requires configuring huge pages.Note: By default, a DPDK application initializes all the cores of the device. This is usuallyunnecessary and may even cause unforeseeable issues. It is recommended to limit the number of cores, especially when using an AMD-based system, to 16 cores using the -c flag whenrunning DPDK.The following is a CLI example for running a reference application over the host using VF:./opt/mellanox/doca/applications/**/bin/*executable* -a "pci address VF0" -a "pci address VF1" -c 0xff -- "application flags"Chapter 5.Topology Example The following is a topology example for running the application over the host.Configure the OVS on BlueField as follows:Bridge ovsbr1Port ovsbr1Interface ovsbr1type: internalTopology ExamplePort pf0hpfInterface pf0hpfPort pf0vf1Interface pf0vf1Bridge vf_brPort p0Interface p0Port vf_brInterface vf_brtype: internalPort pf0vf0Interface pf0vf0When enabling a new VF over the host, VF representors are created on the Arm side. Thefirst OVS bridge connects the uplink connection (p0) to the new VF representor (pf0vf0), and the second bridge connects the second VF representor (pf0vf1) to the host representors(pf0phf). On the host, the 2 PCIe addresses of the newly created function must be initialized when running the applications.When traffic is received (e.g., from the uplink), the following occurs:1.Traffic is received over p0.2.Traffic is forwarded to pf0vf0.3.Application "listens" to pf0vf0 and pf0vf1 and can, therefore, acquire the traffic frompf0vf0, inspect it, and forward to pf0vf1.4.Traffic is forwarded from pf0vf1 to pf0hpf.Chapter 6.VF Creation on ConnectX-6DXThe following steps are required only when running DOCA applications, such as Simple Fwd VNF, on a ConnectX-6 Dx adapter card.1.Set trust level for all VFs. Run:host# mlxreg -d /dev/mst/mt4125_pciconf0 --reg_name VHCA_TRUST_LEVEL --yes --set "all_vhca=0x1,trust_level=0x1"2.Create X VFs (X being the required number of VFs) and run the following to turn on trustedmode for the created VFs:echo ON | tee /sys/class/net/enp1s0f0np0/device/sriov/X/trustFor example, if you are creating 2 VFs, the following commands should be used:echo ON | tee /sys/class/net/enp1s0f0np0/device/sriov/0/trustecho ON | tee /sys/class/net/enp1s0f0np0/device/sriov/1/trustNoticeThis document is provided for information purposes only and shall not be regarded as a warranty of a certain functionality, condition, or quality of a product. NVIDIA Corporation nor any of its direct or indirect subsidiaries and affiliates (collectively: “NVIDIA”) make no representations or warranties, expressed or implied, as to the accuracy or completeness of the information contained in this document and assume no responsibility for any errors contained herein. NVIDIA shall have no liability for the consequences or use of such information or for any infringement of patents or other rights of third parties that may result from its use. This document is not a commitment to develop, release, or deliver any Material (defined below), code, or functionality.NVIDIA reserves the right to make corrections, modifications, enhancements, improvements, and any other changes to this document, at any time without notice. Customer should obtain the latest relevant information before placing orders and should verify that such information is current and complete.NVIDIA products are sold subject to the NVIDIA standard terms and conditions of sale supplied at the time of order acknowledgement, unless otherwise agreed in an individual sales agreement signed by authorized representatives of NVIDIA and customer (“Terms of Sale”). NVIDIA hereby expressly objects to applying any customer general terms and conditions with regards to the purchase of the NVIDIA product referenced in this document. No contractual obligations are formed either directly or indirectly by this document.NVIDIA products are not designed, authorized, or warranted to be suitable for use in medical, military, aircraft, space, or life support equipment, nor in applications where failure or malfunction of the NVIDIA product can reasonably be expected to result in personal injury, death, or property or environmental damage. NVIDIA accepts no liability for inclusion and/or use of NVIDIA products in such equipment or applications and therefore such inclusion and/or use is at customer’s own risk. NVIDIA makes no representation or warranty that products based on this document will be suitable for any specified use. Testing of all parameters of each product is not necessarily performed by NVIDIA. It is customer’s sole responsibility to evaluate and determine the applicability of any information contained in this document, ensure the product is suitable and fit for the application planned by customer, and perform the necessary testing for the application in order to avoid a default of the application or the product. Weaknesses in customer’s product designs may affect the quality and reliability of the NVIDIA product and may result in additional or different conditions and/or requirements beyond those contained in this document. NVIDIA accepts no liability related to any default, damage, costs, or problem which may be based on or attributable to: (i) the use of the NVIDIA product in any manner that is contrary to this document or (ii) customer product designs.No license, either expressed or implied, is granted under any NVIDIA patent right, copyright, or other NVIDIA intellectual property right under this document. Information published by NVIDIA regarding third-party products or services does not constitute a license from NVIDIA to use such products or services or a warranty or endorsement thereof. Use of such information may require a license from a third party under the patents or other intellectual property rights of the third party, or a license from NVIDIA under the patents or other intellectual property rights of NVIDIA.Reproduction of information in this document is permissible only if approved in advance by NVIDIA in writing, reproduced without alteration and in full compliance with all applicable export laws and regulations, and accompanied by all associated conditions, limitations, and notices.THIS DOCUMENT AND ALL NVIDIA DESIGN SPECIFICATIONS, REFERENCE BOARDS, FILES, DRAWINGS, DIAGNOSTICS, LISTS, AND OTHER DOCUMENTS (TOGETHER AND SEPARATELY, “MATERIALS”) ARE BEING PROVIDED “AS IS.” NVIDIA MAKES NO WARRANTIES, EXPRESSED, IMPLIED, STATUTORY, OR OTHERWISE WITH RESPECT TO THE MATERIALS, AND EXPRESSLY DISCLAIMS ALL IMPLIED WARRANTIES OF NONINFRINGEMENT, MERCHANTABILITY, AND FITNESS FOR A PARTICULAR PURPOSE. TO THE EXTENT NOT PROHIBITED BY LAW, IN NO EVENT WILL NVIDIA BE LIABLE FOR ANY DAMAGES, INCLUDING WITHOUT LIMITATION ANY DIRECT, INDIRECT, SPECIAL, INCIDENTAL, PUNITIVE, OR CONSEQUENTIAL DAMAGES, HOWEVER CAUSED AND REGARDLESS OF THE THEORY OF LIABILITY, ARISING OUT OF ANY USE OF THIS DOCUMENT, EVEN IF NVIDIA HAS BEEN ADVISED OF THE POSSIBILITY OF SUCH DAMAGES. Notwithstanding any damages that customer might incur for any reason whatsoever, NVIDIA’s aggregate and cumulative liability towards customer for the products described herein shall be limited in accordance with the Terms of Sale for the product.TrademarksNVIDIA, the NVIDIA logo, and Mellanox are trademarks and/or registered trademarks of Mellanox Technologies Ltd. and/or NVIDIA Corporation in the U.S. and in other countries. The registered trademark Linux® is used pursuant to a sublicense from the Linux Foundation, the exclusive licensee of Linus Torvalds, owner of the mark on a world¬wide basis. Other company and product names may be trademarks of the respective companies with which they are associated.Copyright© 2022 NVIDIA Corporation & affiliates. All rights reserved.NVIDIA Corporation | 2788 San Tomas Expressway, Santa Clara, CA 95051。
EVGA NVIDIA 高性能 3D 卡安装指南说明书

EVGA Precision XTM: Designed from the ground up to support new GPU technology, EVGA Precision XTM redefines what overclocking software should be. For more information please visit /precision.
EVGA Step-Up® Program: In order to give our customers the greatest amount of flexibility when purchasing EVGA graphics cards, we have instituted the EVGA Step-Up® Program. For more information please visit /stepup.
retaining screw, and pulling the card directly up and out of the system. Please note that your motherboard may have a PCI Express (PCI-E) latch on the slot that needs to be pressed in first. (NOTE: If your motherboard has integrated or onboard video, you may need to disable it first, please contact your system or motherboard manufacturer for additional information.)
七彩虹 NVIDIA系列 显卡 说明书

【版 权 声 明】本产品的所有部分,包括配件与软件等,其所有权都归七彩虹科技发展有限公司(以下简称七彩虹公司)所有,未经七彩虹公司许可,不得任意地仿制、拷贝、摘抄、或转译。
本显卡使用手册为七彩虹公司的知识产权,我们很谨慎认真地编写此使用手册,但仍不保证此使用手册的内容完全准确,因为我们的产品一直在持续的更新和升级,故七彩虹公司保留随时修改而不通知的权力。
【商 标】本显卡使用手册中所谈论到的所有名称只起到识别作用,而这些名称可能是属于其它公司的注册商标或版权,其所有权均属于该名称的所有者。
【技 术 支 持】如果您的系统出现问题,并且无法从本显卡使用手册中获得帮助,请联系您所购买显卡的经销商。
此外您还可以尝试通过以下方式获得帮助:●访问七彩虹的官方网站(/)获取产品和驱动程序等信息支持,此外还可以登录七彩虹官方论坛(/ bbs/),获取技术指导。
●通过拨打400-678-5866客户服务热线进行咨询,此外还可以直接与七彩虹各属地平台服务中心联系,具体联系方法如下:“8+1”全国区域售后服务平台业务范围及联系方式版本修订本使用手册的版本会随着产品及驱动程序的升级而变动,具体升级版本的使用手册可以到七彩虹官方网站下载。
版权所有•不得翻印 Ver 1.9联系方法010—51261907024—31321755027—87161646025—83611912021—64389499020—852********—852********—855827070755—33083060注意:以上电话如有变动,请拨打400-678-5866服务热线查询。
平台名称北京服务平台沈阳服务平台武汉服务平台南京服务平台上海服务平台广州服务平台成都服务平台西安服务平台深圳服务平台服务范围北京、天津、河北、河南、山东、山西、内蒙古辽宁、吉林、黑龙江湖北、湖南江苏、安徽上海、浙江广东、广西、福建、海南、江西四川、重庆、云南、贵州、西藏新疆、陕西、甘肃、宁夏、青海深圳地区目 录一、硬件安装与接口连接 (1)二、安装显卡驱动程序 (4)1...安装Windows.XP的显卡驱动程序.. (4)2...安装Windows.Vista的显卡驱动程序.. (6)三、Vista系统下NVIDIA控制面板的使用说明 (8)1、.控制面板简介 (8)1.1.控制面板的开启 (8)1.2.控制面板简介 (10)1.3.菜单栏简介 (10)1.4..工具栏 (12)2、显示设置 (13)2.1.屏幕分辨率、刷新率和颜色质量设置 (13)2.2.调整桌面颜色 (14)2.3.旋转显示屏幕 (14)2.4.设置多个显示器 (15)2.4.1..决定双屏显示的软硬件要求 (15)2.4.2.双屏显示功能设置 (15)3、3D设置 (16)3.1.通过预览调整图像设置 (17)3.2.管理3D设置 (17)3.2.1全局设置 (18)3.2.2程序设置 (18)4、.视频和电视 (19)4.1.调整视频颜色设置 (19)4.2.更改信号或HD制式 (21)四、.PureVideo (23)1、.PureVideo技术 (23)2、.PureVideo技术功能 (23)3、.PureVideo的软硬件组合 (24)3.1..硬件系统需求 (24)3.2..软件系统需求 (24)4、.实战PureVideo (24)4.1.设置Windows.Media.Player (24)4.2..安装PureVideo.DVD.Decoder解码器 (25)4.3..第三方播放软件和解码器 (26)4.3.1..PowerDVD.7.0 (27)五、附........录.. (28)1、.FAQ (28)2、.显卡超频软件和测试软件 (31)2.1.显卡超频软件 (31)2.1.1..Riva.Tuner (31)2.1.2..PowerStrip (33)2.1.3..nTune (34)2.2.显卡测试软件 (36)2.2.1..3DMark03 (36)2.2.2..3DMark05 (36)2.2.3..3DMark06 (37)3、.名词解释 (43)4、.计算机硬件使用维护指南 (47)容易引起电脑不稳定的几个因素 (47)电脑维护指南 (47) 1. 关掉电源并把所有接头拔掉。
显卡使用说明
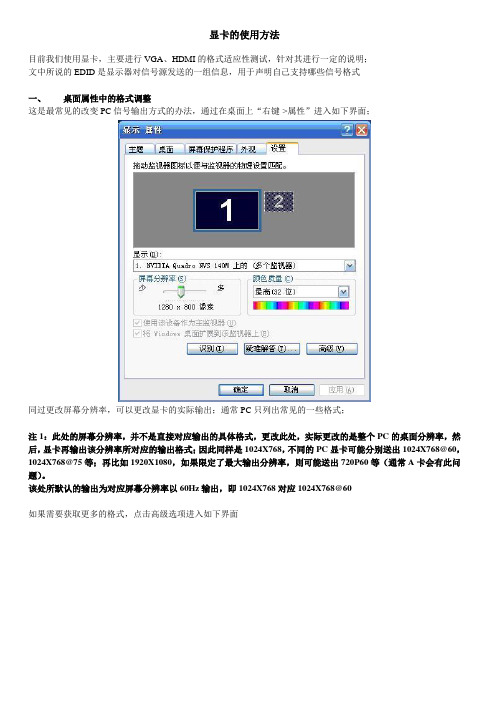
显卡的使用方法目前我们使用显卡,主要进行VGA、HDMI的格式适应性测试,针对其进行一定的说明;文中所说的EDID是显示器对信号源发送的一组信息,用于声明自己支持哪些信号格式一、桌面属性中的格式调整这是最常见的改变PC信号输出方式的办法,通过在桌面上“右键->属性”进入如下界面;同过更改屏幕分辨率,可以更改显卡的实际输出;通常PC只列出常见的一些格式;注1:此处的屏幕分辨率,并不是直接对应输出的具体格式,更改此处,实际更改的是整个PC的桌面分辨率,然后,显卡再输出该分辨率所对应的输出格式;因此同样是1024X768,不同的PC显卡可能分别送出1024X768@60,1024X768@75等;再比如1920X1080,如果限定了最大输出分辨率,则可能送出720P60等(通常A卡会有此问题)。
该处所默认的输出为对应屏幕分辨率以60Hz输出,即1024X768对应1024X768@60如果需要获取更多的格式,点击高级选项进入如下界面再点击列出所有模式,得到更多的格式列表如下;普通的常见格式,通过如上的方法进行调整;注2:此处的输出模式为实际对应的输出格式,与前面注1不一样;二、A卡的使用说明N卡安装对应的驱动后,于桌面点击右键,出现的菜单中的“Catalyst(TM) Control Center”选项,点击后,进入控制面板1、一般简单应用A、显示器选择于控制面板的左侧树形图上,选择显示器属性,进入如下界面;如果有多显示器,可以选择主显示器,单显示器则无法选择,如图所示红框位置,可以改变显示器的主从关系,或者禁用不想使用的显示器;注3:显卡所提供的分辨率由主显示器的EDID决定,如果显示器无EDID,则提供常见的VESA TIMING;B、分辨率更改:在下图中,红框标示的位置,可以更改分辨率及输出格式;注4:图中红框的中,其刷新率为控制显卡输出格式的频率;但是桌面区域的功能与前面注1所描述相同,更改后,不是直接改变输出格式,而是修改电脑桌面大小,然后显卡会根据该大小所对应的格式再进行输出;一般情况下桌面大小与输出格式为一一对应关系;容易出现的特殊情况如下此情况的出现,即为1920X1080的桌面分辨率所对应的显卡实际输出格式不相符;由于VGA模式,很多显示器不再提供EDID,因此显卡会采用默认的VESA参数,该参数说限定的最大输出格式为720P60;因此,在所选择的桌面分辨率大于最大输出格式后,显卡仍然会将桌面设定为所要求的大小,但输出却限定到所设定的最大输出格式上;更改方法如下图如图中红框所示,设定显卡的最大输出格式,如果勾选上方选项,则使用显示器EDID声明的最高分辨率,如无EDID话一般为720P60;如果不勾选,则自己设定;注5:在桌面分辨率大于显卡最大输出格式时,显卡以最大格式输出;在桌面分辨率小于显卡最大输出格式时,显卡以桌面分辨率为输出的视频分辨率输出;2、过扫描问题多接口的A卡(如包含VGA、DVI、HDMI),A卡对每一个端口都分别标示,其中VGA口的输出,均为默认为显示器,不存在过扫描问题;如果是接DVI或HDMI,则可能出现过扫描问题,即信号不满屏如下图所示,于该选项中修改过扫描值,修改至0则全屏显示,否则可能出现信号不满屏的情况三、N卡的使用说明N卡安装对应的驱动后,于桌面点击右键,出现的菜单中的“NVIDIA控制面板”选项,点击后,进入控制面板1、一般简单应用A、显示器选择于控制面板的左侧树形图上,选择更改分辨率,进入如下界面于该界面,可以选择使用一个显示器,还是多个显示器(图示红框中);如果要使用多个显示器(复制模式),需要选择哪个显示器作为第一个显示器(图示紫框处)注6:在复制模式中,显卡送出单一信号格式,所有与显卡相连的显示器所接受的信号格式相同。
显卡参数如何设置方法

显卡参数如何设置方法
1、首先计算机的显卡控制面板一般都在计算机桌面的右下角,右击选择打开NVIDIA控制面板即可。
如果你的图标不小心被你隐藏了,那么在控制面板中同样可以打开。
打开控制面板——硬件,之后就可以看到NVIDIA控制面板的选项了。
2、选择3D设置——通过预览进行图像设置,在右侧的设置界面就可以岁图像的显示方式进行设置了。
我们可以选择:由应用程序决定;使用高级3D设置;使用我的优先设置,侧重于性能还是质量都由你的设置决定,在上方的预览窗口我们可以查看效果。
3、在管理3D设置界面我们可以添加我们需要由显卡运行的程序,一般为大型的游戏之类的软件我们需要将其添加到我们的3D管理中并对其进一步的设置。
在全局设置中我们可以直接将运行的显卡设置为独显,并设置相应的参数,调整参数一定要注意,不要随意调整。
如果调整出现失误可以恢复。
第 1 页共1 页。
NVIDIA nForce 590 SLI系列产品说明说明书
Características y ventajasMCP NVIDIA nForce® 590 SLIPensado para entusiastasLos procesadores de comunicaciones y contenidos multimedia (MCP) NVIDIA nForce® 590 SLI™ proporcionan todas las herramientas y el rendimiento que necesitan los frikis del PC. Si se combinan con determinadas tarjetas gráficas NVIDIA GeForce y otros componentes del sistema, la velocidad del bus aumenta de forma dinámica. Además, ofrecen funciones de overclocking y mayor rapidez en la transmisión de datos.Tecnología NVIDIA LinkBoost™El MCP nForce 590 SLI incrementa automáticamente el ancho de banda cuando detecta la presencia de determinadas tarjetas gráficas NVIDIA® GeForce®.Diseñado para NVIDIA® SLI™La tecnología NVIDIA SLI es una innovación revolucionaria que permite aumentar drásticamente el rendimiento gráfico combinando varias GPU NVIDIA en un mismo sistema dotado de un MCP NVIDIA nForce SLI.Componentes con certificación NVIDIA SLICuando se combinan ciertos componentes (como determinadas GPU NVIDIA® GeForce® y memorias del sistema) con placas basadas en el MCP nForce 590 SLI, se incrementa automáticamente la velocidad del bus del sistema. Si quieres información sobre los componentes con certificación SLI, visita \nForce.Dos enlaces PCI Express SLI x16El ancho de banda de los dos enlaces PCI Express de 16 vías garantiza el máximo rendimiento gráfico para los juegos y las GPU de última generación. Multiplica por dos el ancho de banda de las soluciones PCI Express SLI x8.Almacenamiento MediaShield™ de NVIDIAConjunto de funciones que mantiene a salvo la información digital. Siempre fiable, escalable y accesible. Incluye soporte de configuraciones RAID y unidades de disco SATA.Configuración de varios discosUn sencillo asistente ayuda a configurar fácilmente las unidades de disco para obtener mayor protección de los datos, un acceso más rápido a los discos o máxima capacidad de almacenamiento.MediaShield selecciona automáticamente la configuración RAID 0, 1, 0+1 o 5 en función de tus necesidades. Los más expertos pueden manejar las opciones RAID directamente si lo prefieren.Sistema de alerta de discosSi falla alguno de los discos, MediaShield presenta una imagen en la que señala el disco defectuoso para facilitar su identificación, sustitución y recuperación.Migración de nivel RAID (morphing)MediaShield ofrece al usuario la posibilidad de cambiar la configuración RAID existente por otra configuración en un solo paso denominado cambio de nivel o morphing. Esto elimina la necesidad de hacer la copia de seguridad de los datos y efectuar los numerosos pasos que conllevaría el proceso manual.Matriz de discos de arranqueLas funciones MediaShield permiten utilizar una matriz de discos para cargar el sistema operativo al arranque.Seis unidades de disco SATA 3Gb/sPosibilidad de combinar hasta 6 unidades SATA en un volumen para obtener configuraciones RAID más rápidas y de mayor capacidad. La presencia de más discos significa más opciones de configuración, lo que incluye, por ejemplo, dos matrices RAID 5 o 6 unidades RAID 0 (striping) para obtener máxima velocidad de acceso a los datos. Además, el soporte de unidades SATA-2 3Gb/s permite aprovechar ventajas como las funciones de conexión en caliente y reordenación de colas de comandos (Native Command Queuing y Tagged Command Queuing). Las colas de comandos nativas aumentan la eficacia del acceso a los discos en entornos multithread porque permiten mantener las operaciones de lectura/escritura en espera para ejecutarlas en el orden más conveniente.Comunicación en red con NVIDIA nForceLa tecnología de red de NVIDIA proporciona la máxima velocidad de transmisión con el menor índice de utilización de la CPU. Además de ser extraordinariamente estable y manejable, esta solución facilita la administración de la red y reduce el coste total de propiedad. Sólo NVIDIA integra este nivel de funcionalidad de red para llevar la comunicación online a otra dimensión.Gigabit Ethernet nativo de NVIDIALa máxima velocidad existente en conexiones Gigabit Ethernet. Elimina los cuellos de botella y mejora la eficacia global del sistema.Tecnología NVIDIA FirstPacket™Conviértete en el “rey del ping” con la tecnología FirstPacket de NVIDIA. Tendrás la mejor calidad de comunicación en tus llamadas telefónicas y todo el rendimiento que necesitas al jugar online.FirstPacket garantiza que los datos de los juegos, las comunicaciones de voz sobre IP (VoIP) y las transferencias de archivos de gran tamaño se gestionarán de acuerdo con las preferencias que tú establezcas a través de un sencillo asistente de configuración.Tecnología NVIDIA DualNet®Duplica la capacidad de tus comunicaciones en red con las dos conexiones Gigabit Ethernet integradas en el MCP NVIDIA nForce 500.Combinación de las dos conexiones Gigabit EthernetLa combinación de ambas conexiones permite sumar su capacidad para duplicar el ancho de banda Ethernet y, de esta forma, poder transferir grandes cantidades de datos desde el servidor de archivos a otros PC. Además, proporciona redundancia gracias al cambio automático de enlace en caso de fallo (failover).Aceleración de las funciones TCP/IPOfrece el máximo rendimiento del sistema al realizar mediante hardware el trabajo de filtrado de paquetes normalmente reservado a la CPU, lo que proporciona un entorno de red más rápido. Utilidad NVIDIA nTune™ 4.0La nueva versión de esta utilidad Windows incluye más opciones para optimizar el rendimiento. nTune permite ajustar manual o automáticamente los parámetros del sistema para conseguir el rendimiento deseado. Una vez realizada la configuración, la utilidad elige automáticamente los parámetros adecuados para la aplicación que se ejecute basándose en las reglas personales y los perfiles definidos por el usuario.PCI ExpressDiseñado para funcionar con el bus PCI Express. Este bus duplica el ancho de banda del bus AGP 8X, lo que proporciona una velocidad superior a 4 GB/s en las transferencias de datos en ambas direcciones.Audio de alta definición (HDA)El audio de alta definición introduce en el PC la calidad de sonido de los equipos electrónicos de consumo. Con HDA, los sistemas pueden proporcionar un extraordinario sonido de 192 kHz/32 bits a través de ocho canales que admiten los nuevos formatos de audio.USB 2.0Interfaz estándar que proporciona conexión inmediata con los dispositivos USB.。
EVGA GTX 1080 GTX 1070 FTW Hybrid Cooling Kit安装说明书

2)Remove the 4 spring-loaded screws on the back side of the card, as this will allow you to remove the original coolingsolution. Set these screws aside for now, as you'll use them again in Step 6. After removing the cooling solution, carefully unplug the fan's power connector from the graphics card's fan header (this is necessary for Step 7). Then, remove any remaining screws on the back side of the card, as this will allow you to remove the metal baseplate. Lastly, remove the screw and nut on the bracket, as this needs to be clear for the new shroud.3)Mount one screw and nut on bracket.4) Be sure to fully clean the GPU (see picture) with a high-percentage Isopropyl Alcohol—preferably 90% or higher—and a lint-free cloth to remove all thermal compound.5) R emove the watercooler from the FTW Hybrid CoolingKit packaging, then separate the shroud, copper memoryplate, and heatsink and fan. Carefully place the newheatsink and fan over the VRM, making sure to line up thescrew holes on the graphics card’s PCB. Secure the newheatsink and fan to the graphics card using a single screw,as shown in the image below:6) Remove the plastic cover on top of the waterblock.The waterblock comes with pre-applied thermalcompound. First, line up the copper heatsink such thatthe thermal pads go over the memory. Then, mount the waterblock to the card, using the picture below as aguide. Use the spring-loaded screws you previouslyremoved in Step 2 to secure the waterblock to the card.7) The FTW The Hybrid Cooling Kit's waterblock uses a pass-through cable to power the pump on the waterblock and the fan on the graphics card. Using the pictures below as a guide, (1) plug the fan's power connector into the waterblock's female pass-through connector, then (2) connect the remaining connector into the graphics card's fan header. Once all connectors are attached, please use the included strips of tape to secure the wires to the plastic around the perimeter of the fan; the wires must not come into contact with the fan. Lastly, install the three washers at the end of the card by placing the adhesive side on the PCB.8) Use the fins in the heatsink to run the wires underneath the fan, then gently flatten the cables parallel to the PCB. We recommend using the 6th fin from the bottom, as shown in the pic below.9) Attach the included rubber insert to the edge of the card, which will be used to hold the tubes in place. Make sure to run the fan-connector underneath the small channel provided under the rubber insert.10) Plug in the 2-pin LED power cable from the shroud into the LED header. Use the picture below as a guide:11) Place one thermal pad on the back of PCB.12) Place the shroud over the top of the card. The rubber insert is held down only by the tubing and shroud, so ensure the insert is aligned properly before installing the shroud (See pic in Step 9). Make sure to align the shroud with the tubing and the cutouts in the rubber insert, and then insert the shroud into place. Turn the card over and place the backplate on the PCB. Secure the backplate to the card and shroud using the screws provided. Make sure the screw is attached to the rubber insert.Important InformationThe EVGA GTX™ 1080/GTX™ 1070 FTW Hybrid Cooling Kit is an AIO (All-In-One) Water Cooling System. With AIO Water Cooling Systems, you do not need to add any coolant, and the system is completely self-contained. All EVGA Hybrid Cooling Kits are leak tested at the factory, and are ready to install when received. EVGA GTX™ 1080/GTX™ 1070 FTW Hybrid Cooling Kits are only officially-compatible with air-cooled NVIDIA Reference PCB designs for EVGA GTX™ 1080 and GTX™ 1070 graphics cards, and are neither designed for, nor officially-supported for, any other graphics cards or graphics card brands. Warranty for the GTX™ 1080/GTX™ 1070 FTW Hybrid Cooling KitYour EVGA GTX™ 1080/GTX™ 1070 FTW Hybrid Cooling Kit comes with a 1 (one) year warranty. Refer to your GTX™1080/GTX™ 1070 manufacturer's warranty information before installing the EVGA GTX™ 1080/GTX™ 1070 FTW Hybrid Cooling Kit. EVGA will not be held liable for the physical damage of your GTX™ 1080/GTX™ 1070, FTW Hybrid Cooling Kit, case, motherboard or any other associated hardware when damage is caused by improper installation.Note。
MSI GeForce GTX 1070 Ti 8GB GDDR5 图形卡说明说明书
1. 1x Headset out / 1x Mic in / 1x 2. 1x VR-Link
USB 3.1 Gen 1 Type C / 1x USB 3.1 4. 1x DVI-D
Gen 1 Type A / 1x USB 2.0
6. 1x HDMI™ / 2x USB 3.1 Gen 1
E/S பைடு நூலகம்Frontal)
1x USB 3.1 Gen 1 Type C 1x USB 3.1 Gen 1 Type A 1x USB 2.0 (with Super Charger 2) 1x Mic in / 1 x Headphone out
Adaptador AC Intel® Wireless-AC 9461
Alimentación 550W 80 Plus Bronze certified
Dimensiones
210 x 450 x 488 (mm)
Peso
15 KG
Accesorios
1 x Manual (Optional) 1 x Quick guide 1 x Warranty card 1 x Power cord
© 2023 Micro-Star Int'l Co.Ltd. MSI is a registered trademark of Micro-Star Int'l Co.Ltd. All rights reserved.Intel, the Intel logo, the Intel Inside logo and Intel Core are trademarks of Intel Corporation or its subsidiaries in the U.S. and/or other countries.