思科VOIP完整配置实例
VoIP典型配置举例
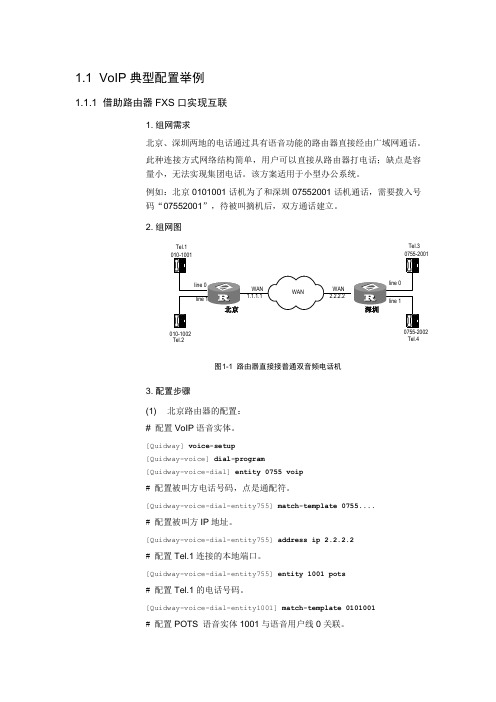
1.1 VoIP典型配置举例1.1.1 借助路由器FXS口实现互联图1-1路由器直接接普通双音频电话机3. 配置步骤(1) 北京路由器的配置:# 配置VoIP语音实体。
[Quidway] voice-setup[Quidway-voice] dial-program[Quidway-voice-dial] entity 0755 voip# 配置被叫方电话号码,点是通配符。
[Quidway-voice-dial-entity755] match-template 0755....# 配置被叫方IP地址。
[Quidway-voice-dial-entity755] address ip 2.2.2.2# 配置Tel.1连接的本地端口。
[Quidway-voice-dial-entity755] entity 1001 pots# 配置Tel.1的电话号码。
[Quidway-voice-dial-entity1001] match-template 0101001# 配置POTS 语音实体1001与语音用户线0关联。
[Quidway-voice-dial-entity1001] line 0# 配置Tel.2连接的本地端口。
[Quidway-voice-dial-entity1001] entity 1002 pots# 配置Tel.2的电话号码。
[Quidway-voice-dial-entity1002] match-template 0101002# 配置POTS 语音实体1002与语音用户线1关联。
[Quidway-voice-dial-entity1002] line 1(2) 深圳路由器的配置# 配置VoIP语音实体。
[Quidway] voice-setup[Quidway-voice] dial-program[Quidway-voice-dial] entity 010 voip[Quidway-voice-dial-entity10] match-template 010....[Quidway-voice-dial-entity10] address ip 1.1.1.1# 配置Tel.3连接的本地端口。
思科voip语音网关配置详解

cisco2811语音网关+callmanager拨打外线,外线拨入详解配置——————包括AA和连接PBX的配置A.首先要在callmanager上进行h.323和router pattern的简单配置B.下面是在CISCO2811路由器上的配置----此路由上安装了一个4FXO口的语音模块1.下面是AA的配置:applicationservice aa flash:its-CISCO.2.0.1.0.tcl //调用TCL脚本,定义服务名字为aa(Auto Attendant)paramspace english language en/定义语言为英文,这个无所谓,反正你播放的是中文的welcome.au就可以了paramspace english index 1//定义索引位置param operator 888 //设置人工总机为888paramspace english location flash:param aa-pilot 678 //设置自动话务员的号码,这个随便设param welcome-prompt en_welcome.au //设置提示音,自己录制时注意格式.au,8-bit,8kHZ,u-law 各音频文件名与系统自带的文件名一致,重启路由器2.在接口上的配置:interface Loopback0 //为了使本地可以拨打AA自动话务员,需要配置这个地址ip address 1.1.1.1 255.255.255.0 //此地址随意!interface FastEthernet0/0ip address 121.29.221.138 255.255.255.0ip nat outsideip virtual-reassemblyduplex autospeed autocrypto map mymap //将保密映射应用到接口上,指定要使用的加密图!interface FastEthernet0/1ip address 192.168.100.3 255.255.255.0ip nbar protocol-discoveryip nat insideip virtual-reassemblyduplex autospeed autoh323-gateway voip interface3.voice-port的配置:voice-port 0/0/0 //进入语音端口FXO配置模式cptone CN //配置铃音使用中国制式timeouts call-disconnect 1timeouts wait-release 1 //定义呼叫、等待时间!voice-port 0/0/1 //此端口连接PSTNsupervisory disconnect dualtone mid-callcptone CNtimeouts call-disconnect 1timeouts wait-release 1caller-id enable!voice-port 0/0/2 //此端口连接PSTNsupervisory disconnect dualtone mid-call//配置Tone管理断开——主要是外线拨打IP 电话时,不能及时挂断的方法cptone CNtimeouts call-disconnect 1//呼叫中断的超时设定timeouts wait-release 1//等待释放的超时设定!voice-port 0/0/3 //此端口连接PBX的FXS口supervisory disconnect dualtone mid-callcptone CNtimeouts call-disconnect 1timeouts wait-release 14.拨打外线的配置:dial-peer voice 2 pots //配置一个POTS拨号对等体(和配置静态路由时的ip route命令类似)service aadestination-pattern 9T//表示9+电话号码,即拨出的电话号码,表示号码前加入9才能通过这个端口出局incoming called-number .port 0/0/1 ////指定端口(FXO口0/0/1)!dial-peer voice 4 potsservice aadestination-pattern 9Tincoming called-number .port 0/0/2!dial-peer voice 200 potsservice aadestination-pattern .T //.表示一个任意数字,T表示多个任意数字port 0/0/35.外线拨入和PBX上模拟电话拨打IP电话的配置:dial-peer voice 344 voip//配置一个VOIP拨号对等体destination-pattern 6..//内部IP分机session target ipv4:192.168.100.209//会话目标IP(和配置静态路由时的下一跳地址类似)dtmf-relay h245-alphanumeric//DTMF使用h245-alphanumeric,写错了就无法输入分机号码了codec g711ulaw //强制使用G.711ulaw,否则容易因为codec出问题no vad //关闭VAD,否则容易出毛病!dial-peer voice 345 voipdestination-pattern 5..session target ipv4:192.168.100.209dtmf-relay h245-alphanumericcodec g711ulawno vad!dial-peer voice 300 voip //配置与实验室2811CME的电话互通destination-pattern 4..session target ipv4:192.168.100.11 //实验室2811的F0/1接口地址!dial-peer voice 10 voipservice aadestination-pattern 678 //使本地可以拨打自动话务员,必须配合下面的session session target ipv4:1.1.1.1//incoming called-number 678 //配置拨入的电话为678的时候,才调用server aa dtmf-relay h245-alphanumericcodec g711ulawno vad。
思科IP电话用户使用手册范本
思科IP话机用户使用手册IP话机常用功能使用方法注:如果在屏幕中找不到下文提到按钮,请按翻页1,拨打1)摘机输入2)在免提状态下,直接按输入。
此时扬声器打开,如果不需要扬声器,可直接摘机3)在免提状态下,直接按,听到拨号音后输入2,接听1)在未摘机情况下,摘机接听2)已摘机情况下,在屏幕左下角按接听3,保留在通话过程中按保留,就可以将这路保留。
此时,对方处于听音乐状态。
如要取消保留,继续按即可。
4,转接在通话状态中按,>输入目标>再按,目标将响铃。
5,呼叫前转(又叫“呼叫转移”)在未摘机状态下,按>听到“嘟嘟”两声提示音>输入目标(前转至座机或者手机,请按照拨打该的方式输入,如市话加拨0),然后稍等一会,系统会自动跳回原来的待机屏幕,并显示前转。
6,取消前转在待机状态下,按。
7, 创建会议1)Ad-hoc方式。
在通话过程中,如果此时你想让某人加入讨论,按,然后输入与会者,再按下。
2)如果你已经在两个通话中(一路被保留,另一路正常),你也可以按,然后再利用方向选择键,往上或者下选择另一路通话,并且再按,即可建立三方会议。
3)Meet-me方式。
会议主持人,先按,输入18后,再拨自己分行站点号与分机号,然后通知其他要参加会议的人直接拨打这个10位,其他人不用按8,查看记录按,就可以选择查看未接呼叫,已接通话,已拨呼叫9,查看语音留言按语音按钮,然后按照提示输入密码,就可以收听语音留言。
在使用过程中如有问题,请致电话机按键介绍编号图标功能描述1预设按钮根据配置设计不同,该按钮有不同的功能,如话路选择(一个话机有多个的情况),快速拨号等按钮会根据当前通话状态改变颜色 并保持,表示正在进行的通话 并闪烁,表示挂起的通话并保持,表示拒绝呼叫开启或者该线路已加入组等编号图标功能描述并保持,表示远端线路忙并闪烁,表示该线路有呼叫进入并保持,表示远端线路忙2 屏幕显示功能3 支架按钮按下可调整话机放置角度4 语音留言按下后自动转到语音留言服务5 目录按钮打开或关闭通信录目录,通过通信录来查询通话记录或者定制的通讯录并拨号6 帮助按钮显示帮助目录7 设定按钮打开设定目录,通过设定目录可以更改网络,屏幕,铃声等设定8 服务按钮打开服务目录9 音量调节用以调节听筒与扬声器(免提\铃声)的音量10 免提按钮激活免提,当免提激活时该按键点亮11 静音按钮使话筒静音,当静音时该按键点亮12 耳机按钮激活头戴式耳机,使用听筒时该按键点亮13 方向按钮方向键用以在菜单中卷动屏幕,在不同栏中移动选择.14 键盘用以输入,用户名等信息,字母键的使用同手机键盘15 软按键对应屏幕最下方的软按键选项16 听筒灯条提示有呼叫进入或者有新语音留言话机电缆连接1 直流变压器端口(DC48V) 6 听筒端口2 交流电源7 头戴式耳机端口3 AC 电源线8 支架按钮4 网络端口(10/100 SW) 9 辅助端口(AUX)5 接入端口(10/100 PC)屏幕上软键定义说明。
思科 DPC2202 和 EPC2202 型号 VoIP 电缆调制解调器 说明书
Cisco DPC2202 和EPC2202 型号VoIP 电缆调制解调器用户指南本文档包含的内容重要安全性说明 (2)简介 (10)装箱内容 (11)前面板说明 (12)后面板说明 (13)互联网服务的系统要求 (14)如何订阅高速互联网和电话服务? (15)放置电缆调制解调器的最佳位置 (16)如何将调制解调器安装在墙壁上?(可选) (17)电话服务的要求 (19)如何连接电缆调制解调器以使用互联网和电话服务? (20)安装USB 驱动程序 (23)常见问题解答 (25)遇到困难? (28)改善性能的小窍门 (29)前面板LED 状态指示灯功能 (30)通告 (32)重要安全性说明重要安全性说明安装人员注意事项本注意事项中的维修说明仅供合格维修人员使用。
为减少触电风险,如您不具备资质,请勿擅自执行使用说明以外的操作。
Notice à l’attention des installateurs de réseaux câblésLes instructions relatives aux interventions d’entretien, fournies dans la présente notice, s’adressentexclusivement au personnel technique qualifié. Pour réduire les risques de chocs électriques, n’effectueraucune intervention autre que celles décrites dans le mode d'emploi et les instructions relatives aufonctionnement, à moins que vous ne soyez qualifié pour ce faire.重要安全性说明Mitteilung für CATV-TechnikerDie in dieser Mitteilung aufgeführten Wartungsanweisungen sind ausschließlich für qualifiziertes Fachpersonal bestimmt. Um die Gefahr eines elektrischen Schlags zu reduzieren, sollten Sie keine Wartungsarbeiten durchführen, die nicht ausdrücklich in der Bedienungsanleitung aufgeführt sind,außer Sie sind zur Durchführung solcher Arbeiten qualifiziert.Aviso a los instaladores de sistemas CATVLas instrucciones de reparación contenidas en el presente aviso son para uso exclusivo por parte de personal de mantenimiento cualificado. Con el fin de reducir el riesgo de descarga eléctrica, no realice ninguna otra operación de reparación distinta a las contenidas en las instrucciones de funcionamiento, a menos que posea la cualificación necesaria para hacerlo.20080814_Installer820_Intl重要安全性说明重要安全性说明1) 阅读这些说明。
cisco-2000-Voip 配置实例解析

下面是一个Cisco 3640的VOIP配置,对方的结构是台北和上海两地做VOIP,后接阿尔卡特的PBX,这是我亲手做的,里面有很多有注意的地方,与大家一起分享快乐!如有看不懂的地方请问我,还有我加的注解:Taipei#sh runBuilding configuration...Current configuration:!version 12.0service timestamps debug uptime(设定Debug跟踪日志显示其时间)service timestamps log uptime(设定看Log时显示其时间)no service password-encryption(口令不加密)!hostname Taipei(主机名)!enable secret 5 $1$R.66$z.BUjhNsJcIr8KCcS9uxG.!!!!!voice-card 1(定义语音卡1)!voice-card 3(定义语音卡3)!ip subnet-zerono ip domain-lookup!isdn voice-call-failure 0!!!!controller E1 1/0(配置 E1语音卡)framing NO-CRC4ds0-group 0 timeslots 1-15,17-31 type e&m-wink-start(定义语音卡的类型为E&M卡)cas-custom 0!controller E1 3/0(配置 E1语音卡)framing NO-CRC4ds0-group 0 timeslots 1-15,17-31 type e&m-wink-start(定义语音卡的类型为E&M卡)cas-custom 0!!!interface BRI0/0no ip addressno ip directed-broadcastshutdownisdn guard-timer 0 on-expiry accept!interface FastEthernet0/0no ip addressno ip directed-broadcastshutdownduplex autospeed auto!interface Serial0/0description "Link to MainLand_ShangHai by NCIC lease line"ip address 192.168.1.1 255.255.255.252no ip directed-broadcastno ip mroute-cacheno fair-queue!interface Serial0/1no ip addressno ip directed-broadcastshutdownclockrate 2000000!ip classlessno ip http server!!voice-port 1/0:0(配置模拟语音端口)compand-type a-law!voice-port 3/0:0(配置模拟语音端口)compand-type a-law!dial-peer voice 1 voip (定义拨号对等体到语音)destination-pattern +445...(为拨号对等体分配电话号码,其中.为通配符)session target ipv4:192.168.1.2(定义Voip路由,为对端的IP地址)req-qos guaranteed-delay (语音数据流RVSP的保证,其中Guaranteed-dealy可用于保证整个网络的延时)ip precedence 5(IP优先级,5为关键)!dial-peer voice 2 pots(定义拨号对等体到语音物理端口)destination-pattern +3...(定义电话话码以3开头的)port 1/0:0(定义语音端口)!dial-peer voice 3 pots(定义拨号对等体到语音物理端口)destination-pattern +3...(定义电话话码以3开头的)port 3/0:0(定义语音端口)!!line con 0(设定登陆)transport input noneline aux 0line vty 0 4(允许用Telnet)password cisco(口令为Cisco)login!endTaipei#上海一方的3640配置ShangHai#sh runBuilding configuration...Current configuration:!version 12.0service timestamps debug uptimeservice timestamps log uptimeno service password-encryption!hostname ShangHai!enable secret 5 $1$dB/c$tnrMU9IxFCJdix5ssHAdH/!!!!!voice-card 1!voice-card 2!ip subnet-zerono ip domain-lookup!isdn voice-call-failure 0!!!!controller E1 1/0framing NO-CRC4ds0-group 0 timeslots 1-15,17-31 type e&m-immediate-start cas-custom 0!controller E1 2/0framing Nds0-group 0 timeslots 1-15,17-31 type e&m-immediate-start cas-custom 0!!!interface BRI0/0no ip addressno ip directed-broadcastencapsulation pppisdn guard-timer 0 on-expiry acceptppp multilink!interface FastEthernet0/0no ip addressno ip directed-broadcastshutdownduplex autospeed auto!interface Serial0/0no ip addressno ip directed-broadcastno ip mroute-cacheshutdownno fair-queueclockrate 2000000!interface Serial0/1ip address 192.168.1.2 255.255.255.252 no ip directed-broadcast!ip classless!no ip http server!!voice-port 1/0:0compand-type a-law!voice-port 2/0:0compand-type a-law!dial-peer voice 20 voipdestination-pattern +3...session target ipv4:192.168.1.1req-qos guaranteed-delayip precedence 5!dial-peer voice 10 potsdestination-pattern +448...port 1/0:0!dial-peer voice 30 voipdestination-pattern +4...session target ipv4:192.168.1.1req-qos guaranteed-delayip precedence 5!dial-peer voice 40 potsdestination-pattern +449...port 2/0:0!!line con 0transport input noneline aux 0line vty 0 4password ciscologin!end ShangHai#。
Cisco_IP_Communicator_软电话全配置(经典)(1)

本实验通过Cisco IP PHONE ,模拟电话软件来实现在内网中互相拨打IP电话实验拓扑:实验要求:一,必须先安装JAVA 虚拟机(如安装此版本:jre-6u4-windows-i586-p),以保证IP电话能正常启动安装过程截图略过,只需要点击下一步,火星人都会哦二,安装Cisco_IP_Communicator,建立安装最新的2.1.4版本,因为早期的2.1.0版本安装完成之后,不能识别旧的声卡程序,造成通话没有声音。
如图1,打开安装目录,点击“CiscoIPcommunicator”如图2,双击,安装如图3:勾选同意安装协议,点击NEXT如图4,如果你需要更改安装路径,请点击,“Change“,倘若保持默认安装路径,点击“”NEXT如图5,安装程序正在拷贝文件到系统中,稍等几分钟如图6,安装完成,退出安装程序如图7,按提示需要重启系统,重启之后软件安装完毕如图8,首次启动Cisco IP Communicator,会自动检查音频和麦克风的设置是否正常如图9,如果系统这些硬件,以及驱动程序正常,则会自动识别出硬件的型号,点击NEXT如图10,Cisco IP Communicator启动界面如图11,Cisco IP Phone,调用JAVA正常启动之后,拨号面板三,在路由器上进行电话机的配置先对模拟器Rack191修改一下,让路由器F1/0接口和PC的物理网卡桥接上,以保证相互通信,为后续IP电话注册提供保障。
如图所示,编辑Rack191,开始-运行-CMD-getmac获得网卡在注册表对应的键值,0016.D324.9FFD这个MAC地址就是我的本地网卡,IP 为172.16.0.6,复制该键值,替换Rack191中“Device\NPF”然后保存。
如图所示,双击运行Rack191,路由器已可以正常启动,并且可以看到1:0和本地桥接。
配置步骤:第一步:先完成路由器最基本的配置如图1第二步:完成电话机的注册配置设置IP电话的网络选项:如图设置:设置TFTP SERVER IP,其实此IP就是路由器接口IP,IP Phone 与此地址去通讯,去完成电话的注册。
PacketTracer7 配置语音电话VOIP详细步骤

Router(config-ephone)#mac-address 00d0.ffa7.da2e
Router(config-ephone)#type 7960
Router(config-ephone)#button 1:1
Router(config-ephone)#exit
Router(config-ephone)#exit
设定电话注册信息地址及端口
Router(config)#telephony-service
Router(config-telephony)#ip source-address 192.168.1.254 port 2000 端口默认2000
Vlan Mac Address Type Ports
---- ----------- -------- -----
1 0001.4227.c901 DYNAMIC Fa0/2
1 000a.f3d0.1801 DYNAMIC Fa0/1
Router(config-telephony)#exit
进入端口0/0 开启
Router(config)#interface fastEthernet 0/0
Router(config-if)#no shutdown
Router(config-if)#exit
保存配置信息 重启
Switch(config-if)#switchport access vlan 100
Switch(config-if)#switchport vswitchport mode access
Switch(config-if)#shutdown
ip电话设置cisco
ip电话设置cisco思科路由器是世界闻名的通讯设备之一了,有不少用户不知道怎么设置cisco ip电话?店铺为大家分享了具体操作方法,供大家参考!设置思科IP电话参考以下命令:第一种配置方式:Router(config)#telephony-service setup ----开启ipPhone配置--- Cisco IOS Telephony Services Setup ---Do you want to setup DHCP service for your IP Phones? [yes/no]: yes ----配置DHCPConfiguring DHCP Pool for Cisco IOS Telephony Services :IP network for telephony-service DHCP Pool:192.168.2.0Subnet mask for DHCP network :255.255.255.0TFTP Server IP address (Option 150) :192.168.2.1Default Router for DHCP Pool :192.168.2.1Do you want to start telephony-service setup? [yes/no]: yes ----开启电话语音Configuring Cisco IOS Telephony Services :Enter the IP source address for Cisco IOS Telephony Services :192.168.2.1Enter the Skinny Port for Cisco IOS Telephony Services : [2000]: ----语音端口How many IP phones do you want to configure : [0]: 2Do you want dual-line extensions assigned to phones? [yes/no]: yesWhat Language do you want on IP phones :0 English1 French2 German3 Russian4 Spanish5 Italian6 Dutch7 Norwegian8 Portuguese9 Danish10 Swedish11 Japanese[0]: 0Which Call Progress tone set do you want on IP phones :0 United States1 France2 Germany3 Russia4 Spain5 Italy6 Netherlands7 Norway8 Portugal9 UK10 Denmark11 Switzerland12 Sweden13 Austria14 Canada15 Japan[0]: 0What is the first extension number you want to configure : 800 ----电话分机号Do you have Direct-Inward-Dial service for all your phones? [yes/no]: yesEnter the full E.164 number for the first phone :888Do you want to forward calls to a voice message service? [yes/no]: yes ----语音信箱Enter extension or pilot number of the voice message service:899Call forward No Answer Timeout : [18]:Do you wish to change any of the above information? [yes/no]: no ----表示不修改了CNF-FILES: Clock is not set or synchronized,retaining old versionStamps---- Setup completed config ---Router(config)#*Mar 1 00:23:46.743: %LINK-3-UPDOWN: Interface ephone_dsp DN 1.1, changed state to up*Mar 1 00:23:46.747: %LINK-3-UPDOWN: Interface ephone_dsp DN 1.2, changed state to up*Mar 1 00:23:46.747: %LINK-3-UPDOWN: Interface ephone_dsp DN 2.1, changed state to up*Mar 1 00:23:46.751: %LINK-3-UPDOWN: Interface ephone_dsp DN 2.2, changed state to upRouter#show runBuilding configuration...!ip dhcp pool ITSnetwork 192.168.2.0 255.255.255.0option 150 ip 192.168.2.1default-router 192.168.2.1!telephony-servicemax-ephones 2max-dn 2ip source-address 192.168.2.1 port 2000auto assign 1 to 2create cnf-files version-stamp Jan 01 2002 00:00:00 dialplan-pattern 1 8.. extension-length 3 voicemail 899max-conferences 4 gain -6transfer-system full-consult!!ephone-dn 1 dual-linenumber 800call-forward busy 899call-forward noan 899 timeout 18!!ephone-dn 2 dual-linenumber 801call-forward busy 899call-forward noan 899 timeout 18!!ephone 1!!!ephone 2!!line con 0line aux 0line vty 0 4!!endRouter#show telephony-service ?admin Show telephony-service admin username and passwordall Show telephony-service detailsdial-peer Show telephony-service dialpeersdirectory-entry Show telephony-service directory-entryephone Show ephone configurationephone-dn Show ephone-dn configurationephone-template Show ephone-template configurationtftp-bindings Show telephony-service tftp-server bindings voice-port Show telephony-service voice ports| Output modifiers<cr>Router#show telephony-serviceCONFIG (Version=3.3)=====================Version 3.3Cisco CallManager ExpressFor on-line documentation please see:/univercd/cc/td/doc/product/access/ip_ph/i p_ks/index.htmip source-address 192.168.2.1 port 2000max-ephones 2max-dn 2max-conferences 4 gain -6dspfarm units 0dspfarm transcode sessions 0hunt-group report delay 1 hoursmax-redirect 5dialplan-pattern 1 8.. extension-length 3 voicemail 899time-format 12date-format mm-dd-yytimezone 0 Greenwich Standard Timekeepalive 30timeout interdigit 10timeout busy 10timeout ringing 180caller-id name-only: enableedit DN through Web: disabled.edit TIME through web: disabled.Log (table parameters):max-size: 150retain-timer: 15create cnf-files version-stamp Jan 01 2002 00:00:00 transfer-system full-consultauto assign 1 to 2local directory service: enabled.第二种配置方式:第1步先配置DHCP:r1(config)#ip dhcp pool CMEr1(dhcp-config)#network 192.168.1.0 /24r1(dhcp-config)#?DHCP pool configuration commands:accounting Send Accounting Start/Stop messages bootfile Boot file nameclass Specify a DHCP classclient-identifier Client identifierclient-name Client namedefault-router Default routersdns-server DNS serversdomain-name Domain nameexit Exit from DHCP pool configuration modehardware-address Client hardware addresshost Client IP address and maskimport Programatically importing DHCP option parameters lease Address lease timenetbios-name-server NetBIOS (WINS) name servers netbios-node-type NetBIOS node typenetwork Network number and masknext-server Next server in boot processno Negate a command or set its defaultsoption Raw DHCP optionsorigin Configure the origin of the poolrelay Function as a DHCP relaysubnet Subnet allocation commandsupdate Dynamic updatesutilization Configure various utilization parametersvrf Associate this pool with a VRFr1(dhcp-config)#default-router 192.168.1.1r1(dhcp-config)#option 150 ip 192.168.1.1r1(dhcp-config)#exit第2步配置telephony服务r1(config)#telephony-servicer1(config-telephony)#max-ephones 2r1(config-telephony)#max-dn 2r1(config-telephony)#auto assign 3 to 4r1(config-telephony)#ip source-address 192.168.1.1 port 2000r1(config-telephony)#exit第3步配置ephoner1(config)#ephone-dn 1r1(config-ephone-dn)#number 111r1(config-ephone-dn)#exitr1(config)#ephone-dn 2r1(config-ephone-dn)#number 112r1(config-ephone-dn)#exit店铺分享了cisco ip电话设置的方法,希望大家喜欢。
Cisco_VOIP接口板卡详解加配置

Cisco VOIP接口板卡详解加配置模拟接口FXS接口:RJ11接口,用于连接用户的电话、传真、modem,一个接口支持1路电话FX0接口:RJ11接口,用于连接局端设备,例如pstn局端设备,或用户端PBX(程控交换机)设备,一个接口支持1路电话E&M接口:听说接口,用于连接局端设备,例如pstn局端设备,或用户端PBX(程控交换机)设备,比FXO接口性能好一点。
对于FX0和E&M这样的模拟接口卡,是自带DSP资源的,不需要单独的购买PVDM。
而对于T1/E1这样的数字语音接口卡。
则需要单独购买PVDM。
大家都知道。
Wic和vic卡都是插在Module上的。
但原来我有一个误区。
就是认为象VWIC2-2MFT-E1或者T1这样的语音的VIC卡是不能直接插在路由器上的。
一定要插在NM-HDV或NM-HDV2上才行。
后来才知道,原来这是不对的。
对于ISR的28和38系列路由器,其实并不需要NM-DHV这样的模块,也可以直接插VWIC2-2MFT-T1/E1到路由器的接口卡插槽上。
但只能在28和38上这样插才行。
原因是只有28和38系列的ISR的集成多业务路由器的主板上已经内置了PVDM的插槽。
同时由于是面向语音的路由器系列并把原来处理语音呼叫改为专门的ASICC芯片来处理,性能上已经有了很大的提升。
数字接口有:E1(欧洲标准,中国遵从欧洲标准) 、T1接口(北美标准)、STM1 (155M的带宽,以后voip核心设备会大量使用)E1:支持30路电话,Cisco模块由一下几种:nm模块NM-HDV2 1-slot IP communications voice/fax network module 语音接口模块,需要另配置VIC接口(模拟or数字接口)配合使用;NM-HDV2-1T1/E1 2-slot I P communications voice/fax network module with one slot for T1/E1 interface (自带E1接口)NM-HDV2-2T1/E1 2-slot IP communications voice/fax network module with two slots forT1/E1 interface (自带2个E1接口)Packet voice data modules PVDM2 channel packet fax/voice DSP module (数字处理模块)PVDM2-16 16-channel packet fax/voice DSP modulePVDM2-32 32-channel packet fax/voice DSP modulePVDM2-48 48-channel packet fax/voice DSP modulePVDM2-64 64-channel packet fax/voice DSP moduledsp模块是数字处理模块,象内存一样插在主板上或者nm模块上(主板上有没有带需要确认),功能主要是实现数字voice的一些处理,例如voice编码格式转换等等功能,VWIC-1MFT-E1模块要作为连接语音设备的中继接口,必须要和dsp模块配合使用。
cisco VoIP软电话配置

hostname CCM
interface FastEthernet0/0
ip address 172.20.15.28 255.255.255.0 /设置F0/0口IP,可以用作TFTP服务器的地置以便VOIP软电话通过此地址到CCM上注册。
duplex auto
system message ‘/ 语音注册后系统上屏幕显示信息内容。
create cnf-files version-stamp Jan 01 2002 00:00:00/创建模板
voicemail 1314520/定义语音邮件发送的号码
max-conferences 8 gain -6
!
!
ephone-dn 1/设置第一路电话号码
number 007/号码XXX
name yixingxu/定义注册后的名称
!
!
ephone-dn 2
numbeቤተ መጻሕፍቲ ባይዱ 008
name zengfei
!
!
ephone 1/设置第一个IP电话
mac-address 0019.2161.26EF/把MAC地址与号码进行绑定,防止号码注册不稳定
type CIPC/注册类型为CISCO
button 1:1/第一个IP电话对应的第一路电话号码,也可以对应多个如1:2;1:3。
!
!
!
ephone 2
mac-address 0019.2161.333C
button 2:2
!
end
现在弄好了配置,那么我们就只需要安装相关语音软件就可以了,在两个客户端pc1,pc2都安装好cisco ip communicator。 在tftp server IP设置时一定要设置成CCM的F0/0的地址 ,要不register注册会不成功的,也就没法通信了。
思科Meraki MC74 VoIP电话说明书

OVERVIEWThe Cisco Meraki MC74 is a premium VoIP phone with an elegant design, featuring a 7” touchscreen display. Representing a fresh approach to the notoriously complex and disjointed world of telephony, it leverages the power of the cloud to eliminate the traditional PBX. MC74 provides simple, intuitive management and the ability to integrate with business applications.MERAKI COMMUNICATIONSMeraki Communications phones benefit from zero-touch deployment. With only a serial number the network admin can remotely configure the phone for a user or meeting room. Once online it will connect to the cloud, pull down its configuration and within seconds be ready to make calls.Using the Meraki dashboard, the network admin is able to manage all the essentials: review call stats, configure alerts, setup conference rooms, manage a contacts directory and set up Interactive Voice Response menus. For connection to the rest of the world via the public switched telephone network (PSTN), there are configuration options for a SIP service provider, and Meraki partners will be able to guide customers on this essential component.INTRODUCING MC74With a beautiful, carefully crafted design and superb sound quality, MC74 is designed to delight the user, featuring easy and intuitive access to the most commonly used features—and the minimum of distractions.A large, high resolution color display is the center of the phone experience, and this blank canvas allows Meraki engineers and designers to evolve and refine the user experience over time. The display and speaker provide intuitive visual and audible cues to communicate status, without requiring the user to navigate through deep, complicated menus.Wideband audio enhances the calling experience, allowing crystal clear speech. Calls can be placed or received using the handset, USB, Bluetooth or even regular cellphone headsets.* A sensitive mi-crophone and full range speaker are also included for an exceptional hands–free experience during meetings.MC74 aims to be nothing less than the best possible communica-tions experience.MC74 Cloud Managed PhoneDatasheet |MC74SpecificationsHardwareHigh definition color 7” IPS backlit touchscreen display (1280x800) Integrated GbE switch with passthrough portIntegrated desktop stand with adjustable hingeOptional wall mount adapter with levelerDedicated volume buttonMute button with status LEDHandset with on-hook proximity sensorMagnetic cable guideRear and side USB headset ports3.5mm audio headset jackSpeakerphone/MicAmbient light sensorMulticolor notification LEDIn the boxMC74 phone + handset and cordWall mounting kit + hardwareMicrofiber screen clothDesign matched ethernet cableVoIPFully encrypted voice and SIP signaling (TLS/SRTP)E911 support for accurate location in emergenciesE164 international dialling formatWideband audio G.722 internal calling (G.711 for PSTN calling)Power802.3af PoE (Class 3)Universal power adapter (optional accessory)EnvironmentOperating temp: 0o C to 40o C (32 to 104F)Humidity 5 – 95% non condensingPhysical dimensionsSize including handset 272 x 186 x 94mm (10.7 x 7.3 x 3.7in) Weight 1.1Kg (2.4lbs)Warranty2 Y ears Licensing1, 3, 5, 7 or 10 year licensing optionsSafetyUL / IEC / EN 60950-1CAN/CSA-C22.2 No. 60950-1Radio ApprovalsFCC Part 15C, 15EEN 300 328, EN 301 893For additional country-specific regulatory information, please contact Meraki salesSupported frequency bands (country-specific restrictions apply)2.412-2.484 GHz5.150-5.250 GHz (UNII-1)5.250-5.350 GHZ (UNII-2)5.470-5.600, 5.660-5.725 GHz (UNII-2e)5.725-5.825 GHz (UNII-3)EMI Approvals (Class B)FCC Part 15BEN 301 489-1-17, EN 55032, EN 55024Exposure ApprovalsFCC Part 2EN 62311, EN 62479Telecom ApprovalsFCC Part 68* A list of tested headsets can be found at CiscoSystems,Inc.|500TerryA.FrancoisBlvd,SanFrancisco,CA94158|(415)432-1000|**************** 2。
思科7945g硬电话配置
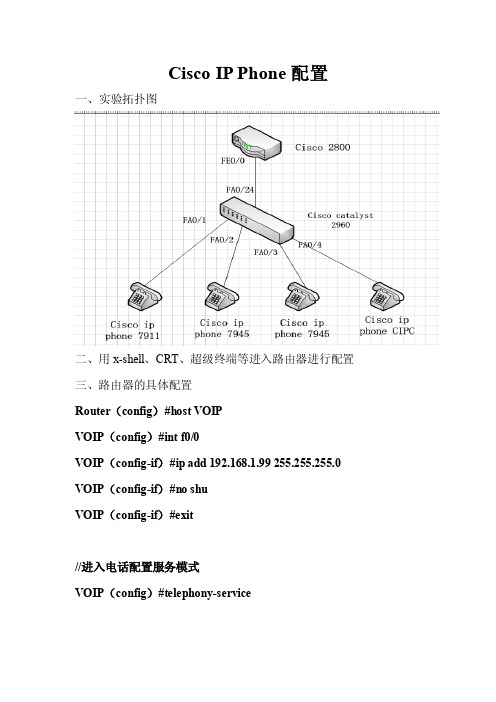
Cisco IP Phone配置一、实验拓扑图二、用x-shell、CRT、超级终端等进入路由器进行配置三、路由器的具体配置Router(config)#host VOIPVOIP(config)#int f0/0VOIP(config-if)#ip add 192.168.1.99 255.255.255.0 VOIP(config-if)#no shuVOIP(config-if)#exit//进入电话配置服务模式VOIP(config)#telephony-service//设置允许注册最多电话数量为10,范围是(1-192)VOIP(config-telephony)#max-ephones 10//设置允许注册最多线路数为10,范围是(1-65535)VOIP(config-telephony)#max-dn 10//设置电话机与CME路由器TCP保持时间为10秒VOIP(config-telephony)#keeplive 10//指定给电话机,在IP语音网络中,CME路由器的IP地址,默认端口是2000VOIP(config-telephony)#ip source-address 192.168.1.99//指定在IP电话注册之后,待机画面的系统消息,在电话机注册之后,可在屏幕上看到(这个可以随意设置)VOIP(config-telephony)#system message welcome to homeVOIP(config-telephony)#exit//进入1号线路下(dual-line设置电话双线,后期可在IP电话上使用会议功能)VOIP(config)#ephone-dn 1 dual-line//配置ephone-dn,每个ephone-dn代表一条线路,定义第一条线路的号码为10011VOIP(config-ephone-dn)#number 10011//配置电话的主机名称为hostAVOIP(config-ephone-dn)#name hostAVOIP(config-ephone-dn)#exit//进入2号线路下VOIP(config)#ephone-dn 2 dual-lineVOIP(config-ephone-dn)#number 10012VOIP(config-ephone-dn)#name hostBVOIP(config-ephone-dn)#exit//配置ephone,每个ephone对应一个ip phoneVOIP(config)#ephone 1//绑定IP电话的MAC地址,把MAC地址与电话号码关联在一起。
CiscoPacketTracerIP电话VoIP配置

CiscoPacketTracerIP电话VoIP配置VoIP介绍基于IP的语⾳传输(英语:Voice over Internet Protocol,缩写为VoIP)是⼀种语⾳通话技术VoIP的配置拓扑规划路由器2811的fa0/0⼝作为IP电话的⽹关IP地址表路由器2811的fa0/0⼝地址:192.168.1.254/24配置命令设置路由RouterA(2811)的Fa0/0端⼝Router(config)#int fa0/0Router(config-if)#ip add 192.168.1.254255.255.255.0Router(config-if)#no shut设置路由的CME电话服务Router(config)#telephony-serviceRouter(config-telephony)#max-dn 5 #定义可以允许注册最多的电话号码(针对号码)Router(config-telephony)#max-ephones 5 #可以允许注册最多的电话数(针对物理设备)Router(config-telephony)#ip source-address 192.168.1.254 port 2000 # IP电话CME服务的IP和端⼝(默认2000),IP电话启动之后会⾃动向此地址发出注册请求。
Router(config-telephony)#auto assign 1 to 5 # ⾃动将号码分配给电话配置DHCP 服务Router(config)#ip dhcp pool VOIPRouter(dhcp-config)#network 192.168.1.0 255.255.255.0Router(dhcp-config)#default -router 192.168.1.254Router(dhcp-config)#option 150 ip 192.168.1.254在交换机SwitchA 上创建⼀个VOICE VLAN Switch(config)#int range fa0/1-20Switch(config-if -range)#switchport mode accessSwitch(config-if -range)#switchport voice vlan 1定义IP 电话的号码Router(config)#ephone-dn 1Router(config-ephone-dn)#number 40001Router(config)#ephone-dn 2Router(config-ephone-dn)#number 40002测试直接输⼊电话,点击话筒即可测试TIPS不要忘记插电源。
Cisco路由器VoIP配置说明书

公共信道信令 (CCS)的VoIP目录简介先决条件要求使用的组件规则T1信令:CAS和CCSCCSCAS配置网络图配置验证故障排除故障排除命令相关信息简介本文档说明本文档中两台路由器通过数字PRI通过IP语音(VoIP)和通用信道信令(CCS)进行通信所需的配置。
请注意,在此配置中,两台路由器通过IP网段背靠背连接。
但是,在大多数拓扑中,支持语音的路由器可以存在于任何位置。
通常,语音路由器通过LAN连通性与连接到WAN的其他路由器相连。
请注意,这一点很重要,因为如果语音路由器未通过租用线路连接,则所有WAN连接配置命令都配置在连接到WAN的路由器上,而不是语音路由器上,如本文档中的配置所示。
虽然本配置示例中使用Cisco 3640路由器和Cisco AS5300路由器,但这些配置也可用于Cisco 2600系列路由器。
先决条件要求在您能够配置Cisco路由器使用VoIP之前,如果您了解Cisco IOS.软件服务质量(QoS)功能的概念是最好的。
要了解有关QoS功能的详细信息,请参阅上Cisco IOS QoS页面的排队、流量整形、过滤和QoS信令。
使用的组件本文档中的信息基于以下软件和硬件版本:Cisco 2600 和 3640 系列路由器qCisco AS5300q本文档中的信息都是基于特定实验室环境中的设备编写的。
本文档中使用的所有设备最初均采用原始(默认)配置。
如果您使用的是真实网络,请确保您已经了解所有命令的潜在影响。
规则有关文档规则的详细信息,请参阅 Cisco 技术提示规则。
T1信令:CAS和CCS在电话中发信令可以提供下述功能,例如监督和广播线路状态,呼叫设法连接时提供给设备的告警信息,路由和寻址信息等。
T1世界中有两种不同类型的信令信息:CCSq信道关联信令(CAS)qCCSCCS是将信令信息从信息频带传出。
此信令类型最引人注目和广泛使用的形式是ISDN。
使用ISDN PRI的一个缺点是删除一个DS0或语音信道。
CISCO 配置VOIP

配置简单的思科设备VOIPR1接口为192.168.1.1,R2接口为192.168.1.2,R1、R2直连,并相互各连两部电话,要想实现互相通话,可以做如下配置:(其中,5164765,6239560为连接R1的电话号码;5164769,6239561为连接R2的电话)路由器R1上的配置:一、配置多链路捆绑:R-1(config)#int multilink 1R-1(config-if)#encapsulation pppR-1(config-if)#ppp multilinkR-1(config-if)#ppp multilink group 1R-1(config-if)#ip add 192.168.1.2 255.255.255.252R-1(config-if)#exitR-1(config)#int s0/0R-1(config-if)#encapsulation pppR-1(config-if)#clock rate 64000R-1(config-if)#ppp multilinkR-1(config-if)#ppp multilink group 1R-1(config-if)#no shR-1(config-if)#exitR-1(config)#int s0/1R-1(config-if)#encapsulation pppR-1(config-if)#clock rate 64000R-1(config-if)#ppp multilinkR-1(config-if)#ppp multilink group 1R-1(config-if)#no sh二、虚拟专用网的配置:步骤1—启用IKER-1(config)# crypto isakmp enable步骤2—创建IKE 策略R-1(config)# crypto isakmp policy 110R-1(config–isakmp)# authentication pre-shareR-1(config–isakmp)# encryption desR-1(config–isakmp)# group 1R-1(config–isakmp)# hash md5R-1(config–isakmp)# lifetime 86400步骤3—配置预共享密钥R-1(config)#crypto isakmp key cisco1234 address 192.168.1.1步骤4—配置IPSec4.1—配置变换集R-1(config)# crypto ipsec transform-set ccnp esp-des esp-md5-hmacR-1(cfg-crypto-trans)#mode tunnel4. 2—配置全局IPSec 安全关联生存时间R-1(config)# crypto ipsec security-association lifetime seconds 864004.3—创建加密系统所需的扩展ACLR-1(config)#access-list 101 permit ip 172.16.20.0 0.0.0.255 172.16.10.0 0.0.0.2554. 4—配置IPSec 加密系统R-1(config)# crypto map cisco 10 ipsec-isakmpR-1(config-crypto-map)#set peer 192.168.1.1R-1(config-crypto-map)#set transform-set ccnpR-1(config-crypto-map)#match address 1014. 5—将加密系统应用至接口R-1(config)# interface multilink 1R-1(config -if)#crypto map cisco三、VoIP配置:R-1(config)#ip route 0.0.0.0 0.0.0.0 192.168.1.11/1/0定义电话号码为6239560的配置:R-1(config)#dial-peer voice 1 potsR-1(config-dial-peer)#destination-pattern 6239560R-1(config-dial-peer)#port 1/1/01/1/1定义电话号码为5164765的配置:R-1(config)#dial-peer voice 2 potsR-1(config-dial-peer)#destination-pattern 5164765R-1(config-dial-peer)#port 1/1/1映射目的地电话号及IP地址码至本地:R-1(config)#dial-peer voice 10 voipR-1(config-dial-peer)#destination-pattern 5164769R-1(config-dial-peer)#session target ipv4:192.168.1.1R-1(config)#dial-peer voice 11 voipR-1(config-dial-peer)#destination-pattern 6239561R-1(config-dial-peer)#session target ipv4:192.168.1.1在路由器R2上的配置:一、配置多链路捆绑Router#conf tEnter configuration commands, one per line. End with CNTL/Z. Router(config)#hostname R2R2(config)#no ip domain lookupR2(config)#interface multilink 1R2(config-if)#encapsulation pppR2(config-if)#ip address 192.168.1.2 255.255.255.252R2(config-if)#ppp multilinkR2(config-if)#ppp multilink group 1R2(config-if)#no shutR2(config-if)#exitR2(config)#interf s0/0R2(config-if)#no ip addR2(config-if)#encapsulation pppR2(config-if)#ppp multilinkR2(config-if)#ppp multilink group 1R2(config-if)#no shutR2(config-if)#exitR2(config-if)#inter s0/1R2(config-if)#no ip addR2(config-if)#encapsulation pppR2(config-if)#ppp multilinkR2(config-if)#ppp multilink group 1R2(config-if)#no shutR2(config-if)#end二、虚拟专用网的配置:1.配置IKE步骤1—启用IKER2(config)#crypto isakmp enable步骤2—创建IKE 策略R2(config)#crypto isakmp policy 110R2(config–isakmp)# authentication pre-shareR2(config–isakmp)# encryption desR2(config–isakmp)# group 1R2(config–isakmp)# hash md5R2(config–isakmp)# lifetime 86400步骤3—配置预共享密钥R2(config)#crypto isakmp key cisco1234 address 192.168.1.22.配置IPSec步骤1—配置变换集R2(config)# crypto ipsec transform-set ccnp esp-des esp-md5-hmacR2(cfg-crypto-trans)#mode tuunel步骤2—配置全局IPSec 安全关联生存时间R2 (config)# crypto ipsec security – association lifetime seconds 86400步骤3—创建加密系统所需的扩展ACLR2 (config)#access-list 101 permit ip 172.16.10.0 0.0.0.255 172.16.20.0 0.0.0.255步骤4—配置IPSec 加密系统R2 (config)# crypto map cisco 10 ipsec-isakmpR2 (config-crypto-map)#set peer 192.168.1.2R2 (config-crypto-map)#set transform-set ccnpR2 (config-crypto-map)#match address 101步骤5—将加密系统应用至接口R2 (config)# interface multilink 1R2 (config -if)# crypto map cisco三、voip配置ip电话配置定义端口电话号码:R2 (config)# dial-peer voice 1 potsR2 (config-dial-peer)#destination-pattern 5164769R2 (config-dial-peer)#port 1/1/0R2 (config)# dial-peer voice 2 potsR2 (config-dial-peer)#destination-pattern 6239561R2 (config-dial-peer)#port 1/1/1映射目的地电话号码及ip地址至本地:R2 (config)#dial-peer voice 10 voipR2 (config-dial-peer)#destination-pattern 6239560R2 (config-dial-peer)#session target ipv4:192.168.1.2R2 (config)#dial-peer voice 11 voipR2 (config-dial-peer)#destination-pattern 5164765R2 (config-dial-peer)#session target ipv4:192.168.1.2。
cisco-1000-acs-5300-voip的配置探索
acs\5300\voip的配置探索最近公司用as53做国际来话下车端并用ciscosecure ACS做记费服务器,记录通话时间和时长。
我就为了做这个项目前后大概用了至少两个星期,今天做测试(估计没什么问题,只是做一些微调)。
我想就说说在做的过程中所碰到的困难,抒发一下,呵呵。
我做在这里不介绍在路由器上所做的关于dial-peer的路由起配置,就讲一下如何实现流量的记费。
说实话,acs并不难,可它是全英文的,以前又没接触过,所以刚开始的阶段没少跟他较劲,用户和组的概念并不难理解,类似于windows中的用户和组,主要是其中的有些属性和设置不好掌握,不过对照有关的帮助,还能忍受。
开始和as53连了,我看过好几本有关的书籍,对于3A这一块,介绍的内容差不多,路由器上要配一下命令:aaa authencation login defult group radius localaaa authori**** network defult group radius localaaa authori**** connection h323 group radius local (其实这几条命令是做认证和授权用的,如果光是记费功能,可以不配,只让路由起做本地认证)aaa accounting network defult start-stop group radius可我配上以后,在acs上的radius accounting 记录中没有任何的内容。
我疑惑了:到底是acs的问题还是as53的问题,还是说都有问题或是他们之间互相根本就没联系上。
这种情况最难处理了,我就一点一点的试呗,边试边看书,也没人帮我,完全就是我一个人做,而我也以前完全没接触过。
现在说起来简单,当时真是没有一点头绪,有时将各种可能性组合起来都试一遍(我是不是很笨,呵呵)。
终于有一次,在acs的纪录中,有了内容,可以记录每个telnet到路由器上用户的用户名、密码和时间,这就是一个大的进步,至少证明acs和as53都可以做认证了,有效果了,以前我甚至怀疑是不是路由起坏了,呵呵。
思科S系列VoIP路由器使用静态IP帐户配置指南说明书

使用静态IP帐户设置S系列VoIP路由器目录简介如何使用静态IP帐户设置思科S系列VoIP路由器?相关信息简介本文是一系列协助设置、排错和维护Cisco小型企业产品文档中的一篇。
问:如何使用静态IP帐户设置思科S系列VoIP路由器?A.某些Internet服务提供商(ISP)要求您在计算机的TCP/IP设置中输入某些数字。
这是您在路由器的基于Web的设置页上为配置静态IP帐户而需要输入的相同编号。
要使用静态IP设置思科S系列路由器,您需要执行以下步骤:验证Internet连接将设备连接在一起检查LED为静态IP帐户配置思科S系列VoIP路由器重新通电验证Internet连接使用以太网电缆连接宽带调制解调器到计算机,不用安装路由器,并且确保互联网连接是活动的。
否则,请与您的ISP联系。
通过调制解调器建立活动Internet连接后,请完成以下步骤,将调制解调器和计算机连接到路由器:将设备连接在一起在您确保有活动的Internet连接后,将调制解调器连接到路由器的Internet端口,将计算机连接到四个以太网端口中的任何一个。
连接设备后,请完成下一节中的步骤,检查LED。
检查LED思科S系列路由器的前面板将指示连接状态。
将宽带调制解调器连接到WAN或Internet端口、计算机连接到可用的编号端口并打开路由器电源后,检查路由器前面板上的指示灯。
检查路由器的LED后,完成下一节中的步骤,为路由器配置静态IP帐户。
为静态IP帐户配置思科S系列VoIP路由器步骤 1:访问路由器的基于Web的设置页。
如需指导,请点击这里。
步骤 2:当显示路由器的基于Web的设置页时,请查找Internet连接类型,在下拉菜单箭头中选择StaticIP,然后输入IP地址、子网掩码、网关和ISP分配的DNS。
q步骤 3:单击 ,然后重新通电。
有关说明,请完成下一节中的步骤。
重新通电步骤 1:关闭计算机。
步骤 2:拔掉路由器的电源电缆。
思科VOIP完整配置实例

! NVRAM config last updated at 00:15:39 UTC Tue Mar 28 2000 ! version 12.1
service timestamps debug datetime msec
service timestamps log datetime msec
no service password-encryption ! hostname cisco5300A ! logging buffered 50000 debugging
end
测试命令:
6
call 通本端的两部电话机 Local_Router#csim start 2201 csim: called number = 2201, loop count = 1 ping count = 0 . csim: loop = 1, failed = 0 csim: call attempted = 1, setup failed = 0, tone failed = 1 检查本地配置 Local_Router#sh dial-peer voice summary dial-peer hunt 0 AD PRE PASS OUT TAG TYPE MIN OPER PREFIX DEST-PATTERN FER THRU SESS-TARGET STAT PORT 10 pots up up 2201 0 up 1/0/0 20 pots up up 2202 0 up 1/0/1 30 voip up up 2203 0 syst ipv4:192.168.1.2 call 通远端的电话机(2203call 通 pbx,pbx 提供 2 次拨号音,然后拨号 468, 对端电话号码响) Local_Router#csim start 2203,468 csim: called number = 2203,468, loop count = 1 ping count = 0 . csim: loop = 1, failed = 0 csim: call attempted = 1, setup failed = 0, tone failed = 1 其中","的含义是等待 2 秒
[原创]Cisco IP Communicator 软电话全配置
![[原创]Cisco IP Communicator 软电话全配置](https://img.taocdn.com/s3/m/1332f9f2f90f76c661371aed.png)
本实验通过Cisco IP PHONE ,模拟电话软件来实现在内网中互相拨打IP电话实验拓扑:实验要求:一,必须先安装JAVA 虚拟机(如安装此版本:jre-6u4-windows-i586-p),以保证IP电话能正常启动安装过程截图略过,只需要点击下一步,火星人都会哦二,安装Cisco_IP_Communicator,建立安装最新的2.1.4版本,因为早期的2.1.0版本安装完成之后,不能识别旧的声卡程序,造成通话没有声音。
如图1,打开安装目录,点击“CiscoIPcommunicator”如图2,双击,安装如图3:勾选同意安装协议,点击NEXT如图4,如果你需要更改安装路径,请点击,“Change“,倘若保持默认安装路径,点击“”NEXT如图5,安装程序正在拷贝文件到系统中,稍等几分钟如图6,安装完成,退出安装程序如图7,按提示需要重启系统,重启之后软件安装完毕如图8,首次启动Cisco IP Communicator,会自动检查音频和麦克风的设置是否正常如图9,如果系统这些硬件,以及驱动程序正常,则会自动识别出硬件的型号,点击NEXT如图10,Cisco IP Communicator启动界面如图11,Cisco IP Phone,调用JAVA正常启动之后,拨号面板三,在路由器上进行电话机的配置先对模拟器Rack191修改一下,让路由器F1/0接口和PC的物理网卡桥接上,以保证相互通信,为后续IP电话注册提供保障。
如图所示,编辑Rack191,开始-运行-CMD-getmac获得网卡在注册表对应的键值,0016.D324.9FFD这个MAC地址就是我的本地网卡,IP 为172.16.0.6,复制该键值,替换Rack191中“Device\NPF”然后保存。
如图所示,双击运行Rack191,路由器已可以正常启动,并且可以看到1:0和本地桥接。
配置步骤:第一步:先完成路由器最基本的配置如图1第二步:完成电话机的注册配置设置IP电话的网络选项:如图设置:设置TFTP SERVER IP,其实此IP就是路由器接口IP,IP Phone 与此地址去通讯,去完成电话的注册。
- 1、下载文档前请自行甄别文档内容的完整性,平台不提供额外的编辑、内容补充、找答案等附加服务。
- 2、"仅部分预览"的文档,不可在线预览部分如存在完整性等问题,可反馈申请退款(可完整预览的文档不适用该条件!)。
- 3、如文档侵犯您的权益,请联系客服反馈,我们会尽快为您处理(人工客服工作时间:9:00-18:30)。
Foreign Exchange Station 1/0/0 Slot is 1, Sub-unit is 0, Port is 0 Type of VoicePort is FXS Operation State is DORMANT Administrative State is UP No Interface Down Failure Description is not set Noise Regeneration is enabled-----------------------------〉打开 Non Linear Processing is enabled 。 。 配置后: Local_Router#conf t Enter configuration commands, one per line. End with CNTL/Z. Local_Router(config)#voice-port 1/0/0 Local_Route(config-voiceport)#no comfort-noise Local_Route(config-voiceport)#end Local_Router# *Mar 1 00:37:19.735: %SYS-5-CONFIG_I: Configured from console by console Local_Router#sh voice port 1/0/0
hostname Remote_Router .....................................................
interface Ethernet0 ip address 192.168.1.2 255.255.255.0 no ip directed-broadcast !
ห้องสมุดไป่ตู้
enable secret cisco ! spe 1/0 1/7
firmware location system:/ucode/mica_port_firmware ! ! resource-pool disable ! ! clock calendar-valid
ip subnet-zero
!
1
isdn switch-type primary-5ess isdn voice-call-failure 0 mta receive maximum-recipients 0 ! ! controller e1 0 clock source line primary pri-group timeslots 1-30 ! ! voice-port 0:D ! ! dial-peer voice 1 pots answer-address 9195552001 destination-pattern 919#9195552... direct-inward-dial port 0:D prefix 919 ! dial-peer voice 2 voip destination-pattern 4085556400
4
实验拓扑
几个简单的 voip 的小例子
(phone A & phone B)-fxs-local router-----------(serial link,voip link)------remote router-fxo-PBX--phone C
配置实例: 1、基本配置:
远端: Remote_Router#sh running-config Building configuration...
network:
思科 VOIP 完整配置实例
AS5300-GK-----GK -AS5300
cisco5300A#sh run
Building configuration...
Current configuration: ! ! Last configuration change at 00:15:38 UTC Tue Mar 28 2000
3
h323-gateway voip interface h323-gateway voip id ciscogk1 ipaddr 172.16.120.1 1718 h323-gateway voip h323-id cisco5300A@ h323-gateway voip tech-prefix 919# ! ip classless ip route 172.16.110.0 255.255.255.0 172.16.120.10 no ip http server ! line con 0 transport input none line 1 48 transport output lat pad telnet rlogin udptn v120 lapb-ta line aux 0 line vty 0 4 password cisco login ! ntp clock-period 17179850 ntp server 172.16.110.10 end
2
tech-prefix 408# session target ras ! num-exp 6... 4085556... gateway ! interface Ethernet0 no ip address shutdown ! interface Serial0:23 no ip address ip mroute-cache isdn switch-type primary-5ess isdn incoming-voice modem fair-queue 64 256 0 no cdp enable ! interface FastEthernet0 ip address 172.16.120.2 255.255.255.0 duplex auto speed auto
5
end
本端: Local_Router#sh running-config
Building configuration...
.................................................... hostname Local_Router
interface Ethernet0/0 ip address 192.168.1.1 255.255.255.0 half-duplex no clns route-cache ! router eigrp 100 network 192.168.1.0 no auto-summary
Foreign Exchange Station 1/0/0 Slot is 1, Sub-unit is 0, Port is 0 Type of VoicePort is FXS Operation State is DORMANT Administrative State is UP No Interface Down Failure Description is not set Noise Regeneration is disabled---------------------------〉关掉了 Non Linear Processing is enabled
下面给出几个需求可以稍作验证: 1、需要配置语音网关的传真速率为 9600,同时要消除舒服噪音。
Local_Router#conf t Enter configuration commands, one per line. End with CNTL/Z. Local_Router(config)#dial-peer voice 30 Local_Route(config-dial-peer)#fax rate 9600 Local_Route(config-dial-peer)#end Local_Router#sh dial-peer voice 30 | in fax Cisc NSE=100, fax=96, fax-ack=97, dtmf=121, fax-relay=122 fax rate = 9600, payload size = 20 bytes fax protocol = system fax-relay ecm enable fax NSF = 0xAD0051 (default) --------------------------------------------------------------------针对舒服噪音,默认情况下 Local_Router#sh voice port 1/0/0
! NVRAM config last updated at 00:15:39 UTC Tue Mar 28 2000 ! version 12.1
service timestamps debug datetime msec
service timestamps log datetime msec
no service password-encryption ! hostname cisco5300A ! logging buffered 50000 debugging
end
测试命令:
6
call 通本端的两部电话机 Local_Router#csim start 2201 csim: called number = 2201, loop count = 1 ping count = 0 . csim: loop = 1, failed = 0 csim: call attempted = 1, setup failed = 0, tone failed = 1 检查本地配置 Local_Router#sh dial-peer voice summary dial-peer hunt 0 AD PRE PASS OUT TAG TYPE MIN OPER PREFIX DEST-PATTERN FER THRU SESS-TARGET STAT PORT 10 pots up up 2201 0 up 1/0/0 20 pots up up 2202 0 up 1/0/1 30 voip up up 2203 0 syst ipv4:192.168.1.2 call 通远端的电话机(2203call 通 pbx,pbx 提供 2 次拨号音,然后拨号 468, 对端电话号码响) Local_Router#csim start 2203,468 csim: called number = 2203,468, loop count = 1 ping count = 0 . csim: loop = 1, failed = 0 csim: call attempted = 1, setup failed = 0, tone failed = 1 其中","的含义是等待 2 秒
