佳能2204N复印机说明书
Thecus N2200 複合式 NAS 说明书
Thecus N2200複合式 NASFW v3.00.08使用手冊版權與註冊商標聲明Thecus 及其他 Thecus 產品名稱皆為 Thecus Technology Corp. 之註冊商標。
Microsoft、Windows 及 Windows 標誌為 Microsoft Corporation 之註冊商標。
Apple、 iTunes 及 Apple OS X 為 Apple Computers, Inc. 之註冊商標。
所有其他商標與產品名稱 皆屬其各自所有者之財產。
產品規格得隨時變更,恕不另行通知。
版權所有 © 2004 Thecus Technology Corporation。
保留所有權利。
關於本手冊本手冊中的所有資訊皆經詳細審閱,以確保其正確性, 如有錯誤,請將您的意見告訴我們。
Thecus Technology Corporation 保留逕行修改本手冊內容的權利,恕不另行通知。
產品名稱: Thecus N2200 手冊版本: 1.4 發行日期: 2010 年 10 月有限保固Thecus Technology Corporation 保證 Thecus N2200 所有元件於出廠前均已經過完整測 試,在正常使用下應可正常運作。
如有發生任何系統功能異常情形,若產品仍在保固期內,且 所有操作皆屬正常使用,Thecus Technology Corporation 及其當地代表與經銷商將負責提 供免費維修。
若產品導致任何損壞或資料遺失,Thecus Technology Corporation 恕不負責。
強烈建議使用者採取必要的備份措施。
2安全警告為了您的安全起見,請詳閱並遵守下列安全警告事項: 嘗試安裝 N2200 前,請先詳閱本手冊。
您的 N2200 是精密的電子裝置, 無論在任何情況下,均請切勿嘗試自行修復。
若發 生功能異常的情形,請立即關閉電源,並將本裝置送至合格維修中心進行修復。
佳能IR3300复印机功能使用说明

佳能IR3300复印机功能使用说明一、复印(双面)印到(单面)特殊功能-------图像合并------A5------下一步-------2合1--------下一步-------A4--------(放置正面)启动-------(放置反面)启动--------完成-------//复位二、双面复印选择纸-------②A4R------完成-------双面模式-------确定三、卡纸处理1、打开右门取纸-------关闭右门2、打开前门扳动左下角的绿色手柄--------取纸------复位绿色手柄3、打开左门取纸-------关闭左门4、关闭前门CANON 佳能iR2200/iR2800/iR3300 /5000/6000 数码复印机维修/调整定期维修周期每12万印进行一次维修程序模式进入法: 按面板操作部的用户方式(星号"*")键→同时按住数字键"2"和"8"→再按面板操作部的用户方式(星号"*")键打印维修模式一览表 COPIER>FUNCTION>MISC-P>LBL-PRNT用手进纸盒,选择LBL-PRNT显示反转后按OK键,打印出一维修模式一览表打印维修模式设定值的一览表 COPIER>FUNCTION>MISC-P>P-PRINT选择P-PRINT,显示反转后按OK键,打印出打印维修模式一览表打印操作面板的按键输入记录 COPIER>FUNCTION>MISC-P>KEY-HIST选择KEY-HIST,显示反转后按OK键,打印出操作面板的按键输入记录打印卡纸记录/出错代码记录 COPIER>FUNCTION>MISC-P>HIST-PRT选择HIST-PRT,显示反转后按OK键,打印出维修模式的卡纸记录/出错代码记录打印用户模式一览表 COPIER>FUNCTION>MISC-P>USER-PRT 选择USER-PRT,显示反转后按OK键,打印出用户模式一览表故障码清除: 选择ERR,显示反转后按OK键盘(全部操作要在3秒完成),再将主电源开关OFF/ON用户设定的[规格设定/密码模式/部门ID/模式记忆等]后备数据的清除COPIER>FUNCTION>CLEAR>MMI 选择MMI,显示反转后按OK键;OFF/ON主电源开关E000~E004定影故障码清除: COPIER>FUNCTION>CLEAR>ERR 选择ERR,显示反转后按OK键盘,再将主电源开关OFF/ONE032清除: COPIER>FUNCTION>CLEAR>ERR 选择ERR,显示反转后按OK键盘,再将主电源开关OFF/ON 清除故障码E717清除: COPIER>FUNCTION>CLEAR>ERR 选择ERR,显示反转后按OK键盘,再将主电源开关OFF/ON 清除故障码E345清除 COPIER>FUNCTION>CLEAR>E345-CLR选择E345-CLR,显示反转后按OK键;OFF/ON主电源开关,清除E345E355清除 COPIER>FUNCTION>CLEAR>E355-CLR选择E355-CLR,显示反转后按OK键;OFF/ON主电源开关,清除E355清除维修模式的后备数据 COPIER>FUNCTION>CLEAR>SERVICE 选择SERVICE,显示反转后按OK键;OFF/ON主电源开关清除卡纸记录 COPIER>FUNCTION>CLEAR>JAN-HIST 选择JAM-HIST,显示反转后按OK键;OFF/ON主电源开关清除出错记录 COPIER>FUNCTION>CLEAR>ERR-HIST 选择ERR-HIST,显示反转后按OK键;OFF/ON主电源开关用户模式[系统管理]密码的清除 COPIER>FUNCTION>CLEAR>PWD-CLR 选择PWD-CLR,显示反转后按OK键;OFF/ON主电源开关主控板计数的维修计数器的清除 COPIER>FUNCTION>CLEAR>CNT-MCON选择CNT-MCON,显示反转后按OK键;OFF/ON主电源开关DC板计数的维修计数器的清除 COPIER>FUNCTION>CLEAR>CNT-DCON选择CNT-DCON,显示反转后按OK键;OFF/ON主电源开关计数器清除步骤: COPIER>COUNTER>××××>××××选择要清除的××××计数器项目,该项目显示反转后按清除键,定期更换/消耗品零部件(定期更换PRDC-1/消耗品零部件DRBL-1/消耗品零部件DRBL-2)计数器的检查:例:TR-ROOL / 00000201 / 00240000 / 0% !! 000082TR-ROOL,零部件名称, 本例中的TR-ROOL为转印电极辊00000201 为转印电极辊计数器实际已使用数 (该零部件更换后要将该计数器清除) 00240000 为转印电极辊零部件寿命限定的使用数(在该项目中的数据可以设定,数据设定后按"OK"键)0% 为实际使用数与限定使用数的比值,!! 为实际使用数与限定使用数的比值达到90~100%时显示1个 ! ;超过100%时显示2个 !!000082 为预计在82天后需要更换转印电极辊零部件.检查图像位置 3-3T纸盒前/后位置调整(图像横向对位调整),首先用下例维修模式调整,如果不能解决问题,可分别调整每个纸盘的机械位置(每个刻多度大约1毫米)纸盒1水平(横向)对位自动调整 COPIER>FUNCTION>MISC-P>C1-ADJ-Y选择C1-ADJ-Y显示反转后按OK键,从纸盒1输纸打印出一半色调PG图像2.5±1.5毫米同时水平对位传感器PS11测试移动量,并把数据存入存储器纸盒2水平(横向)对位自动调整 COPIER>FUNCTION>MISC-P>C2-ADJ-Y选择C2-ADJ-Y显示反转后按OK键,从纸盒2输纸打印出一半色调PG图像2.5±1.5毫米同时水平对位传感器PS11测试移动量,并把数据存入存储器纸盒3水平(横向)对位自动调整 COPIER>FUNCTION>MISC-P>C3-ADJ-Y选择C3-ADJ-Y显示反转后按OK键,从纸盒3输纸打印出一半色调PG图像2.5±1.5毫米同时水平对位传感器PS11测试移动量,并把数据存入存储器纸盒4水平(横向)对位自动调整 COPIER>FUNCTION>MISC-P>C4-ADJ-Y选择C4-ADJ-Y显示反转后按OK键,从纸盒4输纸打印出一半色调PG图像2.5±1.5毫米同时水平对位传感器PS11测试移动量,并把数据存入存储器手进纸盒水平(横向)对位自动调整 COPIER>FUNCTION>MISC-P>MF-ADJ-Y选择MF-ADJ-Y显示反转后按OK键,从手进纸盒输纸打印出一半色调PG图像同时水平对位传感器PS11测试移动量,并把数据存入存储器侧纸仓(L1)水平(横向)对位自动调整 COPIER>FUNCTION>MISC-P>DK-ADJ-Y选择DK-ADJ-Y显示反转后按OK键,从侧纸仓(L1)输纸打印出一半色调PG图像2.5±1.5毫米同时水平对位传感器PS11测试移动量,并把数据存入存储器打印出一维修模式一览表 COPIER>FUNCTION>MISC-P>LBL-PRNT用手进纸盒,选择LBL-PRNT显示反转后按OK键,打印出一维修模式一览表纸盒1激光写开始位置调整 COPIER>ADJUST>MISC>C1-ADJ-Y 调整围-32~+32,每步0.16毫米纸盒2激光写开始位置调整 COPIER>ADJUST>MISC>C2-ADJ-Y 调整围-32~+32,每步0.16毫米纸盒3激光写开始位置调整 COPIER>ADJUST>MISC>C3-ADJ-Y 调整围-32~+32,每步0.16毫米纸盒4激光写开始位置调整 COPIER>ADJUST>MISC>C4-ADJ-Y 调整围-32~+32,每步0.16毫米手进纸盒激光写开始位置调整 COPIER>ADJUST>MISC>MF-ADJ-Y 调整围-32~+32,每步0.16毫米侧纸仓(L1)激光写开始位置调整 COPIER>ADJUST>MISC>DK-ADJ-Y 调整围-32~+32,每步0.16毫米双面再进纸时横向对位调整 COPIER>ADJUST>FEED-ADJ>ADJ-REFE 调整围-100~+100 每步0.1毫米横向对位检测动作 1,横向对位传感器的原位位置检测:当主电源开关ON,或卡纸复位期间,或前门开关关闭时检测2,横向对位传感器的检测开始位置检测:检测开始位置是当对位传感器PS10 ON 时,参考手进纸盘纸宽挡板和纸盘纸尺寸数据,驱动横向对位传感器步进电机M3将横向对位传感器移到离开纸横向边缘大约10毫米处3,当对位传感器PS10检测到纸前沿后,横向对位传感器步进电机M3向横向对位检测开始位置移动,从横向对位检测开始位置到纸的横向边缘大约可移动10毫米,根据横向对位传感器步进电机M3每个脉冲大约移动0.16毫米来确定纸实际位置进纸对位置调整(对位离合器ON时序调整)对位离合器ON时序调整 COPIER>ADJUST>FEED-ADJ>REGIST调整围-600~+600,每步0.1毫米,数据大对位离合器ON时序延迟图像前/后位置调整(图像横向对位调整)主扫描方向图像读取开始位置调整 COPIER>ADJUST>ADJ-XY>ADJ-Y调整围100~400,每12步1毫米,标准2.5±2.0毫米,数据大移向前边DADF主扫描方向图像读取开始位置调整 COPIER>ADJUST>ADJ-XY>ADJ-Y-DF 调整围100~400 每步0.1毫米图像前沿空白调整扫描器图像前沿开始位置调整 COPIER>ADJUST>ADJ-XY>ADJ-X调整围250~290,每12步1毫米,标准2.5±2.0毫米,数据大移向后移光学扫描原位位置调整(原位传感器PS400) COPIER>ADJUST>ADJ-XY>ADJ-S 调整围16~128,工厂调整用,每步0.1毫米DADF流动扫描CCD读取位置的调整 COPIER>ADJUST>ADJ-XY>STRD-POS 调整围0~60 每步0.1毫米激光主扫描速度(横向倍率)调整 COPIER>ADJUST>MISC>FRAME-X 调整围-50~+50,每步1%副扫描方向扫描速度(纵向倍率)调整 COPIER>ADJUST>MISC>FRAME-Y 调整围-50~+50,每步1%主板向DC板送数据时,副扫描方向图像延迟调整 COPIER>ADJUST>MISC>IMG-DLY 调整围-20~+20,每步0.1毫米"漏电继电器开关"的检查: 按"漏电继电器开关"的检查按钮,"漏电继电器开关"跳到开关OFF的位置并将电源切断,如果按检查按钮后,"漏电继电器开关"动作不正常,要更换"漏电继电器开关"后再进行检测主电源开关,操作面板电源开关ON时时序:主电源开关SW1接通复印机AC电源,操作面板电源开关ON时时序:加热器开关SW2,接通镜头,扫描反光镜,纸盒加热器的AC电源门开关SW3,第1,2组接点接通定影加热器;选购件辅助电源板的AC电源;第3组接点检测门打开/关闭状态,接通主电机.定影电机,复合电源板的24VU1SW电源机器启动时序主电源开关ON后主控制板的CPU首先执行辅助ROM中的自诊断程序,检查SDRAM和硬盘的状态,如果检测到自诊断异常显示E601-0000 硬盘驱动;主控制板主控制板与硬盘驱动器图像传输中,主控制板检测到控制信息异常E601-0001 硬盘驱动;主控制板主控制板与DC控制板图像传输中,DC控制板检测到控制信息异常E602-0001 硬盘驱动;主控制板从BOOT ROM 启动硬盘时检测到硬盘安装异常E602-0002 硬盘驱动;主控制板从BOOT ROM 启动硬盘时检测到硬盘读出数据异常如果自诊断正常,辅助ROM中的辅助程序将系统软件从硬盘中读出并写入SDRAM中系统程序区,此后SDRAM中的系统软件启动,进行各部分的初始化初,始化完成后显示正常操作画面;复印键的LED灯由红变绿显示环境传感器检测到的机温度 COPIER>DISPLAY>ANALOG>TMPE 单位℃显示环境传感器检测到的机相对湿度 COPIER>DISPLAY>ANALOG>HUM 单位%RH 机湿度绝对值 COPIER>DISPLAY>ANALOG>ABS-HUM 单位g显示OPC鼓周围温度 COPIER>DISPLAY>ANALOG>DR-TMPE 单位℃显示主热敏电阻M-TH1检测到定影薄膜中间的温度 COPIER>DISPLAY>ANALOG>FIX-C 单位℃显示副热敏电阻S-TH2检测到定影薄膜边缘的温度 COPIER>DISPLAY>ANALOG>FIX-E 单位℃CANON 佳能 iR5000/iR6000 数码复印机读出(扫描)部分维修/调整进入维修程序模式法: 按面板操作部的用户方式(星号"*")键→同时按住数字键"2"和"8"→再按面板操作部的用户方式(星号"*")键更换读出控制板后执行 1,将旧读出控制电路板上的EEPROM取下装到新的读出控制电路板上2,检查COPIER>ADJUST>AE>的全部项目;COPIER>ADJUST>ADJ-XY>和COPIER>ADJUST>CCD>的全部项目,如果与维修模式的值不相同,将新板上的数据登记到维修标签记录卡上电源ON时扫描时序扫描灯架原位传感器PS400检测到扫描灯架在原位后开始前进扫描动作,然后再返回到原位,曝光灯点亮1秒后进行光补偿(增益调整);OFF一定间隔后再次ON,100秒后进行光补偿(CCD原稿尺寸检测用临界电平调整),完成扫描准备(SREADY)动作原稿曝光系统原稿尺寸检测: 1,原稿台读取模式,副扫描方向的原稿尺寸由原稿长度传感器SD1;主扫描方向的原稿尺寸由CCD上的原稿尺寸检测位置的4个检测点2,ADF的流动读取模式,由ADF的原稿尺寸检测传感器完成原稿尺寸检测时序原稿台盖板打开工作模式时1,原稿台打开,第1反光镜灯架从待机时的扫描原位传感器PS400位置前进到CCD上设定的4个原稿尺寸检测位置;原稿扫描曝光(氙灯)OFF,进行CCD外光检测2,放置原稿后CCD上的4个原稿检测点如果有的检测点检测到外光,该位置被判定未被原稿盖住表示无原稿3,按复印键后曝光灯点亮,检测主扫描方向上CCD的原稿原稿尺寸检测点的输出电平;副扫描方向的原稿尺寸由原稿长度传感器SD1检测,组合后确定出原稿尺寸原稿台盖板关闭工作模式时1,原稿台打开,第1反光镜灯架从待机时的扫描原位传感器PS400位置前进到CCD上设定的4个原稿尺寸检测位置;原稿扫描曝光(氙灯)OFF,进行CCD外光检测2,放置原稿后CCD上的4个原稿检测点如果有的检测点检测到外光,该位置被判定未被原稿盖住表示无原稿3,原稿台盖板关闭角度传感器PS401检测到低于25度时曝光灯点亮,检测主扫描方向上CCD的原稿原稿尺寸检测点的输出电平;副扫描方向的原稿尺寸由原稿长度传感器PS43检测,组合后确定出原稿尺寸原稿曝光动作时序书本模式/一页原稿/原稿台盖板(闭)1,稿台打开,第1反光镜灯架从待机时的扫描原位传感器PS400位置前进到原稿尺寸检测位置;原稿扫描曝光(氙灯)OFF,进行CCD外光检测2,原稿台盖板关闭,曝光灯点亮检测原稿尺寸;原稿尺寸检测后曝光灯OFF,第1反光镜灯架从原稿尺寸检测位置返回到扫描原位传感器PS400位置,进行光补偿3,按复印键后,第1反光镜灯架从扫描原位传感器PS400位置,向左移动到流动读出的开始位置后再开始原稿扫描4,原稿图像扫描终了,第1反光镜灯架从停止位置返回到流动读出的开始位置后再回到扫描原位传感器PS400位置书本模式/一页原稿/原稿台盖板(开)1,稿台打开,第1反光镜灯架从待机时的扫描原位传感器PS400位置前进到原稿尺寸检测位置,;原稿扫描曝光(氙灯)OFF,进行CCD外光检测2,按复印键曝光灯点亮后,检测原稿尺寸,检测后曝光灯OFF,第1反光镜灯架从原稿尺寸检测位置返回到扫描原位传感器PS400位置,3,进行光补偿,光补偿后,第1反光镜灯架从扫描原位传感器PS400位置,向左移动到流动读出的开始位置后再开始原稿扫描4,原稿图像扫描终了,第1反光镜灯架从停止位置返回到流动读出的开始位置后再回到原稿尺寸检测位置原稿扫描曝光LAMP1(氙灯) 注:曝光灯亮度不可调整;光强度:40000LX 更换"曝光(氙)灯"执行: 进入维修程序模式, 1,选择COPIER>FUNCTION>CCD>CCD-ADJ进行CCD自动调整;2,选择COPIER>ADJUST>CCD>全部项目进行CCD调整数据原稿扫描曝光(氙)灯异常 E220-0001曝光(氙)灯用的将+24V电压变换为高频高压的(DC/AC)变换电路的INV-ERR信号在读取电路控制板的待机时检测到灯ON,复印读取时检测到灯OFF;读取电路板故障曝光(氙)灯电路,CCD/AP电路异常 E225-0000 电源开关ON后在CCD放大电路光补偿补正中,未收到规定的曝光灯电平信号曝光(氙)灯电路,CCD/AP电路异常 E225-0002 顶端放大补正值与前一的补正值相比超过规定电平复印倍率: 1,ADF模式: 25~800%(第1反光镜架固定在流动读取位置的曝光玻璃下,原稿由ADF输送)2,原稿台读取模式: 25~800%倍率变化: 主扫描方向主扫描方向25~800%,由主控制板图像处理的变倍程序软件完成,副扫描方向副扫描方向50%以上由第1反光镜架的扫描速度或ADF的原稿搬送速度确定副扫描方向25%~49%和401%~800%由主控制板图像处理的变倍程序软件完成,原稿扫描电机,扫描原位传感器 E202-0001电源开关ON后或按复印键后光学系统前进40毫米,扫描原位传感器PS400未OFF;或扫描电机M3故障原稿扫描电机,扫描原位传感器 E202-0002 光学系统返回450毫米,光学系统扫描原位传感器PS400未ON;注:键盘锁住,不显示E202;可进入维修程序模式,选择COPIER>DISPLAY>ERR 中确定故障码图象前沿检测信号故障(ADF) E204-0001 ADF板或读取板故障,打印过程中未收到ADF 来的图象前沿信号;扫描灯架前进时未收到图象前沿信号.注:键盘锁住,不显示E204;可进入维修程序模式,选择COPIER>DISPLAY>ERR 中确定故障码扫描位置调整 ADJ-XY COPIER>ADJUST>ADJ-XY>副扫描方向图像读取开始位置调整 COPIER>ADJUST>ADJ-XY>ADJ-X 调整围250~290 每步0.1毫米数据大移向稿台刻度主扫描方向图像读取开始位置调整 COPIER>ADJUST>ADJ-XY>ADJ-Y 调整围100~400 每步0.1毫米读取开始位置在稿台玻璃左后方,数据大移向前边光学原位位置调整(HP传感器) COPIER>ADJUST>ADJ-XY>ADJ-S 调整围55~70 每步0.1毫米调整值改变后必修将ADF打开再关闭ADF主扫描方向图像读取开始位置调整 COPIER>ADJUST>ADJ-XY>ADJ-Y-DF 调整围100~400 每步0.1毫米用ADF移动扫描时CCD读取位置的调整 COPIER>ADJUST>ADJ-XY>STRD-POS 调整围0~60 每步0.1毫米图像处理系统CCD/AP板(CCD驱动;模拟图像处理;A/D变换)注:CCD,600dpi(7450象素);255级灰度;读取控制板(光补偿补正;自动浓度调整)模拟图像处理由CCD/AP板完成:CCD驱动;模拟图像处理(CCD输出的增益补正,不均匀性补正);CCD输出的A/D变换CCD输出的增益补正,不均匀性补正由于CCD(7450个象素)各象素的光电转换效率不可能相同,要进行CCD输出的模拟图像信号增益补正,;使无入射光时的输出电压为一定值,进行不均匀性补正;注:CCD,600dpi(7450象素);255级灰度(8bit A/D变换)数字图像处理由读取控制板完成遮蔽Shading补偿补正,自动浓度调整遮蔽Shading补偿由于CCD各象素的感光度不均匀;镜头中心与边缘透光率不同;曝光灯中间与边光量不同和老化遮蔽Shading补偿分:用维修模式确定目标值的遮蔽Shading补偿调整和每次原稿扫描时进行的遮蔽Shading补偿补正;短期光量变动的补正用增益来补正遮蔽Shading补偿调整测定白纸和标准白板的浓度数据经演算处理并记忆这些参数作为遮蔽Shading补偿的目标值(更换曝光灯或光量变化后用维修模式进行)遮蔽Shading补偿补正每次原稿扫描时进行,先测定标准白板的数据然后与遮蔽Shading补偿补正的目标值进行比较将其差值作遮蔽Shading补偿补正值来设定补偿原稿扫描时的各CCD的图像的偏差使图像浓度均匀端部增益补正(ADF用) ADF进行流动读出时,第1反光镜灯架固定在流动读出位置,为检测光量的变化在流动读出玻璃的后端部安装了端部增益补正测试板(灰色)读出该测试板反射回来光量,经过计算后作为增益值,使用该数据进行光量变化的补正标准白纸的浓度数据设定如有底灰降低设定数 COPIER>ADJUST>CCD>PPR 设定围0~255标准白板的浓度数据设定 COPIER>ADJUST>CCD>PLT 设定围0~255CCD输出的增益调整值输入 COPIER>ADJUST>CCD>GAIN-E/OCCD输出的不均匀性Offset调整值输入 COPIER>ADJUST>CCD>OFST-E/O遮蔽Shading补偿补正时标准白纸和标准白板的白电平比例数据 COPIER>ADJUST>CCD>SH-RATIO遮蔽Shading补偿正时的白色程度目标值输入 COPIER>ADJUST>CCD>SH-TRGTCCD的顶端放大补正开始位置调整值输入 COPIER>ADJUST>CCD>EGGN-ST CCD的顶端放大补正结束位置调整值输入 COPIER>ADJUST>CCD>EGGN-END 实时AE模式的文字浓度调整 COPIER>ADJUST>AE>AE-TBL 调整围1~9,缺省值5,数据大文字浓度加深对报纸类等底色浓的原稿为了使复印件不再出现原稿的底色,本调整在自动浓度模式或文字模式有效,ABC回路进行数据处理CCD光补偿自动补正的自动调整: COPIER>FUNCTION>CCD>CCD-ADJ1,稿台上放10标准白纸2,选择COPIER>FUNCTION>CCD>CCD-ADJ3,CCD-ADJ,显示反转后按OK键后进行自动调整4,COPIER>ADJUST>CCD>的整个项目已更新,要在维修标签中进行登记CCD 遮蔽(Shading)补偿位置调整: COPIER>FUNCTION>CCD>SHDG-POS遮蔽(Shading)补偿的标准白板上的位置自动调整的数据,调整围240~+320CCD 遮蔽(Shading)补偿位置设定: COPIER>FUNCTION>CCD>SH-PS-SET遮蔽(Shading)补偿的标准白板上的位置自动调整的数据更换稿台玻璃(标准白色板)以后或中间色调中有明显的白色条时要执行该模式执行该模式前要进行COPIER>FUNCTION>CCD>CCD-ADJ 调整1,清洁稿台玻璃2,选择COPIER>FUNCTION>CCD>SH-PS-SET,按OK键3,按OK执行自动CCD 遮蔽(Shading)补偿位置设定调整,调整后自动停止.CCD的端部放大补正的自动调整 COPIER>FUNCTION>CCD>EGGN-POS (仅使用RADF进行流动读出时有效)1,打开ADF,2,选择该项目按OK键,3,自动调整,(大约分钟)调整后自动停止(如果显示NG检查:ADF是否打开;移动读出用扫描玻璃安装是否正确;玻璃顶端(后面)的灰色放大补正板是否有问题;原稿曝光灯点亮是否正确)由于COPIER>ADJUST>CCD>EGGN-ST和EGGN-END的项目已更新,要在维修标签中进行记录图像清晰度电平设定 COPIER>OPTION>BODY>SHARP 设定围:1~5 ;缺省值=3,数值大清晰度高(焦距增大)更换CCD/AP单元后要执行:D光补偿自动补正的自动调整: COPIER>FUNCTION>CCD>CCD-ADJ 1,稿台上放10标准白纸2,选择COPIER>FUNCTION>CCD>CCD-ADJ3,CCD-ADJ,显示反转后按OK键后进行自动调整4,COPIER>ADJUST>CCD>的整个项目已更新,要在维修标签中进行登记D的端部放大补正的自动调整: COPIER>FUNCTION>CCD>EGGN-POS(仅使用ADF进行流动读出时有效)1,打开ADF, 2,选择该项目按OK键, 3,自动调整,4,调整后自动停止显示OK/NG,(如果显示NG检查:ADF是否打开;移动读出用扫描玻璃安装是否正确;玻璃顶端(后面)的灰色放大补正板是否有问题;原稿曝光灯点亮是否正确)5,由于COPIER>ADJUST>CCD>EGGN-ST和EGGN-END的项目已更新,要在维修标签中进行记录D调整数据: COPIER>ADJUST>CCD>的全部进行COPIER>FUNCTION>CCD>CCD-ADJ操作后,图像有问题时,输入维修标签上的值电信号补偿正时的白色程度目标值输入 COPIER>ADJUST>CCD>SH-TRGT电信号补偿正时的标准白色纸与标准白板之比率数据值 COPIER>ADJUST>CCD>SH-RATIO CCD的端部放大补正开始位置调整值输入 COPIER>ADJUST>CCD>EGGN-STCCD的端部放大补正结束位置调整值输入 COPIER>ADJUST>CCD>EGGN-ENDCCD读取位置调整 ADJ-XY主扫描方向图像读取开始位置调整 COPIER>ADJUST>ADJ-XY>ADJ-Y 调整围100~400每步0.1毫米数据大移向前边副扫描方向图像读取开始位置调整 COPIER>ADJUST>ADJ-XY>ADJ-X 调整围250~290每步0.1毫米数据大移向稿台刻度光学原位(白板读取位置)调整(HP传感器) COPIER>ADJUST>ADJ-XY>ADJ-S 调整围55~70 每步0.1毫米调整值改变后必修将ADF打开再关闭ADF主扫描方向图像读取开始位置调整 COPIER>ADJUST>ADJ-XY>ADJ-Y-DF 调整围100~400 每步0.1毫米用ADF移动扫描时CCD读取位置的调整 COPIER>ADJUST>ADJ-XY>STRD-POS 调整围30~60 每步0.1毫米电信号补偿正时的白色程度目标值输入 COPIER>ADJUST>CCD>SH-TRGT标准白纸和标准白板的白电平比例数据 COPIER>ADJUST>CCD>SH-RATIO CCD光补偿正时,标准白纸和标准白板的白电平比例数据。
HWP-N2204IH-DE3 2MP 4× IR网络PTZ摄像头说明书

HWP-N2204IH-DE32MP 4× IR Network PTZ Camera⏹Two-inch 2 MP camera with pan, tilt and zoom (4x) ability⏹Efficient H.265+ compression technology to savebandwidth and storage⏹Clear imaging against strong back light due to 120 dB trueWDR technology⏹Great night-time performance with up to 20 m enhancedIR⏹Water and dust resistant (IP66), and vandal proof (IK10)SpecificationCamera ModuleImage Sensor 1/2.8" progressive scan CMOSMin. Illumination Color: 0.005 Lux @(F1.5, AGC ON),B/W: 0.001 Lux @(F1.5, AGC ON),0 Lux with IRWhite Balance Auto/Manual/ATW (Auto-tracking White Balance)/Indoor/Outdoor/Fluorescent Lamp/Sodium LampGain Auto/ManualShutter Time 50Hz: 1/1 s to 1/30,000 s, 60Hz: 1/1 s to 1/30,000 s Day & Night IR Cut FilterDigital Zoom 16×Privacy Mask 24 programmable privacy masksFocus Mode Auto/Semi-automatic/ManualWDR 120 dB WDRLensFocal Length 2.8 mm to 12 mm, 4× optical zoomZoom Speed Approx. 2 s (optical lens, wide-tele)Working Distance 10 mm to 1500 mm (wide-tele)Aperture Range F1.5 to F2.7Angle of View Horizontal field of view: 109° to 34° (Wide-Tele), Vertical field of view: 57° to 19°(Wide-Tele), Diagonal field of view: 135° to 39° (Wide-Tele)Supplement LightIR Distance 20 mSmart IR SupportPTZMovement Range (Pan) 0° to 355°Pan Speed Configurable, from 0.1°/s to 100°/s, Preset speed: 100°/s Movement Range (Tilt) 0° to 90°Tilt Speed Configurable, from 0.1°/s to 100°/s, Preset Speed: 100°/s Proportional Zoom SupportPresets 300Power-off Memory SupportCompression StandardH.264+ SupportH.265+ SupportH.264 Type Baseline Profile/Main Profile/High ProfileVideo Compression Main Stream: H.265+/H.265/H.264+/H.264, Sub-stream: H.265/H.264/MJPEG,Third Stream: H.265/H.264/MJPEGH.265 Type Main ProfileVideo Bitrate 32 Kbps to 16384 KbpsAudio Compression G.711alaw/G.711ulaw/G.722.1/G.726/MP2L2/PCMAudio Bitrate 64 Kbps (G.711)/16 Kbps (G.722.1)/16 Kbps (G.726)/32 Kbps to 160 Kbps(MP2L2) SVC SupportNetworkSecurity Measures User authentication (ID and PW), Host authentication (MAC address); HTTPS encryption; IEEE 802.1x port-based network access control; IP address filteringNetwork Storage Built-in memory card slot, support Micro SD/SDHC/SDXC, up to 256 GB; NAS (NPS, SMB/ CIPS), ANRProtocols IPv4/IPv6, HTTP, HTTPS, 802.1x, QoS, FTP, SMTP, UPnP, SNMP, DNS, DDNS, NTP, RTSP, RTCP, RTP, TCP/IP, UDP, IGMP, ICMP, DHCP, PPPoE, Bonjour, Websocket, WebsocketsAPI Open-ended, support Open Network Video Interface, ISAPI, and CGI, support HIKVISION SDK and Third-Party Management Platform, support Hik-ConnectSimultaneous Live View Up to 20 channelsUser/Host Up to 32 users, 3 levels: Administrator, Operator and User Client iVMS-4200, HikCentral Pro, Hik-ConnectWeb Browser IE 10-11, Chrome 57+, Firefox 52+, Safari 11+ImageImage Enhancement 3D DNR, BLC, HLC, Regional Exposure, Regional Focus Max. Resolution 1920 × 1080Main Stream 50Hz: 25fps (1920 × 1080, 1280 × 960, 1280 × 720), 60Hz: 30fps (1920 × 1080, 1280 × 960, 1280 × 720)Sub-Stream 50Hz: 25fps (704 × 576, 640 × 480, 352 × 288), 60Hz: 30fps (704 × 480, 640 × 480, 352 × 240)Third Stream 50Hz: 25fps (704 × 576, 640 × 480, 352 × 288), 60Hz: 30fps (704 × 480, 640 × 480, 352 × 240)InterfaceAudio Input 1-ch audio inputAudio Output 1-ch audio outputNetwork Interface 1 RJ45 10 M/100 M Ethernet, PoEBuilt-in Microphone 1 built-in microphone, picking up sounds in the radius up to 5 meters Smart FeaturesBasic Event Detection Motion Detection, Video Tampering Detection, ExceptionSmart Detection Face Detection, Intrusion Detection, Line Crossing Detection, Region Entrance Detection, Region Exiting Detection, Object Removal Detection, Unattended Baggage Detection, Audio Exception DetectionSmart Record ANR (Automatic Network Replenishment), Dual-VCAROI Main stream, sub-stream, and third stream respectively support two fixed areas. GeneralMaterial Aluminum alloy, PC, PC+ABSDimensions Ø 130.7 mm × 101.7 mm (Ø 5.15" × 4.00")Weight Approx. 0.53 kg (1.17 lb)Protection Level IP66 Standard, IK 10, TVS 4000V Lightning Protection, Surge Protection and Voltage Transient ProtectionPower 12 VDC, 1.5 A (Max. 9.9 W, including max. 4.2 W for IR)PoE (802.3af), 36 to 57 VDC, 0.35 A (Max. 11.2 W, including max. 4.2 W for IR)Working Temperature -20°C to 60°C (-4°F to 140°F) Working Humidity ≤ 90%⏹Typical ApplicationHikvision products are classified into three levels according to their anti-corrosion performance. Refer to the following description to choose for your using environment.This model has NO SPECIFIC PROTECTION. LevelDescription Top-level protection Hikvision products at this level are equipped for use in areas where professional anti-corrosionprotection is a must. Typical application scenarios include coastlines, docks, chemical plants, andmore.Moderate protection Hikvision products at this level are equipped for use in areas with moderate anti-corrosiondemands. Typical application scenarios include coastal areas about 2 kilometers (1.24 miles) awayfrom coastlines, as well as areas affected by acid rain.No specific protection Hikvision products at this level are equipped for use in areas where no specific anti-corrosionprotection is needed.⏹ Dimension⏹ Available ModelHWP-N2204IH-DE3 (F)⏹Accessory⏹OptionalDS-1294ZJ-PT。
Canon ME20F-SH Multi-Purpose Camera 产品说明书

K EY F E ATUR E SCanon’s new ME20F-SH Multi-Purpose Camera features a newly designed Canon 2.2MP high sensitivity CMOS sensor, along with Canon’s DIGIC DV 4 image processor, enabling users to shoot crisp, clean, high definition, full-color video in extreme low light conditions. The camera’s versatile, rugged, modular design, combined with a 35mm full frame CMOS sensor with an equivalent sensitivity in excess of ISO 4,000,000, make it ideal for a wide variety of markets.CANON ME20F-SH MULTI-PURPOSE CAMERAAPPLICATIONS• 0.0005 lux (min. scene illumination)• 12 Stop Dynamic Range• 1080P / 720P Video to 60fps • 3G/HD-SDI Terminals • HDMI Terminal• Compatible with EF-mount lenses • Push Auto Iris • One-Shot AF • Auto Exposure• Built-in Motorized ND Filters• Motorized IR Cut Filter for Infrared Shooting • Digital Teleconverter• RS-422 Remote Control Terminal• Cinema • Security • Documentary • Law Enforcement • Reality • Military • Television • Scientific • Astronomy • Nature and Wildlife • UnderwaterFor more info: @CanonUSApro| PRODUCT NAME: ME20F-SH| ITEM CODE: 1002C002| UPC CODE: 013803 271249\©2015 Canon U.S.A., Inc. All rights reserved. Not responsible for typographical errors. Specifications subject to change without notice. Products not shown to scale. Certain images and effects are simulated. Canon is a registered trademark of Canon Inc. in the United States and may also be a trademark or registered trademark in other countries. All other products and brand names may be registered trademarks, trademarks or service marks of their respective owners in the United States and/or other countries.RC-V100 Remote ControllerEXCEPTIONAL LOW LIGHT PERFORMANCEThe ME20F-SH Multi-Purpose Camera features a newly developed Canon full frame 35mm CMOS sensor with an equivalent sensitivity in excess of 4,000,000 ISO. Able to capture full color 1080p video up to 60fps, the ME20F-SH camera is ideal when shooting in extreme low light environments.LARGE PHOTO SITESThe 35mm full-frame CMOS image sensor was specifically developed to shoot Full-HD video in low light, by increasing the light-sensing surface area of each pixel on the sensor. Photo sites measuring 19 micrometers square allow for exceptional low light performance, with a minimum subject illumination of below 0.0005 (at maximum 75 dB gain).FLEXIBLE MULTI-PURPOSE DESIGNThe ME20F-SH Multi-Purpose Camera was designedspecifically with many mounting points along the top and bottom of the camera to allow the freedom for users to customize the rigging of the camera for almost any purpose from a minimal compact size to a fully rigged configuration.COMPATIBLE WITH EF MOUNT LENSESThe ME20F-SH Multi-Purpose Camera is compatible with Canon’s line of EF mount lenses. The camera comes equipped with aCanon locking EF mount,allowing the lens to be attached orremoved without the need to rotate the lens barrel. This facilitates changing lenses in applications where multiple accessories are attached to the lens.REMOTE CONTROLThe ME20F-SH Multi-Purpose Camera can be controlled via either of the two remote terminals offering a mini-pin or RS-422 connection that utilize Canon’s OK protocol and is compatible with the RC-V100 Remote Controller.The front of the camera features a 12-pin lens terminal enabling power connectivity with EF mount CINE-SERVO lenses or 2/3” broadcast lenses with a third party adapter. Support for lens communication will be added in a future firmware update. IMAGE SENSORSENSOR 35mm Full Frame CMOS (16:9 extract)TOTAL PIXELS Approx. 2.59M (2160 x 1200)EFFECTIVE PIXELSApprox. 2.26M (2000 x 1128)RESOLUTION 1920 x 1080, 1280 x 720PIXEL SIZE 19µm x 19µmMIN. SUB. ILLUM.0.0005 lux or less (at 75dB, F1.2, 29.97P , 50IRE)COLOR FILTER ARRAYRGB Bayer LENS SYSTEMCANON EF MOUNT Cinema Lock typeCANON EF LENSES EF, EF-S & Cinema (EF) (compatible lenses to be confirmed)INPUTTERMINALSGEN LOCKBlack burst or Tri-level referenceMICROPHONE φ3.5mm stereo mini jack (plug-in power mic supported)REMOTE CONTROLRemote A: φ2.5mm stereo mini jack (Canon protocol)Remote B: Circular 8-pin for RS-422 (Canon protocol)OUTPUT TERMINALS3G/HD-SDITerminal 1 (On screen display optional)Terminal 2 (Clean out only)Bit Depth: YCbCr422 10bits (effective bits: 8)Frame Rates:1920 x 1080: 59.94P/59.94i/50P/50i/29.97P/25P/23.98P 1280 x 720: 59.94P/50P/29.97P/25P/23.98P*Cannot set framerate and output size separately by SDI and HDMI.HDMIT erminal 1 (On screen display optional)Bit Depth: RGB444, YCbCr422, YCbCr444 (effective bits: 8 for each format)Frame Rates:1920 x 1080: 59.94P/59.94i/50P/50i/29.97P/25P/23.98P 1280 x 720: 59.94P/50P/29.97P/25P/23.98P*Cannot set framerate and output size separately by SDI and HDMI.**640 x 480: 59.94P & 768x576: 50P will be output when connected with a monitor that support 480P and 576P inputs. Cannot be set from the menu and the on screen display will not show.EXPOSURE MODESAUTO EXPOSURE (AE)Iris, Gain, Shutter and ND filter operating together (Cannot set auto/manual separately)AE shift/AE response selectableAGC limit can be set from 36dB to Off/75dB (3-dB intervals)MANUALIris: 1/2 stops (push auto iris can be set to an assign button)Gain: 0dB to 75dB @ 3-dB intervals (approx. ISO 4,560,000 equivalent at 75dB)Shutter: 1/3 to 1/2000 (1/4 stops)IMAGE CONTROLFOCUS CONTROL Manual focus (when used with RC-V100)ONE SHOT AF (can be set to an assign button)W/BAWB (2,000K-15,000K), Daylight, Tungsten, Custom Set A, Custom Set B OPTICAL FILETERS ND filters: 1/8 & 1/64 Built-in (auto or motorized manual)IR cut filter: On/Off (motorized manual)DIGITALTELECONVERTER 2x, 4xCUSTOM PICTURE SETTINGS EOS Standard, Wide DR, Canon Log, Custom 1-6OTHER FUNCTIONS Auto black balance, color bar, test tone (interlocking with color bar), assign buttons, peripheral illumination correction, focus limit, crop for EF-S Lens, scan reverse, flicker reduction, noise reduction, time display, hour meter POWER INPUTTERMINALSXLR 4-pin or terminal block 2-pin jack INPUTDC +11V ~ +17VCONSUMPTION Power consumption Approx. 12W (body only)OTHEROPERATING TEMPERATURE Approx. 0 - 40° C (32-104° F)DIMENSIONS4.0 x 4.6 x 4.4 in. (102 x 116 x 113mm)WEIGHT Approx. 2.4 lbs. (1,100g)INCLUDED IN THE BOX ME20F-SH, 2-pin DC Power ContactRELATED ACCESSORIESCanon RC-V100 Remote Controller, Canon EF Lenses。
canonir2022使用手册

复印机使用手册
发送传真的步骤:
1.点复印机上的“发送”按键,复印机屏幕显示如图:
然后直接按屏幕右侧的数字键输入传真号码,再按“启动”按钮即可将传真发送出去。
扫描文件的步骤:
1.点复印机上的“发送”按键,复印机屏幕显示如图。
然后点击屏幕上的“地址簿”按键。
2.选择一下“mmisz”这个名称,然后按确定。
3.在主界面上点击“扫描设置”可以选择扫描出的文件的分辨率大小或者是彩色的文件。
4.在主界面上的“文件格式”按钮可以设置扫描出的文件为图片格式TIF,JPG 或者是PDF格式。
5.最后按“启动”键进行扫描。
canon2202DN-2202N-2002G-2202L-2002L说明书

[Print] → [Guide] → [index.html] • Canon 扫描仪驱动程序指南 → [Documents] → [simplified_chinese] → [Scan] →
[Guide] → [index.html] 从驱动程序帮助系统显示 从各驱动程序面板,单击 [ ]。
要查看 PDF 格式的手册,需要安装 Adobe Reader/Adobe Acrobat Reader。如果系统中没有安装 Adobe Reader/Adobe Acrobat Reader,请从 Adobe Systems Incorporated 网站下载。
本手册中的示例基于 Windows 环境下的操作。要查看如何使用打印机驱动程序和扫描仪驱动程序,请参考用户 软件 CD-ROM 中包含的驱动程序指南和驱动程序帮助。
显示驱动程序指南
要查看驱动程序指南,从用户软件 CD-ROM 中的以下文件夹双击 HTML 文件。 • Canon UFR II/UFRII LT 打印机驱动程序指南 → [Documents] → [simplified_chinese] →
如何使用电子手册
如何安装电子手册
本节介绍如何安装电子手册。
办公室物品清单
办公室物品清单一、办公室桌椅类物品清单:1. 办公桌:10张,尺寸为120cm*60cm,材质为实木,颜色为浅色系,带有抽屉和键盘托架。
2. 办公椅:20把,材质为人造皮革,颜色为黑色,带有可调节高度和可旋转功能。
3. 会议桌:2张,尺寸为180cm*90cm,材质为玻璃和金属结构,颜色为透明和银色。
4. 会议椅:10把,材质为绒面布,颜色为深灰色,带有可调节高度和可旋转功能。
二、办公文具类物品清单:1. 电脑:15台,品牌为戴尔,型号为XPS 13,配置为Intel Core i7处理器、16GB内存、512GB固态硬盘、13.3英寸显示屏。
2. 打印机:5台,品牌为惠普,型号为LaserJet Pro M402n,支持黑白打印,打印速度为40页/分钟。
3. 复印机:1台,品牌为佳能,型号为ImageRunner 2204N,支持黑白复印和网络打印,复印速度为22张/分钟。
4. 文件柜:5个,尺寸为90cm*40cm*180cm,材质为钢板,颜色为灰色,带有多个抽屉和锁。
5. 订书机:10个,型号为KW-Trio 1620,可订装订和钉装订,适合于不同厚度的文件。
6. 文件夹:100个,材质为塑料,颜色为多种颜色,适合于分类存放文件。
7. 笔记本:50本,尺寸为A4,规格为格子纸,适合于会议记录和笔记。
8. 圆珠笔:50支,颜色为黑色,书写流畅,适合于日常办公。
9. 计算器:10台,型号为Casio FX-991CN X,支持科学计算和统计功能。
10. 文件夹架:5个,材质为金属,颜色为银色,可放置文件夹和杂志。
三、办公设备类物品清单:1. 电话机:5台,品牌为松下,型号为KX-TS880MX,支持来电显示和免提通话功能。
2. 会议电话:1台,品牌为波音,型号为SoundStation 2,支持多方通话和清晰音质。
3. 投影仪:2台,品牌为爱普生,型号为EB-X41,支持高清投影和多种输入接口。
如使用手机一样使用打印机,佳能新一代ADVANCE复合机

如使用手机一样使用打印机,佳能新一代ADVANCE复合机5 月18 日,佳能商务影像系列产品再增添“三丁”,推出了imageRUNNER 2204 Mr.Cool 酷伴系列、经典的imageRUNNER 2500 Mr.B-LUCK 黑白系列,以及 imageRUNNER ADVANCE C3300 Mr.COLOR 色彩达人三款针对不同商务定位的打印机,同时推出了“办公佳族”的最新战略,力求进一步整合佳能在商务打印机领域里面硬件和软件的统一,进一步巩固佳能2016 年在中国商务打印机领域的地位。
据了解,目前中国商务打印机呈现入门级 A3 复合机占比最大,追求中高速的复合机比例在增加,彩色打印的需求快速增长的现况,可以说整个商务打印领域在不断的主动发展,这也是佳能推出“办公佳族”战略的原因所在。
紧随市场的趋势,采取在高端市场通过新一代智简数码复合机竖立标杆;在主流市场,对经典的产品进行软硬件整合。
通过三款中低速数码复合机和三款办公软件,精准地满足用户对于黑白与彩色、入门与进阶、单机与解决方案的不同需求。
imageRUNNER ADVANCE C3300 Mr.COLORimageRUNNER ADVANCE C3300 Mr.COLOR 是本次发布产品里面定位最高端的一款产品,兼顾黑白和彩色的需求。
鉴于移动互联网和智能终端对人们工作方式的改变,佳能的imageRUNNER ADVANCE C3300 Mr.COLOR 也逐渐面向企业用户的需求作出修整,与手机平板等智能终端相同,imageRUNNER ADVANCE C3300 Mr.COLOR 采用了触摸体验更佳的 10.1 英寸电容屏,可以获得与手机平板一样的随意滑动、拖拽、缩放和预览等功能。
触感启动技术是一项更先进的节能省电技术,当检测到用户走近复合机时,复合机会自动判断是否需要启动工作,当用户完全走到复合机前时,复合机已经预先进行好启动工作,免去了预热的等待时间;当用户不在复合机附近时,复合机将会自动休眠,减少不必要的能耗。
佳能(中国) 复合机,打印机,扫描仪,投影机 说明书
Ca non佳能(中国)有限公司技术资讯(复合机,打印机,扫描仪,投影机)第一期发布日期:2005年4月25日佳能(中国)有限公司市场技术服务部Ca non 目录一. 技术常识1. 分辨率的技术指标2. 图像存储格式二. 问题及解决1. PIXMA IP2000打印机安装问题2. W7200打印机在PHOTOSHOP6.0打印时,打印内容不完全3. LBP3200纸张走向歪斜(打印表格不正)解决方法4. LBP3200不定期卡纸问题三. 维修信息发布1. PIXMA iP1500 配件变更信息2. PIXMA iP2000 ROM错误配件号标记信息四. 佳能(中国)上海分公司发布的技术月刊一. 技术常识1. 分辨率的技术指标一般的情况下,我们常用DPI(每英寸的点数)来描述分辨率。
事实上存在一个与DPI相似而又不同的重要参数— PPI(每英寸的像素数)。
图像处理设备中,因为PPI包含了色深(色彩位数),因此PPI往往比我们所习惯的DPI更能确切的说明这个设备的规格。
它提示我们对光学设备的技术规格描述中不要忽略另一些重要的指标,如色深,动态密度等。
因此我们在此将DPI和PPI的概念进行一下比较。
DPI:Dot Per Inch(每英寸的点数)DPI指出在每英寸图像上点的密度,而这里所说明的点只存在有和无“1”和“0”的概念。
PPI:Pixel Per Inch(每英寸的像素数)PPI指出在每英寸图像上的像素数,而这里的像素却包含了对色彩的描述(色深),当我们说图像上的点的原色在数字上以8位描述时,则实际上该点的像素色彩为RGB共24位来说明。
为更确切的描述DPI与PPI的区别,我们以如下实例来进行说明:假设我们要对一个彩色图像进行打印,而所使用的为3色(CMY)打印机。
当打印的图像中某一像素为C或M或Y颜色时,只要对应打印出C或M或Y的点即可表示了。
但是当要打印除CMY以外的任一其它中间颜色时,便无法打印出来了。
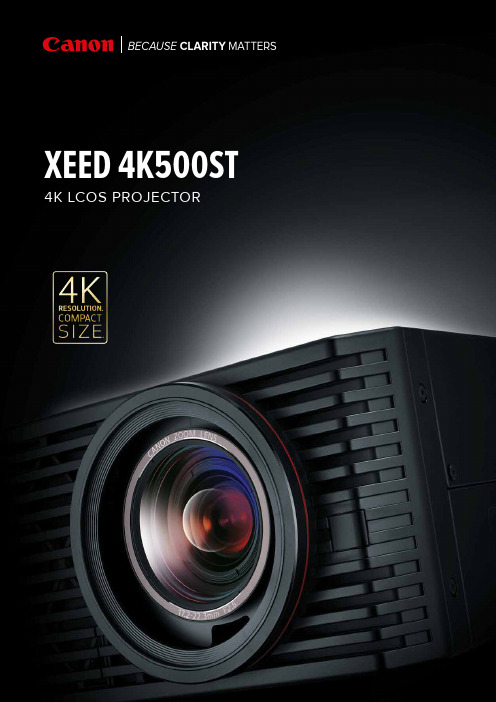
Canon XEED 4K LCOS PROJECTOR产品说明书
23Full HD (1920 x 1080)QFHD (3840 x 2160)DCI (4096 x 2160) Canon 4K (4096 x 2400)CANON 4K PROJECTION. A NEW DIMENSION IN DETAIL.Museums & Galleries Simulation & Training Design & EngineeringMedical Education& Training4Virtually Same Brightness5000 Lumens7.2' (100" projection)9.5' (100" projection) light source and performance of the LCOS(Liquid Crystal On Silicon) panels to produce highresolution, high brightness and high contrast. Where high-level detail and clarity is vital, 5000 lumens of brightness and a contrast ratio of up to 2500:1 help provide a high-quality image. In addition, three 0.76-inch LCOS panels create smooth, natural video and images with a fast response time when compared to other projection technologies. The result is an immersive 4K resolution picture with crisp detail and true-to-life color.REALISTIC “LIFE-LIKE” IMAGES, ALIVE WITH DETAILConsistent Brightness Virtually no light is lost when changingSeamless video with virtually nogrid linesCanon LCOSGrid lines may be visible from spaces between pixelsOther Technologies5Motion Blur Reduction ONMotion Blur ReductionOFF Sharp Trace UpscalingBiCubic UpscalingEnhanced Image Processing TechnologiesCanon’s advanced, powerful dual image processing engines produce exceptional video playback. The engines also incorporate a variety of features available to help enhance the quality of still and motion images, making them more realistic and impactful.• V ideo Playback (4K 60p, 4K 30p): Smoothly reproduces uncompressed 4K video at 60 or 30 frames per second for a natural, fluid feel and highly detailed, true-to-life content. • U pscaling : Non-4K content can be displayed byutilizing two scaling functions of BiCubic and Canon’s Shape Trace – which can detect contours of an image in a diagonal direction and performs interpolation, resulting in a stunningly smooth image.• D ynamic Gamma : When applied, this feature analyzesindividual areas of the image for specific, independentcontrast adjustment so light and dark areas do not appear over or under exposed.• M emory Color Correction : This Canon technology can be used to enhance skin tones and other color features for rich, vivid results that look striking to the human eye.Motion Blur Reduction FunctionAdvanced image adjustments include Canon’s latest Motion Blur Reduction feature** for improved visibility when movement is fast. By inserting extra frames to video content, motion blur is reduced and the clarity of graphics and text on fast-movingobjects is preserved. Three di erent modes (Strong, Low and O ) are included for flexibility, with each depending on the level of movement and type of video content.Low Frame DelayE ective simulation and training depends on realistic video with ‘low latency’ – images that refresh as quickly as possible with minimal lag time. A relatively small frame delay helps to create an immersive, life-like experience. Response times are fast, so if a trainee pilot activates a cockpitcontrol, for example, the corresponding video picture will respond quickly for a real-life look and feel.** When motion blur reduction is activated brightness will be a ected.MUSEUMS & GALLERIESLarge, dramatic displays and panoramas can be createdusing the built-in Edge Blending function of multiple projectors. Accurate color reproduction and professional adjustment options help to amplify the impact by providing faithful images that can suit specific imaging needs.Without MarginalFocusWith Marginal Focus Adjustment Corner areaCenter areaCANON CLARITY AND QUALITY INA COMPACT, FLEXIBLE PACKAGESize: 18.5" (W) x 6.9" (H) x 21" (D), Weight: 38.8 lbs.7Use the markers to overlap the images Creates a beautiful multi projectionBuilt-in Edge BlendingAdvanced Professional SettingsA variety of advanced installation settings provide added customization options for challenging installation areas.• M otorized Lens Shift (V: ±60%, H: ±10%): Makes it possible to easily adjust the vertical and horizontal positioning of the projected image.• 4-point Keystone Correction : Allows the corners of the image to be independently adjusted to help ensure optimal image reproduction.• B uilt-in Edge Blending : Enables the projection of one seamless, large image from multiple projectors without the need of special software.• A dvanced Registration : Allows independent position adjustment of the three primary colors (RGB) with high accuracy (0.1 pixel) ultimately reducing blurred colors or lines often projected at the edge of an image.360-degree Vertical Installation360-degree projection ◊◊ allows the projector to be positioned anywhere on thevertical axis. Fan speed can also be adjusted to help optimize results (depending on projector positioning).Versatile ConnectivityCrestron and AMX Device CompatibilityCrestron Room View, AMX Device Discovery, PJLink and others.Multiple Image Modesacademic meetings or hospital conferences.Motorized Lens ShiftStandard : Ideal for bright rooms, and whenusing content from computer screens or motion picture content.Dynamic : Ideal for rooms that are somewhat bright, and when showing motion picture content. Video : Ideal for rooms that are somewhat dark, and for video content.Presentation : Ideal for somewhat bright rooms when text needs to be clear, such as when part of a video presentation.Photo/sRGB : Ideal for projecting images from sRGB-supported digital cameras.DICOM Simulation Mode :◊ Ideal for displayingmedical images in non-diagnostic settings. Both Blue Base and Clear Base settings are supported.Peace of MindAdvanced Warranty Service Exchange Program and a Service Loaner Program.◊ ◊◊When standing the projector straight up or down, lamp life may be shortened.MEDICAL EDUCATION & TRAININGBase and Clear Base) optimizes the viewing of medical images such as X-Rays and CAT Scans. Combining this with 4K resolution makes the 4K500ST well-suited for medical images in non-diagnostic settings such as lectures, The built-in DICOM Simulation Mode (Blue ◊12 Lamp mode is Full Power/Power Saver. Brightness in Power Saver Mode s specifica tion.3 Compliance with ISO21118-2012.45 Only low frequencies (24 – 30 Hz) are supported.6 EDID is not 7rrors. Specificationsffects are h-Definition Mu ltimedia Interface123345575577 75 775 222257ACCESSORIESITEMITEM CODERemote Control RS-RC044970B001 Projector Remote Control RS-RC05 (same as supplied) 5750B001 Replacement Lamp & Air Filter RS-LP10F1286C001Replacement Air Filter RS-FL030963C001Ceiling Attachment RS-CL150964C001Ceiling Pipe (400 – 600mm) RS-CL083096B001Ceiling Pipe (600 – 1000mm) RS-CL093097B001• Power Cord(includes two AA batteries)• Warranty Card001380326646718.5"21"Audio InAudio OutWired Remote Control USB VGA AC In RJ-45x 2For more info:visit .au/projectors call (02) 9805 2074 or email*****************************.auBECAUSE CLARITY MATTERS。
佳能25系列中速复印机常用功能使用快速设置操作修改
佳能25系列中速复印机常用功能使用快速设置操作修改佳能中速复印机常用功能使用快速设置操作本操作主要针对25系列,其他系列可以借鉴25系列新机组装完成后的墨粉搅拌工作:在面板上连续按“附加功能键或设置注册键、2、8、附加功能键或设置注册键”四个键进入维修模式,通过方向键逐级选择CLEAR---ENGIN---TNRINST,确定后机器开始搅粉操作,大概需要5分钟,停止后开始其他工作。
不执行这一步打印复印副本将会不完整甚至全白。
IP地址的设置:在控制面板上按附加功能键或设置注册键,选择系统设置,在管理员识别码和系统密码中都输入7654321,按ID登录/注销键登陆,进入后选择网络设置——TCP/IP协议——IPV4,进入后,假如网络连接正常的话会有相应的ip地址子网掩码网关等信息,这时只需点一下DHCP(默认DHCP是开启的,呈黑色),关闭自动分配,使其成白色就行了,也可以手动设置合适的ip地址、子网掩码和网关等信息,然后点完成,关机再开机,这样IP地址设置就完了。
ID卡(身份证)复印功能:在25等系列机器上选择特殊功能,选择ID卡复印,直接下一步下一步到完成,我们在复印第一面的时候,ID卡可放置在顶上A4宽度居中位置再下来一张卡偏下一点的位置,翻转复印第二面的时候,ID卡放置在顶上A4宽度居中位置偏下一点点就可以了,这样复印出的两个图像位置就更靠近,当然也可以放在左上角同一个位置。
熟练使用复印机后亦可使用特殊功能中二合一功能,原稿尺寸选A5R,操作同ID卡类似。
一次最多可放置4张ID卡进行复印。
分套功能:在将几页或更多页文件复印成几份文件时,我们需要使用分套功能,按屏幕上的分页装订处理,选择分套,另外还有个旋转选项,选择后可以达到十字分页或分套,但是要求纸张有横着放,推荐使用多功能托盘,横放入纸张选择A4R。
这样设置后就是一套从纸盒一套从多功能托盘交替出纸,而且十字交叉。
只是复印一套是没有意义的。
Canon 电子打印机墨胶零件说明说明书
SECTION 1: Identification of the substance/mixture and of the company/undertaking1.1. Product Identifier Product name Canon Cartridge 055 H Yellow Product Code(s)3017C0021.2. Relevant identified uses of the substance or mixture and uses advised against UseToner for electrophotographic machines1.3. Details of the supplier of the safety data sheet Supplier ImporterCanon Europa N.V.Bovenkerkerweg 59, 1185XB Amstelveen, The Netherlands +31 20 5458545, +31 20 5458222Manufacturer Canon Inc.30-2, Shimomaruko 3-Chome, Ohta-ku, Tokyo 146-8501, Japan 1.4. Emergency Telephone Number *1 Kontakt Giftlinien på tlf.nr.: 82 12 12 12 (åbent 24 timer i døgnet). Se punkt 4 om førstehjælp.*2 Only for the purpose of informing medical personnel in cases of acute intoxications.*3 Ask for Poison InformationSECTION 2: Hazards identification2.1. Classification of the substance or mixtureClassification according to Regulation (EC) No 1272/2008Not classified2.2. Label ElementsLabelling according to Regulation (EC) No 1272/2008112Safety Data SheetMalta 112Bulgaria Netherlands +31 (0)30-2748888 [*2]112Poland 112Version : 01Portugal +351 808 250 143CroatiaRomania +40 21 318 36 06+385 (0)1-23-48-342Slovakia +421 2 5477 4166Slovenia 112Cyprus Spain1121401Sweden 112 [*3]Issuing date : 07-Nov-2018United Kingdom 111 (UK only)Czech Republic Iceland 112+420 224919293Liechtenstein 145Norway+47 22 59 13 00Denmark Switzerland145+45 82 12 12 12 [*1]Estonia 16662SDS # : TCW 1810 N - 01 EU ENFinland +358 (0)9 471977France +33 (0)1 45 42 59 59Greece +30 210 7793777Austria Hungary +36 80 20 11 99+43 (0) 1 406 43 43Italy+39 (0)55 7947819Revision date : -Latvia+371 67042473Belgium Lithuania +370 687 53378+32 (0) 70 245 245LuxembourgHazard pictogramsNot requiredSignal wordNot requiredHazard statementsNot requiredPrecautionary statementsNot requiredOther InformationNone2.3. Other HazardsNoneSECTION 3: Composition/information on ingredients 3.2. MixturesChemical name CAS-No EC-No REACH registrationnumber Weight %Classification (Reg.1272/2008)Note toOtherHazardsStyrene acrylate copolymer CBI CBI None75 - 85NoneWax CBI CBI None 5 - 10NonePigment CBI CBI None 5 - 10NoneAmorphous silica7631-86-9231-545-401-2119379499-16-xxxx 1 - 3NoneFull texts of Hazard statement(s) are listed in SECTION 16Note to Other Hazards : The following substance(s) is (are) marked with (1), (2) and/or (3)- (1) Substance for which EU Occupational Exposure Limit(s) is (are) established (See SECTION 8)- (2) PBT substance or vPvB substance under Regulation (EC) No 1907/2006- (3) Substance listed in Candidate List of SVHC for Authorisation under Regulation (EC) No 1907/2006SECTION 4: First aid measures4.1. Description of first aid measuresInhalation Move to fresh air. Get medical attention immediately if symptoms occur.Ingestion Rinse mouth. Drink 1 or 2 glasses of water. Get medical attention immediately if symptomsoccur.Skin Contact Wash off immediately with soap and plenty of water. Get medical attention immediately ifsymptoms occur.Eye Contact Flush with plenty of water. Get medical attention immediately if symptoms occur.4.2. Most important symptoms and effects, both acute and delayedInhalation None under normal use. Exposure to excessive amounts of dust may cause physicalirritation to respiratory tract.Ingestion None under normal use.Skin Contact None under normal use.Eye Contact None under normal use. May cause slight irritation.Chronic Effects None under normal use. Prolonged inhalation of excessive amounts of dust may cause lungdamage.4.3. Indication of any immediate medical attention and special treatment neededNoneSECTION 5: Firefighting measures5.1. Extinguishing mediaSuitable extinguishing mediaUse CO 2, water, dry chemical, or foam.Unsuitable extinguishing mediaNone5.2. Special hazards arising from the substance or mixtureSpecial HazardMay form explosive mixtures with air.Hazardous combustion productsCarbon dioxide (CO 2), Carbon monoxide (CO)5.3. Advice for firefightersSpecial protective equipment for fire-fightersNoneSECTION 6: Accidental release measures6.1. Personal precautions, protective equipment and emergency proceduresAvoid breathing dust. Avoid contact with skin, eyes and clothing.6.2. Environmental PrecautionsKeep out of waterways.6.3. Methods and material for containment and cleaning upClean up promptly by scoop or vacuum. If a vacuum cleaner is used, be sure to use a model with dust explosion safety measures. May form explosive mixtures with air.6.4. Reference to other sectionsNoneSECTION 7: Handling and storage7.1. Precautions for safe handlingAvoid breathing dust. Avoid contact with skin, eyes and clothing. Clean contaminated surface thoroughly. Use only with adequate ventilation.7.2. Conditions for safe storage, including any incompatibilitiesKeep in a dry, cool and well-ventilated place. Keep out of the reach of children. Incompatible with oxidizing agents.7.3. Specific end usesToner for electrophotographic machines. Obtain special instructions before use.SECTION 8: Exposure controls/personal protection8.1. Control parameters Exposure LimitsChemical name EU OEL Austria Belgium Bulgaria Cyprus Amorphous silica 7631-86-9None TWA: 4 mg/m 3inhalable fractionNone None NoneChemical name Czech Republic Denmark Finland France GermanyAmorphous silica 7631-86-9TWA: 4.0 mg/m 3amorphous SiO2NoneTWA: 5 mg/m 3NoneTRGS TWA: 4 mg/m 3inhalable fraction DFG TWA: 4 mg/m 3inhalable fraction Chemical name Greece Hungary Ireland Italy NetherlandsAmorphous silica 7631-86-9None NoneTWA: 6 mg/m 3 total inhalable dust TWA: 2.4 mg/m 3respirable dust STEL: 18 mg/m 3 totalinhalable dust STEL: 7.2 mg/m 3respirable dust None NoneChemical name Poland Portugal Romania Slovakia SpainAmorphous silica 7631-86-9None None None TWA: 4.0 mg/m 3 totalaerosolNone Chemical name Sweden United Kingdom Norway SwitzerlandTurkey Amorphous silica 7631-86-9NoneTWA: 6 mg/m 3inhalable dust TWA: 2.4 mg/m 3respirable dustTWA: 1.5 mg/m 3respirable dust STEL: 1.5 mg/m 3respirable dust TWA: 4 mg/m 3inhalable dust, also manufactured in wet processingNone8.2. Exposure controlsAppropriate engineering controlsNone under normal use conditions.Individual protection measures, such as personal protective equipmentEye/face ProtectionNot required under normal use.Skin ProtectionNot required under normal use.Respiratory ProtectionNot required under normal use.Thermal hazardsNot Applicable SECTION 9: Physical and chemical properties9.1. Information on basic physical and chemical properties AppearanceYellow ; powder OdorSlight odorOdor threshold No data available pHNot ApplicableEvaporation RateNot ApplicableNot Applicable Flash Point (°C)Not Applicable Melting/Freezing point (°C)80 - 130 (Softening point)Boiling Point/Range (°C)Flammability Limits in AirUpper Flammability Limit Not ApplicableLower Flammability Limit Not ApplicableVapor pressure Not ApplicableVapor density Not ApplicableRelative density 1.0 - 1.2Solubility(ies)Organic solvent; partly soluble Partition coefficient: n-octanol/water Not ApplicableAutoignition Temperature (°C)No data availableDecomposition Temperature (°C)> 200Viscosity (mPa s)Not ApplicableExplosive properties May form explosive mixtures with air Oxidizing properties No data available9.2. Other InformationNo data availableSECTION 10: Stability and reactivity10.1. ReactivityNone10.2. Chemical stabilityStable10.3. Possibility of Hazardous ReactionsNone10.4. Conditions to AvoidNone10.5. Incompatible materialsAcids, Bases, Oxidizing agents, Reducing agents.10.6. Hazardous Decomposition ProductsCarbon dioxide (CO 2), Carbon monoxide (CO)SECTION 11: Toxicological information11.1. Information on toxicological effectsAcute toxicity Estimate: LD50 > 2000 mg/kg (Ingestion)Skin corrosion/irritation Estimate: Non-irritantSerious eye damage/eye irritation Estimate: Transient slight conjunctival irritation only. Sensitization Estimate: Non-sensitizingGerm cell mutagenicity Ames Test (S. typhimurium, E. coli): Negative Carcinogenicity No data availableReproductive Toxicity No data availableSTOT - single exposure No data availableSTOT - repeated exposure Muhle et al. reported pulmonary response upon chronic inhalation exposure in rats to atoner enriched in respirable-sized particles compared to commercial toner. No pulmonarychange was found at 1 mg/m3 which is most relevant to potential human exposure. Aminimal to mild degree of fibrosis was noted in 22% of the animals at 4 mg/m3, and a mildto moderate degree of fibrosis was observed in 92% of the animals at 16 mg/m3.These findings are attributed to "lung overloading", a generic response to excessiveamounts of any dust retained in the lung for a prolonged interval.Aspiration hazard No data availableOther Information No data availableSECTION 12: Ecological information12.1. ToxicityEcotoxicity effectsEstimate: Fish, 96h LC50 > 100 mg/lEstimate: Crustaceans, 48h EC50 > 100 mg/lEstimate: Algae, ErC50(0-72h) > 100 mg/l12.2. Persistence and degradabilityNo data available12.3. Bioaccumulative potentialNo data available12.4. Mobility in soilNo data available12.5. Results of PBT and vPvB assessmentThis preparation contains no substance considered to be persistent, bioaccumulating nor toxic (PBT).This preparation contains no substance considered to be very persistent nor very bioaccumulating (vPvB).12.6. Other adverse effectsNo data availableSECTION 13: Disposal considerations13.1. Waste treatment methodsDO NOT put toner or a toner container into fire. Heated toner may cause severe burns. DO NOT dispose of a toner container in a plastic crusher. Use a facility with dust explosion prevention measures. Finely dispersed particles form explosive mixtures with air. Dispose of in accordance with local regulations.SECTION 14: Transport information14.1. UN number None14.2. UN Proper Shipping Name NoneSECTION 15: Regulatory information15.1. Safety, health and environmental regulations/legislation specific for the substance or mixture (EC) No 1907/2006 Authorisation Not regulated (EC) No 1907/2006 Restriction Not regulated (EC) No 1005/2009Not regulated (EC) No 850/2004Not regulated (EU) No 649/2012Not regulated Other InformationNone15.2. Chemical safety assessment NoneSECTION 16: Other informationKey literature references and sources for data- World Health Organization International Agency for Research on Cancer, IARC Monographs on the Evaluation on the Carcinogenic Risk of Chemicals to Humans- EU Regulation (EC) No 1907/2006, (EC) No 1272/2008, (EC) No 1005/2009, (EC) No 850/2004, (EU) No 649/2012Key or legend to abbreviations and acronyms used in the safety data sheet - PBT: Persistent, Bioaccumulative and Toxic - vPvB: very Persistent and very Bioaccumulative - SVHC: Substances of Very High Concern- EU OEL: Occupational exposure limits at Union level under Directive 2004/37/EC and (EU) 2017/2398, 98/24/EC, 91/322/EEC,2000/39/EC, 2006/15/EC, 2009/161/EU and (EU) 2017/164.- TWA: Time Weighted Average - STEL: Short Term Exposure Limit- IARC: International Agency for Research on Cancer - IATA: International Air Transport Association - CBI: Confidential Business Information Issuing date :07-Nov-2018Revision date :-Revision NoteNoneThis safety data sheet (SDS) is supplied voluntarily.14.5. Environmental Hazards Not classified as environmentally hazardous under UN Model Regulations and marine pollutant under IMDG Code.14.6. Special Precautions for users14.3. Transport Hazard Class IATA: Not regulatedNone 14.7. Transport in bulk according to Annex II of MARPOL and the IBC CodeNot Applicable 14.4. Packing Group NoneDisclaimerThe information provided on this SDS is correct to the best of our knowledge, information and belief at the date of its publication. The information given is designed only as a guide for safe handling, use, processing, storage, transportation, disposal and release and is not to be considered as a warranty or quality specification. The information relates only to the specific material designated and may not be valid for such material used in combination with any other material or in any process, unless specified in the text.。
佳能复印机说明书2

如果要为另一种音调设置音量,请重复步骤4到6。
设置节能模式中的功率消耗您可以将机器处于节能模式时的功率消耗设定为[high],或者[low]。
1 如果您把功率消耗设置为[low],机器在节能模式中消耗的能量就比选择[high]的时候少。
但是,在这种情况下,机器需要花费更多的时间才能重新开始正常操作。
2 出厂默认设置为[low]。
1 进入附加功能菜单,然后打开[mon settings]菜单。
有关上述步骤的详情,请参见“设置键区音量、警告音量、打印结束音和扫描结束音”中的步骤1和步骤2。
设置一个自动纸张选择/自动纸盒切换的纸盒可以把纸盒设置为自动纸张选择和自动纸盒切换。
您可以为复印和打印单独进行项设置。
当使用各种用途不同的纸盒时,此项功能很有效。
1 用于下列功能时.纸盒设置为[on]:自动纸张选择(aps∶auto paper seiection):机器自动地根据原稿的尺寸和设置比例(进行复印时)选择适当的纸张尺寸(纸盒)。
自动纸盒切换(ads∶auto drawer switching):如果在持续打印作业期间,一个纸盒中的纸用完,本机器就会自动选择相同纸张尺寸的另一个纸盒,然后开始从那个纸盒供纸。
2 手送纸道的默认设置为[off],纸盒(1到4)的默认设置为[on]。
1 进入附加功能菜单,然后打开[1.common settings]菜单。
有关上述步骤的详情,请参见“设置键区音量、警告音量、打印结束音和扫描结束音”中的步骤1和步骤2。
将手送纸道设为标准纸张如果您一直使用相同尺寸的纸张,请将手送纸道设置为标准纸张尺寸。
这样您就不需要在每次使用手送纸道时选择纸张尺寸。
重要说明如果您将手送纸道设置为标准纸张尺寸,那么当您使用手送纸道时,则无法再选择纸张尺寸。
默认设置为[off]。
1 进入附加功能菜单,然后打开[mon settings]菜单。
有关上述步骤的详情,请参见“设置键区音量、警告音量、打印结束音和扫描结束音”中的步骤1和步骤2。
canon 2422n打印机打印和扫描使用手册
Canon 2422n 打印机打印扫描使用手册打印机设置
1、要确定打印电脑已安装cannon打印扫描驱动光盘。
2、检查打印机,在面板上选择
3、根据面板, 选择
4、选择网络信息后,再次选择
5、在IPv4子目录下查看IP
6、IP地址显示
7选择面板复位
根据打印机面板上的IP 地址显示修改电脑上的打印机设置和扫描仪设置
打印设置
1、选择“开始”
2、选择打印机和传真
3、在选项上单击鼠标右键,选择属性。
4、在属性的顶端横排菜单栏上选择“端口”,点击“配置端口”
5、在“配置端口”的选项中将打印机名或者IP地址和打印机面板IPv4中的IP设置一致,点击“确定”,即可打印。
扫描设置
1、打开桌面的扫描仪
2、在选择“地址”。
3、将弹跳出来的地址窗口的IP地址和打印机面板
IPv4中的IP设置保持一致,单击“确定”。
4,选择“退出”即可。
扫描方法
1、在打印机控制面板上选择,待面板屏上显示
2、在电脑上面新建一个word文档。
3、在“插入”子目录下选择“来自扫描仪或照相机。
4、在选择“自定义插入”。
5、在根据自己扫描的文件设置尺寸和分辨率之后,选择扫描即可。
PS:如有其它疑问,请咨询办公室黄晓洁。
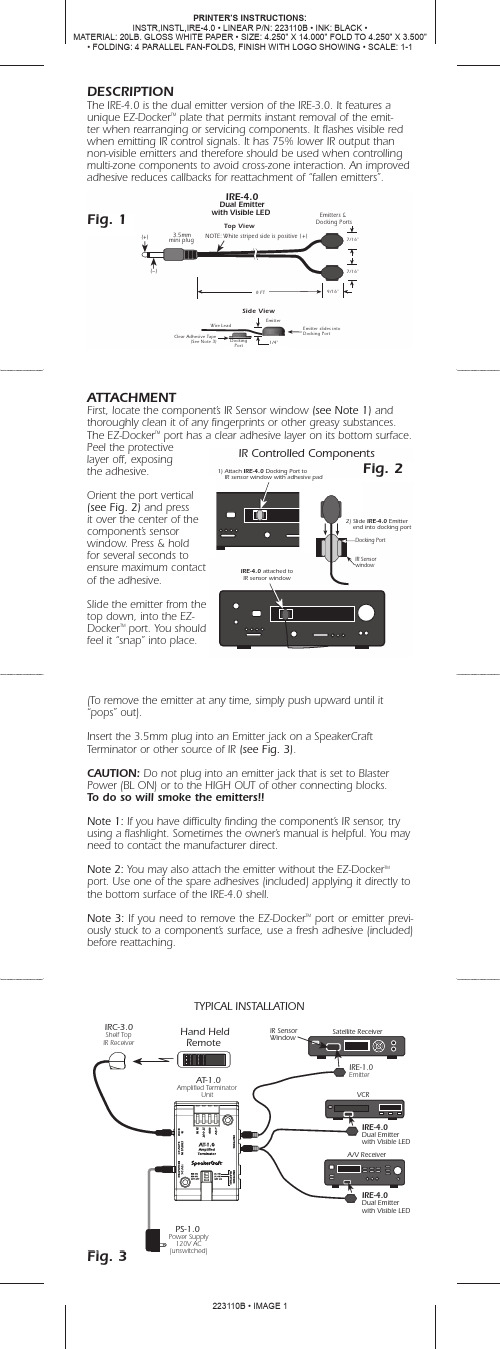
Canon IRE-4.0 IR Emitter Instructions说明书
DESCRIPTION The IRE-4.0 is the dual emitter version of the IRE-3.0. It features a unique EZ-Docker ™plate that permits instant removal of the emit-ter when rearranging or servicing components. It flashes visible red when emitting IR control signals. It has 75% lower IR output than non-visible emitters and therefore should be used when controlling multi-zone components to avoid cross-zone interaction. An improved adhesive reduces callbacks for reattachment of “fallen emitters”.ATTACHMENT First, locate the component’s IR Sensor window (see Note 1) andthoroughly clean it of any fingerprints or other greasy substances. The EZ-Docker ™port has a clear adhesive layer on its bottom surface.the adhesive. (see Fig. 2)component’s of the adhesive.Docker ™1/4"Side ViewEmitterWire Lead Docking Port TYPICAL INSTALLATIONIRC-3.0(To remove the emitter at any time, simply push upward until it “pops” out).Insert the 3.5mm plug into an Emitter jack on a SpeakerCraft Terminator or other source of IR (see Fig. 3).CAUTION: Do not plug into an emitter jack that is set to Blaster Power (BL ON) or to the HIGH OUT of other connecting blocks.To do so will smoke the emitters!!Note 1: If you have difficulty finding the component’s IR sensor , try using a flashlight. Sometimes the owner’s manual is helpful. You may need to contact the manufacturer direct. Note 2: You may also attach the emitter without the EZ-Docker ™port. Use one of the spare adhesives (included) applying it directly to the bottom surface of the IRE-4.0 shell.Note 3: If you need to remove the EZ-Docker ™port or emitter previ-ously stuck to a component’s surface, use a fresh adhesive (included) before reattaching.2940 Columbia Avenue, Riverside, CA 92507 • Phone 1-800-448-0976 • Fax 951-787-8747 LIMITED 5-YEAR WARRANTYSpeakerCraft Inc. warrants to the original retail purchaser only that this SpeakerCraft product will be free from defects in materials and workmanship, for a period of 5-years, provided it was purchased from a SpeakerCraft Authorized Dealer.Defective products must be shipped, together with proof of pur-chase, prepaid insured to the SpeakerCraft Authorized Dealer from whom they were purchased, or to the SpeakerCraft factory at the address listed on this installation instruction manual. Freight collect shipments will be refused. It is preferable to ship this product in the original shipping container to lessen the chance of transit damage. In any case, the risk or loss or damage in transit is to be borne by the purchaser. If upon examination at the Factory or SpeakerCraft Authorized Dealer it is determined that the unit was defective in materials or workmanship at any time during this warranty period, SpeakerCraft or the SpeakerCraft Authorized Dealer will, at its option, repair or replace this product at no additional charge, except as set forth below. If this model is no longer available and can not be repaired effectively, SpeakerCraft, at its sole option may replace the unit with a current model of equal or greater value. In some cases where a new model is substituted, a modification to the mount-ing surface may be required. If mounting surface modification is required, SpeakerCraft assumes no responsibility or liability for such modification. All replaced parts and product become the property of SpeakerCraft Inc. Products replaced or repaired under this warranty will be returned to the original retail purchaser, within a reasonable time, freight prepaid.This warranty does not include service or parts to repair damage caused by accident, disaster, misuse, abuse, negligence, inadequate packing or shipping procedures, commercial use, voltage inputs in excess of the rated maximum of the unit, or service, repair or modification of the product which has not been authorized or approved by SpeakerCraft. This warranty also excludes normal cosmetic deterioration caused by environmental conditions. This warranty will be void if the Serial number on the product has been removed, tampered with or defaced.This warranty is in lieu of all other expressed warranties. If the product is defective in materials or workmanship as warranted above, the purchaser’s sole remedy shall be repair or replacement as provided above. In no event will SpeakerCraft be liable for any incidental or consequential damages arising out of the use or inabil-ity to use the product, even if SpeakerCraft Inc. or a SpeakerCraft Inc. Authorized Dealer has been advised of the possibility of such damages, or for any claim by any other party. Some states do not allow the exclusion or limitation of consequential damages, so the above limitation and exclusion may not apply. All implied warranties on the product are limited to the duration of this expressed warran-ty. Some states do not allow limitation on the length of an implied Warranty. If the original retail purchaser resides in such a state, this limitation does not apply.SpeakerCraft 664254947711I R E -4.0D u a l I RE m i t t e r w i thV is ib leL E D Sm a r t P a t h ™IN S T A L L A T I O N I N S T R U C T I O N S L I T 03400 (r e v 1)223110B EL T 03400Note 4: The emitters on the IRE-4.0 are wired in series. If you cut one off, you will need to short the cut-off wires together for the other one to operate.Note 5: The emitter shell and EZ-Docker ™ port, though dark inappearance, are transparent to Infrared. This allows IR commands to pass through them, permitting local hand held remote control as well as through the IRE-4.0.。
- 1、下载文档前请自行甄别文档内容的完整性,平台不提供额外的编辑、内容补充、找答案等附加服务。
- 2、"仅部分预览"的文档,不可在线预览部分如存在完整性等问题,可反馈申请退款(可完整预览的文档不适用该条件!)。
- 3、如文档侵犯您的权益,请联系客服反馈,我们会尽快为您处理(人工客服工作时间:9:00-18:30)。
故障排除本章主要讲述当主机中出现卡纸或显示错误信息时应采取的措施出现卡纸时的显示信息E现卡纸*如F信息会交替出现.并且控制面板上的卡纸指示器(莎)亮走⅞EC- PAPER JAil5PEN COUER重要说明当输稿器中出现卡纸时,则不能继续操作机器。
按照说明取出卡纸。
参见“清除输稿器中的卡纸”。
1取出卡住的原稿或纸张时,请当心不要让原稿或纸张的边缘割到手。
2取出卡住的纸张或检查机器内部时,不要让项链、手镯或其他金属物碰到机器内部,否则可能会引起燃烧或有触电危险。
3在清除卡在机器内纸张时,请当心不要使纸上的墨粉与您的手或衣服接触,否则会弄脏您的手或衣服。
若手或衣服变脏,应立即用冷水洗净。
若用温水清洗,会使墨粉固着在衣物上,变得不容易清洗。
4在清除卡在机器内的纸张时,应缓慢地将卡住的纸张取出,以防止纸上的墨粉散落,并进入您的眼睛或嘴里。
若墨粉进入您的眼睛或嘴中,应立即用冷水清洗,并去医院就诊。
1检查出错指示灯,并参见关于如何找到并移除卡纸说明的相关页。
若卡纸在取出过程中被撕破,一定要将所有的纸张碎片从机器中取出。
若左盖和定影装置出现卡纸,则会出现如下信息。
按照下述步骤清除卡纸。
REC- PAPER JAM1打开主机的前盖2打开手送纸道3拉出左盖。
握住手柄,并向左水平拉出左盖。
(请当心不要向上拉拽,它很容易脱落。
)4按照箭头所指方向转动绿色的转盘。
5按下感光鼓组件上方的绿色固定杆。
位于出口槽导向器的绿杆周围部件受高温影响。
清除卡纸时, 请当心除了此绿杆,不要触摸此区域中的任何部件。
6取出卡住的纸张。
T将感光鼓组件上方的绿色固定杆推上8关闭左盖1关闭左盖,将其锁住2关闭左盖时,请当心不要夹到您的手指,否则会导致人身伤害。
9关闭手送纸道。
关闭手送纸道时,请当心不要夹到您的手指,否则会导致人身伤害。
10关闭前盖。
关闭前盖时,请当心不要夹到您的手指,否则会导致人身伤害。
清除左侧底盖中的卡纸若主机内部出现卡纸,则显示如下信息。
检查出现卡纸的位置,并按照下述步骤清除卡纸。
1打开主机前盖2打开主机左下部侧盖3取出所有卡在定影装置中的纸张4关闭主机左下部侧盖关闭左下侧时,请当心不要夹到手指5关闭前盖。
关闭前盖时,请当心不要夹到手指,否则会导致人身伤害。
6拉出纸盘并把纸叠的边角放到定位片下。
7缓慢地将纸盘推回到机器中,并听到“喀哒”声将纸盘推回到原来位置时,请当心不要夹到手指,否则会导致人身伤害。
清除手送纸道中的卡纸若手送纸道中出现卡纸现象,则会出现下列信息。
按照下述步骤清除卡纸。
IREC- PAPER -JAM I1从手送纸道中取出卡纸。
2取出所有卡住的纸张。
若您无法取出卡住的纸张,请按“清除左盖和定影装置中的卡纸”中的步骤操作。
使用输稿器复印的复印件变脏当使用输稿器扫描原稿时,复印件中可能会出现原稿中没有的线条 若出现了这样的线条,输稿器的原稿扫描区域可能脏了。
若输稿器扫描区域变脏,则可能导致打印输出上有污点 1翻开输稿器。
RESoRT PLANThe Λθri⅛ S Corai re⅝⅛ Λ,∏βfe brih ∣⅞ntty COlOred f*sħ and a FrFynfid Of Other IfoPICal CreatUTefi come IQflerħe∕ APtly n ∣c>nametj "Tropncat FOfeSLS ur*der me sea 41 these ≤pots Or Drealhlak ∣n⅛oea ∪ιy BerVe as ħome roCCUnv Θss VafJetIeS Of brβ. and tc bs Of rhe lane ιħ梓 aNurιπg. O^ann -hke *oFId IoFmB a tfθp ∣cflf ParAd 4se MtedLiT ⅛VLIlRESORT PLANTh© WOrId e CoraI rβef⅛. Where4- S-AV-Avnai* A . nABB⅛anma ∣B⅛B!iiβ⅛* »»»■■«-!■«■ *«■■ M∙filH4∣⅝l 呻 W*車*⅜⅝h ⅛f⅞∙∙■b my∏ad Of OthIfQPiCBl crβ⅛ti∣rescome IOge(ħer APUy mckrauned -TroPtCaI FO^Sta UOder the sea*, the⅛e⅞po½ ot breetNakιι⅛ beauty BBfVe as home ιc cou∩tiess var⅛t⅝⅞ Of hfe ano to u& o! the Land IhiS ^lIUTrng. dream-l ∣kβ WQrld ftx∏i4 S !rop*cal parad ∣⅞e ħ∣M MirI romance2用一块沾水的湿布清洁输稿器扫描区域扫描区域3合上输稿器当显示E500至E585出错代码时当显示下列出错代码时.一定要先将主电源关闭,然后再次打开。
若在执行了上述的操作后仍显示了相同的出错代码,请咨询佳能的服务代表处。
若维修人员建议您将StaPie Shift 设为开/关,则按照以下叙述的步骤执行设置1 e5002 e5143 e5304 e5315 e5376 e5517 e5778 e5809 e5851仅当安装了 finiSher-II时,这些设置才有效2默认设置为[on ]。
丫按⑥(嗓?叱八出现附加功以M ⅛⅛楷示灯®闪烁。
2 按 V 或 A ,选择 <5. ADJUST∕CLEAN>,并按 ®。
m≡≡F TTR n当您按 8 时,出现VADJUST/CLEAN >菜单。
3 按 VI 或 A ,选择 <2. USE STAPLE∕SHIFT> 、并按 Q当您按①时•出现<USE STAPLE∕ΞHIFT >菜单ADJUSZ- SHlFT4 按 V 或 A,选择<1. 0N>或<2・OFF>.并按φUSE STARi7Λ√; SHIFT ON5按念(停止),返回待机模式。
自检显示机器具有自检功能。
下列情况下,自检(出错)信息会出现在显示屏上:因操作错误打印不能执行。
在扫描或打印过程中,您需要进行调整或执行一些动作HECK DOCUMENT (检査稿件)瞬翦输稿器中可能岀现卡妖*决方法取出鬥E的珞件■iECK PRINTER \检査打印组件'≡≡机器在打印区域检测到错误F决方法潸联系当地的他能授权经销商•TECKSTAPLER (检査装订机>--------------------------------------------------------------- -------- ≡≡ FiniSher-Ll中出现卡纸•¥决方法请检査是否发牛•卡纸,TECKPRINTERCOVER (检査打印功能盖板)W:≡ζ 一个或多个盖板开若。
*决方法关闭所肖的盖板OCUMENTToOLONG(稿件太长)≡O您试图使用输稿器境En过长的原稿:转夬方法在稿台玻璃上进行扫描:INCORRECT PAPER SlZE ∣纸张尺寸不正确)原因制由纸盘自动检测的纸张尺寸可能与实际的纸张尺寸不相符另一卜可能是•在<NAME STACK SIZE>菜单中为手送纸道选择的纸张尺寸与在手送纸道中放置的实际纸张尺寸不相符,解决方法确认实际的纸张尺寸与选择的纸张尺寸相符;设置疋确的纸张尺寸•并打开前盖•然后再关闭。
LOAD STAPLES (装入订书钉)原因域*订书钉接近用完: 解决方法更换订书钉盒。
MEMORY FULL (内存满)机器的内存中已存满扫描的稿件解决方法将原稿分成几部分•并逐个∙N描NO APPROPRlATE SlZE(无台适尺虽然在复印过程中选择了VAUTO PAPER>∙但纸盘或手送纸道中未放人台适的纸张.解决方法选择纸张尺寸・或设置妊印比例:若在此信息显示时按启动)・具有最小贞边距的纸张被自动选择•幷且打印开始,OPENTHEFRONTCOVER (扌『开前盖板)'原因*鑿发生卡纸n解决方法打开前盖板・并按照盖板內标签上叙述的步骤•取岀卡纸OUTPUT TRAY FULL(输出纸盘已满)原因?遞逬输出纸盘纸已满,解决方法从输出纸盘上将打印件拿走•EASEWAIT Qilt等待ι:@ 』当主电掠开启时显示此信息同样・出机器耒做好打印准釜时也出现该显示,:决方法谕爭待・垃到信息消失・IINTLlMITREACHED (达到打印限制)一机器设世了打印限制,!决方法进人系统设V?矣单中的部门IDtf理菜笊•打开<COPY LlMITS>菜单.并改变可打印的说大页数,=C. PAPER JAM •卡纸I沏紂廳I出现原槁卡纸或Sl印纸卡纸而无法进行打印<卡决方法遵陷指耳从机器中取岀卡纸若您在打印中打开了一个盖板・也会岀现此信息・込时・应再次打开盖板•并检査是否有卡纸;如有发现・将卡纸取岀,并关闭證板然后信息消失三MOVE DOC. ON GLASS,取下稿旬TW兑科址倔協荡$原稿遗射在稿台玻璃上乍决方法从稿台玻璃上取卜•原稿•继续操作机器ΓOP KEY PRESSED/PRESS OK KEY < 已按STOP W / 请按OK 键)使用输稠器打描原稿时按了 Q ,停止,¥决方法按6片再次放世原稿:YSTEM ERROR/E100 •系统错俣∕E100∙瞬瞬尚未装人懑光鼓组件,¥决方法他毬光枝组件装人机器•然后关用主电源•并等待10秒神以上・然厉再次打幵电源.机器中发生枚障・军决方法哺与当地授权低能经销商联系SUPPLYREC .PAPER 1 加纸丿S∙ '.7'1纸盘中的IK 用完∙或放置不正亦解决方法 将城盘播到底、或装入纸张-WASTEToNERFULLyREPLACETHEDRUM I 废协满/更換感光鼓组件丄 棘因憋比歧组件内充满⅛t⅛ =解决方法SC 换感光讎组件口维修呼叫信息若机器出现故障,显示屏上出现维修呼叫信息。
不要用湿手插入或拔下电源插头,否则会有触电危险。
拔下电源插头时,应握住插头部分。
拉拽电源线可能使线芯 暴露或折断线芯,或损坏电源线。
若电源线损坏,则会引起漏电并导 致火灾或有触电危险。
重要说明1当内存中仍存有作业时关闭主电源,作业数据即被删除。
2如果[system error /e100]出现在显示屏上,请参见“出 错信息列表”。
呼叫本地佳能授权经销商若机器出现故障,显示屏上出现维修呼叫信息。
请按照下述步骤解决 问题。
exxx1关闭主电源,等待十秒钟以上,然后再次开启机器。
