V59HD V1.2规格书 - EDP
LJD_eWinV5-ST(K)7产品规格书说明书

LJD_eWinV5-ST(K)7产品规格书目录■1. Cortex-A8&Win CE6.0系列嵌入式触控一体机 (2)1.1基本安全注意事项 (2)1.2 修订历史 (2)■2. Cortex-A8&Win CE6.0系列产品规格 (3)2.1 产品规格 (3)2.2 接口设置和功能 (5)2.3 安装尺寸 (6)2.4 安装示意图 (9)LJD_eWinV5-ST7安装示意图 (9)LJD_eWinV5-SK7安装示意图: (9)2.5 Cortex-A8&Win CE6.0系列产品配件及可接外围设备说明 (11)■3. 产品保修及供货周期正常 (12)■4. 后记 (12)■1. Cortex-A8&Win CE6.0系列嵌入式触控一体机本手册包含了LJD_eWinV5-ST(K)7型嵌入式触控一体机的硬件规格、使用和安装过程中的注意事项。
在使用LJD_eWinV5-ST(K)7型人机界面之前请仔细阅读本手册1.1基本安全注意事项1.1.1 注意事项● 请确保所有电缆接头都牢固连接到LJD_eWinV5-ST(K)7上。
●为了保证设备安全,请在接线之前拔下LJD_eWinV5-ST(K)7的电源线。
● 请勿用力或用硬物按压LJD_eWinV5-ST(K)7 的显示屏,以免造成触摸屏和液晶屏的损坏。
● 需要返修的产品,客户需将返修产品包装好避免运输过程中显示屏、触摸屏的碎裂以及产品外壳的损坏。
一切后果由客户承担。
1.1.2 警告(1)系统设计● 请勿在LJD_eWinV5-ST(K)7上制作可能危及设备及人员安全的开关,如紧急停机开关,这些操作应该由独立的硬件开关来执行,以防止电缆以及其它相关设备的损坏导致可能造成重大事故。
● 请勿将LJD_eWinV5-ST(K)7用作可能造成严重人身伤害、设备损坏或系统停机等重要报警的警示设备。
(2)接线● 为了防止触电,请在接线之前拔下LJD_eWinV5-ST(K)7的电源线。
Intelix AS-1H1V-WP技术参数说明书
AS-1H1V-WP Technical SpecificationsThe Intelix AS-1H1V-WP is a two-gang, Decora-style wallplate designed to be the primary PC interface for classrooms, boardrooms, and conference centers. It features VGA + Audio to HDMI conversion with VGA scaling up to 1920x1200 and an HDMI input.The AS-1H1V-WP utilizes HDBaseT technology to extend the digital output up to 70 meters away using solid core shielded Category 5e or greater cable. This transmitter device is compatible with several Intelix HDBaseT receivers, but is designed to work primarily with the DIGI-HD60C-R. The unit features multiple EDID modes to eliminate user confusion, and incompatible video formats.The AS-1H1V can be powered from the rear panel or by Power over HDBaseT (PoH), including midspan injectors that support Power over Ethernet (PoE) Alternative A or Alternative B. Built-in surge protection and diagnostic LEDs ensure hassle-free and robust installations. The AS-1H1V-WP also features a customizable power management system, which will put the unit into a low power state after no video for 30 minutes or being inactive for 3 hours by default. When using the local power input, 12V DC is available for other devices on the power output connections on the rear of the device.The AS-1H1V-WP will detect which input has an active video input, and switch to that input – if both inputs are active, the “last in” will be selected. There are additional contact closure inputs provided on the rear of the unit to allow third party control. RS232 control of the AS-1H1V-WP can be accomplished by connecting to the RS232 port on a compatible receiver, such as a DIGI-HD60C-R, or through a direct connection on the RS232 input of the device.The AS-1H1V-WP can be programmed to control the connected display. The display manufacturer’s RS232 commands can be entered into the AS-1H1V-WP with the use of Intelix Display Control software. This allows display power and input to be automatically controlled based on video activity, eliminating the need for a third party control system in many installations.AS-1H1V-WP Technical SpecificationsHDMI and VGA Auto-Switching WallplateRev 160804AS-1H1V-WP Technical SpecificationsAS-1H1V-WP Technical Specifications Input/Output ConnectionsHDMI Input One (1) HDMI Type A ReceptacleVGA Input One (1) PC Video HD-15-F ReceptacleAnalog Audio One (1) 3.5 mm TRS ReceptacleHDBaseT Port One (1) 8P8C port (Shielded RJ45)Power One (1) 2-pin Removable Terminal Block ConnectorRS232 Port with 12V DC Output One (1) 4-pin Removable Terminal Block ConnectorContact Closures One (1) 4-pin Removable Terminal Block ConnectorFirmware Port One (1) USB Type B Micro ReceptacleSupported Audio, Video and ControlVideo Resolutions SMPTE: 480i, 480p, 576i, 576p, 720p, 1080i, 1080p, UHD/30 (HDMI only)VESA: Resolutions up to 1920x1200Color Depth: 24, 30, 36, 48bitVGA Scaling Resolutions (60 Hz)1024x768, 1400x1050, 1600x1200, 1280x800, 1360x768, 1920x1200, 720p, 1080pMaximum Video Compatibility at 70 m Deep Color 36/30/24 Bit at 1080pMaximum Video Compatibility at 40 m Deep Color 48 Bit at 1080p, 3D (HDMI Input), UHD/30Video Compliance HDMI 1.4 and HDCP 1.4Embedded Audio Up to PCM 8 channel, Dolby Digital TrueHD, and DTS-HD Master AudioAnalog Audio Analog stereo line-level (Converted to 2ch 24bit PCM 48kHz)ARC (Audio Return Channel)NoHEC (HDMI Ethernet Channel)NoCEC (Consumer Electronics Control)Yes (HDMI Pass-through Only)Baud Rate (Wall plate control)2400, 4800, 9600 (default), 19200, 38400, 57600, 115200Supported Baud Rates (Display Control)2400, 4800, 9600, 19200, 38400, 57600, 115200HDBaseT Signal CharacteristicsMaximum Distance70 m (229 ft)Cable Requirements Continuous solid core Category 5e or greater with TIA/EIA-568B crimp pattern (no couplers in-line)Bandwidth10.2 GbpsHDBaseT Chipset VS010TXChassis and EnvironmentalConstruction Alumininum HousingDimensions (H x W x D)104 mm x 89 mm x 51 mm (4.09 in x 3.50 in x 2.01 in)Shipping Weight0.68 kg (11.5 lbs.)Operating Temperature0° to +40° C (+32° to +104° F)Operating Humidity20% to 90%, Non-condensingStorage Temperature-10° to +60° C (+14° to +140° F)Storage Humidity20% to 90%, Non-condensingPower and RegulatoryPower Supply12V DC 2A or 48V DC PoH (Power over HDBaseT)Power Output Port12V DC, 500 mAPower over Ethernet (PoE) Compatibility802.3af Alternative A and Alternative BPower Consumption10 wattsDefault Automatic Standby Mode30 minutes no signalESD Protection16kVRegulatory CE, RoHSOtherWarranty 2 yearsDiagnostic Indicators HDCP, Link, VGA, and HDMIReset Switch MicroswitchAvailable Models AS-1H1V-WP-W (White Faceplate and Painted Insert), AS-1H1V-WP-B (Black Faceplate and Painted Insert) Included Accessories Installation Guide, Power Supply, Two (2) 4-pin Removable Screw Terminals, RS232 cable (3-pin to DE9), 2-pinRemovable Screw Terminal, USB Programming CableHDBaseT Receiver (A/V, PoE, Control) Compatibility DIGI-HD60C-R, DIGI-HDX-R, FLX-64, DIGI-BSR-4KHDBaseT Receiver (A/V, Control) Compatibility FLX-BI4HDBaseT Receiver (A/V and PoE) Compatibility DIGI-HD60-RDistances and picture quality may be affected by cable grade, cable quality, source and destination equipment, RF and electrical interference, and cable patches.。
VG2791R 系列 液晶显示器 用户指南说明书

ii版权所有© 2020 ASUSTeK COMPUTER INC.保留所有权利。
除了购买者出于备份目的而保留的文档外,未经 ASUSTeK COMPUTER INC.(以下简称“ASUS ”)明确书面许可,不得以任何形式或通过任何方式复制、传播、转录本手册的任何部分,包括其中介绍的产品和软件,也不得将其存储到检索系统中或翻译成任何语言。
(“ASUS ”)在下列情况下,不能享受产品保修或维修服务:(1) 未获得ASUS 书面授权,而修理、修改或改动产品;(2) 产品序列号损毁或缺失。
ASUS “按原样”提供本手册,不提供任何明示或隐含的担保,包括但不限于对于适销性或针对特定目的的适用性的隐含担保或条件。
无论在任何情况下,ASUS 及其董事成员、高级职员、员工或代理不对由于本手册或产品中存在任何缺陷或错误而导致的任何间接、特殊、偶然或必然损失(包括收益损失、业务损失、不能使用或数据丢失、业务中断等)承担任何责任,即使 ASUS 已被告知此类损失的可能性。
本手册中包含的规格和信息仅供一般性参考,可能会随时变更而不另行通知,因此不应构成 ASUS 的承诺。
ASUS 对本手册(包括其中介绍的产品和软件)中可能存在的任何错误不承担任何责任。
本手册中出现的产品名称和公司名称可能分别是或不是相应公司的注册商标或版权,仅用于标示或解释目的,无意侵犯其所有者的权益。
声明.........................................................................................................iii 保养和清洁. (iv)1.1欢迎使用! .....................................................................................1-11.2物品清单.........................................................................................1-11.3组装显示器 .....................................................................................1-21.4外形尺寸.........................................................................................1-21.5连接线缆.........................................................................................1-31.5.1 液晶显示器后部 ...............................................................1-31.6显示器简介 .....................................................................................1-41.6.1 使用控制按钮 .................................................................1-42.1卸下底座 ......................................................................................... 2-12.2 调整显示器 .....................................................................................2-23.1 OSD (屏幕显示)菜单...................................................................3-13.1.1 如何重新配置 ..................................................................3-13.1.2 OSD 功能介绍 .................................................................3-23.2规格 ..............................................................................................3-113.3故障排除(常见问题) .................................................................3-123.4 支持的时序列表 ............................................................................3-13iii联邦通信委员会声明本设备符合 FCC 规则第 15 部分的要求。
XH-EDP520G EDP屏液晶驱动板 VGA转DP,HDMI转DP,DVI转eDP DP 液晶驱动板
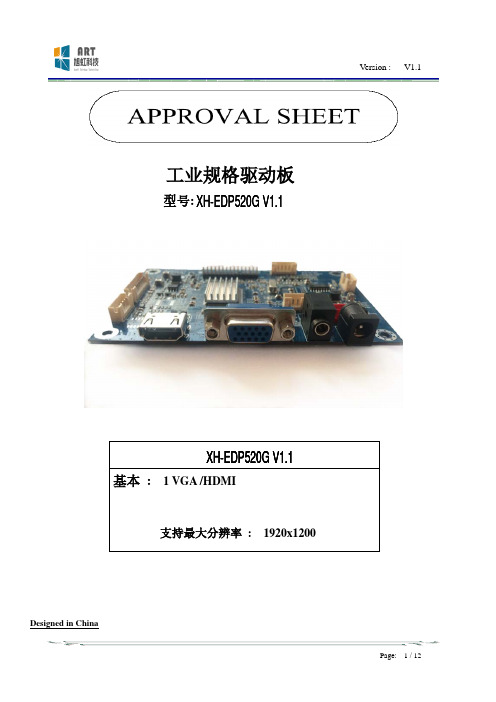
Version : V1.1工业规格驱动板型号:Designed in China杭州旭虹科技有限公司XH-EDP520G V1.1目录1版本历史记录 (3)2产品概述 (4)3产品特性 (4)4性能参数 (5)5操作菜单 (5)5.1 OSD菜单功能键 (5)5.2 OSD菜单项说明 (5)6 连接端子定义 (6)6.1标准电源输入端(J100) (6)6.2排座电源输入端(J101) (6)6.3 eDP输出端(J600) (6)6.4按键端口(J501) (7)6.5背光板端口(J103) (7)6.6模拟RGB输入排座端口(U400) (7)6.7串口和升级端口(J401) (7)6.8 音频输入排座(J203) (8)6.9喇叭输出(J202) (8)6.10外接屏电压(J102) (8)6.11数字HDMI 输入双排座端口(CN300) (8)6.12其它(J502) (8)7产品图片 (10)8尺寸说明 (11)9补充事项 (12)1版本历史记录2产品概述感谢购买本公司的驱动板卡产品,配接液晶屏前,请先确认所有的配件都是相符的配件。
请特别注意驱动屏线规格。
本驱动板主要用于支持TFT LCD 液晶屏,驱动板带1路VGA 和1路HDMI ,支持eDP 输出接口。
主板采用Mstar 信号处理芯片,处理功能强大,能支持各种规格的标准和非标准信号。
使用高规格的器件,具有良好的工作性能。
* 工作温度范围 -20 到 60℃* 可选增加自动感光控制 * 支持最大分辨率到1920x1200* 支持大屏外接电源控制,超低待机功耗3产品特性4性能参数5操作菜单5.1 OSD菜单功能键5.2 OSD菜单项说明5.2.1快捷菜单操作按DOWN进入图像自动调整按UP进入亮度调节按E/S进入信号切换6 连接端子定义6.1标准电源输入端(J100)6.2排座电源输入端(J101)6.3 eDP输出端(J600)6.4按键端口(J501)6.5背光板端口(J103)6.6模拟RGB输入排座端口(U400)6.7串口和升级端口(J401)6.8 音频输入排座(J203)6.9喇叭输出(J202)6.10外接屏电压(J102)6.11数字HDMI 输入双排座端口(CN300)6.12其它(J502)注意:标准屏电压选择改为焊接0欧姆电阻的方式,3.3V屏电压对应:R134,5V屏电压对应:R133, 12V屏电压对应R132,3个电阻只能焊接其中一个电阻,若屏电压不标准请不焊接这3个电阻,直接通过外部输出电压。
V59 设置操作方法

V59工厂设置进入与设置方法:请严格按照以下说明操作,
用遥控按:菜单→2580→参数设置(setting)按确认键进入
【花屏】
1:如果屏幕出现花/水彩画的现象就调这项:菜单→2580→参数设置(按确认键进入)→屏参设置→BIT MODE-----TI_MODE_6BIT/TI_MODE_8BIT(按左右键选择位8/6位转换)
2:如果如果调了上面那项还不行就调下这项:菜单→2580→参数设置(按确认键进入)→屏参设置→TIMODE______________开/关(按左右键转换)
【图像发虚】
如果图像字体出现锯齿状/发虚就调这项:菜单→2580→参数设置(按确认键进入)屏参设置→SWAP______________开/关(按左右键转换)注意此项只对高清屏有效!
【做开机画面,开机LOGO】
1:菜单→2580→参数设置(按确认键进入)→开机LOGO(先打开这项-按左右键选择)2:→首先把要的LOGO图片放进U盘→转换到多媒体播放图片→找到他要的图片→按播放键→再按[显示/显示信息]键
3:→在下方图标中找到[抓图]并保存即可
【恢复工厂设置】(Factory RestoreD)
菜单→2580→参数设置(按确认键进入)→Factory RestoreD(按确认键选择)
【打开酒店模式】
1:菜单→2580→参数设置(按确认键进入)→酒店模式→选择打开
2:就可以在菜单里设置一些酒店的功能了,密码是:1111,进入后就可以控制最大声/按键锁/默认通道等
【其他改开机模式和烤机模式】
菜单→2580→参数设置(按确认键进入)在这里可以设置。
HDMI规格书
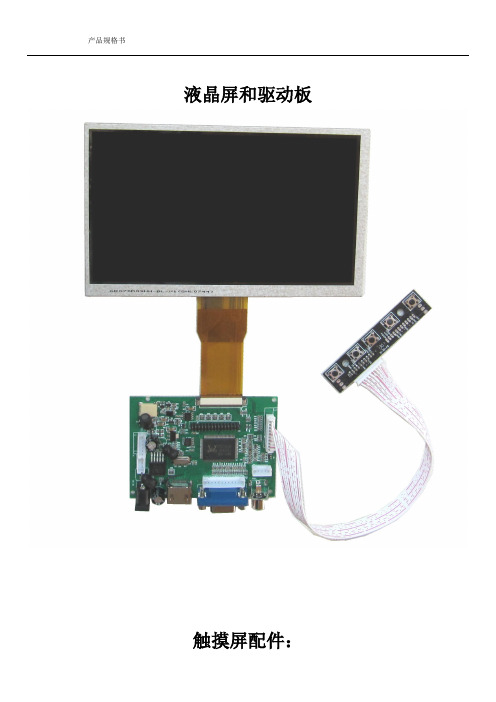
液晶屏和驱动板
触摸屏配件:
1.产品说明:
本驱动板可以
1,1路VGA信号输入
2,2路A V信号输入
3,1路HDMI信号输入,且本IC支持的是HDMI1.1
4,1路倒车信号输入
5,支持宽电压输入,并可以在,5V-24V之间正常工作,
6,标准背光6PIN,接口,可外接高压板
7,驱动板集成液晶屏LED背光驱动板路,
8,标准LVDS信号输出,可支持单6,单8,双6,双8等标准的LVDS信号的液晶屏,但只支持屏供电为3.3V的液晶屏
9,标准按键板接口,并支持双色LED指示灯显示
10,支持TTL信号输出,
屏
800X600 支持1024X768 支持1024X600 支持1280X1024 支持1366X768 支持1440X900 支持....... ....... 1920X1080 支持需要支持其它分辨率,可以后续增加
4,A V模拟
NTSC 支持PAL 支持
6产品尺寸图
7接口功能详细说明
7.1
序号定义说明
1 5V 遥控器供电,实为3.3V
2 GND 地
3 IR 遥控输入
4 POWER 开关机功能
5 MENU 菜单显示功能
6 + 加
7 _ 减
CON1,接口定义
8 运输,存储,使用要求
1,不要重压和弯折变形2,防静电和水
3,相对湿度,小于80% 4, 使用温度-1-度--+60度5,使用湿度0-+40度。
MST9UGXV2.2板卡规格书

深圳市嘉润源电子有限公司规格书- MST9UGX-V2 V1.0液晶显示器驱动主板规格书板卡型号:MST9UGX-V2板卡规格: DVI-I +2DP+2HDMI+AUDIO版本号:V2编制:ZXH审核:ZL批准:日期:2014.03.25深圳市嘉润源电子有限公司规格书- MST9UGX-V2目录页码内容1 目录2 产品概述2 产品特性3 产品外观图4 模式支持表5 产品结构图6 接口定义7 使用注意事项1.规格简介GENERAL DESCRIPTIONMST9U01V1 是一个 4K2K 的 LCD 显示器的单芯片解决方案,最高支持到 4096x2160@60Hz 的分辨率。
MST9U01V1 ,a total chip SOC that for LCD monitors with panel resolutions up to4096x2160@60Hz.主要特点:Key features include:>1. 集成 4个高质量图像缩放引擎,可同时处理 4个 4K2K@30Hz 视频输入流。
Integrated four High-quality scaling engine for processing up to 4 4K2K@30Hz AV Stream.>2. 集成 6 个复合数字接口,每一个都可支持 HDMI/DVI/DP/MHL 接口,另外集成 1 路模拟输入端口,支持 PC(VGA)输入。
Integrated 6 Combo Digital Ports (Supports HDMI/DVI/DP/MHL) and 1 Analog Input Ports (Supports深圳市嘉润源电子有限公司规格书- MST9UGX-V2 Analog RGB Compliant Input Ports);>3. 内建LVDS/eDP(可选),需要转接板支持)/VBY1接口,最高支持分辨率为4096x2160@60Hz的 LCD Panel。
广告机使用说明书(V59)

高清广告机解码驱动一体板使用说明书1.产品概述本款广告机驱动解码一体板,能直接驱动1920*1080及其以下的分辨率的LVDS屏,内含强大的音视频处理功能,能输出高质量的画面和音质。
两路USB2.0接口,支持高清视频和图片的播放。
支持USB之间相互拷贝功能,能方便用户更新文件。
2.使用说明2.1 遥控器说明本产品使用的遥控器如下图所示:遥控器各按键功能:电源键:电源键,控制开关机静音:静音功能:快进,连续按速度加快:快退,连续按速度加快:暂停/播放功能: 向上移动光标(播放时弹出控制条菜单): 向左移动光标: 向右移动光标: 向下移动光标(播放时弹出控制条菜单)MENU :进入设定菜单,进入菜单后是确认功能VOL+:音量加VOL-:音量减播放过程中,按该键进入下一曲:播放过程中,按该键进入上一曲EXIT :退出菜单或播放DEL:光标停留在文件上时,按该键弹出删除菜单2.2 设定菜单设定菜单主界面如下图:2.2.1 通用设定该页设定菜单图片如下:以下个项功能均按左右键来选择。
a.菜单语言:中文:设定菜单语言为中文英文:设定菜单语言为英文b.重复模式:单曲重复:循环播放同一个文件全部重复:循环播放USB根目录下的文件重复取消:播放完一遍根目录下的文件后,停止播放c.播放记录:打开带功能,会自动记录播放的文件名和开始播放的时间,还会记录开关机的时间注:该功能需要用户先在U盘中建立一个PLAY.LOG(可先建立一个同名的txt文件,然后改下后缀就可以了)。
d.断电记忆:播放时自动记录文件播放的文件和播放的时候,断电开机后接着上次断电的地方继续播放(注:不支持音乐文件的断电记忆)e.图片转场模式:设定图片播放时的转场模式。
f.图片播放时间:设定图片刷新的时间(分5s->7s->10s->15s)g.滚动字幕:设定是否打开滚动字幕h.滚动字幕颜色:设定滚动字幕字体的颜色i.字幕背景颜色:设定滚动字幕背景的颜色j.播放类型:图片:只播放存储卡根目录下的图片文件音乐:只播放存储卡根目录下的音乐文件音画同步:播放图片时带有音乐背景,并且一直重复播放图片和音乐文件播放列表:按制作好的播放列表进行播放视频:只播放存储卡根目录下的视频文件全部:播放存储卡根目录下所有能识别的图片音乐和视频文件。
液晶万能驱动板HDVX9-CS V29 TV板的说明书

HDVX9-CS-V29 液晶电视驱动板
Ø CON8 (2 X 20PIN/2.0mm双列排针):LVDS接口
脚序号
1 2 3 4 5 6 7 8 9 10 11 12 13 14 15 16 17 18 19 20 21 22 23 24 25 26 27 28 29 30
定义
VCC VCC VCC GND GND GND TXA0M TXA0P TXA1M TXA1P TXA2M TXA2P GND GND TXACKM TXACKP TXA3M TXA3P TXB0M TXB0P TXB1M TXB1P TXB2M TXB2P GND GND TXBCKM TXBCKP TXB3M TXB3P
描述
屏供电 屏供电 屏供电 地 地 地 LVDS奇数线对0 负极 LVDS奇数线对0 正极 LVDS奇数线对1 负极 LVDS奇数线对1 正极 LVDS奇数线对2 负极 LVDS奇数线对2 正极 地 地 LVDS奇数线时钟 负极 LVDS奇数线时钟 正极 LVDS奇数线对3 负极 LVDS奇数线对3 正极 LVDS偶数线对0 负极 LVDS偶数线对0 正极 LVDS偶数线对1 负极 LVDS偶数线对1 正极 LVDS偶数线对2 负极 LVDS偶数线对2 正极 地 地 LVDS偶数线时钟 负极 LVDS偶数线时钟 正极 LVDS偶数线对3 负极 LVDS偶数线对3 正极
脚序号 1 2 3 4 5 6 7 8 9 10 11 12 13 14
定义 K7 CHCH+ MENU TV/AV VOLVOL+ GND LED-G LED-R STB GND IR-IN +5V-S
未定义 节目减 节目加 菜单 信源 音量减 音量加 地 指示灯_绿 指示灯_红 电源 地 遥控接收输入 接收供电
欣威视通SWH-5159 多媒体网络播放-液晶驱动一体板_技术规格书_SE_151212

*产品信息如有变更,恕不另行通知。
© 2015 南京欣威视通信息科技股份有限公司。版权所有,侵权必究。
目录
1 产品概览 .................................................................................................................................................1 1.1 板卡简介.......................................................................................................................................................1 1.2 功能特点.......................................................................................................................................................1 1.3 应用领域.......................................................................................................................................................2
浩盛硬件5寸HDMI触摸屏LCD说明书

15inch HDMI LCD (B)User Manual 5 inch Resistive Touch Screen LCD, HDMI interface, supports various systemsFeatures●800×480 high resolution, touch control ●Supports Raspberry Pi, and driver is provided (works with custom Raspbian directly) ●Supports BB Black, comes with related images like : Angstrom, Android4.2.2 ●Supports Banana Pi / Banana Pro, comes with related images like : Lubuntu, Raspbian ● Not only for mini-PCs, it can work as a computer monitor just like any other general HDMI screen(touch function is unavailable in this case)●HDMI interface for displaying, USB interface for touch control ●Back light control to lower power consumptionDescription (1)Features (1)1.On-Board resource (4)2.Working with Raspberry Pi (4)2.1.How to program Raspbian image file (4)2.2.Hardware connection (5)2.3.Screen touch calibration (5)2.3.1.Connecting to Raspberry Pi via SSH (5)2.3.2.Calibration steps (5)2.4.Virtual keyboard of Raspberry Pi (6)2.5.How to configure original Raspbian image file (7)2.5.1.How to installing driven script (7)2.5.2.How to enter graphical desktop (7)2.6.How to use with the Ubuntu system (7)3.How to use with BeagleBones (9)3.1.How to program Angstrom image file (9)3.2.Hardware connection (9)3.3.Screen touch calibration (9)4.How to use with Banana Pi (11)4.1.How to program Raspbian_For_BananaPi image file (11)4.2.Hardware connection (11)24.3.Screen touch calibration (11)4.3.1.Connecting to Banana Pi via SSH (11)4.3.2.Calibration steps (12)4.4.How to load WiFi driver of BananaPi Pro (13)4.5.How to use with the Lubuntu system (13)31.Figure 1: Switches and interfaces1 2 3 41)Backlight switch: it is used for backlight control (ON/OFF), working as a screen power button.2)HDMI: it is used for connecting the main board to the LCD screen.3)USB Touch Interface: USB touch/power interface.4)USB Power Interface: USB power interface (used only when the LCD is under power shortage). 2.Working with Raspberry Pi2.1.How to program Raspbian image fileIn order to use with Raspberry Pi, you should configure the original system first. Of course, you can program a ready-to-use system image file to your Raspberry Pi board as well. In this section, we will illustrate how to program the image file by taking the ready-to-use system image file,5inch_HDMI_B_RPI_Raspbian-150405.img, as an example. This image file supports Raspberry Pi Model B/B+/A+/2B.1)Copy the file with the expansion name .img to your PC;2)Connect a TF card to your PC, and format your TF card with the SDFormatter.exeNotices: The capability of TF card in used here should be more than 4GB. In this operation, a TF card reader is also required, which has to be purchased separately.3)Start the Win32DiskImager.exe, and select the system image file copied into your PC, then, click452.2.Hardware connection 1)Connect the LCD to the HDMI on the Raspberry Pi board with a HDMI cable; 2) Connect the USB Touch interface on the LCD to the USB interface on the Raspberry Pi board witha USB type-A male to micro-B cable.2.3.Screen touch calibration1) Enter the system terminal to calibrate the touch screen. The simple method is to connect akeyboard and a HDMI screen to the Raspberry Pi board, to enter the Graphical Desktop forcalibrating operation. However, some users may have no HDMI screen, so we present the SSH method for remote connection to the Raspberry Pi board. To use this method, you should make sure your PC and the Raspberry Pi board can find each other in the network. Normally, they can do so when connected to a same router.2) Open the software PuTTY, and enter the IP address of the Raspberry Pi board (you can enter therouter setting page on your PC to check the IP address). Then, set the Port to 22, and click the3) Enter the user name and the password:User Name: piPassword: raspberry4) When finished, you can enter the system terminal for operation.1)After connecting to the Raspberry Pi board, enter the following command under the terminal:DISPLAY=:0.0 xinput_calibratorAfter entering the calibration interface, there will be a prompt for four-point calibration shown in the screen:2)Click the points marked with the red cross pattern one by one to finish the touch calibration. 3) When finished, the system will generate a string of new calibration data, such as:Section “InputClass”Identifier “calibration”MatchProduct “ADS7843 TouchController”Option “Calibration”“253 3957 224 3820”EndSection4)Create a txt file on your PC, and copy the data above into the file for future use.5)Remove the calibration file in the system by the following command:sudo rm /etc/X11/xorg.conf.d/99-calibration.conf6)Create a new calibration file by the following command:sudo rm /etc/X11/xorg.conf.d/sudo mkdir /etc/X11/xorg.conf.dsudo nano /etc/X11/xorg.conf.d/99-calibration.conf7)When finished, the text editorNano will be run. Please paste the content in the new txt file intothe text editor.8)Yexit.9)Execute the command sudo reboot to restart the system. When finished, the touchconfiguration will be valid.2.4.Virtual keyboard of Raspberry PiThe Virtual keyboard of Raspbian system enables you to save the USB resource, providing easy system operations. After the LCD is working properly, this function can be invoked by the following command: DISPLAY=:0.0 matchbox-keyboard -s 100 extendedNow, the virtual keyboard is ready to use, as Figure 2 shows.Figure 2: Virtual keyboard of Raspberry Pi672.5. How to configure original Raspbian image fileIn the section above, we presented the steps of image programming by taking the ready-to-usesystem image file programming as an example (see Section 2.1), since the ready-to-use image is easier to use and understand. However, you can freely customize your system by configuring the original Raspbian image file to support this LCD module.1) Copy the file RPI2B_B_B+_USB_TOUCH_RES_5.0_RASPBIAN.tar.gz into the Raspbian system, andunzip it. That is, enter the terminal and input the following command:sudo tar zxvf RPI2B_B_B+_USB_TOUCH_RES_5.0_RASPBIAN.tar.gz2)Run the script USB_TOUCH_RES_5.0_RASPBIAN located at the folderRPI2B_B_B+_USB_TOUCH_RES_5.0_RASPBIAN by the following command: cd RPI2B_B_B+_USB_TOUCH_RES_5.0_RASPBIANsudo ./USB_TOUCH_RES_5.0_RASPBIAN3) When finished, the system will reboot automatically. And the LCD module can work properly,including display and touch functions, after the system rebooted.Notice: The Raspbian system boots to terminal interface by default. To make the operations simple when using with a LCD, it is recommended to set the system to boot to graphical desktop directly. Please follow the steps below to configure the system.1)Enter the Raspbian system, and input the following command: sudo raspi-config 2) Select the option Enable Boot to Desktop/Scratch by using the Arrow keys, Space key or/andEnter key.3)Select the option Desktop Login as user ‘Pi’ at the graphical desktop . 4) When you see the prompt “Would you like to reboot now?”, select the option Yes to reboot thesystem.2.6. How to use with the Ubuntu systemProgram the image file 5inch_HDMI_B_RPI_Ubuntu-150405.img to the board. This image file supports Raspberry Pi 2B.User Name: linaroPassword: linaroFor screen touch calibration, the corresponding operations are the same with that of Raspbian. For more detailed information, please refer to the Section 2.3.893. 3.1. How to program Angstrom image fileIf this LCD module is used for display only, you can program the latest Angstrom image file to the board directly without any change. The BeagleBone Black will read the display parameters of the 5 inch HDMI displayer and set the resolution to 800*480 automatically.When using this LCD module as a touch screen, you should program the image file5inch_HDMI_B_BB_Black_Angstrom-150424.img provided by the CD to the board. Please follow the steps below to program the image file.1)Copy the file with the expansion name .img to your PC; 2)Connect a TF card to your PC, and format your TF card with the SDFormatter.exe Notices: The capability of TF card in used here should be more than 4GB. In this operation, a TF card reader is also required, which has to be purchased separately.3) Start the Win32DiskImager.exe, and select the system image file copied into your PC, then, click4) and hold it till power up. Then, you will enter the system located at the TF card. And BeagleBone will take about 40 minutes to copy the system in the TF card into the on-board eMMC. When finished, the 4 LED indicators on the board will light up at a same time. After the systemrebooted, you can enter the graphical desktop directly.3.2.Hardware connection 1)Connect the LCD to the HDMI on the BeagleBone board with a HDMI to micro HDMI cable; 2) Connect the USB Touch interface on the LCD to the USB interface on the BeagleBone board withUSB type-A male to micro-B cable. (BeagleBone has two USB interfaces, one for host and the other for client. In here, you should connect the LCD module to the USB host interface).3.3.Screen touch calibration 1) Remove the calibration file in the system: /etc/pointercal.xinput .Explanation: Connecting a mouse to the board, you can perform any remove operations in the graphical desktop. For SSH connection, the user name is root , no password.2) After rebooted, the Pi will enter the calibration interface automatically before start the system.There will be a prompt for four-point calibration shown in the screen:3)Click the points marked with the red cross pattern one by one to finish the touch calibration;4)When finished, the system will write the new calibration data into the file /etc/pointercal.xinput.10114.Before powering up the Banana Pi, you should connect it to a LCD displayer properly, since the Banana Pi may read the resolution parameters of the LCD displayer on startup. And the connection should be remained till the Banana Pi enters the desktop. In this case, even if you disconnect the LCD displayer and reconnect it again to the Banana Pi, the LCD can still work properly.4.1. How to program Raspbian_For_BananaPi image fileProgram the image file 5inch_HDMI_B_BananaPi_Raspbian-150410.img to the borad. This image file supports the modules BananaPi Pro and BananaPi.1)Copy the file with the expansion name .img to your PC; 2)Connect a TF card to your PC, and format your TF card with the SDFormatter.exe Notices: The capability of TF card in used here should be more than 4GB. In this operation, a TF card reader is also required, which has to be purchased separately.3) Start the Win32DiskImager.exe, and select the system image file copied into your PC, then, click4.2.Hardware connection 1) Connect the LCD to the HDMI on the Banana Pi board with a HDMI cable; 2) Connect the USB Touch interface on the LCD to the USB interface on the Banana Pi board with adual micro USB cable.4.3.Screen touch calibration1) Enter the system terminal to calibrate the touch screen. The simple method is to connect akeyboard and a HDMI screen to the Banana Pi board, to enter the Graphical Desktop forcalibrating operation. However, some users may have no HDMI screen, so we present the SSH method for remote connection to the Banana Pi board. To use this method, you should makesure your PC and the Banana Pi board can find each other in the network. Normally, they can do so when connected to a same router.2) Open the software PuTTY, and enter the IP address of the Banana Pi board (you can enter therouter setting page on your PC to check the IP address). Then, set the Port to 22, and click the123) Enter the user name and the password:User Name: bananapiPassword: bananapi4) When finished, you can enter the system terminal for operation.1)After connecting to the Banana Pi board, enter the following command under the terminal:DISPLAY=:0.0 xinput_calibratorAfter entering the calibration interface, there will be a prompt for four-point calibration shown in the screen:2)Click the points marked with the red cross pattern one by one to finish the touch calibration. 3) When finished, the system will generate a string of new calibration data, such as:Section “InputClass”Identifier “calibration”MatchProduct “ADS7843 TouchController” Option “Calibration”“253 3957 224 3820” EndSection4)Create a txt file on your PC, and copy the data above into the file for future use. 5)Remove the calibration file in the system by the following command: sudo rm /etc/X11/xorg.conf.d/99-calibration.conf 6) Create a new calibration file by the following command:sudo rm /etc/X11/xorg.conf.d/sudo mkdir /etc/X11/xorg.conf.dsudo nano /etc/X11/xorg.conf.d/99-calibration.conf7)When finished, the text editorNano will be run. Please paste the content in the new txt file into the text editor. 8) Yexit.9) Execute the command sudo reboot to restart the system. When finished, the touchconfiguration will be valid.4.4.How to load WiFi driver of BananaPi ProComparing with the Banana Pi, the BananaPi Pro has added an on-board WiFi module. When using the BananaPi Pro, you can use SSH to connect to the Pi and execute the following command to load the WiFi driver:sudo modprobe ap62104.5.How to use with the Lubuntu systemProgram the image file 5inch_HDMI_B_BananaPi_Lubuntu-150410.img to the board. This image file supports the modules BananaPi Pro and BananaPi.User name: bananapiPassword: bananapiFor screen touch calibration, the corresponding operations are the same with that of Raspbian. For more detailed information, please refer to the Section 2.3.。
eDP接口详解

eDP接口详解eDP是一种基于DisplayPort架构和协议的内部数字接口,逐渐取代LVDS传输介面,特别是在FHD或超过FHD解析度的面板上。
eDP广泛应用于各种拥有嵌入式显示面板的产品,例如一体成型电脑、笔记本电脑和平板电脑等。
eDP具备三大基本架构,包括主要通道传输影音资料、附属通道传输设定与指令以及连接过程。
主要通道采用8b/10b编码方式,利用差分讯号线同时传输资料与时脉讯号,连接器包含四对差分讯号线,可选择使用一条、二条或四条通路传输资料。
eDP定义三种不同传输速率,每一条通路皆可选择使用1.62Gbit/s、2.7Gbit/s或5.4Gbit/s传输。
AUX通道是一条独立的双向传输辅助通道,使用两条差分讯号线,单一方向速率仅1Mbit/s左右,用来传输设定与控制指令。
AUX通道还可以读取延伸显示能力识别资讯(EDID),确保传送正确的影像格式,以及读取显示器所支援的DisplayPort项目内容,设定各种显示组态暂存器和读取显示器状态暂存器等。
连接过程有助于强化主要通道可靠度,确保传输的稳定性。
eDP逐渐成为内部数字接口的主流选择,可以提供更高的传输速率和更好的图像质量,为嵌入式显示面板的应用提供更好的支持。
连接是指在传送数据之前,DisplayPort的Transmitter和Receiver建立的连接。
通过AUX通道进行沟通,以确保连接成功。
连接可以增加主通道的可靠性,减少数据错误,并可以补偿不同长度和种类的电缆所导致的电性差异,特别是由于传输端和接收端系统板上信号走线所造成的差异。
eDP接口信号主要由三个部分组成:Main Link、AUX CH 和HPD。
其中,Main Link用于传输各种类型的视频和音频数据,由1到4对数据线组成,每对数据线都是一对差分线。
采用交流耦合技术,发送端和接收端具有不同的共模电压,可以将接口做得更小。
每条线路现在的传输速率为1.62/2.7/5.4Gbps。
V59广告机操作说明书
北京亿汇友胜科技发展有限公司
第 9 页 共 22 页
亿汇美
高清广告机说明书
台标(/关,默认,关)
台标显示时间(3 秒/5 秒/8 秒/10 秒/15 秒/30 秒/60 秒,默认,3 秒)
台标消失时间(3 秒/5 秒/8 秒/10 秒/15 秒/30 秒/60 秒,默认,3 秒)
设置密码
设置菜单加密,按键有 VOL-,VOL+,|◀◀,▶▶|,▶▶
SWAPLVDS POL
0/1,LVDS 奇偶交换 D+/D-(默认,0)
SWAPLVDS CH
0/1,D0 D1 D2 CLK D3 交换 D3 CLK D2 D1 D0(默认,0)
注意:调试屏的参数时也可以通过下面的配置文件对屏参进行修改
用记事本可打开,内容如下:
<?xml version="1.0" encoding="utf-8"?> <MSCONFIG>
北京亿汇友胜科技发展有限公司
第 7 页 共 22 页
亿汇美
高清广告机说明书
定时 0~定时 4,5 段定时
2.3 字幕设置
北京亿汇友胜科技发展有限公司
第 8 页 共 22 页
亿汇美
高清广告机说明书
滚动字幕 开/关(默认,关) 字幕颜色 白色/黑色/红色/蓝色/黄色/绿色/灰色(默认,白色) 字幕底色 透明色/白色/红色/黄色/蓝色/黑色/绿色/灰色(默认,透明色) 字幕速度 慢/中/快(默认,中) 字幕位置 底部/顶部(默认,底部)第 3 页 共 22 页
亿汇美
高清广告机说明书
2.1 基础参数设置
北京亿汇友胜科技发展有限公司
2.9inch e-Paper Module 用户手册说明书
2.9inch e-Paper Module用户手册产品概述●本品是2.9英寸电子墨水屏模块,分辨率为296x128,带有内部控制器,使用SPI接口通信,支持局部刷新。
●具有耗低、视角宽、阳光直射下仍可清晰显示等优点,常用于货架标签、工业仪表等显示应用。
●本模块基于SPI通信协议来对墨水屏进行操作,通过相应函数,就可以完成显示功能,包括几何图形绘制、文字、图片显示,同时本模块支持局部刷新,本产品提供树莓派(基于BCM2835,Wringpi和python),SMT32以及Arduino例程,方便客户进行移植。
规格●工作电压:3.3V●通信接口:3-wire SPI、4-wire SPI●外形尺寸:89.5mm ×38mm●显示尺寸:66.89mm ×29.05mm●点距:0.138 ×0.138●分辨率:296 ×128●显示颜色:黑、白●灰度等级:2●刷新功耗:26.4mW(typ.)●待机功耗:<0.017mW●可视角度:>170°接口说明12工作原理器件介绍本产品使用的电子纸采用“微胶囊电泳显示”技术进行图像显示,其基本原理是悬浮在液体中的带电纳米粒子受到电场作用而产生迁移。
电子纸显示屏是靠反射环境光来显示图案的,不需要背光,即使是在阳光底下,电子纸显示屏依然清晰可视,可视角度几乎达到了180°。
因此,电子纸显示屏非常适合阅读。
通信协议注:与传统的SPI协议不同的地方是:由于是只需要显示,故而将从机发往主机的数据线进行了隐藏。
CS为从机片选,仅当CS为低电平时,芯片才会被使能。
DC为芯片的数据/命令控制引脚,当DC = 0时写命令,当DC = 1时写数据。
SCLK为SPI通信时钟。
SDIN为SPI通信主机发往从机数据。
对于SPI通信而言,数据是有传输时序的,即时钟相位(CPHA)与时钟极性(CPOL)的组合:31)CPOL的高低决定串行同步时钟的空闲状态电平,CPOL = 0,为低电平。
ITX-M19 VER 1.6主板说明书

订购产品前,请向经销商详细了解产品性能是否符合您的需求。本手册所涉及到 的其他商标,其所有权为相应的产品厂家所拥有。
本手册内容受版权保护,版权所有。未经许可,不得以机械的、电子的或其它任 何方式进行复制。 欲知更多信息,请访问:
研域工控网站: 研域工控技术支持邮箱:sh.fawang@ 研域工控技术支持QQ:2850579877
12产品规格产品规格处理器板载intel?celeron1037u18ghz双核处理器可兼容intel?sandyivybridgeceleroni3i5i7bga1023低功耗处理器芯片组采用intel?nm70或hm65高速芯片组内存支持单通道ddr316001333内存最大支持8gb显示功能集成intel?hdgraphics核心显卡提供vgalvdshdmi显示输出支持单独显示双显模式扩展模式lvds支持双通道24bititxm19于基于intel?celeron1037u处理器的miniitx工业主板网络功能集成1个realtekrtl8111e千兆网卡可选做2个千兆网卡支持网络唤醒pxe功能音频功能集成alc6626声道高保真音频控制器支持miclineout功放支持25w双声道扩展总线提供1个minipcie插槽支持wifi3g模块1个msata插槽支持usbwifi或ssd固态硬盘ssd传输速度可达6gbps存储功能提供2个sata硬盘接口提供1个25寸sata笔记本硬盘位背板io接口4usb20接口usb2与lan2二选一1hdmi显示接口1vga显示接口1rj45网络接口可选做2个千兆网卡1lineout接口绿色1mic接口红色112vdc电源输入接口内置接口1ps2键盘鼠标接口16pin1jvga1接口25pin与db15同信号1jhdm1接口28pin与背板io接口的hdmi1可以同时使用1lvds接口215pin支持双通道24bit双81lvds背光接口16pinitxm19于基于intel?celeron1037u处理器的miniitx工业主板1前置音频接口25pin1前置功放接口14pin1前面板功能按钮和指示灯接口25pin2rs232串口且com12第9pin支持带电功能4usb20接口25pin14pinatx12v输入输出电源接口12p蓝色电源座子1lpt打印接口1sim卡座gpio功能支持4路输入输出gpio功能散热系统14pincpu风扇13pin系统风扇bios32mbflashromwatchdog功能支持硬件复位功能256级0255秒电源特性采用dc12v电源供电尺寸环境主板尺寸
STKMV59AAD中文规格书

ZHONGHENGSHENGDATECHNOLOGY 深圳市中恒盛大科技发展有限公司高清广告机解码驱动一体板规格书(产品型号:STKMV59AAD)文件编号: NO.20120712001版本信息: Ver2.1编制:梁修龄审核:梁祥政复审:刘斌批准:吕小莹发布日期: 2012-7-12此文件中包含的所有信息内容最终解释权归ZHONGHENGSHENGDA科技有限公司,所有未经授权和允许的复制都是不被认可和应被禁止的。
目录封面 (1)目录 (2)版本变更记录 (3)1、产品概述 (4)2、主要性能参数 (4)3、产品功能 (5)4、产品PCB尺寸及结构图说明 (6)5、产品主要接口定义说明 (7)6、使用要求 (11)7、产品外观图 (11)8、产品主要OSD界面 (12)版本变更记录版本号日期页码内容2.0 2012.5.25第一版发行2.1 2012.7.12 第二版发行1、产品概述本驱动板采用主芯片是MSTV59MS,此芯片是MSTAR公司的模拟电视芯片系列产品,广泛用于各大品牌(包括国产及日韩品牌)的液晶电视上。
本公司在业内率先将其应用于数码相框、广告机等产品上。
此方案相对传统的 DVD芯片(ESS等)+液晶驱动芯片,在功能,性能及价格上有明显的优势。
本驱动板采用日本rubycon(红宝石)电解电容,美国MPS 和台湾DIODES的电源芯片,并且在设计上预留了充分的冗余。
其它外围元器件及连接座也采用了大公司生产的可靠并优质的产品,以确保本产品的长期稳定工作。
本驱动板可以直接驱动LVDS接口的液晶屏。
支持菜单90度、270度旋转,能方便用于竖装的广告机。
支持画面及菜单180旋转,可以直接反装液晶屏,有效解决小尺寸屏下视角比上视角差的问题。
可提供2×6W的音频输出功率。
2、主要性能参数支持格式视频格式MPG、MPG-1、MPG-2、MPG-4、AVI(Divx编码除外)、MP4、TS、MKV、WMV、RM、RMVB 图片格式JPEG、BMP音乐格式MP3、WMA视频解码支持最大分辨率1920*1080最大色深24bit最大帧速30frm/s最大码流USB2.0 device:30Mb/s音频解码支持抽样速率32kHz,44.1kHz,48kHz,96kHz比特率32kbps 到384kbps 电源DC 12V /300mA功耗< 3W频率响应±3dB(20Hz—20KHz)输出音频 1.00Vrms (47KΩ阻抗)视频1Vp-p+/-5% (CVBS 75Ω阻抗) U S B 传输速率USB2.0,Max 480Mbps外形尺寸116mm(L) x 87.3mm(W) x 19mm(H)3、产品功能★支持横屏/竖屏播放,支持180度旋转功能★支持分屏功能★开机自动循环播放★支持断点记忆功能★广告插播功能★支持定时开关机功能★支持超大BMP挂角图标显示功能★支持HDMI、VGA、AV输入功能★支持超长流水字幕显示功能★支持文件直接在本机上拷贝和删除的功能,支持USB文件更新功能★自动生成播放流水日志文件备案功能(便于广告客户查询记录)无须任何手动操作★分时音量,不同的时段,可以设置不同的音量★最高支持1080P(分辨率为1920*1080 )逐行扫描高清显示以及隔行扫描高清显示(即1080I,分辨率为1920*1080 )★支持USB播放,支持热插拔,内容更新方便快捷★支持音视频格式:MPG、MPG-1、MPG-2、MPG-4、AVI、MP4、TS、MKV、WMV、RM、RMVB等★播放模式:单曲重复播放、文件夹循环播放、全盘循环播放★图片播放:旋转、缩放、平移、幻灯片播放、背景音乐播放★音频模式:左声道、右声道、立体声★OSD多国语言:支持中文、英文等多国语言★支持支持中文、英文的流水滚动字幕。
Philips 32PFL5409 HD Ready LCD 电视说明书

Philips LCD TV81 cm (32")HD Ready32PFL5409Brilliant design, powerful performanceWith superb picture and sound.Experience brilliant performance with a HD 1366 x 768p display. Combined with a powerful Pixel Plus HD Engine and fantastic invisible sound, this Flat TV will never let you down.Easy to connect and enjoy•USB for fantastic multimedia playback•3 HDMI inputs with Easylink for a full HD connection •PC-input allows you to use your TV as a PC monitor•Smart Picture and Smart Sound to personalize your viewing •Swivel stand for the optimal viewing angle Pure and lifelike sound•20W for superior sound clarity•Dynamic Bass Enhancement for cinematic sound •Invisible speakers with incredible surroundVivid and razor sharp pictures•Pixel Plus HD for better details, depth and clarity •HD LCD display, with a 1366 x 768p resolution•Dynamic contrast 50000:1 for incredible rich black details •Active Control with Light Sensor optimizes picture qualityHighlightsPixel Plus HDPixel Plus HD is a picture processing technology that enables viewers to watch content that is vivid, natural, and real. The result means superbly life-like pictures with incredible details and depth from any HD source.LCD display, 1366 x 768pThis WXGA display with state-of-the-art LCD screen technology gives you widescreen HD resolution of 1366 x 768p pixels. It produces brilliant flicker-free progressive scan pictures with optimum brightness and superb colors. This vibrant and sharp image will provide you with an enhanced viewing experience.Dynamic contrast ratio 50000:1You want the LCD flat display with the highest contrast and most vibrant images. Philips advanced video processing combined with unique extreme dimming and backlightboosting technology results in vibrant images. Dynamic Contrast will increase the contrast with excellent blacklevel and accuraterendition of dark shades and colors. It gives abright, lifelike picture with high contrast and vibrant colors.20W for superior sound clarity 20W for superior sound clarityUSB (multimedia)The USB connector allows access to jpeg photos, mp3 music and video files of most USB-sticks (USB memory-class device). Plug the USB into the slot at the side of the TV and access the multimedia content using the easy on screen content browser. You can now view and share your videos, photos and music.3 HDMI inputs with EasyLinkEasyLink uses the HDMI CEC industry standard protocol to share functionalitybetween connected devices and the TV. With Easylink only one remote control is needed to operate main functionalities on your TV and connected devices. HDMI makes anuncompressed digital RGB connection from the source to the screen for the ultimate picture quality. HDMI uses HDCP copyprotection. With 2 HDMI inputs on the back and 1 HDMI on the side of the TV you can connect multiple HD sources, for instance an HD settop box, a Blu-ray player, and Game Console or Digital Camcorder.PC input (HDMI and VGA)With PC input you can use your TV as a PC monitor either using a HDMI-DVI cable/converter (for digital signals) or VGA cable (for analog signals).Smart Picture and Smart SoundPhilips preset modes for Smart Picture and Smart Sound provide you with direct access via a single key on the remote control. You can select optimized picture and sound settings for the various picture and sound modes.Swivel standThis TV comes with a swivel stand that allows you to watch your TV from your favorite position at any angle so that you can enjoy the best entertainment from any seat in the room.Active Control + Light SensorActive Control is a unique and intelligent way of optimizing picture quality by measuring and analyzing the incoming signal to automatically adjust picture quality settings. Active Control with Light Sensor uses a sensor to adjust the picture brightness depending on the room light conditions.True 24p playabilityMovies and many prime time TV programs are captured at 24 frames per second (24p).Without changing the frames processing of the film, the TV displays movie content exactly at 24 frames per second, hencing recreating the exact same motion effect film producers have intended.Dynamic Bass EnhancementBy using digital sound processing, DBEdynamically enhances the bass notes according to your personal wishes. Plus, since it is volume sensitive, the sound is always free from low-end distortion.Invisible speakersAn invisible sound system that blends perfectly with the design of the cabinet. The Incredible Surround allows you to experience total surround with greater depth and width of sound. It gives a clear and spacious sound stagecomplementary to the rich viewing experience.Issue date 2023-10-05Version: 5.6.7EAN: 87 12581 47810 0© 2023 Koninklijke Philips N.V.All Rights reserved.Specifications are subject to change without notice. Trademarks are the property of Koninklijke Philips N.V. or their respective owners.SpecificationsPicture/Display•Aspect ratio: Widescreen•Diagonal screen size (inch): 32 inch •Diagonal screen size (metric): 81 cm •Panel resolution: 1366 x 768p •Brightness: 450 cd/m²•Picture enhancement: Pixel Plus HD, 3/2 - 2/2 motion pull down, 3D Combfilter, Active Control + Light sensor, Color Enhancement, Dynamic contrast enhancement, Jagged Line Suppression, Sharpness Adjustment, Dynamic Noise Reduction, 2D/3D noise reduction, 1080p 24/25/30Hz processing, 1080p 50/60Hz processing•Display screen type: LCD WXGA+ Active Matrix TFT•Dynamic screen contrast: 50 000:1•Response time (typical): 5 ms •Viewing angle: 178º (H) / 178º (V)•Screen enhancement: Semi-glareSupported Display Resolution•Computer formats: 640 x 480, 60, 72, 75, 85Hz, 800 x 600, 60, 72, 75, 85Hz, 1024 x 768, 60, 70, 75, 85Hz, 1280 x 768, 60Hz, 1280 x 1024, 60Hz, 1360 x 768, 60Hz, Via HDMI/DVI input,•Video formats: 480i, 60Hz, 480p, 60Hz, 576i, 50Hz, 576p, 50Hz, 720p, 50, 60Hz, 1080i, 50, 60Hz, 1080p, 24, 25, 30, 50, 60HzTuner/Reception/Transmission•Aerial Input: 75 ohm coaxial (IEC75)•Tuner bands: Hyperband, S-Channel, UHF, VHF •TV system: PAL B/G, PAL D/K •Number of Preset Channels: 99•Video Playback: NTSC, PALMultimedia Applications•Playback Formats: MP3, JPEG Still pictures, MPEG1, MPEG4, RealMedia Video•Playback enhancement: Picture slideshowConvenience•Child Protection: Child Lock+Parental Control •Ease of Installation: Autostore, Fine Tuning, PLL Digital Tuning, Plug & Play, Program Name, Sorting •Ease of Use: Auto Volume Leveller (AVL),Graphical User Interface, On Screen Display, Side Control, Smart Picture, Smart Sound, EasyLink •Clock: On main display, Sleep Timer, Wake upClock, Wake Up Timer•Connection Enhancement: Easy link•Screen Format Adjustments: 4:3, Movie expand 14:9, Movie expand 16:9, Subtitle Zoom, Super Zoom, Widescreen•Multimedia: USB media browser •Remote Control: TV•Remote control type: PF02A09B •Signal strength indication•Teletext: 1000 page Smart Text•On-Screen Display languages: Arabic, English, French, Thai, Traditional Chinese•Firmware upgradeable: Firmware upgradeable via USB•Picture in Picture: Picture in graphics •Teletext enhancements: 4 favourite pagesSound•Output power (RMS): 20W•Sound System: Mono, Nicam Stereo, Stereo •Sound Enhancement: Auto Volume Leveler,Dynamic Bass Enhancement, Incredible Surround, Treble and Bass ControlLoudspeakers •Built-in speakers: 2Connectivity•AV 1: Audio L/R in, YPbPr •AV 2: Audio L/R in, YPbPr •AV 3: Audio L/R in, CVBS in•EasyLink (HDMI-CEC): One touch play, EasyLink, Remote control pass-through, System audio control, System standby•Front /Side connections: HDMI v1.3, S-video in, CVBS in, Audio L/R in, Headphone Out, USB •HDMI 1:HDMI v1.3•HDMI 2:HDMI v1.3•Other connections: Monitor out, CVBS, L/R (cinch), PC-in VGA + Audio L/R inPower•Mains power: 110-240V; 50-60Hz •Ambient temperature: 5 °C to 40 °C •Power consumption: 120 W•Standby power consumption: (typical) <0.15WAccessories•Included accessories: Tabletop swivel stand, Powercord, Quick start guide, User Manual, Remote Control, 2 x AAA Batteries•User Manual: Arabic, English, French, Malay, Thai, Traditional ChineseDimensions•Set Width: 810 mm •Set Height: 519 mm •Set Depth: 95 mm•Product weight: 10.5 kg•Set width (with stand): 810 mm •Set height (with stand): 570 mm •Set depth (with stand): 230 mm •Product weight (+stand): 12.5 kg •Box width: 1034 mm •Box height: 662 mm •Box depth: 246 mm•Weight incl. Packaging: 17.5 kg•Wall mount compatible: 200 x 200 mm。
河迪欧 5.0英寸 IPS 液晶屏模块数据手册说明书
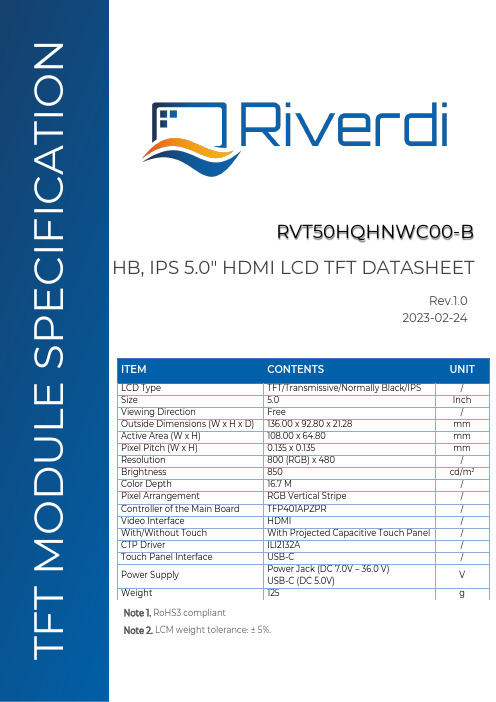
ITEMCONTENTSUNITLCD Type TFT/Transmissive/Normally Black/IPS / Size5.0 Inch Viewing DirectionFree/ Outside Dimensions (W x H x D) 136.00 x 92.80 x 21.28 mm Active Area (W x H) 108.00 x 64.80 mm Pixel Pitch (W x H) 0.135 x 0.135mm Resolution 800 (RGB) x 480 / Brightness 850 cd/m 2 Color Depth16.7 M/ Pixel ArrangementRGB Vertical Stripe / Controller of the Main Board TFP401APZPR / Video InterfaceHDMI/ With/Without Touch With Projected Capacitive Touch Panel / CTP DriverILI2132A / Touch Panel Interface USB-C/ Power Supply Power Jack (DC 7.0V – 36.0 V) USB-C (DC 5.0V) V Weight125gHB, IPS 5.0" HDMI LCD TFT DATASHEETRVT50HQHNWC00-BRev.1.0 2023-02-24F T M O D U L E S P E C I F I C A T I O NNote 1. RoHS3 compliantNote 2. LCM weight tolerance: ± 5%.REVISION RECORDREV NO. REV DATE CONTENTS REMARKS1.0 2023-02-24 Initial versionCONTENTSREVISION RECORD (2)CONTENTS (3)MODULE CLASSIFICATION INFORMATION (4)uxTouch ASSEMBLY GUIDE (5)MODULE DRAWING (6)ABSOLUTE MAXIMUM RATINGS (7)ELECTRICAL CHARACTERISTICS (7)BACKLIGHT DRIVING CONDITIONS (8)ELECTRO-OPTICAL CHARACTERISTICS (8)INTERFACE DESCRIPTION (10)DISPLAY SPECIFICATION (11)CAPACITIVE TOUCH SCREEN PANLE SPECIFICATIONS (11)INSPECTION (12)RELIABILITY TEST (14)LEGAL INFORMATION (15)MODULE CLASSIFICATION INFORMATIONRV T 50 H Q H N W C 00 B 1. 2. 3. 4. 5. 6. 7. 8. 9. 10. 11.uxTouch ASSEMBLY GUIDEuxTouch are LCD TFT displays with specially designed projected capacitive touch panels. uxTouch display can be mounted without any additional holes in the housing. Our standard uxTouch displays include double-sided adhesive tape (DST) to stick TFT easily to the housing.uxTouch models with double-side adhesive tape can be mounted by fastening the glass to the housing.Figure 1. Example of using the support bracketsDETAIL A SCALE 4:14*R 5.00 [R 0.197]LED Circuit DiagramLEDKLEDAC o m p o n e n t A r e a5" RGB DISPLAYTOUCH PANEL-+HDMIPOWER & PWMCN116CN27-36VCN3CN4101CTPCN6401CN7CN8C O M P O N E N TA R E AA0.20 [0.008]*45°0.20 [0.008]*45°108.00 [4.252](TFT A.A.)119.90 [4.720](SENSOR O.D.)120.30 [4.736](TFT O.D.)64.80 [2.551](T F T A .A .)75.40 [2.969](T F T O .D .)110.00 [4.331](SENSOR A.A.)108.60 [4.276](CG V.A.)136.00 [5.354](CG O.D.)68.00 [2.677]66.80 [2.630](S E N S O R A .A .)65.40 [2.575](C G V .A .)74.80 [2.945](S E N S O R O .D .)92.80 [3.654](C G O .D .)46.40 [1.827]14.00 [0.551]13.70 [0.539]10.94 [0.431]14.00 [0.551]13.70 [0.539]13.00 [0.512]8.07 [0.318]7.87 [0.310]13.00 [0.512]11.14 [0.439]BLACK MASK PRINTINGRAL9005MAX 21.28 [0.838](MODULE O.D.)1.10 [0.043](CG)1.275 [0.050](CG+DST)2.03 [0.080](CG+SCA+SENSOR+OCA)4.73 [0.186](CTP+TFT)LENS(T=1.1mm[0.043inch])SCA(T=0.2mm[0.008inch])SENSOR(T=0.55mm[0.022inch])OCA(T=0.175mm[0.007inch])DOUBLE-SIDED TAPE3M9495 T=0.175mm[0.007inch]GROUNDING TAPEUSB TYPE-CHDMITYPE-AMOLEX 53261-0671DC2.1*5.5mm 23.15±0.5 [0.911±0.020]0.00±0.5 [0.000±0.020]96.00±0.5 [3.780±0.020]52.00±0.5 [2.047±0.020]PN:SN:RVT50HQHNWC00-B Revision:Changes:Date:1.0Initial Case2023.01.20TP NOTES:1.TP STRUCTURE: G+G2. CG THICKNESS: 1.10mm[0.043inch]3. SURFACE HARDNESS: 7H4.DRIVER IC: ILI2132A5.INTERFACE:USB-CGENERAL NOTES:1. OPTICAL BONDING BETWEEN TFT AND CTP2. OPERATING TEMPERATURE: -20°C ~ 70°C3. STORAGE TEMPERATURE: -30°C ~ 80°C4. WITHOUT INDIVIDUAL TOLERANCE:±0.3mm[0.012inch]LCM NOTES:1.LCD TYPE: TRANSMISSIVE, NORMALLY BLACK, IPS2.RESOLUTION: 800x4803.VIEWING ANGLE: FREE4. MODULE SURFACE LUMINANCE: 850 cd/m 24.CONTROLLER IC OF MAIN BOARD: TFP401APZPRABSOLUTE MAXIMUM RATINGSPARAMETER SYMBOL MIN MAX UNIT Operating Temperature T OP-20 70°C Storage Temperature T ST-30 80Storage Humidity (@ 25 ± 5°C) H ST10 -% RH Operating Ambient Humidity (@ 25 ± 5°C) H OP10 -ELECTRICAL CHARACTERISTICSPARAMETER SYMBOL MIN TYP MAX UNIT NOTESupply Voltage via DC JACK or CN1 VDD 7.0 12.0 36.0V Note 1Supply Voltage via USBC VDDUSBC 4.7 5.0 5.5 Note 2PWM Logic Input Voltage Low Voltage I VILPWM0 - 0.4 High Voltage I VIHPWM 1 - VDDEN Logic Input Voltage Low Voltage I VILEN0 - 1.2 High Voltage I VIHEN 1.35 - VDDPWM Frequency F PWM 1 10 100 kHz Note 1. The module can be powered via DC jack or CN1 (POWER&PWM) or USB-CThe VDD pin of CN1 is connected directly to the DC jack. Please do not power the module via DC Jack and CN1 at the same time.Note 2. When DC jack and USB-C (or CN1 and USB-C) are both powered, DC jack (or CN1) is the main power supply.PARAMETER SYMBOL BL0%BL50%BL100%UNIT NOTECurrent Drawn from VDD When VEN is active high I VDD230 350500mAVDD=7.0V 145 220300 VDD=12.0V90 130 170 VDD=24.0V75 100 130 VDD=36.0VCurrent Drawn from VDD when VEN is low I VDD- 0.65 -mAVDD=7.0V - 1.20 - VDD=12.0V- 2.60 - VDD=24.0V- 3.90 - VDD=36.0VCurrent drawn fromVDDUSBCI VDDUSBC260 410 630 Note 3BL 50%.current was measured with BL brightness set to 50%,BL 100%.current was measured with BL brightness set to 100%.Test condition:1. Ambient temp 25 °C2.PCAP is in Active modeNote 3. VEN indicates the input voltage of power enable pin of POWER & PWM interface(CN1).When VEN is set to “H igh”, the module is powered on.When VEN is set to “Low”, the module is powered off.Note 4. T he module can’t be switched off via EN pin if USB-C is the only power input.BACKLIGHT DRIVING CONDITIONSPARAMETER SYMBOL MIN TYP MAX UNIT NOTEBacklight PowerConsumptionW BL-1680mW 100% backlight Lifetime - - 50,000 - hours Note 1Note 1. Operating life means the period in which the LED brightness goes down to 50% of the initial brightness. Typical operating lifetime is the estimated parameter.ELECTRO-OPTICAL CHARACTERISTICSITEM SYMBOL CONDITION MIN TYP MAX UNIT RMK NOTEResponse Time Tr+Tfθ=0°∅=0°Ta=25 °C - 30 40 ms FIG 2. 4,7Contrast Ratio Cr 800 1000 - ---FIG 3. 1,7Luminance UniformityδWHITE- 75 80 % 3,7SurfaceLuminanceLv - 850 - cd/m22,7Viewing Angle Range θ∅ = 90° - 80 -deg FIG 4. 6 ∅ = 270° - 80 -∅ = 0° - 80 -∅ = 180° - 80 -CIE (x, y) Chromaticity Rxθ=0°∅=0°Ta=25 °C0.575 0.615 0.655-FIG 3. 5,7 Ry 0.296 0.336 0.376Gx 0.352 0.392 0.432Gy 0.512 0.552 0.592Bx 0.100 0.140 0.180By 0.085 0.125 0.165Wx 0.274 0.316 0.358Wy 0.294 0.336 0.378Note 1. Contrast Ratio (CR) is defined mathematically as below, for more information see Figure 3.Contrast Ratio =Average Surface Luminance with all white pixels (P1,P2,P3,P4,P5) Average Surface Luminance with all black pixels (P1,P2,P3,P4,P5)Note 2.Surface luminance is the LCD surface from the surface with all pixels displaying white at 100% backlight. For more information see Figure 3.Lv = Average Surface Luminance with all white pixels (P1, P2, P3, P4, P5)Note 3.The uniformity in surface luminance δWHITE is determined by measuring luminance at each test position 1 through 5, and then dividing the minimum luminance of 5 points luminance by maximum luminance of 5 points luminance. For more information see Figure 3.test position 1 through 5, and then make average value.Note 6. For TFT module, viewing angle is the angle at which the contrast ratio is greater 10. The angles are determined for the horizontal or x axis and the vertical or y axis with respect to the z axis which is normal to LCD surface. For more information see Figure 4.Note 7. Viewing angle is measured at the center point of the LCD by CONOSCOPE (ergo-80). For response time testing, the testing data is based on BM-7A. Instruments for Contrast Ratio, Surface Luminance, Luminance Uniformity, Chromaticity the test data is based on SR-3A.Figure 2. The definition of response timeA: 5mmB: 5mmH, V: Active AreaLight spot size ∅=5mm, 500mm distancefrom the LCD surface to detector lens.Measurement instrument is SR-3AFigure 3. Measuring method for Contrast ratio, surface luminance, Luminance uniformity,CIE (x, y) chromaticityFigure 4. The definition of viewing angleINTERFACE DESCRIPTIONPCB overviewDC JackThe DC jack power connector features 5.5 mm OD; 2.1mm ID. The input voltage ranges from 7.0V to 36.0V.Backlight PWM & PowerThe 1.25mm, 6-pin Molex connector labeled as “POWER &PWM’ (CN1) is a multifunctional interface. It can be used to power the module, also can be used to control the backlight PWM. A PWM frequency in the range of 1kHz –100kHz must be used.PIN NO.SYMBOLDESCRIPTION NOTE1 VDD Power supply (7.0V- 36.0 V) Note 12 VDD Power supply (7.0V- 36.0 V) 3PWMPWM input4 ENPower enable, active high(Default pulled up to VDD)Note 2 5 GND Ground 6 GND GroundNote 1. Alternative power supply.Note 2.The module can’t be switched off via EN pin if USB-C is the only power input. Note 3. Matched Riverdi power supply cable: RVA-0106M-1.25FF-1.HDMIThis is a HDMI signal source connector.The horizontal HDMI is mounted by default. If you need to change it to the vertical HDMI connector, please contact: *******************USB-CDespite the function of connecting touch panel, USB-C connector can also be used as a power supply.However, the module can’t be switched off via EN pin if USB-C is the only power input. The horizontal USB-C connector (CN4) is mounted by default. Vertical USB-C connector can be mounted through CN5. If you need to change the type of USB-C connector, please contact:*******************DISPLAY SPECIFICATIONThe TFT of the module applies Riverdi high brightness, IPS, 5.0” RGB: RVT50HQTNWC00-B For detailed information, please refer to datasheet of display.C APACITIVE TOUCH SCREEN PANLE SPECIFICATIONSMechanical characteristicsDESCRIPTIONSPECIFICATIONREMARKTouch Panel Size5.0 inchaTouchOutline Dimension of CTP 136.00 mm x 92.80 mm Product Thickness 2.03 mm Glass Thickness 1.1 mmCTP View Area108.60 mm x 65.40 mmSensor Active Area 110.00 mm x 66.80 mm Structure type Glass + Glass Surface Hardness7HElectrical characteristicsPARAMETERSPECIFICATIONREMARKPowerConsumption (IDD) Active Mode 90mA aTouchSleep Mode10mA Linearity +/-1.5mm Controller ILI2132A Resolution800 x 480I NSPECTIONStandard acceptance/rejection criteria for TFT moduleInspection conditionAmbient conditions:•Temperature: 25 ± 2°C • Humidity: (60 ± 10) %RH•Illumination: Single fluorescent lamp non-directive (300 to 700 lux)Viewing distance: 35 ± 5cm between inspector bare eye and LCD. Viewing Angle: U/D: 45°/45°, L/R: 45°/45°Inspection standardITEM CRITERIONBlack spots,white spots,light leakage,Foreign Particle(round Type)D=(x+y)/2Spots density: 10 mm3.5” ≤Size ≤ 5”Average Diameter Qualified QtyD ≤ 0.15 mm Ignored0.15 mm < D ≤ 0.3 mm N≤30.3mm < D Not allowedLCD black spots,white spots,light leakage(line Type)Spots density: 10 mm3.5” ≤Size ≤ 5”Length Width Qualified Qty - W ≤ 0.03 IgnoredL ≤ 3.0 0.03 < W ≤ 0.05 2L ≤ 3.0 0.05 < W ≤ 0.1 13.0 < L 0.10 < W Not allowedBright/Dark Dots3.5” ≤Size ≤ 5”Item Qualified Qty Bright dots N ≤ 1Dark dots N ≤ 2 Total Bright and Dark Dots N ≤ 3Clear spotsSize ≤ 5”Average Diameter Qualified QtyD < 0.2 mm Ignored0.2 mm < D < 0.3 mm 30.3 mm < D < 0.5 mm 20.5 mm < D 0 Spots density: 10 mmPolarizer bubbles3.5” ≤Size ≤ 5”Average Diameter Qualified QtyD ≤ 0.2 mm Ignored0.2 mm < D ≤ 0.3 mm 20.2 mm < D ≤ 0.5 mm 10.5 mm < D 0Total Q’ty 3Size ≤ 5”Touch panel spotsAverage Diameter Qualified QtyD < 0.2 mm Ignored0.2 mm < D < 0.4 mm 50.4 mm < D < 0.5 mm 20.5 mm < D 0Touch panel white line scratchSize ≤ 5”Length Width Qualified Qty - W < 0.02 IgnoredL < 3.0 0.02 < W < 0.05 2L < 5.0 0.05 < W < 0.08 2 - 0.08 < W 0RELIABILITY TESTNO. TEST ITEM TEST CONDITION1 High Temperature Storage 80°C/120 hours2 Low Temperature Storage -30°C/120 hours3 High Temperature Operating 70 °C /120 hours4 Low Temperature Operating -20 °C/120 hours5 High Temperature and High Humidity Humidity 40℃, 90%RH, 120Hrs6 Thermal Cycling Test (No operation) -20℃ for 30min, 70℃ for 30 min. 100 cycles. Then test at room temperature after 1 hour7 Vibration Test Frequency: 10 ÷ 55 Hz.Stroke: 1.5 mm.Sweep: 10Hz ÷ 55Hz ÷ 10 Hz.2 hours for each direction of X, Y, Z (Total 6 hours)Note 1. Sample quantity for each test item is 5 ÷ 10 pcs.Note 2. Before cosmetic and function test, the product must have enough recovery time, at least 2 hours at room temperature.L EGAL INFORMATIONCE marking is usually obligatory only for a complete end product. Riverdi display modules are semi-finished goods which are used as inputs to become part of the finished products. Therefore, Riverdi display modules are not CE marked.Riverdi grants the guarantee for the proper operation of the goods for a period of 12 months from the date of possession of the goods. If in a consequence of this guaranteed execution the customer has received the defects-free item as replacement for the defective item, the effectiveness period of this guarantee shall start anew from the moment the customer receives the defects-free item.Information about device is the property of Riverdi and may be the subject of patents pending or granted. It is not allowed to copy or disclosed this document without prior written permission.Riverdi endeavors to ensure that all contained information in this document is correct but does not accept liability for any error or omission. Riverdi products are in developing process and published information may be not up to date. Riverdi reserves the right to update and makes changes to Specifications or written material without prior notice at any time. It is important to check the current position with Riverdi.Images and graphics used in this document are only for illustrative the purpose. All images and graphics are possible to be displayed on the range products of Riverdi, however the quality may vary. Riverdi is no liable to the buyer or to any third party for any indirect, incidental, special, consequential, punitive or exemplary damages (including without limitation lost profits, lost savings, or loss of business opportunity) relating to any product, service provided or to be provided by Riverdi, or the use or inability to use the same, even if Riverdi has been advised of the possibility of such damages.Riverdi products are not fault tolerant nor designed, manufactured or intended for use or resale as on line control equipment in hazardous environments requiring fail–safe performance, such as in the operation of nuclear facilities, aircraft navigation or communication systems, air traffic control, direct life support machines or weapons systems in which the failure of the product could lead directly to death, personal injury or severe physical or environmental damage (‘High-Risk Activities’). Riverdi and its suppliers specifically disclaim any expressed or implied warranty of fitness for High-Risk Activities. Using Riverdi products and devices in 'High-Risk Activities' and in any other application is entirely at the buyer’s risk, and the buyer agrees to defend, indemnify and hold harmless Riverdi from all damages, claims or expenses resulting from such use. No licenses are conveyed, implicitly or otherwise, under any Riverdi intellectual property rights.。
- 1、下载文档前请自行甄别文档内容的完整性,平台不提供额外的编辑、内容补充、找答案等附加服务。
- 2、"仅部分预览"的文档,不可在线预览部分如存在完整性等问题,可反馈申请退款(可完整预览的文档不适用该条件!)。
- 3、如文档侵犯您的权益,请联系客服反馈,我们会尽快为您处理(人工客服工作时间:9:00-18:30)。
2
GND
3
ON/OFF
4
ADJ
5
+12V
6
+12V
J6(3PIN/2.0)预留 IO 接口
脚序号
定义
1
5V
2
GPIO2
3
GPIO3
4
GND
J7 遥控接口 脚序号
1 2 3 4 5
CN3 按键接口 脚序号
1 2 3 4 5 6 7 8
定义 5V GND IR LED_G LED_R
定义 K7 K6 K5 K4 K3 K2 K1 GND
干扰能强 ◆ 工作模式:正常工作模式,待机模式 ◆ 多存储介质支持功能:可支持USB2.0,支持热插拔 ◆ 兼容多种播放格式:MP3、WMA、JPEG、MEPG4(AVI:Div-X / X-Vid)、MPEG2(DVD:VOB/MPG2)、
MPEG1(VCD:DAT/MPG1)、MOV等 ◆ 视频制式:PAL、NTSC、自动 ◆ 视频输出:最高支持 1080P(分辨率为 1920*1080)逐行扫描高清显示以及隔行扫描高清显
比特率
电
源
功
耗
频率响应
输出
音频 视频
USB 传 输 速 率
32kbps 到 448kbps DC12V/300mA <3W
±3dB (20Hz-20KHz)
1.00Vrms (47KΩ阻抗) 1Vp- p+/-5% (CBVS 75Ω阻抗)
USB2.0 Max480Mbps
第二章.产品功能
◆ 采用MSTAR公司高清多媒体专用解码芯片,超强解码功能,高稳定性 ◆ 电压直流输入:+12V,能适应较恶劣的工作环境(如车载环境),且功耗低、稳定性好、抗
拷贝 ◆ 按键扩展:可外接按键板,支持 HDMI 信号输入(可以当做显示器使用) ◆ 支持多画图同时播放,即分屏功能 ◆ 支持播放列表功能,可以根据需要按不同时间播放内容
第三章.PCBA 尺寸图
*PCB 长度:113.0mm *PCB 高度:8.8mm *PCB 宽度:86.0mm *PCB 螺丝孔径:3.5mm
产 品 规 格书
客户名称: 产品名称:高清广告机解码板 产品型号: V59THE-V1.1(EDP)
拟制:
供应商
审核: 批准:
客户确认
合格 □ 不合格 □
审核: 批准:
第一章 第二章 第三章 第四章 第五章
目录
性能参数 产品功能 PCBA 尺寸图 使用环境 接口定义
第一章.性能参数:
支持格式
视频格式 图片格式 音乐格式
第四章.使用环境
相当湿度 ≤75% 存储温度:-10°C 至 +60°C 使用温度:0°C 至 +60°C *整机装配和运输过程中注意防静电处理. *整机装配时,可下装或侧装,但不要使板子变形或扭曲,勿受重压. *各端子孔的开孔不要过小,特别是 HDMI 端子开孔,以免安装时整机变形导致挤压端子. *RGB 插座的开孔建议不要使用 RGB 插座上的螺丝固定在您的结构挡板上. *本板和配套的模块板之间的连接线不可过长,否则可能会影响性能和图像质量. *整机内部配线合理,各连接线尽可能不要直接从 PCB 板上穿越,特别是从主芯片上方穿越,以 免影响整机 EMC 的性能. *为了整机达到更好的 EMC 效果,建议主板和屏之间连接的 LVDS 双绞紧密,尽可能采取屏蔽线, 有条件的在靠近板端的线上穿上磁环. *主板的 HDMI 和 HDCP 都已经通过相关认证,但只是内部标准测试认证,如果您需要合法使用 HEMI 和 HDCP 功能,请自行到相关协会申请成为会员. *本产品在板卡和外包装上都有 ROHS 标识,符合 ROHS 标准.
示(即1080i,分辨率为 1920*1080) ◆ 音频输出:双声道立体音频输出2X6W,信噪比85dB ◆ 播放模式:单曲重复播放、文件夹循环播放、全盘循环播放 ◆ OSD 语言:支持中文、英文等多国语言 ◆ 遥控功能:红外遥控控制 ◆ 定时开关机:利于节省能源,并且延长其使用寿命 ◆ 滚动字幕:播放视频广告的同时,在屏幕下方显示预先设定的文字信息 ◆ 记忆播放:由于某些情况断电后,再上电时将会从电源切断的时刻播放 ◆ 时钟显示:具有时钟 IC,可显示时间信息 ◆ 支持自动拷贝功能:可将 USB 文件自动 COPY 到记忆卡里,同文件名覆盖,不同文件名
地
描述 喇叭接口
地 地
4
RSPK
J12(3PIN/2.0)耳机输出扩展接口
脚序号
定义
1
ROUT
2
GND
3
LOUT
喇叭接口
描述 右声道输出
地 左声道输出
最大分辨率
视频解码支持
最大色深 最大帧速 最大码流
音频解码支持 抽样速率
MPG,MPG-1,MPG-2,MPG-4,AVI,MP4, DIV,TS,TRP, WMV,M2TS,MKV,RM,RMVB, JPEG,BMP,PNG MP3,WMA
1920*1080@60Hz 24bit 30frm/s
USB2.0device:30Mbit/sec 32kHz,44.1kHz,48kHz,96kHz
第五章.接口定义
主要接口定义说明(面向白插座缺口方向左边起为第一脚)
CN1(10PIN/2.0)5VSTB 电源输入接口
脚序号
定义
描述
1
+12V
电源
2
+12V
电源
3
GND
地
4
GND
地
5
+5V
电源
6
பைடு நூலகம்
+5V
电源
7
5VSTB
8
GND
9
GND
10
STB
CN2(6PIN/2.0)背光电源接口
脚序号
定义
1
GND
J15(4PIN/2.0)喇叭接口
脚序号
定义
1
LSPK
2
GND
3
GND
5VSTB 地 地 STB
描述 地 地 背光开/关控制 背光亮度调节 电源 电源
描述 5V 预留 IO 脚 预留 IO 脚 地
描述 电源 地 遥控接收信号口 LED 指示灯 LED 指示灯
描述 按键 7 按键 6 按键 5 按键 4 按键 3 按键 2 按键 1