Cisco思科光纤交换机配置说明.doc
思科Catalyst 9600系列交换机产品手册说明书

思科公开信息思科 Catalyst 9600 系列线卡目录特性和优势 6 规格概要 6 产品规格7 MTBF 信息8 订购信息9 思科环境可持续性9 思科增强型有限终身硬件保修10 思科服务10 Cisco Capital 11 文档历史记录12思科 Catalyst 9600 系列交换机为实现大规模恢复能力而专门设计,提供业内最全面的安全保护,帮助企业以最低的总运营成本实现增长。
Catalyst 9600 系列构建于 Catalyst 9000 的基础之上,可在必须保证 “永不间断” 的环境中提供可扩展性和安全性。
无论您在基于意图的网络转型过程中处于哪个阶段,Catalyst 9600 系列交换机作为思科全数字化网络架构 (Cisco DNA) 的基本组成部分,都可以利用其他供应商无法提供的智能性、自动化和专业知识,帮助您简化复杂性、优化IT 并降低运营成本。
Catalyst 9600 系列交换机具备安全功能,可为硬件、软件和流经交换机的所有数据提供完整性保障。
该系列交换机的恢复能力也同样出色,可确保您的企业无缝地正常运行。
这些功能与思科 IOS XE 的开放式 API 以及 UADP ASIC 技术的可编程性相结合,确保 Catalyst 9600 系列交换机不仅能满足您当前所需,而且能面向未来创新保护您的投资。
作为业界首批专为企业园区量身打造的模块化 40 和 100 千兆以太网交换机系列,Catalyst 9600 系列交换机可为企业应用提供无与伦比的表规模(MAC 表/路由表/访问控制列表 [ACL])及缓冲性能。
思科 Catalyst 9606R 机箱的硬件最多可支持 25.6 Tbps 的有线交换容量,每个插槽最高可提供 6.4 Tbps 的带宽。
思科 Catalyst 9600 系列交换机支持满足不同园区需求的精细端口密度,包括无阻塞 40 和 100 千兆以太网 (GE) 四通道小型封装热插拔(QSFP+、QSFP28)和 1、10 及 25GE 小型封装热插拔加强版(SFP、SFP+、SFP28)以及 10 千兆以太网/5 千兆以太网/2.5 千兆以太网/1 千兆以太网/100 兆/10 兆 RJ45 铜缆端口。
CISCO交换机基本配置和使用概述
CISCO交换机基本配置和使用概述CISCO交换机是一种常用的网络设备,用于构建局域网(Local Area Network,LAN)。
它可以通过物理线路的连接,将多台计算机或其他网络设备连接到同一个网络中,实现数据的传输和共享。
CISCO交换机的基本配置包括IP地址的配置、VLAN的配置、端口配置、安全性配置等。
接下来,我们将对这些配置进行详细说明。
首先,IP地址的配置是CISCO交换机的基本操作之一。
通过配置IP地址,我们可以对交换机进行管理和监控。
具体的配置步骤如下:1. 进入交换机的配置模式。
在命令行界面输入"enable"命令,进入特权模式。
2. 进入全局配置模式。
在特权模式下输入"configure terminal"命令,进入全局配置模式。
3. 配置交换机的IP地址。
在全局配置模式下输入"interfacevlan 1"命令,进入虚拟局域网1的接口配置模式。
然后输入"ip address 192.168.1.1 255.255.255.0"命令,配置交换机的IP地址和子网掩码。
4. 保存配置并退出。
在接口配置模式下输入"exit"命令,返回到全局配置模式。
然后输入"exit"命令,返回到特权模式。
最后输入"copy running-config startup-config"命令,保存配置到闪存中。
其次,VLAN的配置是CISCO交换机的关键配置之一。
通过配置VLAN,我们可以将交换机的端口划分为不同的虚拟局域网,实现数据的隔离和安全。
1. 进入交换机的配置模式。
同样,在特权模式下输入"configure terminal"命令,进入全局配置模式。
2. 创建VLAN。
在全局配置模式下输入"vlan 10"命令,创建一个编号为10的VLAN。
思科 slm224g2-cn 交换机 说明书
思科SLM224G2-CN带有2个Combo SFP 的24-端口10/100 + 2-端口10/100/1000千兆位高级智能交换机——适用于您成长中的企业,具备简单网管功能的经济有效而又安全的交换机成长中的企业需要一个能够不断满足企业自身变化需求的并且成本低廉的网络解决方案。
Cisco SLM224G2智能交换机能够以一个经济有效的价格为您的企业网络基础架构带来全新水平的智能性和安全性。
它提供24个10/100M以太网(铜缆)端口,并且带有2个10/100/1000M自适应的铜缆接口或可选光纤(SFP)接口为接入用户提供从网络边缘到网络核心的千兆上行链路。
对于任何规模的企业,网络安全性始终被置于较高的优先级别而加以考虑,企业经常担心非授权的用户对网络或业务关键数据进行访问。
这款SLM224G2交换机能够通过802.1x端口认证技术和MAC地址过滤技术使企业的网络变得更加安全,802.1x在交换机端口转发数据之前要求接入用户进行自身的身份验证。
企业用户越来越意识到VoIP语音呼叫的优越性并且正在迅速地把其语音业务迁移到基于IP的平台上来,这就需要其本地网络能够同时有效地支持语音和数据的应用程序。
SLM224G2交换机广泛而丰富的QoS特性为诸如语音、视频等实时应用程序提供了理想的解决方案。
通过四个优先级队列的划分,配合加权轮叫调度(WRR)或严格优先级调度(SP)算法,网络管理员能够快速地把语音/视频等实时数据流和其他数据流加以区分,使实时应用能够获得优先处理。
通过配置各种服务等级(Class of Service,CoS)参数,如:端口、第2层优先级(802.1p)、第3层优先级(TOS或DSCP)等,特殊的用户或应用程序也能够获得较其他用户或程序更高的优先级别。
智能的广播、组播及未知单播风暴控制功能能够把这几类风暴对正常数据流的影响减至最低。
IGMP嗅探功能限制极占带宽的视频数据流,使其仅仅转发至发起视频请求的用户而非滥发至所有用户。
光纤交换机级联配置文档CISCO
光纤交换机级联配置文档Cisco 9120交换机1.配置异构交换机平台协同工作模式Cisco 9120配置过程激活前8个端口switch# config tEnter configuration commands, one per line. End with CNTL/Z. switch(config)#interface fc1/1-8switch(config-if)# no shutdownswitch(config-if)# end配置交换机协同工作模式switch# config tEnter configuration commands, one per line. End with CNTL/Z. switch(config)# vsan databaseswitch(config-vsan-db)# vsan 1 interopswitch(config-vsan-db)# end配置domain IDswitch# config tEnter configuration commands, one per line. End with CNTL/Z. switch(config)# fcdomain domain 100 preferred vsan 1switch(config)# end激活VSANswitch# config tEnter configuration commands, one per line. End with CNTL/Z. switch(config)# vsan databaseswitch(config-vsan-db)# vsan 1 suspendswitch(config-vsan-db)# no vsan 1 suspendswitch(config-vsan-db)# end察看修改之后的系统配置信息switch# show runningversion 2.0(2b)vsan databasevsan 1 interop 1fcdomain domain 100 preferred vsan 1fcdomain fcid persistent vsan 1boot kickstart bootflash:/m9100-s1ek9-kickstart-mz.2.0.2b.bin boot system bootflash:/m9100-s1ek9-mz.2.0.2b.binkernel core target 0.0.0.0kernel core limit 1snmp-server user admin network-admin auth md5 0xeec64ba2afbe9b65e13b23882ac6ae05priv 0xeec64ba2afbe9b65e13b23882ac6ae05 localizedkeyusername admin password 5 $1$V3smTQpb$MTvub69DkVBxdCt9BsEDB1 role network-admincallhomeswitch-priority 7snmp-server enable traps licenseinterface mgmt0ip address 192.168.70.139 255.255.255.0interface fc1/1no shutdowninterface fc1/2no shutdowninterface fc1/3no shutdowninterface fc1/4no shutdowninterface fc1/5no shutdowninterface fc1/6no shutdowninterface fc1/7no shutdowninterface fc1/8no shutdowninterface fc1/9interface fc1/10interface fc1/11interface fc1/12interface fc1/13interface fc1/14interface fc1/15interface fc1/16interface fc1/17interface fc1/18interface fc1/19interface fc1/20switch#察看端口连接状态信息switch# show interface brief------------------------------------------------------------------------------- Interface Vsan Admin Admin Status FCOT Oper Oper Port Mode Trunk Mode Speed ChannelMode (Gbps)-------------------------------------------------------------------------------fc1/1 1 auto on up swl F 2 --fc1/2 1 auto on up swl F 2 --fc1/3 1 auto on up swl E 2 --fc1/4 1 auto on notConnected swl -- --fc1/5 1 FX -- notConnected swl -- --fc1/6 1 FX -- notConnected swl -- --刀片中心光纤交换机模块配置禁止交换机brocadessm:USERID> switchdisable修改Domain IDbrocadessm:USERID> configureConfigure...Fabric parameters (yes, y, no, n): [no] yesDomain: (1..239) [1] 99R_A_TOV: (4000..120000) [10000]E_D_TOV: (1000..5000) [2000]WAN_TOV: (0..30000) [0]MAX_HOPS: (7..19) [7]Data field size: (256..2112) [2112]Sequence Level Switching: (0..1) [0]Disable Device Probing: (0..1) [0]Suppress Class F Traffic: (0..1) [0]Switch PID Format: (1..2) [1]Per-frame Route Priority: (0..1) [0]Long Distance Fabric: (0..1) [0]BB credit: (1..27) [16]Insistent Domain ID Mode (yes, y, no, n): [no]Virtual Channel parameters (yes, y, no, n): [no]Zoning Operation parameters (yes, y, no, n): [no]RSCN Transmission Mode (yes, y, no, n): [no]Arbitrated Loop parameters (yes, y, no, n): [no]System services (yes, y, no, n): [no]Portlog events enable (yes, y, no, n): [no]ssl attributes (yes, y, no, n): [no]http attributes (yes, y, no, n): [no]snmp attributes (yes, y, no, n): [no]rpcd attributes (yes, y, no, n): [no]cfgload attributes (yes, y, no, n): [no]webtools attributes (yes, y, no, n): [no]WARNING: The domain ID will be changed. The port level zoning may be affectedbrocadessm:USERID> msPlMgmtDeactivateSwitch is in Offline state.修改协同工作模式brocadessm:USERID> interoper mode 1The switch effective configuration will be lost when the operating mode is changed; do you want to continue? (yes, y, no, n): [no] yInteropmode is enabledNote: It is recommended that you reboot this switch for the new change to take effect.重新引导交换机brocadessm:USERID> fastbootBroadcast message from root (pts/0) Tue Jun 13 10:07:45 2006...The system is going down for reboot NOW !!USERIDPassword:Please change your passwords now.Use Control-C to exit or press 'Enter' key to proceed.Password was not changed. Will prompt again at next loginuntil password is changed.brocadessm:USERID>brocadessm:USERID> switchenable察看修改配置之后的交换机状态brocadessm:USERID> switchshowswitchName: brocadessmswitchType: 22.0switchState: OnlineswitchMode: InteropswitchRole: PrincipalswitchDomain: 99switchId: fffc63switchWwn: 10:00:00:05:1e:02:78:c6zoning: OFFswitchBeacon: OFFArea Port Media Speed State==============================0 0 id 2G No_Light1 1 cu 2G Online F-Port 21:00:00:14:5e:24:a9:042 2 cu 2G Online F-Port 21:00:00:14:5e:24:a9:363 3 cu 2G Online F-Port 21:00:00:14:5e:24:a9:7a4 4 cu 2G Online F-Port 21:00:00:14:5e:24:a9:b65 5 cu 2G Online F-Port 21:00:00:14:5e:24:a9:286 6 cu 2G Online F-Port 21:00:00:14:5e:24:aa:f67 7 cu 2G Online F-Port 21:00:00:14:5e:24:aa:f08 8 cu 2G Online F-Port 21:00:00:14:5e:24:a9:389 9 cu 2G No_Light10 10 cu 2G No_Light11 11 cu 2G No_Light12 12 cu 2G No_Light13 13 cu 2G No_Light14 14 cu 2G No_Light15 15 id 2G Online E-Port 20:01:00:0d:ec:06:b4:41 (downstream)2.划分zoneCisco 9120划分zone察看fabric连接设备port wwn 信息switch# show fcns database vsan 1--------------------------------------------------------------------------FCID TYPE PWWN (VENDOR) FC4-TYPE:FEATURE--------------------------------------------------------------------------0x630100 N 21:00:00:14:5e:24:a9:04 scsi-fcp0x630200 N 21:00:00:14:5e:24:a9:36 scsi-fcp0x630300 N 21:00:00:14:5e:24:a9:7a scsi-fcp0x630400 N 21:00:00:14:5e:24:a9:b6 scsi-fcp0x630500 N 21:00:00:14:5e:24:a9:28 scsi-fcp0x630600 N 21:00:00:14:5e:24:aa:f6 scsi-fcp0x630700 N 21:00:00:14:5e:24:aa:f0 scsi-fcp0x630800 N 21:00:00:14:5e:24:a9:38 scsi-fcp0x640000 N 20:07:00:a0:b8:21:19:9f (SymBios) scsi-fcp:both0x640100 N 20:06:00:a0:b8:21:19:9f (SymBios) scsi-fcp:bothTotal number of entries = 10创建zone分别创建2个zone,前4个刀片服务器与DS4300 2个控制器组成的zone,第4到第8个刀片服务器与DS4300 2个控制器组成的zone。
Cisco思科光纤交换机配置说明.doc
Cisco思科光纤交换机配置说明Cisco思科光纤交换机配置说明的方法1. 初始化信息首次设置,必须通过console进行连接(需要U口转DB9针的接口线,专门卖接口线的有卖大约30元),然后进行初始化设计,以后设定IP后可通过LAN进行登陆具体步骤:(红色字体部分着重注意,需要进行设置,大部分按照默认设置即可,而且设置的部分进入管理工具软件可以更改) ---- System Admin Account Setup ----Enter the password for admin : passwordConfirm the password for admin : password--- Basic System Configuration Dialog ---This setup utility will guide you through the basic configuration of the system. Setup configures only enough connectivity for management of the system.Press Enter at any time to skip any dialog. Use ctrl-c at anytime to skip the remaining dialogs.Would you like to enter the basic configuration dialog (yes/no): y Create another login account (yes/no) [n]:Configure read-only SNMP community string (yes/no) [n]: Configure read-write SNMP community string (yes/no) [n]:Enter the switch name: Pxx-MDS-x (where xx is your pod number and x is the switch number; for example:P01-MDS-1)Continue with Out-of-band (mgmt0) management configuration? (yes/no) [y]:Mgmt0 IPv4 address : 10.0.x.y (where x is your pod number and y is 5 for MDS-1 and 3 for MDS-2)(客户)0.16Mgmt0 IPv4 netmask : 255.255.255.0Configure the default gateway? (yes/no) [y]:IPv4 address of the default gateway : 10.0.x.254 (where x is your pod number)Configure advanced IP options? (yes/no) [n]:Enable the telnet service? (yes/no) [y]:Enable the ssh service? (yes/no) [n]:Configure the ntp server? (yes/no) [n]:Configure default switchport interface state (shut/noshut) [shut]: (注意一下)noshutConfigure default switchport trunk mode (on/off/auto) [on]:Configure default zone policy (permit/deny) [deny]:Enable full zoneset distribution (yes/no) [n]:NOTE:初始设定的配置对新的VSAN起作用,即原始VSAN1无这些配置解决办法:1 zone default-zone permit VSAN2 新建NEW VSAN2 将port转移VSAN2里面。
思科交换机简单配置(通用教程)

当一个端口允许多个vlan通过时,trunk allowed vlan中要添加各条vlan信息
Switch(config-if)#switchport trunk encapsulation dot1q Switch(config-if)#switchport mode trunk Switch(config-if)# switchport trunk allowed vlan all Switch(config-if)#switchport trunk allowed vlan 10,50,60 Switch(config-if)#switchport trunk allowed vlan add 20 (remove 删除) Switch(config-if)#switchport trunk allowed vlan add 30 Switch(config-if)#switchport trunk allowed vlan add 40 Switch(config-if)#switchport trunk native vlan 1 Switch(config-if)#no shutdown Switch(config-if)#end Switch#copy running-config startup-config
此端口为vlan10 vlan20 vlan30 vlan40的trunk口,default vlan 1经过此端 口时不会带上标签。
•
光端口配置
Switch(config)#interface gigabitEthernet 0/25 Switch(config-if)# switchport mode access Switch(config-if)#switchport access vlan 10 Switch(config-if)#no shutdown Switch(config-if)#end Switch#copy running-config startup-config
cisco思科6000系列交换机经典配置手册(中文)

6000交换机配置维护手册(Native IOS)目录1. 连接设备 (3)1.1.从CONSOLE连接 (3)1.2.远程TELNET连接 (5)2. 基本信息配置 (5)2.1.配置机器名、TELNET、密码 (5)2.2.配置SNMP网管串 (5)3. 冗余及系统高可用性配置 (6)3.1.同步S UPERVISOR E NGINE配置 (6)3.2.查看S UPERVISOR E NGINE冗余 (7)3.3.向冗余S UPERVISOR E NGINE拷贝IOS文件 (8)4. 端口设置 (9)4.1.基本设置 (9)4.2.配置三层端口 (10)5. 配置二层端口 (10)5.1.配置T RUNK: (10)6. 配置HSRP (11)6.1.配置二层普通交换接口 (12)6.2.清除二层接口配置 (12)7. 配置VLAN (12)8. 动态路由协议--OSPF配置 (13)8.1.启用OSPF动态路由协议 (14)8.2.定义参与OSPF的子网 (14)8.3.OSPF区域间的路由信息汇总 (14)8.4.配置密码验证 (15)8.5.设置产生缺省路由 (15)9. 交换机维护 (16)9.1.交换机IOS保存和升级 (16)9.2.交换机密码恢复 (16)1. 连接设备1.1. 从console连接第一次对6000交换机进行配置,必须从console进入。
首先先将机器上架,按要求接好电源,然后用随机附带的Console线和转接头将交换机的console口与PC的串口相联,如下:Com口设置如下:∙9600 baud∙8 data bits∙No parity∙ 2 stop bits检查电源无误后,开电,可能会出现类似下面的显示,按黑粗体字回答:System Bootstrap, Version 6.1(2)Copyright (c) 1994-2000 by cisco Systems, Inc.c6k_sup2 processor with 131072 Kbytes of main memoryrommon 1 > boot slot0:c6sup22-jsv-mz.121-5c.EX.binSelf decompressing the image : ################################################################################################################################ ############################################################################### ############################################################################### ############################################################################### [OK]Restricted Rights LegendUse, duplication, or disclosure by the Government issubject to restrictions as set forth in subparagraph(c) of the Commercial Computer Software - RestrictedRights clause at FAR sec. 52.227-19 and subparagraph(c) (1) (ii) of the Rights in Technical Data and ComputerSoftware clause at DFARS sec. 252.227-7013.cisco Systems, Inc.170 West Tasman DriveSan Jose, California 95134-1706Cisco Internetwork Operating System SoftwareIOS (tm) MSFC2 Software (C6MSFC2-BOOT-M), Version 12.1(3a)E4, EARLY DEPLOYMENT R ELEASE SOFTWARE (fc1)Copyright (c) 1986-2000 by cisco Systems, Inc.Compiled Sat 14-Oct-00 05:33 by eaarmasImage text-base: 0x30008980, data-base: 0x303B6000cisco Cat6k-MSFC2 (R7000) processor with 114688K/16384K bytes of memory.Processor board ID SAD04430J9KR7000 CPU at 300Mhz, Implementation 39, Rev 2.1, 256KB L2, 1024KB L3 CacheLast reset from power-onX.25 software, Version 3.0.0.509K bytes of non-volatile configuration memory.16384K bytes of Flash internal SIMM (Sector size 512K).Press RETURN to get started!--- System Configuration Dialog ---Would you like to enter the initial dialog? [yes]: no回答:NO,进入手工配置,在router>下,输入enable回车,进入全局模式1.2. 远程telnet连接当完成交换机配置,并起给交换机配置了管理地址,就可以直接采用远程telnet 登陆进入交换机了,但是必须先配置line vty的密码和enable密码才能允许远程登陆。
光纤交换机简单配置手册.docx
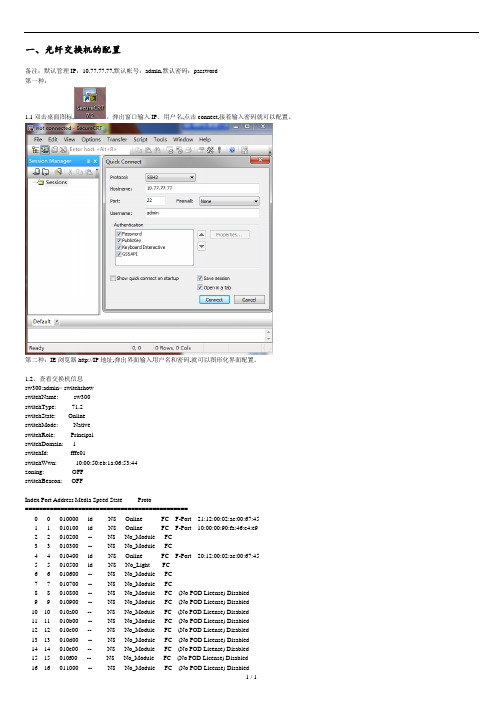
一、光纤交换机的配置备注:默认管理IP:10.77.77.77,默认帐号:admin,默认密码:password第一种:1.1双击桌面图标,。
弹出窗口输入IP、用户名,点击connect,接着输入密码就可以配置。
第二种:IE浏览器http://IP地址,弹出界面输入用户名和密码,就可以图形化界面配置。
1.2、查看交换机信息sw300:admin> switchshowswitchName: sw300switchType: 71.2switchState: OnlineswitchMode: NativeswitchRole: PrincipalswitchDomain: 1switchId: fffc01switchWwn: 10:00:50:eb:1a:06:53:44zoning: OFFswitchBeacon: OFFIndex Port Address Media Speed State Proto==============================================0 0 010000 id N8 Online FC F-Port 21:12:00:02:ac:00:67:451 1 010100 id N8 Online FC F-Port 10:00:00:90:fa:46:c4:e92 2 010200 -- N8 No_Module FC3 3 010300 -- N8 No_Module FC4 4 010400 id N8 Online FC F-Port 20:12:00:02:ac:00:67:455 5 010500 id N8 No_Light FC6 6 010600 -- N8 No_Module FC7 7 010700 -- N8 No_Module FC8 8 010800 -- N8 No_Module FC (No POD License) Disabled9 9 010900 -- N8 No_Module FC (No POD License) Disabled10 10 010a00 -- N8 No_Module FC (No POD License) Disabled11 11 010b00 -- N8 No_Module FC (No POD License) Disabled12 12 010c00 -- N8 No_Module FC (No POD License) Disabled13 13 010d00 -- N8 No_Module FC (No POD License) Disabled14 14 010e00 -- N8 No_Module FC (No POD License) Disabled15 15 010f00 -- N8 No_Module FC (No POD License) Disabled16 16 011000 -- N8 No_Module FC (No POD License) Disabled17 17 011100 -- N8 No_Module FC (No POD License) Disabled18 18 011200 -- N8 No_Module FC (No POD License) Disabled19 19 011300 -- N8 No_Module FC (No POD License) Disabled20 20 011400 -- N8 No_Module FC (No POD License) Disabled21 21 011500 -- N8 No_Module FC (No POD License) Disabled22 22 011600 -- N8 No_Module FC (No POD License) Disabled23 23 011700 -- N8 No_Module FC (No POD License) Disabled1.3、查看licenseshow信息。
光纤交换机级联配置文档CISCO

光纤交换机级联配置文档Cisco 9120交换机1.配置异构交换机平台协同工作模式Cisco 9120配置过程激活前8个端口switch# config tEnter configuration commands, one per line. End with CNTL/Z. switch(config)#interface fc1/1-8switch(config-if)# no shutdownswitch(config-if)# end配置交换机协同工作模式switch# config tEnter configuration commands, one per line. End with CNTL/Z. switch(config)# vsan databaseswitch(config-vsan-db)# vsan 1 interopswitch(config-vsan-db)# end配置domain IDswitch# config tEnter configuration commands, one per line. End with CNTL/Z. switch(config)# fcdomain domain 100 preferred vsan 1switch(config)# end激活VSANswitch# config tEnter configuration commands, one per line. End with CNTL/Z. switch(config)# vsan databaseswitch(config-vsan-db)# vsan 1 suspendswitch(config-vsan-db)# no vsan 1 suspendswitch(config-vsan-db)# end察看修改之后的系统配置信息switch# show runningversion 2.0(2b)vsan databasevsan 1 interop 1fcdomain domain 100 preferred vsan 1fcdomain fcid persistent vsan 1boot kickstart bootflash:/m9100-s1ek9-kickstart-mz.2.0.2b.bin boot system bootflash:/m9100-s1ek9-mz.2.0.2b.binkernel core target 0.0.0.0kernel core limit 1snmp-server user admin network-admin auth md5 0xeec64ba2afbe9b65e13b23882ac6ae05priv 0xeec64ba2afbe9b65e13b23882ac6ae05 localizedkeyusername admin password 5 $1$V3smTQpb$MTvub69DkVBxdCt9BsEDB1 role network-admincallhomeswitch-priority 7snmp-server enable traps licenseinterface mgmt0ip address 192.168.70.139 255.255.255.0interface fc1/1no shutdowninterface fc1/2no shutdowninterface fc1/3no shutdowninterface fc1/4no shutdowninterface fc1/5no shutdowninterface fc1/6no shutdowninterface fc1/7no shutdowninterface fc1/8no shutdowninterface fc1/9interface fc1/10interface fc1/11interface fc1/12interface fc1/13interface fc1/14interface fc1/15interface fc1/16interface fc1/17interface fc1/18interface fc1/19interface fc1/20switch#察看端口连接状态信息switch# show interface brief------------------------------------------------------------------------------- Interface Vsan Admin Admin Status FCOT Oper Oper Port Mode Trunk Mode Speed ChannelMode (Gbps)-------------------------------------------------------------------------------fc1/1 1 auto on up swl F 2 --fc1/2 1 auto on up swl F 2 --fc1/3 1 auto on up swl E 2 --fc1/4 1 auto on notConnected swl -- --fc1/5 1 FX -- notConnected swl -- --fc1/6 1 FX -- notConnected swl -- --刀片中心光纤交换机模块配置禁止交换机brocadessm:USERID> switchdisable修改Domain IDbrocadessm:USERID> configureConfigure...Fabric parameters (yes, y, no, n): [no] yesDomain: (1..239) [1] 99R_A_TOV: (4000..120000) [10000]E_D_TOV: (1000..5000) [2000]WAN_TOV: (0..30000) [0]MAX_HOPS: (7..19) [7]Data field size: (256..2112) [2112]Sequence Level Switching: (0..1) [0]Disable Device Probing: (0..1) [0]Suppress Class F Traffic: (0..1) [0]Switch PID Format: (1..2) [1]Per-frame Route Priority: (0..1) [0]Long Distance Fabric: (0..1) [0]BB credit: (1..27) [16]Insistent Domain ID Mode (yes, y, no, n): [no]Virtual Channel parameters (yes, y, no, n): [no]Zoning Operation parameters (yes, y, no, n): [no]RSCN Transmission Mode (yes, y, no, n): [no]Arbitrated Loop parameters (yes, y, no, n): [no]System services (yes, y, no, n): [no]Portlog events enable (yes, y, no, n): [no]ssl attributes (yes, y, no, n): [no]http attributes (yes, y, no, n): [no]snmp attributes (yes, y, no, n): [no]rpcd attributes (yes, y, no, n): [no]cfgload attributes (yes, y, no, n): [no]webtools attributes (yes, y, no, n): [no]WARNING: The domain ID will be changed. The port level zoning may be affectedbrocadessm:USERID> msPlMgmtDeactivateSwitch is in Offline state.修改协同工作模式brocadessm:USERID> interoper mode 1The switch effective configuration will be lost when the operating mode is changed; do you want to continue? (yes, y, no, n): [no] yInteropmode is enabledNote: It is recommended that you reboot this switch for the new change to take effect.重新引导交换机brocadessm:USERID> fastbootBroadcast message from root (pts/0) Tue Jun 13 10:07:45 2006...The system is going down for reboot NOW !!USERIDPassword:Please change your passwords now.Use Control-C to exit or press 'Enter' key to proceed.Password was not changed. Will prompt again at next loginuntil password is changed.brocadessm:USERID>brocadessm:USERID> switchenable察看修改配置之后的交换机状态brocadessm:USERID> switchshowswitchName: brocadessmswitchType: 22.0switchState: OnlineswitchMode: InteropswitchRole: PrincipalswitchDomain: 99switchId: fffc63switchWwn: 10:00:00:05:1e:02:78:c6zoning: OFFswitchBeacon: OFFArea Port Media Speed State==============================0 0 id 2G No_Light1 1 cu 2G Online F-Port 21:00:00:14:5e:24:a9:042 2 cu 2G Online F-Port 21:00:00:14:5e:24:a9:363 3 cu 2G Online F-Port 21:00:00:14:5e:24:a9:7a4 4 cu 2G Online F-Port 21:00:00:14:5e:24:a9:b65 5 cu 2G Online F-Port 21:00:00:14:5e:24:a9:286 6 cu 2G Online F-Port 21:00:00:14:5e:24:aa:f67 7 cu 2G Online F-Port 21:00:00:14:5e:24:aa:f08 8 cu 2G Online F-Port 21:00:00:14:5e:24:a9:389 9 cu 2G No_Light10 10 cu 2G No_Light11 11 cu 2G No_Light12 12 cu 2G No_Light13 13 cu 2G No_Light14 14 cu 2G No_Light15 15 id 2G Online E-Port 20:01:00:0d:ec:06:b4:41 (downstream)2.划分zoneCisco 9120划分zone察看fabric连接设备port wwn 信息switch# show fcns database vsan 1--------------------------------------------------------------------------FCID TYPE PWWN (VENDOR) FC4-TYPE:FEATURE--------------------------------------------------------------------------0x630100 N 21:00:00:14:5e:24:a9:04 scsi-fcp0x630200 N 21:00:00:14:5e:24:a9:36 scsi-fcp0x630300 N 21:00:00:14:5e:24:a9:7a scsi-fcp0x630400 N 21:00:00:14:5e:24:a9:b6 scsi-fcp0x630500 N 21:00:00:14:5e:24:a9:28 scsi-fcp0x630600 N 21:00:00:14:5e:24:aa:f6 scsi-fcp0x630700 N 21:00:00:14:5e:24:aa:f0 scsi-fcp0x630800 N 21:00:00:14:5e:24:a9:38 scsi-fcp0x640000 N 20:07:00:a0:b8:21:19:9f (SymBios) scsi-fcp:both0x640100 N 20:06:00:a0:b8:21:19:9f (SymBios) scsi-fcp:bothTotal number of entries = 10创建zone分别创建2个zone,前4个刀片服务器与DS4300 2个控制器组成的zone,第4到第8个刀片服务器与DS4300 2个控制器组成的zone。
思科Cisco交换机配置手册配置教程
配置接口特性这一章详细说明交换机上的接口和描述怎么配置他们。
这章有以下这些内容:●理解接口类型●使用接口命令●配置二层接口●监控和维护第二层接口●配置第三从接口注意:需要完整的有关该章的语法和应用信息,请参考Catalyst 3550 Multilayer Switch Command Reference和Cisco IOS Interface Command Referencefor Release 12.1.理解接口类型这个部分描述了不同的接口类型,以及其它章节所包括的详细配置这些接口的一些参考内容。
其他章节描述了物理接口特性的配置过程。
这部分包括:•基于端口的VLAN (Port-Based VLANs)•交换端口(Switch Ports)•以太网通道端口组(EtherChannel Port Groups)•交换虚拟接口(Switch Virtual Interfaces)•被路由端口(Routed Ports)•连接接口(Connecting Interfaces)基于端口的VLAN (Port-based Vlans)一个Vlan是一个按功能、组、或者应用被逻辑分段的交换网络,并不考虑使用者的物理位置。
要更多关于Vlan的信息请看“Configuring VLANS”。
一个端口上接受到的包被发往属于同一个Vlan的接收端口。
没有一个第三层的设备路由Vlan间的流量,不同Vlan的网络设备无法通讯。
为了配置普通范围(Normal-range) Vlan(Vlan IDs 1-1005),使用命令:config-vlan模式(global) vlan vlan-id或vlan-configuration模式(exec) vlan database针对Vlan ID 1-1005的vlan-configration模式被保存在vlan数据库中。
为配置扩展范围(extended-range) Vlans (Vlan ID 1006-4094),你必须使用config-vlan模式,并把VTP的模式设为transparent透明模式。
思科3560交换机中文配置手册

3560客户中文配置手册第1章概述1-11.1 概述1-11.2 初次访问设备1-21.2.1 通过Console口访问设备1-2第2章命令行方式访问设备2-12.1.1 命令行模式2-12.1.2 基本设置命令2-12.2 通过Console口进入命令行接口2-22.3 通过Telnet进入命令行接口2-2第3章接口配置3-13.1 概述3-13.2 二层口配置3-13.2.1 配置端口速率及双工模式3-13.3 配置一组端口3-23.4 配置三层口3-33.5 监控及维护端口3-53.5.1 监控端口和控制器的状态3-53.5.2 刷新、重置端口及计数器3-73.5.3 关闭和打开端口3-83.6 交换机端口镜像配置3-93.6.1 创建一个本地SPAN会话3-103.7 以太通道端口组(Ethernet Port Groups)3-11第4章配置VLAN 4-124.1 简介4-124.2 可支持的VLAN 4-124.3 配置正常范围的VLAN 4-124.3.1 删除VLAN 4-144.3.2 将端口分配给一个VLAN 4-154.4 配置VLAN Trunks 4-164.5 配置VTP DOMAIN 4-184.6 配置VLAN接口地址4-18第5章交换机HSRP配置5-1第6章路由协议配置6-36.1.1 静态路由6-36.1.2 RIP路由6-36.1.3 OSPF路由6-5第1章概述1.1 概述3560交换机是支持二层、三层功能的交换机,共分为EMI,SMI两个版本Enhanced Multilayer Software Image增强多层软件镜像软件(EMI)•EMI提供了一组更加丰富的企业级功能,包括基于硬件的高级IP单播和多播路由。
•支持双机热备(HSRP),OSPF路由功能.Standard Multilayer Software Image标准多层软件镜像软件(SMI)•SMI功能集包括高级QoS、速率限制、访问控制列表(ACL),以及基本的静态和路由信息协议(RIP)路由功能支持VLAN·到1005 个VLAN·支持VLAN ID从1到4094(IEEE 802.1Q 标准)·支持ISL及IEEE 802.1Q封装安全·支持IOS标准的密码保护·静态MAC地址映射·标准及扩展的访问列表支持,对于路由端口支持入出双向的访问列表,对于二层端口支持入的访问列表·支持基于VLAN的访问列表3层支持(需要多层交换的IOS)·HSRP·IP路由协议o RIP versions 1 and 2o OSPFo IGRP及EIGRPo BGP Version 4支持以下SFP模块:·1000BASE-T SFP: 铜线最长100 m·1000BASE-SX SFP: 光纤最长1804 feet (550 m)·1000BASE-LX/LH SFP: 光纤最长32,808 feet (6 miles or 10 km)·1000BASE-ZX SFP: 光纤最长328,084 feet (62 miles or 100 km)管理从用户与设备交互的特点来分,访问设备的方式可以分为命令行方式和Web方式。
思科交换机基本配置(非常详细)

cisco交换机基本配置1.Cisco IOS简介Cisco Catalyst系列交换机所使用的操作系统是IOS(Internetwork Operating System,互联网际操作系统)或COS (Catalyst Operating System),其中以IOS使用最为广泛,该操作系统和路由器所使用的操作系统都基于相同的内核和shell。
IOS的优点在于命令体系比较易用。
利用操作系统所提供的命令,可实现对交换机的配置和管理。
Cisco IOS操作系统具有以下特点:(1)支持通过命令行(Command-Line Interface,简称CLI)或Web界面,来对交换机进行配置和管理。
(2)支持通过交换机的控制端口(Console)或Telnet会话来登录连接访问交换机。
(3)提供有用户模式(user level)和特权模式(privileged level)两种命令执行级别,并提供有全局配置、接口配置、子接口配置和vlan数据库配置等多种级别的配置模式,以允许用户对交换机的资源进行配置。
(4)在用户模式,仅能运行少数的命令,允许查看当前配置信息,但不能对交换机进行配置。
特权模式允许运行提供的所有命令。
(5)IOS命令不区分大小写。
(6)在不引起混淆的情况下,支持命令简写。
比如enable通常可简约表达为en。
(7)可随时使用?来获得命令行帮助,支持命令行编辑功能,并可将执行过的命令保存下来,供进行历史命令查询。
1.搭建交换机配置环境在对交换机进行配置之前,首先应登录连接到交换机,这可通过交换机的控制端口(Console)连接或通过Telnet登录来实现。
(1)通过Console口连接交换机对于首次配置交换机,必须采用该方式。
对交换机设置管理IP地址后,就可采用Telnet登录方式来配置交换机。
对于可管理的交换机一般都提供有一个名为Console的控制台端口(或称配置口),该端口采用RJ-45接口,是一个符合EIA/TIA-232异步串行规范的配置口,通过该控制端口,可实现对交换机的本地配置。
Cisco交换机详细配置及命令说明

Cisco交换机的概述交换机根据OSI层次通常可分为第2层交换机和多层交换机。
通常所说的交换机指第2层交换机也叫LAN交换机(第二层MAC地址进行交换);多层交换机与第2层交换机工作方式类似,除了使用第二层MAC地址进行交换之外,还使用第3层网络地址。
交换机的基本配置3、电缆连接及终端配置如图11-8所示,接好PC机和交换机各自的电源线,在未开机的条件下,把PC机的串口1(COM1)通过控制台电缆线与交换机的Console端口相连,即完成设备连接工作。
交换机Console端口的默认参数如下:端口速率:9600b/s;数据位:8;奇偶校验:无;停止位:1;流控:无。
3、交换机的启动启动过程未用户提供了丰富的信息,我们可以对交换机的硬件结构和软件加载过程有直观的认识,这些信息对我们了解该交换机以及对她做相应的配置很有帮助,另外部件号、序列号、版本号等信息再产品验货时都是非常重要的信息。
3、交换机的基本配置在默认情况下,所有接口处于可用状态并且都属于VLAN1,这种情况下交换机就可用正常工作了,为了方便管理和使用,首先应对交换机做基本的配置,最基本的配置可以通过启动时的对话框配置模式完成,也可以在交换机启动后再进行配置。
(1)配置Enable口令和主机名。
在交换机中可以配置使能口令(Enable password)和使能密码(Enable secret),一般情况下只需配置一个就可以,当两者同时配置时,后者生效。
这两者的区别是使能口令以明文显示而使能密码以密文形式显示。
Switch> (用户执行模式提示符)Switch>enable (进入特权模式)Switch # (特权模式提示符)Switch # config termianal (进入配置模式)Switch (config) # (配置模式提示符)Switch (config) # enable password cisco 设置enable password 为cisco)Switch (config) # enable secret cisco1 (设置enable secret 为cisco1)Switch (config) # hostname C2950 (设置主机名为C2950)C2950 (config) # end (退回到特权模式)C2950 #(2)配置交换机IP地址、默认网关、域名、域名服务器。
Cisco思科交换机配置手册-3550
EG:以3550为例:产品特性3550EMI是支持二层、三层功能(EMI)的交换机支持VLAN·到1005 个VLAN·支持VLAN ID从1到4094(IEEE 802.1Q 标准)·支持ISL及IEEE 802.1Q封装安全·支持IOS标准的密码保护·静态MAC地址映射·标准及扩展的访问列表支持,对于路由端口支持入出双向的访问列表,对于二层端口支持入的访问列表·支持基于VLAN的访问列表3层支持(需要多层交换的IOS)· HSRP· IP路由协议o RIP versions 1 and 2o OSPFo IGRP及EIGRPo BGP Version 4监视·交换机LED指示端口状态· SPAN及远端SPAN (RSPAN) 可以监视任何端口或VLAN的流量·内置支持四组的RMON监控功能(历史、统计、告警及事件)· Syslog功能其它功能:支持以下的GBIC模块:· 1000BASE-T GBIC: 铜线最长100 m· 1000BASE-SX GBIC: 光纤最长1804 feet (550 m)· 1000BASE-LX/LH GBIC: 光纤最长32,808 feet (6 miles or 10 km)· 1000BASE-ZX GBIC: 光纤最长328,084 feet (62 miles or 100 km)配置端口配置一组端口命令目的Step 1 configure terminal 进入配置状态Step 2 interface range {port-range} 进入组配置状态Step 3 可以使用平时的端口配置命令进行配置Step 4 end 退回Step 5 show interfaces [interface-id] 验证配置Step 6 copy running-config startup-config 保存当使用interface range命令时有如下的规则:·有效的组范围:o vlan从1 到4094o fastethernet 槽位/{first port} - {last port}, 槽位为0o gigabitethernet槽位/{first port} - {last port},槽位为0o port-channel port-channel-number - port-channel-number, port-channel号从1到64·端口号之间需要加入空格,如:interface range fastethernet 0/1 - 5 是有效的,而interface range fastethernet 0/1-5 是无效的.· interface range 命令只能配置已经存在的interface vlan·所有在同一组的端口必须是相同类别的。
9124思科光纤交换机配置管理使用手册
9124光纤交换机配置管理使用手册1.初始化信息 (3)2.交换机基本配置 (4)2.1.配置交换机管理地址 (4)2.2.LICENSE注册 (4)2.3.配置VSAN (6)2.4.配置ZONESET (6)2.5.配置ZONE (7)2.6.TRUNKING的配置 (7)3.标准配置模板 (8)4.常用检查命令 (9)5.常用配置命令 (9)5.1.删除创建的ZONE (9)5.2.清除配置 (9)5.3.设置配置口超时 (10)5.4.安装与清除license (10)5.5.显示指定License (10)5.6.显示全部Licenses (10)5.7.显示ID (11)5.8.命名交换机 (11)5.9.设置管理口 (11)5.10.禁止与使能Telnet 与ssh (11)5.11.下载配置文件 (12)5.12.保存配置 (12)5.13.创建与设置VSAN (12)5.14.分配VSAN成员 (12)5.15.删除VSAN (13)5.16.浏览VSAN设置 (13)5.17.设置FC端口 (14)5.18.设置Zone (15)5.19.设置Zone Sets (15)5.20.激活Zone Set (15)5.21.浏览Zone信息 (15)5.22.恢复管理员口令 (18)5.23.设置端口速率 (19)1.初始化信息在启动交换机后,会有类似如下的信息显示:---- System Admin Account Setup ----Enter the password for "admin": 输入admin管理员密码,系统设为P@ssw0rd Confirm the password for "admin": 再次输入admin管理员密码,P@ssw0rd---- Basic System Configuration Dialog ----This setup utility will guide you through the basic configuration ofthe system. Setup configures only enough connectivity for managementof the system.Please register Cisco MDS 9000 Family devices promptly with yoursupplier. Failure to register may affect response times for initialservice calls. MDS devices must be registered to receive entitledsupport services.Press Enter at anytime to skip a dialog. Use ctrl-c at anytimeto skip the remaining dialogs.Would you like to enter the basic configuration dialog (yes/no): noMDS Switchswitch login: adminPassword:TAC support: /tacCopyright (c) 2002-2005, Cisco Systems, Inc. All rights reserved. The copyrights to certain works contained herein are owned by other third parties and are used and distributed under license.Some parts of this software are covered under the GNU Public License. A copy of the license is available at/licenses/gpl.html.switch#然后,可以按照类似以太网交换机配置的方法来配置交换机了。
- 1、下载文档前请自行甄别文档内容的完整性,平台不提供额外的编辑、内容补充、找答案等附加服务。
- 2、"仅部分预览"的文档,不可在线预览部分如存在完整性等问题,可反馈申请退款(可完整预览的文档不适用该条件!)。
- 3、如文档侵犯您的权益,请联系客服反馈,我们会尽快为您处理(人工客服工作时间:9:00-18:30)。
Cisco思科光纤交换机配置说明Cisco思科光纤交换机配置说明的方法1. 初始化信息首次设置,必须通过console进行连接(需要U口转DB9针的接口线,专门卖接口线的有卖大约30元),然后进行初始化设计,以后设定IP后可通过LAN进行登陆具体步骤:(红色字体部分着重注意,需要进行设置,大部分按照默认设置即可,而且设置的部分进入管理工具软件可以更改) ---- System Admin Account Setup ----Enter the password for admin : passwordConfirm the password for admin : password--- Basic System Configuration Dialog ---This setup utility will guide you through the basic configuration of the system. Setup configures only enough connectivity for management of the system.Press Enter at any time to skip any dialog. Use ctrl-c at anytime to skip the remaining dialogs.Would you like to enter the basic configuration dialog (yes/no): y Create another login account (yes/no) [n]:Configure read-only SNMP community string (yes/no) [n]: Configure read-write SNMP community string (yes/no) [n]:Enter the switch name: Pxx-MDS-x (where xx is your pod number and x is the switch number; for example:P01-MDS-1)Continue with Out-of-band (mgmt0) management configuration? (yes/no) [y]:Mgmt0 IPv4 address : 10.0.x.y (where x is your pod number and y is 5 for MDS-1 and 3 for MDS-2)(客户)0.16Mgmt0 IPv4 netmask : 255.255.255.0Configure the default gateway? (yes/no) [y]:IPv4 address of the default gateway : 10.0.x.254 (where x is your pod number)Configure advanced IP options? (yes/no) [n]:Enable the telnet service? (yes/no) [y]:Enable the ssh service? (yes/no) [n]:Configure the ntp server? (yes/no) [n]:Configure default switchport interface state (shut/noshut) [shut]: (注意一下)noshutConfigure default switchport trunk mode (on/off/auto) [on]:Configure default zone policy (permit/deny) [deny]:Enable full zoneset distribution (yes/no) [n]:NOTE:初始设定的配置对新的VSAN起作用,即原始VSAN1无这些配置解决办法:1 zone default-zone permit VSAN2 新建NEW VSAN2 将port转移VSAN2里面。
建议创建VSAN2 把端口放置在VSAN2中2. 交换机配置2.1. 配置交换机管理地址switch# config t(按tab命令可以补全的或者输入命令后空格加?可以出来命令的使用方法)switch (config)# switchname switchswitch(config)# switch(config)# interface mgmt 0switch(config-if)# ip adress 192.168.100.108 255.255.255.0switch(config-if)# no shutdowninterface mgmt 0 表示的是交换机的管理端口。
2.2. 配置VSAN接下来配置VSANswitch#config tswitch (config)#vsan databaseswitch(config-vsan-db)# vsan 2switch(config-vsan-db)#end2.3. 配置ZONESETswitch#config tswitch (config)#zoneset name set10 vsan 2switch (config-zoneset)#member ZONE_NAME把ZONE填加到该ZONESET中注:在交换机处于正常运行时,如果配置了新的ZONE,并且填加到了ZONESET中,此时需要Acitvate才能生效,命令如下:switch#config tswitch (config)#zoneset activate name set10 vsan 22.4. 配置ZONE下面配置ZONE基本命令如下:switch#config tswitch(config)#zone name zone_name vsan 2switch(config)#member interface fc#/#switch(config)#member interface fc#/#交换机端口都是以fc表示,fc1/1 表示第一个模块上的第一个端口。
由于像cisco9506之类的交换机是模块化的,所以其每个端口就是fc模块号/端口号。
像cisco9120,cisco9140,不是模块化的,但其接口默认是fc1/端口号。
2.5. TRUNKING的配置默认情况下,交换机每个端口的TRUNKING协议都是启用的,交换机互连的端口应工作在E mode下,如果有两台交换机互相连接的情况,则要启用TRUNKING,以FC1/1和FC1/2为例。
配置命令如下:switch#config tswitch(config)# interface fc1/1switch(config-if)# switchport mode eswitch(config)# interface fc1/2switch(config-if)# switchport mode e3. 常用命令show run显示当前配置show zone显示当前配置的ZONE的信息show zoneset显示当前配置的ZONESET的信息show interface fc1/1显示端口fc1/1信息show zone activate显示当前活动的ZONE信息show zoneset activate显示当前活动的ZONESET信息copy run start保存当前配置show vsan 查看交换机的vsan信息show vsan x membership 查看某个vsan下面的端口show topology 级联成功后查看对端交换机信息show fcdomain domain-list 查看级联信息show fcs database 查看本地交换机注册的WWN号show fcns database 查看级联后整个fabric注册的WWN号Show interface brief 确认设置trunk的端口已经启用成功Show wwn switch 查看交换机的WWN号码4. 常用技巧4.1. 修改交换机IP地址建议通过串口线修改switch#conf tswitch(config)# int mgmt 0switch(config)-if# ip address 192.168.1.1 255.255.255.0 输入修改后的IP 和掩码switch(config-if)# switchport speed 10/100/100 如果必要,可以指定网口的速率switch(config)# ip default-gateway 192.168.1.2544.2. 解决网口不亮的方法通过串口连接switch#conf t switch(config)# int mgmt 0switch(config-if)# shutdown 提示是否继续,选择yswitch(config-if)# no shut4.3. 修改用户密码switch#conf tswitch(config)# username 用户名password 密码4.4. 修改交换机名字switch#conf tswitch(config)#switchname4.5. 启动关闭服务如果你接手的交换机没有开启TELNET功能,可以参考启停方法如下,其他服务也类似switch#conf tswitch(config)# telnet server enable 开启switch(config)# no telnet server enable 关闭5. 实例交换机级联跨交换机化zoneA交换机端口1,端口2 分别连接B交换机得端口1,端口25.1. 首先初始化按照1初始化两台交换机在每个交换机上创建VSAN2,把端口1-48加入到vsan2 中(config)# vsan database 进入(config-vsan-db)# vsan 2 name VSAN2 创建名字为VSAN2的vsan(config-vsan-db)# vsan 2 interface fc 1/1 48 将光纤口绑定在vsan2上(config-vsan-db)# exit 退出config-vsan-db模式查看VSAN2中的端口信息show vsan 2 membership是否两个交换机得VSAN2中加入了1-48个端口(可以根据需要加端口)5.2. 交换机开启mode E在两个交换机上开启端口模式E,关闭TRUNK(只是级联不是跨交换机跨VSAN化zoneTRUNK可以关闭)根据可需要选择开启的端口,这里是开启fc1/1,fc1/2switch#config tswitch(config)# interface fc1/1switch(config-if)# switchport mode eswitch(config-if)# switchport trunk mode offswitch(config)# interface fc1/2switch(config-if)# switchport mode eswitch(config-if)# switchport trunk mode offswitch(config-if)# show int brief5.3. 查看是否级联成功输入switch#show fcdomain domain-listlocal和Principal 在一行的是主交换机,出现如下的提示是级联成功了查看交换机的WWN号码并记录switch#show wwn switch或者用switch#show fcs database端口1和端口2启用mode e 所以fc1/1上的号码就是对端的交换机的WWN号码记录下来20:00:00:05:73:ba:21:f020:00:00:05:73:e5:fb:d8这两个就是交换机的WWN号码其中的fc1/5是我们的连接的设备的WWN号码也需要记录21:00:00:24:ff:00:2e:f350:06:0e:80:05:8a:ee:005.4. 配置zone及zoneset并激活在主交换机上(输入switch#show fcdomain domain-listlocal和Principal 在一行的是主交换机)配置zone这个地方有两种配置方式,一种是配置端口在一个zone里面,一种是配置设备号在一个zone里面配置端口在一个zone里面,switch#config tswitch(config)#zone name zone5_name vsan 2switch(config)#member interface fc1/5 swwn 20:00:00:05:73:ba:21:f0switch(config)#member interface fc1/5 swwn 20:00:00:05:73:e5:fb:d8进入zonesetswitch (config)#zoneset name set10 vsan 2switch (config-zoneset)#member zone5把ZONE填加到该ZONESET中注:在交换机处于正常运行时,如果配置了新的ZONE,并且填加到了ZONESET中,此时需要Acitvate才能生效,命令如下:switch#config tswitch (config)#zoneset activate name set10 vsan 2switch#show zoneswitch#show zoneset去另一台交换机查看是否也同步出现了相关的zone及zoneset 的信息。
