VirtualboxU盘挂载介绍
VirtualBox使用使用USB设备
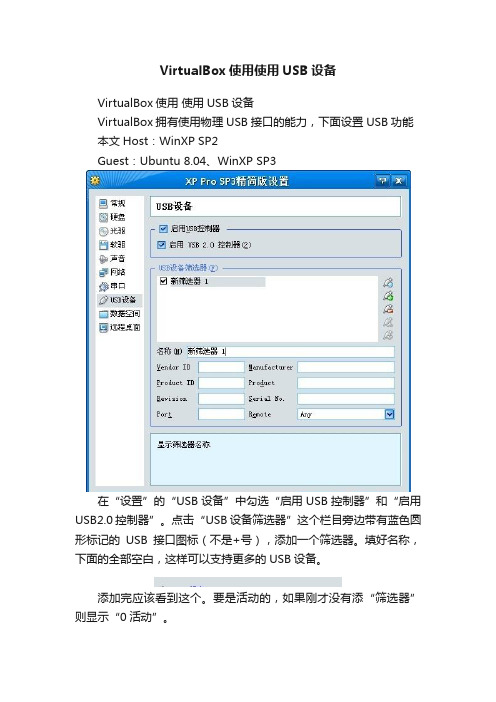
VirtualBox使用使用USB设备VirtualBox使用使用USB设备VirtualBox拥有使用物理USB接口的能力,下面设置USB功能本文Host:WinXP SP2Guest:Ubuntu 8.04、WinXP SP3在“设置”的“USB设备”中勾选“启用USB控制器”和“启用USB2.0控制器”。
点击“USB设备筛选器”这个栏目旁边带有蓝色圆形标记的USB接口图标(不是+号),添加一个筛选器。
填好名称,下面的全部空白,这样可以支持更多的USB设备。
添加完应该看到这个。
要是活动的,如果刚才没有添“筛选器”则显示“0活动”。
启动虚拟机,并且插入USB设备。
在宿主机上可看到“发现一个新设备”。
接下来,宿主机的XP会弹出对话框要求安装USB设备(不像我们插入U盘那样能自动安装),在对话框中选择“不上网寻找”,则XP会安装USB设备驱动,该驱动没有通过签名。
(在这个步骤中,你的USB设备不会显示在宿主里)安装结束后,右键点击VirtualBox右下角的USB接口图标,分配USB设备。
如果出现“忙”,请重启虚拟机,拔出USB设备并再次接入。
(在虚拟机已经启动的情况下,插入的USB设备将直接出现在虚拟机中。
)分配后,虚拟机找到新设备,并自动安装驱动程序。
就可以像平常一样使用了。
自动运行正常。
我的U盘是A-DATA的DisneyU盘,同时存在一个USB光驱和U盘。
两者都能正常使用。
Ubuntu Linux没有安装驱动这一步骤,直接使用。
USB打印机也同样,但需要自行安装驱动。
我的彩色墨盒没水了…………感觉VirtualBox的USB兼容性还不错,我的三块U盘、一个USB 打印机都能正常工作。
当USB设备在虚拟机中使用时,宿主将无法看见这个设备。
只有虚拟机关机后,再次出现。
CentOS7下VirtualBox的安装和使用
CentOS7下VirtualBox的安装和使用2016年10月20日版本历史及修订说明目录1. 安装VirtualBox (4)1.1 准备环境 (4)1.2 安装相关组件和依赖库 (4)1.3 安装VirtualBox-5.1.6 (5)1.4 安装扩展包(使其支持远程桌面等功能) (7)2. 在VirtualBox中创建虚拟机 (7)2.1 准备环境 (7)2.2 创建并安装虚拟机 (7)2.2控制虚拟机常用命令 (10)3. VirtualBox命令详解 (11)1.安装VirtualBox1.1 准备环境操作系统:CentOS7.0VirtualBox:VirtualBox-5.1-5.1.6_110634_el7-1.x86_64.rpmVirtualBox扩展包:Oracle_VM_VirtualBox_Extension_Pack-5.1.6-110634.vbox-extpack VirtualBox下载地址:/virtualbox/5.1.6/1.2 安装相关组件和依赖库1.安装所需依赖包和kernel-headers、kernel-devel并重启#yum install gcc make dkms kernel-headers-$(uname -r) kernel-devel-$(uname -r) #reboot2.查看内核版本和kernel-headers、kernel-devel是否一致#rpm -qa | grep kernel | sort3.安装所需的依赖库#rpm -ivh VirtualBox-5.1-5.1.6_110634_el7-1.x86_64.rpm //这里会发现缺少很多的依赖库通过yum方式安装:#yum install libGL libICE libSDL libSM libXcursor libXext libXinerama libXmu libXrender libXt libfontconfig libvpx然后会发现找不到SDL和fontconfig,需要手动安装:下载SDL和fontconfig并安装:https:///centos-7/centos-x86_64/SDL-1.2.15-14.el7.x86_64.rpm.html https:///centos-7/centos-x86_64/fontconfig-2.10.95-7.el7.i686.rpm.html #rpm -ivh SDL-1.2.15-14.el7.x86_64.rpm#rpm -ivh fontconfig-2.10.95-7.el7.x86_64.rpm需要fontpackages-filesystem,通过yum方式安装fontpackages-filesystem:#yum install fontpackages-filesystem再次安装fontconfig,成功:#rpm -ivh fontconfig-2.10.95-7.el7.x86_64.rpm1.3 安装VirtualBox-5.1.6#rpm -ivh VirtualBox-5.1-5.1.6_110634_el7-1.x86_64.rpm将root用户加到vboxusers组中:#usermod -a -G vboxusers root#/sbin/vboxconfig1.4 安装扩展包(使其支持远程桌面等功能)#VBoxManage extpack install Oracle_VM_VirtualBox_Extension_Pack-5.1.6-110634.vbox-extpack2.在VirtualBox中创建虚拟机2.1 准备环境镜像文件:CentOS-6.5-x86_64-bin-DVD1.iso宿主机有足够大的内存和磁盘空间2.2 创建并安装虚拟机1.查看支持的内核和操作系统类型#VBoxManage list ostypes2.创建一个2.6内核64位的Linux虚拟机,名称为centos6,虚拟机文件存放路径在/data/下#VBoxManage createvm --name centos6 --ostype Linux26_64 --register --basefolder /data/3.创建一个20G的虚拟磁盘#VBoxManage createvdi --filename /data/centos6.vdi --size 204804.创建虚拟机的硬盘控制器#VBoxManage storagectl centos6 --name storage_controller_1 --add ide5.挂载虚拟硬盘#VBoxManage storageattach centos6 --storagectl storage_controller_1 --type hdd --port 0 --device 0 --medium /data/centos6.vdi6.挂载虚拟光驱(这里将5创建好的虚拟磁盘挂载在虚拟机上,同时挂在一个虚拟光驱,加载ISO镜像文件。
如何在VirtualBox中使用U盘或者移动硬盘启动
如何在VirtualBox中使用U盘或者移动硬盘启动
如何在VirtualBox中使用U盘或者移动硬盘启动
VBOX可以很轻易地做到从HOST的光驱启动、从ISO启动、从虚拟硬盘启动等,但启动项里唯独没有从USB设备启动。
如果要用这个功能怎么办? 其实有个方法的。
大概的思路就是把整个USB设备做成一个虚拟硬盘,这里需要为它做个后缀名为vmdk的虚拟硬盘链接文件。
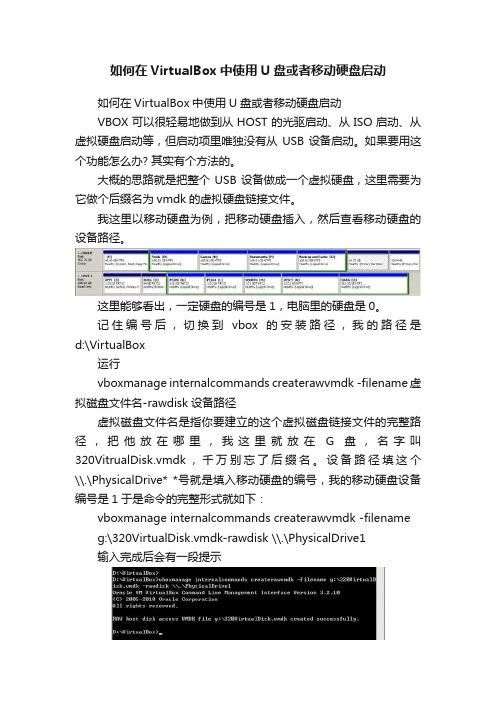
我这里以移动硬盘为例,把移动硬盘插入,然后查看移动硬盘的设备路径。
这里能够看出,一定硬盘的编号是1,电脑里的硬盘是0。
记住编号后,切换到vbox的安装路径,我的路径是d:\VirtualBox
运行
vboxmanage internalcommands createrawvmdk -filename虚拟磁盘文件名-rawdisk设备路径
虚拟磁盘文件名是指你要建立的这个虚拟磁盘链接文件的完整路径,把他放在哪里,我这里就放在G盘,名字叫320VitrualDisk.vmdk,千万别忘了后缀名。
设备路径填这个\\.\PhysicalDrive* *号就是填入移动硬盘的编号,我的移动硬盘设备编号是1于是命令的完整形式就如下:
vboxmanage internalcommands createrawvmdk -filename g:\320VirtualDisk.vmdk-rawdisk \\.\PhysicalDrive1
输入完成后会有一段提示
这样链接文件就创建好了
接下来在VBox的介质管理器里添加这个虚拟磁盘
最后把虚拟这个虚拟磁盘挂载到虚拟机里,注意,他的顺序要在虚拟机原来的磁盘前面才能从移动硬盘启动。
保存设置,虚拟机开机就可以从移动硬盘或者U盘启动了。
VirtualBOX使用U盘或者...
VirtualBOX使用U盘或者...问题重述:前段时间,我从家里带来了一块坏的硬盘,里面的数据还在,但是会间歇性不能识别,并且其中的系统损坏了。
今天我重新购买了sata to usb 的转接器和12v的电源,尝试修复一下磁盘;看看能不能重新启动。
但是我宿舍里只有一个电脑。
为了修复方便,我尝试从虚拟机直接从实体硬盘启动。
通过在网络上搜索,大致过程记录如下,防止下一次重新学习命令。
注1:本方法,还适用于电脑上有多块硬盘,而且每个硬盘里单独装了一个操作系统,并且操作系统引导是独立的。
这样我们可以在现有系统中,使用虚拟机启动另外一个硬盘上的系统。
注2:本方法,还适用于电脑上有多快硬盘,用户可以选择直接在实体硬盘里,使用虚拟机装系统,从而避免虚拟机直接写文件系统的硬盘文件带来的性能损失;这样使得虚拟机可以直接使用裸盘的性能。
解决方法:•在windows中通过磁盘管理,确定磁盘编号:cmd 中键入 diskmgmt 命令,可直接打开。
•使用管理员模式启动cmd,并通过命令创建虚拟磁盘:cd %programfiles%\Oracle\VirtualBox # 进入Virtual Box的安装位置,如果在其他地方,可自由替换。
VBoxManage internalcommands createrawvmdk -filename C:\SSD.vmdk -rawdisk \\.\PhysicalDrive1 # 1 为上述的磁盘编号; C:\SSD.vmdk 为创建的虚拟机可识别的位置;•使用管理模式启动VirtalBox, 并导入创建的虚拟硬盘;C:\SSD.vmdk•创建虚拟机,并选择使用已经存在的硬盘;SSD.vmdk•通过设置,设置虚拟机运行环境;并启动虚拟机,即可通过实体硬盘启动。
•如果实际的硬盘有坏道,可以通过DG进行修复:坏道检测与修复实际效果:我在实际测试过程中,使用的是我在另一块固态上安装的ubuntu 系统,并没有使用从家里带来的那块硬盘,因为那块硬盘存在数据损坏,系统一直蓝屏,书写此篇博客时,硬盘正在进行修复。
VirtualBox使用说明
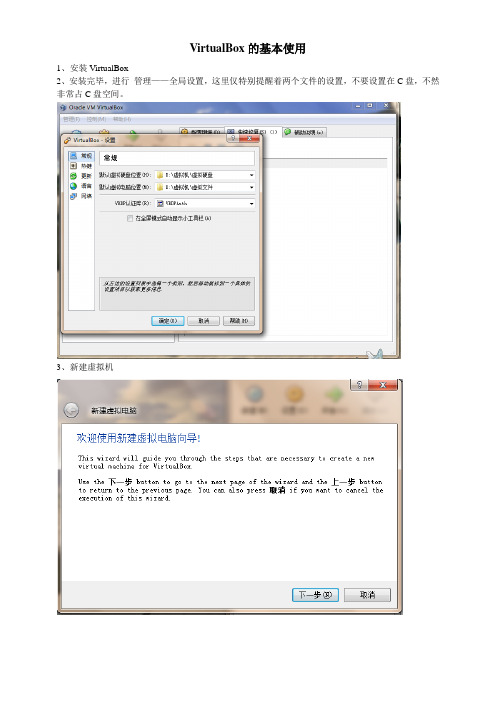
VirtualBox的基本使用
1、安装VirtualBox
2、安装完毕,进行管理——全局设置,这里仅特别提醒着两个文件的设置,不要设置在C盘,不然非常占C盘空间。
3、新建虚拟机
如果有安装光盘,放入光驱,选择物理光驱,或者从网上下载个系统ISO镜像(要使用纯净安装版才行啊,Ghost不可以)如下图
然后就可以安装系统了!
系统安装完毕后
问题
一、如何安装驱动?
安装问系统以后,设备——安装增强功能
这是一般会自动弹出向导,若没有,到我的电脑,打开光驱安装。
二、安装完系统后如何访问寄宿机?
1、用虚拟光驱访问,将文件用UltraISO制作成ISO压缩文件,通过设备——分配光驱——更多虚拟光盘。
这是虚拟机光驱中就存在了。
这种方法针对ISO文件还行,其他文件太费力。
不推荐!
2、通过分配USB设备的方法,即通过U盘转存。
不推荐!
3、通过虚拟空间,这种方法最好。
设备——分配数据空间
做完上述设置,然后在网上邻居右键——映射网络驱动器
选择刚才设置的虚拟空间就行了,这是在我的电脑中会多出一个盘符。
三、如何配置虚拟机的上网方式?
简要说一下,NAT方式与寄宿机使用同一IP,若在虚拟机中上网中毒,会通过网卡传到寄宿机,这种方式不安全。
而Brided adapter方式与主机完全独立,一般不会因虚拟机访问有毒网页而使主机中毒。
其他百度……
四、虚拟机备份
虚拟机备份非常快,还原也非常快,仅1秒时间,设置好备份点,永远不用担心虚拟机崩溃!反正1秒还原……。
虚拟机挂载U盘方法

图解:Linux虚拟机如何挂载U盘首先介绍一下我的环境,虚拟机版本是VMware Workstation 5.5.1,虚拟系统是redhat 9.0,内核版本是2.4.20-8 。
如果不清楚的话,可以用下面的命令查一下:# rpm -qa|grep kernel我看到的是如下界面:。
首先声明一下,我的U盘是FAT32文件系统。
为了使U盘中的中文文件可以正常显示。
首先要确认所用的Linux系统的locale(这个locale包括了系统使用的语言和字符的编码等信息)。
中文Linux 常用的locale是zh_CN.gb2312,zh_CN.gbk,zh_CN.gb18030 和 zh_CN.UTF-8 。
通过如下命令可以查询系统的locale:#echo $LANG可见,我所用系统的locale是zh_CN.gb18030 。
准备好,后续使用。
接下来,可以通过 #fdisk -l 命令查询虚拟机是否识别U盘了,如下:在这儿,可以看到,虚拟机系统并没有识别U盘。
有两种处理办法,如下:1)在主系统(我的是windows XP)中弹出U盘,点击虚拟系统界面,将活动光标置于虚拟系统中,此时再次插入U盘,可以看到主系统右下角弹出虚拟机识别U盘的消息提示,否则,重新上述操作,直到虚拟机识别U盘为止。
这种方法比较笨的,大家可以采取第二种方法,如下:2)在虚拟机界面的VM菜单选项中设置即可,如下:此时,可以看到XP系统右下角弹出安全退出USB设备的消息提示,说明U盘已被虚拟系统识别。
再次通过#fdisk -l命令确认虚拟系统是否识别U盘,如下:呵呵,虚拟系统终于认识到2G的U盘的存在了,并且给取名为 sdb1 。
2: 在/mnt目录下建立一个挂装USB存储器的目录,用下面的命令就可以创建:#mkdir /mnt/usb当然,你也可以取其他的名称,比如udisk等等,在这儿我设置其为usb。
再确认下吧:3: 一切准备工作已做好,终于可以将USB设备(/dev/sdb1)挂装到/mnt/usb目录下,用下面这个命令就可以了:mount命令格式:mount [-参数] [设备名称] [挂载点] [其他参数]mount -t vfat /dev/sdb1/ /mnt/usb -o iocharset=gb2312-t 指定设备的文件系统类型,在此,使用 -t vfat 是由于所使用U盘的文件系统类型是 fat32;如果是ntfs 则使用 -t ntfs 等等,大家可根据自己的文件系统类型灵活修改。
让virtualbox支持U盘启动
让virtualbox支持U盘启动让virtualbox支持U盘启动#进入命令行cmdcd C:\Program Files\Sun\xVM VirtualBox#获取磁盘信息(这个最关键)wmic /output:d:\diskdrive.html diskdrive list /format:htable #打开d:\diskdrive.html ,查看DeviceID栏,获取到你的U 盘DeviceID,如\\.\PHYSICALDRIVE1#获取磁盘分区信息(确认是哪个U盘)VBoxManage internalcommands listpartitions -rawdisk\\.\PHYSICALDRIVE1下面是我的U盘信息,8G的,显示7655MBNumber Type StartCHS EndCHS Size (MiB) Start (Sect)1 0x0b 0 /0 /45 975 /254/63 765544#为U盘创建启动文件VBoxManage internalcommands createrawvmdk -filename d:\UsbDisk.vmdk -rawdisk \\.\PHYSICALDRIVE1 -register #打开virtualbox-->设置-->硬盘-->添加连接(Ins)会找到刚才新建的UsbDisk.vmdk(如果没有自动找到,手工添加就可以了)#常规-->高级-->Boot Order-->硬盘,启动你的虚拟机,成功了!参考资料:virtualbox帮助文档9.9. Using a raw host hard disk from a guest9.9. Using a raw host hard disk from a guestStarting with version 1.4, as an alternative to using virtual disk images (as described in detail in Chapter 5, Virtual storage), VirtualBox can also present either entire physical hard disks or selected partitions thereof as virtual disks to virtual machines.With VirtualBox, this type of access is called "raw hard disk access"; it allows a guest operating system to access its virtual hard disk without going through the host OS file system. The actual performance difference for image files vs. raw disk varies greatly depending on the overhead of the host filesystem, whether dynamically growing images are used and on host OS caching strategies. The caching indirectly also affects other aspects such as failurebehavior, i.e. whether the virtual disk contains all data written before a host OS crash. Consult your host OS documentation for details on this.WarningRaw hard disk access is for expert users only. Incorrect use or use of an outdated configuration can lead to total loss of data on the physical disk. Most importantly, do not attempt to boot the partition with the currently running host operating system in a guest. This will lead to severe data corruption.Raw hard disk access -- both for entire disks and individual partitions -- is implemented as part of the VMDK image format support (see Section 5.4, “VMDK image files”). As a result, you will need to create a special VMDK image file which defines where the data will be stored. After creating such a special VMDK image, you can use it like a regular virtual disk image. For example, you can use the Virtual Disk Manager (Section 3.5,“The Virtual Disk Manager”) or VBoxManage to assign the image to a virtual machine. 9.9.1. Access to entire physical hard diskWhile this variant is the simplest to set up, you must beaware that this will give a guest operating system direct and full access to an entire physical disk. If your host operating system is also booted from this disk, please take special care to not access the partition from the guest at all. On the positive side, the physical disk can be repartitioned in arbitrary ways without having to recreate the image file that gives access to the raw disk.To create an image that represents an entire physical hard disk (which will not contain any actual data, as this will all be stored on the physical disk), on a Linux host, use the commandVBoxManage internalcommands createrawvmdk -filename /path/to/file.vmdk-rawdisk /dev/sdaThis creates the image /path/to/file.vmdk (must be absolute), and all data will be read and written from/dev/sda.On a Windows host, instead of the above device specification, use e.g. \\.\PhysicalDrive0.Creating the image requires read/write access for the given device. Read/write access is also later needed when using the image from a virtual machine.Just like with regular disk images, this does not automatically register the newly created image in the internal registry of hard disks. If you want this done automatically, add -register:VBoxManage internalcommands createrawvmdk -filename /path/to/file.vmdk-rawdisk /dev/sda -registerAfter registering, you can assign the newly created image to a virtual machine withVBoxManage modifyvm WindowsXP -hda/path/to/file.vmdkWhen this is done the selected virtual machine will boot from the specified physical disk.9.9.2. Access to individual physical hard disk partitions This "raw partition support" is quite similar to the "full hard disk" access described above. However, in this case, any partitioning information will be stored inside the VMDK image, so you can e.g. install a different boot loader in the virtual hard disk without affecting the host's partitioning information. While the guest will be able to see all partitions that exist on the physical disk, access will be filtered in that reading from partitions for which no accessis allowed the partitions will only yield zeroes, and all writes to them are ignored.To create a special image for raw partition support (which will contain a small amount of data, as already mentioned), on a Linux host, use the commandVBoxManage internalcommands createrawvmdk -filename /path/to/file.vmdk-rawdisk /dev/sda -partitions 1,5As you can see, the command is identical to the one for "full hard disk" access, except for the additional -partitions parameter. This example would create the image/path/to/file.vmdk (which, again, must be absolute), and partitions 1 and 5 of /dev/sda would be made accessible to the guest.VirtualBox uses the same partition numbering as your Linux host. As a result, the numbers given in the above example would refer to the first primary partition and the first logical drive in the extended partition, respectively.On a Windows host, instead of the above device specification, use e.g. \\.\PhysicalDrive0. Partition numbers are the same on Linux and Windows hosts.The numbers for the list of partitions can be taken from theoutput ofVBoxManage internalcommands listpartitions -rawdisk/dev/sdaThe output lists the partition types and sizes to give the user enough information to identify the partitions necessary for the guest.Images which give access to individual partitions are specific to a particular host disk setup. You cannot transfer these images to another host; also, whenever the host partitioning changes, the image must be recreated. Creating the image requires read/write access for the given device. Read/write access is also later needed when using the image from a virtual machine. If this is not feasible, there is a special variant for raw partition access (currently only available on Linux hosts) that avoids having to give the current user access to the entire disk. To set up such an image, useVBoxManage internalcommands createrawvmdk -filename /path/to/file.vmdk-rawdisk /dev/sda -partitions 1,5 -relativeWhen used from a virtual machine, the image will then refer not to the entire disk, but only to the individualpartitions (in the example /dev/sda1 and /dev/sda5). As a consequence, read/write access is only required for the affected partitions, not for the entire disk. During creation however, read-only access to the entire disk is required to obtain the partitioning information.In some configurations it may be necessary to change the MBR code of the created image, e.g. to replace the Linux boot loader that is used on the host by another boot loader. This allows e.g. the guest to boot directly to Windows, while the host boots Linux from the "same" disk. For this purpose the -mbr parameter is provided. It specifies a file name from which to take the MBR code. The partition table is not modified at all, so a MBR file from a system with totally different partitioning can be used. An example of this isVBoxManage internalcommands createrawvmdk -filename /path/to/file.vmdk-rawdisk /dev/sda -partitions 1,5 -mbr winxp.mbr The modified MBR will be stored inside the image, not on the host disk.For each of the above variants, you can register the resulting image for immediate use in VirtualBox by adding-register to the respective command line. The image will then immediately appear in the list of registered disk images. An example isVBoxManage internalcommands createrawvmdk -filename /path/to/file.vmdk-rawdisk /dev/sda -partitions 1,5 -relative -register which creates an image referring to individual partitions, and registers it when the image is successfully created.。
VirtualBox 虚拟机使用图文教程【系统安装+快照+文件共享+U盘读取】
VirtualBox 是一款开源虚拟机软件。
最早是由德国 Innotek 公司开发,由Sun Microsystems公司出品的软件,在 Sun 被 Oracle 收购后正式更名成 Oracle VM VirtualBox。
Innotek 以GNU General Public License (GPL) 释出VirtualBox,并提供二进制版本及OSE 版本的代码。
使用者可以在VirtualBox上安装并且执行Solaris、Windows、DOS、Linux、OS/2 Warp、BSD等系统作为客户端操作系统。
VirtualBox的最大优势是开源和免费,相对收费虚拟机VM Ware,功能稍少。
一、VirtualBox安装系统1、下载并安装VirtualBox:甲骨文开源虚拟机VirtualBox 4.1.8-75467 精简汉化增强版下载(含扩展包)2、打开VirtualBox,选择新建3、直接点下一步4、设置一个虚拟机名称,如果名称是Win7,下面的操作系统和版本会自动变为Win75、设置虚拟机内存建议不要太小,否则虚拟机会卡,但也不要太大,否则实机也会卡6、如果之前没用过,直接点击下一步7、按照你的需求选择磁盘类型,如果没有特殊需求,可以使用默认的VDI,如果有特殊需求,比如想创建一个VHD镜像,可以按需选择8、这里强烈建议选择固定大小,性能比动态要好一些,而且相对动态分配,长期使用更省硬盘空间9、设置虚拟机文件的安装位置和虚拟机硬盘的大小,Win7不要太小。
10、如果没有问题,直接点创建11、因为之前选择的是固定大小,会又一个创建硬盘的过程,我40G用了大概10分钟,如果之前选择的是动态分配,则没有本步骤12、如果没有问题,直接点创建13、虚拟机已经创建完毕,现在还没有系统,先安装系统,选中虚拟机,点上方的设置14、点击存储,选择主机驱动器,右侧点击光盘图标,点击弹出的,选择一个虚拟光盘文件15、添加一个ISO的系统安装镜像后,点击确定16、系统安装中,和在真实的电脑中安装系统是完全相同的二、安装Guest AdditionsGuest Addtions是一个安装增强工具,该工具的主要目的是使鼠标可以在真实机与虚拟机之间自由穿梭、自动根据VirtualBox窗口大小改变X尺寸等功能1、可以直接点设备中的“安装Guest Additions”,然后等一会,如果没有反应,可以点击CD/DVD设备,点击西安则一个虚拟光盘文件2、找到Virtualbox的安装目录,选择VBoxGuestAdditions.iso3、如果系统有自动播放,会弹出,直接点击运行,如果没有弹出,在计算机中点击光驱位置安装4、安装GuestAdditions5、安装完成后需要重启系统,重启后VBox GuestAdditions就安装成功了三、创建虚拟机快照快照相当于一个备份,可以快速恢复到创建快照时的状态,可以简单理解成GHOST,点一下,GHOST还原1、点击虚拟机-生成快照2、设置一个快照的名字,点击确定3、开始创建快照,VBOX的快照比VM要快,大概10秒左右就完成了4、恢复快照在Oracle VM VirtualBox管理器中点快照,可以看到创建的快照四、虚拟机和实机文件共享VBOX是通过共享文件夹的方式实现文件传送的,这个相对VMware直接拖拽麻烦了很多,而且共享文件也可能造成病毒木马的穿透感染1、点击设备--共享文件夹2、点击左侧的共享文件夹,右侧点击的加号3、点击文件夹路径,选择其它,然后选择一个你在实机中准备作为共享文件夹的目录,下面的设为永久如果你不想每次共享文件都添加一次,可以选择4、在虚拟机中打开计算机,点击上方的影射网络驱动器,在弹出的窗口选择浏览,右侧的网络稍等一会,选择刚才设置的共享文件夹5、在计算机后,就可以可能到刚才设置的映射共享文件夹了,想电脑的分区一样,可以直接打开6、在虚拟机中将文件放在这个分区中,实机也可以看到,相对,实机的文件,虚拟机中也可以看到五、读取U盘文件1、点击设备-USB设备,找到自己的U盘,点击一下,U盘会从实机中弹出,在虚拟机中显示,再点一次,会再次变成实机显示。
VirtualBox虚拟机使用说明(全)
Sun xVM VirtualBox虚拟机安装GHOST封装系统教程:大家好,最近忙得很,有几天没来论坛了。
今天空了。
写点东西给大家。
因为水平有限,不好的地方欢迎批评!写个Sun xVM VirtualBox虚拟机安装GHOST系统的教程,GHOST封装的系统现在装电脑的占多数,象一般电脑城或者电脑公司都用它安装系统。
因为安装速度快。
维护方便。
有好多朋友说这个虚拟机安装不上操作系统,我远程后发现,大部分人都是下载的GHOST封装的ISO光盘文件!针对这个虚拟机,直接常规的安装方法不可行。
大家按我的操作绝对可以装上。
因为好多朋友要ISO光盘文件,我这里给出地址,做了处理,文件太大537兆,论坛上传不了,请版主见谅,谢谢!文件太大,推荐使用迅雷/QQ旋风等下载工具下载!GHOST下载地址:/ghostxpsp3.iso(光驱带刻录功能的朋友可以刻盘备用!)虚拟机下载地址:/my/box/down/virtualbox-1.60-win_x86.rar此GHOST系统为我自己封装,优化,开机13个进程,内存占用90兆。
装了大部分办公软件及QQ,无广告迅雷,千千静听,优化大师,播放器及N多系统维护工具。
系统打全了至4月23日的全部补丁,正版序列号可在线升级!最好以后打补丁还是用360,安全可靠。
[本帖最后由000000老三520 于2009-5-14 20:50 编辑]01.jpg (25.08 KB)02.jpg (34.28 KB)03.jpg (48.36 KB)04.jpg (41.18 KB)05.jpg (28.63 KB)06.jpg (33.41 KB)07.jpg (93.14 KB)08.jpg (88.84 KB)09.jpg (69.95 KB)10.jpg (77.31 KB)11.jpg (73.09 KB)12.jpg (77.8 KB)13.jpg (71.67 KB)14.jpg (78.37 KB)15.jpg (84.72 KB)16.jpg (70.94 KB)17.jpg (72.98 KB)18.jpg (72.71 KB)19.jpg (64.95 KB)20.jpg (82.76 KB)21.jpg (67.99 KB)22.jpg (66.03 KB)23.jpg (72 KB)24.jpg (77.98 KB)25.jpg (68.2 KB)26.jpg (68.88 KB)27.jpg (66.86 KB)28.jpg (54.39 KB)29.jpg (116.6 KB)30.jpg (72.32 KB)31.jpg (71.32 KB)32.jpg (76.53 KB)33.jpg (67.45 KB)34.jpg (69.9 KB)35.jpg (88.32 KB)36.jpg (66.82 KB)37.jpg (124.6 KB)38.jpg (29.64 KB)39.jpg (80.75 KB)40.jpg (37.81 KB)41.jpg (122.5 KB)42.jpg (123.9 KB)43.jpg (100.38 KB)VirtualBox中实现与主机文件共享1.安装增强功能VirtualBox自带了一个增强工具Sun VirtualBox Guest Additions,这是实现虚拟机与真实主机共享的关键。
virtualbox支持usb网银的设置
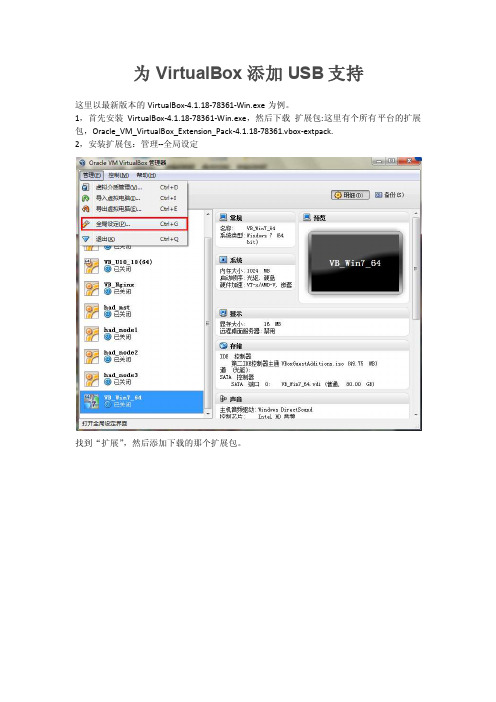
为VirtualBox添加USB支持这里以最新版本的VirtualBox-4.1.18-78361-Win.exe为例。
1,首先安装VirtualBox-4.1.18-78361-Win.exe,然后下载扩展包:这里有个所有平台的扩展包,Oracle_VM_VirtualBox_Extension_Pack-4.1.18-78361.vbox-extpack.2,安装扩展包:管理--全局设定找到“扩展”,然后添加下载的那个扩展包。
点击“确定”,此时就把扩展包安装完毕。
接着挂接usb设备,包括网银usb,usb启动盘等。
3,启动虚拟机,然后右下角,右键选择usb,接着宿主机会安装这个驱动,然后虚拟机也会安装驱动,都有小气泡提示:然后usb挂接成功,就能看到usb设备了。
4,如果是ubuntu,或其他linux系统,那么需要注意当前登录用户是否在vboxusers组里面。
原来VirtualBox在运行时不是以当前用户身份运行的,而是单独创建了一个叫做vboxusers 的用户组,而默认情况下你的当前用户是不在这个用户组里面的,VirtualBox也就没有访问USB设备的权限了。
在用户管理里面把当前用户添加到vboxusers用户组中,再启动VirtualBox,就能顺利使用USB设备了!参考:http://ichon.me/2010/11/19/virtualbox-usb-support.html5,如果要让某个虚拟机一启动就自动挂哪个usb设备,那么要在该虚拟机“设置”里面选择usb设备,就可以。
这样一起来就自动挂上了。
教你如何用WORD文档(2012-06-27 192246)转载▼标签:杂谈1. 问:WORD 里边怎样设置每页不同的页眉?如何使不同的章节显示的页眉不同?答:分节,每节可以设置不同的页眉。
文件――页面设置――版式――页眉和页脚――首页不同。
2. 问:请问word 中怎样让每一章用不同的页眉?怎么我现在只能用一个页眉,一改就全部改了?答:在插入分隔符里,选插入分节符,可以选连续的那个,然后下一页改页眉前,按一下“同前”钮,再做的改动就不影响前面的了。
在vbox虚拟机中设置u盘启动的方法
在vbox虚拟机中设置u盘启动的方法在vbox虚拟机中设置u盘启动的方法WinXP下运行vbox虚拟机,设置USB设备启动挺麻烦的,贴出设置过程,供新手使用。
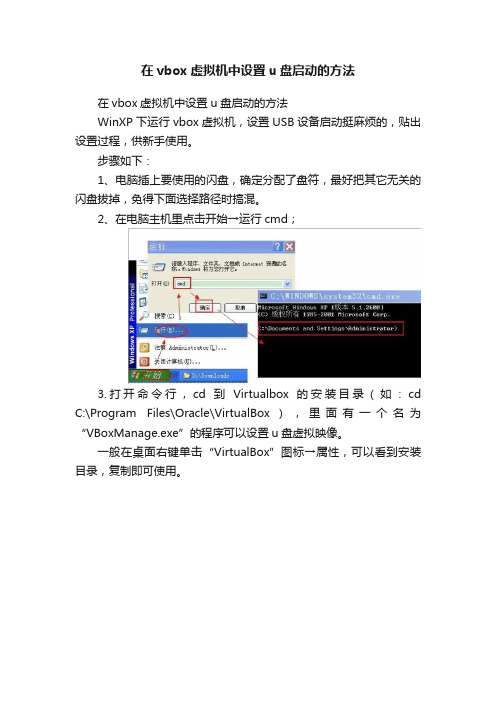
步骤如下:1、电脑插上要使用的闪盘,确定分配了盘符,最好把其它无关的闪盘拔掉,免得下面选择路径时搞混。
2、在电脑主机里点击开始→运行cmd;3.打开命令行,cd到Virtualbox的安装目录(如:cd C:\Program Files\Oracle\VirtualBox),里面有一个名为“VBoxManage.exe”的程序可以设置u盘虚拟映像。
一般在桌面右键单击“VirtualBox”图标→属性,可以看到安装目录,复制即可使用。
回车即可进入安装目录,如下图。
4、然后输入(复制右侧命令到提示符下回车即可,一个字符也不能差啊):VBoxManage internalcommands createrawvmdk -filename d:\localdisk.vmdk -rawdisk \\.\PhysicalDrive1解释:这是建立USB闪盘的虚拟磁盘镜像(磁盘镜像必须放在分区的根目录下,我的在d:\下),“d:\localdisk.vmdk”是镜像输出目录及文件。
一定要用绝对路径,“\\. \PhysicalDrive1”是物理磁盘,后面那个数字由0开始,我有1个硬盘,一个U盘,所以闪盘应是“\\.\PhysicalDrive1”,如果有两个硬盘,一个U盘,闪盘应是“\\.\PhysicalDrive2”。
(介绍一下用命令行获取u盘DeviceID的方法:①、如果不知道U盘的DeviceID是多少,可以通过下面的方法获取U盘DeviceID信息(这个最关键),输入命令:wmic /output:c:\diskdrive.html diskdrive list /format:htable②、接着打开c盘下的diskdrive.html文件,查看DeviceID栏,获取U盘DeviceID,如(有一块真实硬盘id为PhysicalDrive0,所以u盘为PhysicalDrive1,如果有2块硬盘,u盘为PhysicalDrive2)③、获取磁盘分区信息(确认是哪个U盘),输入命令:VBoxManage internalcommands listpartitions -rawdisk5.回车运行后,出现下面代码就代表成功了。
VirtualBox对虚拟机扩容,磁盘分区挂载

VirtualBox对虚拟机扩容,磁盘分区挂载
1.虚拟机关机,在设置⾥点击存储,添加控制器,这⾥为了⽅便在Windows系统下进⾏迁移选择VHD
VDI:专门为VirtualBox使⽤的虚拟磁盘
VHD:Windows环境的虚拟硬盘
VMDK:虚拟机之间通⽤的磁盘,可以移植到VMWare
2.启动虚拟机,查看现有磁盘
查看系统磁盘,Disk表⽰磁盘,Device表⽰分区,新增的 /dev/sdb 和 /dev/sdc还没有区分
fdisk -l
查看磁盘挂载情况
lsblk
sdb和sdc为新增的磁盘,现在还没有挂载
3.对sdb进⾏分区
分区命令
fdisk /dev/sdb
输⼊m查看帮助
输⼊n新建分区
输⼊p新建⼀个主分区,然后输⼊1分区名字变成sdb1,First sector和Last sector直接回车(只建⼀个分区,建多个分区不能回车)输⼊w写⼊分区表并退出
4.格式化分区
mkfs -t ext4 /dev/sdb1
5.挂载分区
创建docker⽂件夹
mkdir /root/docker
挂载
mount /dev/sdb1 /root/docker
查看挂载
lsblk
6.设置开机启动⾃动挂载
编辑/etc/fstab
vim /etc/fstab
在末尾加上
/dev/sdb1 /root/docker ext4 defaults 0 0 。
最新最全VirtulBox教程
最新最全VirtulBox教程Win8RP发布,小白们希望尝鲜,最好在虚拟机下安装,本文结合网上资料介绍VirtulBox的安装,供大家借鉴。
本教程以主机Win8RP,虚拟机Win7和ubuntu10.04,virtualbox4.1.16-78094讲解。
本教程包括以下几个方面的内容:一、virtualbox的安装二、新建一个虚拟机及给虚拟机装系统三、安装增强工具(以xp和ubuntu为例)四、实现u盘在主机与虚拟机中的自由切换五、实现主机与虚拟机的文件共享(以xp和ubuntu为例)六、虚拟机联网七、虚拟机的备份与克隆八、实现虚拟机从u盘启动及BIOS问题告读者:本人是一个菜鸟,只是爱好电脑。
有感于在使用Virtualbox的过程中遇到过不少问题,然后到网上去搜,发现网上讲Virtualbox的教程比较少且凌乱,所以结合网上资料及操作体会写下这篇教程,希望能帮到各位网友,让大家少走一点弯路。
为避免网友搜不到,本文以《最新最全的virtualbox教程》上传至百度文库。
-----------------------------------------------------------------------------------一、virtualbox的安装Virtualbox是一个开源软件,完全免费,官方网站:,推荐去官网下载最新版。
版本是Virtualbox4.1.16-78094注意:如果在安装过程中遇到“无法通过windows徽标测试。
”全部都选择:确定。
整个安装过程英文界面,跟其他软件安装过程差不多,注意一下安装目录,有警告直接无视就行。
警告直接无视掉。
安装完在虚拟机主界面左上角点击“管理”→“全局设定”,打开“Virtualbox-设置”界面,选中“语言”打开“界面语言”选中“简体中文(中国)”点击“确定”整个界面就成中文了。
如下图。
---------------------------------------------------------------------------------------二、新建一个虚拟机及给虚拟机装系统1)打开virtualbox,点击新建,出现新建虚拟向导后直接下一步2)给自己的虚拟电脑取个名字,并选择操作系统和版本。
VirtualBox简明使用教程
VirtualBox简明使⽤教程虚拟机⽐较有名的有VMware,Virtual PC,功能强⼤,但是要$,可能⼤家都曾经为找⼀个可⽤的key⽽抓狂吧。
我在这⾥要介绍的是VirtualBox,⼀款开源,体积⼩,更重要的是免费的虚拟机,其功能不会逊⾊于上⾯的“⼤牌”。
⼤家可以到去下载相应发⾏版的⼆进制包或者是源码包。
这⾥使⽤的是1.5.4的版本,主机HP520,系统Everest Linux 0.5。
========================================================================================================安装完成后,启动VirtualBox,我们可以看到⼀个简洁的界⾯。
⾸先要做的事情是新建⼀个虚拟机。
1---点击左上⾓的新建按钮,填写名称和选择虚拟机的类型,next;2---根据需要给虚拟机分配合适的内存,next;3---因为是第⼀次使⽤,所以我们要新建⼀个虚拟硬盘,在这⾥推荐固定⼤⼩映像,速度⽐较快;4---⼀直next。
=========================================================================================================新建后我们的虚拟机还是裸机,这时候要先装系统,先配置⼀下光驱。
在配置明细⾥,如果是从物理光驱启动就选择主机上的光驱,否则选择iso光盘镜像,然后选择镜像位置。
配置好后按启动,然后就会像真实的主机⼀样开始装系统。
如果是使⽤iso镜像安装的话,推荐在安装完后把光驱设置为物理光驱或者直接把光驱关掉,⼜或者在设置-->⾼级⾥更改启动顺序,把软驱和光驱的勾去掉,要不然每次都会先从光驱启动。
然后重启,怎样,成功了吧,这就是我们的虚拟机了^_^虚拟机和主机默认的切换键是右ctrl,全屏是右ctrl-f,你可以在虚拟机右上⾓的虚拟电脑看到更多的快捷键,当然你也可以在左上⾓的⽂件-->⾸选项⾥更改。
virtualBox_Ubuntu_挂载widows目录

摘要:
本文描述在Virtubox虚拟机中挂载windows文件夹的方法。
(实际上,通过下面的方法,也可以使虚拟机的分辨率变成自动适应虚拟机屏幕大小。
)
✧安装增强功能
1.启动虚拟机,点击[设备]—>[安装增强功能],此时在ubuntu桌面上会加载工具包镜像。
2.在虚拟机中启动终端,并进入该镜像目录。
一般为/media/cdrom0
3.运行VBoxLinuxAdditions-x86.run命令。
sudo sh VBoxLinuxAdditions-x86.run
4.安装后重启ubuntu。
安装增强功能之后,鼠标的焦点可以在虚拟机和主机之间随意切换了。
同时,虚拟机的分辨率变成自动适应虚拟机屏幕大小。
(这个和VMWare就一样了。
)
✧设置共享文件
首先在ubuntu这个虚拟操作系统界面上找到"设备"->"分配数据空间",添加你想共享的文件夹。
如下图所示:
✧挂载windows文件夹
1.cd /mnt
2.sudo mkdir android
3.sudo mount -t vboxsf android /mnt/android
注:vboxsf指的是virtual box的共享文件夹的意思;
android为刚才共享的文件夹名称。
这样,就可以直接访问虚拟机以外的文件夹了。
VirtualBox的版本是:V3.1.2。
- 1、下载文档前请自行甄别文档内容的完整性,平台不提供额外的编辑、内容补充、找答案等附加服务。
- 2、"仅部分预览"的文档,不可在线预览部分如存在完整性等问题,可反馈申请退款(可完整预览的文档不适用该条件!)。
- 3、如文档侵犯您的权益,请联系客服反馈,我们会尽快为您处理(人工客服工作时间:9:00-18:30)。
Virtualbox U盘挂载介绍
Virtualbox U盘挂载
为了让VirtualBox中的客户机可以挂载u盘,要进行以下设置。
在客户机的设置圣诞框中选USB,创建如下USB设备筛选器。
如果不安装Oracle_VM_VirtualBox_Extension_Pack是不可以用USB2.0控制器的,可以到VirtualBox网站上下载,很小才3M左右。
linux中virtualbox不能挂载u盘问题
如果如VirtualBox客户机挂载U盘中设置后,linux中还不能挂载u盘,而使用sudo启动virtualbox后里面的客户机可以挂载U盘,原因为普通用户没有使用USB设备权限。
让GUEST识别USB设备
最简单的办法如下:
$ sudo gedit /etc/fstab
在末尾加上
# the USB group
# 对所有用户开放USB设备的读写权限
none /proc/bus/usb usbfs devmode=666 0 0
然后就可以使用的USB设备了。
但是把USB设备的读写权限开放给所有用户的方式在一些情况下不太安全,更为稳妥的做法是:
增加用户组usbfs
$sudo groupadd usbfs
查看usbfs用户组的gid
$ cat /etc/group | grep usbfs
usbfs:x:1002:
把当前用户增加到usbfs组
$ sudo gedit /etc/group
把 usbfs:x:1002: 修改为 usbfs:x:1002:joson
为USB设备重新设置权限,编辑/etc/fstab文件,添加下面两行,
注意你的gid可能不是1002
$ sudo gedit /etc/fstab
在末尾加上
# 1002 is the USB group IDI
none /proc/bus/usb usbfs devgid=1002,devmode=774 0 0 重新启动后,应该就可以在客户机中使用USB设备了。
方法:插入一个USB设备后,如U盘、鼠标,右键点击虚拟机里右下脚的USB图标,选择已经识别的U盘,就可以正常使用了。
注意:在客户机里使用USB设备前要先在主机里卸载。
win7中virtualbox不能挂载u盘问题
如果如VirtualBox客户机挂载U盘中设置后,客户机还挂载不上u盘,就是程序运行权限问题。
右击VirtualBox图标,在弹出的对话框中选“兼容性”选项卡,选中“以管理员运行此程序”。
以后每次运行程序时都会以管理员的身份运行,就不会有权限问题了。
