华为S2300交换机调试教程
华为S2300交换机开局配置
华为S2300交换机开局配置一、设置用户登录口令,登录方式,设备名称进入配置模式sys设置名称sysname huawei设置Console登录密码user-interface con 0authentication-mode passwordset authentication password cipher huawei配置用于AAA方式登录的用户名和密码aaalocal-user hw password simple hwlocal-user hw privilege level 15配置系统为AAA方式登录user-interface vty 0 4authentication-mode aaa二、设置管理VLAN,设备IP地址,默认网关假设设备管理VLAN为99假设设备管理地址为172.16.0.5,掩码为255.255.255.0假设设备默认网关为172.16.0.1假设设备上行接口为第1个千兆GE光口,如:interface GigabitEthernet0/0/1配置管理VLANvlan batch 99配置管理地址interface Vlanif99ip address 172.16.0.5 255.255.255.0配置默认网关ip route-static 0.0.0.0 0.0.0.0 172.16.0.1配置管理VLAN的上行口interface GigabitEthernet0/0/1port link-type trunkport trunk allow-pass vlan 99三、业务开通,配置业务VLAN的上行接口和下行接口配置业务VLAN,假设分配的业务VLAN为VLAN 2501 to 2524 vlan batch 2501 to 2524配置业务VLAN的上行口interface GigabitEthernet0/0/1port link-type trunkport trunk allow-pass vlan 2501 to 2524配置业务VLAN的下行口,若直接接用户,则为ACCESS模式配置业务VLAN 2501 to 2524到端口1-4interface Ethernet0/0/1port link-type accessport default vlan 2501#interface Ethernet0/0/2port link-type accessport default vlan 2502#interface Ethernet0/0/3port link-type accessport default vlan 2503#interface Ethernet0/0/4port link-type accessport default vlan 2504四、保存配置并验证业务是否正确配置退出配置模式quit保存配置save以下为可选操作:重启设备,可以验证设备断电后是否丢失数据重启之前请确认数据是否已正确配置和保存reboot。
华为S2300交换机
一、配置学习:●如果要删除原先技术人员配置的数据:【1】reset save (删除配置文件vrpcfg)【2】reboot ●进入系统视图模式命令:system-view 、简打sys .●为设备重命名:sysname .●当前配置情况:display current-configuration 、简打dis cu .●进入以太网端口视图:interface Ethernet 1/0/1 简打int e1/0/1●设置端口访问模式:port link-type Access|Trunk|Hybrid●打开以太网端口:undo shutdown●关闭以太网端口:shutdown●退出当前视图模式:quit●查看当前配置文件:dis startup●设置管理telnet端口:【1】interface Vlan-interface 1 【2】ip address 10.10.10.80 255.255.255.0 ●配置telnet用户名和密码:【1】进入:user-interface vty 0 4 【2】设置登陆密码:set authenticationpassword simple(明文)或cipher(密文)*** 【3】配置telnet时候管理IP地址必须在路由器IP段中.【4】user privilege level 3 设置权限(最高3)或user privilege level 15 【5】idle-timeout5 设置登陆超时时间。
●启用系统防攻击功能:system-guard enable●设置上传限制为64kb/秒:line-rate inbound 512●设置下载限制为100kb/秒:line-rate outbound 1024●取消上传限制:ine-rate inbound●取消下载限制:undo line-rate outbound●创建VLAN 1:vlan 1●IP地址的DHCP分配:ip address dhcp-alloc●撤消启用HTTP服务:undo http server enable●增加端口到Vlan组:port GigabitEthernet 1/0/1 to 1/0/8●[switch-vlan2] port Ethernet 0/10 to Ethernet 0/12●查看vlan 1信息:dis vlan 1●隔离端口:port isolate●查看隔离组的信息:display isolate port●设置端口双工属性为自协商:duplux auto●设置以太网端口的速率:speed (10或100)●设置以太网端口的双工状态:duplex (full或half)注解:full –表示全双工.half –表示半双工状态..●显示交换机端口的详细配置信息:display ndp●显示版本信息:display version●修改特权用户密码:super password simple <password>二、端口和MAC地址绑定:●max mac 0●interface ethernet1/0/1●mac-address static 0000-0000-0001 interface e0/1 vlan 1●quit●save三、解除绑定●undo max mac 0●interface ethernet1/0/1●undo mac-address static 0000-0000-0001 interface e0/1 vlan 1。
华为S2300交换机配置现用图解
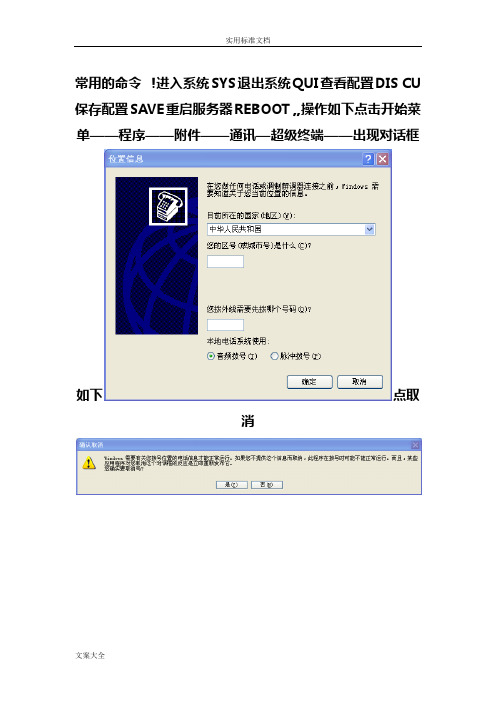
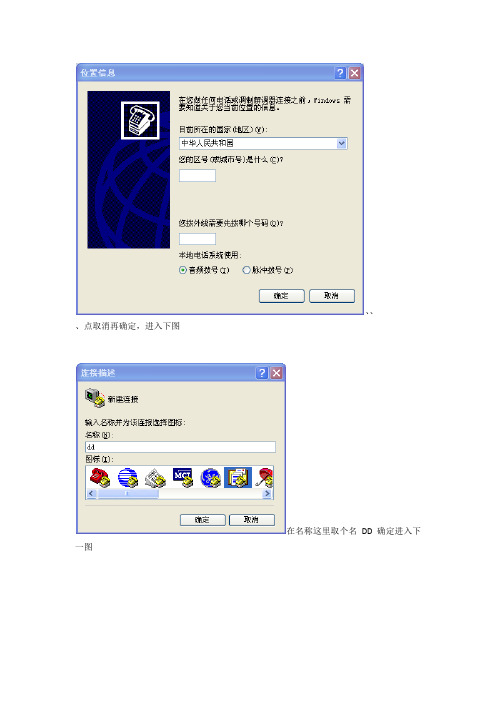
常用的命令!进入系统SYS退出系统QUI查看配置DIS CU 保存配置SAVE重启服务器REBOOT ,,操作如下点击开始菜单——程序——附件——通讯—超级终端——出现对话框如下点取消点是然后进入在名称这里取个名字,必须是英文点确定,出现对话框点取消再点是,,出现在连接时使用这边,用COM3,,或是。
点确定就可以进入超级终端,,进入终端后,一般先输入密码,没有密码,最好了,打SYS进入系统,在系统里面给交换机取个名字如;sysname WODEJIAOHUANJI.然后点Enter进入下一步,,设置VLAN、vlan batch 18 22对VLAN进行描述vlan 18 description cmnet {VLAN18说明,中国移动互联网} vlan 22 description boss {VLAN22描述为,连内网}‘准备华为交换机,数据配置线,用配置线把交换机连接到电脑,用超级终端打开,,,进入系统。
给交换机起名{必须是英文} sysname 名字、设置VLAN、vlan batch 18 22对VLAN 进行描述vlan 18 description cmnet {VLAN18说明,中国移动互联网} vlan 22 description boss {VLAN22描述为,连内网} 。
设置管理IP地址interface Vlanif22{接口vlanif22}、ip address 10.182.13.14 255.255.255.100{IP 地址10.182.13.14.255.255.255.100}、下一步我们设置交换机的端口、进入端口一、interface Ethernet0/0/1{以太网端口一}对端口一进行描述即port link-type trunk[端口链路类型,干线]就是总线的意思,内外网信号从这个端口进入交换机、、port trunk allow-pass vlan 18 21 to 22{意思是允许VLAN18VLAN22通过}第一个端口就设置好了、、、对第二个端口进行设置、、、interface Ethernet0/0/2、、、description to boss{描述端口连到内网}、、port link type access{端口链路类型,访问、、意思是端口属于独立网口,只允许一个VLAN通过只能通过内网或外网}、、、port default vlan 22{端口允许端口VLAN22通过,,意思是端口默认的是内网}。
Quidway路由器交换机使用手册
目录1、产品型号及功能特性 (3)1.2Quidway S3300系列以太网交换机(Quidway S3328TP-SI) (3)1。
3 Quidway S5300系列以太网交换机(Quidway S5352) (4)1.4 Quidway S9300 T比特路由交换机(Quidway S9303) (5)2、登录路由交换机、以太网交换机 (5)2.1通过Console 口进行本地登录 (5)2。
2通过Telnet 进行登录 (8)3、命令行操作 (13)3.1 命令视图 (13)3。
2 命令的级别 (15)3.3 使用命令行在线帮助 (16)3.4 编辑命令行 (17)3.5 改变命令行显示信息的语言 (18)3。
6 控制命令行的显示信息 (18)3.7 使用历史命令 (18)3。
8 快捷键 (18)4、用户界面配置 (19)4。
1支持的用户界面 (19)4。
2交换机用户界面编号 (19)4.3用户界面公共配置 (20)5、路由交换机、以太网交换机端口配置 (20)5.1以太网端口简介 (20)5.2 端口配置 (21)6、vlan配置 (28)6.1 VLAN 简介 (28)6.2 VLAN 配置 (29)7、IP地址配置 (31)7。
1 IP 地址简介 (31)7.2 IP 地址配置 (34)7.3 IP 地址的显示和调试 (35)8、IP路由协议配置 (35)8.1 IP 路由和路由表介绍 (35)8.2 静态路由配置 (37)8。
3 RIP 配置 (39)8.4 OSPF配置 (41)9、ACL配置 (44)9。
1 访问控制列表概述 (44)9.2 配置ACL (44)10、SNMP配置 (47)10.1 SNMP 协议介绍 (47)10。
2 配置SNMP (47)10.3 SNMP 显示和调试 (51)11、FTP与TFTP操作 (52)11。
1 FTP 配置 (52)11.2 TFTP 配置 (56)12、文件系统配置与配置文件管理 (58)12。
Quidway S2300 系列以太网交换机 快速入门(V100R006C00_02)
交换机S2300配置
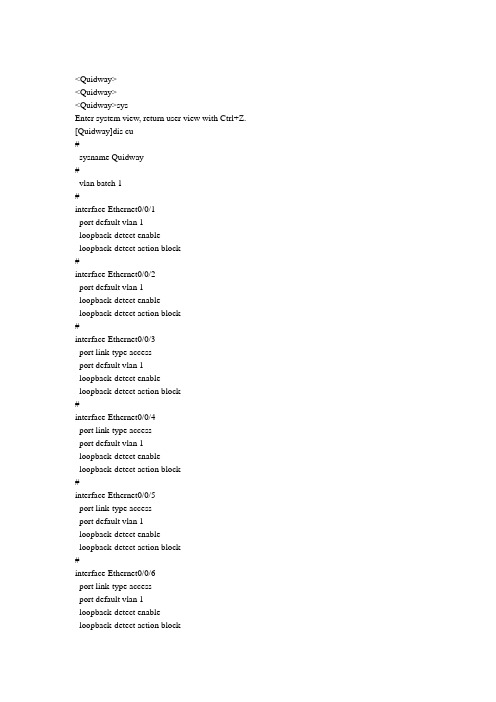
<Quidway><Quidway><Quidway>sysEnter system view, return user view with Ctrl+Z. [Quidway]dis cu#sysname Quidway#vlan batch 1#interface Ethernet0/0/1port default vlan 1loopback-detect enableloopback-detect action block#interface Ethernet0/0/2port default vlan 1loopback-detect enableloopback-detect action block#interface Ethernet0/0/3port link-type accessport default vlan 1loopback-detect enableloopback-detect action block#interface Ethernet0/0/4port link-type accessport default vlan 1loopback-detect enableloopback-detect action block#interface Ethernet0/0/5port link-type accessport default vlan 1loopback-detect enableloopback-detect action block#interface Ethernet0/0/6port link-type accessport default vlan 1loopback-detect enableloopback-detect action blockinterface Ethernet0/0/7port link-type accessport default vlan 1 loopback-detect enable loopback-detect action block #interface Ethernet0/0/8port link-type accessport default vlan 1 loopback-detect enable loopback-detect action block #interface Ethernet0/0/9port link-type accessport default vlan 1 loopback-detect enable loopback-detect action block #interface Ethernet0/0/10port link-type accessport default vlan 1 loopback-detect enable loopback-detect action block #interface Ethernet0/0/11port link-type accessport default vlan 1 loopback-detect enable loopback-detect action block #interface Ethernet0/0/12port link-type accessport default vlan 1 loopback-detect enable loopback-detect action block #interface Ethernet0/0/13port link-type accessport default vlan 1 loopback-detect enable loopback-detect action block #interface Ethernet0/0/14port link-type accessport default vlan 1 loopback-detect enable loopback-detect action block #interface Ethernet0/0/15port link-type accessport default vlan 1 loopback-detect enable loopback-detect action block #interface Ethernet0/0/16port link-type accessport default vlan 1 loopback-detect enable loopback-detect action block #interface Ethernet0/0/17port link-type accessport default vlan 1 loopback-detect enable loopback-detect action block #interface Ethernet0/0/18port link-type accessport default vlan 1 loopback-detect enable loopback-detect action block #interface Ethernet0/0/19port link-type accessport default vlan 1 loopback-detect enable loopback-detect action block #interface Ethernet0/0/20port link-type accessport default vlan 1 loopback-detect enable loopback-detect action block #interface Ethernet0/0/21port link-type accessport default vlan 1loopback-detect enable loopback-detect action block #interface Ethernet0/0/22port link-type accessport default vlan 1 loopback-detect enable loopback-detect action block #interface Ethernet0/0/23port link-type accessport default vlan 1 loopback-detect enable loopback-detect action block #interface Ethernet0/0/24port link-type accessport default vlan 1 loopback-detect enable loopback-detect action block #interface Ethernet0/0/25port default vlan 1 loopback-detect enable loopback-detect action block #interface Ethernet0/0/26port default vlan 1 loopback-detect enable loopback-detect action block #interface NULL0#aaaauthentication-scheme default #authorization-scheme default #accounting-scheme default#domain default##user-interface con 0user-interface vty 0 4 #return[Quidway] [Quidway] [Quidway] [Quidway] [Quidway] [Quidway] [Quidway] [Quidway]sys。
华为交换机配置
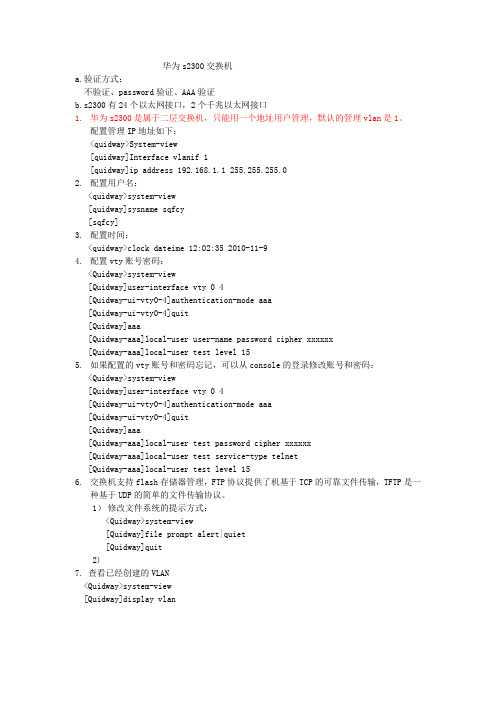
华为s2300交换机a.验证方式:不验证、password验证、AAA验证b.s2300有24个以太网接口,2个千兆以太网接口1.华为s2300是属于二层交换机,只能用一个地址用户管理,默认的管理vlan是1。
配置管理IP地址如下:<quidway>System-view[quidway]Interface vlanif 1[quidway]ip address 192.168.1.1 255.255.255.02.配置用户名:<quidway>system-view[quidway]sysname sqfcy[sqfcy]3.配置时间:<quidway>clock dateime 12:02:35 2010-11-94.配置vty账号密码:<Quidway>system-view[Quidway]user-interface vty 0 4[Quidway-ui-vty0-4]authentication-mode aaa[Quidway-ui-vty0-4]quit[Quidway]aaa[Quidway-aaa]local-user user-name password cipher xxxxxx[Quidway-aaa]local-user test level 155.如果配置的vty账号和密码忘记,可以从console的登录修改账号和密码:<Quidway>system-view[Quidway]user-interface vty 0 4[Quidway-ui-vty0-4]authentication-mode aaa[Quidway-ui-vty0-4]quit[Quidway]aaa[Quidway-aaa]local-user test password cipher xxxxxx[Quidway-aaa]local-user test service-type telnet[Quidway-aaa]local-user test level 156.交换机支持flash存储器管理,FTP协议提供了机基于TCP的可靠文件传输,TFTP是一种基于UDP的简单的文件传输协议。
华为s2000交换机配置过程
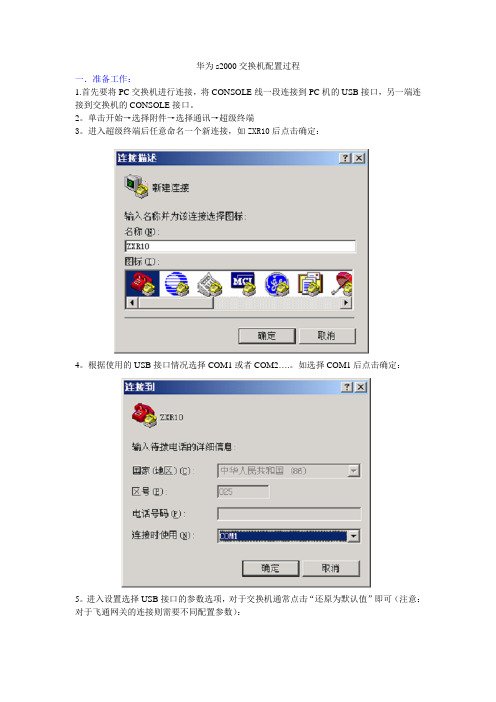
华为s2000交换机配置过程一.准备工作:1.首先要将PC交换机进行连接,将CONSOLE线一段连接到PC机的USB接口,另一端连接到交换机的CONSOLE接口。
2。
单击开始→选择附件→选择通讯→超级终端3。
进入超级终端后任意命名一个新连接,如ZXR10后点击确定:4。
根据使用的USB接口情况选择COM1或者COM2….。
如选择COM1后点击确定:5。
进入设置选择USB接口的参数选项,对于交换机通常点击“还原为默认值”即可(注意:对于飞通网关的连接则需要不同配置参数):6.在完成上述操作后点击确定,等待一定时间即可进入交换机配置模式.二.更改系统用户名:第一次进入华为s2000交换机的时候不存在默认密码,如果以后要使用TELNET功能就必须在进入系统时进行设置,否则无法进入。
与中兴系列相比,s2000进入时不需要用户名和密码.<Quidway〉system-view//进入管理员权限[Quidway]sysname dfjy //将系统的用户名更改为dfjy三。
端口控制及运行信息显示:[dfjy]interface Ethernet0/1 //进入0/1端口[dfjy—Ethernet0/1]description trunk //将端口描述为trunk[dfjy-Ethernet0/1]duplex auto/full/half //设置端口工作模式为自动、全双工,半双工[dfjy—Ethernet0/1]speed 10/100/100/1000/auto //端口限速为10/100/1000/自动协商模式[dfjy]display current-configuration//显示运行信息四.创建vlan:什么是vlan:vlan是一种将物理网络划分成多个逻辑(虚拟)局域网(LAN)的技术。
每个VLAN 都有一个VLAN 标识(VID). 利用VLAN 技术,网络管理者能够根据实际应用需要,把同一物理局域网中的用户逻辑划分成不同的广播域(每个广播域即一个VLAN),使具有相同需求的用户处于同一广播域,不同需求的用户处于不同的广播域. 每个VLAN 在逻辑上就像一个独立的局域网,与物理上形成的LAN 有相同的属性。
华为S2300交换机配置图解Word 文档
、、、点取消再确定,进入下图在名称这里取个名DD确定进入下一图点取消再选是。
进入下图在连接时使用,这里选择一个模式,,点确定进入下图选还原默认值确定进入下图。
系统界面输入SYS进入系统进行设置给系统娶个名字必须是英文呀如sysname jiaohuanji进入下一步,设置VLAN。
我这边有两个VLAN,一个内网一个外网,命名为vlan22和vlan18vlan名必须和上端的基站vlan 名一致,,你们那边用的vlan名跟我们不同吧!!vlan batch 18 22{意思是VLAN22和VLAN18}如下图然后对VLAN22VLAN18进行描述vlan 18description cmnet 【vlan18描述到中国移动互联网】vlan 22description boss 【vlan22描述到内网,办公网】如下图输入qui退出vlan22,18的设置后,下一步设置管理ip远程管理也能用上interface Vlanif22ip address 10.186.69.194 255.255.255.128 意思为{管理ip为10.186.69.194 255.。
}如下图下一步我们设置交换机的端口,,我这边是八口交换机interface Ethernet0/0/1 【以太网接口1】port link-type trunk 【属于窗口模式,就是总线口,】port trunk allow-pass vlan 18 21 to 22 【默认允许vlan18,21vlan22通过,vlan21也是个外网,】。
如下图第二个端口我们把它设置为内网vlan22吧;;interface Ethernet0/0/2 接口2description to boss [ 描述连到内网]port link-type access 【属于独立网口,只允许一个VLAN 内网通过】port default vlan 22 [默认的是vlan22]如下图。
华为S2300交换机调试教程
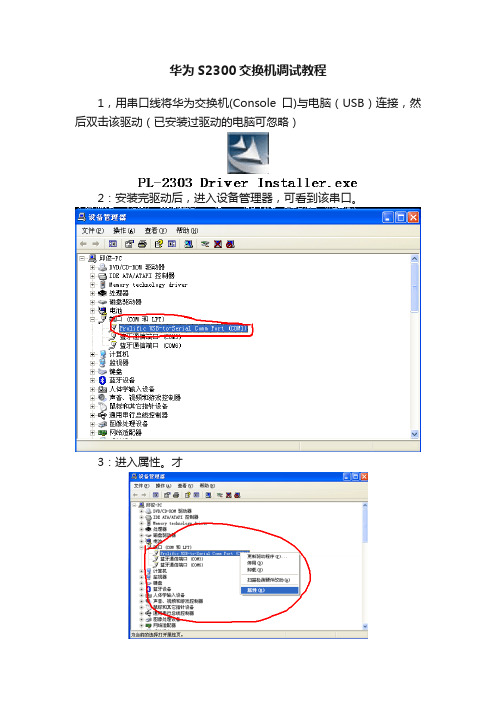
华为S2300交换机调试教程1,用串口线将华为交换机(Console口)与电脑(USB)连接,然后双击该驱动(已安装过驱动的电脑可忽略)2:安装完驱动后,进入设备管理器,可看到该串口。
3:进入属性。
才4:注意红框的内容与图中一致,然后确定。
5:注意红框的内容与图中一致,然后确定。
6:单击超级终端。
7:名字随便取,然后确定。
8: 注意红框的内容与图中一致,然后确定。
9:注意红框的内容与图中一致,然后确定。
黄色背景是要求输入的内容(123是我假设的vlan,请输入每个站点实际的vlan )SYEnter system view, return user view with Ctrl+Z.[Quidway]vlan batch 123Info: This operation may take a few seconds. Please wait for a moment...done.[Quidway]interface Ethernet0/0/1 (上行端口设置)[Quidway-Ethernet0/0/1]port link-type trunk[Quidway-Ethernet0/0/1]port trunk allow-pass vlan 123[Quidway-Ethernet0/0/1]q[Quidway]interface Ethernet0/0/2 (下行端口设置)[Quidway-Ethernet0/0/2]port link-type access[Quidway-Ethernet0/0/2]port default vlan 123[Quidway-Ethernet0/0/2]q………………(中间过程省略,有多少个端口就要设置多少次)[Quidway]interface Ethernet0/0/8 (下行端口设置)[Quidway-Ethernet0/0/8]port link-type access[Quidway-Ethernet0/0/8]port default vlan 123[Quidway-Ethernet0/0/8]q[Quidway]qsaveThe current configuration will be written to the device.Are you sure to continue?[Y/N]YInfo: Please input the file name(*.cfg,*.zip)[vrpcfg.zip]:123.zip Now saving the current configuration to the slot 0 .Info: Save the configuration successfully.OK。
华为2300系列交换机配置命令

[Quidway]sysname 交换机命名
[Quidway]interface ethernet 0/1 进入接口视图
[Quidway]interface vlan x 进入接口视图
[Quidway-Vlan-interfacex]ip address 10.65.1.1 255.255.0.0
[Quidway]stp root {primary|secondary} 设置交换机为根或根的备份
[Quidway-Ethernet0/1]stp cost 200 设置交换机端口的花费
[SwitchA-vlanx]isolate-user-vlan enable 设置主vlan
[SwitchA]Isolate-user-vlan secondary 设置主vlan包括的子vlan
如果包的vlan id与PVId一致,则去掉vlan信息. 默认PVID=1。
所以设置PVID为所属vlan id, 设置可以互通的vlan为untagged.
端口聚合配置命令
[Quidway]link-aggregation ethernet 0/7 to ethernet 0/10 {ingress|both} 配置端口聚合
[S3026-ui-vty0-4]user privilege level 3
[Quidway-Ethernet0/1]duplex {half|full|auto} 配置端口双工工作状态
[Quidway-Ethernet0/1端口工作速率
[Quidway-Ethernet0/1]flow-control 配置端口流控
华为Quidway S2300系列交换机产品规格说明书
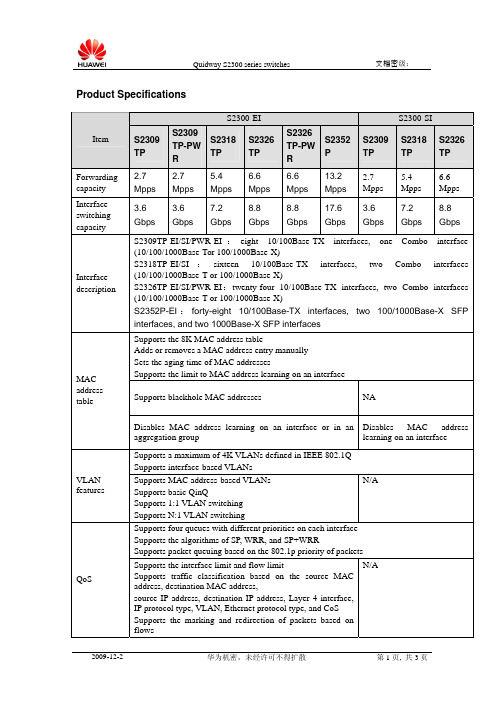
Product SpecificationsS2300-EI S2300-SIItem S2309TP S2309TP-PWRS2318TPS2326TPS2326TP-PWRS2352PS2309TPS2318TPS2326TPForwarding capacity 2.7Mpps2.7Mpps5.4Mpps6.6Mpps6.6Mpps13.2Mpps2.7Mpps5.4Mpps6.6MppsInterface switching capacity 3.6Gbps3.6Gbps7.2Gbps8.8Gbps8.8Gbps17.6Gbps3.6Gbps7.2Gbps8.8GbpsInterface description S2309TP-EI/SI/PWR-EI:eight 10/100Base-TX interfaces, one Combo interface (10/100/1000Base-Tor 100/1000Base-X)S2318TP-EI/SI:sixteen 10/100Base-TX interfaces, two Combo interfaces (10/100/1000Base-T or 100/1000Base-X)S2326TP-EI/SI/PWR-EI:twenty-four 10/100Base-TX interfaces, two Combo interfaces (10/100/1000Base-T or 100/1000Base-X)S2352P-EI:forty-eight 10/100Base-TX interfaces, two 100/1000Base-X SFP interfaces, and two 1000Base-X SFP interfacesSupports the 8K MAC address tableAdds or removes a MAC address entry manuallySets the aging time of MAC addressesSupports the limit to MAC address learning on an interfaceSupports blackhole MAC addresses NAMAC address tableDisables MAC address learning on an interface or in an aggregation group Disables MAC address learning on an interfaceSupports a maximum of 4K VLANs defined in IEEE 802.1Q Supports interface-based VLANsVLAN features Supports MAC address-based VLANsSupports basic QinQSupports 1:1 VLAN switchingSupports N:1 VLAN switchingN/ASupports four queues with different priorities on each interface Supports the algorithms of SP, WRR, and SP+WRRSupports packet queuing based on the 802.1p priority of packetsQoS Supports the interface limit and flow limitSupports traffic classification based on the source MAC address, destination MAC address,source IP address, destination IP address, Layer 4 interface,IP protocol type, VLAN, Ethernet protocol type, and CoS Supports the marking and redirection of packets based on flowsN/AS2300-EI S2300-SIItem S2309TP S2309TP-PWRS2318TPS2326TPS2326TP-PWRS2352PS2309TPS2318TPS2326TPMulticast Supports IGMPv1/v2/v3 snoopingSupports multicast load balancing on trunk interfacesLimits the rate of multicast packets and collects traffic statistics on interfaces Supports IPv6 hostsConfigures static routesIPv6 featuresSupports IPv6 ACLsSupports MLD snoopingNA Supports 1:1 mirroring or N:1 interface mirroringInterfacemirroring Supports flow mirroring N/A Supports IEEE 802.1x and limits the maximum number ofusers on each portSupports dynamic ARP inspectionSupports IP source guardN/ANetwork security Supports AAA authentication such as RADIUS authentication and HWTACACS+ authenticationSupports the binding of the IP address, MAC address, and interfaceSupports the interface limitSupports interface isolation and securitySupports packet filteringSupports MAC address filteringSupports suppression of multicast, broadcast, and unknown unicast packetsLimits the number of learnt MAC addressesSupports CPU protectionLightning protection All service interfaces support 6 KV lightning protection or even 15 KV lightning protection if additional lightning arresters are installedManagement Supports the automatic configuration Configures command lines Supports the configuration of Telnet Supports SNMPv1/v2/v3 Supports RMONSupports HGMPv2Supports SSHv2Support WEB NMSEnvironmentalrequirementsTemperature: 0°C to 50°C Relative humidity: 10% to 90% (non-condensing)Power supply AC:Rated voltage: 100 V to 240 V AC; 50/60 Hz Maximum voltage: 90 V to 264 V AC; 50/60 HzS2300-EIS2300-SI ItemS2309TPS2309TP-PW RS2318TPS2326TPS2326TP-PW RS2352PS2309TPS2318TPS2326TPDC:Rated voltage: –48 V to –60 V DC Maximum voltage: –36 V to –72 V DCN/ADimensions (width x depth x height))S2309TP-EI/SI :250×180×43.6 S2309TP-PWR-EI :320x220x43.6S2318TP-EI/SI,S2326TP-EI/SI :442×220×43.6 S2326TP-PWR-EI :442×420 ×43.6 S2352P-EI :442×220×43.6Weight<1.4kg <2.5kg <2.4kg <2.4kg <4kg (exclusi ve of thepower supply module )<3kg <1.4kg <2.4kg <2.4kgPowerconsumption>7.5W 154W Output PoE power supply: 124W >8.2W >8.6W 160W Output PoEpower supply:124W>20W >7.5W >9W >7.8W。
华为S2300配置手册(配置实例)
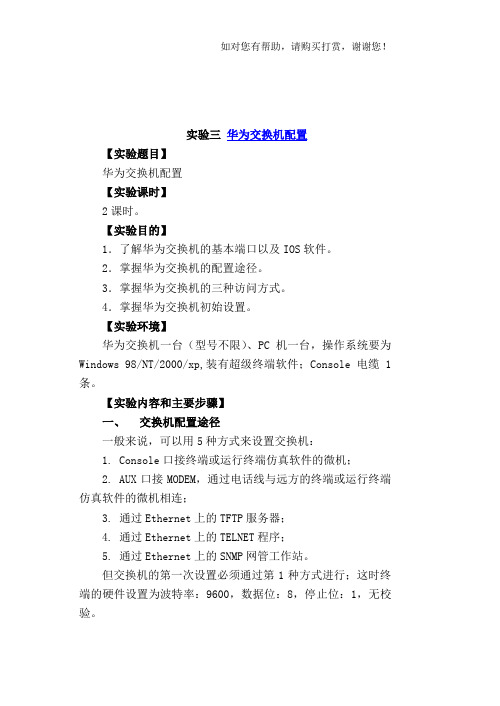
实验三华为交换机配置【实验题目】华为交换机配置【实验课时】2课时。
【实验目的】1.了解华为交换机的基本端口以及IOS软件。
2.掌握华为交换机的配置途径。
3.掌握华为交换机的三种访问方式。
4.掌握华为交换机初始设置。
【实验环境】华为交换机一台(型号不限)、PC机一台,操作系统要为Windows 98/NT/2000/xp,装有超级终端软件;Console 电缆1条。
【实验内容和主要步骤】一、交换机配置途径一般来说,可以用5种方式来设置交换机:1.Console口接终端或运行终端仿真软件的微机;2.AUX口接MODEM,通过电话线与远方的终端或运行终端仿真软件的微机相连;3.通过Ethernet上的TFTP服务器;4.通过Ethernet上的TELNET程序;5.通过Ethernet上的SNMP网管工作站。
但交换机的第一次设置必须通过第1种方式进行;这时终端的硬件设置为波特率:9600,数据位:8,停止位:1,无校验。
二、交换机的几种基本访问模式:一台新交换机开机时自动进入的状态,这时可通过对话方式对交换机进行设置。
利用设置对话过程可以避免手工输入命令的烦琐,但它还不能完全代替手工设置,一些特殊的设置还必须通过手工输入的方式完成。
进入设置对话过程后,交换机首先会显示一些提示信息,华为交换机基本配置过程一:交换机基本配置:1.进入2403交换机,进入用户模式。
2.在命令提示符“>”下,键入“system-view”并回车。
3.键入“display courrent-config”,察看当前配置情况,注意这是缺省值。
(有可能是display courrent-config,因为版本不一)。
4.键入“display version”参看交换机上IOS版本。
5.设置2403交换机名称,使用“sysname”命令(也有可能是hostname命令)。
如:Hostname 2403A(此交换机名为2403A)。
Quidway S2300系列以太网交换机 配置指南-IP组播(V100R003_02)
Quidway S2300 系列以太网交换机 配置指南-IP 组播
目录
目录
前 言.....................................................................................................................................................1
1.2 使能 IGMP Snooping......................................................................................................................................1-2 1.2.1 建立配置任务........................................................................................................................................1-3 1.2.2 使能 S-switch 的 IGMP Snooping 功能................................................................................................1-3 1.2.3 使能 VLAN 的 IGMP Snooping 功能..................................................................................................1-4 1.2.4 (可选)配置接口静态加入组播组....................................................................................................1-4 1.2.5 (可选)配置接口成为静态路由器接口............................................................................................1-5 1.2.6 (可选)使能 IGMP Snooping Proxy 功能.........................................................................................1-5 1.2.7 检查配置结果........................................................................................................................................1-5
S2300&S3300 V100R006C03 版本说明书
主机软件
无
BootROM 主系 S2300EI-bootrom.bin
无
统软件
Web 网管软件 S2300EI-V100R006C03.001.web.zi 无 p
文档版本 01 (2012-06-30)
华为专有和保密信息
1
1
版权所有 © 华为技术有限公司
目录
目录
1 版本配套说明.................................................................................................................................. 1
1.1 产品版本信息................................................................................................................................................. 1 1.2 软件版本配套说明 ......................................................................................................................................... 1 1.3 单板版本配套说明 ......................................................................................................................................... 3
S2300、S2200系列交换机配置说明
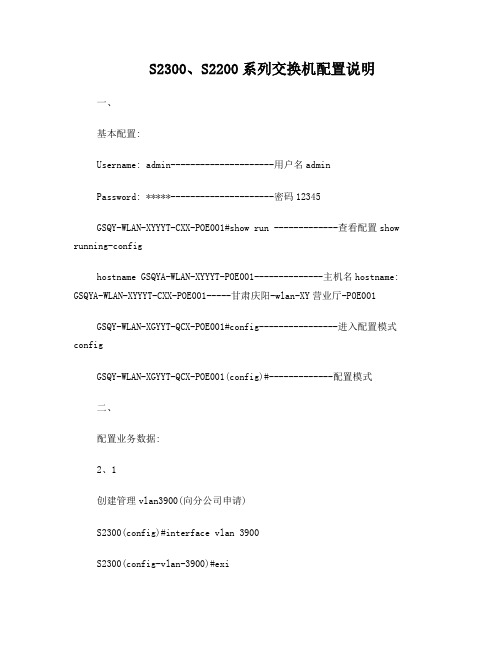
S2300、S2200系列交换机配置说明一、基本配置:Username: admin---------------------用户名adminPassword: *****---------------------密码12345GSQY-WLAN-XYYYT-CXX-POE001#show run -------------查看配置show running-confighostname GSQYA-WLAN-XYYYT-POE001--------------主机名hostname: GSQYA-WLAN-XYYYT-CXX-POE001-----甘肃庆阳-wlan-XY营业厅-POE001GSQY-WLAN-XGYYT-QCX-POE001#config----------------进入配置模式configGSQY-WLAN-XGYYT-QCX-POE001(config)#-------------配置模式二、配置业务数据:2、1创建管理vlan3900(向分公司申请)S2300(config)#interface vlan 3900S2300(config-vlan-3900)#exiS2300(config)#2、2交换机下联口(1-24)fastethernet情况:S2300(config)#interface fastethernet 1/1-----------------------------------进入下联口1口S2300(config-fe1/1)#join vlan 3900 untagged -----------------加入管理Vlan 3900,且untaggedS2300(config-fe1/1)#pvid 3900------------------------------------1口加入pvid 3900S2300(config-fe1/1)#pse enable -----------------------------------打开1口的供电S2300(config-fe1/1)#no shutdown -----------------------------------启用1口S2300(config-fe1/1)#exi------------------------------------------------从1口退出S2300(config)#interface fastethernet 1/2----------------------------------进入下联口2口S2300(config-fe1/2)#join vlan 3900 untagged -----------------加入管理Vlan 3900,且untaggedS2300(config-fe1/2)#pvid 3900 ------------------------------------2口加入pvid 3900S2300(config-fe1/2)#pse enable -----------------------------------打开2口的供电S2300(config-fe1/2)#no shutdown -----------------------------------启用2口S2300(config-fe1/2)#exi-----------------------------------------------从2口退出S2300(config)#==========================以上部分是给1,2口加的数据==========================2300系列交换机有1-24个下联口,每个下联口都重复一遍交换机上联口(25-28)gigaethernet情况:S2300(config)#interface gigaethernet 1/25---------------------------------进入上联口25口S2300(config-ge1/25)#join vlan 3900 tagged----------------加入管理Vlan 3900,且taggedS2300(config-ge1/25)#pvid 3900 -----------------------------------25口加入pvid 3900S2300(config-ge1/25)#no shutdown -----------------------------------启用25口S2300(config-ge1/25)#exi----------------------------------------------从25口退出S2300(config)#==========================以上部分是给25口加的数据==========================2300系列交换机有25-28个上联口,每个上联口都重复一遍三、网管信息:----------所有交换机都一样snmp community GS#POE rw view internetsnmp trap-server 218.203.155.42 162 GS#POE v2snmp trap-server 218.203.165.39 162 GS#POE v2snmp enable四、添加管理地址interface vlAN 3900ip address 172.16.216.180 255.255.252.0quitip route 0.0.0.0 0.0.0.0 172.16.216.1五、常用命令退出:exit或quite或end保存:write file---------y-----------reboot重启erase startup-config---------清除所有数据,重启后生效六、AP运行状态:只有三种方法可以判断:1、AC上看是run还是quite2、查看AP标签上的mac addr 00-26-7a-XX-XX-XX,然后用软件查看是否能收到这个mac地址的信号3、看AP内部指示灯的状态:兰灯常亮就正常;红兰闪烁不正常七、错误判断AP状态的方法:1、交换机上能看到AP的mac地址2、交换机接口灯亮或闪烁3、AP的LAN口灯亮或闪烁八、AP退服的常见原因:1、传输不通,93或交换机vlan没做或做错2、网线不通,网线供电不足,数据传输误码率高3、交换机或AP挂死,需要重启交换机或AP4、换交换机或AP后,交换机没做数据或AC上没替换AP的数据-------------只有当AC上有AP的上报信息时,才能说明AC下联的所有设备正常,且传输链路正常!此时AP才具备上线的必要条件!九、S2200系列交换机的脚本configinterface ethernet 1pse enableQuitinterface ethernet 2pse enablequitinterface ethernet 3pse enablequitinterface vlan 3843member 1-10 untaggedmember 9-10 taggedapply-as-pvid 1-10quitsystemmanagement vlan 3843ip address 172.16.216.41/22gateway 172.16.216.1quitsnmp community GS#POE rwsnmp trap-server 218.203.165.39 GS#POE v2 quit write fileyreboot。
华为交换机s2300的telnet配置
华为交换机s2300的telnet配置华为交换机s2300的telnet配置连接console 口:sys[Quidway]interface vlanif 1 进入到vlan 1[Quidway-Vlanif1]ip address 你的网段ip 你的掩码设置ip:我的例子:ip address 192.168.0.200 255.255.255.0上述设置很重要,搞不好绝对上不了!设完ip后,用xp的cmd telnet 192.168.0.200得到下面画面:************************************************************ All rights reserved (2005-2008) ** Without the owner's prior written consent, ** no decompiling or reverse-engineering shall be allowed. * * Notice: ** This is a private communication system. ** Unauthorized access or use may lead to prosecution. ********************************************************Warning:Login password has not been set!失去了跟主机的连接。
上面的信息说明,ip设置正确,只是telnet用户没有设置!下面设用户:[Quidway]user-interface maximum-vty 5 进入用户界面视图[Quidway]telnet server en 因为是V5平台。
所以要开启telnet 服务,如果是V0-4平台则默认开启telnet服务。
[Quidway]user-interface vty 0 4 设置用户从VTY 0 - 4用户界面登录[Quidway-ui-vty0-4]shell 开启终端服务功能。
华为交换机s2300设置
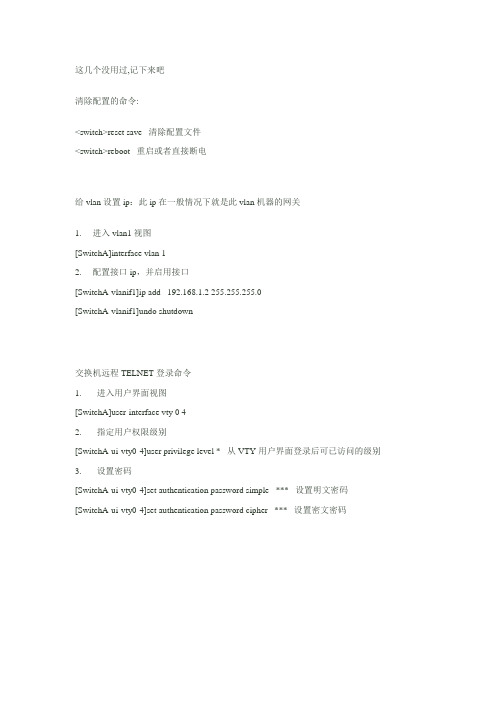
这几个没用过,记下来吧清除配置的命令:<switch>reset save 清除配置文件<switch>reboot 重启或者直接断电给vlan设置ip:此ip在一般情况下就是此vlan机器的网关1. 进入vlan1视图[SwitchA]interface vlan 12. 配置接口ip,并启用接口[SwitchA-vlanif1]ip add 192.168.1.2 255.255.255.0[SwitchA-vlanif1]undo shutdown交换机远程TELNET登录命令1. 进入用户界面视图[SwitchA]user-interface vty 0 42. 指定用户权限级别[SwitchA-ui-vty0-4]user privilege level * 从VTY用户界面登录后可已访问的级别3. 设置密码[SwitchA-ui-vty0-4]set authentication password simple *** 设置明文密码[SwitchA-ui-vty0-4]set authentication password cipher *** 设置密文密码华为交换机常用命令2008-10-07 15:45dis vlan 显示vlanname text 指定当前vlan的名称undo name 取消[h3c] vlan 2[h3c-vlan2]name test vlandis users 显示用户dis startup 显示启动配置文件的信息dis user-interface 显示用户界面的相关信息dis web users 显示web用户的相关信息。
header login 配置登陆验证是显示信息header shellundo headerlock 锁住当前用户界面acl 访问控制列表acl number inbound/outbound[h3c]user-interface vty 0 4[h3c-vty0-4] acl 2000 inboundshutdown:关闭vlan接口undo shutdown 打开vlan接口关闭vlan1 接口[h3c] interface vlan-interface 1[h3c-vlan-interface] shutdownvlan vlan-id 定义vlanundo valn vlan-iddisplay ip routing-tabledisplay ip routing-table protocol staticdisplay ip routing-table statisticsdisplay ip routing-table verbose 查看路由表的全部详细信息interface vlan-interface vlan-id 进入valnmanagement-vlan vlan-id 定义管理vlan号reset ip routing-table statistics protocol all 清除所有路由协议的路由信息.display garp statistics interface GigabitEthernet 1/0/1 显示以太网端口上的garp统计信息display voice vlan status 查看语音vlan状态[h3c-GigabitEthernet1/0/1] broadcast-suppression 20 允许接受的最大广播流量为该端口传输能力的20%.超出部分丢弃.[h3c-GigabitEthernet1/0/1] broadcast-suppression pps 1000 每秒允许接受的最大广播数据包为1000传输能力的20%.超出部分丢弃.display interface GigabitEthernet1/0/1 查看端口信息display brief interface GigabitEthernet1/0/1 查看端口简要配置信息display loopback-detection 用来测试环路测试是否开启display transceiver-information interface GigabitEthernet1/0/50 显示光口相关信息duplex auto/full/half[h3c]interface GigabitEthernet1/0/1[h3c-GigabitEthernet1/0/1]duplux auto 设置端口双工属性为自协商port link-type access/hybrid/trunk 默认为accessport trunk permit vlan all 将trunk扣加入所有vlan中reset counters interface GigabitEthernet1/0/1 清楚端口的统计信息speed auto 10/100/1000display port-security 查看端口安全配置信息am user-bind mac-addr 00e0-fc00-5101 ip-addr 10.153.1.2 interface GigabitEthernet1/0/1 端口ip绑定display arp 显示arpdisplay am user-bind 显示端口绑定的配置信息display mac-address 显示交换机学习到的mac地址display stp 显示生成树状态与统计信息[h3c-GigabitEthernet1/0/1]stp instance 0 cost 200 设置生成树实例0上路径开销为200stp cost 设置当前端口在指定生成树实例上路径开销。
- 1、下载文档前请自行甄别文档内容的完整性,平台不提供额外的编辑、内容补充、找答案等附加服务。
- 2、"仅部分预览"的文档,不可在线预览部分如存在完整性等问题,可反馈申请退款(可完整预览的文档不适用该条件!)。
- 3、如文档侵犯您的权益,请联系客服反馈,我们会尽快为您处理(人工客服工作时间:9:00-18:30)。
1,用串口线将华为交换机(Console口)与电脑(USB)连接,然后双击该驱动(已安装过驱动的电脑可忽略)
2:安装完驱动后,进入设备管理器,可看到该串口。
3:进入属性。
4:注意红框的内容与图中一致,然后确定。
5:注意红框的内容与图中一致,然后确定。
6:单击超级终端。
7:名字随便取,然后确定。
8:注意红框的内容与图中一致,然后确定。
9:注意红框的内容与图中一致,然后确定。
黄色背景是要求输入的内容(123是我假设的vlan,请输入每个站点实际的vlan)
<Quidway>SY
Enter system view,return user view with Ctrl+Z.
[Quidway]vlan batch123
Info:This operation may take a few seconds.Please wait for a moment...done.
[Quidway]interface Ethernet0/0/1(上行端口设置)
[Quidway-Ethernet0/0/1]port link-type trunk
[Quidway-Ethernet0/0/1]port trunk allow-pass vlan123 [Quidway-Ethernet0/0/1]q
[Quidway]interface Ethernet0/0/2(下行端口设置)[Quidway-Ethernet0/0/2]port link-type access
[Quidway-Ethernet0/0/2]port default vlan123
[Quidway-Ethernet0/0/2]q
………………(中间过程省略,有多少个端口就要设置多少次)
[Quidway]interface Ethernet0/0/8(下行端口设置)[Quidway-Ethernet0/0/8]port link-type access
[Quidway-Ethernet0/0/8]port default vlan123
[Quidway-Ethernet0/0/8]q
[Quidway]q
<Quidway>save
The current configuration will be written to the device.
Are you sure to continue?[Y/N]Y
Info:Please input the file name(*.cfg,*.zip)[vrpcfg.zip]:123.zip Now saving the current configuration to the slot0.
Info:Save the configuration successfully.
OK。