半自动充气机产品说明及设备维护手册
圣迪欧半自动款气泵使用说明
圣迪欧半自动款气泵使用说明
1.准备工作:
-打开气泵包装,确认所有配件完整;
-将气泵插头插入电源插座。
2.气泵操作:
-打开气泵开关,确保气泵电源已接通;
-将气泵的充气口与需要充气的物品连接;
-根据需要,选择合适的充气压力模式(若有多档位选择);
-按下气泵上的启动按钮,开始充气;
-当充气到设定的压力后,按下停止按钮停止充气;
-若需要继续充气,可再次按下启动按钮。
3.注意事项:
-在操作气泵前,请确保已仔细阅读并理解使用说明书;
-在使用过程中,请避免将气泵浸入水中或与液体接触;
-若气泵长时间使用后发热,请暂停使用并待其冷却后再继续使用;
-使用完毕后,将气泵开关关闭,并拔掉电源插头。
希望以上内容能对您使用圣迪欧半自动款气泵有所帮助。
如有其他问题,请随时联系我们。
充气机操作

充气机操作(总13页) -CAL-FENGHAI.-(YICAI)-Company One1-CAL-本页仅作为文档封面,使用请直接删除充气机操作手册一、充气机参数设置一:可以设置输出压力上下限、超时时间、告警温度、相对湿度上限、告警电话等,同以前的充气机设置相同,在此不再赘述。
二、充气机参数设置二:在本窗口可以设置以下参数:监控主动发送及其周期、内置采集器功能使能,内置采集器地址,内置总流量功能,流量计箱体数量,自动复位网络,流量计采集,排水时长等,界面如下图所示:按切换键一次,如下图所示:要修改的地方显示黑三角,表示可以修改,这时您可以按数字“1”键,进行选择修改,按一次“1”键变成“×”,再按一次“1”键变成“√”,当为“√”时,表示监控主动发送允许,“×”则关闭监控主动发送。
按数字“1”键就可以自动保存设置,不需要再按确认键。
再按切换键一次,如下图所示:要修改的地方显示黑三角,表示可以修改,这时您可以修改监控主动发送的周期,如1秒,则表示1秒钟发送一次。
按键盘上的数字键即可,输入完后,按确认键,进行保存,并自动切换到下一个要修改的项目。
如果不按确认键,再按切换键一次,如下图所示:要修改的地方显示黑三角,表示可以修改,这时您可以修改内置采集器功能。
按数字“1”键,进行选择修改,按一次“1”键变成“×”,再按一次“1”键变成“√”,当为“√”时,表示内置采集器功能允许,“×”则关闭内置采集器功能。
按数字“1”键就可以自动保存设置,不需要再按确认键。
再按切换键一次,如下图所示:要修改的地方显示黑三角,表示可以修改,这时您可以修改内置采集器地址。
按键盘上的数字键即可,输入完后,按确认键,进行保存,并自动切换到下一个要修改的项目。
如果不按确认键,再按切换键一次,如下图所示:要修改的地方显示黑三角,表示可以修改,这时您可以修改内置总流量功能。
按数字“1”键,进行选择修改,按一次“1”键变成“×”,再按一次“1”键变成“√”,当为“√”时,表示内置总流量功能允许,“×”则关闭内置总流量功能。
真空充气包装机安全操作及保养规程

真空充气包装机安全操作及保养规程前言真空充气包装机是一种用于食品、医药、化妆品等各种产品的包装设备,其独特的真空充气技术能够有效延长产品的保质期,提高产品的附加值。
但是,在使用真空充气包装机时需要注意一些安全操作及保养规程,以免造成设备故障或人员意外伤害。
本文列举了一些常见的真空充气包装机安全操作及保养规程,供使用者参考。
安全操作设备安装1.在使用前,先查看设备的各个部件是否齐全,有无明显损坏。
2.将设备固定在平稳的地面上,并保证有足够的通风空间。
3.首先接通电源,启动设备,检查设备是否正常工作。
操作规范1.在操作前,必须熟悉设备的使用说明,正确使用设备。
2.严格按照设备操作流程进行操作,不得随意更改操作流程。
3.确保设备每天保洁,清除粘在设备上的杂物、油污等。
4.严格按照设备规定范围内的产品,进行包装,不得超容或过大。
5.设备停机前,请关闭设备电源,注意操作并避免设备发生意外事故。
安全设施1.真空充气包装机必须装有自动停机保护装置。
2.真空充气包装机必须装有电气保护装置,避免发短路。
3.真空充气包装机必须装有超温保护装置,防止设备内部过热。
4.真空充气包装机必须装有防水装置,避免在潮湿环境下使用。
防护措施1.在操作设备时,必须佩戴安全护具,包括护目镜、手套等。
2.在操作设备过程中,必须保持机器整洁和无异物,防止异物进入设备。
3.切勿打开设备外壳,以防电气意外。
保养规程日常保养1.每天应进行日常清洁护理,将设备外表部分及操作面板部分擦洗干净。
2.每天使用过后,应将设备关闭电源并拔插头。
3.设备过高运转,应将防尘器上的尘土打掉,保持通畅。
4.设备存放长时间应注意翻糊损坏,应注明陈设处以免损坏。
安全保险1.保持设备出厂时的保修期,定期进行保养,防止设备故障。
2.检查和保护好各电线、接头禁止湿漉电工作和误操作。
3.定期检查设备底座的紧固状况,防止长时间震动影响正常工作。
4.确保设备所使用的电源能满足设备的最大功率,避免因电源不足而损坏设备。
半自动充气机产品说明及设备维护手册

半自动充气机使用说明及设备维护手册本半自动充气灌装机广泛用于各种以空气作为抛射剂的气雾剂产品的定量灌装。
本机具有操作安全可靠,计量准确,适用范围广泛等特点。
一、设备组成及主要参数1.设备组成:本设备组要由气体计量缸、充气头、台面、机架、及气动元件组成。
2.主要参数二、基本结构及工作原理因诸多气雾剂产品在生产时经常会灌装易燃易爆的物质。
本机采用全气压传动的机械结构模式以彻底杜绝因用电时产生电火花的不安全因素,从而达到防火防爆的要求。
本机在结构上主要有气体计量缸、充气头、台面、机架及气动元件组成。
气体计量缸固定在台面上靠后的位置,充气头安装在升降立柱的台板上,根据罐子的高度不同方便上下调节。
充气:打开充气旋钮开关,轻踩一下脚踏阀,气体计量缸双气控换向阀换向,充气头在小气缸的作用下下压气雾罐,喷嘴将自动打开。
同时气体计量缸动力气缸的上腔进气,下腔排气,动力气缸活塞推动抛射剂活塞下压,将计量缸抛射剂缸内的抛射剂经充气头注入封好口的气雾罐内。
这时,动力气缸活塞下压触发信号阀,信号阀输出气压作用到气体计量缸双气控换向阀使其换向,并使充气头小气缸和动力气缸进、出气方向逆转,从而使充气头和计量缸复位,并且计量缸复位同时从钢瓶中吸入等量的气体,等待下次灌装。
可以通过旋转计量缸顶部的调节旋柄来调节计量缸气缸定位活塞的高度,从而改变计量缸活塞的行程来最终改变灌装的计量大小。
三、安装、调试及操作1.设备安装(1)设备安装时注意调节主机各地脚的高度使设备保持水平、安稳。
安装地点应注意设备操作、维护和修理的必要空间。
(2)在主机的气源三联件上的油雾器中添加适量的气动设备专用油。
(3)将从空压机输出的压缩空气气管接入到主机的气源三联件的输入接口。
注意:该设备灌装的抛射剂为压缩空气,所以计量缸进料口连接的气管是从主机气源三联件后端分支出的气管,该气管经过单独的减压阀进行调节压力。
连接时,各接口处的螺帽要拧紧,以免漏气。
如出现漏气现象,需重新接好接口,不要强行生产,以免发生危险。
CZ-27空气充气泵操作规程及保养
空气充气泵操作规程及保养
一、空气充气泵操作规规程
1、务必当心压缩空气与内燃汽油及吸口处油露混合的可能情况。
2、当心电导致的危险,使用设备时,必须有适当的防电保护,尤其在存在水汽的环境中。
3、按操作手册使用内燃机,内燃机的不当操作可能造成危险。
4、使用完的设备局部会很热,在发生烧伤问题之前,进行适当保护在操作设备,设备关闭30分钟后在进行维护。
二、日常保养:
1、使用设备前每天检查一次油量,油量必须保持在油量尺的最大和最小刻度之前。
2、检查安全阀,将过滤阀与水槽阀连接,水槽阀关闭时开启充填泵。
确保阀门在适宜的压力下安装。
3、确保皮轮带与护罩之间有足够的空间,防止两者与传送带的松紧尺度不宜超过0.25英寸。
可以用一个10磅的力作用于带的中间部位检测。
4、使用25小时后检查进口过滤器,先将空气驱散出过滤器,在清洗过滤器的元件,每使用100小时更换一次。
5、溶液呈白色,具有牛奶的浓度,有时带有微量棕色物质,为防止黑色溶液的出现,应及时维护设备,每隔10-15分钟排一次冷凝液。
6在吸入脏空气之前替换过滤器套筒,吸入空气质量的优次取决于套
筒状况的好坏,因此,必须严格按照所建议的周期更换套筒。
7、填充装置须一年一换,若其有损坏迹象,则要先于一年更换。
8、若长时间不使用设备,将滤箱拆卸。
9、安全装置至少每月一查,且设备每维护一次,安全装置也要检查一次。
全气动半自动活塞式灌装机说明书_中新
上海三槐科技有限公司操作说明书前言为了人身安全、提高生产效率、正确使用及维护机器,请务必熟读此使用说明!安全注意事项:一、错误操作可能引起危险的情况,造成受伤或物品损坏!机器工作时手当心靠近工作区,以免发生人身危险!二、非专业技术人员,请勿检修机器,避免引起机器损坏。
三、清洗机身时请勿用水对气控部分直接冲洗!否则可能引起机器损坏。
上海三槐科技有限公司厂址:上海市沪太路8188弄26号联系人:黄汉平电话:7 手机:目录一、性能简介 (3)二、型号选定 (3)三、半自动灌装机的特点 (4)四、开机前的检查和操作顺序 (4)五、工作原理 (4)六、主要部件 (5)七、灌装量的调整 (6)八、灌装速度的调整 (6)九、灌装精度的调整 (7)十、清洗保养维护 (8)十一、装箱情况 (9)十二、灌装物料的适应范围 (9)十三、机器的使用条件 (9)十四、常见故障的解决办法 (10)十五、附图:外形结构图、主机爆炸图、计量部件图一、性能简介本公司生产的半自动活塞式灌装机是建立在参考国外同类产品的基础上进行了重新设计,并增加了部分附加功能。
使产品在使用操作、精度误差、装量调整、设备清洗、维护保养等方面更加简单方便。
在此基础上设计的全气动罐装机采用气动元件来代替电气控制回路,因此特别适合在对于防爆要求的环境中使用。
二、型号选定本公司生产的罐装机型号是根据用户所需的最大罐装量来确定的。
具体型号为:LM3-30mLLM6-60mLLM12-150mLLM20-250mLLM25-500mLLM60-1000mLLM250-2500mLLM500-5000mL客户选定型号时,请注意选择合适的型号,注意点:1、选择的型号与实际罐装量区别大时误差增加。
例如:客户须罐装800mL和65mL 两种罐装量,建议购买LM60-1000mL和LM12-150mL两台机器,如单独购买LM60-1000mL 罐65mL精度误差会较大而不能满足要求。
高压充气机操作维护保养规程

高压充气机操作维护保养规程一、高压充气机操作规程(一)开机前检查:1、曲轴箱内油面高度。
并向一级进气阀处加注润滑油10克。
2、各紧固连接件是否可靠。
3、原动机旋转方向与压缩机转向是否一致及三角皮带松紧程度。
4、进、出冷水管是否接上。
5、盘动曲轴数转有否卡阻现象。
(二)运转要求:1.运转响声正常,无敲击声。
2.曲轴箱导油管有油雾喷入一级进气阀室内。
3.各级压力分配正常:一级…………………………0.44~0.57MPa二级…………………………3.43~4.21MPa三级…………………………14.7MPa4.各级排气温度(冷却前)不超过150℃。
5、进出冷却水温差不超过15℃。
冷却用海水最高进水温度为32℃,淡水最高进水温度为42℃。
6、常用手摸法检查机器温度。
利用短暂时间立刻打开曲轴箱两侧门盖检查运动机件和油温不超过70℃。
7、每隔45 分钟左右打开油水分离器上吹除阀一次,以排除油水。
8、机器不应经常超负荷运行。
(三)有下列情况之一发生时应立即停车:1、有剧烈的冲击和敲打声。
2、任何一级安全阀跳开。
3、冷却水供应中断。
4、压力表读数不正常。
5、一、二级气缸水套上的橡皮安全膜破裂。
(四)机器停车后:1、检查并排除故障。
2、放净冷却水。
3、视实际情况,清除水垢或积炭。
4、停机三个月以上应进行油封。
二、高压充气机维护保养规程(一)空气压缩机运转时,为保证运转机件正常润滑,必须遵循下列各点:1、压缩机应当按使用说明书中所规定牌号的润滑油。
2、压缩机油应当先经过滤油器过滤,然后再用清洁的器皿灌入曲轴箱中。
3、油管的所有接头都应当保证没有赞美,而且不能漏油。
4、压缩机工作尚未正常或走顺时,应增加油量,原则规定,每经20分钟运转,由一级进气阀处加注10克滑油,并视实际情况适当增减之。
(二)压缩机正常工作时的维护:1、经常检查地脚螺钉的螺帽和其他紧固件有否松动等。
2、按时检查轴承温度,滑油温度。
3、按定期检修制度,对活塞、气缸及其他运转机件予以检查。
充气产品的使用说明及保养

充气产品的使用说明及保养:
a、首次充气完,放置8小时后才可以使用,因为产品内拉带和缝接处需要一个缓冲过程;新产品前2天使用,尽量不要充足气,充气大概八分饱。
b、前几次充完气后,产品会有些松懈,这是正常现象,产品的材料有些弹性,充完气后有些涨大变软,才感觉松懈,只要再充气达到期望效果就行了,但不要打气过饱。
充气过足,引起鼓包,则无法修理。
c、气温下降时,产品会变软,注意补气;任何充气制品(包括车胎)都会自然漏气,这是正常现象,注意定时补气。
d、任何时候都不能充气过足(尤其是夏天),否则产品内的拉带将超负荷而断裂,造成产品鼓包,这种情况将无法修补。
e、保证使用的地面没有钉或刺等尖锐的物品,使用前请清扫地面。
f、游泳池和浴缸不能长时间隔夜储水,以免压坏产品。
g、充气产品耐受温度最高不能超过60度,先注入冷水,再注入热水
h、儿童应在成人监护下使用。
关于尺寸问题:充气产品由于材质是使用超坚固热碳增韧聚合pvc制造,新产品材质具有弹性,前期使用时没有能达到标准尺寸,待使用几次后便能还原真正尺寸。
产品是通过国标GB-6675,味道是在安全范围内的,很快就会消失的,请放心使用。
BAI 01充气机说明书

AIRTEC BAI 01自动轮胎充气机用户手册一.技术参数1.该设备可安装在墙壁上或立柱上,供室内外使用。
2.特殊要求使用可定制。
技术参数室内型:89MDA室外型:89HD尺寸220×220×100mm285×300×100mm外壳结构耐碰撞聚碳酯塑料外壳高强度的铝合金外壳电源要求交流220~240V50Hz工作量程35~895kpa0.3~9.0bar输入气源35~895kpa或0.3~10.3bar可调节到975kpa或9.7bar计量单位按5kpa或0.1bar递增精度+5kpa或0.05bar工作温度-10ºC~50ºC气管长度标准管10m×6mm,按要求可配其他长度的气管二.安装1.打开设备包装2.将设备置于墙壁或立柱上,在四个安装孔位置打孔并装上M6或1/4″膨胀螺丝3.按要求供应气源4.接通电源,如果设备装在加油站,请考虑当地有关危险品区域要求5.检测其工况三.蜂鸣音量的调节使用面板按键:1.按住“▼”和“i”按键,接通电源,液晶显示VOL表明设备使用蜂鸣形式2.按“▲”或“▼”键,选择所需音量,蜂鸣器会发出响声,液晶显示不同的音量。
当达到满意音量时,在10秒内按“i”键存储。
如果还需调节,请重复以上步骤。
手动调节:1.打开设备的前面板,蜂鸣器设在前顶部左手边。
2.顺时针或逆时针方向旋转蜂鸣器直至达到所需音量四.操作1.严禁非成年人在无监管下使用该设备2.电子式轮胎充气机有一双气动阀,通过电流控制加气或放气动作,如果压缩机已装上,此动作由一个辅助继电器来控制3.仅当轮胎气压还剩20kpa或0.2bar以上时,才可执行该步骤,如果将加气管接在轮胎上,立即可加气或放气4.按“▲”或“▼”键选择所需气压,增值或减值时可听到“嘀”响声5.将加气管夹在气嘴上,必须连接好,不可漏气。
如果接通空气压缩机,立即自动充气或放气直至结束6.设备根据所需压力自动执行充气或放气过程,当发出5声短的“嘀”响,代表轮胎气压达到预设值,预设量在连续闪烁。
氧压机使用维护说明书

ZW-3.3/165 型氧气压缩机使用维护说明书目录一、主要技术规范二、压缩机概述三、压缩机的安装要求四、压缩机的试运转五、压缩机的正常运转操作六、压缩机可能发生的故障及其消除七、压缩机的检修八、压缩机的启封、主要技术规范型号:ZW-3.3/165 型型式:立式、三列、五级压缩、气缸无润滑、水冷式排气量:200m3/h (吸入状态)介质:干燥氧气吸入工况:压力102KPa(绝压)温度< 30 r排出工况:压力16.5MPa冷却水:进水温度v 30 r流量〜7t/h行程:180 mm转速:255r/min气缸直径:一级255m二级225m三级145m四级80m五级48m轴功率:52KW旋转方向:从飞轮端看为逆时针方向传动方向:电动机-- 三角皮带传动配用电机:型号Y208M-6功率55KW转速980r/min电压380V频率50Hz润滑油:规格L-AN68机械油(GB/T443-89)一次充灌量180L进气管径:①108X 4排气管径:①28 X 3 冷却水进水管管径:G3" 冷却水出水管管径:G4"机组总重量:〜5848Kg二、压缩机概述:本机主要由机身、曲轴、连杆、十字头、刮油器、齿轮油泵、气缸、活塞、气阀、冷却器、以及电动机等部件组成。
机身和曲轴箱沿曲轴中心线水平分开,并用圆锥销来定位,曲轴支承在四个滑动轴承上,曲轴轴衬由两半组成,安装在曲轴箱上,内有巴氏合金轴衬,上轴承盖压紧要轴承上,利用垫片可调节曲轴主轴颈与轴衬间的间隙。
曲轴箱上装有油面计,以观察箱内贮油量,后部有放油管,以排放旧润滑油。
机身前后有装卸孔,以便装卸十字头、连杆,拧紧连杆螺钉,十字头销及调整连杆轴承间隙,装卸孔上有盖板盖严。
曲轴的三个曲拐颈按120°等分,四个主轴颈作为支承点,并以一级与三级之间的中间轴承固定了曲轴的轴向移动,飞轮安装于曲轴的动力传递端以传递动力。
传动方式采用三角皮带传动,而主机的大皮带轮外圆设计为平面的,以与三角皮带的底面接触传动,其目的是减轻三角皮带的二侧面传动磨损,以延长三角皮带的使用寿命。
欧格斯制氧机使用手册与保养维护【范本模板】

欧格斯制氧机使用手册与保养维护社会现代化的不断发展,越来越多的的家庭健康养生这方面的需求不断增长,纷纷都购买了家用制氧机.可能还有很多人对制氧机很陌生,不知如何正确的使用制氧机。
下面就让小编来为大家详细的介绍一下制氧机的使用方法和日常保养维护。
制氧机有什么分类?先来为大家介绍一下制氧机的分类,制氧机分为物理式制氧和化学药剂制氧两张方法,化学制氧的要添加一些化学药剂,操作麻烦,使用成本较高,会有一定的味道,不适合家庭使用;物理制氧的使用简单方便,大多是分子筛制氧机,通过分子筛的变压吸附原理把空气中的氧气提纯,从出氧口放出氧浓度能达到90%以上的氧气,无需添加任何药剂,打开电源开关即可使用。
制氧机有什么作用?作为氧气瓶或化学制氧的有效代替品,分子筛制氧机(氧气机)正在逐步成为长期家庭氧疗的主流设备。
氧疗和氧保健是利用补给氧气改善人体的生理、生化内环境,促进代谢过程的良性循环,以达到治疗疾病、缓解症状、促进康复和预防病变、增进健康的目的.临床实践证明,氧气疗法以其独特的治疗机理,对临床各科的急性、慢性缺血缺氧性病症和因缺氧引起的继发性疾病,能够起到有效的治疗作用。
欧格斯家用制氧机的具体使用流程?(1)将机器从包装箱中取出,平稳放置于室内合适的插座旁(使用的插座上不要同时有其他的电器);距离墙壁、织物或其他物体至少15厘米;确保周围没有热源及明暗火源。
(2)剪断扎带。
请将机器横向平放,剪断机身底部用于固定压缩机的白色扎带,从带结头的方向抽出扎带。
吸氧管和湿化杯消毒。
初次使用,如吸氧管与湿化杯有异味,请放入白醋与温水1:3的溶液中浸泡30分钟,清水洗净后晾干。
(4)湿化杯装水。
将制氧机竖向平放,取下湿化杯,打开湿化杯的舱盖。
往杯中倒入1/3蒸馏水或纯净水(水位应处于容器的MIN和MAX水位之间)。
禁止添加自来水等未经杀菌消毒、不利于人体健康的水。
每3—4天更换一次水,并清洗杯子。
加水后盖上盖子,以免氧气外逸。
充气机说明书
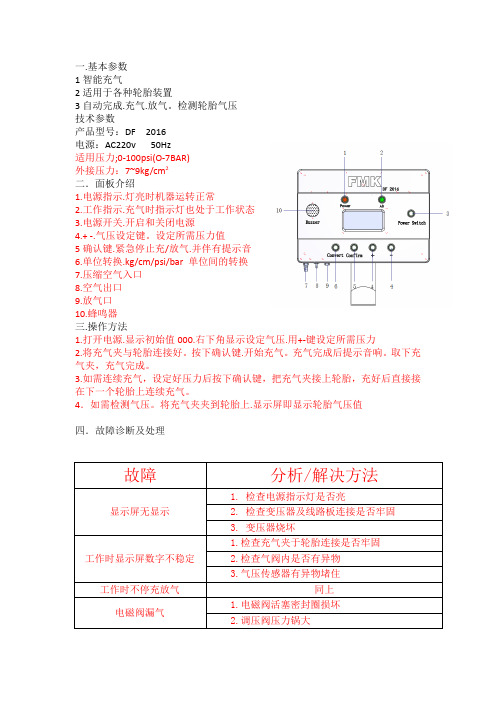
一.基本参数
1智能充气
2适用于各种轮胎装置
3自动完成.充气.放气。
检测轮胎气压
技术参数
产品型号:DF 2016
电源:AC220v 50Hz
适用压力;0-100psi(O-7BAR)
外接压力:7~9kg/cm²
二.面板介绍
1.电源指示.灯亮时机器运转正常
2.工作指示.充气时指示灯也处于工作状态
3.电源开关.开启和关闭电源
4.+ -.气压设定键。
设定所需压力值
5确认键.紧急停止充/放气.并伴有提示音
6.单位转换.kg/cm/psi/bar 单位间的转换
7.压缩空气入口
8.空气出口
9.放气口
10.蜂鸣器
三.操作方法
1.打开电源.显示初始值000.右下角显示设定气压.用+-键设定所需压力
2.将充气夹与轮胎连接好。
按下确认键.开始充气。
充气完成后提示音响。
取下充气夹,充气完成。
3.如需连续充气,设定好压力后按下确认键,把充气夹接上轮胎,充好后直接接在下一个轮胎上连续充气。
4.如需检测气压。
将充气夹夹到轮胎上.显示屏即显示轮胎气压值
四.故障诊断及处理
注意事项:
1.机器外部安装可调整压力的油水分离器
2.油水分离器压力应调至7-9/cm²。
这样使用寿命大大提高
3.严格按照轮胎提供商要求的气压值
4.必要时在气泵出口处安装流量大的油水分离器。
半自动吹瓶机说明书

缺陷原因
排除方法
吹塑气压不足
提高吹塑空气吹塑空气气压不上升,速 改进调压机构布管,提高
度太慢
压力上升速度
拉伸倍率过大
延时吹气选择恰当
型坯壁厚不均
端正注塑型芯
拉伸倍率过低
加大拉伸倍率
拉吹温度过高
降低拉吹温度
拉吹线速度太高
降低拉吹线速度
吹气时间选择不当
将吹气延时时间减少
七、 机器常见故障及排除方法
常见故障
故障原因
排除方法
没有吹气
电磁阀没有动作 电磁阀阻塞
检查 PLC 是否输出,如果 没有输出,更换中继电器 清洗电磁阀
吹气选择按钮按下
按钮复位
没有排气
排气时间太少 排气阀阻塞
加大排气时间 更换气阀
没有拉伸动作
拉伸按钮按下 气阀或气缸失灵
拉伸按钮复位 更换气阀或气缸
半自动状态不能合模
合模按钮按下 合模电磁阀没有动作 合模电磁阀失灵
按钮复位 检查 PLC 有否输出 更换气阀
合模速度缓慢
慢速电磁阀没动作 慢速电磁阀失灵
检查 PLC 是否输出 更换气阀
合模时没缓冲
行程开关碰块位置不对 行程开关失灵
调整碰块 更换行程开关
慢速电磁阀失灵 消声节流阀失灵
检查 PLC 及电磁阀 清洗或调整节流阀
2、 开模行程调节 机器的开模行程可通过开模行程调节丝杆调整(见图一),用户可根据
实际吹制的瓶子大小设定开模行程,以节省开合模时间,提高效率。调整时 注意两支丝杆行程必须一样。 3、 合模减整及销模行程设定
2
机器的合模行程带缓冲减速功能,由碰块与接近开关的相对位置设定 (见图一),锁模行程碰块用来设定锁模位置,当模具厚度不一样时,必须 调整其位置,调整时先合模,然后移动锁模行程碰块直到有信号(开关灯亮)。 若锁模行程碰块太前,模具会合不上,若太厚,则模具无法锁上,容量涨模。 4、 锁模压力调整
充气机操作规程(3篇)
第1篇一、目的为确保充气机安全、高效、稳定地运行,防止操作失误和设备损坏,特制定本操作规程。
二、适用范围本规程适用于所有充气机的操作与管理。
三、操作前准备1. 检查充气机外观是否完好,电源线、气管、支架等配件是否齐全。
2. 确认电源电压符合充气机要求,确保电源插座接触良好。
3. 检查设备铭牌上的参数,确认充气压力、流量等参数符合使用要求。
4. 检查充气机内部是否有异物,如灰尘、杂物等,必要时进行清理。
5. 确认工作场地安全,无易燃、易爆物品。
四、操作步骤1. 打开充气机电源开关,启动设备。
2. 将气管连接到充气机出口,确保连接牢固。
3. 将气管的另一端连接到需要充气的设备,如轮胎、气瓶等。
4. 调整充气压力,根据设备要求设定合适的工作压力。
5. 按下充气机启动按钮,开始充气。
6. 观察充气过程,确保设备充气均匀,压力稳定。
7. 充气过程中,注意观察设备是否异常,如漏气、过热等。
8. 充气至设定压力,停止充气。
9. 关闭充气机电源,拔掉气管。
10. 检查设备充气情况,确保充气效果。
五、注意事项1. 操作过程中,严禁触摸充气机高温部位,以免烫伤。
2. 充气过程中,严禁操作人员离开现场,确保安全。
3. 操作人员应熟悉充气机操作规程,掌握设备性能。
4. 充气机运行过程中,如发现异常,应立即停止操作,排除故障。
5. 操作人员应定期检查充气机,确保设备处于良好状态。
六、维护保养1. 定期检查充气机,更换磨损严重的部件。
2. 保持充气机清洁,定期清理灰尘、杂物。
3. 检查电源线、气管等配件,确保无破损、老化现象。
4. 定期对充气机进行润滑,减少磨损。
5. 按照设备要求进行定期维护保养,确保设备正常运行。
七、安全操作1. 操作人员应穿戴好防护用品,如手套、眼镜等。
2. 充气过程中,严禁操作人员站立在充气设备上。
3. 充气机运行时,严禁触摸设备内部。
4. 充气过程中,如发现设备异常,应立即停止操作,确保安全。
5. 充气机运行过程中,严禁进行无关操作,如调整设备、擦拭设备等。
充气维护概述充气系统及充气设备

充气系统的组成
充气设备
包括压缩机、干燥机、过滤器等设备 ,用于产生压缩气体、净化气体和提 供稳定的气体压力。
管道和阀门
气体压力容器或气瓶
用于储存压缩气体,提供所需的气体 压力和气量。
用于连接充气设备和气体压力容器或 气瓶,控制气体的流动和压力。
充气系统的功能
提供所需压力或气量
根据实际需求,充气系统能够提供稳定的气体压力和气量,满足 生产和生活需求。
手动打气筒
打气筒是一种便携式的手动充气 设备,适用于给自行车轮胎、球 类等小型物品充气。
电动充气设备
电动充气泵
电动充气泵是一种使用电力驱动的充 气设备,具有充气速度快、压力稳定 等优点,适用于给汽车轮胎、气瓶等 大型物品充气。
电动打气机
电动打气机是一种便携式的电动充气 设备,体积小巧、操作简便,适用于 给自行车轮胎等小型物品充气。
在特定的应用场景下,如气瓶压力管 理,充气维护对于安全和合规性至关 重要。
定期检查和调整气压,可以保证设备 的各项功能如预期工作,提高工作效 率。
提高设备寿命
适当的充气维护可以预防设备因气压问题而受到的潜在损坏,从而延长其使用寿命 。
通过预防性的充气维护,可以减少设备因气压问题而导致的故障,降低维修成本。
详细描述
随着汽车工业的发展和消费者对汽车性能要求的提高,高压充气技术逐渐成为充气系统的一个重要发展方向。高 压充气技术能够提供更高的压力和更快的充气速度,从而缩短充气时间,提高车辆的动力性能和续航里程。
智能充气系统
总结词
智能充气系统是一种能够自动识别车辆需求并提供个性化充气方案的充气系统。
详细描述
燃料储罐
航空航天领域的燃料储罐,如液氢或液氧等,需要充气以维 持其存储压力。
充气工具安全操作及保养规程

充气工具安全操作及保养规程充气工具被广泛应用于家用和商业领域中,如汽车轮胎充气、气垫床充气等。
在使用充气工具时,需要遵守一些安全操作规程,以确保使用安全,同时进行正确的保养可以延长充气工具的使用寿命。
安全规程1. 选择合适的充气工具在购买充气工具时,需要选择合适的工具,以满足相应的需求。
不同的充气工具适用于不同场合,例如轮胎充气、气垫充气等。
应根据具体的需求选择不同的充气工具,以保证操作的安全性并提高工具的效率。
2. 操作前检查设备在使用充气工具之前,应先检查设备是否完好。
注意检查气管接口是否牢固,充气管路是否齐全,以及充气工具的出气口是否通畅等等。
通过这些检查,可以确保充气工具运行正常,减少使用过程中出现问题的可能性。
3. 正确操作在充气过程中,应遵循正确的操作方式。
首先,应将充气工具固定在工作台面上,以避免在使用过程中滑动。
其次,应戴上安全手套和护目镜等个人防护装备,以防止意外伤害。
最后,应根据充气的具体需求,在使用过程中控制好充气数值,不要过量充气。
4. 充气工具使用完毕后安全停止在充气工具使用完毕后,应将压力表指数降到0,关闭电源开关或气源开关,然后拆卸充气工具,清理和存放设备。
在存放设备时应将充气管路卸下,放置到通风干燥的地方,以免长时间存放,导致设备性能下降。
保养规程正确的保养是保持充气工具正常运行的关键,在日常使用过程中应该尽可能地保养设备,以提高设备的运行效率,延长设备的使用寿命。
1. 设备的定期检查进行定期的检查是维护充气工具的关键。
每使用一段时间后,应检查设备部件是否磨损或者变形,尤其是气管连接接口是否损坏,气嘴处是否破损,以及压缩机内部各部件的运行情况等等。
在检查过程中,如果发现部件出现问题,应及时进行更换。
2. 清洗充气工具在使用充气工具之前,应对设备进行清洗才能确保充气工具处于干燥状态。
在清洗过程中应注意切断电源开关,拆下气嘴和气管,用毛刷清理各个部件,然后局部弯曲的毛刷清除气门周围的污垢和碎屑。
空气呼吸器充气机安全操作及保养规程
空气呼吸器充气机安全操作及保养规程随着工业生产的不断发展,空气污染和化学品危害对人们健康的影响越来越大,空气呼吸器作为防护工具被广泛应用于危险作业现场。
空气呼吸器的核心是过滤和吸气系统,而充气机则是维护这个系统正常运转的关键设备。
在使用过程中,为了避免意外发生,必须了解充气机的安全操作及保养规程。
一、充气机的安全操作1. 启动前的准备工作在操作充气机之前,应进行以下准备工作:•检查充气机是否处于平稳的地面上,不可放在倾斜的表面。
•检查充气机和呼吸器是否处于关闭状态。
•检查压力表和压力关断调节器是否调整到正确值。
•检查充气机的气源是否可靠,如气瓶是否装满,接口是否牢固。
2. 充气机的操作步骤启动充气机的步骤如下:1.打开充气机电源开关,启动充气机。
2.等待充气机达到预设的压力后,将充气机中的气体传输到空气呼吸器里。
3.确认充气状态,确认呼吸器工作正常。
4.关闭充气机电源开关,停止充气机。
在操作充气机时,注意以下事项:•不可随意调整压力表和压力关断调节器,在未经过培训的情况下不可擅自更改。
•操作人员需要佩戴好防护手套和其他防护设备,以保证自身安全。
•如充气机出现异常(比如产生异响、温度升高等情况),应立即停机检查,并在确认故障原因后才能再次启动。
二、充气机的保养规程1. 定期检查充气机为了保证充气机的安全可靠,应定期检查充气机的状态。
具体方法如下:1.检查充气机的清洁程度,如有灰尘或油污应及时清理。
2.检查充气机内部的软管和连接口是否有损坏或松动现象。
3.检查压力表和压力关断调节器是否正常。
4.检查气瓶和管路是否有漏气情况。
5.检查电源及开关是否正常。
2. 确认充气机的保养周期不同类型的充气机保养周期会有所不同,一般建议在工作一年后,对充气机进行全面检查和保养。
3. 进行定期的磨损项检查充气机的磨损项包括马达、压缩机、气泵等,这些设备出现异常或老化会对充气机造成直接的影响。
因此,应定期对这些部件进行检查,如出现磨损或异常情况及时更换。
充气泵操作规程(3篇)

第1篇一、前言为了确保充气泵的安全、有效使用,防止意外事故的发生,特制定本操作规程。
本规程适用于所有型号的充气泵操作人员。
二、操作前的准备1. 检查充气泵外观是否完好,无破损、裂纹等异常情况。
2. 检查电源插座是否完好,确保电源线无破损、老化现象。
3. 确认充气泵的电压与电源电压相符。
4. 检查气筒或气瓶是否干净、完好,无泄漏。
5. 熟悉充气泵的使用说明书,了解操作步骤和注意事项。
三、操作步骤1. 将充气泵放置在平坦、稳定的地面,确保安全。
2. 打开电源开关,启动充气泵。
3. 将气筒或气瓶连接到充气泵的出口处,确保连接牢固。
4. 将气筒或气瓶的进气口对准要充气的物品,如轮胎、气垫等。
5. 根据需要充气的压力值,调整充气泵的压力调节旋钮。
6. 慢慢打开充气泵的进气阀门,开始充气。
7. 观察压力表,确保压力值达到设定值。
8. 充气过程中,注意观察充气泵的工作状态,如有异常立即停止操作。
9. 充气完成后,关闭充气泵的进气阀门。
10. 断开气筒或气瓶与充气泵的连接。
11. 关闭充气泵的电源开关。
四、操作注意事项1. 充气泵工作时,严禁触摸旋转部件,以防受伤。
2. 充气过程中,严禁将手或任何物体伸入进气口,以免发生危险。
3. 充气时,应保持气筒或气瓶直立,避免倾斜或倒置,以防气体泄漏。
4. 充气压力不宜过高,以免损坏充气物品。
5. 充气泵停止工作时,应立即断开电源,防止意外触电。
6. 长时间不使用充气泵时,应将电源线妥善存放,避免损坏。
7. 充气泵使用过程中,如发现异常情况,应立即停止操作,并及时检查维修。
五、操作后的保养1. 充气泵使用完毕后,应将气筒或气瓶内的气体排空。
2. 清洁充气泵的各个部件,特别是进气口和排气口。
3. 将充气泵存放在干燥、通风的地方,避免阳光直射和潮湿环境。
4. 定期检查充气泵的电源线、插头等部件,确保无破损、老化现象。
六、附则1. 本规程由充气泵操作人员严格遵守。
2. 违反本规程者,将根据情节轻重给予相应处罚。
Powerhorse 气压机操作、维护和安全指南说明书
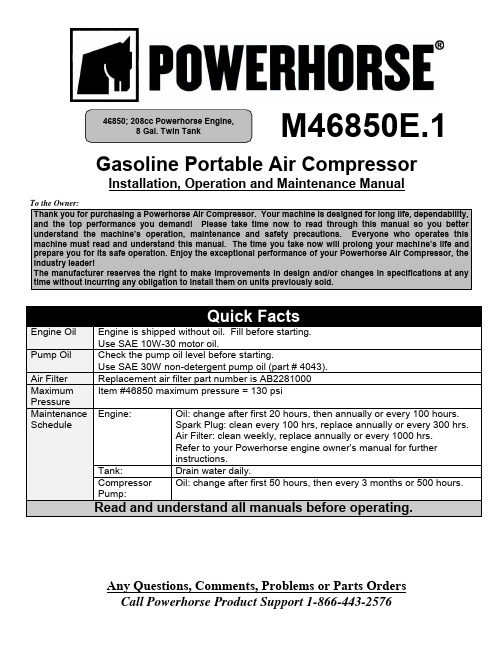
Gasoline Portable Air CompressorInstallation, Operation and Maintenance ManualAny Questions, Comments, Problems or Parts Orders Call Powerhorse Product Support 1-866-443-2576M46850E.1SafetyDEFINITIONSDANGER!WILL cause DEATH, SEVERE INJURY or substantial property damage.WARNING!CAN cause DEATH, SEVERE INJURY or substantial property damage.CAUTION!WILL or CAN cause MINOR INJURY or property damage.GENERAL SAFETY PRECAUTIONSALWAYS wear eye protection when operating or servicing compressor.NEVER operate where flammable or explosive liquids or vapors such as gasoline, natural gas and solvents are present.NEVER remove, paint over, or deface decals. Replace any missing decals.NEVER operate with guards or shields removed, damaged or broken.NEVER operate indoors. This compressor is intended for outdoor use only. Avoid inhaling exhaust fumes, risk of asphyxiation. Exhaust fumes are deadly.NEVER add fuel when the product is operating or hot. NEVER directly inhale compressed air.NEVER over-pressurize the receiver tank or similar vessels beyond design limits.NEVER use a receiver tank or similar vessels that fail to meet the design requirements of the compressor. NEVER drill into, weld or otherwise alter the receiver tank or similar vessels.NEVER remove, adjust, bypass, change, modify or make substitutions for safety/relief valves, unloader valve or other pressure control related devices.NEVER use air tools or attachments without firstdetermining the maximum pressure recommended for that equipment.NEVER point air nozzles or sprayers toward people or animals.NEVER touch the compressor pump, engine ordischarge tubing during or shortly after operation. These parts become hot.BREATHING AIR PRECAUTIONPowerhorse air compressors are not designed,intended or approved for breathing air. Compressed air should not be used for breathing air applications unless treated in accordance with all applicable codes and regulations.Receipt and InspectionBefore signing the delivery receipt, inspect for damage and missing parts. If damage or missing parts areapparent, make the appropriate notation on the delivery receipt, then sign the receipt. Immediately contact Product Support at 1-866-443-2576.If you discover damage after receiving the air compressor (concealed damage), contact Product Support at 1-866-443-2576.Read the compressor nameplate to verify it is the model ordered, and read the motor nameplate to verify it is compatible with your electrical conditions. Make sure electrical enclosures and components are appropriate.12. Pneumatic Tire - Keep tire pressure at 20 psi for easy movement.13. Tank Pressure Gauge - Easy to read liquid filled gauge indicates pressure in the tank.14. Discharge Tube - This tube carries compressed air from the pump to the check valve. This tube becomes veryhot during use. To avoid the risk of severe burns, never touch the discharge tube.15. Engine Control - Location of choke, engine speed and fuel valve.INITIAL START-UP1. Pump is shipped with oil. Remove the oil capand check pump oil level. Add SAE 30 non-detergent pump oil (Part #4043), if necessary. Hand tighten breather cap.2. Turn pressure relief knob to engine startposition.engine manual for oil capacity and viscosity recommendations.4. Refer to engine manual to start your engine.5. Once the engine has started, move the pressurerelief knob to the engine run position.CAUTION! Unusual noise or vibration indicates a problem. Do not continue to operate until you identify and correct the source of the problem.CAUTION! Do not attach air tools to open end of the hose until start-up is completed and the unit checks out OK.6. Run the unit for 30 minutes, with ball valve open,to break in pump parts.7. Close the ball valve to shut off airflow. Thecompressor is now ready for use. 8. After 50 hours of operation change thecompressor oil.WARNING!Never disconnect threaded joints with pressure in the tank.NOTE: Reduce tank pressure below 10 psi, then drain moisture from tank daily to avoid tankcorrosion. Drain moisture from tank by opening the drain petcock located at the bottom of the tank.COMPRESSOR LUBRICATIONCAUTION! Do not operate without lubricant or with inadequate lubricant. Use of compressor without lubricant or inadequate lubricant voids all warranties. Synthetic LubricantsSynthetic lubricants are recommended after 50-hour break-in. Compressor life is greatly increased with the use of synthetic lubricants. CAUTION! If you will be using synthetic lubricant, all downstream piping material and system components must be compatible.Suitable Viton ®, Teflon ®, Epoxy (Glass Filled), Oil ResistantAlkyd, Fluorosilicone, Flourocarbon, Polysulfide, 2-Component Urethane, Nylon, Delrin ®, Celcon ®, High Nitrile Rubber (Buna N. NBR more than 36 Acrylonite), Polyurethane, Polyethylene, Epichlorohydrin, Polyacrylate, Melamine, Polypropylene, Baked Phenolics, Epoxy, Modified Alkyds( ® indicates trademark of DuPont Corporation)Not RecommendedNeoprene, Natural Rubber, SBR Rubber, Acrylic Paint, Lacquer, Varnish, Polystyrene, PVC, ABS, Polycarbonite, CelluloseAcetate, Latex, EPR, Acrylics, Phenoxy, Polysulfones, Styrene Acrylonitile (San), ButylAlternate Lubricants. You may use petroleum-based lubricant that is premium quality, does not contain detergents, contains only anti-rust, anti-oxidation, and anti-foam agents as additives, has a flashpoint of 440︒F (227︒C) or higher, and has a auto-ignition point of 650︒F (343︒C) or higher.See the petroleum lubricant viscosity table below. The table is intended as a general guide only. Heavy duty operatingconditions require heavier viscosities. Refer specific operating conditions to Powerhorse Product Support at 1-866-443-2576Pump Capacities.Refer to the following table for crankcase capacity Item # Crankcase capacity 46850 36 ozWARNING! Disconnect spark plug wire from spark plug and release air pressure from system before performing maintenance.NOTE: All compressed air systems contain maintenance parts (e.g. lubricating oil, filters, separators), which are periodically replaced. These used parts may be, or contain, substances that are regulated and must be disposed of in accordance with local, state, and federal laws and regulations.NOTE: Take note of the position and locations of parts during disassembly to make reassembly easier. The assembly sequences and parts illustrated may differ for your particular unit.DRIVE BELTTO ADJUST DRIVE BELT:1. Remove belt guard.2.the compressor.3.made.4.compressor pulley.5.shaft.6.7.the top plate.8. Attach belt guard.Kits and Service PartsAir filter: Part #AB2281000Non-detergent Oil: Part #4043This section provides a list of the more frequently encountered compressor malfunctions, their causes and corrective actions. Some corrective actions can be performed by the operator or maintenance personnel, and others may require assistance of a qualified electrician or Service Center.Any Questions, Comments, Problems or Parts OrdersCall Powerhorse Product Support 1-866-443-2576Safety CAUTIONThis engine is shipped without oil. If you startthe engine without oil, the engine will bedamaged beyond repair and will not be coveredunder warranty.Safety PrecautionsParts Descriptionsa a(Not Applicable)(Not Applicable) (Not Applicable)(Not Applicable)Battery Connection (Electric-Start Type)Use a 12 volt battery with an ampere-hour rating of at least 18AH.1.Connect the battery positive (+) cable to the starter solenoid terminal, as show.2.Connect the battery negative (-) cable to an engine mounting bolt, frame bolt, or other good engine groundconnection.3.Check the battery cable connections to be sure the cables are secured and free of corrosion. Remove anycorrosion and coat the terminals and cable ends with grease.Pre-Operation Inspection1.SAE-10W-30 is recommended for general, all temperature use. Other viscosities shown in the chart may be used when the average temperature in your area is within the indicated range.1.) Ensure that the engine is stopped and on level ground.2.) Remove the oil filler cap and wipe the dipstick clean.3.) Insert the dipstick into the oil filler neck but do not screw it in.4.) If the level is low, fill to top of the oil filler neck with the recommended oil.5.) Reinstall the dipstick.2. Air CleanerDismantle the air cleaner housing and check its filter element, make sure it is clean and intact, otherwise clean or replace the filter.Pre-Operation Inspection (cont’d)3.Fuel and Fuel TankFuel∙Your engine is designed to use FRESH, UNLEADED GAS WITH AN OCTANE RATING OF 87 OR HIGHER.∙Unleaded gasoline is recommended because it produces fewer engine and spark plug deposits and extends the life of exhaust system components.∙Never use stale or contaminated gasoline or an oil/gasoline mixture. Avoid getting dirt, dust or water in the fuel tank.1.)Remove the fuel filler cap and check fuel level.2.)If the fuel level is too low, refuel the tank.3.)Do not overfill.Gasoline Containing AlcoholIf you decide to use gasoline containing alcohol (gasohol), be sure its octane rating is at least as high as that recommended by Powerhorse. There are two types of “gasohol”. One contains ethanol, the other contains methanol.∙DO NOT use gasohol that contains more than 10% ethanol.∙Do not use gasoline containing methanol (Methyl or Wood Alcohol) that does not also contain cosolvents and corrosion inhibitors for methanol.∙Never use gasoline containing more than 5% methanol, even if it has cosolvents and corrosion inhibitors.If “spark knock” or “pinging” occurs at a steady engine speed under normal load, change brands of gasoline. If spark knock or pinging persists, consult an authorized Powerhorse dealer. If this continues, it could result in engine damage.Fuel Tank Capacity: 208cc (3 Liters) (0.79 Gallons)Starting the Engine1. Push the fuel valve to the “ON” position.2. Move the Choke Lever to the “CLOSED” position.Note: if the engine is hot, closing the choke is not necessary.3. Move the throttle lever slightly to the left.4. Start the engine.Recoil Starta. Turn engine switch to the “ON” position.b. Pull the starter grip towards your shoulder, until you feel it catch, then pull briskly.With Electric Starta. Turn the engine sw itch to the “START” position and hold it until the engine starts.b. Once engine starts, release the engine switch to “On”.Stopping the EngineIn emergency, push the engine switch to “OFF” to stall the engine; to stop it in normal, do so as follows:1.) Push the throttle lever to the right.2.) Turn th e engine switch to the “OFF” position.3.) Turn the fuel valve to the “OFF” position.High Altitude OperationAt high altitude, the standard carburetor air-fuel mixture will be excessively rich. Performance will decrease, and fuel consumption will increase.High altitude performance can be improved by installing a smaller diameter main fuel jet in the carburetor and re-adjusting the pilot screw. If you always operate the engine at altitudes high than 6,000 feet above sea level, have your Powerhorse dealer perform these carburetor modifications.Even with suitable carburetor jetting, engine horsepower will decrease approximately 3.5% for each 1,000 foot increase inaltitude. The effect of altitude on horsepower will be greater than this if no carburetor modifications are made.Exhaust Control SystemWhile the engine is running, carbon monoxide, oxide of nitrogen and hydrocarbon will produce, and in certain conditions, oxide of nitrogen and hydrocarbon will react with each other chemically and create a toxic carbon monoxide.1. MaintenanceMaintain the engine periodically in accordance with the maintenance schedule. The maintenance schedule has been created based on normal use and normal conditions. If using heavy load, operating in dusty and wet conditions, or in extreme temperatures, service of the engine should be done more frequent. 2. Replacement of PartsIt’s recommended that you should choose parts which are manufactured by Powerhorse. Using a lower standards or an incompatible part may impair the exhaust control system.Exhaust Control System (cont’d)3. ModifyingModifying the exhaust control system may affect the exhaust emissions to the point where it exceeds legal limits.Illegal modification such as:a.) Dismantling or modification of air intake or exhaust system.b.) Modification of takeoff speed-adjustment connection device or speed-adjustment device to result in the engines running beyond pre-set parameters.4. Problems Affecting Exhaust Emissionsa.) Difficult starting or difficult stopping.b.) Unstable idling.c.) Puffs of black smoke or excessive fuel consumption.d.) Poor ignition sparks or sparks returned.Should you experience any of the problems listed above, please contact your Powerhorse dealer.Maintenance** Only for paper core air cleaners. Every two years or 600 hours for dust collecting air cleaners. Service engine more frequent if used in dusty conditions.Should be done by your Powerhorse dealer, unless you are trained and equipped with the proper tools.Change engine oilWhile engine is still hot, drain all engine oil out from the crankcase.1.) Remove the oil filler cap and drain plug to drain oil2.) Install the drain plug and tighten it securely.3.) Refill with the recommended oil and check the oil level.208cc (.6 Liters/20 ounces) 4.) Install the oil filler cap.Note: Please dispose of used motor oil in a manner that is compatible with the environment. Do not throw in trash or pour on the ground.Air FilterA dirty air cleaner may block air flowing into the carburetor. To keep the carburetor in good working condition, service the air filter periodically. If operating engine in a dusty environment, it should be cleaned frequently.1.) Remove the wing nut and the air cleaner cover. Remove the element and separate them. Carefully check element for holes or tears and replace if damaged.2.) Clean element with household detergents and warm water, rinse thoroughly. Allow element to dry completely.3.) Soak element in clean engine oil and squeeze out the excess oil. Engine will smoke during initial start- up if too much oil is left on foam.4.) Reinstall the filter element and air cleaner housing.Sediment Cup CleaningTurn the fuel val ve to “OFF”. Remove the sediment cup and o -ring and wash them in nonflammable or high flash point solvent. Dry them thoroughly and reinstall securely. Turn the fuel valve on and check for leaks.Spark PlugRecommended Spark Plug:To ensure the proper engine operation, the spark plug must be properly gapped and free of deposits.1. Remove the spark plug cap and use a spark plug wrench to remove the plug.2. Visually inspect the spark plug. Discard if the insulator is cracked or chipped. Clean the spark plug with a wire brush if it is to be reused.3. Measure the plug gap with a feeler or gauge. The gap should be .07-.08mm (0.028-0.031 in). Correct as necessary by bending the side electrode.4. Check that the spark plug washer is in good condition and thread the spark plug in by hand to prevent cross-threading. If spark plug is damaged, replace with a new one.5. After the spark plug is seated, tighten with a spark plug wrench to compress the washer.NOTE: When installing a new spark plug, tighten ½ turn after the spark plug seats to compress the washer. When reinstalling a used spark plug, tighten 1/8-1/4 turn after the spark plug seats to compress the washer.Idling Adjustment1. Start the engine and allow it to warm up to normal operating temperature.2. With the engine idling, turn the pilot screw in or out to the setting that produces the highest idle rpm. Standard idling will be 1500 ± 150 rpm.Transport, Storage, and Removal from StorageTransportTransport with the fuel vale turned to the “OFF” position. Only store the engine when it has cooled off to avoid fires or burns.StorageBefore Storing EngineBefore storing the unit for an extended period:1. Be sure the storage area is free of excessive humidity and dust.2. Drain the fuel.a. With the fuel valve in the “OFF” position, remove and empty the sediment cup.b. Turn the fuel valve to the “ON” position and drain the gasoline from the fuel tank into a suitable container.c. Replace the sediment cup and tighten securely.d. Draing the carburetor by loosening the drain screw. Drain the gasoline into a suitable container.3. Change the engine oil.4. Remove the spark plug and pour about a tablespoon of clean engine oil into the cylinder. Crank the engine several revolutions to distribute the oil, then reinstall the spark plug.5. Pull the starter rope slowly until resistance is felt. Continue pulling until the notch on the starter pully aligns with the hole on the recoil starter. See illustration below. At this point, the intake and exhaust valves are closed, and this will help to protect the engine from internal corrosion.6. Electric starter type: Remove the battery and store it in a cool, dry place. Recharge it once a month.7. Cover the engine to keep out dust.Transport, Storage, and Removal from Storage (cont’d)Removing From StorageBefore reusing, service the engine.Note: Please dispose of fuel in a manner that is compatible with the environment. Do not throw in trash or pour on the ground.Engine SpecificationsTune-up SpecificationsTroubleshootingDear Valued Customer:The Powerhorse Product you just purchased is built with the finest material and craftsmanship. Use this product properly and enjoy the benefits from its high performance. By purchasing a Powerhorse product, you show a desire for quality and durability. Like all mechanical equipment this unit requires a due amount of care. Treat this unit like the high quality piece of machinery it is. Neglect and improper handling may impair its performance. Please thoroughly read the instructions and understand the operation before using your product. Always contact Powerhorse Product Support at 1-866-443-2576 prior to having any service or warranty work performed, as some services performed by parties other than Powerhorse approved service centers may void this warranty. This warranty is in lieu of any other warranty expressed or implied and Powerhorse assumes no other responsibility or liability outside that expressed within this warranty.Limited WarrantyPowerhorse shall warranty any piece of equipment manufactured, or parts of equipment manufactured, to be free from defects in material or workmanship for a period of:“Consumer use” means personal residential household use by a consumer. “Commercial use” means all other uses, including use f or commercial, income producing or rental purposes or when purchased by a business.This warranty applies to the original purchaser of the equipment (verification of purchase, in the form of a receipt, is the responsibility of the buyer), is non-transferable, and covers parts and labor. Parts will be replaced or repaired at no charge, except when the equipment has failed due to lack of proper maintenance. If a part is no longer available, the part may be replaced with a similar part of equal function. Any misuse, abuse, alteration or improper installation or operations will void warranty. Determining whether a part is to be replaced or repaired is the sole decision of Powerhorse. Powerhorse will not provide for replacement of complete products due to defective parts. Any costs incurred due to replacement or repair of items outside of a Powerhorse approved facility is the responsibility of the buyer and not covered under warranty. Transportation costs to and from service center is the responsibility of the customer.In addition to the normal warranty, Powerhorse shall warrant any normal wear item from defects in material or workmanship for a period of 90 days from the date of purchase by user. Normal wear items include, but are not limited to, belts and filter elements.This warranty specifically excludes the following; failure of parts due to damage caused by accident, fire, flood, windstorm, acts of God, applications not approved by Powerhorse in writing, corrosion caused by chemicals, use of replacement parts whic h do not conform to manufacturer’s specifications, damage related to rodent and/or insect infestation and damage caused by vandalism. Additional exclusions: loss of running time, inconvenience, loss of income, or loss of use, including any implied warranty of merchantability of fitness for a specific use. Also, Outdoor Power Equipment needs periodic parts and service to perform well, and this warranty does not cover instances when normal use has exhausted the life of a component or the engine.This warranty does not cover any personal injury or damage to surrounding property caused by failure of any part. Repair or replacement of parts does not extend the warranty period.The engine warranty is covered under the same terms and conditions as outlined above. Normal engine maintenance such as spark plugs, air filters, adjustments, fuel system cleaning and obstruction due to build up is not covered by this Powerhorse warranty.Please fill in the following information and have it on hand when you call in on a warranty claim.Customer Number: ______________________________________________________________Date of Purchase: _______________________________________________________________Powerhorse Serial Number: _______________________________________________________Item Number: __________________________________________________________________Manufactured byNorthern Tool + Equipment Co.,2800 SouthCross Drive WestP.O. Box 1499 Burnsville, MN 55337-0499。
- 1、下载文档前请自行甄别文档内容的完整性,平台不提供额外的编辑、内容补充、找答案等附加服务。
- 2、"仅部分预览"的文档,不可在线预览部分如存在完整性等问题,可反馈申请退款(可完整预览的文档不适用该条件!)。
- 3、如文档侵犯您的权益,请联系客服反馈,我们会尽快为您处理(人工客服工作时间:9:00-18:30)。
半自动充气机使用说明及设备维护手册
本半自动充气灌装机广泛用于各种以空气作为抛射剂的气雾剂产品的定量灌装。
本机具有操作安全可靠,计量准确,适用范围广泛等特点。
一、设备组成及主要参数
1.设备组成:
本设备组要由气体计量缸、充气头、台面、机架、及气动元件组成。
2.主要参数
二、基本结构及工作原理
因诸多气雾剂产品在生产时经常会灌装易燃易爆的物质。
本机采用全气压传动的机械结构模式以彻底杜绝因用电时产生电火花的不安全因素,从而达到防火防爆的要求。
本机在结构上主要有气体计量缸、充气头、台面、机架及气动元件组成。
气体计量缸固定在台面上靠后的位置,充气头安装在升降立柱的台板上,根据罐子的高度不同方便上下调节。
充气:打开充气旋钮开关,轻踩一下脚踏阀,气体计量缸双气控换向阀换向,充气头在小气缸的作用下下压气雾罐,喷嘴将自动打开。
同时气体计量缸动力气缸的上腔进气,下腔排气,动力气缸活塞推动抛射剂活塞下压,将计量缸抛射剂缸内的抛射剂经充气头注入封好口的气雾罐内。
这时,动力气缸活塞下压触发信号阀,信号阀输出气压作用到气体计量缸双气控换向阀使其换向,并使充气头小气缸和动力气缸进、出气方向逆转,从而使充气头和计量缸复位,并且计量缸复位同时从钢瓶中吸入等量的气体,等待下次灌装。
可以通过旋转计量缸顶部的调节旋柄来调节计量缸气缸定位活塞的高度,从而改变计量缸活塞的行程来最终改变灌装的计量大小。
三、安装、调试及操作
1.设备安装
(1)设备安装时注意调节主机各地脚的高度使设备保持水平、安稳。
安装地点应注意设备操作、维护和修理的必要空间。
(2)在主机的气源三联件上的油雾器中添加适量的气动设备专用油。
(3)将从空压机输出的压缩空气气管接入到主机的气源三联件的输入接口。
注意:该设备灌装的抛射剂为压缩空气,所以计量缸进料口连接的气管是从主机气源三联件后端分支出的气管,该气管经过单独的减压阀进行调节压力。
连接时,各接口处的螺帽要拧紧,以免漏气。
如出现漏气现象,需重新接好接口,不要强行生产,以免发生危险。
2.设备调试
(1)调节主机台板的高度。
首先打开主机的气源前手滑阀,使充气机处于复位状态。
在充气头下方的罐子定位丝杆处放置一个封好口的气雾罐,拧松台板立柱紧固螺丝,调节台板高度,使充气嘴高于气雾罐阀门嘴1cm左右。
最后拧紧台板立柱紧固螺丝。
(注意:在调节台板高度时,要保证充气时充气头下压,充气嘴能完全压住气雾罐阀芯且充气嘴能向上压缩顶开充气头里的阀门,这样才可以进行充气。
否则充气头里的阀门没有顶开是无法进行充气的。
)
(2)气雾罐定位丝杆的调节。
台板高度调节完成后,关掉气源前手滑阀,这时充气头可以上下活动,在充气头下方放置一个封好口的气雾罐,手动将充气头往下压住气雾罐,保持气雾罐位置不动,将定位丝杆上的螺母拧松,调节丝杆的伸出长度,使之刚好顶住罐壁,然后拧紧螺母。
(3) 充气机计量调节。
可以通过旋转计量缸顶部的调节旋柄来调节计量缸气缸定位活塞的高度,从而改变计量缸活塞的行程来最终改变灌装的计量大小。
(注意,在调节前,要关闭主机上气源前手滑阀,并等待设备中压缩空气排空,否则无法转动旋柄。
先将计量调节到一个大概的位置,进行试灌装,然后根据灌装量来进行调整计量,直至计量达到所需要求。
最好是由小往大调节计量,如果是从大往小调节,而且调节的幅度较大,可能会出现调节一段距离后旋柄再无法再继续转动的情况,此时,则需要将充气头的充气嘴向上顶一下,适当排出一点气体即可继续调节了。
)
3.设备操作
开始生产时,将待充气的气雾罐放置在充气头下方的罐子定位丝杆处,然后打开充气开关,踩下脚踏阀,充气机开始充气,完成后取走气雾罐即可。
(注意,踩脚踏阀的时候只需要轻踩一下即可,切勿用力或者踩着不放。
取罐放罐的过程中,用力不宜过大,以免罐子定位不准)。
(1)如果在生产中出现意外情况时,可以按下复位按钮开关,这时,设备将恢复到复位状态。
(2)在生产时,要注意主机前面两块压力的数值,量程0-2.5MPa的压力表是显示压缩空气经主机气源减压阀调节后的压力,与主机气源三联件上的压力表显示的是一致的,一般为0.4-0.7MPa;量程0-4MPa 的压力表是显示抛射剂的压力。
如果压力出现异常,要停止生产排查原因,以免计量不准或者无法生产。
四、故障分析与排除方法
五、机器的维护与保养
1、生产中不要碰撞、折弯设备中的各种气管。
2、要定期对机器作全面的清洁保养,检查接头、阀门等元件是否漏气或损坏。
3、气源三联件的油水分离器要勤排水,以免水分进入气路,使各种阀芯生锈失灵,油雾器要勤加油。
4、各运动部件加油润滑。
5、要经常检查所有的紧固件,排除松动情况。
六、安全生产及注意事项
1、请在专门设置的厂房或者生产作业区域内进行生产,且厂房或者作业区域的安全设施符合国家相关规定。
2、在生产中请使用符合国家标准的气雾罐、阀门及原料。
3、如果生产时涉及到易燃易爆物质,厂房要严禁烟火、禁止使用手机、加强通风,防止易燃易爆气体积聚引发安全事故。
4、在设备安装时要进行可靠的防静电接地措施。
以免在生产过程中因静电产生火花,从而引发安全事故。
5、切勿超过正常额定压力进行生产,以免发生危险或损坏设备。
6、该设备建议安装在远离其他用电设备的生产区域。
7、应定期检查气瓶、各阀门、管道、缸体等设备,特别是活动连接部位,若发现因密封材料老化或者连接不好产生漏气,应立即处置。
8、生产完毕后,应关掉设备压缩空气和原料的阀门,需要进行回流
处理的要及时进行回流操作。
9、要定期进行成品检测,如发现漏气现象要及时停止生产,排除原因。