佳能iP100打印机产品概述
佳能 EF100mm f 2.8L MACRO IS USM 说明书
放大率和有效 f -值
照相机所显示的光圈是假定焦距为无限远时的数 值,以较此更近的对焦距离(放大率增加)拍摄 时,实际光圈(有效 f -值)变暗(有效 f -值增 加) 在普通拍摄时, 。 这不会造成曝光问题, 但在 近距离拍摄时,则不能忽视有效 f -值的变化。
CHI-4
2. 设置对焦模式
3. 切换对焦距离范围
要在自动对焦模式 (AF) 下进行拍摄, 请将对焦 模式开关设置为 AF。 要仅使用手动对焦 (MF) 请将对焦模式开关设 , 置为 MF,然后转动对焦环进行对焦。您可以在 所有对焦模式下使用对焦环。
在单次自动对焦(ONE SHOT AF)模式下进 行自动对焦后, 您可以半按快门键并转动对焦环 来进行手动对焦。 (全时手动对焦)
牢牢握住相机
如右图所示,牢牢握住相机,拍摄时不要让其移 动。
双肘靠在桌子等稳固的平面上。
AI Servo AF(智能伺服对焦)
近距离拍摄时, 将相机的 AF (自动对焦) 模式设 置成 AI Servo AF(智能伺服对焦) 。建议使用 自动对焦。 AI Servo AF(智能伺服对焦)模式可以减少 近距离拍摄时的离焦模糊。 详细内容请参照相机的说明书。
微距拍摄
微距照片的放大倍率最高可达1x (原尺寸放大) 。 最近对焦距离 30 cm 是指从拍摄对象到焦平面 的距离。 从镜头前面到拍摄对象的工作距离大约 为 14 cm。 普通微距拍摄时,放大率越大,快门速度就必须 越快,以防止因相机抖动引起的离焦模糊。 尽管取决于拍摄条件, 但快门速度通常必须比普 通拍摄时至少快一个档或两个档。 对于 0.5 倍拍摄放大率,此镜头具有与快约三个 档的快门等同的效果。对于 1 倍拍摄放大率,具 有与快约两个档的快门等同的效果。*
佳能iP100详细参数

400-622-2666纠错
电话备注
周一至周五:9:00-20:00;周六和周日:9:00-18:00(节假日休息)纠错
详细内容
佳能支持全国联保,可享有三包服务。若按使用说明和操作指南正常使用情况下,本品发生故障,您可查询最近的维修点,由厂商售后解决。也可凭厂商维修中心或特约维修点所提供的质量检测证明,享受7日内退货,15日内换货。超过15日又在质保期内,可享受免费保修等三包服务政策,产品的保修起始日期以购机发票标明的购机日期为准。进入官网>>纠错
最小墨滴
1pl纠错
喷头配置
共1856个喷嘴(青色/品红256×4个,染料黑色/黄色256×2个,颜料黑色320个)纠错
其它参数
产品尺寸
322×185×61.7mm纠错
产品重量
约2kg纠错
系统平台
Windows Vista/ XP/2000
Mac OS X v.10.5/X v.10.4/ X v.10.3.9纠错
T恤转印介质(TR-301):1
信封:European DL and US Com. #10=10纠错
耗材
墨盒类型:一体式墨盒纠错
墨盒数量:五色墨盒纠错
墨盒型号:黑色颜料PGI-35,彩色染料CLI-36纠错
墨水容量:彩色文档(A4):黑色颜料191页,彩色染料249页
照片(4"×6"):黑色颜料2080页,彩色染料112页纠错
介质尺寸
A4,Letter,Legal,A5,B5,Envelopes(DL,COM10),4×6",5×7",8"x10",信用卡,Wide纠错
介质重量
普通纸:64-105g/m²,特殊纸:大约273g/m²纠错
打印机发展史

打印机发展史互联网络的飞速发展,有人预言无纸时代即将来临,打印机的末日已到。
然而全球纸张消费量每年以成倍的速度在增长,打印机的销量以平均接近8%的速度在增加。
这一切都预示着打印机不但不会消失,而且会发展越来越来快,应用的领域越来越宽广。
从1885年全球第一台打印机的出现,到后来各种各样的针式打印机、喷墨打印机和激光打印机,它们在不同的年代各领风骚,今天让我们寻觅历史的足迹,从技术、品牌与产品、应用市场及目标消费者三个方面,回顾喷墨打印机的光辉历史,同时对喷打未来的发展趋势作简单分析。
一、技术喷墨打印机基本的工作原理都是先产生小墨滴,再利用喷墨头把细小的墨滴导引至设定的位置上,墨滴越小,打印的图片就越清晰。
基本原理看起来很简单,但操作起来就没那么简单了。
正如微积分原理也并不复杂,复杂是的如何运用一样。
下面介绍喷墨打印机几次技术突破具有历史意义的纪事。
时间事件纪要1976年全球第一台喷墨打印机诞生1976年压电式墨点控制技术问世1979年Bubble Jet气泡式喷墨技术问世1980年8月Canon公司第一次将其气泡喷墨技术应用到其喷墨打印机Y-80,从此开始了喷墨打印机的历史。
1991年第一台彩色喷墨打印机、大幅面打印机出现1994年微压电打印技术问世1996年Lexmark利用EXCIMER氩(ARGON)/氟(FLUMRINE)雷射切割技术推出全世界第一台1200*1200dpi超高分辨率彩色喷墨打印机Lexmark CJ70001998年全球第一款同时具有1440dpi的最高分辨率和六色打印功能的彩色喷打EPSON Stylus Photo700面世1998年全球首款7色照片打印机Canon BJC-7100诞生1999年第一台不使用计算机可打A4照片的彩色喷墨打印机EpsonIP-100横空出世2000年第一款支持自动双面打印的彩色喷墨打印机HP DJ970Cxi诞生。
2003年全球第一款应用八色墨水技术的数码照片打印机HP Photosmart 7960问世2005年春全球首款9色照片打印机HP Photosmart 8758诞生1976年,第一台喷墨打印机诞生喷墨打印技术早在1960年就有人提出,但过了16年第一部商业化喷墨打印机才诞生在IBM,原始的IBM4640采用欧洲瑞典路德工业技术学院的教授Hertz 和他的同僚所开发,称之为连续式喷墨技术。
Canon PIXMA iP110 电池版打印机说明书

Product RangePIXMA iP110 with batteryPIXMA iP110you canConnected printing on the moveConnect and print on the move with the ultimate portable printer. This lightweight printer can fit into a laptop bag and lets you print direct from smart devices and the cloud -with outstanding results.PIXMA iP110PIXMA iP110 with batteryPIXMA iP110•Connect and print on the move with the ultimate portable Wi-Fi printer•Impress with exceptional quality, high-resolution 9,600 dpi prints•Experience the creative freedom of cloud printing using PIXMA Cloud Link•Get ready to effortlessly print from smart devices using PIXMA Printing Solutions app•Enjoy incredible quality document and photo printing wherever you are•Easily print in your car or anywhere without internet access thanks to Access Point Mode•Print without power cords using the optional battery packTechnical SpecificationsOVERVIEWFunctions Wireless Print, CloudPRINTER SPECIFICATIONSPrint Resolution Up to 9600 [1] x 2400 dpiPrint Engine 2 ink cartridges: Black (Pigment BK) andColour(BK, C, M, Y)Inkjet FINE print head with 1pl (min.) ink droplet sizeChromaLife100 inksPhoto Lab Quality Speed Borderless 10 x 15cm: Approx. 50 seconds (Standard) Mono Print Speed approx. 9.0 ipm[2]Colour Print Speed approx. 5.8 ipm[2]Photo Print Speed Borderless 10x15cm : approx. 53 sec. [3]Borderless Printing Yes (A4, Letter, 13 x 18cm, 10 x 15cm, 20 x 25cm)Two Sided Printing Manual operationCARTRIDES AND YIELDSCompatible Inks PGI-35 BlackCLI-36 ColorInk Cartridge Life PGI-35 Black: 191 pages or 1915 photos*CLI-36 Colour: 249 pages or 104 photosTesting standards ISO/IEC 24711 for A4 colour document pagesISO/IEC 29102 for 10x15cm colour borderless photosValues obtained by continuous printing* Estimated supplemental yieldPAPER SUPPORTPaper Types Plain PaperEnvelopesPhoto Paper Glossy II (PP-201)Glossy Photo Paper (GP-501)Matte Photo Paper (MP-101)Photo Stickers (PS-101)Maximum Paper Input Sheet Feeder: Max. 50 sheetsPaper Sizes A4, B5, A5, Letter, Legal, Envelopes(DL size or Commercial 10), 10 x 15cm,13 x 18cm, 20x25cmPaper Weight Plain paper: 64 to 105 g/m²Canon photo papers up to 275 g/m²CONNECTIVITYWired Connections Hi-Speed USB (B Port)Wireless Connections Wi-Fi: IEEE802.11 b/g/nWi-Fi Security: WPA-PSK, WPA2-PSK, WEP, AdministrationpasswordApplications Support PIXMA Cloud LinkPIXMA Printing Solutions appCanon Print Service Plugin (Android)Google Cloud PrintApple AirPrintAccess point modeWLAN PictBridgeDRIVERS AND SOFTWARESupported OperatingSystems Windows 8.1 / 8 / 7 / Vista SP1 & SP2 / XP SP3 32-bit Mac OS X v10.6.8 or laterSupported Mobile Systems iOSAndroidWindows RTMinimum System Requirements Windows: 3GB disk space, Internet Explorer 8 Mac: Internet connection, 1.5GB disk space, Safari 5 Display: 1024 x 768 XGASoftware Included Printer driverMy Image GardenQuick MenuEasy-WebPrint EX (plug-in for IE8 or higher)Standard disclaimersAll specifications subject to change without notice.Print speed may vary depending on system configuration, interface, software, document complexity, print mode, page coverage, type of paper used etc.Ink yield may vary depending on texts/photos printed, applications software used, print mode and type of paper used. For more information see /ink/yieldAll brand and product names are trademarks of their respective companies.Footnotes[1]Ink droplets can be placed with a minimum pitch of 1/9600 inch[2]Document print speed on plain paper is measured based on average of ESAT in OfficeCategory Test of ISO/IEC 24734 standard[3]Photo print speed is based on default driver setting using ISO/JIS-SCID N2 standard on CanonPhoto Paper Plus Glossy II and does not take into account data processing time on hostcomputer.[4]Declared document yield value in accordance with ISO/IEC 24711 standard. Values obtainedby continuous printing.[5]Declared photo yield value in accordance with ISO/IEC 29102. Values obtained bycontinuous printing.[6]When printing ISO/JIS-SCID N2 (printed by inkjet printer) on A4 size plain paper using defaultsettings.[7]When printing ISO/JIS-SCID N2 pattern on 10x15cm Photo Paper Plus Glossy II using defaultsettings.GENERAL FEATURESPower Source AC: 100-240V, 50/60HzOptional Li-ion battery (LK-62)Power Consumption Standby: approx. 1.8W (wireless connection to PC)Off: approx. 0.2WPrinting: approx. 10W (wireless connection to PC) [6] Recommended OperatingEnvironmentTemperature: 15-30°CHumidity: 10-80%RH (no dew condensation)Acoustic Noise Levels approx. 38.5 dB(A) [7]Dimensions (W x D x H)Approx. 322 x 226 x 62 mmApprox. 322 x 185 x 62 mm (without battery)Weight Approx. 2.2 kgApprox. 2.0 kg (without battery)Connected printing on the moveConnect and print on the move with the ultimate portable printer. Thislightweight printer can fit into a laptop bag and lets you print direct from smartdevices and the cloud -with outstanding results.Positioning: For connected business users on the move –the portable printerwith advanced Wi-FiSales start date: October 2014Product Details:Product name Mercury Code EAN Code Recommended Retail Price iP110 EUM/EMB9596B009AA4549292012477<Please fill in RRP> Consumables or Accessories and SuppliesProduct name Mercury Code EAN Code Recommended Retail Price PGI-35 BK1509B001AA4960999391731 <Please fill in RRP>CLI-36 CL1511B001AF4960999391762 <Please fill in RRP>Battery Kit LK-62 EMEA2446B005AA4960999612157<Please fill in RRP> Measurement / Logistic Information:Package Style Q’ty of the item Size (L x W x H mm)Weight (G/N kg) Individual1381 x 166.3 x 256 3.6 / 1.9Pallet (Upper)721,151 x 1,006 x 1,036.5259.2 / 136.8Pallet (Bottom)721,151 x 1,006 x 1,036.5259.2 / 136.8 What’s in the box?•Printer –PIXMA iP110•Ink Tanks•Power cord•Matte Photo Paper MP-101 (for auto print head alignment)•Setup CD-ROM (CD only for Windows –Mac drivers available online)•Manuals and other documents。
佳能IP系列打印机

佳能ip2780采用佳能成熟的fine打印头技术,令打印出的文本更锐 利清晰;高品质的高速打印,最高打印分辨率4800×1200dpi,最小墨滴 2微微升,最大打印幅面是a4,打印清晰。
整体外观图(19张)佳能ip2780的最高分辨率可达4800×1200dpi,最 小墨滴只有2微微升,单面黑白文本打印速度达7.0ppm,彩色打印速度为 4.8ppm,为家庭用户提供一个快速、高效的打印环境。佳能ip2780采用 佳能成熟的fine打印头技术,令打印出的文本更锐利清晰;高品质的高速 打印,最高打印分辨率4800×1200dpi,最小墨滴2微微升,最大打印幅 面是a4,最高分辨率是4800×1200dpi,打印清晰,支持自动供纸的方式。
适用类型
家用打印机
墨盒类型
四色墨盒
佳能iP7280喷墨打印机黑白打印速度为15.0ipm,A4彩色打印速度为 10.0ipm,快捷高效。4x6寸照片打印速度约为21秒,为家庭用户带来高 速的打印体验。
佳能iP7280喷墨打印机内置了自动双面打印和Wi-Fi无线打印功能。 Wi-Fi无线打印功能也让用户彻底摆脱繁琐的USB线或以太线连接, AirPrint能让用户轻松实现智能的移动无线打印,在家就能让iPad和 iPhone等智能终端实现无线打印照片、邮件等各类文件。 整体外观图(13张)产品定位:家用打印机 墨盒类型:分体式墨盒 墨盒数量:五色墨盒 最高分辨率:9600×9600dpi 络打印:支持无线络打印
介质尺寸 A4,Letter,Legal,A5,B5,Envelopes(DL,COM10), 4×6",5×7",8×10"
介质重量自动供纸器:普通纸:64-105g/㎡,特殊纸:约300g/㎡ (PT-101)
佳能腾彩PIXMA iP100——便携照片打印机
佳能腾彩PIXMA iP100——便携照片打印机
佚名
【期刊名称】《《新潮电子》》
【年(卷),期】2008(000)008
【摘要】笔记本电脑的诞生,便是以便携化的设计迎合了移动商务办公的需求。
便携,这个关键词也一直影响着其他商务产品,正如佳能(Canon)的iP系列所寓示的含义“idea Print”一样,一台能让商务人士随身携带,满足其自助打印的产品不失为一个好主意。
【总页数】1页(P199)
【正文语种】中文
【中图分类】TP334.8
【相关文献】
1.随身办公的便携利器——佳能便携式高端打印机腾彩PIXMA IP100 [J],
2.专业所以精彩:佳能PIXMA Pro9500&PIXMA Pro9000照片打印机 [J],
3.影像魅力的极致呈现——佳能专业A3+喷墨照片打印机腾彩PIXMA Pro系列[J],
4.照片,就要打出来佳能腾彩PIXMA iP4980照片打印机 [J], 王阔
5.照片,就要打出来佳能腾彩PIXMA iP4980照片打印机 [J], 王阔
因版权原因,仅展示原文概要,查看原文内容请购买。
佳能ip2700打印机说明

前视图(1)前盖更换FINE墨盒或取出打印机中的卡纸时将其打开。
(2)纸张导片滑动以对齐纸叠的两侧。
(3)后端托盘装入可以在本打印机上使用的各种尺寸或类型的纸张。
可以同时装入两张或更多相同尺寸和类型的纸张,并且每次自动送入一张。
请参见装入纸张。
(4)靠纸架打开以在后端托盘中装入纸张。
(5)出纸槽输出打印输出。
请勿在出纸槽前面放置任何物品。
(6)电源按钮按下可以打开或关闭电源。
重要事项断开电源插头关闭电源后断开电源插头时,请务必确认电源指示灯是熄灭的。
如果在电源指示灯亮起或闪烁时从壁装电源插座上断开电源插头,打印机可能会由于打印头未受保护而无法正确打印。
注释自动电源开/关功能可以设置打印机自动开启或关闭。
- 自动电源开:从计算机发送数据时会自动开启打印机。
- 自动电源关:在指定时间间隔内无数据发送时会自动关闭打印机。
在打印机驱动程序设置窗口的维护选项卡上指定此设置。
有关设置的详细资料,请参阅电子手册:高级指南。
(7)电源指示灯电源开启时,闪烁后亮起绿色。
(8)警告指示灯发生错误(如缺纸或墨水用完)时,闪烁橙色。
注释电源和警告指示灯可以通过电源和警告指示灯检查打印机状态。
- 电源指示灯熄灭:电源关闭。
- 电源指示灯亮起绿色:打印机已准备就绪,可以打印。
- 电源指示灯闪烁绿色:打印机正在准备打印或打印正在进行。
- 警告指示灯闪烁橙色:发生错误并且打印机无法打印。
有关详细资料,请参阅电子手册:《高级指南》中的“故障排除”。
- 电源指示灯和警告指示灯交替闪烁绿色和橙色:可能发生需要联系服务中心的错误。
有关详细资料,请参阅电子手册:《高级指南》中的“故障排除”。
(9)恢复/取消按钮按此按钮以取消正在进行的打印作业。
在解决打印机问题之后,可按此按钮以解除打印机错误状态并恢复打印。
后视图(10)USB端口插入USB电缆线连接打印机和计算机。
重要事项请勿触摸金属外壳。
请勿在打印时插入或拔出USB电缆线。
(11)电源线连接器在此插入附带的电源线。
Canon FAX-L120 L100 高级指南
CHI 高级指南可执行的操作- 传真- 复印- 打印(仅限于L120)在使用设备前,请先阅读本指南。
阅读完后,请妥善保存以备将来参考。
打印机手册●打印机设置和软件安装●功能概述●维护和疑难解答入门指南●基本功能●打印机设置●规格基础指南●高级传真功能●状态监视器●报告和列表高级指南(本文档)●驱动程序安装●打印软件指南(仅限L120) 表示此手册是在随附的光盘中以PDF 格式提供的。
●要阅读PDF 格式的手册,需要安装Adobe Reader/Adobe Acrobat Reader。
如果您的系统上未安装AdobeReader/Adobe Acrobat Reader,请从Adobe Systems Incorporated 网站下载。
●为了确保打印机手册准确无误,我们做了很多努力。
但是,由于我们一直在改进自己的产品,如果您需要确切的规格,请与Canon 联系。
●封面上的打印机图示可能与您的打印机稍有不同。
CD-ROMCD-ROM高级指南的结构1高级传真功能2状态监视器3报告和清单4故障排除5附录i可进行的工作传真:用单键指定一个收件人单触式快速拨号→基础指南传真:用三位数编码指定收件人编码式快速拨号→基础指南传真:用单键指定多个收件人组拨号→基础指南传真:在电话簿中查找某个特定的收件人电话簿拨号→第1-3页传真:占线情况下的重拨重拨→第1-4页传真:一份传真发至多个收件人群发→第1-11页AAAAABBBBBCCCCC传真:在指定时间发送传真定时发送→第1-11页传真:在收件人请求时发送传真查询发送→第1-12页传真:传真接收到存储器中不作打印存储接收→第1-8页iiiii 传真:拒收来自未登记号码的传真接收限制→第1-9页传真:发送传真后,再转发至其它传真机启动转发→第1-14页复印:根据待扫描图像的质量选择扫描模式图像质量→基础指南ABC ABC ABC ABC复印:调整扫描图像的浓度浓度→基础指南复印:放大或缩小复印图像缩放比例→基础指南A A目录高级指南的结构 (i)可进行的工作 (ii)1 高级传真功能................................................................1-1拨号功能.......................................................1-3电话簿拨号..................................................1-3重拨........................................................1-4通过电话总机拨号............................................1-5临时切换至音频拨号..........................................1-6接收功能.......................................................1-7设定接收模式................................................1-7存储器接收..................................................1-8接收限制....................................................1-9远距离接收..................................................1-9 iv附加传真模式..................................................1-11群发.......................................................1-11定时发送...................................................1-11查询发送...................................................1-12查询接收...................................................1-13启动转发...................................................1-14取消保留...................................................1-15取消作业......................................................1-162 状态监视器..................................................................2-1检查作业和传真机状态...........................................2-2检查和打印发送/接收结果....................................2-2打印报告和清单..............................................2-3检查打印和扫描数量..........................................2-33 报告和清单..................................................................3-1报告和清单一览表...............................................3-2自动打印报告...................................................3-3TX RESULT REPORT(发送结果报告)............................3-3RX RESULT REPORT(接收结果报告)............................3-4ACTIVITY REPORT(动态报告).................................3-5v4 故障排除....................................................................4-1一般问题.......................................................4-2输纸问题.......................................................4-3传真问题.......................................................4-4发送问题....................................................4-4接收问题....................................................4-6复印问题......................................................4-10电话问题......................................................4-11打印问题......................................................4-125 附录........................................................................5-1术语表.........................................................5-2索引...........................................................5-9 vivii 打印机手册中使用下列符号表示在使用打印机时应当牢记的警告和注意事项。
佳能小型照片打印机炫飞系列 个人专用打印指南说明书

有关故障排除的详情, 请参阅打印机使用者 指南。
3
使用炫飞 SELPHY 打印照片变化多样 - 1
B,C
个 人专用打印指南 可在照片上打印日期及编号便于整理。 可采用特殊打印效果, 打印出更精美的照片。 可选择打印张数, 将欢乐和朋友分享。
Y P O
!
可用多种不同类型的纸张打印。
如果出现了错误信息…
请依照画面指示进行操作。 * 如果出现了[文件错误], 表示您选了不能打印的图像。 其他相机拍摄的图像, 或者曾经计算机软件 修改过的图像, 可能不能打印。 * 如果出现了[打印错误], 请检查纸张尺寸的设置。 如果纸张设置是正确的, 但出现了此错误信息, 请关闭打印机, 然后再打开电源。 * 如果出现了[墨水收集器已满], 请联系佳能热线中心, 要求更换墨水收集器。 如果打印机的错误提示灯闪烁或出现了错误信息, 请查阅打印机使用者指南。
钮*, 或触摸[OK] 各相机型号有不同的操作方式。 请 * 依照画面下方的指示进行操作。 按钮, 或转动控制转盘*, 或 触摸 [ ]
[ 证件照片] 所选择的图像, 必须是采用相机 L(大)记录像素设置所拍 * 摄的图像。 [ 固定尺寸] 只可选择 L 尺寸、 明信片尺寸、 宽尺寸的纸张。 *
不能剪裁小于640X480 像素的图像。 * 已附加了日期的图像, 剪裁后, 该图像可能无法正确地 * 显示日期。
4
使用炫飞 SELPHY 打印照片变化多样 - 2
在短片中挑选喜爱的镜头, 然后打印出来。
个 人专用打印指南
将挑选的图像全部打印在一张照片上(DPOF)。 索引打印让图像管理的工作变得十分轻松写意。
佳能打印机 IP3600 IP3680 IP4600 IP4680 连续供墨系统安装手册说明书

Installation Manual onContinuous ink supply system (CISS)For printer Canon IP 3600/IP 3680/IP 4600/IP 4680 Thank you for using the “INKSYSTEM” Continuous ink supply system. It is the best device for an inkjet printer, and it will definitely decrease your printing costs. Before using this system, please read this manual carefully. The pictures in this manual may be different with the real ones. Here just for your reference.Remarks: Some pictures maybe different from the real products, especially for the external ink tank, these pictures are just for reference, please handle according the real products.I. Instruction1. Accessories1) Continuous ink supply system (1)2) Air Filter (1)3) Sponge (1)4) Injector (1)5) Long needle (1)6) Short needle (1)7) Protection clamp (1)8) Installation Manual (1)9) Certificate on free installation (1)Pic. 1-1 Pic. 1-22. Inspection before installationCheck whether CISS is pulling out, if tube is disconnected.Please contact local distributor if have found problems.II. Test printer1. Check whether printer conditions are normal.2. Enter nozzle test option (2-1), print nozzle test sheet to see whether nozzle is normal (2-2, 2-3).Pic. 2-1 Pic. 2-2 Pic. 2-33. If printer is alright, please print a picture to see the result.Ill. Installation Procedures1. Prepare the systemPut this system on the right side of the printer, tidy up ink flow tubes (3-1-1), pull out all air plug and replace them with air filter with bigger side downward (keep air plug for next use) (3-1-2). Move tube valve to close position (3-1-3), if you do not close this valve, ink maybe flow back, leak, or mis-color.Pic. 3-1-1 Pic. 3-1-2 Pic. 3-1-32. Install the CISS cartridgesTurn the printer on, open it’s cover, cartridge holder will move to the "cartridge change" position, plug the power source off, take the original cartridge off. Take cartridge red color, clean them for next use). Install the cartridges according to the color order; press back the cartridge cover.3. Fix iron rackTake the sponge sticker cover off, stick it on the printer body according to the indicated space , do not twist the tube .4. Check the tube lengthMove cartridge holder to the left side, then right side and check whether ink tube is too long or too short. Move cartridge holder to the cartridge-changing place and check whether Ink tube will fall on the paper board. Generally, we have adjusted ink tube to the right size before shipment (lf it is too long or too short, please double check before printing).5. Adjust the ink tube lengthIf step 4 is ok, then there is no need to go through this step.If the tube length is too short then lengthen it (3-5-1, 3-5-2), if too long then shorten. If the tube falls down, you need adjust the angle of sticker to prevent falling.Pic. 3-5-1 Pic. 3-5-26. Insert cartridge fixation rackInsert fixation rack and push upward ( 3-6-1, 3-6-2), move cartridge holder to 3-6-3 position, check if the fixation will touch the printer body or not, this fixation can't be drop out, it can prevent the cartridge drop out during printing.Pic. 3-6-1 Pic. 3-6-2 Pic. 3-6-37. Test printer operationMove tube valve to the open position (3-7-1), use a screw or other tools to press down cover button (3-7-2), plug on power source, turn the printer on, check if the printer can work normal or not, check if the ink tube will touch the printer data-transfer wire or not. Close the printer’s cover, check if there is abnormal noise. Select printer maintenance option (2-1), print nozzle test sheet, if test sheet is normal (2-2), you can begin printing. If the line is missing (2-3), please clean printer head. If printer head is still wrong after cleaning, please contact your local distributor.Pic. 3-7-1 Pic. 3-7-2IV. Take the CISS offDuring printing, if you need to take the system off, please first take off air filter, insert back air plug, move tube valve to CLOSE position (4-1-1), Move out cartridge holder, detach the rack (4-1-2) (can't be too rude to change the shape of rack). Take ink cartridges out, press back the red cover at 45 degree angle (4-1-3).Pic. 4-1-1 Pic. 4-1-2 Pic. 4-1-3 V. Refill inkDuring printing, if you found out that the ink level in the tank is below the red line, please add ink according to the methods.VI. Check air balance tubeDuring printing, if you find some abnormal cases, such as bad output, ink drip out on paper, then you need to check the air balance tube to see if exist ink. If yes, please do according to the manual of "ink pump out from balance tube”.VII. Warnings1. During printing, please do not take cartridges over than the printer. Please keep ink tank and printer in the same level.2. During printing, do not inverse, lift up or lower ink tanks.3. Please do not block up ink tanks for curiosity or for fear of less ink4. Use CISS at clean environment and within the temperature range 15-35 degrees.VIII. Product WarrantyINKSYSTEM warrants its products to be free from defects in material or workmanship. Rarely the equipment partly or completely fails within the warrantyperiod. In these cases we do everything possible to ensure that our customers are satisfied with the purchase.The INKSYSTEM CISS installation is free in any of the representative offices.The warranty repairs are done quickly, with good quality and for free. The warranty duration is 12 months from the date of retail sale. Every product has a Warranty Certificate. The transportation of the failed product is provided by its owner.Please note that the ink and the photo paper are expendable materials and there can be no returning of unsealed ink tanks and photo paper packages. When defects are found by the service managers, a replacement for a new product is performed.Please adhere to the following points to receive a warranty service as soon as possible:When accepting the product check if the warranty certificate is filled in correctly.Keep the original receipt that contains the date of purchase information.Adhere to operating con ditions that are provided in the User’s Manual, or on the web-page of the specific product.Try to avoid mechanical damages when operating the product: chippings, dents, fractures, scratches, etc.We cannot provide a warranty repair under several conditions:If the warranty certificate is wrongly filled in.If the device has mechanical damages: chippings, dents, fractures, scratches, etc.If the defect appeared under the circumstances of insuperable forces, accidents, intended or careless actions of the user or a third party.If the ink used was not manufactured by “INKSYSTEM” (South Korea)If the printing limit was exceeded – more than 100 000 prints.The “INKSYSTEM” Company excludes for itself any liability for incidental, consequential, indirect, special, or punitive damages of any kind to people, pets or property if the stated damages have been affected because of rules and operational conditions / product installation disregard. The Company also excludes any liability for intentional or careless actions of the user or third parties, for loss of revenue or profits, loss of business, loss of information or date, or other financial loss arising out of or in connection with the sale, installation, maintenance, use, performance, failure, or interruption of the possibility of such damages.Warranty certificateThe warranty conditions are agreed and accepted. No claims against the product appearance and the list of equipment.Customer’s signatureInstall Nozzle Seal for BCI – 24BKIn order to strengthen the connection of cartridges and the printer head, prevent air leaking, ink back flowing, ink leaking, we need to add a silicon seal on cartridge nozzle, the processed are as follows:1. Clean the seal: Take out 20*20 sponge sticker and seals, tear off the sticker cover, put seal on the sticker to wipe off the dirt (double sides should be cleaned) (1-1).Pic. 1-12.Take the printer head out: turn the printer on, open the printer’s cover, cartridge holder will move to the cartridge change position, take cartridges out (2-1), lift printer head lock balance (2-2), then you can take out the printer head, place the printer head on clean paper (2-3) to prevent damage, do not touch the electronic panel.Pic. 2-1 Pic. 2-2 Pic. 2-33. Install the silicon seal: check if the original seal and filter have dirt (3-1), if yes, please clean them, then use pliers to install the silicon seal on the printer head according to the shape (3-2), and check if ail seals are in the right position (3-3).Pic. 3-1 Pic. 3-2 Pic. 3-3。
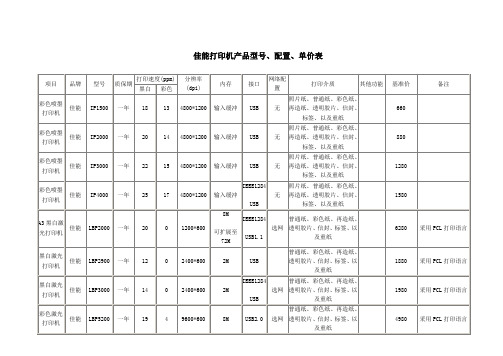
佳能打印机产品型号、配置及其单价表
三、
联想
DP600
一年
250字符/秒
无相应指标
360
64K
并口
无
单页纸\连续纸\信封\明信片\标签
无
2700
3500
22.86%
无
三、
联想
DP8000
一年
250字符/秒
无相应指标
360
64K
并口
单页\连续纸\信封\明信片\标签
无
3200
4999
35.99%
无
一、
联想
LJ1800
一年
16
无相应指标
1200
64MB/576MB
USB/并口
标网
普通纸,信封,胶片
11100
12999
15%
一年上门
9
富士施乐
WorkCentrePE 220
中国
20
600
10
USB/并口
办公用纸等
2800
3499
20%
一年上门
10
富士施乐
DocuPrint203A
中国
20
1200
16MB
USB2.0/并口
办公用纸等
1450
1999
富士施乐
DocuPrint204A
中国
20
1200
16MB
USB/并口
标网
办公用纸
2700
3999
32%
一年
2
富士施乐
DocuPrint255
中国
25
1200
64MB/320MB
USB/并口
标网
普通纸,信封,胶片
佳能i6100使用说明书
软件安装将开始。
11 软件安装完成。
重新启动计算机。
在使用打印机前,您必须执行打印头对齐。有 关如何对齐打印头的说明,请参阅 《Mac OS X 打印机 驱动程序 指南 (Printer Driver Guide for Mac OS X)》。要查看《Mac OS X 打印机驱动程 序指南 (Printer Driver Guide for Mac OS X)》,双 击手册 (Manual) 文件夹和 OSX 用户的附加指 南 (Additional Guide for OSX User’s) 文 件 夹,并选择您需要使用的语言文件夹。 有关如何使用打印机驱动程序的说明,您也可 参阅 《Mac OS X 打印机驱动程序指南 (Printer Driver Guide for Mac OS X)》。
国际能源之星 (ENERGY STAR®) 计划
作为一个能源之星 (ENERGY STAR) 的合作者,佳能公司确认本产品符合 能源之星 (ENERGY STAR) 对于能源效率的指标。
国际能源之星 (ENERGY STAR) 办公室设备计划是全球性计划,它旨在促进计 算机及其它办公室设备使用时的能源节约。该计划支持开发和推广那些能够有 效降低能源消耗的产品。这是一个开放性的系统,各行业均可自愿参加。目标 产品是办公室设备,如计算机、监视器、打印机、传真机、复印机等。 它们的标准和标识在各个参与国中是统一的。
关
2 开启计算机,启动 Windows。如果有任
何应用程序自动运行,请把其关闭。
请勿启动病毒检查程序。 在此阶段,请勿开启打印机。
8
3 把安装软件和用户指南光盘放入光盘驱
佳能iP100彩喷打印机评测
佳能iP100彩喷打印机评测
移动办公的需求,催生出了可携带性极强的笔记本电脑,但事实上,小型化已经是行业内很多产品的发展趋势,而且早就已经不仅仅局限于PC,手机、数码相机、投影机等等产品,都在往更小更便携的方向上发展。
超强的可携带性带来的好处不言而喻,尤其对很多以移动办公为主的用户而言,可随身携带真的很有必要。
在传统的办公产品领域,便携式照片打印机还比较多见,但对于以文本输出为主的打印机产品,便携式几乎可以说是个空白。
佳能iP100打印机形格外小巧,第一眼看去,很难令人相信这是打印机。
iP100三围仅322×185×61.7mm,机身折叠起来后,犹如一个外置光驱一般,或是一台影碟播放机,放置在13.3英寸的笔记本旁,笔记本居然显得更大;放置在一部数码单反相机旁,也丝毫不显得庞大。
佳能iP100的纸张处理单元全部为可折叠设计,进纸单元打开后还可以调整高度,避免由于纸张重量的原因出现纸张输入的问题。
靠近机身的位置,可以看到可调节的纸张固定游标,进一步固定打印输入的纸张。
出纸单元方面,由于收到机身整体外观设计的影响,iP100的打印输出纸张几乎是直接落到打印机的放置平面,因此建议用户不要在打印机前放置任何物品,给打印机前方至少预留出A4幅面纸张的距离,避免因前一张纸张的输出问题影响到其后的作业输出。
- 1、下载文档前请自行甄别文档内容的完整性,平台不提供额外的编辑、内容补充、找答案等附加服务。
- 2、"仅部分预览"的文档,不可在线预览部分如存在完整性等问题,可反馈申请退款(可完整预览的文档不适用该条件!)。
- 3、如文档侵犯您的权益,请联系客服反馈,我们会尽快为您处理(人工客服工作时间:9:00-18:30)。
佳能iP100打印机产品概述
1: 墨滴的最小间距为1/9600英寸。
2: 基于佳能标准模板。
打印速度会根据系统配置,接口,软件,文档复杂程度,打印模式,页面覆盖率,使用纸张类型不同而有所变化,且未将数据在主机上处理的时间计算在内。
3: 指定的710万像素的佳能数码相机拍摄的图像,通过PictBridge协议,默认设置,使用高级光面照片纸无边距打印。
实际的打印速度会根据图像数据,打印模式,使用纸张类型和打印机连接的设备不同而有所区别。
4: 支持无边距打印的纸张类型:专业照片纸,高级光面照片纸,高级光面照片纸II,亚高光照片纸,光面照片纸,亚光照片纸,双面照片纸。
5:佳能iP100打印机模板,A4普通纸,标准模式。
6: 打印量测试条件:
彩色文档:公布的数据值依照ISO/IEC FCD24711得出。
数值经过连续打印ISO/IEC 24712模版获得。
照片(4"×6"): 使用Windows Vista图像浏览软件和Windows Vista打印驱动的无边距打印模式,在测试纸张的默认设置下,4"×6"高级光面照片纸上连续打印佳能标准模板。
公布的数据值根据ISO/IEC 24711的佳能标准测试方法,PGI-35黑色墨水的4"×6"照片上的打印量为估算打印量。
墨水打印量会依据打印的文本/照片、使用的应用软件、打印模式和使用纸张类型不同而有所变化。