爱普生me101扫描仪使用说明
Epson产品使用说明书
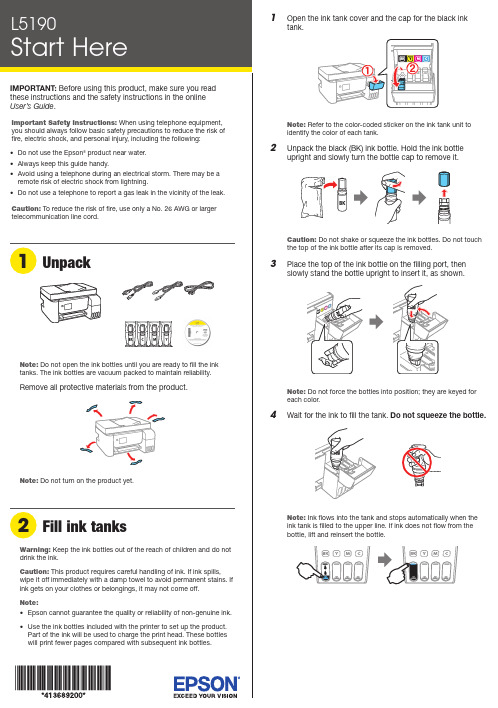
Do not open the ink bottles until you are ready to fill the ink tanks. The ink bottles are vacuum packed to maintain reliability.emove all protective materials from the product.11 Select your language, country, date, and time.Note: You can change these settings later using the product’scontrol panel. For more information see the online User’s Guide.12 W hen instructed to see the Start Here sheet, press andhold the help button for 5 seconds.13 P ress the start button to start ink charging.Note: Ink charging takes about 10 minutes. When the power light stops flashing, ink charging is complete. Once initial setup of the printer is complete, you can top off the ink tanks with any remaining ink. See the online User’s Guidefor instructions.C aution: Do not unplug or turn off the product, or open theinner cover while the product is charging or you’ll waste ink. 14 PressSee the online User’s Guide for information about loading capacity and available paper types and sizes.1 M ake sure the product is not charging ink. Then raise thepaper support and tilt it backwards slightly.2 Slide the edge guides all the way out.Note: If you are using a Mac or your computer does not have aCD/DVD drive, an Internet connection is required to obtain the product software.To print from a Chromebook™, go to.jm/support/gcp for instructions.1 M ake sure the product is NOT CONNECTED to yourcomputer.Windows ®: If you see a Found New Hardware screen, clickCancel and disconnect the USB cable.2I nsert the product CD (Windows only) or download andrun your product’s software package. For the latest software, visit .jm/support/L5190.3 F ollow the instructions on the computer screen to run the setup program.4 W hen you see the Select Your Connection screen, selectone of the following:• Wireless connectionIn most cases, the software installer automatically attempts to set up your wireless connection. If setup is unsuccessful, you may need to enter your network name (SSID) and password.• Direct USB connectionMake sure you have the USB cable ready.• Wired network connectionMake sure you have an Ethernet cable (not included).Mobile printingConnect wirelessly from your smartphone, tablet, or computer. Print documents and photos from across the room or around the world:• Print directly from your iOS device. Simply connect your printer and device to the same network and tap the action icon to select the print option.• Use Epson Print Enabler (free from Google Play™) with Android™ devices (v4.4 or later). Then connect your printer and device to the same network and tap the menu icon to select the print option.• Print remotely with Epson Connect™ and Google Cloud Print™. See your online User’s Guide for instructions or learn more at .jm/connect .3 L oad A4- or letter-size paper, glossy or printable side upand short edge first, in the middle of the rear paper feedslot.Note:guides.4 S lide the edge guides against the paper, but not tootightly.5 P6 W hen prompted, use the arrow and OK buttons to selectAdjust to adjust print quality now, or select Adjust Laterto do so at another time.For instructions on loading envelopes or legal-size paper, see the online User’s Guide.1 C onnect the phone cord to a telephone wall jack andto the LINE port on your product. See the online User’sGuidefor more information.2 P ress the OK button to set up the fax, or press the #pound button to set it up later.EPSON is a registered trademark, EPSON Exceed Your Vision is a registered logomark, and Epson Connect is a trademark of Seiko Epson Corporation.Designed for Excellence is a trademark of Epson America, Inc.Mac is a trademark of Apple Inc., registered in the U.S. and other countries.Windows is a registered trademark of Microsoft Corporation in the United States and/or other countries.Android, Google Cloud Print, Chromebook, and Google Play are trademarks of Google LLC.General Notice: Other product names used herein are for identification purposes only and may be trademarks of their respective owners. Epson disclaims any and all rights in those marks.This information is subject to change without notice. © 2018 Epson America, Inc., 10/18CPD-56090Technical supportVisit .jm/support/L5190 to download drivers, view manuals, get FAQs, or contact Epson.You can also speak to a service technician by calling one of these numbers:Argentina(54 11) 5167-0300 Guatemala * 1-800-835-03580800-288-37766Mexico 01-800-087-1080Bolivia * 800-100-116 Mexico City (52 55) 1323-2052Chile (56 2) 2484-3400 Nicaragua * 00-1-800-226-0368Colombia 018000-915235 Panama * 00-800-052-1376Bogota (57 1) 592-2200 Paraguay 009-800-521-0019Costa Rica 800-377-6627 Peru 0800-10-126DominicanLima (51 1) 418-0210 Republic * 1-888-760-0068 Uruguay 00040-5210067Ecuador * 1-800-000-044 Venezuela (58 212) 240-1111El Salvador * 800-6570* C ontact your local phone company to call this toll-free number from a mobile phone.If your country does not appear on the list, contact your nearest Epson sales office. Toll or long distance charges may apply.Need paper and ink?Ensure brilliant results with Epson specialty papers, engineered specifically for Epson printers. You can purchase them from an Epson authorized reseller. To findthe nearest one, visit .jm or contact Epson as described in “Any questions?” on this sheet.L5190 replacement inks。
EPSON 多媒体液晶投影仪 说明书
1使用说明书请妥善保管此说明书。
请确保先阅读此产品的相关资料,再按照其中的要求安装及使用此产品。
如通过查询此产品的相关资料和爱普生(中国)有限公司主页,仍无法解决问题,请您联系爱普生客户服务热线(800-810-9977)解决。
2说明书中的符号的意义f 安全指示使用说明书和投影机上都使用了符号,指出可能对用户或他人造成的伤害以及财产受损的风险,以便您能够安全、正确地使用投影机。
指示及其含义如下。
请确保在阅读说明书之前正确理解这些指示。
f 一般信息指示警告此符号指示一些信息,若忽视这些信息,则可能由于错误操作而导致死亡或人身伤害。
小心此符号指示一些信息,若忽视这些信息,则可能由于错误操作而导致人身伤害或物品损坏。
注意列示了如果不采取足够的措施可能引起投影机的损坏和人身伤害的内容。
q记述了方便用户使用的一些相关资讯。
s指明可以找到相关主题详细资讯的所在页。
g表示该符号前有下划线的用语在用语解说中作了说明。
请参阅“附录”中的“用语解说”部分。
s 第123页表示操作方法和操作顺序。
请按照编号顺序进行所需的操作。
[(名称)]指示遥控器或控制面板上按钮的名称。
实例:[Esc] 按钮“(菜单名称)”表示配置菜单选项。
实例:“图像”-“亮度”步骤3目录投影机的功能 (5)所有型号的共有特性 (5)EB-G5350 / G5150 特性 (6)各部件的名称和作用 (7)前面 / 上面 (7)底面 (9)后面 (10)控制面板 (12)遥控器 (13)有用功能校正投影图像中的失真 (16)使用 Quick Corner 校正失真 (16)切换投影图像 (18)自动探测外来信号,并切换投影图像(源搜索) (18)直接从遥控器切换 (19)提高投影的功能 (20)选择投影质量(选择颜色模式) (20)暂时隐藏图像和声音(A/V 无声) (21)暂停图像(静止) (21)改变长宽比 (22)光标功能(指示器) (26)放大部分图像(E 变焦) (27)使用多台投影机时目标投影机的限制 (28)设定投影机识别号 (29)检查投影机识别号 (29)设置遥控器识别号 (30)为多台投影机校正颜色(多屏幕调节颜色调节) (31)校正步骤概要 (31)校正方法 (31)安全功能 (33)管理用户(密码保护) (33)限制操作(操作锁) (35)防盗锁 (36)配置菜单使用配置菜单 (38)功能一览表 (39)图像菜单 (39)信号菜单 (40)设定菜单 (42)扩展菜单 (44)网络菜单(只适用于 EB-G5300 / G5200W / G5100) (46)网络菜单(只适用于 EB-G5350 / G5150) (48)信息菜单(只适用于显示) (60)重设菜单 (61)故障排除使用帮助 (63)解决问题 (64)读懂指示灯 (64)看了指示灯仍不明白时 (67)附录安装方法 (77)清洁 (78)清洁投影机表面 (78)清洁镜头 (78)清洁空气过滤器 (78)更换消耗品 (81)更换遥控器电池 (81)更换灯泡 (82)更换空气过滤器 (85)选购件和消耗品 (87)运输注意事项 (89)在附近移动 (89)运输时 (89)保存用户标识 (90)使用无线 LAN 接入点进行 WPS(Wi-Fi Protected Setup)连接(仅适用于 EB-G5350 / G5150) (92)连接设定方式 (92)屏幕尺寸和距离 (96)EB-G5350 / G5300 / G5150 / G5100 的投影距离 (96)EB-G5200W 的投影距离 (97)连接到外部设备 (98)连接到外部监视器 (98)连接到外部扬声器 (98)拆卸和连接投影机镜头单元 (99)拆卸 (99)连接 (99)目录4连接和拆卸 USB 设备(只适用于 EB-G5350 / G5150) (101)连接 USB 设备 (101)读懂 USB 指示灯 (101)拆卸 USB 设备 (101)插入和弹出 SD 卡(只适用于 EB-G5350 / G5150) (102)插入 (102)读懂 SD 卡访问指示灯 (102)拆卸 (103)连接 LAN 电缆 (104)使用 USB 电缆连接和投影(只适用于 USB Display EB-G5350 / G5150) (105)连接 (105)读懂邮件通知功能的问题 (108)ESC/VP21 命令 (109)命令表 (109)电缆配线 (110)读懂网络投影机(只适用于 EB-G5350 / G5150) (111)关于 PJLink (112)受支持的监视器显示一览表 (113)受支持的监视器显示(适用于 EB-G5350 / G5300 / G5150 / G5100) (113)受支持的监视器显示(适用于 EB-G5200W) (116)规格 (119)投影机一般规格 (119)随附软件的操作条件 (121)外形尺寸图 (122)用语解说 (123)索引 (125)5投影机的功能所有型号的共有特性f位于中心的镜头可容易地对准屏幕和投影机,因为镜头位于投影机的中心。
扫描仪的使用方法

扫描仪的使用方法扫描仪已经应用很广泛,现在的打印、复印、扫描、传真一体机更是促进这一趋势,那么你会用扫描仪吗?下面来看看正确的使用方法吧!扫描仪的使用方法和注意事项:1、检测感光元件:扫描一组水平细线(如头发丝或金属丝),然后在ACDSee 32中浏览,将比例设置为100%观察,如纵向有断线现象,说明感光元件排列不均匀或有坏块。
2、检测传动机构:扫描一张扫描仪幅面大小的图片,在ACDSee 32中浏览,将比例设置为100%观察,如横向有撕裂现象或能观察出的水平线,说明传动机构有机械故障。
3、检测分辨率:用扫描仪标称的分辨率(如300dpi、600dpi)扫描彩色照片,然后在ACDSee 32中浏览,将比例设置为l00%观察,不会观察到混杂色块为合格,否则分辨率不足。
4、检测灰度级:选择扫描仪标称的灰度级,扫描一张带有灯光的夜景照片,注意观察亮处和暗处之间的层次,灰度级高的扫描仪,对图像细节(特别是暗区)的表现较好。
5、检测色彩位数:选择扫描仪标称色彩位数,扫描一张色彩丰富的彩照,将显示器的显示模式设置为真彩色,与原稿比较一下,观察色彩是否饱满,有无偏色现象。
要注意的是:与原稿完全一致的情况是没有的,显示器有可能产生色偏,以致影响观察,扫描仪的感光系统也会产生一定的色偏。
大多数高、中档扫描仪均带有色彩校正软件,但仅有少数低档扫描仪才带有色彩校正软件,请先进行显示器、扫描仪的色彩校准,再进行检测。
6、OCR文字识别输入检测:扫描一张自带印刷稿,采用黑白二值、标称分辨率进行扫描,300dpi的扫描仪能对报纸上的5号字作出正确的识别,600dpi的扫描仪几乎能认清名片上的7号字。
使用和保养作为普通用户来说,不仅要购买一台质量过关、方便耐用的扫描仪产品,而且学会正确使用和进行简单的保养也是非常重要的。
1、一旦扫描仪通电后,千万不要热插拔SCSI、EPP接口的电缆,这样会损坏扫描仪或计算机,当然USB接口除外,因为它本身就支持热插拔。
Epson投影仪使用说明书
Epson投影仪使用说明书尊敬的用户,欢迎您选择和使用 Epson 投影仪。
为了让您能更好地了解和操作这款投影仪,充分发挥其性能,我们为您准备了这份详细的使用说明书。
一、投影仪外观及接口介绍首先,让我们来熟悉一下 Epson 投影仪的外观。
它的整体设计简洁大方,机身通常由高质量的塑料或金属材质制成,既美观又耐用。
在投影仪的正面,您会看到镜头,这是投影图像的关键部分。
镜头周围可能会有一些调节环,用于对焦和调整图像大小。
投影仪的侧面和背面分布着各种接口,包括电源接口、HDMI 接口、VGA 接口、USB 接口等。
电源接口用于连接电源线,为投影仪供电。
HDMI 接口可以连接电脑、高清播放器等设备,以传输高清图像和音频信号。
VGA 接口则适用于连接老式的电脑或其他具有 VGA 输出的设备。
USB 接口可用于连接 U 盘、移动硬盘等存储设备,以便直接播放其中的多媒体文件。
二、投影仪的安装1、选择合适的安装位置Epson 投影仪可以选择桌面正投、吊装正投、桌面背投、吊装背投等多种安装方式。
在选择安装位置时,要确保投影仪与屏幕之间有足够的距离,以获得合适大小的图像。
同时,要避免阳光直射或其他强光源直接照射到屏幕上,影响投影效果。
2、调整投影角度如果是桌面放置,您可以通过调整投影仪的脚垫高度来改变投影角度。
如果是吊装安装,则需要使用专业的吊装支架,并通过调整支架的角度来获得理想的投影画面。
3、连接电源和信号源将电源线插入电源接口,并连接好您想要使用的信号源设备,如电脑、笔记本、手机等。
三、开机与关机1、开机连接好电源和信号源后,按下投影仪上的电源按钮,等待片刻,投影仪的灯泡将会亮起,风扇开始运转,系统进行初始化。
2、关机在使用完毕后,不要直接拔掉电源,而是按下电源按钮,选择关机选项。
等待投影仪的风扇继续运转一段时间,以冷却灯泡,然后自动关闭。
四、图像调整1、对焦在开机后,如果图像不够清晰,您可以通过旋转镜头上的对焦环来进行对焦,直到图像清晰锐利。
爱普生ME1+(EPSON ME1+)打印机废墨记数器清零使用说明
爱普生ME1+(EPSON ME1+)打印机废墨记数器清零使用说明清零步骤:当您的爱普生ME1打印机出现绿色电源指示灯和红色错误指示灯交替闪烁的时候,就表示打印机内置的废墨计数器已满,打印机将不接受任何命令,只能够开关机。
这时您就可以使用这个清零软件对打印机内置的废墨计数器进行清零处理。
让您的爱机继续为您服务,从而免去跑爱普生售后服务部的麻烦,也不用去浪费本来不多的银子了!注意:运行打印机清零软件前一定要先进入维修模式,否则无法清零。
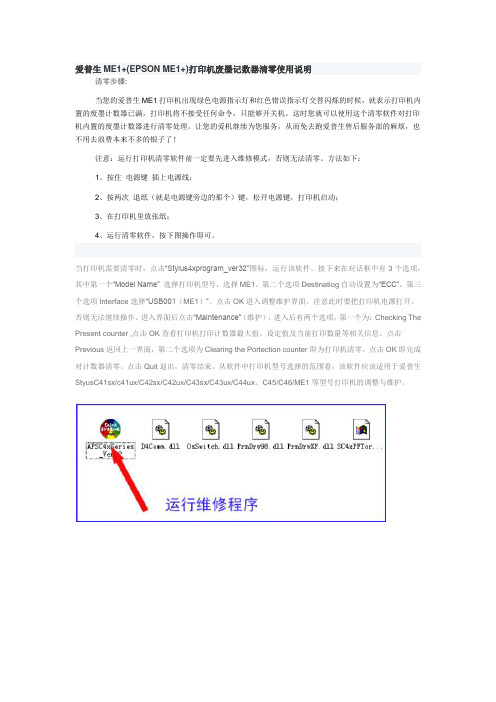
方法如下:1、按住电源键插上电源线;2、按两次退纸(就是电源键旁边的那个)键,松开电源键,打印机启动;3、在打印机里放张纸;4、运行清零软件,按下图操作即可。
当打印机需要清零时,点击“Stylus4xprogram_ver32”图标,运行该软件。
接下来在对话框中有3个选项,其中第一个“Model Name” 选择打印机型号,选择ME1。
第二个选项Destinatiog自动设置为“ECC”,第三个选项Interface选择“USB001(ME1)”。
点击OK进入调整维护界面。
注意此时要把打印机电源打开。
否则无法继续操作。
进入界面后点击“Maintenance”(维护),进入后有两个选项,第一个为:Checking The Present counter ,点击OK查看打印机打印计数器最大值、设定值及当前打印数量等相关信息。
点击Previous返回上一界面,第二个选项为Clearing the Portection counter即为打印机清零。
点击OK即完成对计数器清零。
点击Quit退出,清零结束。
从软件中打印机型号选择的范围看,该软件应该适用于爱普生StyusC41sx/c41ux/C42sx/C42ux/C43sx/C43ux/C44ux、C45/C46/ME1等型号打印机的调整与维护。
运行维修程序前要确保打印已开机并且已连接好打印线,运行完成后关闭打印机,数秒钟后再开机,打印机即可恢复正常。
条码扫描器:如何使用扫描仪扫描图片

扫描仪地使用须知、扫描前地准备普通用户在使用扫描仪之前,应对搞明扫描仪地基本原理和使用说明书.把扫描仪应尽量放在平坦、稳定地地方,扫描前仔细检查玻璃上方是否有污渍,以免影响扫描效果.用户第一次使用扫描仪前,一定要先开锁,且保证电源开关置于“”,才能插入电源插头,因为在运输中扫描镜头前后撞击会损坏,所以厂商在扫描仪上都安装有一个锁定装置(机械装置或电子装置),专门用于锁定扫描仪地镜头组件,确保其不被随意移动.文档收集自网络,仅用于个人学习、预热扫描仪扫描前先打开扫描仪预热至分钟,使机器内地灯管达到均匀发光状态,确保光线平均照到稿件每一处..原稿放置地要求因扫描仪地局限,扫描得到地图像或多或少会出现失真或变形.一定要尽量使用品质出色地原稿扫描,这是得到高质量图片地关键;对一些尺寸较小地稿件,应尽量放置在扫描仪中央,尽量减少变形.原稿放置时使扫描对象地一个角对齐扫描仪上地指示箭头,正面向下放平,对于以反射方式扫描地对象,放置不平会使扫描结果不良,并且对文件地后期处理增加难度. 一般地扫描均应将顶盖合上,但当扫描较厚地对象时,只能采取开盖式,此时要注意以适当地力量压紧对象,并通过预扫调整扫描效果,尽量减少漏光空间.文档收集自网络,仅用于个人学习、预扫步骤不可少预扫功能是非常必要地,它能保证扫描效果.通过预扫后我们可以直接确定自已所需要扫描地图像区域,以减少扫描后对图像地处理工序;另外可通过观察预扫后地图像,依据图像地色彩、效果等对扫描参数重新进行设定、调整之后再进行扫描.预扫对较大地图片,可使用较小地分辨率,对较小地图片,则应该采用高分辨率以获得最佳地效果.文档收集自网络,仅用于个人学习、确定使用多大地分辨率使用多大地分辨率由用户地实际应用需求决定.分辨率越高意味着可以获得更多地图像细节,更清晰地效果,同时也意味着扫描得到地图像文件增大而且不易处理.一般来说,网页图片分辨率通常在左右;印刷出版图片,需要用到以上地分辨率,使用则更佳;如果想将扫描后地作品通过打印机打印出来,则必须综合考虑打印机地分辨率才能决定.对于用于打印用途地彩色图像,用户在设定扫描分辨率时只需将打印机地真实打印分辨率除以或即可.如以分辨率为地打印机为例,扫描分辨率可设定为至之间.但到底是还是呢?用户分别以这两个分辨率用扫描仪进行扫描,然后将打印出来地效果进行比较.如果用户看不出两张图像地差别,表示对该台打印机已经足够,用户甚至可用更低地扫描分辨率(如)再进行一次扫描,如仍看不出差别,表示已足够.若低地分辨率可看出差别,则表示为最佳分辨率.依此类推,如果用户找到了最适当地扫描分辨率,将来凡是要使用该台打印机打印扫描图像时,扫描分辨率都应以此为准.文档收集自网络,仅用于个人学习扫描参数中实际上除了分辨率外,缩放比例也是十分重要地,但多数使用者并不了解它地重要性.原稿面积为×英寸,如果用户希望以×英寸进行打印,这时应该如何设定扫描图像地分辨率呢?用户首先应该根据打印机地分辨率,将扫描仪地分辨率设定为,然后决定缩放比例.×英寸地扫描原稿若想放大为×英寸,用户应以目标尺寸除以原稿尺寸,宽:,高,正确地缩放比例应设定为.当长宽地缩放比例不同时,用户应取较小数值. 文档收集自网络,仅用于个人学习选择正确地图像类型.如果图像是单色地原图像,请选用线条图像进行扫描..对于黑白照片,用灰度图像类型进行扫描从而得到较小地图像文件..如果希望用黑白打印机输出彩色图像,也请用灰度图像类型进行扫描..进行扫描做好上述工作后,从扫描仪地相关软件中选择“扫描到应用程序”,也可以直接从图像处理软件软件地“从扫描仪获得文件”选项中调用扫描仪扫描图像. 文档收集自网络,仅用于个人学习.除去网纹扫描仪在扫描印刷照片时,会将印刷物上地细微墨点扫描进来,影响图像地质量.使用去网技术可以通过对有网点地图像进行分析,将其还原成没有网点地原稿,重现原图片地效果.扫描仪一般都有几个选项供我们选择.当原图是杂志或覆膜印刷品时,请选择“杂志”;当原图是报纸或较粗糙地网点印刷品时,请选择“报纸”;当原图是高品质地精美印刷品、网点非常小时,请选择“艺术印刷品”.需要说明地是,如果扫描非印刷品,要选择“不设定”,不要将这个功能打开,因为这样会降低扫描图像地质量.文档收集自网络,仅用于个人学习.将较大地图分几次扫描后拼接如果扫描仪地幅面比较小,不能将需要扫描地器件一次扫描完,那就分成多次扫描.先用待扫描地器件在扫描仪上横竖测量一下,看是横扫还是竖扫好. 、擅用校色工具在对彩色图像进行扫描时,使用类似于这样地扫描软件对扫描出来地照片之色彩进行校正,可以得到更为准确地图像色彩.文档收集自网络,仅用于个人学习想知道更多扫描仪专业知识,请时刻关注东莞立象条码扫描器网站查看其最新网站动态!。
Epson 扫描器产品信息指南说明书
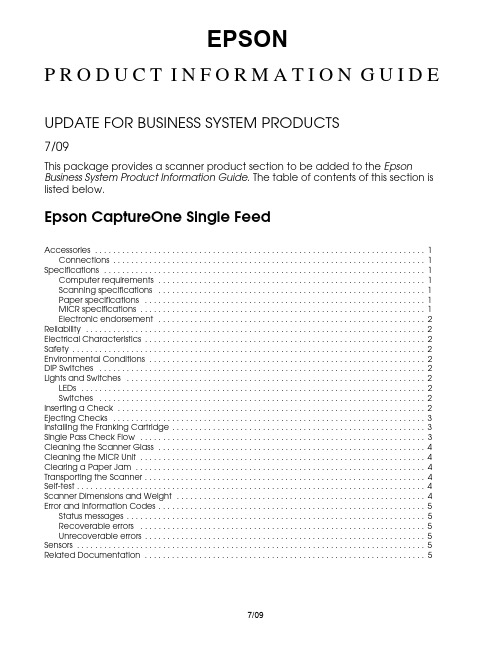
EPSONP R O D U C T I N F O R M A T I O N G U I D EUPDATE FOR BUSINESS SYSTEM PRODUCTS7/09This package provides a scanner product section to be added to the Epson Business System Product Information Guide. The table of contents of this section is listed below.Epson CaptureOne Single FeedAccessories . . . . . . . . . . . . . . . . . . . . . . . . . . . . . . . . . . . . . . . . . . . . . . . . . . . . . . . . . . . . . . . . . . . . . . . . . 1 Connections . . . . . . . . . . . . . . . . . . . . . . . . . . . . . . . . . . . . . . . . . . . . . . . . . . . . . . . . . . . . . . . . . . . . . 1 Specifications . . . . . . . . . . . . . . . . . . . . . . . . . . . . . . . . . . . . . . . . . . . . . . . . . . . . . . . . . . . . . . . . . . . . . . . 1 Computer requirements . . . . . . . . . . . . . . . . . . . . . . . . . . . . . . . . . . . . . . . . . . . . . . . . . . . . . . . . . . . 1 Scanning specifications . . . . . . . . . . . . . . . . . . . . . . . . . . . . . . . . . . . . . . . . . . . . . . . . . . . . . . . . . . . 1 Paper specifications . . . . . . . . . . . . . . . . . . . . . . . . . . . . . . . . . . . . . . . . . . . . . . . . . . . . . . . . . . . . . . 1 MICR specifications . . . . . . . . . . . . . . . . . . . . . . . . . . . . . . . . . . . . . . . . . . . . . . . . . . . . . . . . . . . . . . . 1 Electronic endorsement . . . . . . . . . . . . . . . . . . . . . . . . . . . . . . . . . . . . . . . . . . . . . . . . . . . . . . . . . . . 2 Reliability . . . . . . . . . . . . . . . . . . . . . . . . . . . . . . . . . . . . . . . . . . . . . . . . . . . . . . . . . . . . . . . . . . . . . . . . . . . 2 Electrical Characteristics . . . . . . . . . . . . . . . . . . . . . . . . . . . . . . . . . . . . . . . . . . . . . . . . . . . . . . . . . . . . . . 2 Safety . . . . . . . . . . . . . . . . . . . . . . . . . . . . . . . . . . . . . . . . . . . . . . . . . . . . . . . . . . . . . . . . . . . . . . . . . . . . . . 2 Environmental Conditions . . . . . . . . . . . . . . . . . . . . . . . . . . . . . . . . . . . . . . . . . . . . . . . . . . . . . . . . . . . . . 2 DIP Switches . . . . . . . . . . . . . . . . . . . . . . . . . . . . . . . . . . . . . . . . . . . . . . . . . . . . . . . . . . . . . . . . . . . . . . . . 2 Lights and Switches . . . . . . . . . . . . . . . . . . . . . . . . . . . . . . . . . . . . . . . . . . . . . . . . . . . . . . . . . . . . . . . . . . 2 LEDs . . . . . . . . . . . . . . . . . . . . . . . . . . . . . . . . . . . . . . . . . . . . . . . . . . . . . . . . . . . . . . . . . . . . . . . . . . . . 2 Switches . . . . . . . . . . . . . . . . . . . . . . . . . . . . . . . . . . . . . . . . . . . . . . . . . . . . . . . . . . . . . . . . . . . . . . . . 2 Inserting a Check . . . . . . . . . . . . . . . . . . . . . . . . . . . . . . . . . . . . . . . . . . . . . . . . . . . . . . . . . . . . . . . . . . . . 2 Ejecting Checks . . . . . . . . . . . . . . . . . . . . . . . . . . . . . . . . . . . . . . . . . . . . . . . . . . . . . . . . . . . . . . . . . . . . . 3 Installing the Franking Cartridge . . . . . . . . . . . . . . . . . . . . . . . . . . . . . . . . . . . . . . . . . . . . . . . . . . . . . . . . 3 Single Pass Check Flow . . . . . . . . . . . . . . . . . . . . . . . . . . . . . . . . . . . . . . . . . . . . . . . . . . . . . . . . . . . . . . . 3 Cleaning the Scanner Glass . . . . . . . . . . . . . . . . . . . . . . . . . . . . . . . . . . . . . . . . . . . . . . . . . . . . . . . . . . . 4 Cleaning the MICR Unit . . . . . . . . . . . . . . . . . . . . . . . . . . . . . . . . . . . . . . . . . . . . . . . . . . . . . . . . . . . . . . . 4 Clearing a Paper Jam . . . . . . . . . . . . . . . . . . . . . . . . . . . . . . . . . . . . . . . . . . . . . . . . . . . . . . . . . . . . . . . . 4 Transporting the Scanner . . . . . . . . . . . . . . . . . . . . . . . . . . . . . . . . . . . . . . . . . . . . . . . . . . . . . . . . . . . . . . 4 Self-test . . . . . . . . . . . . . . . . . . . . . . . . . . . . . . . . . . . . . . . . . . . . . . . . . . . . . . . . . . . . . . . . . . . . . . . . . . . . . 4 Scanner Dimensions and Weight . . . . . . . . . . . . . . . . . . . . . . . . . . . . . . . . . . . . . . . . . . . . . . . . . . . . . . . 4 Error and Information Codes . . . . . . . . . . . . . . . . . . . . . . . . . . . . . . . . . . . . . . . . . . . . . . . . . . . . . . . . . . . 5 Status messages . . . . . . . . . . . . . . . . . . . . . . . . . . . . . . . . . . . . . . . . . . . . . . . . . . . . . . . . . . . . . . . . . . 5 Recoverable errors . . . . . . . . . . . . . . . . . . . . . . . . . . . . . . . . . . . . . . . . . . . . . . . . . . . . . . . . . . . . . . . 5 Unrecoverable errors . . . . . . . . . . . . . . . . . . . . . . . . . . . . . . . . . . . . . . . . . . . . . . . . . . . . . . . . . . . . . . 5 Sensors . . . . . . . . . . . . . . . . . . . . . . . . . . . . . . . . . . . . . . . . . . . . . . . . . . . . . . . . . . . . . . . . . . . . . . . . . . . . . 5 Related Documentation . . . . . . . . . . . . . . . . . . . . . . . . . . . . . . . . . . . . . . . . . . . . . . . . . . . . . . . . . . . . . . 57/09Epson CaptureOne Single Feed7/09Epson CaptureOne Single Feed - 1AccessoriesConnectionsSpecificationsComputer requirementsCPU Pentium 4 1.2 GHz or aboveMemory ≥ 256MB above minimum OS system requirementsHDD space ≥ 30MB free space with driver installed InterfaceUSB 2.0 high-speedWindows version 2000 Professional SP4XP Home Edition/ Professional SP2/SP3Vista (32-bit, 64-bit) Home Basic/ Home Premium/ Ultimate/ BusinessVista (32-bit, 64-bit) Home Basic/ Home Premium/ Ultimate/ Business with SP1.NET framework 1.1, 2.0, 3.0, or 3.5Supported development languagesWin32Visual C ++ 6.0, Visual Basic Visual C ++ .NET 2003,Visual C ++ 2005, Visual C #.NET 2003, Visual C # 2005,Visual Basic .NET 2003, Visual Basic 2005Scanning specificationsSingle passScans both sides of check, reads MICR, and performs franking in same pass.Scanner type CIS (contact image scanner)Resolution (dpi)200 x 200, 120 x 120, 100 x 100Graduation Grayscale:256 levelsBlack & white: 2 valuesData formats Grayscale:TIFF, JPEG, BMP, RAWBlack & white:TIFF (CCITT Group 4),BMPImage size 4.04 (W) x 10.59" (L) (maximum){102.6 x 269 mm}Image quality Complies with IQA (Image QualityAssurance) by FSTC (Financial Services Technology Consortium)Scanning speed 19.69 "/s {500 mm/s}Font recognition OCR A and OCR BOCR recognition ≥ 98% at 77°F (ANSI, excluding O and 0)Paper specificationsTypeNormal, single-ply only Size (H x L)2.68 ~ 4.72" x 4.72 ~ 9.25"{68 ~ 120 mm x 120 ~ 235 mm}Thickness 0.003 ~ 0.008" {0.075 ~ 0.2 mm}Weight 16 ~ 32 lb {60 ~ 120 g/m 2}SF capacity Holds 1 sheetMain pocket capacity (both 1- and 2-pocket models)Holds up to 100 sheetsSub pocket capacity (2-pocket model only)Holds up to 50 sheetsInstallation Must be horizontal (within a tilt of ± 5°)MICR specificationsMagnetic character typesE13B, CMC7 (Alphabetic not supported)MICR recognition rate≥ 98% at 77°F (E13B: ANSI)Errors of ≤ 1% (E13B: ANSI)Franking cartridge EFC-01 franking cartridgeInk color: redExpiration:18 months from production(at room temperature)Ink life:18,000 prints** Using Epson’s standard print pattern.Contents of the Utility & Documents CD TM-S1000 Single Feed Driver TM-S1000 Single Feed UtilityTM-S1000 Single Feed Utility User’s Manual TM-S1000 Single Feed User’s ManualConnector Description USB 2.0High-speed transmission at 480 Mbps [bps: bits per second]PowerAC Adapter C, 24 V ± 10%, supplied with CaptureOneUSB connectorPower supply connectorHook to secure USB cableEpson CaptureOne Single Feed Single Feed2 - Epson CaptureOne Single Feed 7/09Electronic endorsementCan paste recorded image data on the back image of a check.ReliabilityFranking cartridge life18,000 in Epson standard print patternFranking cartridge expiration date18 months after productionScanner life span 1 million sheets MTBF 180,000 hours MCBF 2,470,000 cyclesElectrical CharacteristicsPower supply Epson AC Adapter C supplied with scanner Supply voltage 24 V ± 10%Current consumption Operation 1.0 A, approximate Standby 0.2 A, approximateSafetyEMIFCC/ICES-003 Class ASafety standardsUL60950-1/CSA C22.2 No. 60950-1(Tested using Epson AC Adapter C.)Environmental ConditionsTemperatureOperating 50 to 104°F {10 to 40°C}StoragePacked–4 to 140°F {–20 to 60°C}(≤ 120 hours at –4 or 140°F)Humidity (no condensation)Operating 20 to 80% RH Storage5 to 85% RHDIP SwitchesTwo fixed DIP switches are located on the main board inside the bottom cover of the CaptureOne SF.Lights and SwitchesLEDsPOWEROn when CaptureOne SF power is on.ERROROff when CaptureOne SF is online.On when scanner is offline (and when scanner cover or franker cover are open)Flashes during an error, during initialization, or while waiting for document removal. (See “Error LED Codes” below.)DOCUMENTOn when scanner is ready to process the document in the SF or during document processing.Flashes when the scanner is waiting for document insertion.SwitchesPOWERTurns the CaptureOne on or off. A power switch cover is provided to prevent accidental turn off. If installed and a failure occurs, unplug scanner immediately.Inserting a Check1.Fully extend the pocket guide. Extend the SF guide fully, ifneeded. See the illustration below.SW FunctionONOFF1Internal use. Do not change.—Fixed to OFF 2Internal use. Do not change.Fixed to ON—POWERERROR DOCUMENTEpson CaptureOne Single Feed7/09Epson CaptureOne Single Feed - 32.You can insert 1 check into the SF to be fed automatically.3.Insert the check straight facing the outside, as shown below.Ejecting Checks1.When the checks are ejected, remove them.CAUTION :Do not overfill pockets with checks. Otherwise, a paperjam may occur.2-pocket model = main pocket: 100; sub pocket: 50.1-pocket model = main pocket: 100.Installing the Franking CartridgeCAUTION :Keep the franking cartridge out of reach of children.Do not disassemble the franking cartridge.Handle carefully because ink stains e only genuine Epson cartridges.Do not remove cartridge from packing until ready to e cartridge before expiration date printed on the box.Dispose of cartridge according to applicable regulations.1.Open the franker cover by pulling the lever forward.2.Remove used franking cartridge, if installed, as shownbelow. by holding the knob at the top of the cartridge.3.Carefully insert the new franking cartridge from the top,and push it firmly but gently until it clicks into place.4.Close the franker cover until it clicks into place.Single Pass Check FlowThe CaptureOne can perform 4 actions on a document in a single pass: scanning the image of both the face and back, reading magnetic characters, and franking.1.Insert a document into the feeder section.2.The scanner scans the images of the face and back.3.The scanner reads the magnetic characters on thedocument.4.The franking section prints a pattern.5.The document is fed to the outlet.Sub pocketMain pocketTwo-pocket modelKnobEpson CaptureOne Single Feed Single Feed4 - Epson CaptureOne Single Feed 7/09Cleaning the Scanner GlassClean the scanner glass if it gets dirty from ink or paper dust, or at least once every 6 months or 100,000 passes.1.Open the scanner cover as shown below.2.Lightly wipe the glass areas shown in the picture below witha soft dry cloth.CAUTION :To prevent spots or stains, do not use syntheticdetergent, benzine, water, or other liquids to clean. Never apply any liquid directly to the scanner glass.3.If the scanner glass is smeared with grease, oil, ink, etc.,wipe the glass with a cloth lightly dipped in alcohol.4.Close the scanner cover firmly until it clicks into place.Cleaning the MICR UnitDirt or dust on the MICR unit can increase errors in reading magnetic characters. Clean the MICR unit every 6 months or 100,000 passes. Use the TM-S1000 Utility in the Utility & Documents CD or your application to clean the MICR e KICTeam Waffletechnology ® cleaning cards or an equivalent commercial cleaning sheet.Note:For cleaning steps, see the TM-S1000 Utility User’s Manual.Do not use sticky cleaning sheets. They may cause a jam or machine failure.Dispose of used cleaning sheets properly. Do not reuse.Clearing a Paper JamOpen the scanner cover or franker cover to remove the jammed paper. See the illustration below.Transporting the ScannerFollow the steps below to transport the scanner.1.Turn off the scanner.2.Confirm that thePOWER LED is off.3.Remove the power supply connector.4.Store the pocket guide and the SF guide inside the scanner.5.Pack the scanner upright.Self-testThe self-test checks the following scanner functions:❏Model name ❏Serial number❏Control firmware version ❏Presence of franking cartridgeThe self-test is performed with Epson TM-S1000 Utility. See TM-S1000 Utility User’s Manual for details.Scanner Dimensions and Weight6.93 x 13.98 x 6.30" (H x W x D) {176 x 355 x 160 mm}8.6 lb {3.9 kg}Scanner glassMICR unitScanner coverEpson CaptureOne Single Feed7/09Epson CaptureOne Single Feed - 5Error and Information CodesRecoverable errorsUnrecoverable errorsSensorsRelated DocumentationEpson TM-S1000 Single Feed Specification Epson TM-S1000 Single Feed Service Manual Epson TM-S1000 Single Feed Parts Price ListEpson TM-S1000 Single Feed Technical Reference Guide Epson Franking Cartridge EFC-01 SpecificationERROR LED (Orange)Cause and SolutionMechanism position errorThis occurs when the SF, franking, or pocket switch board sensor detect an error during initialization of the scanner.The scanner can recover from this error if an instruction is sent from the driver or if the scanner is turned off, the error is cleared, and the scanner is turned back on.Paper jam errorOne of 5 things has happened:1.Paper has been detected during initialization.2.The paper length, middle, franking, or ejection sensor detected a paper-feed error.3.The SF failed to feed the sheet.4.The check was too short or too long.5.The cover was open during check feeding.Remove the jammed sheet, be sure the cover is closed, and send an instruction from the driver or turn the scanner off and back on again.Document read errorFor this error to occur, the user must select that this error stop reading under any of the following circumstances:1.Double-feeding was detected.2.Incorrect check paper insertion wasdetected.3.The scanner detected externalnoise.After the cause of the error is fixed, the scanner can recover from the error if it receives an instruction from the driver, if the scanner is turned off and back on, or if the franker cover is opened and the check is removed.ERROR LED (Orange)Cause and Required Action CPU execution errorThe CPU is trying to execute an order to an invalid address.Turn off power as soon as possible.Read/write orMemory overwrite errorA read/write check did not end normally or an error occured during a memory overwrite.Turn off power as soon as possible.Approx. 320 ms320 ms intervals320 ms intervalsApprox. 320 msApprox. 5120 msERROR LED (Orange)Cause and Required Action High voltage errorPower supply voltage is too high.Turn off power as soon as possible.Low voltage error Power supply voltage is too low.Turn off power as soon as possible.Communication device errorAn error has occured with a communication device.Turn off power as soon as possible.Drive circuit errorAn image scanner error has occurred.Turn off power as soon as possible.(A) SF sensor(B) Paper length sensor (C) Middle sensor (D) Franking sensor (E) Eject sensor(F) Main pocket nearly full sensor (G) Sub pocket nearly full sensor (H) Scanner cover open sensor(I) Franker cover open sensor (J) Franking cartridge sensor(K) Franking cartridge position sensor (L) Pocket switching board sensor (M) Hopper position sensor (N) Image scanner unit(O) MICR unit (P) Franking unitPaper feed directionPaper feed direction。
EPSON 第3代ME系统学习机 说明书

乐园100学电脑2009.07寓教于乐学习机文=许江峰随着教育模式的多样化发展,如何利用各种有效的教育学习资源以及学习工具,将学生们从枯燥的学习模式中释放出来是家长、学校更应该关心的课题。
如今,很多电脑和数码产品厂商也开始把如何帮助学生们提高学习效率,增强学习的趣味性,激发学生们学习的热情作为产品研发的目标,爱普生率先在打印领域推出了学习机——单功能的ME 30打印机和具有打印、复印、扫描的ME 300一体机。
打印机如何与学习挂钩?或许很多人都会有这个怀疑。
进入信息时代,学生们常常通过电子邮件接到老师布置的作业,或者通过网络下载学习资料,打印机事实上已经成为新一代学习用品。
学生需要具有一定性能,同时又经济、耐用、长期使用成本低的打印机,爱普生用ME 30/300交出了出色的答卷。
以往的喷墨打印机市场,并不缺乏低价产品,但低价往往是低性能的代名词。
打印速度慢、打印质量差、耗材不耐用、机身便宜但耗材贵……随便一举便能说出一大堆缺点,正所谓“一年遭蛇咬,十年怕井绳”,这也让很多初次接触打印机就遇到这种产品的人对喷墨打印机留下恶劣印象,一听“喷墨”便摇头。
EPSON ME 30/300首先要扭转这个局面,凭借全新微压电技术,在低端价位上,提供了媲美中端商务打印机的性能,不仅能印清楚学生常用的试卷、课件、复习资料,打印照片也有不错效果。
在耗材方面,ME 30/300统一使用黑色49元/个,彩色55元/个的4色分体式墨盒,单页黑白A4文档墨水成本仅为0.2元,单页彩色A4文档墨水成本为0.49元,可媲美激光打印机,符合爱普生倡导的“买得起、用得起”理念。
同时,防水耐光的DURABrite Ultra 颜料墨则在各种打印介质上都能精彩输出,卷子、复习材料不小心被水淋湿也不怕,这是很多中高档产品都做不到的。
第3代ME系列产品每年6月份,随着高考、中考、小升初的陆续举行,“考试”和“升学”就成为这个时期公众最关注的话题。
爱普生V33扫描仪使用说明

爱普生V33扫描仪使用说明-CAL-FENGHAI.-(YICAI)-Company One1爱普生V33扫描仪使用说明一、扫描仪部件指南A、扫描仪部件a. 扫描仪文稿盖a. 文稿垫(仅Perfection V330 Photo)b. 文稿台c. 扫描头(在文稿台里边)a. USB接口b. 直流电入口B、指示灯和按钮此扫描仪有四个按钮用于扫描操作。
状态指示灯指示扫描仪操作是否正常a. 电子邮件按钮d. PDF按钮c. 复印按钮d. 电源/启动按钮e. 状态指示灯状态指示灯位于电源/启动按钮和PDF按钮之间。
颜色指示灯状态含义绿色亮准备扫描图像。
闪烁正在初始化或正在扫描。
橙色闪烁发生错误。
有关详细信息,参见状态指示灯闪烁。
(无)灭扫描仪关闭。
按钮功能电源/启动按钮电源如果按下一次可打开扫描仪电源。
当扫描仪电源打开时,按下此按钮3秒钟可关闭扫描仪。
(当扫描软件正在运行时,您不能关闭扫描仪。
)启动Epson Scan启动。
复印Copy Utility启动。
E-mail Epson Scan自动扫描,然后出现传送文件的邮件窗口。
PDF扫描至PDF窗口出现。
二、扫描仪部件指南A、将文稿和照片放在文稿台上1、打开扫描仪盖2、将原始文稿或照片面朝下放置在扫描仪文稿台上。
确保将文稿或照片放置在文稿台的右下角且与箭头标记对齐。
3、轻轻地合上文稿盖,以免移动原始文稿。
注意:扫描多张照片,请将每张照片与其相邻照片之间至少距离20 毫米英寸)放置保持文稿台干净请勿将照片在文稿台上放置过长时间,因为它们可能会粘在玻璃上B、放置大或厚的文稿扫描大的或厚的文稿时,可完全的打开扫描仪的文稿盖,使其平放在扫描仪的旁边1、打开扫描仪盖2、向上笔直地拉出文稿盖3、向下放置文稿盖使其平放在扫描仪的旁边。
注意:当不使用文稿盖进行扫描时,请轻轻向下按住文稿使其平整完成扫描时,放下文稿盖的相反顺序重新安上文稿盖二、扫描原稿A、启动EPSON Scan1、使用扫描仪按钮a. 邮件按钮b. PDF按钮c. 复印按钮d. 电源/启动按钮可通过按下下面扫描仪上的按钮来启动扫描。
EPSONME1+打印机操作指南
EPSON ME1+喷墨打印机+连供使用指南一、安装连接电脑和打印机,开启打印机按钮,待计算机识别打印机后,安装驱动程序(win10可自动识别)。
二、使用方法打印须知:打印前可进行打印测试,查看图案清晰后再打印。
1、原装墨盒更换方法按照打印机软件提示更换即可。
2、连供墨盒更换方法。
方法a首先关闭打印机电源,稍等片刻后执行以下操作:按住打印机上的墨水按键,然后再打开电源开关,打开电源开关的时候,墨水按键不能松开,大概过2到5秒钟,然后松开,机器会自动进入清洗状态,当机器清洗完成以后,打印机会自动进纸打印出一张喷嘴测试页,打印完成以后,用户通过测试页判断喷嘴是否仍然堵头。
如果清洗不够彻底,用户还可以把电源关闭,仍然按照上述方法再次清洗。
方法b关机情况下,使用工具按下打印机右侧滑动皮带后方凹槽内的白色控制开关(需使用手电探照寻找),即可直接轻拨出小车。
方法c1)执行更换墨盒操作,弹出打印车。
2)拨掉电源线。
3)手动拨到可以安装的位置。
3、连供注墨方法将外置墨盒两边气孔全部开启,否则会出现堵墨现象。
适量注墨,过量注墨会引起打印头漏墨现象。
三、问题处理1、颜色不正确清晰多数情况下,打印头并没有堵塞,引起无法打印的原因如下:原因1:外置墨盒的进墨盒墨水量低解决方法:盖上所有墨盒盖子,平放外置墨盒,将外置墨盒进墨盒的墨水位提高,确认成功后打开进墨盒盖子。
原因2:内置墨盒墨水量低解决方法:高置外置墨盒,将外置墨盒墨水注入内置墨盒内。
原因3:堵头猜想解决方法:开启打印头软件选项的维护选项,清洗打印头1次,图形测试通过后停止清洗。
如不成功,再次清洗。
如果图形已经清晰正确,停止清洗。
如不成功,连续清洗打印头2次,等待1分钟左右,进行喷嘴检查,通过后打印。
2、无法识别墨盒有墨原因:排除问题1的原因,可能是软件显示不能正确刷新为实际数据。
解决方法:如果红灯闪烁,按下打印机的更换墨盒键10秒左右,如果墨盒有墨,会重新识别出墨水容量。
EPON爱普生V33扫描仪使用说明(随意调整页面宽高)
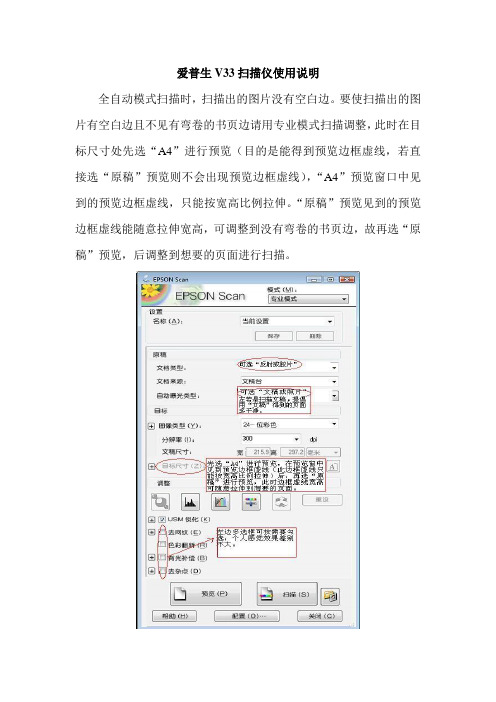
全自动模式扫描时,扫描出的图片没有空白边。
要使扫描出的图片有空白边且不见有弯卷的书页边请用专业模式扫描调整,此时在目标尺寸处先选“A4”进行预览(目的是能得到预览边框虚线,若直接选“原稿”预览则不会出现预览边框虚线),“A4”预览窗口中见到的预览边框虚线,只能按宽高比例拉伸。
“原稿”预览见到的预览边框虚线能随意拉伸宽高,可调整到没有弯卷的书页边,故再选“原稿”预览,后调整到想要的页面进行扫描。
一、扫描仪部件指南A、扫描仪部件a. 扫描仪文稿盖a. 文稿垫(仅Perfection V330 Photo)b. 文稿台c. 扫描头(在文稿台里边)a. USB接口b. 直流电入口B、指示灯和按钮此扫描仪有四个按钮用于扫描操作。
状态指示灯指示扫描仪操作是否正常a. 电子邮件按钮d. PDF按钮c. 复印按钮d. 电源/启动按钮e. 状态指示灯状态指示灯位于电源/启动按钮和PDF按钮之间。
颜色指示灯状态含义绿色亮准备扫描图像。
闪烁正在初始化或正在扫描。
橙色闪烁发生错误。
有关详细信息,参见状态指示灯闪烁。
(无)灭扫描仪关闭。
按钮功能电源/启动按钮电源如果按下一次可打开扫描仪电源。
当扫描仪电源打开时,按下此按钮3秒钟可关闭扫描仪。
(当扫描软件正在运行时,您不能关闭扫描仪。
)启动Epson Scan启动。
复印Copy Utility启动。
E-mail Epson Scan自动扫描,然后出现传送文件的邮件窗口。
PDF 扫描至PDF窗口出现。
二、扫描仪部件指南A、将文稿和照片放在文稿台上1、打开扫描仪盖2、将原始文稿或照片面朝下放置在扫描仪文稿台上。
确保将文稿或照片放置在文稿台的右下角且与箭头标记对齐。
3、轻轻地合上文稿盖,以免移动原始文稿。
注意:扫描多张照片,请将每张照片与其相邻照片之间至少距离20 毫米(0.8 英寸)放置保持文稿台干净请勿将照片在文稿台上放置过长时间,因为它们可能会粘在玻璃上B、放置大或厚的文稿扫描大的或厚的文稿时,可完全的打开扫描仪的文稿盖,使其平放在扫描仪的旁边1、打开扫描仪盖2、向上笔直地拉出文稿盖3、向下放置文稿盖使其平放在扫描仪的旁边。
爱普生V33扫描仪使用说明

爱普生V33扫描仪使用说明一、扫描仪部件指南A、扫描仪部件a. 扫描仪文稿盖a. 文稿垫(仅Perfection V330 Photo)b. 文稿台c. 扫描头(在文稿台里边)a. USB接口b. 直流电入口B、指示灯和按钮此扫描仪有四个按钮用于扫描操作。
状态指示灯指示扫描仪操作是否正常a. 电子邮件按钮d. PDF按钮c. 复印按钮d. 电源/启动按钮e. 状态指示灯状态指示灯位于电源/启动按钮和PDF按钮之间。
颜色指示灯状态含义绿色亮准备扫描图像。
闪烁正在初始化或正在扫描。
橙色闪烁发生错误。
有关详细信息,参见状态指示灯闪烁。
(无)灭扫描仪关闭。
按钮功能电源/启动按钮电源如果按下一次可打开扫描仪电源。
当扫描仪电源打开时,按下此按钮3秒钟可关闭扫描仪。
(当扫描软件正在运行时,您不能关闭扫描仪。
)启动Epson Scan启动。
复印Copy Utility启动。
E-mail Epson Scan自动扫描,然后出现传送文件的邮件窗口。
PDF 扫描至PDF窗口出现。
二、扫描仪部件指南A、将文稿和照片放在文稿台上1、打开扫描仪盖2、将原始文稿或照片面朝下放置在扫描仪文稿台上。
确保将文稿或照片放置在文稿台的右下角且与箭头标记对齐。
3、轻轻地合上文稿盖,以免移动原始文稿。
注意:扫描多张照片,请将每张照片与其相邻照片之间至少距离20 毫米(0.8 英寸)放置保持文稿台干净请勿将照片在文稿台上放置过长时间,因为它们可能会粘在玻璃上B、放置大或厚的文稿扫描大的或厚的文稿时,可完全的打开扫描仪的文稿盖,使其平放在扫描仪的旁边1、打开扫描仪盖2、向上笔直地拉出文稿盖3、向下放置文稿盖使其平放在扫描仪的旁边。
注意:当不使用文稿盖进行扫描时,请轻轻向下按住文稿使其平整完成扫描时,放下文稿盖的相反顺序重新安上文稿盖二、扫描原稿A、启动EPSON Scan1、使用扫描仪按钮a. 邮件按钮b. PDF按钮c. 复印按钮d. 电源/启动按钮可通过按下下面扫描仪上的按钮来启动扫描。
爱普生ddst打印机 扫描仪使用手册说明书

操作说明书打印机/扫描仪参考使用本设备前请仔细阅读本手册,并妥善保存以备今后参考。
为了安全正确使用,务必在使用设备之前阅读“复印参考”中的“安全信息”。
准备使用安装软件使用打印机功能使用TWAIN 扫描仪功能故障排除附录123456DDST Unit Type F简介本手册包含关于本设备操作和使用的详细说明和注意事项。
为了您的安全和利益,请在使用本设备前仔细阅读本手册。
为了便于参考,请将本手册存放在随手可取之处。
重要事项本手册的内容若有更改,恕不另行通知。
对于因操作和使用本设备而导致的直接、间接、特殊、偶然或必然损失,本公司概不负责。
切勿复印或打印法律禁止复制的任何项目。
地方法律通常禁止复印或打印下列项目:纸币、印花税票、债券、股票、银行汇票、支票、护照、驾驶执照。
上述列表仅供参考,未涵盖全部项目。
对其完整性或准确性,我们概不负责。
如果对于复印或打印某些项目的合法性有疑问,请与您的法律顾问联系。
注意:进行本手册中未明确说明的控制、调整或操作可能会受到危险的辐射。
本手册中采用两种尺寸单位。
本机采用公制。
商标Microsoft®、Windows®和Windows NT®是Microsoft Corporation在美国和/或其它国家的注册商标。
本手册涉及的其它产品名称只用作识别目的,有可能分别是相应公司的商标。
我们对这些标志没有任何或全部权利。
Windows操作系统的正规名称如下:• Windows® 98的产品名是Microsoft® Windows® 98• Windows® Me的产品名是Microsoft® Windows® Millennium Edition (Windows Me)• Windows® 2000的产品名如下:Microsoft® Windows® 2000 Advanced ServerMicrosoft® Windows® 2000 ServerMicrosoft® Windows® 2000 Professional• Windows® XP的产品名如下:Microsoft® Windows® XP ProfessionalMicrosoft® Windows® XP Home Edition• Windows Server TM 2003的产品名称如下:Microsoft® Windows Server TM 2003 Standard EditionMicrosoft® Windows Server TM 2003 Enterprise EditionMicrosoft® Windows Server TM 2003 Web Edition注:本手册中的某些图例可能与您所购买的设备略有不同。
爱普生投影仪使用说明
指派要投影的图像 . . . . . . . . . . . . . . . . . . . . . . . . . . . . . . . . . . . . . . . . . . . . 29 投影指派的图像 . . . . . . . . . . . . . . . . . . . . . . . . . . . . . . . . . . . . . . . . . . . . . . 29
附录
设置选项 . . . . . . . . . . . . . . . . . . . . . . . . . . . . . . . . . . . . . . . . . . . . . . . . . . 32
常规设置选项卡 . . . . . . . . . . . . . . . . . . . . . . . . . . . . . . . . . . . . . . . . . . . . . . 32 调节参数选项卡 . . . . . . . . . . . . . . . . . . . . . . . . . . . . . . . . . . . . . . . . . . . . . . 33 音频输出选项卡 . . . . . . . . . . . . . . . . . . . . . . . . . . . . . . . . . . . . . . . . . . . . . . 33
扫描仪面板按键的使用方法详细解答
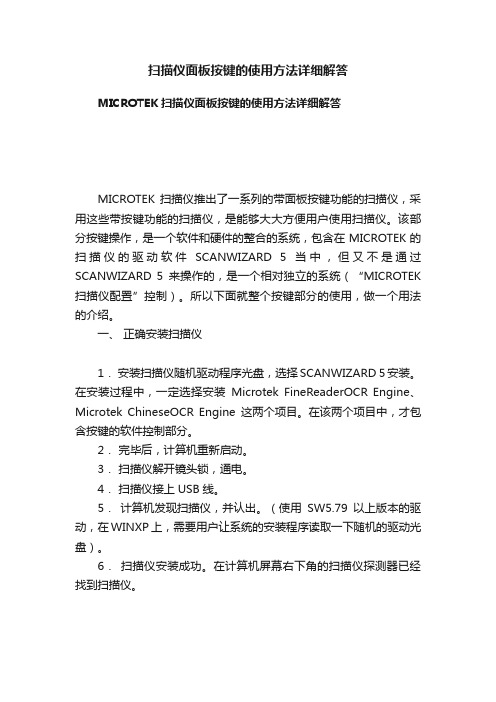
扫描仪面板按键的使用方法详细解答MICROTEK扫描仪面板按键的使用方法详细解答MICROTEK 扫描仪推出了一系列的带面板按键功能的扫描仪,采用这些带按键功能的扫描仪,是能够大大方便用户使用扫描仪。
该部分按键操作,是一个软件和硬件的整合的系统,包含在MICROTEK的扫描仪的驱动软件SCANWIZARD 5当中,但又不是通过SCANWIZARD 5来操作的,是一个相对独立的系统(“MICROTEK 扫描仪配置”控制)。
所以下面就整个按键部分的使用,做一个用法的介绍。
一、正确安装扫描仪1.安装扫描仪随机驱动程序光盘,选择SCANWIZARD 5安装。
在安装过程中,一定选择安装Microtek FineReaderOCR Engine、Microtek ChineseOCR Engine这两个项目。
在该两个项目中,才包含按键的软件控制部分。
2.完毕后,计算机重新启动。
3.扫描仪解开镜头锁,通电。
4.扫描仪接上USB线。
5.计算机发现扫描仪,并认出。
(使用SW5.79以上版本的驱动,在WINXP上,需要用户让系统的安装程序读取一下随机的驱动光盘)。
6.扫描仪安装成功。
在计算机屏幕右下角的扫描仪探测器已经找到扫描仪。
二、面板按键的标志和功能定义用户可以通过查看按键上标明的符号,来得知该按键的功能。
如下图,就是MICROTEK SM5900扫描仪的按键面板的布置图。
现实情况下,MICROTEK的每一款扫描仪的按键布置情况会有所不同,但按键上符号,表达的意思是一样的。
各个按键的功能,具体如下:扫描:直接扫描图像并自动保存为文件或传送到应用程序中。
复制:直接扫描图像并传送至打印机,使您的扫描仪和打印机组成一个复印机系统,您只需设定复制份数。
电子邮件:扫描图像并传送至您的电子邮件编辑器。
文字识别:通过内置的OCR(文字识别)引擎可识别文稿并转换为可编辑数字文件。
影像上传:将扫描好的图像上传至影像共享网站,并通过默认浏览器开启并显示此图像。
- 1、下载文档前请自行甄别文档内容的完整性,平台不提供额外的编辑、内容补充、找答案等附加服务。
- 2、"仅部分预览"的文档,不可在线预览部分如存在完整性等问题,可反馈申请退款(可完整预览的文档不适用该条件!)。
- 3、如文档侵犯您的权益,请联系客服反馈,我们会尽快为您处理(人工客服工作时间:9:00-18:30)。
爱普生me101扫描仪使用说明
以爱普生ME101扫描仪使用说明为标题
一、产品概述
爱普生ME101扫描仪是一款便携式扫描设备,可将纸质文件快速转换为电子文档,方便存储和分享。
该扫描仪具有高分辨率、快速扫描、易于操作等特点,适用于家庭、办公室等场合。
二、产品外观和配件
1. 外观:爱普生ME101扫描仪采用简约设计,外壳采用耐用的塑料材质,具有轻巧便携的特点。
设备上方有一个开关按钮和一个LED 指示灯,便于用户使用。
2. 配件:除了主机外,爱普生ME101扫描仪还配备了一个USB数据线和一份使用手册。
三、使用步骤
1. 准备工作:将扫描仪放在平整的桌面上,并连接USB数据线。
2. 打开电源:按下扫描仪上方的开关按钮,LED指示灯将亮起,表示设备已经开启。
3. 调整设置:在电脑上安装扫描仪的驱动程序后,可以通过电脑进行设置。
用户可以选择扫描分辨率、文件格式、存储路径等参数,根据需要进行个性化设置。
4. 放置文件:打开要扫描的文件,并将文件平整地放置在扫描仪的扫描区域内。
请注意,文件的边缘应与扫描仪对齐,以确保扫描效
果准确。
5. 开始扫描:在电脑上点击扫描按钮或按下扫描仪上的扫描按钮,开始扫描过程。
扫描仪将自动将文件转换为电子文档,并保存到预设的存储路径中。
6. 完成操作:扫描完成后,电脑上会弹出一个提示,显示扫描已经成功完成。
用户可以选择继续扫描其他文件或关闭设备。
四、使用注意事项
1. 使用环境:为了保证扫描仪的正常工作,建议在干燥、通风的环境中使用,避免阳光直射和潮湿的场所。
2. 清洁保养:定期将扫描仪表面的灰尘和污垢清理干净,可以使用柔软的干布进行擦拭。
避免使用含有酒精或化学溶剂的清洁剂。
3. 避免弯折:使用过程中,避免折叠或弯曲文件,以免影响扫描效果或损坏设备。
4. 避免碰撞:请注意轻放扫描仪,避免与硬物碰撞,以免造成损坏。
5. 避免过热:在连续扫描大量文件时,扫描仪可能会产生一定的热量。
为了避免过热,建议适当间隔时间,让设备休息一段时间后再继续使用。
五、常见问题解决
1. 扫描仪无法正常开启:请检查电源是否连接正常,以及电脑的电源是否正常供电。
2. 扫描结果有噪点:请检查扫描区域是否干净,或者更换一张干净
的文件重新扫描。
3. 扫描速度过慢:请检查电脑的配置是否满足要求,以及扫描仪的USB连接是否正常。
4. 扫描后的文件无法打开:请检查文件格式是否支持,或者尝试使用其他软件打开。
六、总结
爱普生ME101扫描仪是一款功能强大、易于操作的扫描设备。
通过本文的使用说明,相信用户能够轻松掌握扫描仪的使用方法,将纸质文件转换为电子文档,提高工作效率。
在使用过程中,请遵循注意事项,保证设备的正常运行,并随时注意设备的清洁和保养。
如有其他问题,请参考使用手册或联系售后客服。
愿您在使用爱普生ME101扫描仪时,能够获得满意的使用体验!。
