SP106E音乐控制器
双木三林 D100 发烧解码器使用说明书

使用说明书Ver 1.0本说明书的内容可能会随版本更改, 如有变动, 恕不另行通知请将本音响系统安装在通风良好、阴凉、干燥、干净的位置,远离直射阳光热源、振动、灰尘、 潮湿或寒冷。
只能使用本机指定的电压。
使用高于指定数值的电压很危险,而且可能导致火灾,损坏本机或造成人身伤害。
对于使用高于指定电压造成的任何损害,我司将不负任何责任。
不要试图自行改造或修理本机。
如果需要任何服务,请与销售或者我司客服人员联系。
不管有任何理由,都没有打开机壳的必要。
如果打算长时间不使用本机(比如度假时),请从墙壁交流电源插座上断开电源线的连接。
一、服务期限 佛山双木三林科技有限公司承诺产品的良好品质,产品自售出之后7天内 正常使用情况下出现故障,客户可以选择退货或者保修(不影响二次销售 才可退货)。
正常使用一年内出现故障可以免费保修。
二、购买日期以销售商开出的购机发票或收据日期为准,网购可以交易截图为准。
三、有以下情况都不能享受“三包”服务 1.一切人为因素损坏,包括非正常工作环境下使用或不按照说明书使用。
2.用户私自拆机、改装、维修。
3.使用非指定或许可的配件造成损坏的。
4.机身的QC或保修贴损毁。
5.不能出示有效购机凭证。
6.不属于本公司产品。
四、保修方式为送修 此条款只适于中国大陆,其它地区请参考当地销售代理商的规定和国家法规。
重要提示:本说明书所提到的产品规格和资讯仅供参考。
如有内容更新,恕不另行通知。
迷你尺寸设计,非常适合桌面使用;CNC一体化铣削工艺,简约时尚;ESS科技高端数模芯片ES9038Q2M;高通最新蓝牙芯片支持LDAC 24bit/96kHz、APTX/HD、SBC、AAC;4片高端双运放OPA1612和大量音频级元器件;第二代XMOS方案支持DoP256和原生DSD512,PCM最高支持32bit/768kHz;音频专用时钟处理电路,大大降低时钟抖动;所有输入端口(蓝牙除外)均支持DSD传输,同轴和光纤支持DoP64;内置专门设计的低噪声开关电源;内置分立元件线性电源和多个模拟电路低噪声电源;高品质镀金输入输出连接端子;永不过时的钢化玻璃显示面板!日本音响协会(JAS)Hi-Res认证;配备全功能遥控器。
Peavey PV6 和 PV6BT 紧凑型混音器 操作 手册说明书
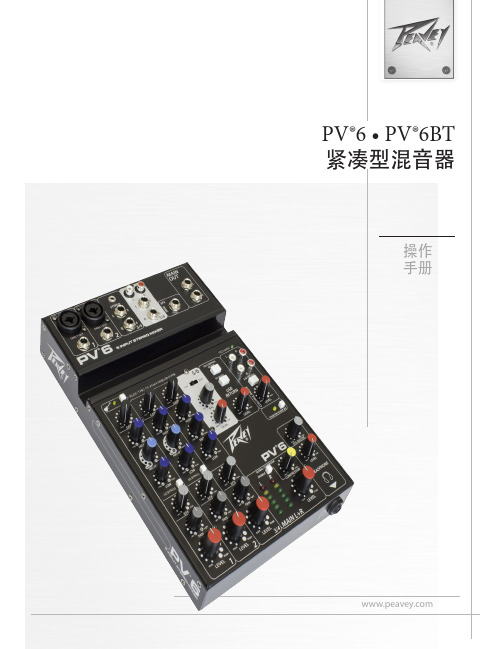
操作手册PV®6 和 PV®6BT紧凑型混音器这里介绍世界级无功放混音器性能的新台阶,所有新型 PV 系列混音控制台具有 Peavey 参考质量的话筒前置放大器,实现了惊人的 0.0007% 总谐波失真,使 PV 系列混音器很适合各种现场或录音应用。
PV 6 BT 包含2个参考质量话筒前置放大器声道、2个用于录音的直接输出、2个立体声道、戴蓝牙无线输入的媒体声道、高质量数字音效、媒体流 USB 输出、48伏幻电、双可选控制室输出、压缩、单声道集成可选吉他前置放大器、每个带旁通声道都有的3-频带均衡、每个声道具有音效电平、信号削波指示器和一个立体总 LED 滑线电桥。
该款具有惊人多样化的混音器适用于音乐工作室及现场应用,它的现代功能特性,如蓝牙等,可无缝连接几乎任何“智能”设备。
直接输出能轻松连接大多数录音用 DAW 接口;另外 PV 6 BT 可以直接发送音频流到电脑。
均衡旁通让您按下按钮即可比较均衡信号和原始信号。
压缩则控制具有难度的信号。
Peavey 独有的吉他整形特别为吉他调整均衡和前置放大器。
所有新型PV 系列混音器代表顶级性能和价值.功能特性(两种模型):• 2 个组合 1/4" 平衡 / XLR 输入静音器™ 前置放大器• 立体声 1/4"/ 3.5mm 输入声道,带输入增益、均衡、音效发送和环绕 / 平衡• 可切换 1/4" / RCA (/ 仅Bluetooth PV6 BT )立体声输入,带输入平衡和电平控制• 所有声道具有3-频带均衡• 2 个具有Peavey’s 独家 Mid-Morph的声道• LED 削波和信号出现指示• 话筒声道的均衡旁通• 双可选控制室输出• 全球48伏幻象电源• 1/4”平衡主立体输出• 耐用控制台设计• 带启动开关的立体声压缩器• 每个声道立体声环绕控制• 2 个直接输出声道• 立体声 USB-B 音频流输入和输出• 高质量总 LED 滑线电桥• 音乐工作室质量的耳机输出• Peavey 独家集成 1 兆欧吉他输入• 带电平控制的控制室输出• 电吉他预整形开关• 外部通用输入电源PV6BT 其他功能特性• 蓝牙无线立体声音频输入• Efx 静音开关仅适用于 PV6 :• Efx 总电平馈送平衡 1/4” 输出安装注意事项:本设备和任何可燃面之间必须具有下列间距:8”, 各侧面:12”, 背面:12"电平EFX 混音的主输出电平控制。
声艺E系列调音台10秒入门教程
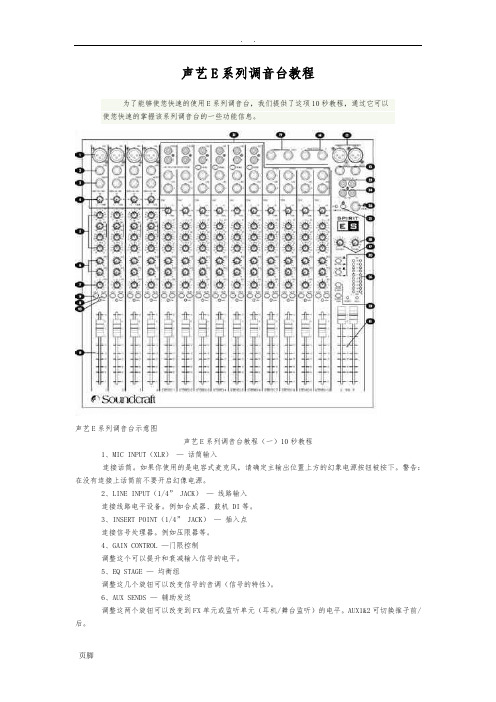
声艺E系列调音台教程为了能够使您快速的使用E系列调音台,我们提供了这项10秒教程,通过它可以使您快速的掌握该系列调音台的一些功能信息。
声艺E系列调音台示意图声艺E系列调音台教程(一)10秒教程1、MIC INPUT(XLR)—话筒输入连接话筒。
如果你使用的是电容式麦克风,请确定主输出位置上方的幻象电源按钮被按下。
警告:在没有连接上话筒前不要开启幻像电源。
2、LINE INPUT(1/4” JACK)—线路输入连接线路电平设备。
例如合成器、鼓机 DI等。
3、INSERT POINT(1/4” JACK)—插入点连接信号处理器。
例如压限器等。
4、GAIN CONTROL —门限控制调整这个可以提升和衰减输入信号的电平。
5、EQ STAGE —均衡组调整这几个旋钮可以改变信号的音调(信号的特性)。
6、AUX SENDS —辅助发送调整这两个旋钮可以改变到FX单元或监听单元(耳机/舞台监听)的电平。
AUX1&2可切换推子前/后。
7、PAN/BAL CONTROL —声像控制使用这个旋钮可以控制立体声信号的声像。
8、MUTE SWITCH —静音切换当这个按钮被按下你将会听不到该通道的信号(post-mute )。
9、SOLO —预听当该按钮按下时信号在监听输出显示—使用这个按钮可以监听通道EQ后的信号。
10、PEAK LED —削波指示灯用来指示特定通道的信号失真(削波)。
11、INPUT CHANNEL FADER —输入通道推子用来控制到调音台的混合总线(Mix Bus)和推子后发送端(Post-fade sends)的电平大小。
12、MIX OUTPUTS(XLR)—混合输出端这里连接到模拟记录设备或你的扩声系统。
13、MIX INSERTS(1/4” Jack)—混合插入端这是个在信号路径推子前的中断,通常用来反馈给动态或控制设备。
信号从JACK 插头的顶端发送,从环端返回。
14、MONITOR O/Ps(1/4” Jack)—监听输出端这个用来连接到你的监听系统。
亿佰特-E106-G03产品使用手册
目录1.快速入门 (4)1.1.产品测试硬件环境 (4)1.2.数据传输测试 (4)2.产品概述 (6)2.1.产品简介 (6)2.2.模块基本参数 (6)2.3.脚位说明 (7)3.1.工作模式 (10)3.2.串口 (19)3.3.特色功能 (22)4.参数设置 (29)4.1.AT指令配置 (29)5.AT指令集 (31)6.免责声明 (34)7.更新历史 (34)1.快速入门E106-G03是为实现串口设备与网络服务器,通过GPRS网络相互传输数据而开发的产品,通过简单的AT 指令进行设置,即可轻松使用本产品实现串口到网络的双向数据透明传输,FTP远程升级,GPS定位。
本章是针对E106-G03产品的快速入门介绍,建议新用户仔细阅读本章并按照指示操作一遍,以对模块产品有一个系统的认识。
熟悉此类产品用户可跳过本章节。
针对特定的细节和说明,请参考后续章节。
本章主要测试E106-G03的网络透传功能,即实现串口端与TCP Server端的数据透传。
1.1.产品测试硬件环境1.1.1.硬件准备本章测试基于E106-G03-EVK的评估套件进行的,如果您已购买,会有如下配件:图1配件测试数据流拓扑图:图2测试数据流拓扑图在测试之前,请按如下图示,进行硬件连接。
电脑串口连接到E106-G03的评估板的串口1上,有些电脑可能没有硬件串口,可以USB转RS232线进行连接。
具体连接方式参考下面的硬件连接示意图,或者使用USB 线直接接到测试底板的USB口,在跳线处选择相应的连线即可。
1.2.数据传输测试1.2.1.模块的初始参数表1测试初始参数工作模式网络数据透传服务器地址服务器端口2317串口参数115200,8,1,None心跳包使能,1.向E106-G03测试底板卡槽内放置SIM卡,用上述的连接方式连接到电脑串口。
打开设置软件,首先选择RS232的串口号、波特率等参数,并打开串口,如下图。
注:GM3P不支持电信的SIM卡注:以WIN7系统为例,串口号可在“控制面板→设备管理器→端口”中查询。
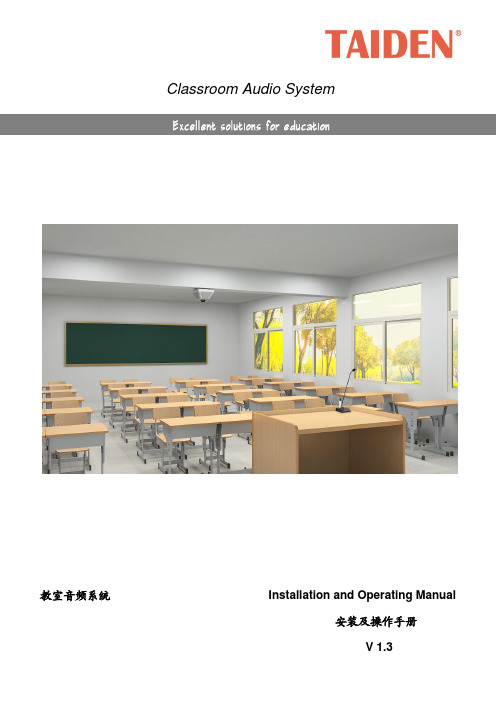
教室音频系统安装及操作手册说明书
Classroom Audio System教室音频系统 Installation and Operating Manual安装及操作手册V 1.3重要的安全说明重要的安全说明1. 在安装和使用设备前请先仔细阅读本安全操作规程。
2. 请保存好您的安全操作指南便于以后作参考用。
3. 请遵守所有设备操作指南中的“警告”事项。
4. 须遵守各项操作指南中的规章原则。
5. 清洁设备:清洁设备之前,请先关掉电源,从插座中拔出设备插头,将各连接的系统单元拆卸出来,清洁时请用干燥的软布擦拭。
6. 未经生产厂家同意,不要使用任何不匹配的附件配置,这都有可能引起危险事故。
7. 勿将设备置于潮湿或靠近热源的地方,以免发生危险。
8. 设备不应遭受水滴或水溅,不应放置诸如花瓶一类装满液体的物品。
9. 电源插头作为断接装置,应便于操作。
10. 设备应可靠连接到带保护接地的电网电源输出插座上。
11. 勿将设备放置在不稳固的台面上;在运输过程中避免设备遭受强烈振动而引起损坏,建议在运输前选用合适的包装或使用原包装。
12. 请勿阻塞设备上的通风开口,并保持室内的空气通畅,便于设备的维护。
13. 供电电压:AC 100 V-240 V 50 Hz/ 60 Hz14. 设备连接所需要的延长电缆线请绕道穿行,勿有重物挤压,这样能有效维护系统的正常工作。
15. 每套系统中所连接的接收器不得超过规定数量,否则可能会导致整个系统中设备的异常工作,如有特殊要求请与距离您最近的深圳台电售后服务中心取得联系。
16. 确保设备不被任意拆开机壳,也不允许任何硬质导体或液态物质残留在机壳内。
17. 设备有需要维护时,不要自行拆卸,请及时与距离您最近的深圳台电售后服务中心取得联系。
18. 所有TAIDEN产品将提供一定期限(详见保修卡)免费保修,但人为损坏除外,例如:A. 设备因人为作用被摔坏;B. 因操作员操作不当而导致设备受损;C. 自行拆卸后而导致部分设备零件受损或丢失。
iriver E10 MP3播放器 说明书

长按左侧键返回到主菜单。 在许多菜单中(如主菜单),长按右侧键可返回至 [正在播放] 画面。 在 E10 播放内容文件时,长按右侧键可显示子菜单。 长按智能键更改指定到智能键的功能。(有关详细信息,请参阅第 30 页。)
准备使用
04
05
快速入门
请按照以下步骤在 E10 上播放您喜爱的音乐 : Step 1 | 安装 iriver plus 2。
2 快速入门..................................................................................................................................................06
用户指南
目录
1 准备使用
首次使用 E10 前............................................................................................................................................. 02 识别控制按钮.................................................................................................................................................. 03 使用 E10 控制按钮......................................................................................................................................... 04
智能家庭背景音乐系统米悦M300控制器安装使用说明书

欢迎您使用米悦智能家庭背景音乐控制器为了顺利使用本产品,请您详细阅读本手册本手册可以让您快速了解本产品的施工布线、安装、使用本产品为小型定制安装类产品,需要专业的安装人员进行安装,如没有专业安装人员,请仔细阅读本手册后,再进行安装。
安装本产品之前请先将电源断开,带电安装将会对本产品造成永久性损坏本产品可以和Control4、快思聪等国际知名的智能家居系统完美对接,需要对接请联系厂方提供技术支持本产品具备在线升级功能,请尽量保持系统软件最新,更新系统后请恢复出厂设置本产品具体参数请查看本公司网站www.miyue.hk本公司免费技术支持电话400-606-0026施工布线注意事项:1.控制面板安装高度保持和开关水平,高度1.3米~1.4米之间;2.系统标配电源为全球通用电源,可安装在30厘米插座高度,强电插座旁边,方便取电;3.HDMI延长器为选配件,需要将视频输出到电视的时候选用,延长器和背景音乐控制器之间通过双六类网线连接;4.为了网络信号稳定,本公司建议使用网线联网5.音箱线建议选择50~100芯纯铜音箱线6.AUX音频输入和音频输出的音频线建议使用RVVP3*0.12高屏蔽话筒线7.为了便于后期安装,请使用本公司标配底盒预埋。
产品安装注意事项1.安装之前请保证电源处于断开状态,所有线路接好之后方可通电,带电安装有可能造成设备损坏;2.卡扣用平口起子轻撬即可分开前面板和后盖,后盖需要安装到国标146型预埋底盒内;3.绿色接线端子全部为可拆卸端子,请用平口螺丝刀轻撬,拆下后接线;4.网线请全部按照EIA/TIA-568B线序压制;5.5V、12V、GN D接口用于给控制面板供电,请按照标签指示连接到标配电源适配器上,不按标签指示接线将可能造成产品损坏;6.喇叭接口L+L-为左声道喇叭输出,请连接左声道喇叭,R+R-为右声道喇叭输出,请连接右声道喇叭;7.外接音频输入接口,用于外接其他播放器作为音源使用,音频输出接口用于将本系统内的音乐扩展其他功放;8.连接好所有线路后,请先固定好后壳,再将前面板盖上,请注意不要用力过猛造成排针弯曲,损坏;9.电源强电接入请直接将强电线拨开1厘米左右,直接插入连接器的圆孔内即可,红色为火线,黑色为零线,电源输出请按照标签指示和触摸面板对应连接;常见问题处理电源指示灯不亮请检查零线和火线连接是否连接正确;用万用表调整到 AC档750V测量零线火线之间是否有电压;如果零线火线之间有电压,请更换电源电源指示灯亮,但是控制面板不好开启1.请检查控制面板上5V12V是否准确,用万用表调整到DC档20V,测量接线图表上5V和GN D和 12V 和GN D之间的电压是否正确,如果连接错误请重新连接,错误的连接可能导致机器永久损坏;2.请检查前面面板和后面底板之间是否准确连接,插针是否有折断,弯曲的现象3.请检查电源和智能背景音乐控制面板之间连接线是否太细,太细将造成电流不够,本公司推荐电源线为RVV3*1.0多股软线无法联网请检查R J45接口是否按照568B顺序连接,交换机端顺序是否按照568B连接,用测线器测试线路通断。
BOSS eBand JS-10 音频播放器与吉他效果说明书
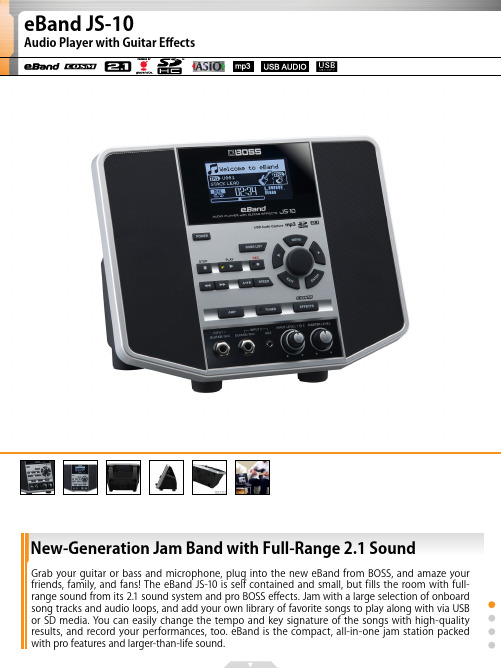
Grab your guitar or bass and microphone, plug into the new eBand from BOSS, and amaze your friends, family, and fans! The eBand JS-10 is self contained and small, but fills the room with full-range sound from its 2.1 sound system and pro BOSS effects. Jam with a large selection of onboard song tracks and audio loops, and add your own library of favorite songs to play along with via USB or SD media. You can easily change the tempo and key signature of the songs with high-quality results, and record your performances, too. eBand is the compact, all-in-one jam station packed with pro features and larger-than-life sound.New-Generation Jam Band with Full-Range 2.1 Soundduet jam sessions and teacher/student lessonsNew custom DSP chip provides effects and COSM amps equivalent to the flagship GT-100Over 350 pre-loaded audio loops for jamming along — including new “minus-one” audio for bass, two guitars, and guitar and bass — plus 50 new songsCenter Cancel for minus-one play-along sessions; tempo/key-shift functionStylish, sturdy designPowerful 2.1 SoundThe eBand JS-10 is compact and travel friendly, but its performance is huge. An innovative onboard 2.1 speaker system provides rich, full-frequency sound for song playback and the built-in effects and COSM amps, with deep bass that can shake the room.Pro BOSS Effects OnboardGet creative with the awesome BOSS effects and COSM amps built into the eBand JS-10 — equivalent in quality to the flagship GT-100 — plus cool extras such as direct recording and Center Cancel for "minus-one" play-along sessions.Two Input Channels with Individual FX PathsTwo independent input channels are provided, each with its own effect and COSM amp paths. You can plug in any dual combination of guitar, bass, and/or microphone, ideal for duet jam sessions as well as teacher/student music lessons.The eBand JS-10 is packed with cool new play-along tracks, including over 350 audio loops for jamming and 50 new songs. The selection is wider with new variations of instrument combinations, including “minus-one” audio for bass, two guitars, and guitar and bass. Your favorite MP3s and WAV files can be played back directly from a USB key, or imported into the JS-10 from a computer via USB. In addition, you can record your live performance with effects along with the songs into the JS-10.Great Practice ToolWith the eBand JS-10, you can jam along with your favorite songs, and freely change the tempo and key with high-quality results. You can also loop and repeat sections of a song, and slow down the fast parts to analyze, learn, and play along. eBand’s dual input channels are also an excellent learning tool. For example, a guitar teacher and student can connect their instruments to one eBand; the teacher demonstrates or quickly records a riff or solo using a built-in backing track, and then the student repeats the performance for the teacher using the same track. It’s a convenient, effective, and fun method for learning!Gracenote is a registered trademark of Gracenote, Inc. The Gracenote logo and logotype,and the “Powered by Gracenote” logo are trademarks of Gracenote.。
Android多媒体(Media)入门

Android 提供了MediaPlayer 和MediaRecorder 两个工具类,来帮助开发者操作音频和视频。
我们通过两个小例子来学习一下多媒体资源的使用。
一、简单音乐播放器1、新建一个项目Lesson28_Music , 主Activity的名字是MainMusic.java2、拷贝这几张图片到res/drawable目录下,并建立3个xml文件,拷贝love.mp3到res/raw文件中。
play.xml1 <?xml version="1.0" encoding="utf-8"?>2 <SELECTOR xmlns:android="/apk/res/android">3 <ITEM android:state_enabled="false" android:drawable="@drawable/play_disable" /> <!-- state_enabled=false -->4 <ITEM android:drawable="@drawable/play_50" /> <!-- default -->5 </SELECTOR>pause.xml1 <?xml version="1.0" encoding="utf-8"?>2 <SELECTOR xmlns:android="/apk/res/android">3 <ITEM android:state_enabled="false" android:drawable="@drawable/pause_disable" /> <!-- state_enabled=false -->4 <ITEM android:drawable="@drawable/pause_50" /> <!-- default -->5 </SELECTOR>stop.xml1 <?xml version="1.0" encoding="utf-8"?>2 <SELECTOR xmlns:android="/apk/res/android">3 <ITEM android:state_enabled="false" android:drawable="@drawable/stop_disable" /> <!-- state_enabled=false -->4 <ITEM android:drawable="@drawable/stop_50" /> <!-- default -->5 </SELECTOR>3、res/layout/main.xml 的内容如下:01 <?xml version="1.0" encoding="utf-8"?>02 <LINEARLAYOUT xmlns:android="/apk/res/android"android:orientation="vertical" android:layout_width="fill_parent" android:layout_height="fill_parent">03 <TEXTVIEW android:layout_width="fill_parent" android:layout_height="wrap_content" android:textsize="25sp" android:text="简单音乐播放器" />04 </LINEARLAYOUT>05 <LINEARLAYOUT xmlns:android="/apk/res/android"android:orientation="horizontal" android:layout_width="fill_parent" android:layout_height="fill_parent">0607 <IMAGEBUTTON android:layout_width="wrap_content" android:layout_height="wrap_content" android:id="@+id/play" android:background="@drawable/play" android:adjustviewbounds="true" android:layout_margin="4dp">08 </IMAGEBUTTON>0910 <IMAGEBUTTON android:layout_width="wrap_content" android:layout_height="wrap_content" android:id="@+id/pause" android:background="@drawable/pause" android:adjustviewbounds="true" android:layout_margin="4dp">11 </IMAGEBUTTON>1213 <IMAGEBUTTON android:layout_width="wrap_content" android:layout_height="wrap_content" android:id="@+id/stop" android:background="@drawable/stop" android:adjustviewbounds="true" android:layout_margin="4dp">14 </IMAGEBUTTON>15 </LINEARLAYOUT>4、MainMusic.java的内容如下:001 package android.basic.lesson28; 002003 import java.io.IOException;004005 import android.app.Activity;006 import android.media.MediaPlayer;007 import android.media.MediaPlayer.OnCompletionListener; 008 import android.media.MediaPlayer.OnPreparedListener; 009 import android.os.Bundle;010 import android.view.View;011 import android.view.View.OnClickListener;012 import android.widget.ImageButton;013 import android.widget.Toast;014015 public class MainMusic extends Activity {016017 // 声明变量018 private ImageButton play, pause, stop;019 private MediaPlayer mPlayer;020021 /** Called when the activity is first created. */022 @Override023 public void onCreate(Bundle savedInstanceState) {024 super.onCreate(savedInstanceState);025 setContentView(yout.main);026027 // 定义UI组件028 play = (ImageButton) findViewById(R.id.play);029 pause = (ImageButton) findViewById(R.id.pause); 030 stop = (ImageButton) findViewById(R.id.stop);031032 // 按钮先全部失效033 play.setEnabled(false);034 pause.setEnabled(false);035 stop.setEnabled(false);036037 // 定义单击监听器038 OnClickListener ocl = new View.OnClickListener() { 039040 @Override041 public void onClick(View v) {042 switch (v.getId()) {043 case R.id.play:044 // 播放045 Toast.makeText(MainMusic.this, "点击播放", Toast.LENGTH_SHORT) 046 .show();047 play();048 break;049 case R.id.pause:050 // 暂停051 Toast.makeText(MainMusic.this, "暂停播放", Toast.LENGTH_SHORT) 052 .show();053 pause();054 break;055 case R.id.stop:056 // 停止057 Toast.makeText(MainMusic.this, "停止播放", Toast.LENGTH_SHORT) 058 .show();059 stop();060 break;061 }062 }063 };064065 // 绑定单击监听066 play.setOnClickListener(ocl);067 pause.setOnClickListener(ocl);068 stop.setOnClickListener(ocl);069070 // 初始化071 initMediaPlayer();072 }073074 // 初始化播放器075 private void initMediaPlayer() {076077 // 定义播放器078 mPlayer = MediaPlayer.create(getApplicationContext(), R.raw.love);079080 // 定义资源准备好的监听器081 mPlayer.setOnPreparedListener(new OnPreparedListener() {082 @Override083 public void onPrepared(MediaPlayer mp) {084 // 资源准备好了再让播放器按钮有效085 Toast.makeText(MainMusic.this, "onPrepared", Toast.LENGTH_SHORT) 086 .show();087 play.setEnabled(true);088 }089 });090091 // 定义播放完成监听器092 mPlayer.setOnCompletionListener(new OnCompletionListener() {093094 @Override095 public void onCompletion(MediaPlayer mp) {096 Toast.makeText(MainMusic.this, "onCompletion",097 Toast.LENGTH_SHORT).show();098 stop();099 }100 });101 }102103 // 停止播放104 private void stop() {105 mPlayer.stop();106 pause.setEnabled(false);107 stop.setEnabled(false);108 try {109 mPlayer.prepare();110 mPlayer.seekTo(0);111 play.setEnabled(true);112 } catch (IllegalStateException e) {113 e.printStackTrace();114 } catch (IOException e) {115 e.printStackTrace();116 }117118 }119120 // 播放121 private void play() {122123 mPlayer.start();124 play.setEnabled(false); 125 pause.setEnabled(true); 126 stop.setEnabled(true); 127 }128129 // 暂停130 private void pause() {131 mPlayer.pause();132 play.setEnabled(true); 133 pause.setEnabled(false); 134 stop.setEnabled(true); 135 }136137 // Activity销毁前停止播放138 @Override139 protected void onDestroy() { 140 super.onDestroy();141 if (stop.isEnabled()) { 142 stop();143 }144145 }146147 }5、运行程序,查看效果二、简单视频播放器Android为视频播放提供了VideoView 和MediaController 两个现成的组件,让我们可以方便的实现MP4、3GP等视频的播放。
声艺 UI12 UI16 数字调音台中文说明书

2.0: 入门
2.1: 系统概述 2.2: 硬件I/O和控制 2.3: 输入通道路径 2.4: 快速连接
6.0: 混合功能
6.1: VIEW & MUTE组 6.2: MORE ME
3.0: 软件控制
3.0.1: 更新与要求 3.0.2: 重置调音台 3.1.1: 控制/手势汇总 3.2.1: 键盘控件
1.1: 安全
Ui12, Ui16 用户手册
简介 > 安全
• 请阅读这些说明。 • 请阅读这些说明。 • 注意所有警告。 • 按照说明操作。 • 只能用干布清洁设备。 • 不要安装在热源附近,如散热器、电热器、火炉或产生热量的其他设备(包括箱头)。 • 不要阻塞任何通风口。 根据制造商的说明安装。 • 不要在潮湿的地方使用该设备。
注意: 本设备已经过测试,符合FCC规则15对A类数字设备的限制。 这些限制旨在为商业环境中运 作的设备提供ቤተ መጻሕፍቲ ባይዱ理的保护,防止有害干扰。 该设备产生、使用和辐射无线电频率能量,如果没有 并按照说明安装使用,可能会对无线电通信产生有害干扰。 本设备在居民区运行可能会导致有害 干扰,此时用户将被要求自费纠正干扰。 This Class A digital apparatus meets the requirements of the Canadian Interference-Causing Equipment Regulations. et appareil numérique de la Classe A respecte toutes les exigences du Règlement sur le matériel C brouilleur du Canada.
Harman International Industries Limited Cranborne House, Cranborne Road, Potters Bar, Hertfordshire, EN6 3JN, 英国 电话: +44 (0)1707 665000 传真: +44 (0)1707 660742
Peavey RBN 110 有源音箱 操作手册说明书

RBN™110有源音箱操作手册简介感谢您购买这台为专业人士专门设计的Peavey® RBN™110有源音箱。
RBN™110 具有双功放输出设计,一路连接到低音喇叭并且可以输出550W 的峰值功率,另外一路连接到带式高音扬声器并可以输出500W 的峰值功率,两者均带有DDT™压缩技术。
配备了10”高性能重低音扬声器和RD™2.6带式高音驱动,RBN™110可提供两个完全独立的混合输入通道,每个通道都带有增益控制装置和一个麦克风/线输入增益开关,并且每个通道也配备了带有1/4” TRS接口和XLR卡侬母头的组合插孔和带有音量控制的平衡输入端。
基于内置DSP 的分频器和处理器能够为使用者在面对各种不同的使用场合提供了极大的灵活性特性* 两路功放设计有源音箱* 550W 峰值功率低音输出,500W 峰值功率高音输出* 两路功率放大器均带有DDT 压缩技术* 10”高性能低音扬声器* 基于低波导失真的Peavey RD™ 2.6 带式高音扬声器* 播放音乐时,峰值声压级(SPL)高达125 dB!* 基于DSP 的分频器、限制和均衡器(EQ)* 可通过旋转编码器按钮选择进行均衡器预设* 可通过旋转编码器按钮设置9 段均衡器以及对其他系统的设置* 动态低音增强功能* 构筑延时长达150 mS* 通过风扇冷却,实现最大的可靠性* 两个独立的混合输入通道,带有增益控制装置和一个麦克风/线输入选择开关* 每个通道配备带有6.3mm TRS 接口和带平衡输入的XLR 卡侬母头的组合插孔* 输入端2 配有3.5 mm 立体声输入插孔* 输出连接器采用XLR 卡侬公头* 右侧和顶部后侧各有一个内嵌式手柄* 长形孔设计的金属网罩,内部衬有网布* 坚固的聚丙烯模压箱体* 内置支撑杆安装孔* 重量仅16.8kg(37磅)!* 顶部和底部设有悬挂嵌入组件,可以与VM™ 70 固定支架紧密配合说明Peavey® RBN™110 的有源,双功放,两路扬声器的设计使之能够在小型有源音箱系统中具有非常高的性能。
杰尼奥 E 系列两唱扬声 loudspeaker 快速启动指南说明书
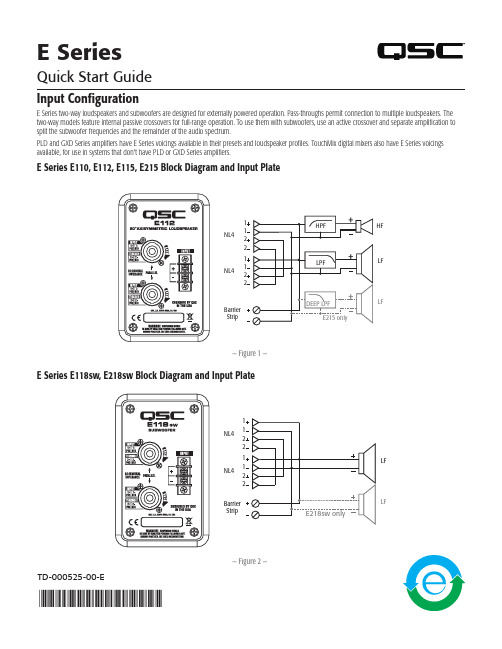
E SeriesQuick Start GuideInput ConfigurationE Series two-way loudspeakers and subwoofers are designed for externally powered operation. Pass-throughs permit connection to multiple loudspeakers. The two-way models feature internal passive crossovers for full-range operation. To use them with subwoofers, use an active crossover and separate amplification to split the subwoofer frequencies and the remainder of the audio spectrum.PLD and GXD Series amplifiers have E Series voicings available in their presets and loudspeaker profiles. TouchMix digital mixers also have E Series voicings available, for use in systems that don't have PLD or GXD Series amplifiers.E Series E110, E112, E115, E215 Block Diagram and Input Plate— Figure 1 —LFHFLFNL4Barrier StripNL4E Series E118sw, E218sw Block Diagram and Input Plate— Figure 2 —LFLFNL4Barrier StripNL411112222 TD-000525-00-E*TD-000525-00*ConnectionsFull Range Stereo System— Figure 3 —Single Channel, Sub / Satellite Option 1— Figure 4 —Single Channel, Sub / Satellite Option 2— Figure 5 —Dual Channel, Sub / Satellite System— Figure 6 —Dual Channel, Sub / Satellite System with 4-channel PLD— Figure 7 —InputF11• E115 dance +SUB • E215 +SUB•E215 dance + SUBPole Mounting on E118swThe E Series loudspeakers (E110, E112, E115) can be mounted above the E118sw subwoofer using the 36-inch pole included with the subwoofer.NOTE: The E215 loudspeaker does not offer a pole mounting option.WRNINNG: This pole, if used inappropriately, may make the loudspeaker system top-heavy and hazardous. Ensure that your system will resist tipping and that it sits on a solid, level surface.WRNINNG: Always use two persons to lift the loudspeaker onto the pole.Do not move a subwoofer if a loudspeaker and pole are mounted on it.Refer to — Figure 81. Place the E118sw subwoofer (1) on a solid level surface positioned where you want to use it.2. Screw the threaded end of the 36-inch mounting pole (3) clockwise into the pole-mounting bracket (2) on top of the subwoofer. Hand tighten only.3. Select one of the two pole mount cups on the E Series loudspeaker:• The rear cup (4) has no tilt.• The front cup (5) gives a downward tilt of 10°.4. Carefully place the loudspeaker onto the pole.Installation OptionsThe following options require purchasing an accessory kit designed for the E Series loudspeakers.Yoke Mounting the LoudspeakersA yoke accessory allows the E110, E112, or E115 to be mounted on a surface, such as a wall or ceiling. The E118sw and E218sw subwoofers cannot be yoke-mounted. Each model has a corresponding yoke accessory kit:• E110 Yoke Accessory Kit: E110 Yoke • E112 Yoke Accessory Kit: E12 Yoke • E115 Yoke Accessory Kit: E15 YokeSuspending the LoudspeakersA pair of E110 loudspeakers can be suspended using the M8 Suspension Kit M8 KIT W , which contains six eye bolts and six washers.To suspend an E112, E115, or E215 loudspeaker, use the M10 KIT- , which contains three eye bolts.The E118sw and E218sw subwoofers cannot be suspended.Always consult a licensed and qualified rigger or structural engineer before suspending any loudspeaker.Subwoofer Caster KitsOptional casters are available to install on the subwoofer models to make them more mobile and ideal for use in portable sound systems.Both the E118sw and the E218sw subwoofers use a kit of two locking and two non-locking 4-inch casters with 16 mounting screws, QSC part number FG-901156-00 (one kit needed per subwoofer).— Figure 8 —54321Mailing Address:QSC, LLC1675 MacArthur BoulevardCosta Mesa, CA 92626-1468 USATelephone Numbers:Main Number: +1 (714) 754-6175Sales & Marketing: +1 (714) 957-7100 or toll free (USA only) (800) 854-4079Customer Service: +1 (714) 957-7150 or toll free (USA only) (800) 772-2834Facsimile Numbers:Sales & Marketing FAX: +1 (714) 754-6174Customer Service FAX: +1 (714) 754-6173World Wide Web:E-mail:***********************************************© 2016 QSC, LLC. All rights reserved. QSC and the QSC logo are registered trademarks of QSC, LLC in the U.S. Patent and Trademark office and other countries. All other trademarks are the property of their respective owners..。
充满创新思维的博斯特SP106/106E系列模切机发布——2008博斯特新产品发布会在上海召开
斯特 S 16 16 P 0 /0 E 列 模 切 机 产 系 品 的 特 点 后 ,全
,
确保了加工精度 同时 .针对目前客户越来越 多的重复订
单 的 加 工生 产 中心线 系统 配 合 博斯 特 特 有 的模 切 及 清 废 工具 的 快速 锁 定 装 置 .能够 最 大 程 度 地减 少操 作 人 员 的换 版 操 作 时 间 大 大 提高 了机 器 的 生产 效 率
避 免 了意 外 事 故 的发 生 。
在 了 解 了 博
国各 地 的 5 多家 企 业 的 1 。 名代 表 参 加 了此 次 会 议 。会 议 在 0 0多 博 斯 特 集 团 大 中华 区折 叠 彩 盒业 务总 监 See Cesy 生 热 情 t r e先 v a 洋 溢 的 致 辞 中拉 开 序 幕 .Se e a e 先 生 首 先对 大 家 的 出 tv C e s y r 席 表 示 了热 烈 的欢 迎 同 时 代 表 博 斯 特 集 团对 广 大 中 国 客 户
断 提高 的生 产 需 求 。
在 新产 品 中 .博 斯 特 沿 用 了其 专利 技 术— — 中心 线 系统 作
为 机 器设 计 的 基 础 .中心 线 系统 能够 保证 设 备 中所 有 的 /  ̄单 J_ H
元 都 使 用相 同的 基 准 ,保 证 了纸 张 在 加 工 过程 中定 位 基 准 的统
一
直 以 来 对 博 斯 特 产 品 的 信 任 及 支 持 表 示 了极 大 的 谢 意 。随
后 ,博 斯特 ( 上海 )有限公 司西南区域销售经理徐 劲松先生
对 博 斯 特 新 的模 切 机 产 品做 了主 题 发言 。 此 次 博 斯特 新发 布 的 模 切 机 产 品 是s 16 t6 系 列 。 P O / 0 E 与 博 斯 特 原 来 的模 切 机 产 品相 比 .在 新 产 品 中 .博 斯 特 根 据 客 户 实 际 使 用 需 求 及 新 技 术 ,材 料 的 发 展 .对 设 备 进 行 了 大 量 的 改 进 工作 .使 得 新 的模 切 机 产 品 能 够 实 现 生 产 效 率 更 高 .设 备 稳 定 性 更 好 .产 品 质 量 更 佳 ” 更 好 地 满 足 客 户 不
px10 px8 px5 px3参考说明书

PX10/PX8/PX5/PX3 参考说明书 2
简介
感谢您购买 Yamaha PX10、 PX8、 PX5 或 PX3 功率放大器。为了最大限度地发挥本功率放大器出色功能和延长正常使用寿命,在使用之前请务必仔细阅 读本说明书。
各控制器及其功能
8
前面板 .......................................................................8 后面板 .......................................................................9
৸㘹䈪᱄Ҝ
ZH
目录
简介
3
功能特点 ....................................................................3
PX 功放相关手册 .......................................................3
AMP PRESET 画面 ................................................ 32
RECALL (调出)............................................. 32 STORE (存储)............................................... 32 CLEAR (清除)............................................... 32 TITLE (标题)................................................. 33 PROTECT (保护).......................................... 33
上海亿光数码 EGS系列话筒升降控制系统 说明书

EGS系列话筒升降控制系统使用说明一简介EGS系列话筒升降控制器系统主要用于控制影剧院、音乐厅、体育馆等演出场所的吊装话筒的高度,以适应不同的演出。
EGS系列话筒升降控制器采用先进的数控电机,具有精度高、可靠性好的特点。
一套基本的EGS话筒升降控制系统是由一台EGSP-5B型数控话筒升降控制主机、五台EGSC-5B型数控话筒升降机组成,系统连接示意图如下:●系统主要特性1)采用数控步进电机,定位精度高,平均误差小于0.5%2)精密机械设计,有效防止线缠绕3)机械、电子双限位保护,运行更安全、可靠。
4)可以控制多达5个数控话筒升降机(吊点)。
5)可以记忆多达5个预置位(场景)。
6)可以对数控话筒升降机进行独立或组合控制。
7)具备液晶显示,话筒吊点高度实时显示,界面美观,操作简便。
8)采用RS485总线通讯,布线简单并可实现远程控制。
9)数控话筒升降机具备断电记忆及自锁功能,断电不会影响吊点高度。
二安装说明准备工作注意事项EGS系列数控话筒升降控制系统必须由合格的电工安装!请严格按照说明书接线,接线错误将可能导致部件损坏!接线备注●RS485通讯线连接请采用菊链式串连方式,并且在总线上最远端的两个的设备处并入120欧姆的总线终接电阻。
●通讯接线的最大长度为600米●工作温度:0~40℃,相对湿度:不高于90%。
线材要求●电源线:14号AWG(2.5mm2)电缆线。
●RS-485通讯线:18号AWG(1.0mm2)双绞电缆或五类线。
安装:警告!在进行任何操作之前,请确保回路上的电源已经关闭,或将电源线上的主保险丝拔下,否则可能造成严重的人身伤害!●EGSP-5B数控话筒升降机控制箱的安装1.确保关闭EGSP-5B数控话筒升降机控制箱之电源。
2. EGSP-5B数控话筒升降机控制箱为3U机箱,请将EGSP-5B数控话筒升降机控制箱置入可以容纳此尺寸之机柜,并且,为便于操作及观察液晶显示屏,应将此主机安装在恰当高度之位置。
单片机课程设计
大庆师范学院单片机原理与课程设计报告设计课题:音乐播放器的设计姓名:马金玉、裴蕾、穆春玉、刘铁、史宏宇学院:物理与电气信息工程学院专业:自动化班级:09级(2)班日期:2011年6月20日——2011年6月30日指导老师:杨桂花目录1 设计的任务 (1)1.1 设计的要求 (1)2 系统硬件原理及设计 (1)2.1 核心器件AT89C51介绍 (1)2.2.1 总体电路设计 (1)2.2.2 单片机电路设计 (2)2.2.3 显示电路设计 (2)2.2.4 晶振时间电路设计 (2)2.2.5 控制电路设计 (2)2.2.6 输出电路设计 (2)2.2 硬件电路设计 (2)3 系统软件设计 (2)3.1 总体软件设计 (2)3.2 单片机音节代码实现 (3)3.3 单片机生产不同频率脉冲信号的原理 (4)3.4 音乐代码实现 (4)3.4.1音乐代码库的建立方法 (4)3.4.2 歌曲选择 (4)3.5 键控子程序 (5)3.5.1 播放/暂停子程序 (5)3.5.2 曲目选择子程序 (6)4 心得体会 (7)参考文献 (7)附录1 程序设计 (8)音乐播放器的设计1.设计任务设计一个音乐播放器,有三个按键及控制按钮:播放/暂停、下一曲、上一曲;通过控制按钮控制单片机,播放所要求的音乐,并通过放大电路和喇叭输出声音。
同时通过LED灯显示器,用来显示所选曲目,该显示器在音乐播放中关闭,一曲演奏结束时,或选曲时才显示曲目信息,从而利于操作。
1.1 设计要求1. 画出电路原理图;2. 元器件及参数选择;3. 编写设计报告,写出设计的全过程,附上有关资料和图纸,有心得体会。
2系统硬件原理及设计2.1 核心器件AT89C51介绍AT89C51是一种带4K字节闪烁可编程可擦除只读存储器的低电压,高性能CMOS 8位微处理器,俗称单片机。
AT89C2051是一种带2K字节闪烁可编程可擦除只读存储器的单片机。
单片机的可擦除只读存储器可以反复擦除100次。
杉纳特超级音乐人平板电脑操作手册说明书

1/13L6561June 20041FEATURES■VERY PRECISE ADJUSTABLE OUTPUT OVERVOLTAGE PROTECTION■MICRO POWER START-UP CURRENT (50µA TYP.)■VERY LOW OPERATING SUPPLY CURRENT(4mA TYP.)■INTERNAL START-UP TIMER■CURRENT SENSE FILTER ON CHIP ■DISABLE FUNCTION■1% PRECISION (@ T j = 25°C) INTERNAL REFERENCE VOLTAGE■TRANSITION MODE OPERATION■TOTEM POLE OUTPUT CURRENT: ±400mA ■DIP-8/SO-8 PACKAGES2DESCRIPTIONL6561 is the improved version of the L6560 stan-dard Power Factor Corrector. Fully compatible with the standard version, it has a superior perfor-mant multiplier making the device capable of work-ing in wide input voltage range applications (from 85V to 265V) with an excellent THD. Furthermore the start up current has been reduced at few tens of mA and a disable function has been implement-ed on the ZCD pin, guaranteeing lower current consumption in stand by mode.Realised in mixed BCD technology, the chip gives the following benefits:–micro power start up current–1% precision internal reference voltage –(Tj = 25°C)–Soft Output Over Voltage Protection–no need for external low pass filter on the cur-rent sense–very low operating quiescent current minimis-es power dissipationThe totem pole output stage is capable of driving a Power MOS or IGBT with source and sink cur-rents of ±400mA. The device is operating in tran-sition mode and it is optimised for Electronic Lamp Ballast application, AC-DC adaptors and SMPS.POWER FACTOR CORRECTORFigure 2. Block DiagramREV . 16Figure 1. PackagesTable 1. Order CodesPart NumberPackage L6561DIP-8L6561D SO-8L6561D013TRTape & ReelL65612/13Table 2. Absolute Maximum RatingsFigure 3. Pin Connection (Top view )Table 3. Thermal DataTable 4. Pin Description(1) Parameter guaranteed by design, not tested in production.Symbol Pin ParameterValue Unit I Vcc 8I q + I Z ; (I GD = 0)30mA I GD 7Output Totem Pole Peak Current (2µs)±700mA INV, COMP MULT1, 2, 3Analog Inputs & Outputs -0.3 to 7V CS 4Current Sense Input -0.3 to 7V ZCD 5Zero Current Detector50 (source)-10 (sink)mA mA P tot Power Dissipation @T amb= 50 °C (DIP-8)(SO-8)10.65W W T j Junction Temperature Operating Range -40 to 150°C T stgStorage Temperature-55 to 150°CSymbol ParameterSO 8MINIDIP Unit R th j-ambThermal Resistance Junction to ambient150100°C/W Function1INV Inverting input of the error amplifier. A resistive divider is connected between the output regulated voltage and this point, to provide voltage feedback.2COMP Output of error amplifier. A feedback compensation network is placed between this pin and the INV pin.3MULT Input of the multiplier stage. A resistive divider connects to this pin the rectified mains. A voltage signal, proportional to the rectified mains, appears on this pin.4CS Input to the comparator of the control loop. The current is sensed by a resistor and the resulting voltage is applied to this pin.5ZCD Zero current detection input. If it is connected to GND, the device is disabled.6GND Current return for driver and control circuits.7GD Gate driver output. A push pull output stage is able to drive the Power MOS with peak current of 400mA (source and sink).8V CCSupply voltage of driver and control circuits.3/13L6561Table 5. Electrical Characteristics(V CC = 14.5V; T amb = -25°C to 125°C;unless otherwise specified)Symbol Pin ParameterTest ConditionMin.Typ.Max.Unit SUPPLY VOLTAGE SECTIONV CC 8Operating Range after turn-on1118V V CC ON 8Turn-on Threshold 111213V V CC OFF 8Turn-off Threshold 8.79.510.3V Hys 8Hysteresis 2.2 2.5 2.8V SUPPLY CURRENT SECTIONI START-U8Start-up Current before turn-on (V CC =11V)205090µA I q 8Quiescent Current 2.64mA I CC 8Operating Supply Current C L = 1nF @ 70KHz4 5.5mA in OVP condition V pin1 = 2.7V 1.4 2.1mA Iq 8Quiescent CurrentV PIN5 ≤150mV , V CC > V CC off 1.4 2.1mA 8V PIN5 ≤ 150mV , V CC < V CC off 205090µA V Z 8Zener VoltageI CC = 25mA182022VERROR AMPLIFIER SECTIONV INV1Voltage Feedback Input Threshold T amb = 25°C 2.465 2.52.535V 12V < V CC < 18V 2.442.56V Line RegulationV CC = 12 to 18V25mV I INV 1Input Bias Current -0.1-1µA G V Voltage Gain Open loop6080dB GB Gain Bandwidth 1MHz I COMP 2Source Current V COMP = 4V , V INV = 2.4V -2-4-8mA Sink Current V COMP = 4V , V INV = 2.6V 2.54.5mA V COMP2Upper Clamp Voltage I SOURCE = 0.5mA 5.8V Lower Clamp VoltageI Sink = 0.5mA2.25VMULTIPLIER SECTION V MULT 3Linear Operating Voltage 0 to 30 to 3.5VOutput Max. SlopeV MULT = from 0V to 0.5VV COMP = Upper Clamp Voltage1.651.9K GainV MULT = 1V V COMP = 4V 0.450.60.751/V CURRENT SENSE COMPARATORV CS 4Current Sense ReferenceClampV MULT = 2.5VV COMP = Upper Clamp Voltage 1.61.7 1.8V I CS 4Input Bias Current V OS = 0-0.05-1µA t d (H-L)4Delay to Output 200450ns 4Current Sense Offset015mV ZERO CURRENT DETECTORV ZCD5Input Threshold Voltage Rising Edge (1) 2.1VHysteresis(1)0.30.50.7V V ZCD 5Upper Clamp Voltage I ZCD = 20µA 4.5 5.1 5.9V V ZCD5Upper Clamp VoltageI ZCD = 3mA4.75.26.1VV CS ∆V mult∆-----------------L65614/133OVER VOLTAGE PROTECTION OVPThe output voltage is expected to be kept by the operation of the PFC circuit close to its nominal value.This is set by the ratio of the two external resistors R1 and R2 (see fig. 5), taking into consideration that the non inverting input of the error amplifier is biased inside the L6561 at 2.5V.In steady state conditions, the current through R1 and R2 is:and, if the external compensation network is made only with a capacitor C comp , the current through C compequals zero.When the output voltage increases abruptly the current through R1 becomes:Since the current through R2 does not change, ∆I R1 must flow through the capacitor C comp and enter the error amplifier.This current is monitored inside the L6561 and when reaches about 37µA the output voltage of the multi-plier is forced to decrease, thus reducing the energy drawn from the mains. If the current exceeds 40µA,the OVP protection is triggered (Dynamic OVP), and the external power transistor is switched off until the current falls approximately below 10µA.However, if the overvoltage persists, an internal comparator (Static OVP) confirms the OVP condition keeping the external power switch turned off (see fig. 4).Finally, the overvoltage that triggers the OVP function is:∆V out = R 1 · 40µA.Typical values for R 1, R 2 and C are shown in the application circuits. The overvoltage can be set indepen-V ZCD 5Lower Clamp Voltage I ZCD = -3mA 0.30.651V I ZCD 5Sink Bias Current 1V ≤ V ZCD ≤ 4.5V2µA I ZCD 5Source Current Capability -3-10mA I ZCD 5Sink Current Capability 310mA V DIS 5Disable threshold150200250mV I ZCD 5Restart Current After Disable V ZCD < V dis ; V CC > V CCOFF -100-200-300µA OUTPUT SECTIONV GD7Dropout VoltageI GDsource = 200mA 1.22V I GDsource = 20mA 0.71V I GDsink = 200mA 1.5V I GDsink = 20mA0.3V t r 7Output Voltage Rise Time C L = 1nF 40100ns t f 7Output Voltage Fall Time C L = 1nF40100ns I GD off 7IGD Sink Current V CC =3.5V V GD = 1V510-mA OUTPUT OVERVOLTAGE SECTIONI OVP2OVP Triggering Current 354045µA Static OVP Threshold2.12.252.4VRESTART TIMER t STARTStart Timer70150400µsTable 5. Electrical Characteristics (continued)(V CC = 14.5V; T amb = -25°C to 125°C;unless otherwise specified)Symbol Pin ParameterTest ConditionMin.Typ.Max.Unit I R1sc V out 2.5–R1-------------------------I R2 2.5V R2------------===I R1V outsc V out 2.5–∆+R1----------------------------------------------------I R1sc I R1∆+==L6561 dently from the average output voltage. The precision in setting the overvoltage threshold is 7% of the ov-ervoltage value (for instance ∆V = 60V ± 4.2V).3.1Disable functionThe zero current detector (ZCD) pin can be used for device disabling as well. By grounding the ZCD volt-age the device is disabled reducing the supply current consumption at 1.4mA typical (@ 14.5V supply volt-age).Releasing the ZCD pin the internal start-up timer will restart the device.Figure 4.Figure 5. Overvoltage Protection Circuit5/13L6561Figure 6. Typical Application Circuit (80W, 110VAC)Figure 7. Typical Application Circuit (120W, 220VAC)Figure 8. Typical Application Circuit (80W, Wide-range Mains)6/137/13L6561Figure 9. Demo Board (EVAL6561-80) Electrical SchematicFigure 10. EVAL6561-80: PCB and Component Layout (Top view, real size 57x108mm)Table 6. EVAL6561-80: Evaluation Results.V in (Vac)Pin (W)V o (Vdc)∆Vo (Vdc)Po (W)η (%)w/o THD reducer with THD reducer PF THD (%)PF THD (%)8587.2400.11480.792.80.999 3.70.999 2.911085.2400.11480.794.70.996 5.00.996 3.213584.2400.11480.795.80.989 6.20.989 3.717583.5400.11480.796.60.9768.30.976 4.322083.1400.11480.797.10.94010.70.941 5.626582.9400.11480.797.30.89013.70.8938.1L65618/13Figure 11. OVP Current Threshold vs.TemperatureFigure 12. Undervoltage Lockout Thresholdvs. TemperatureFigure 13. Supply Current vs. SupplyVoltageFigure 14. Voltage Feedback Input Thresholdvs. TemperatureL6561Figure 15. Output Saturation Voltage vs. Sink CurrentFigure 16. Output Saturation Voltage vs.Source Current Figure 17. Multiplier CharacteristicsFamily9/13L6561Figure 18. DIP-8 Mechanical Data & Package Dimensions10/13L6561 Figure 19. SO-8 Mechanical Data & Package Dimensions11/13L6561Table 7. Revision HistoryDate Revision Description of Changes January 200415First IssueJune 200416Modified the Style-look in compliance with the “Corporate TechnicalPublications Design Guide”.Changed input of the power amplifier connected to Multiplier (Fig. 2). 12/13L6561 Information furnished is believed to be accurate and reliable. However, STMicroelectronics assumes no responsibility for the consequencesof use of such information nor for any infringement of patents or other rights of third parties which may result from its use. No license is granted by implication or otherwise under any patent or patent rights of STMicroelectronics. Specifications mentioned in this publication are subject to change without notice. This publication supersedes and replaces all information previously supplied. STMicroelectronics products are notauthorized for use as critical components in life support devices or systems without express written approval of STMicroelectronics.The ST logo is a registered trademark of STMicroelectronics.All other names are the property of their respective owners© 2004 STMicroelectronics - All rights reservedSTMicroelectronics GROUP OF COMPANIESAustralia - Belgium - Brazil - Canada - China - Czech Republic - Finland - France - Germany - Hong Kong - India - Israel - Italy - Japan - Malaysia - Malta - Morocco - Singapore - Spain - Sweden - Switzerland - United Kingdom - United States13/13。
得胜E160便携式数字扩音器说明书
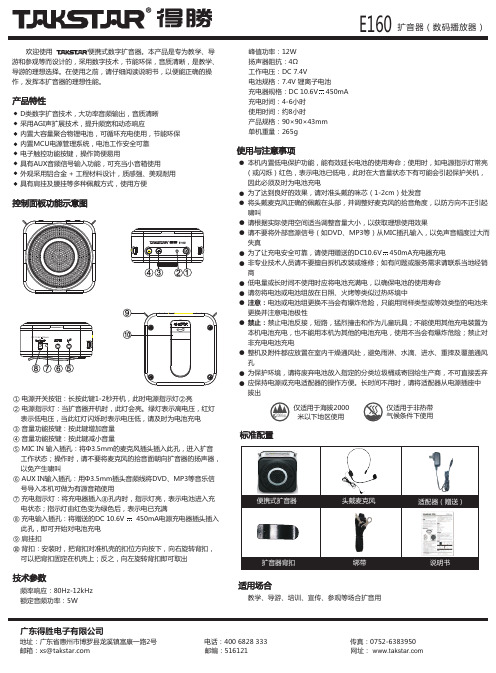
● ● ● ● ● ● ● ●● ● ● ●●●使用与注意事项控制面板功能示意图① 电源开关按钮:长按此键1-2秒开机,此时电源指示灯②亮② 电源指示灯:当扩音器开机时,此灯会亮。
绿灯表示高电压,红灯 表示低电压,当此红灯闪烁时表示电压低,请及时为电池充电 ③ 音量功能按键:按此键增加音量④ 音量功能按键:按此键减小音量⑤ ⑥ AUX IN 输入插孔:用Φ3.5mm 插头音频线将DVD 、MP3等音乐信 号导入本机可做为有源音箱使用⑦⑧ ⑨ 肩挂扣MIC IN 输入插孔:将Φ3.5mm 的麦克风插头插入此孔,进入扩音 工作状态;操作时,请不要将麦克风的拾音面朝向扩音器的扬声器, 以免产生啸叫充电指示灯:将充电器插入⑧孔内时,指示灯亮,表示电池进入充 电状态;指示灯由红色变为绿色后,表示电已充满充电输入插孔:将赠送的DC 10.6V 450mA 电源充电器插头插入 此孔,即可开始对电池充电⑩ 背扣:安装时,把背扣对准机壳的扣位方向按下,向右旋转背扣, 可以把背扣固定在机壳上;反之,向左旋转背扣即可取出技术参数教学、导游、培训、宣传等场合扩音用、参观产品特性E160欢迎使用 便携式数字扩音器。
本产品是专为教学、导游和参观等而设计的,采用数字技术,节能环保,音质清晰,是教学、导游的理想选择。
在使用之前,请仔细阅读说明书,以便能正确的操作,发挥本扩音器的理想性能。
广东得胜电子有限公司地址:广东省惠州市博罗县龙溪镇富康一路2号 电话:400 6828 333 传真:0752-******* 邮箱: 邮编:516121 网址:xs @takstar .com www .takstar .comD 类数字扩音技术,大功率音频输出,音质清晰采用AGI 声扩展技术,提升频宽和动态响应内置大容量聚合物锂电池,可循环充电使用,节能环保内置MCU 电源管理系统,电池工作安全可靠电子触控功能按键,操作简便易用具有AUX 音频信号输入功能,可充当小音箱使用外观采用铝合金 + 工程材料设计,质感强、美观耐用具有肩挂及腰挂等多种佩戴方式,使用方便标准配置适用场合频率响应:80Hz -12kHz 额定音频功率:5W峰值功率:12W 扬声器阻抗:4Ω:工作电压DC 7.4V电池规格:7.4V 锂离子电池充电器规格:DC 10.6V 450mA 充电时间:4-6小时使用时间:约8小时产品规格:90×90×43mm 单机重量:265g本机内置低电保护功能,能有效延长电池的使用寿命;使用时,如电源指示灯常亮 (或闪烁)红色,表示电池已低电,此时在大音量状态下有可能会引起保护关机, 因此必须及时为电池充电为了达到良好的效果,请对准头戴的咪芯(1-2cm )处发音 将头戴麦克风正确的佩戴在头部,并调整好麦克风的拾音角度,以防方向不正引起 啸叫 请根据实际使用空间适当调整音量大小,以获取理想使用效果请不要将外部音源信号(如DVD 、MP3等)从MIC 插孔输入,以免声音幅度过大而 失真为了让充电安全可靠,请使用赠送的DC10. 充电器充电 非专业技术人员请不要擅自拆机改装或维修;如有问题或服务需求请联系当地经销 商低电量或长时间不使用时应将电池充满电,以确保电池的使用寿命 请勿将电池或电池组放在日照、火烤等类似过热环境中注意:电池或电池组更换不当会有爆炸危险,只能用同样类型或等效类型的电池来 更换并注意电池极性禁止:禁止电池反接,短路,猛烈撞击和作为儿童玩具;不能使用其他充电装置为 本机电池充电,也不能用本机为其他的电池充电,使用不当会有爆炸危险;禁止对 非充电电池充电 整机及附件都应放置在室内干燥通风处,避免雨淋、水滴、进水、重摔及覆盖通风 孔为保护环境,请将废弃电池放入指定的分类垃圾桶或寄回给生产商,不可直接丢弃 应保持电源或充电适配器的操作方便。
